


 Loading...
Blender User Manual
Release 2.75
Blender Community
July 22, 2015

CONTENTS
1 |
Getting Started |
2 |
|
|
1.1 |
Getting Started . . . . . . . . . . . . . . . . . . . . . . . . . . . . . . . . . . . . . . . . . . . . . . . . . . . |
2 |
2 |
Sections |
113 |
|
|
2.1 |
Editors . . . . . . . . . . . . . . . . . . . . . . . . . . . . . . . . . . . . . . . . . . . . . . . . . . . . . . . |
113 |
|
2.2 |
Data System . . . . . . . . . . . . . . . . . . . . . . . . . . . . . . . . . . . . . . . . . . . . . . . . . . . . |
159 |
|
2.3 |
Modeling . . . . . . . . . . . . . . . . . . . . . . . . . . . . . . . . . . . . . . . . . . . . . . . . . . . . . . |
175 |
|
2.4 |
Modifiers . . . . . . . . . . . . . . . . . . . . . . . . . . . . . . . . . . . . . . . . . . . . . . . . . . . . . . |
450 |
|
2.5 |
Rigging . . . . . . . . . . . . . . . . . . . . . . . . . . . . . . . . . . . . . . . . . . . . . . . . . . . . . . . |
548 |
|
2.6 |
Animation . . . . . . . . . . . . . . . . . . . . . . . . . . . . . . . . . . . . . . . . . . . . . . . . . . . . . |
648 |
|
2.7 |
Physics . . . . . . . . . . . . . . . . . . . . . . . . . . . . . . . . . . . . . . . . . . . . . . . . . . . . . . . |
743 |
|
2.8 |
Render . . . . . . . . . . . . . . . . . . . . . . . . . . . . . . . . . . . . . . . . . . . . . . . . . . . . . . . |
854 |
|
2.9 |
Composite Nodes . . . . . . . . . . . . . . . . . . . . . . . . . . . . . . . . . . . . . . . . . . . . . . . . . . |
1277 |
|
2.10 |
Motion Tracking . . . . . . . . . . . . . . . . . . . . . . . . . . . . . . . . . . . . . . . . . . . . . . . . . . |
1365 |
|
2.11 |
Grease Pencil . . . . . . . . . . . . . . . . . . . . . . . . . . . . . . . . . . . . . . . . . . . . . . . . . . . . |
1376 |
|
2.12 |
Game Engine . . . . . . . . . . . . . . . . . . . . . . . . . . . . . . . . . . . . . . . . . . . . . . . . . . . . |
1387 |
|
2.13 |
Extensions . . . . . . . . . . . . . . . . . . . . . . . . . . . . . . . . . . . . . . . . . . . . . . . . . . . . . |
1474 |
|
2.14 |
Preferences . . . . . . . . . . . . . . . . . . . . . . . . . . . . . . . . . . . . . . . . . . . . . . . . . . . . . |
1494 |
|
2.15 |
Advanced . . . . . . . . . . . . . . . . . . . . . . . . . . . . . . . . . . . . . . . . . . . . . . . . . . . . . . |
1510 |
|
2.16 |
Troubleshooting . . . . . . . . . . . . . . . . . . . . . . . . . . . . . . . . . . . . . . . . . . . . . . . . . . |
1514 |
|
2.17 |
Glossary . . . . . . . . . . . . . . . . . . . . . . . . . . . . . . . . . . . . . . . . . . . . . . . . . . . . . . |
1517 |
|
2.18 |
Get Involved . . . . . . . . . . . . . . . . . . . . . . . . . . . . . . . . . . . . . . . . . . . . . . . . . . . . |
1523 |
i

Blender User Manual, Release 2.75
Welcome to the Blender Manual!
CONTENTS |
1 |
CHAPTER
ONE
GETTING STARTED
1.1 Getting Started
1.1.1 About Blender
Introduction
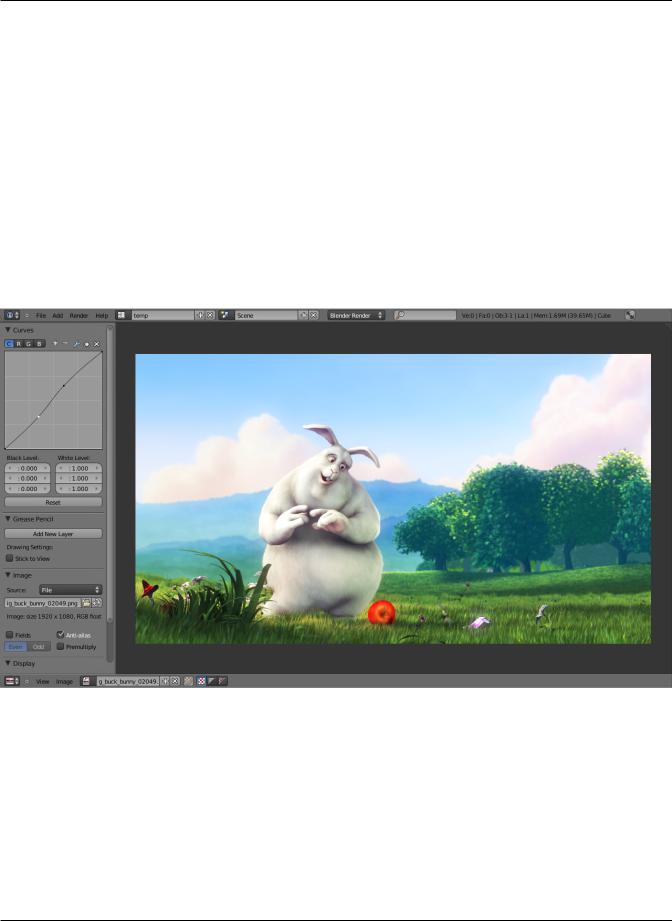
Fig. 1.1: Blender 2.5 with a Big Buck Bunny scene open
Welcome to Blender, the free and open source 3D animation suite.
Blender can be used to create 3D visualizations such as still images, video and real-time interactive video games.
Blender is well suited to individuals and small studios who benefit from its unified pipeline and responsive development process.
2
Blender User Manual, Release 2.75
It is cross-platform and runs equally well on Linux, Windows and Macintosh computers with a small memory and disk footprint. Its interface uses OpenGL to provide a consistent experience across all supported hardware and platforms.
Key Features
•Blender is a fully integrated 3D content creation suite, offering a broad range of essential tools, including modeling, UV mapping, texturing, rigging and skinning, animation, many types of simulations (fluid, rigid bodies, etc), scripting, rendering, compositing, VFX, and game creation.
•Cross platform, with an OpenGL GUI that is uniform on all major platforms (and customizable with Python scripts).
•High quality 3D architecture enabling fast and efficient creation work-flow.
•Excellent community support from forums and IRC.
•Small executable size, optionally portable.
You can download the latest version of Blender here.
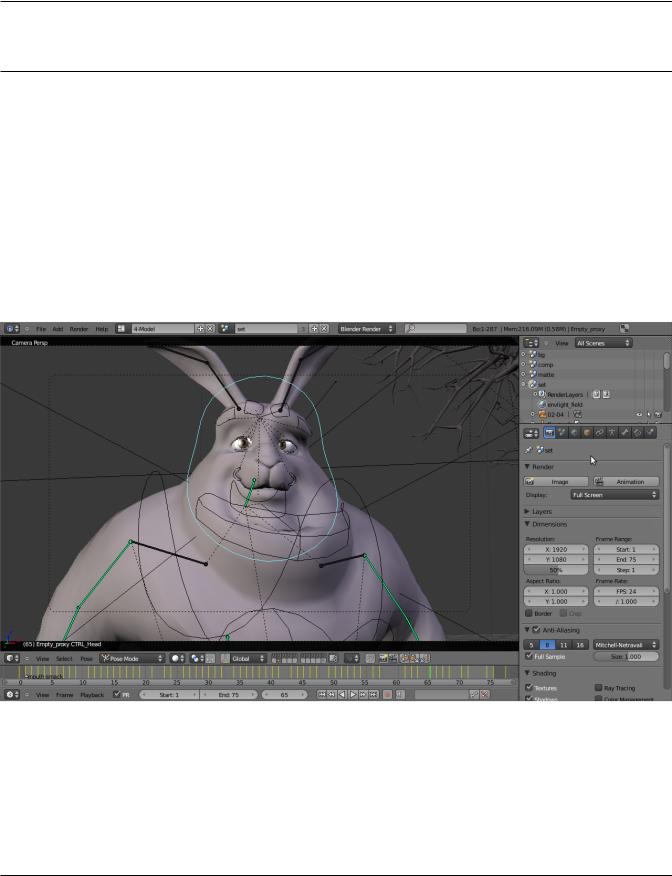
Fig. 1.2: A rendered image being post-processed
Blender makes it possible to perform a wide range of tasks, and it may seem daunting when first trying to grasp the basics. However, with a bit of motivation and the right learning material, it is possible to familiarize yourself with Blender after a few hours of practice.
This manual is a good start, though it serves more as a reference. There are also many online video tutorials from specialized websites, and several books and training DVDs available in the Blender Store and on the Blender Cloud.
Despite everything Blender can do, it remains a tool. Great artists do not create masterpieces by pressing buttons or manipulating brushes, but by learning and practicing subjects such as human anatomy, composition, lighting, animation principles, etc.
1.1. Getting Started |
3 |

Blender User Manual, Release 2.75
3D content creation software such as Blender have the added technical complexity and jargon associated with the underlying technologies. Terms like UV maps, materials, shaders, meshes, and subsurf are the mediums of the digital artist, and understanding them, even broadly, will help you to use Blender to its best.
So keep reading this manual, learn the great tool that Blender is, keep your mind open to other artistic and technological areas, and you too can become a great artist.
Blender’s History
In 1988 Ton Roosendaal co-founded the Dutch animation studio NeoGeo. NeoGeo quickly became the largest 3D animation studio in the Netherlands and one of the leading animation houses in Europe. NeoGeo created award-winning productions (European Corporate Video Awards 1993 and 1995) for large corporate clients such as multi-national electronics company Philips. Within NeoGeo Ton was responsible for both art direction and internal software development. After careful deliberation Ton decided that the current in-house 3D toolset for NeoGeo was too old and cumbersome to maintain, and needed to be rewritten from scratch. In 1995 this rewrite began and was destined to become the 3D software creation we all know as Blender. As NeoGeo continued to refine and improve Blender it became apparent to Ton that Blender could be used as a tool for other artists outside of NeoGeo.
In 1998, Ton decided to found a new company called Not a Number (NaN) as a spin-off of NeoGeo to further market and develop Blender. At the core of NaN was a desire to create and distribute a compact, cross platform 3D application for free. At the time this was a revolutionary concept as most commercial 3D applications cost thousands of dollars. NaN hoped to bring professional level 3D modeling and animation tools within the reach of the general computing public. NaN’s business model involved providing commercial products and services around Blender. In 1999 NaN attended its first SIGGRAPH conference in an effort to more widely promote Blender. Blender’s first SIGGRAPH convention was a huge success and gathered a tremendous amount of interest from both the press and attendees. Blender was a hit and its huge potential confirmed!
Following the success of the SIGGRAPH conference in early 2000, NaN secured financing of C4.5M from venture capitalists. This large inflow of cash enabled NaN to rapidly expand its operations. Soon NaN boasted as many as fifty employees working around the world trying to improve and promote Blender. In the summer of 2000, Blender 2.0 was released. This version of Blender added the integration of a game engine to the 3D application. By the end of 2000, the number of users registered on the NaN website surpassed 250,000.
Unfortunately, NaN’s ambitions and opportunities didn’t match the company’s capabilities and the market realities of the time. This over-extension resulted in restarting NaN with new investor funding and a smaller company in April 2001. Six months later NaN’s first commercial software product, Blender Publisher was launched. This product was targeted at the emerging market of interactive web-based 3D media. Due to disappointing sales and the ongoing difficult economic climate, the new investors decided to shut down all NaN operations. The shutdown also included discontinuing the development of Blender. Although there were clearly shortcomings in the then current version of Blender, such as a complex internal software architecture, unfinished features and a non-standard way of providing the GUI, the enthusiastic support from the user community and customers who had purchased Blender Publisher in the past meant that Ton couldn’t justify leaving Blender to fade into insignificance. Since restarting a company with a sufficiently large team of developers wasn’t feasible, Ton Roosendaal founded the non-profit organization Blender Foundation in March 2002.
The Blender Foundation’s primary goal was to find a way to continue developing and promoting Blender as a communitybased open source project. In July 2002, Ton managed to get the NaN investors to agree to a unique Blender Foundation plan to attempt to release Blender as open source. The “Free Blender” campaign sought to raise C100,000 so that the Foundation could buy the rights to the Blender source code and intellectual property rights from the NaN investors and subsequently release Blender to the open source community. With an enthusiastic group of volunteers, among them several ex-NaN employees, a fund raising campaign was launched to “Free Blender”. To everyone’s surprise and delight the campaign reached the C100,000 goal in only seven short weeks. On Sunday October 13, 2002, Blender was released to the world under the terms of the GNU GPL. Blender development continues to this day driven by a team of dedicated volunteers from around the world led by Blender’s original creator, Ton Roosendaal.
1.1. Getting Started |
4 |

Blender User Manual, Release 2.75
Video: From Blender 1.60 to 2.50
Version/Revision Milestones
The start!
•1.00 - January 1994: Blender in development at animation studio NeoGeo.
•1.23 - January 1998: SGI version published on the web, IrisGL.
•1.30 - April 1998: Linux and FreeBSD version, port to OpenGL and X11.
•1.3x - June 1998: NaN founded.
•1.4x - September 1998: Sun and Linux Alpha version released.
•1.50 - November 1998: First Manual published.
•1.60 - April 1999: C-key (new features behind a lock, $95), Windows version released.
•1.6x - June 1999: BeOS and PPC version released.
•1.80 - June 2000: End of C-key, Blender full freeware again.
•2.00 - August 2000: Interactive 3D and real-time engine.
•2.10 - December 2000: New engine, physics, and Python.
•2.20 - August 2001: Character animation system.
•2.21 - October 2001: Blender Publisher launch.
•2.2x - December 2001: Mac OSX version.
Blender goes Open Source
•13 October 2002: Blender goes Open Source, 1st Blender Conference.
•2.25 - October 2002: Blender Publisher becomes freely available.
•Tuhopuu1 - Oct 2002: The experimental tree of Blender is created, a coder’s playground.
•2.26 - February 2003: The first true open source Blender release.
•2.27 - May 2003: The second open source Blender release.
•2.28x - July 2003: First of the 2.28x series.
•2.30 - October 2003: Preview release of the 2.3x UI makeover presented at the 2nd Blender Conference.
•2.31 - December 2003: Upgrade to stable 2.3x UI project.
•2.32 - January 2004: Major overhaul of internal rendering capabilities.
•2.33 - April 2004: Game Engine returns, ambient occlusion, new procedural textures.
•2.34 - August 2004: Particle interactions, LSCM UV mapping, functional YafRay integration, weighted creases in subdivision surfaces, ramp shaders, full OSA, and many many more.
•2.35 - November 2004: Another version full of improvements: object hooks, curve deforms and curve tapers, particle duplicators and much more.
•2.36 - December 2004: A stabilization version, much work behind the scene, normal and displacement mapping improvements.
•2.37 - June 2005: Transformation tools and widgets, softbodies, force fields, deflections, incremental subdivision surfaces, transparent shadows, and multi-threaded rendering.
1.1. Getting Started |
5 |

Blender User Manual, Release 2.75
•2.40 - December 2005: Full rework of armature system, shape keys, fur with particles, fluids and rigid bodies.
•2.41 - January 2006: Lots of fixes, and some game engine features.
•2.42 - July 2006: The nodes release, array modifier, vector blur, new physics engine, rendering, lip sync, and many other features. This was the release following Project Orange.
•2.43 - February 2007: Multi-resolution meshes, multi-layer UV textures, multi-layer images and multi-pass rendering and baking, sculpting, retopology, multiple additional matte, distort and filter nodes, modeling and animation improvements, better painting with multiple brushes, fluid particles, proxy objects, sequencer rewrite, and post-production UV texturing.
•2.44 - May 2007: The big news, in addition to two new modifiers and re-awakening the 64-bit OS support, was the addition of subsurface scattering, which simulates light scattering beneath the surface of organic and soft objects.
•2.45 - September 2007: Serious bug fixes, with some performance issues addressed.
•2.46 - May 2008: The Peach release was the result of a huge effort of over 70 developers providing enhancements to provide hair and fur, a new particle system, enhanced image browsing, cloth, a seamless and non-intrusive physics cache, rendering improvements in reflections, AO, and render baking, a mesh deform modifier for muscles and such, better animation support via armature tools and drawing, skinning, constraints and a colorful Action Editor, and much more. It was the release following Project Peach.
•2.47 - August 2008: Bugfix release.
•2.48 - October 2008: The Apricot release, cool GLSL shaders, lights and GE improvements, snap, sky simulator, shrinkwrap modifier, and Python editing improvements. This was the release following Project Apricot.
•2.49 - June 2009: Node-based textures, armature sketching (called Etch-a-Ton), boolean mesh operation improvements, JPEG2000 support, projection painting for direct transfer of images to models, and a significant Python script catalogue. GE enhancements included video textures, where you can play movies in-game, upgrades to the Bullet physics engine, dome (fish-eye) rendering, and more API GE calls made available.
Blender 2.5 - The Recode!
•2.5x - From 2009 to August 2011: This series released four pre-version (from Alpha 0 in November 2009 to Beta in July 2010) and three stable versions (from 2.57 - April 2011 - to 2.59 - August 2011). It is one of the most important development projects, with a total refactor of the software with new functions, redesign of the internal window manager and event/tool/data handling system, and new Python API. The final version of this project was Blender 2.59 in August 2011.
•2.60 - October 2011: Internationalization of the UI, improvements in animation system and the GE, vertex weight groups modifiers, 3D audio and video, bug fixes, and the UI internationalization.
•2.61 - December 2011: The Cycles renderer was added in trunk, the camera tracker was added, dynamic paint for modifying textures with mesh contact/approximation, the Ocean Sim modifier to simulate ocean and foam, new add-ons, bug fixes, and more extensions added for the Python API.
•2.62 - February 2012: The Carve library was added to improve boolean operations, support for object tracking was added, the Remesh modifier was added, many improvements in the GE, matrices and vectors in the Python API were improved, new add-ons, and many bug fixes.
•2.63 - April 2012: Bmesh was merged to trunk with full support for n-sided polygons, sculpt hiding, a panoramic camera for Cycles, mirror ball environment textures and float precision textures, render layer mask layers, ambient occlusion and viewport display of background images and render layers, new import and export add-ons were added, and 150 bug fixes.
•2.64 - October 2012: Mask editor, improved motion tracker, OpenColorIO, Cycles improvements, sequencer improvements, better mesh tools (Inset and Bevel were improved), new keying nodes, sculpt masking, Collada improvements, new skin modifier, new compositing nodes backend, and many bugs were fixed.
•2.65 - December 2012: Fire and smoke improvements, anisotropic shader for Cycles, modifier improvements, bevel tool now includes rounding, new add-ons, and over 200 bug fixes.
1.1. Getting Started |
6 |

Blender User Manual, Release 2.75
•2.66 - February 2013: Dynamic topology, rigid body simulation, improvements in UI and usability (including retina display support), Cycles now supports hair, the bevel tool now supports individual vertex bevelling, new Mesh Cache modifier and the new UV Warp modifier, new SPH particle fluid solver. More than 250 bug fixes.
•2.67 - May 2013: Freestyle was added, paint system improvements, subsurface scattering for Cycles, Ceres library in the motion tracker, new custom python nodes, new mesh modeling tools, better support for UTF8 text and improvements in text editors, new add-ons for 3D printing, over 260 bug fixes.
•2.68 - July 2013: New and improved modeling tools, three new Cycles nodes, big improvements in the motion tracker, Python scripts and drivers are disabled by default when loading files for security reasons, and over 280 bug fixes.
•2.69 - October 2013: Even more modeling tools, Cycles improved in many areas, plane tracking is added to the motion tracker, better support for FBX import/export, and over 270 bugs fixed.
•2.70 - March 2014: Cycles gets basic volumetric support on the CPU, more improvements to the motion tracker, two new modeling modifiers, some UI consistency improvements, and more than 560 bug fixes.
•2.71 - June 2014: Deformation motion blur and fire/smoke support is added to Cycles, UI popups are now draggable, performance optimizations for sculpting mode, new interpolation types for animation, many improvements to the GE, and over 400 bug fixes.
•2.72 - October 2014: Cycles gets volume and SSS support on the GPU, pie menus are added and tooltips greatly improved, the intersection modeling tool is added, new sun beam node for the compositor, Freestyle now works with Cycles, texture painting workflow is improved, and more than 220 bug fixes.
About Free Software and the GPL
When one hears about “free software”, the first thing that comes to mind might be “no cost”. While this is typically true, the term “free software” as used by the Free Software Foundation (originators of the GNU Project and creators of the GNU General Public License) is intended to mean “free as in freedom” rather than the “no cost” sense (which is usually referred to as “free as in free beer” or gratis). Free software in this sense is software which you are free to use, copy, modify, redistribute, with no limit. Contrast this with the licensing of most commercial software packages, where you are allowed to load the software on a single computer, are allowed to make no copies, and never see the source code. Free software allows incredible freedom to the end user. Since the source code is universally available, there are also many more chances for bugs to be caught and fixed.
When a program is licensed under the GNU General Public License (the GPL):
• You have the right to use the program for any purpose.
1.1. Getting Started |
7 |

Blender User Manual, Release 2.75
•You have the right to modify the program, and have access to the source codes.
•You have the right to copy and distribute the program.
•You have the right to improve the program, and release your own versions.
In return for these rights, you have some responsibilities if you distribute a GPL’d program, responsibilities that are designed to protect your freedoms and the freedoms of others:
•You must provide a copy of the GPL with the program, so that recipients are aware of their rights under the license.
•You must include the source code or make the source code freely available.
•If you modify the code and distribute the modified version, you must license your modifications available under the GPL (or a compatible license).
•You may not restrict the licensing of the program beyond the terms of the GPL. (you may not turn a GPL’d program into a proprietary product.)
For more on the GPL, check the its page on the GNU Project web site.
Note: The GPL only applies to the Blender application and not the artwork you create with it; for more info see the Blender License.
The Blender Community
Being freely available from the start, even while closed source, helped considerably in Blender’s adoption. A large, stable, and active community of users has gathered around Blender since 1998. The community showed its support for Blender in 2002 when they helped raise C100,000 in seven weeks to enable Blender to go Open Source under the GNU GPL.
Who uses Blender?
Blender has a wide variety of tools making it suitable for almost any sort of media production. People and studios around the world use it for hobby projects, commercials, feature films, games and other interactive applications like kiosks, games and scientific research.
Check out the User Stories page on the Blender website for more examples.
Independent Sites
There are several independent websites such as forums, blogs, news and tutorial sites dedicated to Blender.
One of the largest community forums is Blender Artists, where Blender users gather to show off their creations, get feedback, ask and offer help and in general discuss Blender.
Support
Blender’s community is one of its greatest features, so apart from this user manual there are many different ways to get support from other users, such as IRC and Stack Exchange.
There are also more official sources of support, such as Certified Trainers and the Blender Cloud. If you think you have found an issue with Blender, you can easily report a bug.
More details about support can be found on the support page.
1.1. Getting Started |
8 |
Blender User Manual, Release 2.75
Development
Being open source, some of Blender’s development is done by volunteers. Communication between developers is done mostly through three platforms:
•The developer.blender.org system
•Various mailing lists
•The #blendercoders IRC channel (see below)
If you are interested in helping develop Blender, see the Get Involved page.
IRC Channels
For real-time discussion, there are some Blender IRC channels on the Freenode network. You can join these with your favorite IRC client:
•#blender Community support channel
•#blenderchat For general discussion or offtopic chat
•#blendercoders For developers to discuss Blender development
•#blenderpython For support for developers using the Python API
•#gameblender For discussion on issues related to game creation with the GE
•#blenderwiki For discussion related to Blender’s documentation
Note: If you do not have an IRC client, you can access IRC using webchat.
There also several more Blender-related channels not listed here (e.g. channels for speakers of a particular language). We recommend you search Freenode to see them all.
Other Useful Links
•Blender FAQ (Can I use Blender commercially? What is GPL/GNU? ...)
•Demo and benchmark files
•Developers Ask Us Anything!
About this manual
In this manual aims to be a complete and concise source of information to help you to become familiar with the application. You can find links to the particular areas of interest in the navigation bar on the left.
Conventions used
The mouse buttons are referred to as:
LMB Left Mouse Button
RMB Right Mouse Button
If your mouse has a wheel
1.1. Getting Started |
9 |

Blender User Manual, Release 2.75
MMB Middle Mouse Button
Wheel Scrolling the wheel.
Hotkey letters are shown in this manual like they appear on a keyboard; for example,
G refers to the lowercase g.
Shift, Ctrl, Alt are specified as modifier keys.
Ctrl-W, Shift-Alt-A, ... indicates that these keys should be pressed simultaneously
Numpad0 to Numpad9, NumpadPlus refer to the keys on the separate numeric keypad.
Other keys are referred to by their names, such as Esc, Tab, F1 to F12. Of special note are the arrow keys, Left, Right and so on.
Get Involved If you would like to contribute to this manual, see About this Manual, check for open tasks, or join the mailing list and #blenderwiki channel on IRC.
1.1.2 Installing Blender
Getting Blender
Blender is available for download for Windows, Mac and Linux.
Minimum Requirements
Check if your system meets the minimum or recommended requirements.
Always check that the graphics drivers are up to date, and that OpenGL is well supported. Other Blender dependencies are already included in the binary, and you do not need to worry about those unless installing from source.
Support for other hardware such as 3D mice and graphic tablets is covered later in Supported Hardware.
Download Blender
The Blender Foundation distributes Blender in 3 different ways that you can choose from, to better suit your needs.
The options comprise binary packages for all the supported platforms and the source code. Within the binary packages, you can choose from a stable release or a daily build. The first has the benefit of being more reliable, the latter provides the newest features, as they are developed. Blender is released approximately every 3 months. You can keep up to date with the newest changes through the release notes.
Latest Stable Release This is a binary distribution of the latest version of Blender. It is considered stable and without regressions.
Daily Builds This is a binary distribution of Blender that is updated daily to include the newest changes in development. These versions are not as thoroughly tested as the stable release, and might break, although they are official and generally not highly experimental.
Build from Source
Note: This is included for completeness, but it is not expected that regular users should have to compile their own Blender builds.
Blender’s source is available for reference and installation, with the following advantages:
1.1. Getting Started |
10 |
Blender User Manual, Release 2.75
•Blender is always up to date,
•it allows access to any version or branch where a feature is being developed,
•it can be freely customized.
Building Blender from source is not trivial, as there are many steps involved. Here are the instructions.
Install Blender
The procedure for installing a binary, either the last stable release or a daily build, is the same. Follow the steps for your operative system:
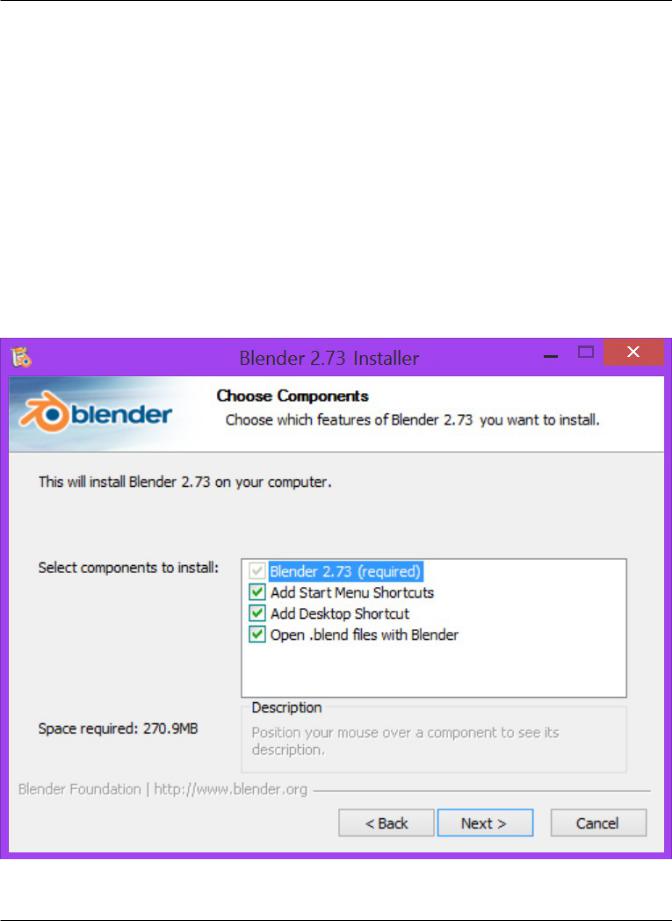
Installing on Windows Check the minimum requirements and where to get Blender, if you haven’t done so yet.
Download the .zip or .exe for your architecture (64bit is preferable if your machine supports it).
The .exe will run an installer to choose where to place Blender and to configure Windows to have an entry on the menu and to open .blend files with Blender. Administrator rights are needed to install Blender on your system.
1.1. Getting Started |
11 |

Blender User Manual, Release 2.75
With .zip you have to manually copy and extract Blender to the desired folder, where you can then double-click the executable to run Blender. There is no installer to place Blender on the menu, but there is also no need for Administrator rights. With this option it is possible to have multiple versions of Blender without conflicting, as they are not actually installed on the system.
Installing on OSX Check the minimum requirements and where to get Blender, if you haven’t done so yet.
After downloading Blender for the Mac, uncompress the file and drag blender.app onto the Applications folder. Alternatively, you can launch Blender directly from the uncompressed folder.
Running from the terminal To run Blender from the terminal without needing to be in the same directory and navigate through the app bundle, add the following alias to your profile:
echo "alias blender=/Applications/Blender/blender.app/Contents/MacOS/blender" >> ~/.profile
Menus Because Blender doesn’t use the standard OS menu system, if you are using a Mac, you likely have a redundant menubar at the top. To remove it see this post on Macworld, but beware that it is somewhat complex. As an alternative: simply make Blender full screen with the last button in the info window header (most times at the top of the screen layout).
Installing on Linux Check the minimum requirements and where to get Blender, if you haven’t done so yet.
Specific packages for distributions Some Linux distributions may have on their repositories a specific package for Blender.
Installing Blender via the distribution’s native mechanisms ensures consistency with other packages on the system and may provide other features (given by the package manager), such as listing of packages, update notifications and automatic menu configuration. Be aware, though, that the package may be outdated comparing to the latest official release, or not include some features of Blender. For example, some distributions do not build Blender with CUDA support for licensing reasons.
If there is a specific package for your distribution, you may choose what is preferable and most convenient, otherwise there is nothing wrong with the official binary on blender.org.
Download from blender.org Download the Linux version for your architecture and uncompress the file to the desired location (eg. ~/software or /usr/local).
Blender can now be launched by double-clicking the executable.
For easy access, you can configure your system by adding a menu entry or shortcut for Blender and associate and open .blend files with Blender when opening from the file browser. These settings typically belong to the Window Manager (KDE, Gnome, Unity).
Running from the terminal To run Blender from the terminal without needing to be in the executable directory, add the extracted folder to the environment PATH.
Add the following command to .bash_rc or .bash_profile with Blender’s binary:
export PATH=$/path/to/blender-VERSION-linux-glibcVERSION-ARCH:$PATH
Tip: If you use daily builds and update Blender frequently, you can link or always rename your folder to ‘blender’ and use this name for the PATH environment variable and for keeping the window manager menu up to date.
1.1. Getting Started |
12 |

Blender User Manual, Release 2.75
Avoiding Alt+Mouse Conflict Many Window Managers default to Alt-LMB for moving windows, which is a shortcut that Blender uses to simulate a 3 button mouse. You can either have this feature disabled User Preferences → Input → Emulate 3 Button Mouse or you can change the Window Manager settings to use the Meta key instead (also called Super or Windows key):
•KDE: System Settings > Window Behavior > Window Behavior > Window Actions , Switch ‘Alt’ for ‘Meta’ key
•Unity/Gnome: enter the following in a command line (effective at next login):
gsettings set org.gnome.desktop.wm.preferences mouse-button-modifier '<Super>'
Configuring Peripherals
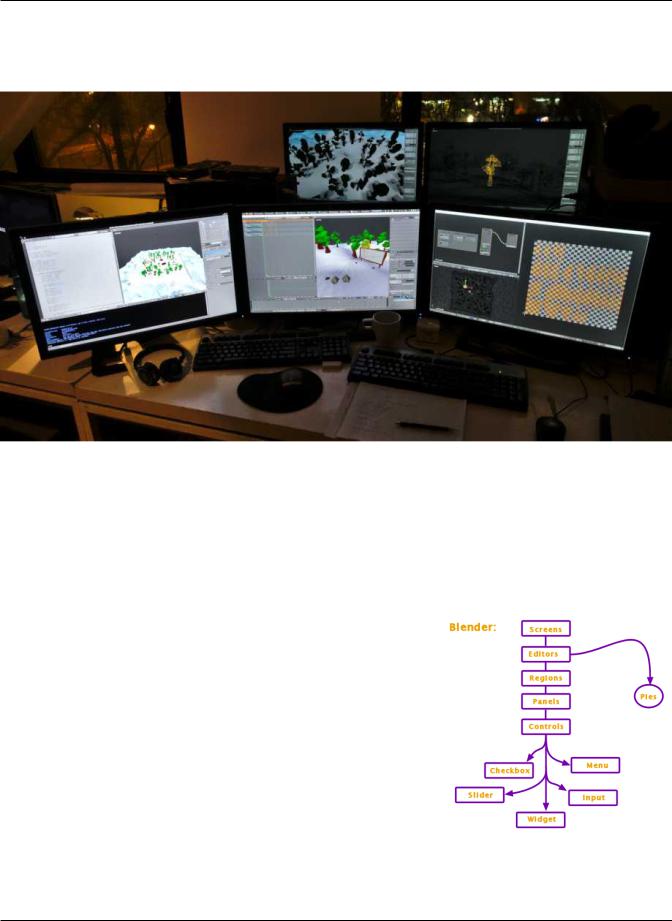
Multi-Monitor Setup
Graphic Tablets
3D Mice
Configuration
Here are some quick preferences that you may wish to set as quickly as possible. The full list and explanation of the preferences is in the section User Preferences.
Language
At File → User Preferences → System, enable International Fonts to choose the Language and what to translate from Interface, Tooltips and New Data. See more at Internationalization
Input
If you have a compact keyboard without a separate number pad enable File → User Preferences → Emulate Numpad.
If you don’t have a middle mouse button you can enable File → User Preferences → Emulate 3 Button Mouse.
File and Paths
At File → User Preferences → File you can set options such as what external Image Editor to use, such as GIMP or Krita, and the Animation Player.
The Temp directory sets where to store files such as temporary renders and autosaves.
Tip: // at the start of a path in Blender means the directory of the currently opened .blend file, used to reference relativepaths.
If you trust the source of your .blend files, you can enable Auto Run Python Scripts. This option is meant to protect you from malicious Python scripts that someone can include inside a Blender file. This would not happen by accident, and most users leave this option on to automatically run scripts such as Rigify that controls the skeleton of a human rig.
1.1. Getting Started |
13 |

Blender User Manual, Release 2.75
Configuration and Data Paths
There are 3 different directories Blender may use, their exact locations are operating system dependent.
LOCAL Location of configuration and runtime data (for self contained bundle)
USER Location of configuration files (normally in the user’s home directory).
SYSTEM Location of runtime data for system wide installation (may be read-only).
For system installations both SYSTEM and USER directories are needed.
For locally extracted Blender distributions, the user configuration and data runtime data are kept in the same sub-directory, allowing multiple Blender versions to run without conflict, ignoring the USER and SYSTEM files.
Note: You may need to have the “show hidden files” option checked in your file browser settings.
Here are the default locations for each system:
Linux
LOCAL
./2.75/
USER $HOME/.config/blender/2.75/
SYSTEM
/usr/share/blender/2.75/
Note: The path ./2.75/ is relative to the Blender Executable & used for self contained bundles distributed by official blender.org builds.
Note: The USER path will use $XDG_CONFIG_HOME if its set: $XDG_CONFIG_HOME/blender/2.75/
OSX
LOCAL
./2.75/
USER
/Users/{user}/Library/Application Support/Blender/2.75/
SYSTEM
/Library/Application Support/Blender/2.75/
Note: OSX stores the Blender binary in ./blender.app/Contents/MacOS/blender, so the local path to data & config is:
./blender.app/Contents/MacOS/2.75/
1.1. Getting Started |
14 |

Blender User Manual, Release 2.75
Windows
LOCAL
.\2.75\.
USER
C:\Documents and Settings\{username}\AppData\Roaming\Blender Foundation\Blender\2.75\
SYSTEM
C:\Documents and Settings\All Users\AppData\Roaming\Blender Foundation\Blender\2.75\
Path Layout
This is the path layout which is used within the directories described above.
Where ./config/startup.blend could be ~/.blender/2.75/config/startup.blend for example.
./autosave/ ... Autosave blend file location. Windows only, temp directory used for other systems.
Search order: LOCAL, USER.
./config/ ... Defaults & session info. Search order: LOCAL, USER.
./config/startup.blend Default file to load on startup.
./config/userpref.blend Default preferences to load on startup.
./config/bookmarks.txt File selector bookmarks.
./config/recent-files.txt Recent file menu list.
./datafiles/ ... Runtime files.
Search order: LOCAL, USER, SYSTEM
./datafiles/locale/{language}/ Static precompiled language files for UI translation.
./datafiles/icons/*.png Icon themes for Blenders user interface. Not currently selectable in the theme preferences.
./datafiles/brushicons/*.png Images for each brush.
./scripts/ ... Python scripts for the user interface and tools. Search order: LOCAL, USER, SYSTEM.
./scripts/addons/*.py Python add-ons which may be enabled in the user preferences, includes import/export format support, render engine integration and many handy utilities.
./scripts/addons/modules/*.py Modules for add-ons to use (added to Python’s sys.path).
./scripts/addons_contrib/*.py Another add-ons directory which is used for community maintained add-ons (must be manually created).
./scripts/addons_contrib/modules/*.py Modules for addons_contrib to use (added to Python’s sys.path).
./scripts/modules/*.py Python modules containing our core API and utility functions for other scripts to import (added to Python’s sys.path).
./scripts/startup/*.py Scripts which are automatically imported on startup.
./scripts/presets/{preset}/*.py Presets used for storing user defined settings for cloth, render formats etc.
1.1. Getting Started |
15 |
Blender User Manual, Release 2.75
./scripts/templates/*.py Example scripts which can be accessed from: Text Space’s Header –> Text –> Script Templates.
./python/ ... Bundled Python distribution, only necessary when the system Python installation is absent or incompatible.
Search order: LOCAL, SYSTEM.
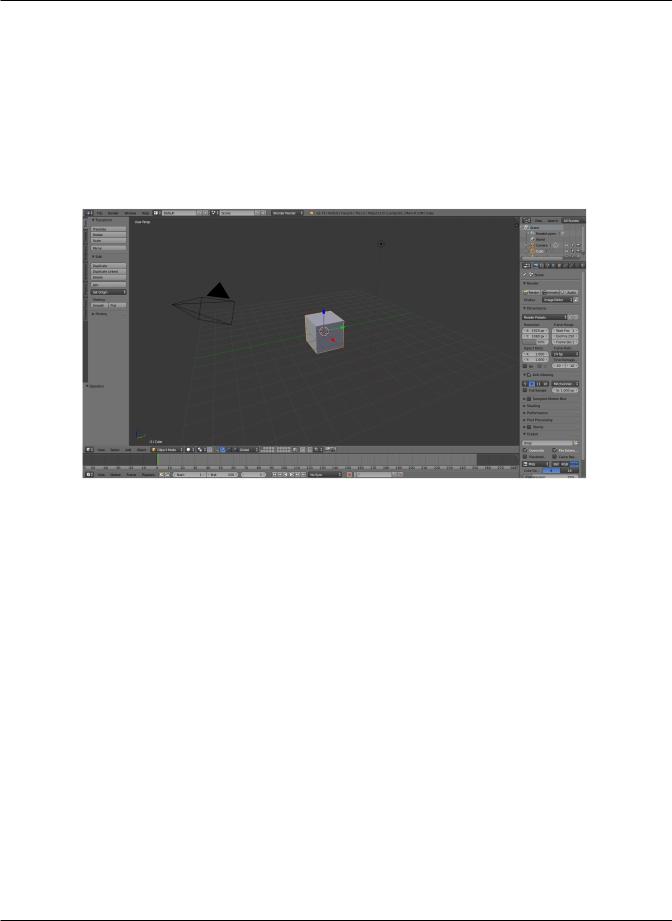
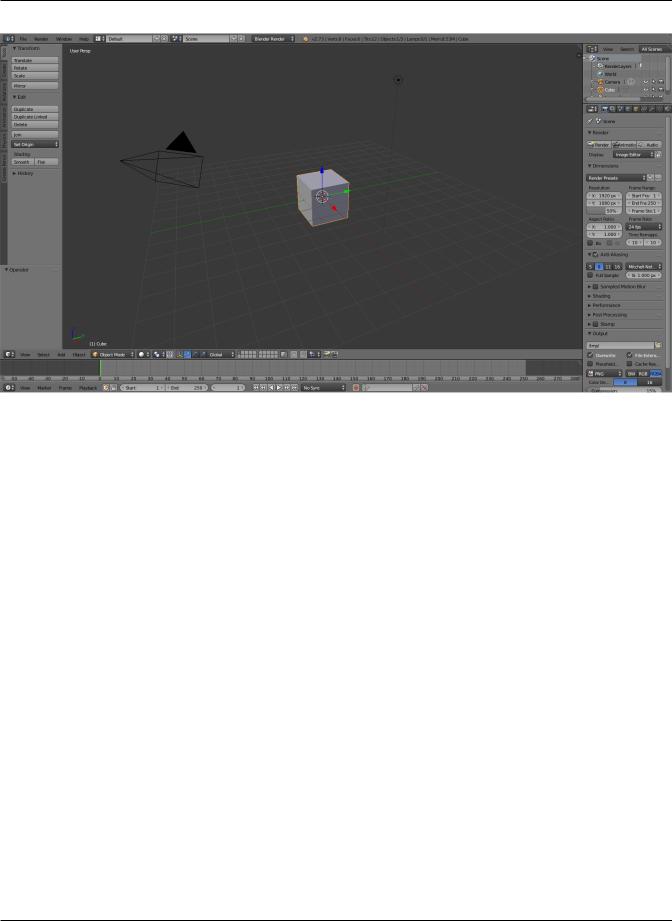
When starting Blender, the splash screen appears. On the left side are links to official web pages, and on the right are your most recently opened projects.
To close the splash screen start a new project, you can press Esc or click anywhere inside the Blender Window (except on the splash screen).
Fig. 1.3: After closing splash screen, this is what the default Blender window looks like.
1.1.3 Basics
Interface
Overview
Introduction Blender’s user interface is consistent across all platforms. The interface can be customized to match specific tasks using Screen Layouts, which can then be named and saved for later use.
Blender also makes heavy use of keyboard shortcuts to speed up work and allows customization of the keymap.
User Interface Principles
Non Overlapping The UI is designed to allow you to view all relevant options and tools at a glance without pushing or dragging editors around.
Non Blocking Tools and interface options do not block the user from any other parts of Blender. Blender typically doesn’t use pop-up boxes (requiring users to fill in data before running an operation).
Non Modal Tools Tools can be accessed efficiently without taking time to select between different tools. Many tools use consistent and predictable, mouse and keyboard actions for interaction.
1.1. Getting Started |
16 |
Blender User Manual, Release 2.75
Fig. 1.4: This is an example of Blender’s multiple window support.
1.1. Getting Started |
17 |

Blender User Manual, Release 2.75
Screen Elements The Blender window is organized into one or more Areas with each area containing an Editor. Editors are divided into a Header and one or more Regions. Regions can have smaller structuring elements like panels with buttons, controls and widgets placed within them.
The composition of various Areas with predefined Editors in them is called a Screen Layout. By default Blender starts up with a layout of 5 Editors as shown in the image below.
Fig. 1.5: Blender’s default Screen Layout with 5 Editors: Info (1), 3D View (2), Outliner (3), Properties (4) and Timeline (5)
Components of an Editor In general an editor provides a way to view and modify your work through a specific part of Blender.
The image below shows the 3D View as an example of an editor.
Editors are consistently organized into following parts:
Regions At least one region of an editor is always visible. It’s called the main region and is the most prominent part of the editor. In the 3D View above this is marked with a green frame.
Aside from that there can be more regions available. In the 3D View above these are the Toolshelf (toggle visibility with T) on the left side and the Properties (toggle visibility with N) on the right side. They’re marked with red frames. Additional regions mostly show context-sensitive content.
Each editor has a specific purpose, so the main region and the availability of additional regions are different between editors. See specific documentation about each editor in the Editors chapter.
1.1. Getting Started |
18 |
Blender User Manual, Release 2.75
Fig. 1.6: The 3D View
Table 1.1: Useful Hotkeys
T Toggle visibility of Toolshelf Region
N Toggle visibility of Properties Region
F5 Flip the Region under the mouse pointer to the opposite side
Header A header is a small horizontal part of an editor and sits either at the top or bottom of the area. It acts as a container for menus and commonly used tools. Much like additional regions the header can be hidden.
The 3D View above the header is marked with a purple frame.
Table 1.2: Useful Hotkeys
F5 Move Header from Top to Bottom (mouse pointer must be over it)
See: Headers for details.
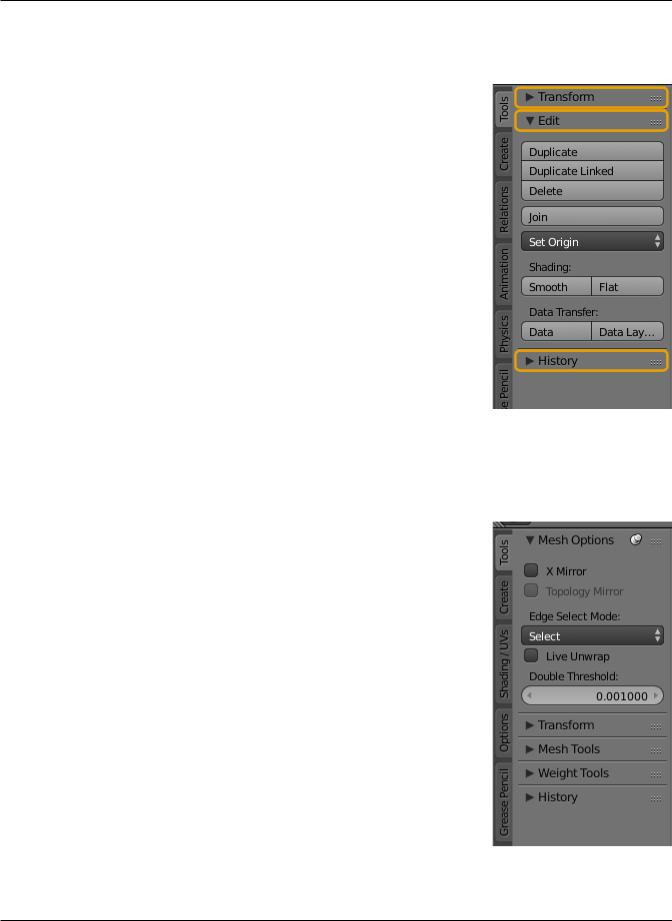
Panels The smallest organizational unit in the user interface is a panel, which can be collapsed to hide its contents by clicking on its header. This is where the buttons, menus, checkboxes, etc. are located.
Panels are usually found in the side regions of an editor, but also make up most of the Properties Editor‘s main region.
In the image on the right there are 3 panels: Transform, Edit and History. The edit panel is expanded and the other 2 panels are collapsed. Note that you can change the order of panels by clicking on the handle in the upper right corner of a panel’s title.
See: panels for details.
Tabs The Toolshelf has been further structured into a set of context sensitive vertical tabs.
In the image to the right you can see the tabs: Tools, Create, etc. The Tools tab is currently selected, showing a set of panels containing various tools.
1.1. Getting Started |
19 |
Blender User Manual, Release 2.75
1.1. Getting Started |
20 |

Blender User Manual, Release 2.75
Pinning Often it is desirable to view panels from different tabs at the same time. This has been solved by making panels pinnable.
A pinned panel remains visible regardless of which tab has been selected. You can pin a panel by Shift clicking its header, or by right clicking on the header and choosing Pin.
Shown in the image above is an example of the Mesh Options pinned in the tools tab.
Input Devices Blender supports various types of input devices:
•Keyboard (recommended: keyboard with numeric keypad, english layout works best)
•Mouse (recommended: 3 button mouse with scroll wheel)
•NDOF Devices (also known as 3D Mouse)
•Graphic Tablets
Usage of Mouse Buttons In Blender the RMB (Right Mouse Button) is generally used for Selection and the LMB (Left Mouse Button) initiates or confirms actions.
The mouse usage summarized:
RMB |
To select an item |
Shift-RMB |
To add more items to the selection |
LMB |
to perform an action on the selection |
Video: Learn more about Blender’s Mouse Button usage
Exceptions from the Rule There are a few corner cases where LMB is used for selection. For example, the File Selector.
Non English Keyboard If you use a keyboard with a non-english keyboard layout, you still may benefit from switching your computer to the UK or US layout as long as you work with Blender.
Note: You can also change the default keymap and default hotkeys from the User Preferences, however this manual assumes you are using the default keymap. Read more about Blender configuration
Window Controls
Window System
The Window System When you start Blender you should see a screen similar to this (the splash screen in the center will change with new versions):
In the center of the window is the splash screen. This gives quick and easy access to recently opened Blender files. If you want to start work on a new file just click outside of the splash screen. The splash screen will disappear revealing the default layout and cube.
Every window you see can be further broken down into separate areas (as described in the section on arranging frames). The default scene is described below.
1.1. Getting Started |
21 |
Blender User Manual, Release 2.75
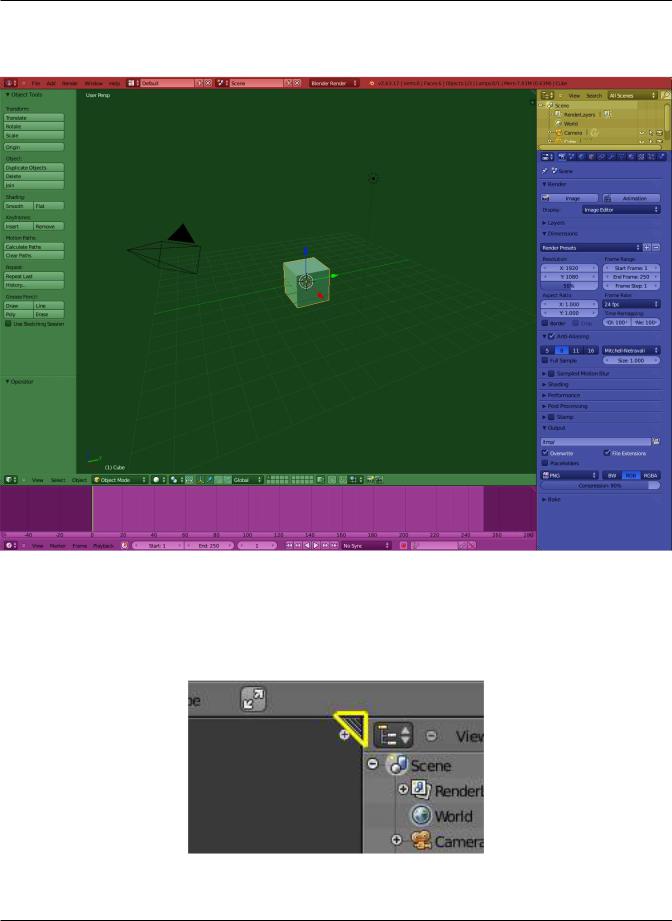
Fig. 1.7: Initial Blender screen
The default scene The default scene is separated into five windows and is loaded each time you start Blender or a new file. The five windows are:
•The Info window (shaded red) at the top. The Info window is comprised solely of a header.
•A large 3D window (3D View) (shaded green).
•A Timeline window at the bottom (shaded purple).
•An Outliner window at the top right (shaded yellow).
•A Properties window (Buttons window) at the bottom right (shaded blue).
As an introduction we will cover a few of the basic elements.
Arranging Frames Blender uses a novel screen-splitting approach to arrange window frames. The application window is always a rectangle on your desktop. It divides it up into a number of re-sizable window frames. A window frame contains the workspace for a particular type of window, like a 3D View window, or an Outliner. The idea is that you split up that big application window into any number of smaller (but still rectangular) non-overlapping window frames. That way, each window is always fully visible, and it is very easy to work in one window and hop over to work in another.
Maximizing a Window You can maximize a window frame to fill the whole application window with the View –> Toggle Full Screen menu entry. To return to normal size, use again View –> Toggle Full Screen. A quicker way to achieve this is to use Shift-Spacebar, Ctrl-Down or Ctrl-Up to toggle between maximized and framed windows. NOTE: The window your mouse is currently hovering over is the one that will be maximized using the keyboard shortcuts.
Splitting a Window In the upper right and lower left corners of a window are the window splitter widgets, and they look like a little ridged thumb grip. It both splits and combines window panes. When you hover over it, your cursor will change to a cross. LMB and drag it to the left to split the window pane vertically, or downward to split it horizontally.
1.1. Getting Started |
22 |
Blender User Manual, Release 2.75
Fig. 1.8: Default Blender scene and Window arrangement
1.1. Getting Started |
23 |
Blender User Manual, Release 2.75
Joining Two Frames In order to merge two window frames, they must be the same dimension in the direction you wish to merge. For example, if you want to combine two window frames that are side-by-side, they must be the same height. If the one on the left is not the same as the one on the right, you will not be able to combine them horizontally. This is so that the combined window space results in a rectangle. The same rule holds for joining two window frames that are stacked on top of one another; they must both have the same width. If the one above is split vertically, you must first merge those two, and then join the bottom one up to the upper one.
To merge the current window with the one above it (in the picture the properties window is being merged “over” the Outliner), hover the mouse pointer over the window splitter. When the pointer changes to a cross, LMB click and drag up to begin the process of combining. The upper window will get a little darker, overlaid with an arrow pointing up. This indicates that the lower (current) frame will “take over” that darkened frame space. Let go of the LMB to merge. If you want the reverse to occur, move your mouse cursor back into the original (lower) frame, and it will instead get the arrow overlay.
In the same way, windows may be merged left to right or vice versa.
If you press Esc before releasing the mouse, the operation will be aborted.
Changing Window Size You can resize window frames by dragging their borders with LMB. Simply move your mouse cursor over the border between two frames until it changes to a double-headed arrow, and then click and drag.
Swapping Contents You can swap the contents between two frames with Ctrl-LMB on one of the splitters of the initial frame, dragging towards the target frame, and releasing the mouse there. Those two frames don’t need to be side by side, though they must be inside the same window.
Opening New Windows You may wish to have a new full window containing Blender frames. This can be useful, for instance, if you have multiple monitors and want them to show different information on the same instance of Blender.
1.1. Getting Started |
24 |
Blender User Manual, Release 2.75
All you need to do is Shift-LMB on a frame splitter, and drag slightly. A new window pops up, with its maximize, minimize, close and other buttons (depending on your platform), containing a single frame with a duplicate of the initial window on which you performed the operation.
Once you have that new window, you can move it to the other monitor (or leave it in the current one); you can resize it (or keep it unchanged); you can also arrange its contents in the same way discussed so far (split and resize frames, and tune them as needed), and so on.
There is, though, another way to get an extra window: File –> User Preferences... (or Ctrl-Alt-U) pops a new window also, with the User Preferences window in its only frame. You can then proceed the same way with this window.
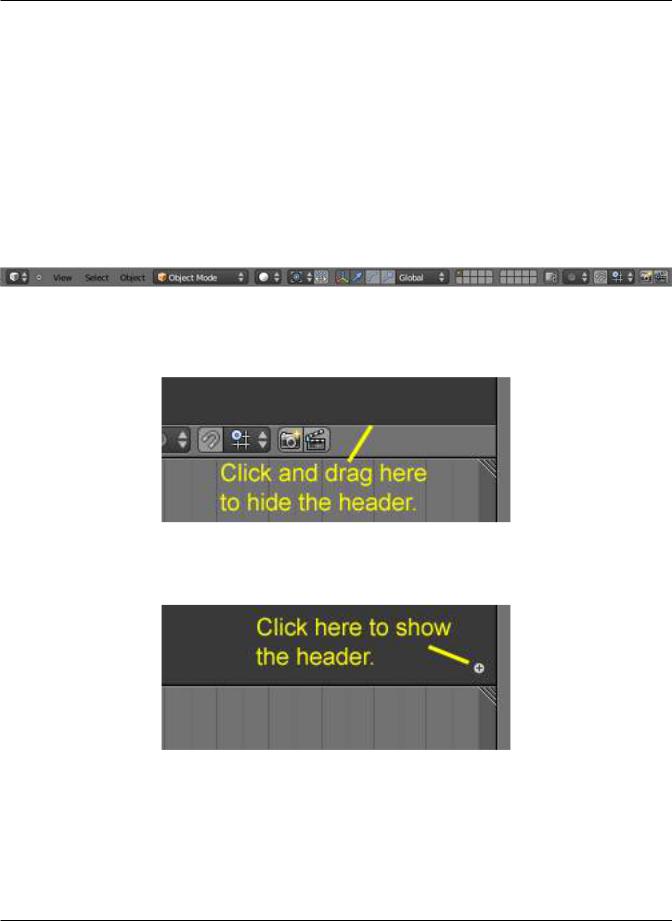
Window Headers All windows have a header (the strip with a lighter gray background containing icon buttons). We will also refer to the header as the window ToolBar. The header may be at the top (as with the Properties Window) or the bottom (as with the 3D Window) of a window’s area. The picture below shows the header of the 3D window:
If you move the mouse over a window, its header changes to a slightly lighter shade of gray. This means that it is “focused”. All hotkeys you press will now affect the contents of this window.
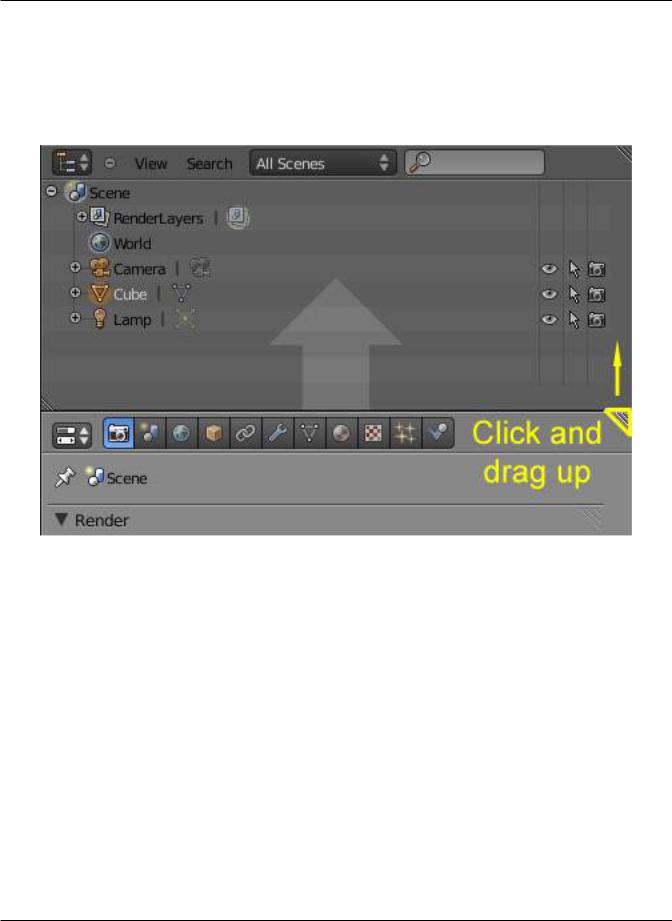
Hiding a header To hide a header, move your mouse over the thin line between a window and its header, until the pointer takes the form of an up/down arrow. Then click, hold and drag with LMB from the window over the header to hide the latter.
Showing a header A hidden header leaves a little plus sign (see picture). By LMB this, the header will reappear.
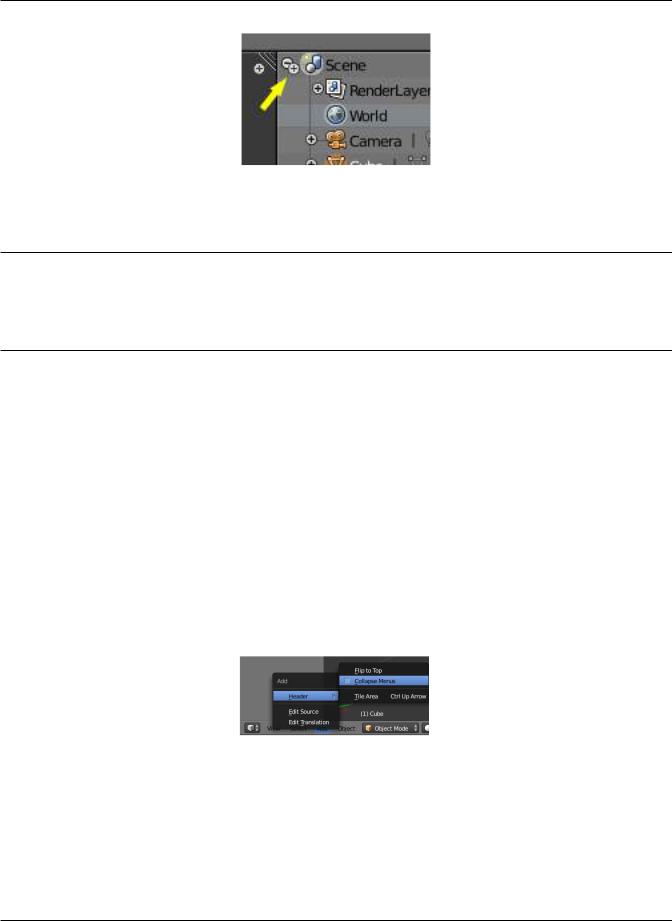
Note 1: In the 3D window, there are up to two more of these little plus signs (to the top left and right of the window). Those will open panels with several tools, not a second header.
Note 2: In some windows, the mentioned plus sign can be hard to find, because it might look like a part of other icons. One example is the Outliner, in which there are other such plus signs, thus giving the one to get the header back good camouflage.
1.1. Getting Started |
25 |
Blender User Manual, Release 2.75
Header position To move a header from top to bottom or the other way round, simply RMB on it and select the appropriate item from the pop-up menu. If the header is at the top, the item text will read “Flip to Bottom”, and if the header is at the bottom the item text will read “Flip to Top”.
Tip: Theme colors
Blender allows for most of its interface color settings to be changed to suit the needs of the user. If you find that the colors you see on screen do not match those mentioned in the Manual then it could be that your default theme has been altered. Creating a new theme or selecting/altering a pre-existing one can be done by selecting the User Preferences window and clicking on the Themes tab of the window.
Window type button LMB clicking on the first icon at the left side of a header allows changing the window type. Every window frame in Blender may contain any type of window, allowing you to customize your window layout to your own work flows.
Menus and buttons Most Window Headers, located immediately next to this first “Window Type” Menu button, exhibit a set of menus which can be hidden - again with a little minus sign. So if you cannot find a menu that was mentioned somewhere, try looking for a little plus sign (once again) next to the “Window Type” button. By clicking LMB on it, the menu will come back.
Menus allow you to directly access many features and commands, so just look through them to see what’s there. All Menu entries show the relevant shortcut keys, if any.
Menus and buttons will change with Window Type and the selected object and mode. They only show the actions that can be performed.
Collapsing Menus Sometimes its helpful to gain some extra horizontal space in the header by collapsing menus, this can be accessed from the header context menu, simply right click on the header and enable set it to collapsed.
Fig. 1.9: Right click to access the header menu
The Console Window The Console Window is an operating system text window that displays messages about Blender operations, status, and internal errors. If Blender crashes on you, the Console Window may be able to indicate the cause or error.
1.1. Getting Started |
26 |
Blender User Manual, Release 2.75
Fig. 1.10: Access the menu from the collapsed icon
Fig. 1.11: The Blender Console Window on Windows XP and subsequent messages.
Microsoft Windows When Blender is started on a Windows operating system, the Console Window is first created as a separate window on the desktop. The main Blender window will also appear and the Console Window will then be toggled off. To display the console again, go to Window → Toggle System Console.
The screenshot shows the Blender Console Window on Windows XP directly after starting Blender and then a short while later after opening a file along with the relevant messages.
Tip: Closing the Blender Console Window
The Blender Console Window must remain open while Blender is running. Closing the Console Window will also close Blender, losing any unsaved work. To turn off the console without closing Blender, toggle the console state to off via re-selecting Toggle System Console option from the drop-down menu Window → Toggle System Console.
Note the Blender Console Window can look very similar to MS-DOS, so make sure that you are closing the correct window if an instance of MS-DOS is open.
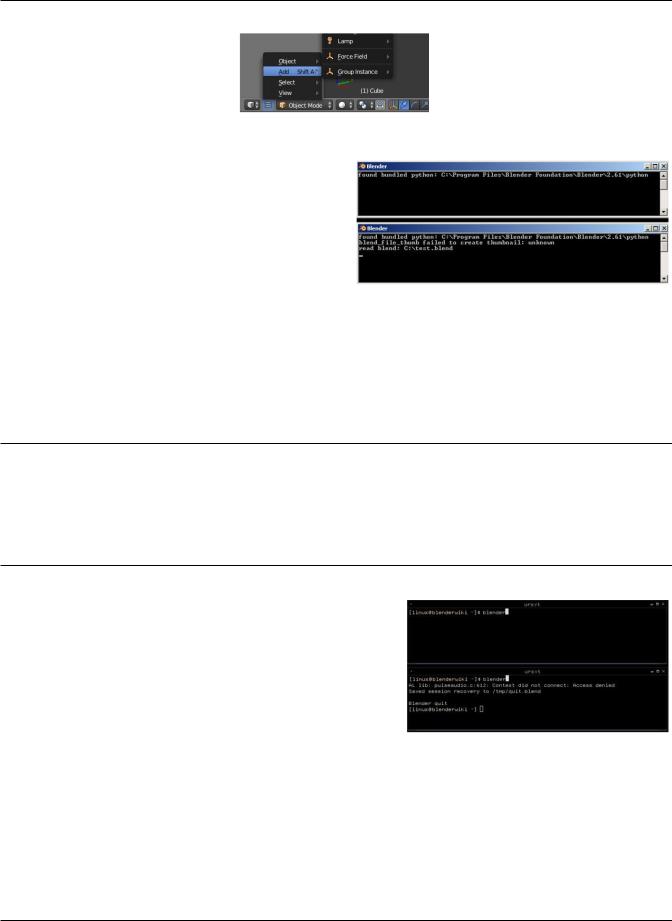
Fig. 1.12: Starting Blender from a Linux console window and subsequent messages.
Linux The Blender Console Window in Linux will generally only be visible on the desktop if Blender is started from a terminal, as Blender outputs to the Console Window it is started from.
Depending on your desktop environment setup, a Blender icon may appear on your desktop or an entry for Blender added to your menu after you install Blender. When you start Blender using a desktop icon or menu entry rather than a Terminal window, the Blender Console Window text will most likely be hidden on the Terminal that your XWindows server was started from.
This screenshot shows Blender started from a Linux Terminal and the resulting console text being printed to it. This example
1.1. Getting Started |
27 |
Blender User Manual, Release 2.75
shows that when Blender was started it was unable to access a library related to the Pulseaudio sound server. When Blender closed, it saved the recovery file to /tmp/quit.blend.
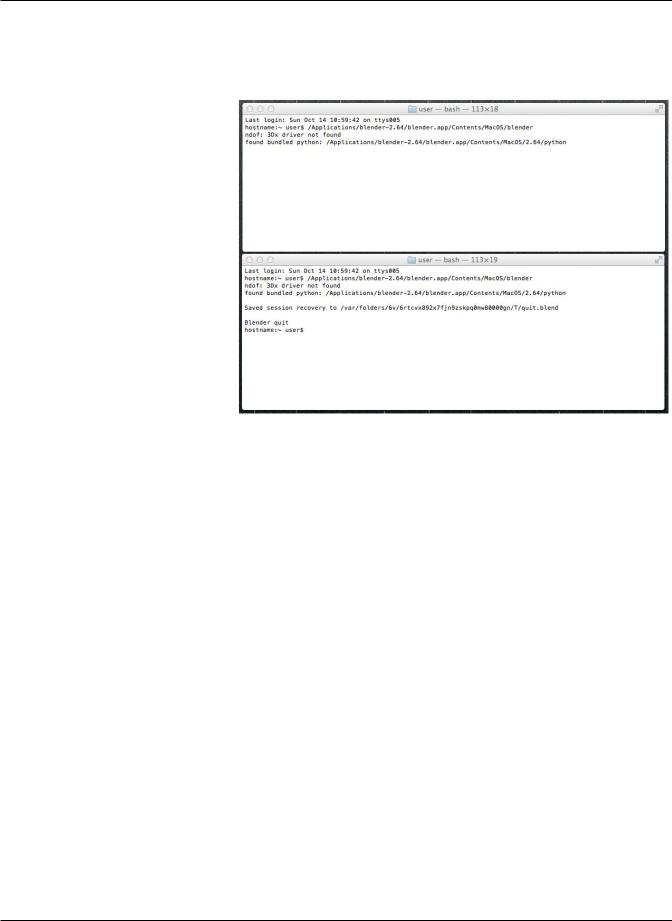
Fig. 1.13: Starting Blender from a Mac OS X console window and subsequent messages.
MacOS MacOS uses “files” with the .app extension called applications. These files are actually folders that appear as files in Finder. In order to run Blender you will have to specify that path to the Blender executable inside this folder, to get all output printed to the terminal. You can start a terminal from Applications –> Utilities. The path to the executable in the .app folder is ./blender.app/Contents/MacOS/blender.
If you have Blender installed in the Applications folder, the following command could be used/adapted to the particular Blender version: /Applications/blender-2.75/blender.app/Contents/MacOS/blender
Console Window Status and Error Messages The Blender Console Window can display many different types of Status and Error Messages. Some messages simply inform the user what Blender is doing, but have no real impact on Blender’s ability to function. Other messages can indicate serious errors that will most likely prevent Blender carrying out a particular task and may even make Blender non-responsive or shut down completely. The Blender Console Window messages can also originate internally from within the Blender code or from external sources such as Python scripts.
Common messages
• found bundled python: (FOLDER)
This message indicates that Blender was able to find the Python library for the Python interpreter embedded within Blender. If this folder is missing or unable to be found, it is likely that an error will occur, and this message will not appear.
• malloc returns nil()
When Blender carries out operations that require extra memory (RAM), it calls a function called malloc (short for memory allocate) which tries to allocate a requested amount of memory for Blender. If this cannot be satisfied, malloc will return nil/null/0 to indicate that it failed to carry out the request. If this happens Blender will not be able to carry out the operation requested by the user. This will most likely result in Blender
1.1. Getting Started |
28 |
Loading...