

Page 1
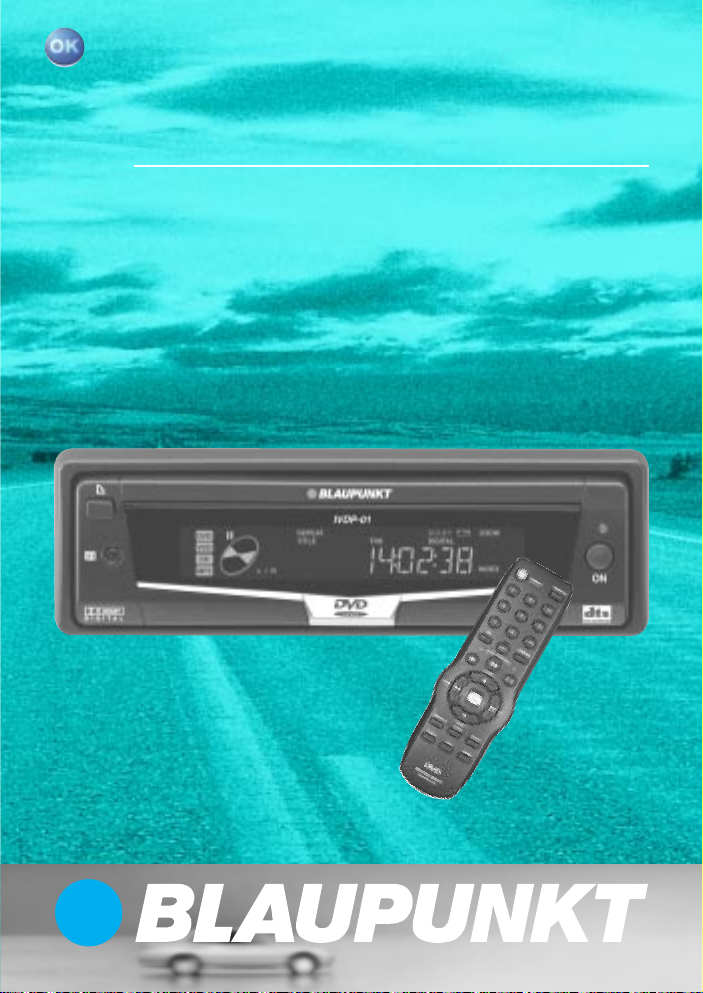
In Car Video
IVDP-01
Bedienungs- und Einbauanleitung
Operating and installation instructions
Notice d’emploi et de montage
Istruzioni d’uso e di installazione
Gebruiksaanwijzing en inbouwhandleiding
Bruks- och monteringsanvisning
Instrucciones de manejo e instalación
Instruções de serviço e de montagem
Betjenings- og monteringsvejledning
http://www.blaupunkt.com
Page 2

TABLE OF CONTENTS
General .................................. 36
Safety instructions ................. 36
Functions ............................... 38
About discs ............................ 38
Fitting ..................................... 40
DIN front fitting
(Method A) .................................... 41
DIN rear fitting
(Method B) .................................... 42
Removable front cover ........... 43
Electrical connections ............ 45
Remote control ...................... 46
Main functions........................ 48
Inserting a DVD/VCD/CD .............. 48
Removing a disc ............................ 48
The RESET button......................... 50
Flashing LED................................. 50
On-screen display function ............ 51
Multiple language audio function .... 52
MENU function .............................. 52
Multilingual subtitles (DVD only) ..... 52
Multi-angle function (DVD only) ...... 53
MP3 disc replay ............................ 53
Special functions ........................... 53
Initial setup ............................ 55
Setup - main screen ...................... 55
General setup ........................ 56
Loudspeaker setup ........................ 60
Dolby setup ................................... 60
Recommended settings ................. 62
Technical Data ....................... 67
DEUTSCH
ENGLISH
FRANÇAIS
ITALIANO
NEDERLANDS
SVENSKAESPAÑOL
35
PORTUGUÊS
DANSK
Page 3

GENERAL SAFETY INSTRUCTIONS
General
Thank you for deciding to use a Blaupunkt product. We hope you enjoy using
this new piece of equipment.
Please read these operating
instructions before using the
equipment for the first time.
The Blaupunkt editors are constantly
working on making the operating
instructions clearer and easier to understand. However, if you still have any
questions on how to operate the
equipment, please contact your dealer
or the telephone hotline for your country .
You will find the hotline telephone
numbers printed at the back of this
booklet.
We provide a manufacturer guarantee
for our products bought within the
European Union. You can view the
guarantee conditions at
www.blaupunkt.de or ask for them
directly at:
Blaupunkt GmbH
Hotline CM/PSS 6
Robert-Bosch-Str. 200
D-31 139 Hildesheim
Germany
In traffic
Adjust the volume to a level that does
not distract your attention from the road.
Car washing
Never expose the product to water or
very damp conditions, as this can result in short circuits, fire or other damage.
Parking
Avoid leaving your car exposed to
strong sunshine, as this can cause very
high temperatures to develop inside.
Allow the inside of your car to cool down
before switching the equipment on.
Correct power supply
This equipment is designed for operation from a 12 Volt DC battery system
with a negative ground connection (the
usual system in US vehicles).
Protecting the disc mechanism
Never insert any foreign objects into the
player’s opening, as this can easily damage the delicate mechanical parts inside
the equipment.
Please note (RESET):
Before initial operation, the RESET
KK
K must be pressed (see page
button
KK
48) !
36
Servicing by an authorised
Service Centre
Do not attempt to dismantle this precision equipment or to repair it yourself.
Please have the equipment serviced at
one of the Service Centres on the list
included with this product.
Page 4
SAFETY INSTRUCTIONS
Release panel
Risk of injury! Please make sure
that the release panel is always
closed. After removing a CD, the release panel does not close
automatically.To close the release
panel, insert a new CD or press the
button. The release panel’s pro-
truding parts could cause injury .
Risk of injury! Never detach the
release panel whilst the control panel
is opened out. The protruding metal
parts of the release panel’s holder
fitting could cause injury .
Fitting
Mount the equipment so that it has a
horizontal orientation. For convenience,
the front may be tilted upwards at an
angle of at most 30°.
WARNING:
The mobile DVD player is a Class I
laser product generating a visible or
invisible laser beam of a potentially
hazardous type. The mobile DVD
player must only be operated in accordance with the specified instructions. The use of operating elements,
adjustment options or functions that
are not described in this handbook
can result in exposure to hazardous
radiation.
Never open the housing, and do not
attempt to perform repairs yourself.
Any servicing should be carried out
by trained personnel.
Warning:
• Minimise the risk of fire or the danger of electrical shock by never exposing this equipment to water or
moisture.
• Only use recommended accessories. This will again reduce the risk
of fire or the danger of electrical
shock, and will avoid interference.
• The equipment is designed for continuous operation. The product contains components and uses techniques protected by specific US patents. The intellectual property is
owned by the Macrovision Corporation and other patent holders. The
use of this protected technology must
be approved by the Macrovision
Corporation. It is licensed only for
private use, or for showing under
other limited circumstances, unless
approval for other uses has first been
granted by the Macrovision Corporation. Reverse engineering or dismantling the equipment are not permitted.
DEUTSCH
ENGLISH
FRANÇAIS
ITALIANO
NEDERLANDS
SVENSKAESPAÑOL
PORTUGUÊS
37
DANSK
Page 5
FUNCTIONS
ABOUT DISCS
Compatible with PAL DVD
(Video CD) and NTSC DVD
(Video CD)
You can use this equipment to replay
discs that were recorded in either PAL
or NTSC-TV format.
All the functions that are important for
DVD replay, including an MPEG2 decoder, video D/A converter and audio
decoder have been integrated into a single LSI chip designed for this equipment.
There is an analog L/R (RCA) stereo
output for connecting existing
headphone amplifier inputs. The video
output is a mixed video signal (RCA).
Software is included for the multi-function remote control (multilingual audio
function/subtitles, multi-angle function),
as well as for all the basic functions.
Note:
Horizontal picture interference may
occur in connection with 16:9 monitors
with NTSC timing.
Region Management
Information
Region Management Information: This
mobile DVD player has been designed
in such a way that Region Management
Information stored on a DVD can be
used. If the region number assigned to
a DVD does not match the region
number of the mobile DVD player, the
disc cannot be played on this equipment.
The regional code for this product is
printed on the label attached to the unit.
38
Disc formats supported by this
player:
DVD
12 cm disc / 8 cm disc
(only discs written on
one side)
DIGITAL VIDEO
Video CD
12 cm disc / 8 cm disc
CD
12 cm disc / 8 cm disc
The following discs are not
supported by this player:
• DVD-ROM
• DVD-R / DVD-RAM
• CD-RAM
• CDV
• CD-G
• Photo CD
• DVDs with a different regional
code.
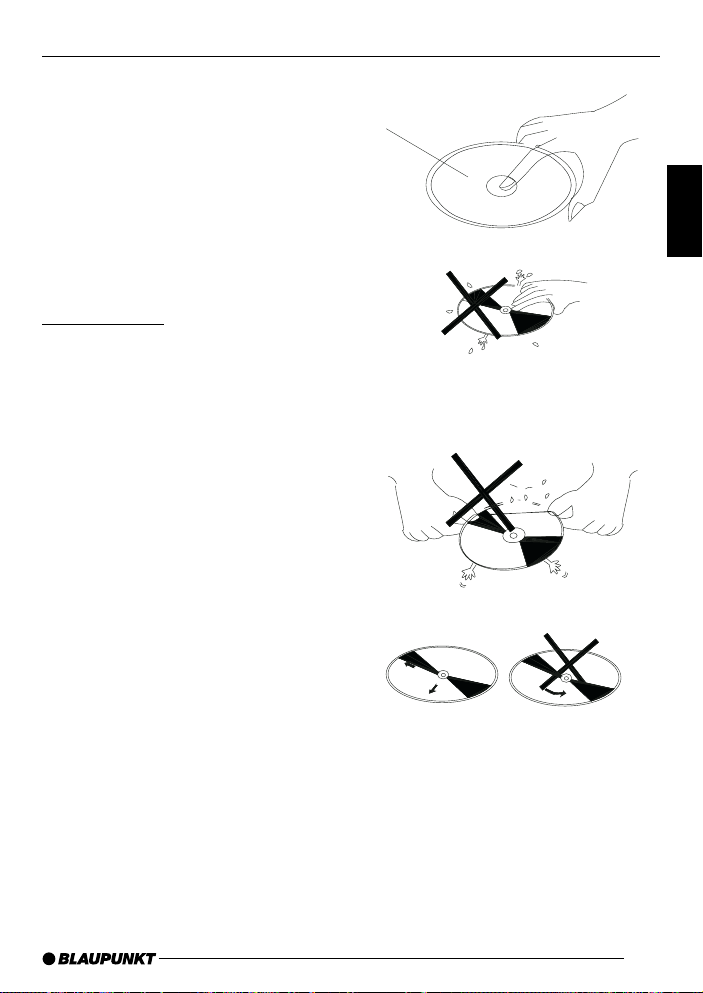
Handling and cleaning
• Dirt, dust, scratches or warped
discs can cause incorrect function.
• Do not put any adhesive labels on
discs, and avoid scratching them.
• Discs must not be bent.
• Minimise damage by always
keeping your discs in their protective envelopes.
Page 6
• Do not keep discs in any of the
following places:
1. Where there exposed to direct
sunshine.
2. Dirty , dusty or damp locations.
3. Close to the vehicle’s heating
system.
4. On the seats or the instrument
panel.
Label on the
top
ABOUT DISCS
DEUTSCH
ENGLISH
Disc cleaning
Wipe the surface with a soft cloth. If the
disc is very dirty, use a soft cloth slightly
dampened with isopropyl alcohol. Never
use cleaning agents such as petrol, thinner or conventional record cleaner, as
these materials can damage the surface
of the disc.
Note:
Depending on how and under what conditions it is handled, the surface of a disc
can easily be scratched, although this
does not make the disc unusable.
Please note that such scratches do not
indicate a problem with the player.
Do not touch the
bottom of the disc.
Do not bend.
.
Always clean the disc from
the inside to the outside.
FRANÇAIS
ITALIANO
NEDERLANDS
SVENSKAESPAÑOL
PORTUGUÊS
39
DANSK
Page 7
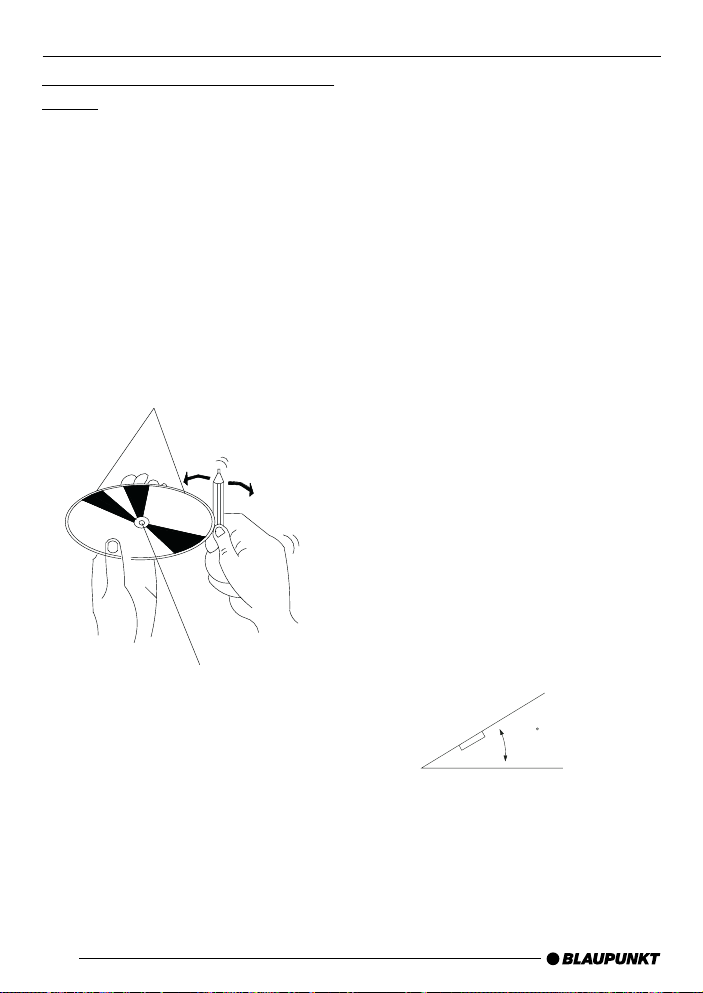
ABOUT DISCS
FITTING
Handling new discs with uneven
edges
• The inner and outer edges of a new
disc may not be perfectly smooth.
• When a disc with uneven edges is
inserted, it may not locate correctly,
making it impossible to play.
• Correct these uneven locations before inserting the disc using a pencil
or ballpoint pen, as shown here, by
running the implement over the inner and outer edges of the disc.
Rough points on
the outer edge
Ballpoint pen
or pencil
Rough points on
the inner edge
Note:
Choose a location to fit the equipment
•
where it will not interfere with the
ability to control the vehicle.
driver’s
• Before fitting the equipment into the
vehicle, temporarily connect the cables and check that all the connectors mate properly and that the equipment and the system operate correctly.
•To ensure correct fitting, only use the
parts supplied with the equipment.
The use of non-approved parts can
cause incorrect function.
• If fitting requires holes to be drilled
or other modifications to be made to
the vehicle, take it to a qualified workshop near you.
• Fit the equipment in a location that
will not interfere with the driver, and
where the occupants of the vehicle
will not be put at risk by an abrupt
stop, such as hard emergency braking.
• If the equipment is fitted as an angle
more than 30° to the horizontal performance may deteriorate.
40
30
•Avoid fitting the equipment at locations where the ambient temperature
is raised by, for instance, direct sunshine or the car’s heating system.
Avoid locations where the equipment
would be exposed to dust, dirt or
heavy vibration.
Page 8
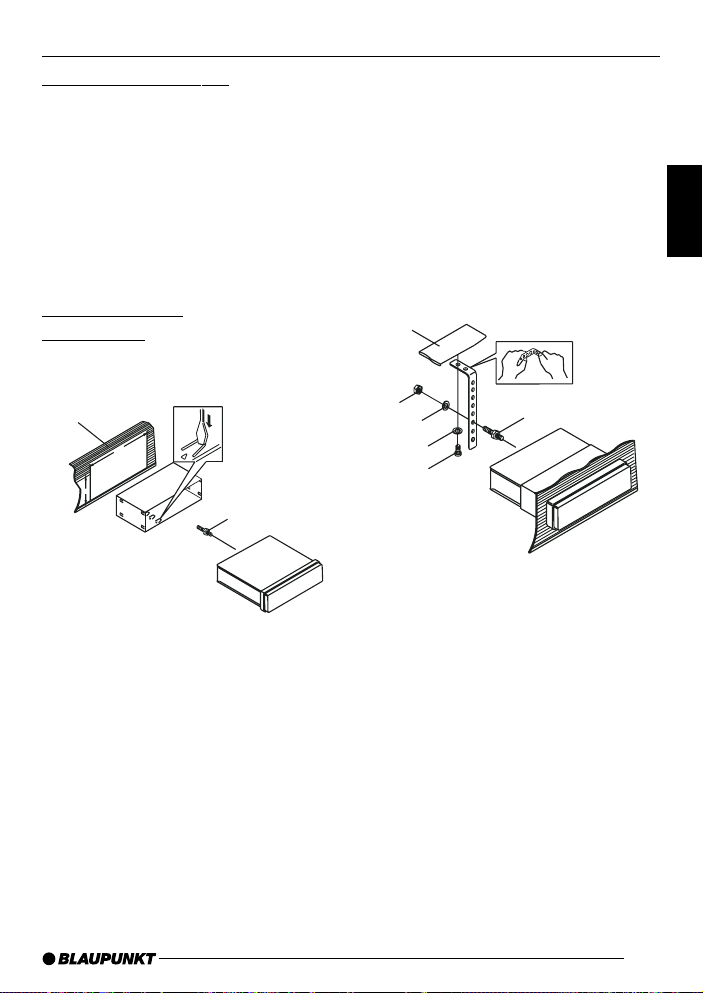
FITTING
DIN front/rear fitting
DIN front/rear fitting of this equipment
can either be carried out from the front
(normal DIN front mounting) or from the
rear (DIN rear mounting, using the
threaded screw holes in the side of the
housing). The exact procedure can be
understood from the following assembly diagrams.
DIN front fitting
(Method A)
Fitting the equipment
1
182
93
Fig. 1
2
3
1. Instrument panel
2. Bracket
When you have inserted the bracket
into the instrument panel, choose the
appropriate metal jointing bar, according to the thickness of the instrument panel material, and bend it inwards so that it can be fixed to the
bracket.
3. Bolt
1
2
3
7
4
6
5
Fig. 2
1. Instrument panel
2. Nut (5 mm)
3. Lock washer
4. Bolt (5 x 25 mm)
5. Bolt
6. Fixing angle
Use the fixing angle piece to fix the
rear of the equipment at the correct
location. The angle piece can be bent
to the desired form by hand.
7. Washer
DEUTSCH
ENGLISH
FRANÇAIS
ITALIANO
NEDERLANDS
SVENSKAESPAÑOL
PORTUGUÊS
41
DANSK
Page 9
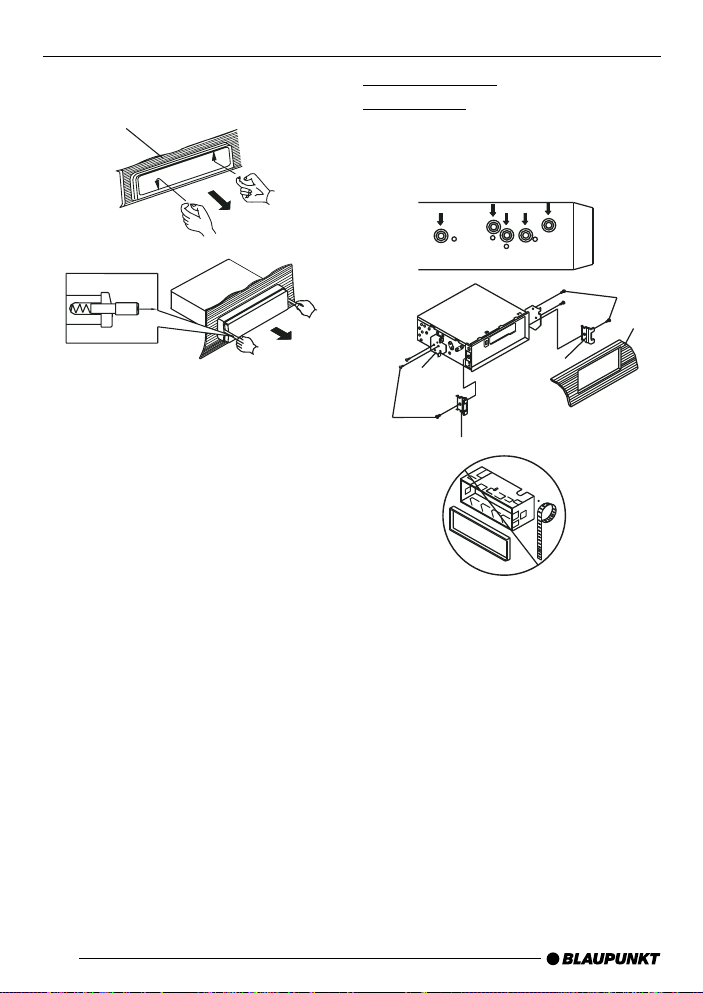
FITTING
Removing the equipment
1
2
3
1. Frame
2. Reach with your fingers into the slot
at the front of the frame, and pull the
frame off. (To replace the frame, put
the side that has the slot downwards,
and insert it.)
3. Lever
Push the levers supplied with the
equipment as shown in the diagram
into the slots at both sides of the
equipment until they latch. The
equipment can be removed from the
instrument panel by pulling the levers.
DIN rear fitting
(Method B)
Assembly using the threaded holes in
the side of the equipment.
1
2
4
3
2
5
Fixing the equipment to the standard
radio mounting clip.
1. Locate the main unit in such a way
that the screw holes in the clip and
threaded holes in the main unit are
aligned with one another, and fix the
screws at two places on each side.
Use either mushroom-headed
screws (5 x 6 mm) or countersunk
screws (4 x 6 mm), according to the
shape of the screw holes in the clip.
5
42
Page 10
FITTING
REMOVABLE FRONT COVER
2. Bolt
3. Standard radio mounting clip
4. Instrument panel or fascia
5. Hook (remove this part)
Note:
The fitting housing, the outer cladding
and the collar are not used for fitting by
method B.
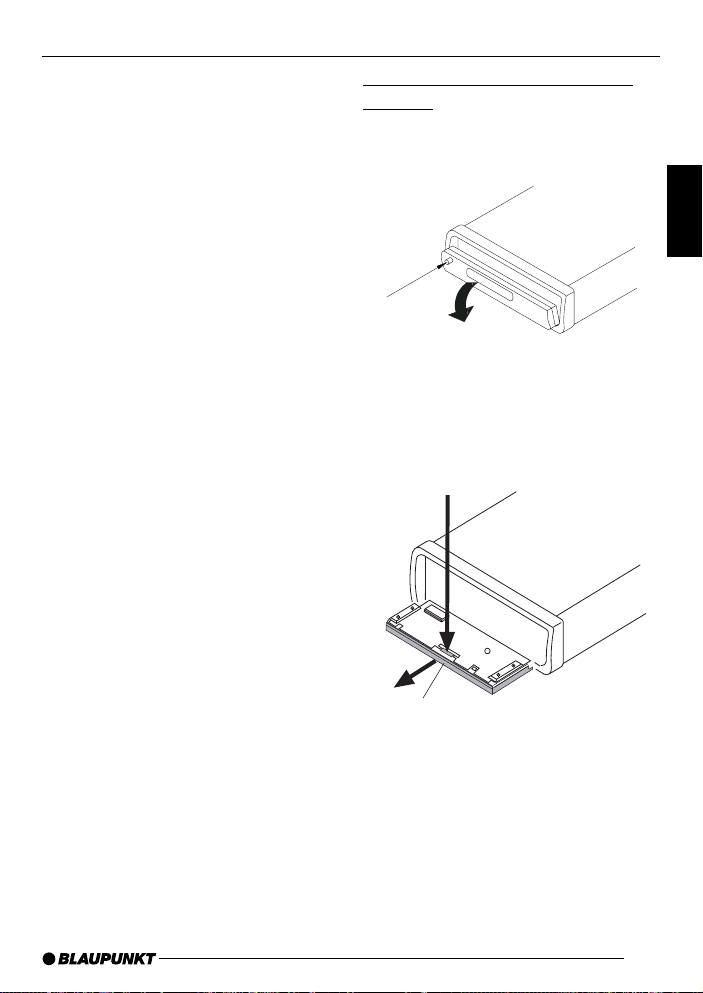
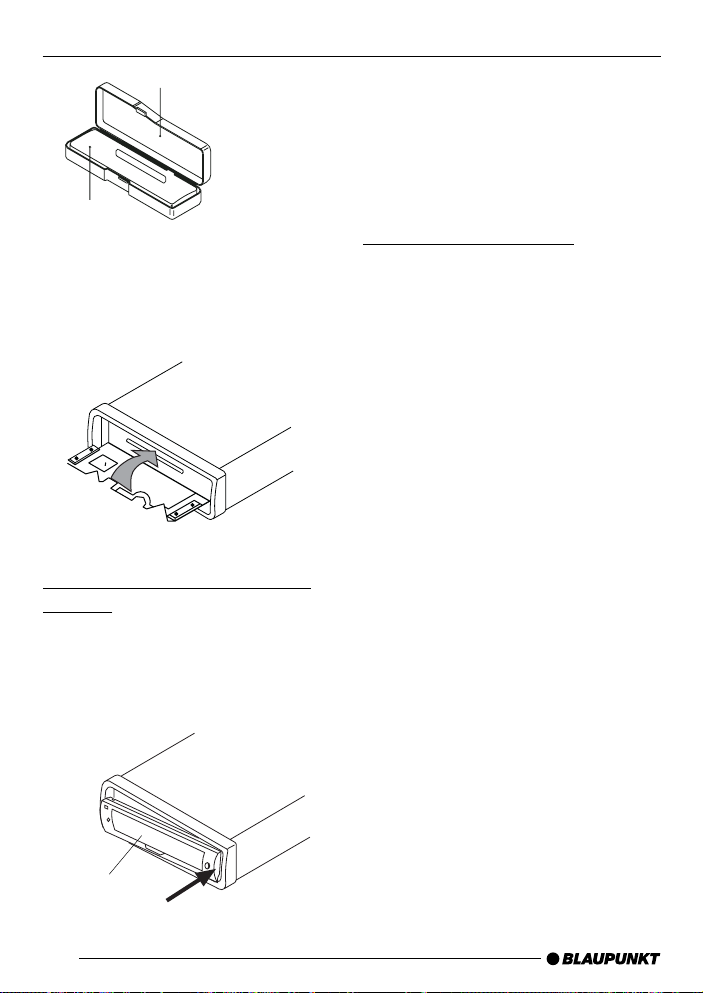
The front cover is removed as
follows:
1. Press the OPEN button, so that the
front cover opens.
Open
2. Pull off the front cover towards the
front of the unit by pressing down on
the release zone (release panel).
1.
DEUTSCH
ENGLISH
FRANÇAIS
ITALIANO
NEDERLANDS
SVENSKAESPAÑOL
2.
Front cover
3. Put the front cover in the supplied
case for safe keeping as soon as you
have removed it.
43
PORTUGUÊS
DANSK
Page 11
REMOVABLE FRONT COVER
Protective case
Front
cover
4. Push the front metal plate into the
main housing. You will hear a click.
The front cover is replaced as
follows:
1. First insert the right-hand side of the
front cover into the main housing and
then push in its left side until you hear
it click into place.
2. Note that if the front cover is inserted
incorrectly, the operating controls
may not function correctly, and that
parts of the LCD display may not
appear. Press the OPEN button, and
reinsert the front cover.
Notes on safe handling
1. Take care not to drop the front cover
onto the floor.
2. When removing or re-inserting the
front cover, do not exert any pressure on the display or on the operating knobs.
3. Avoid touching the contacts on the
front cover or on the main housing,
as this can interfere with their electrical conductivity .
4. Use a clean, dry cloth to remove dirt
or other foreign objects that might
adhere to the contacts.
5. Never expose the front cover to high
temperatures or to direct sunshine.
6. Make sure that the surface does not
come into contact with volatile substances (such as petroleum, thinner
or insecticide).
7. Do not attempt to dismantle the front
cover.
44
Front
cover
Page 12

ELECTRICAL CONNECTIONS
MAIN DVD UNIT
(REAR VIEW)
DEUTSCH
ENGLISH
Input
VIDEO/AUDIO OUTPUT (AV OUTPUT)
RED
WHITE
YELLOW
AUDIO-L VIDEO
AUDIO-R
SPDF digital output
(Toslink)
VIDEO/AUDIO INPUT (AV INPUT)
RED
WHITE
YELLOW
AUDIO-L VIDEO
AUDIO-R
ATTENTION:
The main unit is connected to an external remote receiver, whose function
corresponds to that of the remote sensor IR G on the front cover.
IR
BLACK
GROUND (B-)
RED
IGNITION SWITCH (B+)
YELLOW
EXTERNAL REMOTE RECEIVER
FUSE FOR THE MEMORY
TO THE POWER SUPPLY
This remote receiver can be mounted
in any convenient location.
FRANÇAIS
ITALIANO
NEDERLANDS
SVENSKAESPAÑOL
PORTUGUÊS
DANSK
45
Page 13

REMOTE CONTROL
1
DISPLAY
POWER
123
10
2
3
4
6
5
7
8
9
1 POWER
POWER button for switching the
equipment ON or OFF.
2 0-9
Numerical buttons.
3 ILL
Button for adjusting the brightness
of the VFD display .
4
Stop button to finish play .
5 /
Fast forward button and fast
reverse
.
456
789
ILL REPEAT
0
O
C
C
S
I
D
SKIP
REW
ENTER
SKIP
SUBTITLE
AUDIO
SETUP
TITLE
N
T
R
O
L
A / V
11
12
13
FF
ANGLE
MENU
14
15
16
17
6 /
Button for changing to the start of
the next section,
, or for returning
to the previous section,
menu mode, these buttons control
the cursor.
7 SUBTITLE
Selection of the subtitle on DVD
discs with multilingual subtitle
functions.
8 SETUP
Call the SETUP menu.
. In
46
Page 14

REMOTE CONTROL
9 TITLE
Open the TITLE contained in on
the DVD disc.
: DISPLAY
Button for hiding or displaying the
status line during play .
; REPEAT
Switch between repeat modes
(REPEAT, REPEAT 1 and REPEAT OFF).
<
Button for pausing and restarting
play.
= AV
Switch between DVD player and
external AUDIO/VIDEO.
> ENTER
Button for confirming sections /
chapters selected using the
number or cursor buttons in combination with the screen.
? AUDIO
Selection of the audio soundtrack
on DVDs with multilingual audio
functions.
@ ANGLE
Selection of the camera perspective on DVDs with multi-angle
function.
A MENU
Display a DVD’s main menu.
Preparing the remote control
unit for use
Insert the batteries
1. Open the battery compartment by
taking off the cover.
2. Insert the new batteries. Make sure
that the positive and negative poles
of the battery are positioned as
shown inside the battery compartment.
3. Close the battery compartment. Batteries required: two AAA batteries.
Using the remote control
Point the remote control unit at the infra-red sensor on the front of the player
(the receiver for the remote control unit).
Working angle: up to about 30° in any
direction from the front of the IR sensor.
Note:
Make sure that the connections are
made in accordance with the circuit diagram (Page 45) to avoid damaging the
equipment.
DEUTSCH
ENGLISH
FRANÇAIS
ITALIANO
NEDERLANDS
SVENSKAESPAÑOL
Note:
The
/ , DISPLAY and ANGLE
keys may also be assigned to special
functions (see “Special functions”).
PORTUGUÊS
DANSK
47
Page 15

MAIN FUNCTIONS
24
IR
25
26
212322
ON
27
28
Inserting a DVD/VCD/CD
1. Turn the vehicle’s ignition key to the
ACC position.
2. Press the ON button E.
3. Press the
that the front cover opens slowly forward.
4. Insert the disc with the printed side
upwards.
5. Replay starts automatically .
48
(OPEN) button F so
Removing a disc
1. Press the (OPEN) button F.
2. Wait until the cover has completely
opened, then press the
to eject the disc.
3. Remove the disc and close the front
cover.
button L
Page 16

MAIN FUNCTIONS
Stop play
- If the STOP button is pressed for a
short time, play will be stopped, and
if the PLAY button is pressed, replay
will start again.
- If you press the STOP button twice,
the player will stop and return to the
first section / chapter.
Fast forward / fast reverse
Press the FF and REW buttons
during play . Each time these buttons are
pressed, the speed with which the
player is moving forwards or backwards
will alter, depending on the type of disc,
as follows:
DVD
Normal
Replay
2x 4x 6x 8x
VCD & CD
Normal
Replay 1x 2x 3x 4x
Skipping a section
Press the SKIP buttons, / , during
play.
button takes you to the next
The
section, while the
the previous section.
button returns to
Note:
The
and buttons may not be active
for some VCD 2.0 discs (PBC playback).
Choosing the AV signal
You assign the AV output signal to the
external AV input cable or the DVD
player with this button.
Pause (still picture)
Press the button during play. Press
the button again to return to normal play .
Repeat
Press the REPEA T button to select the
repeat mode, as shown here:
REPEAT 1
REPEAT REPEAT OFF
DVD/CD
1. In the REPEAT 1 mode, the current
section/chapter is continuously repeated.
2. If you have selected the REPEAT
mode, the player will repeat all the
sections / chapters on the disc.
3. When replay of the last section /
chapter of the current disc has completed, the elapsed time is no longer
displayed. (If the equipment is in the
REPEAT OFF mode, then the VFD
display will no longer show REPEA T
& REPEAT.)
DEUTSCH
ENGLISH
FRANÇAIS
ITALIANO
NEDERLANDS
SVENSKAESPAÑOL
PORTUGUÊS
49
DANSK
Page 17

MAIN FUNCTIONS
VCD
The REPEAT function is not active for
VCD 2.0 (with PBC).
ILL (illumination)
Press the ILL button to adjust the illumination of the VFD display in the following sequence.
Brightness levels
3 2 1
4
Selecting a higher level will increase the
brightness of the VFD display .
The RESET button
The RESET button
housing, and must be activated with the
aid of a ballpoint pen or a thin metal
object. It will be necessary to activate
the reset button in the following cases:
- The first time the unit is used after connecting the cable.
- The function buttons do not operate.
- An error symbol is shown on the display.
KK
K is located on the
KK
Remote control sensor (IR)
Point the remote control at the IR sensor for receiving the remote control signals.
Flashing LED
The LED display will flash if the front
cover is not inserted into the main unit.
Switching the player off
Switch the equipment off using the ON
button on the front of the cover, or press
the corresponding key
control unit.
on the remote
Open
Press the OPEN button, so that the front
cover opens.
50
Page 18

MAIN FUNCTIONS
On-screen display function
Press the DISPLAY button during play
in order to show the contents of the inserted disc on the screen.
Examples:
DVD
1) Press the DISPLAY button
once:
TITLE 01/03 CHAPTER
00:02:25
The title number, the total number of
titles, the chapter number and the
total number of chapters under this
title for the disc currently being
played are shown on the LCD display along with the elapsed time.
2) Press the DISPLAY button
twice:
TITLE REMAIN
01:46:58
3) Press the DISPLA Y button
three times:
CHAPTER ELAPSED
00:00:24
4) Press the DISPLA Y button
four times:
CHAPTER REMAIN
00:01:39
5) Press the DISPLA Y button
five times:
The information is no longer displayed on the screen.
Video CD/SVCD/CD
Each time the DISPLAY button is
pressed, the screen display
changes according to the following sequence:
SINGLE ELAPSED (current,
elapsed time)
SINGLE REMAIN (current, remaining time)
TOTAL ELAPSED (total, elapsed
time)
TOTAL REMAIN (total, remaining
time)
OFF
51
DEUTSCH
ENGLISH
FRANÇAIS
ITALIANO
NEDERLANDS
SVENSKAESPAÑOL
PORTUGUÊS
DANSK
Page 19

MAIN FUNCTIONS
MP3
Each time the DISPLAY button is
pressed, the screen display changes
as follows:
SINGLE ELAPSED (current,
elapsed time)
OFF
Multiple language audio function
For DVD
Press the AUDIO button during play.
Each time the button is pressed the
number of the replay language changes
in sequence.
Note:
- The language numbers vary from
one disc to another.
- Only one replay language is available on some discs.
- An information symbol is displayed
in the upper left-hand corner of the
screen if no other languages are
available.
For VCD/CD
Press the AUDIO button during play.
You can choose between stereo and
mono playback modes.
Stereo (L&R)
only L only R
MENU function
TITLE menu
If a DVD contains more than one title,
the title with which replay should start
can be chosen from the title menu.
1. Press the TITLE button during play.
2. Use the cursor buttons to choose a
title from the screen, and confirm
your choice with the ENTER button.
Multilingual subtitles (DVD only)
Press the SUBTITLE button during play.
Each time the button is pressed the
number of the language for the subtitles changes in sequence.
Note:
- The language numbers vary from
one disc to another.
- Only one language is available on
some discs.
- An information symbol is displayed
in the upper left-hand corner of the
screen if no other languages are
available.
52
Page 20

Multi-angle function (DVD only)
Press the ANGLE button during play.
Each time the button is pressed the
number of the camera perspective
changes in sequence.
Note:
- The camera perspective numbers
vary from one disc to another.
- This function is only available on
discs in which scenes have been
recorded from different perspectives.
- The corresponding symbol is displayed in the upper left-hand corner
of the screen if no other perspectives
are available.
MP3 disc replay
This player is suitable for the following
MP3 CD formats:
1) Joliet;
2) Romeo;
3) ISO9660.
When an MP3 disc is played, the format of the folder is definitive.
Example:
SMART NAVI
ROOT
REPEAT MODE
ROOT 0
MP3 MUSIC 1
SKY
MP3 HEAR YOUR
NO REPEAT
MAIN FUNCTIONS
Select the menu item or folder using the
, , and buttons, and confirm
your choice with the ENTER or PLAY
button.
A choice between three replay modes
can be made by pressing the REPEAT
button a number of times:
REP-ONE: A single title is played repeatedly.
FOLDER REPEAT: All the titles in the
current folder are played repeatedly in
the given sequence.
NO REPEAT: All the titles in the current
folder are played just once.
Using the
you can jump onto the next title or return
to the previous title.
: fast rewind, : fast forward.
Note:
It is not possible to select a folder during playback. This can only be done after pressing the STOP button.
Special functions
•Volume, colour, contrast and bright-
ness can be adjusted when in stop
mode.
ANGLE : Adjustment of volume,
DISPLAY: return to normal values
and buttons during play
colour, contrast and
brightness.
: louder / stronger
: softer / weaker
(except for volume)
DEUTSCH
ENGLISH
FRANÇAIS
ITALIANO
NEDERLANDS
SVENSKAESPAÑOL
PORTUGUÊS
DANSK
53
Page 21

MAIN FUNCTIONS
Note:
1) The values mentioned above can
not be changed for an MP3 disc.
2) It is not possible to increase the
values beyond the point at which
the total of the contrast and
brightness values is 29.
3) Do not select excessively high
values of contrast and brightness.
• AV switch
The A V switch is used to change over
between the DVD player and external audio/video.
Push the plug on the external AV
cable into the A V input socket on the
DVD player.
Then press the AV button to switch
over to external AV.
By pressing the AV button again you
return to the DVD equipment’s AV.
Note:
1) Insert the disc into the player after the equipment has been
switched over to external AV. As
soon as the disc has been identified, the equipment selects the
replay mode, and switches automatically to the DVD equipment’s
AV output.
2) If you switch over to external AV
during play, playback will be interrupted. On switching over to
the DVD player’s AV, replay will
start automatically .
54
Page 22

Setup - main screen
GENERAL SETUP
SPEAKER SETUP
DOLBY DIGITAL SETUP
PREFERENCE
EXIT SETUP
1. Press the SETUP button while the
equipment is in stop mode. (Press
the STOP button twice to be certain
that the equipment is in stop mode.)
2. The INITIAL SETUP menu will be
displayed.
3. Use the
desired menu item.
4. Press the ENTER button.
a) General setup
b) Loudspeaker setup
/ buttons to choose the
On this general setup page you
will find all the menu items for the
video and audio output.
You will find further information
under the General Setup menu.
You can activate the audio output
from the DOLBY AC3 5.1
DOWNMIX for 2-channel mode
here.
You will find further information
under the Loudspeaker Setup
menu.
INITIAL SETUP
c) Dolby setup
This setup page contains all the
DOLBY DIGITAL options.
You will find further information
under the Dolby Setup menu.
d) Recommended settings
This setup page includes the full
configuration of the support function.
You will find further information
under the Recommended Set-
tings menu.
Dolby Digital
Manufactured under licence from Dolby
Laboratories.
“Dolby” and the double-D symbol are
trademarks of Dolby Laboratories.
Confidential unpublished work.
© 1992-1997 Dolby Laboratories, Inc.
All rights reserved.
55
DEUTSCH
ENGLISH
FRANÇAIS
ITALIANO
NEDERLANDS
SVENSKAESPAÑOL
PORTUGUÊS
DANSK
Page 23

GENERAL SETUP
General setup
TV DISPLAY
TV TYPE
PIC MODE
ANGLE MARK
OSD LANG
SPDIF
CAPTIONS
MAIN PAGE
Video
4:3
Material
Normal
4:3
16:9
Pan Scan
TV Screen
Letter-box
NORMAL / PS
NORMAL / LB
WIDE
Wide(16:9)
TV DISPLAY setup
You can choose the appropriate picture
format here (4:3 or 16:9) according to
the picture format of the connected TV.
NORMAL/PS (for TV format 4:3)
Replay in PAN & SCAN format. (The
side edges are cropped when used with
a widescreen TV.)
NORMAL/LB (for TV format 4:3)
Replay in letterbox format. (When used
with a wide screen television, the upper
and lower edges of the screen will be
black.)
WIDE (for TV format 04:09:00 PM)
Choose this option if a TV with a
widescreen format is connected.
56
Page 24

General setup
GENERAL SETUP
TV DISPLAY
TV TYPE
PIC MODE
ANGLE MARK
OSD LANG
SPDIF
CAPTIONS
MAIN PAGE
PAL (USA:NTSC)
NTSC
PAL
Setting the TV TYPE
You can use this player to replay discs
that were recorded either in PAL or in
NTSC format.
Choose NTSC if the equipment is connected to a TV that requires NTSC
coded signals.
Choose PAL if the equipment is connected to a TV that requires PAL signals.
If you choose the PAL (USA : NTSC)
option, the output format will be the
same as that of the disc.
TV DISPLAY
TV TYPE
PIC MODE
ANGLE MARK
OSD LANG
SPDIF
CAPTIONS
MAIN PAGE
AUTO
HI-RES
N-FLICKER
Setting the PIC (picture) MODE
Choose the AUTO option. The player’s
PIC mode depends on the configuration of the or DVD disc.
The HI-RES ensures the best picture
resolution.
Choose the N-FLICKER option for images with audio effects.
DEUTSCH
ENGLISH
FRANÇAIS
ITALIANO
NEDERLANDS
SVENSKAESPAÑOL
57
PORTUGUÊS
DANSK
Page 25

GENERAL SETUP
General setup
TV DISPLAY
TV TYPE
PIC MODE
ANGLE MARK
OSD LANG
SPDIF
CAPTIONS
MAIN PAGE
ON
OFF
Setting the ANGLE MARK display
If set to ON, the angle signal will
appear on the screen when a multi-angle DVD disc is played. The signal is
not displayed if OFF is chosen.
TV DISPLAY
TV TYPE
PIC MODE
ANGLE MARK
OSD LANG
SPDIF
CAPTIONS
MAIN PAGE
ENGLISH
CHINESE
Setting the OSD LANG (language)
Use the / buttons to choose the
language for the screen display .
58
Page 26

General setup
GENERAL SETUP
TV DISPLAY
TV TYPE
PIC MODE
ANGLE MARK
OSD LANG
SPDIF
CAPTIONS
MAIN PAGE
ON
OFF
SPDIF setting
Choose whether the SPDIF video output is ON or OFF.
TV DISPLAY
TV TYPE
PIC MODE
ANGLE MARK
OSD LANG
SPDIF
CAPTIONS
MAIN PAGE
ON
OFF
CAPTIONS
Activate the CAPTIONS function by a
choosing ON, and deactivate it again
by selecting OFF.
DEUTSCH
ENGLISH
FRANÇAIS
ITALIANO
NEDERLANDS
SVENSKAESPAÑOL
59
PORTUGUÊS
DANSK
Page 27

GENERAL SETUP
Loudspeaker setup Dolby setup
DOWN MIX
MAIN PAGE
LT / RT
STEREO
You can activate the audio output from
the DOLBY AC3 5.1 DOWNMIX for 2channel mode here.
Use the cursor keys to select the desired LOUDSPEAKER connection.
Selection of LT/RT to activate the
compatible Dolby Surround output.
Selection of STEREO to activate the
standard stereo mode.
OP MODE
DUAL MONO
DRC
LINE MODE
OPERATING MODE
The Dolby Digital decoder only has one
operating mode: LINE OUTPUT.
60
Page 28

Dolby setup
GENERAL SETUP
OP MODE
DUAL MONO
DRC
STEREO
CH1-MONO
CH2-MONO
MIX-MONO
DUAL MONO
Dual mono replay is only available for
Dolby digital programmes with 1+1 audio code mode.
Stereo replay 1+1 programme CH1
for the left-hand channel, CH2 for the
right hand channel.
CH1 mono replay CH1 in both outputs (left/right).
CH2 mono replay CH2 in both outputs (left/right).
Mix mono replay CH1+CH2 in both
outputs (left/right).
OP MODE
DUAL MONO
DRC
FULL
6/8
4/8
2/8
OFF
DRC - DYNAMIC RANGE CONTROL
Select DRC and adjust the dynamic
range of a Dolby Digital coded programme. Eight levels of adjustment are
available from full compression down to
compression switched off.
DEUTSCH
ENGLISH
FRANÇAIS
ITALIANO
NEDERLANDS
SVENSKAESPAÑOL
61
PORTUGUÊS
DANSK
Page 29

GENERAL SETUP
Recommended settings
LANGUAGE
SUBTITLE
DISC MENU
LOCALE
PARENTAL
PASSWORD
DEFAULT
MAIN PAGE
ENGLISH
FRENCH
SPANISH
CHINESE
JAPANESE
LANGUAGE selection
Use the cursor buttons to choose the
desired replay language.
LANGUAGE
SUBTITLE
DISC MENU
LOCALE
PARENTAL
PASSWORD
DEFAULT
MAIN PAGE
ENGLISH
FRENCH
SPANISH
CHINESE
JAPANESE
Language selection for SUBTITLES
Use the cursor buttons to choose the
language in which the SUBTITLES
should be given.
62
Page 30

Recommended settings
GENERAL SETUP
LANGUAGE
SUBTITLE
DISC MENU
LOCALE
PARENTAL
PASSWORD
DEFAULT
MAIN PAGE
ENGLISH
FRENCH
SPANISH
CHINESE
JAPANESE
Language selection for the DISC
MENU
Use the cursor buttons to choose the
desired language for the disc menu.
LANGUAGE
SUBTITLE
DISC MENU
LOCALE
PARENTAL
PASSWORD
DEFAULT
MAIN PAGE
CHINA
FRANCE
HONG KONG
JAPAN
TAIWAN
GBR
USA
LOCALE
Use the cursor keys to select the desired LOCALE. The player will make the
appropriate settings in accordance with
this choice are (e.g. SUBTITLES, LANGUAGE SELECTION and so on).
DEUTSCH
ENGLISH
FRANÇAIS
ITALIANO
NEDERLANDS
SVENSKAESPAÑOL
63
PORTUGUÊS
DANSK
Page 31

GENERAL SETUP
Recommended settings
LANGUAGE
SUBTITLE
DISC MENU
LOCALE
PARENTAL
PASSWORD
DEFAULT
MAIN PAGE
1 G
3 PG
4 PG 13
6 PG-R
7 NC-17
8 ADULT
NO PARENTAL
PAR ENTAL CONTROL FUNCTION
Use the cursor buttons to select the
desired parental control level, and confirm it by pressing the ENTER button.
LANGUAGE
SUBTITLE
DISC MENU
LOCALE
PARENTAL
PASSWORD
DEFAULT
MAIN PAGE
CHANGE
PASSWO RD
Select the CHANGE option, and confirm your choice with the ENTER button. Enter the old password (the password/secret code is pre-set by the factory to 3308), and then enter a new, fourfigure password/secret code. Enter the
password/secret code again as confirmation. Make sure that you repeat your
entry correctly
.
64
Page 32

Recommended settings
GENERAL SETUP
LANGUAGE
SUBTITLE
DISC MENU
LOCALE
PARENTAL
PASSWORD
DEFAULT
MAIN PAGE
RESET
Factory settings (RESET)
Choose the RESET button option to return the equipment to the factory settings.
DEUTSCH
ENGLISH
FRANÇAIS
ITALIANO
NEDERLANDS
SVENSKAESPAÑOL
65
PORTUGUÊS
DANSK
Page 33

GENERAL SETUP
DEFAULT GENERAL SETUP TV DISPLAY NORMAL / PS
TV TYPE PAL (USA:NTSC)
PIC mode AUTO
Angle mark ON
OSD LANGUAGE ON
SPDIF ON
Speaker Setup
Dolby Digital Setup
Preference Language English
Subtitle English
DISC menu English
Locale
Parental
Password 3308
66
Page 34

TECHNICAL DATA
Operating voltage:
+12 V (11 V-16 V), test voltage 14.4 V,
negative earth
Current consumption:
Less than 2.0 A
Operating temperature:
-15° C to +60° C
Signal system:
Mixed video signal 1.0 Vp-p, 75 Ω RCA
socket
Supported disc types:
1. DVD-VIDEO discs
5" (12 cm) single sided, single
layer
5" (12 cm) single sided, double
layer
3" (8 cm) single sided, single layer
3" (8 cm) single sided, double
layer
2. Compact disc
(CD-DA, VIDEO CD)
5" (12 cm) disc
3" (8 cm) disc
Audio output:
600 Ω (2 ch, 2.0 Vrms)
Audio output signal parameters:
1. Frequency range:
20 Hz-20 kHz
2. Signal-to-noise ratio:
90 dB (JIS)
3. Pitch variation:
not measurable
Note:
The technical data and the design of the
equipment are liable to be changed for
the sake of technical improvements
without significant prior notice.
DEUTSCH
ENGLISH
FRANÇAIS
ITALIANO
NEDERLANDS
SVENSKAESPAÑOL
67
PORTUGUÊS
DANSK
Page 35

Service-Nummern / Service numbers / Numéros du service aprèsvente / Numeri del servizio di assistenza / Servicenummers /
Telefonnummer för service / Números de servicio / Números de
serviço / Servicenumre
Country: Phone: Fax: WWW:
Germany (D) 0180-5000225 05121-49 4002 http://www.blaupunkt.com
Austria (A) 01-610 390 01-610 393 91
Belgium (B) 02-525 5454 02-525 5263
Denmark (DK) 44 898 360 44-898 644
Finland (FIN) 09-435 991 09-435 99236
France (F) 01-4010 7007 01-4010 7320
Great Britain (GB) 01-89583 8880 01-89583 8394
Greece (GR) 0800-550 6550 01-576 9473
Ireland (IRL) 01-4149400 01-4598830
Italy (I) 02-369 6331 02-369 6464
Luxembourg (L) 40 4078 40 2085
Netherland (NL) 023-565 6348 023-565 6331
Norway (N) 66-817 000 66-817 157
Portugal (P) 01-2185 00144 01-2185 1 1111
Spain (E) 902-120234 916-467952
Sweden (S) 08-7501500 08-7501810
Switzerland (CH) 01-8471644 01-8471650
Czech. Rep. (CZ) 02-6130 0441 02-6130 0514
Hungary (H) 01-333 9575 01-324 8756
Poland (PL) 0800-118922 022-8771260
Turkey (TR) 0212-3350677 0212-3460040
USA (USA) 800-2662528 708-6817188
Brasil
(Mercosur) (BR) +55-19 3745 2769 +55-19 3745 2773
Malaysia
(Asia Pacific) (MAL) +604-6382 474 +604-6413 640
Blaupunkt GmbH
09/02 CM/PSS - 8 622 403 174
/
 Loading...