

Page 1
Page 2

1
Page 3

2
TABLE OF CONTENTS
Precautions . . . . . . . . . . . . . . . . . . . . . . . . . . . . . . . . . . . . . .3
Safety Precautions . . . . . . . . . . . . . . . . . . . . . . . . . . . . . . . .4
About This Manual . . . . . . . . . . . . . . . . . . . . . . . . . . . . . . . .5
Accessories . . . . . . . . . . . . . . . . . . . . . . . . . . . . . . . . . . . . . .6
Main Unit Button Functions . . . . . . . . . . . . . . . . . . . . . . . . .7
Remote Control Button Functions . . . . . . . . . . . . . . . . . . . .9
Main Unit Connections . . . . . . . . . . . . . . . . . . . . . . . . . . . .11
Control Unit Connections . . . . . . . . . . . . . . . . . . . . . . . . . .12
General Operation . . . . . . . . . . . . . . . . . . . . . . . . . . . . . . . .13
Power On . . . . . . . . . . . . . . . . . . . . . . . . . . . . . . . . . . . . . .13
Power OFF . . . . . . . . . . . . . . . . . . . . . . . . . . . . . . . . . . . . .13
Warning. . . . . . . . . . . . . . . . . . . . . . . . . . . . . . . . . . . . . . . .13
Loading/Ejecting a disc . . . . . . . . . . . . . . . . . . . . . . . . . . . .14
Volume Up/Down . . . . . . . . . . . . . . . . . . . . . . . . . . . . . . . . .15
Mute . . . . . . . . . . . . . . . . . . . . . . . . . . . . . . . . . . . . . . . . . .15
Monitor Tilting . . . . . . . . . . . . . . . . . . . . . . . . . . . . . . . . . . .16
Changing the Wide Screen Mode . . . . . . . . . . . . . . . . . . . . .16
Source Selection . . . . . . . . . . . . . . . . . . . . . . . . . . . . . . . . .17
Audio Controls . . . . . . . . . . . . . . . . . . . . . . . . . . . . . . . . . .17
Down Mix . . . . . . . . . . . . . . . . . . . . . . . . . . . . . . . . . . . . . .18
Front LCD Color Change . . . . . . . . . . . . . . . . . . . . . . . . . . .18
Rear View Camera Mode . . . . . . . . . . . . . . . . . . . . . . . . . . .18
Playback Mode Functions . . . . . . . . . . . . . . . . . . . . . . . . .19
Radio . . . . . . . . . . . . . . . . . . . . . . . . . . . . . . . . . . . . . . . . .19
DVD (Digital Versatile Disc) . . . . . . . . . . . . . . . . . . . . . . . . .22
CD-A (Compact Disc Audio) . . . . . . . . . . . . . . . . . . . . . . . .25
CD-C (Compact Disc Changer) . . . . . . . . . . . . . . . . . . . . . .27
MP3 CD . . . . . . . . . . . . . . . . . . . . . . . . . . . . . . . . . . . . . . .29
AUX (Auxiliary input) . . . . . . . . . . . . . . . . . . . . . . . . . . . . . .30
Navigation . . . . . . . . . . . . . . . . . . . . . . . . . . . . . . . . . . . . . .31
Menu Settings . . . . . . . . . . . . . . . . . . . . . . . . . . . . . . . . . . .31
Select Menu . . . . . . . . . . . . . . . . . . . . . . . . . . . . . . . . . . . .31
General Setup . . . . . . . . . . . . . . . . . . . . . . . . . . . . . . . . . . .31
DVD Setup . . . . . . . . . . . . . . . . . . . . . . . . . . . . . . . . . . . . .31
Language Setup . . . . . . . . . . . . . . . . . . . . . . . . . . . . . . . . .32
Display Setup . . . . . . . . . . . . . . . . . . . . . . . . . . . . . . . . . . .32
Parental Control . . . . . . . . . . . . . . . . . . . . . . . . . . . . . . . . .33
Audio Setup . . . . . . . . . . . . . . . . . . . . . . . . . . . . . . . . . . . .33
Input Level . . . . . . . . . . . . . . . . . . . . . . . . . . . . . . . . . . . . .33
Audio Effect Control . . . . . . . . . . . . . . . . . . . . . . . . . . . . . .34
7 Band Equalizer . . . . . . . . . . . . . . . . . . . . . . . . . . . . . . . . .35
Speaker Setup . . . . . . . . . . . . . . . . . . . . . . . . . . . . . . . . . .35
Speaker Delay Setup . . . . . . . . . . . . . . . . . . . . . . . . . . . . . .36
Speaker Gain Setup . . . . . . . . . . . . . . . . . . . . . . . . . . . . . .36
Dynamic Range Setup . . . . . . . . . . . . . . . . . . . . . . . . . . . . .37
Test Tone . . . . . . . . . . . . . . . . . . . . . . . . . . . . . . . . . . . . . .37
Screen Setup . . . . . . . . . . . . . . . . . . . . . . . . . . . . . . . . . . .37
Monitor Tilt . . . . . . . . . . . . . . . . . . . . . . . . . . . . . . . . . . . . .38
Screen Control . . . . . . . . . . . . . . . . . . . . . . . . . . . . . . . . . .38
Extra Setup . . . . . . . . . . . . . . . . . . . . . . . . . . . . . . . . . . . . .39
ID Code Setup . . . . . . . . . . . . . . . . . . . . . . . . . . . . . . . . . .39
Images Manager . . . . . . . . . . . . . . . . . . . . . . . . . . . . . . . . .39
How to download Wallpaper/Upgrade Software . . . . . . . . . .41
How to change Wallpaper . . . . . . . . . . . . . . . . . . . . . . . . . .43
Adjust Date & Time . . . . . . . . . . . . . . . . . . . . . . . . . . . . . . .45
External Source Setup . . . . . . . . . . . . . . . . . . . . . . . . . . . . .45
DVD Language Code Table . . . . . . . . . . . . . . . . . . . . . . . . .48
Warranty (USA) . . . . . . . . . . . . . . . . . . . . . . . . . . . . . . . . . .49
Page 4
3
Precautions
Before attempting to connect, or operate this product, please read the manual completely.
TO REDUCE THE RISK OF
ELECTRIC SHOCK, DO
NOT REMOVE THE
COVER (OR BACK).
NO USER-SERVICEABLE PARTS ARE INSIDE.
REFER SERVICING TO QUALIFIED SERVICE PERSONNEL.
CAUTION: THIS UNIT HAS BEEN ADAPTED WITH AN
INVISIBLE CLASS 1 LASER BEAM WHICH CAN CAUSE
HAZARDOUS RADIATION EXPOSURE IF DIRECTED. BE SURE
TO OPERATE THE UNIT CORRECTLY AS INSTRUCTED.
Caution:
This product satisfies FCC regulations when shielded cables and
connectors are used to connect the unit to other equipment. To
prevent electromagnetic interference with electric appliances, such
as radios and televisions, use shielded cables and connectors for
connections.
FCC NOTE (for U.S.A):
This equipment has been tested and found to comply with the limits
for a Class B digital device, pursuant to Part 15 of the FCC rules.
These limits are designed to provide reasonable protection against
harmful interference in a residential installation. This equipment
generates, uses and can radiate radio frequency energy and, if not
installed and used in accordance with the instructions, may cause
harmful interference to radio or television reception, which can be
determined by turning the equipment off and on, the user is
encouraged to try to correct the interference by one or more of the
following measures.
• Reorient or relocate the receiving antenna.
• Increase the separation between the equipment and receiver.
• Connect this equipment into an outlet on a circuit different form
that to which the receiver is connected.
• Consult the dealer or an experienced radio/TV technician for help.
This class B digital apparatus meets
all requirements of the Canadian
lnterference - Causing Equipment
Regulations.
WARNING
To reduce the risk of fire or shock hazard, do not expose this DVD
player to rain or moisture.
CAUTION
THIS PRODUCT UTILIZES A LASER. USE OF CONTROLS OR
ADJUSTMENTS OR PERFORMANCE OF PROCEDURES OTHER
THAN THOSE SPECIFIED HEREIN MAY RESULT IN
HAZARDOUS RADIATION EXPOSURE. DO NOT OPEN COVER
AND DO NOT REPAIR YOURSELF. REFER SERVICING TO
QUALIFIED PERSONNEL.
This symbol indicates dangerous voltage
inside the product that presents a risk of
electric shock or personal injury.
This symbol indicates
important instructions
accompanying the product.
CLASS 1 LASER PRODUCT
KLASSE 1 LASER PRODUKT
LUOKAN 1 LASER LAITE
KLASS 1 LASER APPARAT
Page 5
4
Safety Precautions
Caution
Install the control unit away from moisture, heat sources, and places
exposed to strong magnetic or electric fields. When condensation
forms inside the player or on the surface of the disc due to sudden
temperature changes from cold to hot, the player may not operate
correctly. If this occurs, leave the player at room temperature for
about 2 hours or until the player becomes operational.
Warning
Never disassemble the main unit in any way. Electric shock or
exposure to an invisible laser beam may result. Do not look inside
the DVD player.
Installation
Install the in-dash unit so that the driver cannot view video while the
vehicle is in motion. The driver should park the vehicle in a safe area
and apply the parking brake before viewing video on the monitor.
Batteries
The batteries used in the remote control contain the chemical that
are harmful to the environment. Properly dispose of batteries.
Handling the Main Unit
For safety reasons,
• Do not use benzene or other solvents when cleaning.
• Wipe the main unit with a soft cloth.
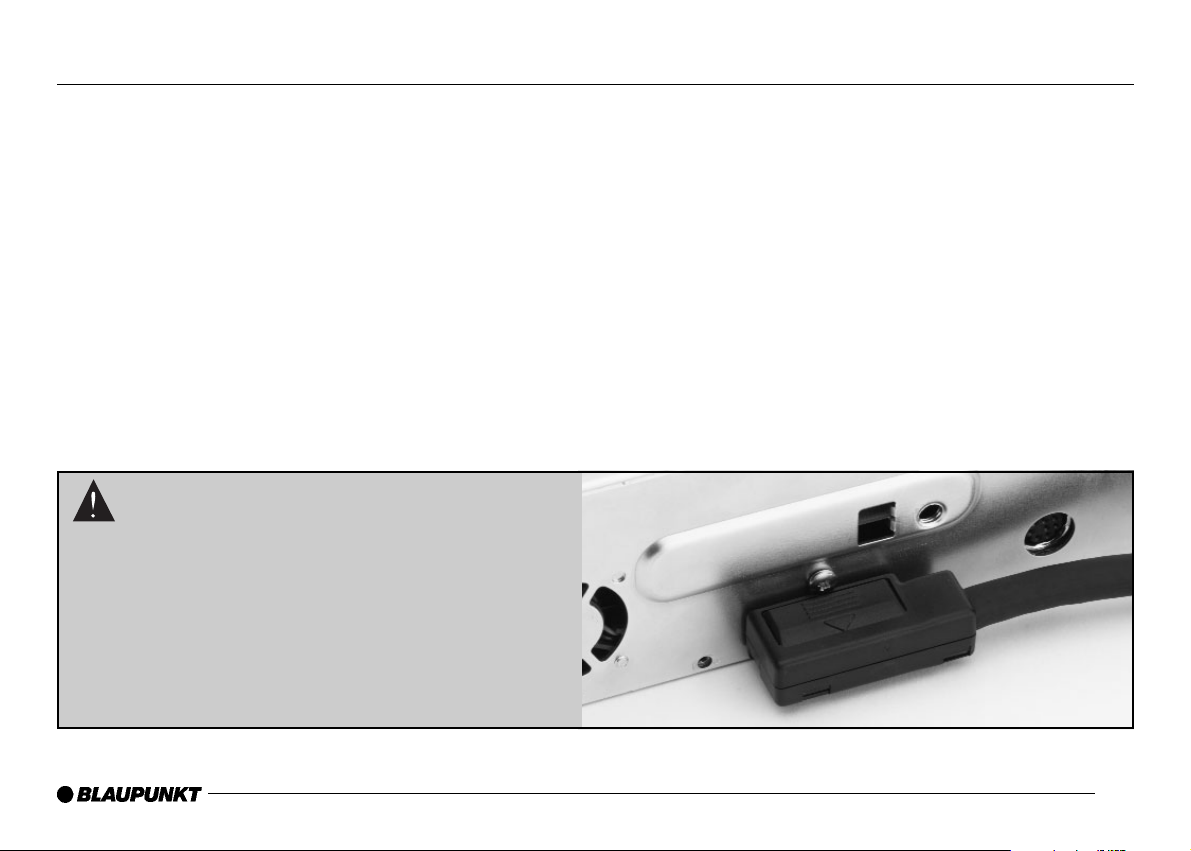
Caution
When connecting the data cable to the back of
the main unit, it must be connected as shown.
Incorrect connection will cause permanent
damage to the unit.
Page 6

5
About This OWNER'S MANUAL
• This OWNER'S MANUAL describes basic operation for this unit.
• Subject to the type of DVD disc, some features may not be
operated as described in this manual.
• Please read and follow instructions displayed on the monitor.
Region Number
DVD players and DVD discs are marked for the Region number to
be played in the relevant country as shown in the above table.
This device conforms to Region Code 1.
Playable Discs in this DVD player
DVD/CD-R/CD-RW/MP3
Region Number Region (Deleted as appropriate)
1. North America such as U.S., Canada
2. Japan, Europe (except Eastern Europe), Middle East,
South Africa
3. Korea and Southeast Asia
4. Oceania such as Australia. New Zealand, Central and
South America
5. India, East Europe, Africa, Russia
6. China
All All countries
Manufactured under license from Dolby Laboratories.
"Dolby", "Pro Logic", and the double-D symbol are trademarks of
Dolby Laboratories.
This product incorporates copyright protection technology that is
protected by method Claims of certain U.S. patents and other
intellectual property rights owned by Macrovision Corporation and
other rights owners. Use of this copyright protection technology
must be Authorized by Macrovision Corporation, and is intended
for home and other limited viewing uses only unless otherwise
authorized by Macrovision Corporation. Reverse engineering or
disassembly is prohibited.
Caution
Do not insert a 3.1” (80mm) disc. This unit is not designed for
the use of a 3.1” (80mm) disc.
Caution
This unit employs a laser system. To ensure proper use of the
unit, read this manual carefully and keep it for future reference. If
the unit requires servicing, contact the retailer and/or Blaupunkt
Service Center - see “Limited Warranty Information”. To prevent
direct exposure to the laser radiation, do not open the cabinet or
back of the unit.
Page 7

6
Accessories
Remote Control Mounting Brackets Mounting Strap Power Connectors
Removal Keys Trim Ring Wiring Harness Antenna Cable
Batteries
Hardware
Case for Detachable Panel
Data Cable
Page 8
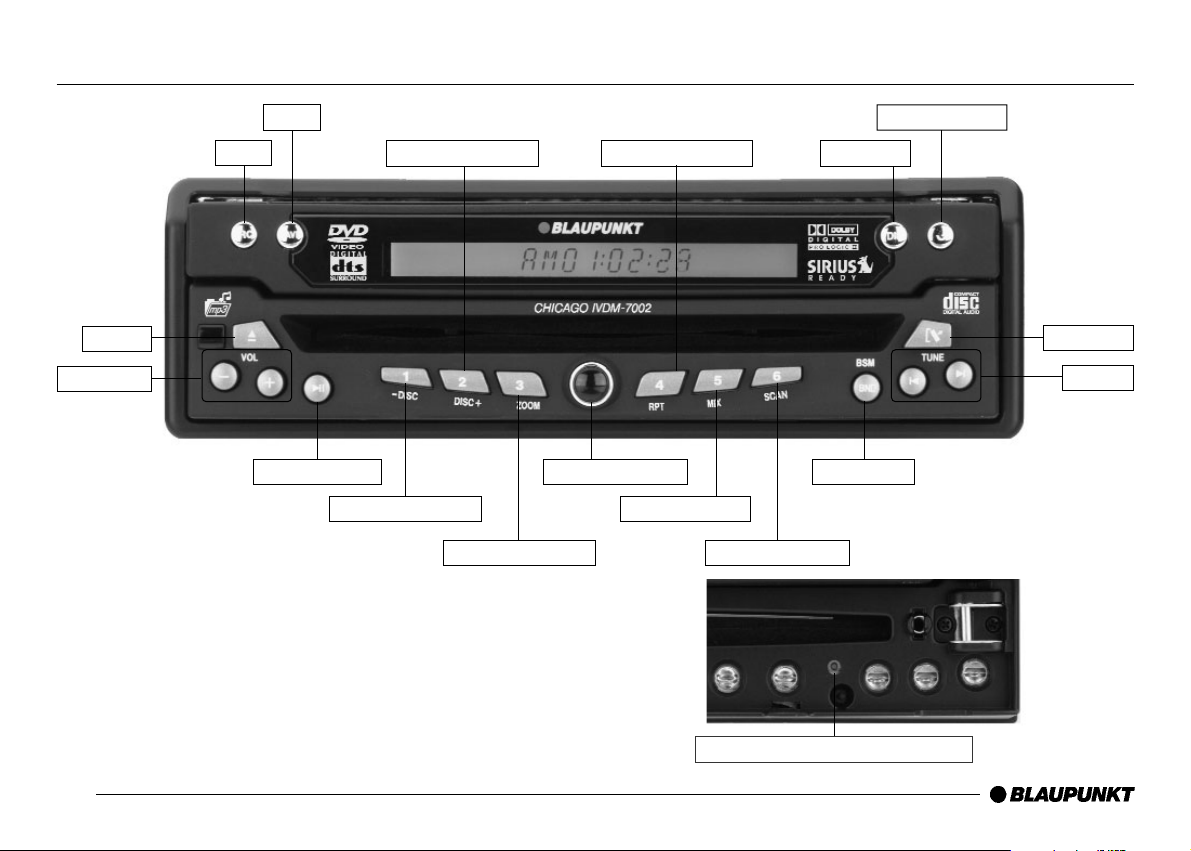
Main Unit Button Functions
7
SRC
NAVI
DIS/FLIP
DETACH
TUNE
BND/BSM
Preset 1/DISC –
Preset 2/DISC +
Preset 3/ZOOM
Preset 4/RPT
Preset 5/MIX
POWER/MUTE
PLAY/PAUSE
EJECT
VOLUME
Preset 6/SCAN
OPEN/CLOSE
RESET (behind detachable panel)
Page 9

8
Main Unit Button Functions
[SRC] button
• Press to cycle through all available sources.
[NAVI] button
• Press to select Navigation mode (if optional navigation unit is
installed).
[DIS/FLIP] multi-function button
• Press DIS to change clock info, press and hold DIS to change
display background color.
• Press FLIP (with monitor in open position) to adjust the monitor
viewing angle.
[OPEN/CLOSE] button
• Press to close LCD monitor. Press again to open LCD monitor.
[DETACH] button
• Press to remove panel from the main unit.
[TUNE] buttons
• Press < or > to go forward or reverse. Used in Radio/CD/DVD
modes.
[BND/BSM] button
• Press to select among three FM bands and one AM band. Hold
down to automatically store radio presets.
[RESET] button (behind detachable panel)
• Press and hold to reset unit.
[Preset 1/DISC –] button
• Press and hold to store Radio preset.
• CD Changer Mode press to change Disc DOWN.
• MP3 Mode press to change Folder DOWN.
[Preset 2/DISC+] button
• Press and hold to store Radio preset.
• CD Changer Mode press to change Disc UP.
• MP3 Mode press to change Folder UP.
[Preset 3/ZOOM] button
• Press and hold to store Radio preset.
• DVD Mode press for "ZOOM" function.
[Preset 4/RPT] button
• Press and hold to store radio preset.
• CD/CD-C/MP3/DVD Mode press for “Repeat” function.
[Preset 5/MIX] button
• Press and hold to store Radio preset.
• CD/CD-C/MP3 Mode press for "MIX" function.
[Preset 6/SCAN] button
• Press and hold to store radio preset.
• CD/CD-C/MP3 Mode press for “Intro” function.
[POWER/MUTE] button
• Press and hold to turn main unit on and off.
• Press to mute audio. Press again to return to the original volume.
[PLAY/PAUSE] button
• Press to play CD/DVD. Press again to Pause.
[–/+] Volume buttons
• Press + for volume UP, press – for DOWN.
[EJECT] button
• Press to eject CD or DVD.
Page 10
9
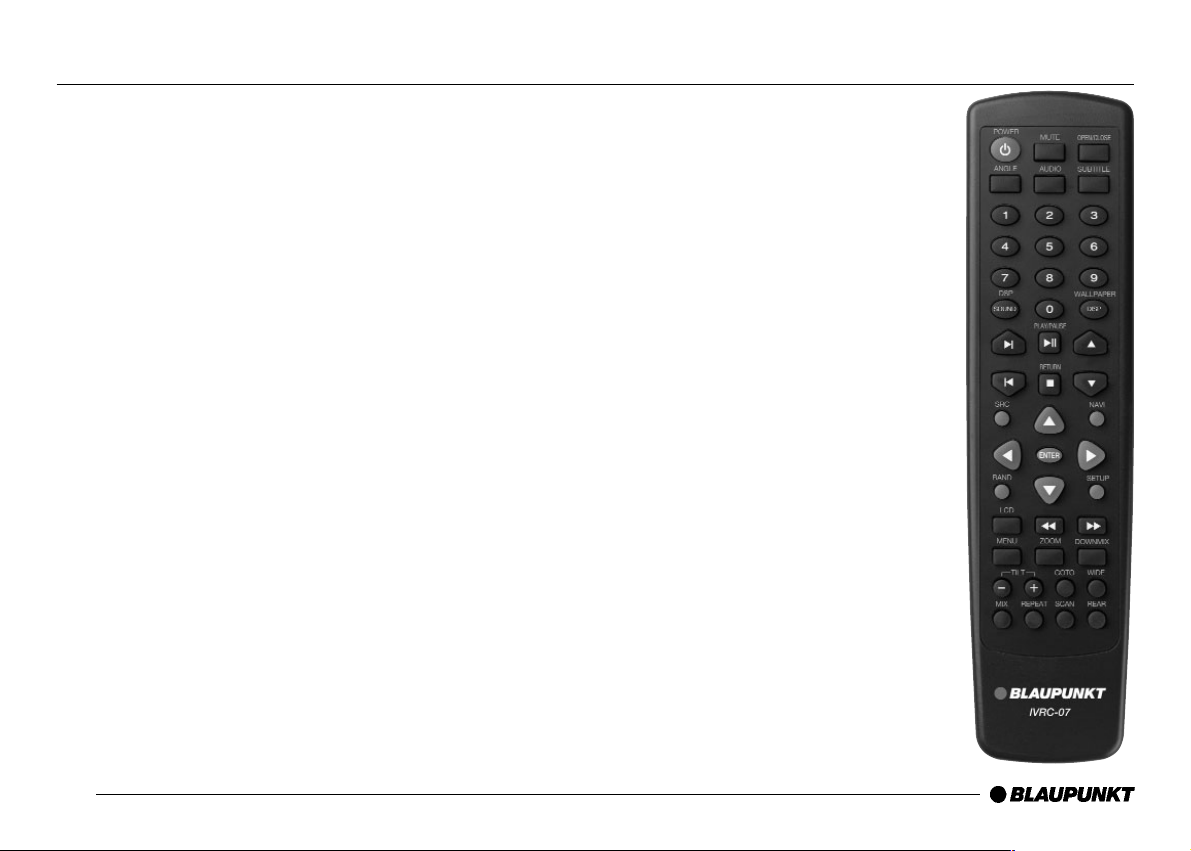
Remote Control Button Functions
Basic Operation
[POWER] button
• Power on and off
[MUTE] button
• Mute on and off
[SOUND/DSP] button
• Display audio control window
[DOWNMIX] button
• Audio downmix on and off
[NAVI] button
• Switches to navigation mode
[SRC] button
• Changing the source
[DISP/WALLPAPER] button
• OSD information on and off (DVD, Aux)
• Changes Wallpaper images (Radio, CD, CD-C,
MP3)
[VOLUME] button
• Volume up and down
[TILT] button
• Monitor tilting
[REAR] button
• Selects rear camera
[LCD] button
• Changing the front “LCD” backlight color
[], [] buttons
• Scroll OSD menu
[], [] buttons
• Select item and adjust the value on OSD menu
[ENTER] button
• Enters the selected item
[SETUP] button
• Open or close setup menu on OSD
Radio mode
[BAND] button
• Changes the band
[0 ~ 6] buttons
• Recall preset or memorized station
[], [] buttons
• Seeks and stops at next strong station
[ l], [l ] buttons
• Tune up or down
(AM: 9KHz step, FM: 0.1MHz step)
DVD mode
[ll ] button
• Switches between play and pause
[
■ ] button
• Performs stop
[MENU] button
• Shows the menu display
[], [], [], [] buttons
• Scroll menu
[ l], [l ] buttons
• Move to next or previous chapter
[], [] buttons
• Press and hold to fast forward or fast backward
[AUDIO] button
• Switches languages for DVDs with multi-language
audio settings
[SUBTITLE] button
• Switches subtitles
[ANGLE] button
• Switches the angle of the picture
(Activated only on multiple angles supporting DVDs)
Page 11

10
Remote Control Button Functions
[REPEAT] button
• Repeat chapter or title
[ZOOM] button
• Zoom in or zoom out
CD-A/CD-C/MP3 mode
[ll ] button
• Switches between play and pause
[0 ~ 9] buttons
• Press to enter track or file wish to play
[ l], [l ] buttons
• Move to next or previous disc, track or file
[], [] buttons
• Change discs in CD Changer/MP3 Folder up and
down
[], [] buttons
• Press and hold to fast forward or fast backward
[REPEAT] button
• Repeat disc, track or file
[MIX] button
• Play track or file in a random sequence
[SCAN] button
• Intro scan each file or title for 10 seconds
Page 12
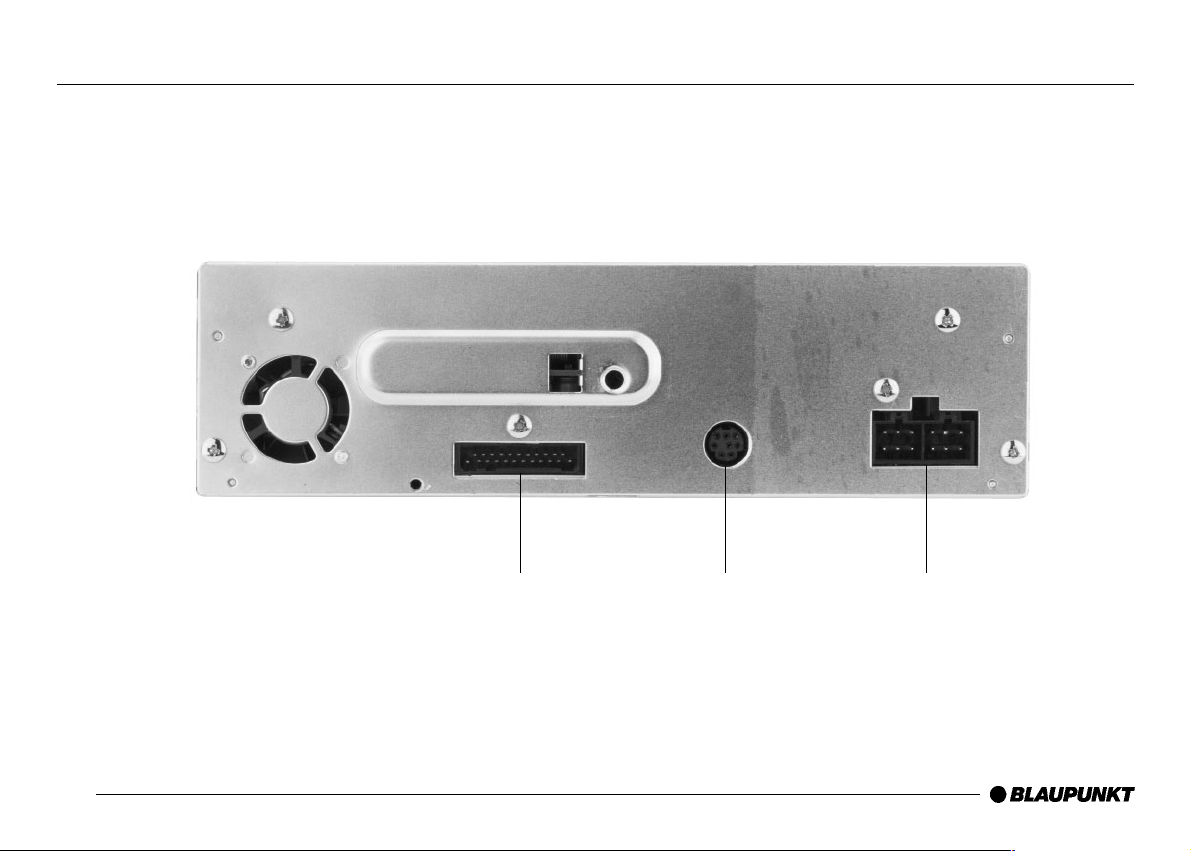
11
Main Unit Connections
Data Bus
Navigation Input/
RC-10 Remote Eye
(Optional)
Power
Page 13
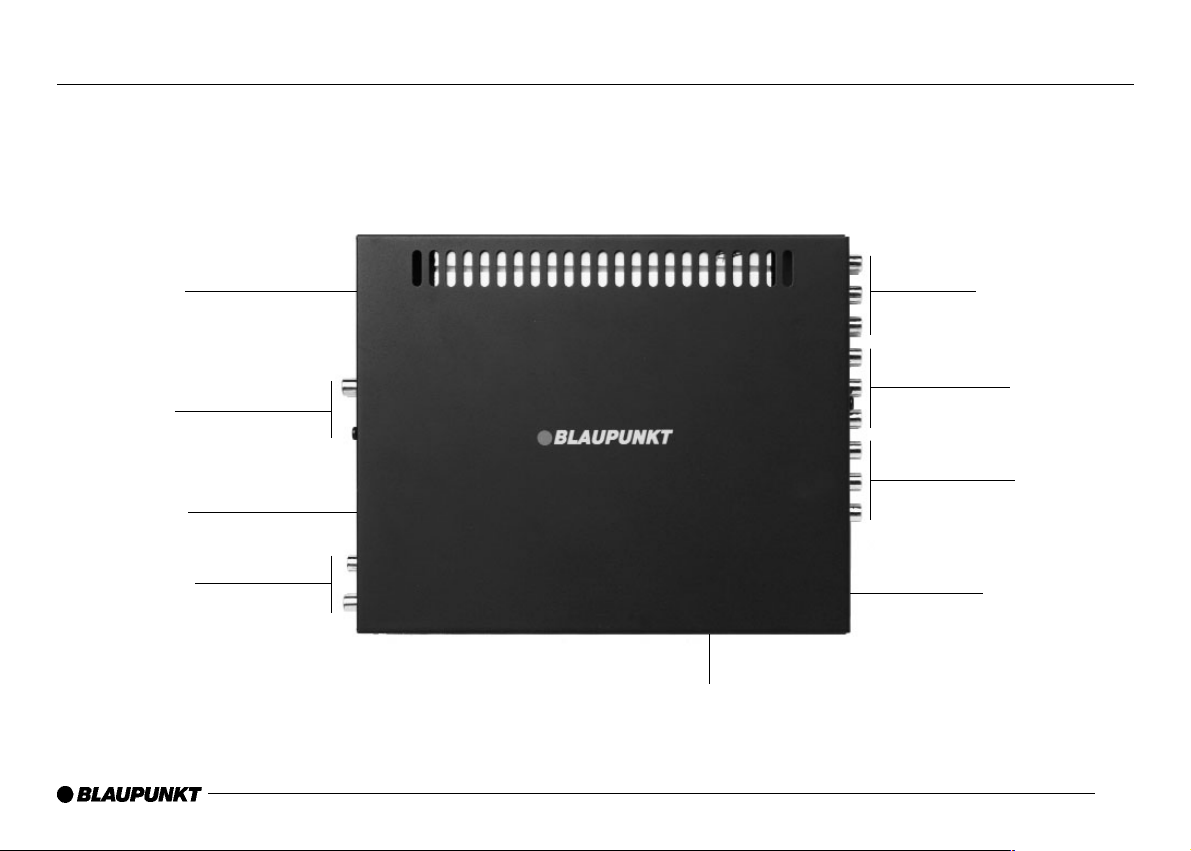
12
Control Unit Connections
Wiring
Harness
CD Changer
Inputs
Data Bus from
Main Unit
Aux 3 Input
Sirius Input or
Blaupunkt Signal
Controller Connection
Audio
Preamp Outputs
Monitor 1 &2
Ouputs
Aux 1 & 2
Inputs
Antenna Input
Page 14
13
General Operation
General Operation
The following are key explanations for common operations.
- “FUNCTION modes will be activated by holding a key for 1 or
more seconds.
- All the OSD and front LCD displays remain visible for 3 seconds.
Turning the Unit ON
Main Unit: press “Blue” Power button
Remote: press power button
- System will initialize, “Welcome” menu will appear.
Note: Unit will return to last used mode (Last Condition Memory)
Power OFF
- Press [POWER] button and hold.
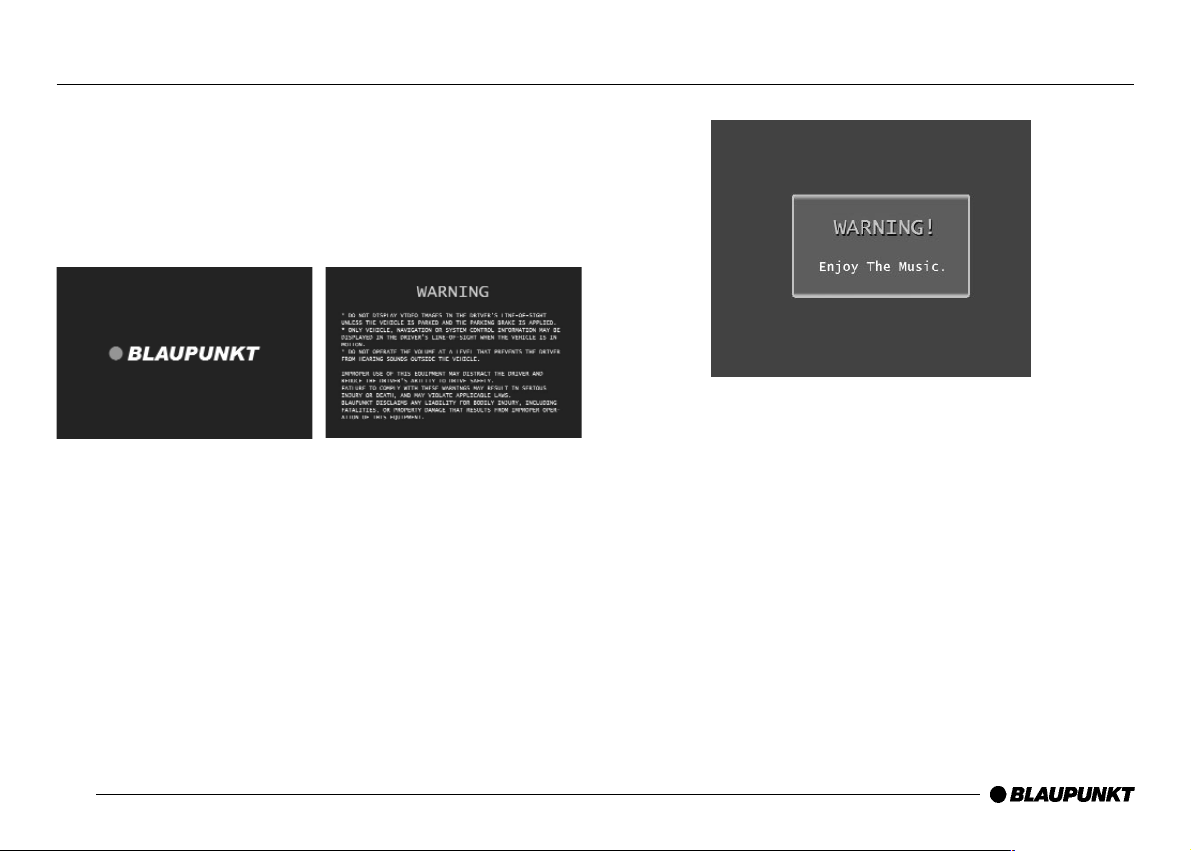
Warning
- Any function that requires driver’s prolonged attention should only
be performed after coming to a complete stop. Video does not
play while driving and once tried, the above warning message will
be displayed and unit will have sound ONLY. Watching the video
may distract the driver from looking ahead of the vehicle and cause
an accident.
- Navigation and audio information can be an exception.
Page 15
14
General Operation
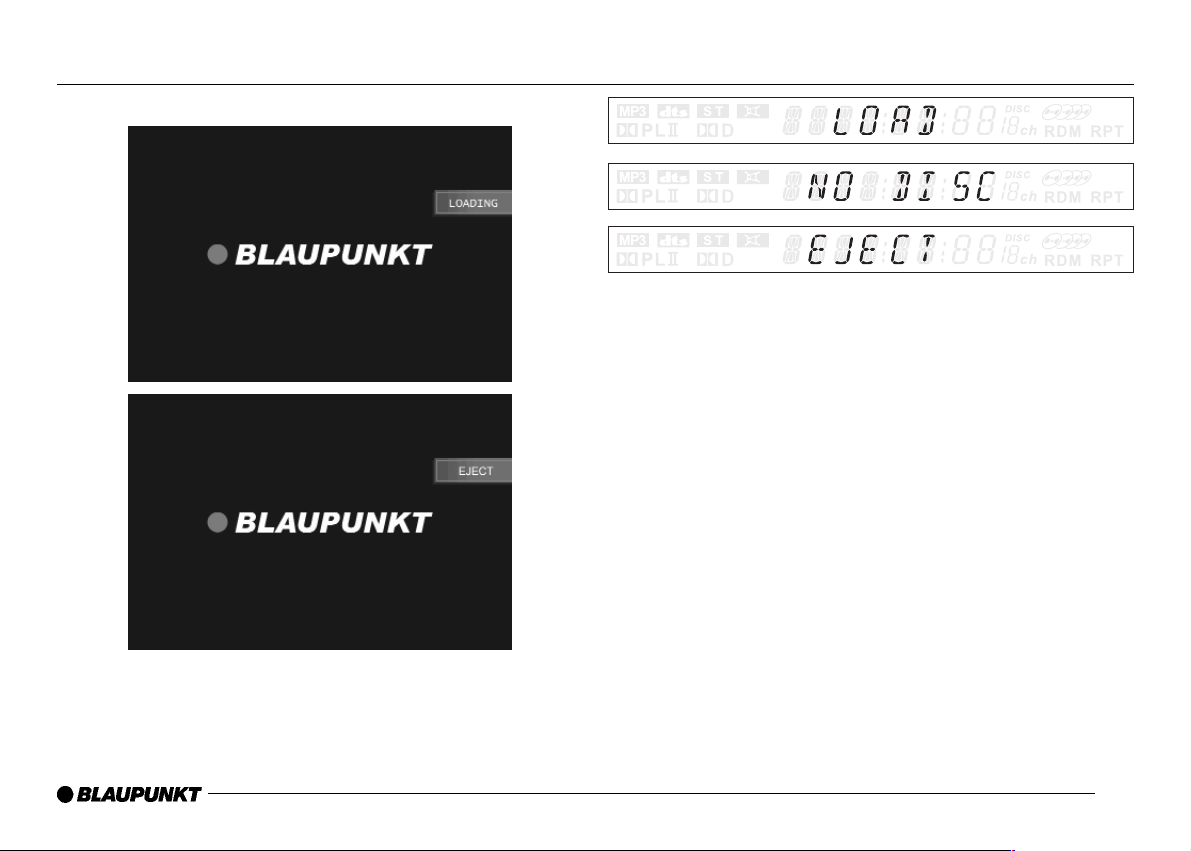
Loading a disc
- Insert a disc into the loading slot. Playback will automatically begin.
- To eject the disc, press EJECT.
Page 16
15
General Operation
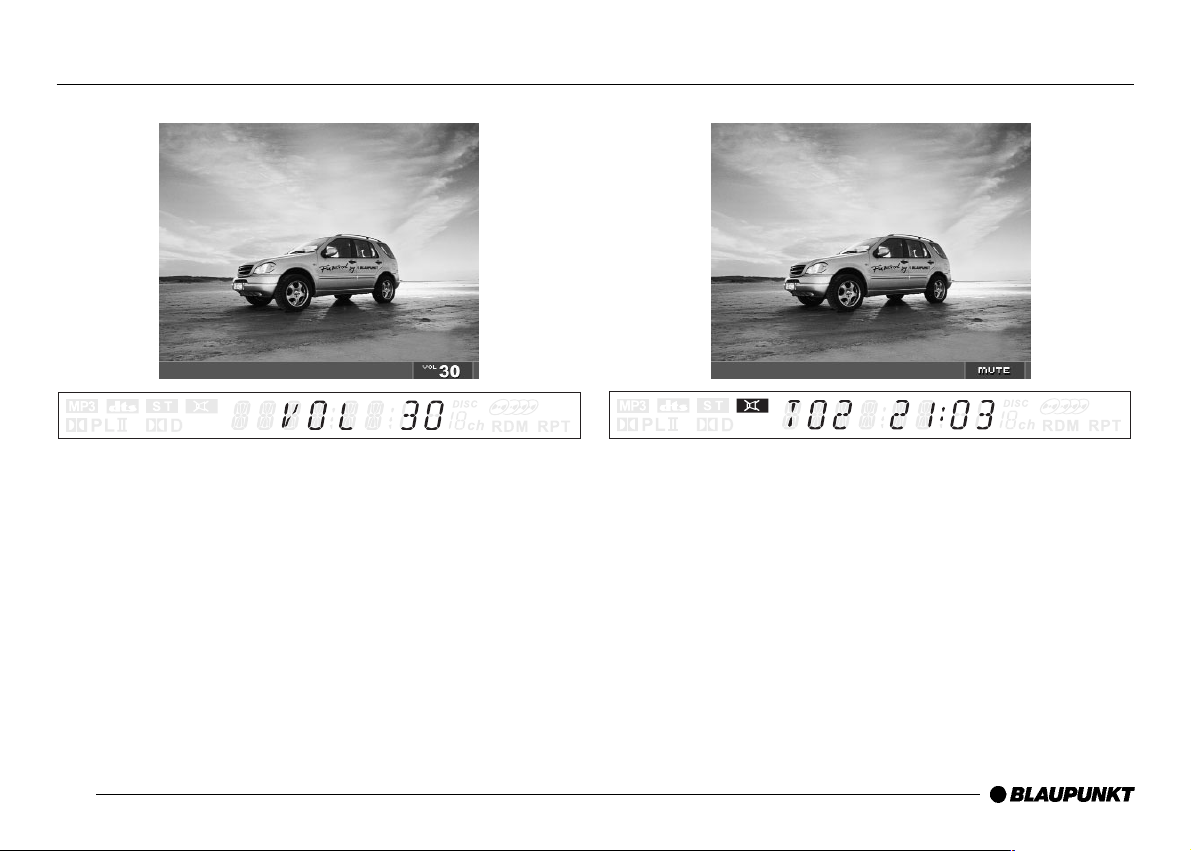
Adjusting the Volume
- Use VOLUME to adjust the sound level
Main unit: press Volume + or – to increase or decrease volume
Remote: press Volume /\ or \/ to increase or decrease volume
Mute
- Activate/Deactivate the mute mode.
Main unit: press POWER key and release (less than 2 seconds)
Remote: press MUTE button
Page 17
16
General Operation
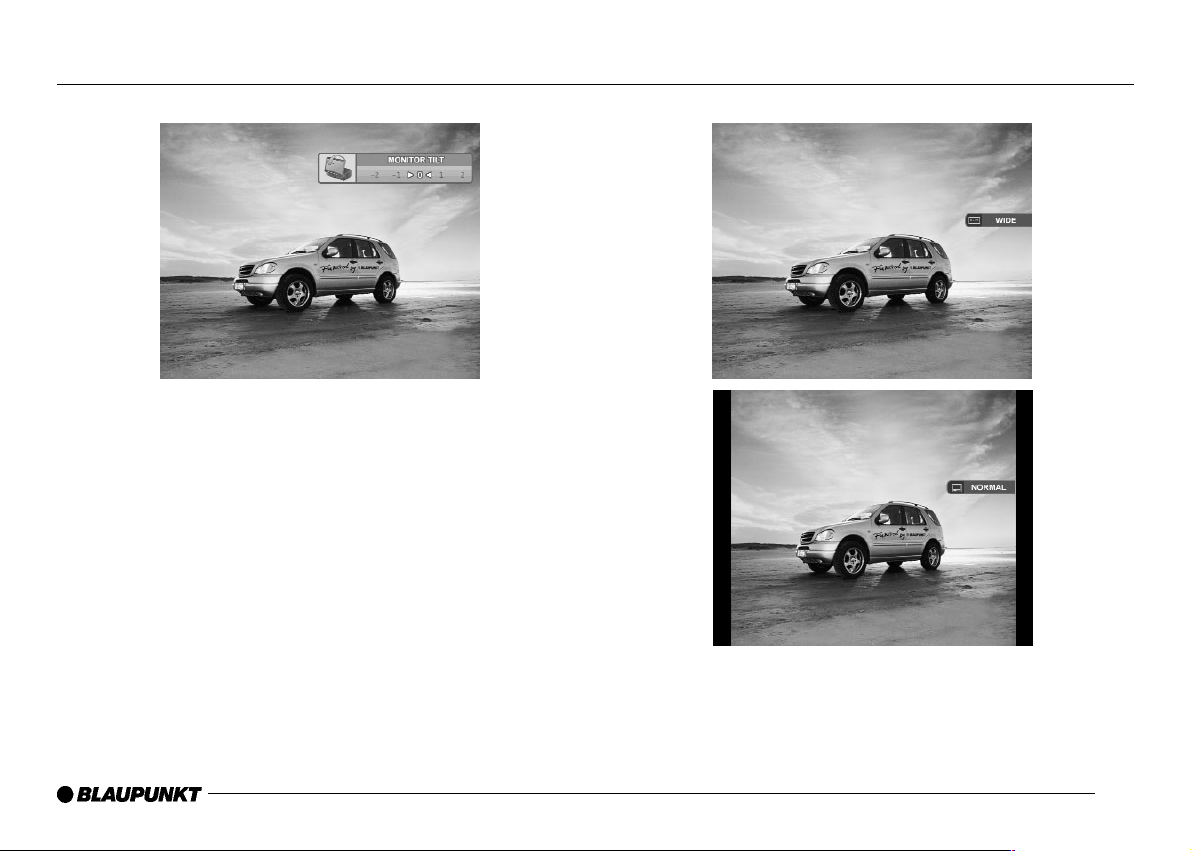
Monitor Tilting
- Main unit : N/A
- Remote: press TILT – or + to adjust screen angle up or down.
Note: To tilt screen to flat position without closing, press FLIP
button. Screen will return to original position when button is
pressed again.
Changing Wide Screen Mode.
- Main unit: N/A
- Remote: press WIDE button repeatedly to switch between WIDE
and NORMAL during video playback.
Note: Screen aspect ratio: WIDE (16:9) ➠ NORMAL (4:3)
Page 18

17
General Operation
Selecting a Source
- Main unit and Remote: press SRC button repeatedly to toggle
through sources.
- Source outline : RADIO > DISC > CD-C > AUX1 > AUX2 > AUX3
Note: CD-C is activated only when a CD-Changer is connected
Audio Mode Control
To select from the previous sound field effects.
- Remote: press SOUND/DSP button.
- A text header will appear at the bottom of the screen.
- Press /\ or \/ to select audio mode.
- Press < or> to edit within audio mode.
Note: Lower right text will show you current status of mode.
See Audio Effect Control for detailed operation
Audio Modes
- S.F.C control : OFF > Studio > Hall > Church > Stadium > Movie
> Club
- Dolby PLII control : OFF > Pro Logic > Music > Movie > Matrix
- 7 Band EQ control : Flat > Classic > Jazz > Rock > Pops > Ballad
> Dance > User
- Balance Control : <Left, Right>
- Fader Control : <Rear, Front>
- Press DSP key to return to main page.
Sound Field Control
7 Band Equalizer
Dolby ProLogic II
Balance
Fader
Page 19

18
General Operation
Down Mix
- Reduces multiple channels to a fewer number of channels.
- Remote: press Down Mix
- Toggles on and off.
Front LCD Color Change
- Changes the color of Front LCD
- Remote: press LCD button repeatedly to toggle between colors.
- Sky Blue > Red > Pink > Yellow > White > Blue > Green >
Rear View Camera Mode
- Once the rear view camera is activated it will turn on automatically
when the car is placed in reverse.
- To activate rear view camera. Press SETUP / toggle SRC to the
USER menu
- Scroll down to EXTRA SETUP press ENTER / select Camera
choose AUX# / press SETUP to exit.
Note: To use rear view independently, press REAR on remote to turn
on and off.
Screen Saver Mode
- The screen saver shown above will appear when 5 minutes elapses
without inserting a disc in disc playing mode (DVD/CD/MP3).
- The screen saver will also appear when no buttons are pressed for
up to 2 hours while playing audio sources
(Radio/CD-A/CD-C/MP3).
Page 20

19
Playback Mode Functions (Radio)
- These are the basic steps necessary to operate the radio
- Press SRC button on the remote or main unit to select the tuner
FM, AM is displayed as text.
- Band selection
- Main unit / Remote: press BAND
• Press BAND repeatedly until desired band is displayed,
(FM1>FM2>FM3>AM1)
Radio Mode
Indication
Preset
Channel &
Frequency
Information
Station
Information
(RDS,
Sirius only)
Radio
Band
Station Name is being displayed on RDS / Sirius model
Page 21

20
Playback Mode Functions (Radio)
- Manual Tuning
• Main unit / Remote: press lor l button(s) to tune up or down
frequencies.
- Seek Tuning
• Main unit: press[ l]or [l ] button(s) and hold.
• Remote: press [] or [] button(s).
Note: The tuner will scan the frequencies until a broadcast strong
enough for a good reception is found.
BAND Selection (FM1 > FM2 > FM3 > AM)
Select and stop automatically when next strong station detected
Page 22

21
Playback Mode Functions (Radio)
- Station Preset Memory
• When you want to keep a station in memory, for quick one button
access.
Select the station desired.
Press and hold the numeric key on front of main unit.
Corresponding number on left of screen will confirm station in
memory.
Note: up to 18 FM stations, 6 for each of the three FM bands, and
6 AM stations can be stored in memory.
- Automatic Memory of Station Preset (Best Station Memory)
Allows you to automatically store the six strongest signals under the
preset tuning keys (1-6)
On the main unit press the BND button and hold.
Note: Using the Best Station Memory may replace stations you have
already saved.
Page 23

22
Playback Mode Functions (DVD)
- To access DVD menu:
- Main unit / Remote: press SRC button to toggle to DVD mode.
Note: By loading a DVD disc mode will change automatically.
DVD will continue to play for back seat viewing when other modes
are selected. (Radio, Aux, CDC)
- Play / Pause
Unit will read and play the DVD automatically when disc is inserted.
press [ll ] button on main unit / Remote to play or pause.
- Searching by Chapter or Track (Skip)
Press [ lorl ] button on the main unit or remote, to easily move to
the beginning of the next chapter.
- Searching by Title / Chapter (Direct move)
• Remote: press GOTO. A cursor will appear at the top of the
screen under the Title menu. Select the number of the title you wish
to play and press enter.
• Press GOTO repeatedly to move cursor (Title> Cursor )
DVD Mode
Indication
Title on
playing
Chapter on
Playing
Time
Elapsed
Sub-title
Indication
Audio Out
Indication
Dolby Digital
Indication
Clock
Playing
Indication
Play/Pause/
FF/FR/Zoom
DTS
Indication
Displays Clock, Dolby Digital, Pro Logic, DTS etc
Press [Display] to see the information through Front LCD
Current time -> Chapter -> Title -> etc.
Page 24

23
Playback Mode Functions (DVD)
- Fast forward or reverse
During playback, press [ or ] button on Remote to Fast forward
or Reverse. F/F or R speed switches each time the button is
pressed (x2, x4, x6, x8). No sound or subtitles are played during
fast-forward or reverse.
Press [] button to return to normal speed.
- Language Mode Change
• Remote: press AUDIO repeatedly to toggle through language options.
Note: this feature is available only if DVD contains soundtracks in
different languages.
- Sub-title Mode Change
• Remote: press S-TITLE repeatedly to toggle through sub-title options.
Play X2
Page 25

24
Playback Mode Functions (DVD)
- Repeat
There are two repeat ranges for the DVD playback. Chapter (C) /
Track (T)
• Press REPEAT on remote, or RPT on head unit.
• The repeat mode switches each time the button is pressed:
Chapter repeat > Title repeat > Repeat off.
- Zoom
There are several magnifications of zoom. Allowing for a close up
view of the DVD.
• Press ZOOM on remote or head unit to zoom in or zoom out.
• Press ZOOM repeatedly to toggle between options:
Normal > x1.5 > x2 > x3
- Angle
Enables use of multi-angle features from supporting DVD.
Press ANGLE on remote.
Press Repeatedly to toggle through available options
ZOOM
Indication
Chapter (C)
Track (T)
Page 26

25
Playback Mode Functions (CD)
- To access CD-A menu:
- Main unit / Remote: press SRC button to toggle to CD-A mode.
Note: By loading a CD-A disc, mode will change automatically.
- Play / Pause
Unit will read and play the CD-A automatically when disc is inserted.
Press [ll ] button on head unit / Remote to play or pause.
- Searching by Track (Skip)
Press [ lorl] button on the main unit or remote, to easily move to
the beginning of the next track.
- Fast forward or reverse
During playback, press [ or] button on Remote to forward or
reverse the disc. F/F or R speed switches each time the button is
pressed (x1.5, x2, x3, x4).
Press [ll ] button to return to normal speed.
CD-A
Mode
Indication
Track on
playing
Time
Elapsed
Visual
Spectrum
Playing Mode
(Play/Pause/
FF/FR/etc.)
Clock
Playing Mode
Indication
(Normal,
Repeat, Mix,
Scan)
Track
Information
CD-Text
Displays clock, Pro Logic etc.
Press [Display] to see the information through Front LCD
(T: Track, Time elapsed)
Page 27

26
Playback Mode Functions (CD)
- Repeat
• Press REPEAT on remote, or RPT on main unit.
• The repeat mode switches each time the button is pressed :
Track repeat on> Track repeat off
- Random
• Press MIX on remote or RDM on main unit.
• The random mode switches each time the button is pressed :
Random on> Random off
- Scan
Use this function to search the song by playing an intro of the disc’s
tracks for 10 seconds, then moving to next track repeatedly.
• Press SCAN on remote, or on main unit.
• The scan mode switches each time the button pressed:
Scan on > Scan off (Normal play).
Page 28

27
Playback Mode Functions (CD Changer)
- To access CD-C menu:
- Main unit / Remote: press SRC button to toggle to CD-C mode.
- Play / Pause
The unit will read and play the title loaded, automatically. Press [ll ]
button on Remote or main unit to play or pause
- Selecting Disc
Press [ ], [] button on Remote or [DISC -/+] button on Front, to
easily move to the disc you would like to play.
- Fast Forward or Reverse
During playback, press [ or ] button on Remote to fast-forward
or reverse the disc. F/F or R speed switches each time the button is
pressed (x1.5, x2, x3, x4).
Press [ll ] button to return to normal speed.
CD-C
Mode
Indication
Track on
playing
Time
Elapsed
Disc number
on Playing
Clock
Playing Mode
Indication
(Normal,
Repeat, Mix,
Scan)
Playing mode
(Play/Pause/
FF/FR etc.)
Track
Information
Disc number
Indicates clock, Pro Logic, CD-Changer mark, DISC number etc.
Page 29

28
Playback Mode Functions (CD Changer)
- Searching by Track (Skip)
Press [ lorl] button on the main unit or remote, to easily move to
the beginning of the next track.
- Repeat
• Press REPEAT on remote, or RPT on main unit.
• The repeat mode switches each time the button is pressed :
Track repeat > Disc repeat >repeat off
- Random
• Press MIX on remote or RDM on the main unit.
• The random mode switches each time the button is pressed:
Disc Random > Changer Random > Random off.
- Scan
Use this function to search for a song by playing an intro of the
disc’s tracks for 10 seconds, then moving to next track repeatedly.
• Press SCAN on remote, or on main unit.
• The scan mode switches each time the button pressed:
Scan on > Scan off (Normal play).
Page 30

29
Playback Mode Functions (MP3 CD)
- To access MP3 menu:
- Main unit / Remote: press SRC button to toggle to CD-A mode.
Note: By loading a MP3 disc, mode will change automatically.
- ID3 TAG will be shown at the bottom of the screen.
Note: ID3 TAG will only appear if added during recording of disc.
- Play / Pause
The unit will read and play the title loaded, automatically. Press [ll ]
button on Remote or head unit to play or pause
- Fast forwarding or Fast reversing
During playback, press [ or ] button on Remote to forward or
reverse. F/F or F/R speed switches each time the button is pressed
(x2, x4, x6, x8).
Press [ll ] button to return to normal speed.
- Searching by File
Press [, ] button on Remote to scroll File UP/DOWN.
- Searching by Folder
Press [, ] button on Remote or [DISC -/+] on Main Unit, to
scroll Folder UP/DOWN.
- Repeat
• Press REPEAT on remote, or RPT on head unit.
• The repeat mode switches each time the button is pressed:
File repeat > Folder repeat > repeat off
MP3
Mode
Indication
File on
playing
Time
Elapsed
Playing mode
(Play/Pause/
FF/FR etc.)
Clock
Playing Mode
Indication
(Normal,
Repeat, Mix,
Scan)
File list
ID3 Tag
Folder
Information
Displays Clock. MP3-CD indicator
Press [Display] to see the information through Front LCD
(F: File, Time elapsed, Folder number)
Page 31

30
Playback Mode Functions (AUX)
- Random
• Press MIX on remote or RDM on main unit.
• The random mode switches each time the button is pressed:
Folder Random > Disc Random > Random off.
- Scan
Use this function to search for a song by playing an intro of the discs
tracks for 10 seconds, then moving to next track repeatedly.
• Press SCAN on remote, or on main unit.
• The scan mode switches each time the button pressed:
Folder Scan > Disc scan > Scan off (Normal play).
- To activate your auxiliary devices (rear view camera, navigation
system etc.)
- Press SRC button on remote or main unit to select AUX mode.
- The Aux mode switches each time the button pressed:
AUX 1 > AUX 2 > AUX 3.
AUX Mode
Page 32

- Press NAVI button on remote or main unit for direct activation of
navigation.
- Press NAVI button again to resume previous mode.
Note: No OSD will be visible on the monitor when the Navigation is
connected through optional RGB connector.
Selecting Set Up Menu
Press SETUP button on Remote.
General Setup
- Setting the Menu
1. Once the Set-Up menu is activated, continue to press SRC and it
will switch the categories in the following sequence: DVD >
AUDIO > SCREEN > USER.
2. Press [ or ] button to activate sub menu.
3. Press [RETURN] button to return to the previous step and press
[SETUP] button to finish.
4. For more of specific way of setting the menu, it will be explained
at each menu separately.
Note: The HELP tab on the bottom of the screen will help navigate
through the menu.
31
Playback Mode Functions (Navigation) Menu Settings
NAVI Mode
Current
mode on
playing
Setup
mode
Indication
Sub menu
Help
Selected Sub
Menu
Selected
Menu
Selected
Item
Page 33

32
Menu Settings
DVD Setup
- Press SETUP button on the remote and press SRC to move to
DVD setup mode.
Note: The DVD setup mode is the initial mode when Set-Up is
activated.
Language Setup
- Press SETUP button on the remote and press SRC to move to
DVD setup mode
- Press [ or ] button to activate Language setup and press the ENTER button.
- Press [ or ] button to select (Audio or Sub-Title) header press
the ENTER button
- Press < or > button to select setting within chosen header. Press
the ENTER button to select.
Note: OTHERS refers to the standard language table in the manual
for other language selections. Input 4-digit code of language you
would like selected. See language code table on page 48.
Display Setup
- Press SETUP button on the remote and press SRC to move to
DVD setup mode.
- Press [ or ] button to activate Display setup and press the
ENTER button.
- Press [ or ] button to select (Aspect, Type or Video STD)
header press the ENTER button.
- Press [ or ] button to select setting within chosen header.
Press the ENTER button to select.
Page 34

33
Menu Settings
Parental Control
- Press SETUP button on the remote and press SRC to move to
DVD setup mode
- Press [ or ] button to activate Parental Control setup and
press the ENTER button.
- Press [ or ] button to select setting within chosen header.
Press the ENTER button to select.
- The following are the viewing level options for DVDs.
• 1. General (G) > 2. Most audiences > 3. Mature young audience
(PG) > 4. Teenage audience (PG-13 ) > 5. Mature teenage
audience > 6. Mature audience (R) > 7. Adult audience ( NC-17 )
> 8. Unrated
Note: When the settings are changed, you will need to input ID
code. (see ID code)
- Not all DVDs provide a parental guide feature.
Audio Setup
Press SETUP button on the remote and press the SRC button
repeatedly to move to Audio setup mode
Input Level
Press SETUP button on the remote and press the SRC button
repeatedly to move to Audio setup mode
- Press [ or ] button to activate the Input Level setup menu and
press the ENTER button.
- Press [ or ] button to select (Aux1, Aux 2 or Aux 3) header
press the ENTER button.
- Press [or] button to select voltage setting within chosen
header. Press the ENTER button to select.
Page 35

34
Menu Settings
Audio Effect Control
Press SETUP button on the remote and press the SRC button
repeatedly to move to Audio setup mode
- Press [ or ] button to activate the Input Level setup menu and
press the ENTER button.
- Press [ or ] button to select (Prologic 2, SFC or Down Mix)
header press the ENTER button.
- Press [or] button to select audio effect setting within chosen
header. Press the ENTER button to select.
- Dolby ProLogic II.
- This mode will allow you to select the following:
OFF > Pro Logic > Music > Movie > Matrix
- Select SFC (Sound Field Control).
- The mode will allow you to select the following:
OFF > Studio > Hall > Church > Stadium > Movie > Club
- Select Down Mix. (for dual zone use)
- The mode when activated, will only play music from the front
speakers.
• Lt / Rt: mix rear surround to the front
• Stereo: stereo down mix
• VSS: virtual surround sound
Page 36

35
Menu Settings
7 Band Equalizer
Press SETUP button on the remote and press the SRC button
repeatedly to move to Audio setup mode
- Press [ or ] button to activate the 7 Band Equalizer setup
menu and press the ENTER button.
- Press [or] button to select preset EQ and press SRC to exit.
- Total of 7 EQ modes are available: 6 preset and 1 user selection.
- Flat > Classic > Jazz > Rock > Pop > Ballad > Dance > User
Note: To adjust any frequency individually, choose your EQ mode
press ENTER.
Press [or] to select your frequency. Then press [ or ] to
adjust the gain (+6 /-6) of the selected frequency. Press SRC to
exit.
Speaker Setup
Press SETUP button on the remote and press the SRC button
repeatedly to move to Audio setup mode
- Press [ or ] button to activate the Speaker Setup menu and
press the ENTER button.
- Press [ or ] button to select (Front, Rear, Center, Subwoofer)
header press the ENTER button.
- Press [or] button to select speaker size within chosen header.
Press the ENTER button to select.
Note: Front speaker setup does not support “None” since all the
vehicles are equipped with front speakers. Large/Small indicates the
physical size of the speaker being used. Selecting SMALL will filter
lower frequencies to protect it. Selecting LARGE will allow full range
to the indicated speaker.
Page 37

36
Menu Settings
Speaker Delay Setup
Press SETUP button on the remote and press the SRC button
repeatedly to move to Audio setup mode
- Press [ or ] button to activate the Speaker Delay menu and
press the ENTER button.
- Press [ or ] button to select (Rear, Center,) header press the
ENTER button.
- Press [or] button to select delay for chosen speaker. Press the
ENTER button.
Speaker Gain Setup
Press SETUP button on the remote and press the SRC button
repeatedly to move to Audio setup mode
- Press [ or ] button to activate the Speaker Gain menu and
press the ENTER button.
- Press [ or ] button to select (Front R/L, Rear R/L, Center,
Subwoofer) header press the ENTER button.
- Press [or] button to select + or - gain for chosen speaker.
Press the ENTER button.
Page 38

37
Menu Settings
Dynamic Range Setup
Press SETUP button on the remote and press the SRC button
repeatedly to move to Audio setup mode
- Press [ or ] button to activate dynamic range setup and press
[ENTER] button.
- Press [or] button to select + or – dynamic range.
Note: The level varies upon the sequence following: OFF, 1/8, 2/8,
3/8, 4/8, 5/8, 6/8, 7/8, Full.
Test Tone
Press SETUP button on the remote and press the SRC button
repeatedly to move to Audio setup mode
- Press [ or ] button to activate Test Tone setup and press
[ENTER] button.
- This will create a test tone for any selected speaker.
Use [ or ], [or] to navigate speaker configuration
Note: Be sure to have the center, rear and subwoofer set to large or
small when testing. This can be checked in the SPEAKER SETUP
menu. (See page 35)
Screen Setup
Press SETUP button on the remote and press the SRC button
repeatedly to move to Screen setup mode
Page 39

38
Menu Settings
Monitor Tilt
Press SETUP button on the remote and press the SRC button
repeatedly to move to Screen setup mode
- Press [/\ or \/ ] button to activate the Tilt menu and press the
ENTER button.
- Press [/\ or \/ ] button to select (Tilt, Position) header press the
ENTER button.
- Press [< or >] button to select setting Press the ENTER button.
Note: Tilt –2 cannot be chosen when unit is in backward position.
Screen Control
Press SETUP button on the remote and press the SRC button
repeatedly to move to Screen setup mode
- Press [ or ] button to activate the Control menu and press the
ENTER button.
- Press [ or ] button to select (Brightness, Color, Contrast, Tint,
Dimmer) header press the ENTER button.
- Press [or] button to select setting Press the ENTER button.
Page 40

39
Menu Settings
Extra Setup
Press SETUP button on the remote and press the SRC button
repeatedly to move to USER setup mode
ID Code Setup
Protects your radio from theft by having an ID code. The radio will
ask for the code if disconnected from battery power.
Press SETUP button on the remote and press the SRC button
repeatedly to move to USER setup mode
- Press [ or ] button to activate ID code mode and press the
ENTER button.
Note: Parental guide with DVD mode will ask for ID code.
Images Manager
Press SETUP button on the remote and press the SRC button
repeatedly to move to USER setup mode
- Press [ or ] button to activate Image manager mode and
press [ENTER] button.
Page 41

40
Menu Settings
- Press [ or ] button to select (Preview, IMG Swing) header
press the ENTER button.
- Press [or] button to select setting Press the ENTER button.
Note: User can select the image to use as wallpaper for playback
modes Radio, MP3, Audio CD, and CD-C.
- Preview IMG 1~7 and select one of them as a wallpaper (Image
Swing should be OFF for this operation).
Note: To remove stored images Select CLEAR then the confirmation
message pops up to clear image. Upon confirmation, the selected
image can be removed and the screen shows a black window.
Removed image cannot be shown on image swing.
Page 42

41
Menu Settings
- Select image swing function.
Note: With the Image Swing function ON the wallpaper will change
after every song played on Audio-CD, MP3 mode. In Radio mode
the wallpaper will change every 5 minutes. Up to 7 images can be
loaded.
WallPaper Download
- This unit supports custom wallpaper by downloading them via a
CD-ROM.
- Connect to http://www.blaupunktusa.com, to download the correct
software.
-
Pictures automatically download when image CD is inserted into the unit.
Note: When placing your wallpaper images on a CD-ROM (minimum
of three required), you will also need to place a 20 MB (minimum)
text file on the CD (this should be in a folder named DUMMY.TXT).
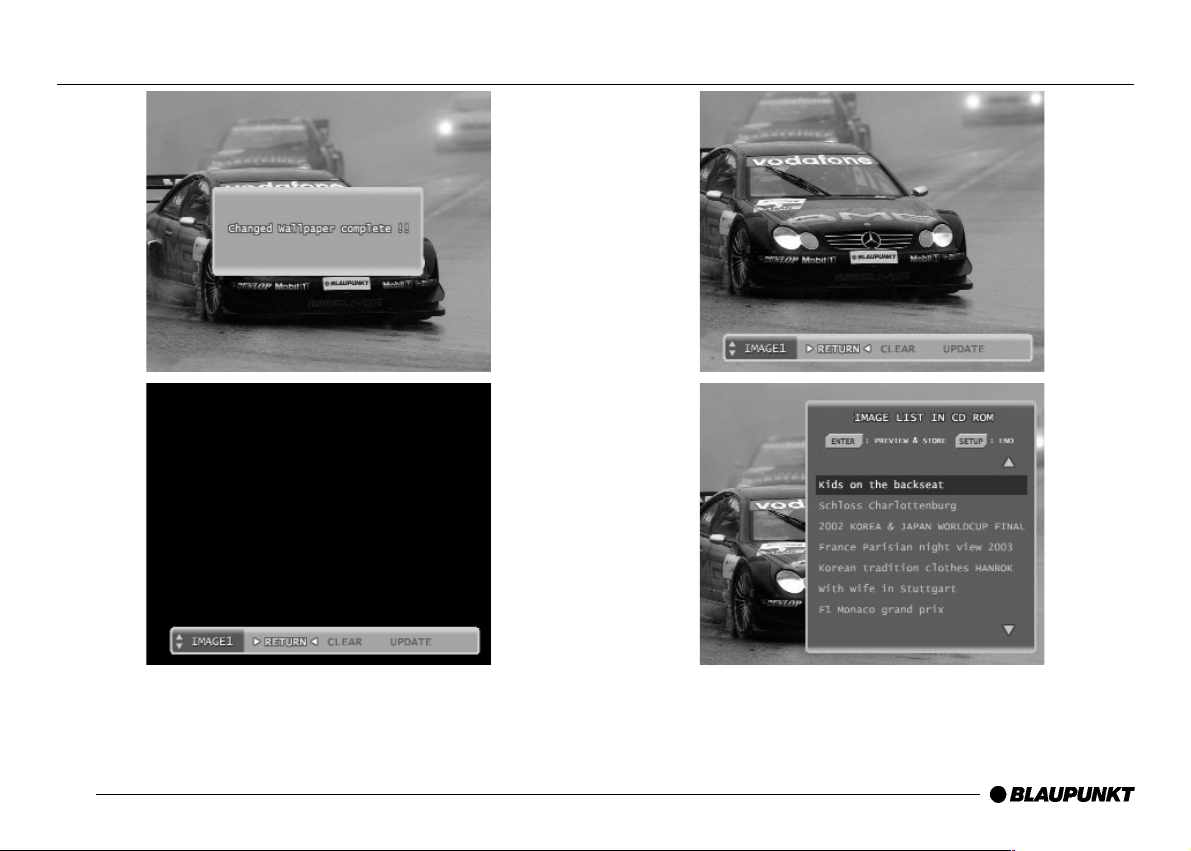
-
Press [ENTER] on the remote. To bring up the menu (as seen
above) and select the image number to PREVIEW, CLEAR, UPDATE
- Press [ or ] on the remote to toggle between images.
Upgrade Software
- Connect to http://www.blaupunktusa.com to download software
upgrades.
Note: When placing software upgrades on a CD-ROM to transfer to
the main unit, you will also need to place a 20 MB (minimum) text file
on the CD (this should be in a folder named DUMMY.TXT).
Page 43

42
Menu Settings
- Select CLEAR to delete current image from memory.
Page 44
43
Menu Settings
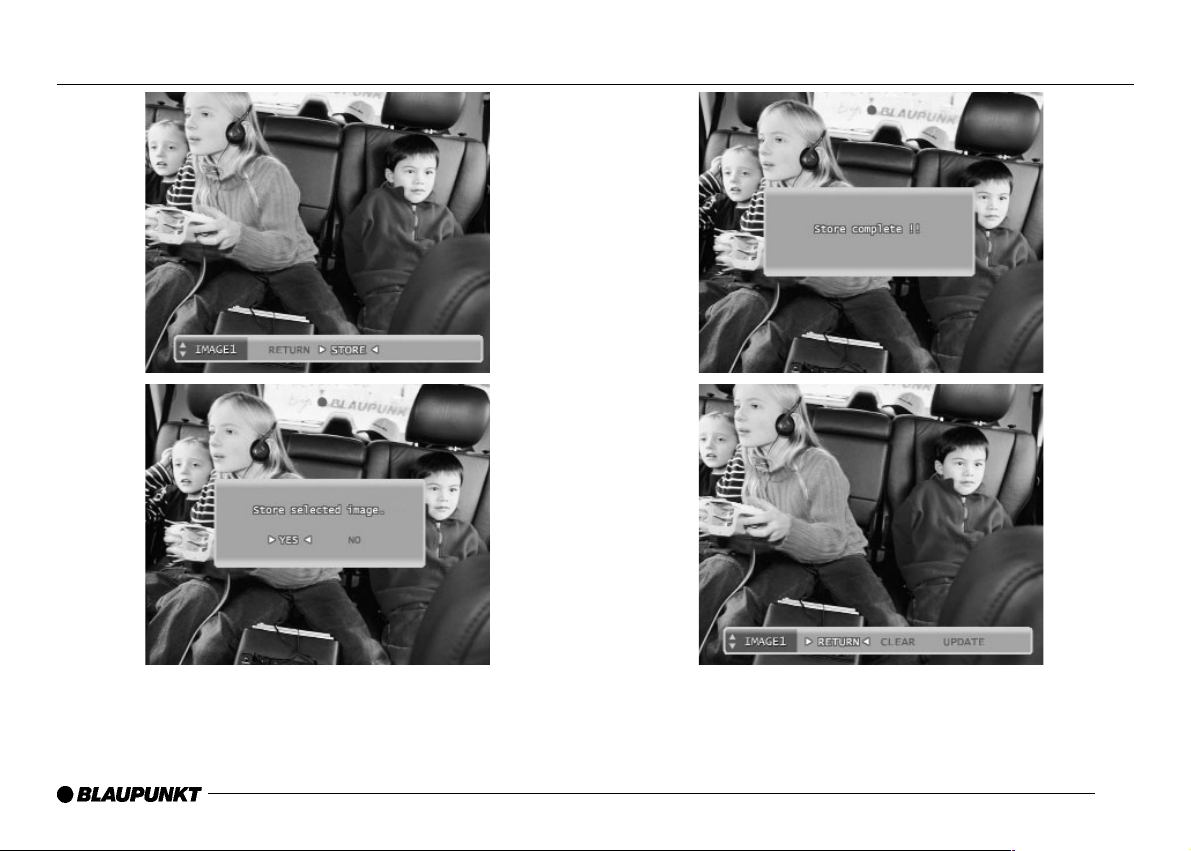
- Select UPDATE to choose current image and store as wallpaper.
Page 45
44
Menu Settings
- Select UPDATE to choose current image and store as wallpaper.
- Once stored, the image will be displayed on the monitor as
wallpaper. You may select and store up to seven images.
- Press RETURN to finish and return to initial mode.
Note: When finished, the CD-ROM will eject automatically.
Page 46

Wallpaper Change
- In order to change the wallpaper in playback mode.
- Main unit: N/A
- Remote: press DISP/WALLPAPER. This will toggle through all
saved images.
Adjust Date & Time
Press SETUP button on the remote and press the SRC button
repeatedly to move to USER setup mode
- Press [ or ] button to activate Adjust Date & Time mode and
press [ENTER] button.
- Press [ or ] button to select (Year, Month, Day, Hour, Min)
header press the ENTER button.
- Press [or] button to select setting Press the ENTER button.
Note - In order for the system memory to function, Date and
Time information must be entered when the system is installed
and turned on.
45
Menu Settings
Page 47

46
Menu Settings
External Source Setup
Press SETUP button on the remote and press the SRC button
repeatedly to move to USER setup mode
Press [ or ] button to select External Source Setup mode and
Press the [ENTER] button.
- Press [ or ] button to select (Navi, Camera, Reverse,
Monitor 1, Monitor 2) header; press the ENTER button.
- Press [or] button to select setting. Press the ENTER button.
- Select Navigation input.
- Select rear view camera input.
- Select to reverse the captured view by the rear view camera.
Page 48

47
Menu Settings
- Select Aux1, Aux2 or Aux3 input ON/OFF.
- Select AUTO to apply the video source selected at the main unit.
- Select Monitor 1 and choose one of the following:
(DISC/RADIO/Aux1/Aux2/Aux3) for independent monitor 1 source,
press the ENTER button.
Note: If no input is connected to Aux1, Aux2 or Aux3 turn OFF.
Press [ or ] button to select Factory Default Setting and press
the ENTER button.
Page 49

48
DVD Language Code Table
6565 Afar
6566 Abkhazian
6570 Afrikaans
8381 Albanian
6577 Amharic
6582 Arabic
6583 Assamese
6569 Avestan
6588 Aymara
6590 Azerbaijani
6665 Bashkir
6985 Basque
6669 Belarusian
6678 Bengali
6672 Bihari
6673 Bislama
6679 Tibetan
6683 Bosnian
6682 Breton
6671 Bulgarian
7789 Burmese
6765 Catalan
6783 Czech
6772 Chamorro
6769 Chechen
9072 Chinese
6785 Church Slavic
6786 Chuvash
7587 Cornish
6779 Corsican
6789 Welsh
6783 Czech
6865 Danish
6869 German
7876 Dutch
6890 Dzongkha
6976 Greek
6978 English
6979 Esperanto
6984 Estonian
6985 Basque
7079 Faroese
7065 Persian
7074 Fijian
7073 Finnish
7082 French
7089 Frisian
7565 Georgian
6869 German
7168 Gaelic
7165 Irish
7176 Gallegan
7186 Manx
6976 Greek
7178 Guarani
7185 Gujarati
7265 Hausa
7387 Hebrew
7290 Herero
7273 Hindi
7279 Hiri Motu
7282 Croatian
7285 Hungarian
7289 Armenian
7383 Icelandic
7385 Inuktitut
7369 Interlingue
7365 Interlingua
7378 Indonesian
7375 Inupiaq
7383 Icelandic
7384 Italian
7487 Javanese
7465 Japanese
7576 Kalaallisut
7578 Kannada
7583 Kashmiri
7575 Kazakh
7577 Khmer
7573 Kikuyu
8287 Kinyarwanda
7589 Kirghiz
7586 Komi
7579 Korean
7574 Kuanyama
7585 Kurdish
7679 Lao
7665 Latin
7686 Latvian
7678 Lingala
7684 Lithuanian
7666 Letzeburgesch
7775 Macedonian
7772 Marshall
7776 Malayalam
7773 Maori
7782 Marathi
7783 Malay
7775 Macedonian
7771 Malagasy
7784 Maltese
7779 Moldavian
7778 Mongolian
7773 Maori
7783 Malay
7865 Nauru
7886 Navajo
7882 Ndebele, South
7868 Ndebele, North
7871 Ndonga
7869 Nepali
7876 Dutch
7879 Norwegian
7878
Norwegian Nynorsk
7866
Norwegian Bokma'l
7889 Chichewa
7967 Occitan
7982 Oriya
7977 Oromo
7983 Ossetian
8065 Panjabi
7065 Persian
8073 Pali
8076 Polish
8084 Portuguese
8083 Pushto
8185 Quechua
8277
Raeto-Romance
8279 Romanian
8278 Rundi
8285 Russian
8371 Sango
8365 Sanskrit
8382 Serbian
8372 Croatian
8373 Sinhalese
8375 Slovak
8376 Slovenian
8369 Northern Sami
8377 Samoan
8378 Shona
8368 Sindhi
8379 Somali
8384
Sotho, Southern
6983 Spanish
8381 Albanian
8367 Sardinian
8383 Swati
8385 Sundanese
8387 Swahili
8386 Swedish
8489 Tahitian
8465 Tamil
8484 Tatar
8469 Telugu
8471 Tajik
8476 Tagalog
8472 Thai
6679 Tibetan
8473 Tigrinya
8479 Tonga
8478 Tswana
8483 Tsonga
8475 Turkmen
8482 Turkish
8487 Twi
8571 Uighur
8575 Ukrainian
8582 Urdu
8590 Uzbek
8673 Vietnamese
8679 Volapumk
6789 Welsh
8779 Wolof
8872 Xhosa
7437 Yiddish
8979 Yoruba
9065 Zhuang
9085 Zulu
Code Language Code Language Code Language Code Language Code Language Code Language
Page 50

Robert Bosch Corporation warrants new Blaupunkt car audio and video
products it distributes in the United States through authorized Blaupunkt
dealers, or which are imported as original vehicle equipment by the
automobile manufacturer, to be free from defects in material and
workmanship, in accordance with the following: For twelve (12) months
after delivery to you, the original consumer purchaser, we will repair or at
our option replace at no charge to you any car audio and video product
which, under normal conditions of use and service, proves to be defective in
materials or workmanship. However, this warranty does not cover expenses
incurred in the removal or reinstallation of any car audio and video product,
whether or not proven defective, and does not cover products not
purchased from an authorized Blaupunkt dealer. This warranty is limited to
the original consumer purchaser and is not transferable. Repaired and
replacement car audio and video products shall assume the identity of the
original for purpose of this warranty and this warranty shall not be extended
with respect to such products. To obtain performance of this warranty,
contact the nearest Blaupunkt authorized repair facility or our nearest office.
A dated purchase receipt or other proof that the product is within the
warranty period will be required in order to honor your claim. Carefully pack
the unit and ship prepaid to the servicing location. For further information,
write to the Robert Bosch Corporation, 2800 South 25th Avenue,
Broadview, Illinois, 60155, attention Blaupunkt Customer Service
Department or call 1-800-266-2528. Specifically excluded from this
warranty are failures caused by misuse, neglect, abuse, improper operation
or installation, dropping or damaging, unauthorized service or parts, or
failure to follow maintenance instructions or perform normal maintenance
activities. Normal maintenance activities for car audio and video products
include but are not limited to cleaning and other minor maintenance activities
and adjustments that are outlined in the owner's manual or that are normally
required for continued proper operation. Also excluded from this warranty is
the correction of improper installation and the elimination of any external
electromagnetic interference. This warranty sets forth your exclusive
remedies with respect to the products covered by it. We shall not be liable
for any incidental, consequential, special or punitive damages arising from
the sale or use of any Blaupunkt car audio and video products, whether
such claim is in contract or tort. No attempt to alter, modify, or amend this
warranty shall be effective unless authorized in writing by an officer of
Robert Bosch Corporation. THIS WARRANTY IS IN LIEU OF ALL OTHER
WARRANTIES OR REPRESENTATIONS, EXPRESS OR IMPLIED,
INCLUDING ANY WARRANTY IMPLIED BY LAW, WHETHER FOR
MERCHANTABILITY OR FITNESS FOR A PARTICULAR PURPOSE OR
OTHERWISE AND SHALL BE EFFECTIVE ONLY FOR THE PERIOD
THAT THIS EXPRESS WARRANTY IS EFFECTIVE. In the event any
provision, or any part or portion of this warranty shall be held invalid, void or
otherwise unenforceable, such holding shall not affect the remaining part or
portions of that provision or any other provision hereof.
NOTICE TO CALIFORNIA OWNERS: If your Blaupunkt car audio product
needs warranty repair service and there is no authorized service center
reasonably close to you, you can return the defective unit to the dealer from
whom you purchased it, or you can return it to any dealer who sells
Blaupunkt car audio and video products. The dealer may, at the dealer's
option, replace, repair or refund the purchase price for any Blaupunkt car
audio and video products which prove defective under conditions of normal
use. If the dealer fails to repair, replace, or partially refund your money, you
may take your Blaupunkt car audio and video product to any repair shop
and they can repair your unit at our expense unless the repair cost exceeds
the depreciated value of the unit, but you must contact Blaupunkt to receive
authorization to do this before your car audio and video product is repaired.
ROBERT BOSCH CORPORATION
BLAUPUNKT CUSTOMER SERVICE
2800 SOUTH 25TH AVENUE
BROADVIEW, IL 60155
TEL: 1-800-266-2528
49
Limited Warranty Information (United States Only)
Page 51

50
Page 52

Robert Bosch Corporation
Sales Group - Blaupunkt Division
2800 S. 25th Avenue, Broadview, Illinois 60155 U.S.A.
www.blaupunktusa.com
Copyright 2003 by the Robert Bosch Corporation
Blaupunkt and the blue dot are registered trademarks of Blaupunkt GmbH.
No portion of this work may be reproduced in any form without the written consent of the Robert Bosch Corporation Printed in Korea (9/03)
Page 53

Chicago IVDM-7002
Installation & Connections
Robert Bosch Corporation
Sales Group - Blaupunkt Division
2800 S. 25th Avenue, Broadview, Illinois 60155 U.S.A.
www.blaupunktusa.com
Copyright 2003 by the Robert Bosch Corporation
Blaupunkt and the blue dot are registered trademarks of Blaupunkt GmbH.
No portion of this work may be reproduced in any form without the written
consent of the Robert Bosch Corporation
Printed in Korea (9/03)
Before attempting to connect, or operate this product, please read the manual completely.
TO REDUCE THE RISK OF
ELECTRIC SHOCK, DO
NOT REMOVE THE
COVER (OR BACK).
NO USER-SERVICEABLE PARTS ARE INSIDE.
REFER SERVICING TO QUALIFIED SERVICE PERSONNEL.
CAUTION: THIS UNIT HAS BEEN ADAPTED WITH AN
INVISIBLE CLASS 1 LASER BEAM WHICH CAN CAUSE
HAZARDOUS RADIATION EXPOSURE IF DIRECTED. BE SURE
TO OPERATE THE UNIT CORRECTLY AS INSTRUCTED.
Caution:
This product satisfies FCC regulations when shielded cables and
connectors are used to connect the unit to other equipment. To
prevent electromagnetic interference with electric appliances, such
as radios and televisions, use shielded cables and connectors for
connections.
FCC NOTE (for U.S.A):
This equipment has been tested and found to comply with the limits
for a Class B digital device, pursuant to Part 15 of the FCC rules.
These limits are designed to provide reasonable protection against
harmful interference in a residential installation. This equipment
generates, uses and can radiate radio frequency energy and, if not
installed and used in accordance with the instructions, may cause
harmful interference to radio or television reception, which can be
determined by turning the equipment off and on, the user is
encouraged to try to correct the interference by one or more of the
following measures.
• Reorient or relocate the receiving antenna.
• Increase the separation between the equipment and receiver.
• Connect this equipment into an outlet on a circuit different form
that to which the receiver is connected.
• Consult the dealer or an experienced radio/TV technician for help.
This class B digital apparatus
meets all requirements of the
Canadian lnterference - Causing
Equipment Regulations.
WARNING
To reduce the risk of fire or shock hazard, do not expose this DVD
player to rain or moisture.
CAUTION
THIS PRODUCT UTILIZES A LASER. USE OF CONTROLS OR
ADJUSTMENTS OR PERFORMANCE OF PROCEDURES OTHER
THAN THOSE SPECIFIED HEREIN MAY RESULT IN
HAZARDOUS RADIATION EXPOSURE. DO NOT OPEN COVER
AND DO NOT REPAIR YOURSELF. REFER SERVICING TO
QUALIFIED PERSONNEL.
Caution
Install the control unit away from moisture, heat sources, and places
exposed to strong magnetic or electric fields. When condensation
forms inside the player or on the surface of the disc due to sudden
temperature changes from cold to hot, the player may not operate
correctly. If this occurs, leave the player at room temperature for
about 2 hours or until the player becomes operational.
Warning
Never disassemble the main unit in any way. Electric shock or
exposure to an invisible laser beam may result. Do not look inside
the DVD player.
Installation
Install the in-dash unit so that the driver cannot view video while the
vehicle is in motion. The driver should park the vehicle in a safe area
and apply the parking brake before viewing video on the monitor.
Batteries
The batteries used in the remote control contain the chemical that
are harmful to the environment. Properly dispose of batteries.
Handling the Main Unit
For safety reasons,
• Do not use benzene or other solvents when cleaning.
• Wipe the main unit with a soft cloth.
This symbol indicates dangerous voltage
inside the product that presents a risk of
electric shock or personal injury.
This symbol indicates
important instructions
accompanying the product.
CLASS 1 LASER PRODUCT
KLASSE 1 LASER PRODUKT
LUOKAN 1 LASER LAITE
KLASS 1 LASER APPARAT
Page 54

Chicago IVDM-7002
Main Unit & Control Unit Connections
Main Unit
Caution
When connecting the data cable to the
back of the main unit, it must be connected
as shown. Incorrect connection will cause
permanent damage to the unit.
12 V Constant
(Yellow)
FILTER &
FUSE BOX
Ground
(Black)
12 V Switched
(Red)
Illumination
(Orange)
Parking Brake (–)
(Green)
System Remote (Turn-On)
Max. 100mA
(Blue)
Blaupunkt CDC-A08 Input
Line Input
Control Unit
Data Bus
Page 55

Chicago IVDM-7002 Control Unit
Input & Output Connections
(Yellow)
Fuse
12 V Constant
*Caution
• DO NOT connect any speaker wires to the metal
body or chassis of the vehicle.
• DO NOT connect the speaker common (-) wires
to each other.
• Connect each speaker wire directly to each
speaker terminal.
• All speaker common (-) wires must remain
floating. ie - no common connections or
connection to vehicle ground.
• Connect each pair of speaker leads only to a
single speaker (or speaker system) that has an
impedance of at least 4 ohms, as well as a
50-watt power-handling capability.
• DO NOT connect speaker leads to any inputs on
external amplifiers. This will cause damage to
the internal amplifier of this unit.
(Black)
(Brown/White)
(Purple/White)
(Orange)
(Blue)
(Blue/White)
(Black)
(Black/White)
(White)
(White/Black)
(Gray)
(Gray/Black)
(Green)
(Green/Black)
Ground
Twin CDC Remote (Turn-On)
Max. 100mA
Reverse (+)
Navi-Mute (–)
Power Antenna
Max. 100mA
System Remote (Turn-On)
Max. 100mA
+
Center Speaker*
–
+
Front Left Speaker*
–
+
Front Right Speaker*
–
+
Rear Left Speaker*
–
Control Unit
Sirius input or
Blaupunkt Signal
Controller Connection
Sirius Cable Required (7 607 001 606)
1m 13 Pin Male/Male DI N Cable
(Purple)
(Purple/Black)
Antenna Input
+
Rear Right Speaker*
–
Center
Rear Right
Front Right
Audio
Preamp
Front Left
Rear Left
Subwoofer
Monitor 2 Video Output
Monitor 2 Audio Output
Aux 2 Video Input
Aux 2 Audio Intput
Aux 1 Audio Input
Aux 1 Video Input
Monitor 1 Audio Output
Monitor 1 Video Output
AUX 3 Video Input
Outputs
AUX 3 Audio Input
Page 56

Chicago IVDM-7002
Main Unit to DX-N/DX-V Navigation Connections
Navigation Audio Kit - (7 607 001 607)
Kit includes:
• RGB/RC-10 Adapter Cable (7 607 001 609)
• 4 meter RGB Extension Cable (7 607 001 602)
• Speaker Output Connector (8 604 492 515)
• Speaker (8 618 842 586)
• Navi Mute Connector (7 607 001 608)
Chicago IVDM-7002 Main Unit
DX-N/DX-V Navigation Unit
RGB/RC-10 Adapter Cable
Remote Mounted IR Sensor
(RC-10 Compatible)
Speaker Output Connector
(Pin 5 & 6)
4m RGB Extension Cable
Speaker
Navi Mute Connector
(Pin 4, Connects to orange wire
of Control unit)
 Loading...