

Page 1
Manual
ISD-RG1200
Radar Alarm Guard
Page 2

Language Index
ISD-RG1200 | Manual
EN MANUAL 2
DE BEDIENUNGSANLEITUNG 6
ES MANUAL DE USUARIO
FR MODE D'EMPLOI 16
IT MANUALE 21
NL HANDLEIDING
DA
BRUGERVEJLEDNING
11
26
31
Radar Alarm Guard
Page 3

English
Radar Alarm Guard - ISD-RG1200 Manual
English
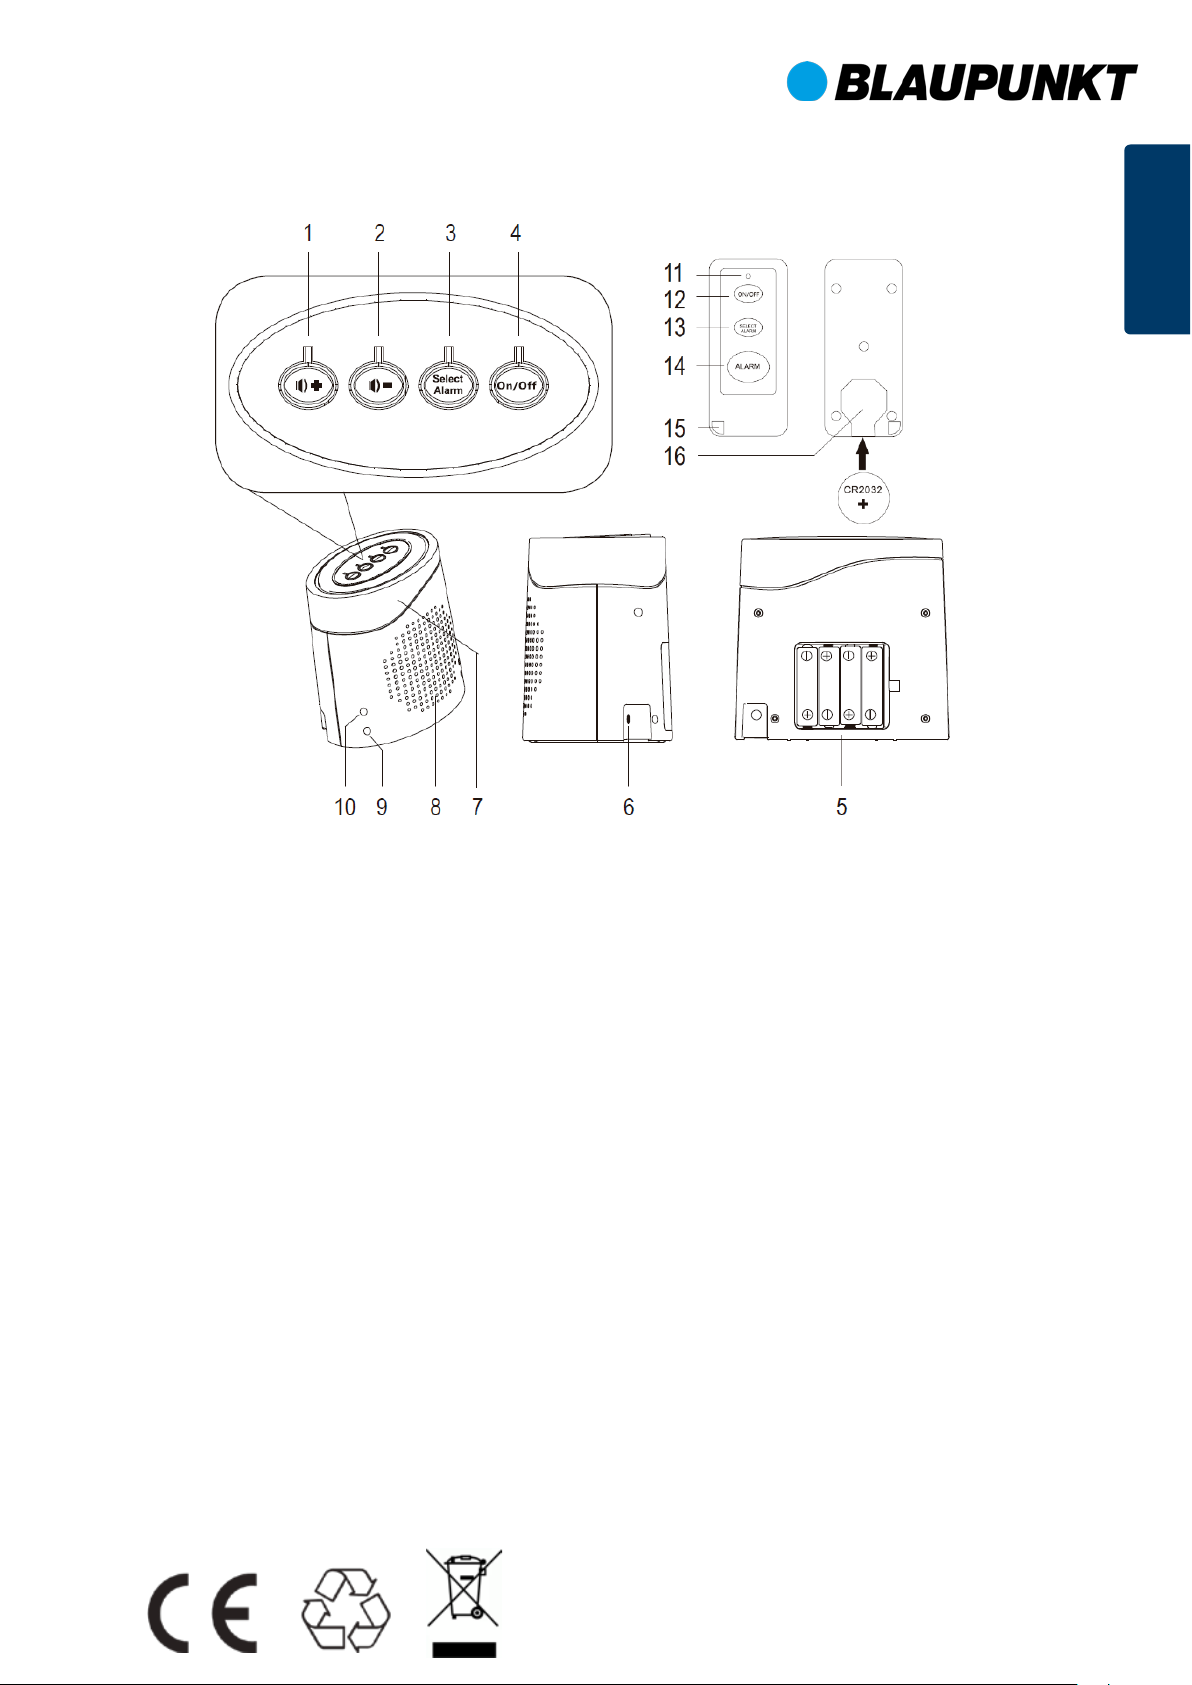
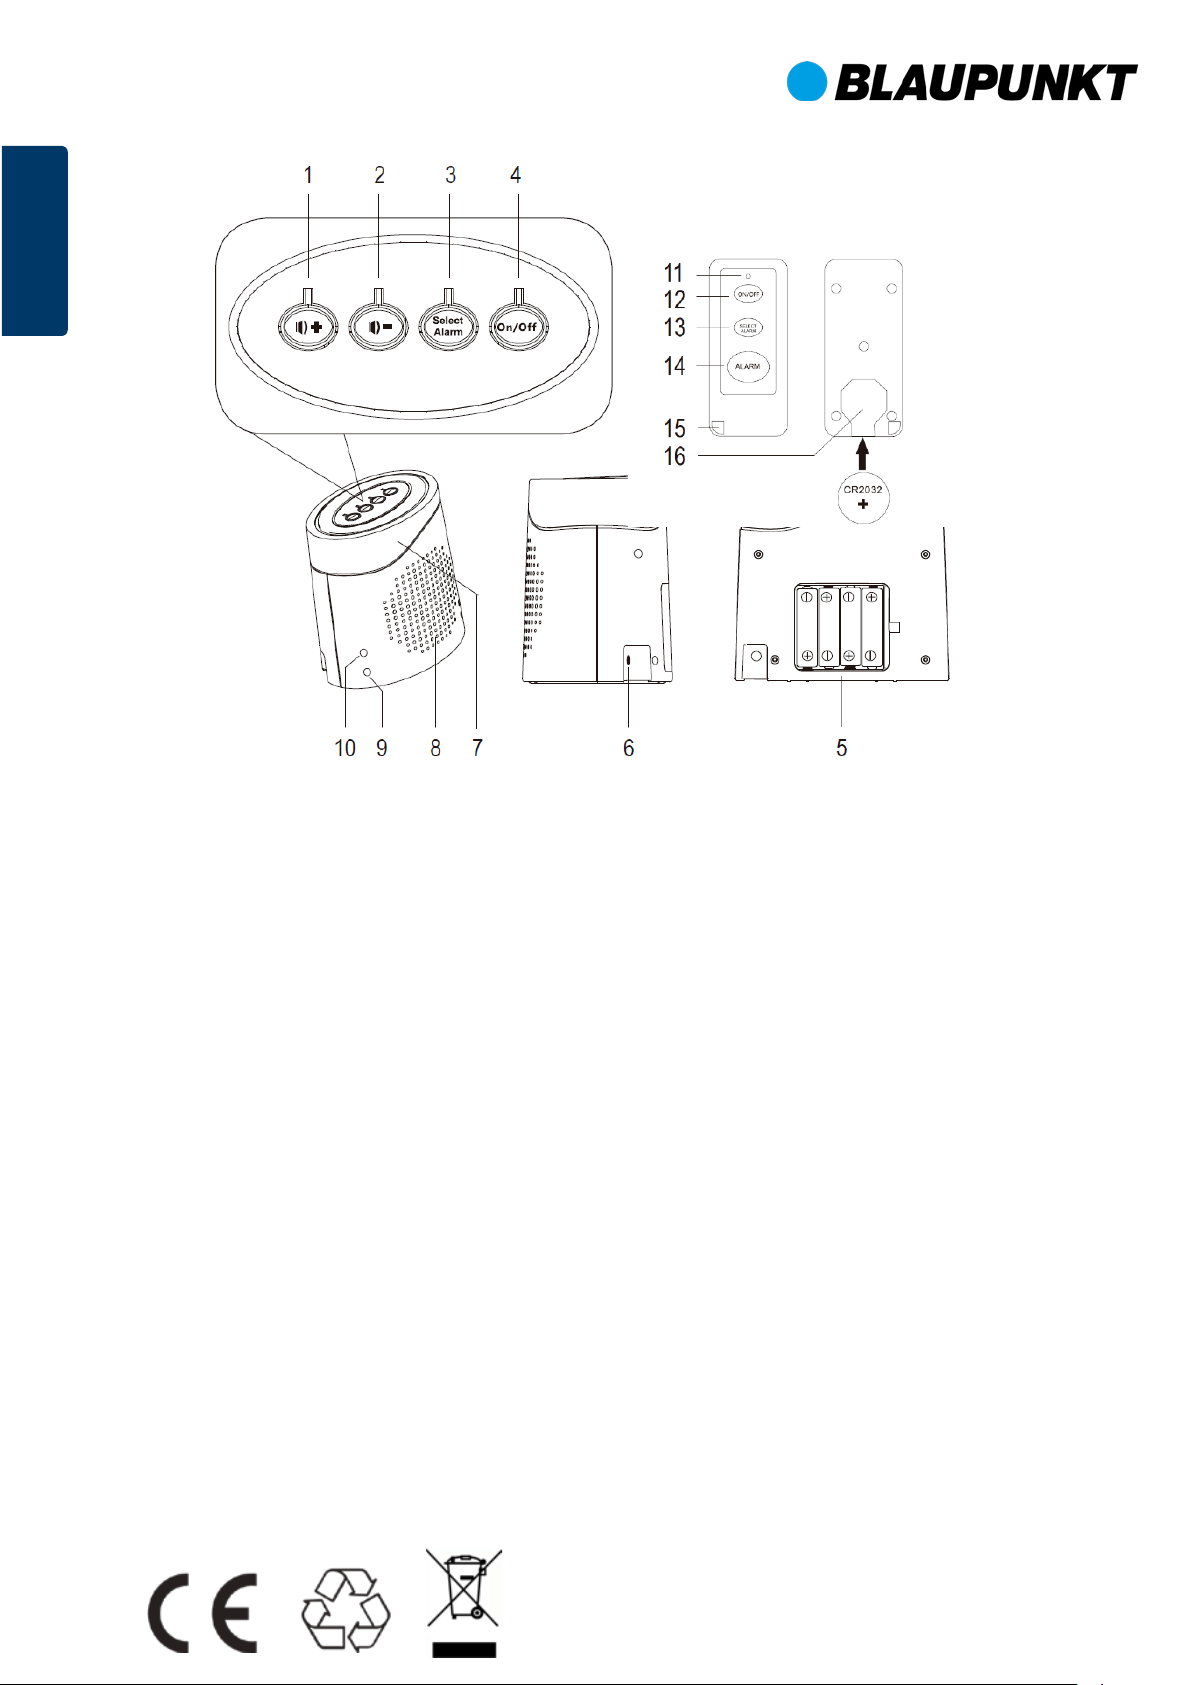
1 – Parts description
1. Volume + button
2. Volume - button
3. Select Alarm button
4. On/off button
5. Battery compartment
6. Connection socket 12 V/D C 1 A
7. Radar sensor
8. Speaker
9. POWER LED Indicator
10. ARM LED Indicator
11. Signal LED
12. ON/OFF button
13. Select Alarm button
14. Alarm button
15. Eyelet with snap hook
16. Battery compartment
2 – Package content
1 x Radar Guard ISD-RG1200
2 x Remote control
1 x Power adapter
1x Manual
1x Battery CR2032
3 – Installation
• Installation of remote control batteries: Open the battery compartment (16) of the
remote control. Insert the included type CR2032 button cell with the positive terminal
facing up into the battery compartment. Close the battery compartment.
2
Page 4
English
Press the ON/OFF button to disarm the device. The ARM indicator LED will turn off.
English
Note:
• Please note that whenever the device gets plugged ON it will be armed automatically.
• Connect the round plug of the mains adapter to the 12 V/DC 1 A connection socket
(6).
• Once the unit has be en connected to the m ains s upp ly, the POWER LED ind icator a nd
ARM LED indicator (10) light up. The device is turned ON and in is ARM mode.
Optional: Insert 8x 1.5 V AA batter ies (not incl uded) into the batt e ry compartment (5). Observe
correct polarity (+/-) as indicated in the battery compartment. Close the battery compartment.
We do not recommend the use of rechargeable batteries, since those have a lower voltage.
Note:
• Radar Guard batteries are intended for use as backup batteries (backup power
supply), in case the supply through the mains adapter gets disconnected or fails.
Do not consider bat teries as a m ain pow er sup ply . The main unit m ust be co nnected
to the provided mai ns adapter during use.
In case of power failure, the lifes pan of the b at ter ies can last for up to one w eek, as
•
long as the device does not activate the alarm peri odically. Periodically activating
the alarm can cause the batteries to be exhausted after one day or even faster.
•
Replace the batteries, once the POWER indicator lamp gets weaker or turns off.
Remove the batteries when not using the device for a longer period of time.
•
3
Page 5
English
4 – Operation
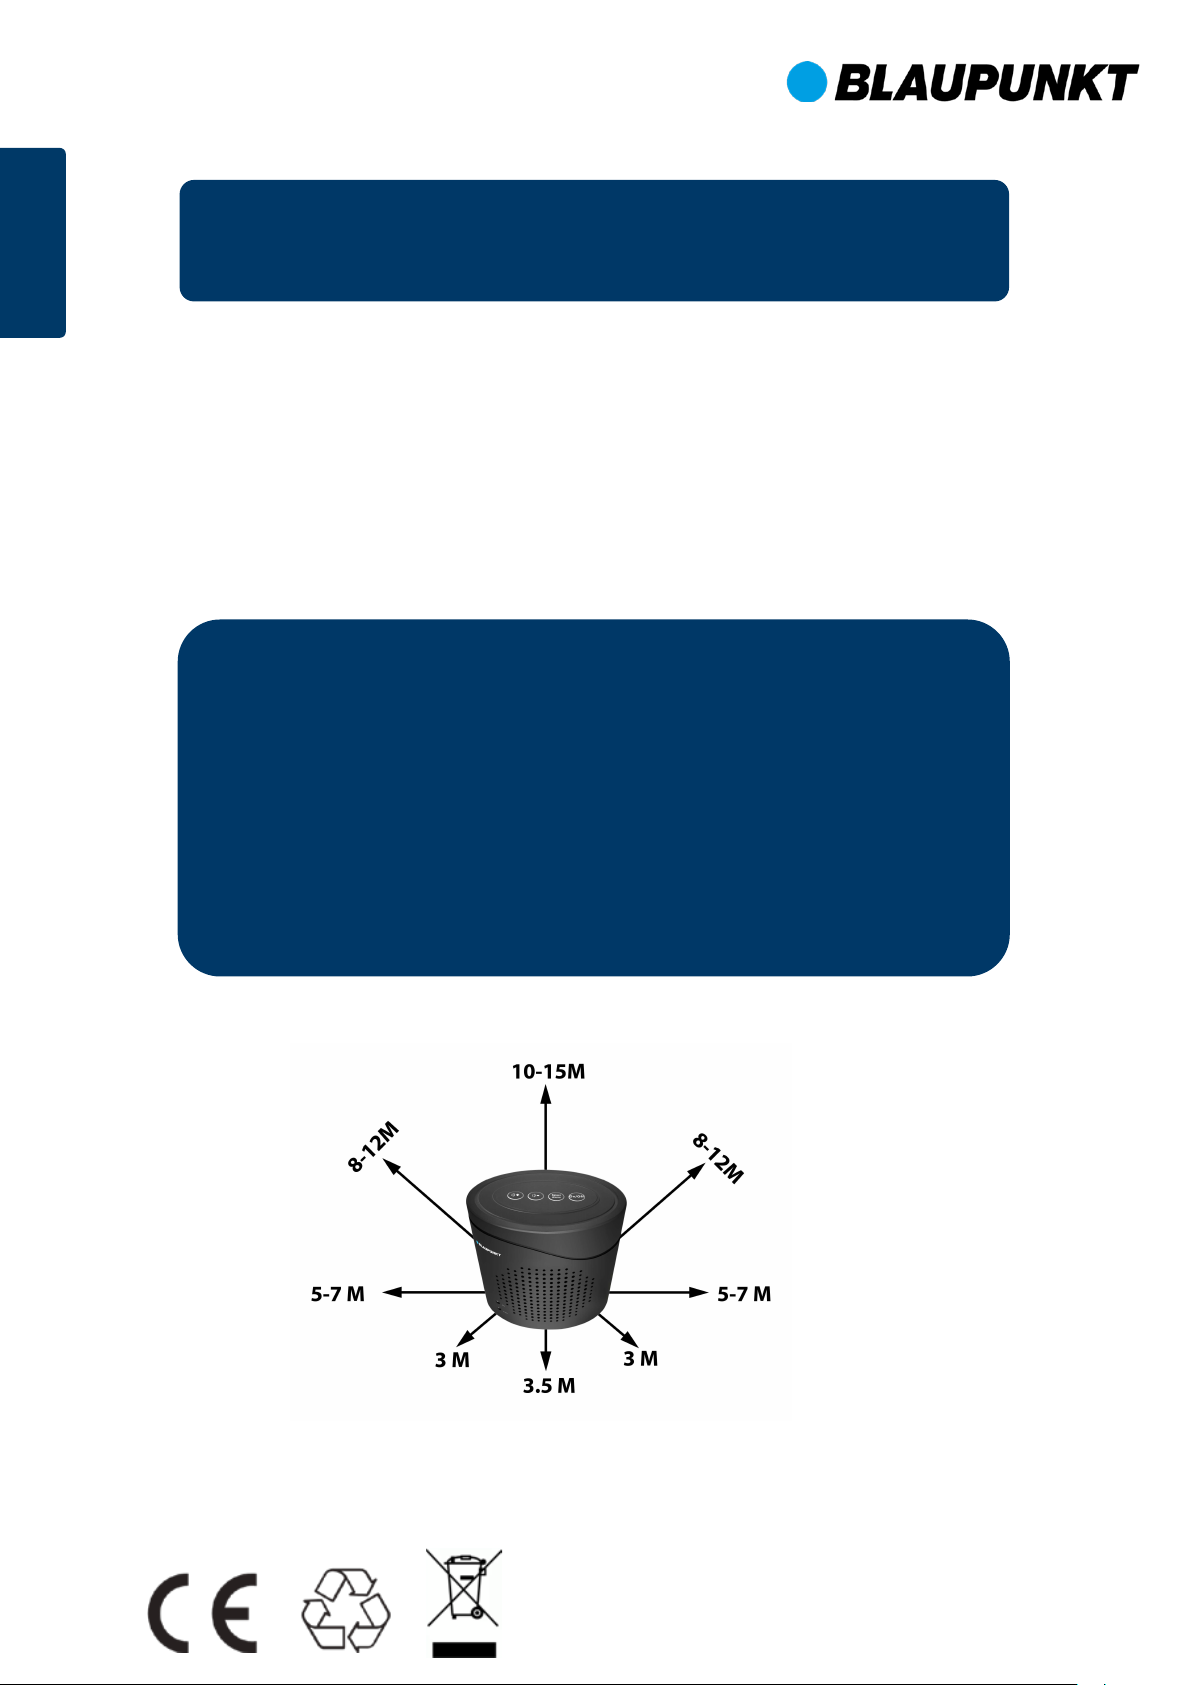
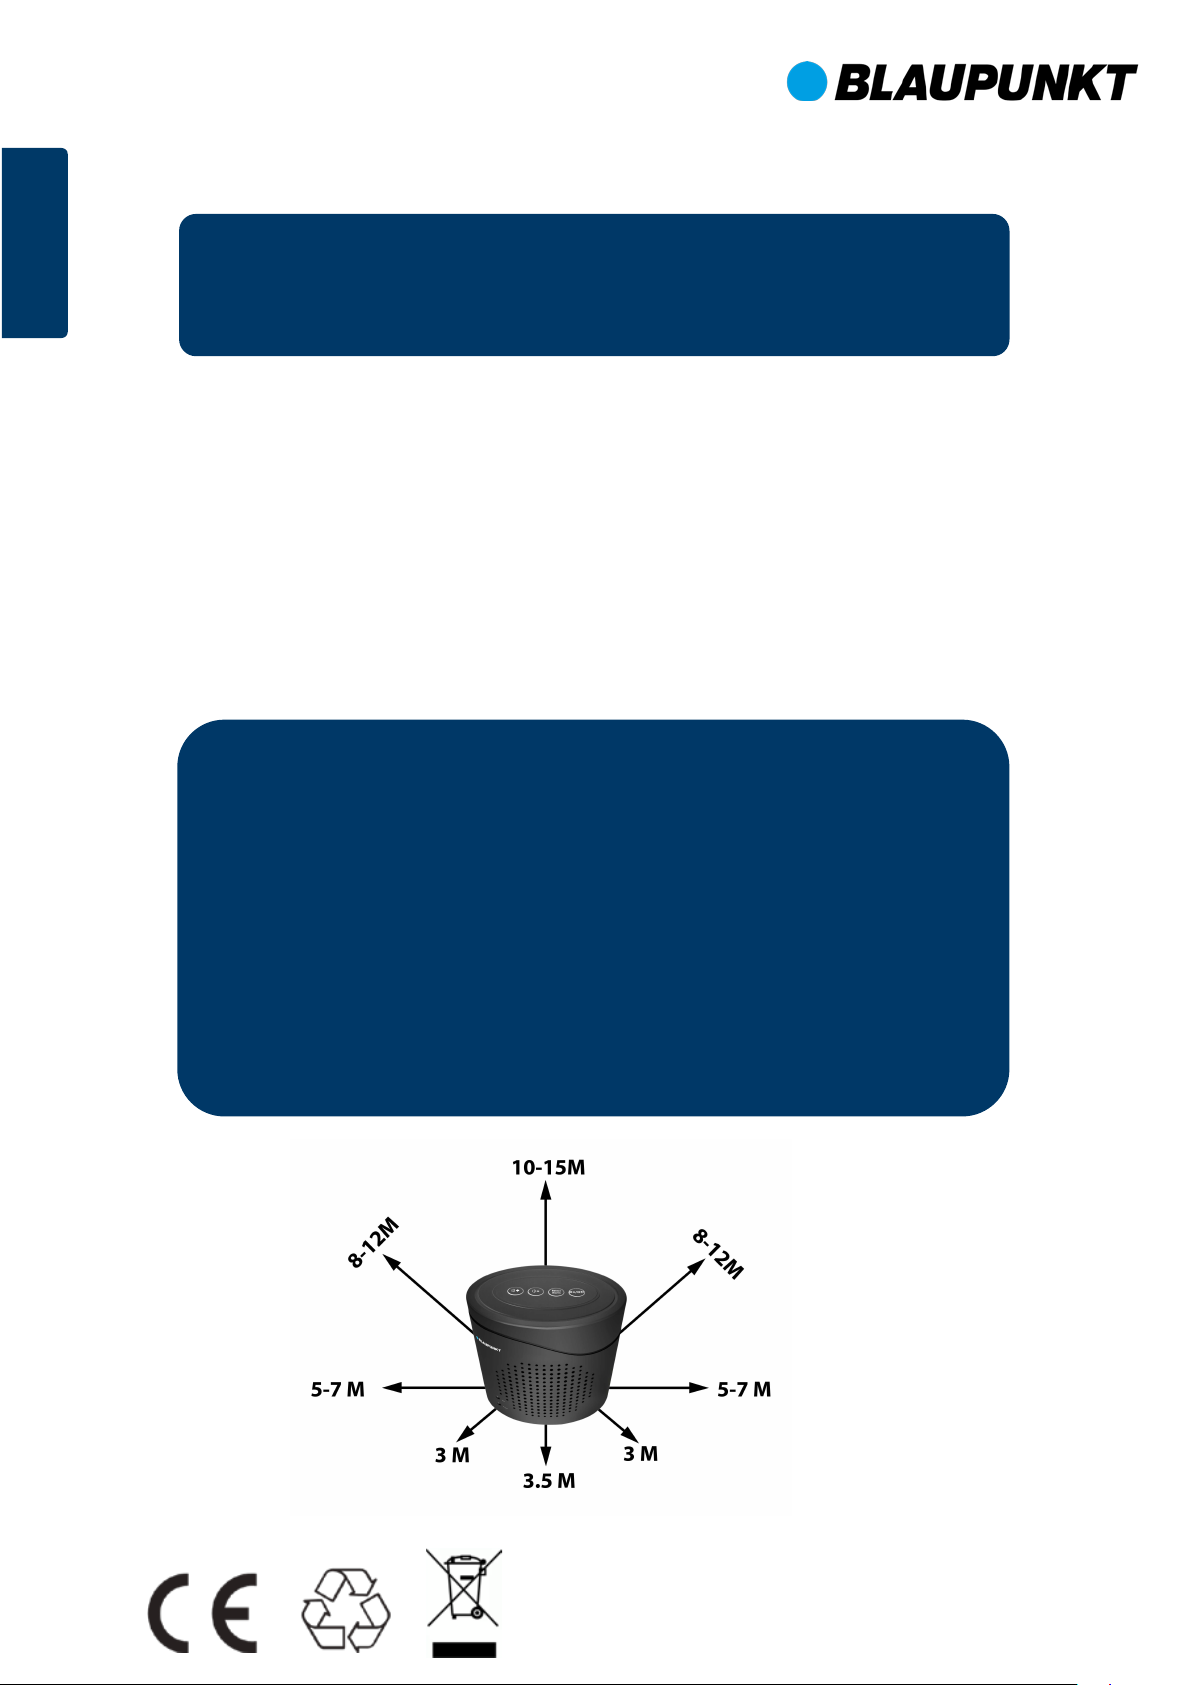
Radar detection: The integrated radar sensor (7) reacts to motions within its detection range
with a detection angle of 360°, for example, if a human being or animal enters the detection
range (0 - 10 m in open areas). If the device is in arm mode, the alarm will be activated
immediately.
Important note:
Motions can be detected through wooden, plastic and stone walls etc. of max. 18 cm in
thickness. Detection through glass is also possible.
The detection range va r ies depend ing on the thickness or material of the wall and m ight be
reduced if there are any metal frames reducing the radar wave penetration.
Alarm siren: Press the Select Alarm button on the device or the remote control to change
the alarm type. Choose between 5 different alarm sounds: 3 different siren alarm types, 1
realistic Dog bark sound, and 1 door bell. Adjust the volume using the VOL+ (1) and VOL- (2)
buttons to select between the 8 different volume levels. A demonstration sound level will be
triggered for 10 seconds after pressing any volume button.
English
Panic alarm: Press the ALARM button to activate an immediate alarm. For this function, the
device must not be in activated mode.
Arm / disarm: Press the On/Off button to turn ON the alarm. The device will start a 10 sec onds
countdown and will be armed afterwards. Please leave the detection range before the
countdown ends, as the alarm will get activated otherwise. To stop an alarm please press the
On/Off button to turn off the alarm. The alarm will stop immediately, but the device is still in
armed mode. Press the On/Off button agai n to disarm the device, the ARM LED indicator will
turn off. The dogs barking and siren sound will last for approx. 60 seconds each time the alarm
is activated. The doorbell will ring only once when it’s activated.
5 – Cleaning a nd care
• Turn off and disconnect the product from the mains before each cleaning.
• Under no circumstances use aggressive cleanings agents, cleaning alcohol or other
chemical solutions since these can penetrate the housing or impai r functionality.
• Never submerge the product in water or other liquids.
• Clean the product with a dry, fibre-free cloth.
6 – Safety instructions
Read the operating instructions carefully and especially observe the safety information. If you
do not follow the safety instructions and information on proper handling in this manual,
we assume no liability for any resulting personal injury or damage to property. Such
cases will invalidate the warranty/guarantee.
4
Page 6

English
English
• Do not install the system where it will be exposed to direct sunlight or rain (for indoor
use only).
• The unit should be away from heat sources such as radiators, heating ducts and stoves.
• If the device launch a false alarm it is might be located too close to a heat source,
changing the location or direction of the unit can remedy this.
• Only use the suppli ed mains adapter as a power supply.
• The system sound is very loud, never put the unit close to your ear.
• For safety reasons, d isconnect the pow er adapter from the mains socket dur ing storms .
• If you have questions which remain unanswered by these operating instructions,
contact our technical support service or other techni cal personnel.
6 – Technical specifications
ISD-RG1200
Input voltage / current.......................................... 12 V/DC, 1 A via power adapter
Backup battery..................................................... 8 x 1.5 V battery type AA
Power consumption............................................. ≤ 6 W
Standby current consumption.............................. ≤ 7 mA
Dynamic current consumption............................. ≤ 500 mA
Noise level range..................................................≤ 95 dB
Doorbell noise level range....................................70-95 dB
Dogs barking noise level range.............................65-95 dB
Alarm noise level range........................................ 75-95 dB
Transmission frequency/power............................ 5.8 GHz, 1 mW
Radar detection angle......................................... 360°
Radar detection range (open area) ..................... 0 – 15 m (rear), 0 – 3,5 m (front),
0 – 7 m (side)
Operating conditions............................................ 0 to +40 ºC, 20 % – 85 % RH
Storage conditions............................................... 0 to +40 ºC, 20 % – 50 % RH
Dimensions (W x H x D) ...................................... 154 x 160 x 110 m m
Weight................................................................. Approx. 820 g
Power adapter
Input voltage / current.......................................... 100 – 240 V/AC, 50/60 Hz, max. 0.3 A
Output voltage / current....................................... 12 V/DC, 1 A
Cable length........................................................ 1.5 m
Remote control
Operating voltage................................................ 1 x 3 V button cell, type CR2032
Range (open area) .............................................. max. 60 m
Transmission frequency/power............................ 433 MHz, 0.1 mW
5
Page 7
Deutsch
Deutsch
Radar-Bewegungsmelder- ISD-RG1200 Bedienungsanleitung
1 – Geräteübersicht
1. Lautstärke + Taste
2. Lautstärke - Taste
3. Select Alarm Taste (Alarm-Typ
wählen)
4. On/Off (Ein/Aus) Taste
5. Batteriefach
6. Stromeingang 12 V/DC 1 A
7. Radar-Sensor
8. Lautsprecher
2 – Lieferumfang
1 x Radar-Bewegungsmelder
ISD-RG1200
2 x Fernbedienung
1 x Netzteil
3 – Inbetriebnahme
• Einlegen der Batterien der Fernbedienung: Öffnen Sie das Batteriefach (16). Legen
Sie die mitgelieferten Batterie-Knopfzelle vom Typ CR2032 mit der + Seiten ach oben.
9. EIN LED-Anzeige
10. SCHARF LED-Anzeige
11. Fernbedienung LED
12. ON/OFF (Ein/Aus) Taste
13. Select Alarm Taste (Al arm-Typ
wählen)
14. Alarm Taste
15. Öse mit Karabinerhaken
16. Batteriefach
1x Bedienungsanleitung
1x Batterie CR2032
6
Page 8
SCHARF-LED-Anzeige erlischt.
Deutsch
Deutsch
Hinweis:
• Beachten Sie, dass das Gerät scharfgeschaltet wird, sobald es mit dem Strom
verbunden ist. Drücken Sie die ON/OFF Taste, um das Gerät unscharf zu schalten. Die
ein. Setzen Sie die Abdeckung wieder auf.
• Verbinden Sie das Netzteil mit dem 12 V/DC 1 A Stromeingang (6).
• Ist das Gerät mit dem Strom verbunden, leuchten die EIN-LED (9) und die
SCHARF-LED (10). Das Gerät ist also ein- und scharf geschaltet.
Optional: Legen Sie 8x 1.5 V AA Batterien (nicht mitgeliefert) in das Batteriefach ein (5).
Achten Sie dabei auf die Polarität (+/-) wie im Batteriefach angezeigt. Setzen Sie die
Abdeckung wieder a uf. Wir raten von der Verwendung von Akk us ab, da die Voltzahl in der
Regel zu niedrig ist.
Hinweis:
• Batterien im Gerät sind zur Notstromversorgung gedacht, falls der Strom
ausfällt. Nutzen Sie Batterien nicht grundsätzlich als Hauptstromzufuhr. Das
Gerät sollte während der Verwendung mit dem Strom verbunden sein.
Im Falle eines Stromausfalls, können Batterien das Gerät bis zu einer Woche mit
•
Strom versorgen, es sei d enn es wird regelmäßig Alarm ausgelöst. I n diesem
Fall können die Batterien innerhalb eines Tages oder sogar schneller leer sein.
•
Ersetzen Sie die Batterie n, sobald die EIN LED-Anzeige sc hwächer wird oder
aus ist, wenn das Gerät nicht mehr mit dem Strom verbunden ist.
Nehmen Sie die Batterien heraus, wenn Sie das Gerät für längere Zeit nicht
•
nutzen.
7
Page 9
Deutsch
4 – Bedienung
Radar-Bewegungsmeldung: Der integrierte Radar-Sensor (7) reagiert auf Bewegung im
Erfassungsbereich mit einem Erfassungswinkel von 360°, zum Beispiel, wenn ein Mensch
oder ein Tier sich durch den B ereich bewegt (0 - 15 m auf offener Fläche). Wenn das G erät
scharf geschaltet ist, wird dann unmittelbar Alarm ausgelöst.
Wichtiger Hinweis:
Bewegung kann durc h Holz-, Plastik - und Steinwände m it einer maximalen D icke von 18
cm erkannt werden. Bewegungserkennung durch Glaß ist ebenfalls möglich.
Der Erfassungsbereich ist kleiner oder größer, abhängig von der Beschaffenheit der Wand
und kann durch Metall verringert werden, da dieses die Radarwellen aufhält.
Sirenenalarm: Dr üc k en Sie die Select Alarm Taste am Gerät oder d er Fer nbe dienun g, um
den gewünschten Alarm-Typ zu wählen. Wählen Sie zwischen 5 verschiedenen
Geräuscheffekten: 3 verschiedene Sirenen, realistisches Hundegebell oder eine Türklingel.
Mit den Lautstärke + (1) und Lautstärke- (2) Tasten stellen Sie die gewünschte Lautstärke
ein. Die gewählte Lautss tärke wird zum Test nach Veränderung der Lautstär ke jeweils für 10
Sekunden wiedergege ben .
Deutsch
Panik-Alarm: Drücken Sie die ALARM Taste, um unmittelbar Alarm auszulösen. Zur Nutzung
dieser Funktion darf das Gerät nicht scharf geschaltet sein.
Scharf / Unscharf: Drücken Sie die On/Off Taste, um das Gerät scharf oder unscharf zu
schalten. Das Gerät s tar tet bei Sc h arf s c haltung (O n) e i nen 10-sekündigen Countd o wn und is t
danach scharf geschal tet. Verlassen Sie vor Ablauf des Count downs den Erf assungsbereich ,
oder es wird Alarm aus gelös t. U m den Alarm abzubrechen, dr üc k en Sie d ie On/Off Taste. Der
Alarm wird sofort abgebrochen, aber das Gerät ist weiterhin scharf geschaltet. Drücken Sie die
On/Off Taste erneut, um das Gerät unscharf zu scha lten. Die EIN-LED wird erlöschen. Das
Hundegebell und die Sirene ertönen bei Alarm für etwa 60 Sekunden. Die Türklingel läutet bei
Aktivierung nur einmal.
5 – Wartung und Pflege
• Um das Gerät zu reinigen, nehmen Sie es vom Strom und schalten es aus.
• Benutzen Sie keinesfalls aggressive Reinigungsmittel, Alkohol oder andere
chemische Reinigungsmittel, da diese das Gehäuse angreifen oder die Funktion
beeinträchtigen können.
• Tauchen Sie das Produkt nie in Wasser oder andere Flüssigkeiten.
• Reinigen Sie das Produkt mit einem trockenen, faserfreien Tuch.
8
Page 10

Deutsch
Deutsch
6 – Sicherheitshinweise
Lesen Sie die Anleitung sorgfältig und befolgen Sie die Hinweise, insbesondere diese
Sicherheitshinweise. Wenn Sie die Sicherheitshinweise bezüglich der korrekten Nutzung nicht
befolgen, übernehm en wir keine Haftung für Verletzungen oder Besc hädigungen. Wenn Sie
die folgenden Hinweise nicht befolgen, verfällt die Garantie.
• Setzen Sie das Gerät nicht direkter Sonneneinstrahlung oder Regen aus (nur zur
Nutzung in Innenräumen).
• Das Gerät sollte sich nicht in der Nähe von Hitzequellen befinde n, z. B. Heizungen,
Heizungsrohre, Öfen oder Kaminen.
• Wenn das Gerät einen Fehlalarm auslöst, k önnte es daran lieg en, dass es zu nah an
einer Hitzequelle installiert wurde. Den Ort oder die Ausrichtung des Geräts zu ändern
kann dieses Problem lösen.
• Verwenden Sie nur das mitgelieferte Netzteil.
• Der Alarm ist sehr laut, bringen Sie das Gerät nicht nahe ans Ohr.
• Nehmen Sie das Gerät aus Sicherheitsgründen während eines Gewitters vom Strom.
• Wenn Sie offene Fragen zum G erät haben, die in dieser Anleit ung nicht beantwortet
werden, wenden Sie sich an den Kundendienst oder Fachpersonal.
9
Page 11

Deutsch
7 – Spezifikationen
ISD-RG1200
Strom / Spannung............................................... 12 V/DC, 1 A via Netzteil
Notstrom-Batterien.............................................. 8 x 1.5 V battery type AA
Stromverbrauch................................................... ≤ 6 W
Standby Verbrauch ………….............................. ≤ 7 mA
Dynamischer Verbrauch ……............................. ≤ 500 mA
Lautstärke-Bereich..............................................
Türklingel Lautstärk e-Bereich..............................
undegebell Lau
H
Alarm Lautstärke-Bereich....................................
Übertragungsfrequenz/Leistung........................... 5.8 GHz, 1 mW
Radar: Erfassungswink el ..................................... 360°
Radar: Erfassungsbere ich (offene Fläche) ........... 0 – 15 m (hinten), 0 – 3,5 m (vorne),
0 – 7 m (seitlich)
Betriebsbedingungen............................................ 0 bis +40 ºC, 20 % – 85 % RH
Lagerungsbedingungen.......................................... 0 to +40 ºC, 20 % – 50 % RH
Abmessungen (W x H x T) ...................................... 154 x 160 x 110 m m
Gewicht................................................................. Etwa 820 g
tstärke-Bereich.........................
≤ 95 dB
70-95 dB
65-95 dB
75-95 dB
Deutsch
Netzteil
Eingangsspannung / Volt.......................................... 100 – 240 V/AC, 50/60 Hz, max. 0.3 A
Ausgangsspannung / Volt......................................... 12 V/DC, 1 A
Kabellänge................................................................ 1.5 m
Fernbedienung
Betrieb Volt........................................................... 1 x 3 V button cell, type CR2032
Reichweite (offene Fläche) .............................................. max. 60 m
Übertragungsfrequenz/Leistung............................ 433 MHz, 0.1 mW
10
Page 12
Español
Español
Manual de Alarma de Vigilancia por Radar - ISD-RG1200
1 – Descripción del producto
1. Botón Volumen +
2. Botón Volumen -
3. Botón Seleccionar Alarma
4. Botón Encendido/Apagado
5. Compartimento de las pilas
6. Toma de conexión 12 V/DC 1 A
7. Sensor del radar
8. Altavoz
2 – Contenido del paquete
1 x Vigilancia por Radar ISD-RG1200
2 x Control remoto
1 x Adaptador de corriente
1x Manual
1x Batería/Pila CR2032
3 – Instalación
• Instalación de la pila del mando a dis tanc ia: Abra el com partim ento de la pila (16) del
mando a distancia. Ins erte la pila de botón CR2032, incluida en el e qui po, con el lado
positivo hacia arriba en el compartimento de la pila. Cierre el compartimento de la pila.
9. Indicador LED POWER
10. Indicador LED ARMADO
11. Señal LED
12. Botón ENCENDIDO/APAGADO
13. Botón Seleccionar Alarma
14. Botón de Alarma
15. Ojal con mosquetón.
16. Compartimento de las pilas
11
Page 13

Español
Nota:
• Tenga en cuenta que siempre que el dispositivo este enchufado, éste se activará
automáticamente. Presione el botón ON/OFF para desactivar el dispositivo.
El indicador LED de ARMADO se apagará.
• Conecte la clavija del adaptador de corriente a la toma de conexión 12 V/DC 1 A (6).
• Una vez que la unidad esté conectada a la red eléctrica, el POWER LED (9) y el LED
ARMADO se encenderán (10). El dispositivo se ACTIVA y entra en modo ARMADO.
Opcional: Inserte 8x pilas 1.5 V AA (no incluidas) en el compartimento de las pilas (5). Observe
que la polaridad sea correcta (+/-) como se indica en el compartimento. Cierre el
compartimento de las pilas. No recomendamos el uso de pilas recargables, ya que éstas tienen
un voltaje más bajo.
Español
Nota:
• Las pilas de la Alarma de Vigilancia por Radar están d i s eñadas par a us ars e c omo
respaldo de seguridad, en caso de que el suministro de la red eléctrica se
desconecte o falle la fuente de alimentación. No considere las pilas como fuente de
alimentación principal. La unidad principal debe estar conectada mediante el
adaptador de corriente suministrado para su uso.
•
En caso de fallo de alimentación, la autonom ía de l as pilas pue de d ur ar hasta una
semana, siempre y cuando el dispos iti vo no acti ve la alar ma periódicamente.
La activación periód ica de l a al ar ma puede hacer que las pilas s e ag ot en desp ués
de tan solo un día o incluso en menos tiempo.
Reemplace las pilas, cuando la luz de “POWER” se vuelva más débil o se apague.
•
Retire las pilas cuando no utilice el dispositivo durante un periodo de tiempo
•
prolongado.
12
Page 14

Español
4 – Funcionamiento
Español
Detección por radar: El sensor de radar integrado (7) reacciona a los movimientos dentro de
su rango de detección c on un ángulo de detección de 360°, por ejemplo, si una persona o
animal entra en e l rango de detec ción (0 - 10 m en áreas ab iertas). Si el dispositivo es tá en
modo ARMADO, la alarma se activará inmediatamente.
Nota importante:
Los movimientos pueden detectarse a través de paredes de madera, plástico y piedra, etc.
de hasta máximo 18 cm de grosor. También puede detectar a través del vidrio.
El rango de detección varía dependiendo del espesor o material de la pared y podría
reducirse si hay algún marco metálico que reduzca la penetración de la onda del radar.
Sirena de alarma: Pulse el botón Select Alarm en el dispositivo o en el control remoto para
cambiar el tipo de alarma. Elija entre 5 tipos diferentes de sonidos de alarma: 3 tipos de sonidos
de sir ena de alarma, 1 sonido realista de un perro lad rando, y 1 sonido t ipo timbre. Ajuste el
volumen con los botones VOL+ (1) y VOL- (2) para seleccionar entre los 8 niveles de volumen
diferentes. U n nivel de sonido de demos tración se acti vará durant e 10 segu ndos des pués de
pulsar cualquier botón de volumen.
Alarma de pánico: Pulse el botón ALARM para activar una alarma inmediata. Para esta
función, el dispositivo no debe estar en modo activado.
Activar (A RM) / desactivar: Pulse el botón On/Off para activar la alarma. El dispositivo iniciará
una cuenta atrás de 10 segundos y será activado después. Por favor deje el rango de detección
antes de que finalice la cuenta atrás, ya que la alarma se activará de lo contrario. Para detener
una alarma pulse el botón On/Off para apagar la alarma. La alarma se detendrá
inmediatamente, pero el dispositivo está aún activado. Pulse nuevamente el botón On/Off para
desactivar el dispositi vo, el indicador LED ARMADO se apag ará. Los sonidos de ladridos de
perro y sirena durarán aprox. 60 segundos cada vez que se active la alarma. El timbre sonará
una sola vez cuando es té a c tiva do.
5 – Limpieza y mantenimiento
• Apague y desconecte el producto de la red eléctrica antes de cada limpieza.
• Bajo ninguna circunstancia utilice productos de limpieza agresivos, alcohol de
limpieza u otras sustancias químicas, ya que éstos pueden penetrar en la carcasa o
deteriorar su funcionalidad.
• Nunca sumerja el producto en agua u otros líquidos.
• Limpie el producto con una tela seca de microfibra.
13
Page 15

Español
6 – Instrucciones de seguridad
Lea atentamente las instrucciones de uso y observe especialmente la información de seguridad.
Si no sigue las instruccion es de seguridad e inform ación sobre el manejo adec uado en este
manual, no asumimos ninguna responsabilidad por lesiones personales o daños a la propiedad.
Tales casos invalidarán la garantía.
• No instale el sistema donde esté expuesto a la luz directa del sol o a la lluvia
(solo para uso en interiores).
• El equipo debe estar lejos de focos de calor como radiadores, conductos de
calefacción y estufas.
• Si el dispositivo inicia una alarma falsa, es posible que se encuentre demasiado cerca
de un foco de calor, cambiar la ubicación o el direccionamiento del equipo puede
solventarlo.
• Utilice únicamente el adaptador de corriente suministrado como fuente de alimentación.
• El sonido del sistema es muy ruidoso, nunca ponga el equipo cerca del oído.
• Por razones de seguridad, desconecte la fuente de alimentación de la corriente
durante las tormentas.
Español
• Si t iene preguntas que no han sido contes tadas por este manual de instruccio nes,
póngase en contacto con nuestro servicio de asistencia técnica u otro personal técnico.
7 – Especificaciones técnicas
ISD-RG1200
Voltaje/corriente de entra d a....... ...... ....... ...... ....... ...... ... 12 V/DC, 1 A (vía adaptador corriente)
Batería de respaldo......................................................... 8 x 1.5 V pilas tipo AA
Consumo de energía...................................................... ≤ 6 W
Consumo de corriente en espera.................................... ≤ 7 mA
Consumo dinámico de corriente..................................... ≤ 500 mA
Rango del nivel de ruido.................................................. ≤ 95 dB
Rango de nivel del sonido timbre..................................... 70-95dB
Rango de nivel del sonido ladrido.................................... 65-95dB
Rango de nivel del sonido alarma.................................... 75-95dB
Frecuencia/potencia de transmisión................................ 5.8 GHz, 1 mW
Ángulo de detección del radar......................................... 360°
Alcance de detección del radar (área abierta)................ 0 – 15 m (trasero), 0 – 3,5 m (frontal),
0 – 7 m (lateral)
Condiciones de funcionamiento...................................... 0 a +40 ºC, 20 % – 85 % HR
Condiciones de almacenamiento.................................... 0 a +40 ºC, 20 % – 50 % HR
Dimensiones (Ancho x Alto x Profundidad).................... 154 x 160 x 110 mm
Peso................................................................................ Aprox. 820 g
14
Page 16

Español
Adaptador de corriente
Español
Voltaje/corriente de entra d a............................................ 100 – 240 V/AC, 50/60 Hz, máx. 0.3
Voltaje/corriente de salida.................................................12 V/DC, 1 A
Longitud del cable…..........................................................1.5 m
Control remoto
Tensión de funcionamiento............................................. 1 x 3 V pila botón, tipo CR2032
Rango (área abierta)….................................................. máx. 60 m
Frecuencia/potencia de transmisión.............................. 433 MHz, 0.1 mW
15
Page 17

Français
Français
Gardien alarme-radar - Mode d'emploi – ISD-RG1200
1 – Description des composants
1. Bouton Volume +
2. Bouton Volume -
3. Bouton Sélectionner alarme
4. Bouton Marche/Arrêt
5. Compartiment des piles
6. Prise de connexion 12V/CD 1A
7. Capteur radar
8. Haut-parleur
2 – Contenu de la boîte
1 x Gardien radar ISD-RG1200
2 x Télécommande
1x Adaptateur secteur
3 – Installation
• Installation de la pile de la télécommande : Ouvrez le compartiment de la pile (16) de
la télécommande. Insérez la pile-bouton de type CR2032 incluse, terminal positif
tourné vers le haut, dans le compartiment de la pile. Fermez le compartiment de
la pile.
9. Voyant DEL ALIMENTATION
10. Voyant DEL ARM
11. Voyant DEL Signal
12. Bouton Marche/Arrêt
13. Bouton Sélectionner alarme
14. Bouton Alarme
15. Œilleton avec mousqueton
16. Compartiment de la pile
1x Mode d'emploi
1x Pile CR2032
16
Page 18

Français
Français
Note :
• Notez que l'appareil est armé automatiquement lorsque vous le branchez. Appuyez
sur le bouton Marche/Arrêt pour désarmer l'appareil. Le voyant DEL ARM s'éteindra
alors.
• Branchez la prise ron de de l'adaptateur sec teur à la prise de c onnexion 12V/CD 1 A
(6).
• Lorsque l'unité est c on nectée à l'alimentation secte ur, le voyant DEL ALIMENTATION
et ARM (10) s'illuminent. L'appareil est alors Allumé et en mode ARM.
Facultatif : Insérez 8 piles AA 1,5V (non incluses) dans le compartiment des piles (5).
Respectez le sens des polarités (+/-) comme indiqué dans le compartiment des piles.
Note :
• Les piles du gardien radar sont utilisées comme piles de sec ours (alimentation d e
secours), en cas de cou pure de co urant sur l'adaptate ur secteur ou de déf aillance
de ce dernier. Ne pas utiliser les piles comme alimentation principale. L'unité
principale doit être connectée à l'adaptateur secteur pendant son utilisation.
En cas de coupure d e courant, les piles peuvent a limenter l'appare il pendant une
•
semaine, tant qu'il ne déclenche pas l'alarme de manière régulière. L'activation
régulière de l'alarme peut entraîner l'usure des piles en une journée, voir plus
rapidement.
Remplacez les piles lorsque le voyant ALIM ENTATION semble moins brillant o u
•
qu'il s'éteint complètement.
Fermez le compartiment des piles.
Nous ne recommandons pas l'utilisation de piles rechargeables, car ces dernières opèrent
selon un voltage inférieur.
17
Page 19

Français
4 – Utilisation
Détection radar : Le capteur radar intégré (7) réagit aux mouvements dans son cham p de
détection sur un angle de 360°, par exem ple lorsqu'une personne ou qu'un animal pénètre
dans le champ de détection (0 - 10 m en espace ouvert). Si l'appareil est en mode ARM,
l'alarme se déclenche immédiatement.
Note importante :
Les mouvements peuvent être détectés au travers des murs de bois, de plastique et de
pierre d'une épaisseur maximum de 18 cm. La détection au-travers du verre est également
possible.
La portée de détecti on varie selon l'épaisseur ou du type de m atériau du mur, et pourrait
être réduite par des éléments métalliques.
Sirène d'alarme : Appuyez sur le bouton Sélectionner alarme sur l'appareil ou sur la
télécommande pour changer le type d'alarme. Choisissez entre 5 types de sirènes d'alarme : 3
différents types de sirène d'alarme, 1 son d'aboiement de chien réaliste et 1 sonnette de porte.
Réglez le volume avec l es boutons VOL+ (1) et VOL- (2) pour sélectionner entre 8 différents
niveaux de volum e. Un son de démonstration sera déclenché pendant 10 secondes après
pression sur un bouton de volume.
Français
Alarme de panique : Appuyez sur le bouton ALARME pour activer une alarme
immédiatement. Pour que cette fonction soit utilisable, l'appareil ne doit pas être en activation.
Armer/Désarmer : Appuyez sur le bouton Marche/Arrêt pour Allumer l'alarme. L'appareil
commence un décompte de 10 secondes puis s'arme. Quittez la zone de détection avant la fin
du décompte, sinon l' alarme se déclenchera. Pour interrom pre une alarme, appuyez sur le
bouton Marche/Arrêt pour éteindre l'alarme. L'alarme se coupe immédiatement, mais
l'appareil est toujours arm é. Appuyez sur le bouton Marche/Arrêt de nouveau p our dés arm er
l'appareil. Le voyant DEL ARM s'éteint alors. Les aboiements et le son de sirène durent
pendant environ 60 secon d es à chaqu e fois que l'alar m e est ac tivée. La sonnette de porte ne
retentit qu'une fois.
5 – Nettoyage et entretien
• Éteignez et débranchez le produit de l'alimentation secteur avant chaque nettoyage.
• Ne jamais utiliser de détergents agressifs, d'alcool de nettoyage ou d'autres solutions
chimiques, car ces dernières pourraient s'infiltrer dans le boîtier et entraîner des
défaillances.
• Ne jamais submerger le produit dans l'eau ou dans d'autres liquides.
• Nettoyez le produit avec un chiffon sec et non pelucheux.
18
Page 20

Français
Français
6 – Instructions de sécurité
Lisez les instructions d'utilisation avec soin, et r espectez sans exception l es informations de
sécurité. Si vous ne respectez pas les informations de sécurité concernant l'utilisation correcte
données dans ce m ode d'emploi, no us sommes dégagés de toute r esponsabilité concernant
les dégâts matériels ou les blessures. Cela in va lide la gar ant ie.
• Ne pas installer le système en un lieu exposé directement à la lumière du Soleil ou à la
pluie (utilisation en intérieur seulement).
• L'unité doit être installée loin des sources de chaleur, comme les radiateurs, les
bouches de chauffage et les fours.
• Si l'appareil se déclench e par erreur, il est possible qu'il se tr ouve trop proche d 'une
source de chaleur. Changer la position ou l'orientation de l'unité pour remédier au
problème.
• Utilisez seulement l'adaptateur secteur inclus comme source d'alimentation.
• Le son émit par l'alarme est très fort, ne pas la positionner proche de votre oreille.
• Pour votre sécurité, d ébranchez l'adaptateur secteur de la prise murale pend ant les
tempêtes.
• Si vous avez des questions supplémentaires apr ès la lecture de ce m ode d'emploi,
prenez contact avec note service d'assistance ou notre autre personnel technique.
19
Page 21

Français
7 – Caractéristiques techniques
ISD-RG1200
Voltage d'alimentation / courant.......................................... 12V/CD, 1A via adaptateur secteur
Piles d'alimentation de secours..................................................... 8 piles AA 1,5V
Consommation électrique.............................................
Consommation de courant en veille..............................
Consommation de courant dynamique.............................
Niveau de bruit................................................. ≤ 95 dB
Puis
sance sonore de la sonnerie de porte............... 70-95 dB
Puissance sonore de l'aboiement........................... 65-95 dB
Puissance sonore de l'alarme................................. 75–95 dB
P
uissance/Fréquence de transmission................... 5,8 GHz, 1mW
Angle de détection radar......................................... 360°
Portée de détection radar (zone ouverte) ............... 0
0
– 7 m (Côtés)
Conditions d'utilisation............................................ 0 à +40 ºC, HR 20 %
Conditions de rangement............................................... 0 à +40 ºC, HR 20 %
Dimensions (L x H x P) ...................................... 154 x 160 x 110 mm
Poids................................................................. Approx. 820 g
≥ 6W
≥ 7mA
≥ 500mA
– 15 m (arrière), 0 – 3,5 m (avant),
– 85 %
– 50 %
Français
Adaptateur secteur
(Shenzhen Shenghuacheng Technology Co. Ltd.,model : SHCY-SP1201000EU)
Voltage d'alimentation / courant.......................................... 100
0,3A
Voltage d'alimentation / courant....................................... 12V/CD, 1A
Longueur de câble........................................................ 1,5 m
Télécommande
Voltage en fonctionnement................................................ 1 pile-bouton 3V, type CR2032
Portée de détection (zone ouverte) .............................................. max. 60 m
Puissance/Fréquence de transmission............................ 433 MHz, 0,1mW
– 240V/CA, 50/60 Hz, max.
20
Page 22

Italiano
Italiano
Allarme radar - Manuale ISD-RG1200
1 – Descrizione componenti
1. Pulsante Volume +
Pulsante Volume -
2.
Pulsante Select Alarm
3.
(Seleziona allarme)
Pulsante On/Off
4.
5. Vano batteria
Presa da 12 V CC 1 A
6.
7. Sensore radar
8. Altoparlante
2 – Contenuto della confezione
1 x Allarme radar ISD-RG1200
2 x Telecomando
1 x Adattatore di al imentazione
1 x Manuale
1x Batteria CR2032
3 – Installazione
• Installazione delle batterie del telecomando. Aprire il vano batteria (16) del
telecomando. Inserire la batteria a bottone in dotazione di tipo CR2032 con il polo
positivo rivolto verso l'alto all'inter n o del vano bat t eria. C hiuder e il vano batt er ia .
Spia LED POWER
9.
Spia LED ARM
10.
11. LED di avviso
Pulsante ON/OFF
12.
Pulsante Select Alarm
13.
(Seleziona allarme)
Pulsante Alarm (Allarme)
14.
15. Occhiello con moschettone
16. Vano batteria
21
Page 23

Italiano
Nota:
• Notare che ogni volta che il dispositivo è inserito nella spina viene azionato
automaticamente. Premere il pulsante ON/OFF per dis-azionare il dispositivo. La spia
LED ARM si spegne.
• Collegare la spina roton da dell'adattatore di alim entazione alla presa da 12 V CC 1
A(6).
Una volta collegata l'unità all'alimentazione elettrica, la spia LED POWER e la spia
•
LED ARM (10) si accendono. Il dispositivo è acceso e in modalità attiva.
Opzionale: Inserire 8 batterie da 1,5 V di tipo AA (non in dotazione) nel vano batteria (5).
Rispettare la polarità corr etta (+/-) come ind icato nel vano batt eria. Chiudere il vano batteria.
Nota:
• Le batterie del dispositivo sono da utilizzarsi come batterie di backup
(alimentazione di backup), in caso di disconnessione o guasto dell'alimentazione di
rete tramite l'adattatore. N on considerare le batterie come f onte di alimentazione
principale. Collegare l'unità principale all'adattatore di alimentazione fornito durante
l'uso.
Italiano
• In caso di guasto all'alim entazione la durata delle batterie può raggiun gere fino a
una settimana, salvo che l'allarme del dispositivo non venga attivato
periodicamente. In caso ai periodica attivazione dell'allarm e, le batterie possono
esaurirsi dopo un giorno o più velocem ente.
• Sostituire le batterie una volta che la spia POWER si indebolisce o nel caso il
dispositivo si spenga.
Rimuovere le batterie in caso di inutilizzo prolungato del dispositivo.
•
Non si consiglia di usare batterie ricaricabili poiché hanno una tensione inferiore.
22
Page 24

onde radar.
Italiano
Italiano
4 – Funzionamento
Rilevamento radar: Il sen sore radar i ntegrato (7) r ileva i m ovimenti entro il campo di azione
con un angolo di 360°; ad esempio, la presenza di un essere umano o di un animale all'interno
dell'intervallo di ril evamento (0 - 10 m in zone senza ostacoli). Se il dispositivo è in m odalità
ARM, l'allarme si attiva immediatamente.
Nota importante:
È possibile rilevare i movimenti attraverso pareti di legno, plastica, pietra ecc. con uno
spessore massimo di 18 cm. È inoltre possibile rilevare i movimenti attraverso i vetri.
L'intervallo di rilev amento varia a seconda del lo spessore e del materia le della parete e
potrebbe ridursi in cas o di pres en za di c or nic i in metallo che limitano la penetr a zione delle
Sirena di allarme. Premer e il pulsante Sel ect Alarm (Seleziona allarm e) sul disp ositivo o sul
telecomando per modificare il tipo di allarme. È possibile scegliere tra 5 diversi allarmi: 3 tipi di
sirene di allarme, 1 suono di cane che abbaia e 1 suono di cam panello. Regolare il volume
mediante i pulsanti VOL+ (1) e VOL- (2) per selezionare 8 diversi livelli di volume. Viene
avviato un allarme di prova per 10 secondi dopo avere premuto un qualsiasi pulsante del
volume.
Allarme antipanico. Premere il pulsante ALARM (ALLARME) per attivare immediatament e
un allarme. Per questa funzione il dispositivo non deve essere in modalità attiva.
Attivazione/disattivazione. Per accendere l'allarme premere il pulsante On/Off. Il dispositivo
inizia un conto alla rovescia di 10 secondi, quindi viene attivato. Abbandonare la zona di
rilevamento prima della fine del conto alla rovescia per non attivare l'allarme.
l'allarme
è ancora attivo. Prem er e nuovam ente i l pulsan te On/Off per disattivare l'a llarm e, il L ED ARM
si spegne.
l'allarme.
premere il pulsante On/Off. L'allarme si interrompe immediatamente, ma il dispositivo
Il cane che abbaia e la sirena durano circa 60 secondi ogni volta che viene attivato
Il campanello suona una volta sola quando attivato.
Per interrompere
5 – Pulizia e manutenzione
• Spegnere e scollegare il prodotto dall'alimentazione prima delle operazioni di pu lizi a.
• Non utilizzare mai agenti detergenti, alcool o altre soluzioni chimiche poiché
potrebbero penetrare nell'a l log giamento o impedire un corretto funzionamento.
• Non immergere l'apparecchio in acqua o altr i liqui di.
• Pulire il prodotto con un panno asciutto senza pelucchi.
23
Page 25

Italiano
6 – Istruzioni di sicurezza
Leggere attentamente le istruzioni d'uso e osservare in modo particolare le informazioni
relative alla sicurezza. Non si accetta alcuna responsabilità in caso di lesioni personali o danni
alle cose in caso di m ancato rispetto delle istruzioni e delle inform azioni di sicure zza relative
all'uso corretto contenute nel presente manuale. In tali casi la garanzia sarà invalidata.
• Non installare l'apparecchio in luoghi esposti alla luce solare diretta o alla pioggia
(l'apparecchio è ad uso esclusivo in interni).
• Tenere l'apparecchio lontano da fonti di calore come radiatori, tubi del riscaldamento e
stufe.
• Se il dispositivo attiva u n falso allarm e potrebbe trovarsi troppo v icino a una fonte di
calore; per porre rimedio a ciò modificare la posizione o l'orientamento dell'unità.
• Utilizzare esclusivamente l'adattatore di alimentazione in dotazione come fonte di
alimentazione.
• Il segnale acustico del dispositivo è molto alto, non avvicinare l'unità all'orecchio.
• Per r agioni di sicurezza scollegare l' adattatore di alimentazione dalla rete dura nte i
temporali.
Italiano
• In caso di ulteriori domande sulle presenti istruzioni, contattare il nostro servizio di
assistenza tecnica o un tecnico qualificato.
24
Page 26

Italiano
Italiano
7 – Specifiche Tecniche
ISD-RG1200
Tensione/corrente di ingresso.......................................... 12 V CC, 1 A mediante adattatore di
alimentazione
Batteria di backup............................... ...... ....................... 8 batterie da 1,5 V tipo AA
Consumo energetico........................................................ ≤ 6 W
Consumo di corrente in standby....................................... ≤ 7 mA
Consumo di corrente dinamico......................................... ≤ 500 mA
Intervallo livello di rumore.................................................. ≤ 95 dB
Intervallo livello di rumore campanello.............................. 70-95 dB
Intervallo livello di rumore cane che abbaia...................... 65-95 dB
Interv
allo livello di rumore allarme.................................... 75-95 dB
quenza/potenza di trasmissione.................................. 5,8 GHz, 1 mW
Fre
Angolo rilevamento radar.................................................. 360°
Intervallo rilevamento radar (zona senza ostacoli) .......... 0 – 15 m (retro), 0 – 3,5 m (parte
anteriore), 0 – 7 m (lato)
Condizioni di funzionamento....................................... Da 0 a +40 ºC, 20 – 85% UR
Condizioni di conservazione....................................... Da 0 a +40 ºC, 20 – 50% U R
Dimensioni (L x A x P) ................................................ 154 x 160 x 110 mm
Peso............................................................................ Circa 820 g
Adattatore di alimentazione
(Shenzhen Shenghuacheng Technology Co. Ltd., modello: SHCY-SP1201000EU)
Tensione/corrente di ingresso...................................... 100 – 240 V CA, 50/60 Hz, max. 0,3 A
Tensione/corrente di uscita.......................................... 12 V CC, 1 A
Lunghezza del cavo...................................................... 1,5 m
Telecomando
Tensione di esercizio................................................ 1 batteria a bottone da 3 V, tipo CR2032
Intervallo rilevamento (zona senza ostacoli) ............ max. 60 m
Frequenza/potenza di trasmissione....................... .... 433 MHz, 0,1 mW
25
Page 27

Nederlands
Nederlands
Radar Alarm Guard - ISD-RG1200 Handleiding
1 - Beschrijving van de onderdelen
1. Volume + toets
2. Volume - toets
3. Selecteer alarm knop
4. Aan/Uit knop
5. Batterijcompartiment
6. Aansluiting 12 V/DC 1 A
7. Radar sensor
8. Luidspreker
9. AAN/UIT LED indicator
2 - Inhoud van de verpakking
1 x Radar Guard ISD-RG1200
2 x Afstandsbediening
1 x Voedingsadapter
10. INGESCHAKELD LED
Indicator
11. Signaal LED
12. AAN/UIT knop
13. Selecteer alarm knop
14. Alarm knop
15. Oogje met karabijnhaak
16. Batterijcompartiment
1 x Handleiding
1 x Batterij CR2032
26
Page 28

Nederlands
dat wanneer het apparaat aangesloten wordt, het automatisch
inschakelt. Druk op de toets AAN/UIT knop om het apparaat uit te schakelen. Het
3 - Installeren
• Plaatsen van batterijen afs tandsbe di eni ng: Open het batterijcompartiment (16) van de
afstandsbediening. Plaats de meegeleverde CR2032 knoopcelbatterij met de
positieve aansluiting omhooggericht in het batterijcompartiment. Sluit het
batterijcompartiment.
Let op: Denk eraan
INGESCHAKELD LED indicatorlampje gaat uit.
• Sluit de ronde stekker van de voeding aan op de 12 V/DC 1 A-aansluiting (6).
• Zodra het apparaat is aangesloten op de netspanning, gaan de AAN/UIT LED
indicator en INGESC HAKELD LED in dicator (10) branden. H et apparaat staat AAN
en is ingeschakeld.
Nederlands
Optioneel: Plaats 8x 1,5 V A A batter ijen (niet meegeleverd) in het batterijcompartim ent (5).
Zorg dat de + en - polen zijn gepla atst als aangegeven in het batterij compartiment. Sluit het
batterijcompartiment. Wij raden het gebruik van oplaadbare batterijen af omdat deze een lager
voltage hebben.
Let op:
• Radar Guard batterijen zijn bedoeld voor gebruik als back-up batterijen (back-up voeding),
in het geval van een stroomstor ing of wanneer de voedi ng losgek oppeld wordt. Beschouw
de batterijen niet als hoofd voedi ng. Het hoofdap paraat dient op de m eegel everde voedin g
aangesloten te blijven tijdens het gebruik.
In het geval van een stroomstoring is de levensduur van de batterijen ongeveer een week,
•
zolang het apparaat he t alarm niet r egelmatig acti veert. Het regelm atig activeren va n het
alarm kan ervoor zorgen dat de batterijen na een dag of zelfs nog eerder leeg zijn.
Vervang de batterijen als de AAN/UIT indicatorlamp zwakker gaat branden of uit gaat.
•
Verwijder de batterijen als het apparaat voor een langere tijd niet wordt gebruikt.
•
27
Page 29

Nederlands
Nederlands
4 - Gebruik
Radar detectie: De geïntegreerde radarsensor (7) reageert op beweging binnen het
detectiebereik met een detectiehoek van 36 0°, bij v oor bee ld wanneer een mens of dier bi nn en
het detectiebereik k omt (0 - 10 m in o pen gebieden). Als het apparaat ingeschak eld is wordt
het alarm onmiddellijk geactiveerd.
Belangrijke opmerking:
Beweging kan gedetecteerd worden door houten, kunststof en stenen muren etc. van max.
18 cm dik. Detectie door glas is ook mogelijk.
Het detectiebereik varieert afhankelijk van de dikte of materiaal van de muur en kan
verminderd worden wanneer er metalen frames zijn die de radargolven tegengehouden.
Alarm sirene: D ruk op de Select Alarm k nop op het apparaat of de af standsbediening om
het soort alarm te wijzig en. Kies uit 5 verschil lende alarm geluiden: 3 verschillen de sirenes, 1
realistisch klinkende blaffende hond en 1 deurbel. Pas het volume aan met VOL+ (1) en VOL-
(2) knoppen om te kiezen tussen de 8 verschillende geluidsniveaus. Een voorbeeldgeluid
klinkt gedurende 10 seconden na het indrukken van een volumeknop.
Paniek alarm: Druk op de ALARM k nop om het alar m direct te act iveren. Voor deze functie
mag het apparaat niet geactiveerd zijn.
In-/uitschakelen: Druk op de aan/uit toets om het al arm IN te schakelen. Het apparaat s tart
met 10 seconden aftellen en wordt daarna ingeschakeld. Verlaat de detectiezone voor het
aftellen klaar is omdat and ers het alarm geac tiveerd wordt. Druk op de aan/uit toets om een
alarm UIT te schakelen. Het alarm stopt direct, maar het apparaat is nog steeds ingeschakeld.
Druk nogmaals op de toets aan/uit knop om het apparaat uit te schakelen, de
INGESCHAKELD LED indicator gaat uit. Het geblaf en de sirene duren elke keer dat het
alarm geactiveerd wordt ong. 60 seconden. De deurbel belt eenmaal als deze geactiveerd
wordt.
28
Page 30

Nederlands
5 - Reiniging en onderhoud
• Schakel het apparaat uit en trek de stekker uit het stopcontact voor het reinigen.
• Gebruik in geen geval agressieve schoonmaakmiddelen, schoonmaakalcohol of
andere chemische oplossingen omdat deze in de behuizing kunnen trekken of de
functionaliteit k unnen bep erken.
• Dompel het product nooit onder in water of een andere vloeistof.
• Reinig de behuizing met een droge, pluisvrije doek.
6 - Veiligheidsinstructies
Lees de gebruiksaanwijzing zorg vuldig door en let voor al op de ve iligh ei dsinf or m atie . A ls u de
veiligheidsinstructi es en de infor matie over d e juiste hanteri ng in deze handleiding n iet volgt,
aanvaarden wij geen aansprakelijkheid voor letsel of eigendomsschade die hiervan het gevolg
is. Dergelijke gevallen zullen de garantie doen vervallen.
• Installeer het systeem niet wa ar het aan direct zonlicht of regen wordt blootges teld
(alleen voor gebruik binnenshuis).
• Het apparaat moet uit de buurt gehouden worden van warmtebronnen zoals
radiatoren, verwarmingskanalen en fornuizen.
Nederlands
• Als het apparaat een vals alarm afgeeft, kan het zijn dat het zich te dicht bij een
warmtebron bevindt, de loc atie of richt ing van het ap paraat wij zigen k an de o plos sing
zijn.
• Gebruik uitsluitend de meegeleverde voedingsadapter.
• Het systeemgeluid is erg hard, houd het toestel nooit dicht bij het oor.
• Om veiligheidsred enen dient u de stekker uit het sto pcontact te verwijderen tijdens
onweer.
• Als u vragen hebt die do or deze gebruiks aanwijzing niet beantwoor d worden, kunt u
contact opnemen met onze technische dienst of ander technisch personeel.
29
Page 31

Nederlands
Nederlands
7 - Technische specificaties
ISD-RG1200
Ingangsspanning / stroom............................................. 12 V DC, 1 A via voedingsadapter
Backup batterij............................................................................ 8 x 1,5 V batterij type AA
Stroomverbruik.......................................................................................................... ≤ 6 W
Stroomverbruik in stand-by .................................................................................... ≤ 7 mA
Dynamisch stroomverbruik.................................................................................. ≤ 500 mA
Geluidsniveau...................................................................................................≤ 95 dB
Geluidsniveau deurbel..................................................................................... 70-95 dB
Geluidsniveau blaffende hond......................................................................... 65-95 dB
Geluidsniveau alarm...................................................................................... 75-95 dB
Zendfrequentie/vermogen.......................................................................... 5,8 GHz, 1 mW
Detectiehoek................................................................................................................ 360°
Radar detectiebereik (open gebied): 0 – 15 m (achter), 0 – 3,5 m (voor), 0 – 7 m (zijkant)
Gebruikscondities................................................................. 0 tot +40 ºC, 20 % – 85 % RV
Opslagcondities.................................................................... 0 tot +40 ºC, 20 % – 50 % RV
Afmetingen (B x H x D): ......................................................................154 x 160 x 110 mm
Gewicht............................................................................................................. Circa 820 g
Voedingsadapter
(Shenzhen Shenghuacheng Technology Co. Ltd., model : …………… SHCY-SP1201000EU)
Ingangsspanning / stroom........................................... 1 00 – 240 V AC, 50/60 Hz, max. 0,3 A
Uitgangsspanning / stroom................................................................................ .. 12 V DC, 1 A
Lengte kabel.................................................................................................................... 1,5 m
Afstandsbediening
Werkspanning........................................................................... 1 x 3V knoopcel type CR2032
Bereik (open gebied) .............................................................................................. max. 60 m
Zendfrequentie/vermogen............................................................................ 433 MHz, 0,1 mW
30
Page 32

Radaralarmovervågning - ISD-RG1200 manual
Dansk
1 - Beskrivelse af dele
1. Knappen Volume +
2. Knappen Volume -
3. Knappen Vælg alarm
4. Tænd/sluk-knap
5. Batterirum
6. Tilslutningsstik 12 V/DC 1 A
7. Radarsensor
8. Højttaler
9. LED-indikator for strøm
10. LED-indikator for aktivering
11. Signal-LED
12. Tænd/Sluk-knap
13. Knappen Vælg alarm
14. Alarm-knap
15. Hul
16. Batterirum
2 - Pakkens indhold
1 stk. radarovervågning ISD-RG1200
2 stk. fjernbetjeninger
1 stk. strømadapter
1 stk. håndbog
1 stk. CR2032-batteri
3 - Installation
• Isætning af batterier i fjernbetjeningen Åbn fjernbetjeningens batterirum (16). Isæt det
medfølgende batteri af typen CR2032 med den positive terminal opad i batterirummet.
Luk batterirummet.
31
Page 33

Note:
• Radarovervågningens batterier er beregnet som backup-batterier
(backup-strømforsyning), i tilfælde af at strømforsyningen via elnetadapteren bliver
frakoblet eller svigter. Anse ikke batterierne som en primær strømforsyning. Den
primære enhed skal være sluttet til den medfølgende elnetadapter under brug.
• I tilfælde af strømsvigt kan batteriernes levetid vare i op til en uge, så længe
enheden ikke aktiverer alaramen periodisk. Periodisk aktivering af alarmen kan
udtømme batterierne efter én dag eller endda hurtigere.
• Udskift batterierne, når strømindikatorlampen bliver svagere eller går ud.
• Fjern batterierne, når enheden ikke skal bruges i en længere periode.
Note:
• Bemærk, at hver gang enheden tilføres strøm, bliver den automatisk slået til. Tryk på
Tænd/sluk-knappen for at slå enheden fra. ARM LED-indikatoren slukkes.
Dansk
• Slut det runde stik på elnetsadapteren til forbindelsesstikket med 12 V jævnstrøm, 1
A (6)
• Når enhden er blevet sluttet til strøm, lyser LED-indikatoren for strøm og
LED-indikatoren for aktivering (10). Enheden er tændt og i Aktiveringstilstand.
Valgfri: Sæt 8 x 1,5 V AA batterier (medfølger ikke) i batterirummet (5). Overhold den korrekte
polaritet (+/-) som angivet i batterirummet. Luk batterirummet. Vi fraråder brugen af
genopladelige batterier, da de har en lavere spænding.
32
Page 34

4 - Betjening
Vigtig bemærkning:
Bevægelser kan detekteres gennem træ-, plastik- og stenvægge osv. med en tykkelse
på maks. 18 cm. Detektion gennem glas er også mulig.
Detektionsområdet varierer afhængigt, hvor tyk vægmaterialet er, og det kan være
reduceret, hvis der er nogen metalrammer, som reducerer radarbølgens
gennemtrængning.
Radardetektion:Den integrerede radarsensor (7) reagerer på bevægelser inden for dens
detektionsområde på 360°, hvis et menneske eller dyr for eksempel trænger ind i
detektionsområdet (0-10 m i åbne områder). Hvis enheden er i aktiveringstilstand, bliver
alarmen aktiveret med det samme.
Alarmsirene: Tryk på knappen Vælg alarm på enheden eller fjernbetjeningen for at ændre
alarmtypen. Vælg mellem 5 forskellige alarmlyde: 3 forskellige slags sirenealarmer, 1 realistisk
hundegøen og 1 dørklokke. Juster lydstyrken ved hjælp af knapperne VOL+ (1) og VOL- (2)
for at vælge mellem de 8 forskellige lydstyrkeniveauer. Et demonstrationslydniveau udlæses i
10 sekunder, efter der er trykket p[ en af lydstyrkeknapperne.
Dansk
Panikalarm: Tryk på ALARM-knappen for at aktivere en øjeblikkelig alarm. Enheden må ikke
være i aktiveret tilstand til denne funktion.
Aktiver/deaktiver: Tryk på Tænd/sluk-knappen for at tænde for alarmen. Enheden starter
efter 10 sekunders nedtælling og vil derefter være aktiveret. Forlad detektionsområdet, inden
nedtællingen stopper, da alarmen ellers vil blive aktiveret. For at stoppe alarmen skal der
trykkes på Tænd/sluk-knappen for at slukke for alarmen. Alarmen stopper øjeblikkeligt, men
enheden er stadig i aktiveret tilstand. Tryk på Tænd/sluk-knappen igen for at deaktivere
enheden, og LED-indikatoren for aktivering slukkes. Hundene, der gør, og sirenelyden varer
ca. 60 sekunder, hver gang alarmen aktiveres. Dørklokken ringer kun én gang, når den er
aktiveret.
5 - Rengøring og vedligeholdelse
• Sluk og kobl produktet fra elnettet inden hver rengøring.
• Der må under ingen omstændigheder bruges aggressive rengøringsmidler,
rengøringssprit eller andre kemiske opløsninger, da de kan trænge gennem huset
eller forringe funktionaliteten.
• Nedsænk aldrig produktet i vand eller andre væsker.
• Rengør produktet med en tør, fiberfri klud.
33
Page 35

6 - Sikkerhedsvejledning
Dansk
Læs betjeningsvejledningen nøje igennem, og overhold især sikkerhedsoplysningerne. Hvis
du ikke følger sikkerhedsvejledningen og -oplysningerne om korrekt håndtering i denne
håndbog, påtager vi os intet ansvar for eventuelle personskader eller ejendomsskader som
følge deraf. Sådanne tilfælde vil ugyldiggøre garantien.
• Installer systemet, hvor det bliver eksponeret for direkte sollys eller regn (kun til
indendørs brug).
• Enheden skal altid være på afstand af varmekilder såsom radiatorer, varmekanaler og
brændeovne.
• Hvis enheden udsender en falsk alarm, er den muligvis placeret for tæt på en
varmekilde, og ændring af placeringen eller enhedens retning kan udbedre dette.
• Brug kun den medfølgende elnetadapter som strømforsyning.
• Systemets lyd er meget høj, så placer aldrig enheden tæt på ørerne.
• Af sikkerhedsmæssige årsager skal elnetadapteren tages ud af stikkontakten under
storme.
• Hvis du har nogen spørgsmål, som betjeningsvejledningen stadig ikke har besvaret,
kan du kontakte vores tekniske supporttjeneste eller andet teknisk personale.
34
Page 36

6 - Tekniske specifikationer
ISD-RG1200
Indgangsstrøm/-spænding.................................. 12 V jævnstrømm 1 A via strømadapteren
Backup-batteri..................................................... 8 stik.1,5 V batterier af typen AA
Strømforbrug...................................................... ≤ 6 W
Strømforbrug ved standby.................................. ≤ 7 mA
Dynamisk strømforbrug...................................... ≤ 500 mA
Støjniveauinterval................................................. ≤ 95 dB
Støjniveauinterval for dørklokke.............................. 70-95 dB
Støjniveauinterval for hundegøen........................... 65-95 dB
Støjniveauinterval for alarm.................................... 75-95 dB
Sendefrekvens/-effekt........................................... 5,8 GHz, 1 mW
Radardetektionsvinkel........................................... 360°
Radardetektionområde (åbent område) ..................... 0-15 m (bagtil), 0-3,5 m (fortil)
0-7 m (side)
Driftsforhold........................................................... 0 til +40 ºC, 20 % - 85 % relativ luftfugtighed
Opbevaringsforhold............................................... 0 til +40 ºC, 20 % - 50 % relativ luftfugtighed
Mål (B x H x D) ...................................... 154 x 160 x 110 mm
Vægt................................................................. Ca. 820 g
Dansk
Strømadapter
(Shenzhen Shenghuacheng Technology Co. Ltd.,model : SHCY-SP1201000EU)
Indgangsstrøm/-spænding............................... 100-240 V vekselstrøm, 50/60 Hz, maks. 0,3 A
Udgangsspænding/-strøm....................................... 12 V jævnstrøm, 1 A
Kabellængde........................................................ 1,5 m
Fjernbetjening
Driftsspænding............................................................ 1 x 3 V knapcelle, typen CR2032
Interval (åbent område) .............................................. maks. 60 m
Sendefrekvens/-effekt.................................................. 433 MHz, 0,1 mW
35
Page 37

Page 38

Blaupunkt Competence Center Security
Security Brand Pro GmbH
Mondstrasse 2-4
85622 Feldkirchen
Germany
E-Mail: contact@blaupunkt-sc.com
www.blaupunkt.com/service
Scan here:
Blaupunkt Service Support
 Loading...