

Page 1
OWNER’S MANUAL
Mobile Audio System
MILANO 170 BT/AUGSBURG 170 BT
Instruction manual
Bedienungsanleitung
Mode d’emploi
Manual de instrucciones
Handleiding
Manuale di istruzioni
Instruktionsbok
ALICANTE 170/ESSEN 170
Käyttöohje
Brugsanvisning
Instrukcja obsługi
Manual de instruções
Használati utasítás
Návod k použití
Page 2

CONTENTS
Operation ...................................... 4
Location of keys .................................. 4
Turn on/off the unit ............................. 5
Mute................................................... 5
Faceplate release ................................ 5
Sound adjustment ............................... 5
REG on/off .......................................... 5
Ejecting a disc .................................... 8
Select directory
up/down........................................8
Selecting files by button ................. .9
USB play operation ............................. .9
TF operation ...................................... .9
Disc notes .......................................... .10
TA volume .......................................... 5
LOC on/off .......................................... 5
Stereo/mono ....................................... 5
Beep on/off ......................................... 5
AREA .................................................. 5
EQ ...................................................... 6
XBASS ................................................ 6
Display information.............................. 6
Set the time ........................................ 6
Liquid crystal display ........................... 6
ESP function ....................................... 6
Auxiliary input ................................... 6
Reset function ..................................... 6
Radio operation ................................... 6
Switching to radio mode ................... 6
Selecting the frequency band ............ 6
Selecting station .............................. 7
Automatic memory storing& program
scanning.......................................... 7
Manually store station & recall preset
station .............................................. 7
RDS (Radio Data System )
operation ….…………………..…………..7
CD/ MP3/ WMA operation .................... 8
Bluetooth operation*) ......................... .11
Remote control ............................ ..13
Specification ................................ ..14
Trouble shooting .......................... .15
Installation instructions............... 208
*) Only for devices with Bluetooth
function
Switching to disc mode ........................ 8
Selecting tracks/file ............................. 8
Pausing playing ................................... 8
Scan play all tracks/files ...................... 8
Repeating the same track/file .............. 8
Playing all tracks/files in random .......... 8
2
Page 3

Declaration of conformity
The Blaupunkt Competence Center Car
Multimedia-Evo Sales GmbH declares that
the device complies with the basic
requirements and the other relevant
regulations of the directive 2014/53/EU.
The declaration of conformity can be found
on the Internet under www.blaupunkt.com
Declaration of Conformity with regard to the
RE Directive 2014/53/EU
Declaration of Conformity with regard to the
RoHS Directive 2011/65/EU
Warranty
The warranty terms can be called up from
www.blaupunkt.com
Warranty
If you ever need to use a repair service, you
will find information about service partners
in your country under www.blaupunkt.com
E
N
L
I
S
H
3
Page 4
OPERATION
” (panel release) button.
LOCATION OF KEYS
4
1. “MUTE” button.
2. “TS” button.
3. “BAND” button.
4. “ /SRC(source)” button.
5. “
6. “VOL /MENU” button.
7. DISC Slot.
8. LCD display.
9. “ ”(SEEK DOWN) button.
10. “DISP” button.
11. “Eject”button.
12. USB port
13. “AUX IN” jack.
14. “ ”(SEEK UP) button.
15. “EQ ” button.
16. “6 DIR+/ ” button. *)
17. “5 DIR-/ ” button. *)
18. “4 RDM” button
19. “3 RPT ” button.
20. “2 SCN ” button.
21. “1 ” button.
22. “ ” MP3 search button
23. RESET button.
24. TF card slot.
25.IR SENSOR
26.MICPHONE
*) Only for devices with Bluetooth function
Page 5

OPERATION
TURN ON/OFF THE UNIT
Turn on the unit by pressing button(4).
When system is on. Press and hold
button (4) for 2 seconds to turn off the unit.
MUTE
Shortly press MUTE button(1) to muting
the audio output. Press it again to recover
output.
FACEPLATE RELEASE
Press release button (5) to detach the
removable faceplate.
SOUND ADJUSTMENT
Press MENU button (6) shortly to select the
desired adjustment mode. The adjustment
mode will change in the following order:
-BAS-TRE-BAL-FAD- VOLBAS: bass
TRE: treble
BAL: balance
FAD: fader
VOL: volume
By rotating the audio knob (6) it is possible
to adjust the desired sound quality.
Press and hold MENU button (6) for 2
seconds into the system menu as below:
AF– TA – REG – TAVOL – LOC – STEREO –
BEEP – XBASS-AREA
AF: Alternative Frequencies
TA: Traffic Announcement
REG: region
TAVOL:TA volume
LOC: local
STEREO
AREA: Europe
REG on/off
When AF function is on. In REG item of
the system menu you can switch it on or
off. Some broadcasting stations change
their program from normal broadcasting
to regional broadcasting for a certain
time period. When region is on, the
current listening program remains
unchanged
TA volume
This function allows you to define the
minimum volume for the traffic
announcements. The adjustable range is
20~43. The defaulted value is 25. Rotate
the volume knob to adjust the volume of
the traffic.
LOC on/off
In this item rotating the audio knob (6) to
turn on/off local function. In LOC ON mode the
unit will reduce the receiving sensitivity
when you search station. That means you
can receive the station that sound is good.
It will ignores the station that sound is not
good. In LOC OFF mode it will increase the
receiving sensitivity when you search the
station. That means you can receive more
stations.
STEREO/MONO
In this item rotating the audio knob (6) to
choose STEREO or MONO mode. In STEREO
mode you can receive FM stereo signal. In
MONO mode the stereo station will be
switched to monochrome. Sometimes when
the signal is not good. If you change it to
MONO mode. The noise will be reduced.
BEEP on/off
The car audio device is equipped with 2
beep tone modes. Rotate the volume
knob to choose one.
- Beep on mode:
sound is heard whenever a button is
pressed.
- Beep off mode:
switched off whenever a key is pressed
AREA
In this item, rotate the volume to select
Europe/USA/LAT area.
.
The confirmation beep
The confirmation beep is
E
N
L
I
S
H
5
Page 6
OPERATION
XBASS
Press and hold the EQ button for 2 seconds
to active the XBASS function. Press it and
hold it again to cancel this function.
EQ (Equalisation)
audio player through the AUX IN jack (13).
Pressing SRC button to switch to AUX
mode when inserted an audio source to the
unit.
Press EQ button shortly to select the preset
EQ mode as below:
FLAT-CLASSICS-POP-ROCK-EQ OFF
DISPLAY INFORMATION
Press DISP button (10) to show the time
for 5 seconds. Then it returns to show the
information.
SET THE TIME
(1) Manual setting:
Press and hold DISP button for 2 seconds.
The hour of the time will be flashing. Press
/ button to set the correct hour.
Press DISP button shortly to change to
minute. Also use / button to set the
correct minute. After that press DISP
button to confirm.
(2) Synchronize the time from the
RDS station:
To receive a RDS station which has good
signal(The AF symbol of the LCD does not
flashing). Several minutes later the time will
be synchronized to the correct time by the
station’s signal. (Note: None RDS station
does not have this function.)
LIQUID CRYSTAL DISPLAY
Exhibit current frequency and activated
functions on the display.
ESP FUNCTION
The unit can be shockproof between ten
seconds and twenty seconds.
AUXILIARY INPUT
The unit can be connected to a portable
RESET FUNCTION
RESET button (23) must be activated with
either a ballpoint pen or thin metal object.
The RESET button is to be activated for the
following reasons:
- Initial installation of the unit when all
wiring is completed.
- All the function buttons do not operate.
- Error symbol on the display.
Note: if press RESET button (23), the unit
can’t work yet, please use a cotton swab
soaked in isopropyl alcohol to clean the
socket on the front panel.
RADIO OPERATION
SWITCHING TO RADIO MODE
Press SRC button (4) to select radio
mode, the radio mode appears in the
display together with the memory band
and frequency.
SELECTING THE RADIO BAND
At radio mode, press BAND button (3)
to select the desired band.
The reception band will change in
following order:
→FM1→ FM2→ FM3 → MW1(AM1)→ MW2(AM2)
SELECTING STATION
Press button (14) or button (9)
shortly to activate automatic seek
function. It will search up/down a
station automatically. Press for 2
seconds until “MANUAL” appears on
the display, the manual tuning mode is
selected. In this
6
Page 7

OPERATION
mode you can turn up/down a step
frequency one by one till searched a
station. If both buttons have not been
pressed for 5 seconds, it will return to
seek tuning mode and “AUTO” appears
on the display.
AUTOMATIC STORING &
PROGRAM SCANNING
- Automatic storing
- Press TS button (2) for 2 seconds the
radio searches from the 87.5MHz
frequency and checks the signal
strength until one cycle search is
finished. And then some strong stations
are stored into the corresponding preset
number button of the FM3 band. In the
first cycle it will in LOCAL mode to
receive the stronger station. If it is less
than 6 pcs station it will searching
stations in 2nd cycle in LOCAL OFF mode.
- Program scanning
Press TS button (2) shortly to scan
preset station. The radio is holding at
that preset number for 5 seconds with
release mute.
MANUALLY STORE STATION &
RECALL PRESET STATION
To received a station, Press one of the
preset button (1~6) for 2 seconds. The
current station is stored into the number
button. Shortly press the preset button
(1~6) to directly listen the station that
saved in the corresponding preset
button.
RDS (RADIO DATA SYSTEM)
OPERATION
Setting RDS mode
In AF item of system menu. Rotating
audio knob to switch on or off the AF
function.
Whenever AF is on, symbol “AF”
appears on the display.
Program name is displayed on receiving
7
a RDS station.
“AF” starts blinking if the broadcasting
signal getting worse.
“ALARM” will be displayed when an
emergency broadcasting is received,
meanwhile sound output level will be
adjusted to the preset output level
automatically when the volume control
is set at minimum.
Regional Program Operation
When AF function is on. In REG item of
system menu. Rotating audio knob to
turn the REG function on or off. When
AF function is off. The REG function can’t
set to off.
Some broadcasting stations change
their program from normal broadcasting
to regional broadcasting for a certain
time period. When region is on, the
current listening program remains
unchanged. When region is off, it allows
the reception moves to the regional
station.
Listening to Traffic Announcement
In TA item of system menu. Rotating
audio knob to switch on or off the TA
function. When TA mode is on and a
traffic announcement is transmitted:
When the unit was in CD (MP3) or AUX
mode, it will switch temporarily to radio
mode.
Temporary switch over to an EON linked
station when EON detects a traffic
announcement on that other program.
If the volume level was under the
threshold point it will be raised to the
threshold point.
When TA mode is on, TA of individual
segment is turned on. When a TP station
is received, TP of individual segment is
turned on.
TA interruption function
The current traffic announcement is
cancelled by turn the TA function to STOP
(in TA item of RDS menu, when
the TA station is not received it only has
E
N
L
I
S
H
Page 8

OPERATION
on/off. But when received a TA station
the TA item will have on/stop/off for
your selection). But the TA mode will
not be off.
unwanted EON TA switching, which
EON TA information was received from
current station and the radio switched to
that EON linked station, but no
Information could not be received
because the EON linked station is
located too far from that area. So the
radio is switched back to current station
again. In above operation, a customer
listens to a wrong program or mute
sound for a while. The RDS data used
are the PI, PS, AF, TP, TA, EON and PTY
data.
PS: Program Service Name
Broadcast station name data expressed
in alphanumerically characters
AF: Alternative Frequencies
Frequency list of broadcasting stations
transmitting the same program
TP: Traffic Program Identification
Identification data for traffic
information-broadcasting station
TA: Traffic Announcement Identification
Identification data showing traffic
information is being transmitted or not.
If a disc is already inserted in the driver:
Keep pressing SRC button (4) shortly
until the DISC mode display appears.
SELECTING TRACKS/FILE
Press button (14) or button (9)
to move to the previous track/file or the
following track/file. Track/file number
shows on the display.
Hold button (14) or button (9)
to fast reverse or fast forward. disc play
starts from when you release the
button.
PAUSING PLAYING
Press button (21) to pause playing.
Press it again to resume play.
SCAN PLAY ALL TRACKS/FILES
Press SCN button (20) to play first
several seconds of each track/file. Press
again to stop intro play and listen to
track/file.
REPEATING THE SAME
TRACK/FILE
Press RPT button (19) to continuously
repeat the same track/file. Press it again
to repeat all the tracks/files.
EON: Enhanced Other Networks
Information
Broadcasting information on PI, AF, TP,
TA, etc, relating to networks other than
the network used for current reception.
CD/MP3/WMA OPERATION
SWITCHING TO DISC MODE
If there is no disc inserted in the driver:
Gently insert a disc with the printed
side uppermost into the disc
compartment until you feel some
resistance. The disc is drawn into the
driver automatically. disc playback
begins.
8
PLAYING ALL TRACKS IN RANDOM
Press RDM button (18) to play all tracks
/files in random order. Press it again to
cancel the random function.
EJECTING A DISC
Press button (11) to stop disc
playing and eject the disc from the disc
slot (6).
SELECT DIRECTORY UP/DOWN
Press DIR-button (17) or DIR+ button
(16) to select previous directory or next
directory. If the MP3/WMA disc does not
contain any directory, there is no
function of pressing DIR- button (17) or
Page 9
OPERATION
DIR+ button (16).
SELECTING FILES BY
BUTTON
(22) is assigned as selection button
in MP3/WMA operation.
When pressed, it is activated the
selecting each mode as below:
Search from folder. => Search file
number.
Search From Folder
Press button for one time. It
enter into “Searching from folder”
mode. Rotating the VOL knob to
select desired folder. After that
press
MENU knob (6) to enter the folder.
Rotating knob (6) to select desired
file. And then press MENU knob (6)
again to play.
Press button will back to
previous folder.
Search File number
Press button for two times. It
is activated the “Search file number”
mode. Rotating knob (21) to select
the file number then press MENU
knob (4) to confirm. The unit
searches the selected file to play.
You also can enter the file’s number.
In front panel except there are 1~6
digit. please note7/8/9/0 as below:
EQ: 7
: 8
: 9
DISP: 0.
If the file number was selected.
The unit wait for seconds. The unit
searches the track after few seconds,
even if the MENU (4) button is not
pressed.
9
USB PLAY OPERATION
In the front panel of the unit, there is an
USB interface (10). You can connect an USB
driver through this interface (12).
When you connect an USB driver through
the interface, the unit will search the MP3/
WMA files in the USB driver and start to play.
If in other mode, you can also press
SRC button to select USB mode.
When playing the MP3/WMA files in the
device, the operation is the same with the
CD/MP3/WMA operation described above.
Note:
The main unit can only support the
standard USB-memory disc which is
approved by Microsoft.
USB MP3 player is not a standard which
means different brand name or different
models have their own standard. So our
product cannot support every MP3
player.
When connecting an MP3 player which
has normal battery (non rechargeable
battery), you should remove the battery
from the MP3 player then connect it to
the USB interface. Otherwise, it may
cause battery burst.
TF OPERATION
There is a TF interface (24) on the front
panel of the unit.
When you insert a TF card in the TF
interface, the unit will search the MP3/WMA
files in the card and start to play. The
operation is the same with the
CD/MP3/WMA operation described above.
If in other mode. You can also press SRC (4)
button to select SD mode.
SUPPORTED MP3/WMA DECODING
MODES
The main unit supports MP3/WMA
(Windows Media Audio) decoding modes as
below.
E
N
L
I
S
H
Page 10

OPERATION
Re W rit a ble
Standard
MPEG1 Audio
Layer 3
(44.1kHz)
Windows
Media Audio
(44.1kHz)
Bit Rate
(kbps)
32,48,64,96,
128,192,256,
320
64,96,128,192 Stereo
The USB solution can support:
1. Folder: 500 max.
2. File: 999 max.
3. Depth of folder: 8 layers
4. Size: 32 GB
CAUTION
When there are important files in the USB
device or TF card, do not connect it to the
main unit to play. And don’t play the
CD-R/RW disc that has important files in it.
Because any wrong operation may cause
files loss. And our company assumes no
responsibility for this.
DISC NOTES
A. Notes on discs:
Attempting to use non-standard
shape discs (e.g. square, start, heart)
may
Supports
Mode
Stereo
1. Be sure to use discs with following
marks only for the unit to play:
2. The unit cannot play a CD-R and CD-RW
that is not finalized. (Please refer to the
manual of your CD-R/CD-RW recorder or
CD-R/CD-RW software for more
information on finalization process).
3. Depending on the recording status,
conditions of the disc and the
equipment used for the recording, some
CD-Rs/CD-RWs may not be played on
this unit. (see *1)
*1: To have more reliable play back, please
0
see following recommendations:
a: Use CD-RWs with speed 1x to 4x
and write with speed 1x to 2x.
b. Use CD-Rs with speed 1x to 8x and write
with speed 1x to 2x.
c. Do not play a CD-RW which has been
written for more than 5 times.
1. damage the unit. Be sure to use round
shape CD discs only for this unit.
2. Do not stick paper or tape, etc, onto the
label side or the recording side of any
discs, as it may cause a malfunction.
3. Dirt, dust, scratches and warping discs
will cause mis-operation.
B. Notes on CD-Rs (recordable
CDs)/CD-RWs (rewritable CDs):
10
C. Notes on MP3 files (MP3 Version
Only):
1. The disc must be in the ISO9660 level 1
or level 2 format, or Joliet or Romeo in
the expansion format.
2. When naming a MP3 file, be sure the file
name extension is “.MP3”.
3. For a non-MP3 file, even though the file
name extension is “.MP3”, the unit
cannot recognize it.
Page 11
OPERATION
BLUETOOTH OPERATION *)
PRE-PAIR FOR BLUETOOTH
OPERATION
(i) When use Bluetooth, please make sure
the mobile phone supports Bluetooth
function.
(ii) For the different kind of mobile phone,
Bluetooth emissive power has some
difference. To get the best conversation
quality, it is commended that the distance
between the mobile phone and the unit is
within 3m. And please don’t put any metal
object or any obstacle between the path of
the mobile phone and the unit.
Checking phone book / received /
dialed / missed call (for Android and
Iphone mobile)
Press SRC key it will show “PHONE” on
the display. press button it will
show BOOK on the LCD. Then repeatedly
press it will show items as below:
BOOK---RECEIVED---DIALED---MISSED--
-PHONE
In each item you can use button or
button to check corresponding
number.
Note: In the first time your mobile will
receive a message that the unit will visit
your mobile through Bluetooth. You have
to agree and press “YES” to confirm.
E
N
L
I
S
H
PAIRING
1) On the mobile phone, select the
Bluetooth set up. (Please refer to the
instruction manual of your mobile phone on
how to operate Bluetooth.)
2) “CAR KIT” should appear in the list on
your
mobile phone, please select “BP 170 BT”
and then input password “0000”. If it needs
a password.
3) When successful paired, the BT mark will
be displayed on LCD.
Answering / rejecting an incoming
call
When there is a phone is coming in. Press
key to answer the call. Press key to
reject the call.
Hang up a call
When finished a conversation ,press
key to hang up this call.
11
(Note: It is necessary the phone number is
in the phone not in the SIM card).
Call out
1) Making an outgoing call by
inputting the phone number
manually.
Press SRC key it will show “PHONE” on the
display. Press and hold key. The LCD
will become BLANK. Then you can enter
phone number and press key to
confirm
the dialing. (Note: If you inputted wrong
numbers. Press the key to cancel
wrong numbers.)
In front panel except there are 1~6 digit.
please note 0/7/8/9/*/# as below:
0: DISP button.
7: EQ
8:
9:
*: press and hold 5 key for 2 seconds.
#: press and hold 6 key for 2 seconds.
Page 12

OPERATION
1) Redialing an outgoing call
Press SRC key it will show “PHONE” on the
display. Press and hold key for 2
seconds it will redial the last phone number.
2) Making an outgoing call from
the phone book / received /
dialed / missed call (for
Android and Iphone mobile)
- Please reference “Checking phone
book / received / dialed / missed
call” item then select a phone number.
Press key to dial.
Note: If there are 2 pcs of SIM card in
your mobile phone. When you dial out a
call from the front panel of the unit. The
call will be dialed out from the default
card (or asking using which card each
time dial out).
Transfer the call between mobile
phone and unit
During the talking mode, you can press
button (22) to transfer the phone call
between the mobile phone and the unit.
Bluetooth audio (A2DP function)
Press SRC button (4) it will show “PHONE”
on the display. Then turn on the music
player of your mobile phone and playing a
song. The sound will come out from the
speaker of the
unit. Press key (21) of the front panel
of the unit to pause/play the song. Press
button (14) or button (9) to select
next/previous song.
Connect/disconnect bluetooth
Press and hold SRC button for 2 seconds to
connect/disconnect bluetooth.
*) Only for devices with Bluetooth function
12
Page 13
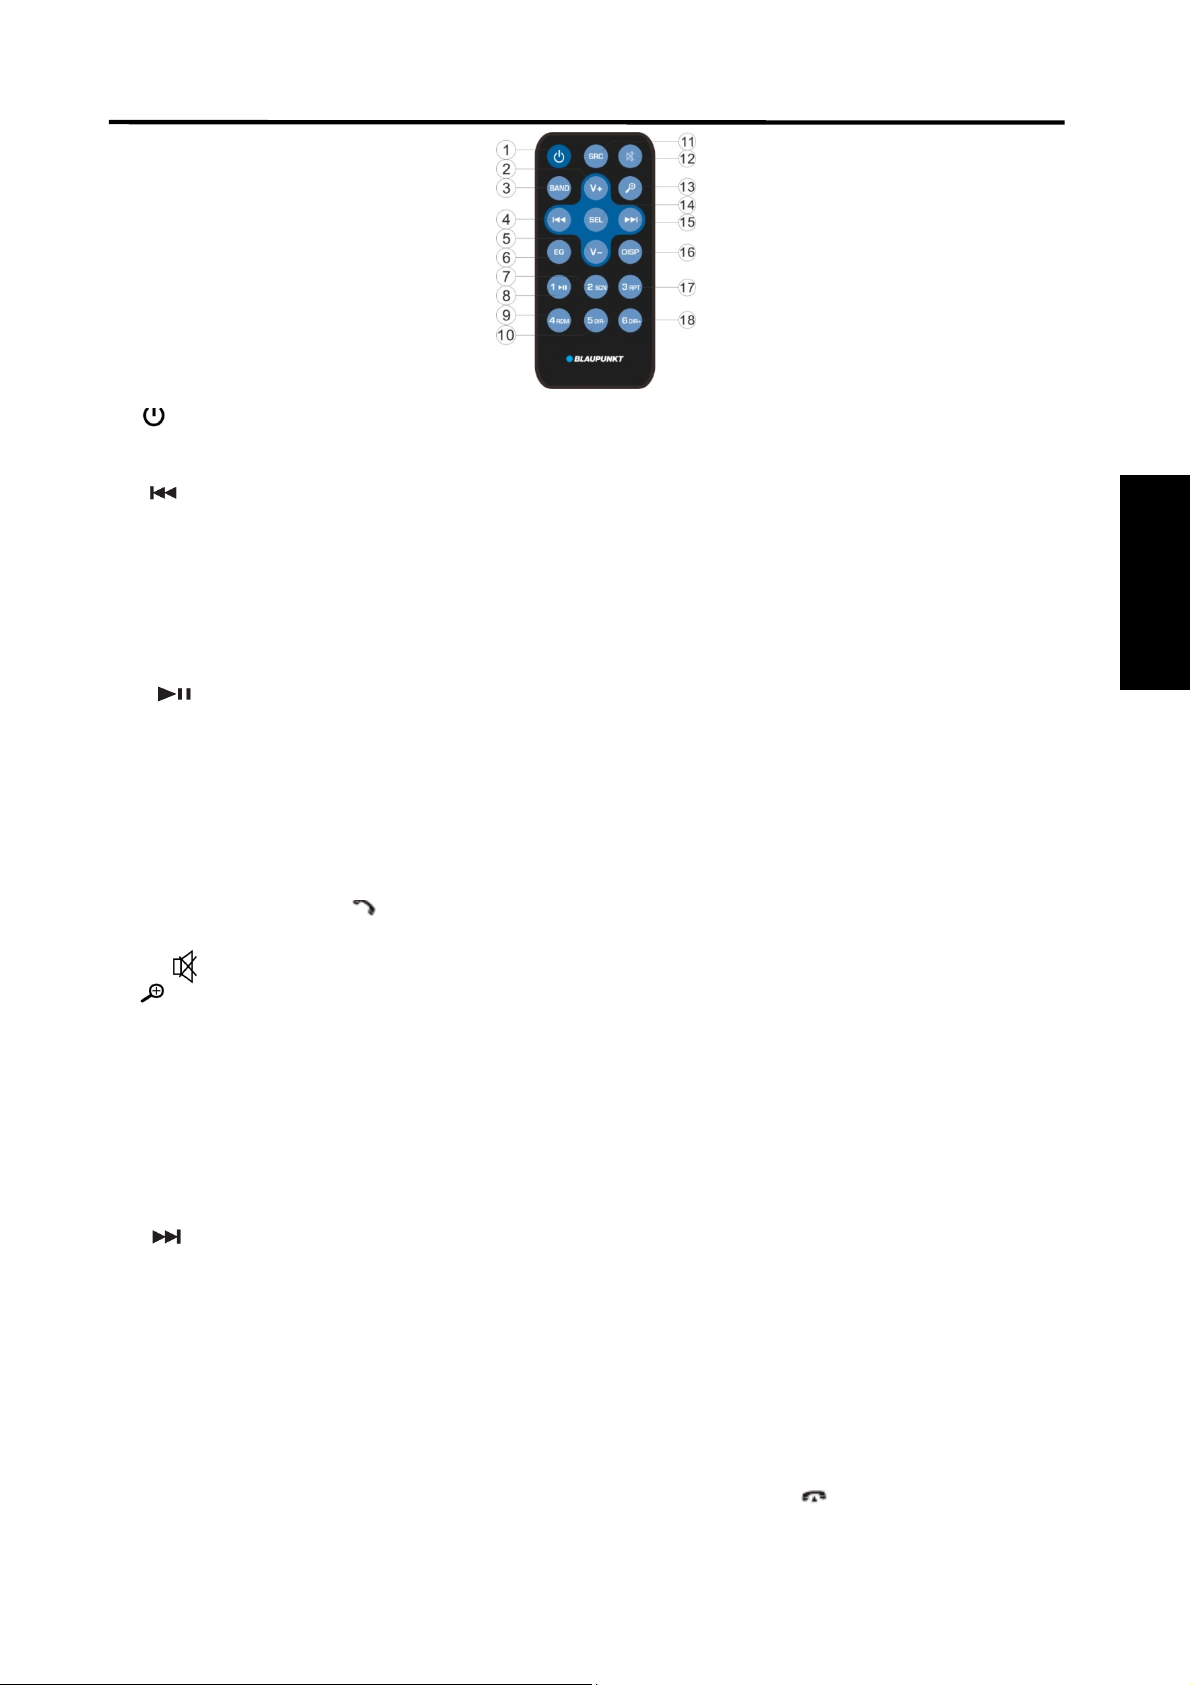
REMOTE CONTROL HANDSET
FUNCTION KEY & CONTROL
1. : Power ON/OFF Button.
2. VOL+: Volume up button.
3. BAND: To select FM1/FM2/FM3/AM1/AM2 band in RADIO mode.
4. : In RADIO mode: Press it shortly for seek down function. Press
and hold it for manual turn down.
In CD/MP3/WMA mode: Press it shortly for skip previous one track/file. Press and hold it
for fast reverse.
5. VOL- : Volume down button.
6. EQ: It is EQ button.
7. 2 SCN: In RADIO mode: Number 2. See page 11 MANUALLY STORE STATION & RECALL PRESET
STATION.
In CD/MP3/WMA mode: Press it turn on/off SCANNING function.
8. 1 : In RADIO mode: Number 1. See page 11 MANUALLY STORE STATION & RECALL PRESET
STATION.
In CD/MP3/WMA mode: Press to pause/resume playing.
9. 4 RDM: In RADIO mode: Number 4. See page 11 MANUALLY STORE STATION & RECALL PRESET
STATION.
In CD/MP3/WMA mode: turn on/off random function.
10. 5 DIR-: In RADIO mode: Number 5. See page 11 MANUALLY STORE STATION & RECALL PRESET
STATION.
In MP3/WMA mode: Press it back to previous folder.
It is key in BT mode. *)
11. SRC: It is SRC key.
12. : Press it to mute/recover the sound.
E
N
L
I
S
H
13. : In RADIO mode: It is TS function. See page 11 AUTOMATIC STORING &
PROGRAM SCANNING
In MP3/WMA mode: It is file searching function. (See page 12).
In PHONE mode. Its function seeing page 15 BLUETOOTH OPERATION
14. SEL: Press it shortly for audio menu. Press and hold for system menu
(See page 9). In MP3/WMA searching mode press it for confirm function (See page
13).
15. : In RADIO mode: Press it shortly for seek down function. Press
and hold it for manual turn up.
In CD/MP3/WMA mode: Press it shortly for skip next one track/file. Press and hold it for
fast forward.
16. DISP: Press DISP to show the time.
17. 3 RPT: In RADIO mode: Number 3. See page 11 MANUALLY STORE STATION & RECALL PRESET
STATION.
In CD/MP3/WMA mode: Press it turn on/off repeat function.
18. 6 DIR+: In RADIO mode: Number 6. See page 11 MANUALLY STORE STATION & RECALL PRESET
STATION.
In MP3/WMA mode: Press it to next folder
When incoming a call or finish a call. It is key. *).
*) Only for devices with Bluetooth function
13
Page 14

SPECIFICATION
GENERAL
Power Supply Requirements : DC 12 Volts, Negative Ground
Chassis Dimensions : 178 (W) x 160 (D) x 50 (H)
Tone Controls
- Bass (at 100 Hz) : ±10 dB
- Treble (at 10 kHz) : ±10 dB
- Maximum Output Power : 4x40 watts
- Current Drain : 10 Ampere (max.) (For Normal Power Version)
CD PLAYER
Signal to Noise Ratio : More than 55 dB
Channel Separation : More than 45 dB
Frequency Response : 40Hz – 18 kHz
RADIO
FM
Frequency Coverage 87.5 to 108 MHz
IF 10.7 MHz
Sensitivity (S/N=30dB) 4μV
Stereo Separation >25dB
AM(MW)
Frequency Coverage 522 to 1620 kHz
IF 450 kHz
Sensitivity (S/N=20dB) 36 dBuV
14
Page 15

TROUBLE SHOOTING
Disc cannot be
loaded or
Inserting the disc in reverse
Insert the compact disc with the
is extremely
Clean the disc or try to play a new
Temperature inside the car
Cool off or until the ambient
Leave the player off for an hour or
Wiring is not properly
The installation angle is
Clean the compact disc, then try to
The operation
keys do not
in microcomputer
is not operating properly
Front panel is not properly fix into
The radio does
not Work. The
radio station
selection does
The antenna cable is not
Before going through the checklist, check wiring connection. If any of the problems persist
after checklist has been made, consult your nearest service dealer.
Symptom Cause Solution
No power.
The car ignition switch is
not on.
If the power supply is
connected to the car accessory
circuits, but the engine is not
moving, switch the ignition key
to “ACC”.
The fuse is blown. Replace the fuse.
Presence of CD disc inside
the player.
Remove the disc in the player, then
put a new one.
ejected.
direction.
Compact disc
dirty or detective disc.
label facing upward.
one.
is too high.
temperature return to normal.
E
N
L
I
S
H
No sound.
Sound skips.
work.
automatic
Condensation.
so, then try again.
Volume is in minimum Adjust volume to a desired level.
Check wiring connection.
connected.
Adjust the installation angle less
more than 30 degree.
than 30 degree.
The disc is extremely dirty
or defective disc.
The built-
due to noise.
play a new one.
Press the RESET button.
its place.
Insert the antenna cable firmly.
connected.
The signals are too weak. Select a station manually.
not work.
15
Page 16

INHALTSVERZEICHNIS
Bedienung .................................... 18
Tastenlage .......................................... 18
Gerät einschalten/ausschalten .............. 19
Stumm machen ................................... 19
Abnehmen der Frontplatte ................... 19
Lautstärkeeinstellung ........................... 19
Ein-/ausschalten REG .......................... 19
Lautstärke TA ..................................... 19
Ein-/ausschalten LOC........................... 19
Stereo/Mono-Modus ............................ 19
Summer ein- und ausschalten .............. 19
AREA .................................................. 19
EQ ...................................................... 20
Anzeige der Informationen ................... 20
Uhrzeiteinstellung ................................ 20
Flüssigkristallanzeige ........................... 20
......................................................... 23
Ausschieben einer CD ......................... 23
Auswahl eines Ordners nach oben/unten
.................................................... 23
Auswahl der Dateien mit der Taste . 23
Bedienung des USB-Spielers ................ 24
Bedienung TF ..................................... 24
Bemerkungen zu den CDs ................... 25
Bluetooth-Bedienung*) ....................... 26
Fernsteuerung ............................. 29
Spezifikation ................................ 30
Störungssuche und Beseitigung ... 31
*) Gilt nur für die Geräte mit der
Bluetooth-Funktion
Hilfseingang ........................................ 20
RESET-FUNKTION ............................... 20
Bedienung des Radios ......................... 21
Wechseln in den Radio-Betrieb ......... 21
Auswahl des Frequenzbandes ........... 21
Sendersuche .................................... 21
AUTOMATISCHES SPEICHERN DER
GESCANNTEN PROGRAMME ............. 21
MANUELLES SPEICHERN DER SENDER
UND DER AUFRUF DER
VOREINGESTELLTEN SENDER ............ 21
RDS-BEDIENUNG (RADIO DATA
SYSTEM)......................................21
Bedienung CD/MP3/WMA ..................... 23
Wechseln in den CD-Betrieb ................. 23
Auswahl des Titels/der Datei ................ 23
Wiedergabepause ................................ 23
Anschauliches Anspielen von allen
Titel/Dateien ....................................... 23
Wiederholen des gleichen Titels/Datei .. 23
Zufälliges Abspielen von allen Titel/Dateien
16
Page 17
Konformitätserklärung
Blaupunkt Competence Center Car
Multimedia-Evo Sales GmbH erklärt hiermit,
dass dieses Gerät mit den grundlegenden
Forderungen und anderen, entsprechenden
Bestimmungen der Richtlinie 2014/53/EU
konform ist.
Die Konformitätserklärung ist unter
folgender Adresse verfügbar
www.blaupunkt.com
Die Konformitätserklärung mit der
Richtlinie über Funkanlagen 2014/53/EU
Konformitätserklärung mit der Richtlinie
RoHS 2011/65/WE
Garantie
Die Garantiebedingungen können von
folgender Webseite heruntergeladen
werden: www.blaupunkt.com
Garantie
Unter der Adresse www.blaupunkt.com sind
Informationen zu den Servicebetrieben, die in
Ihrem Land Garantie-Service leisten, verfügbar.
G
E
R
M
A
N
17
Page 18
Bedienung
Tastenlage
1 MUTE-Taste (STUMM)
2 TS-Taste
3 Bandtaste (BAND)
4 Taste „ /SRC (Quelle)”
5 Taste „ ” (Freigabe des Panels)
6 Lautstärketaste/Menu
(VOL/MENU)
7 Tasche für CD-Platten
8 LCD-Anzeige (Display)
9 Taste „ ”(SEEK DOWN
(DURCHSUCHEN NACH UNTEN))
10 Anzeigetaste (DISP)
11 Taste „Ausschieben“
12 USB-Anschluss
13 AUX-IN-Steckdose
14 Taste „ ”(DURCHSUCHEN NACH
OBEN)
15 Korrekturtaste (EQ)
16 Taste „6 DIR+/ ” *)
17 Taste „5 DIR-/ ” *)
18 Taste „4 RDM” (zufällige
Reihenfolge)
19 Taste „3 RPT” (Wiederholen)
20 Taste „2 SCN” (Scannen)
21 Taste „1 ”
22 Taste „ ” (Suchen nach den
MP3-Dateien)
23 RESET-Taste (RESET)
24 Steckplatz der TF-Karte
25 INFRAROTSENSOR
26 MIKROFON
*) Gilt nur für die Geräte mit der
Bluetooth-Funktion
18
Page 19

BEDIENUNG
Die Taste (4) betätigen um das Gerät
einzuschalten. Das System wird
hochgefahren. Die Taste (4) 2 sec.
Eingedrückt halten und das Gerät
auszuschalten.
STUMMMACHEN
Die Taste MUTE (1) kurz drücken und den
Audioausgang stumm zu machen. Die
Taste erneut betätigen um die Lautstärke
wiederherzustellen.
ABNEHMEN DER FRONPLATTE
Die Freigabetaste (5) drücken um die
abnehmbare Frontplatte zu lösen.
LAUTSTÄRKEEINSTELLUNG
Die MENU-Taste (6) kurz drücken um den
gesuchten Einstellmodus zu wählen. Der
Einstellmodus kann in folgender
Reihenfolge umgeschaltet werden:
-BAS-TRE-BAL-FAD- VOL-
BAS: Tiefe Töne
TRE: Hohe Töne
BAL: Balance
FAD: Ausklingen
VOL: Lautstärke
Mit dem Audio-Drehknopf (6) kann die
entsprechende Tonqualität angepasst
werden.
Die Taste MENU (6) drücken und 2 Sec.
gedrückt halten, um in das Systemmenü zu
gelangen – siehe unten:
AF– TA – REG – TAVOL – LOC – STEREO –
BEEP – XBASS-AREA
AF: Alternative Frequenzen
TA: Verkehrsdurchsagen
REG: Region
TA VOL: Lautstärke der
Verkehrsdurchsagen
LOC = lokal
STEREO
BEREICH (AREA): Europa
Ein-/ausschalten REG
Ist die AF-Funktion eingeschaltet, kann sie
aus der Funktion REG im Systemmenü einund ausgeschaltet werden. Einige Sender
schalten für bestimme Zeit das Programm
zwischen dem normalen und regionalem
Empfang um. Die Arbeit der REG-Funktion
hat keinen Einfluss auf die aktuell gehörte
Sendung.
Lautstärke der Verkehrsdurchsagen
(TA)
Mit dieser Funktion kann die minimale
Lautstärke der empfangenen
Verkehrsdurchsagen eingestellt werden.
Der Einstellbereich ist 20-43. Voreingestellt
ist der Wert 25 Mit dem Drehregler die
Lautstärke der Verkehrsdurchsagen
anpassen.
Ein-/ausschalten LOC
Durch das Drehen des Audioreglers (6)
wird in dieser Funktion das Lokalisieren
ein- und ausgeschaltet. Das Gerät reduziert
im LOC-Modus die
Empfangsempfindlichkeit beim
Durchsuchen der Radiosender. Es bedeutet,
dass nur Sender mit gutem Signal
empfangen werden. Alle Sender mit
niedriger Tonqualität werden ignoriert.
Arbeitet das Gerät, das mit
ausgeschaltetem LOC-Modus, so wird
erhöht die Empfangsempfindlichkeit beim
Durchsuchen der Radiosender höher
gestellt. Das bedeutet, dass das Radio das
Signal von mehreren Sender empfangen
kann.
STEREO/MONO
Das Drehen des Audioreglers (6) in dieser
Funktion schaltet zwischen STEREO und
MONO um. Im STEREO-Modus können
Stereosignale im FM-Band empfangen
werden. Im MONO-Modus werden die
Sender mit Stereoübertragung zum MonoModus konvertiert. In einigen Fällen, wenn
das empfangene Signal schlechter Qualität
ist, werden die Störungen durch die
Umschaltung auf MONO reduziert.
19
G
E
R
M
A
N
Page 20

BEDIENUNG
Ein- und Ausschalten des Summers
(BEEP)
Das Autoradio hat zwei Arten des
Summertones. Der Ton wird durch drehen
des Lautstärkereglers gewählt.
- Modus des eingeschalteten Summers
(Beep on): Bei jeder Betätigung beliebiger
Taste wird ein Bestätigungston ertönen.
- Modus des ausgeschalteten Summers
(Beep off): Bei Betätigung beliebiger
Tasten wird kein Bestätigungston ertönen.
REGION
Nach dem Einschalten dieser Funktion wird
das Drehen des Lautstärkereglers
die Wahl der Region Europa/USA/LAT
(Lateinamerika) ermöglichen.
XBASS
Die Taste EQ 2 sec. eingedrückt halten um
die Funktion XBASS einzuschalten. Die
Taste erneut eindrücken und halten um die
Funktion auszuschalten.
EQ (Tonkorrektur)
Die Taste EQ kurz drücken um eine von
folgenden, voreingestellten EQBetriebsarten zu wählen:
FLAT-CLASSICS-POP-ROCK-EQ OFF
ANZEIGE
Die Taste DISP (10) drücken, um für ca. 5
sec. die Uhrzeit anzuzeigen. Nach dieser
Zeit schaltet das Display auf die Anzeige
der Informationen zurück um.
UHRZEITEINSTELLUNG
(1) Manuelle Einstellung:
(2) Synchronisieren der Uhrzeit mit
der RDS-Station:
Das ermöglicht, eine RDS-Station zu
empfangen, die ein Signal in guter Qualität
(das Symbol AF auf dem Display blinkt
nicht) sendet. Einige Minuten später wird
die korrekte Uhrzeit gem. des von dem
Radiosender ausgestrahlten Signal
eingestellt. (Achtung: Einige RDS-Stationen
verfügen nicht über diese Funktion).
Flüssigkristallanzeige
Sie ermöglicht die Anzeige der aktuellen
Frequenz und der aktiven Funktionen.
ESP-Funktion
Es ist Möglich das Gerät vor den Stößen im
Bereich von 10 - 20 s zu schützen.
HILFSEINGANG
Das Gerät kann mit der AUX IN Buchse
(13) an einen tragbaren CD-Spieler
angeschlossen werden. Die SRC-Taste
drücken, um in den AUX-Modus zu
wechseln, wenn an das Gerät eine
externe Audiosignalquelle bereits
angeschlossen ist..
RESET-FUNKTION
Die RESET-Taste (23) muss mit einer
Kugelschreiberspitze oder mit schmalem
Metallstück betätigt werden.
Die RESTET-Taste wird in folgenden
Fällen gebraucht:
- Nach der Vormontage des Gerätes,
wenn die ganze Verkabelung
angeschlossen ist.
Die Taste DISP 2 sec. eingedrückt halten.
Die Stundenanzeige blinkt. Die Taste /
drücken um entsprechende Stunde
einzustellen. Die Taste DISP kurz drücken
um die Minutenanzeige zu ändern. Es ist
auch möglich, genauen Wert für die
Minutenanzeige mit der Taste /
einzustellen. Danach erneut zur
Bestätigung DISP drücken.
- Wenn keine Funktionstaste funktioniert.
- Wenn auf der Anzeige ein Fehlersymbol
erschienen ist.
Achtung: Mit der Betätigung der RESETTaste (23) wird das Gerät nicht wieder
eingeschaltet. Mit einem mit Isopropanol
getränktem Wattetupfer die Buchse auf
dem Frontpanel abzuwaschen.
20
Page 21
BEDIENUNG
RADIOBEDIENUNG
WECHSELN IN DEN RADIO-
BETRIEB
Mit der SRC-Taste (4) den RadioBetrieb wählen. Auf der Anzeige wird
der Radio-Betriebsmodus mit dem
gespeicherten Band und der Frequenz
angezeigt.
AUSWAHL DES RADIOBANDES
Nach dem Wechseln in den RadioBetrieb wird die Taste BAND (3)
gedrückt, um das gewünschte Band zu
wählen.
Das Empfangsband kann in folgender
Reihenfolge umgeschaltet werden:
→FM1→ FM2→ FM3 → MW1(AM1) → MW2(AM2)
Signalstärke so lange prüft, bis der
einzelne Suchzyklus abgeschlossen wird.
Danach werden die Sender mit dem
stärksten Signal unter den
voreingestellten Nummern der mit dem
FM3-Band verbundenen Tasten
gespeichert. Der erste Suchzyklus läuft
im LOCAL-Modus ab und sucht die
Sender mit dem stärksten
Empfangssignal aus. Werden keine 6
Sender gefunden, wird das Radio den
nächsten Suchzyklus, aber schon mit
ausgeschaltetem LOCAL-Modus (LOCAL
OFF) ausführen.
- Scannen der Programme
Die TS-Taste (2) kurz drücken um die
voreingestellten Sender zu scannen.
Das Radio hält für 5 Sekunden bei der
jeweiligen, voreingestellten Nummer an,
ohne stumm zu schalten.
G
E
R
M
A
N
SENDERWAHL
Die Taste (14) oder (9) kurz
drücken, um die automatische
Suchfunktion zu starten. Das Radio
sucht automatisch einen Sender aus
(nach oben und nach unten). Die Taste
2 sec. eingedrückt halten, bis auf der
Anzeige die Meldung
„MANUAL“ (Handbetrieb) erscheint,
was das Wechseln in den Einstellbetrieb
bedeutet. In dieser Zeit kann man
zwischen den Frequenzen (nach oben
und nach unten) schrittweise wechseln,
bis der Sender gefunden wird. Wenn in
5 Sekunden keine Taste gedrückt wird,
spring das Radio in den Betrieb der
automatischen Auswahl zurück und auf
der Anzeige erscheint die Meldung
„AUTO“.
AUTOMATISCHES SPEICHERN DER
GESCANNTEN PROGRAMME
- Automatisches Speichern
- Die TS-Taste (2) 2 sec. eingedrückt
halten, damit das Radio die Suche bei
der Frequenz 87,5 MHz beginnt und die
MANUELLES SPEICHERN DER
SENDER UND DER AUFRUF VON
VOREINGESTELLTEN SENDERN
Eine der Tasten, die den gespeicherten
Radiosender (1-6) zugeordnet sind,
gedrückt halten, um das Signal des
Senders zu empfangen. Der aktuelle
Sender wird unter der jeweiligen
Nummer gespeichert. Die Taste des
programmierten Senders (1-6) kurz
drücken um direkt das Sendesignal des
unter der zugehörigen
Programmnummer gespeicherten
Senders zu hören.
RDS-BEDIENUNG (RADIO DATA
SYSTEM)
Der RDS-Betrieb wird
in der AF-Position im Systemmenü
eingestellt. Das Drehen des
Audioreglers schaltet die Funktion AF
ein oder aus.
Nach jedem Einschalten der AFFunktion wird das Symbol
„AF“ angezeigt.
21
Page 22

BEDIENUNG
Der Programmname wird beim
Empfang eines RDS-Senders angezeigt.
DAS AF-Symbol beginnt zu blinken,
wenn die Qualität des gesendeten
Signals schlechter wird.
Beim Empfang eines gesendeten
Alarmsignals erscheint auf der Anzeige
die Meldung „ALARM“ und die Stärke
des akustischen Ausganges wird
automatisch an die voreingestellte
Ausgangsstärke angepasst - wenn die
Kontrolle der Lautstärke auf das
Minimum eingestellt ist.
Bedienung der lokalen Programme
Bei aktivierten AF-Funktion in der
Funktion REG des Systemmenüs. Mit
der Umstellung des Audio-Drehreglers
kann die REG-Funktion ein- und
ausgeschaltet werden. Nach dem
Ausschalten der AF-Funktion kann die
REG-Funktion nicht ausgeschaltet
werden.
Einige Sender schalten das Versenden
des Programms aus dem normalen auf
den regionalen Empfang um. Beim
Einschalten der geografischen Region
wird der aktuell wiedergegebene
Sender nicht geändert. Nach dem
Ausschalten der Funktion der
geografischen Region kann auf das
Empfangssignal eines regionalen
Senders umgeschaltet werden.
Wiedergabe der
Verkehrsdurchsagen
In der TA-Position des Systemmenüs
kann durch die Umstellung des AudioDrehreglers die TA-Funktion ein- und
ausgeschaltet werden. Das Einschalten
des TA-Betriebes ermöglicht den
Empfang der Verkehrsdurchsagen:
Arbeitet das Gerät im CD- (MP3) oder
AUX-Betrieb, wird vorläufig auf RadioBetrieb umgeschaltet.
Stellt die EON-Funktion anstehende
Verkehrsdurchsagen in einem anderem
Sender fest, dann wird das Gerät
vorläufig auf den mit der EON-Funktion
verbundenen Sender umgeschaltet.
Ist die Lautstärke unter den Grenzwert
eingestellt, wird sie zu diesem Wert
angehoben.
Mit dem Einschalten des TA-Betriebes
wird die TA-Funktion für ein einzelnes
Segment eingeschaltet. Wird ein Signal
eines TP-Senders empfangen, wird die
TP-Funktion für ein einzelnes Segment
eingeschaltet.
Störfunktion der Verkehrsdurchsagen
Durch das Umschalten der TA-Funktion
auf STOP wird der Empfang der
aktuellen Verkehrsdurchsagen annulliert
(Position TA im RDS-Menü, mögliche
Optionen sind:
Ein-/Ausschalten, wenn kein TA-Sender
empfangen wird. Beim Empfang eines
TA-Senders werden auf entsprechender
TA-Stelle des Menüs die Optionen
Einschalten/Stopp/Ausschalten
angezeigt). Es kann zum zufälligen
Umschalten in den EON TA Betrieb
kommen, wenn die Informationen EON
TA vom aktuell gewählten Sender
bereits empfangen waren und das
Radio auf den Empfang dieses EON-
Senders umgeschaltet hat, aber
die Entfernung vom EON-Sender
den Signalempfang unmöglich
macht, . Das Radio wird dann zurück
auf den aktuellen Sender umgeschaltet.
Obiges Beispiel stellt eine Situation dar,
wenn der Benutzer falsch eingestelltes
Programm empfängt oder der Ton
vorläufig stumm geschaltet wurde.
Daten, die von der RDS-Funktion
genutzt werden, sind die PI-, PS-, AF-,
TP-, TA-, EON- und PTY-Daten.
PS: Programmname
Es ist ein Sendername, der mit
alphanumerischen Zeichen angegeben
wird.
AF: Alternative Frequenzen
Es ist eine Liste der Senderfrequenzen,
die das gleiche Programm senden.
TP: Identifikation des Sender mit
22
Page 23
BEDIENUNG
Verkehrsdurchsagen.
Es sind die Identifikationsangaben von
Sendern mit Verkehrsangaben.
TA: Identifikation der
Verkehrsdurchsagen
Es sind Identifikationsangaben, die die
Übertragung oder keine Übertragung
der Verkehrsdurchsagen signalisieren.
EON: Informationen über Programme
eines anderen Senders
Zubehör
Es sind Informationen, die in den
Funktion PI, AF, TP, TA, usw. gesendet
werden und für andere Programme aus
anderen als der aktuell empfange
Sender gelten.
Bedienung CD/MP3/WMA
WECHSELN IN DEN CD-BETRIEB
Wenn keine CD in das Gerät eingelegt
ist:
Die CD vorsichtig in den Schlitz
(bedruckte Seite nach oben) bis zum
kleinen Widerstand einschieben. Die
CD wird dann selbsttätig in das Gerät
eingezogen und abgespielt.
Wenn eine CD bereits in das Gerät
eingelegt war:Die SRC-Taste (4)
betätigen, bis auf der Anzeige der
DISC-Modus (CD) erscheint.
Auswahl des Titels/der Datei
Die Taste (9) oder (14), für den
Sprung zum vorherigen oder zum
nächsten Titel/Datei betätigen. In der
Anzeige erscheint die Nummer des
Titels/der Datei.
Die Taste (9) oder (14) gedrückt
halten, um den Titel-die Datei schnell
nach vorn oder zurück zu spulen. Das
Abspielen wird beim Freigeben der
Taste wieder aufgenommen.
Taste (21) betätigen. Die Taste für
weitere Wiedergabe erneut betätigen.
Anschauliches Anspielen von allen
Titel/Dateien
Die SCN-Taste (20) betätigen um
einige Anfangssekunden jeden
Titels/jeder Datei abzuspielen. Nach
erneuter Betätigung der Taste wird das
anschauliche Anspielen gestoppt und
der Titel/die Datei kann abgespielt
werden.
Wiederholen des gleichen
Titels/der gleichen Datei
Die Taste RPT (19) betätigen, um den
gleichen Titel/die gleiche Datei zu
wiederholen. Bei erneuter Betätigung
werden alle Titel/Dateien erneut
abgespielt.
Abspielen in zufälliger
Reihenfolge von allen
Titel/Dateien
Nach der Betätigung der Taste RDM
(18) werden alle Titel/Dateien in
zufälliger Reihenfolge abgespielt. Beim
erneuten Betätigen wird die Funktion
des Abspielens in zufälliger Reihenfolge
ausgeschaltet.
Ausschieben der CD
Die Taste (11) betätigen um das
Abspielen der CD zu stoppen und sie
aus dem Schacht des Gerätes (6)
auszuschieben.
Auswahl des Ordners nach
oben/unten
Für die Wahl des vorherigen oder
nächsten Ordners ist die Taste DIR-
(17) oder DIR+(16) zu betätigen. Die
Tasten DIR- (17) oder DIR+ (16)
werden keine Funktion starten, wenn
auf der CD mit den MP3/WMA-Dateien
keine Ordner angelegt sind.
G
E
R
M
A
N
Wiedergabepause
Um die Wiedergabe zu pausieren, die
Auswahl der Dateien mit der Taste
23
Page 24
BEDIENUNG
Mit der Taste (22) werden die
MP3/WMA-Dateien gewählt.
Bedienung eines USB-Spielers
Bei der Betätigung aktiviert
den Auswahlmodus nach folgenden
Schema:
Im Ordner suchen. => Suchen nach der
Dateinummer.
Im Ordner suchen
Die Taste einmal betätigen. Das
Gerät wechselt in den Betrieb „Suchen im
Ordner“
. Den Regler VOL (Lautstärke) drehen um
den gesuchten Ordner zu wählen. Dann
den Regler MENU (6) drehen um den
gewählten Ordner zu öffnen. Den Regler (6)
drehen um die gesuchte Datei zu wählen.
Anschließend den Regler MENU (6) erneut
betätigen um die gewählte Datei
abzuspielen.
Mit dem Druck auf die Taste wird in
den vorherigen Ordner zurück gesprungen.
Suchen nach der Dateinummer
Die Taste zwei mal drücken. Danach
wird der Betrieb „Suchen nach der
Dateinummer” aktiviert. Den Regler (21)
drehen um entsprechende Dateinummer zu
wählen und den Regler MENU (4) zur
Bestätigung der Wahl drücken. Das Gerät
sucht die gewählte Datei aus und spielt sie
ab. Es ist auch möglich die Nummer
manuell einzugeben. Auf dem Frontpanel
sind die Ziffern 1-6 und Tasten 7/8/9/0 mit
folgenden Funktionen zu finden:
EQ: 7
: 8
: 9
DISP: 0.
Das Gerät wartet nach der Wahl der
Dateinummer einige Sekunden ab. Nach
dieser Zeit wird die jeweilige Datei
gefunden, sogar wenn der Dreh-Regler
MENU (4) nicht eingedrückt war.
Die USB-Buchse (10) befindet sich auf dem
Frontpanel des Gerätes. An diese Buchse
(12) werden die USB-Steuergeräte
angeschlossen.
Nach dem Anschluss eines Steuergerätes
an die USB-Buchse wird das Gerät die
gespeicherten MP3/WMA-Dateien
aussuchen und abspielen. Nach dem Start
dieses Betriebes kann auch die Taste
SRC betätigt und der USB-Betrieb gewählt
werden.
Wird ein USB-Speicher zum Abspielen von
MP3/WMA-Dateien im Radio eingesetzt, so
ist die Bedienung mit der oben für den
CD/MP3/WMA-Betrieb beschrieben
identisch.
Achtung:
Das Hauptgerät unterstützt nur die
Standardarten der USB-Speicher, die
vom Microsoft zugelassen sind.
Ein USB MP3-Spieler ist kein
Standardgerät, was bedeutet, dass die
verschiedenen Gerätemarken und
Modelle eigene Standards haben. Aus
diesem Grund werden von unserem
Gerät nicht alle MP3-Spieler unterstützt.
Beim Anschluss eines MP3-Spielers mit
Normalbatterie (kein Akku), soll zuerst
die Batterie aus dem Spieler gezogen
werden, und erst dann kann es an die
USB-Buchse angeschlossen werden.
Anderenfalls kann die Batterie bersten.
Bedienung TF
Auf dem Frontpanel des Gerätes ist die TFSchnittstelle (24) zu finden.
Nach dem Anschluss einer TF-Karte an die
TF-Buchse wird das Gerät die
gespeicherten MP3/WMA-Dateien
aussuchen und abspielen. Der AbspielMechanismus ist mit dem oben für das
Abspielen der CD/MP3/WMA-Dateien
24
Page 25
BEDIENUNG
Re W rit a ble
beschriebenen identisch.
Bei der Arbeit in einem anderen Betrieb
wird nach der Betätigung der SRC-Taste
Der Einsatz von CDs mit nicht
standardkonformer Form (z.B.
(4) in den SD-Betrieb gewechselt.
UTERSTÜTZTE BETRIEBSARTEN DER
MP3-/WMA-DEKODIERUNG
Das Hauptgerät unterstützt die weiter
genannten Dekodierungsarten der MP3/WMA-Dateien (Windows Media Audio).
Unterst
Normd
aten
MPEG1
Audio
Layer 3
(44,1
kHz)
Window
s Media
Audio
(44,1
kHz)
Datenübertragungsge
schwindigkeit (kB/s)
32, 48, 64, 96,
128, 192, 256,
320
64, 96, 128, 192 Stereo
ützte
Betriebs
arten
Stereo
USB-Betrieb unterstützt:
1. Ordner: 500 max.
2. Datei: 999 max.
3. Ordnertiefe: 8 Ebenen
4. Größe: 32 GB
ACHTUNG
Es ist verboten an das Hauptgerät einen
USB-Spieler oder eine TF-Karte mit
wichtigen Dateien anzuschließen. Es dürfen
auch keine CD-R/RW-Platten mit wichtigen
Dateien abgespielt werden. Bei einer
falscher Bedienung des Spielers könnten
die Dateien verloren gehen. Unsere Firma
haftet für den Verlust von solchen Daten
nicht.
Bemerkungen zu den CDs
A. Bemerkungen zu den CDs:
quadratisch, in Form eines Sternes
oder Herzens, usw.) kann
1. zur Beschädigung des Gerätes führen.
Es ist zu beachten, dass das Gerät nur
mit runden CDs arbeitet.
2. Es soll kein Papier, Band, usw. auf
keine CD-Seite (bedruckt oder mit der
Aufnahme) angeklebt werden, weil es
zur falschen Arbeit des Gerätes führen
kann.
3. Verunreinigungen, Staub, Kratzer und
Verformungen auf der CD werden
Störungen beim Abspielen verursachen.
B. Bemerkungen zu den CD-Rs
(beschreibbare) / CD-RWs (mehrfach
beschreibbare)
1. In das Gerät können nur CDs
mit folgenden Bezeichnungen
eingelegt werden:
Das Gerät wird keine CD-Rs und CD-RWs
abspielen, wenn der Schreibvorgang nicht
abgeschlossen wurde. (Siehe die Anleitung
des CD-R/CD-RW Brenners oder
der CD-R/CD-RW Software für wietere
Informationen
zum Abschließen des Schreibprozesses)
Das Gerät kann einige CD-Rs/CD-RWs
nicht abspielen, was aus dem
Schreibstatus,
dem Zustand der CD selbst und der
25
G
E
R
M
A
N
Page 26

BEDIENUNG
beim Schreiben der CD eingesetzten
Einrichtungen resultieren kann. (Siehe
*1)
*1: Bitte lesen Sie genau die folgenden
Empfehlungen, um zuverlässigeres
Abspielen zu sichern:
a: Benutzen Sie immer CD-RWs mit der
Abspielgeschwindigkeit von 1x bis 4x und
schreiben Sie die Daten mit der
Geschwindigkeit 1x oder 2x.
b. Benutzen Sie immer CD-Rs mit der
Abspielgeschwindigkeit von 1x bis 8x und
schreiben Sie die Daten mit der
Geschwindigkeit 1x oder 2x.
c. Spielen Sie keine CD-RW ab, die mehr
als 5-mal beschrieben wurden.
überschreitet, was die beste Qualität der
Verbindung garantiert. Auf der
Übertragungsstrecke zwischen dem Handy
und dem Gerät sollen keine
Metallgegenstände und Hindernisse
platziert werden.
KOPPELN
1) Wählen Sie im Handy die BluetoothKonfiguration aus. (Die Informationen
über die Bedienung der BluetoothVerbindung sind in der Handy-Anleitung zu
finden).
2) Auf der im Handy angezeigten Liste soll
die Position „CAR KIT“ (Kfz-Einheit)
erscheinen. Wählen Sie die Position „BP
C. Bemerkungen uz den MP3-Dateien
(nur MP3-Format):
1. Die CD muss im Format ISO9660 Level
1 oder Level 2 oder mit der
Erweiterung Joliet oder Romero
bespielt werden.
2. Beim Benennen der MP3-Dateien muss
beachtet werden, dass die Erweiterung
die Form „.mp3“ haben muss.
3. Das Gerät erkennt keine Nicht-MP3Dateien sogar dann, wenn die
Erweiterung des Namens die Form
„.mp3” hat.
Bluetooth-Bedienung *)
VORLÄUFIGES KOPPELN VON
GERÄTEN IM BLUETOOTH-MODUS
(i) Wenn Sie Bluetooth-Modus nutzen,
müssen Sie prüfen, ob das Handy die
Bluetooth-Funktion unterstützt.
(ii) Verschiedene Handys nutzen
verschiedene Sende-Parameter. Es wird
empfohlen, dass der Abstand zwischen
dem Handy und dem Gerät 3 m nicht
170 BT” und geben das Passwort „0000”
ein. Es ist möglich, dass kein Passwort
nötwendig wird.
3) Nach dem erfolgreichen Koppeln der
Geräte wird das Symbol BT angezeigt.
Annehmen/abweisen des
ankommenden Anrufes
Beim ankommenden Anruft wird die Taste
betätigt um den Anruft anzunehmen.
Mit dem Druck auf die Taste wird der
Anruf abgewiesen.
Beenden des Anrufes
Um den Anruf zu beenden, die Taste
drücken.
Überprüfen des Telefonbuches /der
angenommenen/
gewählten/verpassten Gespräche
(gilt für Mobiltelefone mit
Android-und iPhone-System)
Die SRC-Taste drücken um im Display
die Meldung „PHONE” (Telefon)
26
Page 27
BEDIENUNG
anzuzeigen. Die -Taste drücken um
im Display die Meldung „BOOK”
(Telefonbuch) anzuzeigen. Beim
nächsten Druck werden der Reihe nach
folgende Optionen angezeigt:
BOOK---RECEIVED---DIALED---MISSED--
-PHONE (Telefonbuch -> Angenommen > Angewählt -> Nicht angenommen->
Telefon)
Mit der Taste oder in jeder von
diesen Positionen können die
zugehörigen Nummern geprüft werden.
Achtung: Nach dem ersten Kkoppeln
wird das Handy die Information anzeigen,
dass es mit dem Autoradio verbunden
wurde. Sie müssen Ihre Zustimmung
geben und die Taste „YES” (Ja), zur
Bestätigung drücken.
(Achtung: Es ist wichtig, dass die
Telefonnummer im Telefonspeicher und
nicht auf der SIM-Karte gespeichert ist.
Anrufen
1) Anrufen mit manueller Eingabe der
Telefonnummer.
Die SRC-Taste drücken um im Display die
Meldung „PHONE” (Telefon) anzuzeigen.
Die Taste drücken und gedrückt
halten. Die LCD-Anzeige erscheint leer.
Jetzt kann die Telefonnummer eingegeben
und die Taste zur Bestätigung
der eingegebenen Nummer gedrückt
werden. (Achtung: Bei der Eingabe einer
*: Die Taste (5) 2 sec. eingedrückt halten.
#: Die Taste (6) 2 sec. eingedrückt halten.
1) Anruf wiederholen
Die SRC-Taste drücken um im Display die
Meldung „PHONE” (Telefon) anzuzeigen.
Die Taste drücken und 2 Sekunden
für die zuletzt gewählte Nummer gedrückt
halten.
2) Ein Anruf mit der
Telefonnummer aus dem
Telefonbuch /den angenommenen /
angewählten/nicht angenommenen
Gesprächen (gilt für Mobiltelefone
mit dem System Android und iPhone)
- Die Position „Überprüfen des
Telefonbuches /angenommen
/angewählten /nicht
angenommen Gespräche” wählen
und dann die gesuchte Telefonnummer
anrufen. Die Taste zur Auswahl der
gesuchten Nummer drücken.
Achtung: Sind im Mobiltelefon zwei (2)
SIM-Karten installiert, wird beim
Anrufen mit Hilfe des Frontpanels des
Gerätes die voreingestellte Karte
genutzt oder es wird jedes mal eine
Frage zur Auswahl der Karte, die beim
Anrufen genutzt werden sollte,
erscheinen.
Übergabe des Gespräches
zwischen dem Mobiltelefon und
dem Gerät
Während des Anrufes kann die Taste (22)
G
E
R
M
A
N
falschen Nummer die Taste drücken
um die irrtümlich eingegebenen Ziffern zu
löschen).
Auf dem Frontpanel sind die Ziffern 1-6
und Tasten 0/7/8/9/*/# mit folgenden
Funktionen zu finden:
0: Anzeigetaste (DISP)
7: EQ:
8:
9:
gedrückt werden, um den Anruf zwischen dem
Telefon und dem Gerät zu schalten.
Tonübertragung über Bluetooth
(A2DP-Funktion)
Die SRC-Taste (4) drücken um im Display
die Meldung „PHONE” (Telefon)
anzuzeigen. Dann den Musikspieler im
Telefon einschalten um das Abspielen
eines Musikstückes zu starten. Der Ton
27
Page 28

BEDIENUNG
wird über den Lautsprecher im Gerät
ausgegeben. Die Taste (21) auf dem
Frontpanel drücken um das Abspielen zu
stoppen/wieder aufnehmen. Mit dem Druck
auf die Taste (9) oder (14) den
nächsten/vorherigen Titel wählen.
Koppeln/Entkoppeln von Bluetooth
Die SRC-Taste drücken und 2 Sekunden
gedrückt halten um die
Bluetoothverbindung ein-/auszuschalten.
*) Gilt nur für die Geräte mit der
Bluetooth-Funktion
28
Page 29
Fernsteuerung
Funktions- und Steuerungstasten
1. : Ein- und Ausschalttaste der Versorgung
2. VOL+: Lautstärkeerhöhung
3. BAND: Im RADIO-Betrieb kann das Band FM1/FM2/FM3/AM1/AM2 w gewählt werden.
4. : Im RADIO-Betrieb: Kurz drücken für Durchsuchen nach unten. Drücken für manuelles Ausschalten. Im
CD/MP3/WMA-Betrieb: Kurz drücken für ein Titel/eine Datei zurück zu schalten. Für schnelles zurückrollen drücken
und gedrückt halten.
5. VOL- : Lautstärkeverringerung
6. EQ: Taste der Tonkorrektur.
7. 2 SCN: Im RADIO-Betrieb: Nummer 2. Siehe die Seite 11 - MANUELLES SPEICHERN DER SENDER UND DER
AUFRUF VON VOREINGESTELLTEN SENDERN.
Im CD/MP3/WMA-Betrieb: Drücken, um das SCANNEN ein-/auszuschalten
8. 1 : Im RADIO-Betrieb: Nummer 1. Siehe die Seite 11 - MANUELLES SPEICHERN DER SENDER UND DER
AUFRUF VON VOREINGESTELLTEN SENDERN.
Im CD/MP3/WMA-Betrieb: Drücken um das Abspielen zu stoppen/wieder aufnehmen
9. 4 RDM: Im RADIO-Betrieb: Nummer 4. Siehe die Seite 11 - MANUELLES SPEICHERN DER SENDER UND DER
AUFRUF VON VOREINGESTELLTEN SENDERN.
Im CD/MP3/WMA-Betrieb: ein-/ausschalten der Abspielfunktion in zufälliger Reihenfolge.
10. 5 DIR-: Im RADIO-Betrieb: Nummer 5. Siehe die Seite 11 - MANUELLES SPEICHERN DER SENDER UND DER
AUFRUF VON VOREINGESTELLTEN SENDERN.
Im MP3/WMA-Betrieb: Drücken für das Zurückspringen zum vorherigen Ordner.
Es ist die Taste wenn das Gerät im Bluetooth-Betrieb ist. *)
11. SRC: Die Taste aktiviert die SCR-Funktion (Tonquelle).
12. : Drücken um stumm zu schalten oder die Lautstärke wieder zu aktivieren.
G
E
R
M
A
N
13. : Im RADIO-Betrieb: Ist für die TS-Funktion verantwortlich Siehe Seite 11 AUTOMATISCHEN SPEICHERN
DER GESCANNTEN PROGRAMME
Im MP3/WMA-Betrieb: Es ist die Suchfunktion. (Siehe Seite 12).
Im PHONE-Betrieb (Telefon). Die Funktion der Taste wurde auf der Seite 15 –
BLUETOOTH-Bedienung beschrieben.
14. SEL: Kurz für das Öffnen des Menüs im Radio-Betrieb drücken. Drücken und gedrückt
halten um zum Systemmenü zu gelangen.
(Siehe Seite 9). Zur Bestätigung der Suchfunktion (s. Seite 13) nach der Wahl des
Suchbetriebes MP3/WMA drücken.
15. : Im RADIO-Betrieb: Kurz drücken für das Durchsuchen nach unten. Drücken, um die Funktion
manuell zu finden.
Im CD/MP3/WMA-Betrieb: Kurz drücken, um das nächste Titel/nächste Datei nach
vorn zu überspringen. Drücken und gedrückt halten für schnelles rollen nach vorn.
16. DISP: Die DISP-Taste (Anzeigen) drücken um die Uhrzeit anzuzeigen
17. 3 RPT: Im RADIO-Betrieb: Nummer 3. Siehe die Seite 11 - MANUELLES SPEICHERN DER SENDER UND DER
AUFRUF VON VOREINGESTELLTEN SENDERN.
Im CD/MP3/WMA-Betrieb: Drücken, um die Wiederholfunktion ein-/auszuschalten.
18. 6 DIR+: Im RADIO-Betrieb: Nummer 6. Siehe die Seite 11 - MANUELLES SPEICHERN DER SENDER UND
DER AUFRUF VON VOREINGESTELLTEN SENDERN.
Im MP3/WMA-Betrieb: Drücken, um zum nächsten Ordner zu springen.
Bei der Annahme oder Beendigung des Anrufes funktioniert in der Funktion der Taste *
*) Gilt nur für die Geräte mit der Bluetooth-Funktion
29
Page 30

Spezifikation
ALLGEMEINE DATEN
Anforderungen an Versorgung: Gleichstrom 12 V, Minus verbunden mit der Masse
Abmessungen des Montagesockels: 178 (B) x 160 (T) x 50 (H)
Tonkontrolle
- Tief (bei 100 Hz): ±10 dB
- Hoch (bei 10 kHz): ±10 dB
- Max. Ausgangsleistung 4X40 W
- Stromaufnahme: 10 A (max.) (Bei der Variante mit normaler Versorgung)
CD-Spieler
Verhältnis Signal-Rauschen (SNR): Über 55 dB:
Kanaltrennung: Über 45 dB:
Frequenzkennlinie: 40 Hz-18 kHz
FM-RADIO
Frequenzbereich von 87,5 bis 109 MHz
IF 10,7 MHz
Empfindlichkeit (S/N=30 dB) 4 μV
Trennung der Stereokanäle >25 dB
AM (MW)
Frequenzbereich von 522 bis 1620 kHz
IF 450 kHz
Empfindlichkeit (S/N=20 dB) 36 dBuV
30
Page 31

Die Kabelverbindungen vor der Überprüfung der Checkliste prüfen. Einen Vertreter der
Firma konsultieren, wenn nach der Prüfung der Checkliste ein Problem weiterhin besteht.
Störung Ursache Lösung
Keine Versorgung
Die CDkann nicht einoder ausgeschoben
werden
Die Zündung im Auto nicht
eingeschaltet
Defekte Sicherung Sicherung austauschen
Im Spieler ist schon eine Platte
eingelegt.
Die CD wurde falsch eingelegt. Die CD so einlegen, dass die Beschriftung sich
Die CD ist stark verschmutzt oder
beschädigt.
Zu hohe Temperatur im Auto Das Auto abkühlen oder abwarten, bis die
Kondenswasser im Gerät. Den Spieler für ca. eine Stunde ausgeschaltet
Den Zündschlüssel in die "ACC"-Stellung
umschalten, wenn die Versorgung an den
Hilfskreis im Fahrzeug angeschlossen ist
und der Motor nicht dreht.
Die CD herausnehmen und erst dann eine
andere einlegen.
oben befindet.
Die CDreinigen oder mit einer anderen
versuchen
Umgebungstemperatur wieder normal ist.
lassen und erneut probieren.
G
E
R
M
A
N
Kein Ton.
Störungen bei der
Tonwiedergabe.
Die Bedienungstasten
funktionieren nicht.
Das Radio
funktioniert nicht. Die
Funktion der
automatischen
Senderwahl
funktioniert nicht.
Lautstärke auf Minimum eingestellt. Die Lautstärke anpassen.
Die Verkabelung ist falsch
angeschlossen.
Der Befestigungswinkel des Gerätes
überschreitet 30 Grad.
Die CD ist verschmutzt oder
beschädigt.
Die Funktionen des eingebauten
Microcomputers durch Lärm gestört.
Keine Antennenleitung
angeschlossen.
Die Signalstärke ist zu schwach. Den Sender manuell einstellen.
Die Leitungsverbindungen prüfen.
Den Winkel so einstellen, dass der 30 Grad
nicht überschreitet.
Die CD reinigen oder mit einer anderen
versuchen.
Die RESET-Taste drücken.
Das Frontpanel wurde falsch befestigt.
Die Antennenleitung sorgfältig anschließen.
31
Page 32

TABLE DE MATIÈRES
Manipulation ................................. 34
Emplacement des touches ................... 34
Mise en marche / arrêt de l’appareil ..... 35
Mise en sourdine ................................. 35
Enlèvement de la plaque frontale ......... 35
Réglage du son ....................................35
Activer / désactiver REG .......................35
Volume TA .......................................... 35
Activer / désactiver LOC ....................... 35
Mode stéréo / mono ............................ 35
Activer / désactiver le bip sonore .........35
ZONE.................................................. 35
EQ ...................................................... 36
Affichage des informations ...................36
Réglage de l'heure ...............................36
Affichage à cristaux liquides ................36
Sélection d’un répertoire haut/bas ...... 39
Sélection des fichiers avec la touche
......................................................... 39
Utilisation du lecteur USB .................... 40
Utilisation TF ...................................... 40
Remarques concernant le disque ......... 41
Utilisation Bluetooth*) ........................ 42
Télécommande ............................ 44
Spécification ................................ 46
Dépannage................................... 47
*) Concerne seulement les appareils
équipés de la fonction Bluetooth
Entrée auxiliaire ...................................36
Fonction de réinitialisation ................... 36
Utilisation de la radio ...........................37
Passage en mode radio .....................37
Sélection d’une bande de fréquence 37
Sélection d’une station.................. .37
Mémorisation automatique et balayage
des chaînes ..................................... 37
Enregistrement manuel des stations et
rappel des stations préconfigurées...... 37
Utilisation du RDS (Radio Data System) 37
Utilisation du CD/MP3/WMA ................. 39
Passage en mode disque ......................39
Sélection des pistes/d’un fichier .......... 39
Arrêt de la lecture ............................... 39
Lecture initiale de toutes les pistes/tous les
fichiers ............................................... 39
Répétition de la même piste/du même
fichier ................................................. 39
Lecture aléatoire de toutes les pistes/tous
les fichiers .......................................... 39
Éjection du disque ............................... 39
32
Page 33

Déclaration de conformité
Blaupunkt Competence Center Car
Multimedia-Evo Sales GmbH certifie que cet
appareil satisfait aux exigences de base et
aux exigences des autres dispositions
applicables de la directive 2014/53/CE.
Vous trouverez la déclaration de conformité
sur le site Internet www.blaupunkt.com
Déclaration de conformité à la directive sur
les équipements radioélectriques
2014/53/CE
Déclaration de conformité à la directive
RoHS 2011/65/CE
Garantie
Les conditions de garantie sont à
télécharger depuis le site Internet
www.blaupunkt.com
Garantie
Si vous avez besoin d'un service de
réparation pendant la garantie, des
informations sur nos partenaires qui
proposent ces services dans votre pays se
trouvent surwww.blaupunkt.com
F
R
E
N
C
H
33
Page 34

Manipulation
Emplacement des touches
1. Touche MUTE (MISE EN
SOURDINE)
2. Touche TS
3. Touche de la bande (BAND)
4. Touche « /SRC (source) »
5. Touche « » (déverrouillage de
la face)
6. Touche volume/menu
(VOL/MENU)
7. Poche pour les CD
8. Écran LCD
9. Touche « » (SEEK DOWN
(RECHERCHE DESCENDANTE))
10. Bouton d’affichage (DISP)
11. Touche « Éjection »
12. Interface USB
13. Prise AUX-IN
14. Touche « » (RECHERCHE
34
ASCENDANTE)
15. Touche de l'égaliseur (EQ)
16. Touche « 6 DIR+/ » *)
17. Touche « 5 DIR-/ » *)
18. Touche « 4 RDM » (recherche
aléatoire)
19. Touche « 3 RPT » (répétition)
20. Touche « 2 SCN » (balayage)
21. Touche « 1 »
22. Touche « » (recherche des
fichiers MP3)
23. Touche RESET
(RÉINITIALISATION)
24. Fente de la carte TF
25. CAPTEUR INFRAROUGE
26. MICROPHONE
*) Concerne seulement les appareils
équipés de la fonction Bluetooth
Page 35

Manipulation
Allumez l’appareil en appuyant sur la
(4). Le système est démarré. Appuyez et
maintenez enfoncée pendant 2 secondes la
touche (4) afin de mettre en marche
l’appareil.
MISE EN SOURDINE
Appuyez brièvement sur la touche MUTE (1)
afin d'atténuer la sortie audio. Appuyez à
nouveau pour rétablir le son.
RETRAIT DE LA FACE AVANT
Appuyez sur la touche de déverrouillage
(5) pour détacher la face avant amovible.
RÉGLAGE DU SON
Appuyer brièvement sur la touche MENU (6)
pour sélectionner le mode de réglage
souhaité. Le mode de réglage peut être
modulé de la manière suivante :
-BAS-TRE-BAL-FAD- VOL-
BAS : Tons bas
TRE : Tons aigus
BAL : Balance
FAD : Atténuation
VOL : Volume
Tourner le bouton audio (6) permet
d’ajuster la qualité du son.
Appuyez et maintenez enfoncée pendant 2
secondes la touche MENU (6) pour passer
au menu système – voir ci-dessous :
AF– TA – REG – TAVOL – LOC – STEREO –
BEEP – XBASS-AREA
AF : Fréquences alternatives
TA : Informations sur le trafic routier
REG : Région
TA VOL : Volume des informations
sur le trafic routier
LOC = Local
STEREO
ZONE (AREA) : Europe
Activation / désactivation de la
fonction REG
En mode de fonctionnement de la fonction
35
AF, il est possible de l’activer et désactiver
dans la position REG du menu système.
Certaines stations de radiodiffusion
changent pour une certaine période de
temps leur programme de diffusion normale
pour la diffusion régionale. Si la fonction
REG fonctionne, elle n’a aucun impact au
programme en cours.
Volume des informations sur le trafic
routier (TA)
Cette fonction permet de définir le volume
minimal des informations sur le trafic routier.
La plage de réglage est de 20-43. La valeur
par défaut est 25. Tournez le bouton de
volume pour régler le volume des
informations routières.
Activer / désactiver LOC
Le fait de tourner le bouton audio (6) dans
cette fonction provoque l’activation/la
désactivation de la localisation. L’appareil
qui fonctionne en mode LOC réduit la
sensibilité de réception pendant la
recherche des stations radio. Cela signifie
que vous recevez uniquement les stations
qui offrent une bonne qualité de réception.
Toutes les stations de faible qualité sonore
seront ignorées. L’appareil qui fonctionne
en mode LOC augmente la sensibilité de
réception pendant la recherche des stations
radio. Cela signifie que la radio peut
recevoir des signaux à partir d'un plus
grand nombre de stations.
STÉRÉO/MONO
Le fait de tourner le bouton audio (6) dans
cette fonction vous permet de choisir entre
les modes audio STÉREO ou MONO. En
mode stéréo, vous pouvez recevoir le signal
stéréo dans la bande FM. En mode MONO
les station diffusant en stéréo sont
converties en mode mono. Dans certains
cas, lorsque le signal reçu est de faible
qualité, le passage au mode MONO permet
de réduire le niveau des perturbations.
F
R
E
N
C
H
Page 36

Manipulation
Activation / désactivation du bip
sonore (BEEP)
L'autoradio propose 2 modes de bip.
Tournez le bouton de réglage du volume
pour en choisir un.
- Mode d'activation du bip (Beep on) :
Chaque appui sur n’importe quelle
provoquera la génération du son de
confirmation.
- Mode de désactivation du bip (Beep off) :
Aucun appui sur n’importe quelle touche
ne provoquera la génération du son de
confirmation.
ZONE
Une fois cette fonction activée, le fait de
tourner le bouton du volume
permet une sélection entre la zone de
l’Europe/États-Unis/LAT (Amérique
Latine).
XBASS
Appuyez et maintenez enfoncée pendant 2
secondes la touche EQ pour activer la
fonction XBASS. Maintenez-la enfoncée à
nouveau pour la désactiver.
EQ (égaliseur)
Appuyez brièvement sur la touche EQ pour
sélectionner l'un des modes EQ
préconfigurés suivants :
FLAT-CLASSICS-POP-ROCK-EQ OFF
AFFICHAGE DES INFORMATIONS
Appuyez sur la touche DISP (10) pour
afficher l'heure sur l'écran pendant 5
secondes. Passé ce délai, l'écran revient à
l’affichage des informations.
également utiliser la touche / pour
régler la valeur des minutes. Réappuyez
ensuite sur la touche DISP pour confirmer.
(2) Synchronisation de l'heure avec
une station RDS :
Cela permet la réception de la station
RDS qui émet le signal de qualité
élevée (le symbole AF sur l'écran ne
clignote pas). Quelques minutes plus
tard, l'heure est synchronisée avec la
valeur de l'heure correcte transmise
par un signal depuis la station. (Note :
Certaines stations RDS ne disposent pas de
cette fonction).
AFFICHAGE À CRISTAUX LIQUIDES
Il permet d'afficher la fréquence actuelle et
les fonctions activées.
FONCTION ESP
Il est possible de protéger l’appareil contre
les chocs dans la page de 10–20 s.
ENTRÉE AUXILIAIRE
L’appareil peut être connecté à un lecteur
portable via la prise AUX IN (13). Appuyez
sur la touche SRC pour passer au mode
AUX, lorsqu’une source de signal audio est
déjà connectée à l’appareil.
FONCTION DE RÉINITIALISATION
La touche RESET (23) doit être activée au
moyen d'une pointe de stylo ou d’un objet
métallique éffilé.
La touche RESET est activée dans les
situations suivantes :
RÉGLAGE DE L'HEURE
(1) Configuration manuelle :
Appuyez et maintenez enfoncée pendant 2
secondes la touche DISP. L'heure se met à
clignoter. Appuyer sur la touche
- Après l'installation initiale de l’appareil,
une fois la connexion de tout câblage
terminée.
- Lorsqu’aucune touche de fonction n’est
pas activée.
- Le symbole de l’erreur s’affiche à
/ pour régler les heures. Appuyez
brièvement sur la touche DISP pour
changer les minutes. Vous pouvez
36
Note : L’appui sur la touche RESET (23) ne
remet pas l’appareil en marche. Utilisez un
coton-tige imbibé d'alcool isopropylique
Page 37

Manipulation
pour essuyer la fente sur la face avant.
UTILISATION DE LA RADIO
PASSAGE EN MODE RADIO
Appuyez sur la touche SRC (4) pour
sélectionner le mode de radio. L'écran
affiche le mode radio, ainsi que la bande
mémorisée et sa fréquence.
SÉLECTION D’UNE BANDE RADIO
Après être entré dans le mode radio,
appuyez sur la touche BAND (3) pour
sélectionner la bande recherchée.
La bande de réception peut être
modifiée dans l'ordre suivant :
→FM1→ FM2→ FM3 → MW1(AM1) → MW2(AM2)
SÉLECTION D’UNE STATION
Appuyez brièvement sur la touche
(14) ou (9) pour lancer la
recherche automatique. La radio
recherchera automatiquement une
station (vers le haut et vers le bas).
Appuyez et maintenez enfoncée la
touche pendant 2 secondes jusqu'à
l'affichage indique « MANUAL » (mode
manuel), qui signifie le passage vers le
mode de réglage manuel. En ce mode, il
est possible de se déplacer
progressivement entre les fréquences
successives (haut et bas) jusqu'à
trouver une station. Si aucune touche
n’est pas appuyée pendant 5 secondes,
la radio retournera en mode de réglage
automatique, et l'écran affiche
« AUTO ».
MÉMORISATION AUTOMATIQUE
ET BALAYAGE DES CHAÎNES
- Mémorisation automatique
- Appuyez et maintenez enfoncée
pendant 2 secondes la touche TS (2)
pour que la radio commence le balayage
depuis la fréquence de 87,5 MHz et
vérifie la puissance du signal jusqu'à
37
l'achèvement d'un cycle unique de
recherche. Puis, quelques stations ayant
le signal le plus fort sont enregistrées
sous les numéros de touches par défaut
associés à la bande FM3. Le premier
cycle fonctionne en mode LOCAL (local)
et recherche des stations qui ont un
signal de réception le plus fort. Si la
recherche de 6 stations a échouée, la
radio effectuera le second cycle de
recherche, mais avec le mode local
désactivé (LOCAL OFF).
- Balayage des chaînes
Appuyer brièvement sur la touche TS (2)
pour balayer les stations préconfigurées.
La radio s'arrête pendant 5 secondes à
un numéro préconfiguré sans atténuer
le son.
ENREGISTREMENT MANUEL DES
STATIONS ET RAPPEL DES
STATIONS PRÉCONFIGURÉES
Appuyez et maintenez enfoncée
pendant 2 secondes une des touches
attribuées aux stations radio
mémorisées (1-6) pour recevoir son
signal. La station actuelle est
enregistrée sous la touche numérique.
Appuyer brièvement sur la touche de
station mémorisée (1-6) pour écouter
directement le signal émis par la station
et enregistré sous la touche de
programmation qui lui est attribuée.
UTILISATION DU RDS (RADIO DATA
SYSTEM)
Le mode RDS est réglé
dans la position AF du menu système.
Tourner le bouton audio pour activer ou
désactiver la fonction AF.
Chaque fois que vous activez la fonction
AF, l'écran affiche le symbole « AF ».
Le nom du programme est affiché au
moment de la réception des stations
RDS.
Le symbole « AF » se met à clignoter si
F
R
E
N
C
H
Page 38

Manipulation
la qualité du signal transmis est
détériorée.
Lors de la réception du signal de
diffusion d'urgence, l'écran affiche
« ALARM », et le niveau de la sortie du
son est ajusté automatiquement au
niveau de sortie pré-configuré – si le
contrôle du volume sonore est réglé au
minimum.
Utilisation des chaînes régionales
Après l’activation de la fonction AF dans
la position REG du menu système. Le
déplacement du bouton audio permet
d'activer ou de désactiver la fonction
REG. Après avoir désactivé la fonction AF,
il est impossible de désactiver la fonction
REG.
Certaines stations de radiodiffusion
changent pour une certaine période de
temps leur programme de diffusion
normale pour la diffusion régionale. Si la
région géographique est activée, le
programme actuellement écouté reste
inchangé. Après la désactivation de la
région géographique, il est possible de
passer au signal de réception transmis
par une station régionale.
Écoute des informations sur le trafic
routier
Dans la position TA dans le menu
système, le déplacement du bouton
audio permet d'activer ou de désactiver
la fonction TA. L’activation du mode TA
permet la réception des informations sur
le trafic routier :
Si l'appareil fonctionne en mode CD
(MP3) ou AUX, il basculera
temporairement sur le mode radio.
Si la fonction EON détecte la présence
d'informations sur le trafic routier dans
un autre programme, l'appareil passe
temporairement à la station liée à la
fonction EON.
Si le niveau sonore est inférieur au seuil,
il sera porté à cette valeur.
L’activation du mode TA provoque
l’activation de la fonction TA pour un
38
seul segment. Lorsque vous recevez un
signal de la station TP la fonction TP
sera activée pour un seul segment.
Fonction d'informations sur les
perturbations du trafic routier
La commutation de la fonction TA en
STOP annule la réception des
informations sur le trafic routier (position
TA dans le menu RDS – les options
disponibles sont les suivantes
activer/désactiver, si aucune station TA
n’est diffusée. Si vous écoutez une
station TA, dans la position appropriée
TA dans le menu des options
activer/arrêt/désactiver apparaissent).
Une commutation accidentelle en mode
EON TA peut avoir lieu lorsque les
informations EON TA avait été déjà
reçues de la station actuelle, et la radio
s’est commutée pour la réception du
signal de cette station EON, mais une
distance trop grande de la station EON
empêche la réception du signal. Dans ce
cas, la radio passe à nouveau à la
station actuelle. L'exemple ci-dessus
illustre une situation lorsque l’utilisateur
écoute un programme inapproprié ou le
son a été temporairement atténué. Les
données utilisées par la fonction RDS
sont les suivantes : PI, PS, AF, TP, TA,
EON et PTY.
PS : Nom de la chaîne
C’est le nom de la station donnée en
utilisant des caractères
alphanumériques.
AF : Fréquences alternatives
C’est la liste des fréquences des stations
qui émettent le même programme.
TP : Identification du programme avec
des informations sur le trafic routier
Ces sont les données d'identification
provenant de stations diffusant des
informations sur le trafic routier.
TA : Identification des informations sur
le trafic routier
Ces sont les données d'identification
indiquant l'émission ou le manque
Page 39

Manipulation
d'émission d'informations routières.
EON : Informations sur les programmes
d’autre station
piste/fichier. Appuyez à nouveau sur la
touche pour arrêter la lecture initiale et
écouter une piste/un fichier.
Ce sont les informations émises dans les
fonctions PI, AF, TP, TA, etc. relatives à
d'autres programmes en provenance
d'autres stations que la station actuelle.
UTILISATION CD/MP3/WMA
PASSAGE EN MODE DISQUE
Si aucun disque n’a pas été inséré
l’appareil :
Faites glisser délicatement le disque
dans la fente (côté imprimé vers le
haut) jusqu'à ce que vous sentiez une
légère résistance. Le disque sera
alors automatiquement tiré dans l'unité,
puis immédiatement lis.
Si le disque est déjà inséré dans
l’appareil : Appuyez sur la touche SRC
(4) jusqu'à ce que l'écran affiche le
mode DISC (disque).
SÉLECTION DES PISTES/DU
FICHIER
Appuyer sur la touche (14) ou
(9) pour revenir à la piste précédente/au
fichier précédent ou passer à la piste
suivante/au fichier suivant. L'écran
affiche le numéro de la piste/du fichier.
Appuyez et maintenez enfoncée la
touche (14) ou (9) pour faire
défiler vite les pistes/les fichiers vers
l'arrière ou vers l’avant. La lecture sera
reprise à la libération de la touche.
ARRÊT DE LA LECTURE
Appuyez sur la touche (21) pour
arrêter la lecture. Appuyez à nouveau
sur elle pour la reprendre.
LECTURE INITIALE DE TOUTES
LES PISTES/TOUS LES FICHIERS
Appuyez sur la touche SCN (20) pour
lire les premières secondes de chaque
39
RÉPÉTITION DE LA MÊME
PISTE/DU MÊME FICHIER
Appuyez sur la touche RPT (19) pour
répéter la lecture de la même piste/du
même fichier. Appuyez à nouveau pour
répéter la lecture de toutes les
pistes/tous les fichiers.
LECTURE ALÉATOIRE DE TOUS LES
FICHIERS
Appuyez sur la touche RDM (18) pour
lire toutes les pistes/tous les fichiers
dans un ordre aléatoire. Appuyez à
nouveau sur la touche pour désactiver la
fonction de lecture aléatoire.
ÉJECTION DU DISQUE
Appuyez sur la touche (11) pour
arrêter la lecture du disque et l'éjecter
de la fente dans l’appareil (6).
SÉLECTION D’UN RÉPERTOIRE
HAUT/BAS
Appuyez sur la touche DIR- (17) ou
DIR+ (16) pour sélectionner le
répertoire précédent ou suivant. Les
touches DIR- (17) ou DIR+ (16) ne
vont activer aucune fonction si aucuns
répertoires ne se trouvent sur le disque
avec des fichiers MP3/WMA.
SÉLECTION DES FICHIERS AVEC LA
TOUCHE
La touche (22) est affecté à la
fonction de sélection de fichiers
MP3/WMA.
Son appui provoque l’activation
du mode de sélection conformément au
schéma ci-dessous :
Recherchez dans le répertoire. =>
Recherchez selon le numéro du fichier.
Recherchez dans le répertoire
Appuyez une fois sur la touche
. L’appareil se mettra en
F
R
E
N
C
H
Page 40

Manipulation
« Recherche depuis le répertoire »
. Faites tourner le bouton VOL
(volume) pour sélectionner le
répertoire recherché. Ensuite,
appuyez sur le bouton MENU (6)
pour entrer dans ce répertoire.
Faites tourner le bouton (6) pour
sélectionner le répertoire recherché.
Ensuite, appuyez à nouveau sur le
bouton (6) pour ouvrir le fichier.
Appuyez sur la touche pour
revenir au répertoire précédent.
Recherchez selon le numéro du
fichier
Appuyez deux fois sur la touche
. Cela activera le mode de
« recherche selon le numéro du
fichier ». Tournez le bouton (21)
pour sélectionner le numéro de
fichier souhaité, puis appuyez sur le
bouton MENU (4) pour confirmer la
sélection. L'appareil recherche le
fichier sélectionné et commence la
lecture. Vous pouvez également
saisir le numéro manuellement. Sur
la face avant il y a les chiffres 1-6 et
les boutons 7/8/9/0 auxquels sont
attribuées les fonctions suivantes :
EQ : 7
: 8
: 9
DISP : 0.
Si vous sélectionnez un numéro du fichier,
l'appareil attend quelques secondes. Au
bout de quelques secondes, l'appareil
recherche le fichier même si le bouton
MENU (4) n’a pas été enfoncé.
UTILISATION DU LECTEUR USB
Le connecteur USB (10) est situé sur la face
avant de l’appareil. Ce connecteur (12) sert
à connecter les pilotes USB.
40
Lorsqu'un pilote USB est connecté,
l'appareil recherchera les fichiers MP3 /
WMA qui y sont stockés et commencera leur
lecture. Une fois ce mode activé, il est
également possible d’appuyer sur la touche
SRC et de choisir le mode USB.
Si la mémoire USB sert à la lecture des
fichiers MP3/WMA, son utilisation est
identique à la description relative à
CD/MP3/WMA.
Note :
L'unité principale ne supporte que les
clés USB standard approuvées par
Microsoft.
Le lecteur USB MP3 n'est pas un
dispositif standard, ce qui signifie que
les différentes marques et différents
modèles des appareils ont leurs propres
standards. Pour cette raison, notre
appareil ne supporte pas chaque lecteur
MP3.
Lors de la connexion d'un lecteur MP3
équipé d'une pile normale (batterie non
rechargeable), il faut d'abord retirer la
pile du lecteur, puis le connecter au
connecteur USB. Dans le cas contraire,
cela peut provoquer la rupture de la
pile.
UTILISATION TF
Sur la face avant de l’appareil il y a un
connecteur TF (24).
Lorsqu'une carte TF est connectée au
connecteur TF, l'appareil recherchera les
fichiers MP3 / WMA qui y sont stockés et
commencera leur lecture. Ce mécanisme
fonctionne d’une manière identique à
l'opération de lecture des fichiers
CD/MP3/WMA décrite précédemment.
En cas de fonctionnement dans un autre
mode, l’appui sur la touche SRC (4)
permettra de passer au mode SD.
MODES DE DÉCODAGE MP3/WMA
Page 41

Manipulation
Re W rit a ble
SUPPORTÉS
L'unité principale supporte les modes de
décodage des fichiers MP3/WMA (Windows
Media Audio) mentionnés ci-dessous.
Vitesse de
Norme
MPEG1 Audio
Layer 3 (44,1
kHz)
Windows
Media Audio
(44,1 kHz)
transmission
des données
(ko/s)
32, 48, 64, 96,
128, 192, 256,
320
64, 96, 128,
192
Le mode USB supporte :
1. Dossier : 500 max,.
2. Fichier : 999 max,.
3. Profondeur du répertoire : 8 couches
4. Dimensions : 32 Go
ATTENTION
Ne pas connecter le lecteur USB ou une
carte TF à l'unité principale, si vous y avez
enregistrés des fichiers importants. Ne pas
faire lire les disques CD-R/RW contenant
des fichiers importants. Une mauvaise
utilisation du lecteur peut entraîner la perte
de fichiers. Notre société n'est pas
responsable de la perte de ces données.
REMARQUES CONCERNANT LE DISQUE
A. Remarques concernant les disques :
Modes
supporté
s
Stéréo
Stéréo
tout côté du disque (imprimé ou
enregistré), car cela pourrait provoquer
un dysfonctionnement de l'appareil.
3. La saleté, la poussière, les égratignures
et la déformation du disque vont
provoquer des interférences pendant la
lecture.
B. Remarques concernant le disque de
type CD-R (enregistrable) / CD-RW
(réinscriptible)
1. N'insérez à l’appareil que les disques
portant les symboles suivants :
2. L'appareil ne lira pas les disques CD-R et
CD-RW si la session d’enregistrement
pas été terminée. (Voir le manuel du
lecteur CD-R / CD-RW ou du logiciel
CD-R/CD-RW pour apprendre plus
sur le processus d'achèvement de la
session d’enregistrement).
3. L’appareil peut ne pas lire certains
disques CD-R / CD-RW, ce qui résulte de
l'état de l'enregistrement,
du disque lui-même ou du dispositif
F
R
E
N
C
H
L'utilisation de disques ayant une
forme non standard (par ex. carré, en
forme d'étoile ou cœur, etc.) peut
1. provoquer l’endommagement de
l’appareil. Rappelez-vous que l'appareil
ne fonctionne qu'avec des CD ronds.
2. Ne collez pas du papier, ruban, etc., à
41
utilisé
pour son enregistrement. (Voir *1)
*1 : Veuillez lire les recommandations
suivantes pour assurer une lecture plus
fiable :
a : Utilisez les disques CD-RW avec la vitesse de
lecture de 1x à 4x et enregistrez des données
avec la vitesse d’1x ou 2x.
Page 42

Manipulation
b. Utilisez les disques CD-R avec la
vitesse de lecture de 1x à 8x et enregistrez
des données avec la vitesse d’1x ou 2x.
c. Ne faites pas lire les disques CD-RW,
qui ont été enregistrés plus que 5 fois.
C. Remarques concernant les fichiers
MP3 (seulement le format MP3) :
1. Le disque doit être enregistré dans le
format ISO9660 niveau 1 ou 2 ou avec
une extension Joliet ou Romero.
2. En nommant les fichiers MP3, n’oubliez
pas que l’extension du fichier doit être
« mp3 ».
3. L’appareil ne reconnaîtra des fichiers
non-MP3, même avec une extension
« mp3 ».
UTILISATION BLUETOOTH *)
APPAIRIEMENT INITIAL DES
DISPOSITIFS EN MODE
BLUETOOTH
(i) Si vous voulez utiliser le mode Bluetooth,
assurez-vous que votre téléphone mobile
prend en charge la fonction Bluetooth.
(ii) Différents types de téléphones mobiles
ont des paramètres d'émission différents. Il
est recommandé que la distance entre le
téléphone mobile et l'appareil ne dépasse
pas 3 m, ce qui permettra d’obtenir la
meilleure qualité d'appel. Ne placez pas
d'objets métalliques et des obstacles sur le
chemin de transmission entre le téléphone
mobile et l'appareil.
APPAIRIEMENT
1) Choisissez la configuration Bluetooth
dans le téléphone mobile. (À propos de la
connexion Bluetooth, consultez les
instructions fournies avec votre téléphone).
2) La liste affichée sur le téléphone devrait
inclure « CAR KIT » (kit de voiture).
Sélectionnez la position « BP 170 BT » et
saisissez le mot de passe « 0000 ».
Peut-être le mot de passe ne sera pas
nécessaire.
3) Une fois l'appariement terminé, l'écran
affiche le symbole BT.
Accepter / refuser un appel
entrant
Dans le cas d'un appel entrant, appuyez sur
la touche , pour accepter l’appel. Un
appui sur la touche provoquera le refus
de l’appel.
Mettre fin à un appel
Une fois la conversation terminée, appuyez
sur la touche , pour raccrocher.
Vérification de l’annuaire
téléphonique/des appels reçus/
passés/manqués (concerne les
téléphones Android et iPhone)
Appuyez sur la touche SRC pour afficher
« PHONE » (téléphone) sur l'écran.
Appuyez sur la touche pour afficher
« BOOK » (annuaire téléphonique) sur
l'écran. Les appuis consécutifs font
afficher les options suivantes :
BOOK---RECEIVED---DIALED---MISSED--
-PHONE (Annuaire téléphonique -> Reçus
-> Faits -> Manqués -> Téléphone)
L’utilisation de la touche ou dans
chacune de ces positions permettra de
vérifier les numéros qui y sont attribués.
Note : Une fois la connexion effectuée,
votre mobile affichera une information
concernant la connexion avec l’autoradio.
Vous devez donner votre consentement
et appuyer sur « YES » (Oui) pour
confirmer.
42
Page 43

Manipulation
(Note : Il est important que le numéro de
téléphone a été enregistré dans la mémoire
du téléphone et non sur la carte SIM).
Faire un appel
1) Faire un appel en entrant
manuellement un numéro de
téléphone.
Appuyez sur la touche SRC pour afficher
« PHONE » (téléphone) sur l'écran.
Appuyez et maintenez enfoncée la touche
. L'écran LCD sera complètement vide.
Maintenant, vous pouvez entrer un numéro
de téléphone et appuyer sur la touche
pour confirmer
la sélection du numéro saisi. (Note : Si vous
entrez un numéro erroné, appuyez sur la
- Passer à la position « Vérification de
l’annuaire téléphonique/des
appels reçus/ faits/manqués », et
puis sélectionnez le numéro de
téléphone recherché. Appuyez sur la
touche pour sélectionner ce
numéro.
Note : Si votre téléphone portable a
deux (2) cartes SIM, pendant un appel
effectué en utilisant la face avant, une
carte par défaut sera sélectionnée (ou à
tout moment, il sera demandé
d'identifier la carte à partir de laquelle
la connexion doit être établie).
Transfert d'un appel entre le
téléphone mobile et l’appareil
En mode de conversation, il est possible
touche pour annuler les chiffres mal
saisis.)
Sur la face avant il y a les chiffres 1-6 et les
boutons 0/7/8/9/*/# auxquels sont
attribuées les fonctions suivantes :
0 : Bouton d’affichage (DISP)
7 : EQ :
8 :
9 :
* : Appuyez et maintenez enfoncée pendant
2 secondes la touche (5).
# : Appuyez et maintenez enfoncée
pendant 2 secondes la touche (6).
1) Refaire un appel
Appuyez sur la touche SRCpour afficher
« PHONE » (téléphone) sur l'écran.
Appuyez et maintenez enfoncé la touche
pendant 2 secondes,
pour sélectionner à nouveau le dernier
numéro de téléphone.
2) Faire un appel sur le numéro de
l’annuaire téléphonique/des appels
d'appuyer sur la touche (22) pour
transférer l'appel téléphonique entre le
mobile et la radio.
Transmission du son via Bluetooth
(fonction A2DP)
Appuyez sur la touche SRC (4) pour afficher
« PHONE » (téléphone) sur l'écran. Mettez
ensuite en marche le lecteur de musique sur
votre téléphone pour commencer la lecture
de la chanson. Le son sera transmis via le
haut-parleur dans l’appareil. Appuyez sur la
touche (21) située sur la face avant
pour arrêter/reprendre la lecture de la piste.
Appuyez sur la touche (14) ou (9)
pour sélectionner la piste
suivante/précédente.
Activation/désactivation du Bluetooth
Appuyez et maintenez enfoncée la touche
SRC pendant 2 secondes pour activer /
désactiver Bluetooth.
*) Concerne seulement les appareils
équipés de la fonction Bluetooth
F
R
E
N
C
H
reçus/ faits/manqués (concerne les
téléphones Android et iPhone)
43
Page 44

Télécommande
TOUCHES DE FONCTION ET DE COMMANDE
1. : Touche Marche/Arrêt
2. VOL+ : Touche d’intensification du volume.
3. BAND : Permet de sélectionner une bande FM1/FM2/FM3/AM1/AM2 en mode
RADIO.
4. : En mode RADIO : Appuyez brièvement pour rechercher les fonctions vers
le bas. Appuyez, pour désactiver manuellement. En mode CD/MP3/WMA : Appuyez
brièvement pour passer d’une piste/d’un fichier en arrière. Appuyez et maintenez
enfoncée pour passer vite en arrière.
5. VOL- : Touche d'atténuation du volume.
6. EQ : C’est la touche de l'égaliseur.
7. 2 SCN : En mode RADIO : Numéro 2. Voir page 11 – ENREGISTREMENT MANUEL
DES STATIONS ET RAPPEL DES STATIONS PRÉCONFIGURÉES.
En mode CD/MP3/WMA : Appuyez pour activer/désactiver la
fonction BALAYAGE.
8. 1 : En mode RADIO : Numéro 1. Voir page 11 – ENREGISTREMENT
MANUEL DES STATIONS ET RAPPEL DES STATIONS
PRÉCONFIGURÉES.
En mode CD/MP3/WMA : Appuyez pour arrêter/reprendre la
lecture.
9. 4 RDM : En mode RADIO : Numéro 4. Voir page 11 – ENREGISTREMENT
MANUEL DES STATIONS ET RAPPEL DES STATIONS
PRÉCONFIGURÉES.
En mode CD/MP3/WMA : activation/désactivation de la fonction de lecture
aléatoire.
10. 5 DIR- : En mode RADIO : Numéro 5. Voir page 11 – ENREGISTREMENT
44
Page 45

Télécommande
MANUEL DES STATIONS ET RAPPEL DES STATIONS PRÉCONFIGURÉES.
En mode MP3/WMA : Appuyez pour revenir au répertoire précédent.
C’est la touche , si l’appareil fonctionne en mode Bluetooth. *)
11. SRC : La touche fait activer la fonction SRC (source du son).
12. : Appuyez pour atténuer/rétablir le son.
13. : En mode RADIO : Elle assure la fonction TS. Voir page 11
MÉMORISATION AUTOMATIQUE ET BALAYAGE DES CHAÎNES
En mode MP3/WMA : C’est la fonction de recherche. (Voir page 12)
en mode PHONE (Téléphone). La fonction de la touche est décrite à
la page 15 – UTILISATION DU BLUETOOTH.
14. SEL : Appuyez brièvement pour entrer dans le menu du mode audio.
Appuyez et maintenez enfoncée la touche pour entrer au menu
système.
(Voir page 9). Appuyez pour confirmer la fonction de recherche
(voir la page 13) une fois entré en mode de recherche MP3/WMA.
15. : En mode RADIO : Appuyez brièvement pour rechercher les
fonctions vers le bas. Appuyez pour rechercher manuellement une
fonction.
En mode CD/MP3/WMA : Appuyez brièvement pour faire passer
une piste/un fichier en avant. Appuyez et maintenez enfoncée
pour passer vite en avant.
F
R
E
N
C
H
16. DISP : Appuyez la touche DISP (Afficher) pour afficher l’heure.
17. 3 RPT : En mode RADIO : Numéro 3. Voir page 11 – ENREGISTREMENT
MANUEL DES STATIONS ET RAPPEL DES STATIONS
PRÉCONFIGURÉES.
En mode CD/MP3/WMA : Appuyez pour activer/désactiver la
fonction de répétition.
18. 6 DIR+ : En mode RADIO : Numéro 6. Voir page 11 – ENREGISTREMENT
MANUEL DES STATIONS ET RAPPEL DES STATIONS
PRÉCONFIGURÉES.
En mode MP3/WMA : Appuyez pour passer au répertoire suivant.
Quand vous répondez à un appel ou raccrochez, il fonctionne en mode touche . . *).
*) Concerne seulement les appareils équipés de la fonction Bluetooth
45
Page 46

Spécification
NORMES GÉNÉRALES
Exigences relatives à l’alimentation : Courant continu 12 V, borne négative reliée à la masse
Dimensions du support de montage : 178 (largeur) x 160 (profondeur) x 50 (hauteur)
Contrôle des tons
- Bas (à 100 Hz) : ±10 dB
- Aigus (à 10 kHz) : ±10 dB
- Puissance de sortie maximale : 4X40 W
- Consommation de courant : 10 A (max) (concerne la version avec l’alimentation
normale)
Lecteur de CD
Rapport signal sur bruit (SNR) : Plus de 55 dB :
Séparation des canaux : Plus de 45 dB :
Réponse harmonique : 40 Hz-18 kHz
RADIO FM
Plage de fréquences de 87,5 à 109 MHz
IF 10,7 MHz
Sensibilité (S/N=30 dB) 4 μV
Séparation des canaux stéréo >25 dB
AM (MW)
Plage de fréquences de 522 à 1620 kHz
IF 450 kHz
Sensibilité (S/N=20 dB) 36 dBuV
46
Page 47

fonctionne pas correctement en
Vérifiez les connexions des câbles avant de vérifier la liste de contrôle. Consultez votre revendeur le plus
proche si, après la vérification de la liste de contrôle le problème persiste.
Symptôme Cause Solution
Pas
d'alimentation.
Impossible
d'insérer ou
d'éjecter le disque.
Absence de son.
Le contact de la voiture n'est
pas allumé.
Le fusible est grillé. Remplacez le fusible.
Il y a déjà un disque dans le
lecteur.
Le disque a été inséré dans la
mauvaise position.
Le CD est très sale ou
endommagé.
La température est trop élevée
dans la voiture.
Présence de la vapeur
condensée.
Le volume est réglé au
minimum.
Le câblage présente un défaut
de connexion.
Tournez la clé de contact en position
« ACC » si l’alimentation est reliée
au circuit auxiliaire du véhicule et
que le moteur ne tourne pas.
Retirez le disque du lecteur puis insérez
un autre.
Insérez le disque de sorte que les
inscriptions se trouvent au-dessus.
Nettoyez le disque ou essayez un autre.
Refroidissez le véhicule ou attendez
jusqu'à ce que la température ambiante
retourne à la normale.
Laissez le lecteur hors tension pendant
environ une heure et essayez à nouveau.
Ajustez le son au niveau souhaité.
Vérifiez les connexions des câbles.
F
R
E
N
C
H
Distorsion dans la
reproduction
sonore.
Les touches de
commande ne
fonctionnent pas.
La radio ne
fonctionne pas. La
fonction de
sélection
automatique des
stations radio ne
fonctionne pas.
L’angle de montage de
l’appareil dépasse 30 degrés.
Le disque est très sale ou
endommagé.
Le micro-ordinateur intégré ne
raison du bruit.
Le câble d’antenne n’est pas
connecté.
La puissance du signal est trop
faible.
47
Réglez l'angle de sorte qu'il soit inférieur
à 30 degrés.
Nettoyez le disque ou essayez un autre.
Appuyez sur le bouton de réinitialisation
(RESET).
La face avant a été mal fixée.
Connectez correctement le câble
d’antenne.
Sélectionnez une station manuellement.
Page 48

ÍNDICE
Operación ...................................... 50
Disposición de botones ........................ 50
Encendido/apagado del equipo ............ 51
Función de silencio .............................. 51
Extracción del panel frontal .................. 51
Ajuste de sonido ................................. 51
Encendido/apagado REG ...................... 51
Volumen TA ........................................ 51
Encendido/apagado LOC ...................... 51
Modo estéreo/mono ............................ 51
Encendido/apagado del pitido .............. 51
AREA .................................................. 51
EQ ...................................................... 52
Visualización de información ................ 52
Ajuste de hora .................................... 52
Pantalla de cristal líquido ..................... 52
Retirada del disco ............................... 55
Selección del directorio hacia arriba/hacia
abajo ............................................ 55
Selección de ficheros con el botón . 55
Uso del reproductor USB ..................... 56
Uso de la modalidad TF ...................... 56
Observaciones con respecto al disco .... 57
Uso de la modalidad Bluetooth*) ......... 58
Mando a distancia ........................ 60
Especificación .............................. 62
Detección y eliminación de defectos
.................................................... 63
*) Aplicable solo a equipos con
función Bluetooth
Entrada auxiliar ................................... 52
Función de puesta a cero ..................... 52
Uso de la modalidad de radio ............... 52
Conmutación al modo de radio ......... 52
Selección de la banda de frecuencia .. 53
Selección de la emisora .................... 53
Registro automático en la memoria y
escaneo de programas ..................... 53
Registro manual de emisoras y selección
entre las emisoras predefinidas .......... 53
Uso de la modalidad de RDS (Radio Data
System) .......................................53
Uso de la modalidad de CD/MP3/WMA .. 54
Conmutación al modo de disco ............. 55
Selección de pistas/fichero ................... 55
Interrupción de la reproducción ............ 55
Reproducción con exploración de todas las
pistas/ todos los ficheros ..................... 55
Repetición de la misma pista/el mismo
fichero ................................................ 55
Reproducción aleatoria de todas las pistas/
todos los ficheros ................................ 55
48
Page 49

Declaración de conformidad
Blaupunkt Competence Center Car
Multimedia-Evo Sales GmbH declara que el
equipo es compatible con los requisitos
esenciales y el resto de las condiciones de la
Directiva 2014/53/CE.
La declaración se puede consultar en la
página web www.blaupunkt.com
Declaración de conformidad con la Directiva
2014/53/UE sobre la comercialización de
equipos radioeléctricos.
Declaración de conformidad con la Directiva
RoHS 2011/65/UE
Garantía
Las condiciones de garantía están
disponibles para su descarga en la página
web: www.blaupunkt.com
Garantía
Si es necesario recurrir a la reparación del
equipo en el marco de la garantía concedida,
la información pertinente sobre los
colaboradores que prestan tales servicios
en su país se encuentra en la página
web:www.blaupunkt.com
S
P
A
N
I
S
H
49
Page 50

Operación
Disposición de botones
1. Botón MUTE (SILENCIO)
2. Botón TS
3. Botón de banda (BAND)
4. Botón “ /SRC (fuente)”
5. Botón “ ” (liberación del panel)
6. Botón VOL/MENU (VOL/MENU)
7. Bandeja de CD
8. Pantalla LCD
9. Botón “ ”(SEEK DOWN
(BÚSQUEDA HACIA ABAJO))
10. Botón de visualización (DISP)
11. Botón “Retirada”
12. Conector USB
13. Toma AUX-IN
50
14. Botón “ ” (BÚSQUEDA HACIA
ARRIBA)
15. Botón del corrector (EQ)
16. Botón “6 DIR+/ ” *)
17. Botón “5 DIR-/ ” *)
18. Botón “4 RDM” (búsqueda aleatoria)
19. Botón “3 RPT” (repetir)
20. Botón “2 SCN” (escanear)
21. Botón “1 ”
22. Botón “ ” (búsqueda de ficheros
MP3)
23. Botón RESET (REINICIAR)
24. Toma de la tarjeta TF
25. DETECTOR DE INFRARROJOS
26. MICRÓFONO
*) Aplicable solo a equipos con función
Bluetooth
Page 51

Operación
MONTAJE
D Disposición de botones
Encendido/apagado del equipo
Encienda el equipo pulsando el botón
(4). El sistema se activa. Pulse y mantenga
pulsado el botón (4) durante 2
segundos para apagar el equipo.
FUNCIÓN DE SILENCIO
Pulse rápidamente el botón MUTE (1) para
activar la función de silencio en la salida
audio. Vuelva a pulsarlo para desactivarla.
EXTRACCIÓN DEL PANEL FRONTAL
Pulse el botón de liberación (5) para
desconectar el panel frontal extraíble.
AJUSTE DE SONIDO
Pulse rápidamente el botón MENU (6) para
seleccionar el modo de ajuste requerido. El
modo de ajuste se puede cambiar en la
secuencia siguiente:
-BAS-TRE-BAL-FAD- VOL-
BAS: Tonos bajos
TRE: Tonos altos
BAL: Balance
FAD: Desaparición
VOL: Volumen
Al girar la perilla (6) se puede ajustar la
calidad del sonido.
Pulse y mantenga pulsado el botón MENU
(6) durante 2 segundos para ir al menú de
sistema, véase abajo:
AF– TA – REG – TAVOL – LOC – STEREO –
BEEP – XBASS-AREA
AF: Frecuencias alternativas
TA: Información sobre el tráfico
REG: Región
TA VOL: Volumen de la información
sobre el tráfico
LOC = Local
ESTÉREO
ÁREA (AREA): Europa
Encendido/apagado REG
En modo de activación de la función AF, ésta
se puede activar y desactivar desde la
posición REG en el menú de sistema.
51
Ciertas emisoras a veces cambian su
programa de emisión normal a emisión
regional. La activación de la función REG no
afecta al programa actualmente escuchado.
Volumen de la información sobre el
tráfico (TA)
Esta función permite definir el volumen
mínimo de la información recibida sobre el
tráfico. El intervalo de ajuste está
comprendido entre 20 y 43. Por defecto, el
valor está fijado en 25. Gire la perilla de
volumen para ajustar el volumen de
información sobre el tráfico.
Encendido/apagado LOC
Al girar la perilla audio (6) en el ámbito de
esta función, se activa/desactiva la
localización. El equipo en modo LOC reduce
la sensibilidad de recepción a la hora de
buscar emisoras de radio. Esto significa que
va a escuchar solo las emisoras que
garanticen una buena calidad de recepción.
Todas las emisoras de baja calidad de
sonido se ignorarán. El equipo en modo
LOC desactivado aumenta la sensibilidad de
recepción a la hora de buscar emisoras de
radio. Esto significa que la radio puede
recibir la señal de la mayoría de las
emisoras.
ESTÉREO/MONO
Al girar la perilla audio (6) en el ámbito de
esta función, se puede seleccionar entre el
modo de sonido ESTÉREO o MONO. En
modo ESTÉREO se puede recibir la señal
estéreo en la banda. En modo MONO las
emisoras que emitan en estéreo se
convertirán en mono. En algunos casos,
cuando la señal recibida sea de mala calidad,
al pasar a modo MONO, el nivel de
interferencias se reducirá.
Encendido/apagado del pitido (BEEP)
La radio del coche cuenta con dos modos
de sonido del pitido. Gire la perilla de
volumen para seleccionar uno de ellos.
- Modo de pitido activado (Beep on):
Cada
vez al pulsar cualquier botón se genera
S
P
A
N
I
S
H
Page 52

Operación
MONTAJE
D Disposición de botones
un sonido de confirmación.
- Modo de pitido desactivado (Beep off):
Al no pulsar ningún botón, no se genera
un sonido de confirmación.
ÁREA
Una vez activada esta función, al girar la
perilla de volumen
se puede seleccionar entre el área de
Europa/USA/LAT (América Latina).
XBASS
Pulse y mantenga pulsado el botón EQ
durante 2 segundos para activar la función
XBASS. Vuelva a pulsar y mantenerlo
pulsado para desactivar la función.
EQ (Corrector de sonido)
Pulse rápidamente el botón EQ para
seleccionar uno de los modos EQ
preconfigurados:
FLAT-CLASSICS-POP-ROCK-EQ OFF
VISUALIZACIÓN DE INFORMACIÓN
Pulse el botón DISP (10) para visualizar el
tiempo durante 5 segundos en la pantalla.
Una vez transcurridos los 5 segundos, la
pantalla vuelve a visualizar la información.
AJUSTE DE HORA
(1) Configuración manual:
Pulse y mantenga pulsado el botón DISP
durante 2 segundos. El valor de la hora
empieza a parpadear. Pulse el botón
/ para ajustar la hora. Pulse
rápidamente el botón DISP para cambiar el
valor de los minutos. También se puede
usar el botón / para ajustar los
minutos. Luego vuelva a pulsar DISP para
confirmar.
acuerdo con la hora enviada por la señal
procedente de la emisora. (Nota: Algunas
emisoras RDS no tienen esta función).
PANTALLA DE CRISTAL LÍQUIDO
Permite visualizar la frecuencia actual y las
funciones activadas.
FUNCIÓN ESP
Es posible proteger el equipo contra
sacudidas en el intervalo de 10 a 20 s.
ENTRADA AUXILIAR
El equipo se puede conectar a un
reproductor portátil mediante la toma AUX
IN (13). Pulse el botón SRC para ir a modo
AUX cuando al equipo ya esté conectada
una fuente externa de la señal audio.
FUNCIÓN DE PUESTA A CERO
El botón RESET (23) debe pulsarse con una
punta del bolígrafo o un objeto metálico
agudo.
El botón RESET se usa en las siguientes
situaciones:
- Tras la instalación inicial del equipo
cuando se hayan conectado todos los
cables.
- Cuando no funcione ningún botón
funcional.
- Si en la pantalla aparece el símbolo de
error.
Nota: Al pulsar el botón RESET (23), el
equipo no reanudará el funcionamiento.
Use una almohadilla de algodón
impregnada con alcohol isopropílico para
limpiar la ranura en el panel frontal.
USO DE LA MODALIDAD DE
(2) Sincronizado de la hora con la
emisora RDS:
Permite recibir la emisora RDS que emita la
señal de una buena calidad (el símbolo AF
en la pantalla no parpadea). Al cabo de
unos minutos la hora se sincronizará de
52
RADIO
CONMUTACIÓN AL MODO DE
RADIO
Pulse el botón SRC (4) para seleccionar
el modo de radio. En la pantalla aparece
Page 53

Operación
MONTAJE
D Disposición de botones
el modo de radio y la banda guardada en
la memoria junto con su frecuencia.
SELECCIÓN DE LA BANDA DE RADIO
Al entrar en el modo de radio, pulse el
botón BAND (3) para seleccionar la
banda requerida.
La banda de recepción se puede
cambiar en la secuencia siguiente:
→FM1→ FM2→ FM3 → MW1(AM1) → MW2(AM2)
SELECCIÓN DE LA EMISORA
Pulse rápidamente el botón (14) o
(9) para activar la función de
búsqueda automática. La radio
automáticamente buscará la emisora
(hacia arriba y hacia abajo). Pulse y
mantenga pulsado el botón durante 2
segundos hasta que la pantalla aparezca
el mensaje “MANUAL” (modo manual),
lo cual significa la entrada en el modo
manual de ajuste. En este modo se
puede navegar entre las frecuencias
consecutivas (hacia arriba y hacia abajo)
hasta encontrar la emisora
correspondiente. Si ninguno de los
botones se pulsa durante 5 segundos, la
radio volverá al modo automático de
ajuste y en la pantalla aparecerá el
mensaje “AUTO”.
REGISTRO AUTOMÁTICO EN LA
MEMORIA Y ESCANEO DE
PROGRAMAS
- Registro automático en la memoria
- Pulse y mantenga pulsado el botón TS
(2) durante 2 segundos: la radio
empieza la búsqueda a partir de la
frecuencia de 87,5 MHz y comprueba la
fuerza de la señal hasta que termine un
ciclo de búsqueda. Luego las emisoras
que cuenten con la señal más fuerte se
guardarán bajo los números
predefinidos de los botones vinculados
con la banda FM3. El primer ciclo de
búsqueda funciona en modo LOCAL y
busca emisoras con la señal de
recepción más fuerte. Si no ha sido
posible buscar 6 emisoras, la radio
realizará el segundo ciclo de búsqueda,
pero ya con el modo local desactivado
(LOCAL OFF).
- Escaneo de programas
Pulse rápidamente el botón TS (2) para
escanear las emisoras preconfiguradas.
La radio se para durante 5 segundos
bajo el número predefinidas sin activar
la función de silencio.
REGISTRO MANUAL DE EMISORAS
Y SELECCIÓN ENTRE LAS
EMISORAS PREDEFINIDAS
Pulse y mantenga pulsado uno de los
botones asignados a las emisoras
guardadas en la memoria (1-6) durante
2 segundos para recibir su señal. La
emisora actual se guardará en la
memoria bajo el determinado botón
numérico. Pulse rápidamente el botón
de la emisora programada (1-6) para
escuchar directamente la señal emitida
por dicha emisora y guardada bajo el
botón de programación asignado.
USO DE LA MODALIDAD DE RDS
(RADIO DATA SYSTEM)
El modo RDS se ajusta
en la posición SF en el menú del sistema.
La perilla de audio se gira para activar o
desactivar la función AF.
Cada activación de la función AF hace
que en la pantalla aparezca el símbolo
“AF”.
Durante la recepción de la emisora RDS
se visualiza el nombre del programa.
El símbolo “AF” empieza a parpadear si
empeora la calidad de la señal emitida.
En el momento de recibir una señal
emisora de alarma, en la pantalla
aparecerá el mensaje “ALARM” y el
nivel de la salida acústica se ajustará
automáticamente al nivel de salida
S
P
A
N
I
S
H
53
Page 54

Operación
MONTAJE
D Disposición de botones
preconfigurado, si el control de la
intensidad de sonido se ha ajustado al
nivel mínimo.
Operación de los programas
regionales
Disponible con la función AF activada,
en la posición RED en el menú de
sistema. Al girar la perilla audio, se
puede activar o desactivar la función
REG. Una vez desactivada la función AF,
no se podrá desactivar la función REG.
Ciertas emisoras a veces cambian su
programa de emisión normal a emisión
regional. En caso de activar la región
geográfica, el programa actual no
cambia. Una vez desactivada la función
de región geográfica, se podrá pasar a
la señal receptora emitida desde una
emisora regional.
Escucha de la información sobre el
tráfico
En la posición TA en el menú de sistema,
girando la perilla de audio se puede
activar o desactivar la función TA. La
activación del modo TA permite recibir
la información sobre el tráfico:
Si el equipo trabaja en modo CD (MP3) o
AUX, se producirá una conmutación
temporal al modo de radio.
Si la función EON detecta la información
sobre el tráfico en otro programa, el
equipo pasará temporalmente a la
emisora vinculada con la función EON.
Si el nivel de intensidad del sonido está
por debajo del valor umbral, se subirá
hasta alcanzar dicho valor.
La activación del modo TA hace que se
active la función TA para un segmento
particular. En el momento de recibir la
señal desde la emisora TP la función TP
se activará para un segmento particular.
Función de interferencia de la
información sobre el tráfico
Al conmutar la función TA a STOP, se
anula la recepción de la información
actual sobre el tráfico (posición TA en el
menú RDS; las opciones disponibles son:
activar/desactivar, si no se recibe
ninguna emisora TA. En caso de recibir
la emisora TA, en la posición TA
correspondiente del menú aparecerán
las opciones activar/parar/desactivar).
Asimismo, podrá producirse una
conmutación accidental al modo EON
TA, cuando la información EON TA ya
se haya recibido de la emisora
actualmente seleccionada y la radio se
haya conmutado a la recepción de la
señal desde esa emisora EON, pero una
distancia excesiva de la emisora EON
impide la recepción de la señal. En tal
supuesto la radio se conmutará de
nuevo a la emisora actualmente recibida.
El ejemplo anterior muestra la situación
en la que el usuario escucha un
programa inadecuado o el sonido ha
sido silenciado durante un momento.
Los datos usados por la función RDS son
los datos PI, PS, AF, TP, TA, EON y PTY.
PS: Nombre del programa
Es el nombre de la emisora indicado por
medio de caracteres alfanuméricos.
AF: Frecuencias alternativas
Es una lista de frecuencias de las
emisoras que emiten el mismo
programa.
TP: Identificación del programa con la
información sobre el tráfico.
Son los datos de identificación
procedentes de las emisoras que emiten
la información sobre el tráfico.
TA: Identificación de la información
sobre el tráfico.
Son los datos de identificación que
señalan la emisión o falta de emisión de
la información sobre el tráfico.
EON: Información sobre los programas
de otra emisora.
de los accesorios
Es la información emitida en las
funciones PI, AF, TP, TA, etc., que se
refiere a otros programas procedentes
de otras emisoras que la emisora
actualmente recibida.
54
Page 55

Operación
MONTAJE
D Disposición de botones
USO DE LA MODALIDAD DE
CD/MP3/WMA
CONMUTACIÓN AL MODO DE
DISCO
Si no se ha introducido ningún disco en
el equipo:
PISTA/EL MISMO FICHERO
Pulse el botón RPT (19) para repetir la
reproducción de la misma pista/el
mismo fichero. Pulse otra vez para
repetir la reproducción de todas las
pistas/todos los ficheros.
Introduzca cuidadosamente el disco en
la bandeja (con la cara impresa hacia
arriba) hasta sentir una pequeña
resistencia. El disco se insertará
automáticamente en el equipo y luego
se reproducirá.
Si el disco ya está insertado en el
equipo: Pulse el botón SRC (4) hasta
que en la pantalla aparezca el modo
DISC (disco).
SELECCIÓN DE PISTAS/FICHERO
Pulse el botón (14) o (9) para
volver a la pista/el fichero anterior o
pasar a la pista/el fichero siguiente. En
la pantalla aparecerá el número de la
pista/el fichero.
Pulse y mantenga pulsado el botón
(14) o (9) para navegar
rápidamente entre las pistas/los ficheros
para adelante o para atrás. La
reproducción se reanudará al soltar el
botón.
INTERRUPCIÓN DE LA
REPRODUCCIÓN
Pulse el botón (21) para interrumpir
la reproducción. Vuelva a pulsarlo para
reanudarla.
REPRODUCCIÓN CON
EXPLORACIÓN DE TODAS LAS
PISTAS/TODOS LOS FICHEROS
Pulse el botón SCN (20) para reproducir
los primeros segundos de cada pista o
fichero. Vuelva a pulsar el botón para
interrumpir la reproducción con
exploración y escuchar la pista/el
fichero.
REPRODUCCIÓN ALEATORIA DE
TODOS LOS FICHEROS
Pulse el botón RDM (18) para
reproducir todas las pistas/todos los
ficheros de manera aleatoria. Vuelva a
pulsarlo para desactivar la función de
reproducción aleatoria.
RETIRADA DEL DISCO
Pulse el botón (11) para detener la
reproducción del disco y sacarlo de la
bandeja del equipo (6).
SELECCIÓN DEL DIRECTORIO
HACIA ARRIBA/HACIA ABAJO
Pulse el botón DIR- (17) o DIR+ (16)
para seleccionar el directorio anterior o
el siguiente. Los botones DIR- (17) o
DIR+ (16) no activarán ninguna función
si en el disco con los ficheros MP3/WMA
no hay directorios.
SELECCIÓN DE FICHEROS CON EL
BOTÓN
El botón (22) tiene asignada la
función de selección de ficheros
MP3/WMA.
Al pulsarlo, se activa
el modo de selección según el siguiente
esquema:
Buscar en el directorio. => Buscar por
número del fichero.
Buscar en el directorio
Pulse una vez el botón . El
equipo entrará en modo de
“Búsqueda del directorio”
. Gire la perilla VOL (volumen) para
seleccionar el directorio buscado.
S
P
A
N
I
S
H
REPETICIÓN DE LA MISMA
55
Luego pulse la perilla MENU (6)
Page 56

Operación
MONTAJE
D Disposición de botones
para entrar en el directorio
seleccionado. Gire la perilla (6) para
seleccionar el fichero buscado.
Vuelva a pulsar la perilla MENU (6)
para reproducir el fichero.
Pulse el botón para volver al
directorio anterior.
Buscar por número del fichero
Pulse dos veces el botón . Se
activará el modo de “Búsqueda por
número del fichero”. Gire la perilla
(21) para seleccionar el número
correspondiente del fichero y luego
pulse la perilla MENU (4) para
confirmar la selección. El equipo
buscará el fichero seleccionado y
empezará a reproducirlo. También
se puede introducir el número
correspondiente manualmente. En
el panel frontal se encuentran los
dígitos 1-6 y los botones 7/8/9/0 con
las siguientes funciones asignadas:
EQ: 7
: 8
: 9
DISP: 0.
En caso de seleccionar el número del
fichero el equipo esperará unos
segundos. Al cabo de unos
segundos el equipo buscará el
fichero determinado, si no se ha
pulsado la perilla MENU (4).
USO DEL REPRODUCTOR USB
El conector USB (10) está situado en el
panel frontal del equipo. Este conector (12)
sirve para conectar los controladores USB.
Una vez conectado el controlador USB en el
conector, el equipo buscará los ficheros
MP3/WMA guardados en el mismo y
empezará a reproducirlos. Una vez activado
este modo, también se puede pulsar el
botón
56
SRC y seleccionar el modo USB.
Si la memoria USB sirve para reproducir los
ficheros MP3/WMA en la radio, su manejo
es igual al manejo del reproductor
CD/MP3/WMA anteriormente descrito.
Nota:
El equipo principal trabaja solo con las
memorias USB estándares aprobadas
por Microsoft.
El reproductor USB MP3 no es un
equipo estándar, lo que quiere decir que
diferentes marcas y modelos del equipo
tienen sus propios estándares. Por lo
tanto, nuestro equipo no podrá trabajar
con toda clase de reproductores MP3.
En caso de conectar el reproductor MP3
provisto de una pila normal (no
batería-acumulador), primero retire la
pila del reproductor y luego conéctelo
en el conector USB. En caso contrario la
pila se podrá romper.
USO DE LA MODALIDAD TF
En el panel frontal del equipo se encuentra
el conector TF (24).
Una vez conectada la tarjeta TF en el
conector, el equipo buscará los ficheros
MP3/WMA guardados en la misma y
empezará a reproducirlos. Este mecanismo
funciona de la misma manera que la
operación de reproducción en modo de
CD/MP3/WMA anteriormente descrita.
En caso de trabajo en otro modo, al pulsar
el botón SRC (4) se puede pasar al modo
SD.
MODOS SOPORTADOS DE
DECODIFICACIÓN MP3/WMA
El equipo principal trabaja en los modos de
decodificación de los ficheros MP3/WMA
(Windows Media Audio) indicados a
continuación.
Page 57

Operación
Re W rit a ble
MONTAJE
D Disposición de botones
Velocidad de
Norma
MPEG1 Audio
Layer 3 (44,1
kHz)
Windows
Media Audio
(44,1 kHz)
transmisión
de datos
(kB/s)
32, 48, 64, 96,
128, 192, 256,
320
64, 96, 128,
192
El modo USB soporta:
1. Directorio: máx. 500
2. Fichero: máx. 999
3. Profundidad del directorio: 8 niveles
4. Medidas: 32 GB
¡ATENCIÓN!
Está prohibido conectar el reproductor USB
o la tarjeta TF al equipo principal si
contienen ficheros importantes. Tampoco
se pueden reproducir los discos CD-R/RW
con ficheros importantes. Una operación
incorrecta del reproductor podrá causar la
pérdida de los ficheros. No asumimos la
responsabilidad por la pérdida de dichos
datos.
OBSERVACIONES CON RESPECTO AL
DISCO
A. Observaciones acerca de los discos:
El uso de discos con una forma
Modos
soportad
os
Estéreo
Estéreo
funcionamiento del equipo.
3. Impurezas, polvo, arañazos y
deformaciones en el disco podrán
afectar la reproducción.
B. Observaciones acerca del disco de
tipo CD-R (para grabaciones) /
CD-RW (para múltiples grabaciones)
1. En el equipo se pueden introducir
únicamente los discos
identificados con los siguientes
símbolos:
2. El equipo no reproducirá un disco CD-R
y CD-RW, si no ha terminado la sesión
de grabación. (Véase el manual de la
grabadora CD-R/CD-RW o del software
CD-R/CD-RW para saber más
sobre el proceso de cierre de la sesión
de grabación).
3. El equipo no es capaz de reproducir
ciertos discos CD-R/CD-RW, lo que
resulta del estado de grabación,
del estado del propio disco y del equipo
usado
S
P
A
N
I
S
H
distinta a la estándar (p.ej. cuadrada,
estrella o corazón, etc.) puede
1. causar daños del equipo. Recuerde que
el equipo trabaja solo con los discos
redondos.
2. No pegue papel, cinta, etc., en ninguna
cara del disco (impresa o grabada),
dado que eso podrá afectar el
57
para su grabación. (Véase *1)
*1: Lea las siguientes instrucciones a fin
de garantizar una reproducción óptima:
a: Use discos CD-RW con una velocidad de
reproducción de 1x a 4x y guarde los datos
con una velocidad de 1x o 2x.
b. Use discos CD-R con una velocidad de
reproducción de 1x a 8x y guarde los datos
Page 58

Operación
MONTAJE
D Disposición de botones
con una velocidad de 1x o 2x.
c. No reproduzca discos CD-RW grabados
más de 5 veces.
e introduzca el código “0000”. La
introducción del código puede no ser
necesaria.
C. Observaciones acerca de los
ficheros MP3 (únicamente el formato
MP3):
1. El disco debe grabarse en el formato
ISO9660 nivel 1 o nivel 2 o con la
extensión Joliet o Romero.
2. Al indicar nombres para los ficheros MP3
recuerde que la extensión del fichero
debe ser “.mp3”.
3. El equipo no reconocerá ficheros que no
sean MP3, incluso si la extensión del
fichero es “.mp3”.
USO DE LA MODALIDAD BLUETOOTH
*)
EMPAREJAMIENTO INICIAL DE
EQUIPOS EN MODO BLUETOOTH
(i) En caso de usar el modo Bluetooth,
compruebe si su móvil soporta la función de
Bluetooth.
(ii) Distintos tipos de móviles soportan
diferentes parámetros de la fuerza de
emisión. Es recomendable que la distancia
entre el móvil y el equipo no exceda 3 m, lo
que permite obtener la mejor calidad de la
conexión. No coloque objetos metálicos ni
obstáculos en la pista de transmisión entre
el móvil y el equipo.
EMPAREJAMIENTO
1) Seleccione la configuración Bluetooth en
su móvil. (La información sobre la
3) Una vez realizado el emparejamiento de
los equipos, en la pantalla aparecerá el
símbolo BT.
Recepción/rechazo de una
llamada entrante
En caso de una llamada entrante pulse el
botón para recibirla. Al pulsar el
botón se rechaza la llamada.
Colgar una llamada
Una vez terminada la llamada, pulse el
botón para colgar.
Consulta de la lista de
contactos/las llamadas
recibidas/realizadas/rechazadas
(aplicable a móviles con el sistema
Android y la marca iPhone)
Pulse el botón SRC para que en la
pantalla aparezca el mensaje “PHONE”
(teléfono). Pulse el botón para que
en la pantalla aparezca el mensaje
“BOOK” (lista de contactos). Cada vez al
pulsar el botón se mostrarán las
siguientes opciones:
BOOK---RECEIVED---DIALED---MISSED--
-PHONE (Lista de contactos -> Recibidas
-> Realizadas -> Rechazadas ->
Teléfono)
El uso del botón o en cada una
de estas posiciones permitirá consultar
los números correspondientes.
modalidad Bluetooth se encuentra en el
manual proporcionado junto con su móvil).
2) En la lista visualizada en su móvil deberá
aparecer el elemento “CAR KIT” (kit de
Nota: Después de la primera conexión
en su móvil aparecerá un mensaje de
conectarlo con la radio del coche. Debe
acepar y pulsar “YES” (Sí) para confirmar.
(Nota: Es importante que el número de
coche). Seleccione el elemento “BP 170 BT”
58
teléfono esté guardado en la memoria del
Page 59

Operación
MONTAJE
D Disposición de botones
teléfono y no en la tarjeta SIM).
Realización de una llamada
1) Realización de una llamada con la
introducción manual del número de
teléfono.
Pulse el botón SRC para que en la pantalla
aparezca el mensaje “PHONE” (teléfono).
Pulse y mantenga pulsado el botón .
La pantalla LCD se quedará en blanco.
Ahora podrá introducir el número de
teléfono y pulsar el botón para confirmar
el número introducido. (Nota: En caso de
introducir un número incorrecto pulse el
botón para anular los números
recibidas/realizadas/rechazadas”
y seleccione el número de teléfono
buscado. Pulse el botón para
seleccionar el número.
Nota: Si en su móvil hay dos (2)
tarjetas SIM, al hacer una llamada a
través del panel frontal del equipo se
seleccionará la tarjeta predefinida (o
cada vez aparecerá una solicitud de
indicación de la tarjeta correspondiente
para hacer la llamada).
Transmisión de una llamada entre
el móvil y el equipo
En modo de llamada se puede pulsar el
botón (22) para transmitir la llamada
entre el teléfono y la radio.
incorrectos).
En el panel frontal se encuentran los dígitos
1-6 y los botones 0/7/8/9/*/# con las
siguientes funciones asignadas:
0: Botón de visualización (DISP)
7: EQ:
8:
9:
*: Pulse y mantenga pulsado el botón (5)
durante 2 segundos.
#: Pulse y mantenga pulsado el botón (6)
durante 2 segundos.
1) Hacer una llamada de nuevo
Pulse el botón SRC para que en la pantalla
aparezca el mensaje “PHONE” (teléfono).
Pulse y mantenga pulsado el botón
durante 2 segundos
para volver a llamar al último número.
2) Hacer una llamada a un número
de la lista de contactos/las
llamadas
recibidas/realizadas/rechazad
as (aplicable a móviles con el
sistema Android y la marca
iPhone)
Transmisión del sonido a través de
Bluetooth (función A2DP)
Pulse el botón SRC (4) para que en la
pantalla aparezca el mensaje “PHONE”
(teléfono). Luego active la reproducción de
música en el teléfono para iniciar la
reproducción de una pista. El sonido se
transmitirá a través del altavoz en el equipo.
Pulse el botón (21) situado en el panel
frontal para interrumpir/reanudar la
reproducción de la pista. Pulse el botón
(14) o (9) para seleccionar la pista
anterior/siguiente.
Activación/desactivación de
Bluetooth
Pulse y mantenga pulsado el botón SRC
durante 2 segundos para activar/desactivar
la conexión Bluetooth.
*) Aplicable solo a equipos con función
Bluetooth
S
P
A
N
I
S
H
- Pase al elemento “Consulta de la
de contactos/las llamadas
59
Page 60

Mando a distancia
BOTONES FUNCIONALES Y DE MANDO
1. : Botón de enc./apag. de alimentación
2. VOL+: Botón para aumentar el volumen.
3. BAND: Permite seleccionar la banda de FM1/FM2/FM3/AM1/AM2 en modo de
RADIO.
4. : En modo de RADIO: Pulse rápidamente para buscar las funciones hacia
abajo. Pulse para desactivarlas manualmente. En modo de CD/MP3/WMA: Pulse
rápidamente para retroceder una pista/un fichero. Pulse y mantenga pulsado para
retroceder rápidamente.
5. VOL- : Botón para reducir el volumen.
6. EQ: Es un botón de corrector de sonido.
7. 2 SCN: En modo de RADIO: Número 2. Véase la página 11: REGISTRO MANUAL
DE EMISORAS Y SELECCIÓN ENTRE LAS EMISORAS
PREDEFINIDAS
En modo de CD/MP3/WMA: Pulse para activar/desactivar la
función de ESCANEO.
8. 1 : En modo de RADIO: Número 1. Véase la página 11: REGISTRO
MANUAL DE EMISORAS Y SELECCIÓN ENTRE LAS EMISORAS
PREDEFINIDAS
En modo de CD/MP3/WMA: Pulse para interrumpir/reanudar la
reproducción.
9. 4 RDM: En modo de RADIO: Número 4. Véase la página 11: REGISTRO
MANUAL DE EMISORAS Y SELECCIÓN ENTRE LAS EMISORAS
PREDEFINIDAS
En modo de CD/MP3/WMA: activación/desactivación de la función de
reproducción aleatoria.
10. 5 DIR-: En modo de RADIO: Número 5. Véase la página 11: REGISTRO MANUAL
DE EMISORAS Y SELECCIÓN ENTRE LAS EMISORAS PREDEFINIDAS
En modo de MP3/WMA: Pulse para volver al directorio anterior.
Es el botón , si el equipo funciona en modo Bluetooth. *)
11. SRC: El botón activa la función de SRC (fuente de sonido).
12. : Pulse para silenciar/recuperar el sonido.
60
Page 61

Mando a distancia
13. : En modo de RADIO: Responde de la función TS. Véase la pagina 11:
REGISTRO AUTOMÁTICO EN LA MEMORIA Y ESCANEO DE
PROGRAMAS
En modo de MP3/WMA: Es una función de búsqueda. (Véase la
página 12).
en modo PHONE (Teléfono). La función del botón se describe en la
página 15: USO DE LA MODALIDAD BLUETOOTH.
14. SEL: Pulse rápidamente para entrar en el menú del modo audio. Pulse
y mantenga pulsado para entrar en el menú de sistema.
(Véase la página 9). Pulse para confirmar la función de búsqueda
(véase la página 13) tras entrar en el modo de búsqueda
MP3/WMA.
15. : En modo de RADIO: Pulse rápidamente para buscar las
funciones hacia abajo. Pulse para buscar la función manualmente.
En modo de CD/MP3/WMA: Pulse rápidamente para saltar a la
pista/el fichero siguiente. Pulse y mantenga pulsado para ir
rápidamente hacia adelante.
16. DISP: Pulse el botón DISP (Visualizar) para visualizar la hora.
17. 3 RPT: En modo de RADIO: Número 3. Véase la página 11: REGISTRO
MANUAL DE EMISORAS Y SELECCIÓN ENTRE LAS EMISORAS
PREDEFINIDAS
En modo de CD/MP3/WMA: Pulse para activar/desactivar la
función de repetición.
18. 6 DIR+: En modo de RADIO: Número 6. Véase la página 11: REGISTRO
MANUAL DE EMISORAS Y SELECCIÓN ENTRE LAS EMISORAS
PREDEFINIDAS
En modo de MP3/WMA: Pulse para ir al directorio siguiente.
Al recibir una llamada o colgarla trabaja en la función de la tecla . *).
*) Aplicable solo a equipos con función Bluetooth
S
P
A
N
I
S
H
61
Page 62

Especificación
NORMAS GENERALES
Requisitos de alimentación eléctrica: Corriente continua de 12 V, negativo a tierra
Medidas de la base de montaje: 178 (ancho) x 160 (profundo) x 50 (alto)
Control de tonos
- Bajos (a 100 Hz): ±10 dB
- Altos (a 10 kHz): ±10 dB
- Potencia máxima de salida 4X40 W
- Consumo energético: 10 A (máx.) (aplicable a la versión con alimentación eléctrica
normal)
Reproductor CD
Relación entre la señal y el ruido (SNR): Más de 55 dB:
Separación de canales: Más de 45 dB:
Característica de frecuencia: 40 Hz-18 kHz
RADIO FM
Rango de frecuencias de 87,5 a 109 MHz
IF 10,7 MHz
Sensibilidad (S/N=30 dB) 4 μV
Separación de los canales estéreo >25 dB
AM (MW)
Rango de frecuencias de 522 a 1620 kHz
IF 450 kHz
Sensibilidad (S/N=20 dB) 36 dBuV
62
Page 63

Deje el reproductor apagado durante una
la reproducción del
funciona la función
Verifique las conexiones de cables antes de consultar la lista de control. Póngase en
contacto con el representante de la empresa más cercano, si el problema persiste una vez
verificada la lista de control.
Problema Causa Solución
Ausencia de
alimentación.
No se puede
introducir o retirar
el disco.
La ignición del coche no está
encendida.
Fusible quemado. Sustituya el fusible.
En el reproductor ya hay otro
disco.
El disco está mal introducido. Introduzca el disco de tal forma que el
El disco está muy sucio o
dañado.
Temperatura excesiva en el
coche.
Presencia de vapor condensado.
Gire la llave de la ignición hasta la
posición “ACC”, si la alimentación
está conectada al circuito auxiliar
del coche y el motor no presenta
rotaciones.
Retire el disco del reproductor e
introduzca el otro.
texto se encuentre boca arriba.
Limpie el disco o intente reproducir otro.
Enfríe el coche o espere hasta que la
temperatura vuelva a la normal.
hora e intente otra vez.
Ausencia de
sonido.
Interferencias en
sonido.
Los botones de
manejo no
funcionan.
La radio no
funciona. No
de selección
automática de
emisoras.
El volumen está ajustado al
mínimo.
Los cables no están bien
conectados.
El ángulo de instalación del
equipo excede los 30 grados.
El disco está muy sucio o
dañado.
El microodenador incorporado
no funciona correctamente
debido al ruido.
El cable de antena no está
conectado.
La fuerza de la señal es
demasiado débil.
Ajuste el sonido al nivel requerido.
Compruebe la conexión de los cables.
Ajuste el ángulo para que sea inferior a
los 30 grados.
Limpie el disco o intente reproducir otro.
Pulse el botón de puesta a cero (RESET).
El panel frontal está mal instalado.
Conecte bien el cable de antena.
Seleccione la emisora manualmente.
S
P
A
N
I
S
H
63
Page 64

INHOUDSOPGAVE
Plaats van de knoppen......................... 66
Het apparaat in-/uitschakelen ............. 66
Het geluid uitschakelen ...................... 67
Het voorpaneel verwijderen ................. 67
Het geluidsniveau regelen .................... 67
REG in-/uitschakelen ........................... 67
Volume TA .......................................... 67
LOC in-/uitschakelen............................ 67
Stand stereo/mono .............................. 67
Zoemer in-/uitschakelen ...................... 67
AREA .................................................. 67
EQ ...................................................... 67
Informatie weergeven ......................... 68
De tijd instellen ................................. 68
Lcd-scherm ....................................... 68
Aux-ingangen ...................................... 68
De Usb-speler bedienen ...................... 72
TF bedienen ..................................... 72
Opmerkingen over cd’s ...................... 73
Bluetooth bedienen*) ........................ 74
Afstandsbediening ...................... 77
Specificatie ................................. 79
Defecten detecteren en herstellen 80
*) Geldt enkel voor apparaten met
Bluetoothfunctie
Functie reset ....................................... 68
De radio bedienen ............................... 69
Overschakelen naar de stand radio ... 69
Een frequentieband kiezen .............. 69
Een zender kiezen .......................... 69
Automatisch programma’s opslaan in het
geheugen en programma’s scannen 69
Manueel zenders opslaan en reeds
geconfigureerde zenders oproepen ... 69
RDS (Radio data system) bedienen .....69
De CD/MP3/WMA-speler bedienen ........ 71
Overschakelen naar de stand DISC ....... 71
Tracks/bestanden kiezen ...................... 71
Afspelen pauzeren ............................... 71
Alle tracks/bestanden scannend afspelen
.......................................................... 71
Dezelfde track/hetzelfde bestand herhalen
.......................................................... 71
Alle tracks/bestanden random afspelen 71
Cd uitschuiven .................................... 71
Map naar onder/naar boven zoeken ..... 71
Bestanden kiezen met de knop ......... 71
64
Page 65
Conformiteitsverklaring
Blaupunkt Competence Center Car
Multimedia-Evo Sales GmbH verklaart dat
dit apparaat voldoet aan de basisvereisten
en de overige toepasselijke bepalingen van
Richtlijn 2014/53/EG.
De conformiteitsverklaring kan worden
ingekeken op het internet op de website
www.blaupunkt.com
Verklaring van overeenstemming met de
Richtlijn Radioapparatuur 2014/53/EG
Verklaring van overeenstemming met de
Richtlijn RoHS 2011/65/EG.
Garantie
De garantievoorwaarden kunnen worden
gedownload van de website
www.blaupunkt.com
Garantie
Als u in het kader van de garantie gebruik
moet maken van de hersteldienst, dan kunt
u informatie over de servicepartners die
zulke diensten leveren in uw land, vinden
op de website www.blaupunkt.com.
D
U
T
C
H
65
Page 66

Bediening
Plaats van de knoppen
1. Knop MUTE (GELUID UIT)
2. Knop TS
3. Knop Band (BAND)
4. Knop “ /SRC (bron)”
5. Knop „ ” (paneel losmaken)
6. Knop Volume/Menu
(VOL/MENU)
7. Gleuf voor cd’s
8. Lcd-scherm
9. Knop „ ”(SEEK DOWN (ZOEKEN
NAAR ONDER))
10. Knop Display (DISP)
11. Knop “Uitschuiven”
12. USB-poort
13. AUX-IN-contact
14. Knop „ ”(ZOEKEN NAAR
BOVEN)
15. Knop Equalizer (EQ)
16. Knop „6 DIR+/ ” *)
66
17. Knop „5 DIR-/ ” *)
18. Knop „4 RDM” (random zoeken)
19. Knop „3 RPT” (herhalen)
20. Knop „2 SCN” (scannen)
21. Knop „1 ”
22. Knop „ ” (MP3-bestanden
zoeken)
23. Knop RESET
24. TF-kaartgleuf
25. INFRAROODSENSOR
26. MICROFOON
*) Geldt enkel voor apparaten met
Bluetoothfunctie
Page 67

Bediening
Het apparaat in-/uitschakelen
Schakel het apparaat aan door op de knop
(4) te drukken. Het systeem wordt
opgestart. Houd de knop (4) 2
seconden ingedrukt om het apparaat uit te
schakelen.
HET GELUID UITSCHAKELEN
Druk kort op de knop MUTE (1) om het
geluid uit te schakelen. Druk er opnieuw
op om het geluid terug in te schakelen.
HET VOORPANEEL VERWIJDEREN
Druk op de losmaakknop (5) om het
afneembare voorpaneel los te maken.
HET GELUIDSNIVEAU REGELEN
Druk kort op de knop MENU (6) om de
gewenste regelstand te kiezen. De
regelstand kan worden gewijzigd in deze
volgorde:
-BAS-TRE-BAL-FAD- VOL-
BAS: Lage tonen
TRE: Hoge tonen
BAL: Balans
FAD: Faden
VOL: Volume
Door aan de audioknop (6) te draaien kan
de gewenste geluidskwaliteit worden
aangepast.
Houd de knop MENU (6) 2 seconden
ingedrukt om door te gaan naar het
systeemmenu - zie hieronder:
AF– TA – REG – TAVOL – LOC – STEREO –
BEEP – XBASS-AREA
AF: Alternatieve frequenties
TA: Verkeersinformatie
REG: Regionaal
TA VOL: Volume van de
verkeersinformatie
LOC: Lokaal
STEREO
ZONE (AREA): Europa
REG in-/uitschakelen
Als de functie AF is ingeschakeld, kunt u
67
de functie REG in- en uitschakelen in de
stand REG in het systeemmenu. Bepaalde
zendstations veranderen soms voor
bepaalde tijd hun programma van normale
uitzending naar regionale uitzending. Als
de functie REG werkt, heeft dit geen
invloed op het programma dat u op dat
moment beluistert.
Volume van de verkeersinformatie
(TA)
Deze functie geeft de mogelijkheid om de
minimale geluidssterkte van de ontvangen
verkeersinformatie te regelen. Het
regelbereik is 20-43. De
standaardinstelling is 25. Draai aan de
volumeknop om het volume van de
verkeersinformatie aan te passen.
LOC in-/uitschakelen
Door in deze functie aan de audioknop (6)
te draaien, wordt de functie Lokaal
ingeschakeld. Als het apparaat in de
stand LOC werkt, zal de
ontvangstgevoeligheid bij het zoeken van
radiozenders verminderen. Dit betekent
dat u enkel zenders zult ontvangen die een
goede ontvangstkwaliteit garanderen. Alle
zenders met lage geluidskwaliteit worden
genegeerd. Als het apparaat niet in de
stand LOC werkt, zal de
ontvangstgevoeligheid bij het zoeken van
radiozenders groter zijn. Dit betekent dat
de radio het signaal van een groter aantal
zenders zal ontvangen.
STEREO/MONO
Draai de audioknop (6) in deze functie om
te kiezen tussen de geluidsstand STEREO
of MONO. In de stand STEREO kunt u het
stereosignaal op de FM-band ontvangen.
In de stand MONO worden de zenders die
in stereo uitzenden, geconverteerd naar
mono. In bepaalde gevallen wanneer het
signaal van lage kwaliteit is, zorgt de
keuze van de stand MONO ervoor dat er
minder storingen optreden.
Zoemer (BEEP) in-/uitschakelen
De autoradio is uitgerust met twee
D
U
T
C
H
Page 68

Bediening
zoemstanden. Draai aan de volumeknop
om een van de standen te kiezen.
- Stand Zoemer aan (Beep on):
Telkens u
op een knop drukt, wordt een
bevestigingsgeluid weergegeven.
- Stand Zoemer uit (Beep off):
Als u op
een knop drukt, wordt er geen
bevestigingsgeluid weergegeven.
ZONE
Nadat deze functie is opgestart door aan
de volumknop te draaien, kunt u kiezen
tussen de zones Europa/USA/LAT
(Latijns-Amerika).
XBASS
Houd de knop EQ 2 seconden ingedrukt
om de functie XBASS op te starten. Houd
de knop opnieuw ingedrukt om deze
functie uit te schakelen.
EQ (Equalizer)
Druk kort op de knop EQ om een van de
onderstaande standen EQ te kiezen, die al
geconfigureerd zijn:
FLAT-CLASSICS-POP-ROCK-EQ OFF
Dit is mogelijk als u een RDS-station
ontvangt met een kwalitatief goed signaal
(het symbool AF knippert niet op de
display). Enkele minuten later wordt de
tijd gesynchroniseerd met de correcte
tijdswaarde die met het signaal van de
radiozender wordt meegezonden.
(Opgelet: Sommige RDS-stations hebben
deze functie niet).
LCD-SCHERM
Het lcd-scherm maakt het mogelijk om de
huidige frequentie en de ingeschakelde
functies weer te geven.
FUNCTIE ESP
Deze functie maakt het apparaat voor
10-20 seconden schokbestendig.
AUX-INGANGEN
Het apparaat kan met behulp van het
contact AUX IN (13) worden aangesloten
op een draagbare speler. Druk op de knop
SRC om over te gaan naar de stand AUX,
wanneer er al een externe geluidsbron op
de radio is aangesloten.
INFORMATIE WEERGEVEN
Druk op de knop DISP (10) om
gedurende 5 seconden de tijd op het
scherm weer te geven. Na deze 5
seconden keert het scherm terug naar de
informatieweergave.
DE TIJD INSTELLEN
(1) Manuele configuratie:
Houd de knop DISP 2 seconden ingedrukt.
De uurwaarde begint te knipperen. Druk
op de knop / om de gepaste
uurwaarde in te stellen. Druk kort op de
knop DISP om de minutenwaarde te
wijzigen. U kunt ook de knop /
gebruiken om de gepaste minutenwaarde
in te stellen. Druk opnieuw op de knop
DISP om te bevestigen.
(2) Tijd synchroniseren met een
RDS-station:
FUNCTIE RESET
De knop RESET (23) kan worden
opgestart met behulp van de punt van een
balpen of met een dun stukje metaal.
De knop RESET wordt gebruikt in de
volgende situaties:
- Nadat het apparaat voor de eerste
maal is geïnstalleerd, wanneer de
volledige bekabeling is aangesloten.
- Als er geen enkele van de
functieknoppen werkt.
- Als er een foutmelding op de display
verschijnt.
Opgelet: Door op de knop RESET (23) te
drukken wordt het apparaat niet terug
opgestart. Gebruik een katoenen watje
met wat isopropylalcohol om het contact
op het voorpaneel schoon te vegen.
68
Page 69

Bediening
DE RADIO BEDIENEN
OVERSCHAKELEN NAAR DE
STAND RADIO
Druk op de knop SRC (4) om de stand
radio te kiezen. Op de display
verschijnen de stand radio en de band
en frequentie die in het geheugen zijn
opgeslagen.
EEN RADIOBAND KIEZEN
Ga naar de radiostand en druk op de
knop BAND (3) om de gewenste band
te kiezen.
De ontvangstband kan als volgt
worden gewijzigd:
→FM1→ FM2→ FM3 → MW1(AM1) → MW2(AM2)
EEN ZENDER KIEZEN
Druk kort op de knop (14) of
(9) om de automatische zoekfunctie op
te starten. De radio zoekt automatisch
een zender (naar boven en naar onder).
Druk 2 seconden op de knop totdat het
bericht „MANUAL” (manuele stand) op
de display verschijnt. Zo gaat u naar de
stand om manueel een zender te
zoeken. In deze stand kunt u
geleidelijk langs de opeenvolgende
frequenties lopen (naar boven en naar
onder) totdat u de zender hebt
gevonden. Als er gedurende 5
seconden geen enkele van de knoppen
wordt ingedrukt, keert de radio terug
naar de automatische zoekstand en op
de display verschijnt het bericht
„AUTO”.
AUTOMATISCH PROGRAMMA’S
OPSLAAN IN HET GEHEUGEN EN
PROGRAMMA’S SCANNEN
- Automatisch programma’s opslaan in
het geheugen
- Druk 2 seconden op de knop TS (2)
zodat de radio begint te zoeken vanaf
de frequentie 87,5 MHz en de
signaalsterkte controleert totdat de
radio één zoekcyclus heeft beëindigd.
Daarna worden een paar zenders met
het sterkste signaal opgeslagen onder
de standaardnummers van de knoppen
die aan de band FM3 zijn
toegeschreven. De eerste zoekcyclus
werkt in de stand LOCAL (lokaal) en
zoekt de zenders met het sterkste
ontvangstsignaal. Als de radio er niet in
slaagt om 6 zenders te vinden, dan
voert hij een tweede zoekcyclus uit
maar met de lokale stand
uitgeschakeld (LOCAL OFF).
- Programma’s scannen
Druk kort op de knop TS (2) om de al
ingestelde zenders te scannen. De
radio stopt 5 seconden bij een reeds
geconfigureerd nummer zonder het
geluid te verstillen.
MANUEEL ZENDERS OPSLAAN EN
REEDS GECONFIGUREERDE
ZENDERS OPROEPEN
Druk 2 seconden op een van de
knoppen die zijn toegeschreven aan de
radiozenders (1-6) die in het geheugen
zijn opgeslagen. De zender die op dat
moment speelt, wordt onder de
nummerknop opgeslagen in het
geheugen. Druk kort op de knop van
de geprogrammeerde zender (1-6) om
naar het signaal te luisteren van de
zender die aan dit nummer is
toegeschreven.
RDS (RADIO DATA SYSTEM)
BEDIENEN
De stand RDS kan worden ingesteld
in de stand AF in het systeemmenu.
Draai aan de audioknop om de functie
AF in- of uit te schakelen.
Telkens de functie AF wordt
ingeschakeld, verschijnt het symbool
D
U
T
C
H
69
Page 70

Bediening
„AF” op de display.
De naam van het programma wordt
weergegeven, wanneer er een
RDS-station wordt ontvangen.
Het symbool „AF” begint te knipperen
als de kwaliteit van het signaal
verslechtert.
Op het moment dat er een noodsignaal
wordt ontvangen, verschijnt het
bericht „ALARM” op de display, en het
volume van de uitzending wordt
automatisch aangepast aan het
ingestelde geluidsniveau, als de
volumecontrole is ingesteld op het
minimumniveau.
Regionale programma’s bedienen
Dit is mogelijk in de stand REG in het
systeemmenu, als de functie AF is
ingeschakeld. Door aan de audioknop
te draaien kunt u de functie REG in- of
uitschakelen. Als de functie AF is
uitgeschakeld, kan de functie REG niet
worden uitgeschakeld.
Bepaalde zendstations veranderen
soms voor bepaalde tijd hun
programma van normale uitzending
naar regionale uitzending. Als de
functie regionaal is ingeschakeld, zal
het programma dat op dat moment
wordt beluisterd, niet worden
gewijzigd. Nadat de functie regionaal is
uitgeschakeld, kunt u overgaan naar
een ontvangstsignaal dat wordt
uitgezonden door een regionale
zender.
Verkeersinformatie beluisteren
Door aan de audioknop te draaien in de
stand TA in het systeemmenu kunt u
de functie TA in- of uitschakelen. Door
de stand TA in te schakelen kunt u
verkeersinformatie ontvangen.
Als het apparaat werkt in de stand CD
(MP3) of AUX, wordt er tijdelijk
overgeschakeld in radiostand.
Als de functie EON verkeersinformatie
detecteert in een ander programma,
70
schakelt het apparaat tijdelijk over
naar de zender die met de functie EON
is verbonden.
Als het volume onder de
drempelwaarde ligt, wordt het
verhoogd tot die waarde.
Door de stand TA in te schakelen,
wordt de functie TA ingeschakeld voor
één segment. Op het moment dat er
een signaal van een TP-zender wordt
ontvangen, wordt de functie TP
opgestart voor dat bepaald segment.
Functie Verkeersinformatie
verstoren
Door de functie TA over te schakelen
naar STOP wordt de ontvangst van
verkeersinformatie geannuleerd (stand
TA in het menu RDS – beschikbare
opties:
aan/uit, als er geen enkele TA-zender
wordt ontvangen. Wanneer er een
TA-station wordt ontvangen,
verschijnen de opties aan/stop/uit in
de gepaste stand TA in het menu). Er
kan ongewild worden overgeschakeld
naar de stand EON TA, wanneer de
informatie EON TA al werd ontvangen
van de zender die op dat moment is
gekozen, en de radio overschakelt naar
een signaal van deze EON-zender,
maar te ver van de EON-zender is om
het signaal te ontvangen. In deze
situatie wordt de radio terug
overgeschakeld naar de zender die op
dat moment wordt ontvangen. Het
bovenstaande voorbeeld illustreert een
situatie waarbij de gebruiker een
verkeerd programma beluistert of het
volume plots is gedempt. De gegevens
die door de functie RDS worden
gebruikt zijn PI, PS, AF, TP, TA, EON en
PTY.
PS: Naam van het programma
Dit is de naam van de zender die wordt
weergegeven met behulp van
alfanumerieke tekens.
AF: Alternatieve frequenties
Dit is een lijst van frequenties van
Page 71

Bediening
radiozenders die hetzelfde programma
uitzenden.
TP: Identificatie van het
verkeersinformatieprogramma
Dit zijn identificatiegegevens die
afkomstig zijn van zenders die
verkeersinformatie uitzenden.
TA: Identificatie van de
verkeersinformatie
Dit zijn identificatiegegevens die
aangeven dat er al dan niet
verkeersinformatie wordt uitgezonden.
EON: Informatie over programma’s
een andere zender
accessoires
Dit is informatie die wordt uitgezonden
in de functies PI, AF, TP, TA, enz., met
betrekking tot andere programma’s
afkomstig zijn van andere zenders dan
de zender die op dat moment wordt
ontvangen.
DE CD/MP3/WMA-SPELER
BEDIENEN
OVERSCHAKELEN NAAR DE
STAND DISC
Als er geen cd in het apparaat is
gestoken:
Schuif zachtjes de cd in de gleuf
(bedrukte zijde naar boven) tot u
lichte weerstand voelt. De cd wordt
daarna automatisch in het apparaat
getrokken en dan afgespeeld.
Als er al een cd in het apparaat zit:
Druk op de knop SRC (4) totdat de
stand DISC (schijf) op de display
verschijnt.
TRACKS/BESTANDEN KIEZEN
Druk op de knop (14) of (9)
om terug te keren naar de vorige
track/het vorige bestand of om door te
gaan naar de volgende track/het
volgende bestand. Op de display
verschijnt het nummer van de
track/het bestand.
Houd de knop (14) of (9)
71
ingedrukt om snel de tracks/bestanden
naar achter of naar voor te doorzoeken.
Op het moment dat u de knop lost,
gaat het apparaat weer spelen.
AFSPELEN PAUZEREN
Druk op de knop (21) om het
afspelen te pauzeren. Druk opnieuw op
de knop om het afspelen te hervatten.
ALLE TRACKS/BESTANDEN
SCANNEND AFSPELEN
Druk op de knop SCN (20) om de
eerste seconden van elke track/elk
bestand af te spelen. Druk opnieuw op
de knop om het scannend afspelen te
stoppen en de gekozen track/het
gekozen bestand te beluisteren.
DEZELFDE TRACK/HETZELFDE
BESTAND HERHALEN
Druk op de knop RPT (19) om dezelfde
track/hetzelfde bestand te herhalen.
Druk opnieuw op de knop om het
afspelen van alle tracks/bestanden te
herhalen.
RANDOM ALLE BESTANDEN
AFSPELEN
Druk op de knop RDM (18) om alle
tracks/bestanden in random volgorde
af te spelen. Druk opnieuw op de knop
om de functie random afspelen uit te
schakelen.
CD UITSCHUIVEN
Druk op de knop (11) om het
afspelen van de cd te stoppen en de cd
uit de gleuf in het apparaat (6) te
schuiven.
MAP NAAR BOVEN/NAAR ONDER
ZOEKEN
Druk op de knop DIR- (17) of DIR+
(16) om de vorige of volgende map te
kiezen. De knoppen DIR- (17) of
DIR+ (16) starten geen functie op als
er op de cd met MP3/WMA bestanden
geen mappen zijn aangemaakt.
D
U
T
C
H
Page 72

Bediening
BESTANDEN KIEZEN MET DE
KNOP
De knop (22) bedient de functie
om MP3/WMA-bestanden te kiezen.
Door op deze knop te drukken
wordt de keuzestand opgestart volgens
het onderstaande schema:
Zoeken in de map. => Zoeken volgens
het bestandnummer.
Zoeken in de map
Druk eenmaal op de knop .
Het apparaat gaat naar de stand
“Zoeken in de map”
. Draai aan de draaiknop VOL
(volume) om de gewenste map te
kiezen. Draai daarna aan de
draaiknop MENU (6) om de
gekozen map te openen. Draai aan
de draaiknop (6) om het gewenste
bestand te kiezen. Druk daarna
opnieuw op de draaiknop MENU (6)
om het bestand te openen.
Druk op de knop om terug te
keren naar de vorige map.
Zoeken volgens het
bestandnummer
Druk tweemaal op de knop .
De stand “Zoeken volgens het
bestandnummer” wordt opgestart.
Draai aan de draaiknop (21) om
het gewenste bestandnummer te
kiezen en druk daarna op de
draaiknop MENU (4) om de keuze
te bevestigen. Het apparaat zoekt
het gekozen bestand en begint het
af te spelen. U kunt het gewenste
nummer ook manueel invoeren. Op
het voorpaneel vindt u de cijfers
1-6 en de knoppen 7/8/9/0
waaraan de volgende functies zijn
toegeschreven:
72
EQ: 7
: 8
: 9
DISP: 0.
Als u een bestandnummer hebt gekozen,
wacht het apparaat enkele seconden. Na
enkele seconden begint het apparaat het
bestand te zoeken, zelfs als de draaiknop
MENU (4) niet is ingedrukt.
DE USB-SPELER BEDIENEN
De USB-poort (10) is te vinden op het
voorpaneel van het apparaat. Deze poort
(12) dient om USB-drivers aan te sluiten.
Als er een USB-driver is aangesloten, zoekt
het apparaat de MP3/WMA-bestanden die
erop staan en begint ze af te spelen. Als
deze stand is opgestart, kunt u ook op de
knop
SRC drukken en de stand USB kiezen.
Als het USB-geheugen dient om
MP3/WBA-bestanden op de radio af te
spelen, dan worden die op dezelfde
manier bediend zoals beschreven is bij de
bediening van CD/MP3/WMA.
Opgelet:
Het hoofdapparaat bedient enkel
standaard USB-geheugens die door
Microsoft worden ondersteund.
USB-MP3-spelers zijn geen
standaardapparaten, wat betekent dat
verschillende merken en verschillende
modellen hun eigen standaarden
hebben. Dit betekent dat ons apparaat
niet elke MP3-speler zal bedienen.
Als er een MP3-speler met een
normale batterij (geen oplaadbare
batterij) wordt aangesloten, moet
eerst de batterij uit de speler worden
gehaald, en daarna mag de speler pas
op de USB-poort worden aangesloten.
Als dit niet gebeurt, kan de batterij
barsten.
TF BEDIENEN
Op het voorpaneel is er een TF-kaartgleuf
(24).
Page 73

Bediening
Re W rit a ble
Als er een TF-kaart in de TF-kaartgleuf
wordt gestoken, zoekt het apparaat de
MP3/WMA-bestanden die erop staan en
begint ze af te spelen. Dit mechanisme
werkt op dezelfde manier zoals is
beschreven bij de bediening van de stand
CD/MP3/WMA.
Als het apparaat in een andere stand
werkt, dan drukt u op de knop SRC (4) om
naar de stand SD over te gaan.
ONDERSTEUNDE
MP3/WMA-DECODERINGSSYSTEME
N
Het hoofdapparaat bedient de hieronder
vermelde decoderingssystemen voor
MP3/WMA (Windows Media Audio).
orm
MPEG1 Audio
Layer 3 (44,1
kHz)
Windows
Media Audio
(44,1 kHz)
Snelheid
gegevenstran
sfer (kB/s)
32, 48, 64, 96,
128, 192, 256,
320
64, 96, 128,
192
Onderste
unde
systemen
Stereo
Stereo
De stand USB bedient:
1. Folder: 500 max.
2. Bestand: 999 max.
3. Diepte van de map: 8 lagen
4. Grootte: 32 GB
OPGELET
U mag de USB-speler of TF-kaart niet op
het hoofdapparaat aansluiten, als er
belangrijke bestanden in opgeslagen zijn.
U mag geen CD-R/RW afspelen als er
belangrijke bestanden op staan.
Verkeerde bediening van de speler kan
leiden tot het verlies van de bestanden.
Onze firma is niet aansprakelijk voor het
verlies van deze gegevens.
OPMERKINGEN OVER CD’S
A. Opmerkingen over cd’s:
Het gebruik van cd’s met ongewone
vorm (bv. vierkant, stervormig,
hartvormig, enz.) kan
1. leiden tot beschadiging tot het
apparaat. Vergeet niet dat het
apparaat enkel samenwerkt met ronde
cd’s.
2. U mag geen papier, plakband enz. op
om het even welke kant van de cd
(zowel de bedrukte als gebrande kant)
plakken, want dit kan leiden tot slechte
werking van het apparaat.
3. Vuil, stof, krassen en vervormingen op
de cd zullen tijdens het afspelen
storingen veroorzaken.
B. Opmerkingen over CD-R’s
(beschrijfbare cd) / CD-RW
(meermaals beschrijfbare cd)
1. In het apparaat mogen enkel cd’s
worden afgespeeld
die met de volgende symbolen zijn
aangeduid:
2. Het apparaat kan geen CD-R’s
en CD-RW’s openmaken, als de
opnamesessie niet is beëindigd. (Zie
instructie van de
CD-R/CD-RW-opnemer of -software
om meer te lezen over het afsluiten
van een opnamesessie).
D
U
T
C
H
73
Page 74

Bediening
3. Het apparaat kan bepaalde
CD-R’s/CD-RW’s niet afspelen als
gevolg van de stand van de
opname, de stand van de cd zelf of
de apparatuur die is gebruikt
voor de opname. (Zie *1)
*1: Gelieve de onderstaande
aanbevelingen te lezen, om ervoor te
zorgen dat het apparaat probleemloos
afspeelt:
a. Gebruik CD-RW’s met een afspeelsnelheid
van 1x tot 4x en neem de gegevens op met een
snelheid van 1x of 2x.
B. Gebruik CD-R’s met een
afspeelsnelheid van 1x tot 8x en neem de
gegevens op met een snelheid van 1x of
2x.
c. Speel geen CD-RW’s af, waarop meer
dan 5 maal gegevens zijn opgenomen.
C. Opmerkingen over
MP3-bestanden (enkel
MP3-formaat):
1. De cd moet opgenomen zijn in het
formaat ISO9660 niveau 1 of niveau 2
of met de uitbreiding Joliet of Romeo.
2. Bij het benoemen van MP3-bestanden
mag u niet vergeten dat de extensie
van het bestand het formaat “.mp3”
moet hebben.
3. Het apparaat herkent geen bestanden
die geen MP3-bestanden zijn, zelfs als
de extensie het formaat “.mp3” heeft.
raden aan om een afstand van maximaal
3 m tussen de gsm en het apparaat te
behouden, om zo een verbinding van
goede kwaliteit te krijgen. Plaats geen
metalen voorwerpen of hindernissen op
het zendtraject tussen de gsm en het
apparaat.
KOPPELEN
1) Kies de Bluetoothconfiguratie in de gsm.
(Informatie over de bediening van
Bluetoothverbindingen vindt u in de
handleiding van uw telefoon).
2) Op de lijst in uw telefoon zou de optie
“CAR KIT” (autoset) moeten verschijnen.
Kies de optie “BP 170 BT” en voer het
wachtwoord “0000” in. Het kan zijn dat het
wachtwoord niet noodzakelijk is.
3) Als de apparaten gekoppeld zijn,
verschijnt het symbool BT op de display.
Inkomend gesprek
aannemen/weigeren
Bij een inkomend gesprek klikt u op de
knop om het gesprek aan te nemen.
Door op de knop te drukken wordt het
gesprek geweigerd.
Gesprek beëindigen
Druk na het einde van het gesprek op de
knop om de verbinding te verbreken.
BLUETOOTH BEDIENEN *)
APPARATEN VOORKOPPELEN IN
BLUETOOTHSTAND
(i) Als u de bluetoothstand wilt gebruiken,
controleer dan of uw gsm de
bluetoothfunctie ondersteunt.
(ii) De parameters van de zendkracht
verschillen van telefoon tot telefoon. We
74
Contacten/inkomende
gesprekken/uitgaande
gesprekken/gemiste gesprekken
bekijken (voor telefoons met
een Androidsysteem of iPhones)
Druk op de knop SRC zodat het bericht
“PHONE” (telefoon) op de display
verschijnt. Druk op de knop zodat
Page 75

Bediening
het bericht “BOOK”
(telefoonboek/contacten) op de display
verschijnt. Als u nogmaals op de knop
drukt, verschijnen de volgende opties:
BOOK---RECEIVED---DIALED---MISSED
---PHONE (Contacten -> Inkomende ->
Uitgaande -> Gemiste -> Telefoon)
Met de knop of kunt u in elk van
deze opties de opgeslagen nummers
controleren.
Opgelet: Als de apparaten voor de
eerste maal worden aangekoppeld,
verschijnt er op uw gsm informatie dat
de telefoon met de autoradio is
verbonden. U moet hiermee akkoord
gaan en “YES” (ja) indrukken om dit te
bevestigen.
(Opgelet: Het is belangrijk dat het
telefoonnummer in het geheugen van de
telefoon is opgeslagen, en niet op de
SIM-kaart).
Een nummer bellen
1) Een nummer bellen door manueel
het telefoonnummer in te voeren.
Druk op de knop SRC zodat het bericht
„PHONE” (telefoon) op de display verschijnt.
verschijnt. Houd de knop ingedrukt.
De lcd-display is volledig leeg. Nu kunt u
het telefoonnummer invoeren en door op
de knop te drukken kunt u
het ingevoerde nummer bevestigen.
(Opgelet: Als u een verkeerd nummer
invoert, druk dan op de knop om de
verkeerde cijfers te annuleren.)
Op het voorpaneel vindt u de cijfers 1-6 en
de knoppen 0/7/8/9/*/# waaraan de
volgende functies zijn toegeschreven:
0: Knop display (DISP)
7: EQ:
8:
9:
*: Houd de knop (5) 2 seconden
75
ingedrukt.
#: Houd de knop (6) 2 seconden
ingedrukt.
1) Opnieuw hetzelfde nummer
bellen
Druk op de knop SRC zodat het bericht
„PHONE” (telefoon) op de display verschijnt.
verschijnt. Houd de knop 2 seconden
ingedrukt,
om het laatste telefoonnummer opnieuw
te bellen.
2) Een nummer uit uw
contacten/inkomende
gesprekken/uitgaande
gesprekken/gemiste gesprekken
bellen (voor telefoons met een
Androidsysteem of iPhones)
- Ga naar de optie
„Contacten/inkomende
gesprekken/uitgaande
gesprekken/gemiste gesprekken
bekijken” en kies daarna het
gewenste telefoonnummer. Druk op
de knop om het gewenste nummer
te kiezen.
Opgelet: Als uw gsm twee (2)
SIM-kaarten heeft, wordt tijdens het
bellen met behulp van het voorpaneel
van het apparaat de standaardkaart
gekozen (of zal er telkens een verzoek
verschijnen om de kaart aan te duiden,
die u wilt gebruiken voor het gesprek).
Een gesprek doorverbinden
tussen uw gsm en het apparaat
In de stand gesprek kunt u op de knop
(22) drukken om het
telefoongesprek door te verbinden van uw
telefoon naar de radio.
Geluid doorsturen via Bluetooth
(functie A2DP)
Druk op de knop SRC (4) zodat het bericht
„PHONE” (telefoon) op de display verschijnt.
D
U
T
C
H
Page 76

Bediening
verschijnt. Schakel daarna de
muziekspeler op uw telefoon aan om een
nummer af te spelen. Het geluid zal door
de luidspreker van het apparaat worden
afgespeeld. Druk op de knop (21) op
het voorpaneel om het nummer te
stoppen/te hervatten. Druk op de knop
(14) of (9) om het volgende/vorige
nummer te kiezen.
Bluetoothverbinding
inschakelen/verbreken
Druk 2 seconden op de knop SRC om de
Bluetoothverbinding in te schakelen/te
verbreken.
*) Geldt enkel voor apparaten met
Bluetoothfunctie
76
Page 77

Afstandsbediening
FUNCTIE- EN BEDIENINGSKNOPPEN
1. : Knop voeding aan/uit
2. VOL+: Knop om het volume te verhogen.
3. BAND: Laat toe om in de stand RADIO de band FM1/FM2/FM3/AM1/AM2 te
kiezen.
4. : In de stand RADIO: Druk kort op de knop om de functies naar onder te
doorzoeken. Druk op de knop om de manuele stand uit te schakelen. In
de stand CD/MP3/WMA: Druk kort op de knop om één track/bestand
terug te gaan. Houd de knop ingedrukt om snel terug te gaan.
5. VOL- : Knop om het volume te verlagen.
6. EQ: Knop van de equalizer.
7. 2 SCN: In de stand RADIO: Nummer 2. Zie pagina 11 - MANUEEL ZENDERS
OPSLAAN EN REEDS GECONFIGUREERDE ZENDERS OPROEPEN.
In de stand CD/MP3/WMA: Druk op de knop om de functie
SCANNEN in/uit te schakelen.
8. 1 : In de stand RADIO: Nummer 1. Zie pagina 11 - MANUEEL
ZENDERS OPSLAAN EN REEDS GECONFIGUREERDE ZENDERS
OPROEPEN.
In de stand CD/MP3/WMA: Druk op de knop om het afspelen te
stoppen/te hervatten.
9. 4 RDM: In de stand RADIO: Nummer 4. Zie pagina 11 - MANUEEL
ZENDERS OPSLAAN EN REEDS GECONFIGUREERDE ZENDERS
OPROEPEN.
In de stand CD/MP3/WMA: Functie random afspelen
in-/uitschakelen.
10. 5 DIR-: In de stand RADIO: Nummer 5. Zie pagina 11 - MANUEEL ZENDERS
OPSLAAN EN REEDS GECONFIGUREERDE ZENDERS OPROEPEN.
In de stand MP3/WMA: Druk op de knop om terug te keren naar de
vorige map.
D
U
T
C
H
77
Page 78

Afstandsbediening
Dit is de knop , als het apparaat in Bluetoothstand werkt. *)
11. SRC: Deze knop activeert de functie SRC (geluidsbron).
12. : Druk op de knop om het geluid uit te schakelen/terug in te
schakelen.
13. : In de stand RADIO: Bedient de functie TS. Zie pagina 11
AUTOMATISCH PROGRAMMA’S OPSLAAN IN HET GEHEUGEN EN
PROGRAMMA’S SCANNEN.
In de stand MP3/WMA: Dit is de zoekfunctie. (Zie pagina 12).
In de stand PHONE (Telefoon). De functie van de knop is besproken
op pagina 15 - BLUETOOTH BEDIENEN.
14. SEL: Druk kort op de knop om het menu van de stand audio te openen.
Houd de knop ingedrukt om het systeemmenu te openen.
(Zie pagina 9). Druk op de knop om de zoekfunctie te bevestigen
(zie pagina 13) nadat u de zoekstand MP3/WMA hebt geopend.
15. : In de stand RADIO: Druk kort op de knop om de functies naar
onder te doorzoeken. Druk op de knop om de functie manueel te
vinden.
In de stand CD/MP3/WMA: Druk kort op de knop om naar de
volgende track/het volgende bestand te springen. Houd de knop
ingedrukt om snel vooruit te gaan.
16. DISP: Druk op de knop DISP (Display) om de tijd weer te geven.
17. 3 RPT: In de stand RADIO: Nummer 3. Zie pagina 11 - MANUEEL
ZENDERS OPSLAAN EN REEDS GECONFIGUREERDE ZENDERS
OPROEPEN.
In de stand CD/MP3/WMA: Druk op de knop om de functie
herhalen in/uit te schakelen.
18. 6 DIR+: In de stand RADIO: Nummer 6. Zie pagina 11 - MANUEEL
ZENDERS OPSLAAN EN REEDS GECONFIGUREERDE ZENDERS
OPROEPEN.
In de stand MP3/WMA: Druk op de knop om naar de volgende
map te gaan.
Tijdens een inkomend gesprek of het beëindigen van een gesprek
werkt de knop als . *)
*) Geldt enkel voor apparaten met Bluetoothfunctie
78
Page 79

Specificatie
ALGEMENE NORMEN
Vereisten betreffende de voeding: Gelijkstroom 12 V, negatieve aarding
Afmetingen van de montagebasis: 178 (b) x 160 (d) x 50 (h)
Tooncontrole
- Lage tonen (bij 100 Hz): ±10 dB
- Hoge tonen (bij 10 kHz): ±10 dB
- Maximaal uitgangsvermogen: 4X40 W
- Stroomverbruik: 10 A (max.) (Betreft versies met normale voeding)
Cd-speler
Signaal-ruisverhouding (SNR): Meer dan 55 dB:
Kanaalscheiding: Meer dan 45 dB:
Frequentierespons: 40 Hz-18 kHz
RADIO FM
Frequentiebereik van 87,5 tot 109 MHz
IF 10,7 MHz
Gevoeligheid (S/N=30 dB) 4 μV
Stereokanaalscheiding > 25 dB
AM (MW)
Frequentiebereik van 522 tot 1620 kHz
IF 450 kHz
Gevoeligheid (S/N=20 dB) 36 dBuV
D
U
T
C
H
79
Page 80

Steek de cd er met de bedrukte kant naar
Het voorpaneel is niet goed op zijn plaats
radiozenders werkt
Controleer de kabelverbinding vooraleer u de checklist controleert. Raadpleeg de
dichtstbijzijnde vertegenwoordiger van de firma, als het probleem na controle van de
checklist nog steeds optreedt.
Verschijnsel Oorzaak Oplossing
Geen voeding.
Er kan geen cd
worden in- of
uitgeschoven.
Het contact van de wagen is
niet ingeschakeld.
Doorgebrande zekering. Vervang de zekering.
Er zit al een cd in de cd-speler. Neem de cd uit de cd-speler en steek pas
De cd is in een slechte stand
ingeschoven.
De cd is vuil of beschadigd. Reinig de cd of probeer een andere cd af
Te hoge temperatuur in de
wagen.
Er is condens aanwezig. Laat de cd-speler ongeveer een uur
Zet de contactsleutel in de stand
“ACC” (tussenstand), als de voeding
is aangesloten op het schakelcircuit
in de wagen, en de motor niet draait.
daarna de volgende cd erin.
boven in.
te spelen.
Koel de wagen of wacht tot de
omgevingstemperatuur terug normaal
wordt.
uitgeschakeld en probeer opnieuw.
Geen geluid.
Storingen in het
weergegeven
geluid.
De
bedieningsknoppe
n werken niet.
De radio werkt
niet. De functie
voor automatische
keuze van de
niet.
Het volume staat op het
minimum.
De bekabeling is niet correct
aangesloten.
De montagehoek van het
apparaat bedraagt meer dan 30
graden.
De cd is heel vuil of
beschadigd.
De ingebouwde microcomputer
werkt niet correct door ruis.
De antenneleiding is niet
aangesloten.
Het signaal is te zwak. Kies manueel een zender.
Pas het volume aan aan het gewenste
niveau.
Controleer de aansluiting van de
leidingen.
Zet het apparaat in een hoek van minder
dan 30 graden.
Reinig de cd of probeer een andere cd af
te spelen.
Druk op de resetknop (RESET).
bevestigd.
Sluit de antenneleiding zorgvuldig aan.
80
Page 81

INDICE
Utilizzo .......................................... 83
Posizione dei tasti ................................ 83
Accensione/spegnimento del dispositivo 84
Silenziamento ..................................... 84
Rimozione del frontalino ...................... 84
Regolazione del suono ......................... 84
Attivazione/disattivazione della funzione
REG .................................................... 84
Volume delle informazioni sul traffico (TA)
.......................................................... 84
Attivazione/disattivazione della funzione
LOC .................................................... 84
Modalità stereo/mono .......................... 84
Attivazione/disattivazione del segnale
acustico .............................................. 84
REGIONE ............................................ 85
Riproduzione casuale di tutti i brani/file 88
Espulsione del disco............................ 89
Scelta della cartella su/giù .................. 89
Selezione dei file tramite il tasto .... 89
Utilizzo della porta USB ....................... 89
Utilizzo della porta TF ......................... 90
Avvertenze sui CD .............................. 91
Funzione Bluetooth*) .......................... 92
Controllo a distanza ..................... 94
Dati tecnici................................... 96
Guida alla risoluzione dei problemi 97.
*) Disponibile solo nei dispositivi
dotati di funzione Bluetooth
EQ ...................................................... 85
Visualizzazione delle informazioni ......... 85
Impostazione dell'ora........................... 85
Display a cristalli liquidi ........................ 85
Ingresso ausiliario ............................... 85
Funzione di azzeramento ..................... 85
Ascolto della radio ............................... 86
Commutazione in modalità radio ....... 86
Scelta della banda di frequenza ........ 86
Selezione della stazione radio ........... 86
Memorizzazione automatica e scansione
delle stazioni.................................... 86
Memorizzazione manuale delle stazioni e
richiamo delle stazioni preconfigurate . 86
Funzione RDS (Radio Data System) 87
Riproduzione di CD/MP3/WMA ............. 88
Commutazione in modalità lettore CD ... 88
Scelta del brano/file ............................ 88
Messa in pausa della riproduzione ........ 888
Riproduzione in anteprima di tutti i brani/file
.......................................................... 88
Ripetizione dello stesso brano/file ........ 88
81
I
T
A
L
I
A
N
Page 82

Dichiarazione di conformità
Blaupunkt Competence Center Car
Multimedia-Evo Sales GmbH dichiara che il
presente dispositivo è conforme ai requisiti
essenziali e alle restanti disposizioni
pertinenti della Direttiva 2014/53/UE.
La dichiarazione di conformità può essere
consultata sul sito web all'indirizzo
www.blaupunkt.com
Dichiarazione di conformità con la direttiva
sulle apparecchiature radio 2014/53/UE
Dichiarazione di conformità con la direttiva
RoHS 2011/65/UE
Garanzia
Le condizioni di garanzia possono essere
consultate sul sito web www.blaupunkt.com
Garanzia
Qualora risulti necessario rivolgersi ad un
centro assistenza per riparazioni in garanzia,
maggiori informazioni sui centri assistenza
affiliati che offrono tale servizio nel paese di
acquisto sono disponibili all'indirizzo
www.blaupunkt.com
82
Page 83

Utilizzo
Posizione dei tasti
-
1. Tasto MUTE (SILENZIAMENTO)
2. Tasto TS
3. Tasto banda (BAND)
4. Tasto " / SRC (sorgente)"
5. Tasto " " (rilascio frontalino)
6. Tasto volume/menu
(VOL/MENU)
7. Fessura del lettore CD
8. Display LCD
9. Tasto " " (SEEK DOWN
(RICERCA IN GIÙ)
10. Tasto di visualizzazione (DISP)
11. Tasto "Espulsione"
12. Porta USB
13. Presa AUX-IN
14. Tasto " " (RICERCA IN SU)
15. Tasto equalizzatore (EQ)
16. Tasto "6 DIR+/ " *)
17. Tasto "5 DIR-/ " *)
18. Tasto "4 RDM" (ricerca casuale)
19. Tasto "3 RPT" (ripeti)
20. Tasto "2 SCN" (scansione)
21. Tasto "1 "
22. Tasto " " (ricerca file MP3)
23. Tasto RESET
(REIMPOSTAZIONE)
24. Slot per carta TF
25. SENSORE AD INFRAROSSI
26. MICROFONO
*) Disponibile solo nei dispositivi
dotati di funzione Bluetooth
I
T
A
L
I
A
N
83
Page 84

Utilizzo
Accendere il dispositivo premendo il tasto
(4). Il sistema verrà attivato. Premere e
tenere premuto per 2 secondi il tasto
(4) per accendere il dispositivo.
SILENZIAMENTO
Premere brevemente il tasto MUTE (1)
per disattivare l'uscita audio. Premere
nuovamente il tasto per ripristinare
l'audio.
RIMOZIONE DEL FRONTALINO
Premere il tasto di rilascio (5) per
scollegare il frontalino rimovibile.
REGOLAZIONE DEL SUONO
Premere brevemente il tasto MENU (6)
per selezionare la modalità di regolazione
desiderata. La modalità di regolazione può
essere modificata nel seguente ordine:
-BAS-TRE-BAL-FAD- VOL-
BAS: Toni bassi
TRE: Toni alti
BAL: Bilanciamento
FAD: Fader
VOL: Volume
Ruotando la manopola del volume (6)
potremo regolare la qualità audio
desiderata.
Premere e tenere premuto il tasto MENU
(6) per 2 secondi per accedere al menu di
sistema – vedi sotto:
AF– TA – REG – TAVOL – LOC – STEREO –
BEEP – XBASS-AREA
AF: Frequenze alternative
TA: Informazioni sul traffico
REG: Regione
TA VOL: Volume delle
informazioni sul traffico
LOC = Locale
STEREO
REGIONE (AREA): Europa
Attivazione/disattivazione della
funzione REG
84
In modalità di attivazione della funzione AF,
questa può essere attivata e disattivata
dalla voce REG del menu sistema. Alcune
stazioni radio modificano per un certo
periodo di tempo la modalità di
trasmissione da normale a regionale. Se
funziona REG è attiva, ciò non influisce
sulla stazione radio correntemente
ascoltata.
Volume delle informazioni sul
traffico (TA)
Questa funzione consente di regolare il
volume minimo per la ricezione delle
informazioni sul traffico. La gamma di
regolazione è 20-43. Il valore predefinito è
25. Ruotare la manopola del volume per
regolare il volume di ascolto delle
informazioni sul traffico.
Attivazione/disattivazione della
funzione LOC
Ruotando la manopola di regolazione del
volume (6) in questa funzione
attiveremo/disattiveremo la funzione di
localizzazione. Il dispositivo attivo in
modalità LOC riduce la sensibilità di
ricezione durante la ricerca delle stazioni
radio. Questo significa che verranno
selezionate solo quelle stazioni che
assicurano una buona qualità di ricezione.
Tutte le stazioni con una bassa qualità del
suono verranno ignorate. Il dispositivo
attivo in modalità LOC aumenta la
sensibilità della ricezione durante la ricerca
delle stazioni radio. Ciò significa che la
radio può ricevere il segnale da un
maggior numero di stazioni.
STEREO/MONO
Ruotando la manopola del volume (6) con
questa funzione attiva potremo scegliere
tra le modalità audio STEREO o MONO. In
modalità STEREO sarà possibile ricevere il
segnale stereo nella banda FM. In
modalità MONO le stazioni che
trasmettono in stereo verranno convertite
in modalità mono. In alcuni casi, quando il
segnale ricevuto è di bassa qualità, la
Page 85

Utilizzo
commutazione in modalità MONO
consente di ridurre il livello delle
interferenze.
Attivazione/disattivazione del
segnale acustico (BEEP):
L'autoradio è dotata di due modalità
operative del segnalatore acustico.
Ruotare la manopola del volume per
selezionare una di queste.
Premere e tenere premuto per 2 secondi il
tasto DISP. Il valore dell'ora inizierà a
lampeggiare. Premere il tasto / per
impostare l'ora desiderata. Premere
brevemente il tasto DISP per modificare il
valore dei minuti. Inoltre è possibile
utilizzare il tasto / per impostare il
valore desiderato dei minuti. Quindi
premere il tasto DISP per confermare
l'operazione.
- Modalità segnale acustico attivo (Beep
on): Ad ogni pressione di un qualsiasi
tasto verrà generato un segnale di
conferma.
- Modalità segnale acustico non attivo
(Beep off): Ad ogni pressione di un tasto
non verrà generato alcun segnale di
conferma.
REGIONE
Dopo l'attivazione di questa funzione,
ruotando la manopola del volume
potremo selezionare tra le regioni
Europa/USA/LAT (America Latina).
XBASS
Premere e tenere premuto il tasto EQ per
2 secondi per attivare la funzione XBASS.
Premere e tenere premuto nuovamente il
tasto per disattivare questa modalità.
EQ (Equalizzatore)
(2) Sincronizzazione dell'ora con la
stazione RDS:
Quest'operazione consente la ricezione di
una stazione RDS che trasmette un
segnale di buona qualità (il simbolo AF sul
display non lampeggerà). Alcuni minuti più
tardi l'ora verrà sincronizzata con l'ora
inviata dalla stazione radio. (Attenzione:
Alcune stazioni RDS non dispongono di
questa funzione).
DISPLAY A CRISTALLI LIQUIDI
Consente la visualizzazione della
frequenza sintonizzata e delle funzioni
attive.
FUNZIONE ESP
Consente di proteggere il dispositivo da
urti con un intervallo di 10-20 s.
Premere brevemente il tasto EQ per
selezionare una delle seguenti modalità
EQ preconfigurate:
FLAT-CLASSICS-POP-ROCK-EQ OFF
VISUALIZZAZIONE DELLE
INFORMAZIONI
Premendo il tasto DISP (10), sul display
verrà visualizzata l'ora per 5 minuti.
Trascorso questo periodo di tempo, sul
display verranno visualizzate le
informazioni correnti.
IMPOSTAZIONE DELL'ORA
(1) Configurazione manuale:
85
INGRESSO AUSILIARIO
Il dispositivo può essere collegato ad un
lettore portatile utilizzando la presa AUX
IN (13). Premere il tasto SRC per
accedere alla modalità AUX, dopo che al
dispositivo è stata collegata una sorgente
audio esterna.
FUNZIONE DI AZZERAMENTO
Il tasto RESET (23) deve essere premuto
utilizzando la punta di una penna o un
oggetto metallico appuntito.
Il tasto RESET viene utilizzato nelle
seguenti situazioni:
- Dopo l'installazione iniziale del
I
T
A
L
I
A
N
Page 86

Utilizzo
dispositivo, una volta terminato il
collegamento dei cablaggi.
- In caso di mancato funzionamento dei
tasti funzione.
- Sul display viene visualizzato il simbolo
d'errore.
Attenzione: Premendo il tasto RESET (23)
non ripristineremo il funzionamento del
dispositivo. Utilizzare un batuffolo di
cotone imbevuto di alcol isopropilico per
pulire la presa sul frontalino.
ASCOLTO DELLA RADIO
COMMUTAZIONE IN MODALITÀ
RADIO
Premere il tasto SRC (4) per
selezionare la modalità radio. Sul
display verrà visualizzata la modalità
radio, la banda e la frequenza
memorizzate.
SELEZIONE DELLA BANDA
Dopo aver eseguito l'accesso alla
modalità radio, premere il tasto BAND
(3) per selezionare la banda
desiderata.
La banda può essere modificata nel
seguente ordine:
→FM1→ FM2→ FM3 → MW1(AM1) → MW2(AM2)
SELEZIONE DELLA STAZIONE
Premere brevemente il tasto (14)
o (9) per attivare la funzione di
ricerca automatica. La radio ricercherà
automaticamente la stazione radio (in
su e in giù). Premere e tenere premuto
il tasto per 2 secondi, fino a quando sul
display viene visualizzato il messaggio
"MANUAL" (modalità manuale), che
indica il passaggio in modalità di
sintonizzazione manuale. In questa
modalità è possibile scorrere
gradualmente le frequenze (in su e in
giù) fino a trovare la stazione
86
desiderata. Se entrambi i tasti non
vengono premuti per 5 secondi,
l'autoradio tornerà in modalità di
sintonizzazione automatica, e sul
display verrà visualizzato il messaggio
"AUTO".
MEMORIZZAZIONE AUTOMATICA
E SCANSIONE DELLE STAZIONI
- Memorizzazione automatica
- Premere e tenere premuto il tasto TS
(2) per 2 secondi, la radio inizierà la
scansione a partire dalla frequenza
87,5 MHz e controllerà l'intensità del
segnale fino al completamento di un
singolo ciclo di ricerca. Alcune delle
stazioni successive con segnale forte
verranno memorizzate sotto il numero
predefinito dei tasti associati alla
banda FM3. Il primo ciclo di ricerca
viene eseguito in modalità LOCAL
(locale) e ricerca le stazioni con il
segnale di ricezione più forte. Se non si
è riusciti a trovare almeno 6 stazioni,
l'autoradio eseguirà un secondo ciclo di
ricerca, ma con la modalità locale
disattivata (LOCAL OFF).
- Scansione delle stazioni radio
Premere brevemente il tasto TS (2) per
scansionare preliminarmente le
stazioni preimpostate. La radio si ferma
per 5 secondi in corrispondenza del
numero pre-configurato senza
disattivare il suono.
MEMORIZZAZIONE MANUALE
DELLA STAZIONE E RICHIAMO
DELLE STAZIONI
PRECONFIGURATE
Per sintonizzare la stazione, premere e
tenere premuto per 2 secondi uno dei
tasti assegnati alle stazioni radio
memorizzate (1-6). La stazione
corrente verrà memorizzata sotto un
determinato tasto numerico. Premere
brevemente la stazione preselezionata
Page 87

Utilizzo
(1-6) per sintonizzare il segnale
trasmesso da questa stazione,
memorizzata sotto il tasto di
programmazione assegnato.
FUNZIONE RDS (RADIO DATA
SYSTEM)
La funzione RDS viene impostata
mediante la voce AF nel menu di
sistema. Ruotare la manopola del
volume per attivare o disattivare la
funzione AF.
Ad ogni attivazione della funzione AF,
sul display verrà visualizzato il simbolo
"AF".
Durante la ricezione di una stazione
RDS, verranno visualizzati i dati inviati
dalla stazione radio.
In caso di deterioramento della qualità
del segnale trasmesso, il simbolo "AF"
inizierà a lampeggiare.
Al momento della ricezione del segnale
d'allarme, sul display verrà visualizzato
il messaggio "ALARM", ed il livello di
volume verrà impostato
automaticamente al livello
preconfigurato – se il controllo del
volume è stato impostato al livello
minimo.
Supporto per programmi regionali
Dopo aver attivato la funzione AF nella
voce REG del menu di sistema.
Ruotando la manopola del volume è
possibile attivare o disattivare la
funzione REG. Dopo la disattivazione
della funzione AF non sarà possibile
disattivare la funzione REG.
Alcune stazioni radio modificano per un
certo periodo di tempo la modalità di
trasmissione da normale a regionale.
In caso di attivazione della regione
geografica, la stazione radio
attualmente ascoltata rimarrà invariata.
Una volta disattivata la funzione di
regione geografica è possibile
accedere al segnale trasmesso dalla
stazione regionale.
Ascolto delle informazioni sul
traffico
Mediante la voce TA nel menu di
sistema ruotando la manopola del
volume è possibile attivare o disattivare
la funzione TA. L'attivazione della
modalità TA consente la ricezione delle
informazioni sul traffico:
Se il dispositivo è attivo in modalità CD
(MP3) o AUX, avrà luogo una
commutazione temporanea in modalità
radio.
Se la funzione EON rileva la presenza di
informazioni sul traffico su un’altra
stazione radio, il dispositivo si
sintonizzerà temporaneamente sulla
stazione associata alla funzione EON.
Se il livello del volume è inferiore alla
soglia preconfigurata, il volume verrà
aumentato fino a questo valore.
L'attivazione della modalità TA provoca
l'attivazione della funzione TA per un
singolo segmento. Al momento della
ricezione del segnale dalla stazione TP,
la funzione TP verrà attivata per un
singolo segmento.
Interruzione delle informazioni sul
traffico
La commutazione della funzione TA su
STOP annulla la ricezione delle
informazioni aggiornate sul traffico
(voce TA nel menu RDS – le opzioni
disponibili sono
attiva/disattiva, se non è sintonizzata
alcuna stazione TA. Se viene ascoltata
la stazione TA, nell'apposita voce TA
del menu vengono visualizzate le
opzioni on/stop/off). Accidentalmente
può verificarsi il passaggio in modalità
EON TA quando le informazioni EON
TA sono già state ricevute dalla
stazione attualmente selezionata e la
radio si è sintonizzata per la ricezione
del segnale da questa stazione EON,
ma una distanza eccessiva dalla
stazione EON impedisce la ricezione
I
T
A
L
I
A
N
87
Page 88

Utilizzo
del segnale. In questo caso, la radio si
sintonizzerà nuovamente sulla stazione
attualmente ascoltata. L'esempio
precedente illustra la situazione in cui
l'utente non ascolta la stazione radio
prevista o è stato disattivato
temporaneamente l'audio del
dispositivo. I dati utilizzati dalla
funzione RDS sono i dati: PI, PS, AF, TP,
TA, EON e PTY.
PS: Nome dell'emittente
Nome della stazione radio espresso con
caratteri alfanumerici.
AF: Frequenze alternative
Elenco delle frequenze che
trasmettono la stessa stazione radio.
TP: Identificazione del programma con
informazioni sul traffico
Corrispondono ai dati identificativi
della stazione che trasmette le
informazioni sul traffico.
TA: Identificazione delle informazioni
sul traffico
Dati identificativi che segnalano la
trasmissione o meno delle informazioni
sul traffico.
EON: Informazioni sui programmi di
un'altra stazione
accessori
Informazioni trasmesse nelle funzioni
PI, AF, TP, TA, ecc, relative ad altre
stazioni radio diverse dalla stazione
attualmente sintonizzata.
RIPRODUZIONE DI CD/MP3/WMA
COMMUTAZIONE IN MODALITÀ
LETTORE CD
Se non è stato inserito nessun disco
nel dispositivo:
Inserire delicatamente il disco nella
fessura (lato stampato rivolto verso
l'alto), fino ad avvertire una leggera
resistenza. Il disco verrà caricato
automaticamente dal dispositivo e
successivamente riprodotto.
Se il disco è già stato inserito nel
88
dispositivo: Premere il tasto SRC (4)
fino a quando non viene visualizzata
la modalità DISC (disco).
SCELTA DEL BRANO/FILE
Premere il tasto (14) o (9)
per tornare al brano/file precedente o
passare al brano/file successivo. Sul
display verrà visualizzato il numero del
brano/file.
Premere e tenere premuto il tasto
(14) o (9), per scorrere
rapidamente il brano/file in avanti o
indietro. La riproduzione riprenderà
quando il tasto viene rilasciato.
MESSA IN PAUSA DELLA
RIPRODUZIONE
Premere il tasto (21) per mettere in
pausa la riproduzione. Premere
nuovamente il tasto per riprendere la
riproduzione.
RIPRODUZIONE IN ANTEPRIMA
DI TUTTI I BRANI/FILE
Premere il tasto SCN (20) per
riprodurre i primi secondi di ciascuno
dei brani/file. Premere nuovamente il
tasto per interrompere la riproduzione
in anteprima e riprendere la normale
riproduzione del brano/file.
RIPETIZIONE DELLO STESSO
BRANO/FILE
Premere il tasto RPT (19), per ripetere
lo stesso brano/file. Premere
nuovamente il tasto per ripetere tutti i
brani/file.
RIPRODUZIONE CASUALE DI
TUTTI I FILE
Premere il tasto RDM (18) per
riprodurre tutti i brani/file in ordine
casuale. Premere nuovamente il tasto
per disattivare la funzione di
riproduzione casuale.
ESPULSIONE DEL DISCO
Premere il tasto (11) per
Page 89

Utilizzo
interrompere la riproduzione del CD ed
espellere il CD dalla fessura del
dispositivo (6).
SCELTA DELLA CARTELLA SU/GIÙ
Premere il tasto DIR- (17) o DIR +
(16) per selezionare la cartella
precedente o successiva. I tasti DIR -
(17) o DIR + (16) non consentiranno
l'attivazione di alcuna funzione se sul
disco con i file MP3/WMA non sono
presenti cartelle.
Ruotare la manopola (21) per
selezionare il numero del file
desiderato, quindi premere la
manopola MENU (4) per
confermare la selezione. Il
dispositivo cercherà il file scelto ed
inizierà la riproduzione del brano.
Inoltre è possibile digitare il
numero manualmente. Sul
frontalino sono presenti i numeri
SELEZIONE DEI FILE MEDIANTE
IL TASTO
Al tasto (22) è assegnata la
funzione di selezione dei file
MP3/WMA.
Premendo il tasto attiveremo
la modalità di selezione secondo il
seguente schema:
Ricerca nella cartella. = > Ricerca in
base al numero del file.
Ricerca nella cartella
Premere una volta il tasto . Il
dispositivo passerà in modalità
"Ricerca nella cartella"
. Ruotare la manopola VOL
(volume) per selezionare la cartella
desiderata. Quindi premere la
manopola MENU (6) per accedere
alla cartella selezionata. Ruotare la
manopola (6) per selezionare il file
1-6 ed i tasti 7/8/9/0/*/, cui sono
assegnate le seguenti funzioni:
EQ 7
: 8
: 9
DISP: 0.
In caso di selezione del numero del file, il
dispositivo attenderà per alcuni secondi
Dopo alcuni secondi il dispositivo
cercherà il file selezionato, anche se non
è stata premuta la manopola MENU (4).
UTILIZZO DELLA PORTA USB
La porta USB (10) si trova sul frontalino
del dispositivo. La porta (12) viene
utilizzata per collegare i dispositivi USB.
Dopo aver collegato alla porta il dispositivo
USB, l'autoradio effettuerà la ricerca dei
file MP3/WMA memorizzati sul dispositivo
ed inizierà la loro riproduzione. Dopo aver
attivato questa modalità è possibile
premere il tasto
ricercato. Quindi premere la
manopola MENU (6) per riprodurre
il file desiderato.
Premere il tasto per ritornare
alla cartella precedente.
Ricerca in base al numero del
file
Premere due volte il tasto .
Questo attiverà la modalità
"Ricerca in base al numero del file".
89
SRC e selezionare la modalità USB.
Se il dispositivo USB è stato progettato per
riprodurre i file MP3/WMA, il
funzionamento sarà identico a quello
descritto in precedenza per la funzione
CD/MP3/WMA.
Attenzione:
L'autoradio supporta solo memorie
USB compatibili con lo standard
Microsoft.
Il lettore MP3 USB non costituisce uno
I
T
A
L
I
A
N
Page 90

Utilizzo
standard unico, ciò significa che
diversi modelli e marchi possono avere
propri standard. Per questo motivo il
nostro dispositivo non supporta tutti i
lettori MP3 disponibili.
In caso di collegamento di un lettore
MP3 dotato di batteria normale (non
ricaricabile), prima è necessario
rimuovere la batteria dal lettore e
successivamente collegarlo alla presa
USB. In caso contrario potrebbe avere
luogo l'esplosione della batteria.
FUNZIONAMENTO DELLA PORTA TF
La porta TF (24) si trova sul pannello
anteriore del dispositivo.
Dopo aver inserito la carta TF nella porta
TF, l'autoradio effettuerà la ricerca dei file
MP3/WMA memorizzati su di essa ed
inizierà la loro riproduzione. Questa
funzione presenta le stesse caratteristiche
La modalità USB supporta:
1. Cartelle: 500 max.
2. File: 999 max.
3. Profondità della cartella: 8 livelli
4. Dimensioni: 32 GB
ATTENZIONE
Non collegare il dispositivo USB o la carta
TF all'autoradio, se su tali dispositivi sono
salvati file importanti. Inoltre non è
consentito riprodurre dischi CD-R/RW
contenenti file importanti. Eventuali
malfunzionamenti del lettore potrebbero
provocare la perdita dei file. La nostra
azienda declina ogni responsabilità per la
perdita di tali dati.
AVVERTENZE SUI CD
A. Avvertenze sui CD:
L'uso di dischi di forma non standard
della funzione di riproduzione di
CD/MP3/WMA precedentemente descritta.
In caso di funzionamento del dispositivo in
una modalità diversa, la pressione del
tasto SRC (4) consentirà il passaggio alla
modalità SD.
MODALITÀ SUPPORTATE DI
DECODIFICA MP3/WMA
L'autoradio supporta le seguenti modalità
di decodifica dei file MP3/WMA (Windows
Media Audio).
Standard
MPEG1 Audio
Layer 3 (44,1
kHz)
Windows
Media Audio
(44,1 kHz)
Velocità di
trasmissione
dati (kB/s)
32, 48, 64, 96,
128, 192, 256,
320
64, 96, 128,
192
Modalità
supportat
e
Stereo
Stereo
90
(ad esempio di forma quadrata, a
stella o a cuore, ecc.) può
1. causare il danneggiamento del
dispositivo. Si ricorda che il dispositivo
supporta solo CD rotondi.
2. Sui CD non è consentito applicare
etichette di carta, nastro adesivo, ecc.,
su qualsiasi lato del disco (stampato o
registrato), poiché ciò potrebbe
causare il malfunzionamento del
dispositivo.
3. La presenza di sporco, polvere, graffi e
deformazioni sul disco può causare
interferenze durante la riproduzione.
B. Avvertenze sui dischi di tipo CD-R
(scrivibile) / CD-RW (riscrivibile)
1. Nel dispositivo possono essere inseriti
esclusivamente dischi
Page 91

Utilizzo
Re W rit a ble
contrassegnati con i seguenti simboli:
2. Il dispositivo non consente la
riproduzione di CD-R e CD-RW se la
sessione di registrazione non è stata
finalizzata. (Vedi il manuale del
masterizzatore CD-R/CD-RW o il
formato ISO9660 con livello 1 o livello
2 o con estensione Joliet o Romero.
2. Durante l'assegnazione dei nomi ai file
MP3 ricordare che l'estensione del file
deve essere ".mp3".
3. Il dispositivo non riconoscerà file non
MP3, anche quando l'estensione nel
nome del file sarà ".mp3".
FUNZIONE BLUETOOTH *)
ACCOPPIAMENTO PRELIMINARE
software
CD-R/CD-RW, per maggiori
informazioni
sul processo di finalizzazione della
sessione di registrazione).
3. Il dispositivo potrebbe non essere in
grado di riprodurre alcuni CD-R/CD-RW,
ciò può essere causato dallo stato di
registrazione,
dallo stato del disco stesso o dal
dispositivo utilizzato
per la masterizzazione. (Vedi *1)
*1: Per una riproduzione più efficiente si
prega di leggere le seguenti
raccomandazioni:
a: Utilizzare CD-RW con velocità di
riproduzione da 1x a 4x e masterizzare i dati
con velocità 1x o 2x.
b. Utilizzare CD-R con velocità di
riproduzione da 1x a 8x e masterizzare i
dati con velocità 1x o 2x.
c. Non riprodurre dischi CD-RW che
sono stati masterizzati più di 5 volte.
C. Avvertenze sui file MP3 (solo
formato MP3):
1. Il CD deve essere masterizzato in
DEI DISPOSITIVI IN MODALITÀ
BLUETOOTH
(i) In caso di uso della modalità Bluetooth,
verificare che il proprio telefono cellulare
supporti la funzione Bluetooth.
(ii) Differenti tipi di telefoni cellulari
utilizzano diversi parametri di intensità del
segnale. Si consiglia di mantenere una
distanza tra il telefono cellulare ed il
dispositivo non superiore a 3 m, ciò
consentirà di raggiungere la migliore
qualità del collegamento. Non posizionare
nessun oggetto metallico ed evitare la
presenza di ostacoli tra il telefono e
l'autoradio.
ACCOPPIAMENTO
1) Selezionare la configurazione Bluetooth
sul telefono cellulare. (Le informazioni sul
supporto della funzione Bluetooth sono
disponibili nel manuale fornito con il vostro
telefono cellulare).
2) Nell'elenco visualizzato sul telefono
dovrebbe essere visibile la voce "CAR KIT"
(kit auto). Selezionare la voce "BP 170 BT"
e digitare la password "0000". La
password potrebbe non essere necessaria.
3) Dopo il corretto accoppiamento dei
I
T
A
L
I
A
N
91
Page 92

Utilizzo
dispositivi, sul display verrà visualizzato il
simbolo BT.
Accettare/rifiutare una chiamata
in arrivo
Nel caso di una chiamata in arrivo,
premere per rispondere alla chiamata.
Premendo il tasto , la chiamata verrà
rifiutata.
Terminare una chiamata
Dopo aver terminato la chiamata, premere
il tasto per riagganciare.
Consultazione della rubrica
telefonica/delle chiamate
ricevute/ effettuate/ perse (per
telefoni con sistema Android e del
marchio iPhone)
Premere il tasto SRC, sul display verrà
visualizzato il messaggio "PHONE"
(telefono). Premere il tasto , sul
display verrà visualizzato il messaggio
"BOOK" (rubrica). Un'ulteriore pressione
del tasto consentirà la visualizzazione in
sequenza delle seguenti opzioni:
BOOK---RECEIVED---DIALED---MISSED
---PHONE (Rubrica -> Ricevute ->
Effettuate -> Perse -> Telefono)
Utilizzando il tasto o in ciascuna
di queste voci sarà possibile controllare i
numeri assegnati.
Attenzione: Dopo il primo
accoppiamento, sul telefono cellulare
verrà visualizzata l'informazione, che
questo è stato collegato all'autoradio. È
necessario accettare il messaggio e
premere "YES" (Sì) per confermare.
(Attenzione: L'importante è che il numero
di telefono sia stato salvato nella memoria
del telefono e non sulla scheda SIM).
Effettuare una chiamata
1) Effettuare una chiamata
inserendo manualmente il
numero di telefono.
Premere il tasto SRC in modo che sul
display venga visualizzato il messaggio
"PHONE" (telefono). Premere e tenere
premuto il tasto . Il display LCD sarà
completamente vuoto. Ora è possibile
digitare il numero di telefono e premere il
tasto per confermare la
selezione del numero digitato. (Attenzione:
In caso di digitazione di un numero errato,
premere il tasto per cancellare le
cifre errate.)
Sul frontalino sono presenti i numeri 1-6
ed i tasti 0/7/8/9/*/#, cui sono assegnate
le seguenti funzioni:
0: Tasto di visualizzazione (DISP)
7: EQ
8:
9:
*: Premere e tenere premuto per 2
secondi il tasto (5).
#: Premere e tenere premuto per 2
secondi il tasto (6).
1) Ripristino della connessione
Premere il tasto SRC in modo che sul
display venga visualizzato il messaggio
"PHONE" (telefono). Premere e tenere
premuto il tasto per 2 secondi,
per ricomporre l'ultimo numero di
telefono.
2) Composizione di un numero
della rubrica telefonica/delle
chiamate ricevute/
effettuate/ perse (per telefoni
con sistema Android e del
marchio iPhone)
- Accedere alla voce "consultazione
della rubrica telefonica/chiamate
ricevute/effettuate/perse", quindi
selezionare il numero desiderato.
92
Page 93

Utilizzo
Premere il tasto per scegliere il
numero desiderato.
Attenzione: Se il telefono cellulare
dispone di due (2) schede SIM, in tal
caso durante la chiamata effettuata
utilizzando il frontalino del dispositivo
verrà selezionata la scheda predefinita
(o verrà richiesto ogni volta di
selezionare la scheda con cui
effettuare la chiamata).
Commutazione della chiamata tra
il telefono cellulare e l'autoradio
In modalità di conversazione è possibile
premere il tasto (22) per
commutare la telefonata tra il telefono e
l'autoradio.
Riproduzione audio attraverso la
funzione Bluetooth (funzione
A2DP)
Premere il tasto SRC (4) in modo che sul
display venga visualizzato il messaggio
"PHONE" (telefono). Quindi accendere il
lettore musicale del telefono per iniziare la
riproduzione del brano musicale. Il suono
verrà riprodotto attraverso gli altoparlanti
collegati al dispositivo. Premere il tasto
(21) presente sul frontalino per
interrompere/riprendere la riproduzione
del brano. Premere il tasto (14) o
(9) per selezionare il brano
successivo/precedente.
Collegamento/scollegamento del
dispositivo Bluetooth
Premere e tenere premuto il tasto SRC per
2 secondi per attivare/disattivare la
connessione Bluetooth.
*) Disponibile solo nei dispositivi dotati di
funzione Bluetooth
I
T
A
L
I
A
N
93
Page 94

Controllo a distanza
TASTI FUNZIONE E DI COMANDO
1. : Tasto di accensione/spegnimento dell'alimentazione elettrica
2. VOL+: Tasto per aumentare il volume.
3. BAND: Consente la selezione della banda FM1/FM2/FM3/AM1/AM2 in modalità
RADIO.
4. : In modalità RADIO: Premere brevemente per la funzione di ricerca in giù.
Premere per disattivare manualmente. In modalità CD/MP3/WMA: Premere brevemente
per tornare indietro di un solo brano/file. Premere e tenere premuto per tornare indietro
rapidamente.
5. VOL- : Tasto per diminuire il volume.
6. EQ Tasto per attivare la funzione dell'equalizzatore.
7. 2 SCN: In modalità RADIO: Numero 2. Vedi pagina 11 – MEMORIZZAZIONE
MANUALE DELLA STAZIONE E RICHIAMO DELLE STAZIONI
PRECONFIGURATE.
In modalità CD/MP3/WMA: Premere per attivare o disattivare la funzione di SCANSIONE.
8. 1 : In modalità RADIO: Numero 1. Vedi pagina 11 –
MEMORIZZAZIONE MANUALE DELLA STAZIONE E RICHIAMO
DELLE STAZIONI PRECONFIGURATE.
In modalità CD/MP3/WMA: Premere per interrompere/riprendere
la riproduzione.
9. 4 RDM: In modalità RADIO: Numero 4. Vedi pagina 11 –
MEMORIZZAZIONE MANUALE DELLA STAZIONE E RICHIAMO
DELLE STAZIONI PRECONFIGURATE.
In modalità CD/MP3/WMA: attiva/disattiva la funzione di riproduzione casuale.
10. 5 DIR-: In modalità RADIO: Numero 5. Vedi pagina 11 – MEMORIZZAZIONE
MANUALE DELLA STAZIONE E RICHIAMO DELLE STAZIONI
PRECONFIGURATE.
In modalità MP3/WMA: Premere per ritornare alla cartella precedente.
Utilizzare il tasto , se il dispositivo è in modalità Bluetooth. *)
11. SRC: Il tasto attiva la funzione SRC (sorgente audio).
12. : Premere per silenziare/ripristinare l'audio.
13. : In modalità RADIO: Attiva la funzione TS. Vedi pagina 11
94
Page 95

Controllo a distanza
MEMORIZZAZIONE AUTOMATICA E SCANSIONE DEI PROGRAMMI
In modalità MP3/WMA: Funzione di ricerca. (Vedi pagina 12).
in modalità PHONE (telefono). La funzione del tasto è stata
descritta a pagina 15 – FUNZIONE BLUETOOTH.
14. SEL: Premere brevemente per accedere al menu della modalità audio.
Premere e tenere premuto per accedere al menu di sistema.
(Vedi pagina 9). Premere per confermare la funzione di ricerca
(vedi pagina 13) dopo aver eseguito l'accesso alla modalità di
ricerca: MP3/WMA.
15. : In modalità RADIO: Premere brevemente per la funzione di
ricerca in giù. Premere per la funzione di ricerca manuale.
In modalità CD/MP3/WMA: Premere brevemente per passare al
brano/file successivo. Premere e tenere premuto per avanzare
rapidamente.
16. DISP: Premere il tasto DISP (visualizza) per visualizzare l'ora.
17. 3 RPT: In modalità RADIO: Numero 3. Vedi pagina 11 –
MEMORIZZAZIONE MANUALE DELLA STAZIONE E RICHIAMO
DELLE STAZIONI PRECONFIGURATE.
In modalità CD/MP3/WMA: Premere per attivare/disattivare la funzione di ripetizione.
18. 6 DIR+: In modalità RADIO: Numero 6. Vedi pagina 11 –
MEMORIZZAZIONE MANUALE DELLA STAZIONE E RICHIAMO
DELLE STAZIONI PRECONFIGURATE.
In modalità MP3/WMA: Premere per accedere alla cartella successiva.
Al momento della ricezione o della terminazione della chiamata svolge la funzione del tasto
. *).
*) Disponibile solo nei dispositivi dotati di funzione Bluetooth
I
T
A
L
I
A
N
95
Page 96

Dati tecnici
NORME GENERALI
Requisiti inerenti l'alimentazione: Corrente continua 12V, negativo a massa
Dimensioni dello chassis: 178 (larg.) x 160 (prof.) x 50 (alt.)
Controllo dei toni
- Toni bassi (a 100 Hz): ±10dB
- Toni alti (a 10 kHz): ±10dB
- Potenza massima in uscita: 4X40 W
- Consumo di corrente: 10 A (max.) (per le versioni con alimentazione normale)
Lettore CD
Rapporto segnale-rumore (SNR): Oltre 55 dB:
Separazione dei canali: Oltre 45 dB:
Risposta in frequenza: 40 Hz-18 kHz
RADIO FM
Gamma di frequenza da 87,5 a 109 MHz
IF 10,7 MHz
Sensibilità (S/N = 30dB) 4 μV
Separazione dei canali stereo >25 dB
AM (MW)
Gamma di frequenza da 522 a 1620 MHz
IF 450 kHz
Sensibilità (S/N = 20dB) 36 dBuV
96
Page 97

a quando la temperatura ambiente ritorni
I tasti funzione non
Verificare le connessioni dei cavi prima di controllare la lista di controllo sottostante. Se dopo aver
controllato la lista di controllo il problema persiste, consultare il rivenditore più vicino.
Sintomo Causa Soluzione
Assenza di
alimentazione.
Non è possibile
inserire o espellere
il disco.
L'accensione nell'automobile
non è stata attivata.
Fusibile bruciato. Sostituire il fusibile.
All'interno del lettore CD è già
presente un disco.
Il disco è stato inserito in modo
errato.
Il CD è molto sporco o
danneggiato.
Temperatura eccessiva
all'interno dell'auto.
Presenza di vapore condensato. Lasciare il lettore spento per circa un'ora
Se l'alimentazione è stata collegata
al circuito ausiliario del veicolo ed il
motore non è acceso, posizionare la
chiave d'accensione in posizione
"ACC".
Rimuovere il disco dal lettore, quindi
inserire un altro disco.
Inserire il disco in modo che la scritta sia
rivolta verso l'alto.
Pulire il disco o provare ad inserirne un
altro.
Far raffreddare il veicolo o attendere fino
normale.
e riprovare.
Nessun suono.
Interferenze
durante la
riproduzione.
funzionano.
La radio non
funziona. La
funzione di
selezione
automatica delle
stazioni radio non
funziona.
Il volume è regolato al minimo. Regolare il volume al livello desiderato.
Il cablaggio non è collegato
correttamente
L'angolo di montaggio del
dispositivo supera i 30 gradi.
Il disco è molto sporco o
danneggiato.
Il microcomputer interno non
funziona correttamente a causa
di interferenze.
Il cavo dell'antenna non è
collegato.
Il segnale è troppo debole. Selezionare la stazione manualmente.
Controllare le connessioni dei cavi.
Regolare l'angolo in modo che questo sia
inferiore a 30 gradi.
Pulire il disco o provare ad inserirne un
altro.
Premere il tasto reset (RESET).
Il frontalino non è stato inserito
correttamente.
Collegare correttamente il cavo
dell'antenna.
I
T
A
L
I
A
N
97
Page 98

INNEHÅLLSFÖRTECKNING
Handhavande................................ 100
Knapparnas placering..........................100
Slå på/ av........................................... 101
Mute.................................................. 101
Borttagning av frontpanelen................ 101
Justering av ljudnivån.......................... 101
Slå på/av REG..................................... 101
TA-volym........................................... 101
Slå på/ av LOC.................................... 101
Stereo/mono.......................................101
Slå på/av ljudsignal..............................101
AREA..................................................102
EQ......................................................102
LCD-display.........................................102
Tidsinställning.....................................102
Bildskärm (Display) LCD......................102
Extra ingång.......................................102
Återställningsfunktion...........................102
Hantering av
radion...................................................102
Koppla om till radioläge..........................102
Val av frekvens......................................102
Val av station.........................................103
Att automatiskt spara och skanna
program................................................103
Att manuellt spara station och hämta
förkonfigurerade stationer......................103
RDS-hantering(Radio Data System)........103
Hantering av CD/MP3/WMA....................104
Byte till CD-funktion...............................104
Val av spår/fil........................................104
Paus.....................................................104
Förhandsspela alla spår/filer...................104
Upprepa samma spår/fil.........................105
Slumpvis uppspelning av alla spår/filer....105
Mata ut skiva.........................................105
Val av fil med hjälp av knappen...........105
Hantering av USB-spelare.......................105
TF-hantering..........................................106
Anmärkningar om CD:n..........................106
Bluetooth*)...........................................107
Fjärrkontroll.....................................109
Specifikation.....................................111
Felsökning........................................112
*) Endast för enheter utrustade med
Bluetooth-funktion
98
Page 99

Installation
Försäkran om överensstämmelse
Blaupunkt Competence Center Car
Multimedia-Evo Sales GmbH försäkrar att
denna produkt uppfyller grundläggande
krav och andra relevanta bestämmelser i
direktivet 2014/53/EG.
Denna försäkran om överensstämmelse
kan ses på Internet
www.blaupunkt.com
Försäkran om överensstämmelse
med direktivet om förnybara energikällor
2014/53/EG.
Försäkran om överensstämmelse med
direktivetRoHS 2011/65/EG.
Garanti
Garantivillkoren kan laddas ner från
www.blaupunkt.com
Garanti
Vid behov av garantireparation kan
information om servicepartners som
tillhandahåller sådana tjänster i ditt land
hittas på www.blaupunkt.com
99
S
W
E
D
I
S
H
Page 100

Handhavande
Knapparnas placering
-
1. MUTE-knapp (Ljudlös)
2. TS-knapp
3. Band-knapp (BAND)
4. /SRC (källa) knapp
5. knapp (Release panel )
6.Volym-/menyknapp (VOL/MENU)
7. CD-skivfack
8. LCD-display
9. knapp(SÖK BAKÅT)
10. Displayknapp (DISP)
11. Mata in/ut-knapp
12. USB-kontakt
13. AUX-IN-uttag
14. knapp (SÖK FRAMÅT)
15. Ljudjustering(EQ)
16.6 DIR+/ knapp*)
17.5 DIR-/ knapp *)
18. 4 RDM- knapp (slumpvis
sökning )
19.3 RPT knapp (upprepning)
20.SCN-knapp (skanning)
21. 1 -knapp
100
22. -knapp (sök MP3 filer)
23.RESET-knapp (ÅTERSTÄLLNING)
24.Fack för TF-kort
25. INFRARÖDSENSOR
26. MIKROFON
*) Endast för enheter utrustade med
Bluetooth-funktion
 Loading...