

Page 1
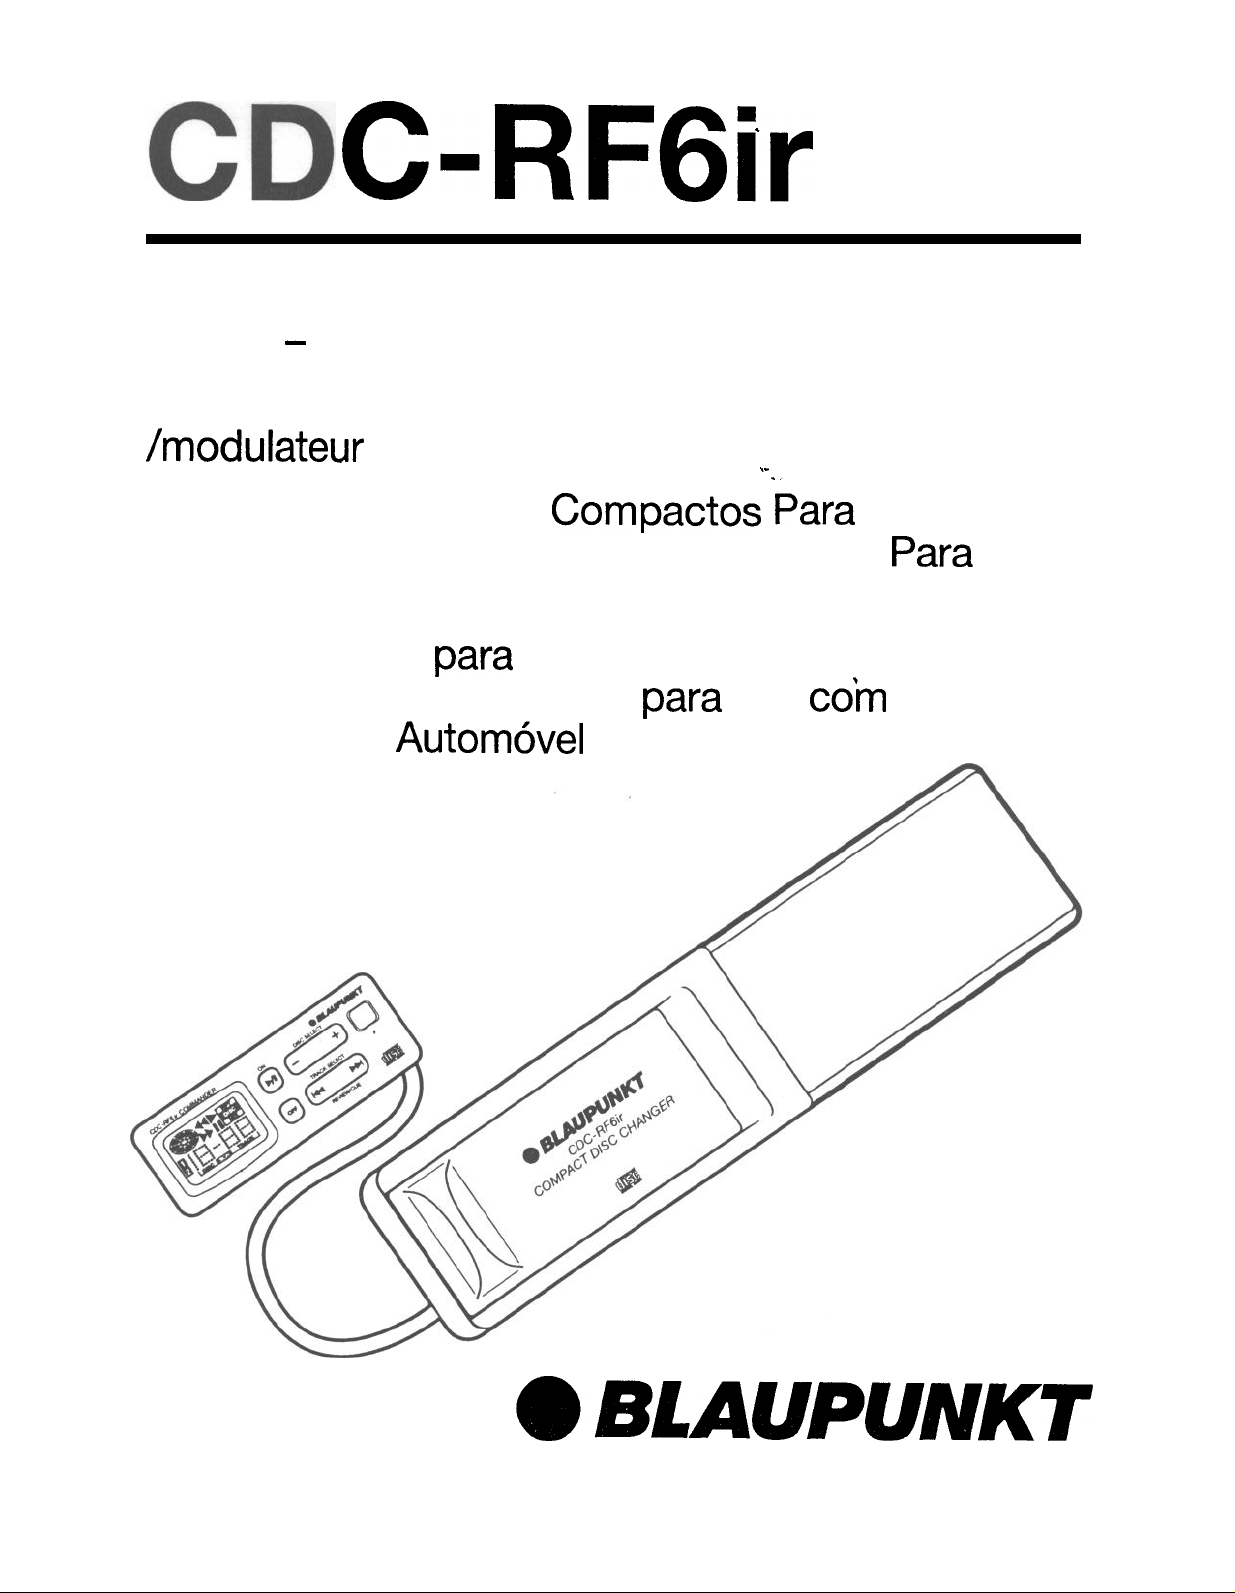
C-RF6ir
6-Disc FM Modulator CD Changer with Infrared
Sensor - For Use With Any FM Vehicle Radio
Changeur de CD a capteur infrarouge
/modulateur FM a 6 disques
Cambiador de Discos Compactos
con Sensor lnfrarojo y Modulador de FM
con Cualquier Radio FM de Vehiculo
Cambiador CD
corn Sensor lnfravermelho
Radio FM de
para
Automovel
6 discos corn Modulador FM
para
.-
Para
uso coin qualquer
6 Discos
Para
Uso
@BLAUPUNKT
Bosch Group
Page 2

Owner’s Record
The model and warranty numbers are located on the rear of the unit. Record the warranty in the space
provided below. Refer to these numbers whenever you call upon your Blaupunkt dealer regarding this
product.
Model No. CDC-RF6ir
Warranty Number
FCC Warning
The equipment has been tested and found to comply with the limits for a Class B device, pursuant to
Part 15 of the FCC Rules. These limits are designed to provide reasonable protection against harmful
interference in a residential installation. This equipment generates, uses, and can radiate radio
frequency energy, and, if not installed and used in accordance with instructions, may cause harmful
interference with radio communications. However, there is no guarantee that radio interference will not
occur in particular installation.
l
The shielded interface cable recommended in this manual must be used with this equipment in order
to comply with limits for a digital device pursuant to Sub-part B of Part 15 of the FCC rules.
l
Because the laser beam used in this compact disc changer is harmful to the eyes, do not attempt to
disassemble the cabinet. Refer servicing to qualified personnel only.
l
You are cautioned that any changes or modifications not expressly approved in this manual could
void your warranty and authority to operate this equipment.
l
If you have any questions or problems concerning your unit that are not covered in this manual,
please contact your Blaupunkt dealer.
CAUTION
The use of optical instruments with this product will increase eye hazard.
Because the laser beam used in this compact disc changer is harmful to the eyes, do not attempt to
disassemble the cabinet. Refer servicing to qualified personnel only.
Safety Certification
This Compact Disc Player is made and tested to meet exacting safety standards, It meets FCC
requirements and complies with safety performance standards of the U.S. Department of Health and
Human Services.
Staple Your Sales Receipt Here
2
Page 3
Table of Contents
Before installing and operating this unit, please
read this manual thoroughly and retain it for
future reference.
English
Owners’s Record
FCC Warning
Features
Precautions ..........................................................
Before lnstallating and Testing The System..
Electrical
Installation
Specifications
Magazine & Compact Discs
Location of Controls
Operating
Optional
Switching to A
Switching to Radio or Cassette16.........................
Troubleshooting Guide
Error Codes
Avant d’installer et de faire fonctionner cet
appareil, veuillez
le conserver
I’avenir si
...............................................................
Connections..
............................................................
Instructions
Wireless
nkcessaire.
.................................................
........................................................
......................................
...................................................
.............................
.........................................
......................................
Fiemoto Control..
SecondCDChanger..
.....................................
........................................................
lire
attentivement ce manuel et
afin
de pouvoir le
.................
...............
consulter a
......
.12
.13
.14
.15
.16
.17
2
2
4
4
.
.6
7
16
18
Antes de instalar y operar esta unidad, por favor
lea este manual detenidamente y
referencia en el futuro.
guardelo para
lndice
...........
......
.35
.35
.36
36
.36
.38
39
.44
5
46
.47
.48
.48
.48
.49
50
Apuntes del Propietario
Advertencia
Caracteristicas
Precauciones
Antes de
Conexiones Electricas
Instalacion
Especificaciones
Compartimiento de
Ubicacion
lnstrucciones de
Control
Cambio
Cambio a
Guia de
Codigo
Antes de instalar e operar esta unidade, por
favor leia este manual minuciosamente e
guarde-o
delaFCC..
..................................................
.....................................................
lnstalar y
..........................................................
de
10s
Controles
Remoto Inalambrico
aunSegundo Cambiador..
Ejecucion
Detection
de
Errores
para
futura
....................................
....................................
Probar
el Sistema
......................................
...............................................
Discos y
Operation
de Radio o de Cinta..
de Problemas
.........
Discos
...............................
.............................
Optional..
....................................
.
referencia.
..............
Compactos......4
..................
....................
Sommaire
.........
........
.....3 2
.
.19
.19
.20
.20
23
.28
.29
.30
1
32
..3 2
.33
.34
Archive du
Avertissement de la FCC
Caracteristiques ................................................. 20
Precautions
Avant de monter et de tester le
Raccordements
Installation
Specifications
Compartiment CD & disques compacts..
Emplacement
Mode d’emploi-Fonctionnement
Commande a distance sans fil optionnelle..
Comment passer A un
de disques compacts
Comment passer au mode Radio & Cassette..
Guide de
Codes d’erreurs
proprietaire
a prendre
..........................................................
...................................................
des commandes
depannage
.....................................
..................................
......................................
systeme
electriques
................................................
............................... 22
.......................
g&&al..........3
second
.........................................
........................................
changeur
indice
Registro do
Avis0
da FCC
Caracteristicas
PrecaucBes
Antes
Conexoes Eletricas
Instalacao
Especificacdes..
Porta-discos
Localizacao
Instrucoes
Controle Remoto sem
Mudando
Mudando
para
Guia
Mensagens de
Proprietario
....................................................
...................................................
........................................................
de
lnstalar e Testar o
............................................
...........................................................
................................................
e Discos Laser
dos Controles
de
Funcionamento..
para urn
paraoRadioe Toca-fitas..
Soluc%o
Segundo Cambiador CD..
de
Erro
...........................................
.....................................
sistema..
............................
...............................
Fio
Optional
Problemas
...............
........................
.................
................
....................
...
51
.51
52
52
.52
54
55
.60
.61
.62
.63
.64
.
.64
.65
.66
3
Page 4
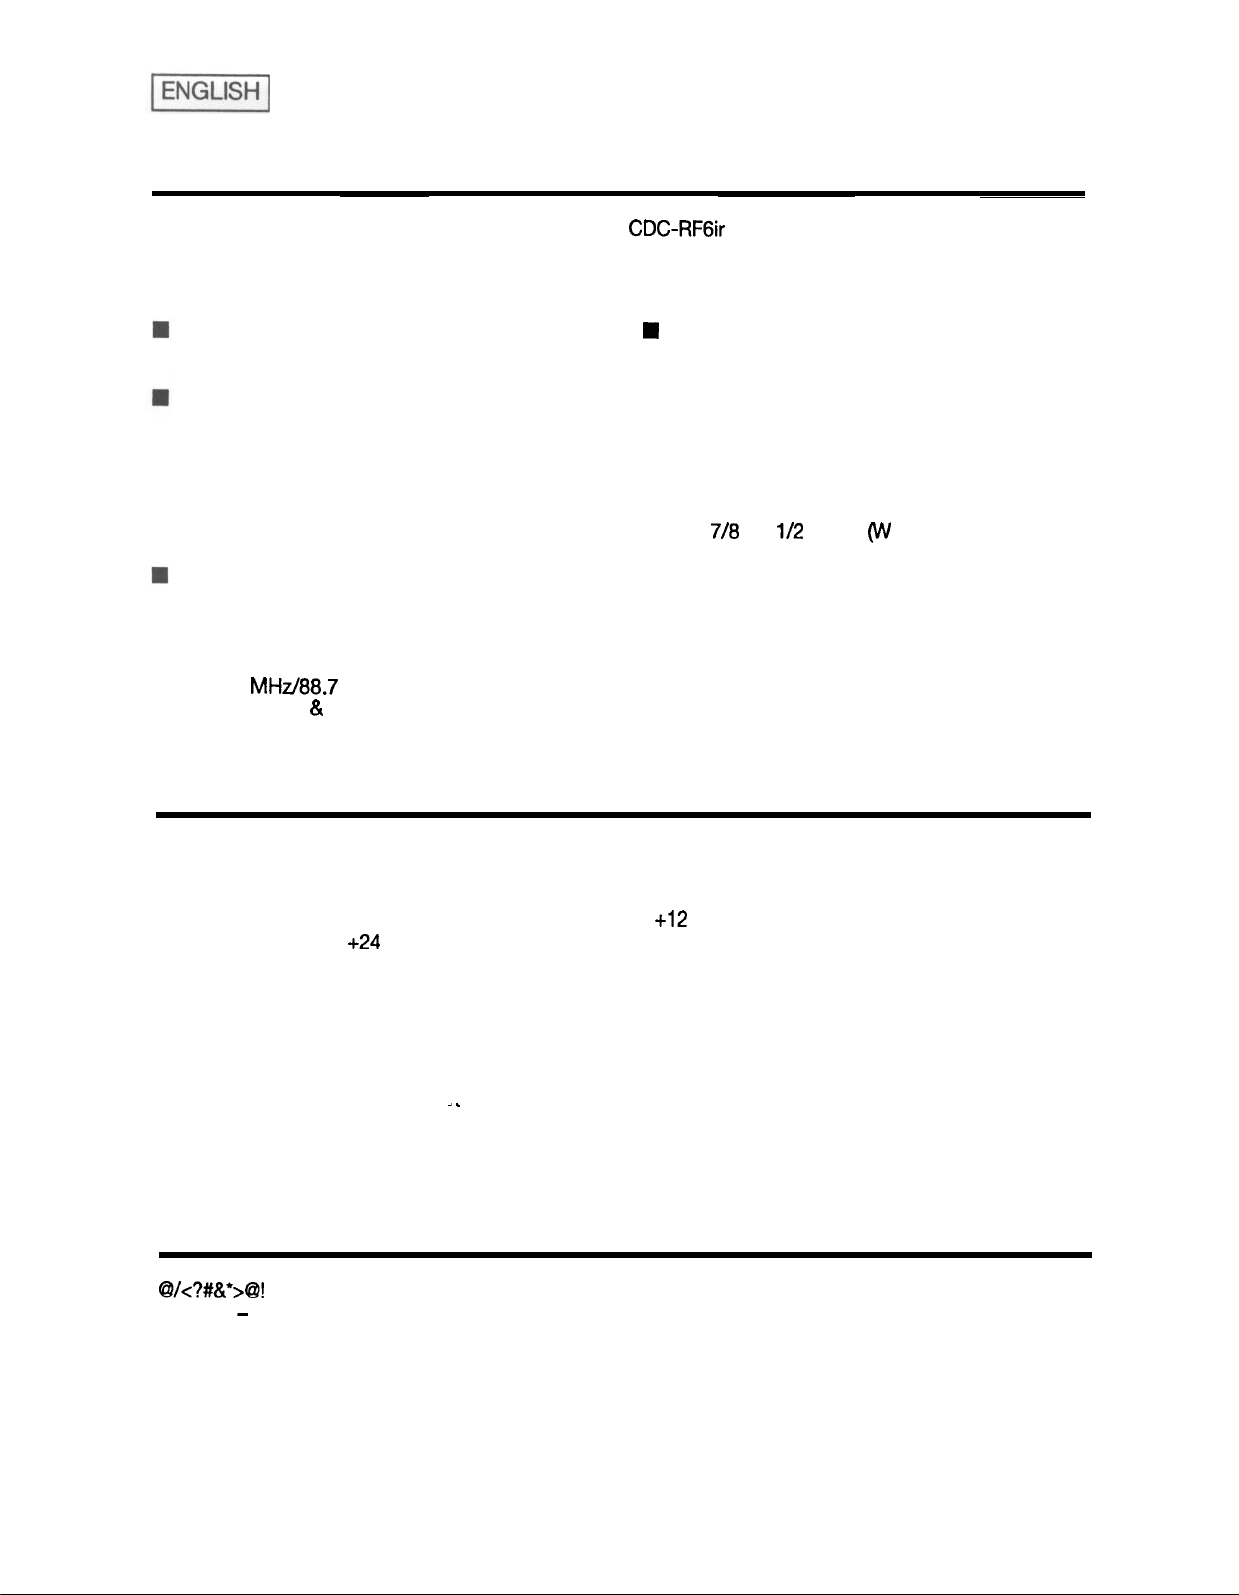
Features
Congratulations on your purchase of your Blaupunkt
CDC-RF6ir
FM Modulator CD Changer. This unit
is designed to convert CD sound into FM signals (89.1 MHz or 88.7 MHz) and play them through any
FM car stereo. This unit features:
For Use With Any Electronically-Tuned FM
Vehicle Radio
4
Optional Wireless Remote Control:
l
Disc and Track Mix and Repeat
l
Disc and Track Scan
Includes:
l
Changer
l
Wired Remote Control
l
FM Modulator
l
Disc Magazine
l
Cables
l
Mounting Hardware
Features Include:
l
Disc and Track Select
l
Audible Cue/Review
l
Pause/Play
l
Switchable Output Frequency:
89.1
MHz/88.7
l
Anti-Shock & Vibration Mechanism
MHz
n
Power Requirement:
l
12 V DC Vehicle Battery
n
Compact, Space-Saving Dimensions:
l
25Ox64x178mm
l
9
718
x 2
l/2
x 7 in. (W x H x D)
l
Fits in Many Gloveboxes
l
Vertical, Horizontal, or 45” Installation
Precautions
l
The use of optical instruments with this product will increase eye hazard.
l
Because the laser beam used in this compact disc changer is harmful to the eyes, do not attempt to
disassemble the cabinet. Refer servicing to qualified personnel only.
l
This CD Changer is designed to be operated only on
cannot be used on
l
If your vehicle was parked in direct sunlight resulting in a considerable rise in temperature inside the
+24
volt or positive ground systems.
+12
volt DC negative ground systems. The unit
vehicle, allow the unit to cool off before operating your unit. The unit may not operate correctly in
extremely hot or cold temperatures. The unit is equipped with a built in self protection circuit. When
the temperature reaches a preset level, the protection circuit halts all unit operation. If this should
happen, open a window and allow the car to cool.
l
You are cautioned that any changes or modifications not expressly approved in this manual could
void your warranty.
l
If you have any questions or problems concerning your unit that are not covered in this manual,
- .
please contact your Blaupunkt dealer.
Before Installation and Testing the System
@I/<?#&*>@!
this way - please carefully follow all of the instructions. You’ll be glad you did!
General Recommendations
l
If you’re not confident that you can install the unit correctly, have it installed by a qualified Blaupunkt
installation technician.
l
Design and specifications subject to change without notice.
l
We recommend making all electrical connections and testing the system before installing the unit.
To avoid the aggravation of costly mistakes and serious damage that could make you feel
4
Page 5
Before Installation and Testing (continued)
Transport Lock
The
mechanism in the CD changer is “locked” into place during
SCWWS
shipment by three transport screws. Be sure to remove the screws prior
to testing the system and installation.
To keep dust out of the unit, which could cause a malfunction, place the
enclosed seals over the screw holes after the Transport Lock Screws
have been removed.
Reset Button
A Reset Button is located on the front panel of the
Commander and must be activated with a pen tip or other
thin object, as it is recessed to prevent accidental
engagement. Press the Reset Button under the following
circumstances:
1. After connections have been made for initial testing.
2. After installation, when all wiring is completed.
3. If abnormal disc operation is encountered, the Reset
Button should be pressed to clear the system to
return to normaloperation.
4. After disconnecting and reconnecting the car battery, etc.
ID (Identity) Switch for 2nd CD Changer
To connect a second CDC-RF 6 changer, you
must use
Blaupunkt’s
CDC-RF BRIDGE,
which is sold separately. When an
additional CD changer has been connected
using this unit, the ID switch is used to
indicate the number of each respective
changer unit.
l
The ID switch is initially set to “1” when
shipped.
l
When only one changer is connected, the
switch should be set to “1”.
l
When two changers are connected, one
of the unit’s switches should be set to
“2”
1
using a ballpoint pen or similar fine-tipped
tool.
I
1st unit
Setting the Radio Frequency
You must select and test the radio frequency that the changer will use before
.
2nd unit (additional changer unit)
you mount the FM Modulator.
Set the radio frequency setting to 89.1 using the switch on the back of the
FM Modulator. Test the operation of the changer. (See page 15) If a clear
signal cannot be obtained on 89.1 MHz, change the position of the
frequency-select switch to 88.7.
2
CD
The radio sensitivity is slightly reduced when the FM Modulator is connected.
Page 6
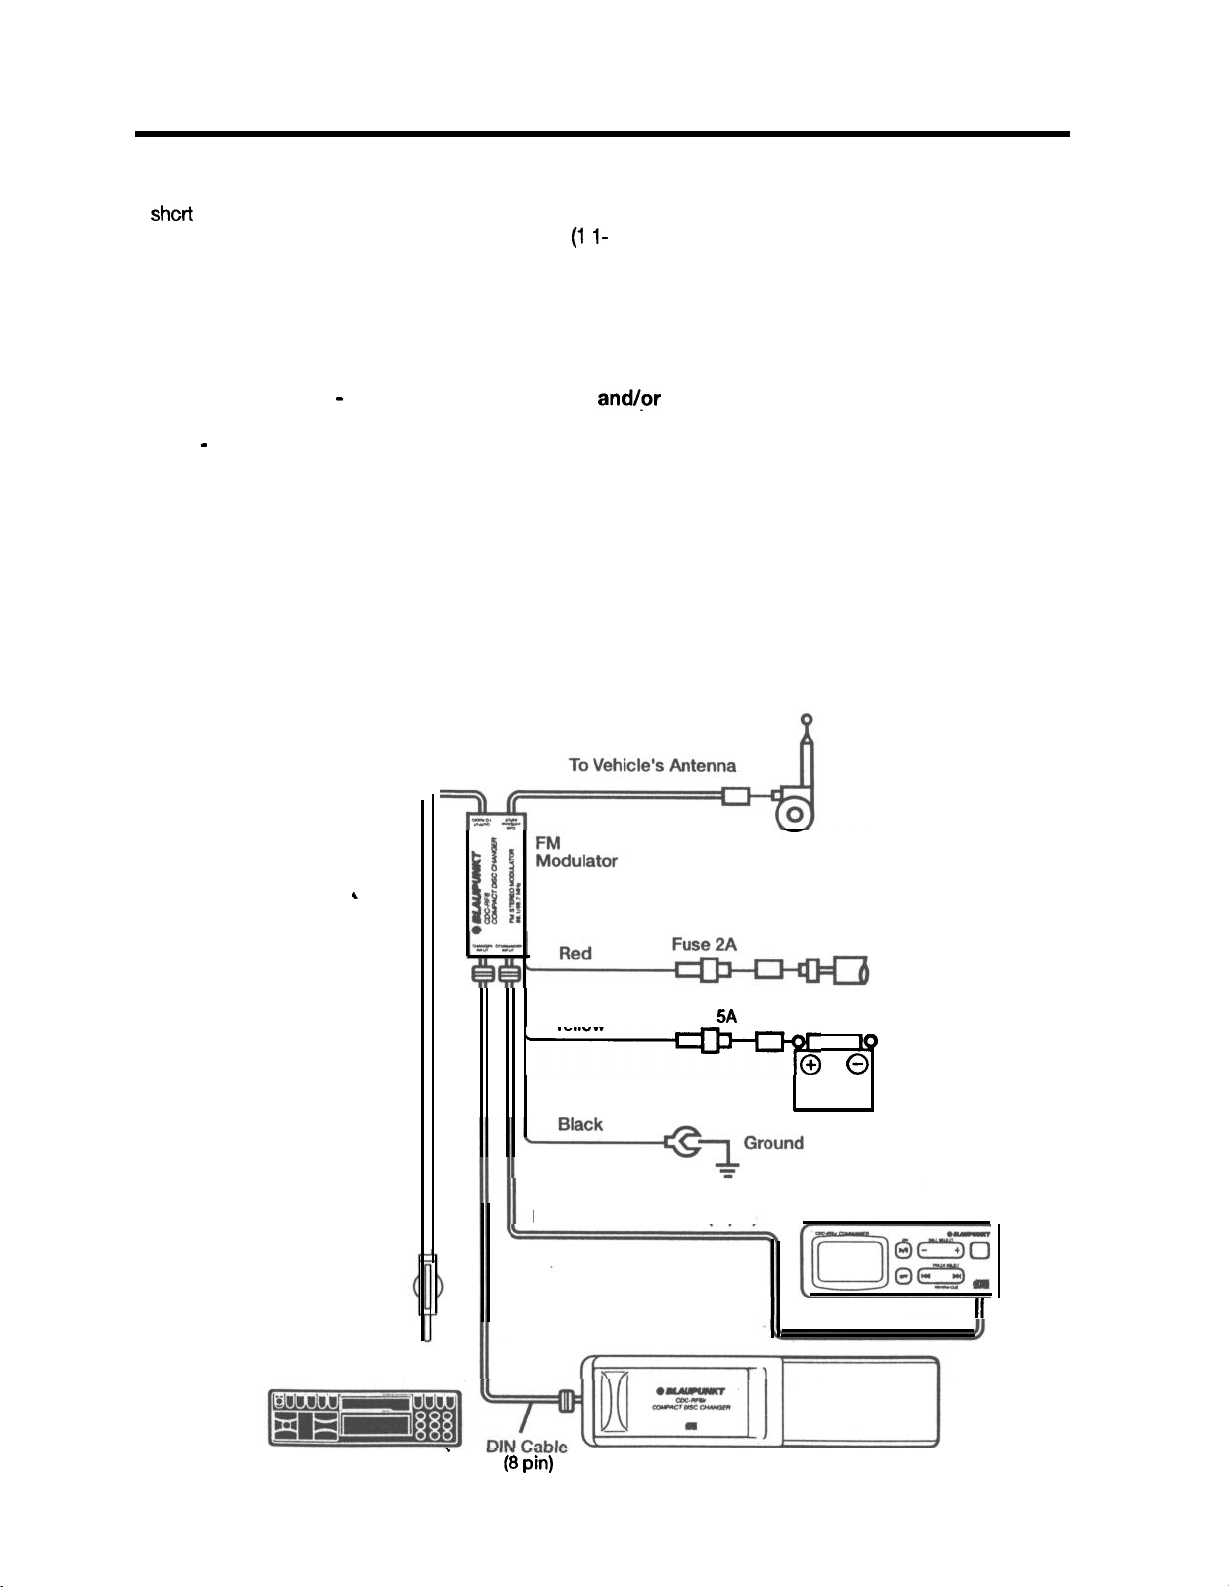
Electrical Connections
Electrical Connections
l Caution:
shcrt
l
Use this unit only with negative ground 12 Volt
l
Be sure to use the supplied changer cord. Using a cord other than the one supplied may cause
noise or damage.
l
Be sure to connect the changer cord to the FM Modulator before mounting. If you attach the
changer cord to the modulator and the cord projects down toward the back of the modulator,
remove the cord and attach the other end of the cord to the modulator.
before making connections, disconnect the ground wire terminal of the car battery to avoid
circuits.
(1
l- 16 Volt) direct current (DC).
Power Connections - To prevent short circuits
l
Disconnect the vehicle battery’s negative terminal before making connections.
and@
serious damage:
Note - If the changer is to be installed in a car that is equipped with an on-board drive or navigation
computer, do not disconnect the battery cable. If the cable is disconnected, the computer memory
may be lost. Under these conditions, use extra caution to avoid causing a short circuit during
installation.
l
Connect leads according to the wiring diagram.
l
Connect the yellow lead to a constant source of power which has passed through the vehicle’s fuse unit.
l
Connect the red power input lead only after the other leads are connected. And be sure to connect it
to a positive (+) 12 Volt power terminal that is energized only when the ignition key is set to the
accessory position or on position.
l
Connect the black lead to a grounded metal part of the vehicle. We recommend grounding all audio
system black ground leads (head unit, external amplifier, etc.) to a common point.
Modulator
-
output
,
Fuse
Radio Antenna
Input (in back)
FM Radio
Yellow
t
DIN Connection Cord (6
’
(6 pin)
5A
pin)
To Battery
CD Changer
Ip
0
Commander
11
6
Page 7

Installation
Recommendations
l
Carefully choose the mounting location so that the unit won’t interfere with normal driving.
l
Avoid installing the unit it a place:
- Subject to temperatures exceeding 55 degrees C (131 degrees
sunlight.)
- Subject to direct sunlight
-
Subject to excessive vibration
-
Near heat sources (such as heaters and heat ducts)
- Exposed to rain, moisture, excessive dirt and/or dust
l
This unit should not be installed in any way except that which is authorized (on its side, on
a 45” angle or suspended). Installing it with its side facing down or upside down can cause
malfunctioning.
l
The fuel tank must not be damaged by the installation.
l
The unit should not cover any wires or pipelines.
l
The unit (and its installation) should not damage or interfere with access to the spare tire, tools or
other equipment in or under the trunk.
l
For a safe and secure installation, be sure to use only the supplied mounting hardware.
l
Press the reset button after completing the electrical connections and installation. The reset button is
located on the front of the chassis (See page 5).
l
If you have any questions or problems concerning your unit that are not covered in this manual,
please contact your Blaupunkt dealer.
l
Be sure to remove the transport screws (See page 5).
.
F)
(such as in a car parked in direct
its end, at
1-
*
Anti-Vibration Setting
l
This unit can be installed horizontally (to the floor or suspended), vertically, and at a 45” angle.
l
Once the installation position has been chosen, set Anti-Vibration Setting Switches on both sides of
the unit using a screwdriver.
l
The unit may skip if used with the wrong installation setting.
Type of Installation
Horizontal
Suspended
Vertical
45” angle
Setting
H
H
V
45”
Mounting Hardware
(1)
Bracket (L)
(1)
Bracket (R)
(2)
Bracket (B)
(4)
Hexagonal Bolt
(M6
x20)
(4)
Hexagonal Bolt
With Washer
(4)
Nut
(M6)
(4)
Tapping Screw
(M5x 12)
ti
v
(2)
Tapping Screw
(M3x12)
DIN 8 Pin Cable
@q
(1)
Seal
Double
Sided Tape
7
Page 8

Horizontal Installation
l
Confirm that Anti-Vibration
Switches on both left and
right sides are set to
position H.
l
Attach bracket
bracket
hexagonal bolts (M5 x 8).
l
Attach brackets (L) and (R)
to their respective
brackets (B) using the
hexagonal bolts (M6 x 20)
and the hexagonal nuts
(M6).
l
Pull back the carpet and determine
0
where to attach the unit.
l
Stick the supplied double-sided tape
to the bottom of the brackets (B) and
peel off the paper backing.
l
Affix the unit to the floor by pressing
in place.
(Ft)
(L)
and
using the
0
.
Remove the hexagonal nuts and
take off the changer.
8
CD
l
l
A
Using a knife, cut
directly above the brackets
l
Return the carpet to its original
position allowing the bolts to
protrude through.
“x”s
in the carpet
(6)
bolts.
Q
Once more, use the hexagonal nuts
to attach the changer on top of the
carpet.
Page 9

Vertical Installation
onfinn
that Anti-Vibration
Switches on both left and
right sides are set to position
l
Attach brackets (L) and (R)
V,
using the hexagonal bolts
(M5
x 8).
l
Attach brackets (L) and (R) to
their respective brackets (B)
using the hexagonal bolts
(M6 x 20) and the hexagonal
nuts (MS).
l
Pull back the carpet and determine
where to attach the unit.
l
Stick the supplied double-sided tape
to the bottom of the brackets (B) and
peel off the paper backing.
l
Affix the unit to the floor by pressing
in place.
l
Once more, use the hexagonal nuts
attach the
to
changer on
top of the
Page 10

45’
I
Installation
l
Confirm that Anti-Vibration
Switches on both left and
right sides are set to
position 45.
l
Attach brackets (L) and (R)
using the hexagonal bolts
(M5
x 8).
l
Attach brackets (L) and (R)
to their respective
brackets (B) using the
hexagonal bolts (M6 x
and the hexagonal nuts
(M6).
l
Pull back the carpet and determine
where to attach the unit.
l
Stick the supplied double-sided tape
to the bottom of the brackets (B) and
peel off the paper backing.
l
Affix the unit to the floor by pressing
in place.
20)
Q
l
Remove the hexagonal nuts and
take off the changer.
I
A
0
10
l
Using a knife, cut
directly above the brackets (B) bolts.
l
Return the carpet to its original
position allowing the bolts to
protrude through.
Y’s
in the carpet
e
l
Once more, use the hexagonal nuts
to attach the changer on top of the
carpet.
Page 11

Sumended
l
Make sure that the unit
does not hinder the
movement of torsion bar
spring or other parts of the
trunk lid.
l
Confirm Anti-Vibration
Switches on both the left
and right sides are set to
0
position
l
Attach bracket
bracket (R) using the
hexagonal bolts
l
Determine the mounting location and
drill four mounting holes.
“H”.
Installation
(L)
and
(M5
x 8).
0
.
l
Attach the CD changer with the
tapping screws (M5 x 12).
.
3.6 mm Diameter
Installation of the Controller
Peel off the removable seal on the back of
the controller unit and install it in a location
that will not obstruct driving.
Page 12

Installation of the FM Modulator
install the FM Modulator to the floor or other surface with the included tapping screws
(M3x12).
Changer Specifications
System
Oversampling
Laser Diode
Frequency response
Wow and Flutter
THD (Total Harmonic
Distortion)
Dynamic Range
Signal-to-Noise Ratio
Channel Separation
Current Drain
Operating Temperature
Dimensions
Mass
Power Requirement
Part Number
Optional Accessories
CDC-RF6ir
Remote Control
CDC-RF6 Magazine
Wireless
.
Compact disc digital audio system
1 -Bit/8 X Oversampling
GaALAs
20-l 5,000 Hz
Below Measurable limit
0.1%
95
90
75
0.4 A (During playback)
1 .O A (During loading or ejecting a disc)
-10”to50”C/14”to122”F
25Ox64x178mm
9
Approximately 2.0
12 V DC Vehicle Battery (Negative Ground)
FOOEB00020
FOOEB00021
FOOEBOOO15
Double Hetero Type
+/-
3
dB
dB
dB
7/8
x 2
l/2
x 7 in. (W x H x D)
dB
kg/4.4
tbs.
12
Page 13

Magazine & Compact Discs
Notes on the Disc Magazine
Dirt, dust, scratches and
quality. Here are some suggestions on how to take care of your discs and the magazine:
l
Use compact discs that have
the mark compact disc logo.
l
Do
not use 3”
l
Handle the disc by its edge, and to keep the disc clean, do not touch the surface.
l
Do not leave the discs or the magazine in locations with high temperatures and high humidity, such
(Scm)
as on a car dashboard or at the rear window where they will be subjected to direct sunlight or near
heat ducts.
l
Do not stick paper or write anything on the disc surface.
l
Do not drop the disc magazine or subject it to a violent shock.
l
Do not insert more than one disc at a time into a slot, otherwise the changer and the discs may be
damaged.
l
Discs should be put back in their cases after use to avoid serious scratches that could cause the
sound to skip.
Cleaning Discs
Before playing, remove fingerprints and dust the disc with a compact disc cleaning cloth. Wipe the disc
from the center of the disc to the outer edge of the disc. Do not use solvents
commercially available cleaners or anti-static spray intended for analog discs.
Wipe in a straight motion from the inside to the outside of the disc.
warpage
cause sound skips during playback and a deterioration of sound
DIGITAL AUDIO
discs with the CDC-RF6k
.-
.._
s&h
as benzine, thinner,
Although protective film is being marketed as a CD accessory, use of this type of product will result in
malfunctions and should absolutely be avoided.
Loading A Disc
1. Grip the tab on the magazine’s
disc tray and pull out only one of
the trays.
2. l Each tray can accommodate
only one disc.
l
Put the disc in the tray with its
play surface facing up and the
Play side
up
printed (labeled) surface facing
down. “E-07” appears about
8 seconds if the disc is placed
upside down.
l
Do not play 3” (8 cm) discs in
this unit.
down
3. Press the tab on the disc tray to
store the tray back in the magazine. Up to six discs can be loaded.
13
Page 14

Magazine & Compact Discs
Installing The Magazine
1. Slide the door toward the right.
2. Position the magazine so the top is facing up, and the
arrow is facing the changer. Push it in until it clicks into
place. Note: When the magazine is used for the first time,
it will not lock into place unless the power supply has
been connected.
Make sure the door is closed. Otherwise, foreign matter
may enter the unit, and contaminate the lenses inside the
changer.
When the magazine has been inserted into changer (or
when the Reset Button on the Commander is pressed),
the unit will automatically be activated and begin reading
the infonation on the CDs, one CD at a time, until all of
the CDs have been read.
Ejecting The Magazine
Press the Eject Button inside the unit to remove the
magazine. Note: Be sure to close the door after inserting or
removing the magazine. If dust or dirt enters the changer, it
may cause a malfunction.
Remove the magazine from the unit between uses during
hot weather and when the
periods of time.
CD
changer is not
used
for long
Location of Controls
\
1
4
1. Play/Pause Button Press to turn unit on, to temporarily pause play or to resume play.
2. DISC SELECT Button. Press to select the desired disc.
3. TRACK SELECT Button Press to select the desired track.
for audible cue and review.
4. OFF Button Press to turn the unit off.
2
3
Keep this button depressed during play
14
Page 15

Operating Instructions l
Before operating the unit for the first item (or after reconnecting the battery, etc.) press the Reset
Button on the Commander. See page 5. Load the discs into the CD magazine and install the magazine
into the CD charger.
Turning Unit On/Playing A CD
Vehicle ignition must be on. Turn on the car stereo and select FM band. Tune the radio to either 89.1 or
88.7 MHz. (depending on frequency chosen during installation). We suggest dedicating a Preset Radio
Station Button to the frequency chosen during installation. To turn CD Changer on, press Play/Pause
Button (1).
Number. Play of first disc
Pause
Press the Play/Pause Button (1) during play.
Press the button again to resume play starting from where it was stopped. When the pause mode is
maintained for 5 minutes or more, the power will be automatically turned off.
Turning Unit Off
Press the OFF Button (4) to turn the unit off. The Commander’s backlighting stays on.
At The End Of The Disc
When the last track on each disc is finished, the next available disc is automatically selected and play
begins with the first track on the disc. When the last track on the last disc in
finished, the first disc is automatically selected and play begins with the first track on the disc.
The
LCD panel on the controller will illuminate and show the Disc Number, the Track
will.begin.
II
appears on the displayand play is temporarily stopped.
the
CD magazine is
Moving To Another Track
l
To go to the next track, press and release the w Control (3).
l
To go back to the beginning of the track being played, press and release the
l
Press these controls repeatedly to locate previous or succeeding tracks.
w
Control (3).
Audible Cue/Review
l
To move within a track, press and hold the w Control (3) for audible cue or the H1 control (3) for
audible review.
l
The display flashes, and play is skipped to the desired part of a track in the forward or backward
direction.
l
When the Track Select Button is kept depressed until the start or end of the disc is reached, the unit
goes into a Pause mode.
Switching to Another Disc
Display the number of the disc to be heard using the Disc Select Button (2).
l
To advance to the next disc, press the right side of the Disc Select Button.
l
To return the previous disc, press the left side of the Disc Select Button.
Continued on Next Page
15
Page 16

Optional Wireless Remote Control
The optional Wireless Remote
to activate the following features in addition to the features that
can be controlled with the
5.
MIX Button This plays the tracks or discs in a random
sequence.
6. REPEAT Button This plays a certain track or disc over and
over again,
7. SCAN Button This plays the first portion of each track or disc.
8. CHANGER Button When two CD changers have been installed, use
this button to select the changer whose CDs are to be played.
Mix Play
Track Mix - Press the MIX Button (5). MIX appears in the Display, and the
tracks on the disc now heard are played in a random order. When all the
tracks have been played, they will be played again, this time in a different
random order.
Disc Mix - When the MIX Button (5) is pressed for two seconds or more, DISC and MIX appear, the sequence in
which the discs are to be played is first m-arranged and then the sequence in which the tracks are to be played
is rearranged, after which the tracks on the first disc are played. When all the tracks on the first disc have been
played, operation advances to the next disc.
Press the MIX Button again to release the Mix Play function.
Repeat
Track Repeat - Press the Repeat Button (6).
repeatedly.
Disc Repeat - When the Repeat Button (6) is pressed for two seconds or more, DISC and RPT appear, and the
disc now heard is played repeatedly.
CDC-RF6ir
CDC-RFGir’s
Wired Commander:
Control allows you
7
6
RPT
appears in the display, and the track now heard is played
/:
OFF
0
l BLAUPUNKT
CLXSRF6rr
CONTROL
LX
m
ON
0
m
\
6
5
J
Press the Repeat Button again to end Repeat play.
Scan
Track Scan - When the’scan Button (7) is pressed, SCAN appears, and the first 10 seconds of each
track on the selected disc are played in order.
Disc Scan - When the Scan Button (7) is pressed for two seconds or more DISC and SCN appears,
and the first 10 seconds of each track on each disc are played in order.
Press the Scan Button again to end Scan play.
Switching TO A
If the CDC-RF BRIDGE (sold separately) is used, this CD changer system can accommodate an
additional CDC-RF6 Changer. When two CD changers have been installed, the Changer Select Button
(8) is used to select the desired changer. This button is not operational when only one CD changer has
been connected.
Second
CD
Changer
(If
connected)
Switching To Radio Or Tape
Press the OFF Button (4) to stop CD play, and listen to the radio or tape. Noise is heard and the
reception deteriorates when listening to the radio without stopping CD play first. To resume CD play,
set the radio’s FM frequency to 89.1 MHz or 88.7 MHz and press the Play/Pause Button (1).
16
Page 17

Troubleshooting Guide
The following check will assist in the correction of most problems that you might encounter with your
unit. Perform the checks described below before contacting your Blaupunkt dealer.
.
Symptom
No Power
No Sound
No Sound,
Two-Speak System
Magazine cannot be
installed.
Selected disc does
not play.
Noise is heard
during playback or
sound is
intermittent.
Cause
Replace with a fuse of the same type
Fuse blown.
Improper connection.
Improper connection. Check connections.
Fader set to non-existent speakers.
Attempt made to insert magazine
improperly.
Disc is loaded incorrectly.
Large scratches on disc or warped
disc.
Extemely dirty disc.
Transit Screws still in place.
and rating as the original.
If the fuse blows again, consult with
your dealer.
Check connections.
Set fader to center position to
determine if speakers are wired for
front or rear setting.
Insert it in proper direction.
Load disc with play side facing up.
(Printed side should face down).
Compare sound with another disc. If
sound from second disc is
acceptable, first disc is defective.
Clean disc.
Remove 3 screws on bottom of unit
and try again.
Remedy
Anti-Vibration Switch set in wrong
position.
Wireless Remote
Control does not
work
Fuse Replacement
When replacing the fuse, be sure to use one with the correct amperage, which will be stated on the
fuse case. Never use a fuse that has a stated amperage exceeding the one supplied for this unit, as
this could cause malfunction and serious damage to the unit.
Moisture Condensation
On a rainy day or in a very damp area, moisture may condense on the lens inside the unit Should this
occur, the unit will not operate properly. In this case, remove the disc and wait for about an hour until the
moisture has evaporated.
Battery is dead.
Commander ir sensor or Wireless
Remote Control is dirty.
Set the Anti-Vibration Switch to the
correct position (See page 7-l 1).
Replace Battery.
Clean the sensor and/or the control’s
lens.
17
Page 18

Error Codes
If the changer malfunctions, one of the following error codes will be displayed:
Error Display
. .
:-:
.I).
:
:
111
: :
:...:
:...:
. .
:
3
5...5
. . . . .
. .
..i
!!
5...: :...P
:...:
: :
I...!
:
. . . . .
0
I....
1.W.
I....
:.... I
e....
:....
:.... II -4
!....
1.1 HI .” ..I
:...: :.I.: :...p
:
k-1
n
-¤¤:
n...: - “. I..
:....
..L
Cause
:
Disc change malfunction.
:
5
Disc loaded with print facing up
:
or disc is dirty.
I
Temperature inside car too hot.
Magazine has not been installed.
No discs in magazine.
No discs in magazine No 2. Load discs into magazine No 2.
Consult with dealer.
Load disc properly.
Clean disc.
Allow the car to cool.
Then press the Play/Pause Button.
Install magazine.
Load discs into magazine.
Remedy
18
Page 19

a BLAUPUNKT
Bosch Group
Robert Bosch Corporation
Sales Group-Blaupunkt Division
2800 South 25th Avenue, Broadview, Illinois 60153
Robert Bosch Inc.
6811 Century Avenue
Mississauga, Ontario
Canada
L5N
1
Rl
Robert Bosch S.A. de
Dr.
Lucia
270, Cols.
Mexico D. F. 06720
Copyright
No portion of this work may br reproduced in any form without
the written consent of the Robert Bosch Corporation.
Printed in Japan (12&l)
1
RAGPlOA71601
1994
by the Robert Bosch Corporation
C.V.
Doctores,
 Loading...