

Page 1

Einbauanleitung
Fitting Instructions
Instructions de montage
lstruzioni di montaggio
Inbouwinstrukties
Monteringsanvisning
lnstrucciones de montaje
Instru@es de montagem
ebruiksaanwijzin
Page 2

English
Preparatory steps
Loading the disc magazine
Figure 1
Figure 2
Note:
!
A
Inserting the disc magazine
Figure 3
Figure 4
Figure 5
Note:
Removing the disc magazine
Figure 6
Attention: Failure to open the door completely may very likely
Notes on moisture condensation
On a rainy day or when the temperature varies considerably
moisture may condense on the laser lens and the unit will not
operate properly.
In this case remove the disc and wait for about one hour until
the moisture has evaporated.
Notes on CD
A
playing. To optain optimum sound, handle the disc as follows:
Keep the CD clean, and handle the disc by its edge only.
If required, clean the disc with an optional cleaning cloth. Wipe
the disc surface from the middle towards the edge!
Do not use any solvants such as benzine, thinner, antistatic spray
or a
Do not stick paper or tape anywhere Qn the disc!
Do not expose the disc to direct sunlight or high temperatures.
To load the magazine, move it into the position
shown in the picture (arrow up).
Pull out the empty tray.
To be sure that all trays are correctly loaded with
the right orientation, never remove more than one
disc tray at a time.
Insert one CD per tray with the labelling facing up.
Insert the tray with the disc into the magazine until it
stops (locks).
You can load the magazine with a maximum of
discs. You can also leave individual disc trays
unoccupied.
Make sure not to use discs measuring 8 cm in
diameter. Avoid getting fingerprints or scratches on
the CD. After having removed a CD tray, take care
that the disc lying on it does not fall down.
You
may leave individual disc trays empty,
though you should insert all of the trays into the
magazine.
Slide the door to the rightmost position.
Insert the magazine with the arrow showing up until
it stops and locks.
Close the door sliding it back to the leftmostposition.
Be sure that the slider is always closed. This will
protect the changer’s laser lens against
contamination.
Make sure to open the door completely moving it to
the rightmost end and press the Eject button 8.
The magazine will come out automatically.
result in damages of the-changer and the magazine!
contaminated or damaged CD can produce drop-outs in
convenQonal
cleaning agent intended for analog discs!
_.
IO
Do not leave the discs in a car parked in the sun.
High temperatures in the car can damage the disc.
Notes on the disc magazine
Do not expose the magazine to high temperatures and humidity.
Store the magazine where it is not exposed to direct sunlight
(not on the dashboard or rear shelf)!
Protect the magazine against vibration!
Operation
Please refer to car stereo’s owner’s manual.
Technical data
Frequency response:
Wow and flutter:
Signal-to-noise ratio:
Operating temperature:
(Subject to modifications without notice)
FCC warning for USA
The equipment has been tested and found to comply with the
limits for a Class B device, pursuant to Part 15 of the FCC
Rules. These limits are designed to provide reasonable
protection against harmful interference in a residential
installation. This equipment generates, uses, and can radiate
radio frequency energy, and, if not installed and used in
accordance with instructions, may cause harmful interference
with radio communications. However, there is no guarantee that
radio interference will not occur in particular installation. If this
equipment does cause harmful interference to radio or television
reception, which can be determined by turning the equipment off
and on, the user is encouraged to contact the dealer or an
experienced RadioRV technician for help.
You are cautioned that any changes or modifications not
expressly approved in this manual could void your authority to
operate this equipment.
The shielded interface cable recommended in this manual must
be used with this equipment in order to comply with limits for a
digital device pursuant to Sub-part B of Part 15 of the FCC rules.
Caution
-
The use of optical instruments with this product will increase
eye hazard.
-
Because the laser beam in this compact disc player is
harmful to the eyes, do not attempt to disassemble this
cabinet. Refer servicing to qualified personnel only.
Safety certification
This Compact Disc Player is made and tested to meet exacting
safety standards. It meets FCC requirements and complies with
safety performance standards of the US Department of Heath
and Human Services.
Notice:
This
Class B digital apparatus meets all requirements of the
Canadian Interference-Causing Equipment Regulations.
Warranty: Refer to radio warranty.
5 - 20 000 Hz &l
below measurable limit
94
dB
-10 “C to
dB
+50 “C
‘.
Page 3
\
Allacciamento 0
Aa&&i%x~ * Ansluitning * Conex2h
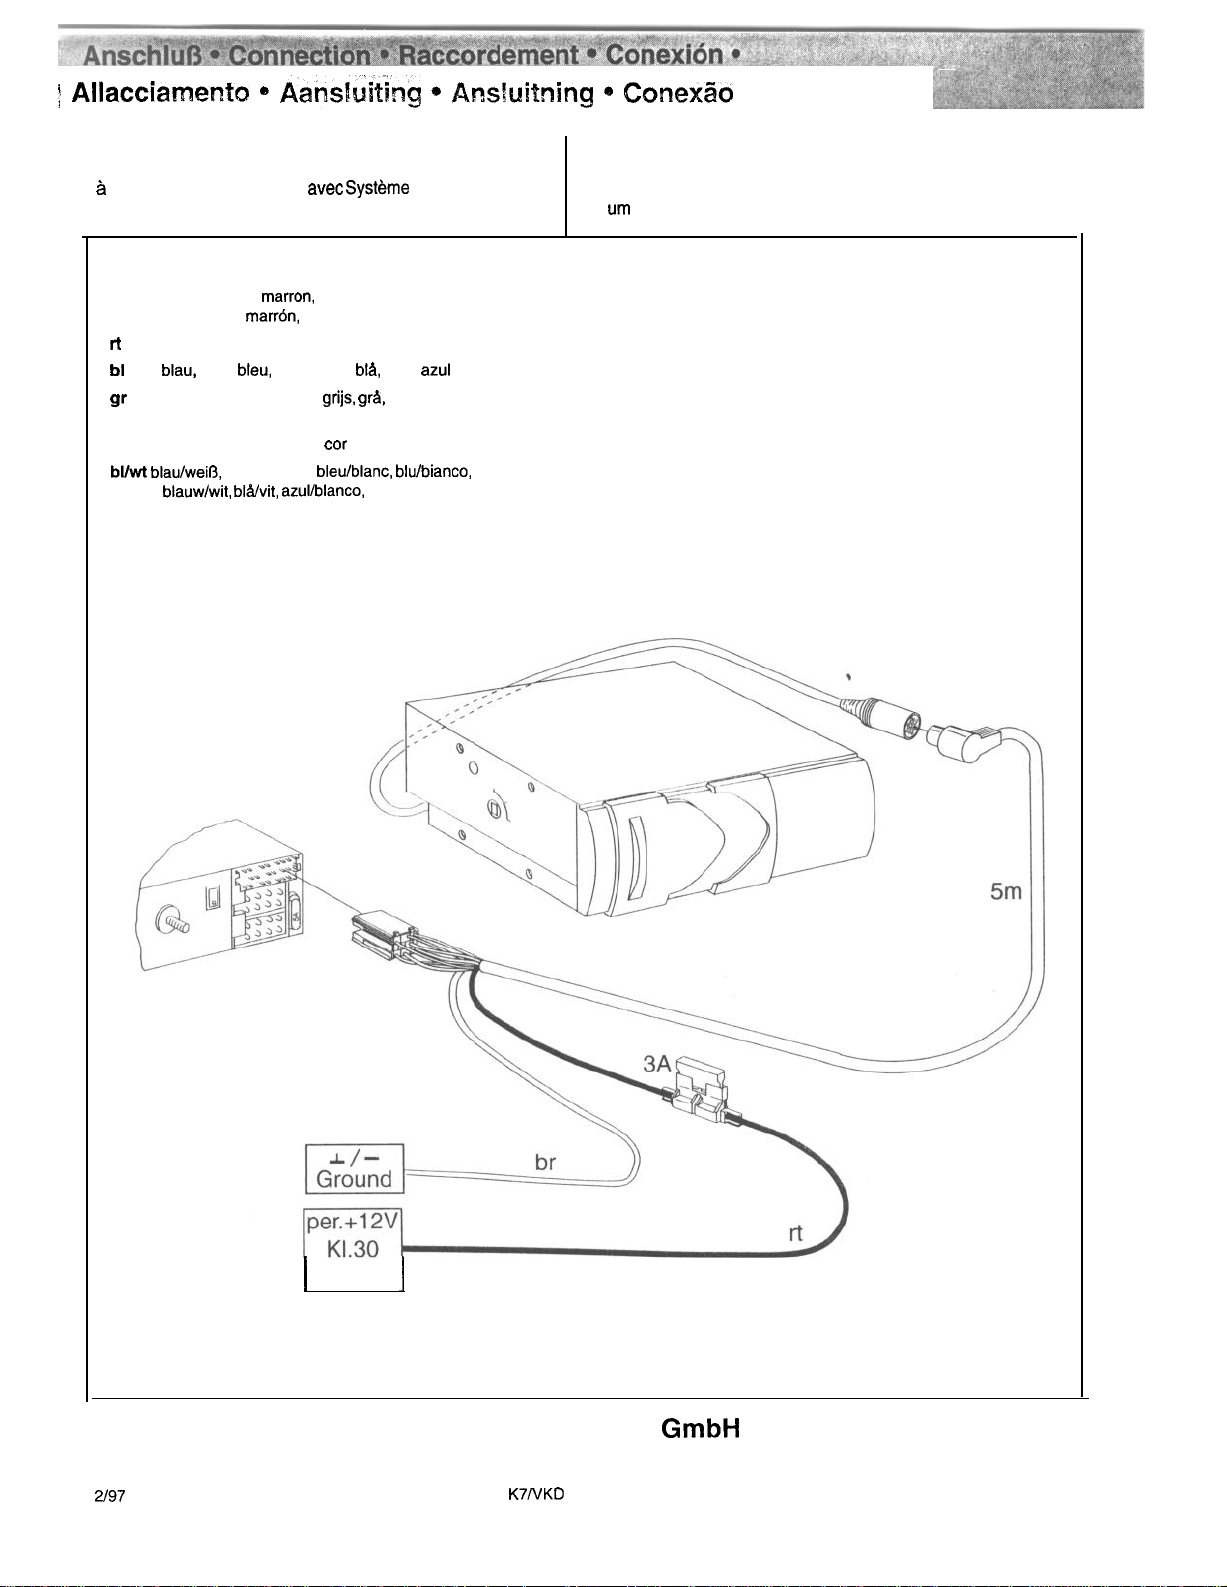
l an ein Blaupunkt-Autoradio mit Disc-Management-System.
l to a Blaupunkt car stereo with Disc Management System.
l a un autoradio de Blaupunkt avec Systeme Disc Management.
l a un autorradio Blaupunkt con Disc Management System.
braun, brown,
br
bruin, brun,
rot, red, rouge, rosso, rood, rod, rojo, vermelho
rt
bl
blau,
blue,
grau, grey, gris, grigio,
gr
orange, orange, orange, arancio, oranje,
or
orangefargad, naranja, car de laranja
bllwt blau/weif3,
blauw/wit, blA/vit, azul/blanco,
marron,
marron,
castanho
bleu,
blu, blauw,
blue/white,
marrone,
bla,
azul,
azul
grijs. gra,
bleu/blanc. blu/bianco,
gris, cinzento
azullbranco
l ad un’autoradio Blaupunkt dotata di un sistema Disc-Management.
l op een Blaupunkt autoradio met DSC (Disc Management System).
l till en Blaupunkt bilstereo med Disc Management System.
l a
urn
auto-radio Blaupunkt corn sistema Disc-Management.
2/97
1
Battery
]
Blaupunkt-Werke
Bosch Gruppe
K7NKD 8 622 401 239
GmbH
PM
Page 4

Einbauanleitung
Mitgelieferte Befestigungsteile l Supplied Mounting Hardware l Materiel de montage fourni .
Ferreteria de montaje suministrada l Componenti di fissaggio comprese
Meegeleverde montagematerialen . Medfijljande monteringsdetaljer l Elementos de
wFitting /
Installation Instructions l Notice d’installation l lstruzion
nella
fornitura l
fixaclo
@
0
x4
x4 x4
0
fornecidos
0
x4
8
.
Q
M4x8
Zur besonderen Beachtung
.
Bei
der Wahl des Einbauortes ist folgendes zu beachten:
-
Der Tank darf durch die Blechschrauben nicht beschadigt werden.
-
Unter der Flache, auf die das Gerat montiert werden soll, dtirfen
-
Ersatzreifen, Werkzeug usw. diirfen durch die Blechschrauben nicht beschadigt werden. Achten Sie
dal3
.
lnstallieren Sie das Gerat nicht an einem
-
-
-
-
-
.
Fur
Precautions
.
Choose the mounting location carefully, observing the following:
-
-
-
.
Do not install the unit at a place,
-
-
-
-
-
.
Be sure to use only the supplied mounting hardware for a safe and secure installation.
die Herausnahme des Ersatzreifens, Werkzeugs usw. nicht durch das Gerat behindert wird.
Or?,
der Temperaturen tiber 55” C
der sich in der Nahe von Warmluftauslassen (Heizung usw.) befindet.
der Regen oder Feuchtigkeit ausgesetzt ist.
der Staub oder Schmutz ausgesetzt ist.
der starken Vibrationen ausgesetzt ist.
sicheren und stabilen Einbau verwenden Sie ausschliet3lich die mitgelieferten Befestigungsteile.
The fuel tank must not be damaged by the tapping screws.
There should be no wire harnesses nor any tubes located under the place where you are going to install the unit.
The spare wheel, tools or other equipment in or under the trunk must not be blocked or damaged by the screws
or the unit itself.
which is exposed to temperatures of more than 55” C (e.g. in a car parked in the sun).
which is close to hot air outlets (heating, etc.).
which is exposed to rain or humidity.
which is exposed to dust or dirt.
which is exposed to considerable vibrations.
(z.B.
in einem in der Sonne geparkten
sich
keine Drahte oder Rohrleitungen befinden.
Wagen)
4,8x16
ausgesetzt ist.
M6x25
M6
such
darauf,
Precautions
.
Choisir soigneusement I’endroit de montage en observant ce qui suit.
-
Le reservoir d’essence ne doit pas etre endommage par les vis a t6le.
-
II ne doit pas y avoir de faisceau de fils ou de tuyaux a I’endroit oti I’on desire installer I’appareil.
-
La roue de secours, les outils ou autre equipement dans ou sous le coffre ne doivent pas etre genes ni
.
.
endommages par les vis ou I’appareil
Eviter d’instalier le poste a un lieu,
-
qui est soumis a des temperatures exedent 55” C (p. ex. dans une voiture stationnee au soleil).
-
qui se trouve pres des echappements d’air
-
qui est soumis a la pluie ou a I’humidite.
-
qui est soumis a la poussiere ou a la salete.
-
qui est soumi a des vibrations fortes.
s’assurer d’utiliser uniquement le materiel de montage fourni pour une installation correcte et
lui-m&me.
chaud
(chauffage etc.).
sure.
Page 5

Precauzioni impottante
.
Per la scelta del luogo di montaggio osservare le seguenti indicazioni:
fare attenzione a non danneggiare il serbatoio del carburante con le viti autofilettanti.
-
Sotto
-
-
.
Non installare I’apparecchio in un posto,
-
-
-
-
-
.
usare esclusivamente le componenti di fissaggio fornite per garantie un montaggio sicuro e stabile.
Let op!
.
Bij
-
-
-
.
De CD-wisselaar niet plaatsen,
-
-
-
.
Voor veilige en solide inbouw uitsluitend meegeleverde montagematerialen gebruiken.
la superficie sulla quale si desidera montare I’apparecchio non devono esserci fili oppure tubi.
Fare attenzione a non danneggiare la ruota di scorta, attrezzi
al fatto,
attrezzi
esposto a temperature superiori a
the
esporto a pioggia ed
esposto a polvere e sporoizia.
esposto a forti vibrazioni.
het bepalen van de inbouwplaats erop letten dat:
de brandstoftank niet door schroeven wordt beschadigd
direct onder het vlak, waarop de wisselaar wordt gemonteerd, geen draden of andere kabels
het resetvewiel, gereedschap e.d. niet door schroeven worden beschadigd,
de gemonteerde wisselaar het uitnemen van het reservewiel, gereedschap e.d. niet belemmert
daar waar de temperatuur tot boven 55” C kan oplopen (denk b.v.aan een in de zon geparkeerde auto!)
vlakbij een heteluchtuitlaat (verwarming enz.).
daar waar hij
the
I’apparecchio verga montato in modo da non ostacolarVi, se dovete estrarre la ruota di acorta. gli
etc.
55O
C (per es. in un’autovettura parcheggiata al sole).
si trova esposto a soffi d’aria calda (riscaldamento
umidit8.
aan
vocht, regen, stof, vuil of sterke trillingen is blootgesteld.
etc.).
etc.
con le viti autofilettanti. Fare anche attenzione
lopen
Att
tsnka pB
.
Vid val av monteringsplats maste faljande beaktas:
-
Bensintanken f3r ej skadas av plfitskruvar.
-
Under ytan, som vaxlaren monteras p& f8r det ej finnas nsgra kablar eller rbrledninqar.
-
Se till att intc
.
.
Precauciones
.
.
.
reservhjul och verktyg inte Aventyras.
Montera inte v8xlaren.
-
d2r ternperatrtretl
-
i ntirheten av varmluftsutsltipp
-
dZr
den kan
-
d8r den kan utsattas
-
d% den kan paverkas av starka vibrationer.
Ftjr en stiker och stabil montering, anvtind endast de medlevererade monteringsdetaljerna.
Elija cuidadosamente el lugar de montaje, teniendo en cuenta lo siguiente:
-
El dep6sito de combustible no deber;i
-
No debera haber mazos de conductores ni tubos debajo del lugar donde vaya a instalar la unidad.
-
La
rueda
verse interferidos ni
No instala el aparato en un
-
donde existen temperaturas de
-
que este junto a salidas de aire caliente
-
que est.3 suieto a la Iluvia o la humedad.
-
que estti sujeto al sucio.
-
que estti sujeto a vibraciones fuertes.
Para
realizar una instalacibn segura, emplee solamente la ferreteria de montaje suministrada.
teservhjlll. vcrklyg
knn bli ijver 55”
uts?ittas fijr
.
de repuesto, las herramientas, u otros equipos situados dentro o debajo del portaequipajes no
regn och fuktighet.
fijr
damm och smuts.
daiiados
lugar,
m m
skaclas
av plAtskruvarna. Placera v$xlarcn s?+ilt atkomliqheten till
por
C (t cx
10s
rn&
vitl
dirckt
solbnstr,4lninq).
daRarse
tornillos ni por la propia unidad.
de 55” C
con
10s
(p.ej.
en un
(calefacciOn).
tornillos roscachapa.
cache
aparcado en el sol).
deberAn
Para
considera@o
.
Ao escolher o local de montagem 6
-
NBo
-
Sob a superficie onde o aparelho serti montado, Go devem encontrar-se fios ou tubos condutores.
-
0 Pneumtitico sobressalente, as ferramentas etc.,
atenCW0 para clue
.
.
aparelho.
N.30
instale o aparelho em urn local,
-
corn
-
pert0 de escapamento de ar aquecido (aquecimento etc.).
-
exposto B chuva e
-
exposto B poeira e sujidade.
-
sujeito a fortes vibra@es.
Para
uma montagem segura e
especial
danificar o tanque corn OS parafusos de metal.
a remo@o do
temperatura superior de 55” C (par exemplo em
humMade.
necessBrio
pneumBtico
estsvel
utilize somerite OS elementos de fixa@o fornecidos.
observar o seguinte:
nAo
devem ser danificadas pelos parafusos de metal. Tome
sobressalente, das ferrarnentas, etc.,
urn
veiculo estacionado sob o sol).
n%o
seja impedida
pelo
Page 6

ildi-montaggio
l
lnbouwinstrukties l Monteringsanvisning l Noticia de montaje o
Vor der Montage die zwei Transportsicherungsschrauben entfernen.
Undo the two transport security bolts before you start with the lnstallatlon.
Avant d’effectuer le montage,
enlever
les deux vis de
securite
de transport.
Prima di effettuare il montaggio svitate le due viti di fissaggio per sicureua di
trasporto.
Verwijder v66r de montage de twee transportbeveiligingsschroeven.
lnnan monteringen
Remover
10s
dos tornillos de seguridad de transporte antes de comenzar con la
skall
de tvo transportslkrlngsskruvarna av
IZigsnas.
instalacibn.
Antes de montar B
necessarlo
retlrar
OS
dos parafusos de seguranca de
transporte.
Horizontaler Einbau . Horltontal Installation l Installation horizontale de I’appareil l lnstalaclbn
Montaggio orluontale l Horlzontale montage l Horisontell monterlng l Montagem horizontal
horizontal
InstruG6
l
Page 7

Vertikaler Einbau l Vertical Installation l Installation verticale l Instalaci6n vertical l Montaggio verticale l
Vertikale montage l Vertikal montering l Montagem vertical
---------
1
f
Hhgender
Hangende montage l
Einbau l Suspended Installation l Installation suspendue l Montaggio sospeso l
HIngande
//,,
montering l Montagem suspensa
D
Page 8

Winkeleinstellschalter
Angle adjustment switches
Commutateurs de reglage d’angle
Conmutadores de adjuste de
lnterruttori di regolazione dell’angolatura
Vinkelinst~llningsomkopplare
Schakelaars voor installatiehoek
Interruptor de adjuste do
Angulo
Bngulo
Einbauwinkel
Installation angle
Angle d’installation
Angulo de
Angolo di installazione
Monteringsvinkel
lnstallatiehoek
Angulo de instalacao
Winkeleinstellschalter-Position
Angle adjustment switch position
Posrtion
Posrcion
Postzrone
Vinkelinstallingsomkopplare-position
Stand van de schakelaar overeenkomstig met de
rnstallatrehoek
Pos@o para OS interruptores de ajuste do angulo
4nschluO
1
1
,
b
.
.
.
instalacion
des cotateurs de reglage d’angle
de
10s
conmutadores de ajuste de angel0
interruttore di regolazione
l
Connection l Raccordement l Conexibn
FUr
die Dauer der Montage und des Anschlusses ist der Minuspol der Batterie abzuklemmen. Hierbei
weise des Kfz-Herstellers
I
.
tutta
la durata
quest0
do veiculo
a
darauf achten,
pole negatif
vehicule (airbag,
vehicule
delle
intervento bisogna attenersi
(airbag, alarminstallaties,
farddator, startsparr). Var noga med
de no
daiiar
nao
danificar quaisquer
A
Disconnect the vehicle battery’s negative terminal before making connections. Be sure to observe the safety notes of the automobile
manufacturer (airbags, alarm systems, on-board computers, immobilisers). Before drilling holes, look to see what is on the other side
making holes into the battery, wiring looms or fuse box is not recommended!
Debrancher le
du fabricant du
elements du
Per
effettua
bloccaggio di avvio). Quando si trapano
dei fusibili).
Tijdens de montage en de aansluiting moet de minpool van de accu
autofabrikant
geen onderdelen van de auto (accu, kabels, zekeringskasten) beschadigd
Under monterings- och inkopplingstiden
alarmanlaggning,
Desconecte el terminal negativo de la bateria del vehfculo antes de hater las conexiones. Observe las informaciones de seguridad del
fabricante del vehiculo (con
asegurese
Durante o tempo da montagem e da
construtor
atencao
dal3
de la batterie pendant les operations de montage et de branchement. Prendre note des indications de
(batterie, cable,
operazioni di montaggio e di allacciamento il polo negativo
respect0
ningunas panes del
(airbag,
sistemas anti-roubo, computadores de bordo, sistemas imobilizadores). Na furagem de buracos, dar
(Airbag,
keine Fahrzeugteile (Batterie, Kabel, Sicherungskasten)
alarmes, ordinateur de bord, dispositifs de
boite a
fusibles) ne
alle
fori
bisogna fare attenzione a non danneggiare
boordcomputer, wegrijbeveiliging) in
skall
a
airbags,
vehiculo
ligacao,
desapertar o terminal do borne negativo da bateria. Seguir as
peoas
do
vefculo
rD
Alarmanlagen, Bordcomputer, Wegfahrsperren) zu beachten. Beim
note di sicurezza del fabbricante d’auto
bilbatteriets minuspol vara
sistema de
(bateria, cableado,
(bateria,
O”-5”
-LJ@J!
&
l
solent
att
inga delar i bilen (batten, ledningar,
T
1"
Allacciamento l Aanslulting l Anslultnlng l Conextio
pas endommages.
worden
alarma,
ordenador de a bordo, inmovilizador). Antes de taladrar agujeros,
cabos,
caixa de fusiveis).
blocage
della
ontkoppeld. Hierbij
acht worden
worden.
lossad.
Beakta biltillverkarens
caja
de fusibles).
40’-50”
-I
&x
beschadigt
des roues). En
batteria deve rimanere distaccato. Quando si
(airbag,
nossun element0
genomen. Let er bij het boren van gaten op dat
,
jD
werden.
percant
impianto di allarme, computer di bordo,
moeten
de veiligheidsvoorschriften van de
sakringshbllare)
des
di veicolo (batteria,
sakerhetsanvisningar (airbag,
skadas vid borming av
instrucoes
85’-90”
00%
sind
die
Sicherheltshin-
Bohren
von
trous,
veiller ace que les
de
seguranca
II
Lochern
cave, scatok
-
securite
hal.
do
Page 9

ies de montagem
Bei
der
hangenden
-
Wahlen
-
Achten Sie darauf,
When the unit is to be installed under the backshelf or in the trunk, note the following:
-
Choose the mounting location carefully so that the unit can be installed horizontally.
-
Make sure that the unit does not hinder the movement of the torsion bar spring etc. of the trunk flap.
Si I’appareil doit etre installe sous le plateau arriere ou dans le coffre, par exemple, prendre d’abord les precautions suivantes.
-
Bien choisir I’emplacement pour pouvoir installer I’appareil a I’horizontale.
-
Verifier que I’appareil ne gene pas le mouvement du ressort du
Cuando desee instalar la unidad en la bandeja trasera o dentro del portaequipajes, tenga en cuentra lo siguente:
-
Elija cuidadosamente el lugar de montaje de forma que la unidad pueda instalarse horizontalmente.
-
Cerciorese de que la unidad no impida el movimiento del resorte de la barra de torsion, el brazo etc., de la tapa dsl
portaequipajes.
Nel case di un montaggio sospeso sotto il ripiano posteriore oppure nel vano bagagli osservare le seguenti misure di sicurezza:
-
Scegliere con
-
Fare attenzione al fatto,
Montage unter der Heckablage oder im Kofferraum beachten Sie folgende VorsichtsmaBnahmen:
Sie den Befestigungsort so
daR
die Einheit die Federn, den Arm usw. des Kofferraumdeckels nicht behindert.
cura il
luogo di fissaggio in modo
the
I’apparecchio non ostacoli le molle, il braccio
aus, daB
die Einheit horizontal montiert werden kann.
capot,
entre autres.
._
the
I’apparecchio possa essere montato in posizione orizzontale.
etc.
del coperchio del portabagagli.
Bij montage
wisselaar horizontaal gemonteerd kan worden.
-
De wisselaar mag de vrije beweging van veren/armen van achterklep of kofferdeksel niet belemmeren.
Nar vaxlare monteras hangande under hatthyllan
-
Valj
-
Se noga till &I att bagageluckans fjadrar
No case de uma montagem suspensa sob o
-
Escolha o local de fixacao atenciosamente para que a unidade possa ser montada horizontalmente.
-
Atencao para que a unidade
, Winkeleinstellschalter l Angle adjustment switches l Commutateurs de
gngulo
Interruptor de adjuste do
.
Die Winkeleinstellschalter an der Seite mijssen entsprechend des Einbauwinkels des CD-Autowechslers eingestellt werden.
Beide Schalter werden auf die gleiche Position eingestellt. Wenn die Schalter nicht richtig eingestellt sind,
Tonausfalle und andere Fehlfunktionen eintreten.
.
The angle adjust switches at the side part are to be set in accordance with the installation angle of the automatic CD
changer. Set both switches to the same position..lf the switches are not set correctly, audio failures and other malfunction
may occur.
.
Les commutateurs de reglage d’angle qui se trouvent sur le panneau du fond doivent etre places dans la position
correspondant a I’angle d’installation du changeur de CD. Les deux commutateurs doivent etre dans la meme position. Si
ces commutateurs ne sont pas convenablement regles, il peut y avoir des rates de son ou d’autres problemes de
fonctionnement.
.
Gli interruttori di regolazione dell’angolatura del pannello posteriore , disposti lateralmente, vengono regolati sull’angolo di
installazione del cambia CD automatic0 Ambedue si devono trovare nella stessa posizione. Se non fossero rego lati bene,
la riproduzione potrebbe ,,saltare“ o si potrebbero avere altri errori di funzionamento.
.
De schakelaars
geanstalleerd te worden gesteld. Druk beide schakelaars in dezelfde stand. lndien de schakelaars niet in de juiste stand zijn
gedrukt, zal het geluid mogelijk ,,overspringen“ of het toestel anderzijds niet juist funktioneren.
.
Vinkelinstallningsomkopplarna, pa sidan, maste stallas in pa den position som vaxlaren skall monteras i. Bada omkopplarna
maste stallas pa samma position. Om omkopplarna ej stalls i ratt
upptrada.
.
Los conmutadores de ajuste de angulo ubicados en el panel lateral deberan ajustarse segtin el angulo de instalacion del
cambiador de discos compactos automatico. Ponga ambos conmutadores en la misma
mal ajustados, el sonido saltara o podra producirse un mal funcionamiento.
.
OS
automatico. Coloque OS dois interruptores na mesma posicao. Se OS interruptores estiverem mal ajustados, poderaocorrer
hangend
noga platsen sa att vaxlaren hanger horisontellt.
l lnterruttori di regolazione dell’angolatura l
interruptores de ajuste do angulo situados na lateral, devem ajustar-se
salto de som ou outro problema de funcionamento.
onder de hoedenplank (of anderszins in de kofferruimte) de inbouwplaats zo kiezen dat de
eller
i bagageutrymmet
eller
stag ej hindras.
porta-chap&
nao
impessa as molas e o
dngulo
aan
de zijkant dienen in overeenstemming met de hoek waarin de automatische CD-wisselaar is
ou na mala, observe as seguintes medias de seguranca:
braco
da mala.
VinkelinstSillningsomkopplare
Iage
air
det viktigt att tanka pa foljande:
.
reglage
kan ljudbortfall och andra funktionsstorningar
d’angle l Conmutadores de adjuste de
l Schakelaars voor installatiehoek l
kdnnen
Segundo
position.
o angulo de instalacao do CD-Changer
Si
10s
conmutadores
estan
%
 Loading...