

Page 1
CAR MULTIMEDIA
ALICE SPRINGS 500
Operating and Installation Instructions
Page 2

CAUTIONS
Safety Notes
This car radio has been manufactured according to
established safety guidelines. However, dangers may still
occur if the safety notes in this manual is not observed.
This manual is intended to familiarize the user with the
car radio’s important functions. Read this carefully, prior
to using the car radio. Keep this manual in an easily
accessible location. In addition, do observe the
instructions of the devices used in conjunction with this
car radio
Road Safety
Always observe the following notes for road safety:
•
Car radio must be used in a way that compliments
safety of the user when driving the vehicle. It is
recommended for the user to park at an appropriate
location when operating the car radio. While
driving, user is not recommended to use
applications that can be prone to distraction e.g.
streaming to medias etc.
•
Radios with Navigation : User is recommended to
proceed with proposed driving routes only if it does
not violate any trac regulations. Local trac signs
and regulations always prevail over the routes
proposed.
•
User is advised to keep the volume of the car radio
to a moderate level for the protection of the ears
and to increase the ability to hear any emergency
warning signals (e.g. police and ambulance sirens).
Do not increase the car radio volume while the car
radio is muted as it is not audible. The car radio
volume can be too loud when the car radio is
unmuted.
General Safety Notes:
Observe the following for protection against injuries:
•
This car radio is intended for installation and
operation in a vehicle with 12V vehicle system
outage, hence the radio unit must be installed in a
DIN slot. Observe the output limits of the car radio.
Do not dismantle or modify the car radio.
Installation and repairs, if necessary, should be
performed by a specialist. We are not liable for any
loss or damage caused or resulting from
unauthorized disassembly or modication to the
product.
•
This car radio’s core components may result to
damage when the car is driven on bumpy roads for
a prolonged period of time or if it is used to play
non-standard or severely damaged discs.
•
Please do not operate the car radio under extreme
temperature conditions (extremely high
temperature or extremely low temperature); make
sure that temperature within the car ranges from
-20°C to 80°C before you connect the car radio to
the power supply.
•
For abnormalities, please refer to the
“Troubleshooting” section. If the problem cannot be
resolved, please press the Reset button to recover
its factory settings. Otherwise, please contact
respective installer/seller directly for help.
•
As SD/USB le formats, codecs, bitrate, resolution
and other parameters available in the market are
not all the same, there is no guarantee that this car
radio can play all media le formats.
•
Dierent cars may have dierent congurations. It is
normal that some CAN-Bus functions cannot be
enabled because it is not supported by the user’s
car or this car radio.
•
Solvents, cleaning and scouring agents as well as
dashboard spray and plastics care products may
contain materials which can damage the surface
and screen of the car radio. Use only dry or slightly
moistened cloth to clean the car radio surface and
screen.
This manual may be updated from time to time without
any notice.
Disclaimer
In no event shall Blaupunkt be liable for any direct,
indirect, punitive, incidental, special consequential
damages to property or life and whatsoever arising out
of or connected with the use or misuse of our products.
USA & CANADA: This product is not intended for sale in
the United States and Canada. If purchased in the U.S. or
Canada, this product is purchased on as-is basis. No
warranty, whether expressed or implied is provided in
the U.S. or Canada.
1
Page 3
CAUTIONS
Disposal Notes
Do not dispose of your old unit in the
household trash!
Use the return and collection systems
available to dispose of the old device.
Radios with Detachable Panel - Damage to the
control panel
Never drop the control panel.
•
Transport the control panel so that it is protected
•
against impacts and the contacts cannot become
dirty.
Do not expose the control panel to direct sunlight
•
or another heat source.
Avoid direct skin contact
•
Scope of Delivery
Car sound system
•
Operating / installation instructions
•
Remote control (include battery)
•
Connecting cable
•
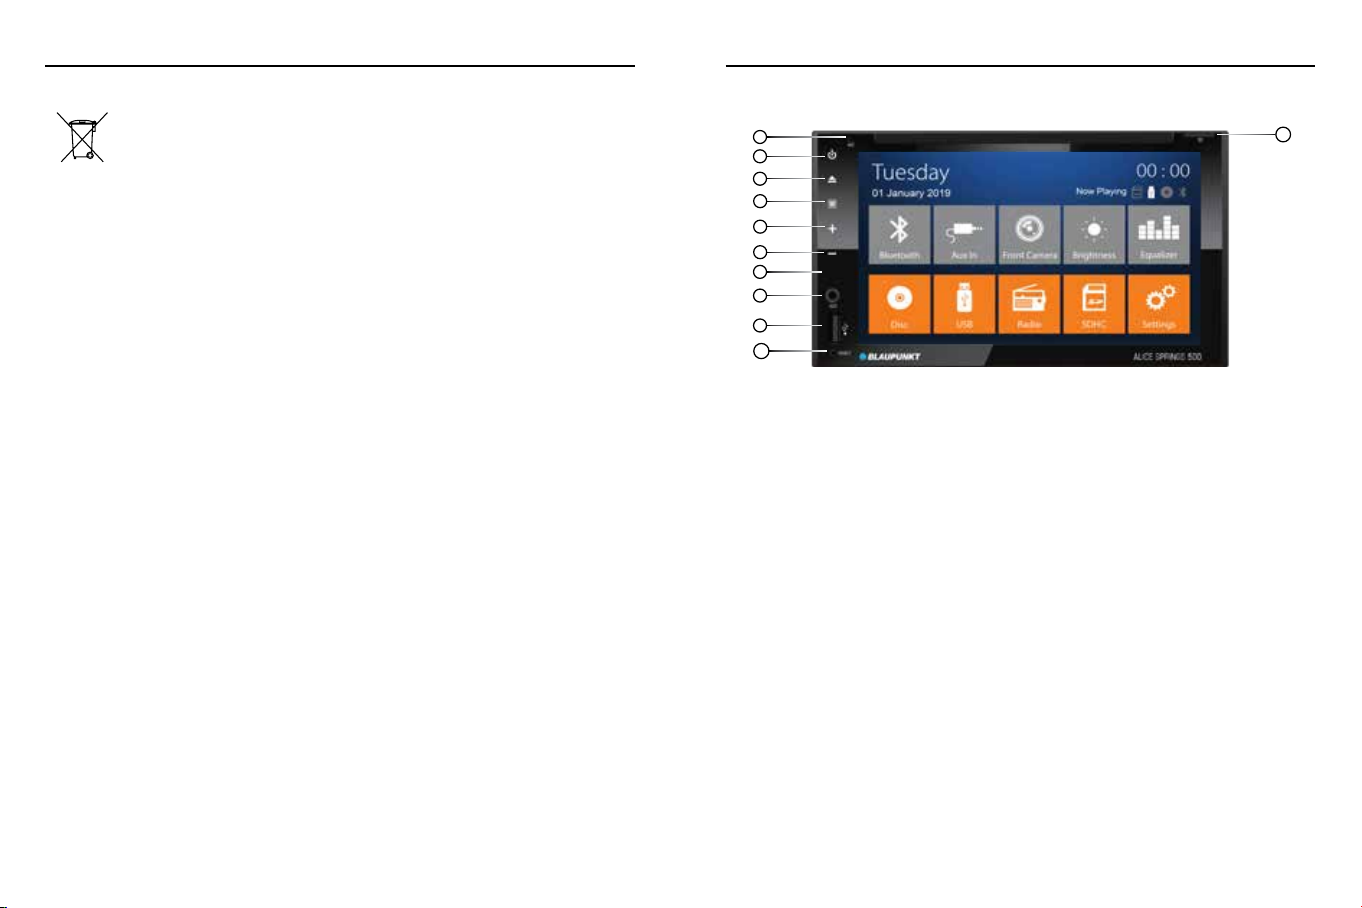
KEY FUNCTIONS
1
2
3
4
5
6
7
8
9
10
Functions
Microphone
1
Power Button
2
• Press and hold turn on or turn o
• Press to mute or unmute
3
Eject
4
Home Page
5
Increase Volume
6
Decrease Volume
7
IR
8
AUX IN
9
USB
10
RESET Button
11
MicroSD Card Slot
11
2
3
Page 4

REMOTE CONTROL
REMOTE CONTROL
1
2
3
4
5
6
7
8
9
10
11
12
13
14
15
Press to switch between media RADIO-DISC-USB-
1
SD-AUXIN
•
2
Press to turn on or o
•
Press to switch between media RADIO-DISC-USBSD-AUXIN
Up button
3
•
4
Radio mode : Press to select radio band FM1-FM2FM3-AM1-AM2. Press and hold for automatic radio
stations scan and save
•
Playback mode :
- Band : Press to enter manual selection
- System : Press to switch the system
Press to Enter to select the preferred option
5
Left button
6
Down button
7
8
•
16
17
18
19
20
21
22
23
24
25
26
27
28
29
30
31
Playback mode :
- Replay : Press to repeat the track/ chapter
- Stop : Press to stop
9
Playback mode :
•
- Stereo : Press to switch between mono or stereo
mode
- Programme : Press to select the programme
10
•
Playback mode :
- Automatic music search : Press and hold to search
stations
- Repeat : Press to repeat 1/All
11
•
Radio mode : Press to decrease radio frequency
manually. Press and hold to decrease radio
frequency automatically
•
Playback mode : Press to skip to previous track/
chapter. Press & hold to fast reverse current track.
12
•
Playback mode :
- Localizer : Switch between Local (reduce receiv
ing sensitivity when searching stations) or Remote
(receive weak stations signal) searching.
- Random : Press to turn on or o shue play
13
Press to enter on screen display
14
Playback control mode : Press to go to main menu
(subject to media le’s setting)
15
Digit button
16
Pause/Play
17
Mute/ Unmute
18
Press to go to title (subject to media le’s setting)
19
Press to select the media’s subtitle (subject to
media le’s setting)
20
Right button
21
Press to go to setting
22
Press to change the viewing angle (subject to media
le’s setting)
-
Press to slow play the track/chapter
23
Increase volume
24
Press to adjust screen ratio
25
•
Press to access to BAS/ TRE/ BAL/ FAD setting
26
•
Press to conrm option
•
Radio mode : Press to increase radio frequency
27
manually. Press and hold to increase radio frequen
cy automatically
Playback mode : Press to skip to next track/
•
chapter. Press & hold to fast forward current
track.
Decrease volume
28
Press to select audio sound track
29
Press to skip to next 10th track/ chapter
30
Press to fast search track by entering desired
31
track number
-
4
5
Page 5

OPERATION
HOME PAGE
BLUETOOTH
•
Pre-pair Bluetooth
Ensure mobile phone supports Bluetooth function
before pairing. Dierent mobile phone will have
dierent emissive power. To get the best
connection, the recommended distance range is
3m without any object obstruction.
•
Pairing
•
Turn on mobile phone’s Bluetooth to set up.
(Please refer to the instruction manual of the
mobile phone on how to operate Bluetooth)
“ALICE SPRINGS 500” should appear on your
available Bluetooth scanning list.
•
Select “ALICE SPRINGS 500” then insert password
“0000”, if password is required. Select conrm but
tons when pairing prompt message appear. will
appear in white colour in the Home Page
when pairing successful.
PHONELINK
Android - Support iOS & Android
•
Pre-pair PhoneLink
iOS : Supported 1 way control
Go to mobile phone’s Settings to turn on the
•
personal hotspot.
Android : Supported 2 way control
Go to mobile phone’s Settings to connect to car
•
radio’s Bluetooth (for audio output) and enable
USB debugging (Please refer to the instruction
manual of mobile phone on how to operate USB
debugging and Bluetooth setting).
•
Pairing
Connect the unit with smartphone using USB
cable. The unit will begin to project smartphone’s
display when pairing successful.
GENERAL
Power supply (12V)
Current consumption
Max. power output
Dimension (WxLxH)
Weight
......................................................................................1.52kg
Operation temperature
Screen size
.......................................................................... 6.2 inch
Resolution
.......................................................... 1024 x 600 pixel
Aspect ratio
FM Stereo Radio
Frequency range
Preset memory stations
AM/MW Radio
Frequency range
Preset memory stations
Audio Specication
Frequency response
Input
CD/ DVD/ VCD/ USB 2.0/ MicroSD
Aux-in
-
Bluetooth
Prole 4.2
6
..................................................................... 4:3 / 16:9
................................................. 87.5 - 108MHz
................................................. 522 - 1620kHz
........................................................................................... RCA
.............................HFP, PBAP, A2DP, AVRCP, HSP, SPP
.............................................10 V ~ 16 V DC
................................................. max. 15 A
.......................................................... 4 x 50W
.....................................178 x 164 x 97mm
........................................ -20°C ~ 60°C
........................................................... 18
........................................................... 12
.............................................. 63Hz-16kHz
...........Audio : MP3, FLAC
Video : AVI, MP4
Image : JPG
TROUBLESHOOTING
If any of the following problem occur, please resort to Troubleshooting for the possible solutions. Consult Blaupunkt
authorized dealer if problem persist.
Problems
Unable to start up
No sound
Dim screen or
black-&-white screen
while playing video
Slow in SD card
reading
No rear-view reverse
image
Unable to search
radio stations
Possible Causes
The car key is not inserted into the
ignition; ignition is o
Power Cable is not inserted into the
main body.
Burnt power fuse .
Drained car battery.
Audio cables are not properly connected
to the unit.
Mute setting is on.
Low volume.
No sound from front, rear, left & right
speakers due to Fade-Balance settings.
Brightness, contrast ratio and color
values are excessively adjusted.
The pixel of the picture le exceeds this
system’s capacity.
SD card may contain corrupted les or
virus.
The rear camera is not appropriately
connected with power supply.
Camera’s signal line not plugged in.
Radio’s antenna is not well inserted.
Solutions
Insert the car key and turn on the ignition.
Insert the power cable.
Replace it with a new fuse.
Charge or replace the car battery.
Ensure proper connection of the audio cables.
Unmute the volume.
Adjust the volume.
Select Equalizer from Home Page to adjust setting.
Ensure brightness, color and contrast ratio values
are in normal range.
Replace it with a new audio/video SD card with
compatible le formats.
Examine the camera’s power supply connectivity.
Insert the camera’s signal line into the interface
port of this unit.
Ensure radio antenna is properly installed.
WIRING DIAGRAM
WIRE
BROWN
GREEN
BROWN
YELLOW
WHITE
WHITE
YELLOW
WHITE
RED
RED
YELLOW
RED
-
-
C
FRONT CAM
SUB
REAR CAM
AUX-V-IN
A-OUT_FL
A-OUT_RL
V-OUT2
AUX-A-IN_L
A-OUT_FR
A-OUT_RR
V-OUT1
AUX-A-IN_R
RADIO ANT
TV ANT
A
B
NO.
WIRE
1
PURPLE
2
GREY
3
WHITE
4
GREEN
5
PURPLE/BLACK
6
GREY/BLACK
7
WHITE/BLACK
8
GREEN/BLACK
NO.
GPSKEY2
1
2
3
5
1
5
4
6
7
8
2
3
4
6
7
8
A
RR+
FR+
FL+
RL+
RRFRFLRL-
C
1
5
9
NO.
WIRE
1
PINK
2
BROWN
3
BLUE
4
RED
5
ORANGE/BLACK
6
YELLOW
7
ORANGE
8
BLACK
2
3
4
6
7
8
10
11
12 13 14
B
BRAKING
KEY
AUTO ANT+
12V+ACC
REAR CAM
BATTERY+
ILL
GND
7
1
2
3
4
5
6
7
8
9
10
11
12
13
14
Page 6

Page 7

Designed and engineered by Blaupunkt Competence Centre
1 104 19 022 29 02
 Loading...