

Page 1
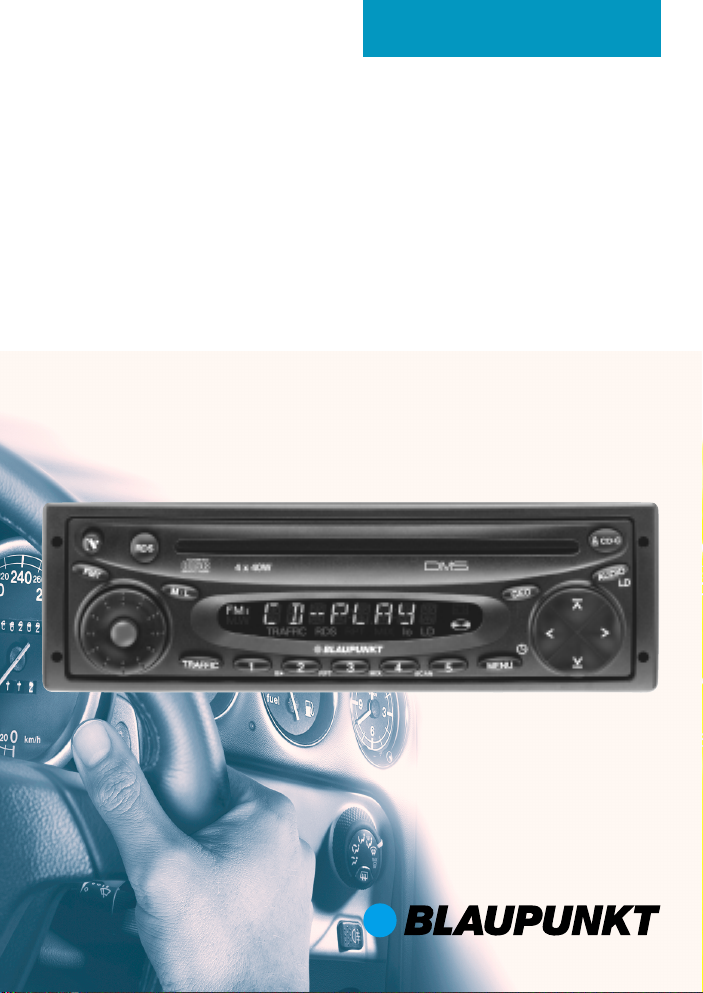
Operating instructions
Radio / CD
Alicante CD30
Kiel CD30
Lausanne CD30
Page 2
DEUTSCH
ENGLISH
5
3
2
4
1
6
14
10
8
FRANÇAIS
ITALIANO
NEDERLANDS
9
SVENSKA
ESPAÑOL
7
11
1213
33
PORTUGUÊS
Page 3

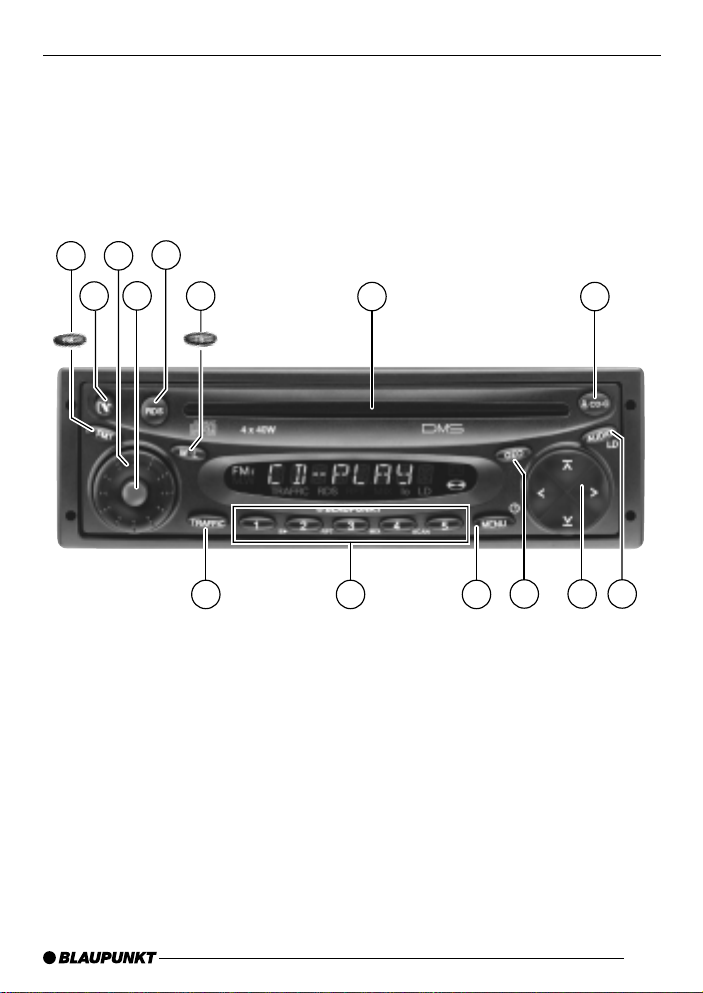
CONTROLS
1 Button to release the control
panel
2 FM button – selects the FM
memory
FMT button – Travelstore (not on
the Kiel CD30)
3 Volume control
4 ON button – switches the unit
on/off
5 RDS button – switches the RDS
function on/off
6 M•L button – selects the MW
and LW frequency ranges
TS button – activates the
Travelstore function on the Kiel
CD30
7 CD compartment
8 CD eject
CD•C button – selects CD, radio
and CD changer (if connected)
sources
9 AUDIO button – sets bass and
treble
LD button – switches the
loudness function on/off
: Arrow buttons
; GEO button – sets balance and
fader
< MENU button – opens the basic
settings menu
= Buttons 1-5
> TRAFFIC button – activates/
deactivates traffic information
standby
22
Page 4

CONTENTS
Important information ............ 24
Road safety ................................... 24
Installation ..................................... 24
Accessories .................................. 24
Guarantee ..................................... 24
International telephone hotline........ 24
Theft protection ..................... 25
Removable control panel ............... 25
Theft protection CODE.................. 26
Switching on/off .................... 27
Volume adjustment ................ 27
Setting the power-on volume ......... 27
Mute setting .................................. 28
Mute while telephoning .................. 28
Radio mode ............................ 28
Switching to radio mode ................ 28
Changing the display ..................... 28
RDS functions (AF, REG) .............. 28
Selecting the frequency range /
memory ......................................... 29
Tuning into a station ....................... 29
Setting the sensitivity of the station
search mode ................................. 29
Storing stations ............................. 30
Storing stations automatically
(Travelstore) .................................. 30
Listening to preset stations ............ 30
Programme type (PTY) .................. 30
Treble reduction feature during
interference (HICUT) ..................... 31
Traffic information reception . 32
Switching traffic information priority
on/off ............................................ 32
Setting the traffic announcement
volume .......................................... 32
Switching off the warning sound .... 33
CD mode ................................ 33
Switching to CD mode .................. 33
Selecting a track ........................... 33
Random play (MIX) ........................ 34
Scanning tracks (SCAN) ............... 34
Setting the scantime ...................... 34
Repeating a track (REPEAT) .......... 34
Pausing playback (PAUSE)............ 34
Changing the display ..................... 34
Traffic announcements in CD mode 35
Ejecting a CD ................................ 35
CD changer mode .................. 35
Switching to CD changer mode..... 35
Selecting a CD.............................. 35
Selecting a track ........................... 35
Changing the display ..................... 35
Repeating individual tracks or
whole CDs (REPEAT).................... 36
Random play (MIX) ........................ 36
Scanning all tracks on all CDs
(SCAN) ......................................... 36
Pausing playback (PAUSE)............ 36
Time (CLOCK) ........................ 37
Displaying the time ........................ 37
Setting the time manually ............... 37
Selecting 12/24-hour clock mode .. 37
Displaying the time when the unit
is off .............................................. 37
Audio settings ........................ 38
Switching loudness on/off ............. 38
Volume distribution settings .. 38
Balance settings ............................ 38
Fader settings ............................... 38
External audio sources .......... 39
Technical data ........................ 39
DEUTSCH
ENGLISH
FRANÇAIS
ITALIANO
NEDERLANDS
SVENSKA
ESPAÑOL
PORTUGUÊS
2323
Page 5
IMPORTANT INSTRUCTIONS
Important information
Before using your car radio, please read
these instructions carefully and familiarise yourself with the unit. Keep these
instructions in your vehicle for later reference.
Road safety
Road saf ety has priority . Only operate your car radio if the road and
traffic conditions allow you to do so.
Familiarise y ourself with the unit before setting off on your journey.
You should always be able hear police, fire and ambulance sirens from
afar . F or this reason, set your car radio’s v olume to a suitable lev el.
Installation
If you want to install your car radio yourself, read the installation and connection instructions that follow these operating instructions.
Accessories
Only use accessories approved by
Blaupunkt.
Remote control
The optional RC 08 remote control allows you to safely access the most impor tant functions from your steering
wheel.
Amplifier
All Blaupunkt amplifiers can be used.
CD changer
Y ou can connect the follo wing Blaupunkt
CD changers:
CDC A 06, CDC A 08, CDC A 072 and
IDC A 09.
Y ou can also connect the CDC A 05 and
CDC A 071 CD changers by using a
special adapter cable (Blaupunkt no.:
7 607 889 093).
Guarantee
The scope of the guarantee is orientated
around the regulations in force within the
country in which the unit was purchased.
Regardless of what the legal regulations
may stipulate, Blaupunkt provides a
twelve-month guarantee.
If you have any questions regarding the
guarantee, please contact your authorised Blaupunkt dealer. The purchase
receipt is accepted as proof of guarantee in all cases.
International telephone hotline
If you have any questions regarding the
operation of your car radio or if you require further information, please do not
hesitate to call us!
The information hotline numbers are
printed on the last page of these instructions.
24
Page 6
THEFT PROTECTION
Theft protection
Removable control panel
As a way of protecting your car radio
against theft, the unit is equipped with
a removable control panel (release
panel). Without this control panel, the
car radio is worthless to a thief.
Protect you car radio against theft by
taking the control panel with you every
time you leav e your vehicle . Do not leav e
the control panel in your vehicle – not
even in a hiding place . The control panel
has been designed to be easy to use.
Note:
● Never drop the control panel.
● Never e xpose the control panel to
direct sunlight or other heat
sources.
● Protect the control panel against
moisture.
● Store the control panel in the
supplied case.
● If the unit was still switched on
when you removed the control
panel, the unit will automatically
switch on with the last settings
activated (i.e. radio, CD or CD
changer mode) when the panel is
replaced.
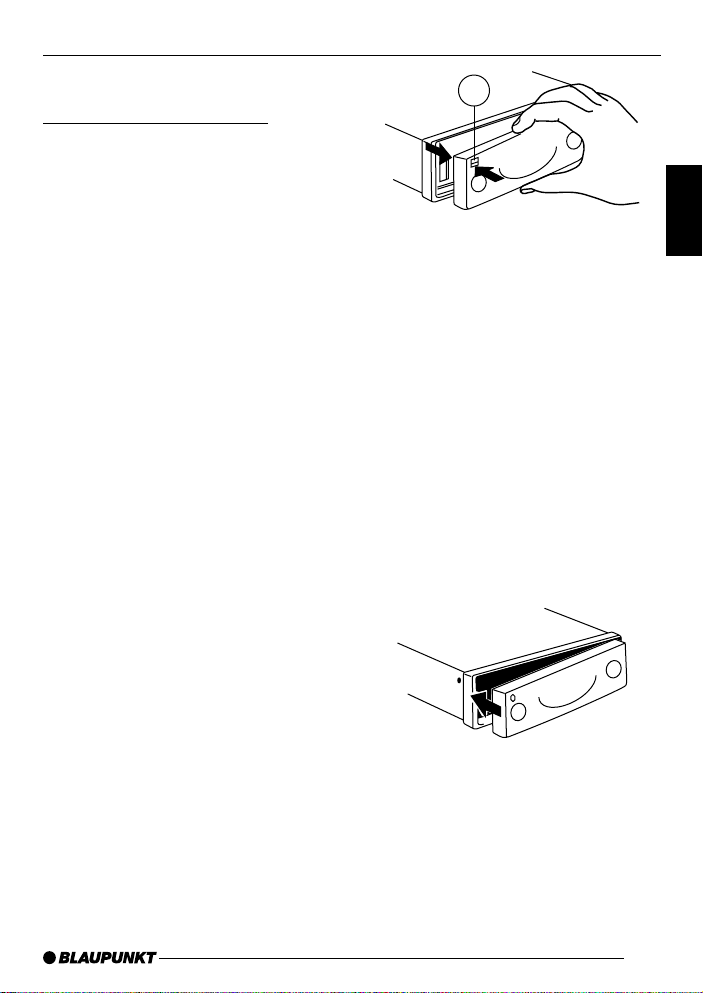
Removing the control panel
➮ Press button 1.
The control panel locking mechanism
opens.
1
➮ First, pull the control panel straight
off the unit and then out tow ards
the left.
● The unit switches off after the
control panel is removed.
● The current settings are saved.
● Any CD already inserted in the unit
remains there.
Attaching the control panel
➮ Slide the control panel from left to
right into the unit’ s panel locking
mechanism.
➮ Press the left-hand edge of the
control panel into the unit until it
clicks into place.
Note:
● When attaching the control panel,
make sure y ou do not press the
display.
DEUTSCH
ENGLISH
FRANÇAIS
ITALIANO
NEDERLANDS
SVENSKA
ESPAÑOL
PORTUGUÊS
2525
Page 7

THEFT PROTECTION
Theft protection CODE
As a way of protecting your car radio
against theft, the system features a fourdigit code. You ha ve to enter this number
every time the unit is disconnected from
your vehicle’ s electrical power supply.
As a factory default, the code entry request function is deactivated. Ho wev er ,
you do have the option of activ ating this
function.
The numerical code is printed on the
pass card supplied with your unit.
Note:
Never keep your radio’s pass card in
your vehicle!
Activating/deactivating the code
In order to activate/deactivate the code
request function, proceed as follows:
➮ Press the ON button 4 to switch
off the unit.
➮ Press station buttons 1 and 4 = at
the same time.
➮ Keep these station b uttons pressed
while switching the unit on by
pressing the ON button 4.
➮ Keep station buttons 1 and 4 =
pressed until “PUNKT” appears in
the display.
➮ Release the station buttons.
The code request function is now activated.
➮ Follow the same procedure to
deactivate the code request
function.
Note:
To prevent unauthorised persons from
deactivating the code, you will have to
enter the numerical code in order to
deactivate the code request function.
Entering the code
➮ Switch on the unit.
“CODE” appears in the display first of
all and is followed by four zeros.
➮ Keep pressing station button 1 =
until the first number of your code
appears in the display.
➮ Keep pressing station button 2 =
until the second number of your
code appears in the display.
➮ Keep pressing station button 3 =
until the third number of your code
appears in the display.
➮ Keep pressing station button 4 =
until the f ourth number of your
code appears in the display.
➮ Once the correct code is displayed,
press the
Note:
If the code is entered incorrectly three
times, you will have to wait for a fixed
time period. “WAIT 1 H” appears in the
display. The unit must remain switched
on during this hour.
or button :.
26
Page 8

VOLUME ADJUSTMENTSWITCHING ON/OFF
Switching on/off
There are various wa ys of switching the
unit on/off .
● Switching on/off using the vehicle
ignition.
If the unit is correctly connected to the
vehicle’s ignition, it will s witch on/off simultaneously with the ignition.
You can also switch the unit on even if
the ignition is off.
➮ To do so, press button 4 until the
unit turns on.
Note:
To protect the vehicle battery, the unit
will switch off automatically after one
hour.
● Switching on/off using the remov-
able control panel.
➮ Remove the control panel.
The unit switches off.
➮ Attach the control panel again.
The unit switches on. The settings (radio, CD or CD changer) that were set
before the unit was switched off will be
reactiv ated.
● Switching on/off using button 4.
➮ To switch the unit on, press button
4.
➮ To switch the unit off, press button
4 for longer than two seconds.
Volume adjustment
The system volume can be adjusted in
steps from 0 (off) to 66 (maximum).
➮ To increase the system volume,
turn the volume control 3 to the
right.
➮ To decrease the system volume,
turn the volume control 3 to the
left.
Setting the power-on volume
You can set the unit’s default pow er-on
volume.
➮ Pressing the MENU < button.
➮ Press the : button.
“ON VOLUME” appears in the display.
➮ Set the power-on volume using the
and buttons :.
To assist you in setting the power-on
volume, the volume will change in response to the changes you make.
If you set the power-on volume to 0:
every time you turn the unit on, the
power-on volume will be the same as
the volume lev el that was set before the
unit was last switched off.
Risk of serious injury.
If the power-on volume is set to maximum, the volume level can be very
high when the unit is switched on.
If the volume was set to maximum
before the unit was s witched off and
the power-on volume is set to 0, the
volume lev el can be very high when
the unit is switched on again.
This can cause hearing damage.
DEUTSCH
ENGLISH
FRANÇAIS
ITALIANO
NEDERLANDS
SVENSKA
ESPAÑOL
PORTUGUÊS
2727
Page 9

VOLUME ADJUSTMENT RADIO MODE
➮ When you have finished making
your changes, press the MENU
button <.
Mute setting
This feature allows you to instantaneously reduce the system volume (mute).
➮ Press button 4.
Setting the mute level
You can set the unit’s mute level.
➮ Pressing the MENU < button.
➮ Keep pressing the button :
until “MUTE LEVEL” appears in the
display.
➮ Set the mute level using the and
buttons :.
➮ When you have finished making
your changes, press the MENU
button <.
Mute while telephoning
If your car radio is connected to a mobile telephone, the unit’s volume will be
muted as soon as you “pic k up” the telephone. In order for this to work, the
mobile telephone has to be connected
to the car radio in the manner described
in the installation instructions.
If a traffic announcement is received
during a telephone call and traffic information priority has been activated, the
traffic announcement will be played. For
further details, read the chapter entitled
“Traffic information reception”.
The volume will be muted according to
the set mute level.
28
Radio mode
This unit is equipped with an RDS radio
receiver. Near ly all receivable FM stations transmit a signal that not only carries the programme but also additional
information such as the station name
and programme type (PTY).
The station name appears in the display as soon as it is received. The programme type can be displayed if required. Read the section entitled “Programme Type (PTY)” for further details.
Switching to radio mode
If you are in CD or CD changer mode:
➮ Keep pressing the CD•C button 8
until “RADIO” appears in the
display.
Changing the display
➮ To briefly display the time, press
the MENU button < until the time
appears in the display.
RDS functions (AF, REG)
The RDS functions – AF (Alternative
Frequency) and REG (Regional) – extend your radio’s range of functions.
● AF: If this RDS function is acti-
vated, the unit automatically carries
out a backg round search for the
best receivable frequency for the
station that is currently set.
● REG: Some radio stations set
aside some of their broadcasting
time for regional programmes that
provide different regional content.
You can use the REG function to
prevent the car radio from switching to alternative frequencies that
Page 10

RADIO MODE
are transmitting different programmes.
Note:
REG has to be additionally activated/
deactiv ated in the unit’s menu.
Switching REG on/off
➮ Press the MENU button <.
➮ Keep pressing the button :
until “REG” followed by “ON” or
“OFF” appears in the display.
➮ To switch REG on/off, press the
or button :.
➮ Press the MENU button <.
Switching the RDS function on/off
➮ To use the RDS functions (AF and
REG), press the RDS button 5.
The RDS functions are active when
“RDS” lights up in the displa y . When the
RDS functions are switched on, “REG
ON” or “REG OFF” appears briefly in
the display.
Selecting the frequency range /
memory
This unit can receive programmes
broadcast over the UKW (FM), MW and
L W frequency ranges (MW and L W are
not av ailable on the Kiel C30). There are
three preset memory levels for the FM
range and one for each of the MW and
L W ranges . Fiv e stations can be stored
on each memory level.
Selecting the UKW (FM) memory
➮ Press the FMT or FM 2 button to
switch between the various UKW
memory levels.
Selecting the MW and LW memory
➮ Press the M•L 6 button to switch
between the MW and LW memory
levels .
Tuning into a station
There are various methods available f or
tuning into a station.
Automatic station search mode
➮ Press the or button :.
The unit tunes into the next receivable
station.
Setting the sensitivity of the
station search mode
Y ou can configure the radio to only tune
into stations with a strong reception or
to also tune into those with a weak reception.
➮ Press the MENU button <.
➮ Keep pressing the : button
until “SENS” appears in the display.
➮ Press the button :.
The display shows the currently set
value for sensitivity. “SENS HI6” means
that the tuner is highly sensitive. “SENS
LO1” means it is set to the lowest sensitivity setting. If “SENS LO” is selected,
“lo” lights up in the displa y.
➮ Set the required sensitivity using
the
and buttons :.
➮ When you ha ve finished making
your changes, press the MENU
button <.
DEUTSCH
ENGLISH
FRANÇAIS
ITALIANO
NEDERLANDS
SVENSKA
ESPAÑOL
PORTUGUÊS
2929
Page 11

RADIO MODE
Tuning into stations manually
You can also tune into stations manually.
➮ Press either the or button :.
Note:
You can only tune into stations manually if the RDS function is first deactivated.
Browsing through broadcasting
networks (only FM)
If a radio station provides several programmes, you hav e the option of browsing through its so-called “broadcasting
network”.
➮ Press the or button : to
move to the next station on the
broadcasting network.
Note:
If you want to use this feature, the RDS
function must first be activated.
You will then only be able to switch to
stations that you have received once
already. To do so, use the Travelstore
function or allow the automatic station
search function to run once through the
entire frequency range.
Storing stations
Storing stations manually
➮ Select the required memory (i.e.
FM1, FM2 or FMT (only for FM)) or
select the required frequency
range.
➮ Tune into the station.
➮ Press one of the station buttons 1-
5 = for longer than one second to
store the station to that button.
30
Storing stations automatically
(Travelstore)
Y ou can automatically store the fiv e stations with the strongest reception in the
region (only FM).
The stations are stored in the FMT
memory.
Note:
Stations that were previously stored in
this memory are deleted in the process.
➮ Keep the FMT button 2 pressed
for longer than two seconds or
briefly press the TS button 6 on
the Kiel CD30.
The automatic station storing procedure
begins. “T-STORE” appears in the display . After the process is completed, the
station stored in FMT memory location
1 will be played.
Listening to preset stations
➮ Select the memory in which the
station was stored.
➮ Press the preset station button of
the station you want to listen to.
Programme type (PTY)
Besides transmitting the station name,
some FM stations also provide information on the type of programme they are
broadcasting. For example, the programme types can be:
CULTURE TRAVEL JAZZ
SPORT NEWS POP
ROCK CLASSICS
Using the PTY function, you can directly
select stations of a particular programme type.
Page 12

RADIO MODE
As soon as a station is received corresponding to the programme type you
have selected, the radio unit automatically switches to that station from the
currently tuned station or from CD
mode / CD changer mode.
Switching PTY on/off
➮ Press the MENU button <.
“MENU” appears in the display.
➮ Keep pressing the button :
until “PTY ON” or “PTY OFF”
appears in the display.
➮ Press the or button : to
switch PTY on (ON) or off (OFF).
➮ Press the MENU button <.
Selecting a programme type and
starting a search
➮ Press the or button :.
The current programme type appears
in the display.
➮ If you want to select another
programme type you can do so by
pressing the
or button :
whilst in this display.
Or
➮ Press one of the buttons 1-5 = to
select a programme type that is
stored on one of these buttons.
The selected programme type is displayed briefly.
➮ Press the or button : to start
the search.
The next station corresponding to your
selected programme type will be tuned
into.
Note:
If no station is found that corresponds
to the selected programme type, you will
hear a beep sound and “NO PTY” appears briefly in the display. The station
that was listened to last will then automatically be tuned into again.
Storing a programme type on a
station button
➮ Select a programme type using the
or button :.
➮ Press the required button 1 - 5 =
until you hear a beep sound.
The programme type is now stored on
the station button 1 - 5 = y ou selected.
Selecting the PTY language
You can set the language in which you
want the programme type to appear .
➮ Press the MENU button <.
“MENU” appears in the displa y.
➮ Keep pressing the button :
until “PTY LANG” appears in the
display.
➮ Press the or button : to
select German, English or French.
➮ When the language you require
appears in the display, press the
MENU button <.
Treble reduction feature during
interference (HICUT)
The hicut function improves the sound
during poor radio reception. If interference occurs, the treble is automatically
reduced.
DEUTSCH
ENGLISH
FRANÇAIS
ITALIANO
NEDERLANDS
SVENSKA
ESPAÑOL
PORTUGUÊS
3131
Page 13

TRAFFIC INFORMATIONRADIO MODE
Switching hicut on/off
➮ Press the MENU button <.
“MENU” appears in the display.
➮ Keep pressing the button :
until “HICUT” appears in the
display.
➮ Press the or button : to
switch HICUT on/off.
“HICUT 0” means that treble will not be
reduced; “HICUT 1” means that treble
will be reduced.
➮ Press the MENU button <.
Traffic information
reception
Switching traffic information
priority on/off
➮ Press the TRAFFIC button >.
Priority for traffic announcements is activated when “TRAFFIC” lights up in the
display.
Note:
You will hear a warning sound:
● if you leave the reception area of a
traffic inf ormation station that you
are currently listening to.
● if, while listening to a CD, you leave
the reception area of a traffic
information station that you are
tuned into and the subsequent
automatic search cannot find a
new traffic inf ormation station.
● if you retune the radio from a traffic
information station to a station that
does not broadcast traffic information.
If you hear the warning sound, you can
either switch off traffic information priority or tune into a station that broadcasts traffic information.
Setting the traffic
announcement volume
➮ Press the MENU button <.
➮ Press the button : until “TA
VOLUME” appears in the display.
➮ Set the required announcement
volume using the
:.
and buttons
32
Page 14

TRAFFIC INFORMATION CD MODE
➮ When you have finished making
your changes, press the MENU
button <.
Switching off the warning sound
➮ Press the MENU button <.
“MENU” appears in the display.
➮ Press the button : until “BEEP
ON” appears in the display.
➮ Press the button :.
The displa y changes to “BEEP OFF”.
➮ Press the MENU button <.
CD mode
You can use this unit to play standard
CDs with a diameter of 12 cm.
Risk of damage to CD drive!
So-called “CD singles” with a diameter of 8 cm and contoured CDs
(“shape CDs”) are not suitable for
playback in this unit.
We accept no liability for any damage to the CD drive that may occur
as a result of the use of unsuitable
CDs.
Switching to CD mode
● If no CD is inserted in the drive.
➮ Gently insert the CD with the
printed side uppermost into the CD
compartment until you feel some
resistance.
The CD will be drawn automatically into
the drive.
Do not use force when inserting the CD.
You must not hinder or assist the drive
as it draws the CD in. Once inserted,
CD playback begins immediately.
● If a CD is already inserted in the
drive.
➮ Press the CD•C button 8 until
“CD” appears in the display.
Playback begins from the point at which
it was last interrupted.
DEUTSCH
ENGLISH
FRANÇAIS
ITALIANO
NEDERLANDS
SVENSKA
ESPAÑOL
Selecting a track
➮ Press the or button : to
select the next or previous track.
If the
button : is pressed once, the
current track will be heard again from
the beginning.
3333
PORTUGUÊS
Page 15

CD MODE
Random play (MIX)
➮ Press button 4 (MIX) =.
MIX lights up in the display. The next
randomly selected track will then be
played.
Stopping MIX
➮ Press button 4 (MIX) = again.
MIX disappears from the display.
Scanning tracks (SCAN)
You can briefly play all the tracks on a
CD.
➮ Press button 5 (SCAN) =.
Note:
You can set the scanning time.
Stopping SCAN and continuing
playback
➮ To stop scanning, press b utton
5 (SCAN) = again.
The current track will then continue to
be played.
Setting the scantime
➮ Press the MENU button <.
“MENU” appears in the display.
➮ Keep pressing the button :
until “SCANTIME” appears in the
display.
➮ Set the required scantime using
the
and buttons :.
➮ When you have finished making
your changes, press the MENU
button <.
Repeating a track (REPEAT)
➮ If you want to repeat a trac k, press
button 3 (RPT) =.
RPT appears in the display. The trac k is
repeated until you deactivate RPT.
Stopping REPEAT
➮ If you want to stop the repeat
function, press button 3 (RPT ) =
again.
RPT disappears. Normal playback is
then continued.
Pausing playback (PAUSE)
➮ Press button 2 =.
“PAUSE” appears in the display.
Cancelling pause
➮ Press button 2 = while in
pause mode.
Playbac k is continued.
Changing the display
To change the display between CD
number and playing time:
➮ Press the MENU button <.
“MENU” appears in the displa y.
➮ Keep pressing the button :
until “CDC DISP” appears in the
display.
➮ Press the button :.
The current setting is displayed.
“TIME” stands for the playing time and
“CD NO” for the CD number display.
➮ Selected the required setting using
the
button :.
➮ Press the MENU button <.
34
Page 16

CD CHANGER MODECD MODE
Traffic announcements in CD
mode
➮ If you want to receive traffic
announcements whilst listening to
a CD, press the TRAFFIC b utton
>.
Traffic announcement prior ity is active
when TRAFFIC lights up in the displa y.
Ejecting a CD
To remove a CD from the unit:
➮ Press the CD•C button 8 until the
CD is ejected.
You must not hinder or assist the drive
while it is ejecting the CD. If you do not
remove the CD from the compartment
within 20 seconds, the CD will be automatically drawn back into the unit.
CD changer mode
Note:
Information on handling CDs, inserting
CDs and operating the CD changer can
be found in the operating instructions
accompanying your CD changer.
Switching to CD changer mode
➮ Keep pressing the CD•C button 8
until “CHANGER” appears in the
display.
Playback is started using the first CD
that the CD changer detects.
Selecting a CD
➮ To move up/down from one CD to
another , press the
: (on the rocker switch) once or
several times.
Selecting a track
➮ To move up/down from one track to
another on the current CD, press
or button : once or
the
several times.
Changing the display
To change the display between CD
number and playing time:
➮ Press the MENU button <.
“MENU” appears in the displa y.
➮ Keep pressing the button :
until “CDC DISP” appears in the
display.
➮ Press the button :.
The current setting is displayed.
“TIME” stands for the playing time and
“CD NO” for the CD n umber display.
or button
DEUTSCH
ENGLISH
FRANÇAIS
ITALIANO
NEDERLANDS
SVENSKA
ESPAÑOL
PORTUGUÊS
3535
Page 17

CD CHANGER MODE
➮ Selected the required setting using
the
button :.
➮ Press the MENU button <.
Repeating individual tracks or
whole CDs (REPEAT)
➮ If you wish to repeat the current
track, briefly press button 3 (RPT)
=.
“RPT TRCK” appears briefly and RPT
lights up in the display.
➮ If you wish to repeat the current
CD , press button 3 (RPT) =
again.
“RPT DISC” appears briefly and RPT
lights up in the display.
Stopping REPEAT
➮ If you want to stop the repeat
function for the current track or CD,
press button 3 (RPT) = until “RPT
OFF” appears in the display and
RPT disappears.
Random play (MIX)
➮ To play all the tr acks on the current
CD in random order, press button
4 (MIX) =.
“MIX CD” appears briefly and MIX lights
up in the display.
➮ To play the tr acks on all the
inserted CDs in random order,
press button 4 (MIX) = again.
“MIX ALL ” appears briefly and MIX lights
up in the display.
Note:
In the case of the CDC A 08, all the CDs
in the changer are selected randomly.
36
In the case of other changers, all the
tracks on one CD are played randomly
before the next CD in the changer is
played.
Stopping MIX
➮ To stop the tracks being played
randomly, press button 4 (MIX) =
until “MIX OFF” appears in the
display and MIX disappears.
Scanning all tracks on all CDs
(SCAN)
➮ To briefly play all the tracks on all
inserted CDs in ascending order,
press button 5 (SCAN) =.
“SCAN” appears in the displa y.
Stopping SCAN
➮ To stop scanning, briefly press
button 5 (SCAN) = again.
The current track will then continue to
be play ed.
Note:
You can set the scanning time. For further details, please read the section
entitled “Setting scantime” in the “CD
mode” chapter.
Pausing playback (PAUSE)
➮ Press button 2 =.
“PAUSE” appears in the display.
Cancelling pause
➮ Press button 2 = while in
pause mode.
Playbac k is continued.
Page 18

CLOCK
Time (CLOCK)
Displaying the time
➮ To briefly display the time , press
the MENU button < until the time
appears in the display.
Setting the time manually
The time is set automatically using the
RDS signal. Ho wever, if you cannot receive any RDS stations or the RDS stations that you listen to do not support
this feature, you can also set the time
manually.
➮ Press the MENU button <.
➮ Keep pressing the button :
until “CLOCKSET” appears in the
display.
➮ Press the button :.
The time appears in the display. The
minutes flash on and off and can be
adjusted.
➮ Set the minutes using the and
buttons :.
➮ Once you have set the minutes,
press the
now flash on and off.
➮ Set the hours using the and
buttons :.
➮ When you have finished making
your changes, press the MENU
button <.
button :. The hours
Selecting 12/24-hour clock
mode
➮ Press the MENU button <.
“MENU” appears in the displa y.
➮ Keep pressing the button :
until “24 H MODE” or “12 H MODE”
appears in the display.
➮ Press the or button : to
switch betw een the modes.
➮ When you ha ve finished making
your changes, press the MENU
button <.
Displaying the time when the
unit is off
➮ To display the time when the unit is
turned off, press the MENU button
<.
“MENU” appears in the displa y.
➮ Keep pressing the button :
until “CLOCK OFF” or “CLOCK
ON” appears in the display.
➮ Press the or button : to
switch betw een the settings.
➮ When you ha ve finished making
your changes, press the MENU
button <.
DEUTSCH
ENGLISH
FRANÇAIS
ITALIANO
NEDERLANDS
SVENSKA
ESPAÑOL
PORTUGUÊS
3737
Page 19

VOLUME DISTRIBUTIONAUDIO SETTINGS
Audio settings
Bass settings
➮ To set the bass, press the AUDIO
button 9.
“BASS” appears in the display.
➮ Press the or button : to
adjust the bass.
Treble settings
➮ To set the treble, press the AUDIO
button 9.
“BASS” appears in the display.
➮ Press the AUDIO button 9 again.
“TREBLE” appears in the display.
➮ Press the or button : to
adjust the treble.
Switching loudness on/off
If loudness is activated, the bass and
treble levels are aurally compensated,
i.e. the y are increased at lower volume
levels.
➮ Press the AUDIO button 9 for
approximately 2 seconds.
LD lights up in the display when loudness is switched on.
Setting loudness intensity
The loudness level can be set in steps
ranging from 1 to 6.
➮ Press the MENU button <.
➮ Keep pressing the button :
until “LOUDNESS” appears in the
display.
➮ Press the or button : to set
the level.
➮ Press the MENU button <.
Volume distribution
settings
Balance settings
➮ To set the balance, press the GEO
button ;.
“BAL” appears in the display.
➮ Press the or button : to
adjust the balance (right/left).
Fader settings
➮ To set the fader, press the GEO
button ;.
“BAL” appears in the display.
➮ Press the GEO button ; again.
“F ADER” appears in the display.
➮ Press the or button : to
adjust the fader (front/back).
38
Page 20

EXTERNAL AUDIO SOURCES
TECHNICAL DATA
External audio sources
In place
also attach other external audio sources
that have a line output, f or instance, portable CD players, MiniDisc players or
MP3 pla yers.
If you want to connect an external audio source, you will need a Blaupunkt
adapter cable to do so (Blaupunkt no.:
7 607 897 093).
Furthermore, the AUX input must be
activated in the men u.
Switching the AUX input on/off
➮ Press the MENU button <.
“MENU” appears in the display.
➮ Keep pressing the button :
➮ Press the or button : to
➮ When you have finished making
Note:
The A UX input can now be selected b y
pressing the CD•C b utton 8.
of the CD changer, you can
until “AUX OFF” or “AUX ON”
appears in the display.
switch AUX on/off.
your changes, press the MENU
button <.
Technical data
Amplifier
Output power: 4 x 25 watts sine
in accordance with
DIN 45 324
at 14.4 V
4 x 40 watts max.
power
Tuner
Frequency r anges:
UKW (FM) : 87.5 – 108 MHz
MW : 531 – 1602 kHz
LW : 153 – 279 kHz
FM transmission range:
20 - 16 000 Hz
CD
Transmission range:
20 - 20 000 Hz
DEUTSCH
ENGLISH
FRANÇAIS
ITALIANO
NEDERLANDS
SVENSKA
Subject to changes!
ESPAÑOL
PORTUGUÊS
3939
Page 21

Service-Nummern / Service numbers / Numéros du service aprèsvente / Numeri del servizio di assistenza / Servicenummers /
Telefonnummer för service / Números de servicio / Número de
serviço
Tel.: Fax:
Deutschland 0 18 05 00 02 25 0 51 21 49 40 02
Belgique / België 0 25 25 54 44 0 25 25 54 48
France 014 010 70 07 014 010 73 20
Nederland 023 565 63 48 023 565 63 31
Great Britain 018 958 383 66 018 958 383 94
Danmark 44 89 83 60 44 89 86 44
Sverige 08 750 15 00 08 750 18 10
Norge 66 81 70 00 66 81 71 57
Suomi 094 359 91 094 359 92 36
Österreich 01-6 10 39-0 01-6 10 39-391
EÏÏ¿˜
âeská republika 026 130 04 41 026 130 05 14
USA 800-266 25 28 708-681 71 88
Singapore 006 535 054 47 006 535 053 12
Slovensko 042 175 873 212 042 175 873 229
015 762 241 015 769 473
Blaupunkt-Werke GmbH
Bosch Gruppe
11/99 TRO K7/VKD 8 622 402 136
 Loading...