

Page 1
Einbauanleitung
Fitting Instructions
Instructions de
montage
edienungsanleitung
Operati
lstruzioni di montaggio
hbouwinstrukties
Monteringsanvisning
lnstrucciones de montaje
lnstruqdes
de montagem
Bstruzioni d’uso
lnstrucciones de
manejo
Page 2

English
Preparatory steps
Inserting CDs into the changer magazine (fig. 1).
Do not insert more than one CD into a slot (the disc will be
damaged).
It is not necessary to load all of the slots.
Note:
l
Do not play 8-cm disks, neither with nor without
adapter.
l
Keep the door of the unit closed. Otherwise, foreign
matter can enter into the set and contaminate the
lenses in the player.
Do not expose the disc to direct sunlight or high
temperatures. Do not leave the discs in a car parked in the
sun.
High temperatures in the car can damage the disc.
Notes on the changer magazine
Do not expose. the magazine to high temperatures and
humidity.
Store the magazine where it is not exposed to direct sunlight
(not on the dashboard or rear shelf)!
Do not insert more than one disc into a slot. Otherwise, the
disc and the CD changer can be damaged!
Removing a CD from the magazine (fig. 2).
Inserting the changer magazine
l
Move the door to the left to open the magazine (fig. 3).
l
Insert the loaded CD magazine until the stop is reached
(fig. 4).
l
Move the door to the right
Removing the changer magazine
Protect the magazine against vibration!
Technical data
Frequency response:
Wow and flutter:
Signal-to-noise ratio:
Operating temperature:
Modifications reserved
Exchange the magazine only when the car radio is switched
Off.
Attention:
l
It is absolutely necessary to move the door fully to the
left (fig. 3) otherwise the changer and the magazine
can be damaged.
l
Press the EJECT button (fig. 5).
The magazine will be transported into the take-out position.
5 - 20 000 Hz fl
’
below measurable limit
94
dB
-10 “C to
+50 “C
dB
Notes on moisture condensation
On a rainy day or when the temperature varies
considerably moisture may condense on the focussing lens
and the unit will not operate properly.
In this case remove the disc and wait for about one hour
until the moisture has evaporated.
Notes on CD
A
contaminated or damaged CD can produce drop-outs in
playing. To optain optimum sound, handle the disc as
follows: Keep the CD clean, and handle the disc by its
edge only.
Do not touch the surface, without label!
If required, clean the disc with an optional cleaning cloth.
Wipe the disc surface from the middle towards the edge!
Do not use any solvants such as benrine, thinner, antistatic
spray or a conventional cleaning agent intended for analog
discs!
Do not stick paper or tape on the labeled surface!
Page 3
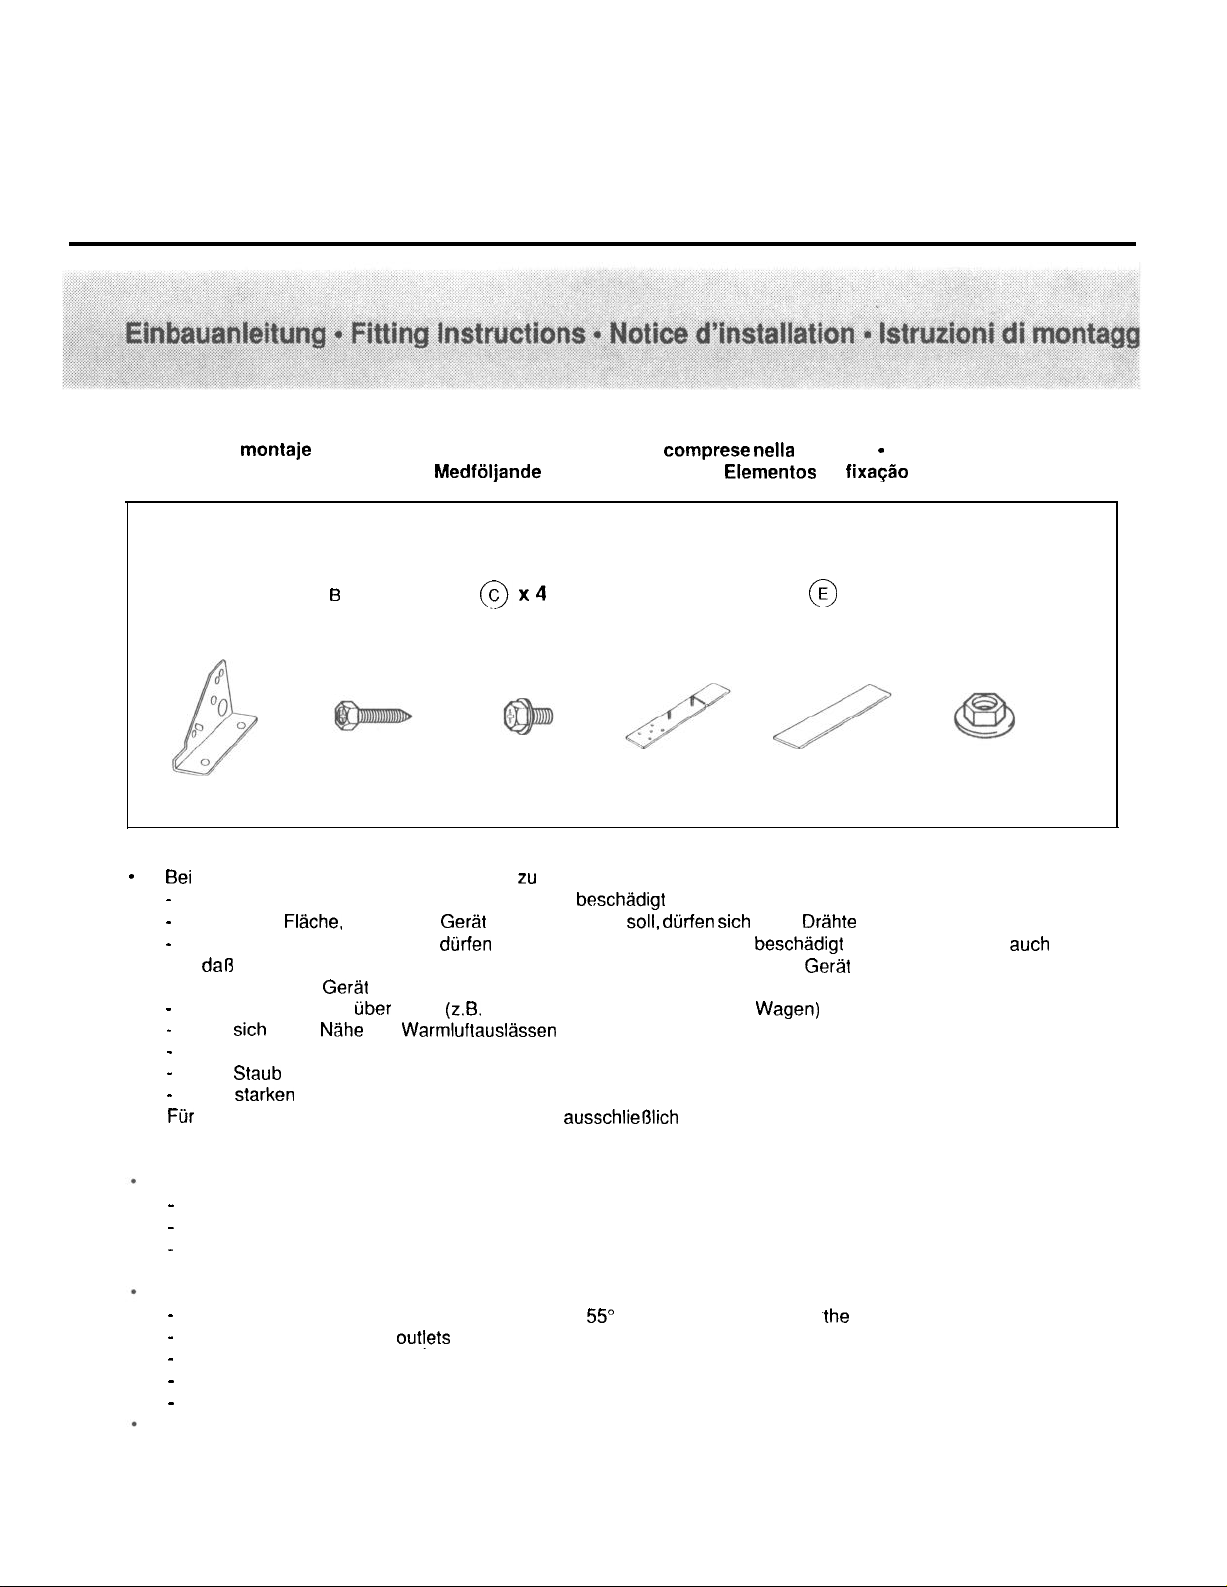
Mitgelieferte Befestigungsteile l Supplied Mounting Hardware l Materiel de montage fourni l
Ferreteria de montaje suministrada l Componenti di fissaggio comprese
Meegeleverde montagematerialen l Medfijljande monteringsdetaljer l
nella
fornitura
Elementos
9
de fixa@o fornecidos
I3
A X2
0
Zur besonderen Beachtung
.
Bei
der Wahl des Einbauortes ist folgendes zu beachten:
-
Der Tank darf durch die Blechschrauben nicht beschadigt werden.
-
Unter der
-
Ersatzreifen, Werkzeug usw. dijrfen durch die Blechschrauben nicht beschadigt werden. Achten Sie such darauf,
dal3
.
lnstallieren Sie das Gerat nicht an einem Ort,
-
-
-
-
-
.
Fi.ir
Precautions
Choose the mounting location carefully, observing the following:
-
-
-
Do not install the unit at a place,
-
-
-
-
-
Be sure to use only the supplied mounting hardware for a safe and secure installation.
die Herausnahme des Ersatzreifens, Werkzeugs usw. nicht durch das Gerat behindert wird.
der Temperaturen tiber 55” C
der
sich
in der
der Regen oder Feuchtigkeit ausgesetzt ist.
der
Staub
der starken Vibrationen ausgesetzt ist.
sicheren und stabilen Einbau verwenden Sie ausschliefilich die mitgelieferten Befestigungsteile.
The fuel tank must not be damaged by the tapping screws.
There should be no wire harnesses nor any tubes located under the place where you are going to install the unit.
The spare wheel, tools or other equipment in or under the trunk must not be blocked or damaged by the screws
or the unit itself.
which is exposed to temperatures of more than
which is close to hot air
which is exposed to rain or humidity.
which is exposed to dust or dirt.
which is exposed to considerable vibrations.
x4
0
Fl$iche,
auf die das Ger3t montiert werden soll,
N3he
von Warmluftausltissen (Heizung usw.) befindet.
oder Schmutz ausgesetzt ist.
,
out!ets
@x4
(z.B.
in einem in der Sonne geparkten
(heating, etc.).
55O
D X2
0
d&fen sich
C (e.g. in a car parked in
keine
Wagen)
E X2
0
Drahte
oder Rohrleitungen befinden.
ausgesetzt ist.
.the
sun).
F X4
0
Page 4

Horizontaler Einbau l Horizontal Installation - Installation horizontale de I’appareil l
-
Montaggio orizzontale l Horizontale montage
Horisontell montering l Montagem horizontal
lnstalacidn
horizontal l
Page 5

Vertikaler Einbau l Vertical installation l Installation
Vertikale
montage l Vertikal montering l Montagem vertical
verticale
l
Instalaci6n
vertical l Montaggio vertlcale
l
Page 6

Hangender
Hangende montage l
Einbau l Suspended Installation l Installation suspendue l Montaggio sospeso l
HIngande
montering l Montagem suspensa
I
04
Page 7

Bei
der hangenden Montage unter der Heckablage oder im Kofferraum beachten Sie folgende VorsichtsmaOnahmen:
-
Wahlen
-
Achten Sie darauf,
When the unit is to be installed under the backshelf or in the trunk, note the following:
-
Choose the mounting location carefully so that the unit can be installed horizontally.
-
Sie den Befestigungsort so
dat3
die Einheit die Federn, den Arm usw. des Kofferraumdeckels nicht behinden.
Make sure that the unit does not hinder the movement of the torsion bar spring etc. of the trunk flap.
aus, daf3
die Einheit horizontal montiert werden kann.
Si I’appareil doit etre installe
-
Bien choisir I’emplacement pour pouvoir installer I’appareil a I’horizontale.
-
Verifier que I’appareil ne gene pas le mouvement du ressort du
Cuando desee instalar la unidad en la bandeja trasera o dentro del portaequipajes, tenga en cuentra lo siguente:
-
Elija cuidadosamente el lugar de montaje de forma que la unidad pueda instalarse horizontalmente.
-
Cerciorese de que la unidad no impida el movimiento del resorte de la barra de torsion, el brazo etc., de la tapa del
portaequipajes.
Nel case di un montaggio sospeso
-
Scegliere con cura il luogo di fissaggio in modo
-
Fare attenzione al
Bij montage
wisselaar horizontaal gemonteerd kan
-
De wisselaar mag de vrije beweging van verenlarmen van achterklep of kofferdeksel niet belemmeren.
Nar vaxlare monteras hangande under hatthyllan eller i bagageutrymmet ar det viktigt att tanka pa foljande:
-
Valj
-
Se noga till sa att bagageluckans fjadrar eller stag ej hindras.
No case de uma montagem suspensa sob o
-
Escolha o local de fixacao atenciosamente
-
Atencao para que a unidade
Winkeleinstellschalter l Angle’adjustment switches l Commutateurs de
Bngulo l lnterruttori di regolazione dell’angolatura l Vinkelinstlllningsomkopplare l Schakelaars voor installatiehoek l
Interruptor de adjuste do
hangend
noga platsen sa att vaxlaren hanger horisontellt.
sous
le plateau arriere ou dans le
sotto il
ripiano posteriore oppure nel vano bagagli osservare le seguenti misure di sicurezza:
the
fatto, the
onder de hoedenplank (of anderszins in de kofferruimte) de inbouwplaats zo kiezen dat de
I’apparecchio non ostacoli le molle, il braccio
worden.
porta-chap&
para
que a unidade possa ser montada horizontalmente.
n%o
impessa as molas e o
dngulo
coffre,
par exemple, prendre d’abord les precautions suivantes.
capot,
entre autres.
I’apparecchio possa essere montato in posizione orizzontale.
etc.
del coperchio del portabagagli.
ou na
mala,
observe as seguintes medias de seguranca:
brace
da
mala.
reglage
d’angle l Conmutadores de adjuste de
Die Winkeleinstellschalter an der Unterseite miissen entsprechend des Einbauwinkels
des CD-Autowechslers eingestellt werden. Beide Schalter werden auf die gleiche Position eingestellt. Wenn die Schalter nicht
richtig eingestellt sind, kijnnen Tonausfalle und andere Fehlfunktionen eintreten.
The angle adjustment switches on the bottom panel are to be set ac cording to the angle of installation of the CD auto changer.
Set both of the two switches to the same position. If the switches are not set properly, sound skip or other malfunction may
occur.
Les commutateurs de reglage d’angle qui se trouvent sur le panneau du fond doivent etre places dans la position correspondant
a
Tangle d’in stallation du changeur de CD. Les deux commutateurs doivent etre dans la
ne sont pas convenablement regles, il peut y avpir des ratees de son ou d’autres problemes de fonctionnement.
Los conmutadores de ajuste de angulo ubicados en el panel inferior debe ran ajustarse
cambiador de discos compactos automatico. Ponga ambos conmutadores en la misma posici6n. Si
ajustados, el sonido saltara o
Gli interruttori di regolazione dell’angolatura del pannello posteriore vengono regolati sull’angolo di installazione del cambia CD
automatic0 Ambedue si devono trovare nella stessa posizione. Se non fossero rego lati bene, la riproduzione potrebbe saltare”
o si potrebbero avere altri errori di funzionamento.
Vinkelinstallningsomkopplarna, pa undersidan, maste stallas in pa den position som vaxlaren skall monteras i.
omkopplarna maste stallas pa samma position. Om omkopplarna ej stalls i
funktionsstijrningar
upptrada.
podra
producirse un mal funcionamiento.
ratt Iage
m&me
position. Si ces commutateurs
segun
el angulo de instalacion del
10s
conmutadores
kan ljudbortfall och andra
Bada
estan
mal
Page 8

Winkeleinstellschalter
Angle adjustment switches
Commutateurs de reglage d’angle
Conmutadores de adjuste de angulo
lnterruttori di regolazione dell’angolatura
Vinkelinstallningsomkopplare
Schakelaars voor installatiehoek
Interruptor de adjuste do angulo
49
90
0
37
Bodenansicht I Bottom view I
Visione dal basso / Undersida / Onderpaneele / Vista do painel inferior
Einbauwinkel
Installation angle
Angle d’installation
Angulo de instalacibn
Angola
di installazione
Uonteringsvinkel
Installatiehoek
Angulo de
Winkeleinstellschalter-Position
Angle adjustment switch position
Position des cotateurs de reglage dangle
Posicibn
Posizione interruttore di regolazione
Vinkelinstallingsomkopplare-position
Stand van de schakelaar overeenkomstig met de installatiehoek
Posicao
instalacao
de
10s
conmutadores de ajuste de angel0
para OS interruptores de ajuste do angulo
Der Einbau in einem Winkel von 45’ ist
Eine Halterung verwenden wenn der Einbau in einem Winkel von 45’ notwendig ist.
It is not possible to install at an angle of 45 deg. if only @ is used. Use a support when
it is required to install at an angle of 45 deg.
L’installtion a une inclinaison de 45’ est impossible en utilisant 0. Pour I’installation
45’, il faut utiliser un support.
No es posible realizar una instalacion con un angulo de 45’ si
un soporte cuando quiera realizar una instalacion con un angulo de 45’.
L’installazione ad un angolo di 45 gradi @ non e possibile. Se esso fosse necessario,
servirsi di un
Det ar ej mojligt att montera med 45 graders lutning nar endast @ anvandes. Anvand
en hallare nar det ar nodvandigt att montera med en vinkel pa 45 grader.
U kunt het toestel niet met een hoek van 45
Gebruik een ondersteuningsbeugel wanneer u het toestel met een hoek van 45 graden
wenst te installeren.
N%o e
possivel instalar corn
necessario instalar corn
O’-10’
supporto.
Vue
de dessous / Vista del panel inferior
nicht moglich,
graden
urn
angulo de 45’ utilizado 0. Utilize
urn
angulo de 45’.
/
-
80"-90'
wenn nur @ verwendet wird.
~610
se utiliza 0. Utilice
installeren bij gebruik van
urn
apoio se for
0.
a
Page 9

l
an ein Blaupunkt-Autoradio mit Disc-Management-System.
l
to a Blaupunkt car stereo with Disc Management System.
l
B
un autoradio de Blaupunkt
l
a un autorradio Blaupunkt con Disc Management System.
l
ad un’autoradio Blaupunkt dotata di un sistema Disc-Management.
l
op een Blaupunkt autoradio met DSC (Disc Management System).
l
till en Blaupunkt bilstereo med Disc Management System.
l
a
urn
auto-radio Blaupunkt corn sistema Disc-Management.
avec Systeme
Disc Management.
.
Achtung
Zur Vermeidung von
Anschliegen
den
Kurzschltissen
ErdungsanschluO
der Autobatterie ab.
trennen Sie vor dem
Caution
Before making connections, disconnect the ground pole of
the car battery to avoid short circuits.
Attention
Avant d’effectuer les connexions, debrancher le fil de
masse de la batterie de voiture pour
eviter
un court-circuit.
Precauci6n
Antes de realizar las conexiones, desconecte el polo de
masa de la bateria del
autom6vil para
evitar cortocircuitos.
Attenzione
Per evitare corti
circuiti
staccare il
cave
di
massa dalla
batteria dell’auto prima di iniziare con il collegamento.
Let op!
Voorkom kortsluiting! Alvorens
massa
van de accu loskoppelen.
aan
te sluiten eerst de
Varning
For att undvika kortslutning
lossad
under monterings- och inkopplingstiden.
skall
bilbatteries minuspol vara
AtencHo
Para
evitar
de
curto-circuitos,
massa
da bateria do veiculo antes da montagem.
separe por
pressao
0 contact0
Hinweis
Achten Sie darauf,
kabel zu verwenden.
Kabels
kdnnen Storgerausche
stets
das mitgelleferte
Bei
Verwendung sines anderen
Verlangerungs-
auftreten.
Note
Be sure to use the supplied extension cord. Using a cord
other than supplied one may cause noise.
Note
S’assurer d’utiliser le cable de rallonge fourni. D’autres
cables risqueraient de causer des parasites.
Nota
Asegurese
Si
usa
de utilizar el cable de
extensi6n
suministrado.
otro cable que no sea el suministrado, pueden
producirse ruidos.
Nota
Utilizzare esclusivamente la prolunga fornita. Utilizzando
altre prolunghe possono verificarsi disturbi.
Opm.
Gebruik uitsluitend de meegeleverde verlengkabel. Bij
gebruik van een andere kabel kunnen stooringen optreden.
Information
Anvand
endast den medlevererade
fbrlangningskabeln.
Vid anvandning av andra kablar finns risk for stbrningar.
IndicagSo
Utilize sempre o fio de
outro fio,
podem
surgir interferencias.
extencao
fornecido. Ao utilizar
urn
12195
Blaupunkt-Werke
GmbH
Bosch Telecom
KH-CNKD 3 D94 162 010
PM
864-0426-00
 Loading...