

Page 1
Enjoy it.
Bedienungsanleitung
Operating instructions
Notice d'utilisation
Istruzioni d'uso
Bedieningshandleiding
Bruksanvisning
Manual de instrucciones
Instruções de serviço
Betjeningsvejledning
Käyttöohjeet
Οδηγίε χειρισού
Instrukcja obsługi
Návod kobsluze
Használati útmutató
Instrucţiuni de utilizare
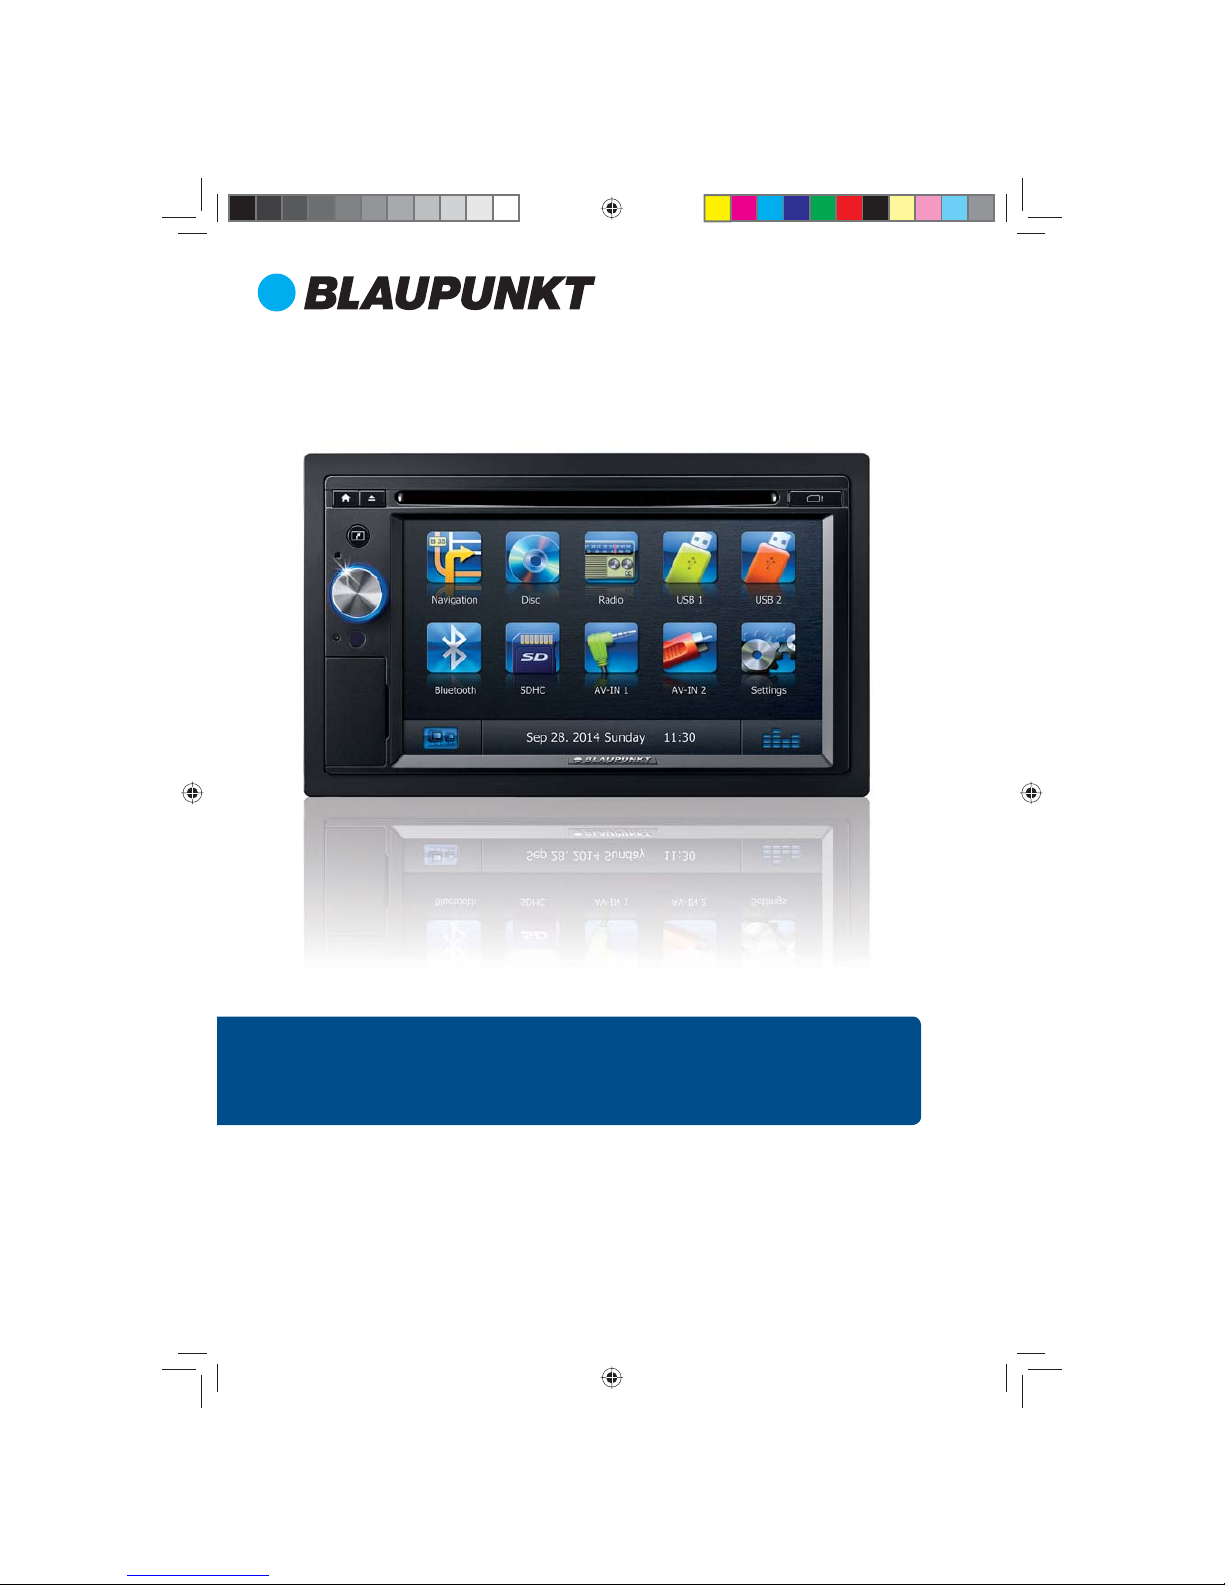
SERIES 840 / 845
Multimedia Navigation
01_NewYork_840_845_de.indd 1
01_NewYork_840_845_de.indd 1
03.09.14 15:04
03.09.14 15:04
Page 2
2
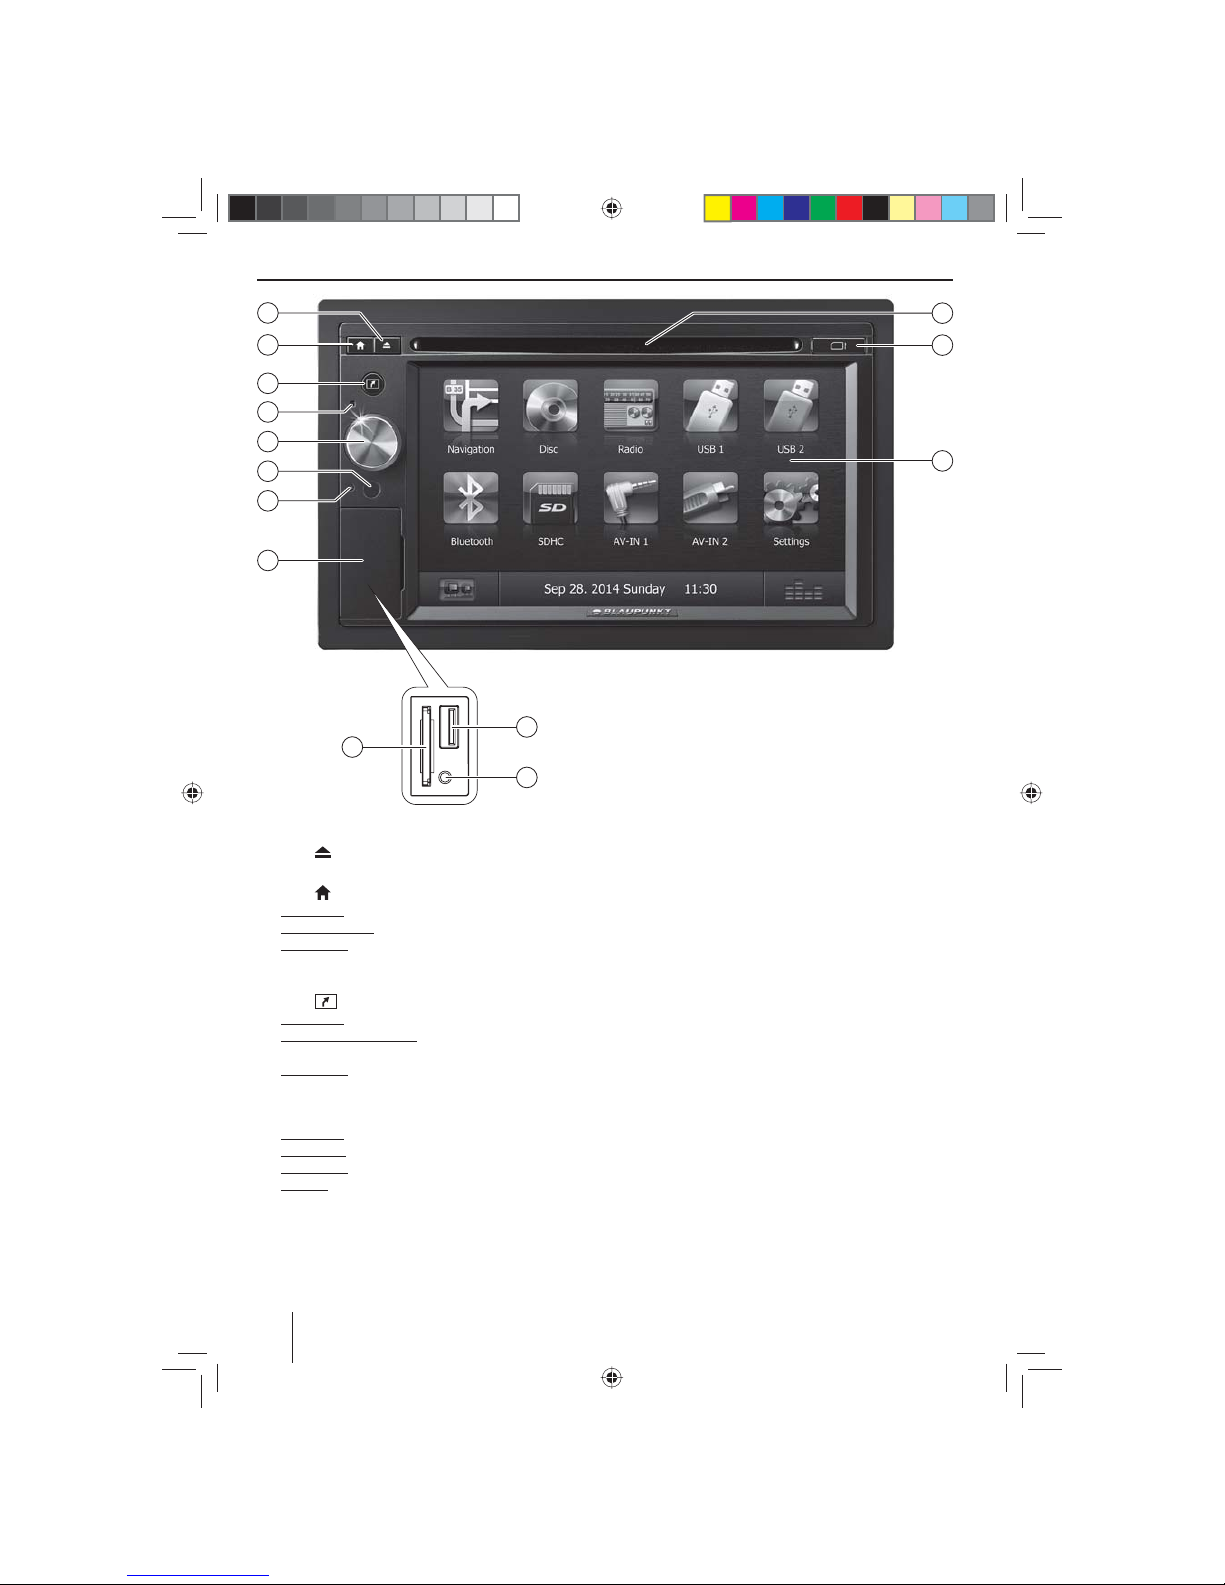
Bedienelemente – Gerät
1
Taste (Eject)
DVD/CD ausgeben
2
Taste
Kurzdruck: Hauptmenü aufrufen
Im Hauptmenü: Menü der aktiven Quelle aufrufen
Langdruck: Bluetooth®-Funktion aufrufen bzw. Display ausschalten. Funktion kann im EinstellungenMenü gewählt werden.
3
Taste
Kurzdruck: Navigation aufrufen
Im Navigationsbetrieb: Menü der aktiven Quelle aufrufen
Langdruck: Einstellung Displayhelligkeit aufrufen
4
Mikrofon
5
Dreh-/Druckknopf
Kurzdruck: Gerät einschalten
Im Betrieb: Audioquelle stumm schalten (Mute)
Langdruck: Gerät ausschalten
Drehen: Lautstärke einstellen
6
Infrarotempfänger für die Fernbedienung
7
Reset-Taste
Ursprüngliche Werkseinstellungen des Gerätes wiederherstellen.
Achtung! Alle persönlichen Einstellungen gehen verloren!
8
Abdeckklappe
9
SD-Kartenleser
Zugang nur bei geö neter Abdeckung
:
Front-AV-IN-Buchse (Quelle AV-IN 1)
Zugang nur bei geö neter Abdeckung
;
Front-USB-Buchse (Quelle USB 1)
Zugang nur bei geö neter Abdeckung
<
Touchscreen Bedienober äche
=
microSD-Kartenleser für Navigationsdaten
Zugang nur bei geö neter Abdeckung
>
DVD-/CD-Laufwerk
2
3
5
8
6
4
7
1
13
12
14
9
10
11
01_NewYork_840_845_de.indd 2
01_NewYork_840_845_de.indd 2
03.09.14 15:04
03.09.14 15:04
Page 3
3
DEUTSCH
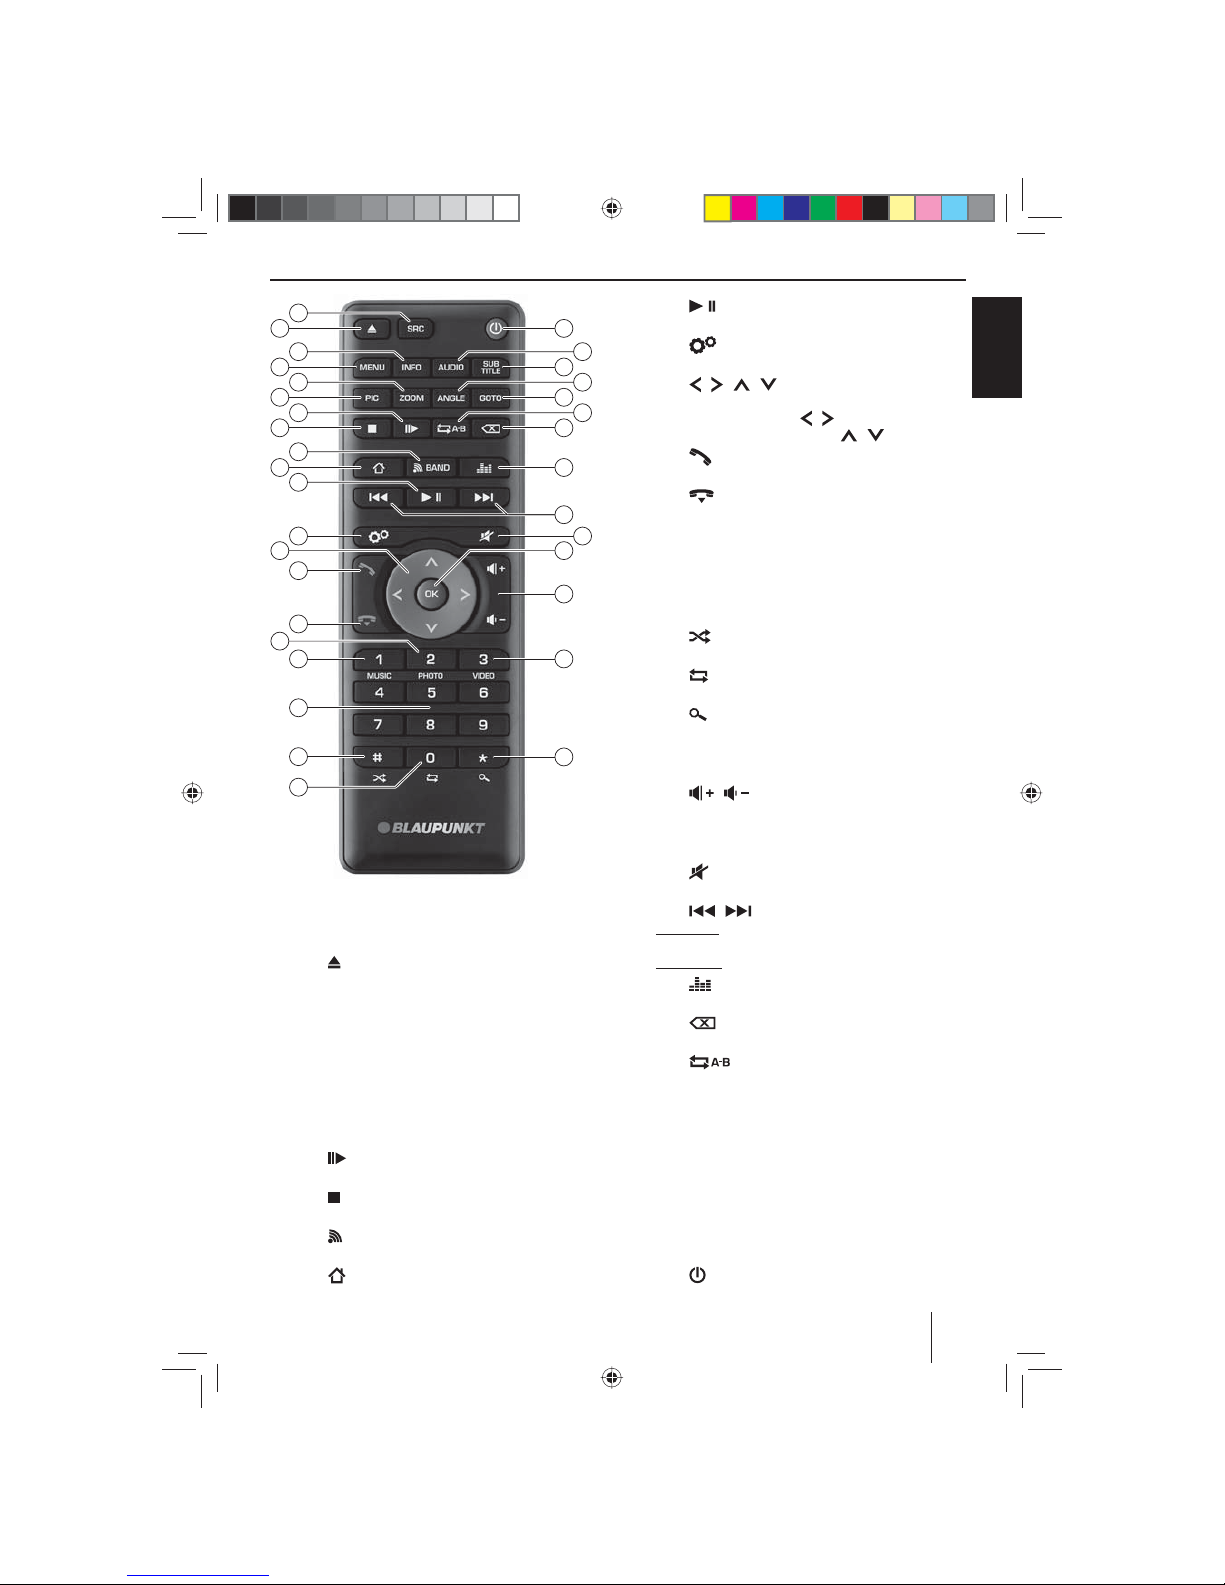
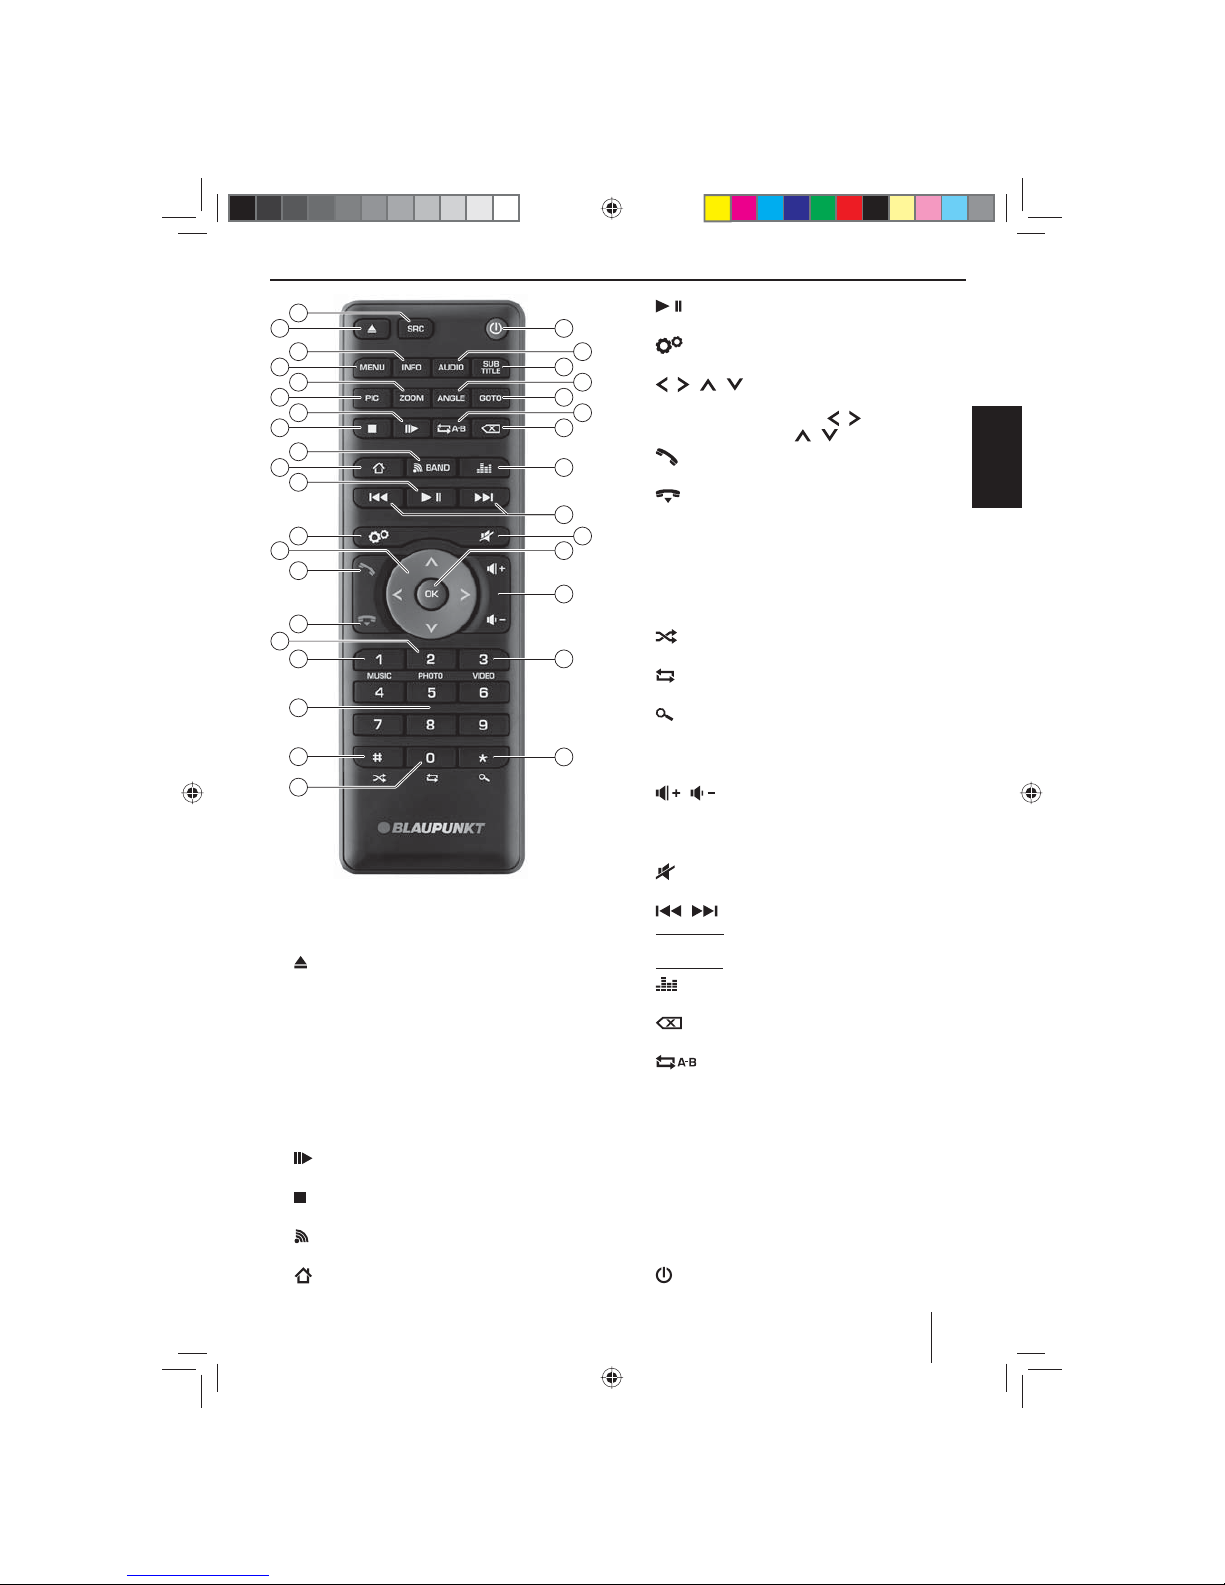
Bedienelemente – Fernbedienung
26
28
29
32
33
31
34
18
20
22
24
16
35
36
48
46
44
42
41
39
37
38
21
23
25
30
19
17
15
47
45
43
27
40
?
Taste SRC
Quelle auswählen
@
Taste
DVD/CD ausgeben
A
Taste INFO
Informationen im Display anzeigen
B
Taste MENU
DVD-Menü aufrufen
C
Taste ZOOM
Bildausschnitt vergrößern
D
Taste PIC
Displayhelligkeit einstellen
E
Taste
Zeitlupen-Wiedergabe
F
Taste
Wiedergabe beenden
G
Taste BAND
Wellenbereich/Speicherebene auswählen
H
Taste
Hauptmenü aufrufen
I
Taste
Widergabe starten und unterbrechen
J
Taste
Einstellungen-Menü aufrufen
K
Taste / / /
In Menüs navigieren und Einstellungen ändern
Sendersuchlauf starten ( / )
Gespeicherte Sender aufrufen ( / )
L
Taste
Anruf annehmen
M
Taste
Anruf beenden/abweisen
N
Taste PHOTO
Ordnerübersicht der Bilder aufrufen
O
Taste MUSIC
Ordnerübersicht der Audiodateien aufrufen
P
Zi erntasten 0 - 9
Q
Taste
Zufallswiedergabe
R
Taste
Wiederholfunktion
S
Taste
Scan-Funktion
T
Taste VIDEO
Ordnerübersicht der Filme aufrufen
U
Taste /
Lautstärke einstellen
V
Taste OK
Auswahl bestätigen
W
Taste
Audioquelle stumm schalten
X
Taste /
Kurzdruck: Sender manuell einstellen; Titel, Kapitel,
Film auswählen
Langdruck: Schneller Suchlauf
Y
Taste
Equalizer-Menü aufrufen
Z
Taste
Letztes Zeichen einer Eingabe löschen
[
Taste
Bereich für Wiederholfunktion festlegen
\
Taste GOTO
Direkteingabe für Senderfrequenz, Titel, Kapitel, Film
bzw. Laufzeit aufrufen
]
Taste ANGLE
Kamerablickwinkel wählen (wenn auf DVD verfügbar)
a
Taste SUBTITLE
Untertitelsprache wählen (wenn auf DVD verfügbar)
b
Taste AUDIO
Wiedergabesprache wählen (wenn auf DVD verfügbar)
c
Taste
Gerät ein-/ausschalten
01_NewYork_840_845_de.indd 3
01_NewYork_840_845_de.indd 3
03.09.14 15:04
03.09.14 15:04
Page 4

4
Inhalt
Sicherheitshinweise ................................................... 5
Verwendete Symbole ............................................................5
Verkehrssicherheit ..................................................................5
Allgemeine Sicherheitshinweise .......................................5
Konformitätserklärung ..........................................................5
Reinigungshinweise ................................................... 5
Entsorgungshinweise ................................................. 5
Lieferumfang .............................................................. 6
In Betrieb nehmen ...................................................... 6
Diebstahlschutz .......................................................................6
Ein-/Ausschalten .....................................................................6
Lautstärke ..................................................................................6
Hauptmenü ...............................................................................6
Empfangsregion einstellen .................................................7
Radiobetrieb ............................................................... 7
Radiobetrieb starten ..............................................................7
Speicherebene wählen .........................................................7
Sender einstellen ....................................................................7
Sender manuell speichern ...................................................7
Sender automatisch speichern (Travelstore) ................8
Sender anspielen ....................................................................8
RDS ein-/ausschalten .............................................................8
RDS-Zeitsignal ein-/ausschalten ........................................ 8
Radioempfang optimieren ..................................................8
REG-Funktion (Regionalprogramme)
ein-/ausschalten ......................................................................8
AF-Funktion (Alternativfrequenzen)
ein-/ausschalten ......................................................................8
Suchlauf-Emp ndlichkeit einstellen ................................8
Programmtyp auswählen und Suchlauf starten ..........9
Verkehrsfunk .............................................................................9
Navigation (nur bei Geräten mit Navigation)........... 9
Navigationsdaten laden .......................................................9
Download von Kartendaten ...............................................9
Navigation starten ..................................................................9
Erste Inbetriebnahme ............................................................9
Ziel eingeben ......................................................................... 10
Adresse ...................................................................................10
Sonderziele - Points of Interest (POI) ........................... 11
Routenoptionen einstellen .............................................. 11
Karteneinstellungen ........................................................... 12
Medienwiedergabe DVD/CD/USB/SDHC/iPod ...... 13
Grundlegende Informationen ......................................... 13
DVD-/CD-Betrieb .................................................................. 13
USB-Datenträger .................................................................. 13
SDHC-Karten .......................................................................... 14
iPod/iPhone über USB ........................................................ 14
DVD Filmwiedergabe.......................................................... 14
Audiowiedergabe von DVD/CD, USB, SDHC oder
iPod/iPhone ........................................................................... 15
Videowiedergabe von DVD/CD, USB oder SDHC ..... 16
Bildwiedergabe von DVD/CD, USB oder SDHC ......... 17
Bluetooth-Betrieb..................................................... 17
Bluetooth-Betrieb starten ................................................. 17
Bluetooth-Geräte koppeln................................................ 18
Telefonbetrieb ....................................................................... 18
Audiowiedergabe - Bluetooth-Streaming .................. 18
Audiowiedergabe -
Android-Mobiltelefon ...................... 19
Bluetooth-Einstellungen ................................................... 19
Rear Seat Entertainment (RSE) ................................ 20
Externe Audio-/Videoquellen .................................. 20
Klangeinstellungen .................................................. 21
Lautstärkeverteilung (Fader/Balance) .......................... 21
Equalizer .................................................................................. 21
Grundeinstellungen ................................................. 21
Video ......................................................................................... 21
Allgemein................................................................................ 22
Zeit ............................................................................................ 22
Klang ......................................................................................... 22
Sprache .................................................................................... 23
Bluetooth ................................................................................ 23
DVD ........................................................................................... 23
Lautstärke ............................................................................... 23
Nützliche Informationen .......................................... 23
Gewährleistung .................................................................... 23
Service ...................................................................................... 23
Anschlussschema ................................................... 336
Anhang .................................................................... 337
01_NewYork_840_845_de.indd 4
01_NewYork_840_845_de.indd 4
03.09.14 15:04
03.09.14 15:04
Page 5

5
DEUTSCH
Sicherheitshinweise | Reinigungshinweise | Entsorgungshinweise
Sicherheitshinweise
Das Autoradio wurde entsprechend dem heutigen Stand
der Technik und den anerkannten sicherheitstechnischen Regeln hergestellt. Trotzdem können Gefahren
entstehen, wenn Sie die Sicherheitshinweise in dieser
Anleitung nicht beachten.
Diese Anleitung soll Sie mit den wichtigsten Funktionen
vertraut machen. Ausführliche Informationen zur Navigation nden Sie im Internet unter www.blaupunkt.com.
• Lesen Sie diese Anleitung sorgfältig und vollständig,
bevor Sie das Autoradio benutzen.
• Bewahren Sie die Anleitung so auf, dass sie jederzeit
für alle Benutzer zugänglich ist.
• Geben Sie das Autoradio an Dritte stets zusammen
mit dieser Anleitung weiter.
Beachten Sie außerdem die Anleitungen der Geräte, die
Sie im Zusammenhang mit diesem Autoradio verwenden.
Verwendete Symbole
In dieser Anleitung werden folgende Symbole verwendet:
GEFAHR!
Warnt vor Verletzungen
VORSICHT!
Warnt vor Beschädigung des DVD-/CD-Laufwerks
GEFAHR!
Warnt vor hoher Lautstärke
Das CE-Kennzeichen bestätigt die Einhaltung
der EU-Richtlinien.
쏅 Kennzeichnet einen Handlungsschritt
• Kennzeichnet eine Aufzählung
Verkehrssicherheit
Beachten Sie folgende Hinweise zur Verkehrssicherheit:
• Benutzen Sie Ihr Gerät so, dass Sie Ihr Fahrzeug
immer sicher steuern können. Im Zweifelsfall halten Sie an geeigneter Stelle an und bedienen Ihr Gerät bei stehendem Fahrzeug. Sind Sie Fahrer, dürfen
Sie die Anwendungen nicht verwenden, die Sie vom
Verkehrsgeschehen ablenken (je nach Funktionsumfang des Gerätes z. B. Videos anschauen, Ziel eingeben).
• Befolgen Sie die Fahrempfehlungen während
der Zielführung nur dann, wenn Sie dabei keine
Verkehrsregeln missachten! Verkehrsschilder und
Verkehrsvorschriften haben stets Vorrang vor den
Fahrempfehlungen.
• Hören Sie stets in mäßiger Lautstärke, um Ihr Ge-
hör zu schützen und um akustische Warnsignale (z. B.
der Polizei) hören zu können. In Stummschaltungspausen (z. B. beim Wechsel der Audioquelle) ist das
Verändern der Lautstärke nicht hörbar. Erhöhen Sie
die Lautstärke nicht während dieser Stummschaltungspause.
Allgemeine Sicherheitshinweise
Beachten Sie folgenden Hinweis, um sich selbst vor Verletzungen zu schützen:
Verändern oder ö nen Sie das Gerät nicht. Im Gerät
be ndet sich ein Class-1-Laser, der Ihre Augen verletzen
kann.
Bestimmungsgemäßer Gebrauch
Dieses Autoradio ist für den Einbau und Be trieb in einem Fahrzeug mit 12-V-Bord netz spannung vorgesehen
und muss in einen DIN-Schacht eingebaut werden. Beachten Sie die Leistungsgrenzen des Gerätes. Lassen Sie
Reparaturen und ggf. den Einbau von einem Fachmann
durchführen.
Einbauhinweise
Sie dürfen das Autoradio nur dann einbauen, wenn Sie
Erfahrung mit dem Einbau von Autoradios haben und Ihnen die Elektrik des Fahrzeugs vertraut ist. Beachten Sie
dazu das Anschlussschema am Ende dieser Anleitung.
Konformitätserklärung
Hiermit erklärt die Blaupunkt Technology GmbH, dass
sich das Gerät in Übereinstimmung mit den grundlegenden Anforderungen und den anderen relevanten Vorschriften der Richtlinie 1999/5/EG be ndet.
Sie nden die Konformitätserklärung im Internet unter
www.blaupunkt.com.
Reinigungshinweise
Löse-, Reinigungs- und Scheuermittel sowie CockpitSpray und Kunststo -P egemittel können Sto e enthalten, welche die Ober äche des Autoradios angreifen.
Verwenden Sie zur Reinigung des Autoradios nur ein trockenes oder leicht feuchtes Tuch.
Entsorgungshinweise
Entsorgen Sie Ihr Altgerät nicht in den Hausmüll!
Nutzen Sie zur Entsorgung des Altgerätes, der
Fernbedienung und verbrauchter Batterien die zur
Verfügung stehenden Rückgabe- und Sammelsysteme.
01_NewYork_840_845_de.indd 5
01_NewYork_840_845_de.indd 5
03.09.14 15:04
03.09.14 15:04
Page 6
6
Lieferumfang
Im Lieferumfang enthalten sind:
• Autoradio
• Fernbedienung (inkl. Batterie)
• TMC Tuner (nur bei Geräten mit Europa-Navigation)
• microSD-Karte mit Navigationsdaten im microSDKartenschacht (nur bei Geräten mit Navigation)
• GPS-Antenne
• Externes Bluetooth-Mikrofon
• Kurzanleitung
• Halterahmen
• Kleinteile-Set
• Installationsmaterial
• Anschlusskabel
In Betrieb nehmen
Achtung
Transportsicherungsschrauben
Stellen Sie sicher, dass vor der Inbetriebnahme des Gerätes die Transportsicherungsschrauben auf der Geräteoberseite entfernt werden.
Diebstahlschutz
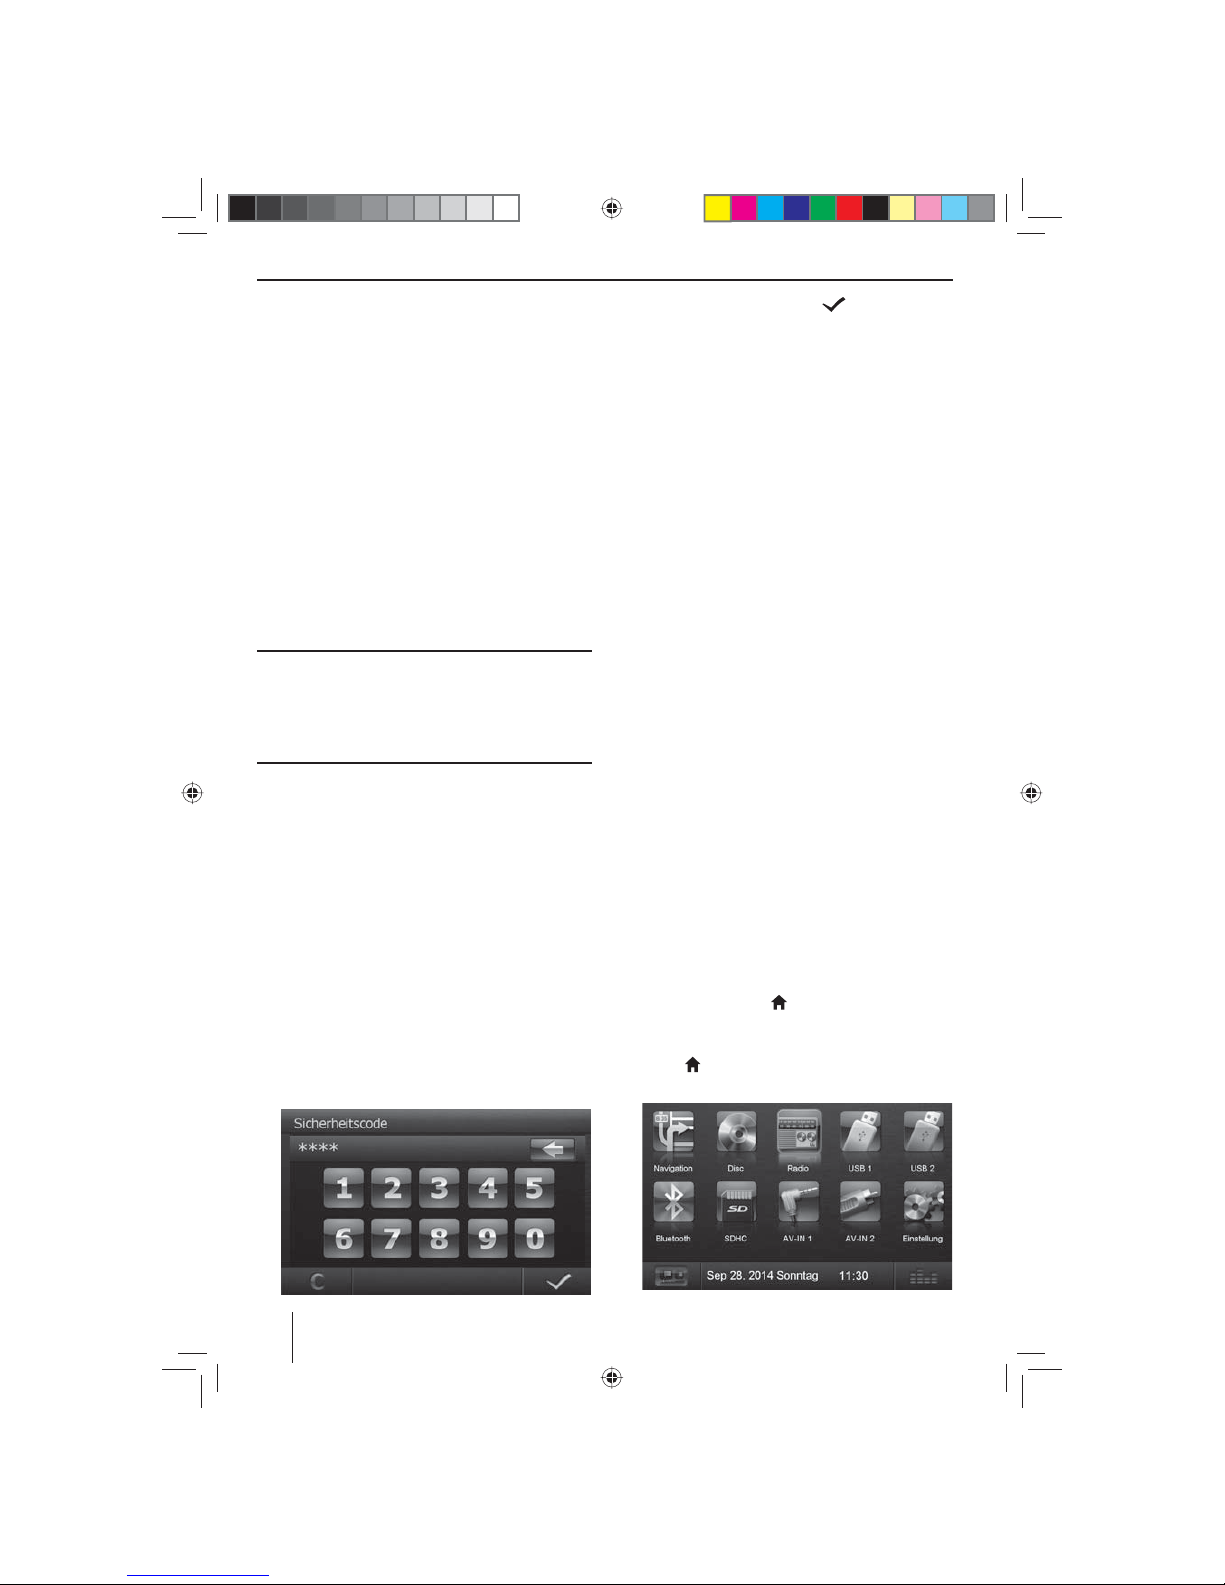
Dieses Autoradio ist gegen Diebstahl mit einer vierstelligen Code-Nummer geschützt (Code-Nummer werkseitig: 0000).
Ist die Code-Abfrage aktiviert, muss die Code-Nummer
nach jeder Unterbrechung der Stromversorgung von der
Fahrzeugbatterie eingegeben werden.
Hinweis:
Im Untermenü Allgemein des Einstellungen-Menüs
können Sie die Code-Abfrage aktivieren/deaktivieren und die Code-Nummer ändern.
Code-Nummer nach Spannungsunterbrechung
eingeben
Wenn die Code-Nummer erforderlich ist, wird ein Zahlenfeld zur Eingabe der Code-Nummer angezeigt.
쏅 Geben Sie die Code-Nummer mit dem Zahlenfeld ein.
쏅 Drücken Sie die Schalt äche , um die Eingabe
zu bestätigen.
Das Gerät wird eingeschaltet.
Hinweis:
Wenn Sie eine falsche Code-Nummer eingegeben
haben, wird kurz Sicherheitscode falsch! angezeigt.
Danach können Sie die Code-Eingabe wiederholen.
Ein-/Ausschalten
Ein-/Ausschalten mit dem Dreh-/Druckknopf
쏅 Zum Einschalten drücken Sie den Dreh-/Druck-
knopf
5
.
쏅 Zum Ausschalten halten Sie den Dreh-/Druck-
knopf
5
länger als 2 Sekunden gedrückt.
Ein-/Ausschalten über die Fahrzeugzündung
Wenn das Autoradio mit der Fahrzeugzündung verbunden ist und es nicht mit dem Dreh-/Druckknopf 5
ausgeschaltet wurde, wird es mit der Zündung aus- bzw.
eingeschaltet.
Lautstärke
Lautstärke einstellen
Die Lautstärke ist in Schritten von 0 (aus) bis 50 (maximal)
einstellbar.
쏅 Drehen Sie den Dreh-/Druckknopf 5, um die Laut-
stärke zu verändern.
Autoradio stumm schalten (Mute)
쏅 Drücken Sie kurz den Dreh-/Druckknopf 5, um das
Gerät stumm zu schalten bzw. um wieder die vorherige Lautstärke zu aktivieren.
Hauptmenü
Im Hauptmenü können Sie durch Drücken der Schalt ächen auf dem Touchscreen die verschiedenen Quellen
und Betriebsarten aufrufen.
쏅 Drücken Sie die Taste
2.
- Oder -
쏅 Drücken Sie in der aktuellen Quelle die Schalt äche
……
.
Das Hauptmenü wird angezeigt.
Lieferumfang | In Betrieb nehmen
01_NewYork_840_845_de.indd 6
01_NewYork_840_845_de.indd 6
03.09.14 15:04
03.09.14 15:04
Page 7
7
DEUTSCH
Solange Sie keine neue Audioquelle wählen, wird die
zuletzt aktive Audioquelle wiedergegeben.
Hinweis:
Die in dieser Anleitung dargestellten Abbildungen
sollen die Erklärungen unterstützen und können im
Detail von Ihrem Gerät abweichen.
Empfangsregion einstellen
Dieses Autoradio ist für den Betrieb in verschiedenen
Regionen mit unterschiedlichen Frequenzbereichen
und Sendertechnologien ausgelegt. Werkseitig ist die
Empfangsregion „Europa“ eingestellt. Betreiben Sie das
Autoradio außerhalb von Europa z. B. in den USA oder
Asien, müssen Sie ggf. erst eine geeignete Empfangsregion einstellen.
쏅 Drücken Sie dazu im Hauptmenü die Schalt äche
Einstellung.
Das Einstellungen-Menü wird angezeigt.
쏅 Drücken Sie im unteren Bereich des Einstellungen-
Menüs die Schalt äche Allgemein.
Hinter „Radio Region“ wird die aktuelle Einstellung
angezeigt.
쏅 Drücken Sie die Schalt äche Radio Region, um die
Liste der verfügbaren Empfangsregionen einzublenden.
쏅 Blättern Sie mit
bzw. durch die Liste und
tippen Sie auf die gewünschte Empfangsregion, um
sie auszuwählen.
Die Liste wird ausgeblendet, die ausgewählte Empfangsregion ist eingestellt.
쏅 Drücken Sie die Schalt äche Einstellung
.
Das Hauptmenü wird wieder angezeigt.
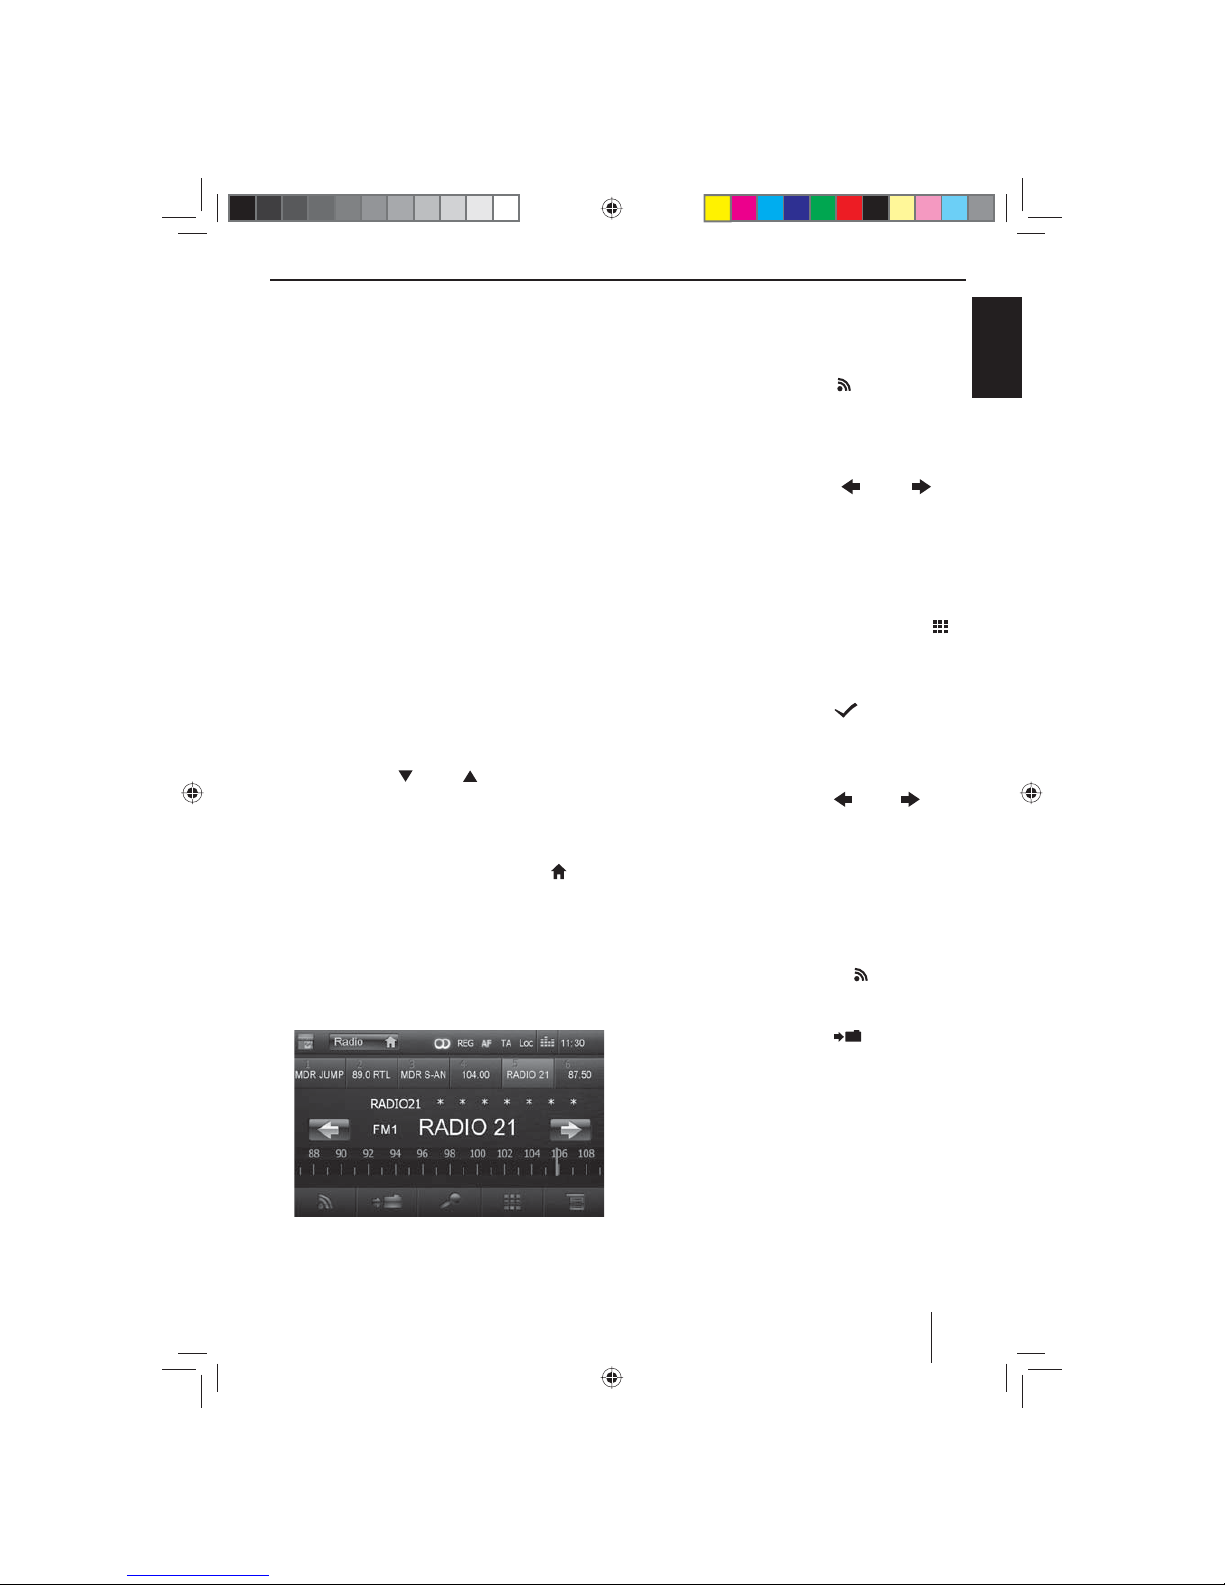
Radiobetrieb
Radiobetrieb starten
쏅 Drücken Sie im Hauptmenü die Schalt äche Radio.
Das Radiomenü wird angezeigt.
Speicherebene wählen
Es stehen verschiedene Speicherebenen und Wellenbereiche zur Verfügung. Auf jeder Speicherebene können
bis zu 6 Sender gespeichert werden.
쏅 Drücken Sie die Schalt äche
so oft, bis die ge-
wünschte Speicherebene angezeigt wird.
Sender einstellen
Sender manuell einstellen
쏅 Drücken Sie die Schalt äche
bzw. ein-
oder mehrmals kurz, um die Frequenz schrittweise
zu ändern.
Sendefrequenz direkt eingeben
Wenn ihnen die Frequenz des gewünschten Senders bekannt ist, können Sie diese über den Touchscreen direkt
eingeben.
쏅 Drücken Sie im Radiobetrieb die Schalt äche
.
Ein Zahlenfeld zur Frequenzeingabe wird angezeigt.
쏅 Geben Sie die Frequenz des gewünschten Senders
mit dem Zahlenfeld ein.
쏅 Drücken Sie die Schalt äche .
Das Radiomenü wird angezeigt, der Sender der eingegebenen Frequenz wird wiedergegeben.
Sendersuchlauf starten
쏅 Drücken Sie die Schalt äche
bzw. für ca.
2 Sekunden, um den Sendersuchlauf zu starten.
Der nächste empfangbare Sender wird eingestellt.
Hinweis:
Für die Empfangsregion Europa: Im Wellenbereich
FM werden bei eingeschaltetem Vorrang für Verkehrsfunk nur Verkehrsfunksender eingestellt.
Sender manuell speichern
쏅 Wählen Sie mit der Schalt äche die gewünsch-
te Speicherebene.
쏅 Stellen Sie den gewünschten Sender ein.
쏅 Drücken Sie die Schalt äche
.
Das Menü zum Speichern wird angezeigt. Es stehen
6 Speicherplätze zur Verfügung die als Schalt ächen
angezeigt werden.
쏅 Drücken Sie die Schalt äche, auf der Sie den aktuel-
len Sender speichern möchten.
Der Sender wird gespeichert, das Radiomenü wird
wieder angezeigt.
In Betrieb nehmen | Radiobetrieb
01_NewYork_840_845_de.indd 7
01_NewYork_840_845_de.indd 7
03.09.14 15:04
03.09.14 15:04
Page 8
8
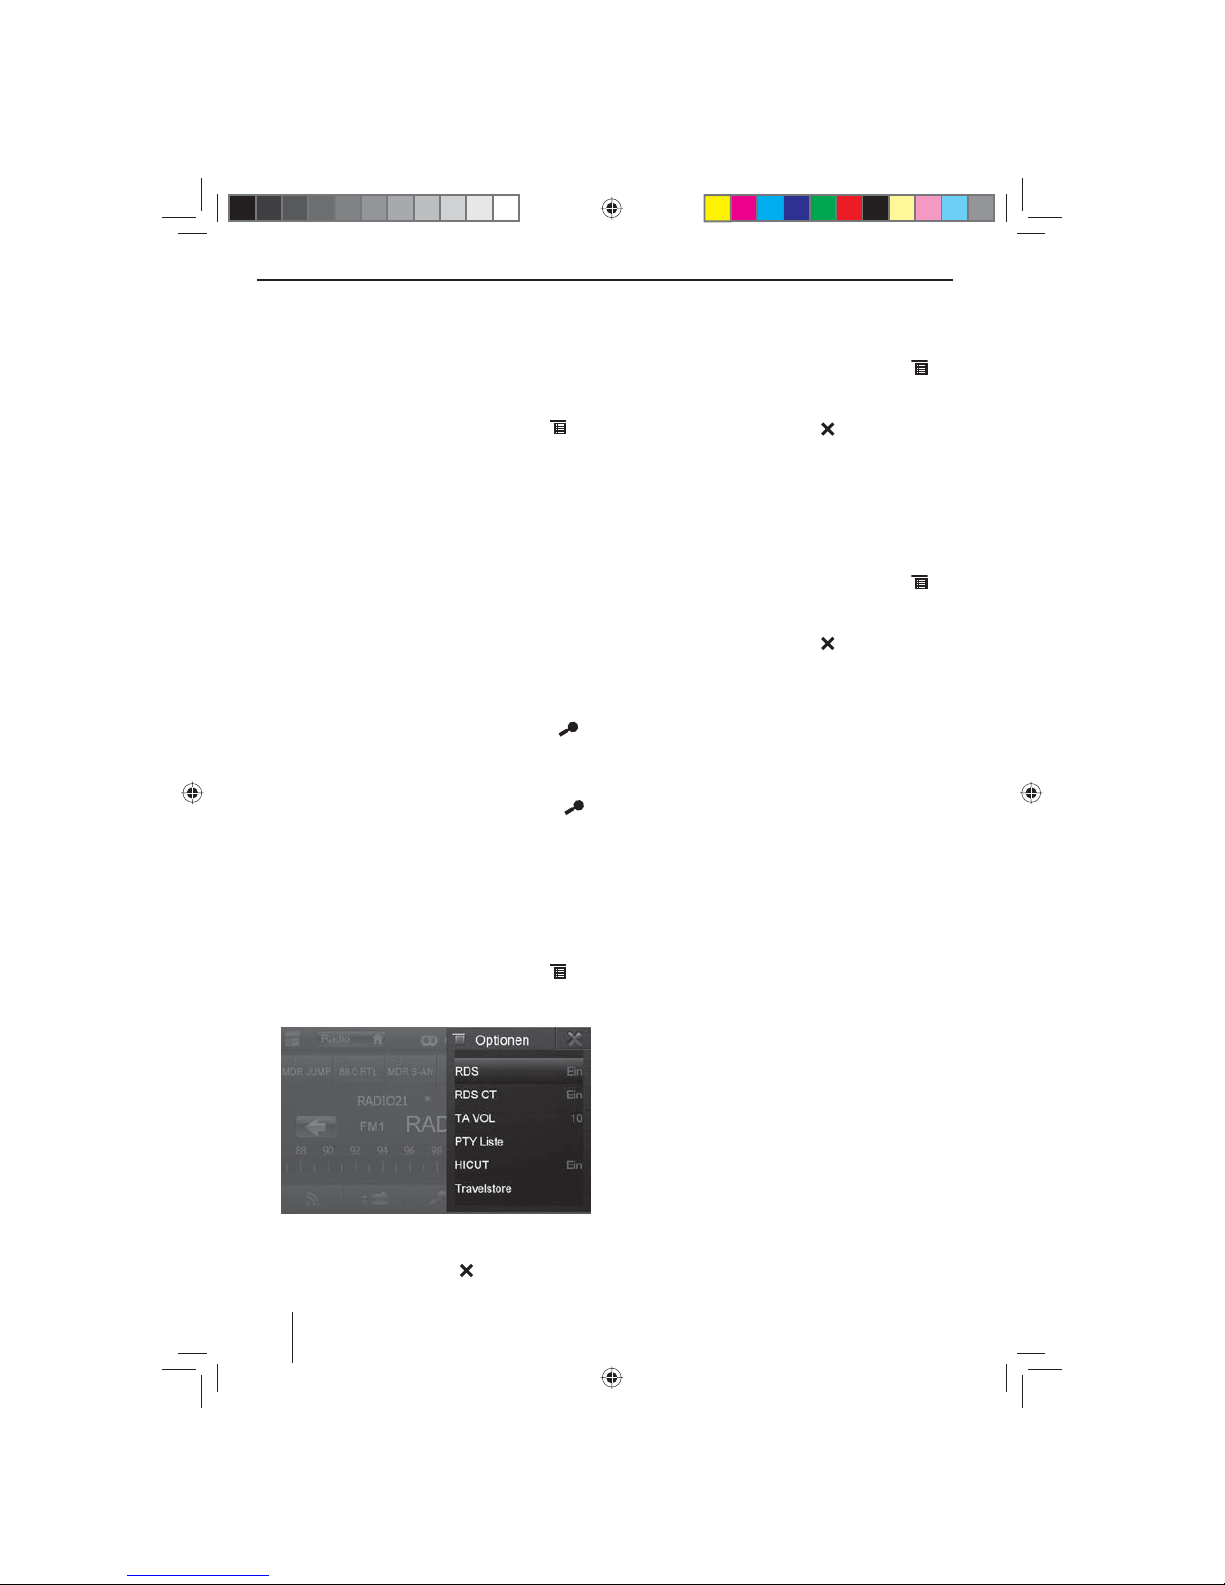
Sender automatisch speichern
(Travelstore)
Mit Travelstore können Sie die 6 stärksten Sender der
Region automatisch suchen und auf der Speicherebene
FM1, FM2 oder FM3 speichern.
쏅 Wählen Sie eine FM-Speicherebene.
쏅 Drücken Sie im Radiomenü die Schalt äche
.
쏅 Drücken Sie im Optionen-Menü die Schalt äche
Travelstore.
Der Tuner beginnt mit dem automatischen Sender-
suchlauf. Wenn das Speichern beendet ist, wird der
Sender auf Speicherplatz 1 der zuvor gewählten
Speicherebene wiedergegeben.
Hinweis:
Für die Empfangsregion Europa: Bei eingeschaltetem
Vorrang für Verkehrsfunk werden nur Verkehrsfunksender gespeichert.
Sender anspielen
Mit der Scan-Funktion können Sie alle empfangbaren
Sender des aktuellen Wellenbereichs einige Sekunden
anspielen lassen.
쏅 Drücken Sie im Radiobetrieb die Schalt äche
.
Der Scan-Suchlauf sucht im aktuellen Wellenbereich
nach Sendern. Jeder empfangbare Sender wird dabei einige Sekunden angespielt.
쏅 Durch nochmaliges Drücken der Schalt äche
wird der gerade angespielte Sender ausgewählt und
wiedergegeben.
RDS ein-/ausschalten
In der Empfangsregion Europa strahlen viele FM-Sender
neben ihrem Programm ein RDS-Signal (Radio Data System) aus, das Zusatzfunktionen wie z.B. die Anzeige des
Sendernamens im Display ermöglicht.
쏅 Drücken Sie im Radiomenü die Schalt äche
.
Das Optionen-Menü wird angezeigt, hinter RDS wird
die aktuelle Einstellung angezeigt.
쏅 Drücken Sie im Optionen-Menü die Schalt äche
RDS, um die Einstellung zu ändern.
쏅 Drücken Sie die Schalt äche
.
Das Radiomenü wird wieder angezeigt.
RDS-Zeitsignal ein-/ausschalten
Die Uhrzeit kann mit den über RDS gesendeten Uhrzeitdaten synchronisiert werden.
쏅 Drücken Sie im Radiomenü die Schalt äche
.
쏅 Drücken Sie im Optionen-Menü die Schalt äche
RDS CT, um die Einstellung zu ändern.
쏅 Drücken Sie die Schalt äche
.
Das Radiomenü wird wieder angezeigt.
Radioempfang optimieren
Die HICUT-Funktion bewirkt eine Empfangsverbesserung
bei schlechtem Radioempfang (nur im FM-Radiobetrieb).
Wenn Empfangsstörungen vorhanden sind, wird automatisch der Störpegel abgesenkt.
쏅 Drücken Sie im Radiomenü die Schalt äche
.
쏅 Drücken Sie im Optionen-Menü die Schalt äche
HICUT, um die Einstellung zu ändern.
쏅 Drücken Sie die Schalt äche
.
Das Radiomenü wird wieder angezeigt.
REG-Funktion (Regionalprogramme)
ein-/ausschalten
Einige RDS-Sender teilen zu bestimmten Zeiten ihr Programm in Regionalprogramme mit unterschiedlichem
Inhalt auf. Bei eingeschalteter REG-Funktion wechselt
das Autoradio nur auf Alternativfrequenzen des eingestellten Senders, auf denen dasselbe Regionalprogramm
ausgestrahlt wird.
쏅 Drücken Sie im Radiomenü die Schalt äche REG, um
die REG-Funktion ein- bzw. auszuschalten.
Die Schalt äche REG leuchtet, wenn die REG-Funk-
tion eingeschaltet ist.
AF-Funktion (Alternativfrequenzen)
ein-/ausschalten
Wenn die AF-Funktion aktiviert ist, schaltet das Autoradio automatisch auf die am besten zu empfangende Frequenz des eingestellten Senders.
쏅 Drücken Sie im Radiomenü die Schalt äche AF, um
die AF-Funktion ein- bzw. auszuschalten.
Die Schalt äche AF leuchtet, wenn die AF-Funktion
eingeschaltet ist.
Suchlauf-Emp ndlichkeit einstellen
Die Suchlauf-Emp ndlichkeit entscheidet darüber, ob
der automatische Sendersuchlauf nur starke Sender oder
auch schwächere Sender, die evtl. verrauscht sind, ndet.
쏅 Drücken Sie im Radiomenü die Schalt äche Loc, um
die Em ndlichkeit des Sendersuchlaufs einzustellen.
Wenn die Schalt äche Loc leuchtet, ndet der Such-
lauf nur starke Sender.
Radiobetrieb
01_NewYork_840_845_de.indd 8
01_NewYork_840_845_de.indd 8
03.09.14 15:04
03.09.14 15:04
Page 9

9
DEUTSCH
Programmtyp auswählen und Suchlauf
starten
Mit der PTY-Funktion können Sie einen Programmtyp
wählen und so gezielt nach Sendern suchen, die z. B.
Rockmusik oder Sportsendungen ausstrahlen.
쏅 Drücken Sie im Radiomenü die Schalt äche
.
쏅 Drücken Sie im Optionen-Menü die Schalt äche
PTY Liste, um die Programmtypen einzublenden.
쏅 Wählen Sie mit der Schaltfläche
bzw. den
gewünschten Programmtyp aus.
쏅 Drücken Sie die Schalt äche
, um den PTY-
Suchlauf zu starten.
Wenn ein Sender eine Sendung mit dem gewählten
Programmtyp ausstrahlt, wird dieser Sender wiedergegeben.
Verkehrsfunk
In der Empfangsregion Europa kann ein FM-Sender Verkehrsmeldungen durch ein RDS-Signal kennzeichnen.
Wenn der Vorrang für Verkehrsmeldungen eingeschaltet ist, wird eine Verkehrsmeldung automatisch durchgestellt, auch wenn sich das Autoradio gerade nicht im
Radiobetrieb be ndet.
Hinweis:
Die Lautstärke wird für die Dauer der durchgestellten
Verkehrsdurchsage erhöht. Sie können die Minimallautstärke für Verkehrsdurchsagen einstellen.
Vorrang für Verkehrsmeldungen ein-/ausschalten
쏅 Drücken Sie im Radiomenü die Schalt äche TA , um
den Vorrang für Verkehrsmeldungen ein- bzw. auszuschalten.
Die Schalt äche TA leuchtet, wenn der Vorrang für
Verkehrsmeldungen eingeschaltet ist.
Minimallautstärke für Verkehrsdurchsagen
einstellen
쏅 Drücken Sie im Radiomenü die Schalt äche
.
쏅 Drücken Sie im Optionen-Menü die Schalt äche
TA V OL .
쏅 Stellen Sie die gewünschte Lautstärke mit der Schalt-
äche
bzw. ein.
쏅 Drücken Sie die Schalt äche
.
Das Radiomenü wird wieder angezeigt, die eingestellte Lautstärke ist gespeichert.
Navigation
(nur bei Geräten mit Navigation)
Navigationsdaten laden
Die Navigationssoftware und Kartendaten be nden
sich auf einer microSD-Karte. Bei Geräten mit Navigation wird das Gerät mit der microSD-Karte im microSDKartenschacht ausgeliefert. Um die Navigation nutzen
zu können, muss die microSD-Karte im Kartenschacht
eingelegt sein.
쏅 Ö nen Sie die Abdeckung des Kartenschachtes
=
neben dem DVD-/CD-Schacht.
쏅 Schieben Sie die microSD-Karte mit der bedruckten
Seite nach oben in den Schacht, bis sie einrastet.
쏅 Schließen Sie die Abdeckung des Schachtes wieder.
Download von Kartendaten
Um Ihnen beim Erwerb des Gerätes den neuesten
Stand der Kartendaten zu garantieren, besteht 30 Tage
nach der ersten GPS-Ortung die Möglichkeit, über die
Internetseite www.naviextras.com einmalig und kostenlos, die aktuellsten Kartendaten auf die serienmäßige
microSD-Karte herunterzuladen.
Zu späteren Zeitpunkten können Sie hier jederzeit neues
Kartenmaterial kostenp ichtig erwerben.
Wichtiger Hinweis:
Bei Verlust oder Beschädigung der microSD-Karte
erlischt die damit verbundene Navigations-Kartenlizenz. In diesem Fall muss die Lizenz zusammen mit
einer neuen microSD-Karte neu erworben werden.
Navigation starten
쏅 Drücken Sie die Taste 3.
- Oder -
쏅 Drücken Sie im Hauptmenü auf Navigation.
Das Navigationsmenü wird angezeigt. Wenn Sie die
Navigation zum ersten Mal starten wird der Einrichtungsassistent angezeigt.
Erste Inbetriebnahme
Wenn Sie die Navigation zum ersten Mal starten, wird ein
Einrichtungsassistent gestartet der die Grundeinstellungen für die Navigation vornimmt.
쏅 Stellen Sie die Sprache für die Navigation ein. Dies
kann eine andere Sprache sein als für die anderen
Funktionen des Gerätes.
쏅 Bestätigen Sie die Auswahl mit
.
Der Endbenutzerlizenzvertrag wird angezeigt.
쏅 Lesen Sie den Endbenutzerlizenzvertrag. Wenn Sie
mit den Bestimmungen einverstanden sind, drücken
Sie auf
.
Radiobetrieb | Navigation
01_NewYork_840_845_de.indd 9
01_NewYork_840_845_de.indd 9
03.09.14 15:04
03.09.14 15:04
Page 10

10
Der Kon gurationsassistent wird gestartet.
쏅 Drücken Sie auf
, um fortzufahren.
쏅 Wählen Sie eine Stimme für die Sprachausgabe der
Navigation. Es stehen unterschiedliche Stimmen für
die Sprachen zur Verfügung.
쏅 Bestätigen Sie die Auswahl mit
.
쏅 Legen Sie das Zeitformat und die Einheiten für die
Navigation fest. Drücken Sie anschließend
.
Auf dem nächsten Bildschirm können Sie ihre bevorzugten Routeneinstellungen vornehmen.
쏅 Ändern Sie die Einträge ggf. durch Drücken der ange-
zeigten Menüeinträge.
쏅 Drücken Sie
, wenn Sie die Einstellungen ange-
passt haben.
쏅 Tippen Sie auf
, um die Kon guration abzu-
schließen.
Das Navigationsmenü wird angezeigt.
Ziel eingeben
Sie haben verschiedene Möglichkeiten, Ziele einzugeben: Über die Adresse oder als Sonderziel aus der Datenbank der Sonderziele. Sonderziele sind z.B. Sehenswürdigkeiten, Museen, Stadien, Tankstellen.
Adresse
쏅 Ö nen Sie das Navigationsmenü.
쏅 Drücken Sie auf Ziel.
Das Menü zur Zieleingabe wird angezeigt.
쏅 Drücken Sie auf Adresse suchen.
Das Menü zur Adresseingabe wird angezeigt.
쏅 Geben Sie nacheinander das Land, die Stadt und die
Straße sowie die Kreuzung oder Hausnummer ein.
Drücken Sie dazu die entsprechenden Einträge im
Menü zur Adresseingabe.
Ein Menü zur Texteingabe wird angezeigt.
쏅 Geben Sie das gewünschte Ziel mit der Tastatur ein.
Mit jedem Buchstaben den Sie eingeben wird der
Eintrag in der Eingabezeile automatisch vervollständigt.
쏅 Wenn der Name des gewünschten Ziels in der
Adress zeile angezeigt wird, drücken Sie die Schalt äche
.
Das ausgewählte Ziel wird auf der Karte gezeigt.
쏅 Drücken Sie Weiter, um die Zielführung zu starten.
Die Berechnung der Route beginnt. Abhängig von
der Entfernung zwischen Start und Ziel kann die
Routenberechnung einige Zeit dauern.
Navigation
01_NewYork_840_845_de.indd 10
01_NewYork_840_845_de.indd 10
03.09.14 15:04
03.09.14 15:04
Page 11
11
DEUTSCH
Nach Abschluss der Routenberechnung werden die
Parameter der Route wie Entfernung und Zeit angezeigt. Außerdem wird der gesamte Routenverlauf auf
der Karte dargestellt.
쏅 Drücken Sie Los!, um die Zielführung zu starten.
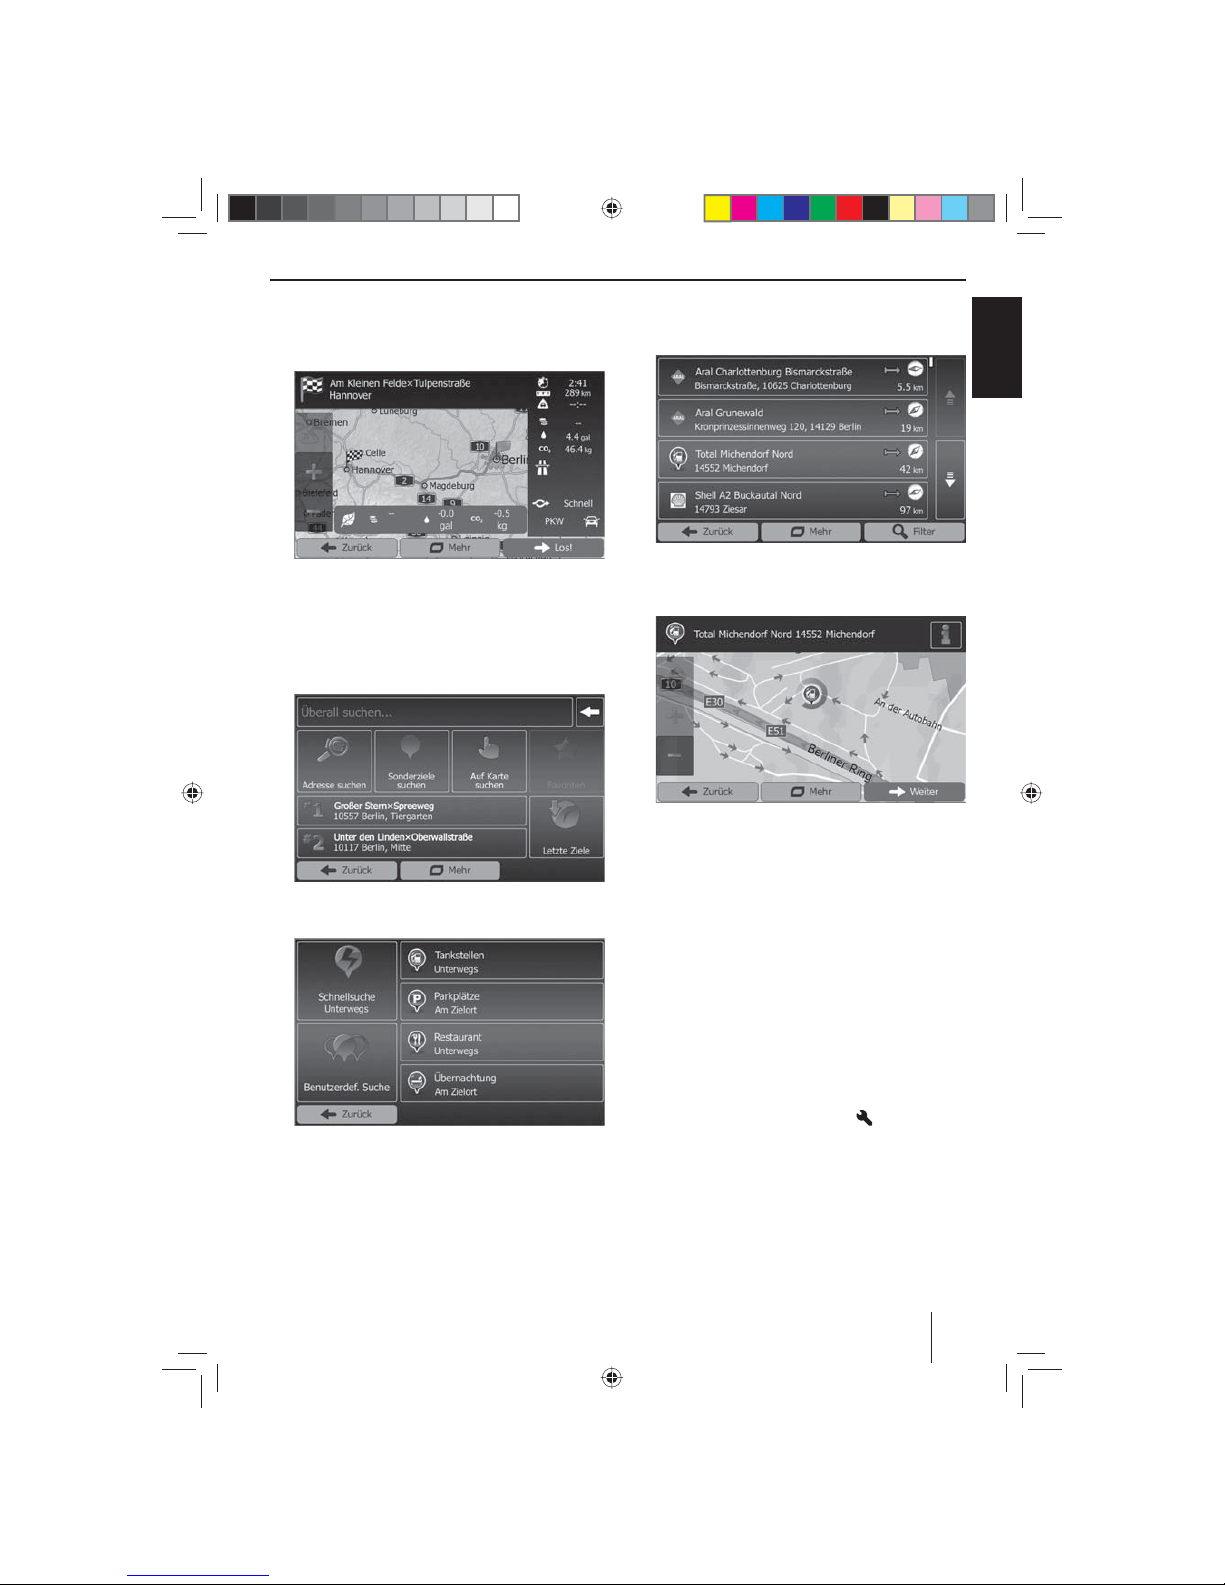
Sonderziele - Points of Interest (POI)
쏅 Ö nen Sie das Navigationsmenü.
쏅 Drücken Sie auf Ziel.
Das Menü zur Zieleingabe wird angezeigt.
쏅 Drücken Sie auf Sonderziele suchen.
Das Sonderziel-Menü wird angezeigt.
쏅 Sie können aus einer der vier vorde nierten Kate-
gorien Tankstellen, Parkplätze, Restaurant und
Übernachtung ein Sonderziel auswählen oder eine
eigene Suche starten.
쏅 Drücken Sie z. B. auf Tankstellen, um schnell eine
Tankstelle zu nden.
Eine Liste mit Tankstellen in der Umgebung des Fahrzeugs wird angezeigt. Die Tankstellen sind dabei sortiert nach der Entfernung zum Fahrzeug.
쏅 Wählen Sie eine Tankstelle aus der Liste durch Drü-
cken auf den Listeneintrag aus.
Die Tankstelle wird auf der Karte angezeigt.
쏅 Drücken Sie Weiter.
Der Routenverlauf und die Routendaten werden angezeigt.
쏅 Drücken Sie Los!, um die Zielführung zu starten.
Routenoptionen einstellen
In den Routenoptionen werden der Fahrzeugtyp, die Art
der Route (schnell, kurz, dynamisch) sowie weitere Parameter eingestellt die das Gerät benötigt, um die Route
nach ihren Anforderungen zu berechnen.
Sie stellen die Routenoptionen bei der ersten Einrichtung
der Navigation ein, können diese aber für jede Zielführung ändern.
Routenoptionen vor der Zielführung anpassen
쏅 Rufen Sie das Navigationsmenü auf.
쏅 Drücken Sie auf die Schalt äche
.
Navigation
01_NewYork_840_845_de.indd 11
01_NewYork_840_845_de.indd 11
03.09.14 15:04
03.09.14 15:04
Page 12
12
Das Einstellungen-Menü für die Navigation wird angezeigt.
쏅 Drücken Sie auf die Schalt äche , um die zweite
Seite anzeigen zu lassen.
쏅 Drücken Sie Routeneinstellungen.
Die Routeneinstellungen werden angezeigt.
쏅 Ändern Sie ggf. die Einstellungen.
쏅 Drücken Sie Zurück so oft, bis wieder das Naviga-
tionsmenü angezeigt wird.
Routenoptionen während der Zielführung ändern
쏅 Drücken Sie während einer Zielführung die Schalt ä-
che
.
쏅 Drücken Sie Routeneinstellungen.
Die Routeneinstellungen werden angezeigt.
쏅 Ändern Sie ggf. die Einstellungen.
쏅 Drücken Sie Zurück.
Die Zielführung wird wieder angezeigt.
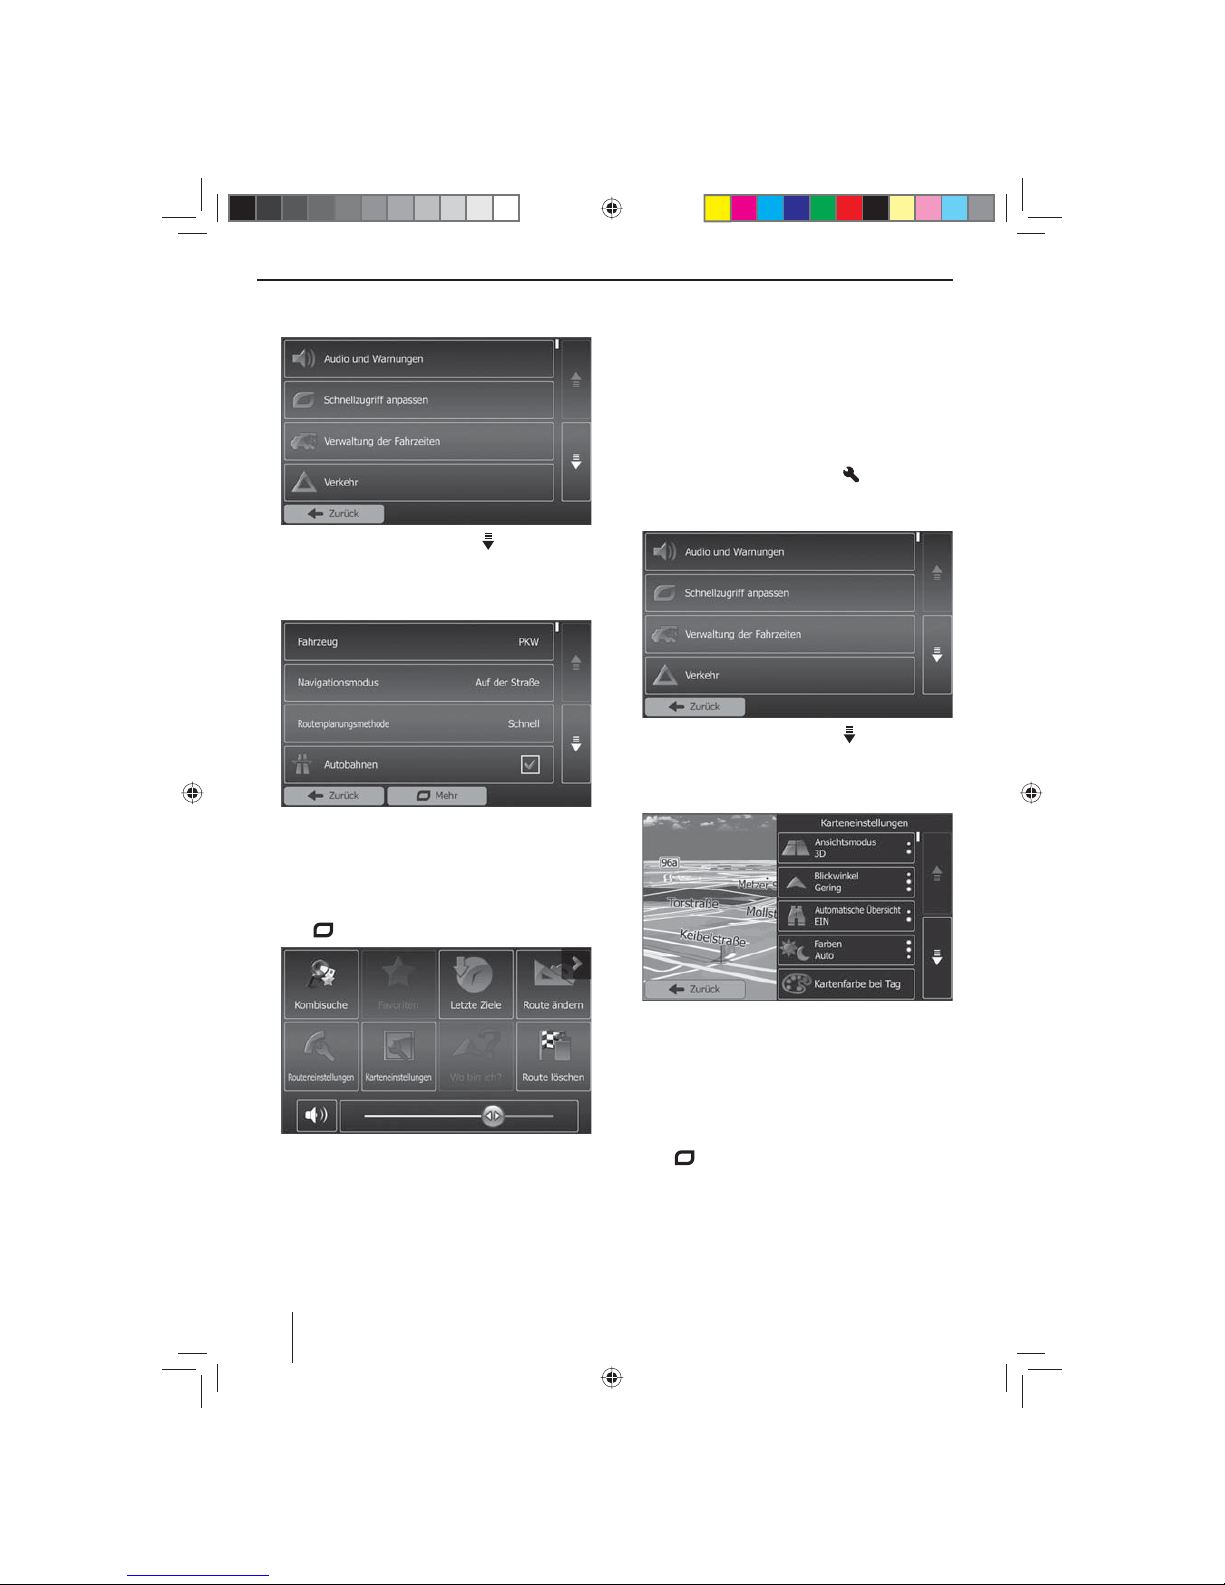
Karteneinstellungen
Mit den Karteneinstellungen können Sie den Ansichtsmodus (2D oder 3D), den Blickwinkel der Karte, die
Farben sowie die Anzeige von Gebäuden und Orientierungspunkten auf der Karte einstellen. Darüber hinaus
können Sie für Kategorien von Sonderzielen einstellen,
ob diese auf der Karte angezeigt werden sollen z.B. Autohäuser, Cafés, Restaurants.
쏅 Rufen Sie das Navigationsmenü auf.
쏅 Drücken Sie auf die Schalt äche
.
Das Einstellungen-Menü für die Navigation wird angezeigt.
쏅 Drücken Sie auf die Schalt äche , um die zweite
Seite anzeigen zu lassen.
쏅 Drücken Sie Karteneinstellungen.
Die Karteneinstellungen werden angezeigt.
쏅 Ändern Sie ggf. die Einstellungen.
쏅 Drücken Sie Zurück so oft, bis wieder das Naviga-
tionsmenü angezeigt wird.
Hinweis:
Sie können die Karteneinstellungen auch während
der Zielführung ändern:
쏅 Drücken Sie während einer Zielführung die Schalt ä-
che
.
쏅 Drücken Sie Karteneinstellungen.
Die Karteneinstellungen werden angezeigt.
쏅 Ändern Sie ggf. die Einstellungen.
쏅 Drücken Sie Zurück.
Die Zielführung wird wieder angezeigt.
Navigation
01_NewYork_840_845_de.indd 12
01_NewYork_840_845_de.indd 12
03.09.14 15:04
03.09.14 15:04
Page 13

13
DEUTSCH
Medienwiedergabe DVD/CD/USB/
SDHC/iPod
Grundlegende Informationen
Sie können mit dem Autoradio Audio-DVDs/CDs (CDDA)
und DVD-/CD-R/RWs mit Audio-, MP3- oder WMA-Dateien sowie MP3- oder WMA-Dateien auf USB-Datenträgern
und SDHC-Karten spielen.
Außerdem können Sie Filme und Bilder von DVDs/VCDs/
CDs, USB-Datenträgern und SDHC-Karten auf dem Display anzeigen lassen. Auf einem externen Monitor (Rear
Seat Entertainment - RSE) können Filme und Bilder von
DVDs/VCDs/CDs, USB-Datenträgern und AV-Quellen angezeigt werden.
Die Wiedergabe von Filmen und Fotos ist aus Sicherheitsgründen auf dem eingebauten Monitor nur bei stehendem Fahrzeug und angezogener Handbremse erlaubt.
Das Kabel „BRAKE“ muss an den Handbremsanschluss
des Fahrzeugs angeschlossen werden (siehe Anschlussschema am Ende dieser Anleitung). Die Filmwiedergabe
auf einem externen Monitor ist auch während der Fahrt
möglich.
Hinweise:
• Für eine einwandfreie Funktion verwenden Sie
nur CDs mit dem Compact-Disc-Logo und DVDs
mit dem DVD-Logo.
• Blaupunkt kann nicht die einwandfreie Funktion
von kopiergeschützten DVDs/CDs sowie aller auf
dem Markt erhältlichen DVD-/CD-Rohlinge, USBDatenträger und SD-Karten garantieren.
Beachten Sie beim Vorbereiten eines MP3-/WMA-Datenträgers die folgenden Angaben:
• Benennung von Titeln und Verzeichnissen: Max.
32 Zeichen ohne Dateiendung „.mp3“ bzw. „.wma“
(bei mehr Zeichen verringert sich die Anzahl der vom
Autoradio erkennbaren Titel und Ordner)
• DVD-/CD-Formate: DVD-/CD-R/RW, Ø: 12 cm
• DVD -/CD-Datenformate: ISO 9669 Level 1 und 2, Joliet
• CD-Brenngeschwindigkeit: Max. 16-fach (empfohlen)
• USB-Format/-Dateisystem: Mass Storage Device
(Massenspeicher)/FAT32
• SD-Karten-Dateisystem: FAT32
• Dateiendung von Audiodateien:
– .MP3 für MP3-Dateien
– .WMA für WMA-Dateien
• WMA-Dateien nur ohne Digital Rights Management
(DRM) und erstellt mit Windows Media® Player ab
Version 8
• MP3-ID3-Tags: Version 1 und 2
• Bitrate für die Erzeugung von Audiodateien:
– MP3: 32 bis 320 kbps
– WMA: 32 bis 192 kbps
• Kapazität des Datenträgers: Bis zu 32 GB
DVD-/CD-Betrieb
DVD/CD einlegen
Zerstörungsgefahr des DVD/CD-Laufwerks!
Unrund konturierte DVDs/CDs und DVDs/CDs
mit 8 cm Durchmesser (Mini-DVDs/CDs) dürfen nicht verwendet werden.
Für Beschädigungen des Laufwerks durch ungeeignete
DVDs/CDs wird keine Haftung übernommen.
쏅 Schieben Sie die DVD/CD mit der bedruckten Seite
nach oben in den DVD-/CD-Schacht
>
, bis ein Wi-
derstand spürbar wird.
Die DVD/CD wird automatisch eingezogen und ihre
Daten werden überprüft. Danach beginnt die Wiedergabe im DVD/CD- bzw. MP3-Betrieb.
Hinweis:
Der automatische Einzug der DVD/CD darf nicht behindert oder unterstützt werden.
DVD/CD entnehmen
쏅 Drücken Sie die Taste
1, um eine eingelegte
DVD/CD auszuschieben.
Hinweis:
Das Ausschieben der DVD/CD darf nicht behindert
oder unterstützt werden.
USB-Datenträger
Dieses Gerät verfügt über drei USB-Anschlüsse:
• USB1 ist unter der Abdeckklappe in die Gerätefront
integriert.
• USB2 und USB RSE sind als USB-Buchse an einem
Kabel an der Geräterückseite ausgeführt.
Hinweise:
• Auf einem USB-Datenträger gespeicherte Filme
und Bilder können nur über den USB RSE Anschluss auf einem externen Monitor (Rear Seat
Entertainment - RSE) wiedergegeben werden.
• Der USB RSE Anschluss unterstützt USB-Datenträger mit einer Kapazität von maximal 32 GB. Die
höchstmögliche Anzahl an Dateien und Verzeichnissen beträgt 1900 Dateien / 450 Verzeichnisse.
• Der USB RSE Anschluss unterstützt DivX. Die Anschlüsse USB1 und USB2 unterstützen DivX nicht.
USB1 anschließen
쏅 Ö nen Sie die Abdeckklappe
8
unterhalb des
Dreh-/Druckknopfes.
쏅 Stecken Sie den USB-Datenträger in die USB-Buchse
;
.
Das Gerät schaltet automatisch in den USB1-Betrieb.
Die Daten werden eingelesen, die Wiedergabe beginnt
mit der ersten Mediendatei die das Gerät erkennt.
Medienwiedergabe DVD/CD/USB/SDHC/iPod
01_NewYork_840_845_de.indd 13
01_NewYork_840_845_de.indd 13
11.09.14 12:06
11.09.14 12:06
Page 14
14
USB1 Datenträger entfernen
쏅 Schalten Sie das Autoradio aus.
쏅 Ziehen Sie den USB-Datenträger ab.
SDHC-Karten
Dieses Gerät verfügt über einen SDHC-Kartenschacht unter der Abdeckklappe an der Gerätefront.
SDHC-Karte einstecken
쏅 Ö nen Sie die Abdeckklappe
8
unterhalb des
Dreh-/Druckknopfes.
쏅 Schieben Sie die SDHC-Karte mit der bedruckten
Seite nach links (abge achte Ecke nach oben) und
den Kontakten voran in den Kartenschacht
9
, bis
sie einrastet.
Das Gerät schaltet automatisch in den SDHC-Betrieb.
Die Daten werden eingelesen, die Wiedergabe beginnt mit der ersten Mediendatei die das Gerät erkennt.
SDHC-Karte entnehmen
쏅 Ö nen Sie ggf. die Abdeckklappe
8
.
쏅 Drücken Sie auf die SDHC-Karte, bis sie entriegelt
wird.
쏅 Ziehen Sie die SDHC-Kar te aus dem Kartenschacht
9
heraus.
iPod/iPhone über USB
Sie können zahlreiche iPod®- und iPhone®-Modelle über
die USB-Anschlüsse an das Autoradio anschließen und
die Audiowiedergabe vom Autoradio aus steuern.
Hinweis:
Eine Liste kompatibler iPod®- und iPhone®-Modelle
nden Sie am Ende der Anleitung. Blaupunkt kann
nicht die einwandfreie Funktion anderer iPod®- und
iPhone®-Modelle garantieren.
Verwenden Sie ein geeignetes Adapterkabel, um Ihren
iPod® oder Ihr iPhone® mit dem USB-Anschluss des Autoradios zu verbinden.
쏅 Stecken Sie den USB-Stecker des Adapterkabels in
eine der USB-Buchsen (USB1 oder USB2) des Gerätes.
Das Gerät schaltet automatisch in den USB-Betrieb.
Die Daten werden eingelesen, die Wiedergabe beginnt mit der ersten Mediendatei auf dem iPod®/
iPhone® die das Gerät erkennt.
DVD Filmwiedergabe
Das Autoradio kann Video-DVDs und VCDs abspielen.
Nach dem Einlegen der DVD startet automatisch die
Wiedergabe. Das DVD-Menü wird angezeigt.
Sie können im DVD-Menü navigieren indem Sie die
entsprechenden Schalt ächen im DVD-Menü auf dem
Touchscreen berühren.
Nachdem Sie den Film über das Menü der DVD gestartet
haben, wird der Film angezeigt. Das Wiedergabemenü
für DVDs wird ausgeblendet.
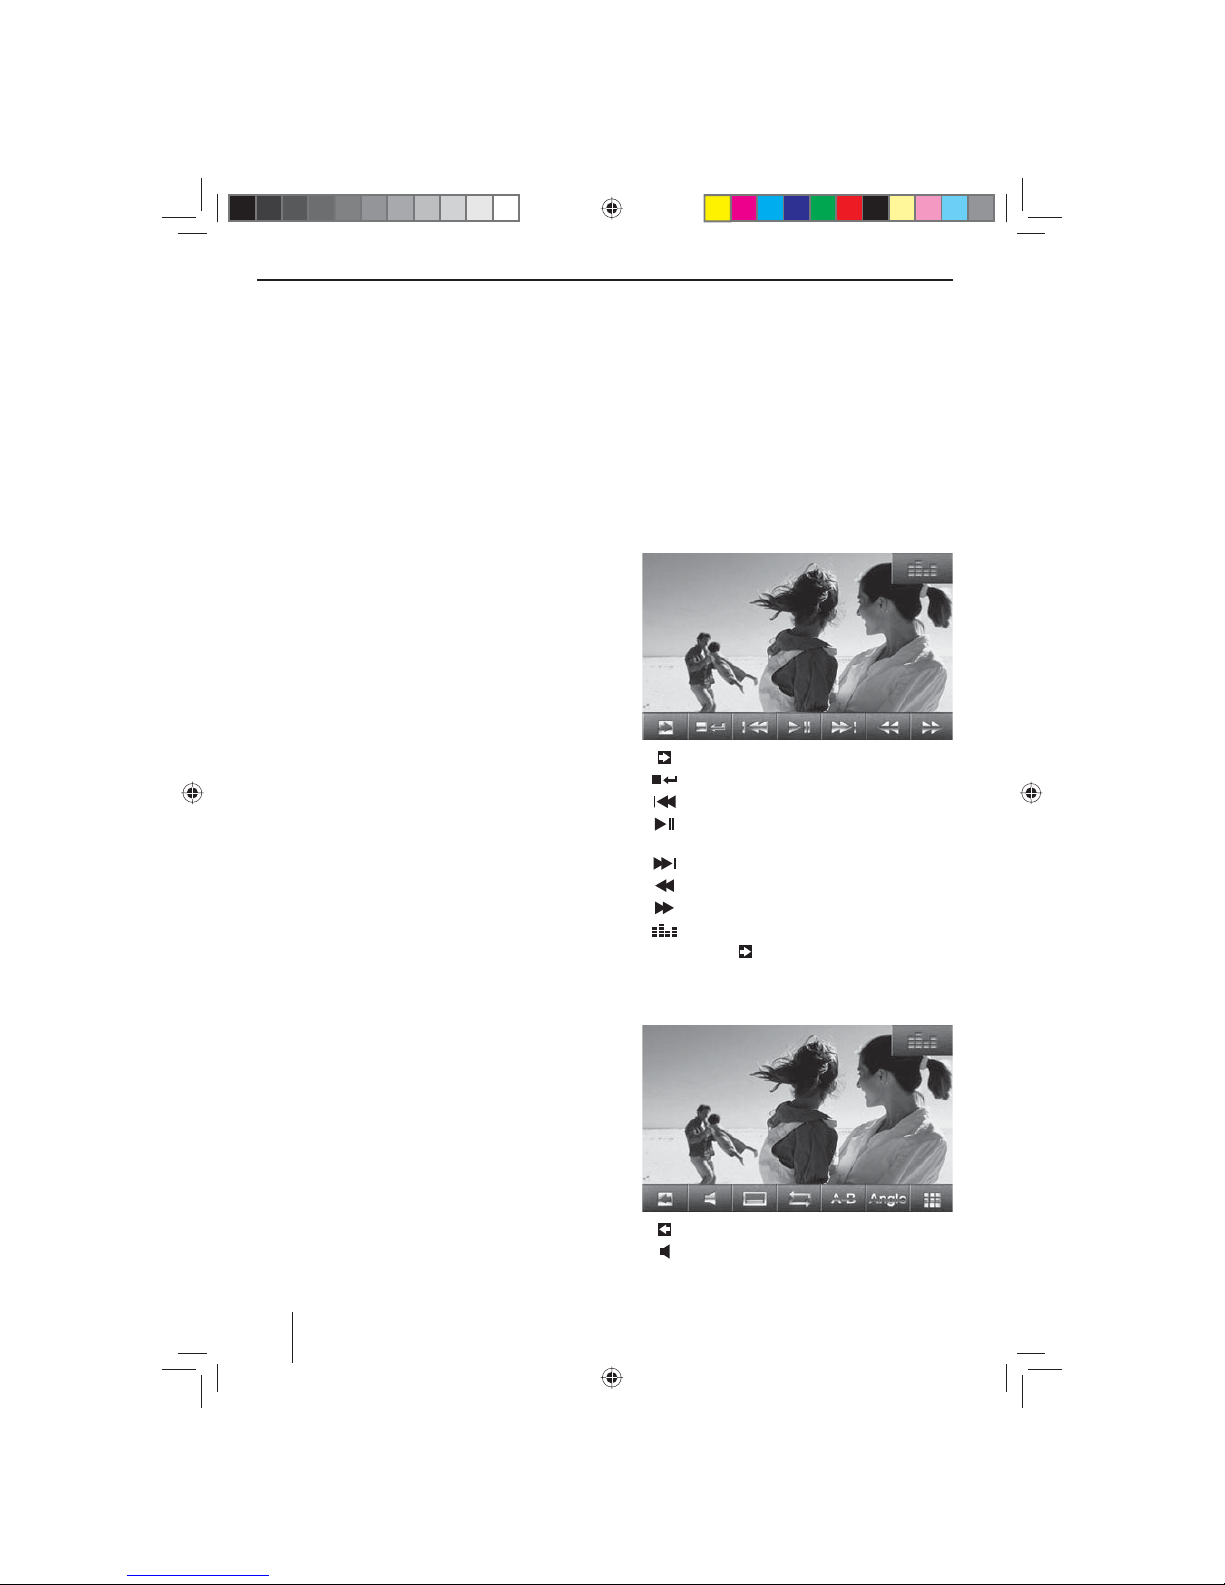
쏅 Tippen Sie einmal kurz auf den Touchscreen, um das
Wiedergabemenü anzeigen zu lassen.
Das Wiedergabemenü wird eingeblendet.
[ ] Zweite Seite des Menüs anzeigen lassen.
[
] Wiedergabe beenden, DVD-Menü aufrufen.
[
] Vorheriges Kapitel auswählen.
[
] Wiedergabe unterbrechen und wieder fort-
setzen.
[
] Nächstes Kapitel auswählen.
[
] Schneller Suchlauf rückwärts.
[
] Schneller Suchlauf vorwärts.
[
] Equalizer anzeigen lassen.
쏅 Tippen Sie auf
, um die zweite Seite des Wieder-
gabemenüs anzeigen zu lassen.
Die zweite Seite des Wiedergabemenüs wird einge-
blendet.
[ ] Erste Seite anzeigen lassen.
[
] Wiedergabesprache wählen (nur wenn von
der DVD unterstützt).
Medienwiedergabe DVD/CD/USB/SDHC/iPod
01_NewYork_840_845_de.indd 14
01_NewYork_840_845_de.indd 14
03.09.14 15:04
03.09.14 15:04
Page 15
15
DEUTSCH
[ ] Untertitel einblenden (nur wenn von der
DVD unterstützt).
[
] Wiederholfunktion für Kapitel oder Bereich
A-B ein-/ausschalten.
[
] Bereich für Wiederholfunktion festlegen.
[
] Kamerablickwinkel (Angle) umschalten (nur
wenn von der DVD unterstützt).
[
] Tastenfeld zur direkten Anwahl von Titeln,
Kapiteln bzw. Laufzeit aufrufen.
Audiowiedergabe von DVD/CD, USB,
SDHC oder iPod/iPhone
Die Prinzipien der Audiowiedergabe (MP3/WMA) von
Datenträgern bzw. iPod®/iPhone® sind für alle Quellen
identisch.
쏅 Wählen Sie über das Hauptmenü die gewünschte
Quelle.
Wenn die Wiedergabe mit Bild- oder Videodateien startet,
쏅 drücken Sie die Schalt äche
, um in die Audio-
wiedergabe zu wechseln.
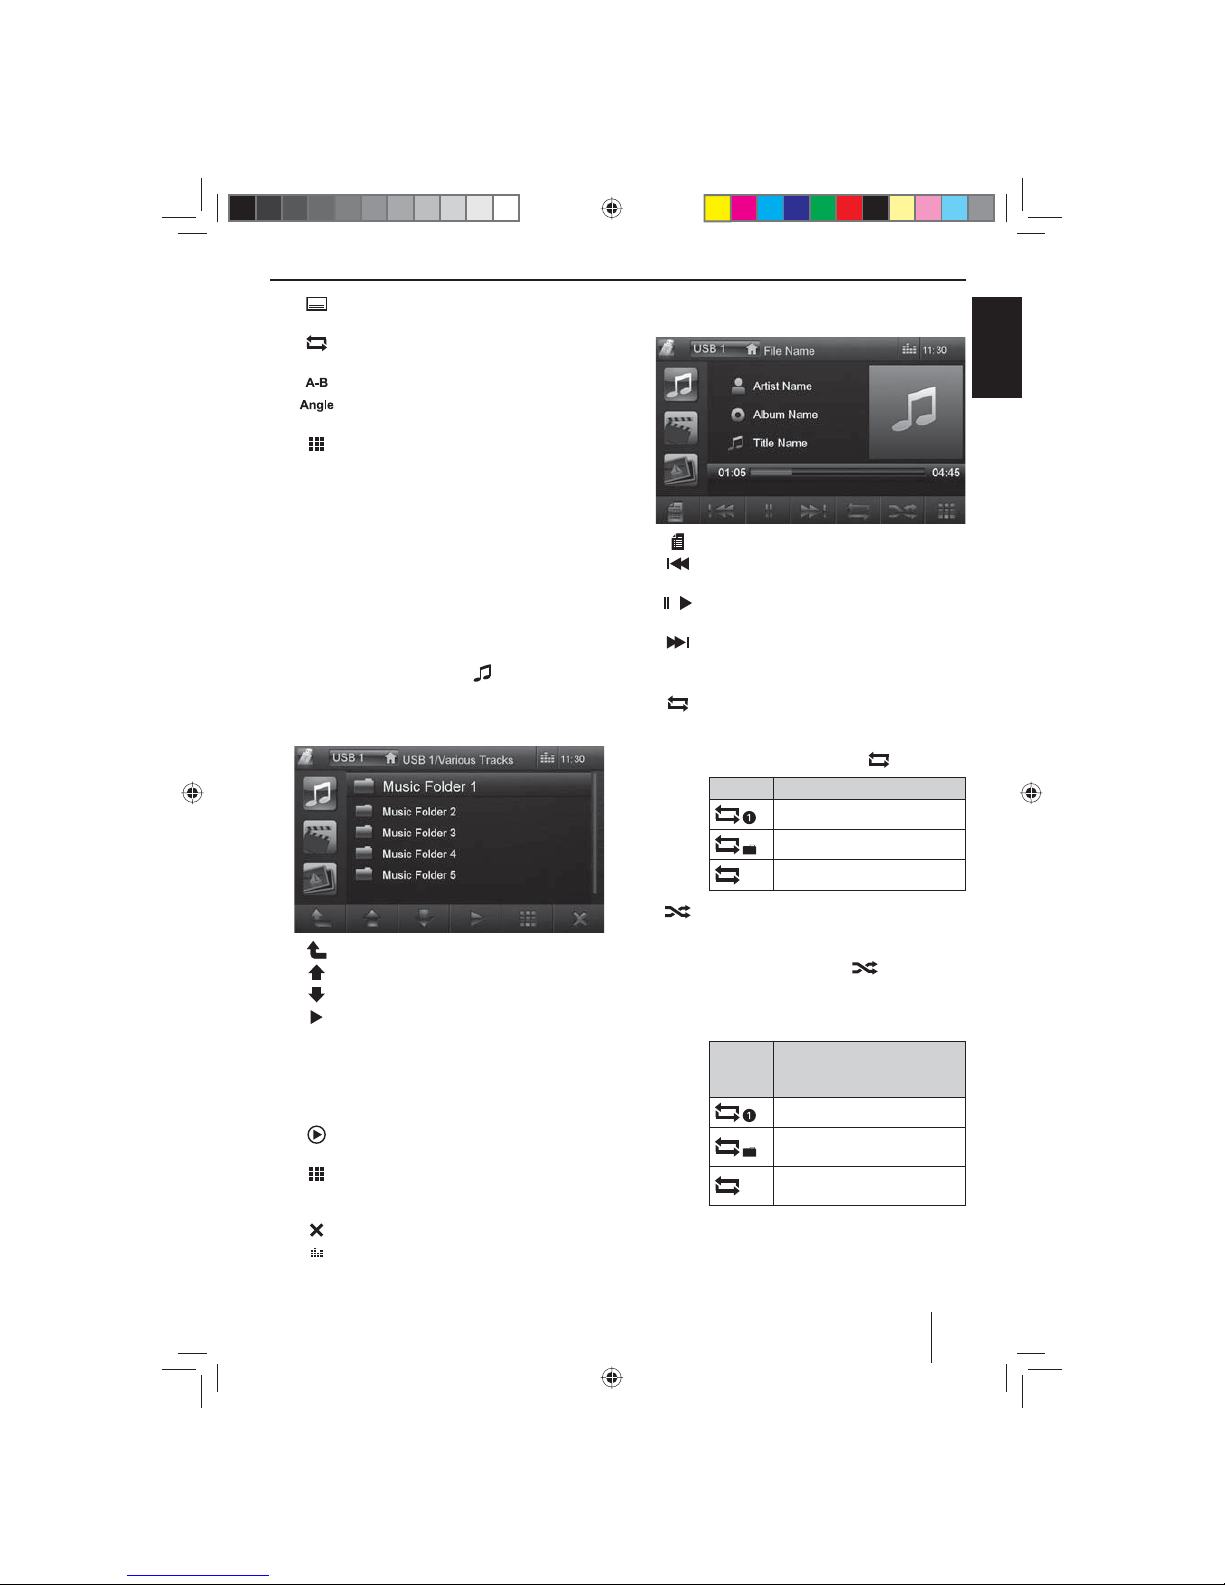
Die Ordner des Datenträgers, die Audiodateien ent-
halten, werden angezeigt.
[ ] Wechsel in die nächsthöhere Ordnerebene.
[
] Auswahlmarkierung verschieben.
[
] Auswahlmarkierung verschieben.
[
] Ausgewählten Ordner ö nen bzw. Titel
starten.
- Oder Auf den Namen des Ordners bzw. des Titels
tippen. Der Ordner wird geö net bzw. der
Titel wird gestartet.
[ ] Wiedergabe fortsetzen
nur iPod®/iPhone®
[
] Tastenfeld anzeigen lassen, um die Num-
mer des gewünschten Titels direkt einzugeben.
[
] Ordner-/Dateiliste verlassen.
[
] Equalizer anzeigen lassen.
Wenn Sie einen Titel gestartet haben, wird das Wiedergabemenü angezeigt.
[ ] Ordneransicht anzeigen lassen.
[
] Kurzdruck: Titelwahl.
Langdruck: Schneller Suchlauf.
[
/ ] Wiedergabe unterbrechen und wieder fort-
setzen.
[
] Kurzdruck: Titelwahl.
Langdruck: Schneller Suchlauf.
Audiowiedergabe von DVD/CD, USB oder SDHC:
[
] Wiederholfunktion REPEAT starten und wie-
der beenden.
Der REPEAT-Modus wechselt mit jedem
Drücken der Schalt äche
.
Anzeige REPEAT-Modus
Aktuellen Titel wiederholen
Aktuellen Ordner wiederholen
Normale Wiedergabe
[
] Zufallswiedergabe MIX starten und wieder
beenden.
Wenn die MIX-Funktion eingeschaltet ist
wird die Schalt äche
hervorgeho-
ben angezeigt.
Der MIX-Modus ist abhängig von der ge-
wählten Wiederholfunktion REPEAT.
Anzeige
REPEATModus
MIX-Modus
Keine Zufallswiedergabe
Titel des aktuellen Ordners
mischen
Titel des Datenträgers
mischen
Medienwiedergabe DVD/CD/USB/SDHC/iPod
01_NewYork_840_845_de.indd 15
01_NewYork_840_845_de.indd 15
03.09.14 15:04
03.09.14 15:04
Page 16

16
Audiowiedergabe von iPod®/iPhone®:
[
] Wiederholfunktion REPEAT starten und wie-
der beenden.
Der REPEAT-Modus wechselt mit jedem
Drücken der Schalt äche
.
Anzeige REPEAT-Modus
Aktuellen Titel wiederholen
Aktuelle Auswahl wiederholen
[
] Zufallswiedergabe MIX starten und wieder
beenden.
Der MIX-Modus wechselt mit jedem Drü-
cken der Schalt äche
.
Anzeige MIX-Modus
Titel der aktuellen Auswahl
mischen
Titel des aktuellen Albums
mischen
Hinweis:
Die Zufallswiedergabe der Titel ist abhängig
vom benutzten iPod®-/iPhone®-Modell.
[
] Tastenfeld anzeigen lassen, um die Num-
mer des gewünschten Titels direkt einzugeben.
Videowiedergabe von DVD/CD, USB oder
SDHC
쏅 Wählen Sie über das Hauptmenü die gewünschte
Quelle.
Wenn die Wiedergabe mit Audio- oder Bilddateien startet,
쏅 drücken Sie die Schalt äche
, um in die Video-
wiedergabe zu wechseln.
Die Ordner des Datenträgers, die Filme enthalten,
werden angezeigt.
Hinweis:
Ordner und Titel werden gewählt und gestartet, wie
unter Audiowiedergabe beschrieben.
Wenn Sie einen Film ausgewählt haben, wird die Wiedergabe gestartet. Während der Filmwiedergabe ist das
Wiedergabemenü ausgeblendet.
쏅 Tippen Sie einmal kurz auf den Touchscreen, um das
Wiedergabemenü anzeigen zu lassen.
Das Wiedergabemenü wird eingeblendet.
[ ] Zweite Seite des Menüs anzeigen lassen.
[
] Wiedergabe beenden, zur Ordneransicht
wechseln.
[
] Vorherigen Film auswählen.
[
] Wiedergabe unterbrechen und wieder fort-
setzen.
[
] Nächsten Film auswählen.
[
] Schneller Suchlauf rückwärts.
[
] Schneller Suchlauf vorwärts.
[
] Equalizer anzeigen lassen.
Zweite Seite des Wiedergabemenüs.
[ ] Erste Seite anzeigen lassen.
[
] Wiedergabe beenden, zur Ordneransicht
wechseln.
[
] Wiedergabesprache wählen (nur wenn die-
se Funktion vom Film unterstützt wird).
[
] Unter titel einblenden (nur wenn diese Funk-
tion vom Film unterstützt wird).
[
] Wiederholfunktion für Film oder Ordner
ein-/ausschalten.
[
] Zufallswiedergabe ein-/ausschalten.
[
] Tastenfeld zur direkten Anwahl von Film
bzw. Laufzeit aufrufen.
Medienwiedergabe DVD/CD/USB/SDHC/iPod
01_NewYork_840_845_de.indd 16
01_NewYork_840_845_de.indd 16
03.09.14 15:04
03.09.14 15:04
Page 17

17
DEUTSCH
Hinweis:
Sie können auf einem iPod®/iPhone® gespeicherte
Videodateien über dieses Gerät abspielen. Dafür
muss der iPod®/das iPhone® mit einem speziellen im
Zubehörhandel erhältlichen Spezialkabel (USB - A/V)
an das Gerät angeschlossen werden.
Bildwiedergabe von DVD/CD, USB oder
SDHC
쏅 Wählen Sie über das Hauptmenü die gewünschte
Quelle.
Wenn die Wiedergabe mit Audio- oder Filmdateien startet,
쏅 drücken Sie die Schalt äche
, um in die Bild-
wiedergabe zu wechseln.
Die Ordner des Datenträgers, die Bilder enthalten,
werden angezeigt.
Hinweis:
Ordner und Bilder werden gewählt und gestartet,
wie unter Audiowiedergabe beschrieben.
Medienwiedergabe DVD/CD/USB/SDHC/iPod | Bluetooth-Betrieb
Bluetooth-Betrieb
Sie können über die Bluetooth®-Funktion Mobiltelefone
und Medienabspielgeräte mit dem Autoradio koppeln.
Wenn Sie ein Mobiltelefon mit dem Autoradio koppeln,
können Sie Telefonate mit der eingebauten Freisprechfunktion führen. Sie können auf die Listen der gewählten
Nummern und das Telefonbuch des gekoppelten Mobiltelefons zugreifen.
Wenn das verbundene Bluetooth®-Gerät die Funktionen
A2DP und AVRCP unterstützt, können Sie die Musik über
das Autoradio wiedergeben und die Wiedergabe steuern. Während eines Anrufs wird die Musikwiedergabe
unterbrochen und nach dem Gespräch fortgesetzt.
Wenn ein Mobiltelefon über Bluetooth® gekoppelt ist
und während der Wiedergabe einer anderen Quelle ein
Anruf eingeht, wird die Quellenwiedergabe unterbrochen und das Anrufmenü angezeigt.
Bluetooth-Betrieb starten
쏅 Drücken Sie im Hauptmenü auf Bluetooth.
- Oder -
쏅 Drücken Sie die Taste
2 für ca. 2 Sekunden. (Voraussetzung: Diese Funktion ist der Taste im Einstellungen-Menü zugeordnet.)
Das Bluetooth®-Menü wird angezeigt. Es enthält die
Liste der bekannten Bluetooth®-Geräte. Andere Audioquellen werden abgeschaltet.
[ ] Auswahlmarkierung verschieben.
[
] Auswahlmarkierung verschieben.
[
] Verbindung zu markiertem Gerät beenden.
[
] Markiertes Gerät aus der Liste löschen.
[
] Optionen-Menü anzeigen lassen.
쏅 Tippen Sie auf den Namen des Bluetooth®-Gerätes
mit dem Sie eine Verbindung aufbauen wollen.
Wenn das Gerät in Reichweite ist, wird die Verbin-
dung hergestellt und das Menü für das Gerät wird
angezeigt.
01_NewYork_840_845_de.indd 17
01_NewYork_840_845_de.indd 17
03.09.14 15:04
03.09.14 15:04
Page 18
18
Bluetooth-Geräte koppeln
Wenn Sie ein Gerät zum ersten Mal mit dem Autoradio
koppeln wollen, gehen Sie wie folgt vor:
쏅 Stellen Sie sicher das Bluetooth® am Autoradio und
an ihrem Bluetooth®-Gerät aktiviert sind.
쏅 Geben Sie im Optionen-Menü des Bluetooth®-
Betriebs einen Pairing Code ein (s. Bluetooth®Einstellungen).
쏅 Suchen Sie an ihrem Bluetooth®-Gerät nach neuen
Geräten/Verbindungen.
쏅 Das Autoradio erscheint als „BP 84x“ in der Liste der
Bluetooth®-Geräte.
쏅 Stellen Sie die Verbindung her, ggf. müssen Sie den
vorher am Autoradio festgelegten Pairing Code eingeben.
Die Verbindung wird hergestellt und das Menü für
das gekoppelte Gerät wird angezeigt.
Hinweis:
Wenn ein Telefon mit dem Autoradio verbunden ist,
wird in allen Audio-/Videoquellen am rechten oberen Rand des Displays das Bluetooth®-Symbol
ein-
geblendet.
Telefonbetrieb
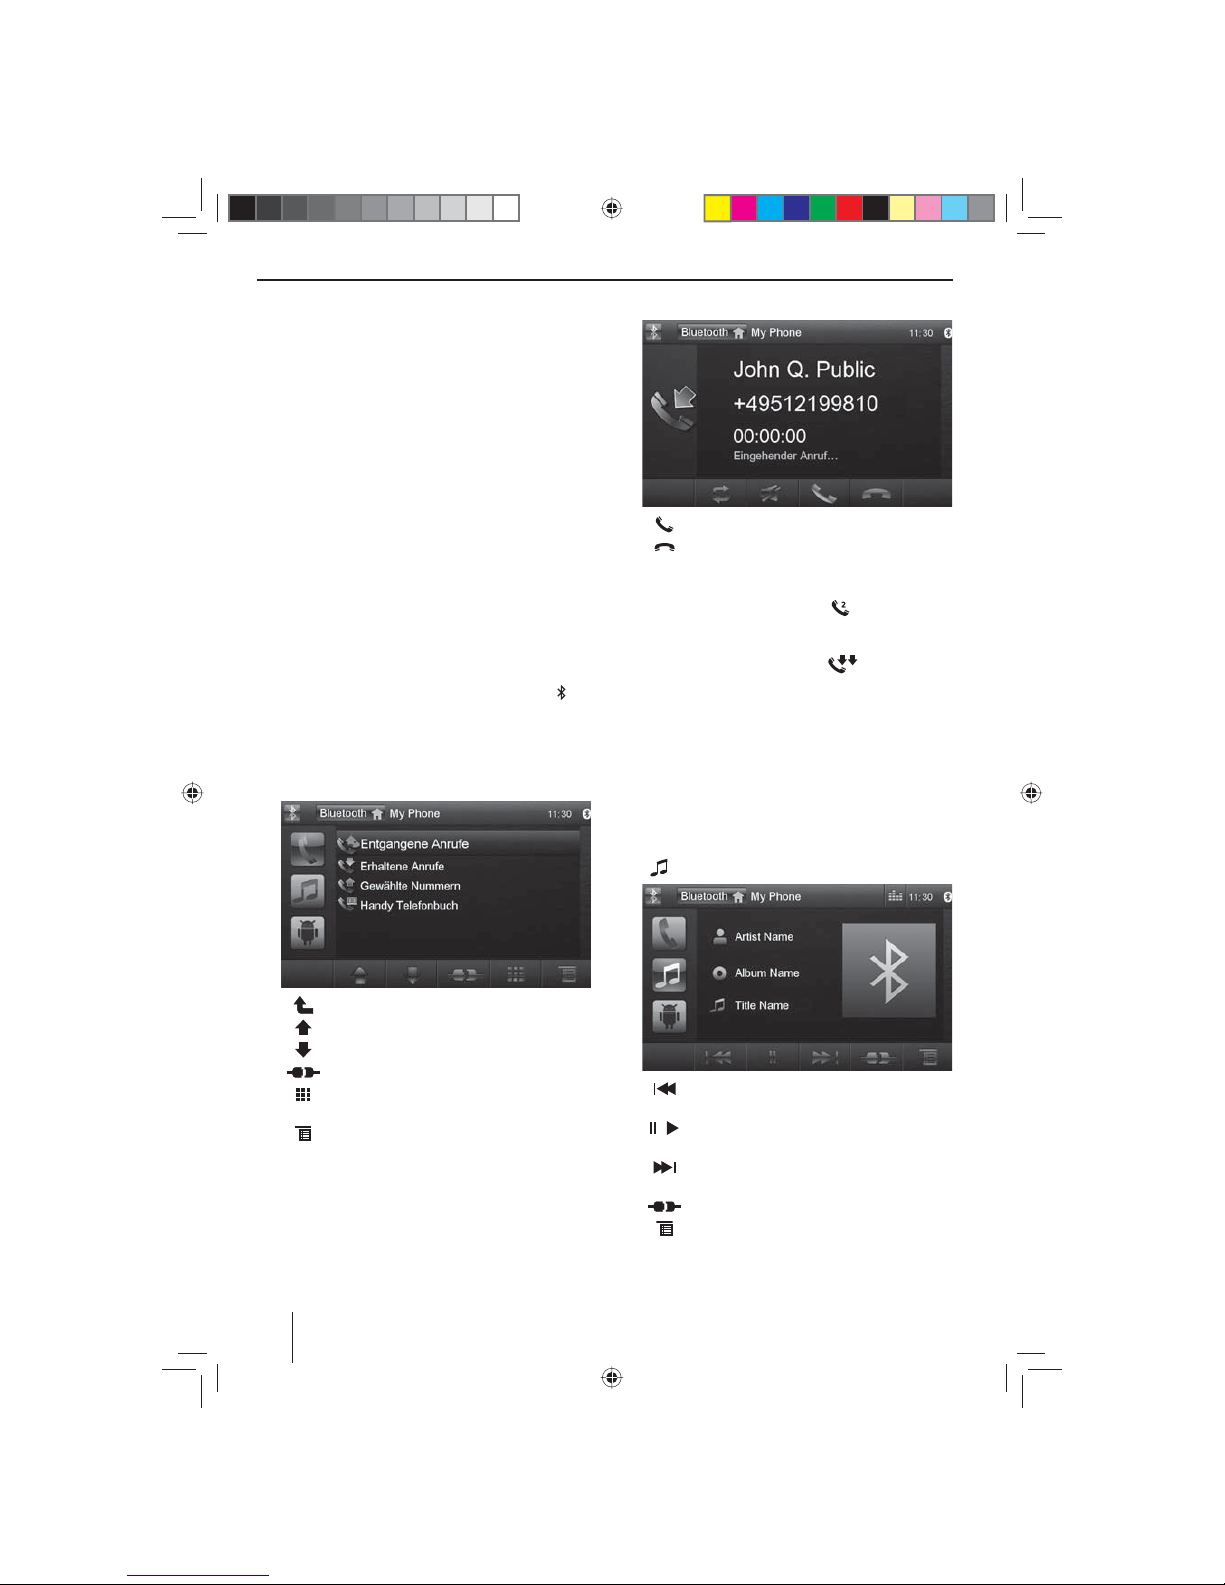
Wenn ein Telefon über Bluetooth® mit dem Autoradio
verbunden ist, wird folgendes Menü angezeigt.
[ ] Wechsel in die nächsthöhere Ebene.
[
] Auswahlmarkierung verschieben.
[
] Auswahlmarkierung verschieben.
[
] Verbindung mit aktuellem Gerät beenden.
[
] Tastenfeld anzeigen lassen, um eine Tele-
fonnummer direkt einzugeben
[
] Optionen-Menü anzeigen lassen.
쏅 Wählen Sie über die Anru isten oder das Telefon-
buch einen Kontakt/eine Nummer aus und tippen
Sie auf den Eintrag.
Die Verbindung wird aufgebaut.
Bluetooth-Betrieb
Wenn ein Anruf eingeht, wird das Anrufmenü angezeigt.
[ ] Anruf annehmen.
[
] Anruf ablehnen.
Wenn während eines Gesprächs ein zweiter Anruf eingeht, haben Sie folgende Möglichkeiten:
쏅 Drücken Sie die Schalt äche
, um das aktive
Gespräch zu halten und den eingehenden Anruf anzunehmen.
쏅 Drücken Sie die Schalt äche
, um zwischen
den beiden Gesprächen hin- und herzuschalten.
Hinweis:
Diese Funktion muss an Ihrem Telefon aktiviert sein.
Audiowiedergabe - Bluetooth-Streaming
Wenn ein Audiostreaming-Gerät über Bluetooth® mit
dem Autoradio verbunden ist, können Sie die Musik
über das Autoradio wiedergeben und die Wiedergabe
steuern.
쏅 Drücken Sie im Bluetooth®-Menü die Schalt äche
, um in die Audiowiedergabe zu wechseln.
[ ] Kur zdruck: Titelwahl.
Langdruck: Schneller Suchlauf.
[
/ ] Wiedergabe unterbrechen und wieder fort-
setzen.
[
] Kurzdruck: Titelwahl.
Langdruck: Schneller Suchlauf.
[
] Verbindung mit aktuellem Gerät beenden.
[
] Optionen-Menü anzeigen lassen.
01_NewYork_840_845_de.indd 18
01_NewYork_840_845_de.indd 18
03.09.14 15:04
03.09.14 15:04
Page 19
19
DEUTSCH
Bluetooth-Betrieb
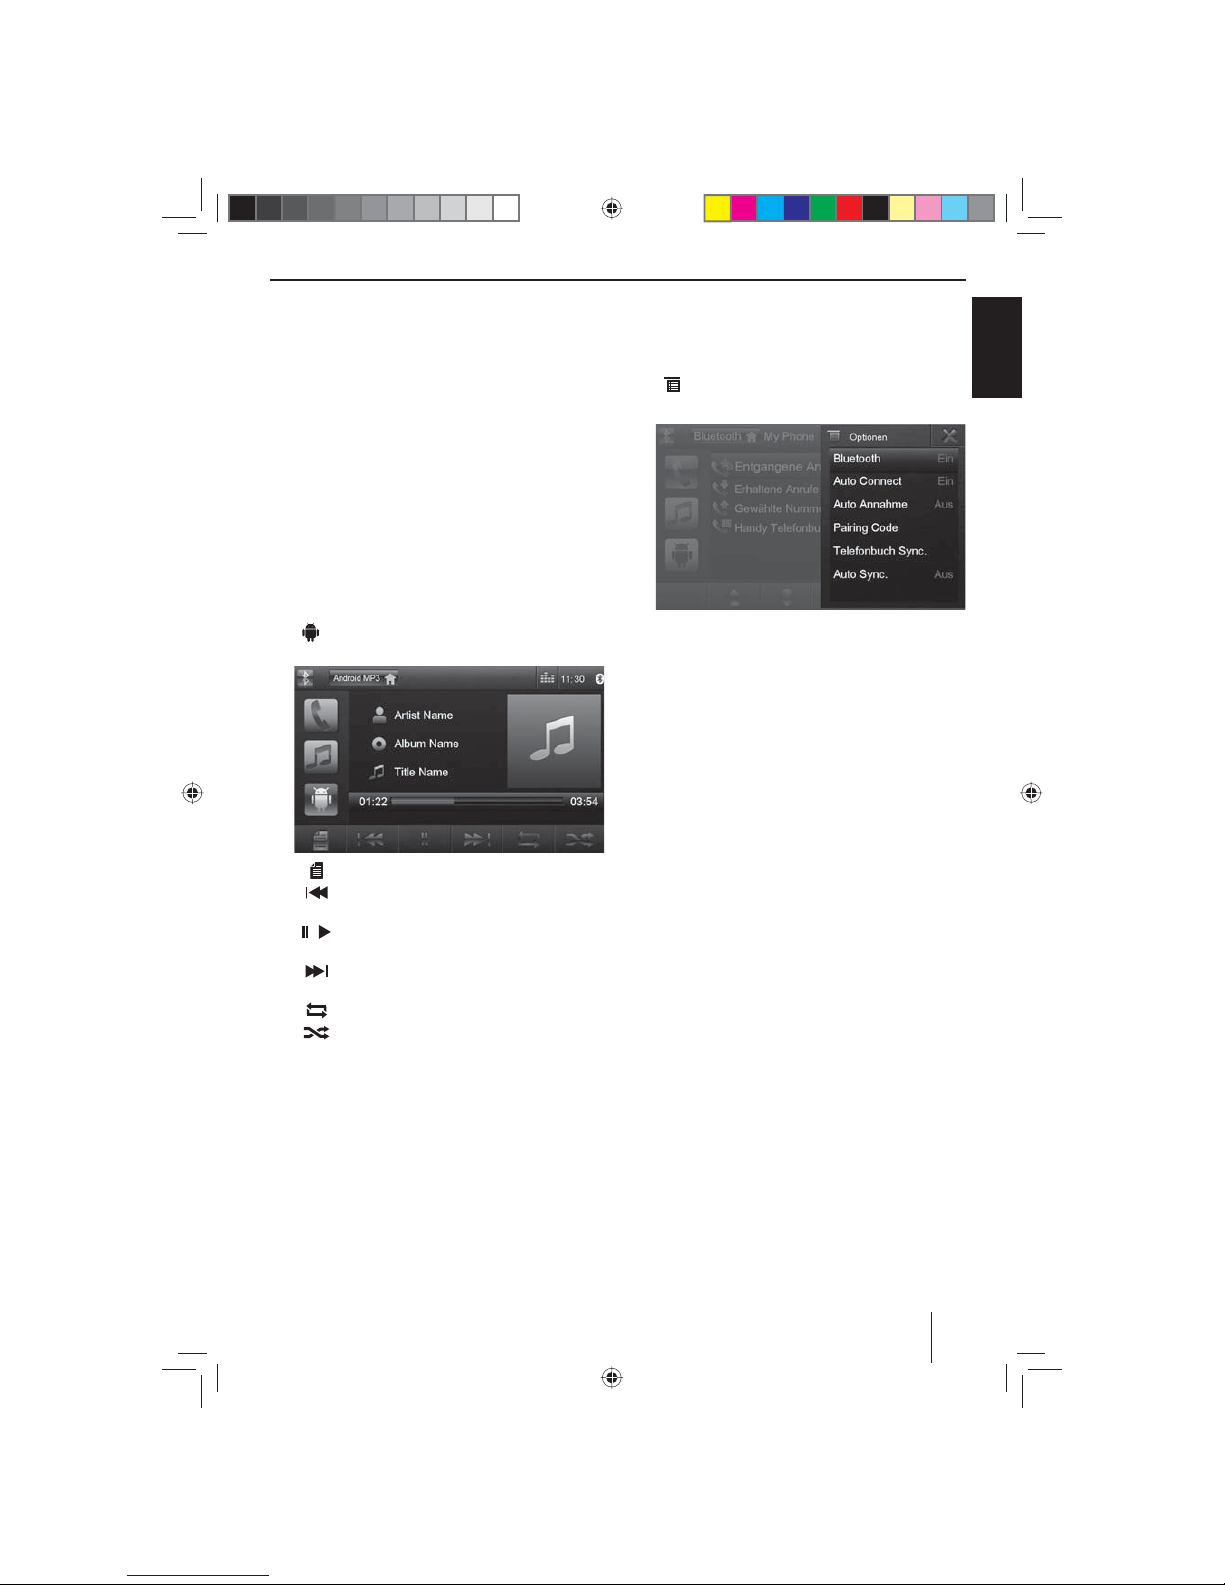
Audiowiedergabe -
Android-Mobiltelefon
Mit der „Android Music Player“ App von Blaupunkt lassen sich auf einem Android-Mobiltelefon gespeicherte Musikdateien mithilfe von ID3-Tag-Informationen
in bestimmte Kategorien unterteilen. So können Sie
Musiktitel schnell und bequem über verschiedene Kategorien auswählen und wiedergeben. Dazu muss die
App auf dem Android-Mobiltelefon installiert sein. Die
„ Android Music Player“ App können Sie im Internet unter
www.blaupunkt.com herunterladen.
Hinweis:
Die Audiowiedergabe über die „Android Music
Player“ App steht nur bei Android-Mobiltelefonen
mit Betriebssystem Android 2.3 und höher zur
Verfügung. Zusätzlich muss das Mobiltelefon die
Bluetooth®-Pro le SPP (Serial Port Pro le) und A2DP
(Advanced Audio Distribution Pro le) unterstützen.
쏅 Drücken Sie im Bluetooth®-Menü die Schalt äche
, um in die Android-Audiowiedergabe zu wech-
seln.
[ ] Kategorielisten anzeigen lassen.
[
] Kurzdruck: Titelwahl.
Langdruck: Schneller Suchlauf.
[
/ ] Wiedergabe unterbrechen und wieder fort-
setzen.
[
] Kurzdruck: Titelwahl.
Langdruck: Schneller Suchlauf.
[
] Wiederholfunktion ein-/ausschalten.
[
] Zufallswiedergabe ein-/ausschalten.
Bluetooth-Einstellungen
Im Optionen-Menü für Bluetooth® können Sie die Grundeinstellungen für den Bluetooth®-Betrieb vornehmen.
쏅 Drücken Sie im Bluetooth®-Menü die Schalt äche
.
Das Optionen-Menü wird angezeigt.
Bluetooth – Sie können hier Bluetooth® ein- bzw.
ausschalten.
Auto Connect – Wenn „Auto Connect“ eingeschaltet
ist, verbindet sich das Gerät automatisch mit bekannten Bluetooth®-Geräten sobald diese in Reichweite sind.
Auto Annahme – Wenn „Auto Annahme“ aktiviert
ist, werden eingehende Telefonate automatisch angenommen.
Pairing Code – Viele Bluetooth®-Geräte fragen vor
der Aufnahme der Verbindung den Pairing Code ab.
Diesen können Sie hier festlegen.
Telefonbuch Sync. – Um auf das Telefonbuch eines
verbundenen Telefons zugreifen zu können, müssen
Sie es zuerst über diesen Menüeintrag synchronisieren.
Auto Sync. – Wenn „Auto Sync.“ aktiviert ist, wird
die Synchronisation des Telefonbuchs automatisch
durchgeführt sobald das Telefon mit dem Gerät verbunden ist.
01_NewYork_840_845_de.indd 19
01_NewYork_840_845_de.indd 19
03.09.14 15:04
03.09.14 15:04
Page 20
20
Rear Seat Entertainment (RSE)
Das Gerät verfügt über Ausgänge zum Anschluss von
zwei externen Monitoren und Audioausgängen für den
hinteren Bereich des Fahrzeugs.
Auf den externen Monitoren kann ein anderes Programm als auf dem Gerät gezeigt werden, so ist es z.B.
möglich, während der Fahrt auf einem externen Monitor
Bilder und Filme zu sehen.
Die Audiowiedergabe für das RSE erfolgt über die Buchsen Rear Out R und Rear Out L. Diese Buchsen sollten mit
geeigneten Klinkenbuchsen verbunden werden, so dass
die Passagiere im Fond ihr Audioprogramm über Kopfhörer hören können.
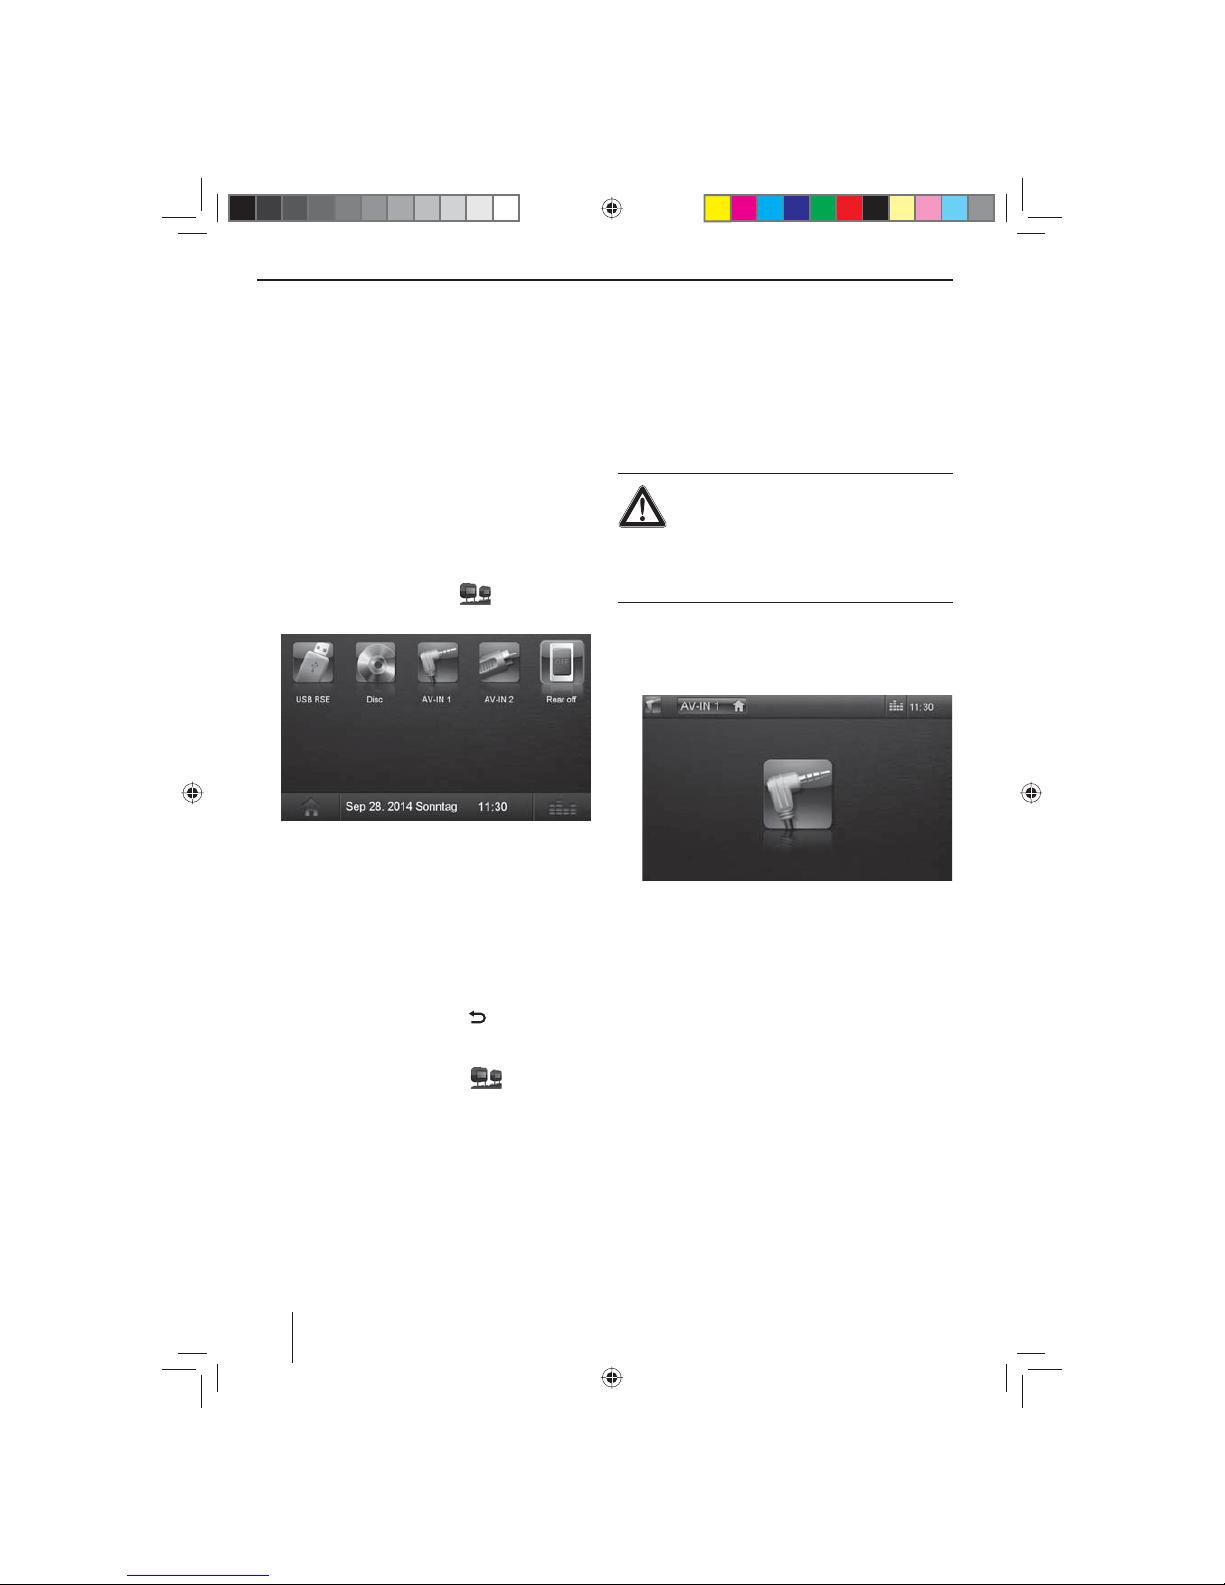
RSE über externe Monitore starten:
쏅 Rufen Sie das Hauptmenü auf.
쏅 Drücken Sie die Schalt äche
.
Das RSE Hauptmenü wird angezeigt.
Folgende Quellen sind für die externen Monitore
wählbar: USB RSE, Disc, AV-IN 1 und AV-IN 2.
Hinweis:
Nur der USB RSE Anschluss an der Geräterückseite
unterstützt die externen Monitore.
쏅 Wählen Sie die Quelle, die auf den externen Monito-
ren angezeigt werden soll.
Die ausgewählte Quelle wird auf dem Display des
Gerätes und den externen Monitoren angezeigt.
쏅 Drücken Sie die Schalt äche
, um wieder zur
Quelle für den vorderen Bereich zurückzukehren.
- Oder -
쏅 Drücken Sie die Schalt äche
, um das RSE
Hauptmenü für den hinteren Bereich aufzurufen.
Hinweis:
Wenn Sie für den eingebauten Monitor eine andere
Quelle wählen, wird die aktuelle Quelle auf den externen Monitoren weiter angezeigt.
쏅 Um das RSE zu deaktivieren, rufen Sie das RSE Haupt-
menü auf und drücken die Schalt äche Rear o .
Externe Audio-/Videoquellen
Dieses Gerät verfügt über zwei externe AV-Eingänge für
Audio- und Videowiedergabe:
• AV-IN 1 ist unter der Abdeckklappe in die Gerätefront
integriert.
• AV-IN 2 ist als Cinch-Buchse an einem Kabel an der
Geräterückseite ausgeführt. Sie können beim Einbau
des Gerätes den Installationsort des Anschlusses bestimmen.
Gefahr!
Erhöhte Verletzungsgefahr durch Stecker.
Im Falle eines Unfalls kann der hervorstehende
Stecker in der Front-AV-IN-Buchse Verletzungen verursachen. Die Verwendung gerader Stecker oder Adapter
führt zu einem erhöhten Verletzungsrisiko.
쏅 Starten Sie den AV-IN-Betrieb mit der Schalt äche
AV-IN 1 bzw. AV-IN 2.
Im Display wird die Audio- bzw. Videowiedergabe
der ausgewählten AV-Quelle angezeigt.
Rear Seat Entertainment | Externe Audio-/Videoquellen
01_NewYork_840_845_de.indd 20
01_NewYork_840_845_de.indd 20
03.09.14 15:04
03.09.14 15:04
Page 21
21
DEUTSCH
Klangeinstellungen | Grundeinstellungen
Klangeinstellungen
Lautstärkeverteilung (Fader/Balance)
Sie können die Lautstärkeverteilung im Fahrzeug für alle
Quellen einstellen.
쏅 Drücken Sie im Hauptmenü die Schalt äche
.
Das Equalizer-Menü wird angezeigt.
쏅 Drücken Sie die Schalt äche
.
Das Menü für Fader und Balance wird angezeigt.
쏅 Stellen Sie Fader und Balance mit / bzw.
/ ein.
쏅 Drücken Sie anschließend auf Equalizer
.
Die Einstellung wird gespeichert, das Hauptmenü
wird wieder angezeigt.
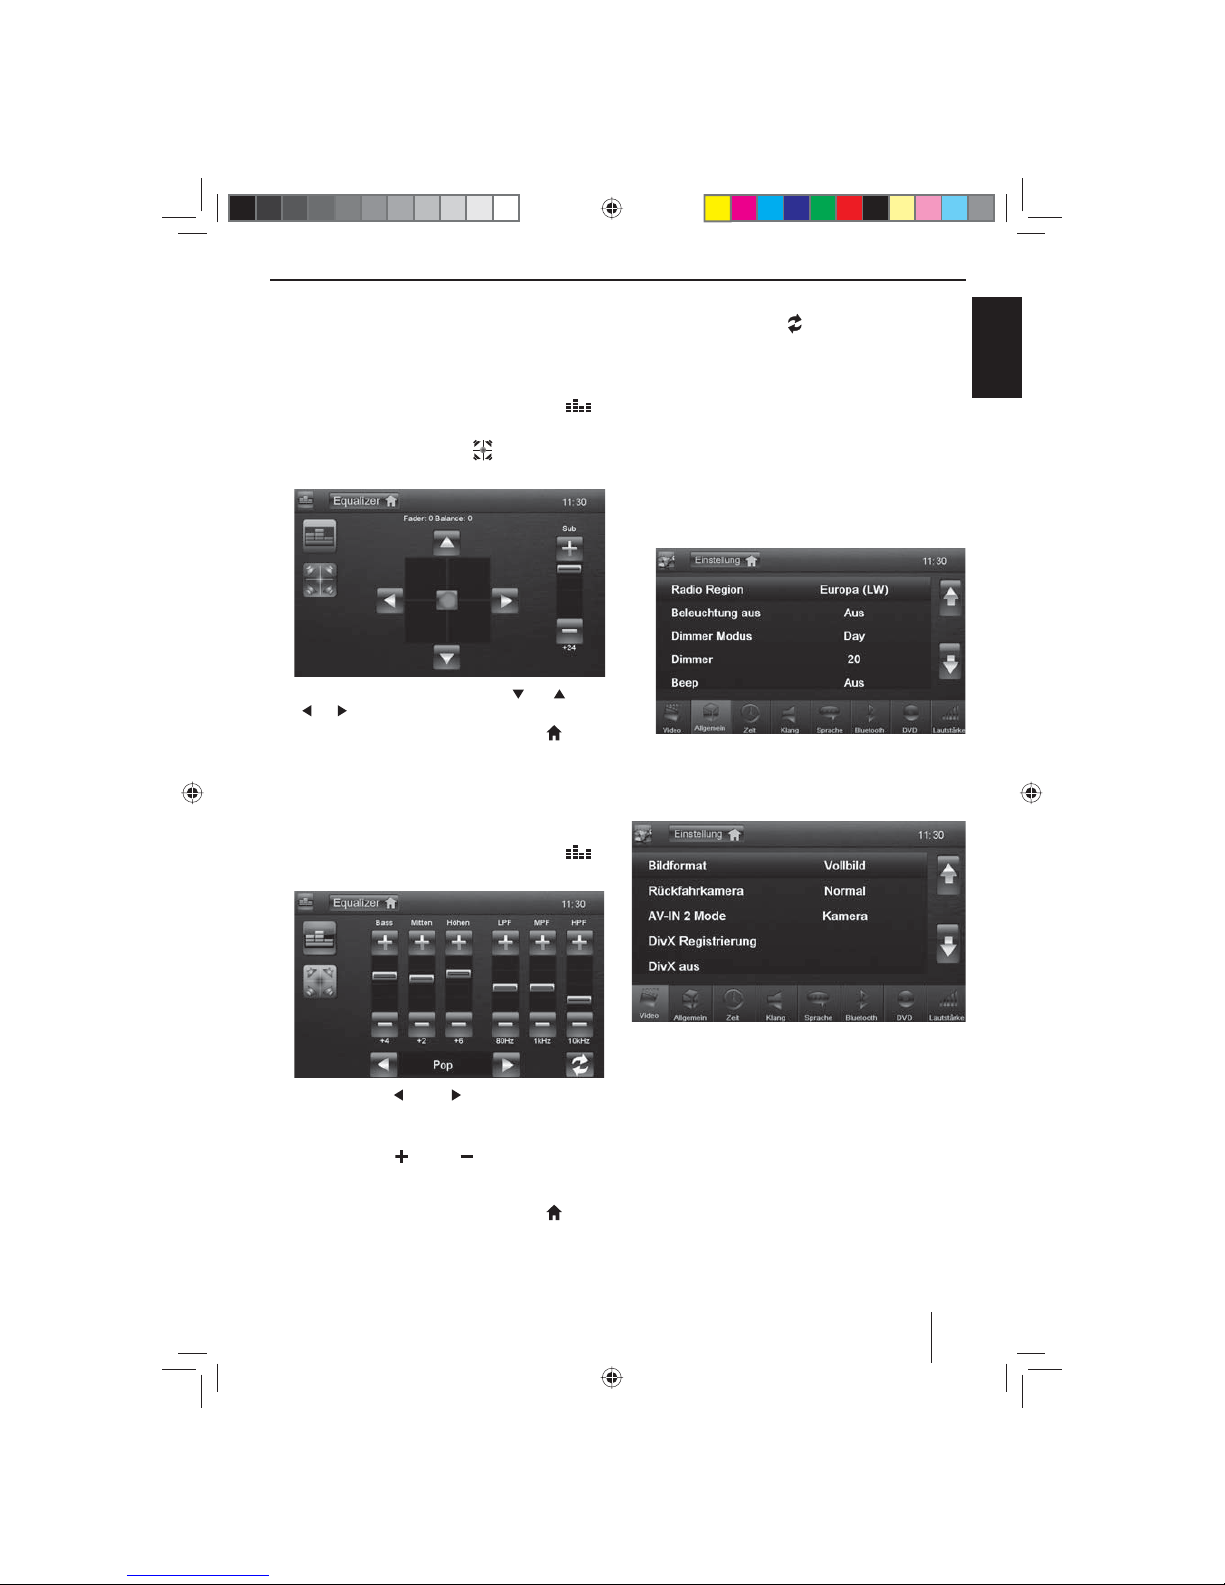
Equalizer
Sie können den Equalizer für alle Quellen einstellen.
쏅 Drücken Sie im Hauptmenü die Schalt äche
.
Das Equalizer-Menü wird angezeigt.
쏅 Wählen Sie mit bzw. einen voreingestellten
Equalizer.
- Oder -
쏅 Stellen Sie mit
bzw. den Pegel für Bass,
Mitten und Höhen sowie die Frequenz der Filter
LPF, MPF und HPF nach ihren Wünschen ein.
쏅 Drücken Sie anschließend auf Equalizer
.
Die Einstellung wird gespeichert, das Hauptmenü
wird wieder angezeigt.
Hinweis:
Mit der Schalt äche [
] können Sie die Standard-
werte der ausgewählten Equalizer-Voreinstellung
wiederherstellen.
Grundeinstellungen
Im Einstellungen-Menü können Sie die Grundeinstellungen zu den verschiedenen Funktionen des Gerätes an
ihre Anforderungen anpassen.
쏅 Drücken Sie die Schalt äche Einstellung im Haupt-
menü.
Das Einstellungen-Menü wird angezeigt, das Unter-
menü Allgemein ist aktiviert.
쏅 Rufen Sie mit den Schalt ächen im unteren Bereich
des Einstellungen-Menüs die Untermenüs auf.
Video
Folgende Einstellungen sind möglich:
Bildformat – Bildformat einstellen
Rückfahrkamera – Rückfahrkamera einstellen (wenn
eine Rückfahrkamera angeschlossen ist)
AV-IN 2 Mode – Wenn Sie eine Rückfahrkamera mit
Audiosignal an den AV-IN 2 Eingang des Gerätes anschließen, können Sie den Kameraton über die Autoradiolautsprecher wiedergeben lassen. Stellen Sie dazu
„Kamera“ ein.
DivX Registrierung – Anzeige des DivX®-Registrierungscodes
01_NewYork_840_845_de.indd 21
01_NewYork_840_845_de.indd 21
03.09.14 15:04
03.09.14 15:04
Page 22
22
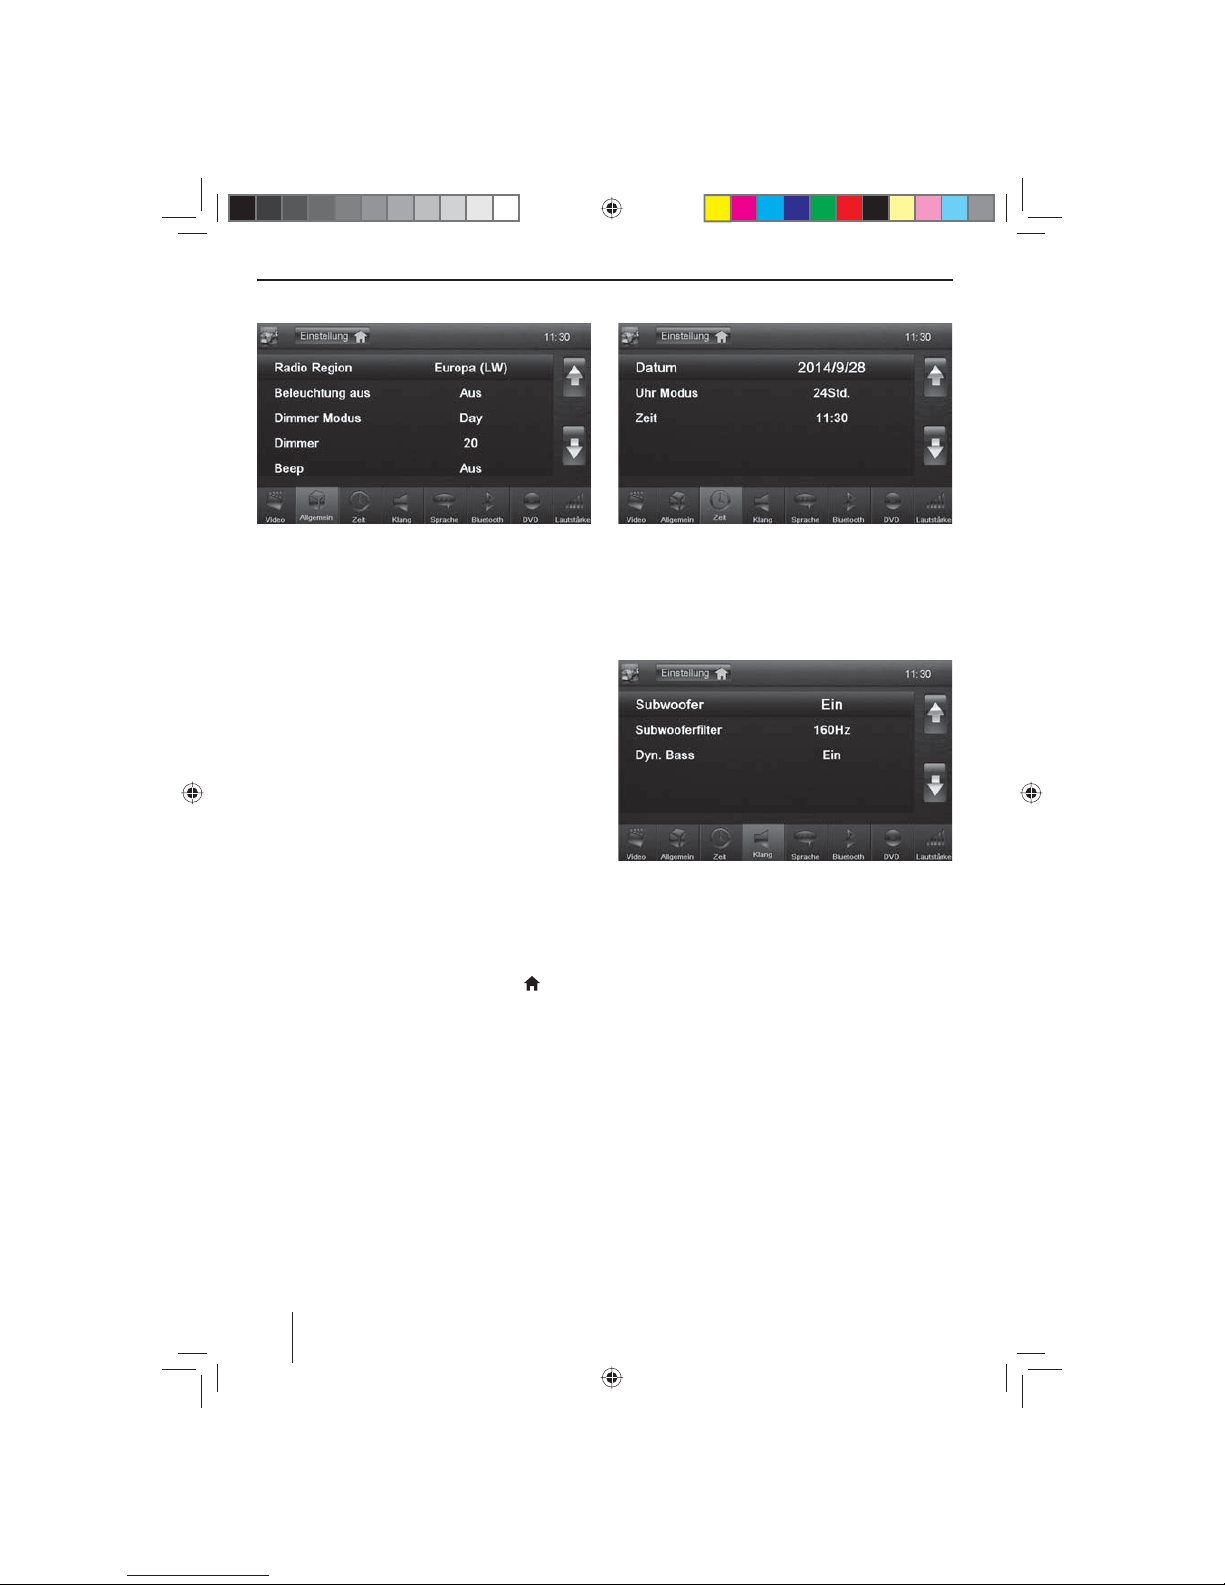
Allgemein
Folgende Einstellungen sind möglich:
Radio Region – Empfangsregion für den Radioempfang
auswählen.
Beleuchtung aus – Wenn dieser Wert gesetzt ist, wird
das Display des Radios jeweils nach 10 bzw. 20 Sek. ohne
Benutzung komplett ausgeschaltet.
Dimmer Modus – Displayhelligkeit zwischen Tagmodus
und Nachtmodus umschalten.
Dimmer – Displayhelligkeit für den Tag bzw. für die
Nacht einstellen.
Beep – Bestätigungston ein-/ausschalten
IR Fernbedienung – Hier können Sie wählen, ob mit der
Fernbedienung die Quelle auf dem Display des Gerätes
(Front zone) oder die Quelle auf dem externen Monitor
(Rear zone) angesteuert werden soll.
Hintergrund – Hintergrundbild für die Menüs auswählen. Es stehen verschiedene Motive im Gerät zur Auswahl.
Sie können auch eigene Bilder auswählen, die Sie vorher
auf der microSD-Karte gespeichert haben.
Kalibrierung – Hier können Sie den Touchscreen kalibrieren.
SWC – Hier können Sie die Tasten einer angeschlossenen
Lenkradfernbedienung kon gurieren.
Softkey MENU – Hier können Sie der Taste
2 eine
Funktion zuordnen, wenn sie für ca. 2 Sekunden gedrückt
wird. Wählen Sie zwischen den Optionen Bluetooth®Betrieb starten und Display ausschalten.
Diebstahlschutz – Code-Abfrage aktivieren/deaktivieren. Wenn die Code-Abfrage aktiviert ist, muss nach jeder
Trennung des Gerätes von der Bordspannung (z.B. Ausbau der Batterie bei Reparaturen) die vierstellige CodeNummer eingegeben werden.
Sicherheitscode – Sie können die Code-Nummer ändern. Um die Code-Nummer zu ändern, müssen Sie die
vierstellige Code-Nummer eingeben. Werkseitig ist die
Code-Nummer auf 0000 eingestellt.
Fabrikeinstellungen laden – Setzt alle personalisierten
Einstellungen zurück. Mit Ausnahme des persönlich gewählten Sicherheitscodes.
Software Version – Anzeige der aktuellen Softwareversionen.
Zeit
Folgende Einstellungen sind möglich:
Datum – Datum einstellen
Uhr Modus – Auswahl zwischen 12 und 24 Std. Modus
Zeit – Uhrzeit einstellen
Klang
Folgende Einstellungen sind möglich:
Subwoofer – Subwoofer ein-/ausschalten
Subwoofer lter – Nehmen Sie die Einstellung entspre-
chend des verwendeten Subwoofers vor (Einstellungen:
80/120/160 Hz).
Dyn. Bass – Dynamik Bass ein-/ausschalten
Grundeinstellungen
01_NewYork_840_845_de.indd 22
01_NewYork_840_845_de.indd 22
03.09.14 15:04
03.09.14 15:04
Page 23
23
DEUTSCH
Grundeinstellungen | Nützliche Informationen
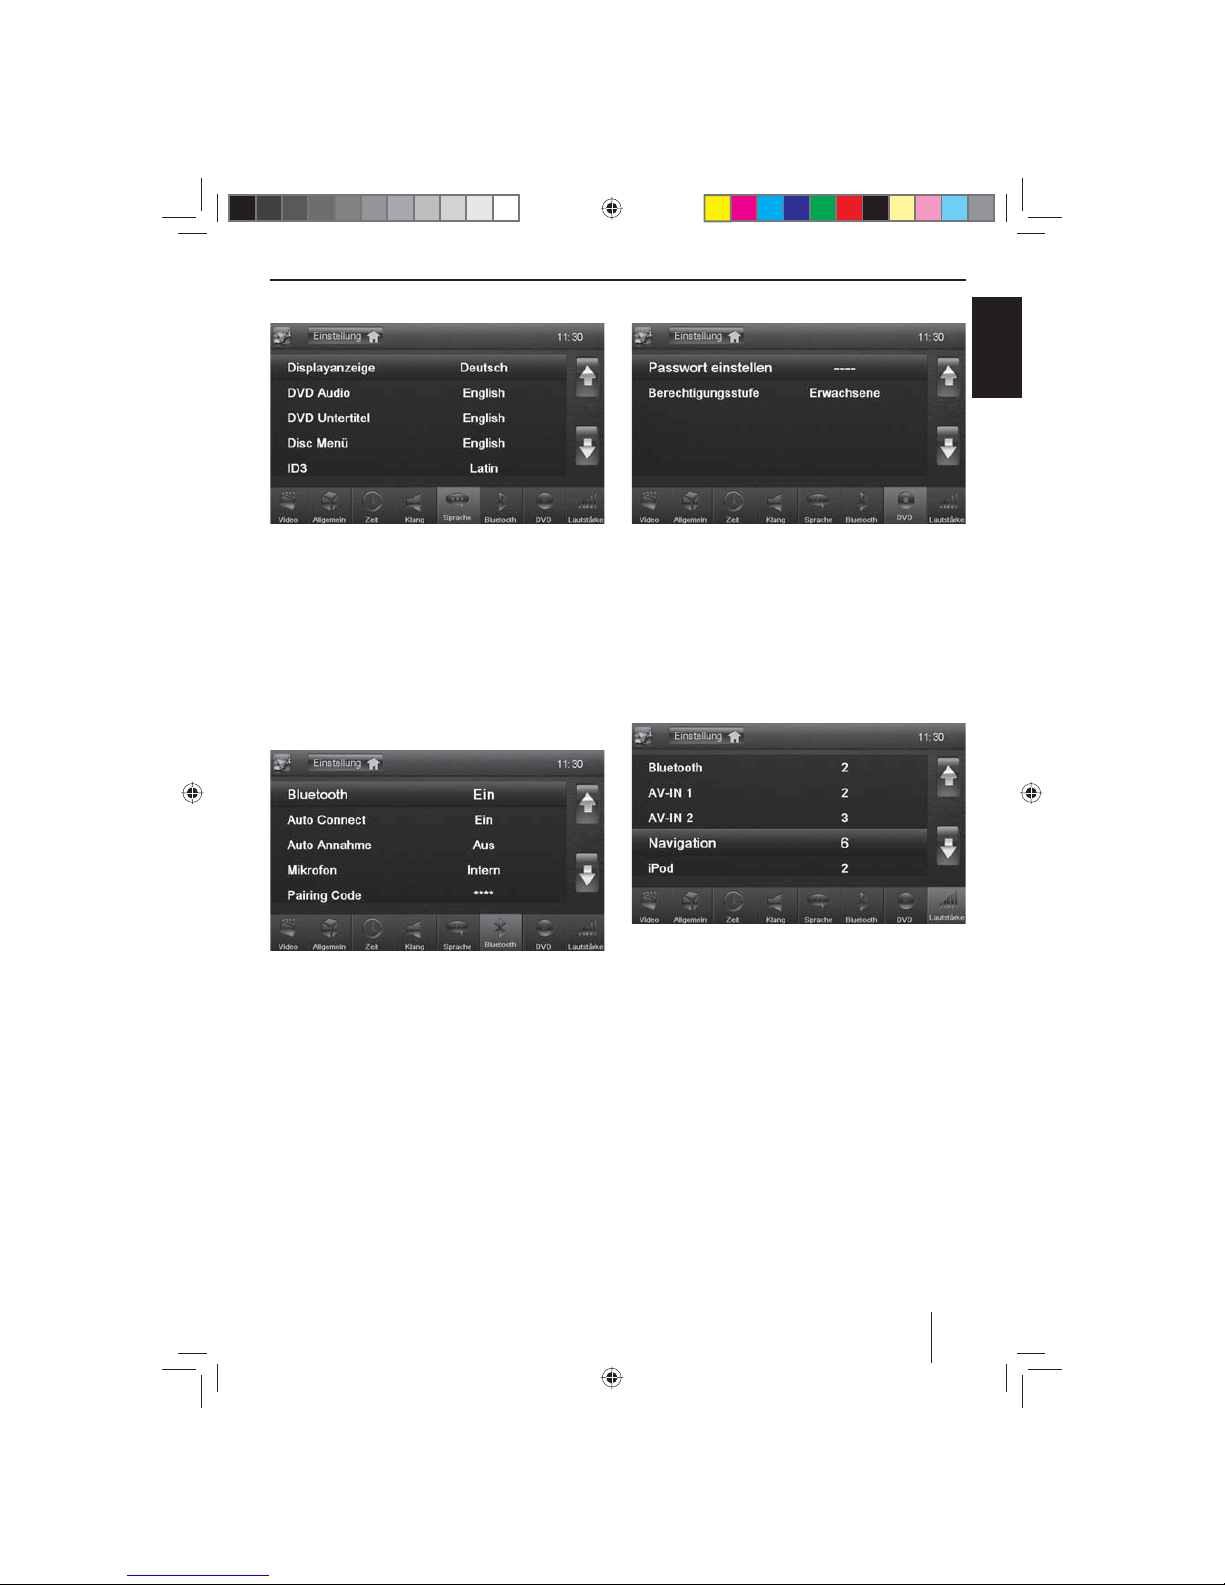
Sprache
Folgende Einstellungen sind möglich:
Displayanzeige – Sprache für die Bedienober äche des
Gerätes.
DVD Audio – Die Audio-Wiedergabe von DVDs wird in
der hier eingestellten Sprache gestartet.
DVD Untertitel – Die Untertitel von DVDs werden in der
hier eingestellten Sprache eingeblendet.
Disc Menü – Das DVD-Menü wird in der hier eingestell-
ten Sprache angezeigt.
Bluetooth
Folgende Einstellungen sind möglich:
Bluetooth – Sie können hier Bluetooth® ein- bzw. aus-
schalten
Auto Connect – Wenn „Auto Connect“ eingeschaltet ist,
verbindet sich das Gerät automatisch mit bekannten
Bluetooth®-Geräten sobald diese in Reichweite sind.
Auto Annahme – Telefongespräche von verbundenen
Telefonen werden automatisch angenommen, wenn
„Auto Annahme“ eingeschaltet ist.
Mikrofon – Wählen Sie welches Mikrofon für die Freisprecheinrichtung über Bluetooth® verwendet werden
soll.
Pairing Code – Viele Bluetooth®-Geräte fragen vor der
Aufnahme der Verbindung den Pairing Code ab. Diesen
können Sie hier festlegen.
BT Tastatur – Sie können hier das Tastaturlayout für die
Suche im Telefonbuch einstellen.
DVD
Folgende Einstellungen sind möglich:
Passwort einstellen – Legen Sie ein Passwort fest, wenn
Sie die Jugendschutzeinstellungen nutzen möchten.
Berechtigungsstufe – Hier können Sie die Altersfreiga-
be von DVDs festlegen. Wenn Sie „Erwachsene“ einstellen, können alle Filme wiedergegeben werden. Wenn Sie
ein Passwort eingerichtet haben, können Sie die Berechtigungsstufe nur mit dem Passwort ändern.
Lautstärke
Im Lautstärke-Menü können Sie das Lautstärkeverhältnis
für alle Audio-Quellen einstellen.
Nützliche Informationen
Gewährleistung
Für innerhalb der Euro päischen Union ge kaufte Produkte geben wir eine Her steller garantie. Für außerhalb der
Europäischen Union gekaufte Geräte gelten die von unserer jeweils zuständigen Landesvertretung herausgegebenen Garantiebedingungen. Die Garantiebedingungen
können Sie unter www.blaupunkt.com abrufen.
Service
Sollten Sie einmal einen Reparaturservice in Anspruch
nehmen müssen, nden Sie unter www.blaupunkt.com
Informationen über Servicepartner in Ihrem Land.
Technische Änderungen vorbehalten!
01_NewYork_840_845_de.indd 23
01_NewYork_840_845_de.indd 23
03.09.14 15:04
03.09.14 15:04
Page 24

24
Controls – Device
1
button (Eject)
Eject a DVD/CD
2
button
Short press: Call up main menu
In the main menu: Call up menu of active source
Long press: Call up Bluetooth® function or switch
o display. Function can be selected in the settings
menu.
3
button
Short press: Call up navigation
In navigation mode: Call up menu of active source
Long press: Call up display brightness setting
4
Microphone
5
Rotary/pushbutton
Short press: Switch on device
In operation: Mute audio source
Long press: Switch o device
Turn: Adjust volume
6
Infrared receiver for remote control
7
Reset button
Restoring the original factory settings of the device.
Caution! All personal settings will be lost!
8
Cover
9
SD card reader
Access only with open cover
:
Front AV-IN socket (source AV-IN 1)
Access only with open cover
;
Front USB socket (source USB 1)
Access only with open cover
<
Touchscreen user interface
=
microSD card reader for navigation data
Access only with open cover
>
DVD/CD drive
2
3
5
8
6
4
7
1
13
12
14
9
10
11
02_NewYork_840_845_gb.indd 24
02_NewYork_840_845_gb.indd 24
03.09.14 15:05
03.09.14 15:05
Page 25
25
ENGLISH
Controls – Remote control
26
28
29
32
33
31
34
18
20
22
24
16
35
36
48
46
44
42
41
39
37
38
21
23
25
30
19
17
15
47
45
43
27
40
?
SRC button
Select source
@
button
Eject a DVD/CD
A
INFO button
Show information on the display
B
MENU button
Call up DVD menu
C
ZOOM button
Zoom in on image area
D
PIC button
Adjust the display brightness
E
button
Slow-motion playback
F
button
Quit playback
G
BAND button
Select waveband/memory bank
H
button
Call up main menu
I
button
Start and interrupt playback
J
button
Call up settings menu
K
/ / / button
Navigate in menus and change settings
Starting station seek tuning ( / )
Calling stored stations ( / )
L
button
Answer a call
M
button
Ending/rejecting a phone call
N
PHOTO button
Call up folder overview of images
O
MUSIC button
Call up folder overview of audio les
P
Number buttons 0 - 9
Q
button
Random track play
R
button
Repeat function
S
button
Scan function
T
VIDEO button
Call up folder overview of movies
U
/ button
Adjusting the volume
V
OK button
Con rm selection
W
button
Mute audio source
X
/ button
Short press: Tuning into stations manually; select title,
chapter, movie
Long press: Fast searching
Y
button
Call up equaliser menu
Z
button
Delete last character of an entry
[
button
De ne range for repeat function
\
GOTO button
Calling up direct input for transmitter frequency,
track, chapter, movie or playtime
]
ANGLE button
Select camera viewing angle (if available on DVD)
a
SUBTITLE button
Select subtitle language (if available on DVD)
b
AUDIO button
Select playback language (if available on DVD)
c
button
Switching device on/o
02_NewYork_840_845_gb.indd 25
02_NewYork_840_845_gb.indd 25
03.09.14 15:05
03.09.14 15:05
Page 26

26
Contents
Safety notes .............................................................. 27
Symbols used ........................................................................ 27
Road safety ............................................................................. 27
General safety notes ...........................................................27
Declaration of conformity ................................................. 27
Cleaning notes .......................................................... 27
Disposal notes........................................................... 27
Scope of delivery ...................................................... 28
Placing the device in operation ............................... 28
Theft protection ................................................................... 28
Switching on/o ................................................................... 28
Volume ..................................................................................... 28
Main menu ............................................................................. 28
Setting the reception area ................................................ 29
Radio mode ............................................................... 29
Start radio mode .................................................................. 29
Select memory bank ........................................................... 29
Tuning into a station ........................................................... 29
Storing stations manually ................................................. 29
Storing stations automatically (Travelstore) .............. 29
Scanning stations................................................................. 30
Switching RDS on/o ......................................................... 30
Switching RDS time signal on/o .................................. 30
Optimising radio reception .............................................. 30
Switching the REG function (regional
programmes) on/o ........................................................... 30
Switching the AF (alternative frequencies)
function on/o ...................................................................... 30
Adjusting the seek tuning sensitivity ...........................30
Selecting the programme type and starting
seek tuning ............................................................................. 30
Tra c information ............................................................... 31
Navigation (only for devices with navigation) ....... 31
Loading navigation data ................................................... 31
Download of map data ...................................................... 31
Starting the navigation ...................................................... 31
Initial startup ......................................................................... 31
Entering a destination ........................................................ 32
Address ................................................................................... 32
Points of Interest ................................................................. 32
Setting route options ......................................................... 33
Map Settings .......................................................................... 34
DVD/CD/USB/SDHC/iPod media playback ............. 34
Basic information ................................................................. 34
DVD/CD mode ...................................................................... 35
USB data carrier ....................................................................35
SDHC cards ............................................................................. 35
iPod/iPhone via USB ........................................................... 36
DVD movie playback .......................................................... 36
Audio playback of DVD/CD, USB, SDHC or
iPod/iPhone ........................................................................... 36
Video playback from DVD/CD, USB or SDHC ............. 38
Image playback from DVD/CD, USB or SDHC ............ 38
Bluetooth mode ........................................................ 39
Starting Bluetooth mode .................................................. 39
Registering Bluetooth devices ........................................ 39
Telephone mode .................................................................. 39
Audio playback - Bluetooth streaming ........................ 40
Audio playback - Android cell phone ........................... 40
Bluetooth settings ............................................................... 41
Rear Seat Entertainment (RSE) ................................ 41
External audio/video sources .................................. 42
Sound settings .......................................................... 42
Volume distribution (fader/balance) ............................42
Equalizer .................................................................................. 42
Basic settings ............................................................ 43
Video ......................................................................................... 43
General .................................................................................... 43
Time .......................................................................................... 44
Sound ....................................................................................... 44
Language ................................................................................ 44
Bluetooth ................................................................................ 44
DVD ........................................................................................... 45
Volume ..................................................................................... 45
Useful information ................................................... 45
Warranty .................................................................................. 45
Service ...................................................................................... 45
Connection diagram .............................................. 336
Appendix ................................................................. 337
02_NewYork_840_845_gb.indd 26
02_NewYork_840_845_gb.indd 26
03.09.14 15:05
03.09.14 15:05
Page 27
27
ENGLISH
Safety notes | Cleaning notes | Disposal notes
Safety notes
The car sound system was manufactured according to
the state of the art and established safety guidelines.
Even so, dangers may occur if you do not observe the
safety notes in these instructions.
These instructions are intended to familiarise you with
the most important functions. Detailed information can
be found on the Internet under www.blaupunkt.com.
• Read these instructions carefully and completely
before using the car sound system.
• Keep the instructions at a location so that they
are always accessible to all users.
• Always pass on the car sound system to third parties
together with these instructions.
In addition, observe the instructions of the devices used
in conjunction with this car sound system.
Symbols used
These instructions employ the following symbols:
DANGER!
Warns about injuries
CAUTION!
Warns about damages to the DVD/CD drive
DANGER!
Warns about high volume
The CE mark con rms the compliance with EU
directives.
쏅 Identi es a sequencing step
• Identi es a listing
Road safety
Observe the following notes about road safety:
• Use your device in such a way that you can always
safely control your vehicle. In case of doubt, stop
at a suitable location and operate your device while
the vehicle is standing. As the driver, you may not use
the applications that will distract you from tra c (depending on the scope of functions of the device, e.g.
viewing videos, entering a destination).
• Follow the driving recommendations during the
route guidance only if you are not violating any
tra c regulations! Tra c signs and tra c regula-
tions have always priority over driving recommendations.
• Always listen at a moderate volume to protect
your hearing and to be able to hear acoustic warning signals (e.g. police sirens). During mute phases
(e.g. when changing the audio source), changing the
volume is not audible. Do not increase the volume
during this mute phase.
General safety notes
Observe the following note to protect yourself against
injuries:
Do not modify or open the device. The device contains
a Class 1 laser that can cause injuries to your eyes.
Use as directed
This car sound system is intended for installation and
operation in a vehicle with 12 V vehicle system voltage
and must be installed in a DIN slot. Observe the output
limits of the device. Repairs and installation, if necessary,
should be performed by a specialist.
Installation instructions
You may only install the car sound system yourself if you
are experienced in installing car sound systems and are
very familiar with the electrical system of the vehicle. For
this purpose, observe the connection diagram at the end
of these instructions.
Declaration of conformity
The Blaupunkt Technology GmbH declares that the device complies with the basic requirements and the other
relevant regulations of the directive 1999/5/EC.
The declaration of conformity can be found on the Internet under www.blaupunkt.com.
Cleaning notes
Solvents, cleaning and scouring agents as well as dashboard spray and plastics care product may contain ingredients that will damage the surface of the car sound
system.
Use only a dry or slightly moistened cloth for cleaning the
car sound system.
Disposal notes
Do not dispose of your old unit in the household
trash!
Use the return and collection systems available to
dispose of the old device, the remote control and
exhausted batteries.
02_NewYork_840_845_gb.indd 27
02_NewYork_840_845_gb.indd 27
03.09.14 15:05
03.09.14 15:05
Page 28
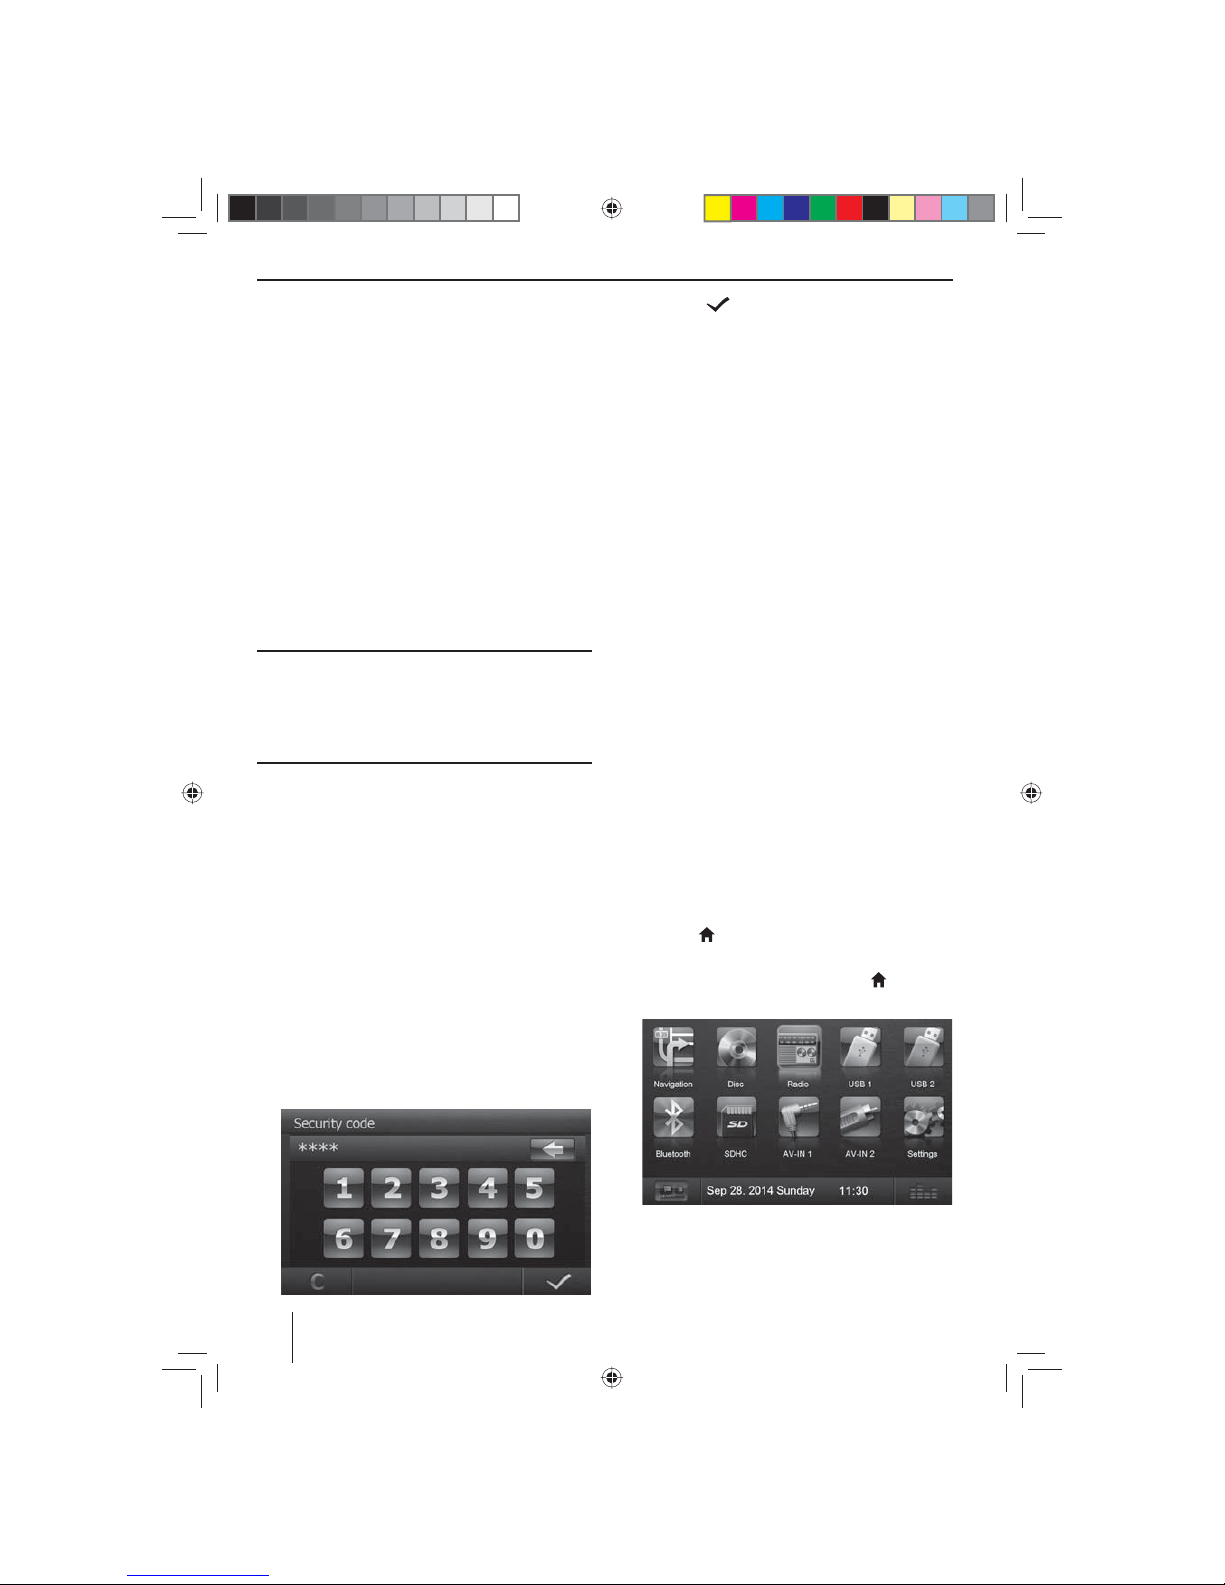
28
Scope of delivery
The scope of delivery includes:
• Car sound system
• Remote control (incl. battery)
• TMC tuner (only for devices with Europe navigation)
• microSD card with navigation data in the microSD
card slot (only for devices with navigation)
• GPS antenna
• External Bluetooth microphone
• Getting started
• Support frame
• Small parts set
• Installation material
• Connecting cable
Placing the device in operation
Caution!
Transport securing screws
Ensure that the transport securing screws at the top side
of the device are removed before the startup of the device.
Theft protection
This car sound system is protected against theft with a
four-digit code number (code number is factory-set to
0000).
If the code query is activated, the code number must
be entered after every interruption of the power supply
from the vehicle battery.
Note:
In the General submenu of the settings menu, you
can activate/deactivate the code query and change
the code number.
Entering the code number after a voltage
interruption
If the code number is required, a keypad for entering the
code number is displayed.
쏅 Enter the code number via the keypad.
쏅 Press the button to con rm the entry.
The device is switched on.
Note:
If you entered an incorrect code number, the display
brie y shows Security code incorrect!. Afterwards,
you can repeat the code entry.
Switching on/o
Switching on/o with the rotary/pushbutton
쏅 For switch-on, press the rotary/pushbutton
5
.
쏅 For switch-o , hold the rotary/pushbutton
5
pressed for more than 2 seconds.
Switching on/o via vehicle ignition
If the car sound system is connected with the vehicle
ignition and it was switched o with the rotary/pushbutton 5, it is switched on or o with the ignition.
Volume
Adjusting the volume
You can adjust the volume in steps from 0 (o ) to 50
(maximum).
쏅 Turn the rotary/pushbutton
5
to change the vol-
ume.
Muting the car sound system (Mute)
쏅 Brie y press the rotary/pushbutton 5 to mute the
device or to reactivate the previous volume.
Main menu
In the main menu, you press the buttons on the touchscreen to call up the di erent sources and operating
modes.
쏅 Press the
button 2.
- Or -
쏅 In the current source, press the ……
button.
The main menu is displayed.
As long as you do not select a new audio source, the
last active audio source is played back.
Scope of delivery | Startup
02_NewYork_840_845_gb.indd 28
02_NewYork_840_845_gb.indd 28
03.09.14 15:05
03.09.14 15:05
Page 29
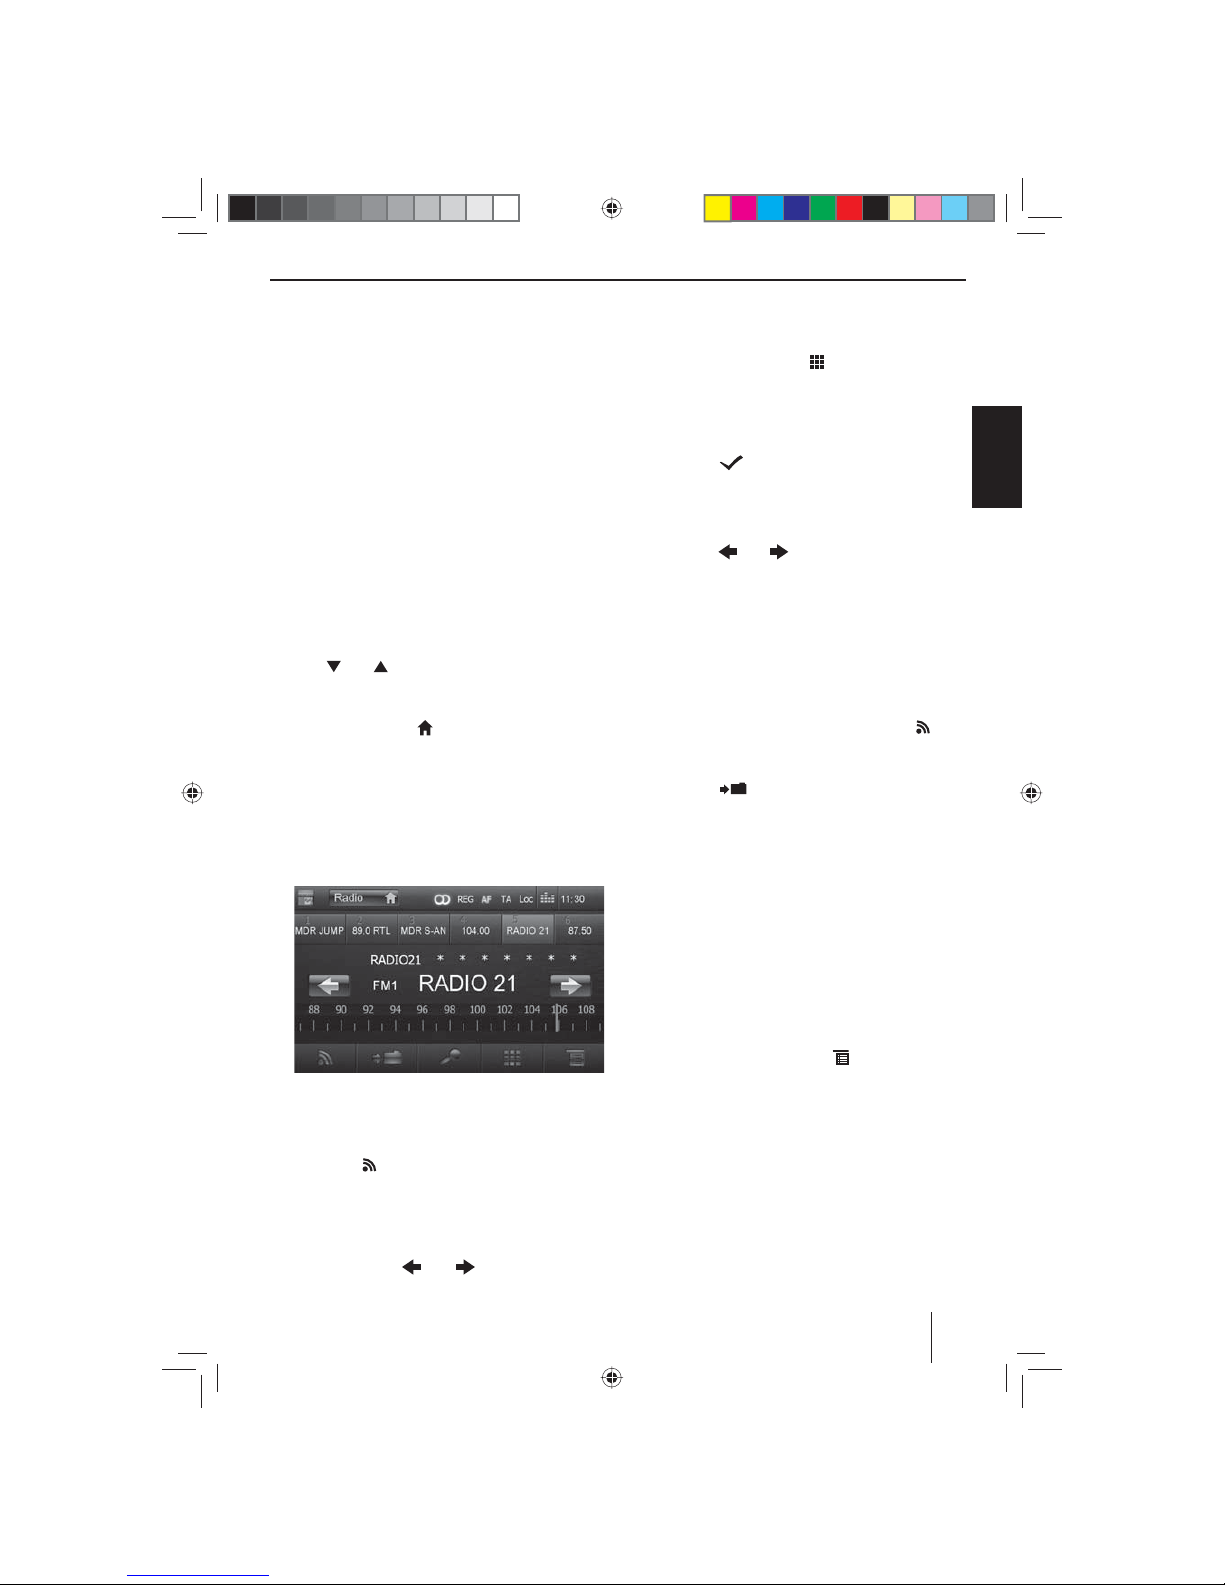
29
ENGLISH
Note:
The gures used in these instructions are intended
to facilitate the explanations and details may deviate
from your device.
Setting the reception area
This car sound system is designed for operation in di erent regions with di erent frequency ranges and station
technologies. The factory default of the reception area is
"Europe". If you operate the car sound system outside of
Europe, e.g. in the US or Asia, you may rst have to set a
suitable reception area in the menu:
쏅 In the main menu, press the Settings button.
The settings menu is displayed.
쏅 In the bottom area of the settings menu, press the
General button.
The current setting is displayed behind "Radio region".
쏅 Press the Radio region button to display the list of
available reception areas.
쏅 Use [
] or [ ] to scroll through the list and tap on
the desired reception area to select it.
The list is hidden, the selected reception area is set.
쏅 Press the Settings
button.
The main menu is displayed again.
Radio mode
Start radio mode
쏅 In the main menu, press the Radio button.
The radio menu is displayed.
Select memory bank
Di erent memory banks and wavebands are available.
Up to 6 stations can be stored in each memory bank.
쏅 Press the
button repeatedly until the desired
memory bank is displayed.
Tuning into a station
Tuning into stations manually
쏅 Brie y press the
or button once or sev-
eral times to change the frequency in increments.
Enter broadcast frequency directly
If the frequency of the desired stations is known, it can
be entered directly via the touchscreen.
쏅 In radio mode, press the
button.
A numeric keypad is displayed for the frequency
input.
쏅 Enter the frequency of the desired station with the
numeric keypad.
쏅 Press the
button.
The radio menu is displayed, the station of the
frequency entered is played back.
Starting station seek tuning
쏅 Press the
or button for approx. 2 seconds
to start station seek tuning.
The radio tunes into the next receivable station.
Note:
For the reception area Europe: In the FM waveband,
only tra c information stations are tuned into if the
priority for tra c information is switched on.
Storing stations manually
쏅 Select the desired memory bank with the but-
ton.
쏅 Set the desired station.
쏅 Press the
button.
The menu for storing stations is displayed. 6 memory
locations are available that are displayed as buttons.
쏅 Press the button under which you want to store the
current station.
The station is stored, the radio menu is displayed
again.
Storing stations automatically
(Travelstore)
With Travelstore, you can automatically search for and
store the 6 FM stations o ering the strongest reception
in the region in the memory bank FM1, FM2 or FM3.
쏅 Select an FM memory bank.
쏅 In the radio menu, press the
button.
쏅 In the options menu, press the Travelstore button.
The tuner starts the automatic station seek tuning.
After the storing is completed, the radio plays the
station at memory location 1 of the previously selected memory bank.
Note:
For the reception area Europe: With switched-on priority for tra c information, only tra c information
stations are stored.
Startup | Radio mode
02_NewYork_840_845_gb.indd 29
02_NewYork_840_845_gb.indd 29
03.09.14 15:05
03.09.14 15:05
Page 30
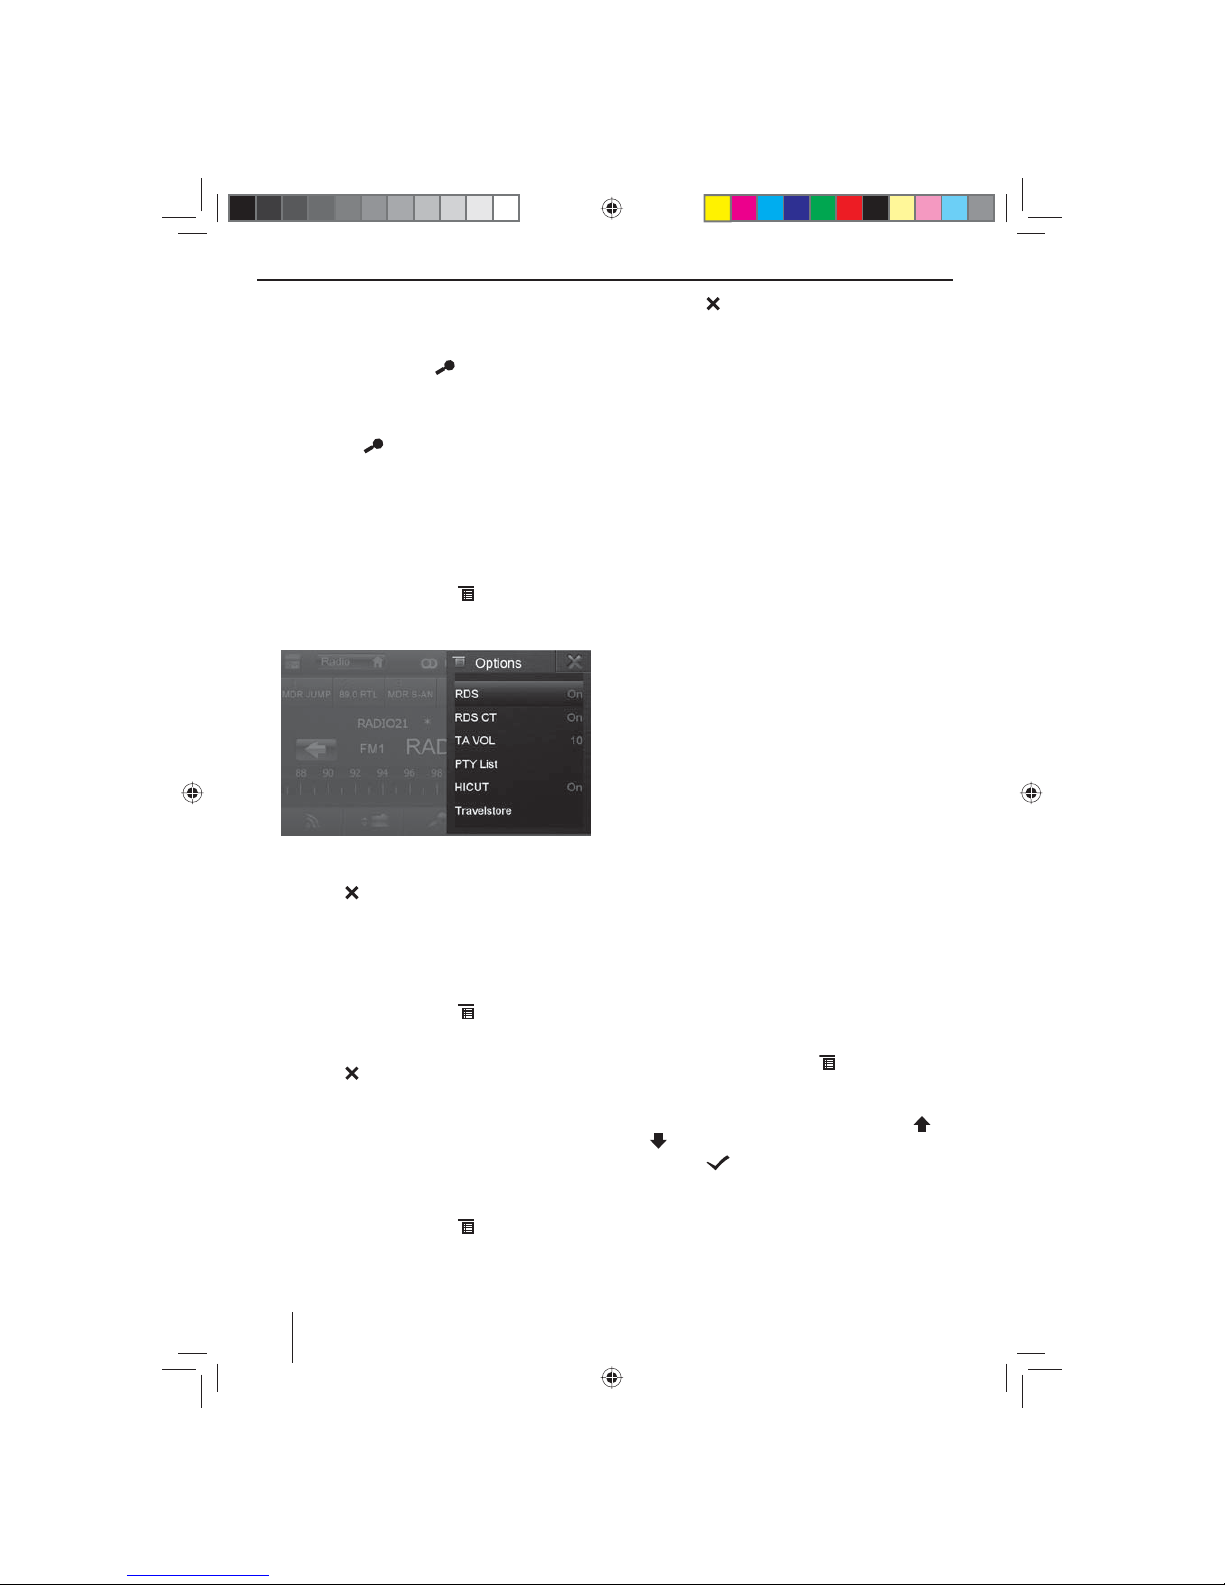
30
Scanning stations
You can use the scan function to play all the receivable
stations of the current waveband for a few seconds.
쏅 In radio mode, press the
button.
The seek tuning searches for stations in the current
waveband. Each receivable station is played for a few
seconds in the process.
쏅 Pressing the
button again selects the currently
scanned station and plays it back.
Switching RDS on/o
Many FM stations broadcast an RDS (Radio Data System)
signal in addition to their programme in the reception
area Europe that allows additional functions, such as the
display of the station name.
쏅 In the radio menu, press the
button.
The options menu is displayed, the current setting is
shown after RDS.
쏅 In the options menu, press the RDS button to change
the setting.
쏅 Press the
button.
The radio menu is displayed again.
Switching RDS time signal on/o
The time can be synchronised with the time data transmitted via RDS.
쏅 In the radio menu, press the
button.
쏅 In the options menu, press the RDS CT button to
change the setting.
쏅 Press the
button.
The radio menu is displayed again.
Optimising radio reception
The HICUT function causes a reception improvement in
case of poor radio reception (in FM radio mode only). If
reception interferences exist, the interference level is automatically decreased.
쏅 In the radio menu, press the
button.
쏅 In the options menu, press the HICUT button to
change the setting.
쏅 Press the
button.
The radio menu is displayed again.
Switching the REG function (regional
programmes) on/o
Some RDS stations divide their programmes into regional programmes with di erent contents at certain times.
If the REG function is activated, the car sound system
changes only to those alternate frequencies of the set
station on which the same regional programme is being
broadcast.
쏅 In the radio menu, press the REG button to switch
the REG function on or o .
The REG button is illuminated if the REG function is
switched on.
Switching the AF (alternative frequencies)
function on/o
If the AF function is activated, the car sound system automatically tunes into the best receivable frequency for the
station that is currently set.
쏅 In the radio menu, press the AF button to switch the
AF function on or o .
The AF button is illuminated if the AF function is
switched on.
Adjusting the seek tuning sensitivity
The seek tuning sensitivity decides whether the automatic station seek tuning nds only strong stations or
also weaker stations that may be noisy.
쏅 In the radio menu, press the Loc button to set the
sensitivity of the station seek tuning.
If the Loc button is illuminated, the seek tuning lo-
cates only strong stations.
Selecting the programme type and
starting seek tuning
You can select a programme type with the PTY function
to purposefully search for stations, for example, that
broadcast rock music or sport events.
쏅 In the radio menu, press the
button.
쏅 In the options menu, press the PTY List button to
display the programme types.
쏅 Select the desired programme type with the [
] or
[ ] button.
쏅 Press the
button to start PTY seek tuning.
If a station broadcasts a programme with the selected programme type, this station is played back.
Radio mode
02_NewYork_840_845_gb.indd 30
02_NewYork_840_845_gb.indd 30
03.09.14 15:05
03.09.14 15:05
Page 31

31
ENGLISH
Tra c information
In the reception region Europe, an FM station can identify tra c announcements via an RDS signal. If priority for
tra c reports is switched on, a tra c report is automatically switched through, even if the car sound system is
currently not in radio mode.
Note:
The volume is increased for the duration of the
switched-through tra c announcement. You can adjust the minimum volume for tra c announcements.
Switching priority for tra c announcements on/o
쏅 In the radio menu, press the TA button to switch the
priority for tra c announcements on or o .
The TA button is illuminated if the priority for tra c
announcements is switched on.
Setting the minimum volume for tra c
announcements
쏅 In the radio menu, press the
button.
쏅 In the options menu, press the TA VOL button.
쏅 Adjust the desired volume with the
or but-
ton.
쏅 Press the
button.
The radio menu is displayed again, the set volume
is stored.
Navigation
(only for devices with navigation)
Loading navigation data
The navigation software and map data are located on a
microSD card. For devices with navigation, the device is
delivered with the microSD card in the microSD card slot.
To be able to use the navigation, the microSD card must
be inserted in the card slot.
쏅 Open the cover of the card slot
=
next to the DVD/
CD tray.
쏅 Insert the microSD card with the printed side up into
the slot until it engages.
쏅 Close the cover of the slot.
Download of map data
To ensure that you have the latest version of the map data
when you purchase the device, you have 30 days from
the rst GPS positioning to download the latest version
of the map data once and free of charge to the standard
microSD card from the Internet at www.naviextras.com.
You can always purchase map material from this site at
a later time.
Important note:
If the microSD card is lost or damaged, the navigation map license associated with the card will be lost.
In this case, the license must be purchased anew with
a new microSD card.
Starting the navigation
쏅 Press the button 3.
- Or -
쏅 In the main menu, press the Navigation button.
The navigation menu is displayed. If you start the
navigation for the rst time, the setup wizard is displayed.
Initial startup
If you start the navigation for the rst time, a setup wizard
appears which performs the basic settings for the navigation.
쏅 Adjust the language for the navigation. This can be
a di erent language from the other functions of the
device.
쏅 Con rm the selection with
.
The end-user license agreement is displayed.
쏅 Read the end-user license agreement. If you agree
with the terms and conditions, press
.
The con guration wizard starts.
쏅 Press
to continue.
쏅 Select a voice for the voice output of the navigation.
Various voices are available for the languages.
쏅 Con rm the selection with
.
쏅 Specify the time format and the units for the naviga-
tion. Next, press
.
On the next screen, you can perform your preferred
route settings.
쏅 If necessary, change the entries by pressing the dis-
played menu entries.
쏅 Press , after you adjusted the settings.
쏅 Touch
, to nish the con guration.
The navigation menu is displayed.
Radio mode | Navigation
02_NewYork_840_845_gb.indd 31
02_NewYork_840_845_gb.indd 31
03.09.14 15:05
03.09.14 15:05
Page 32

32
Entering a destination
Destinations can be entered in di erent ways: Via the address or as point of interest from the database of points
of interest. Points of interest can be sights, museums, stadiums, petrol stations.
Address
쏅 Open the navigation menu.
쏅 Press on Destination.
The menu for the destination entry is displayed.
쏅 Press Find Address.
The menu for the address entry is displayed.
쏅 Enter the country, city and street in succession as
well as the intersection or house number. To do so,
press the corresponding entry in the address entry
menu.
A menu for text entry is displayed.
쏅 Enter the desired destination via the keyboard.
With every character entered, the entry in the input
line is automatically completed.
쏅 If the name of the desired destination is displayed in
the address line, press the
button.
The selected destination is displayed on the map
.
쏅 Press Next to start the route guidance.
The calculation of the route starts. Depending on the
distance between start and destination, the route
calculation may take some time.
After the route calculation is complete, the parameters of the route, such as distance and time, are
displayed. In addition, the entire route is displayed
on the map.
쏅 Press Go! to start the route guidance.
Points of Interest
쏅 Open the navigation menu.
쏅 Press on Destination.
The menu for the destination entry is displayed.
Navigation
02_NewYork_840_845_gb.indd 32
02_NewYork_840_845_gb.indd 32
03.09.14 15:05
03.09.14 15:05
Page 33

33
ENGLISH
쏅 Press Find Places.
The point of interest menu is displayed.
쏅 You can select a point of interest from one of the
four prede ned categories Petrol Station, Parking,
Restaurant and Accommodation or start a separate
search.
쏅 For example, press on Petrol Station to quickly nd
a petrol stations.
A list of petrol stations in the vicinity of the vehicle is
displayed. The petrol stations are sorted by distance
to vehicle.
쏅 Select a petrol station from the list by pressing on the
list entry.
The petrol stations is displayed on the map.
쏅 Press Next.
The route course and the route data are displayed.
쏅 Press Go! to start the route guidance.
Setting route options
In the route options, the vehicle type, type of route
(quick, short, dynamic) and additional parameters are
de ned which are required by the device to calculate the
route according to your requirements.
You de ne the route options during the initial con guration of the navigation, but you can change them for any
route guidance.
Adjusting route options before the route guidance
쏅 Call up the navigation menu.
쏅 Press the
button.
The settings menu for the navigation is displayed.
쏅 Press on the button to display the second page.
쏅 Press Route Settings.
The route settings are displayed.
쏅 Change the settings, if necessary.
쏅 Press Back repeatedly until the navigation menu is
displayed again.
Navigation
02_NewYork_840_845_gb.indd 33
02_NewYork_840_845_gb.indd 33
03.09.14 15:05
03.09.14 15:05
Page 34

34
Navigation | DVD/CD/USB/SDHC/iPod media playback
Changing route options during route guidance
쏅 During a route guidance, press the
button.
쏅 Press Route Settings.
The route settings are displayed.
쏅 Change the settings, if necessary.
쏅 Press Back.
The route guidance is displayed again.
Map Settings
With the map settings, you can adjust the view mode
(2D or 3D), the viewing angle of the map, the colours and
the display of buildings and points of orientation on the
map. In addition, you can specify for categories of points
of interest whether they should be displayed on the map,
e.g. car dealerships, cafés, restaurants.
쏅 Call up the navigation menu.
쏅 Press the
button.
The settings menu for the navigation is displayed.
쏅 Press on the button to display the second page.
쏅 Press Map Settings.
The map settings are displayed.
쏅 Change the settings, if necessary.
쏅 Press Back repeatedly until the navigation menu is
displayed again.
Note:
You can also change the map settings during the
route guidance:
쏅 During a route guidance, press the
button.
쏅 Press Map Settings.
The map settings are displayed.
쏅 Change the settings, if necessary.
쏅 Press Back.
The route guidance is displayed again.
DVD/CD/USB/SDHC/iPod media
playback
Basic information
The car sound system can be used to play audio DVDs/
CDs (CDDA) and DVD/CD-R/RWs with audio, MP3 or WMA
les as well as MP3 or WMA les on USB data carriers and
SDHC cards.
In addition, you can show movies and images from
DVDs/VCDs/CDs, USB data carriers and SDHC cards on
the display. Movies and images from DVDs/VCDs/CDs,
USB data carriers and AV sources can be displayed on an
external monitor (Rear Seat Entertainment - RSE).
For safety reasons, the playback of movies and images on
the integrated monitor is allowed only while the vehicle
is standing and the hand brake is applied. The "BRAKE"
cable must be connected with the hand brake connection of the vehicle (see Connection diagram at the end
of these instructions). The movie playback on an external
monitor is also possible while driving.
Notes:
• To ensure proper functioning, use only CDs with
the Compact-Disc logo and DVDs with the DVD
logo.
02_NewYork_840_845_gb.indd 34
02_NewYork_840_845_gb.indd 34
03.09.14 15:05
03.09.14 15:05
Page 35

35
ENGLISH
• Blaupunkt cannot guarantee the awless function of copy-protected DVDs/CDs and all DVD/CD
blanks, USB data carriers and SD cards available on
the market.
Note the following information when preparing an MP3/
WMA data carrier:
• Naming of tracks and directories: Max. 32 characters
without the le extension ".mp3" or ".wma" (the use
of more characters reduces the number of tracks and
folders that the car sound system can recognise)
• DVD/CD formats: DVD/CD-R/RW, Ø: 12 cm
• DVD/CD data formats: ISO 9669 Level 1 and 2, Joliet
• CD burn speed: Max. 16x (recommended)
• USB format/ le system: mass storage device/FAT32
• SD card le system: FAT32
• File extension of audio les:
– .MP3 for MP3 les
– .WMA for WMA les
•WMA les only without Digital Rights Management
(DRM) and created with Windows Media® Player version 8 or later
• MP3 ID3 tags: Version 1 and 2
• Bit rate for creating audio les:
– MP3: 32 to 320 kbps
– WMA: 32 to 192 kbps
• Capacity of data carrier: Up to 32 GB
DVD/CD mode
Inserting a DVD/CD
Risk of severe damage to the DVD/CD drive!
Noncircular contoured DVDs/CDs and DVDs/
CDs with a diameter of 8 cm (mini DVDs/CDs)
must not be used.
We accept no responsibility for any damage to the
drive that may occur as a result of the use of unsuitable
DVDs/CDs.
쏅 Insert the DVD/CD with its printed side up into the
DVD/CD tray
>
until you feel a slight resistance.
The drive automatically draws in the DVD/CD and
checks its data. Afterwards, the playback starts in
DVD/CD or MP3 mode.
Note:
You must not hinder or assist the drive as it automatically draws in the DVD/CD.
Ejecting a DVD/CD
쏅 Press the button 1 to eject an inserted DVD/CD.
Note:
You must not hinder or assist the drive as it ejects the
DVD/CD.
USB data carrier
This device features three USB ports:
• USB1 is located under the cover at the front of the
device.
• USB2 and USB RSE are implemented as a USB socket
on a cable at the rear of the device.
Notes:
• Movies and images stored on a USB data carrier
can be played back or shown on an external monitor (Rear Seat Entertainment - RSE) only via the
USB RSE port.
• The USB RSE port supports USB data carriers with
a capacity of up to 32 GB. The maximum possible number of les and directories is 1900 les /
450 directories.
• The USB RSE port supports DivX. The USB1 and
USB2 ports do not support DivX.
Connecting USB1
쏅 Open the cover
8
underneath the rotary/pushbut-
ton.
쏅 Insert the USB data carrier in the USB socket
;
.
The device automatically switches to USB1 mode.
The data are read, the playback starts with the rst
media le recognized by the device.
Removing the USB1 data carrier
쏅 Turn o the car sound system.
쏅 Disconnect the USB data carrier.
SDHC cards
This device features an SDHC card slot under the cover at
the front of the device.
Inserting the SDHC card
쏅 Open the cover 8 underneath the rotary/pushbut-
ton.
쏅 Insert the SDHC card with its labelled side to the left
( attened corner to the top) and its contacts rst into
the card slot
9
until it clicks into place.
The device automatically switches to SDHC mode.
The data are read, the playback starts with the rst
media le recognized by the device.
Removing the SDHC card
쏅 If necessary, open the cover
8
.
쏅 Push on the SDHC card until it disengages.
쏅 Pull the SDHC card out of the card slot
9
.
DVD/CD/USB/SDHC/iPod media playback
02_NewYork_840_845_gb.indd 35
02_NewYork_840_845_gb.indd 35
11.09.14 12:07
11.09.14 12:07
Page 36

36
iPod/iPhone via USB
You can connect numerous iPod® and iPhone® models to
the car sound system via the USB ports and control the
audio playback from the car sound system.
Note:
A list of compatible iPod® and iPhone® models is located at the end of these instructions. Blaupunkt cannot guarantee the awless function of other iPod®
and iPhone® models.
Use a suitable adapter cable to connect your iPod® or
iPhone® with the USB port of the car sound system.
쏅 Insert the USB plug of the adapter cable into one of
the USB sockets (USB1 or USB2) of the device.
The device automatically switches to USB mode. The
data are read, the playback starts with the rst media
le on the iPod®/iPhone® recognized by the device.
DVD movie playback
The car sound system can play video DVDs and VCDs. After inserting the DVD, the playback starts automatically.
The DVD menu is displayed.
You can navigate in the DVD menu by touching the corresponding buttons in the DVD menu on the touchscreen.
After starting the movie via the menu of the DVD, the
movie is displayed. The playback menu for DVDs is hidden.
쏅 Brie y touch the touchscreen once to display the
playback menu again.
The playback menu is shown.
[ ] Display the second page of the menu.
[
] End playback, call up DVD menu.
[
] Select previous chapter.
[
] Interrupt playback and continue playback.
[
] Select next chapter.
[
] Fast searching reverse.
[
] Fast searching forward.
[
] Display equalizer.
쏅 Touch
to display the second page of the play-
back menu.
The second page of the playback menu is displayed.
[ ] Display rst page.
[
] Select playback language (only if supported
by the DVD).
[
] Show subtitles (only if supported by the
DVD).
[
] Switch repeat function for chapter or area
A-B on/o .
[
] De ne range for repeat function.
[
] Switch camera viewing angle (Angle) (only
if supported by the DVD).
[
] Call up keypad for direct selection of titles,
chapters or playing time.
Audio playback of DVD/CD, USB, SDHC or
iPod/iPhone
The principles of the audio playback (MP3/WMA) from
data carriers or iPod®/iPhone® are identical for all sources.
쏅 Select the desired source via the main menu.
If the playback starts with image or video les,
쏅 press the button to change to the audio play-
back.
The folders of the data carrier containing audio les
are displayed.
[ ] Change to next higher folder level.
[
] Move selection mark.
[
] Move selection mark.
DVD/CD/USB/SDHC/iPod media playback
02_NewYork_840_845_gb.indd 36
02_NewYork_840_845_gb.indd 36
03.09.14 15:05
03.09.14 15:05
Page 37

37
ENGLISH
[ ] Open selected folder or start titles.
- Or Tap on the name of the folder or track. The
folder is opened or the track is started.
[
] Continue playback
only iPod®/iPhone®
[
] Display keypad to directly enter the number
of the desired title.
[
] Exit the folder/ le list.
[
] Display equalizer.
After starting a title, the playback menu is displayed.
[ ] Display folder view.
[
] Short press: Title selection.
Long press: Fast searching.
[
/ ] Interrupt playback and continue playback.
[
] Short press: Title selection.
Long press: Fast searching.
Audio playback from DVD/CD, USB or SDHC:
[
] Start and end REPEAT function.
The REPEAT mode changes each time the
button is pressed.
Display REPEAT mode
Repeat current track
Repeat current folder
Regular playback
[
] Start MIX random track play and end it
again.
If the MIX function is activated, the
button is displayed as highlighted.
The MIX mode depends on the selected
REPEAT function.
REPEAT
mode
display
MIX mode
No random track play
Mixing tracks of the current
folder
Mixing tracks of the data
carrier
Audio playback from iPod®/iPhone®:
[
] Start and end REPEAT function.
The REPEAT mode changes each time the
button is pressed.
Display REPEAT mode
Repeat current track
Repeat current selection
[
] Start MIX random track play and end it
again.
The MIX mode changes each time the
button is pressed.
Display MIX mode
Mixing tracks of the current
selection
Mixing tracks of the current
album
Note:
The random track play of tracks depends on
the iPod®/iPhone® model used.
[
] Display keypad to directly enter the number
of the desired title.
DVD/CD/USB/SDHC/iPod media playback
02_NewYork_840_845_gb.indd 37
02_NewYork_840_845_gb.indd 37
03.09.14 15:05
03.09.14 15:05
Page 38

38
Video playback from DVD/CD, USB or
SDHC
쏅 Select the desired source via the main menu.
If the playback starts with audio or image les,
쏅 press the
button to change to the video play-
back.
The folders of the data carrier containing movie les
are displayed.
Note:
Folders and titles are selected and started as described under audio playback.
If you selected a movie, the playback is started. During
the movie playback, the playback menu is hidden.
쏅 Brie y touch the touchscreen once to display the
playback menu again.
The playback menu is shown.
[ ] Display the second page of the menu.
[
] End playback, change to folder view.
[
] Select previous movie.
[
] Interrupt playback and continue playback.
[
] Select next movie.
[
] Fast searching reverse.
[
] Fast searching forward.
[
] Display equalizer.
Second page of playback menu.
[ ] Display rst page.
[
] End playback, change to folder view.
[
] Select playback language (only if supported
by the movie).
[
] Show subtitles (only if supported by the
movie).
[
] Switch repeat function for movie or folder
on/o .
[
] Switch random playback on/o .
[
] Call up keypad for direct selection of movie
or playing time.
Note:
You can play back video les stored on an iPod®/
iPhone® with this device. For this purpose, the iPod®/
iPhone® must be connected with the device using a
special cable (USB - AV) that is commercially available.
Image playback from DVD/CD, USB or
SDHC
쏅 Select the desired source via the main menu.
If the playback starts with audio or movie les,
쏅 press the
button to change to the image play-
back.
The folders of the data carrier containing images are
displayed.
Note:
Folders and images are selected and started as described under audio playback.
DVD/CD/USB/SDHC/iPod media playback
02_NewYork_840_845_gb.indd 38
02_NewYork_840_845_gb.indd 38
03.09.14 15:05
03.09.14 15:05
Page 39

39
ENGLISH
Bluetooth mode
The Bluetooth® function allows registering cell phones
and media playback devices with the car sound system.
When you register a cell phone with the car sound system, you can make phone calls with the built-in handsfree function. You can access the lists of dialled numbers
and the phone book of the registered cell phone.
If the connected Bluetooth® device supports the functions A2DP and AVRCP, you can play the music via the
car sound system and control the playback. During a call,
the music playback is interrupted and continued again
after the call.
If a cell phone is registered via Bluetooth® and a call is received during the playback of another source, the source
playback is interrupted and the call menu is displayed.
Starting Bluetooth mode
쏅 In the main menu, press on Bluetooth.
- Or -
쏅 Press the
button 2 for approx. 2 seconds. (Prerequisite: This function is assigned to the button in
the settings menu.)
The Bluetooth® menu is displayed. It contains the list
of known Bluetooth® devices. Other audio sources
are switched o .
[ ] Move selection mark.
[
] Move selection mark.
[
] Disconnect connection to marked device.
[
] Delete marked device from the list.
[
] Display options menu.
쏅 Tap on the name of the Bluetooth® device with which
you want to establish a connection.
When the device is in range, the connection is estab-
lished and the menu for the device is displayed.
Registering Bluetooth devices
If you want to register a device with the car sound system
for the rst time, proceed as follows:
쏅 Ensure that Bluetooth® is activated at the car sound
system and at your Bluetooth® device.
쏅 In the options menu of the Bluetooth® mode, enter a
pairing code (see Bluetooth® settings).
쏅 Search for new devices/connections on your Blue-
tooth® device.
쏅 The car sound system appears as "BP 84x" in the list
of Bluetooth® devices.
쏅 Establish the connection; you may have to enter the
pairing code that was previously entered on the car
sound system.
The connection is being established and the menu
for the registered device is displayed.
Note:
If a telephone is connected with the car sound system, the Bluetooth® icon
is displayed at the top
right edge of the display in all audio/video sources.
Telephone mode
If you connected a phone with the car sound system via
Bluetooth®, the following menu appears.
[ ] Change to next higher level.
[
] Move selection mark.
[
] Move selection mark.
[
] Disconnect connection with current device.
[
] Display keypad to directly enter a phone
number
[
] Display options menu.
쏅 Select a contact/number via the call lists or the
phone book and tap on the entry.
The connection is being established.
Bluetooth mode
02_NewYork_840_845_gb.indd 39
02_NewYork_840_845_gb.indd 39
03.09.14 15:05
03.09.14 15:05
Page 40

40
If a call is coming in, the call menu is displayed.
[ ] Answer a call.
[
] Reject a call.
If a second call arrives during a phone call, you have the
following options:
쏅 Press the
button to pause the active call and to
answer the incoming call.
쏅 Press the
button to switch back and forth be-
tween the two calls.
Note:
This function must be activated on your phone.
Audio playback - Bluetooth streaming
If an audio streaming device is connected with the car
sound system via Bluetooth®, you can play back the music via the car sound system and control the playback.
쏅 In the Bluetooth® menu, press the
button to
change to the audio playback.
[ ] Short press: Title selection.
Long press: Fast searching.
[
/ ] Interrupt playback and continue playback.
[
] Short press: Title selection.
Long press: Fast searching.
[
] Disconnect connection with current device.
[
] Display options menu.
Bluetooth mode
Audio playback - Android cell phone
With the "Android Music Player" app from Blaupunkt,
music les stored on an Android cell phone can be divided into certain categories with the help of ID3 tag
information. This allows you to quickly and conveniently
select and play back music tracks across di erent categories. For this purpose, the app must be installed on the
Android cell phone. The "Android Music Player" app can
be downloaded on the Internet from www.blaupunkt.com.
Note:
The audio playback via "Android Music Player" app
is available only for Android cell phones with operating system Android 2.3 and higher. In addition,
the cell phone must support the Bluetooth® pro les
SPP (Serial Port Pro le) and A2DP (Advanced Audio
Distribution Pro le).
쏅 In the Bluetooth® menu, press the
button to
change to the Android audio playback.
[ ] Display category lists.
[
] Short press: Title selection.
Long press: Fast searching.
[
/ ] Interrupt playback and continue playback.
[
] Short press: Title selection.
Long press: Fast searching.
[
] Switch repeat function on/o .
[
] Switch random playback on/o .
02_NewYork_840_845_gb.indd 40
02_NewYork_840_845_gb.indd 40
03.09.14 15:05
03.09.14 15:05
Page 41

41
ENGLISH
Bluetooth mode | Rear Seat Entertainment
Bluetooth settings
In the options menu for Bluetooth®, you can make the
basic settings for the Bluetooth® mode.
쏅 In the Bluetooth® menu, press the
button.
The options menu is displayed.
Bluetooth – Bluetooth® can be switched on or o .
Auto connect – If "Auto Connect" is activated, the
device automatically connects with known Bluetooth® devices as soon as they are in range.
Auto answer – If "Auto Answer" is activated, incoming phone calls are automatically answered.
Pairing code – Many Bluetooth® devices request the
pairing code before establishing the connection. You
can de ne it here.
Phone book sync – To be able to access the phone
book of a connected telephone, you must rst synchronise it via this menu entry.
Auto sync – If "Auto sync" is activated, the synchronisation of the phone book is performed automatically as soon as the telephone is connected with the
device.
Rear Seat Entertainment (RSE)
The device features outputs to connect two external
monitors and audio outputs for the rear area of the vehicle.
Since a di erent programme can be displayed on the external monitors than on the device, it is possible to view
images and movies on an external monitor while driving.
The audio playback for the RSE is established via the
sockets Rear Out R and Rear Out L. These sockets should
be connected with suitable jack sockets so that the passengers in the front can listen to their audio programme
via headphones.
Starting RSE via external monitors:
쏅 Call up the main menu.
쏅 Press the
button.
The RSE menu is displayed.
The following sources can be selected for the external monitors: USB RSE, Disc, AV-IN 1 and AV-IN 2.
Note:
Only the USB RSE port at the rear of the housing
supports the external monitors.
쏅 Select the source to be displayed on the external
monitors.
The selected source is shown on the display of the
device and the external monitors.
쏅 Press the
button to return to the source for the
front zone.
- Or -
쏅 Press the
button to call up the RSE main
menu for the rear zone.
Note:
If you select di erent source for the built-in monitor,
the current source continues to be displayed on the
external monitors.
쏅 To deactivate the RSE, call up the RSE main menu and
press the Rear o button.
02_NewYork_840_845_gb.indd 41
02_NewYork_840_845_gb.indd 41
03.09.14 15:05
03.09.14 15:05
Page 42

42
External audio/video sources
This device features two external AV inputs for audio and
video playback:
• AV-IN 1 is located under the cover at the front of the
device.
• AV-IN 2 is implemented as a cinch socket on a cable
at the rear of the device. You can specify the installation location of the port during the installation of
the device.
Danger!
Increased risk of injury from connector.
In case of an accident, the protruding connector in the front AV-IN socket may cause injuries. The use
of straight plugs or adapters leads to an increased risk
of injury.
쏅 Start the AV-IN mode with the button AV-IN 1 or
AV-IN 2.
The display shows the audio or video playback of the
selected AV source.
Sound settings
Volume distribution (fader/balance)
You can adjust the volume distribution in the vehicle
for all sources.
쏅 In the main menu, press the
button.
The equalizer menu is displayed.
쏅 Press the
button.
External audio/video sources | Sound settings
The menu for fader and balance is displayed.
쏅 Adjust fader and balance with / or
/ .
쏅 Next press on Equalizer
.
The setting is stored, the main menu is displayed
again.
Equalizer
You can adjust the equalizer for all sources.
쏅 In the main menu, press the
button.
The equalizer menu is displayed.
쏅 Select a preset equalizer with or .
- Or -
쏅 Use
or to adjust the level for Bass, Mid and
Treble as well as the frequency of the LPF, MPF and
HPF lters according to your needs.
쏅 Next press on Equalizer
.
The setting is stored, the main menu is displayed
again.
Note:
With the [ ] button, you can restore the default values of the selected equalizer presettings.
02_NewYork_840_845_gb.indd 42
02_NewYork_840_845_gb.indd 42
03.09.14 15:05
03.09.14 15:05
Page 43

43
ENGLISH
Basic settings
Basic settings
In the settings menu, you can adjust the basic settings
for the di erent functions of the device to your requirements.
쏅 In the main menu, press the Settings button.
The settings menu is displayed, the General submenu is activated.
쏅 Call up the submenus with the buttons in the lower
area of the settings menu.
Video
The following settings are possible:
Aspect ratio – Adjust image format
Rear view camera – Adjust back-up camera (if a back-up
camera is connected)
AV-IN 2 mode – If you connect a back-up camera with
audio signal to the AV-IN 2 input of the device, you can
play the camera tone via the loudspeakers of the car
sound system. To do so, enable "Camera".
DivX registration code – Display of the DivX® registration code
General
The following settings are possible:
Radio region – Select the reception region for the radio
reception.
Background light o – If this value is set, the display of
the radio is completely switched o after 10 or 20 sec.
without use.
Dimmer mode – Switching the display brightness between daytime and nighttime mode.
Dimmer – Setting the display brightness for the day or
the night.
Beep – Switch con rmation beep on/o
IR remote control – Here you can select whether the re-
mote control should be used to control the source on the
display of the device (front zone) or the source on the
external monitor (rear zone).
Wallpaper – Select the wallpaper for menus. Various mo tifs can be selected in the device. You can also select your
own images which you previously stored on the microSD
card.
Calibration – The touchscreen can be calibrated here.
SWC – The buttons of a connected steering wheel con-
trol can be con gured here.
Softkey MENU – Here, you can assign a function to the
button 2 if it is pressed for approx. 2 seconds. Select
between the options Start Bluetooth® mode and Switch
o display.
Theft protection – Activate/deactivate the code query.
If the code query is activated, the four-digit code number must be re-entered every time the device is disconnected from the vehicle system voltage (e.g. removal of
the battery for repairs).
Security code – You can change the code number. To
change the code number, enter the four-digit code number. The code number is set to 0000 at the factory.
Load factory – Resets all personalised settings. With the
exception of the personally selected security code.
Software version – Display of the current software version.
02_NewYork_840_845_gb.indd 43
02_NewYork_840_845_gb.indd 43
03.09.14 15:05
03.09.14 15:05
Page 44

44
Time
The following settings are possible:
Date – Set the date
Clock mode – Selection between 12 and 24-h mode
Time – Set the time
Sound
The following settings are possible:
Subwoofer – Switch subwoofer on/o
Subwoofer lter – Make the setting according to the
subwoofer used (settings: 80/120/160 Hz).
Dynamic bass boost – Switch dynamic bass on/o
Language
The following settings are possible:
On screen display – Language for the user interface of
the device.
DVD audio – The audio playback of DVDs is started in the
language de ned here.
DVD subtitle – The subtitles of DVDs are shown in the
language de ned here.
Disc menu – The DVD menu is displayed in the language
de ned here.
Bluetooth
The following settings are possible:
Bluetooth – Bluetooth® can be switched on or o .
Auto connect – If "Auto Connect" is activated, the device
automatically connects with known Bluetooth® devices
as soon as they are in range.
Auto answer – Phone calls from connected telephones
are automatically answered if this option is enabled.
Microphone – Select the microphone to be used for the
hands-free system via Bluetooth®.
Pairing code – Many Bluetooth® devices request the
pairing code before establishing the connection. You can
de ne it here.
BT keyboard – Adjust the keyboard layout for searching
in the phone book.
Basic settings
02_NewYork_840_845_gb.indd 44
02_NewYork_840_845_gb.indd 44
03.09.14 15:05
03.09.14 15:05
Page 45

45
ENGLISH
Basic settings | Useful information
DVD
The following settings are possible:
Set password – De ne a password if you want to use the
parental controls.
Rating level – The rating of DVDs can be de ned here.
If set to "Adult", all movies can be played back. If a password was con gured, the rating level can be changed
only with the password
Volume
You can adjust the volume ratio for all audio sources in
the volume menu.
Useful information
Warranty
We provide a manufacturer's warranty for products
bought within the European Union. For devices purchased outside the European Union, the warranty terms
issued by our respective responsible domestic agency
are valid. The warranty terms can be called up from
www.blaupunkt.com.
Service
If you ever need to use a repair service, you will nd information about service partners in your country under
www.blaupunkt.com.
Subject to technical changes!
02_NewYork_840_845_gb.indd 45
02_NewYork_840_845_gb.indd 45
03.09.14 15:05
03.09.14 15:05
Page 46

46
Eléments de commande – Appareil
1
Touche (Eject)
Ejection du DVD/CD
2
Touche
Pression brève : appel du menu principal
Dans le menu principal : appel du menu de la source
active
Pression prolongée: appel de la fonction Bluetooth®
ou arrêt de l'écran. La fonction peut être sélectionnée
dans le menu réglages.
3
Touche
Pression brève : appel de la navigation
Dans le mode navigation : appel du menu de la
source active
Pression prolongée: appel du réglage de la luminosité de l'écran
4
Microphone
5
Bouton-poussoir rotatif
Pression brève : mise en marche de l'appareil
En fonctionnement : coupure du son de la source
audio (Mute)
Pression prolongée : arrêt de l'appareil
Rotation : réglage du volume sonore
6
Récepteur infrarouge pour la télécommande
7
Touche de réinitialisation (Reset)
Retour au réglages d'usine de l'appareil.
Attention ! Tous les réglages personnels sont perdus !
8
Volet de protection
9
Lecteur de carte SD
Accès uniquement lorsque le volet de protection est
ouvert
:
Prise AV-IN frontale (source AV-IN 1)
Accès uniquement lorsque le volet de protection est
ouvert
;
Prise USB frontale (source USB 1)
Accès uniquement lorsque le volet de protection est
ouvert
<
Interface utilisateur à écran tactile (Touchscreen)
=
Lecteur de carte microSD pour données de naviga-
tion
Accès uniquement lorsque le volet de protection est
ouvert
>
Lecteur de DVD/CD
2
3
5
8
6
4
7
1
13
12
14
9
10
11
03_NewYork_840_845_fr.indd 46
03_NewYork_840_845_fr.indd 46
03.09.14 15:06
03.09.14 15:06
Page 47

47
FRANÇAIS
Eléments de commande – Télécommande
26
28
29
32
33
31
34
18
20
22
24
16
35
36
48
46
44
42
41
39
37
38
21
23
25
30
19
17
15
47
45
43
27
40
?
Touche SRC
Sélection de la source
@
Touche
Ejection du DVD/CD
A
Touche INFO
A chage d'informations sur l'écran
B
Touche MENU
Appel du menu DVD
C
Touche ZOOM
Agrandissement de l'image
D
Touche PIC
Régler la luminosité de l'écran
E
Touche
Lecture ralentie
F
Touche
Arrêt de la lecture
G
Touche BAND
Sélection de la gamme d'ondes/du niveau de mémoire
H
Touche
Appel du menu principal
I
Touche
Démarrage et interruption de la lecture
J
Touche
Appel du menu réglages
K
Touche / / /
Navigation dans les menus et modi cation des réglages
Démarrage de la recherche des stations ( / )
Appel des stations mémorisées ( / )
L
Touche
Prise d'appel
M
Touche
Fin de communication/refus d'appel
N
Touche PHOTO
Appel de la vue d'ensemble des dossiers de photos
O
Touche MUSIC
Appel de la vue d'ensemble des dossiers de chiers
audio
P
Touches numériques 0 - 9
Q
Touche
Lecture aléatoire
R
Touche
Fonction de répétition
S
Touche
Fonction de balayage
T
Touche VIDEO
Appel de la vue d'ensemble des dossiers de lms
U
Touche /
Réglage du volume sonore
V
Touche OK
Con rmation de la sélection
W
Touche
Coupure du son de la source audio
X
Touche /
Pression brève : réglage manuel des stations ; sélection des titres, chapitres, lms
Pression prolongée : recherche rapide
Y
Touche
Appel du menu égaliseur
Z
Touche
E acement du dernier caractère entré
[
Touche
Détermination de la section pour la fonction de répétition
\
Touche GOTO
Appeler la saisie direct pour la fréquence de station,
le titre, le chapitre, le l ou la durée
]
Touche ANGLE
Sélection de l'angle de caméra (si disponible sur le DVD)
a
Touche SUBTITLE
Sélection de la langue de sous-titrage (si disponible
sur le DVD)
b
Touche AUDIO
Sélection de la langue de lecture (si disponible sur le DVD)
c
Touche
Mise en marche et arrêt de l'appareil
03_NewYork_840_845_fr.indd 47
03_NewYork_840_845_fr.indd 47
03.09.14 15:06
03.09.14 15:06
Page 48

48
Table des matières
Consignes de sécurité .............................................. 49
Symboles utilisés .................................................................. 49
Sécurité routière ................................................................... 49
Consignes de sécurité générales .................................... 49
Déclaration de conformité................................................ 49
Instructions de nettoyage ........................................ 49
Instructions pour l’élimination ................................ 49
Composition de la fourniture .................................. 50
Mise en service .......................................................... 50
Protection antivol ................................................................50
Mise en marche et arrêt ..................................................... 50
Volume sonore ...................................................................... 50
Menu principal ...................................................................... 51
Réglage de la zone de réception .................................... 51
Mode radio ................................................................ 51
Démarrage du mode radio ............................................... 51
Sélection du niveau de mémoire ................................... 51
Réglage des stations ........................................................... 51
Mémorisation manuelle des stations ........................... 52
Mémorisation automatique de stations
(Travelstore) ........................................................................... 52
Balayage des stations ......................................................... 52
Activation et désactivation du RDS ............................... 52
Activation/désactivation du signal d'horloge RDS ... 52
Optimisation de la réception radio ............................... 52
Activation/désactivation de la fonction REG
(programmes régionaux) .................................................. 53
Activation/désactivation de la fonction AF
(fréquences alternatives) ................................................... 53
Réglage de la sensibilité de la recherche .................... 53
Sélectionner un type de programme et
démarrer la recherche ........................................................ 53
Informations routières ....................................................... 53
Navigation
(uniquement appareils avec navigation) ................ 53
Chargement des données de navigation .................... 53
Téléchargement des données cartographiques ....... 54
Démarrage de la navigation ............................................ 54
Première mise en service .................................................. 54
Entrée des destinations .....................................................54
Adresse ...................................................................................54
Destinations spéciales - Points d'intérêt (POI) .......... 55
Réglage des options d'itinéraire ..................................... 56
Paramètres de la carte ........................................................ 56
Lecture des médias DVD/CD/USB/SDHC/iPod ....... 57
Informations de base .......................................................... 57
Mode DVD/CD ....................................................................... 58
Supports de données USB ................................................ 58
Cartes SDHC ........................................................................... 58
iPod/iPhone par USB ........................................................... 58
Lecture de lms sur DVD ................................................... 59
Lecture des chiers audio de DVD/CD, USB,
SDHC ou iPod/iPhone......................................................... 59
Lecture des chiers vidéo de DVD/CD, USB
ou SDHC .................................................................................. 60
Lecture des chiers d'images de DVD/CD,
USB ou SDHC ......................................................................... 61
Mode Bluetooth ........................................................ 62
Démarrage du mode Bluetooth .....................................62
Couplage d'appareils Bluetooth ..................................... 62
Mode téléphone ................................................................... 62
Lecture de chiers audio - Streaming Bluetooth ...... 63
Lecture de chiers audio - Téléphone portable
Android .................................................................................... 63
Réglages Bluetooth ............................................................. 64
Rear Seat Entertainment (RSE)
(système de divertissement à l'arrière) ................... 64
Sources audio/vidéo externes ................................. 65
Réglages du son ........................................................ 65
Répartition du volume sonore (Fader/Balance) ........ 65
Egaliseur .................................................................................. 65
Réglages de base ...................................................... 66
Vidéo ......................................................................................... 66
Général .................................................................................... 66
Temps ....................................................................................... 67
Son ............................................................................................ 67
Langue ..................................................................................... 67
Bluetooth ................................................................................ 67
DVD ........................................................................................... 68
Volume sonore ...................................................................... 68
Informations utiles ................................................... 68
Garantie ................................................................................... 68
Service ...................................................................................... 68
Schéma de raccordement ...................................... 336
Annexe .....................................................................337
03_NewYork_840_845_fr.indd 48
03_NewYork_840_845_fr.indd 48
03.09.14 15:06
03.09.14 15:06
Page 49

49
FRANÇAIS
Consignes de sécurité | Instructions de nettoyage | Instructions pour l'élimination
Consignes de sécurité
L’autoradio a été fabriqué en fonction de l’état actuel des
connaissances techniques et selon les règles techniques
de sécurité reconnues. Vous prenez cependant des
risques si vous ne suivez pas les consignes de sécurité
qui se trouvent dans cette notice.
Cette notice a pour but de vous familiariser avec les principales fonctions de l'appareil. Vous trouverez des informations détaillées sur la navigation en vous rendant sur
le site Internet www.blaupunkt.com.
• Lisez cette notice avec soin et intégralement avant
d’utiliser l’autoradio.
• Conservez cette notice de façon à ce qu’elle soit accessible à tout moment à tous les utilisateurs.
• Remettez toujours l’autoradio à un tiers avec cette
notice.
Tenez également compte des notices jointes aux appareils utilisés conjointement à cet autoradio.
Symboles utilisés
Les symboles suivants sont utilisés dans cette notice:
DANGER !
Avertit d’un risque de blessure
ATTENTION !
Avertit de la possibilité d’endommager le lecteur de DVD/CD
DANGER !
Avertit de la possibilité d'un volume sonore
élevé
Le sigle CE con rme que les directives UE sont
respectées.
쏅 Identi e une action
• Identi e une énumération
Sécurité routière
Tenez compte des remarques suivantes relatives à la sécurité routière:
• Utilisez l’appareil de manière à pouvoir toujours
conduire votre véhicule en toute sécurité. En cas
de doute, arrêtez-vous dans un endroit approprié et
manipulez l’appareil alors que le véhicule est immobilisé. Si vous conduisez, vous ne devez pas utiliser
les applications qui détournent votre attention de la
circulation (en fonction de l'équipement de l'appareil,
par ex. regarder des vidéos, entrer une destination).
• Lors du guidage vers la destination, suivez les re-
commandations de conduite uniquement si elles
ne sont pas contraires aux règles de circulation !
Les panneaux et les consignes de circulation ont la
priorité sur les recommandations de conduite.
• Réglez toujours un volume sonore modéré de
manière à protéger votre ouïe et à pouvoir entendre
les signaux d’alerte (par ex. de la police). Si vous
modi ez le volume sonore pendant une coupure
momentanée du son (par ex. lors d’un changement
de source audio), la di érence ne sera audible qu’une
fois le son rétabli. N’augmentez pas le volume sonore
pendant la coupure momentanée du son.
Consignes de sécurité générales
Tenez compte de la remarque suivante pour ne pas vous
exposer à un risque de blessure :
N’ouvrez pas l’appareil, ne le modi ez pas. L'appareil
comporte un laser de classe 1 qui est susceptible de blesser vos yeux.
Utilisation conforme
Cet autoradio est prévu pour le montage et le fonctionnement dans un véhicule disposant d’une tension de bord
de 12 V et il doit être monté dans une baie DIN. Tenez
compte des limites de puissance de l'appareil. Con ez
les réparations, et au besoin le montage, à un spécialiste.
Instructions de montage
Vous n’êtes autorisé à monter l’autoradio que si vous
possédez une expérience dans le montage d’autoradios
et disposez de bonnes connaissances en électricité automobile. Tenez compte pour cela du schéma de raccordement qui se trouve à la n de cette notice.
Déclaration de conformité
Blaupunkt Technology GmbH certi e que l'appareil satisfait aux exigences de base et aux exigences des autres
dispositions applicables de la directive 1999/5/CE.
Vous trouverez la déclaration de conformité sur le site
Internet www.blaupunkt.com.
Instructions de nettoyage
Les solvants, les produits de nettoyage, les abrasifs et
les produits pour l’entretien du poste de conduite et du
plastique contiennent des substances susceptibles d’attaquer les surfaces de l’autoradio.
Pour nettoyer l’autoradio, utilisez uniquement un chi on
sec ou légèrement humide.
Instructions pour l’élimination
Ne jetez pas votre ancien appareil avec les ordures
ménagères !
Utilisez les systèmes mis à votre disposition pour
le retour ou la collecte de l'appareil usagé, de la
télécommande et des piles usées en vue de leur
élimination.
03_NewYork_840_845_fr.indd 49
03_NewYork_840_845_fr.indd 49
03.09.14 15:06
03.09.14 15:06
Page 50

50
Composition de la fourniture
La fourniture comprend les articles suivants:
• Autoradio
• Télécommande (pile comprise)
• Tuner TMC (uniquement sur les appareils avec navigation Europe)
• Carte microSD avec données de navigation dans la
fente d'introduction des cartes microSD (uniquement appareils avec navigation)
• Antenne GPS
• Microphone Bluetooth externe
• Notice abrégée
• Cadre support
• Petit matériel
• Matériel de montage
• Câble de raccordement
Mise en service
Attention
Vis de sécurité de transport
Avant la mise en service de l'appareil, assurez-vous que
les vis de sécurité de transport du dessus de l'appareil ont
été enlevées.
Protection antivol
Cet autoradio est protégé contre le vol par un code à
quatre chi res (code d'usine: 0000).
Si la demande d’entrée du code est activée, le code doit
être entré après chaque interruption de l’alimentation
électrique fournie par la batterie du véhicule.
Remarque:
Le sous-menu Général du menu réglages vous permet d'activer/désactiver la demande d'entrée du
code et de modi er le code.
Entrée du code après une interruption de la tension
d'alimentation
Si le code doit être entré, un pavé numérique s'a che
permettant la saisie du code.
쏅 Entrez le code au moyen des touches du pavé numé-
rique.
쏅 Appuyez sur le bouton , pour valider votre
entrée.
L'appareil se met en marche.
Remarque:
En cas d'erreur de saisie du code, le message Code de
sécurité erroné! s'a che brièvement. Ensuite, vous
pouvez ressaisir le code.
Mise en marche et arrêt
Mise en marche et arrêt avec le bouton-poussoir
rotatif
쏅 Pour mettre l'appareil en marche, appuyez sur le
bouton-poussoir rotatif
5
.
쏅 Pour arrêter l'appareil, maintenez le bouton-poussoir
rotatif
5
appuyé pendant plus de 2 secondes.
Mise en marche et arrêt par l'intermédiaire du
contact du véhicule
Lorsque l'autoradio est raccordé au contacteur d'allumage du véhicule et qu'il n'a pas été arrêté avec le bouton-poussoir rotatif 5, il est mis en marche et arrêté
lorsque le contact est mis ou coupé.
Volume sonore
Réglage du volume sonore
Le volume sonore est réglable par pas de 0 (arrêt) à 50
(maximum).
쏅 Tournez le bouton-poussoir rotatif 5 pour modi er
le volume sonore.
Coupure du son de l'autoradio (Mute)
쏅 Appuyez brièvement sur la bouton-poussoir rotatif
5
pour couper le son de l'appareil ou réactiver le
volume sonore précédent.
Composition de la fourniture | Mise en service
03_NewYork_840_845_fr.indd 50
03_NewYork_840_845_fr.indd 50
03.09.14 15:06
03.09.14 15:06
Page 51

51
FRANÇAIS
Menu principal
Dans le menu principal, vous pouvez appeler di érentes
sources ou di érents modes de fonctionnement en appuyant sur les boutons de l'écran tactile.
쏅 Appuyez sur la touche
2.
- ou -
쏅 Dans la source actuelle, appuyez sur le bouton
……
.
Le menu principal apparaît.
Tant que vous ne sélectionnez pas une nouvelle source
audio, la source audio activée en dernier est di usée.
Remarque :
Les gures présentées dans cette notice servent à
compléter les explications et elles peuvent varier dans
le détail de ce que vous pouvez voir sur l'appareil.
Réglage de la zone de réception
Cet autoradio est conçu pour fonctionner dans di érentes zones avec des gammes de fréquences et des
technologies d'émission diverses. La zone de réception
«Europe» est réglée d'usine. En cas d'utilisation de l'autoradio en dehors de l'Europe, parex. aux USA ou en Asie, il
faudra éventuellement commencer par régler une zone
de réception compatible.
쏅 Pour ce faire, appuyez sur le bouton Paramètres du
menu principal.
Le menu des réglages s'a che.
쏅 Dans la partie inférieure du menu des réglages, ap-
puyez sur le bouton Général.
Après «Radio Région» s'a che le réglage actuel.
쏅 Appuyez sur le bouton Radio Région pour a cher la
liste des zones de réception disponibles.
쏅 Parcourez la liste avec ou. [ ] et appuyez
brièvement sur la zone de réception souhaitée pour
la sélectionner.
La liste est a chée, la zone de réception sélectionnée est réglée.
쏅 Appuyez sur le bouton Paramètres
.
Le menu principal s'a che de nouveau.
Mode radio
Démarrage du mode radio
쏅 Appuyez sur le bouton Radio dans le menu principal.
Le menu radio apparaît.
Sélection du niveau de mémoire
Plusieurs niveaux de mémoire et plusieurs gammes
d'ondes sont disponibles. Six stations au maximum
peuvent être mémorisées sur chaque niveau de mémoire.
쏅 Appuyez sur le bouton
autant de fois qu'il est
nécessaire pour faire apparaître le niveau de mémoire souhaité.
Réglage des stations
Réglage manuel des stations
쏅 Appuyez une ou plusieurs fois brièvement sur le bou-
ton
ou pour modi er la fréquence pas
par pas.
Entrée directe de la fréquence de la station
Si vous connaissez la fréquence de la station souhaitée,
vous pouvez l'entrer directement par l'intermédiaire de
l'écran tactile.
쏅 Appuyez sur le bouton
dans le mode radio.
Un pavé numérique pour l'entrée de la fréquence
apparaît.
쏅 Entrez la fréquence de la station souhaitée avec le
pavé numérique.
쏅 Appuyez sur le bouton
.
Le menu radio est a ché, la station correspondant à
la fréquence entrée est di usée.
Démarrage de la recherche des stations
쏅 Appuyez sur le bouton
ou et maintenez-
le appuyé pendant 2 secondes environ pour démarrer la recherche des stations.
L’autoradio se règle sur la station suivante qui peut
être reçue.
Mise en service | Mode radio
03_NewYork_840_845_fr.indd 51
03_NewYork_840_845_fr.indd 51
03.09.14 15:06
03.09.14 15:06
Page 52

52
Remarque :
Pour la zone de réception Europe : dans la gamme
d’ondes FM, seules les stations qui di usent des informations routières sont réglées lorsque la priorité
aux informations routières est activée.
Mémorisation manuelle des stations
쏅 Sélectionnez le niveau de mémoire souhaité avec le
bouton
.
쏅 Réglez la station souhaitée.
쏅 Appuyez sur le bouton
.
Le menu de mémorisation apparaît. Un bouton est affecté à chacune des 6 places de mémoire disponibles.
쏅 Appuyez sur le bouton sous lequel vous souhaitez
mémoriser la station actuelle.
La station est mémorisée, le menu radio réapparaît.
Mémorisation automatique de stations
(Travelstore)
La fonction Travelstore vous permet de rechercher automatiquement les 6 stations les plus puissantes de la région et de
les mémoriser sur le niveau de mémoire FM1, FM2 ou FM3.
쏅 Sélectionnez un niveau de mémoire FM.
쏅 Appuyez sur le bouton
dans le menu radio.
쏅 Appuyez sur le bouton Travelstore dans le menu
options.
Le tuner démarre la recherche automatique des sta-
tions. A la n de la mémorisation, la station occupant
la place de mémoire 1 du niveau de mémoire sélectionné précédemment est di usée.
Remarque :
Pour la zone de réception Europe : lorsque la priorité aux informations routières est activée, seules les
stations qui di usent des informations routières sont
mémorisées.
Balayage des stations
La fonction Scan vous permet d'écouter pendant
quelques secondes chacune des stations pouvant être
reçues dans la gamme d'ondes sélectionnée.
쏅 Appuyez sur le bouton
dans le mode radio.
La fonction de balayage Scan recherche les stations
dans la gamme d'ondes sélectionnée. Chacune des
stations pouvant être reçue est alors captée pendant
quelques secondes.
쏅 Appuyez encore une fois sur le bouton
pour
sélectionner et continuer d'écouter la station qui
vient d'être balayée.
Activation et désactivation du RDS
Dans la zone de réception Europe, de nombreuses stations
FM émettent, outre leur programme, un signal RDS (Radio
Data System) qui propose les fonctions supplémentaires,
par ex. l'a chage du nom de la station sur l'écran.
쏅 Appuyez sur le bouton
dans le menu radio.
Le menu options apparaît, le réglage actuel est a ché derrière RDS.
쏅 Appuyez sur le bouton RDS dans le menu options
pour modi er le réglage.
쏅 Appuyez sur le bouton
.
Le menu radio réapparaît.
Activation/désactivation du signal
d'horloge RDS
L'heure peut être synchronisée au moyen des données
d'heure d'horloge envoyées via RDS.
쏅 Appuyez sur le bouton
dans le menu radio.
쏅 Appuyez sur le bouton RDS CT dans le menu options
pour modi er le réglage.
쏅 Appuyez sur le bouton
.
Le menu radio réapparaît.
Optimisation de la réception radio
La fonction HICUT améliore la qualité de la réception en
cas de mauvaise réception radio (uniquement en mode
radio FM). Elle réduit automatiquement le niveau de perturbation.
쏅 Appuyez sur le bouton
dans le menu radio.
쏅 Appuyez sur le bouton HICUT dans le menu options
pour modi er le réglage.
쏅 Appuyez sur le bouton
.
Le menu radio réapparaît.
Mode radio
03_NewYork_840_845_fr.indd 52
03_NewYork_840_845_fr.indd 52
03.09.14 15:06
03.09.14 15:06
Page 53

53
FRANÇAIS
Activation/désactivation de la fonction REG
(programmes régionaux)
Certaines stations RDS répartissent leur programme, à
certaines heures de la journée, en programmes régionaux proposant des émissions di érentes. Si la fonction
REG est activée, l'autoradio se règle uniquement sur la
fréquence alternative d'une station qui di use le même
programme régional.
쏅 Appuyez sur le bouton REG dans le menu radio pour
activer ou désactiver la fonction REG.
Le bouton REG est allumé lorsque la fonction REG
est activée.
Activation/désactivation de la fonction AF
(fréquences alternatives)
L'autoradio se règle automatiquement sur la fréquence
la plus puissante de la station dont vous êtes à l'écoute
quand la fonction AF est activée.
쏅 Appuyez sur le bouton AF dans le menu radio pour
activer ou désactiver la fonction AF.
Le bouton AF est allumé lorsque la fonction AF est
activée.
Réglage de la sensibilité de la recherche
La sensibilité de la recherche dé nit si la recherche automatique des stations ne s'arrête que sur des stations
puissantes ou aussi sur des stations plus faibles éventuellement perturbées.
쏅 Appuyez sur le bouton Loc dans le menu radio pour
régler la sensibilité de la recherche des stations.
Lorsque le bouton Loc est allumé, la fonction de re-
cherche détecte uniquement les stations puissantes.
Sélectionner un type de programme et
démarrer la recherche
La fonction PTY vous permet de sélectionner un type de
programme et de rechercher des stations de manière
ciblée, par ex. pour écouter du rock ou des émissions
sportives.
쏅 Appuyez sur le bouton
dans le menu radio.
쏅 Appuyez sur le bouton La liste PTY dans le menu
options pour afficher les types de programmes.
쏅 Sélectionnez le type de programme souhaité avec le
bouton [
] ou. [ ].
쏅 Appuyez sur le bouton
pour démarrer la re-
cherche PTY.
Si une station di use une émission du type de pro-
gramme sélectionné, c'est cette station qui sera diffusée.
Informations routières
Dans la zone de réception Europe, une station FM peut
identi er des messages d'information routière grâce au
signal RDS. Lorsque la priorité aux informations routières
est activée, un message d'information routière est di usé
automatiquement, même si l'autoradio ne se trouve pas
dans le mode radio.
Remarque :
Le volume sonore est augmenté pendant la di usion du
message d’information routière. Vous pouvez régler le
volume sonore minimal pour les informations routières.
Activation et désactivation de la priorité aux
messages d'information routière
쏅 Appuyez sur le bouton TA dans le menu radio pour
activer ou désactiver la priorité aux messages d'information routière.
Le bouton TA est allumé lorsque la priorité aux messages d'information routière est activée.
Réglage du volume sonore minimal pour les
informations routières
쏅 Appuyez sur le bouton
dans le menu radio.
쏅 Appuyez sur le bouton TA VO L dans le menu options.
쏅 Réglez le volume sonore souhaité avec le bouton
ou .
쏅 Appuyez sur le bouton
.
Le menu radio réapparaît, le volume sonore réglé est
mémorisé.
Navigation
(uniquement appareils avec
navigation)
Chargement des données de navigation
Le logiciel de navigation et les données cartographiques
se trouvent sur une carte microSD. Les appareils avec
navigation sont livrés avec la carte microSD dans la fente
d'introduction des cartes microSD. Pour pouvoir utiliser
la navigation, la carte microSD doit être introduite dans
la fente d'introduction des cartes.
쏅 Ouvrez le volet de protection de la fente d'introduc-
tion des cartes
=
à côté de la fente d'insertion du
DVD/CD.
쏅 Introduisez la carte microSD, côté imprimé en haut,
dans la fente jusqu'à ce qu'elle se verrouille.
쏅 Refermez le volet de protection de la fente.
Mode radio | Navigation
03_NewYork_840_845_fr.indd 53
03_NewYork_840_845_fr.indd 53
03.09.14 15:06
03.09.14 15:06
Page 54
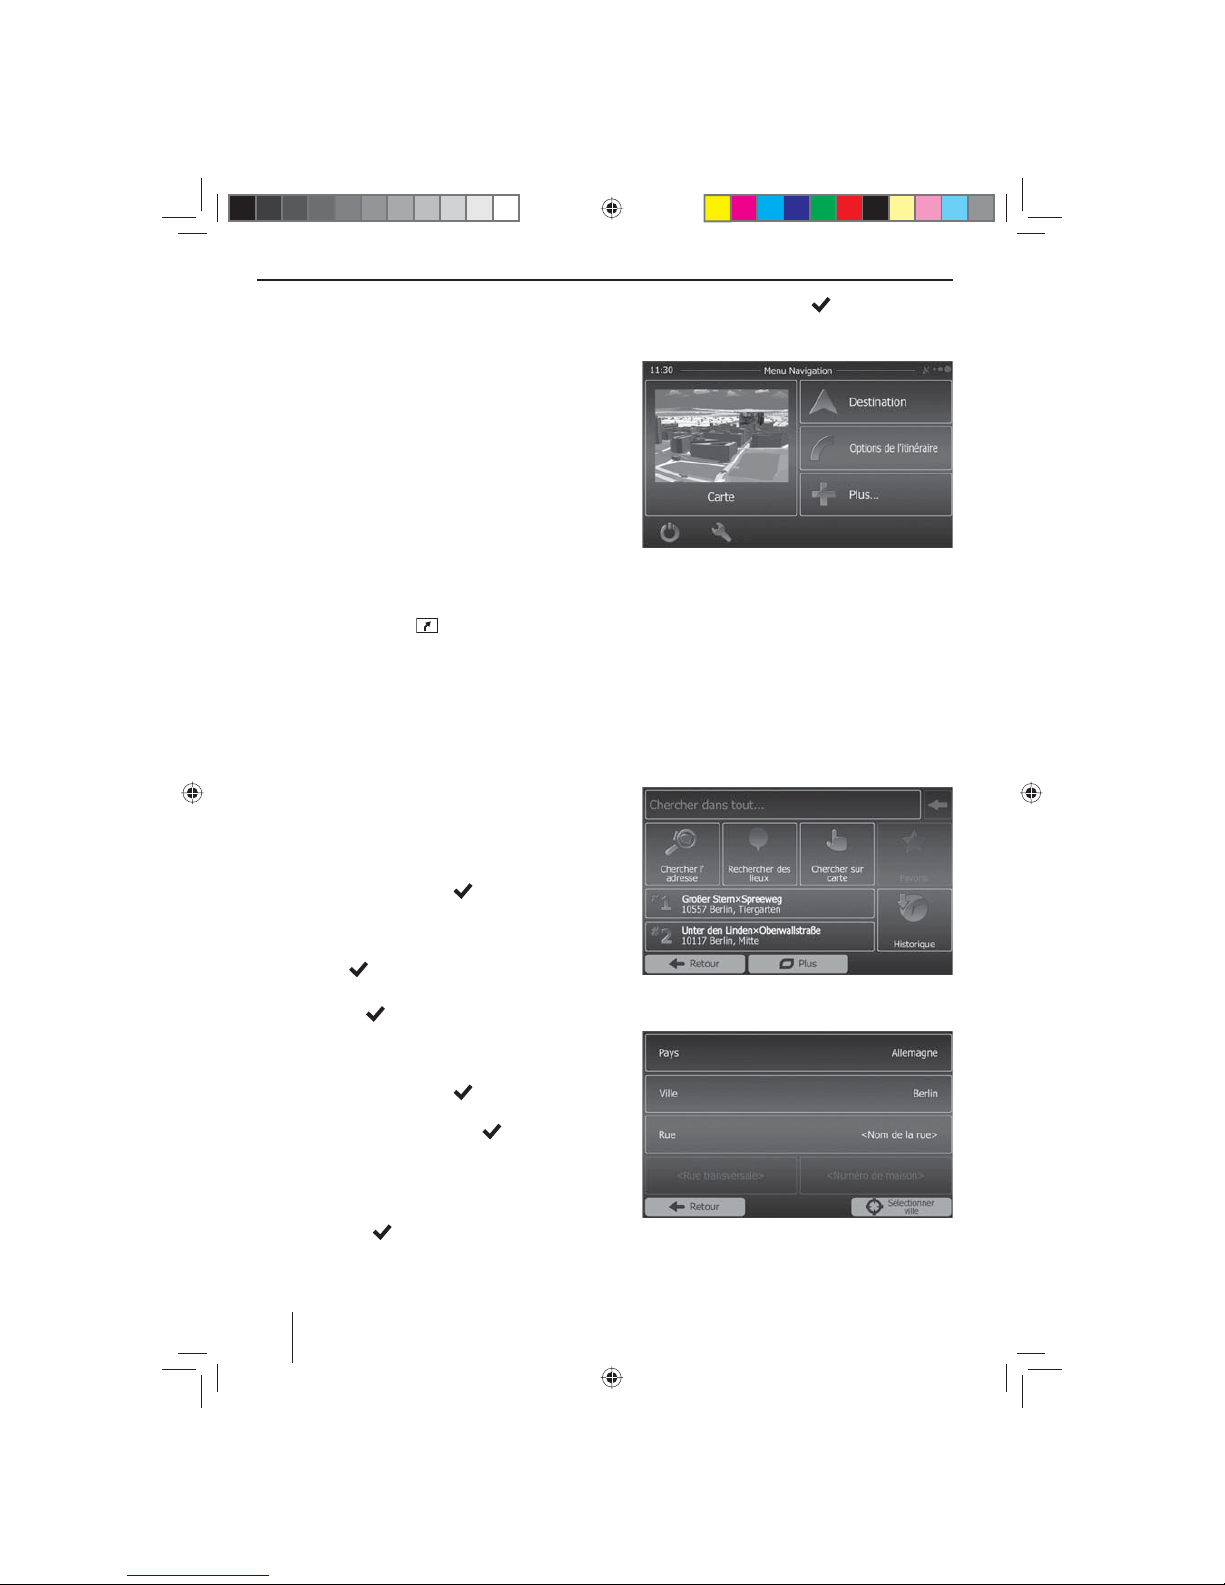
54
Téléchargement des données
cartographiques
Pour que vous soyez sûr d'avoir les données cartographiques les plus récentes lors de l'acquisition de l'appareil, vous disposez de 30 jours à partir de la première
localisation GPS pour télécharger une fois gratuitement
ces données sur la carte microSD en vous rendant sur le
site Internet www.naviextras.com.
Vous pouvez ensuite obtenir les données cartographiques récentes à tout moment contre paiement.
Remarque importante :
Si vous perdez ou endommagez la carte microSD, la
licence d'utilisation des cartes de navigation correspondante expire. Dans ce cas, vous devez acquérir
une nouvelle licence avec une nouvelle carte microSD.
Démarrage de la navigation
쏅 Appuyez sur la touche 3.
- ou -
쏅 Appuyez sur Navigation dans le menu principal.
Le menu navigation apparaît. Lorsque vous démarrez la navigation pour la première fois, l'assistant de
con guration apparaît.
Première mise en service
Lorsque vous démarrez la navigation pour la première
fois, un assistant de con guration vous aide à e ectuer
les réglages de base pour la navigation.
쏅 Réglez la langue pour la navigation. Cela peut être
une autre langue que celle sélectionnée pour les
autres fonctions de l'appareil.
쏅 Con rmez la sélection avec
.
Le contrat de licence d'utilisateur nal apparaît.
쏅 Prenez connaissance du contenu de ce contrat. Si
vous êtes d'accord avec les clauses de celui-ci, appuyez sur
.
L'assistant de con guration démarre.
쏅 Appuyez sur
pour continuer.
쏅 Sélectionnez une voix pour la sortie vocale du sys-
tème de navigation. Di érentes voix sont disponibles pour chaque langue.
쏅 Con rmez la sélection avec
.
쏅 Déterminez le format horaire et les unités pour la
navigation. Appuyez ensuite sur
.
Sur l'écran suivant, vous pouvez e ectuer votre paramétrage d'itinéraire préféré.
쏅 Modi ez au besoin les choix en appuyant sur les
entrées de menu a chées.
쏅 Appuyez sur
, lorsque vous avez adapté les
réglages.
쏅 Appuyez brièvement sur
, pour terminer la
con guration.
Le menu navigation apparaît.
Entrée des destinations
Vous avez plusieurs possibilités pour entrer des destinations : par l'adresse ou par destination spéciale à partir de
la base de données des destinations spéciales. Les destinations spéciales sont par ex. des curiosités touristiques,
des musées, des stades, des stations-service.
Adresse
쏅 Ouvrez le menu navigation.
쏅 Appuyez sur Destination.
Le menu pour l'entrée de la destination apparaît.
쏅 Appuyez sur Chercher l'adresse.
Le menu d'entrée de l'adresse apparaît.
쏅 Entrez successivement le pays, la localité et la rue
ainsi que le croisement ou le numéro de maison.
Appuyez pour cela sur les entrées correspondantes
dans le menu d'entrée de l'adresse.
Navigation
03_NewYork_840_845_fr.indd 54
03_NewYork_840_845_fr.indd 54
03.09.14 15:06
03.09.14 15:06
Page 55

55
FRANÇAIS
Un menu d'entrée du texte apparaît.
쏅 Entrez la destination souhaitée avec le clavier.
A chaque lettre, l'entrée dans la ligne d'adresse est
complétée automatiquement.
쏅 Lorsque le nom de la destination souhaitée est a -
chée dans la ligne d'adresse, appuyez sur le bouton
.
La destination sélectionnée est indiquée sur la carte.
쏅 Appuyez sur Suivant pour démarrer le guidage vers
la destination.
Le calcul de l'itinéraire commence. En fonction de la
distance entre le point de départ et la destination, le
calcul de l'itinéraire peut prendre un certain temps.
Une fois le calcul de l'itinéraire terminé, les paramètres de l'itinéraire ainsi que la distance et le temps
de parcours sont a chés. De plus, le tracé de l'itinéraire est représenté sur la carte.
쏅 Appuyez sur Aller! pour démarrer le guidage vers la
destination.
Destinations spéciales - Points d'intérêt
(POI)
쏅 Ouvrez le menu navigation.
쏅 Appuyez sur Destination.
Le menu pour l'entrée de la destination apparaît.
쏅 Appuyez sur Rechercher des lieux.
Le menu destinations spéciales apparaît.
쏅 Vous pouvez sélectionner une destination spéciale
dans quatre catégories prédé nies : Station-service,
Parking, Restaurant et Hébergement ou démarrer
votre propre recherche.
쏅 Appuyez par ex. sur Station-service pour trouver
rapidement une station-service.
Une liste des stations-service dans les environs du
véhicule apparaît. Les stations-service sont classées
par ordre de distance par rapport au véhicule.
쏅 Sélectionnez une station-service de la liste en ap-
puyant sur l'entrée correspondante.
Navigation
03_NewYork_840_845_fr.indd 55
03_NewYork_840_845_fr.indd 55
03.09.14 15:06
03.09.14 15:06
Page 56

56
Navigation
La station-service est indiquée sur la carte.
쏅 Appuyez sur Suivant.
Le tracé et les données de l'itinéraire apparaissent.
쏅 Appuyez sur Aller! pour démarrer le guidage vers la
destination.
Réglage des options d'itinéraire
Les options d'itinéraire permettent de régler le type de
véhicule, le type d'itinéraire (rapide, court, dynamique)
ainsi que d'autres paramètres dont l'appareil a besoin
pour calculer l'itinéraire en fonction de vos préférences.
Vous réglez les options d'itinéraire lors de la première
con guration de la navigation, mais vous pouvez les
modi er si vous le souhaitez pour chaque guidage vers
la destination.
Adaptation des options d'itinéraire avant le guidage
vers la destination
쏅 Appelez le menu navigation.
쏅 Appuyez sur le bouton
.
Le menu réglages pour la navigation apparaît.
쏅 Appuyez sur le bouton pour a cher la deu-
xième page.
쏅 Appuyez sur Paramétrage de l'itinéraire.
Le paramétrage de l'itinéraire apparaît.
쏅 Modi ez les réglages selon besoin.
쏅 Appuyez sur Retour autant de fois qu'il est néces-
saire pour faire de nouveau apparaître le menu navigation.
Modi cation des options d'itinéraire pendant le
guidage vers la destination
쏅 Appuyez sur le bouton
pendant le guidage
vers la destination.
쏅 Appuyez sur Paramétrage de l'itinéraire.
Le paramétrage de l'itinéraire apparaît.
쏅 Modi ez les réglages selon besoin.
쏅 Appuyez sur Retour.
Le guidage vers la destination réapparaît.
Paramètres de la carte
Les paramètres de la carte vous permettent de régler
le mode d'a chage (2D ou 3D), l'angle de vision de la
carte, les couleurs ainsi que l'a chage des bâtiments
et des points d'orientation sur la carte. Vous pouvez en
outre déterminer si les destinations spéciales pour les
di érentes catégories, par ex. les garages, les cafés, les
restaurants, doivent être a chées sur la carte.
쏅 Appelez le menu navigation.
쏅 Appuyez sur le bouton
.
03_NewYork_840_845_fr.indd 56
03_NewYork_840_845_fr.indd 56
03.09.14 15:06
03.09.14 15:06
Page 57

57
FRANÇAIS
Le menu réglages pour la navigation apparaît.
쏅 Appuyez sur le bouton pour a cher la deu-
xième page.
쏅 Appuyez sur Paramètres de la carte.
Les paramètres de la carte apparaissent.
쏅 Modi ez les réglages selon besoin.
쏅 Appuyez sur Retour autant de fois qu'il est néces-
saire pour faire réapparaître le menu navigation.
Remarque :
Vous pouvez également modi er les paramètres de
la carte pendant le guidage vers la destination :
쏅 Appuyez sur le bouton
pendant le guidage
vers la destination.
쏅 Appuyez sur Paramètres de la carte.
Les paramètres de la carte apparaissent.
쏅 Modi ez les réglages selon besoin.
쏅 Appuyez sur Retour.
Le guidage vers la destination réapparaît.
Lecture des médias DVD/CD/USB/
SDHC/iPod
Informations de base
L'autoradio vous permet de lire des DVD/CD audio
(CDDA) et des DVD/CD-R/RW avec des chiers audio,
MP3 ou WMA ainsi que des chiers MP3 ou WMA sur des
supports de données USB et sur des cartes SDHC.
En outre, vous pouvez regarder des lms et des photos
sur l'écran à partir de DVD/CD vidéo/CD, de supports de
données USB et de cartes SDHC. Des lms et des photos
sur des DVD/VCD/CD, des supports de données USB et
des sources AV peuvent a chés sur un moniteur externe
(Rear Seat Entertainment - RSE).
Pour des raisons de sécurité, la vision de lms ou de photos sur l'écran intégré est possible uniquement lorsque le
véhicule est à l'arrêt et que le frein de stationnement est
serré. Le câble «BRAKE» doit être raccordé au frein de stationnement du véhicule (voir le schéma de raccordement
qui se trouve à la n de cette notice). La vision de lms
sur un moniteur externe est possible pendant la marche.
Remarques :
• Pour éviter tout problème de fonctionnement, utilisez uniquement des CD avec le logo CompactDisc et des DVD avec le logo DVD.
• Blaupunkt ne peut pas garantir le bon fonctionnement de ses appareils avec des DVD/CD protégés contre la copie ainsi qu’avec certains DVD/
CD vierges, supports de données USB et cartes SD
disponibles sur le marché.
Pour préparer un support de données MP3/WMA, tenez
compte des remarques suivantes:
• Noms pour les titres et les répertoires: 32 caractères
au maximum, extension «.mp3 » ou « .wma » non
comprise (un nombre de caractères plus grand limite
le nombre de titres et de dossiers que l’autoradio
peut reconnaître)
• Formats de DVD/CD : DVD/CD-R/RW, Ø : 12 cm
• Formats de données de DVD/CD: ISO 9669 Level 1
et 2, Joliet
• Vitesse de gravage des CD: max. 16x (recommandé)
• Format/système de chiers USB: Mass Storage Device (mémoire de masse)/ FAT32
• Système de chiers des cartes SD: FAT32
• Extensions des chiers audio:
– .MP3 pour les chiers MP3
– .WMA pour les chiers WMA
• Fichiers WMA uniquement sans Digital Rights Management (DRM) et établis avec Windows Media®
Player à partir de la version 8
• Balise ID3 du MP3: versions 1 et 2
Navigation | Lecture des médias DVD/CD/USB/SDHC/iPod
03_NewYork_840_845_fr.indd 57
03_NewYork_840_845_fr.indd 57
03.09.14 15:06
03.09.14 15:06
Page 58

58
• Vitesse de transmission pour la génération des chiers audio:
– MP3: 32 à 320 kbps
– WMA: 32 à 192 kbps
• Capacité du support de données: jusqu'à 32 Go
Mode DVD/CD
Introduction des DVD/CD
Risque de destruction du lecteur DVD/CD !
Les DVD/CD de forme autre que circulaire et les
DVD/CD de 8 cm de diamètre (mini-DVD/CD)
ne doivent pas être utilisés.
Blaupunkt décline toute responsabilité en cas d’endommagement du lecteur suite à l’utilisation de DVD/CD
inappropriés.
쏅 Introduisez le DVD/CD dans la fente d’insertion du
DVD/CD
>
, face imprimée tournée vers le haut,
jusqu’à ce que vous rencontriez une résistance.
Le DVD/CD est automatiquement inséré et les don-
nées qu'il contient sont contrôlées. La lecture dans le
mode DVD/CD ou MP3 commence ensuite.
Remarque :
L’introduction automatique du DVD/CD doit s’e ectuer sans entrave et sans intervention de votre part.
Retrait des DVD/CD
쏅 Appuyez sur la touche 1 pour éjecter un DVD/
CD qui se trouve dans l’appareil.
Remarque :
L’éjection du DVD/CD doit s’e ectuer sans entrave et
sans intervention de votre part.
Supports de données USB
Cet appareil comporte trois raccordements USB :
• USB1 est intégré à l'avant de l'appareil, sous le volet
de protection.
• USB2 et USB RSE consistent en une prise USB pour un
raccordement par câble à l'arrière de l'appareil.
Remarques:
• Les lms et les photos mémorisés sur un support
de données USB ne peuvent être a chées sur un
moniteur externe (Rear Seat Entertainment - RSE)
que via la prise USB RSE.
• La prise USB RSE prend en charge les supports
de données USB d'une capacité maximale de
32 Go. Le nombre maximal possible de chiers et
de répertoires et de 1900 chiers/450 répertoires.
Raccordement USB1
쏅 Ouvrez le volet de protection
8
qui se trouve en
dessous du bouton-poussoir rotatif.
쏅 Emboîter le support de données USB dans la prise
USB
;
.
L'appareil passe automatiquement dans le mode
USB1. Les données sont lues, la lecture commence
par le premier chier que l'appareil reconnaît.
Retrait du support de données USB1
쏅 Arrêtez l'autoradio.
쏅 Retirez le support de données USB.
Cartes SDHC
Cet appareil dispose d'une fente d'introduction des
cartes SDHC en dessous du volet de protection qui se
trouve sur la face avant.
Introduction des cartes SDHC
쏅 Ouvrez le volet de protection
8
qui se trouve en
dessous du bouton-poussoir rotatif.
쏅 Introduisez la carte SDHC, face imprimée orientée
vers la gauche (angle coupé en haut) et contacts vers
l'avant, dans la fente d'introduction des cartes
9
et
enfoncez-la jusqu'à ce qu'elle se verrouille.
L'appareil passe automatiquement dans le mode
SDHC. Les données sont lues, la lecture commence
par le premier chier que l'appareil reconnaît.
Retrait des cartes SDHC
쏅 Ouvrez le volet de protection
8
si nécessaire.
쏅 Enfoncez la carte SDHC jusqu'à ce qu'elle se déver-
rouille.
쏅 Retirez la carte SDHC de la fente d'introduction
9
.
iPod/iPhone par USB
Vous pouvez brancher de nombreux modèles d'iPod® et
d'iPhone® sur l'autoradio par l'intermédiaire des raccordements USB et commander la lecture depuis l'autoradio.
Remarque :
Vous trouverez une liste des modèles d'iPod® et
d'iPhone® compatibles à la n de cette notice.
Blaupunkt ne peut garantir le fonctionnement parfait avec tous les modèles d'iPod® et d'iPhone®.
Utilisez un câble d'adaptation approprié pour relier votre
iPod® ou votre iPhone® à la prise USB de l'autoradio.
쏅 Brancher le connecteur USB du câble adaptateur
dans une des prises USB (USB1 ou USB2) de l'appareil.
L'appareil passe automatiquement dans le mode
USB. Les données sont lues, la lecture commence par
le premier chier de l'iPod®/iPhone® que l'appareil
reconnaît.
Lecture des médias DVD/CD/USB/SDHC/iPod
03_NewYork_840_845_fr.indd 58
03_NewYork_840_845_fr.indd 58
03.09.14 15:06
03.09.14 15:06
Page 59

59
FRANÇAIS
Lecture de lms sur DVD
L'autoradio peut lire les DVD vidéo et les CD vidéo. La
lecture commence automatiquement une fois le DVD
introduit. Le menu DVD apparaît.
Vous pouvez naviguer dans le menu DVD en e eurant
les boutons correspondants du menu DVD sur l'écran
tactile.
Après que vous avez démarré la lecture du lm par l'intermédiaire du menu DVD, vous pouvez voir le lm. Le
menu lecture des DVD est masqué.
쏅 Appuyez brièvement une fois sur l'écran tactile pour
faire réapparaître le menu lecture.
Le menu lecture réapparaît.
[ ] A chage de la deuxième page du menu.
[
] Arrêt de la lecture, appel du menu DVD.
[
] Sélection du chapitre précédent.
[
] Interruption et reprise de la lecture
[
] Sélection du chapitre suivant.
[
] Recherche rapide en arrière.
[
] Recherche rapide en avant.
[
] A chage de l'égaliseur.
쏅 Appuyez brièvement sur
pour a cher la deu-
xième page du menu lecture.
La deuxième page du menu lecture apparaît.
[ ] A chage de la première page.
[
] Sélection de la langue de lecture (unique-
ment si reconnu par le DVD).
[
] A chage des sous-titres (uniquement si
reconnu par le DVD).
[
] Activation/désactivation de la fonction de
répétition du chapitre ou de la section A-B.
[
] Détermination de la section pour la fonc-
tion de répétition.
[
] Commutation de l'angle de caméra (uni-
quement si reconnu par le DVD).
[
] A chage du clavier pour la sélection di-
recte de titres, chapitres ou durée de lecture.
Lecture des chiers audio de DVD/CD,
USB, SDHC ou iPod/iPhone
Les principes de lecture des chiers audio (MP3/WMA)
de supports de données ou de iPod®/iPhone® sont identiques pour toutes les sources.
쏅 Sélectionnez la source souhaitée par l'intermédiaire
du menu principal.
Lorsque la lecture démarre avec des chiers image ou
vidéo,
쏅 appuyez sur le bouton
pour passer à la lecture
des chiers audio.
Le dossier du support de données, qui contient les
chiers audio, apparaît.
[ ] Passage dans le niveau de dossier immédia-
tement supérieur.
[
] Déplacement du curseur.
[
] Déplacement du curseur.
[
] Ouverture du dossier sélectionné ou dé-
marrage de la lecture d'un titre.
- ou Appuyez brièvement sur le nom du dossier
ou du titre. Le dossier s'ouvre ou la lecture
du titre démarre.
[ ] Reprise de la lecture
uniquement iPod®/iPhone®
[
] A chage du clavier pour l'entrée directe du
numéro du titre souhaité.
[
] Quitter la liste des dossiers/ chiers.
[
] A chage de l'égaliseur.
Lecture des médias DVD/CD/USB/SDHC/iPod
03_NewYork_840_845_fr.indd 59
03_NewYork_840_845_fr.indd 59
03.09.14 15:06
03.09.14 15:06
Page 60

60
Lorsque vous avez démarré la lecture d'un titre, le menu
lecture apparaît.
[ ] A chage des dossiers.
[
] Pression brève : sélection du titre.
Pression prolongée : recherche rapide.
[
/ ] Interruption et reprise de la lecture.
[
] Pression brève : sélection du titre.
Pression prolongée : recherche rapide.
Lecture des chiers audio de DVD/CD, USB ou
SDHC:
[
] Démarrage et arrêt de la fonction de répéti-
tion REPEAT.
Le mode REPEAT commute à chaque pres-
sion du bouton
.
A chage Mode REPEAT
Répétition du titre actuel
Répétition du dossier actuel
Lecture normale
[
] Démarrage et arrêt de la lecture aléatoire
MIX.
Lorsque la fonction MIX est activée, le bou-
ton
est mis en surbrillance.
Le fonctionnement du mode MIX varie en
fonction de la fonction de répétition REPEAT
sélectionnée.
A chage
du mode
REPEAT
Mode MIX
Pas de lecture aléatoire
Mélange des titres du dossier
actuel
Mélange des titres du sup-
port de données
Lecture des chiers audio de iPod®/iPhone®:
[
] Démarrage et arrêt de la fonction REPEAT.
Le mode REPEAT commute à chaque pression du bouton
.
A chage Mode REPEAT
Répétition du titre actuel
Répétition de la sélection
actuelle
[ ] Démarrage et arrêt de la lecture aléatoire
MIX.
Le mode MIX commute avec chaque pres-
sion du bouton
.
A chage Mode MIX
Mélange des titres de la
sélection actuelle
Mélange des titres de l'album
actuel
Remarque:
La lecture aléatoire des titres dépend du
modèle d'iPod®-/iPhone®.
[
] A chage du clavier pour l'entrée directe du
numéro du titre souhaité.
Lecture des chiers vidéo de DVD/CD, USB
ou SDHC
쏅 Sélectionnez la source souhaitée par l'intermédiaire
du menu principal.
Lorsque la lecture démarre avec des chiers audio ou
image,
쏅 appuyez sur le bouton
pour passer à la lecture
des chiers vidéo.
Le dossier du support de données, qui contient les
lms, apparaît.
Remarque :
La sélection et la lecture du dossier et du titre s'e ectuent comme décrit pour la lecture des chiers audio.
Lecture des médias DVD/CD/USB/SDHC/iPod
03_NewYork_840_845_fr.indd 60
03_NewYork_840_845_fr.indd 60
03.09.14 15:06
03.09.14 15:06
Page 61

61
FRANÇAIS
Lorsque vous avez sélectionné un lm, la lecture démarre.
Le menu lecture est masqué pendant la lecture du lm.
쏅 Appuyez brièvement une fois sur l'écran tactile pour
faire réapparaître le menu lecture.
Le menu lecture réapparaît.
[ ] A chage de la deuxième page du menu.
[
] Arrêt de la lecture, a chage du dossier.
[
] Sélection du lm précédent.
[
] Interruption et reprise de la lecture.
[
] Sélection du lm suivant.
[
] Recherche rapide en arrière.
[
] Recherche rapide en avant.
[
] A chage de l'égaliseur.
Deuxième page du menu lecture.
[ ] A chage de la première page.
[
] Arrêt de la lecture, a chage du dossier.
[
] Sélection de la langue de lecture (unique-
ment si cette fonction est reconnue par le
lm).
[
] A chage des sous-titres (uniquement si
cette fonction est reconnue par le lm).
[
] Activation et désactivation de la fonc tion de
répétition du lm ou du dossier.
[
] Activation et désactivation de la lecture
aléatoire.
[
] A chage du clavier pour la sélection di-
recte du lm ou de la durée de lecture.
Remarque :
Avec cet appareil, vous pouvez lire les chiers vidéo
mémorisés sur un iPod®/iPhone®. L'iPod®/iPhone®
doit pour cela être raccordé à l'appareil avec un
câble spécial (USB - A/V) disponible dans un magasin
d'accessoires.
Lecture des chiers d'images de DVD/CD,
USB ou SDHC
쏅 Sélectionnez la source souhaitée par l'intermédiaire
du menu principal.
Lorsque la lecture démarre avec des chiers audio ou des
lms,
쏅 appuyez sur le bouton
pour passer à la lecture
des chiers d'images.
Le dossier du support de données, qui contient les
images, apparaît.
Remarque :
La sélection et la lecture du dossier et des images
s'e ectuent comme décrit pour la lecture des chiers
audio.
Lecture des médias DVD/CD/USB/SDHC/iPod
03_NewYork_840_845_fr.indd 61
03_NewYork_840_845_fr.indd 61
03.09.14 15:06
03.09.14 15:06
Page 62

62
Mode Bluetooth
Vous pouvez coupler des téléphones portables et des
lecteurs de média à l'autoradiopar l'intermédiaire de la
fonction Bluetooth®.
Lorsque vous couplez un téléphone portable avec l'autoradio, vous pouvez béné cier de la fonction mains libres
intégrée pour téléphoner. Vous pouvez accéder aux listes
des numéros sélectionnés et au répertoire téléphonique
du téléphone portable couplé.
Si l'appareil Bluetooth® connecté reconnaît les fonctions
A2DP et AVRCP, vous pouvez procéder à une lecture de la
musique via l'autoradio et commander la lecture. La lecture musicale est interrompue pour la durée d'un appel
et reprise une fois l'appel terminé.
Lorsqu'un téléphone portable est couplé par l'intermédiaire de Bluetooth® et qu'un appel survient pendant la
di usion d'une autre source, celle-ci est interrompue et
le menu appels apparaît.
Démarrage du mode Bluetooth
쏅 Appuyez sur Bluetooth dans le menu principal.
- ou -
쏅 Appuyez sur la touche
2 pendant env. 2 secondes. (Condition préalable : cette fonction est
a ectée à la touche dans le menu réglages.)
Le menu Bluetooth® apparaît. Il contient la liste des
appareils Bluetooth® connus. Les autres sources audio sont coupées.
[ ] Déplacement du curseur.
[
] Déplacement du curseur.
[
] Fin de liaison avec l'appareil marqué.
[
] E acement de l'appareil marqué de la liste.
[
] A chage du menu options.
쏅 Appuyez brièvement sur le nom de l'appareil
Bluetooth® avec lequel vous souhaitez établir la
liaison.
Lorsque l'appareil est à portée, la liaison est établie et
le menu pour l'appareil apparaît.
Mode Bluetooth
Couplage d'appareils Bluetooth
Lorsque vous couplez un appareil à l'autoradio pour la
première fois, procédez comme suit :
쏅 Assurez-vous que la fonction Bluetooth® est activée
sur l'autoradio et sur l'appareil Bluetooth®.
쏅 Entrez un code de pairage dans le menu options du
mode Bluetooth® (voir réglages Bluetooth®).
쏅 Recherchez les nouveaux appareils/nouvelles
liaisons sur votre appareil Bluetooth®.
쏅 L'autoradio apparaît comme «BP 84x» sur la liste des
appareils Bluetooth®.
쏅 Établissez la connexion, si nécessaire, il vous faut
entrer le code de pairage préalablement dé ni sur
l'autoradio.
La liaison est établie et le menu pour l'appareil couplé apparaît.
Remarque:
Lorsqu'un téléphone est couplé à l'autoradio, le symbole Bluetooth®
apparaît en haut à droite de l'écran
de la source audio/vidéo.
Mode téléphone
Lorsque vous avez connecté un téléphone à l'autoradio par l'intermédiaire de Bluetooth®, le menu suivant
s'a che.
[ ] Passage dans le niveau immédiatement
supérieur.
[
] Déplacement du curseur.
[
] Déplacement du curseur.
[
] Fin de liaison avec l'appareil actuel.
[
] A chage du clavier pour l'entrée directe
d'un numéro de téléphone
[
] A chage du menu options.
쏅 Sélectionnez un contact/un numéro par l'intermé-
diaire des listes d'appels ou du répertoire téléphonique et appuyez brièvement sur l'entrée.
La liaison s'établit.
03_NewYork_840_845_fr.indd 62
03_NewYork_840_845_fr.indd 62
03.09.14 15:06
03.09.14 15:06
Page 63

63
FRANÇAIS
Mode Bluetooth
Dans le cas d'un appel entrant, le menu appels apparaît.
[ ] Prise d'appel.
[
] Refus d'appel.
Si un deuxième appel survient pendant une liaison téléphonique, vous avez les possibilités suivantes:
쏅 Appuyez sur le bouton
, pour maintenir la
liaison en cours et prendre l'appel entrant.
쏅 Appuyez sur le bouton
, pour passer de l'une
à l'autre liaison.
Remarque:
Cette fonction doit être activée sur votre téléphone.
Lecture de chiers audio - Streaming
Bluetooth
Si un appareil de lecture audio en continu (streaming
audio) est connecté à l'autoradio par Bluetooth®, vous
pouvez procéder à la lecture musicale via l'autoradio et
commander la lecture.
쏅 Appuyez sur le bouton
dans le menu Bluetooth®,
pour passer en mode de lecture de chiers audio.
[ ] Pression brève : sélection du titre.
Pression prolongée : recherche rapide.
[
/ ] Interruption et reprise de la lecture.
[
] Pression brève : sélection du titre.
Pression prolongée : recherche rapide.
[
] Fin de liaison avec l'appareil actuel.
[
] A chage du menu options.
Lecture de chiers audio - Téléphone
portable Android
L'app « Android Music Player» de Blaupunkt vous permet de classer des chiers musicaux mémorisés sur un
téléphone portable dans des catégories dé nies à l'aide
des informations de balise ID3. Vous pouvez ainsi sélectionner et lire des titres musicaux de manière rapide et
confortable via diverses catégories. Pour ce faire, l'App
doit être installée sur le téléphone portable Android.
Vous pouvez télécharger l'App « Android Music Player»
sur Internet à l'adresse www.blaupunkt.com.
Remarque:
La lecture de chiers audio via l'App « Android
Music Player » est uniquement disponible sur les
téléphones portables avec système d'exploitation
Android 2.3 et supérieur. De plus, le téléphone portable doit prendre en charge les pro ls Bluetooth®
SPP (Serial Port Pro le) et A2DP (Advanced Audio
Distribution Pro le).
쏅 Appuyez sur le bouton , dans le menu
Bluetooth®, pour passer en mode de lecture Android
de chiers audio.
[ ] A cher des listes de catégorie.
[
] Pression brève : sélection du titre.
Pression prolongée : recherche rapide.
[
/ ] Interruption et reprise de la lecture.
[
] Pression brève : sélection du titre.
Pression prolongée : recherche rapide.
[
] Activation et désactivation de la fonc tion de
répétition.
[
] Activation et désactivation de la lecture
aléatoire.
03_NewYork_840_845_fr.indd 63
03_NewYork_840_845_fr.indd 63
03.09.14 15:06
03.09.14 15:06
Page 64

64
Réglages Bluetooth
Le menu options pour Bluetooth® vous permet d'e ectuer les réglages de base pour le mode Bluetooth®.
쏅 Appuyez sur le bouton
dans le menu Bluetooth®.
Le menu options apparaît.
Bluetooth – Ici, vous pouvez activer ou désactiver
Bluetooth®.
Auto connect – Lorsque «Auto connect» est activé,
l'autoradio établit automatiquement la liaison avec
les appareils Bluetooth® connus dès que ceux-ci sont
à portée.
Réponse auto – Lorsque «Réponse auto» est activé,
les appels entrants sont pris automatiquement.
Pairing code – De nombreux appareils Bluetooth®
demandent un code de pairage avant l'acceptation
de la liaison. Vous pouvez le déterminer ici.
Synchronisation – Pour avoir accès au répertoire téléphonique d'un téléphone relié, vous devez d'abord
e ectuer la synchronisation par l'intermédiaire de
cette entrée du menu.
Auto sync – Si la fonction «Auto sync» est activée,
la synchronisation du répertoire téléphonique est
automatique dès que le téléphone est connecté à
l'appareil.
Mode Bluetooth | Rear Seat Entertainment
Rear Seat Entertainment (RSE)
(système de divertissement à
l'arrière)
L'appareil propose des sorties pour le raccorde ment de
deux moniteurs externes et des sorties audio pour l'arrière du véhicule.
Les moniteurs externes peuvent présenter un autre programme que celui de l'appareil, ce qui permet par ex. de
voir des photos ou des lms sur un moniteur externe
pendant la marche.
La reproduction audio pour le RSE s'e ectue par l'intermédiaire des prises Rear Out R et Rear Out L. Ces prises
doivent être reliées à des douilles de jack appropriées
a n que les passagers arrière puissent écouter leur programme en utilisant des casques.
Démarrage de la fonction RSE par moniteurs externes:
쏅 Appelez le menu principal.
쏅 Appuyez sur le bouton
.
Le menu principal RSE apparaît.
Les sources suivantes peuvent être sélectionnées
pour les moniteurs externes: USB RSE, Disque, AV-IN 1
et AV-IN 2.
Remarque:
Seul la prise USB RSE à l'arrière de l'appareil prend en
charge les moniteurs externes.
쏅 Sélectionnez la source qui est censée s'a cher sur les
moniteurs externes.
La source sélectionnée s'a che sur l'écran de l'appa-
reil et sur les moniteurs externes.
쏅 Appuyez sur le bouton
, pour retourner à la
source pour la partie avant du véhicule.
- ou -
쏅 Appuyez sur le bouton
pour appeler le menu
principal RSE pour la partie arrière du véhicule.
Remarque:
Si vous sélectionnez une autre source pour le moniteur intégré, la source actuelle continue d’être a chée sur les moniteurs externes.
쏅 Pour désactiver la fonction RSE, appelez le menu
principal RSE et appuyez sur le bouton Rear o .
03_NewYork_840_845_fr.indd 64
03_NewYork_840_845_fr.indd 64
03.09.14 15:06
03.09.14 15:06
Page 65

65
FRANÇAIS
Sources audio/vidéo externes | Réglages du son
Sources audio/vidéo externes
Cet appareil dispose de deux entrées AV externes pour la
lecture de chiers audio et vidéo :
• AV-IN 1 est intégré à l'avant de l'appareil, sous le volet
de protection.
• AV-IN 2 consiste en une prise Cinch pour un raccordement par câble à l'arrière de l'appareil. Vous pouvez déterminer l'emplacement du support de données lors du montage de l'appareil.
Danger !
Risque élevé de blessure par la che.
La che introduite dans la prise AV-IN frontale
dépasse et peut provoquer des blessures en cas d’accident. L’utilisation d’une che droite ou d’un adaptateur
entraîne un risque de blessure élevé.
쏅 Démarrez le mode AV-IN avec le bouton AV-IN 1 ou
AV-IN 2.
Les données de lecture des chiers audio ou vidéo
de la source AV sélectionnée apparaissent sur l'écran.
Réglages du son
Répartition du volume sonore (Fader/Balance)
Vous pouvez régler la répartition du volume sonore dans
le véhicule pour toutes les sources.
쏅 App<uyez sur le bouton
dans le menu principal.
Le menu égaliseur apparaît.
쏅 Appuyez sur le bouton
.
Le menu pour fader (répartition avant/arrière du volume sonore) et balance (répartition droite/gauche
du volume sonore) apparaît.
쏅 Réglez le fader et la balance avec / ou
/ .
쏅 Appuyez ensuite sur Equalizer
.
Le réglage est mémorisé, le menu principal réapparaît.
Egaliseur
Vous pouvez régler l'égaliseur pour toutes les sources.
쏅 Appuyez sur le bouton
dans le menu principal.
Le menu égaliseur apparaît.
쏅 Sélectionnez un préréglage de l'égaliseur avec
ou .
- ou -
쏅 Les boutons
ou vous permettent de régler
le niveau pour Bass (graves), Mid (médium) et Treble
(aiguës) ainsi que la fréquence des ltres LPF, MPF et
HPF selon vos préférences.
쏅 Appuyez ensuite sur Equalizer
.
Le réglage est mémorisé, le menu principal réapparaît.
Remarque:
Le bouton [ ] vous permet de rétablir les valeurs
par défaut du préréglage de l'égaliseur sélectionné.
03_NewYork_840_845_fr.indd 65
03_NewYork_840_845_fr.indd 65
03.09.14 15:06
03.09.14 15:06
Page 66

66
Réglages de base
Le menu réglages vous permet d'e ectuer les réglages
de base pour les di érentes fonctions de l'appareil en
fonction de vos préférences.
쏅 Appuyez sur le bouton Paramètres dans le menu
principal.
Le menu réglages apparaît, le sous-menu Général
est activé.
쏅 Appelez les sous-menus avec les boutons qui se
trouvent dans la zone inférieure du menu réglages.
Vidéo
Les réglages possibles sont les suivants :
Format d'image – Réglage du format d'image
Caméra externe – Réglage de la caméra de marche ar-
rière (lorsqu'une caméra de marche arrière est raccordée)
AV-IN 2 Mode – Si vous raccordez une caméra de marche
arrière avec signa audio à l'entrée AV-IN 2 de l’appareil,
vous pouvez écouter le son de la caméra via les hautparleurs de l'autoradio. Pour ce faire, réglez «Camera».
DivX registration – A chage du code d'enregistrement
DivX®
Général
Les réglages possibles sont les suivants :
Radio Region – Sélection de la région pour la réception
radio.
Non Éclairage – En fonction du réglage, l'écran de l'auto-
radio s'éteint complètement au bout de 10 ou 20 s s'il
n'est pas utilisé.
Mode variateur – Commutation de la luminosité de
l'écran entre mode jour et mode nuit.
Dimmer – Réglage de la luminosité de l'écran pour le
jour ou pour la nuit.
Beep – Activation et désactivation du bip de con rmation
Télécommande IR – Ici, vous pouvez sélectionnez si la
télécommande est censée commander la source sur
l'écran de l'appareil (zone avant) ou la source sur le moniteur externe (zone arrière).
Second plan – Sélection du fond d'écran pour les menus.
L'appareil propose plusieurs motifs. Vous pouvez aussi
sélectionner vos propres images que vous aurez mémorisées au préalable sur la carte microSD.
Calibrage – Vous pouvez calibrer l'écran tactile ici.
SWC – Ici, vous pouvez con gurer les touches d'une télé-
commande au volant raccordée.
Softkey MENU – Vous pouvez a ecter à la touche
2
une fonction en la maintenant appuyée pendant env.
2 secondes. Choisissez entre les options Démarrage du
mode Bluetooth® et Arrêt de l'écran.
Code antivol – Activation/désactivation de la demande
d'entrée du code. Lorsque la demande d'entrée du code
est activée, le code à quatre chi res doit être entré
chaque fois que l'appareil est déconnecté de la tension
de bord (par ex. en cas de dépose de la batterie lors d'une
réparation).
Code – Vous pouvez modi er le code. Pour modi er le
code, vous devez entrer le code à quatre chi res. Au départ de l'usine, le code est réglé sur 0000.
Load factory – E ace tous les réglages personnels. À
l'exception du code de sécurité personnel.
Software Version – A chage des versions actuelles du
logiciel.
Réglages de base
03_NewYork_840_845_fr.indd 66
03_NewYork_840_845_fr.indd 66
03.09.14 15:06
03.09.14 15:06
Page 67

67
FRANÇAIS
Réglages de base
Temps
Les réglages possibles sont les suivants :
Date – Réglage de la date
Mode heure – Sélection de l'a chage sur 12 ou 24
heures
Temps – Réglage de l'heure
Son
Les réglages possibles sont les suivants :
Subwoofer – Activation et désactivation du subwoofer
Filtre du sub – E ectuez le réglage en fonction du
subwoofer utilisé (réglages : 80/120/160 Hz).
Dyn. bass – Activation et désactivation des graves dyna-
miques
Langue
Les réglages possibles sont les suivants :
On screen display – Langue de l'interface utilisateur de
l'appareil..
DVD audio – La lecture des chiers audio de DVD dé-
marre dans la langue réglée ici.
DVD subtitle – Les sous-titres du DVD apparaissent dans
la langue réglée ici.
Disc menu – Le menu DVD est a ché dans la langue
réglée ici.
Bluetooth
Les réglages possibles sont les suivants :
Bluetooth – Vous pouvez activer et désactiver Blue-
tooth® ici
Auto connect – Lorsque «Auto connect» est activé, l'au-
toradio établit automatiquement la liaison avec les appareils Bluetooth® connus dès que ceux-ci sont à portée.
Réponse auto – Lorsque «Réponse auto» est activé, les
appels entrants des téléphones reliés sont pris automatiquement.
Microphone – Sélectionnez le microphone qui doit être
utilisé avec le kit mains-libres Bluetooth®.
Code pairing – De nombreux appareils Bluetooth® demandent un code de pairage avant l'acceptation de la
liaison. Vous pouvez le déterminer ici.
Clavier BT – Vous pouvez régler ici la con guration du
clavier pour la recherche dans l'annuaire.
03_NewYork_840_845_fr.indd 67
03_NewYork_840_845_fr.indd 67
03.09.14 15:06
03.09.14 15:06
Page 68

68
DVD
Les réglages possibles sont les suivants :
Dé nir le mot de passe – Déterminez un mot de passe
lorsque vous souhaitez utiliser les réglages de protection
de l'enfance.
Niveau d'autorisation – Ici, vous pouvez déterminer
la limite d'âge pour les DVD. Lorsque vous réglez sur
«Adulte», tous les lms peuvent être lus. Si vous avez
con guré un mot de passe, vous pouvez modi er la limite d'âge uniquement avec le mot de passe.
Volume sonore
Le menu volume sonore vous permet de régler le rapport
de volume sonore pour toutes les sources audio.
Réglages de base | Informations utiles
Informations utiles
Garantie
Notre garantie constructeur s’étend à tous nos produits
achetés à l'intérieur de l’Union Européenne. Pour les
appareils vendus en dehors de l’Union européenne,
les conditions de garantie applicables sont celles dé nies par notre représentant agréé dans le pays. Vous
pouvez consulter les conditions de garantie sur le site
www.blaupunkt.com.
Service
Si vous devez un jour faire appel à notre service de réparation, vous trouverez les informations sur notre partenaire de service dans votre pays en vous rendant sur le
site Internet www.blaupunkt.com.
Sous réserve de modi cations techniques !
03_NewYork_840_845_fr.indd 68
03_NewYork_840_845_fr.indd 68
03.09.14 15:06
03.09.14 15:06
Page 69

69
ITALIANO
Elementi di comando – apparecchio
1
Tasto (Eject)
Espulsione del DVD/CD
2
Tasto
Premuto brevemente: richiamo menu principale
Nel menu principale: richiamo menu della fonte attiva
Premuto a lungo: richiamare la funzione Bluetooth®
oppure spegnere il display. È possibile selezionare la
funzione nel menu impostazioni.
3
Tasto
Premuto brevemente: richiamo navigazione
In modalità navigazione: richiamo della fonte attiva
Premuto a lungo: richiamare l'impostazione luminosità del display
4
Microfono
5
Pulsante-manopola
Premuto brevemente: accensione apparecchio
Durante l'uso: modalità silenziosa (mute) della fonte
audio
Premuto a lungo: spegnimento apparecchio
Rotazione: regolazione del volume
6
Ricevitore infrarossi per telecomando
7
Tasto Reset
Ripristino delle impostazioni di fabbrica originarie
dell'apparecchio.
Attenzione! Tutte le impostazioni personalizzate andranno perse!
8
Sportellino di protezione
9
Lettore schede SD
Accesso solo con sportellino aperto
:
Presa AV-IN frontale (fonte AV-IN 1)
Accesso solo con sportellino aperto
;
Presa USB frontale (fonte USB 1)
Accesso solo con sportellino aperto
<
Interfaccia utente touchscreen
=
Lettore schede micro SD per dati di navigazione
Accesso solo con sportellino aperto
>
Lettore DVD/CD
2
3
5
8
6
4
7
1
13
12
14
9
10
11
04_NewYork_840_845_it.indd 69
04_NewYork_840_845_it.indd 69
03.09.14 15:09
03.09.14 15:09
Page 70

70
Elementi di comando – telecomando
26
28
29
32
33
31
34
18
20
22
24
16
35
36
48
46
44
42
41
39
37
38
21
23
25
30
19
17
15
47
45
43
27
40
?
Tasto SRC
Selezione della fonte
@
Tasto
Espulsione del DVD/CD
A
Tasto INFO
Visualizzazione informazioni sul display
B
Tasto MENU
Richiamo menu DVD
C
Tasto ZOOM
Ingrandimento selezione
D
Tasto PIC
Impostazione della luminosità del display
E
Tasto
Riproduzione rallentata
F
Tasto
Fine riproduzione
G
Tasto BAND
Selezione gamma di lunghezze d'onda/livello di memoria
H
Tasto
Richiamo menu principale
I
Tasto
Avvio e interruzione riproduzione
J
Tasto
Richiamo menu Impostazioni
K
Tasto / / /
Navigazione nel menu e modi ca impostazioni
Avvio della ricerca delle stazioni ( / )
Richiamo delle stazioni memorizzate ( / )
L
Tasto
Accettazione chiamata
M
Tasto
Conclusione/ri uto di una chiamata
N
Tasto PHOTO
Richiamo panoramica cartella delle immagini
O
Tasto MUSIC
Richiamo panoramica cartella dei le audio
P
Tasti numerici 0 - 9
Q
Tasto
Riproduzione in ordine casuale
R
Tasto
Funzione di ripetizione
S
Tasto
Funzione Scan
T
Tasto VIDEO
Richiamo panoramica cartella dei lm
U
Tasto /
Regolazione del volume
V
Tasto OK
Conferma selezione
W
Tasto
Fonte audio in modalità silenziosa
X
Tasto /
Premuto brevemente: impostazione manuale delle
stazioni; selezione brano, capitolo, lm
Premuto a lungo: ricerca rapida automatica
Y
Tasto
Richiamo menu equilizzatore
Z
Tasto
Cancellazione dell'ultimo carattere inserito
[
Tasto
Area de nizione della funzione di ripetizione
\
Tasto GOTO
Richiamare l'immissione diretta per frequenza dell'emittente, brano, capitolo, lm e/o durata
]
Tasto ANGLE
Selezione angolazione telecamera (se disponibile sul
DVD)
a
Tasto SUBTITLE
Selezione lingua dei sottotitoli (se disponibile sul DVD)
b
Tasto AUDIO
Selezionare lingua riproduzione (se disponibile sul DVD)
c
Tasto
Accensione/spegnimento apparecchio
04_NewYork_840_845_it.indd 70
04_NewYork_840_845_it.indd 70
03.09.14 15:09
03.09.14 15:09
Page 71

71
ITALIANO
Sommario
Norme di sicurezza ................................................... 72
Simboli utilizzati ................................................................... 72
Sicurezza stradale ................................................................ 72
Norme di sicurezza generali ............................................. 72
Dichiarazione di conformità ............................................. 72
Avvertenze per la pulizia ......................................... 72
Avvertenze per lo smaltimento ............................... 72
Fornitura.................................................................... 73
Messa in funzione ..................................................... 73
Protezione antifurto ............................................................ 73
Accensione e spegnimento .............................................. 73
Volume ..................................................................................... 73
Menu principale ................................................................... 74
Impostare la regione di ricezione ................................... 74
Esercizio radio ........................................................... 74
Avvio esercizio radio ........................................................... 74
Selezione livello di memoria ............................................ 74
Sintonizzazione di una stazione ..................................... 74
Memorizzazione manuale delle stazioni ..................... 75
Memorizzazione automatica delle stazioni
(Travelstore) ........................................................................... 75
Breve ascolto delle stazioni .............................................. 75
Attivazione e disattivazione RDS .................................... 75
Attivazione e disattivazione del segnale
orario RDS ............................................................................... 75
Ottimizzazione della ricezione radio ............................ 75
Attivazione/disattivazione della funzione REG
(programmi regionali) ........................................................ 75
Attivazione e spegnimento della funzione AF
(frequenze alternate) .......................................................... 76
Impostazione della sensibilità nella ricerca ................ 76
Selezione del tipo di programma ed avvio
ricerca automatica ............................................................... 76
Informazioni sul tra co ..................................................... 76
Navigazione
(solo negli apparecchi con navigazione) ................ 76
Caricamento dei dati di navigazione ............................ 76
Download di dati della mappa ........................................ 76
Avvio della navigazione ..................................................... 77
Prima messa in funzione ................................................... 77
Inserimento della destinazione ...................................... 77
Indirizzo .................................................................................. 77
Destinazioni speciali - Points of Interest (POI) .......... 78
Impostazione delle opzioni di percorso ......................79
Impostazioni mappa ........................................................... 79
Riproduzione DVD/CD/USB/SDHC/iPod ................ 80
Informazioni principali ....................................................... 80
Esercizio DVD/CD ................................................................. 81
Supporto USB ........................................................................ 81
Schede SDHC ......................................................................... 81
iPod/iPhone tramite USB ................................................... 81
Riproduzione di lm su DVD ............................................82
Riproduzione audio di DVD/CD, USB, SDHC o
iPod/iPhone ........................................................................... 82
Riproduzione video di DVD/CD, USB o SDHC ............ 83
Riproduzione immagini da DVD/CD, USB o SDHC .... 84
Esercizio Bluetooth................................................... 85
Avvio dell'esercizio Bluetooth ......................................... 85
Accoppiamento di apparecchi Bluetooth ................... 85
Esercizio telefono ................................................................. 85
Riproduzione audio - Bluetooth-Streaming ............... 86
Riproduzione audio - Telefono cellulare Android..... 86
Impostazioni Bluetooth ..................................................... 87
Rear Seat Entertainment (RSE) ................................ 87
Fonti audio/video esterne........................................ 88
Regolazioni del suono .............................................. 88
Bilanciamento del volume (Fader/Balance)................88
Equalizer .................................................................................. 88
Impostazioni generali .............................................. 89
Video ......................................................................................... 89
Generali ................................................................................... 89
Ora ............................................................................................. 90
Suono ....................................................................................... 90
Lingua ...................................................................................... 90
Bluetooth ................................................................................ 90
DVD ........................................................................................... 91
Volume ..................................................................................... 91
Informazioni utili ...................................................... 91
Garanzia ................................................................................... 91
Servizio di assistenza .......................................................... 91
Schema elettrico .................................................... 336
Appendice ............................................................... 337
04_NewYork_840_845_it.indd 71
04_NewYork_840_845_it.indd 71
03.09.14 15:09
03.09.14 15:09
Page 72
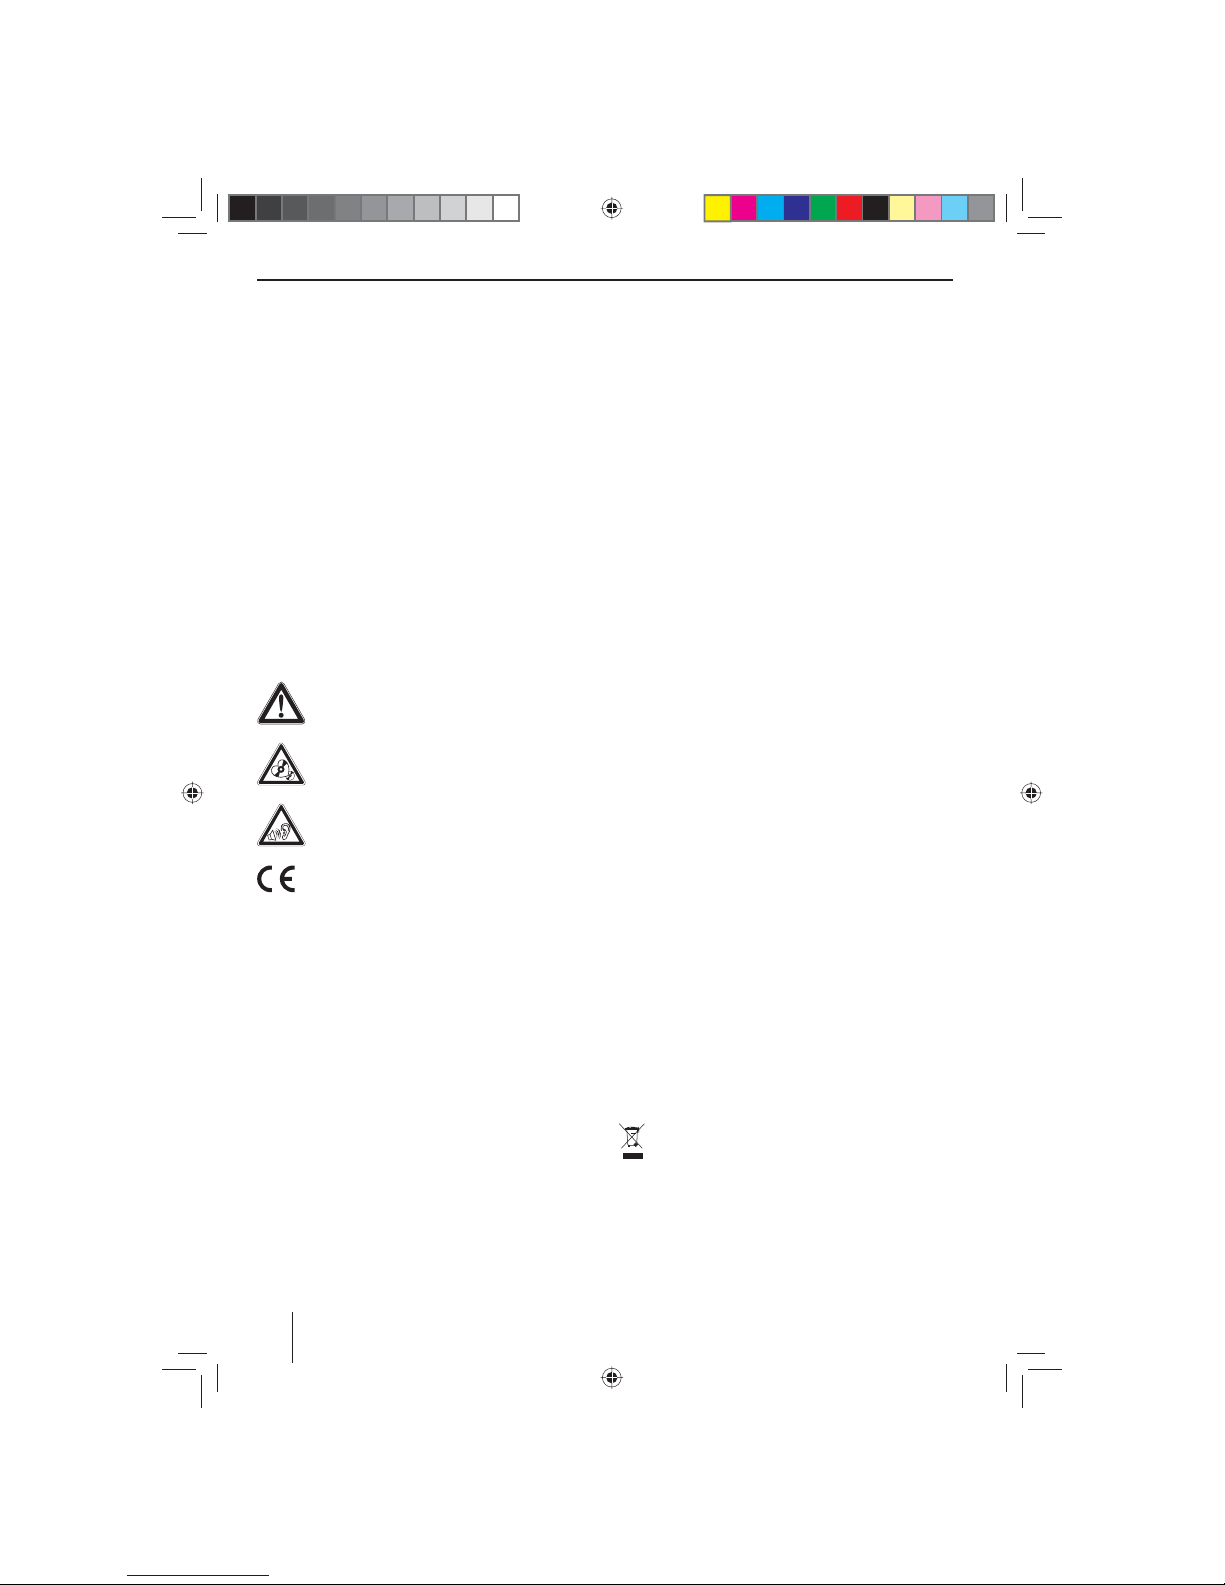
72
Norme di sicurezza | Avvertenze per la pulizia | Avvertenze per lo smaltimento
Norme di sicurezza
L'autoradio è stata prodotta conformemente allo stato
attuale della tecnica e alle regole di sicurezza generali riconosciute. Ciononostante possono sussistere pericoli a
causa della mancata osservanza delle norme di sicurezza
contenute in queste istruzioni.
È necessario conoscere bene le presenti istruzioni, nonché
le funzioni più importanti. Informazioni più dettagliate
sono riportate nel sito Internet www.blaupunkt.com.
• Leggere accuratamente tutte le istruzioni, prima di
utilizzare l'autoradio.
• Conservare le istruzioni in modo che siano sempre
disponibili per tutti gli utilizzatori.
• Consegnare l'autoradio a terzi sempre completa di
manuale.
Osservare inoltre le istruzioni degli apparecchi che si utilizzano in questo contesto.
Simboli utilizzati
In queste istruzioni vengono utilizzati i seguenti simboli:
PERICOLO!
Pericolo di lesioni
ATTENZIONE!
Danneggiamento del lettore DVD/CD
PERICOLO!
Volume elevato
Il marchio CE certi ca l'osservanza delle direttive UE.
쏅 Identi ca un passo operativo
• Identi ca un conteggio
Sicurezza stradale
Prestare attenzione alle seguenti note sulla sicurezza stradale:
• Utilizzare l'apparecchio in modo da poter condur-
re il veicolo sempre in sicurezza. In caso di dubbio,
fermarsi in un luogo adeguato e utilizzare l'apparecchio a veicolo fermo. Il guidatore non può utilizzare
le applicazioni che potrebbero distrarlo dalla guida
(a seconda delle caratteristiche dell'apparecchio, ad
es. guardare video, inserire destinazioni).
• Seguire le indicazioni durante la guida a destina-
zione soltanto nella misura in cui ciò non comporti violazioni del codice stradale! I cartelli stradali e
le norme del codice della strada hanno sempre priorità rispetto alle indicazioni del navigatore.
• L'ascolto deve avvenire sempre a volume mode-
rato, per proteggere l'udito e percepire i segnali di
avvertimento acustici (ad es. la polizia). Nelle pause
durante le quali l'apparecchio si trova in modalità silenziosa (ad es. quando si commuta su una diversa
fonte audio) la variazione del volume non può essere
percepita. Non aumentare il volume durante la pausa
in modalità silenziosa.
Norme di sicurezza generali
Prestare attenzione alla seguente nota per proteggere se
stessi da eventuali lesioni:
Non aprire né apportare modi che all'apparecchio.
Nell'apparecchio è presente un laser Classe 1, che può
danneggiare gli occhi.
Uso conforme alle norme
Questa autoradio è concepita per il montaggio e l'impiego in un veicolo con tensione della rete di bordo a 12 Volt
e deve essere installato in un vano conforme alle norme
DIN. Tenere in considerazione i limiti di potenza dell'apparecchio. Far eseguire le riparazioni ed eventualmente il
montaggio da un tecnico specializzato.
Avvertenze per il montaggio
L'autoradio può essere montata solo da chi abbia esperienza nel montaggio di autoradio e sistemi di navigazione e conosca bene l'impianto elettrico del veicolo. Osservare a tal ne lo schema elettrico contenuto in fondo a
queste istruzioni.
Dichiarazione di conformità
Blaupunkt Technology GmbH dichiara che l'apparecchio
soddisfa i requisiti fondamentali ed altre prescrizioni importanti della direttiva 1999/5/CE.
La dichiarazione di conformità è riportata nel sito Internet www.blaupunkt.com.
Avvertenze per la pulizia
Solventi, detergenti e abrasivi come spray per il cockpit
e prodotti per la cura dei materiali sintetici possono contenere sostanze corrosive per la super cie dell'autoradio.
Per la pulizia dell'autoradio utilizzare soltanto un panno
asciutto o leggermente umido.
Avvertenze per lo smaltimento
Non smaltire il proprio vecchio apparecchio nei ri uti domestici!
Per lo smaltimento del vecchio apparecchio, del
telecomando e delle batterie esauste, utilizzare i
sistemi di restituzione e raccolta disponibili.
04_NewYork_840_845_it.indd 72
04_NewYork_840_845_it.indd 72
03.09.14 15:09
03.09.14 15:09
Page 73

73
ITALIANO
Fornitura
Sono compresi nella fornitura:
• Autoradio
• Telecomando (incl. batteria)
• TMC Tuner (solo negli apparecchi con navigazione
Europa)
• Scheda micro SD con dati di navigazione nel vano
portaschede micro SD (solo negli apparecchi con
navigazione)
• Antenna GPS
• Microfono Bluetooth esterno
• Istruzioni brevi
• Telaio di supporto
• Set parti piccole
• Materiale per il montaggio
• Cavo di collegamento
Messa in funzione
Attenzione
Viti di sicurezza per il trasporto
Assicurarsi che le viti di sicurezza per il trasporto, poste
sul lato superiore dell'apparecchio, siano state rimosse
prima della messa in funzione dell'apparecchio.
Protezione antifurto
Quest'autoradio è dotata di una protezione antifurto con
codice numerico a quattro cifre (codice numerico impostato di fabbrica: 0000).
Se la richiesta del codice è attivata, il codice numerico
deve essere inserito dopo ogni interruzione dell'alimentazione di corrente della batteria della vettura.
Nota:
Nel sottomenu Generali del menu impostazioni è
possibile attivare/disattivare la richiesta del codice e
modi care il codice numerico.
Immissione del codice numerico dopo un'interruzione
di tensione
Se è necessario inserire il codice numerico, viene visualizzato un campo numerico per immettere il codice.
쏅 Immettere il codice numerico con il campo numerico.
쏅 Premere il pulsante per confermare l'immis-
sione.
L'apparecchio si accende.
Nota:
Immettendo un codice numerico errato viene brevemente visualizzato il messaggio Codice di sicurezza
errato!. In seguito, è possibile ripetere l'immissione
del codice.
Accensione e spegnimento
Accensione e spegnimento con il pulsante-manopola
쏅 Per accendere l'apparecchio, premere il pulsante-
manopola
5
.
쏅 Per spegnerlo tenere premuto il pulsante-manopo-
la
5
per più di 2 secondi.
Accensione e spegnimento tramite accensione del
veicolo
Se l'autoradio è collegata all'accensione del veicolo e non
è stata spenta con il pulsante-manopola 5, si accenderà
e spegnerà automaticamente insieme al veicolo.
Volume
Regolazione del volume
Il volume si può regolare passo a passo dal valore 0 (spento) no a 50 (massimo).
쏅 Girare il pulsante-manopola 5 per modi care il vo-
lume.
Attivazione dell'autoradio in modalità "silenziosa"
(Mute)
쏅 Premere brevemente il pulsante-manopola 5 per
passare in modalità "silenziosa" o per ripristinare il
livello di volume precedente.
Fornitura | Messa in funzione
04_NewYork_840_845_it.indd 73
04_NewYork_840_845_it.indd 73
03.09.14 15:09
03.09.14 15:09
Page 74

74
Menu principale
Nel menu principale, premendo i pulsanti sul touchscreen
è possibile richiamare le varie fonti e modalità.
쏅 Premere il tasto
2.
- oppure -
쏅 Nella fonte attuale, premere il pulsante ……
.
Viene visualizzato il menu principale.
Finché non viene selezionata una nuova fonte audio,
continua ad essere riprodotta l'ultima fonte attivata.
Nota:
Le gure contenute nelle presenti istruzioni servono
a rendere più chiare le spiegazioni e possono quindi
di erire, nei dettagli, rispetto al singolo apparecchio
acquistato.
Impostare la regione di ricezione
Questa autoradio è progettata per funzionare in diversi Paesi, con diversi range di frequenza e tecnologie di
trasmissione. In fabbrica viene impostata la regione di
ricezione "Europa". Qualora si utilizzasse l'autoradio al di
fuori dell'Europa, ad esempio negli Stati Uniti o in Asia,
all'occorrenza si dovrà impostare una regione di ricezione adeguata.
쏅 A tale scopo premere nel menu principale il pulsante
Impostazione.
Viene visualizzato il menu impostazioni.
쏅 Nella parte inferiore del menu impostazioni, premere
il pulsante Generali.
Alla voce "Regione radio" viene visualizzata l'impo-
stazione attuale.
쏅 Premere il pulsante Regione radio al ne di visualiz-
zare la lista delle regioni radio disponibili.
쏅 Sfogliare con [ ] e/o [ ] la lista e premere leg-
germente sulla regione di ricezione desiderata per
selezionarla.
L'elenco scompare e la regione di ricezione selezionata è così impostata.
쏅 Premere il pulsante Impostazione
.
Viene nuovamente visualizzato il menu principale.
Esercizio radio
Avvio esercizio radio
쏅 Premere, nel menu principale, il pulsante Radio.
Viene visualizzato il menu radio.
Selezione livello di memoria
Sono disponibili vari livelli di memoria e gamme di lunghezze d'onda. Su ogni livello di memoria si possono memorizzare al massimo 6 stazioni.
쏅 Premere ripetutamente il pulsante
, nché ap-
pare il livello di memoria desiderato.
Sintonizzazione di una stazione
Impostazione manuale delle stazioni
쏅 Premere brevemente il pulsante
o una o
più volte per modi care gradualmente la frequenza.
Inserimento diretto della frequenza della stazione
Se si conosce la frequenza della stazione desiderata, è
possibile inserirla direttamente dal touchscreen.
쏅 Premere in esercizio radio il pulsante
.
Viene visualizzato un campo numerico per l'inserimento della frequenza.
쏅 Inserire la frequenza della stazione desiderata.
쏅 Premere il pulsante
.
Viene visualizzato il menu radio e riprodotta la stazione corrispondente alla frequenza inserita.
Avvio della ricerca delle stazioni
쏅 Premere il pulsante
o per ca. 2 secondi
per avviare la ricerca delle stazioni.
La radio si sintonizza su una delle successive stazioni
ricevibili.
Nota:
Per la regione di ricezione Europa: nella gamma di
lunghezze d'onda FM, se la priorità per le informazioni sul tra co è attivata, verranno sintonizzate solo
stazioni che trasmettono informazioni sul tra co.
Messa in funzione | Esercizio radio
04_NewYork_840_845_it.indd 74
04_NewYork_840_845_it.indd 74
03.09.14 15:09
03.09.14 15:09
Page 75

75
ITALIANO
Memorizzazione manuale delle stazioni
쏅 Selezionare con il pulsante il livello di memoria
desiderato.
쏅 Sintonizzarsi sulla stazione desiderata.
쏅 Premere il pulsante
.
Viene visualizzato il menu di memorizzazione. Sono
disponibili 6 posti di memoria, visualizzati come pulsanti.
쏅 Premere il pulsante sul quale si desidera salvare la
stazione corrente.
La stazione viene memorizzata e appare nuovamen-
te il menu radio.
Memorizzazione automatica delle stazioni
(Travelstore)
Con Travelstore, le 6 stazioni FM di maggiore potenza del
Paese possono essere ricercate automaticamente e memorizzate sul livello di memoria FM1, FM2 o FM3.
쏅 Selezionare un livello di memoria FM.
쏅 Premere nel menu radio il pulsante
.
쏅 Premere nel menu opzioni il pulsante Travelstore.
Il tuner avvia la ricerca delle stazioni automatica.
Quando la memorizzazione è conclusa, si ascolta la
stazione della posizione di memoria 1 del livello di
memoria selezionato precedentemente.
Nota:
Per la regione di ricezione Europa: se è attivata la
priorità per le informazioni sul tra co, vengono memorizzate solo le stazioni che trasmettono tali informazioni.
Breve ascolto delle stazioni
Con la funzione Scan è possibile ascoltare per alcuni
secondi tutte le stazioni ricevibili della gamma di lunghezze d'onda corrente.
쏅 Premere in esercizio radio il pulsante
.
La ricerca automatica Scan cerca le stazioni nella
gamma di lunghezze d’onda corrente e consente di
ascoltare per alcuni secondi ogni stazione ricevibile.
쏅 Premendo nuovamente il pulsante
viene se-
lezionata e riprodotta la stazione appena ascoltata.
Attivazione e disattivazione RDS
Nella regione di ricezione Europa, molte stazioni FM trasmettono oltre al proprio programma un segnale RDS
(Radio Data System), che consente di utilizzare delle funzioni supplementari, come ad esempio l'indicazione del
nome della stazione sul display.
쏅 Premere nel menu radio il pulsante
.
Viene visualizzato il menu opzioni, accanto a RDS viene indicata l'impostazione corrente.
쏅 Premere nel menu opzioni il pulsante RDS per modi-
care l'impostazione.
쏅 Premere il pulsante
.
Viene nuovamente visualizzato il menu radio.
Attivazione e disattivazione del segnale
orario RDS
È possibile sincronizzare l'ora con i dati inviati tramite
RDS.
쏅 Premere nel menu radio il pulsante
.
쏅 Premere nel menu opzioni il pulsante RDS CT per mo-
di care l'impostazione.
쏅 Premere il pulsante
.
Viene nuovamente visualizzato il menu radio.
Ottimizzazione della ricezione radio
La funzione HICUT comporta un miglioramento qualitativo della ricezione quando ci sono dei disturbi radio
(solo per la ricezione radio FM). Quando la ricezione è
disturbata, il livello di disturbo viene abbassato automaticamente.
쏅 Premere nel menu radio il pulsante
.
쏅 Premere nel menu opzioni il pulsante HICUT per mo-
di care l'impostazione.
쏅 Premere il pulsante
.
Viene nuovamente visualizzato il menu radio.
Attivazione/disattivazione della funzione
REG (programmi regionali)
In determinate ore del giorno alcune stazioni RDS suddividono il loro programma in diversi programmi regionali con di erenti contenuti. Con funzione REG attivata
l'autoradio commuta solo sulle frequenze alternate per
la stazione sintonizzata, sulle quali viene trasmesso lo
stesso programma nazionale.
쏅 Nel menu radio premere il pulsante REG per attivare
o disattivare la funzione REG.
Il pulsante REG s'illumina quando la funzione REG è
attivata.
Esercizio radio
04_NewYork_840_845_it.indd 75
04_NewYork_840_845_it.indd 75
03.09.14 15:09
03.09.14 15:09
Page 76

76
Attivazione e spegnimento della funzione
AF (frequenze alternate)
Con la funzione AF attivata, l'autoradio cerca automaticamente la migliore frequenza di ricezione per la stazione
sintonizzata.
쏅 Nel menu radio premere il pulsante AF per attivare o
disattivare la funzione AF.
Il pulsante AF s'illumina quando la funzione AF è at-
tivata.
Impostazione della sensibilità nella
ricerca
La sensibilità nella ricerca decide se nel ciclo di ricerca
automatica debbano essere rilevate solo le stazioni forti
o anche quelle con un segnale più debole, magari disturbato.
쏅 Nel menu radio premere il pulsante Loc per imposta-
re la sensibilità nella ricerca delle stazioni.
Quando il pulsante Loc s'illumina la ricerca trova solo
le stazioni forti.
Selezione del tipo di programma ed avvio
ricerca automatica
Mediante la funzione PTY è possibile selezionare un tipo
di programma e quindi ricercare in modo mirato le stazioni che trasmettono, ad esempio, musica rock o programmi sportivi.
쏅 Premere nel menu radio il pulsante
.
쏅 Premere nel menu opzioni il pulsante Lista PTY per
visualizzare i tipi di programma.
쏅 Selezionare con il pulsante [
] oppure [ ] il tipo
di programma desiderato.
쏅 Premere il pulsante
, per avviare la ricerca au-
tomatica PTY.
Quando una stazione manda in onda una trasmis-
sione con il tipo di programma selezionato, questa
stazione viene riprodotto.
Informazioni sul tra co
Nella regione di ricezione Europa, una stazione FM può
identi care messaggi sul tra co tramite segnale RDS. Se
è attivata la priorità per i messaggi sul tra co, i messaggi
sul tra co vengono trasmessi automaticamente, anche
quando l'autoradio non si trova ancora in esercizio radio.
Nota:
Il volume, durante la trasmissione delle informazioni
sul tra co, viene alzato. È possibile impostare il volume minimo per le informazioni sul tra co.
Attivazione e disattivazione della priorità per i
messaggi sul tra co
쏅 Premere nel menu radio il pulsante TA per attivare
o disattivare la priorità dei messaggi sul tra co.
Il pulsante TA è acceso se la priorità dei messaggi sul
tra co è attivata.
Impostare il volume minimo per le informazioni sul
tra co
쏅 Premere nel menu radio il pulsante
.
쏅 Premere nel menu opzioni il pulsante Volume TA.
쏅 Impostare il volume desiderato con il pulsante
e .
쏅 Premere il pulsante
.
Viene nuovamente visualizzato il menu radio, il volume impostato è stato salvato.
Navigazione
(solo negli apparecchi con
navigazione)
Caricamento dei dati di navigazione
Il software di navigazione e i dati della mappa si trovano
su una scheda micro SD. Gli apparecchi con navigazione vengono forniti con la scheda micro SD nell'apposito
vano portaschede SD. Per poter utilizzare la navigazione,
la scheda micro SD deve essere inserita nel vano portascheda.
쏅 Aprire lo sportellino del vano portascheda
=
accan-
to al vano DVD/CD.
쏅 Inserire la scheda micro SD nel vano con la parte
stampata rivolta verso l'alto, no a farla scattare in
sede.
쏅 Chiudere lo sportellino del vano.
Download di dati della mappa
Per garantire, all'atto dell'acquisto dell'apparecchio,
l'ultimo aggiornamento dei dati della mappa, 30 giorni
dopo la localizzazione GPS c'è la possibilità di scaricare
gratuitamente e una sola volta, tramite il sito Internet
www.naviextras.com, i dati aggiornati sulla propria scheda micro SD di serie.
Successivamente sarà comunque possibile richiedere in
qualsiasi momento, a pagamento, nuovo materiale della
mappa.
Nota importante:
In caso di smarrimento o danneggiamento della
scheda micro SD, decade la licenza di navigazione ad
essa collegata. In tal caso è necessario richiedere una
nuova licenza con una nuova scheda micro SD.
Esercizio radio | Navigazione
04_NewYork_840_845_it.indd 76
04_NewYork_840_845_it.indd 76
03.09.14 15:09
03.09.14 15:09
Page 77

77
ITALIANO
Avvio della navigazione
쏅 Premete il tasto 3.
- oppure -
쏅 Nel menu principale, premere Navigazione.
Viene visualizzato il menu navigazione. Quando si
avvia la navigazione per la prima volta, viene visualizzato l'assistente alla con gurazione.
Prima messa in funzione
Quando si avvia la navigazione per la prima volta, viene
attivato un assistente alla con gurazione che e ettua le
impostazioni generali per la navigazione.
쏅 Impostare la lingua di navigazione. È possibile sele-
zionare una lingua diversa da quella impostata per le
altre funzioni dell'apparecchio.
쏅 Confermare la scelta con
.
Viene visualizzata la licenza dell'utente nale.
쏅 Leggere la licenza dell'utente nale. Se si accettano le
condizioni proposte, premere
.
Viene attivato l'assistente alla con gurazione.
쏅 Premere
per continuare.
쏅 Selezionare una voce per i messaggi vocali della na-
vigazione. Per ogni lingua sono disponibili varie voci.
쏅 Confermare la scelta con
.
쏅 Scegliere il formato dell'ora e le unità di misura per la
navigazione. Premere in ne
.
Sulla schermata successiva sarà possibile e ettuare
le impostazioni di percorso preferite.
쏅 Modi care eventualmente le voci premendo le voci
del menu visualizzate.
쏅 Premere , quando le impostazioni sono state
e ettuate.
쏅 Premere leggermente su
per terminare la con-
gurazione.
Viene visualizzato il menu navigazione.
Inserimento della destinazione
Esistono diverse possibilità per inserire una destinazione:
è possibile digitare l'indirizzo oppure scegliere una destinazione speciale dalla relativa banca dati. Le destinazioni
speciali sono, ad es., attrazioni turistiche, musei, stadi,
aree di servizio.
Indirizzo
쏅 Aprire il menu di navigazione.
쏅 Premere Destinazione.
Viene visualizzato il menu per l'inserimento della destinazione.
쏅 Premere su Trova indirizzo.
Viene visualizzato il menu per l'inserimento dell'indirizzo.
쏅 Inserire nell'ordine il Paese, la città e la strada, non-
ché l'incrocio o il numero civico. Premere le voci corrispondenti nel menu di inserimento degli indirizzi.
Viene visualizzato un menu per l'immissione di testo.
Navigazione
04_NewYork_840_845_it.indd 77
04_NewYork_840_845_it.indd 77
03.09.14 15:09
03.09.14 15:09
Page 78

78
쏅 Inserire la destinazione desiderata utilizzando la ta-
stiera.
Ad ogni lettera inserita, la voce nella riga di inseri-
mento viene automaticamente completata.
쏅 Quando nella riga dell'indirizzo viene visualizzato il
nome della destinazione desiderata, premere il pulsante
.
La destinazione selezionata viene indicata sulla mappa.
쏅 Premere Avanti per iniziare la guida a destinazione.
Si avvia il calcolo del percorso. A seconda della distanza tra punto di partenza e destinazione, il calcolo
del percorso può durare piuttosto a lungo.
Concluso il calcolo del percorso, vengono visualizzati i relativi parametri, come distanza e tempo. Viene
inoltre rappresentato, sulla mappa, l'intero andamento del percorso.
쏅 Premere Vai! per avviare la guida a destinazione.
Destinazioni speciali - Points of Interest
(POI)
쏅 Aprire il menu di navigazione.
쏅 Premere Destinazione.
Viene visualizzato il menu per l'inserimento della destinazione.
쏅 Premere su Trova POI.
Viene visualizzato il menu delle destinazioni speciali.
쏅 È possibile selezionare una destinazione speciale
oppure avviare una ricerca propria, scegliendo una
tra le quattro categorie prede nite: Distributore,
Parcheggio, Ristorante e Alloggio.
쏅 Premere ad es. Distributore se si desidera trovare
rapidamente un'area di servizio.
Viene visualizzato un elenco di distributori nelle vici-
nanze del veicolo. I distributori vengono elencati in
base alla distanza dal veicolo.
Navigazione
04_NewYork_840_845_it.indd 78
04_NewYork_840_845_it.indd 78
03.09.14 15:09
03.09.14 15:09
Page 79

79
ITALIANO
Navigazione
쏅 Selezionare un distributore dall'elenco premendo
sulla voce corrispondente.
Il distributore selezionato viene visualizzato sulla
mappa.
쏅 Premere Avanti.
Vengono visualizzati l'andamento e i dati del percorso.
쏅 Premere Vai! per avviare la guida a destinazione.
Impostazione delle opzioni di percorso
Nelle opzioni di percorso è possibile impostare il tipo di
veicolo, il tipo di percorso (rapido, breve, dinamico), nonché altri parametri necessari all'apparecchio per calcolare
il percorso in base alle preferenze dell'utente.
Le opzioni di percorso vengono impostate durante la prima con gurazione della navigazione, ma possono essere
modi cate per ogni singola guida a destinazione.
Modi care le opzioni di percorso prima della guida a
destinazione
쏅 Richiamare il menu di navigazione.
쏅 Premere il pulsante
.
Viene visualizzato il menu impostazioni per la navigazione.
쏅 Premere il pulsante per visualizzare la seconda
pagina.
쏅 Premere Parametri del percorso.
Vengono visualizzate le impostazioni del percorso.
쏅 Modi care le impostazioni desiderate.
쏅 Premere ripetutamente Indietro, nché viene nuo-
vamente visualizzato il menu di navigazione.
Modi care le opzioni di percorso durante la guida a
destinazione
쏅 Premere, durante la guida a destinazione, il pulsante
.
쏅 Premere Parametri del percorso.
Vengono visualizzate le impostazioni del percorso.
쏅 Modi care le impostazioni desiderate.
쏅 Premere Indietro.
Viene visualizzata nuovamente la guida a destinazione.
Impostazioni mappa
Le impostazioni mappa consentono di scegliere la modalità di visualizzazione (2D o 3D), l'angolo visuale della
mappa, i colori e l'indicazione di edi ci e punti di orientamento sulla mappa. È inoltre possibile impostare le categorie di destinazioni speciali da indicare sulla mappa, ad
es. o cine, bar, ristoranti.
쏅 Richiamare il menu di navigazione.
쏅 Premere il pulsante
.
04_NewYork_840_845_it.indd 79
04_NewYork_840_845_it.indd 79
03.09.14 15:09
03.09.14 15:09
Page 80

80
Viene visualizzato il menu impostazioni per la navigazione.
쏅 Premere il pulsante per visualizzare la seconda
pagina.
쏅 Premere Impostazioni mappa.
Vengono visualizzate le impostazioni mappa.
쏅 Modi care le impostazioni desiderate.
쏅 Premere ripetutamente Indietro, nché viene nuo-
vamente visualizzato il menu di navigazione.
Nota:
È possibile modi care le impostazioni mappa anche
durante la guida a destinazione:
쏅 Premere, durante la guida a destinazione, il pulsante
.
쏅 Premere Impostazioni mappa.
Vengono visualizzate le impostazioni mappa.
쏅 Modi care le impostazioni desiderate.
쏅 Premere Indietro.
Viene visualizzata nuovamente la guida a destinazione.
Riproduzione DVD/CD/USB/SDHC/
iPod
Informazioni principali
Con l'autoradio è possibile riprodurre DVD/CD audio
(CDDA) e DVD/CD-R/RWs con le audio, MP3 o WMA,
nonché le MP3 o WMA su supporto USB e su schede
SDHC.
Inoltre è possibile riprodurre sul display lm ed immagini
da DVD/VCD/CD, supporti USB e schede SDHC. Su di un
monitor esterno (Rear Seat Entertainment - RSE) possono essere visualizzati lm ed immagini da DVD/VCD/CD,
supporti dati USB e sorgenti AV.
La riproduzione di lm e foto sul monitor integrato è consentita, per motivi di sicurezza, soltanto a veicolo fermo
e freno di stazionamento attivato. Il cavo "BRAKE" deve
essere collegato all'apposita presa del freno di stazionamento del veicolo (vedi schema elettrico alla ne delle
presenti istruzioni). La riproduzione di lm su un monitor
esterno è possibile anche durante la guida.
Note:
• Per un corretto funzionamento del lettore, utilizzare esclusivamente CD con il logo Compact Disc
e DVD con il logo DVD.
• Blaupunkt non può garantire il perfetto funzionamento dei DVD/CD con controllo di copia, nonché
di tutti i DVD/CD vergini, dei supporti USB e delle
schede SD disponibili sul mercato.
Nel preparare un supporto MP3/WMA prestare attenzione alle seguenti indicazioni:
• Denominazione di brani e directory: max 32 caratteri
esclusa l'estensione del le rispettivamente ".mp3"
e ".wma" (con più caratteri diminuisce il numero dei
brani e delle cartelle riconoscibili dall'autoradio)
• Formati DVD/CD: DVD/CD-R/RW, Ø: 12 cm
• Formato dati DVD/CD: ISO 9669 Level 1 e 2, Joliet
• Velocità di masterizzazione dei CD: max 16x (consigliata)
• Formato USB/ le di sistema USB: Mass Storage Device (memoria di massa)/FAT32
• File di sistema schede SD: FAT32
• Estensione di le audio:
– .MP3 per le MP3
– .WMA per le WMA
• File WMA solo senza Digital Rights Management
(DRM) e realizzati con Windows Media® Player a partire dalla versione 8
• Tag MP3-ID3: versione 1 e 2
Navigazione | Riproduzione DVD/CD/USB/SDHC/iPod
04_NewYork_840_845_it.indd 80
04_NewYork_840_845_it.indd 80
03.09.14 15:09
03.09.14 15:09
Page 81

81
ITALIANO
• Velocità di trasferimento dati per la generazione
di le audio:
– MP3: da 32 a 320 kbps
– WMA: da 32 a 192 kbps
• Capacità del supporto dati: no a 32 GB
Esercizio DVD/CD
Inserimento DVD/CD
Pericolo di danneggiamento del lettore
DVD/CD!
Non utilizzare DVD/CD sagomati e DVD/CD
con diametro di 8 cm (mini DVD/CD).
Non ci assumiamo alcuna responsabilità per eventuali
danni al lettore conseguenti all’impiego di DVD/CD inadatti.
쏅 Spingere il DVD/CD nel vano DVD/CD con il lato
stampato rivolto verso l'alto
>
, nché si percepisce
una certa resistenza.
Il DVD/CD viene automaticamente inserito e i dati
in esso contenuti vengono controllati. Viene quindi
avviata la riproduzione nell'esercizio DVD/CD o MP3.
Nota:
L'inserimento automatico del DVD/CD non deve essere ostacolato o aiutato.
Estrazione del DVD/CD
쏅 Premere il tasto 1 per estrarre il DVD/CD inserito.
Nota:
L'estrazione del DVD/CD non deve essere ostacolata
né favorita.
Supporto USB
Questo apparecchio dispone di tre porte USB:
• la USB1 è integrata nel frontalino, sotto lo sportellino.
• La porta USB2 e la porta USB RSE consistono in una
presa USB su di un cavo nel retro dell'apparecchio.
Note:
• Film o immagini memorizzati su di un supporto
dati USB possono essere riprodotti solamente mediante la porta USB RSE su di un monitor esterno
(Rear Seat Entertainment - RSE).
• La porta USB RSE è compatibile con supporti dati
USB aventi una capacità massima di 32 GB. Il numero massimo consentito di le e directory è pari
a 1900 le / 450 directory.
Collegamento della USB1
쏅 Aprire lo sportellino
8
sotto il pulsante-manopola.
쏅 In lare il supporto USB nella presa USB
;
.
L'apparecchio passa automaticamente all'esercizio
USB1. Vengono letti i dati e inizia la riproduzione del
primo le media riconosciuto dall'apparecchio.
Rimozione del supporto USB1
쏅 Spegnere l'autoradio.
쏅 Estrarre il supporto USB.
Schede SDHC
Questo apparecchio dispone di un vano portascheda
SDHC sotto lo sportellino presente sul frontalino.
Inserire la scheda SDHC
쏅 Aprire lo sportellino
8
sotto il pulsante-manopola.
쏅 Spingere la scheda SDHC nel vano portascheda
9
con il lato stampato rivolto verso sinistra (angolo
smussato verso l'alto) e i contatti in avanti, no a farla scattare in sede.
L'apparecchio passa automaticamente all'esercizio
SDHC. Vengono letti i dati e inizia la riproduzione del
primo le media riconosciuto dall'apparecchio.
Estrazione della scheda SDHC
쏅 Aprire lo sportellino
8
.
쏅 Premere la scheda SDHC no a sbloccarla.
쏅 Estrarre la scheda SDHC dal vano portascheda
9
.
iPod/iPhone tramite USB
Mediante le porte USB è possibile collegare all'autoradio
numerosi modelli di iPod® e iPhone® e comandare la riproduzione audio dall'autoradio medesima.
Nota:
Alla ne delle presenti istruzioni si trova un elenco dei
modelli di iPod® e iPhone® compatibili. La Blaupunkt
non può garantire il perfetto funzionamento di altri
modelli di iPod® e di iPhone®.
Per collegare il proprio iPod® o il proprio iPhone® con
la porta USB dell'autoradio utilizzare un adeguato cavo
adattatore.
쏅 Inserire il connettore USB del cavo adattatore in una
delle prese USB (USB1 o USB2) dell'apparecchio.
L'apparecchio passa automaticamente all'eserci-
zio USB. Vengono letti i dati e inizia la riproduzione
del primo le media riconosciuto dall'apparecchio
sull'iPod®/iPhone® .
Riproduzione DVD/CD/USB/SDHC/iPod
04_NewYork_840_845_it.indd 81
04_NewYork_840_845_it.indd 81
03.09.14 15:09
03.09.14 15:09
Page 82

82
Riproduzione di lm su DVD
L'autoradio è in grado di riprodurre DVD video e VCD. Una
volta inserito il DVD, la riproduzione si avvia automaticamente. Viene visualizzato il menu DVD.
È possibile navigare all'interno del menu DVD toccando
i pulsanti corrispondenti nel menu DVD sul touchscreen.
Dopo aver avviato la riproduzione del lm tramite menu
DVD, viene visualizzato il lm. I l menu di riproduzione del
DVD viene nascosto.
쏅 Toccare brevemente il touchscreen per richiamare il
menu di riproduzione.
Il menu di riproduzione appare nuovamente.
[ ] Visualizzazione della seconda pagina del
menu.
[
] Fine riproduzione, richiamo del menu DVD.
[
] Selezione del capitolo precedente.
[
] Interruzione e ripresa della riproduzione.
[
] Selezione del capitolo successivo.
[
] Ricerca rapida automatica indietro.
[
] Ricerca rapida automatica avanti.
[
] Visualizzare l'equalizzatore.
쏅 Premere
per visualizzare la seconda pagina del
menu di riproduzione.
Viene visualizzata la seconda pagina del menu di ri-
produzione.
[ ] Visualizzazione della prima pagina.
[
] Selezione della lingua di riproduzione
(se supportata dal DVD).
[
] Attivazione dei sottotitoli (solo se supportati
dal DVD).
[
] Funzione di ripetizione per capitoli o attiva-
zione e disattivazione area A-B.
[
] De nizione dell'area della funzione di ripe-
tizione.
[
] Cambio angolazione della telecamera
(angle) (solo se supportato dal DVD).
[
] Tastiera per la selezione diretta di brani,
capitolo o tempo esecuzione.
Riproduzione audio di DVD/CD, USB,
SDHC o iPod/iPhone
I principi della riproduzione audio (MP3/WMA) di supporti dati e iPod®/iPhone® sono identici per tutte le fonti.
쏅 Selezionare dal menu principale la fonte desiderata.
Se viene avviata la riproduzione di le di immagini o video,
쏅 premere il pulsante
per passare alla riproduzio-
ne audio.
Vengono visualizzate le cartelle del supporto in cui
sono contenuti i le audio.
[ ] Passaggio al livello della cartella immedia-
tamente superiore.
[
] Spostamento del segno di selezione.
[
] Spostamento del segno di selezione.
[
] Apertura della cartella selezionata e avvio
del brano.
- oppure Premere leggermente sul nome della car-
tella/sul nome del brano. La cartella viene
aperta/il brano viene avviato.
[ ] Continuazione della riproduzione
solo iPod®/iPhone®
[
] Visualizzare la tastiera per inserire diretta-
mente il numero del brano desiderato.
[
] Abbandonare la lista cartelle/ le.
[
] Visualizzare l'equalizzatore.
Riproduzione DVD/CD/USB/SDHC/iPod
04_NewYork_840_845_it.indd 82
04_NewYork_840_845_it.indd 82
03.09.14 15:09
03.09.14 15:09
Page 83

83
ITALIANO
Quando si avvia un brano, viene visualizzato il menu di
riproduzione.
[ ] Visualizzazione delle cartelle.
[
] Premuto brevemente: selezione del brano.
Premuto a lungo: ricerca rapida automatica.
[
/ ] Interruzione e ripresa della riproduzione.
[
] Premuto brevemente: selezione del brano.
Premuto a lungo: ricerca rapida automatica.
Riproduzione audio da DVD/CD, USB o SDHC:
[
] Avvio e ne della funzione di ripetizione
REPEAT.
La modalità REPEAT commuta ogni volta
che si preme il pulsante
.
Indicazione
Modalità REPEAT
Ripetizione brano corrente
Ripetizione cartella corrente
Riproduzione normale
[
] Avvio e ne della riproduzione in ordine ca-
suale MIX.
Se è attivata la funzione MIX, il relativo pul-
sante
viene evidenziato.
La modalità MIX dipende dalla funzione di
ripetizione REPEAT selezionata.
Visualizzazione
modalità
REPEAT
Modalità MIX
Nessuna riproduzione in
ordine casuale
Mescolare i brani della cartella
attuale
Mescolare i brani del supporto
Riproduzione audio da iPod®/iPhone®:
[ ] Avvio e ne della funzione di ripetizione
REPEAT.
La modalità REPEAT commuta ogni volta
che si preme il pulsante
.
Indicazione
Modalità REPEAT
Ripetizione brano corrente
Ripetizione selezione corrente
[
] Avvio e ne della riproduzione in ordine ca-
suale MIX.
La modalità MIX commuta ogni volta che si
preme il pulsante
.
Indicazione
Modalità MIX
Mescolare i brani della selezione corrente
Mescolare i brani dell'album
corrente
Nota:
La riproduzione in ordine casuale del brano dipende dal modello di iPod®-/iPhone®
utilizzato.
[
] Visualizzare la tastiera per inserire diretta-
mente il numero del brano desiderato.
Riproduzione video di DVD/CD, USB o
SDHC
쏅 Selezionare dal menu principale la fonte desiderata.
Se viene avviata la riproduzione di le audio o di immagini,
쏅 premere il pulsante
per passare alla riprodu-
zione video.
Vengono visualizzate le cartelle del supporto in cui
sono contenuti i lm.
Nota:
La selezione e l'avvio della cartella e del brano avvengono come illustrato nella riproduzione audio.
Riproduzione DVD/CD/USB/SDHC/iPod
04_NewYork_840_845_it.indd 83
04_NewYork_840_845_it.indd 83
03.09.14 15:09
03.09.14 15:09
Page 84

84
Selezionando un lm, si avvia la riproduzione. Durante la
riproduzione del lm, il menu di riproduzione è nascosto.
쏅 Toccare brevemente il touchscreen per richiamare il
menu di riproduzione.
Il menu di riproduzione appare nuovamente.
[ ] Visualizzazione della seconda pagina del
menu.
[
] Fine riproduzione per passare alla visualiz-
zazione della cartella.
[
] Selezione del lm precedente.
[
] Interruzione e ripresa della riproduzione.
[
] Selezione del lm successivo.
[
] Ricerca rapida automatica indietro.
[
] Ricerca rapida automatica avanti.
[
] Visualizzare l'equalizzatore.
Seconda pagina del menu di riproduzione.
[ ] Visualizzazione della prima pagina.
[
] Fine riproduzione per passare alla visualiz-
zazione della cartella.
[
] Selezione della lingua di riproduzione (solo
se tale funzione è supportata dal lm).
[
] Attivazione sottotitoli (solo se tale funzione
è supportata dal lm).
[
] Attivazione e disattivazione della funzione
di ripetizione del lm o della cartella.
[
] Attivazione e disattivazione della riprodu-
zione in ordine casuale.
[
] Richiamo della tastiera per la selezione di-
retta del lm o del tempo esecuzione.
Nota:
Con questo apparecchio, è possibile riprodurre i le
video memorizzati su iPod®/iPhone®. È necessario
collegare l'iPod®/iPhone® all'apparecchio con un cavo
speciale disponibile come accessorio (USB – A/V).
Riproduzione immagini da DVD/CD, USB
o SDHC
쏅 Selezionare dal menu principale la fonte desiderata.
Se viene avviata la riproduzione di le audio o video,
쏅 premere il pulsante
per passare alla riprodu-
zione delle immagini.
Vengono visualizzate le cartelle del supporto in cui
sono contenute immagini.
Nota:
La selezione e l'avvio della cartella e delle immagini
avvengono come illustrato nella riproduzione audio.
Riproduzione DVD/CD/USB/SDHC/iPod
04_NewYork_840_845_it.indd 84
04_NewYork_840_845_it.indd 84
03.09.14 15:09
03.09.14 15:09
Page 85

85
ITALIANO
Esercizio Bluetooth
Con la funzione Bluetooth® è possibile accoppiare l'autoradio con telefoni cellulari e riproduttori di media.
Se si accoppia all'autoradio un telefono cellulare, è possibile telefonare con la funzione vivavoce integrata dell'autoradio stessa. È inoltre possibile accedere alla lista delle
chiamate e all'elenco telefonico del telefono cellulare
accoppiato.
Se l'apparecchio Bluetooth® connesso supporta le funzioni A2DP e AVRCP, è possibile riprodurre la musica con
l'autoradio e regolarne la riproduzione. Durante una
chiamata in entrata, la riproduzione viene interrotta e
ripresa al termine della conversazione.
Se è stato accoppiato un telefono cellulare tramite
Bluetooth® e durante la riproduzione si riceve una chiamata, la riproduzione della fonte viene interrotta e viene
visualizzato il menu della chiamata.
Avvio dell'esercizio Bluetooth
쏅 Nel menu principale, premere Bluetooth.
- oppure -
쏅 Premere il tasto
2 per circa 2 secondi. (Condi-
zione fondamentale: questa funzione è associata al
tasto del menu impostazioni.)
Viene visualizzato il menu Bluetooth®. Nel menu
è contenuto l'elenco degli apparecchi Bluetooth®
conosciuti. Le altre fonti audio vengono disattivate.
[ ] Spostamento del segno di selezione.
[
] Spostamento del segno di selezione.
[
] Fine connessione all'apparecchio seleziona-
to.
[
] Cancellazione dell'apparecchio selezionato
dall'elenco.
[
] Visualizzazione del menu opzioni.
쏅 Premere brevemente sul nome dell'apparecchio
Bluetooth® con il quale si desidera stabilire una connessione.
Se l'apparecchio desiderato si trova nel raggio d'azione, viene stabilita la connessione e viene visualizzato
il menu dell'apparecchio.
Accoppiamento di apparecchi Bluetooth
Se si desidera accoppiare per la prima volta un apparecchio con l'autoradio, procedere come segue:
쏅 Assicurarsi che il Bluetooth® sia attivato sull'autora-
dio e sul proprio apparecchio Bluetooth®.
쏅 Inserire nel menu opzioni dell'esercizio Bluetooth®
un codice pairing (v. impostazioni Bluetooth®).
쏅 Cercare, nel proprio apparecchio Bluetooth®, nuovi
apparecchi/connessioni.
쏅 Nell'elenco degli apparecchi Bluetooth®, l'autoradio
viene visualizzata come "BP 84x".
쏅 Stabilire la connessione, digitando eventualmente il
codice pairing precedentemente impostato sull'autoradio.
La connessione viene stabilita e viene visualizzato il
menu dell'apparecchio accoppiato.
Nota:
Se l'autoradio è connessa ad un telefono, in tutte le
fonti audio/video viene visualizzato sul bordo destro
superiore del display il simbolo Bluetooth®
.
Esercizio telefono
Se un telefono è connesso all'autoradio via Bluetooth®,
viene visualizzato il seguente menu.
[ ] Passaggio al livello immediatamente supe-
riore.
[
] Spostamento del segno di selezione.
[
] Spostamento del segno di selezione.
[
] Fine della connessione con l'apparecchio
corrente.
[
] Richiamo della tastiera per digitare diretta-
mente i numeri telefonici
[
] Visualizzazione del menu opzioni.
쏅 Selezionare, tramite elenco delle chiamate o rubrica
telefonica, un contatto/numero e premere sulla voce
selezionata.
La connessione viene avviata.
Esercizio Bluetooth
04_NewYork_840_845_it.indd 85
04_NewYork_840_845_it.indd 85
03.09.14 15:09
03.09.14 15:09
Page 86

86
Quando si riceve una chiamata, viene visualizzato il
menu della chiamata.
[ ] Accettazione chiamata.
[
] Ri uto chiamata.
Se durante una conversazione arriva una seconda chiamata, è possibile procedere nella maniera seguente:
쏅 Premere il pulsante
per continuare la conversa-
zione attiva e accettare la chiamata in arrivo.
쏅 Premere il pulsante
per passare da una con-
versazione all'altra.
Nota:
Questa funzione deve essere attivata sul proprio telefono.
Riproduzione audio - BluetoothStreaming
Se l'autoradio è connessa ad un apparecchio di audiostreaming tramite Bluetooth®, è possibile riprodurre la
musica con l'autoradio e regolarne la riproduzione.
쏅 Premere il pulsante
nel menu Bluetooth® per
passare alla riproduzione audio.
[ ] Premuto brevemente: selezione del brano.
Premuto a lungo: ricerca rapida automatica.
[
/ ] Interruzione e ripresa della riproduzione.
[
] Premuto brevemente: selezione del brano.
Premuto a lungo: ricerca rapida automatica.
[
] Fine della connessione con l'apparecchio
corrente.
[
] Visualizzazione del menu opzioni.
Esercizio Bluetooth
Riproduzione audio - Telefono cellulare
Android
Con l'App "Android Music Player" di Blaupunkt è possibile
suddividere in determinate categorie, con l'ausilio delle
informazioni ID3-Tag, i le musicali memorizzati su di un
telefono cellulare Android. In questo modo è possibile
selezionare e riprodurre velocemente e comodamente i brani musicali da diverse categorie. A tale scopo è
necessario che l'App sia installata sul telefono cellulare Android. È possibile scaricare l'App "Android Music
Player" dal sito Internet www.blaupunkt.com.
Nota:
La riproduzione audio mediante l'App "Android
Music Player" è disponibile solo per i telefoni cellulari Android dotati di sistema operativo Android 2.3 e
superiori. Inoltre il telefono cellulare deve supportare i pro li Bluetooth® SPP (Serial Port Pro le) e A2DP
(Advanced Audio Distribution Pro le).
쏅 Nel menu Bluetooth® premere il pulsante , per
passare alla riproduzione audio-Android.
[ ] Visualizzare gli elenchi delle categorie.
[
] Premuto brevemente: selezione del brano.
Premuto a lungo: ricerca rapida automatica.
[
/ ] Interruzione e ripresa della riproduzione.
[
] Premuto brevemente: selezione del brano.
Premuto a lungo: ricerca rapida automatica.
[
] Attivazione e disattivazione della funzione
di ripetizione.
[
] Attivazione e disattivazione della riprodu-
zione in ordine casuale.
04_NewYork_840_845_it.indd 86
04_NewYork_840_845_it.indd 86
03.09.14 15:09
03.09.14 15:09
Page 87

87
ITALIANO
Esercizio Bluetooth | Rear Seat Entertainment
Impostazioni Bluetooth
Nel menu opzioni del Bluetooth® è possibile e ettuare le
impostazioni generali per l'esercizio Bluetooth®.
쏅 Premere, nel menu Bluetooth®, il pulsante
.
Viene visualizzato il menu opzioni.
Bluetooth – È possibile attivare o disattivare il Bluetooth®.
Auto Connect – Quando è attivato "Auto Connect",
l'apparecchio si connette automaticamente con gli
apparecchi Bluetooth® conosciuti, non appena entrano nel raggio d'azione.
Risp. Autom. – Se è attivato "Risp. Autom.", le chiamate in arrivo vengono automaticamente accettate.
Codice pair. – Molti apparecchi Bluetooth® richiedono, per la connessione, un codice pairing. Qui è possibile de nire tale codice.
Sincro. elenco tel – Per poter accedere all'elenco telefonico di un telefono connesso, è necessario sincronizzarla utilizzando questa voce del menu.
Auto sync – Quando è attivato "Auto sync" viene
eseguita automaticamente la sincronizzazione della
rubrica telefonica non appena il telefono è connesso
all'apparecchio.
Rear Seat Entertainment (RSE)
Questo apparecchio dispone di uscite per il collegamento di due monitor esterni e uscite audio per la zona posteriore dell'abitacolo del veicolo.
Sui monitor esterni è possibile visualizzare un programma diverso rispetto all'apparecchio, è quindi possibile,
ad es., guardare su un monitor esterno, durante la guida,
foto e lm.
La riproduzione audio per l'RSE avviene tramite le prese Rear Out R e Rear Out L. Queste prese devono essere
connesse con prese jack adeguate, cosicché i passeggeri
nella parte posteriore del veicolo potranno ascoltare il
programma audio tramite cu e.
Avvio di RSE tramite monitor esterni:
쏅 Richiamare il menu principale.
쏅 Premere il pulsante
.
Viene visualizzato il menu principale RSE.
Per i monitor esterni possono essere selezionate le
seguenti fonti: USB RSE, Disco, AV-IN 1 e AV-IN 2.
Nota:
Solo la porta USB RSE nella parte posteriore dell'apparecchio supporta i monitor esterni.
쏅 Selezionare la fonte che dovrà essere riprodotta sui
monitor esterni.
La fonte selezionata viene visualizzata sul display
dell'apparecchio e sui monitor esterni.
쏅 Premere il pulsante
per ritornare alla fonte per
la zona anteriore dell'abitacolo.
- oppure -
쏅 Premere il pulsante
, per richiamare il menu
principale RSE per la zona posteriore dell'abitacolo.
Nota:
qualora venisse selezionata una fonte diversa per il
monitor installato, la fonte attuale continuerebbe ad
essere visualizzata sui monitor esterni.
쏅 Per disattivare l'RSE richiamare il menu principale
RSE e premere il pulsante Rear o .
04_NewYork_840_845_it.indd 87
04_NewYork_840_845_it.indd 87
03.09.14 15:09
03.09.14 15:09
Page 88

88
Fonti audio/video esterne
Questo apparecchio dispone di due entrate AV esterne
per la riproduzione audio e video:
• AV-IN 1 è integrata nel frontalino, sotto lo sportellino.
• AV-IN 2 consiste di una presa cinch su un cavo sul
retro dell'apparecchio. Durante il montaggio dell'apparecchio è possibile de nire il punto d'installazione
del collegamento.
Pericolo!
Maggior pericolo di lesioni a causa del
connettore.
In caso di incidenti la presa sporgente nella presa AV-IN
anteriore potrebbe essere causa di lesioni. L'impiego di
una presa sporgente o di un adattatore aumenta il rischio
di lesioni.
쏅 Avviare l'esercizio AV-IN con il pulsante AV-IN 1 o
AV-IN 2.
Sul display viene visualizzata la riproduzione audio o
video della fonte AV selezionata.
Regolazioni del suono
Bilanciamento del volume (Fader/Balance)
È possibile impostare il bilanciamento del volume nel veicolo per tutte le fonti.
쏅 Premere nel menu principale il pulsante
.
Viene visualizzato il menu equalizzatore.
쏅 Premere il pulsante
.
Fonti audio/video esterne | Regolazione del suono
Viene visualizzato il menu Fader e Balance.
쏅 Regolare fader e balance con / o / .
쏅 Premere in ne su Equalizer
.
L'impostazione viene salvata, viene visualizzato nuovamente il menu principale.
Equalizer
È possibile impostare l'equalizzatore per tutte le fonti.
쏅 Premere nel menu principale il pulsante
.
Viene visualizzato il menu equalizzatore.
쏅 Selezionare con o un equalizzatore preim-
postato.
- oppure -
쏅 Impostare con
o il livello per Bassi, Medi e
Alti, nonché la frequenza dei ltri LPF, MPF e HPF a
seconda delle proprie esigenze.
쏅 Premere in ne su Equalizer
.
L'impostazione viene salvata, viene visualizzato nuovamente il menu principale.
Nota:
Il pulsante [ ] consente di ripristinare i valori standard della preimpostazione dell'equalizzatore selezionata.
04_NewYork_840_845_it.indd 88
04_NewYork_840_845_it.indd 88
03.09.14 15:09
03.09.14 15:09
Page 89

89
ITALIANO
Impostazioni generali
Impostazioni generali
Nel menu impostazioni è possibile regolare le impostazioni generali delle varie funzioni dell'apparecchio in funzione delle proprie esigenze.
쏅 Premere il pulsante Impostazione nel menu princi-
pale.
Viene visualizzato il menu impostazioni, il sottomenu
Generali è attivo.
쏅 Richiamare, con i pulsanti nell'area inferiore del
menu impostazioni, i sottomenu.
Video
Sono disponibili le seguenti impostazioni:
Formato immagine – Impostazione del formato imma-
gine
Telecam retrom. – Impostazione della telecamera per la
retromarcia (se è collegata una telecamera per la retromarcia)
AV-IN 2 Mode – Quando viene collegata una telecamera
per la retromarcia con segnale audio nell'ingresso AV-IN 2
dell'apparecchio, è possibile riprodurre il suono della telecamera tramite gli altoparlanti dell'autoradio. A questo
proposito impostare la modalità "Camera".
Codice di registrazione DivX – Indicazione del codice di
registrazione DivX®
Generali
Sono disponibili le seguenti impostazioni:
Regione radio – Selezione della regione di ricevimento
per la ricezione radio.
Illuminazione sfondo spenta – Se questo valore viene
impostato, il display della radio, se non viene usato, si disattiva completamente dopo 10 o 20 secondi.
Modalità dimmer – Commutare la luminosità del display
tra la modalità diurna e la modalità notturna.
Dimmer – Impostare la luminosità del display per il giorno e per la notte.
Beep – Attivazione e disattivazione del segnale acustico
di conferma
Telecomando a raggi infrarossi – In questo caso è
possibile scegliere se con il telecomando debba essere
comandata la fonte sul display dell'apparecchio (Front
zone) oppure la fonte sul monitor esterno (Rear zone).
Sfondo – Selezione dell'immagine dello sfondo per i
menu. L'apparecchio dispone di vari motivi che è possibile selezionare. È inoltre possibile selezionare delle
immagini personali, memorizzate sulla scheda micro SD.
Calibrazione – Qui è possibile calibrare il touchscreen.
SWC – Qui è possibile con gurare i tasti di un telecoman-
do sul volante eventualmente collegato.
Softkey MENU – Consente di attribuire una funzione al
tasto
2, premendolo per ca. 2 secondi. Selezionare
una delle seguenti opzioni: avvio esercizio Bluetooth® e
Disattivazione display.
Antifurto – Attivazione/disattivazione richiesta del codice. Quando la richiesta del codice è attivata, dopo ogni
disconnessione dell'apparecchio dalla tensione di bordo
(ad es. rimozione della batteria per le riparazioni) è necessario inserire il codice numerico a quattro cifre.
Codice – È possibile modi care il codice numerico. Per
modi care il codice numerico inserire il codice numerico
a quattro cifre. Il codice numerico è impostato di default
su "0000".
Impostazione di fabbrica – Ripristina tutte le impostazioni di fabbrica. Ad eccezione del codice di sicurezza
scelto personalmente.
Software Version – Visualizzazione delle versioni del
software attuali.
04_NewYork_840_845_it.indd 89
04_NewYork_840_845_it.indd 89
03.09.14 15:09
03.09.14 15:09
Page 90

90
Ora
Sono disponibili le seguenti impostazioni:
Data – Impostazione data
Modalità orologio – Scelta tra modalità 12h e 24h
Tempo – Impostazione ora
Suono
Sono disponibili le seguenti impostazioni:
Subwoofer – Attivazione e disattivazione subwoofer
Filtro subwoofer – Impostare a seconda del subwoofer
utilizzato (impostazioni: 80/120/160 Hz).
Dyn. bass – Attivazione e disattivazione aumento dina-
mico delle basse frequenze
Lingua
Sono disponibili le seguenti impostazioni:
Indicazione display – Lingua per l'interfaccia utente
dell'apparecchio.
DVD audio – La riproduzione audio di DVD utilizza la lin-
gua impostata qui.
Sottotitoli DVD – I sottotitoli del DVD vengono visualiz-
zati nella lingua impostata qui.
Disc menu – Il menu DVD viene visualizzato nella lingua
impostata qui.
Bluetooth
Sono disponibili le seguenti impostazioni:
Bluetooth – È possibile attivare o disattivare il Blue tooth®
Auto connect – Quando è attivato "Auto connect", l'ap-
parecchio si connette automaticamente con gli apparecchi Bluetooth® conosciuti, non appena entrano nel
raggio d'azione.
Risp. Autom. – Le chiamate dei telefoni connessi vengono automaticamente accettate se è attivato "Risp.
Autom.".
Microfono – Selezionare quale microfono deve essere
utilizzato tramite Bluetooth® per il vivavoce.
Codice pair. – Molti apparecchi Bluetooth® richiedono,
per la connessione, un codice pairing. Qui è possibile de nire tale codice.
Tastiera BT – Qui è possibile impostare il layout della
tastiera per la ricerca nella rubrica telefonica.
Impostazioni generali
04_NewYork_840_845_it.indd 90
04_NewYork_840_845_it.indd 90
03.09.14 15:09
03.09.14 15:09
Page 91

91
ITALIANO
Impostazioni generali | Informazioni utili
DVD
Sono disponibili le seguenti impostazioni:
Inserimento password – Impostare una password se si
desidera utilizzare la funzione di parental control.
Livello di legittimazione – Qui è possibile impostare l'e-
tà per la riproduzione dei DVD. Se si imposta "Adulto", è
possibile riprodurre tutti i lm. Se è stata impostata una
password, è possibile modi care il livello di autorizzazione soltanto tramite password.
Volume
Nel menu Volume, è possibile impostare il rapporto di
volume per tutte le fonti audio.
Informazioni utili
Garanzia
Concediamo una garanzia del produttore per gli apparecchi acquistati in uno dei Paesi dell'Unione Europea.
Per gli apparecchi venduti fuori dell'Unione Europea,
valgono le condizioni di garanzia stabilite dalla nostra
rappresentanza nel Paese. È possibile consultare le condizioni di garanzia sul sito www.blaupunkt.com.
Servizio di assistenza
Qualora si rendesse necessario contattare un servizio di
riparazioni, all'indirizzo www.blaupunkt.com si possono
trovare informazioni sui service partner presenti nei vari
Paesi.
Con riserva di modi che tecniche!
04_NewYork_840_845_it.indd 91
04_NewYork_840_845_it.indd 91
03.09.14 15:09
03.09.14 15:09
Page 92

92
Bedieningselementen – apparaat
1
Toets (Eject)
DVD/CD uitwerpen
2
Toets
Kort indrukken: hoofdmenu oproepen
In het hoofdmenu: menu van de actieve bron oproepen
Lang indrukken: Bluetooth®-functie oproepen resp.
display uitschakelen. De functie kan in het instellingenmenu worden gekozen.
3
Toets
Kort indrukken: navigatie oproepen
Tijdens navigatiefunctie: menu van de actieve bron
oproepen
Lang indrukken: instelling displayhelderheid oproepen
4
Microfoon
5
Draai-/drukknop
Kort indrukken: apparaat inschakelen
In bedrijf: audiobron onderdrukken (mute)
Lang indrukken: apparaat uitschakelen
Draaien: volume instellen
6
Infrarood-ontvanger voor de afstandsbediening
7
Reset-toets
Oorspronkelijke fabrieksinstellingen van het apparaat weer instellen.
Let op! Alle persoonlijke instellingen gaan verloren!
8
Afdekklep
9
SD-kaartlezer
Toegang alleen bij geopende afdekking
:
Front-AV-IN-bus (bron AV-IN 1)
Toegang alleen bij geopende afdekking
;
Front-USB-bus (bron USB 1)
Toegang alleen bij geopende afdekking
<
Touchscreen bedieningsinterface
=
microSD-kaartlezer voor navigatiedata
Toegang alleen bij geopende afdekking
>
DVD-/CD-speler
2
3
5
8
6
4
7
1
13
12
14
9
10
11
05_NewYork_840_845_nl.indd 92
05_NewYork_840_845_nl.indd 92
03.09.14 15:11
03.09.14 15:11
Page 93

93
NEDERLANDS
Bedieningselementen – afstandsbediening
26
28
29
32
33
31
34
18
20
22
24
16
35
36
48
46
44
42
41
39
37
38
21
23
25
30
19
17
15
47
45
43
27
40
?
Toets SRC
Bron selecteren
@
Toets
DVD/CD uitwerpen
A
Toets INFO
Informatie op het display weergeven
B
Toets MENU
DVD-menu oproepen
C
Toets ZOOM
Beelduitsnede vergroten
D
Toets PIC
Displayhelderheid instellen
E
Toets
Tijdlusweergave
F
Toets
Weergave beëindigen
G
Toets BAND
Golfgebied/geheugenniveau selecteren
H
Toets
Hoofdmenu oproepen
I
Toets
Weergave starten en onderbreken
J
Toets
Instellingenmenu oproepen
K
Toets / / /
In menu's navigeren en instellingen veranderen
Zoekafstemming starten ( / )
Opgeslagen zender oproepen ( / )
L
Toets
Oproep accepteren
M
Toets
Gesprek beëindigen/afwijzen
N
Toets PHOTO
Mapoverzicht van de foto's oproepen
O
Toets MUSIC
Mapoverzicht van de audiobestanden oproepen
P
Cijfertoetsen 0 - 9
Q
Toets
Willekeurige weergave
R
Toets
Herhaalfunctie
S
Toets
Scanfunctie
T
Toets VIDEO
Mapoverzicht van de lm oproepen
U
Toets /
Volume instellen
V
Toets OK
Selectie bevestigen
W
Toets
Audiobron onderdrukken
X
Toets /
Kort indrukken: zender handmatig instellen; titel,
hoofdstuk, lm selecteren
Lang indrukken: snelle zoekdoorloop
Y
Toets
Equalizer-menu oproepen
Z
Toets
Laatste teken van invoer wissen
[
Toets
Bereik voor herhaalfunctie vastleggen
\
Toets GOTO
Directe invoer voor zenderfrequentie, titel, hoofdstuk, lm, resp. looptijd oproepen
]
Toets ANGLE
Camerahoek kiezen (indien op DVD beschikbaar)
a
Toets SUBTITLE
Ondertiteltaal kiezen (indien op DVD beschikbaar)
b
Toets AUDIO
Weergavetaal kiezen (wanneer op DVD beschikbaar)
c
Toets
Apparaat in-/uitschakelen
05_NewYork_840_845_nl.indd 93
05_NewYork_840_845_nl.indd 93
03.09.14 15:11
03.09.14 15:11
Page 94

94
Inhoud
Veiligheidsinstructies .............................................. 95
Gebruikte symbolen ........................................................... 95
Verkeersveiligheid ............................................................... 95
Algemene veiligheidsinstructies .................................... 95
Conformiteitsverklaring .................................................... 95
Reinigingsinstructies ............................................... 95
Afvoerinstructies ...................................................... 95
Leveringsomvang ..................................................... 96
In bedrijf nemen ....................................................... 96
Diefstalbeveiliging ............................................................... 96
In-/uitschakelen .................................................................... 96
Volume ..................................................................................... 96
Home (Hoofdmenu) ............................................................ 96
Ontvangstregio instellen .................................................. 97
Radioweergave ......................................................... 97
Radioweergave starten ...................................................... 97
Geheugenniveau kiezen ................................................... 97
Zenders instellen .................................................................. 97
Zenders handmatig opslaan ............................................ 97
Zenders automatisch programmeren
(Travelstore) ........................................................................... 98
Zenders kort weergeven ................................................... 98
RDS in-/uitschakelen ........................................................... 98
RDS-tijdsignaal in-/uitschakelen ....................................98
Radio-ontvangst optimaliseren ...................................... 98
REG-functie (regionale programma's)
in-/uitschakelen .................................................................... 98
AF-functie (alternatieve frequenties)
in-/uitschakelen .................................................................... 98
Zoekgevoeligheid instellen .............................................. 98
Programmatype selecteren en zoekdoorloop
starten ...................................................................................... 99
Verkeersinformatie .............................................................. 99
Navigatie (alleen bij apparaten met navigatie) ..... 99
Navigatiedata laden ............................................................ 99
Downloaden van kaartgegevens ................................... 99
Navigatie starten .................................................................. 99
Eerste inbedrijfname .......................................................... 99
Bestemming invoeren ......................................................100
Adressen ............................................................................... 100
Bijzondere bestemmingen - Points of Interest ....... 101
Routeopties instellen ........................................................101
Kaartinstellingen ................................................................ 102
Mediaweergave DVD/CD/USB/SDHC/iPod ........... 103
Basisinformatie ...................................................................103
DVD-/CD-weergave ...........................................................103
USB-datadrager .................................................................. 103
SDHC-kaarten ......................................................................104
iPod/iPhone via USB .........................................................104
DVD lmweergave ............................................................. 104
Audioweergave van DVD/CD, USB, SDHC of
iPod/iPhone .........................................................................105
Videoweergave van DVD/CD, USB of SDHC .............106
Beeldweergave van DVD/CD, USB of SDHC .............107
Bluetooth-bedrijf .................................................... 107
Bluetooth-bedrijf starten ................................................107
Bluetooth-apparaten koppelen .................................... 108
Telefoonfunctie ...................................................................108
Audioweergave - Bluetooth-Streaming ..................... 108
Audioweergave - Android mobiele telefoon ........... 109
Bluetooth-instellingen .....................................................109
Rear Seat Entertainment (RSE) ..............................110
Externe audio-/videobronnen ............................... 110
Klankinstellingen ................................................... 111
Volumeverdeling (fader/balans) ................................... 111
Equalizer ................................................................................111
Basisinstellingen .................................................... 111
Video .......................................................................................111
Algemeen ............................................................................. 112
Tijd ...........................................................................................112
Klankkleur ............................................................................. 112
Taal ..........................................................................................113
Bluetooth ..............................................................................113
DVD ......................................................................................... 113
Volume ...................................................................................113
Nuttige informatie .................................................. 113
Garantie ................................................................................. 113
Service ....................................................................................113
Aansluitschema ...................................................... 336
Bijlage ...................................................................... 337
05_NewYork_840_845_nl.indd 94
05_NewYork_840_845_nl.indd 94
03.09.14 15:11
03.09.14 15:11
Page 95

95
NEDERLANDS
Veiligheidsinstructies | Reinigingsinstructies | Afvoerinstructies
Veiligheidsinstructies
De autoradio is conform de huidige stand van de techniek en erkende veiligheidstechnische voorschriften
geproduceerd. Toch kunnen er gevaren ontstaan wanneer u de veiligheidsinstructies in deze handleiding niet
aanhoudt.
Deze handleiding moet u vertrouwd maken met de
belangrijkste functies. Uitgebreide informatie over
de navigatie kunt u vinden op het internet onder
www.blaupunkt.com.
• Lees deze handleiding zorgvuldig en volledig door,
voordat u de autoradio gebruikt.
• Bewaar deze handleiding zodanig, dat deze te allen
tijde voor alle gebruikers toegankelijk is.
• Geef de autoradio altijd samen met deze handleiding aan derden door.
Houd u tevens de handleidingen van de apparaten aan
die in combinatie met deze autoradio worden gebruikt.
Gebruikte symbolen
In deze handleiding worden de volgende symbolen gebruikt:
GEVAAR!
Waarschuwt voor persoonlijk letsel
VOORZICHTIG!
Waarschuwt voor beschadiging van de DVD/
CD-speler
GEVAAR!
Waarschuwt voor hoog volume
Het CE-teken bevestigt dat de EU-richtlijnen
zijn aangehouden.
쏅 Geeft een handeling aan
• Geeft een opsomming aan
Verkeersveiligheid
Houd de volgende instructies aan m.b.t. de verkeersveiligheid:
• Gebruik het apparaat zodanig, dat u uw voertuig
altijd veilig kunt besturen. Stop bij twijfel op een
geschikte plek en bedien uw apparaat terwijl het
voertuig stil staat. U bent de bestuurder, gebruik
geen toepassingen die u van het verkeer a eiden
(afh. van de functionaliteit van het apparaat, bijv. video's bekijken, bestemming invoeren).
• Houd de rijadviezen tijdens de routegeleiding al-
leen dan aan, wanneer u daarbij geen verkeersregels overtreedt! Verkeersborden en voorschriften
hebben altijd voorrang boven de rijadviezen.
• Luister altijd met een redelijk volume, om uw ge-
hoor te beschermen en om akoestische waarschuwingssignalen (bijv. politie) te kunnen horen. Tijdens
mute-pauzes (bijv. bij het wisselen van audiobron)
is het veranderen van het volume niet hoorbaar.
Verhoog niet het volume tijdens deze geluidsonderdrukking.
Algemene veiligheidsinstructies
Houd de volgende instructie aan, om uzelf tegen letsel
te beschermen:
U mag het apparaat niet openen of veranderen. In dit
apparaat bevindt zich een klasse-1-laser welke letsel aan
uw ogen kan veroorzaken.
Correct gebruik
Deze autoradio is voor inbouw en gebruik in een voertuig met 12 V boordspanning ontworpen en moet in een
DIN-opening worden ingebouwd. Let op de vermogensgrenzen van het apparaat. Laat reparaties en eventueel
de inbouw door een vakman uitvoeren.
Inbouwinstructies
U mag de autoradio alleen inbouwen, wanneer u ervaring heeft met de inbouw van autoradio's en bekend
bent met het elektrische systeem van het voertuig. Houd
daarbij het aansluitschema aan zoals weergegeven achter in deze handleiding.
Conformiteitsverklaring
Hiermee verklaart Blaupunkt Technology GmbH dat
het apparaat in overeenstemming is met de vereisten
en de andere relevante voorschriften van de richtlijn
1999/5/EG.
De conformiteitsverklaring kunt u op het internet vinden
onder www.blaupunkt.com.
Reinigingsinstructies
Oplos-, reinigings- en schuurmiddelen alsmede cockpitspray en kunststofonderhoudsmiddelen kunnen sto en
bevatten welke het oppervlak van de autoradio aantasten.
Gebruik voor de reiniging van de autoradio uitsluitend
een droge, of licht vochtige doek.
Afvoerinstructies
Voer uw afgedankte apparaat niet af met het huisvuil!
Gebruik voor het afvoeren van het oude apparaat,
de afstandsbediening en verbruikte batterijen de
beschikbare retour- en verzamelsystemen.
05_NewYork_840_845_nl.indd 95
05_NewYork_840_845_nl.indd 95
03.09.14 15:11
03.09.14 15:11
Page 96

96
Leveringsomvang
In de leveringsomvang zijn inbegrepen:
• Autoradio
• Afstandsbediening (incl. batterij)
• TMC tuner (alleen bij apparaten met Europa-navigatie)
• microSD-kaart met navigatiedata in microSD-kaartsleuf (alleen bij apparaten met navigatie)
• GPS-antenne
• Externe Bluetooth-microfoon
• Verkorte handleiding
• Montageframe
• Set bevestigingsmateriaal
• Installatiemateriaal
• Aansluitkabel
In bedrijf nemen
Let op
Transportborgschroeven
Veri eer dat voor de inbedrijfname van het apparaat de
transportborgschroeven aan de bovenkant van het apparaat worden verwijderd.
Diefstalbeveiliging
Deze autoradio is beveiligd tegen diefstal met een viercijferige code (code af-fabriek: 0000).
Wanneer de codevraag is geactiveerd, dan moet de code
na elke onderbreking van de voeding van de voertuigaccu worden ingevoerd.
Opmerking:
In het submenu Algemeen van het Instellingen
menu kunt u de codevraag activeren/deactiveren en
de code wijzigen.
Codenummer na spanningsonderbreking invoeren
Wanneer de invoer van de code noodzakelijk is, wordt
een cijferveld voor de invoer van de code weergegeven.
쏅 Voer de code in het cijferveld in.
쏅 Druk op de knop , om de invoer te bevestigen.
Het apparaat wordt ingeschakeld.
Opmerking:
Wanneer u een verkeerde code heeft ingevoerd,
wordt kort Security code incorrect! weergegeven.
Daarna kunt u de code-invoer herhalen.
In-/uitschakelen
In-/uitschakelen met de draai-/drukknop
쏅 Voor het inschakelen drukt u op de draai-/druk-
knop
5
.
쏅 Voor het uitschakelen houdt u de draai-/druk-
knop
5
langer dan 2 seconden ingedrukt.
In-/uitschakelen via voertuigcontact
Wanneer de autoradio is verbonden met het voertuigcontact en het niet met de draai-/drukknop 5 is uitgeschakeld, dan wordt het via het contact uit- resp. ingeschakeld.
Volume
Volume instellen
Het volume kan in stappen van 0 (uit) tot 50 (maximaal)
worden ingesteld.
쏅 Draai aan de draai-/drukknop 5, om het volume te
veranderen.
Autoradio geluid onderdrukken (mute)
쏅 Druk kort op de draai-/drukknop 5, om het appa-
raat te onderdrukken, resp. om het vorige volume
weer te activeren.
Home (Hoofdmenu)
In het hoofdmenu kunt u door op een knop te drukken
op het touchscreen de verschillende bronnen en weergavesoorten oproepen.
쏅 Druk op de toets
2.
- Of -
쏅 Druk in de actuele bron op de knop ……
.
Het hoofdmenu wordt weergegeven.
Leveringsomvang | In bedrijf nemen
05_NewYork_840_845_nl.indd 96
05_NewYork_840_845_nl.indd 96
03.09.14 15:11
03.09.14 15:11
Page 97

97
NEDERLANDS
Zolang u geen nieuwe audiobron kiest, wordt de
laatste actieve audiobron weergegeven.
Opmerking:
De in deze handleiding weergegeven afbeeldingen
moeten de toelichtingen ondersteunen en kunnen
in detail van uw apparaat afwijken.
Ontvangstregio instellen
Deze autoradio is gemaakt voor gebruik in verschillende
regio's met verschillende frequentiebereiken en zendertechnologieën. Af fabriek is de ontvangstregio "Europa"
ingesteld. Gebruikt u de autoradio buiten Europa, bijv. in
de VS of Azië, dan moet u eventueel eerst een geschikte
ontvangstregio instellen.
쏅 Druk daarvoor in het hoofdmenu op knop Settings
(Instelling).
Het instellingenmenu wordt weergegeven.
쏅 Druk in het onderste deel van het instellingenmenu
op de knop General (Algemeen).
Achter "Radio region“ Radio regio wordt de actuele
instelling weergegeven.
쏅 Druk op de knop Radio region Radio regio, om de
lijst van beschikbare ontvangstregio's weer te geven.
쏅 Blader met [
] resp. [ ] door de lijst en tik op de
gewenste ontvangstregio om deze te selecteren.
De lijst verdwijnt, de geselecteerde ontvangstregio
is ingesteld.
쏅 Druk op de knop Settings
.
Het hoofdmenu wordt weer weergegeven.
Radioweergave
Radioweergave starten
쏅 Druk in het hoofdmenu op de toets Radio.
Het radiomenu wordt weergegeven.
Geheugenniveau kiezen
Er staan verschillende geheugenniveaus en golfgebieden ter beschikking. Op elk geheugenniveau kunnen
maximaal 6 zenders worden geprogrammeerd.
쏅 Druk net zo vaak op de knop
tot het gewenste
geheugenniveau wordt weergegeven.
Zenders instellen
Zenders handmatig instellen
쏅 Druk één of enkele keren kort op de knop
resp.
om de frequentie stapsgewijs te wijzigen.
Zenderfrequentie direct invoeren
Wanneer u de frequentie van de gewenste zender kent,
kunt u deze via het touchscreen direct invoeren.
쏅 Druk tijdens radioweergave op de knop
.
Een cijferveld voor invoer van de frequentie wordt
weergegeven.
쏅 Voer de frequentie in van de gewenste zender m.b.v.
het cijferveld.
쏅 Druk op de knop .
Het radiomenu wordt weergegeven, de zender van
de ingevoerde frequentie weergegeven.
Zoekafstemming starten
쏅 Druk op de knop
resp. gedurende ca.
2seconden, om de zoekafstemming te starten.
De eerstvolgende ontvangbare zender wordt inge-
steld.
Opmerking:
Voor de ontvangstregio Europa: in het golfgebied FM
worden bij ingeschakelde voorrang voor verkeersinformatie alleen verkeersinformatiezenders ingesteld.
Zenders handmatig opslaan
쏅 Kies met de knoppen de gewenste geheugen-
niveaus.
쏅 Stel de gewenste zender in.
쏅 Druk op de knop
.
Het menu voor opslaan wordt weergegeven. Er zijn
6 geheugenposities beschikbaar die als knoppen
worden weergegeven.
쏅 Druk op de knop, waaronder u de actuele zender wilt
opslaan.
De zender wordt opgeslagen, het radiomenu wordt
weer weergegeven.
In bedrijf nemen | Radioweergave
05_NewYork_840_845_nl.indd 97
05_NewYork_840_845_nl.indd 97
03.09.14 15:11
03.09.14 15:11
Page 98
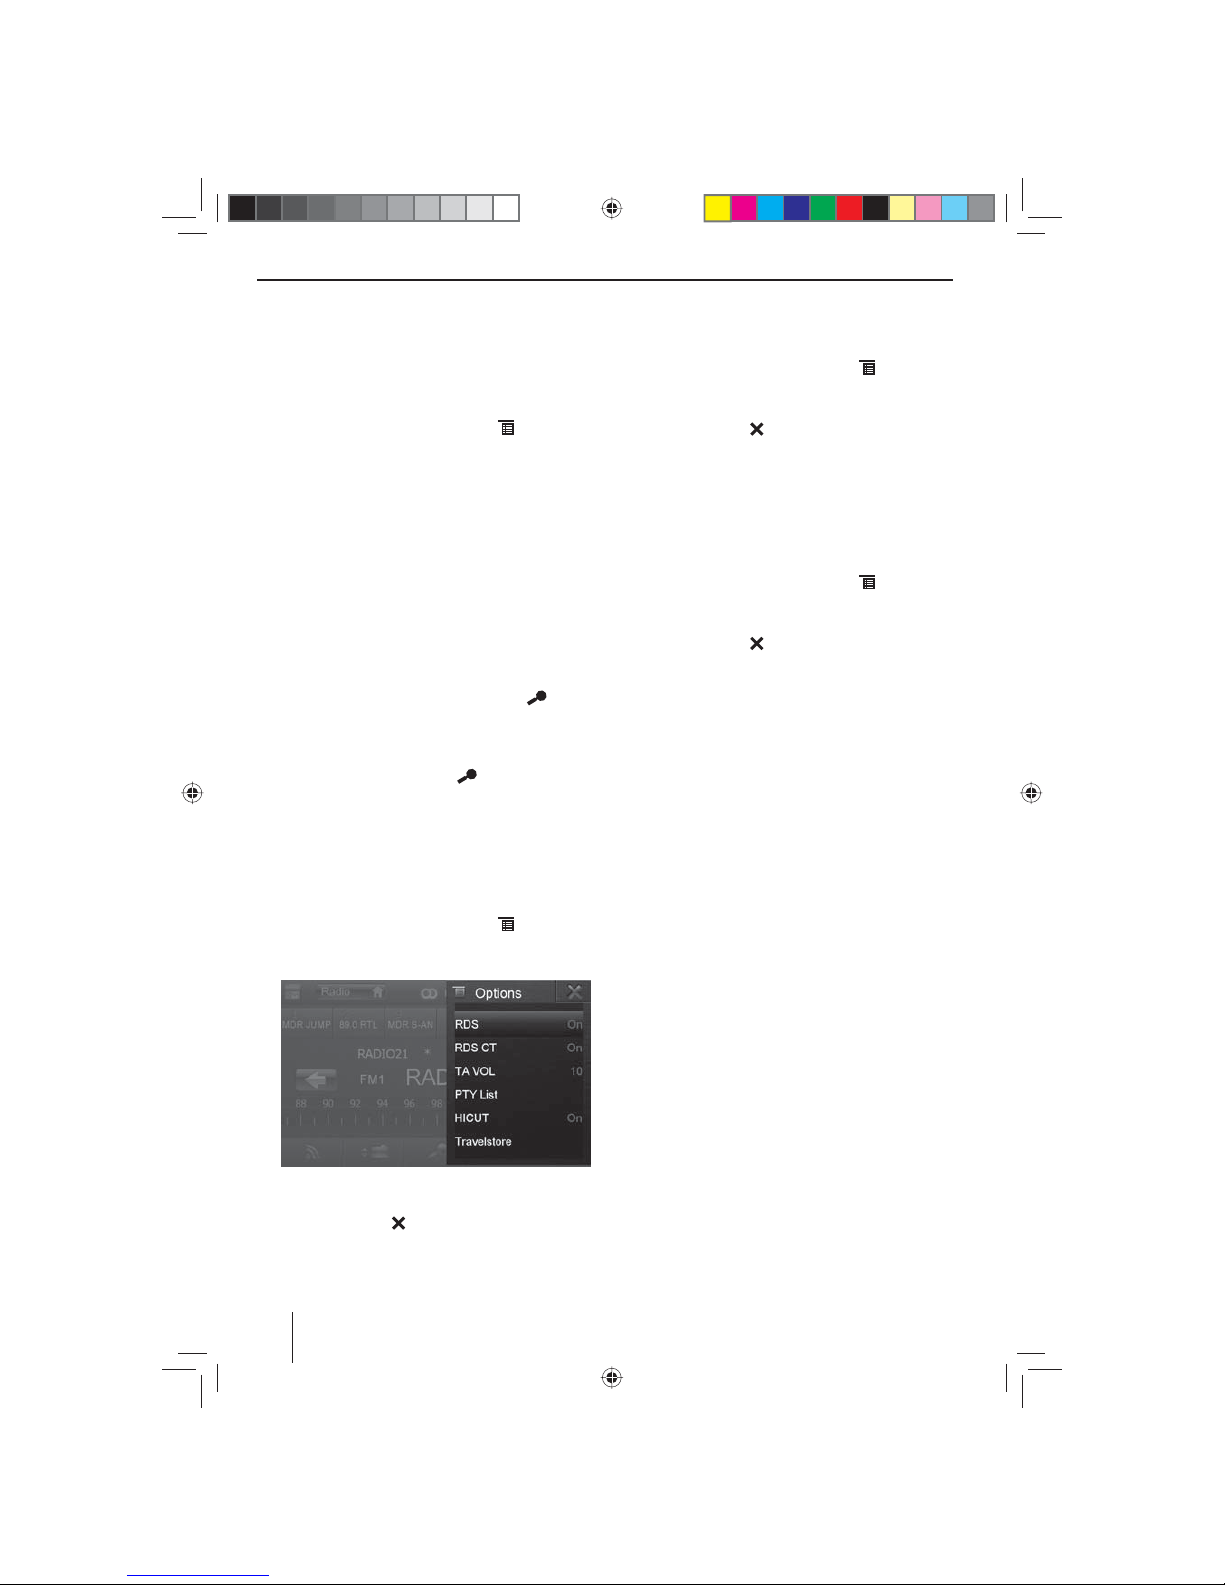
98
Zenders automatisch programmeren
(Travelstore)
Met Travelstore kunt u de 6 sterkste zenders van de regio
automatisch zoeken en op de geheugenniveaus FM1,
FM2 of FM3 opslaan.
쏅 Kies een FM-geheugenniveau.
쏅 Druk in het radiomenu op de knop
.
쏅 Druk in het optiemenu op de knop Travelstore.
De tuner begint met een automatische zoekafstemming. Wanneer het opslaan is voltooid, wordt de zender op geheugenpositie 1 van het eerder gekozen
geheugenniveau weergegeven.
Opmerking:
Voor de ontvangstregio Europa: bij ingeschakelde
voorrang voor verkeersinformatie worden uitsluitend verkeersinformatiezenders opgeslagen.
Zenders kort weergeven
Met de scan-functie kunt u alle ontvangbare zenders van
het actuele golfgebied enkele seconden kort weergeven.
쏅 Druk tijdens radioweergave op de knop
.
De scan-zoekdoorloop zoekt in het actuele golfgebied naar zenders. Elke ontvangbare zender wordt
daarbij enkele seconden kort weergegeven.
쏅 Door nogmaals op de knop
te drukken wordt
de weergegeven zender gekozen en weergegeven.
RDS in-/uitschakelen
In de ontvangstregio Europa zenden veel FM-zenders
naast hun programma tevens een RDS-signaal (Radio
Data System) uit, dat extra functies, zoals bijv. de weergaven van de zendernaam in het display mogelijk maakt.
쏅 Druk in het radiomenu op de knop
.
Het opties menu wordt weergegeven, achter RDS
wordt de actuele instelling weergegeven.
쏅 Druk in het optiemenu op de knop RDS, om de in-
stelling te veranderen.
쏅 Druk op de knop
.
Het radiomenu wordt opnieuw weergegeven.
RDS-tijdsignaal in-/uitschakelen
De tijd kan met het via RDS verzonden tijdsignaal worden gesynchroniseerd.
쏅 Druk in het radiomenu op de knop
.
쏅 Druk in het optiemenu op de knop RDS CT, om de
instelling te wijzigen.
쏅 Druk op de knop
.
Het radiomenu wordt opnieuw weergegeven.
Radio-ontvangst optimaliseren
De HICUT-werking resulteert in een ontvangstverbetering bij een slechte radio-ontvangst (alleen in FM-radioweergave). Wanneer ontvangststoringen aanwezig zijn,
wordt automatisch de storing afgezwakt.
쏅 Druk in het radiomenu op de knop
.
쏅 Druk in het optiemenu op de knop HICUT, om de
instelling te wijzigen.
쏅 Druk op de knop
.
Het radiomenu wordt opnieuw weergegeven.
REG-functie (regionale programma's)
in-/uitschakelen
Sommige RDS-zenders verdelen hun programma op
bepaalde tijden in regionale programma's met verschillende inhoud. Bij ingeschakelde REG-functie schakelt
de autoradio alleen naar alternatieve frequenties van de
ingestelde zender, wanneer op die zender hetzelfde regionale programma wordt uitgezonden.
쏅 Druk in het radiomenu op de knop REG, om de REG-
functie in- resp. uit te schakelen.
De knop REG gaat branden wanneer de REG-functie
is ingeschakeld.
AF-functie (alternatieve frequenties)
in-/uitschakelen
Wanneer de AF-functie is geactiveerd, dan schakelt de
radio automatisch naar de beste ontvangbare frequentie
van de ingestelde zender.
쏅 Druk in het radiomenu op de knop AF, om de AF-
functie in- resp. uit te schakelen.
De knop AF gaat branden wanneer de AF-functie is
ingeschakeld.
Zoekgevoeligheid instellen
De zoekgevoeligheid bepaalt of de automatische zoekafstemming alleen sterke zenders, of ook zwakkere zenders, eventueel met ruis, vindt.
쏅 Druk in het radiomenu op de knop Loc, om de ge-
voeligheid van de zoekafstemming in te stellen.
Wanneer de knop Loc brandt, vindt de zoekdoorloop
uitsluitend sterke zenders.
Radioweergave
05_NewYork_840_845_nl.indd 98
05_NewYork_840_845_nl.indd 98
03.09.14 15:11
03.09.14 15:11
Page 99

99
NEDERLANDS
Programmatype selecteren en
zoekdoorloop starten
Met de PTY-functie kunt u een programmatype kiezen
en zo gericht naar zenders zoeken, die bijvoorbeeld rockmuziek of sportprogramma's uitzenden.
쏅 Druk in het radiomenu op de knop
.
쏅 Druk in het optiemenu op de knop PTY List, om de
programmatypen weer te geven.
쏅 Selecteer met de knop [
] resp. [ ] het gewens-
te programmatype.
쏅 Druk op de knop
, om de PTY-zoekdoorloop
te starten.
Wanneer een zender een programma met het ge-
wenste programmatype uitzendt, dan wordt deze
zender weergegeven.
Verkeersinformatie
In de ontvangstregio Europa kan een FM-zender verkeersberichten markeren m.b.v. een RDS-signaal. Wanneer de voorrang voor verkeersberichten is ingeschakeld,
wordt een verkeersbericht automatisch doorgegeven,
ook wanneer de autoradio op dat moment niet in radioweergave staat.
Opmerking:
Het volume wordt voor de duur van het doorgeschakelde verkeersbericht verhoogd. U kunt het minimale geluidsvolume voor verkeersberichten instellen.
Voorrang voor verkeersberichten in-/uitschakelen
쏅 Druk in het radiomenu op de knop TA , om de voor-
rang voor verkeersberichten in- resp. uit te schakelen.
De knop TA licht op wanneer de voorrang voor ver-
keersberichten is ingeschakeld.
Minimale volume voor verkeersberichten instellen
쏅 Druk in het radiomenu op de knop
.
쏅 Druk in het optiesmenu op de knop TA VO L.
쏅 Stel het gewenste volume in met de knop
resp.
.
쏅 Druk op de knop
.
Het radiomenu wordt opnieuw weergegeven, het
ingestelde volume is opgeslagen.
Navigatie
(alleen bij apparaten met navigatie)
Navigatiedata laden
De navigatiesoftware en kaarten bevinden zich op een
microSD-kaart. Bij apparaten met navigatie wordt het apparaat met de microSD-kaart in een microSD-kaartsleuf
uitgeleverd. Om de navigatie te kunnen gebruiken, moet
de microSD-kaart in de kaartsleuf zijn geplaatst.
쏅 Open de afdekking van de kaartsleuf
=
naast de
DVD-/CD-opening.
쏅 Schuif de microSD-kaart met de bedrukte zijde naar
boven in de schacht, totdat deze borgt.
쏅 Sluit de afdekking van de sleuf weer.
Downloaden van kaartgegevens
Om voor u bij aanschaf van het apparaat de laatste stand
van het kaartmateriaal te garanderen, bestaat 30 dagen
na de eerste GPS-plaatsbepaling de mogelijkheid via de
internetpagina www.naviextras.com eenmalig en kosteloos de meest actuele kaartgegevens op de standaard
microSD-kaart te downloaden.
Later kunt u hier altijd nieuw kaartmateriaal aanscha en
tegen een vergoeding.
Belangrijke opmerking:
Bij verlies of beschadiging van de microSD-kaart gaat
de daaraan gekoppelde navigatielicentie verloren. In
dat geval moet de licentie, samen met een nieuwe
microSD-kaart opnieuw worden aangeschaft.
Navigatie starten
쏅 Druk op de toets 3.
- Of -
쏅 Druk in het hoofdmenu op Navigation (Navigatie).
Het navigatiemenu wordt weergegeven. Wanneer
u de navigatie voor de eerste keer start, wordt de
con guratie-assistent weergeven.
Eerste inbedrijfname
Wanneer u de navigatie voor de eerste keer start, wordt
een con guratie-assistent gestart, die de basisinstellingen van de navigatie uitvoert.
쏅 Stel de taal voor de navigatie in. Dit kan een andere
taal zijn dan voor de andere functies van het apparaat.
쏅 Bevestig de keuze met
.
De eindgebruikerslicentie-overeenkomst wordt
weergegeven.
쏅 Lees de eindgebruikerslicentie-overeenkomst. Wan-
neer u akkoord gaat met de bepalingen, druk dan op
.
De con guratie-assistent wordt gestart.
Radioweergave | Navigatie
05_NewYork_840_845_nl.indd 99
05_NewYork_840_845_nl.indd 99
03.09.14 15:11
03.09.14 15:11
Page 100

100
쏅 Druk op om verder te gaan.
쏅 Kies een stem voor de gesproken mededelingen van
de navigatie. Er zijn verschillende stemmen voor de
talen beschikbaar.
쏅 Bevestig de keuze met
.
쏅 Leg het tijdformaat en de eenheden voor de naviga-
tie vast. Druk aansluitend op
.
Op het volgende scherm kunt u uw voorkeursrouteinstellingen maken.
쏅 Wijzig de keuzes eventueel door op de getoonde
menu-opties te drukken.
쏅 Druk op , wanneer u de instellingen heeft aan-
gepast.
쏅 Druk op
, om de con guratie af te sluiten.
Het navigatiemenu wordt weergegeven.
Bestemming invoeren
U heeft verschillende mogelijkheden, bestemmingen in
te voeren: via het adres, als bijzondere bestemming uit
de database van bijzondere bestemmingen. Bijzondere
bestemmingen zijn bijv. bezienswaardigheden, musea,
stadions, , tankstations.
Adressen
쏅 Open het navigatiemenu.
쏅 Druk op Destination (Bestemming).
Het menu voor bestemmingsinvoer wordt weergegeven.
쏅 Druk op Find Address (Adres zoeken).
Het menu voor adresinvoer wordt weergegeven.
쏅 Voer na elkaar het land, de stad en de straat alsmede
kruising of huisnummer in. Druk daarvoor op de
betre ende opties in het menu voor invoer van het
adres.
Een menu voor tekstinvoer wordt weergegeven.
쏅 Voer het gewenste doel in m.b.v. het toetsenbord.
Met elke letter die u invoert wordt de invoer in de
invoerregel automatisch aangevuld.
쏅 Wanneer de naam van de gewenste bestemming in
de adresregel wordt weergegeven, druk dan op de
knop
.
De geselecteerde bestemming wordt op de kaart
weergegeven.
.
쏅 Druk op Next (Volgende), om de routegeleiding te
starten.
De berekening van de route begint. Afhankelijk van
de afstand tussen start en bestemming kan de routeberekening enige tijd duren.
Navigatie
05_NewYork_840_845_nl.indd 100
05_NewYork_840_845_nl.indd 100
03.09.14 15:11
03.09.14 15:11
 Loading...