

Page 1
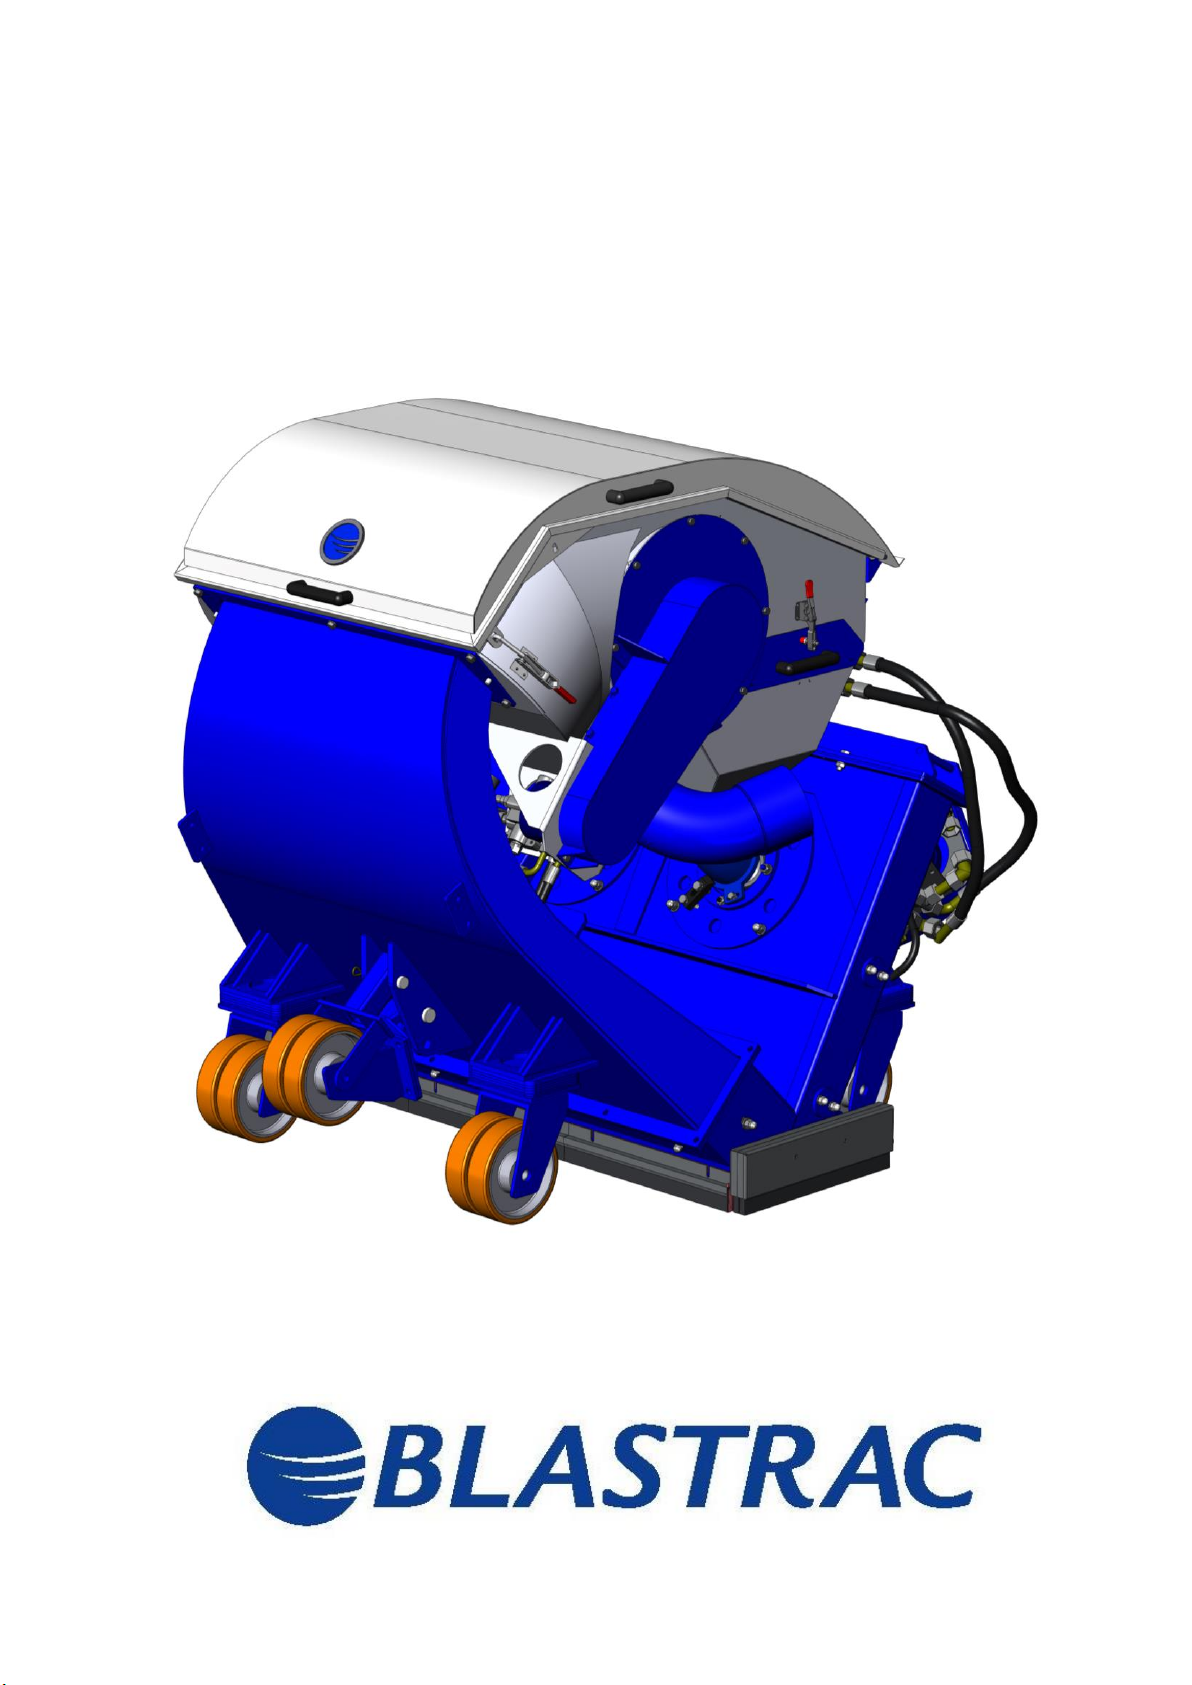
Operating Instructions
2-45D
MAN-2-45D-EN (Freightliner)
Page 2
Technical Data
Safety Instructions
General
Transport
Initial Operation
Operation
Maintenance
Electrical & Hydraulic Systems
Fault Diagnosis
Spare parts
Design and specicati ons are subject to
change w ithout notice - November 2008
Page 3

Page 4

2-45D Operating Instructions
Technical data
Contents Chapter 1
1.1 Rating
1.2 Unit specifications
1.3 Operative range and correct usage
1.4 Machine type designation
1.5 Advice for operators of blast cleaning machines
1
Page 5
45D
2 x 25 kW
Operating Instructions 2Technical data
1.1 Rating
Unit / designation : Blastrac blast cleaning machine
Machine type : 2-45D
Manufacturer : Blastrac BV
Utrechthaven 12
NL-3433PN Nieuwegein
THE NETHERLANDS
1.2 Unit specifications
Dimensions:
Machine 2-45D
Length 1576 mm
Width 1420 mm
Height 1415 mm
Weight 1650 kg
Power consumption (hydraulic system):
The indicated values correspond to normal operating conditions.
Power consumption Flow and pressure
Blast wheel drive
Magnet drum motor 0,8 kW 4,8 l/min at 100 bar
Blower motor 22 kW 63 l/min at 210 bar
Required hydraulic flow: min. 200 l/min at 250 bar
Required cooling capacity: min. 22,5 kW
Required oil tank: min. 350 liters
Required drain lines for blast wheel motors: min. 1/2"
.....
Please contact Blastrac to get more details about other (hydraulic)
requirements for the 2-45D machine.
2 x 64 l/min at 235 bar
2
Page 6
2-45D Operating Instructions
Technical data
Rated speed
Blast wheel speed 4000 min-1
Magnet drum speed 160 min-1
Blast wheel size : 2 x 349 mm Ø
Working width : 1150 mm
Required drive speed : 0 - 5,0 km/h
Blast cleaning output : up to 2000 m²/h
Dust hose connection : 2 x 150 mm Ø
Recommended abrasive : Shot 460-550
Abrasive consumption : 0,1 - 0,5 kg/m²
Recommended filter unit : 2-45 TDC
1.3 Operative range and correct usage
The 2-45D is exclusively designed to clean dry, frostfree horizontal surfaces. The machine may not be
used for other purposes. The manufacturer will not
be liable for damage resulting from such incorrect
usage. In these cases the user assumes all risks.
3
Page 7
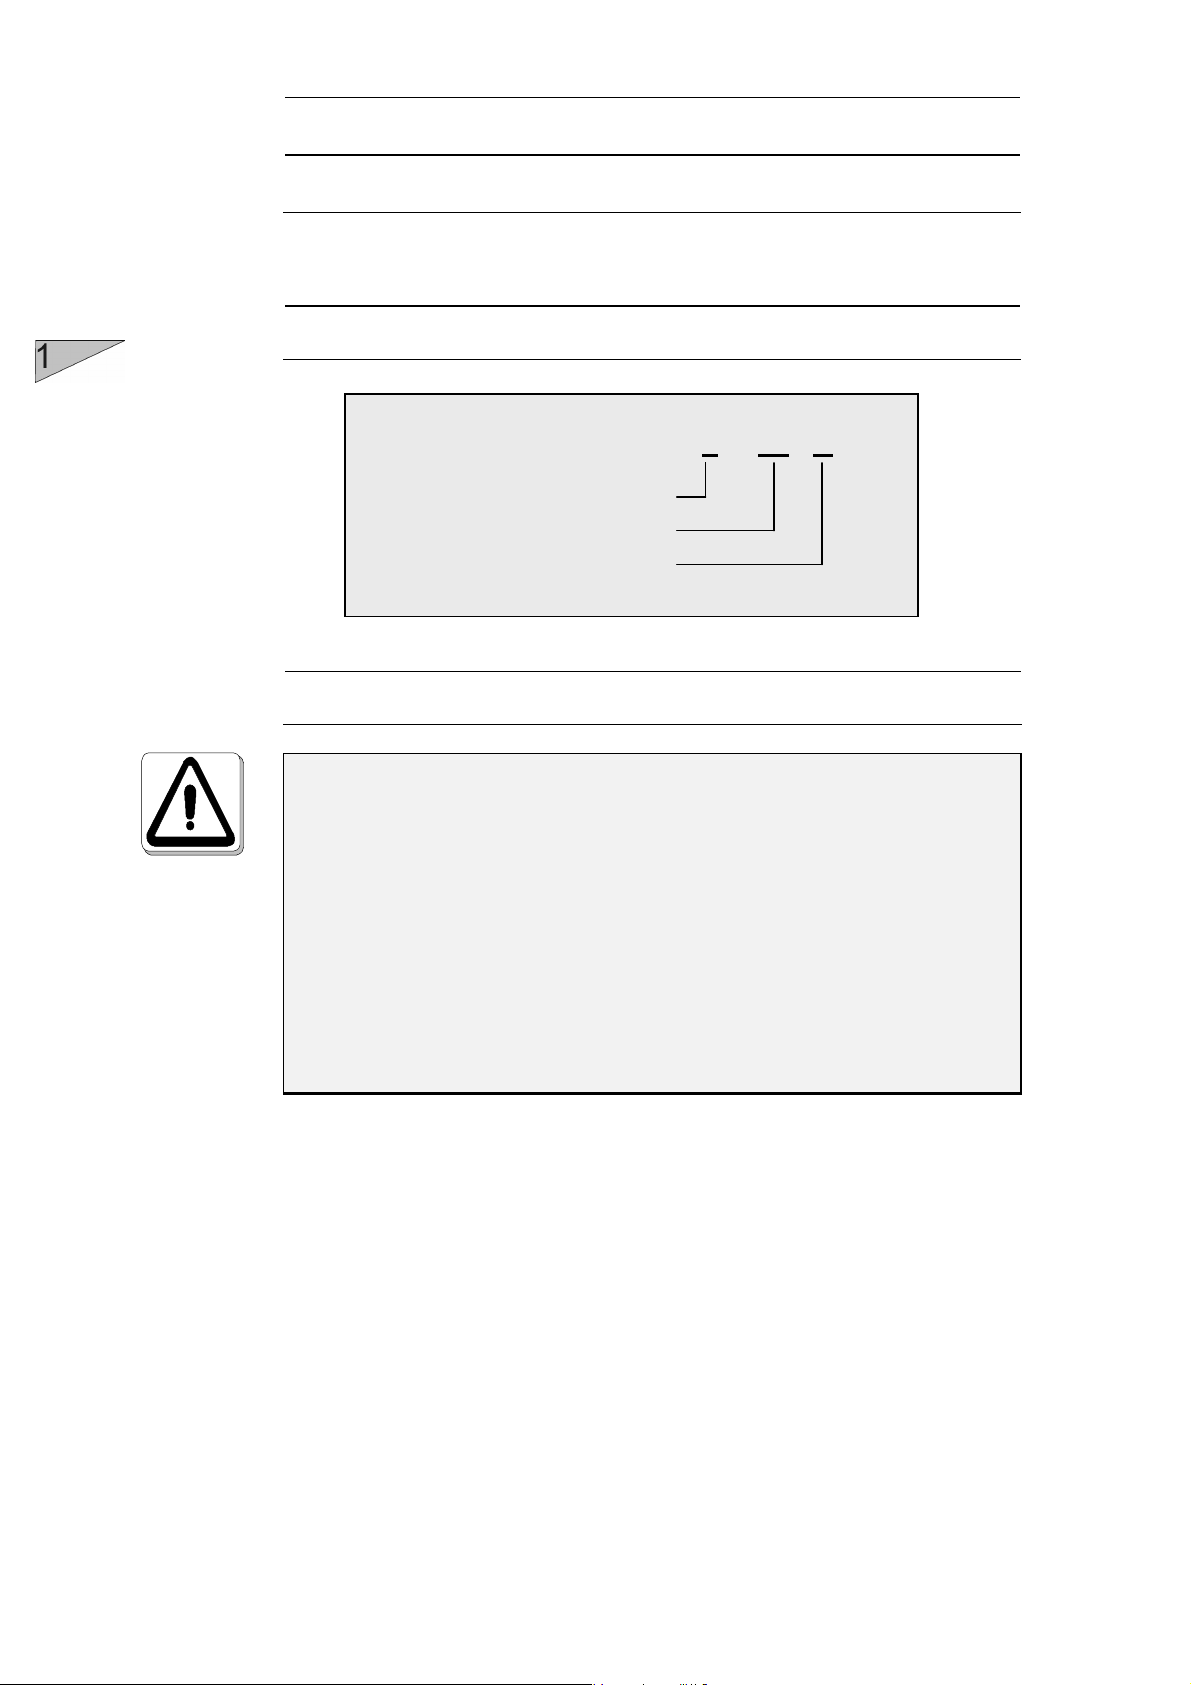
45D
number of blastwheels
blast cleaning width
product code
Operating Instructions 2Technical data
1.4 Machine type designation
2 - 45 D
1.5 Advise for operators of blast cleaning machines
In accordance with the accident prevention
regulations for blast cleaning work (VBG 48) the
operator must provide operating instructions for
blast cleaning work in a form and language that is
understandable.
The blast cleaning machine Operating Instructions
are only part of these operating instructions. Please
consult the current accident prevention regulations
for the precise content.
4
Page 8

2-45D Operating Instructions
Safety instructions
Special work within the scope of use of the equipment and
Contents Chapter 2
2.0 Warnings and symbols
2.1 Organisational measures
2.2 Personnel selection and qualification
2.3 Safety precautions applicable to different operating conditions
2.4
maintenance activities as well as repairs during operation
2.5 Definition of the Safety off position
2.6 Particular dangerous aspects of the equipment
2.7 Hydraulic and electrical engineering regulations
1
Page 9

45D
Operating Instructions 2Safety instructions
2.0 Warnings and symbols
The following denominations and symbols are used in the Operating
Instructions to highlight areas of particular importance:
Symbol of operational safety.
In these Operating Instructions this symbol will be
shown next to all safety precautions that are to be
taken in order to ensure prevention to life and injury.
Follow these instructions and take special care in
these circumstances. In addition to these
instructions, the general safety precautions and
accident prevention guidelines are also to be
followed.
Particular details regarding the economical use of
the equipment.
Information, instructions and restrictions with regard
to possible risks to persons or to extensive material
damages.
2
Page 10

2-45D Operating Instructions
Safety instructions
Warning against dangerous voltages.
Indications relating to protective devices in electrical
appliances.
Indications where consultation with the
manufacturer is required.
Instructions relating to periodical checks.
Reference to important instructions contained in the
Operating Instructions.
2.1 Organisational measures
The Operating Instructions are to be kept near the location
where the machine is located and must be within reach at all
times!
In addition to the Operating Instructions general and legal regulations
regarding accident prevention and environmental protection must be
complied with and indicated!
Such duties may for example relate to the handling of hazardous
substances or to the provision and wearing of personal protection
equipment as well as compliance with traffic regulations.
3
Page 11

45D
Operating Instructions 2Safety instructions
The Operating Instructions must be supplemented by instructions
including the duty to supervise and report relating to particular
working practices, for example work organisation, work procedures
and personnel allocation.
Personnel entrusted with working with the machine must have read
the Operating Instructions before starting work, in particular the
Safety Instructions chapter. To read these instructions during work
is too late. This particularly applies to incidental activities such as
setting up the equipment, carrying out maintenance work or training
staff to work with the machine.
From time to time the working practices of the staff are to be checked
regarding awareness of safety and hazards.
Personnel must tie back long hair and not wear loose clothing or
jewellery including rings. There is a risk of injury through getting stuck
or being drawn into moving machinery.
Use personnel protection equipment if necessary or required by
regulations! Take notice of all safety and hazard notices on the
machine!
All safety and hazard notices at or on the machine must be kept
complete and legible!
If safety-critical changes occur to the machine or its working
method, the machine must be shut down immediately! The cause of
the fault must be established immediately!
Changes, add-ons or conversions to the machine which might impair
safety must not be undertaken without the manufacturer’s
permission!
This applies in particular to the fitting and adjustment of safety
devices as well as to welding on load-bearing parts.
Spare parts must comply with the technical requirements specified
by the manufacturer. This is always guaranteed if original spare
parts are used.
Intervals for recurring checks and inspections specified in these
Operating Instructions must be complied with!
4
Page 12

2-45D Operating Instructions
Safety instructions
To perform maintenance work correctly it is imperative to be equipped
with the proper tools for the task in question.
The location and the operation of fire extinguishers must be made
known on each building site!
Take note of the facilities for reporting and fighting fires!
2.2 Personnel selection and qualification
Fundamental duties :
Work on the machine may only be undertaken by reliable personnel.
Only trained personnel may be deployed. Note the statutory
minimum age! Specify clearly the responsibilities of personnel for
operation, setting up, servicing and maintenance work!
Make sure that only authorised personnel operate or work on the
machine!
Define responsibilities of the machine operator also regarding to
traffic safety regulations and empower him to decline instructions
from third parties which are not complying with the safety
requirements!
Personnel being trained or made acquainted with the equipment may
only be deployed on the machine under constant supervision of an
experienced person!
5
Page 13
45D
Safety precautions applicable to different operating
Operating Instructions 2Safety instructions
2.3
conditions
Ban any method of working that impairs safety!
Only operate the machine when all safety devices and related
safety equipment, e.g. detachable safety devices, emergency
stops and suction devices are present and operational!
Check the machine visually for any damage and defects at least
once a day!
In the event of operational malfunctions the machine must be shut
down immediately and secured, and the fault must be rectified!
Secure the work area around the machine in public areas
providing a safety distance of at least 2m from the machine.
Before switching on the machine make sure that no-one can be
endangered when the machine starts up!
Do not switch off or remove the exhaust and ventilation devices when
the machine is running!
All persons in the proximity of the machine must wear ear
protectors, safety glasses with lateral protection as well as safety
shoes. The operator is obliged to wear close-fitting protective
clothing.
6
Page 14

2-45D Operating Instructions
Safety instructions
Special work within the scope of use of the equipment and
2.4
maintenance activities as well as repairs during operation
Mechanical servicing work:
Put the machine in the Safety off position as described in chapter
2.5 for any servicing work on the machine in order to prevent the
machine from being switched on accidentally.
Please follow any special safety instructions in the various chapters
on servicing the machine.
See chapter 7.1 - 7.9.
Adjustment, servicing and inspection work and time limits
specified in these Operating Instructions as well as any information
on the replacement of parts and equipment must be undertaken
and/or complied with!
These activities may only be undertaken by qualified personnel.
Do not use any aggressive cleaning materials!
Use lint-free cleaning cloths!
Always tighten any screw connections that are undone during
servicing and maintenance work!
If safety devices need to be dismantled during setting up, servicing
and repairs, these safety devices must be reinstalled and inspected
immediately after completion of the servicing and repair work.
Make sure that process materials and replaced parts are
disposed of safely and in an environmentally-friendly manner!
Hydraulic servicing work:
Make sure that hydraulic components used for replacement purposes
comply with the original parts and are correctly adjusted if necessary.
For safety notes see 2.7 Hydraulic and electrical engineering
regulations.
7
Page 15

45D
Operating Instructions 2Safety instructions
2.5 Definition of the Safety off position
Definition:
The machine is in a safe condition when it cannot generate any
hazard.
Putting the equipment in the Safety off position means:
Close the shot valves.
Switch off the blast machine.
Switch off the dust collector.
Wait for standstill of all drives.
Disengage the hydraulics - Switch off PTO.
8
Page 16

2-45D Operating Instructions
Safety instructions
2.6 Particular dangerous aspects of the equipment
Any machine, if it is not used according the regulations, may be
hazardous for operating, setting-up and service personnel. The
operating authority is responsible for compliance with the
safety regulations during operation and maintenance of safety
devices supplied with the machine as well as the provision of
appropriate additional safety devices!
1. Blast housing outlet
Danger of injury!
Abrasive leaves housing with
high speed!
Moving parts!
Lift and cant the machine only
when it is in Safety off position.
It is not allowed to stay within
the working radius of the
machine!
2. Wheels
Danger of injury!
Moving parts!
It is not allowed to stay within
the working radius of the
machine!
9
Page 17
45D
equipment or operating materials may only be
persons
skilled hydraulic
hydraulic engineering
equipment or operating materials may only be
persons under
as well as
.
. Use only
hoses and pipe work that are sized and marked in accordance with
Operating Instructions 2Safety instructions
2.7 Hydraulic and electrical engineering regulations
Work on hydraulic
undertaken by a skilled hydraulic engineer or by trained
under the guidance and supervision of a
engineer as well as in accordance with the
regulations.
Work on electrical
undertaken by a skilled electrician or by trained
the guidance and supervision of a skilled electrician
in accordance with the electrical engineering regulations.
Hoses and pipe work can be under hydraulic pressure
Temperature of the components can be above 37° C
the overall power consumption of the machine.
The hydraulic and electrical equipment for the plant must be
inspected regularly. Please note in particular the specified
recurring inspections. Defects such as loose connections or
scorched hoses and cables must be rectified immediately. Call a
skilled hydraulic or electrical engineer or our Customer
Services.
A second person must be deployed who can disengage the
hydraulics and switch off the PTO in an emergency if work on live
parts is necessary. The work area must be sealed off using a red and
white safety chain and a danger sign. For the electrical parts, use a
tool that is insulated against voltages.
Only start work once you are familiar with the hydraulic and
electrical engineering regulations that apply to your area.
Only use voltage seekers that comply with the regulations when
troubleshooting. From time to time check voltage seekers to ensure
that they are operationally efficient.
10
Page 18

2-45D Operating Instructions
General
Contents Chapter 3
3.1 Introduction
3.2 Operating instructions
3.3 Hydraulic connections
3.4 Care and maintenance
3.5 Scope of supply
3.6 Description
3.7 Blast wheel
3.8 Separator, magnetic drum and hopper
3.9 Abrasive sealing
3.10 Air suction and filter system
3.11 Abrasive media
1
Page 19

45D
Operating Instructions 2General
3.1 Introduction
Blastrac wants to thank you for your decision to employ the blast
cleaning machine 2-45D for the treatment of horizontal surfaces.
The machine has a closed abrasive circuit with dust separation. This
comprehensively avoids damaging the environment and endangering
the operating staff.
The 2-45D is designed to remove coatings, non-skid, epoxy, bitumen
and asphalt on different types of horizontal surfaces.
3.2 Operating instructions
This manual has been written to support the operating personnel on
learning the functioning of the machine and to guarantee optimum
operation and maintenance.
Therefore it is important that all persons operating and
maintaining the machine read this manual carefully and
understand it fully.
The supplied machine has been manufactured for being employed in
the user’s country. All descriptions and notes have been formulated in
the language of the user’s country or in English in accordance with
the statutory regulations, or shown as pictograms. If the customer
deploys personnel with little knowledge of the language of the user’s
country, appropriate instruction and training must be provided.
Before using the machine personnel must be familiar with how
to operate the machine, with all important components, with the
method of working and with its dimensions.
Blastrac offers a course on the use of the machine in order to make
the operating and maintenance personnel familiar with all elements of
the blast cleaning machine.
2
Page 20

2-45D Operating Instructions
General
eration must wear
ear protectors, safety glasses with lateral protection and safety
fitting protective
Initial commissioning of the machine must be carried out very
carefully. The machine operator must fully understand the sequence
of commissioning of the individual parts and their functioning.
All persons in the proximity of the machine in op
shoes. The machine operator must wear close-
clothing.
3.3 Hydraulic connections
Flow Pressure
Blast wheel drive 2 x 64 l/min 210 bar
Magnet drum motor
Blower motor 63 l/min 180 bar
Required hydraulic flow: min. 200 l/min at 230 bar
Required cooling capacity: min. 50 kW
Required oil tank: min. 350 liters
Required drain lines for blast wheel motors: min. 1/2"
.....
Please contact Blastrac to get more details about other (hydraulic)
requirements for the 2-45D machine.
3.4 Care and maintenance
Special attendance and regular maintenance of the machine and its
parts are imperative for functioning and safety.
In order to prevent unnecessary downtimes it is recommended to
keep original spare and wear parts on stock as listed in the
maintenance box.
A list of contents of the maintenance box is provided in Chapter 10 to
enable the above-mentioned work to be carried out quickly.
8 l/min 100 bar
3
Page 21
45D
Operating Instructions 2General
3.5 Scope of supply
Scope of supply of the machine:
Blast cleaning machine (2-45D)
Dust hose
Operating instructions (2 x)
Machine adapter
Tow behind magnet sweeper (2-45TBS)
3.6 Description
4
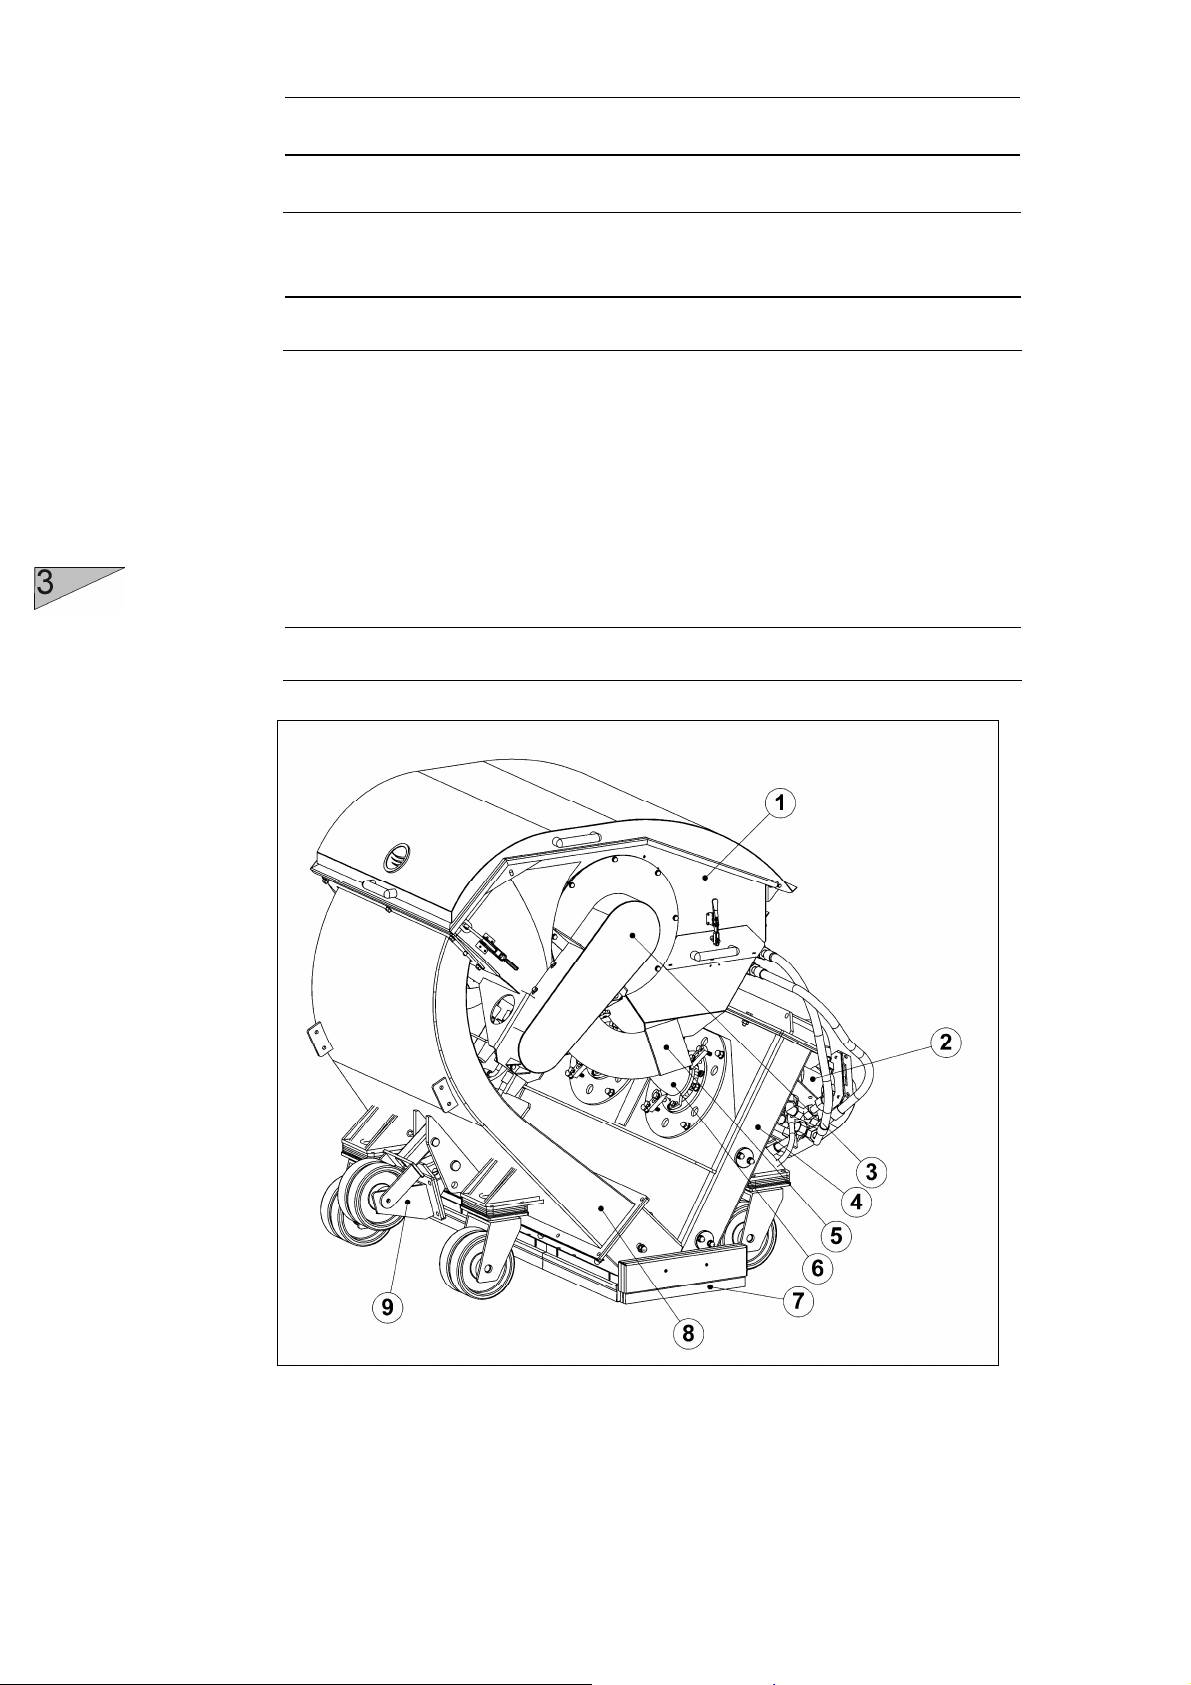
Fig. 3.1
Separator incl. hopper 6 Feed spout
2 Blast wheel motor 7 Blasthead, rubber sealing, brush sealing
3 Magnetic drum 8 Recovery duct
4 Blast housing 9 Transport castor
5 Filter connection
Page 22

2-45D Operating Instructions
General
The Blastrac blast cleaning machine 2-45D is a downward blasting
machine with a closed abrasive circuit designed for the pre-treatment
of horizontal surfaces. The bouncing impact of metallic abrasive onto
the surface to be treated thoroughly removes surface contaminants,
coats of paint, sealants and thin coatings.
Like many revolutionary inventions the blast wheel method is based
on a simple principle: after mechanical pre-acceleration the abrasive
is thrown onto the surface at high speed by the blast wheel. Once the
abrasive has impacted on the surface it rebounds into a recovery
duct. The recovery duct deflects the abrasive into an air current
separator. Here dust and other contaminants are removed from the
abrasive so that only abrasive containing a very small amount of dust
is fed into the abrasive storage hopper for re-use by the blast wheel.
A suitable filter unit must be connected to the machine in order to
separate the dust from the abrasive.
A specially designed dust collection system ensures dust-free
operation of the machine and clean air at the workspace.
Fig. 3.2
5
Page 23

45D
Operating Instructions 2General
3.7 Blast wheel
The heart of the blast cleaning machine are two blast wheels that
throw the abrasive onto the surface to be cleaned by using centrifugal
force. The blast wheels are placed in a protective housing lined with
replaceable wear parts. The blast wheels are driven by two hydraulic
motors.
Fig. 3.3
Around the centre of the blast wheel there is the impeller feeding
dosed quantities of abrasive onto the blades of the turning blast
wheel. On top of this is the control cage, which once it is carefully set,
regulates the flow of abrasive.
1 Control cage
2 Impeller
3 Blades (set of 6)
4 Blast wheel
6
Page 24

2-45D Operating Instructions
General
3.8 Separator, magnetic drum and hopper
The abrasive separator is mounted to the end of the recovery duct. It
separates the abrasive from contaminants and feeds the cleaned
abrasive onto the magnetic drum. This magnetic drum functions as a
second separator for bigger particles and feeds the cleaned abrasive
back to the abrasive storage hopper.
Two wire meshes are fitted to prevent any coarse contaminants from
getting into the blast wheel. In order to clean the wire mesh drawers,
the drawers can be removed from the sides.
Fig. 3.4
1 Separator cover
2 Magnetic drum
3 Deflector
4 Separator
5 Magnetic drum motor
6 Belt cover
7 Hopper (part of separator)
8 Separator tray
9 Hose connector
7
Page 25
D
Operating Instructions 2-45
General
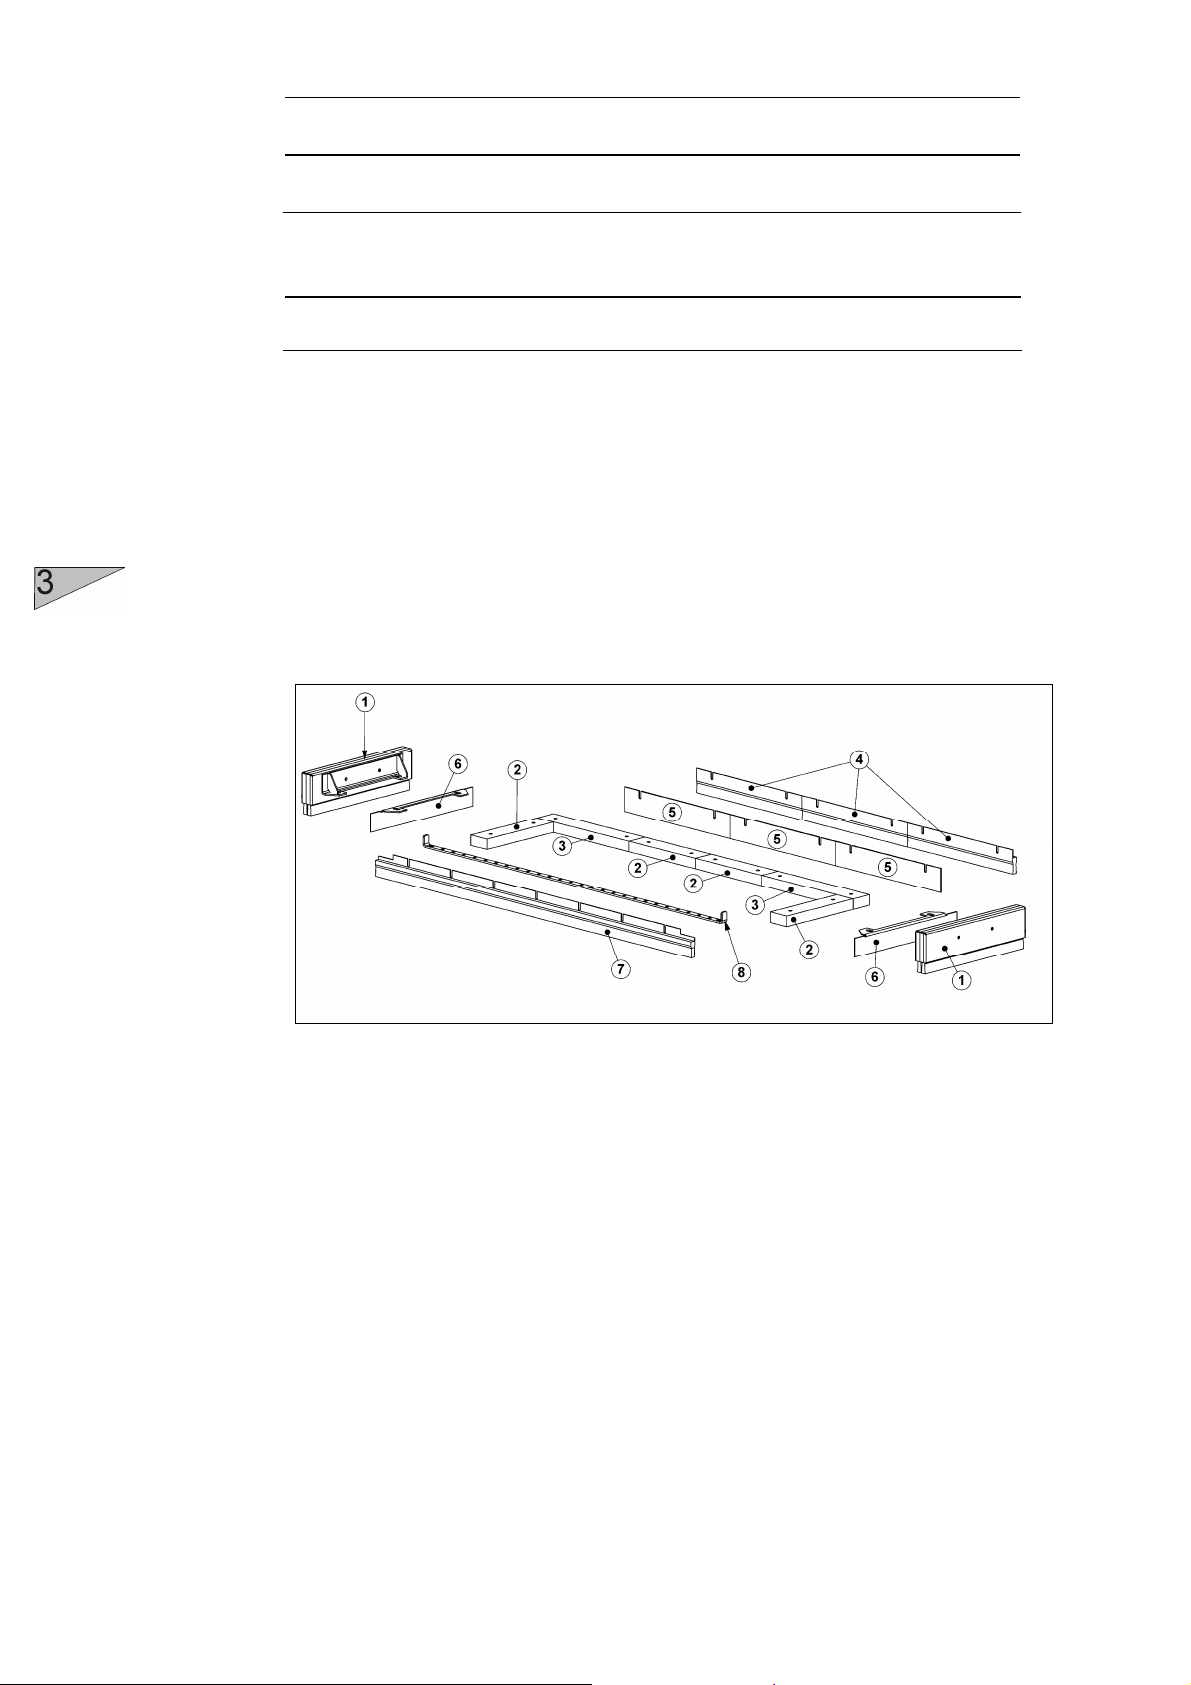
3.9 Abrasive sealing
Magnetic seals are fitted to the front and the sides of the blast housing
outlet and are surrounded by rubber and brush seals. At the rear there
are four seals sliding over the floor.
The seals are employed to seal the blasting area in a way to avoid
leakage of any abrasive.
The correct height adjustment of the magnetic seals (16-20 mm) is very
important for optimum functionability of the machine. The adjustment
can be carried out by means of shaft nuts at the front and rear wheels.
Fig. 3.5
1 Side brush housing
2 Side magnet
3 Front magnet
4 Front brush
5 Front seal rubber
6 Side seal rubber
7 Rear brush
8 Airflow adjuster
8
Page 26

2-45D Operating Instructions
General
Side brush housing:
The inner- and outer side brush are able to float over the treated
surface. The brushes are clamped between two guides. This
assembly is pressed on the floor by two springs inside the brush
housing. The floating side brushes are kept inside the brush housing
by two screws mounted at the side.
Fig. 3.6
1 Brush housing
2 Side brush spring
3 Guide
4 Felt seal
5 Side brush inner
6 Side brush outer
9
Page 27
D
20 mm) is of
utmost importance. There must be no leaks in the blast housing,
onnection points must be sealed carefully and the dust hose
The filter housing must be sealed properly and all sealings must
If dust leaves the filter unit instead of clean air, this is a sign that
the filter cartridges are either damaged or not fixed correctly
Operating Instructions 2-45
General
3.10 Air suction and filter system
The sucked-in air streaming through the complete system when the
blast cleaning machine and the filter unit are in operation has the
following functions:
Cooling of the blast wheels
Cooling of the abrasive
Transport of the abrasive
Transport of dust through the system
Separation of dust from the re-useable abrasive
Transport of dust to the filter unit
Recommended blower : 2-45 TDC
Motor output : 22 kW
Air throughput : 5400 m³/h
Dust hose: : 2 x 8 m
Diameter : Ø150 mm
The correct height adjustment of the machine (16at the control cage and in the dust separator.
All c
must be fixed with hose clamps!
be in good condition!
inside the filter chamber.
10
Page 28

2-45D Operating Instructions
General
The air streams through the machine as follows:
Abrasive
Air & Dust
Fig. 3.7
Air is sucked in at the rear seal and carries along abrasive and
dust.
The air stream flows through the rebound plenum and carries along
abrasive and dust. In doing so the air stream cools the abrasive and
the housing walls.
The air enters the separator, separates the dust from the abrasive
and transports the dust to the outlet opening. The separator cover
must be closed air-tight in order to grant an optimum performance
of the separator.
The air stream then flows through the approx. 30 m long flexible
dust hose taking dust and particles with it.
The air stream now enters the filter chamber of the filter unit
where the dust and the particles are separated from the air. The
cleaned air is then fed into the environment again.
11
Page 29
D
Operating Instructions 2-45
General
3.11 Abrasive media
In order to operate the Blastrac machine 2-45D you need hardened
(max. 45 Rockwell), spherical abrasive. The machine 2-45D has been
especially designed to be operated with Blastrac abrasive.
The Blastrac abrasive is of very high quality and owns the rebouncing
ability required for the efficient use of model 2-45D. The selection of the
abrasive is very important since this is the material to carry out the
surface treatment.
12
Fig. 3.8
Page 30

2-45D Operating Instructions
General
Warning: never use abrasive harder than 45 Rockwell !
Otherwise the wear in the machine would increase
Selection of abrasive
Abrasive shot S460 – S550:
This abrasive shot is suitable for about 90 % of all applications. Creates
a medium to coarse profile on concrete.
Applications:
retexturing of asphalt and concrete on roads and runways
removes laitance from new concrete
roughening of smooth concrete or natural stone
removes coatings with a thickness of 1-3 mm
removes sediments on concrete prior to coating
removes flexible coatings on parking house decks
removes markings on roads and runways
disproportionately.
The effectiveness of the 2-45D depends on the rebound effect which
ensures that the abrasive can be re-used.
Please take into account that the use of incorrect abrasive increases
wear.
Our service engineers have the experience to select the appropriate
abrasive for the individual cases of application.
Please consult our local Blastrac customer service department if you
have any questions about the selection of the best abrasive for your
blast cleaning work.
13
Page 31

2-45D Operating Instructions
Transport
Contents Chapter 4
4.1 General notes
4.2 Transport
4.3 Operation conditions
4.4 Operation
4.5 Unit specifications
1
Page 32

45D
Operating Instructions 2Transport
4.1 General notes
Before the machine is used for the first time, Blastrac authorised
dealers offer a course to familiarise maintenance and operating
personnel with all elements of the machine. We are not liable for
damage caused by incorrect use of the machine by personnel not
trained by Blastrac.
4.2 Transport
When transporting the machine proceed in such a manner that
damage due to the effects of the use of force or incorrect loading and
unloading is avoided.
Remove the abrasive from the machine before it is transported. The
machine may only be lifted by using the suspension eyelets. The
weight and dimensions of the machine are shown in Chapter 1
"Technical data“.
Fig. 4.1
2
Because of trafic safety, a truck mounted 2-45D must be stored
inside the truck before it is transported. Local and general safety
precautions and accident prevention guidelines are to be followed.
Page 33

2-45D Operating Instructions
Transport
4.3 Operation conditions
Check the surface to be treated for loose parts (stones, screws, etc.).
The surface must be swept if necessary. Make sure that the machine
can travel over all inequalities on the surface. Small inequalities like
weld seams or floor joints are no barriers for the machine.
4.4 Operation
The machine is operated in accordance with the instructions given in
Chapter 5 ”Initial operation“.
Whenever the machine is not used for blast cleaning, the abrasive
valves must always be closed!
Please note that the illustrations are simplified.
4.5 Unit specifications
The main dimensions and unit specifications of the machine when
assembled are shown in Chapter 1 "Technical data“.
3
Page 34

2-45D Operating Instructions
Initial operation
Contents Chapter 5
5.1 Preparations for initial operation
5.2 Initial operation
1
Page 35

45D
Operating Instructions 2Initial operation
5.1 Preparations for initial operation
Before switching on make sure that all existing protective housings
are mounted and that the filter unit is connected correctly.
All persons in the proximity of the machine must wear ear
protectors, safety glasses with lateral protection as well as safety
shoes. The operator is obliged to wear close-fitting protective
clothing.
Handle all plugs, cables, hoses and operating devices with care.
Avoid any contact with live wires.
Works on the electrical and/or hydraulic system must only be carried
out by qualified specialists.
Check the surface to be treated for loose parts (stones, screws, etc.).
The surface must be swept if necessary. Make sure that the machine
can travel over all inequalities on the surface. Small inequalities like
weld seams or floor joints are no barriers for the machine.
Regular inspection is important in order to avoid downtimes. Carry
out the following checks before any start-up:
Check whether all machine parts are assembled safely and
correctly.
Check all screws and other fasteners for tight seat.
Check all hydraulic connections and hoses for oil leakage.
Check the abrasive storage hopper, the feed spouts and the blast
wheel parts for foreign bodies and remove them.
Check the blast wheel blades, impellers, control cages, liners and
fastening screws for damages and wear.
Wear will take place in the form of grooves along the blade
surface outwards. Wear grooves are acceptable until 75% of the
blade thickness has been worn away. When this point is reached,
replace all blades as a set.
Check the front, side and rear magnet and brush seals for wear.
2
Page 36

2-45D Operating Instructions
Initial operation
Check the tightness of the hose connections and the condition of
the hose(s) to the filter.
Make sure the dust container of the filter unit is empty.
Check the separator parts for wear and defects. Remove foreign
bodies and dust deposits in order to prevent the separator from
being blocked.
Check the electrical connections for dirt and foreign body
deposits.
Check the electrical motors for dirt and other contaminants.
Check the level of abrasive in the storage hopper. Refill if
necessary.
Before start-up the operating personnel must be familiar with the
safety regulations given in this manual and with the service
manual supplied with this blast machine.
Place the blast cleaning machine and the filter unit onto the
surface to be treated.
Check the height adjustment (approx. 16 - 20 mm) of the blast
cleaning machine. For the height adjustment, an 16 - 20 mm
sheet steel strip is shifted below the magnetic sealing.
Check all hoses and cables for damage. Replace or repair all
damaged parts before starting the machine.
Connect the blast cleaning machine and the filter unit with the
dust hose(s). Use hose clamps at the connections.
3
Page 37

45D
All persons in the proximity of the machine must wear ear
as well as
fitting
Operating Instructions 2Initial operation
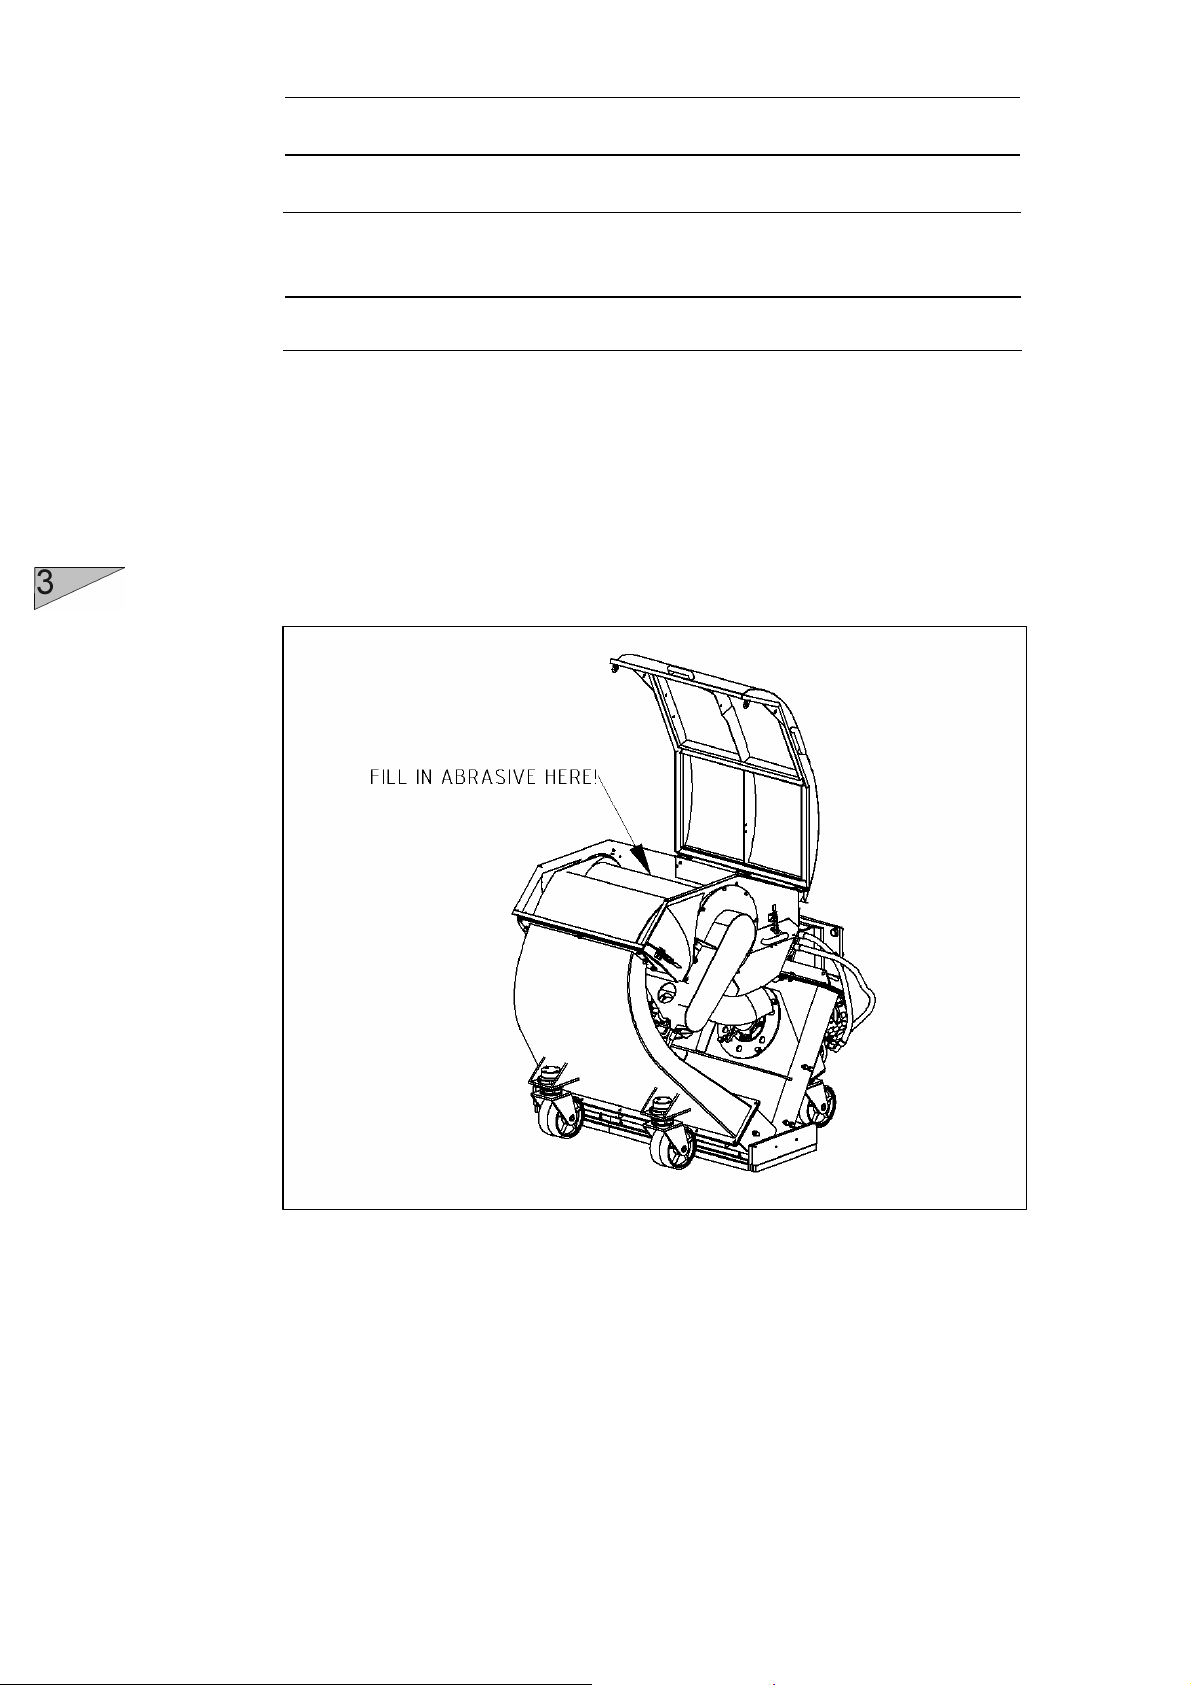
Fill approx. 150 kg of the selected abrasive (see Chapter 3.11)
into the abrasive storage hopper of the blast cleaning machine.
The shot valves must be closed whilst doing this.
Fig. 5.1
Check that the filter dust collector is operational ready.
5.2 Initial operation
protectors, safety glasses with lateral protection
safety shoes. The operator is obliged to wear closeprotective clothing.
The start of the blast cleaning machine and the filter unit is effected in
the following sequence:
1 Switching on the filter unit
2 Initial operation of the blast cleaning machine
For illustrations and detailed description of the controls please contact
Blastrac.
4
Page 38

2-45D Operating Instructions
Initial operation
When blast cleaning concrete the abrasive shot valve may only
g! If the
Activate the electrical system.
Activate the hydraulic system.
Activate the magnetic drum.
Start up the blast wheel motors.
Check the power consumption of the blast wheel motors.
If the hydraulic flow after having reached the idle-running speed
is too high, the shot valve may be partially open or there may be
another disturbance.
Find out the cause of the disturbance and, if necessary, contact
your Blastrac customer service engineer.
Start driving in the working direction and set the travel speed.
Working direction
Fig. 5.2
be opened when the blast cleaning machine is travellin
machine is at a standstill and the shot valve is open deep holes
may be blasted into the concrete surface within seconds.
When the machine is travelling, open the shot valves. Observe
the hydraulic pressure of the blast wheels.
5
Page 39

45D
Operating Instructions 2Initial operation
An indication exceeding the full load value means overloading of
the hydraulic system, whereas an indication below the full load
value shows that there is not enough abrasive fed to the blast
wheel. If necessary re-adjust the abrasive shot valves or refill the
hopper with abrasive.
6
Page 40

2-45D Operating Instructions
Operation
Contents Chapter 6
6.1 Operation
6.2 Hydraulic system
6.3 Switching-off the machine
6.4 What to do if a fault occurs
6.5 Safety shutdown
6.6 Restarting after a fault
1
Page 41

45D
Make sure that all turning machine parts have come to standstill
Operating Instructions 2Operation
6.1 Operation
Normal start-up and operation of the blast machine 2-45D is no
different from the procedure described in Chapter 5 “Initial operation”.
Carry out blasting in parallel tracks.
The selection of the correct advancing speed of the blast machine is
important for a good blast result. In the case that the surface has
different characteristics, a uniform blast result can be achieved by
varying the advancing speed during blast cleaning.
6.2 Hydraulic system
Please contact Blastrac for a complete manual describing all controls
and settings.
6.3 Switching-off the machine
Shut off the abrasive supply.
Advance the machine until you are sure that no deep holes are
being blasted into the surface.
Switch off the blast wheel motors.
Switch off the magnetic drum motor.
After several minutes switch off the filter unit.
Switch off the hydraulic system.
Switch off the electrical system.
before any inspection or maintenance works are started.
2
Page 42

2-45D Operating Instructions
Operation
with lateral protection as well as safety shoes. The operator is
6.4 What to do if a fault occurs
Irrespective of the following information, the local safety regulations
are valid in any case for the operation of the machine.
First put the machine to its Safety off position. After that start
looking for the defect.
6.5 Safety shutdown
The machine must be put to its safety off position before starting
repair works. See Chapter 2 “Safety instructions”.
6.6 Restarting after a fault
See Chapter 5 “Initial operation“.
All persons in the proximity of the machine must wear safety glasses
obliged to wear close-fitting protective clothing.
3
Page 43

45D
Operating Instructions 2Operation
4
Page 44

2-45D Operating Instructions
Maintenance
Contents Chapter 7
7.1 Recommendations
7.2 Maintenance and inspection list
7.3 Repairing
7.4 The blast pattern
7.5 Setting the blast pattern
7.6 Setting the control cages
7.7 Wear parts
7.8 Changing the liners
7.9 Blast wheel blades & Impeller replacement
1
Page 45

45D
Operating Instructions 2Maintenance
7.1 Recommendations
With maintenance and inspection works, please observe Chapter 2
"Safety instructions".
Failures due to inadequate or incorrect maintenance may generate
very high repair costs and long standstill periods of the machine.
Regular maintenance is therefore imperative.
Operational safety and service life of the machine depend, among
other things, on proper maintenance.
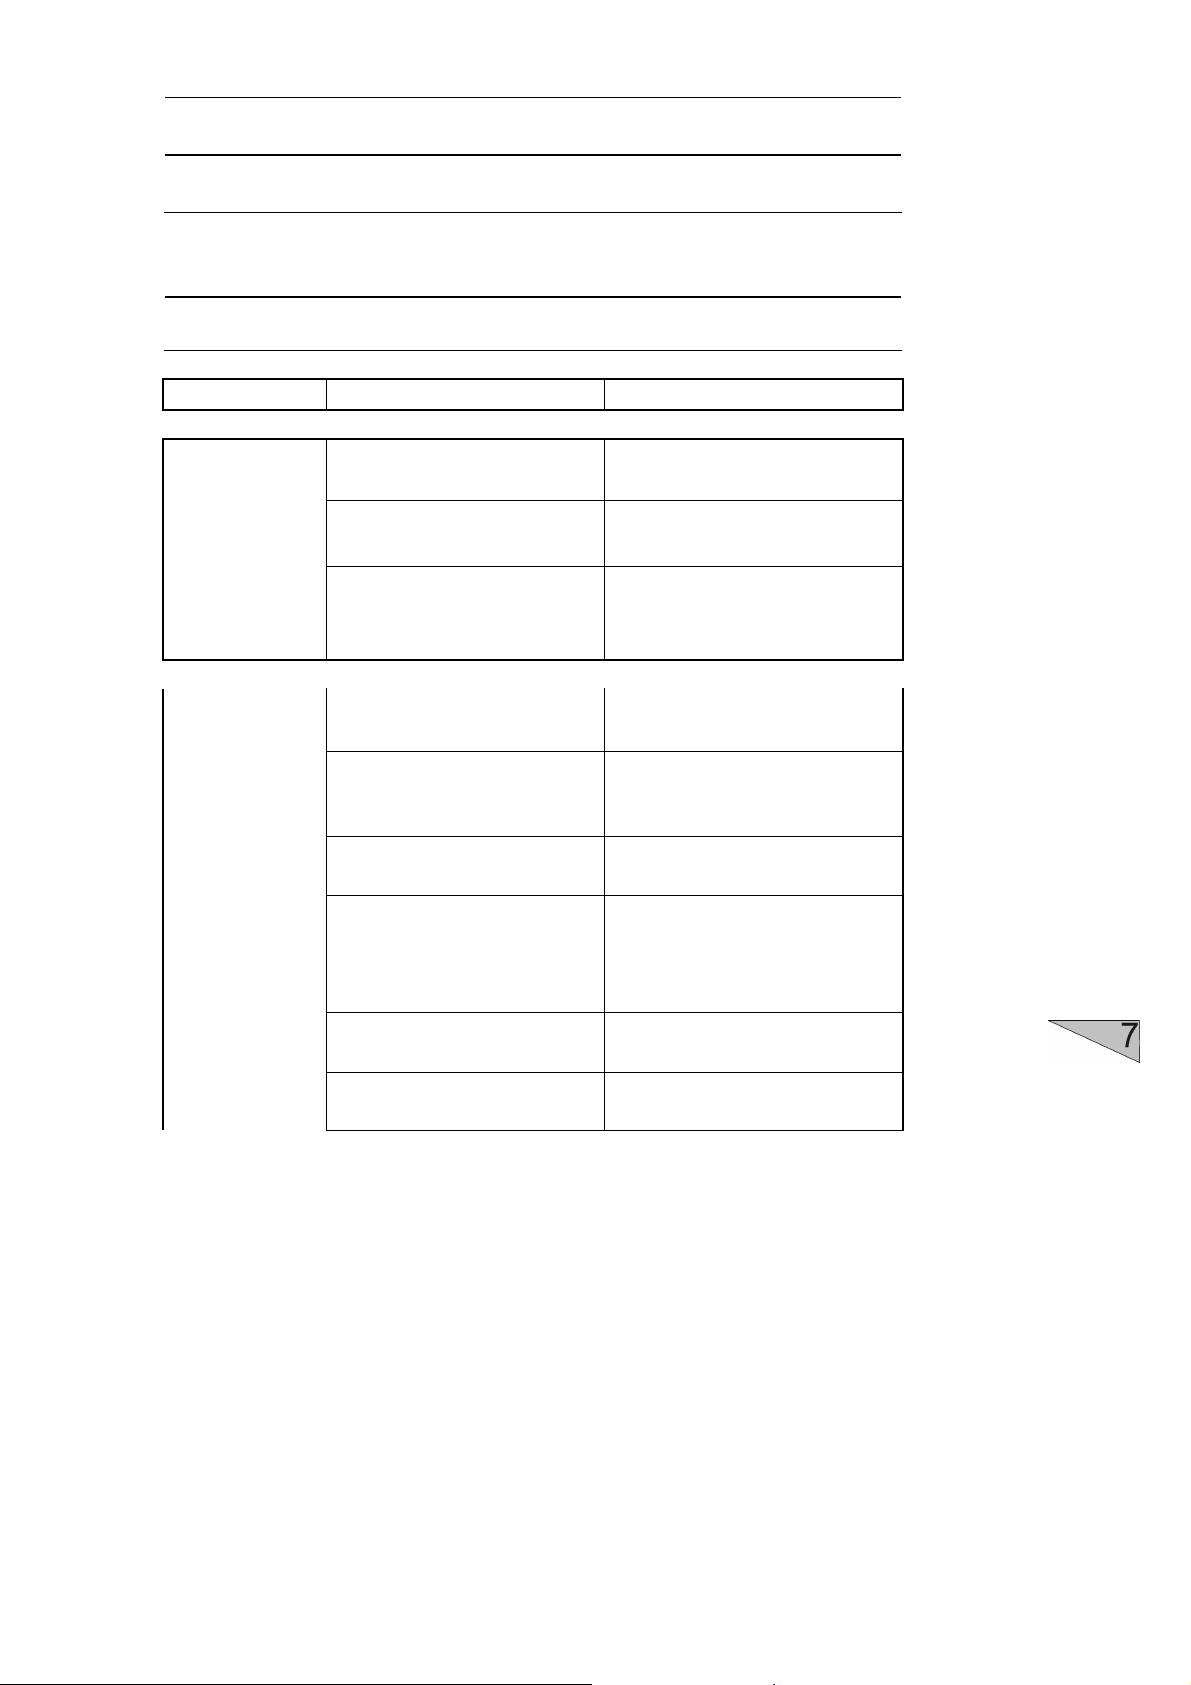
The following table shows recommendations about time, inspection
and maintenance for the normal use of the machine.
The time indications are based on uninterrupted operation. When the
indicated number of working hours is not achieved during the
corresponding period, the period can be extended. However a full
overhaul must be carried out at least once a year.
Due to different working conditions it cannot be foreseen how
frequently inspections for wear checking’s, inspection, maintenance
and repair works ought to be carried out. Prepare a suitable
inspection schedule considering your own working conditions.
Our specialists will be happy to assist you with more advice.
2
Prior to any repair works on the machine and its drives,
secure the machine against unintentional switching-on. Put
the machine to its safety off position.
The supplier’s operating and maintenance instructions
should also be followed during service and maintenance.
IMPORTANT: First read the Service Manual!
Page 46
2-45D Operating Instructions
Maintenance
nnections
7.2 Maintenance and inspection list
Check period Check Comments
After repairing
Check the functionality of all
safety devices.
Daily and prior
to starting work
Check all accessible screw
connections for tight seat.
Check whether all machine
parts are assembled safely
and correctly.
Check the hose to the filter for
damages.
Check the electric co
for sediments of dirt or foreign
bodies.
Check the hydraulic hoses for
damages and wear.
Check the blast wheels, blast
wheel blades, impellers,
control cages, feed spouts,
liners and fasteners for
damages and wear.
Check the magnetic, rubber
and brush seals for wear.
Check the separator parts for
wear and defects.
Remove foreign bodies and dust
deposits.
Replace if necessary.
Replace if necessary.
Replace if necessary.
Replace parts if necessary.
3
Page 47

45D
Fill the separator equally with the
bottom of the separator tray. The
Check the belt tension of the V
Operating Instructions 2Maintenance
Check period Check Comments
Daily and prior
to starting work
Check the level of abrasive in
the storage hopper.
selected abrasive up to the
magnetic valve must be closed
whilst doing this.
During
operation
Every 3 hours
Weekly
Check the area around the
blast housing for foreign
bodies and dust.
Check that the blast wheel
pressure is equal at both
sides.
Watch the level and mixture of
abrasive in the abrasive
storage hopper. The mixture
should be nearly clean.
Check that less than 20% of
the tray surface is covered
with stones or metal parts.
Check whether there is any
foreign matter in the hopper.
Check the separator parts for
wear and defects.
Check the belt tension of the
HTD drives of the blast
motors.
belts.
Remove foreign bodies and dust
deposits.
If necessary re-adjust the
magnetic valves so that they
open equally or refill the hopper
with abrasive.
If necessary regulate the air flow
with the blower throttle.
If necessary take out tray and
remove stones or metal parts.
Remove foreign bodies.
Remove foreign bodies and dust
deposits in order to prevent the
separator from being blocked.
Allow 5 to 7 mm at approx. 10kg
both ways.
Allow 5 to 7 mm at approx. 10kg
both ways.
4
Page 48

2-45D Operating Instructions
Maintenance
Check period Check Comments
Weekly
Every 3 month
Annually
Check the rear brushes and
seals of the machine for wear.
Check the condition and
tension of the V belts.
Fill up the bearing unit of the
blower with grease.
Clean the upper section of the
filter unit.
Full overhaul and cleaning of
the complete machine.
Replace if necessary.
Adjust or replace if necessary.
Depending on the use of the
machine pump two to three
strokes of grease at both sides.
Clean around the holes of the
tubes, clean tube and replace
cartridges if necessary.
5
Page 49

45D
Operating Instructions 2Maintenance
7.3 Repairing
As already mentioned in Chapter 5 “Initial operation” we recommend
to execute the first repair works on the machine with the help of
Blastrac personnel. With this your maintenance personnel gets the
opportunity to be trained intensely.
Only those repair works are described which occur within the context
of maintenance or which are required to replace wear parts.
If you replace parts yourself for specific reasons, the following
instructions and work sequence have to be observed.
You should also stock all spare or wear parts that cannot be supplied
quickly. As a rule, production standstill periods are more expensive
than the cost for the corresponding spare part.
Screws that have been removed must be replaced with those of the
same quality (strength, material) and design.
Prior to any repair works on the machine and its drives, secure the
machine against unintentional switching-on.
6
Page 50

2-45D Operating Instructions
Maintenance
7.4 The blast pattern
Abrasive leaving the blast wheel blades is not thrown in all directions.
Scatter is restricted to an angle of about 80°. This is achieved through
the use of a control cage which surrounds the impeller. The position
of the window in the control cage determines the blast pattern.
Correct adjustment of the control cage and thus of the blast pattern is
the most important factor for optimum working with the 2-45D blast
cleaning machine.
Incorrect adjustment of the control cage results in very high wear and
premature blasting-through of the liners in the blast wheel housing, as
well as reduced blasting performance and a possible loss of the
rebounce energy of the abrasive.
Fig. 7.1
1 Feed spout and shot valve
2 Cage clamp
3 Control cage
The adjustment is effected by loosening the cage clamps (pos.2) and
turning of the control cage (pos.3).
7
Page 51

45D
Operating Instructions 2Maintenance
Every time the control cage is replaced, the thread of the blast wheel
fastening screw should be checked. Make sure that this screw will be
tightened correctly. In addition, absolute care must be taken to clean
the thread from dust and abrasive.
After each blast wheel repair work switch on the blast wheel motor for a
short period (without feeding abrasive) in order to find out whether the
rotating parts turn freely and without vibration. After that, the blast
cleaning procedure can be continued.
The blast wheel motor is designed for a long service life. Damages to
the blast wheel motor can be detected by unusual noises or functional
failure of the hydraulicic motor. In this case notify our service
department.
7.5 Setting the blast pattern
In order to obtain a uniform and perfect blast pattern on the surfaces to
be treated, the correct adjustment of the blast pattern is of utmost
importance.
Prior to any repair works on the machine and its drives,
secure the machine against unintentional switching-on. Put
the machine to its safety off position.
An incorrect adjustment of the blast pattern results in:
Uneven cleaning (shadows on the right or left hand side).
Extremely high wear of the blast wheels, blades, impellers, control
cages and liners.
8
Page 52

2-45D Operating Instructions
Maintenance
The following 4 factors affect the blast pattern:
Turning direction of the blast wheels:
The turning direction of the blast wheels must correspond to the
instructions on the housing (arrows indicating the turning
direction).
Worn blast wheel parts:
With increased wear of the blast wheels, blades, impellers and
control cages, the blast pattern will change.
Size of abrasive:
The size of the abrasive affects the blast pattern. With every
exchange of abrasive, the blast pattern must be re-adjusted.
Position of the control cages:
The correct adjustment of the control cages is the most
important factor to obtain an optimum blast pattern. The control
cage has a lateral window. The position of the window
determines where the abrasive is fed onto the blast wheel
blades and where it hits the surface to be treated.
After each exchange of blast wheel parts, the adjustment of the
control cages must be checked and re-adjusted by creating a
blast pattern. The same applies for blasting on another type of
surface.
9
Page 53

45D
Operating Instructions 2Maintenance
7.6 Setting the control cages
The adjustment is effected by loosening the cage clamps and turning
the control cage in the suitable direction. The cast grooves on the
control cage show the position of the control cage opening. The
following adjustment standard value is valid: the control cage opening
is approximately opposite to the throwing angle. The abrasive grain
size plays an important role here. Different types of abrasive have
different throwing characteristics due to their different weights and
frictional resistance. This means that you must never use different
types of abrasive at the same time.
Prior to any repair works on the machine and its drives,
secure the machine against unintentional switching-on. Put
the machine to its safety off position.
After fitting new spare parts always create a blast pattern in order
to check the blasting direction. This is the only way to grant
economical work and to avoid unnecessary wear and repair costs.
The adjustment can be carried out as follows:
Determine the upper and lower window edges.
Set the lower window edge of the left-hand control cage (1) to
imaginary 9:00 of a dial. Set the right-hand control cage (2)
exactly in a laterally inversed way (see fig. 7.2).
10
Fig. 7.2
Page 54

2-45D Operating Instructions
Maintenance
Never loosen the cage clamps or try to adjust the control cage
Move the blast head of the blast machine onto a 5-8 mm thick
steel plate and blast for 45 seconds at full power without
moving the machine from the spot.
Stop the abrasive flow and move the machine forward until the
blasted area is accessible. With both hands, carefully feel the
temperature of the blasted area. You will find the hot spot on
the blasted surface where the machine has developed the
highest blast cleaning intensity.
An even temperature from left to right indicates that the control
cages are correctly positioned.
Looking from the front side of the machine onto the left-hand
control cage: If the left side of the left blasted area is warmer,
turn the lower edge of the control cage anti-clockwise for 3-6
mm. If the right side is warmer, turn the lower edge of the
control cage clockwise for 3-6 mm.
Looking from the front side of the machine onto the right-hand
control cage: If the right side of the right blasted area is warmer,
turn the lower edge of the control cage clockwise for 3-6 mm. If
the left side is warmer, turn the lower edge of the control cage
anti-clockwise for 3-6 mm.
This process has to be repeated until an even temperature
across the blast pattern is achieved.
Now the blasting procedure can be started. When a concrete
surface is to be blasted, check the blast pattern again after
some meters and re-adjust slightly if necessary. The blast
pattern will change with an increased wear of the blast wheels,
blades, impellers and control cages, and when the size of the
employed abrasive is changed.
when the machine is in operation.
11
Page 55

45D
Operating Instructions 2Maintenance
7.7 Wear parts
The blast wheel parts
Fig. 7.3
1 Control cage
2 Impeller
3 Blades (set of 6)
4 Blast wheel
12
Page 56

2-45D Operating Instructions
Maintenance
The liners
Fig. 7.4
1 Top liner outer
2 Top liner inner
3 Side liner
4 Rebound side liner LH
5 Rebound top liner
6 Rebound bottom liner
7 Rebound side liner RH
13
Page 57
45D
Operating Instructions 2Maintenance
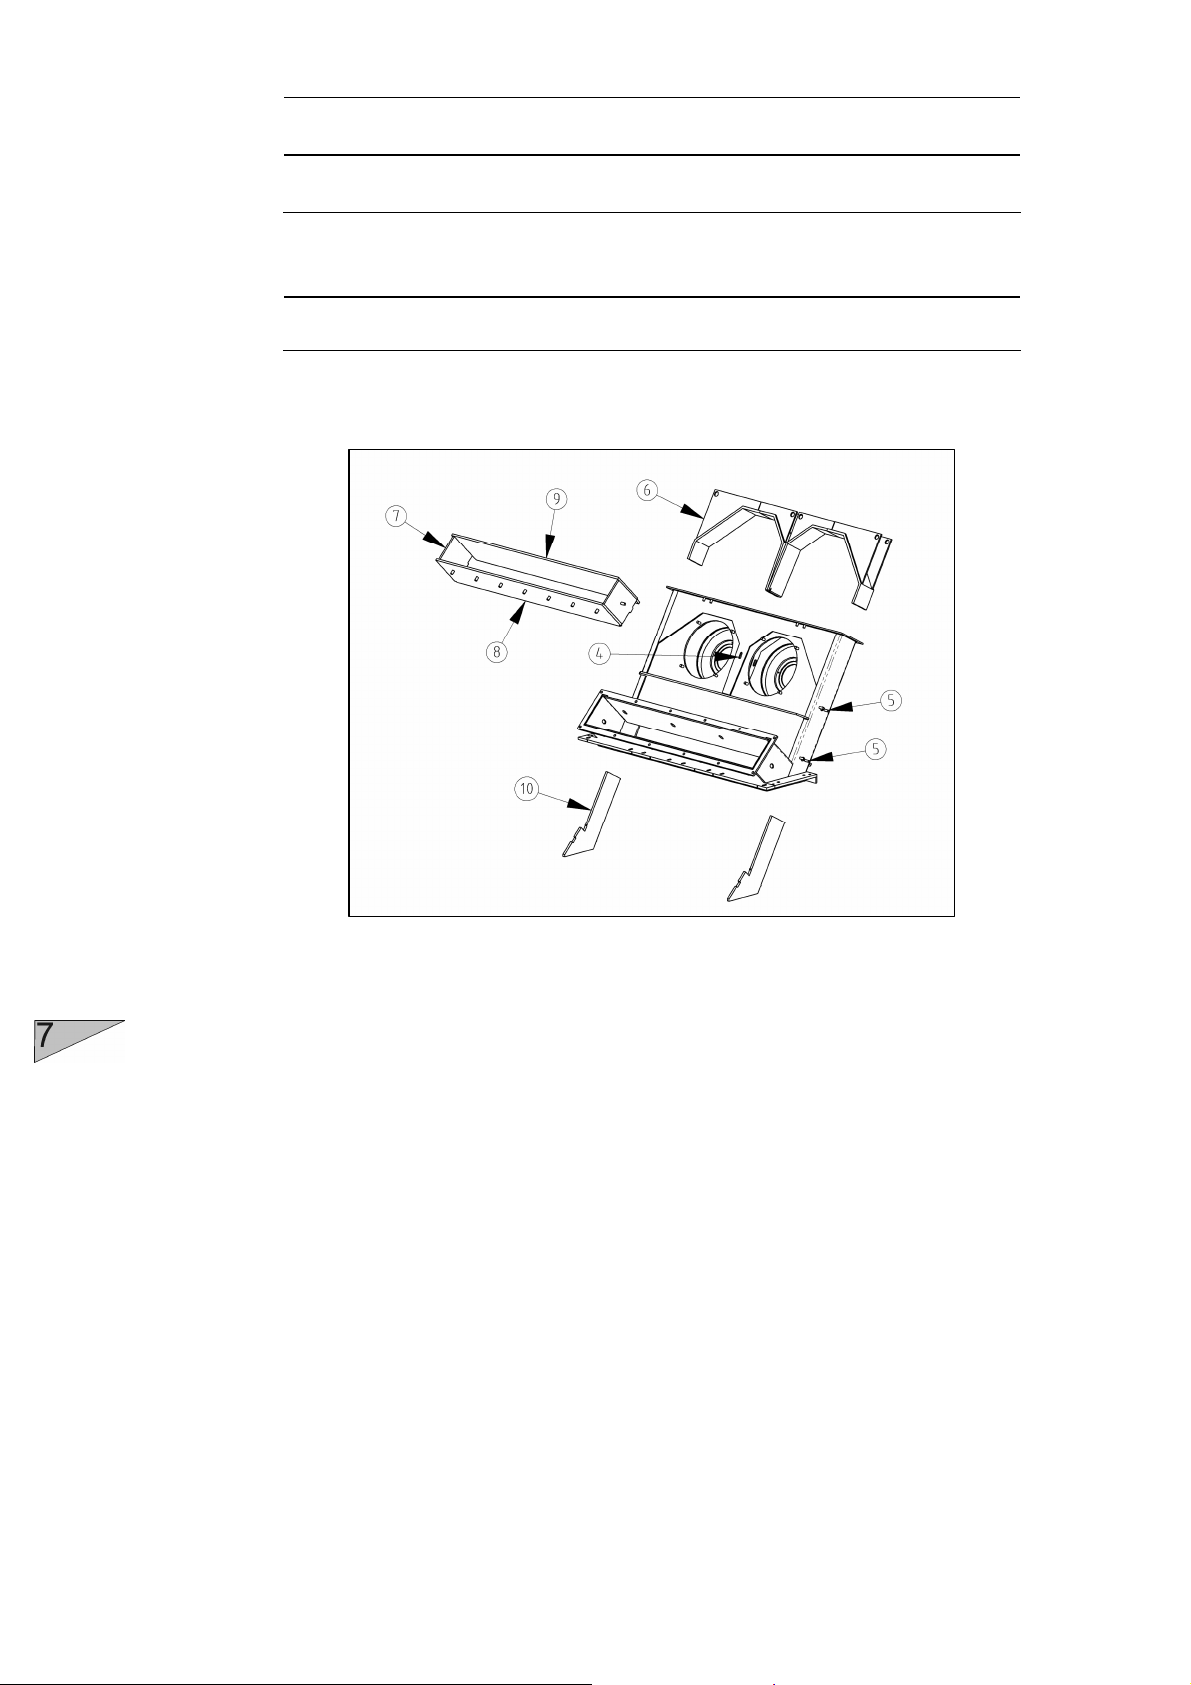
7.8 Changing the liners
Unscrew the top liner cover and remove the top liner cover and
the rubber seal.
14
Fig. 7.5
Remove the bolt in the centre of the blast housing holding the
top inner liners (1).
Loosen the four liner fixing blocks at the side of the blast housing
holding the top outer liners and the side liners (2).
Remove the top liners (3).
Loosen the fastening screws securing the left and the right-hand
rebound side liners and take these liners out of the blast housing
(4).
Loosen the fastening screws securing the rebound bottom liner
and take the liner out of the blast housing (5).
Loosen the fastening screws securing the rebound top liner and
take the liner out of the blast housing (6).
Now the side liners can be taken out of the blast housing (7).
Replace all worn items and re-assemble the machine in reverse
order.
Page 58

2-45D Operating Instructions
Maintenance
7.9 Blast wheel blades & Impeller replacement
Fig. 7.6
Remove the top liners (1) as described on the previous pages.
Make sure the power unit is stopped, disengage the hydraulics
and switch off the PTO.
Remove the feed spouts (2).
Remove the front plates covering the blast wheels (3).
Unscrew the impeller bolt and remove the impeller (4).
Clean the blast wheel and the blades with air.
Through the opening at the top of the blast housing: use a
wooden or brass drift to tap out all six blades from the blast
wheel towards the centre of the blast wheel.
Clean the blast wheel thoroughly to make sure that the new
blades and impeller will fit well and to avoid any imbalance of the
blast wheel.
Replace the blades with six new ones and re-assemble the
machine in reverse order. Note: blast wheel blades must be
replaced as a set. Replacing only some of the blades can cause
imbalance of the blast wheel.
15
Page 59

2-45D Operating Instructions
Electrical & hydraulic systems
Contents Chapter 8
8.1 Circuit diagram
8.2 Hydraulic diagram
Page 60

45D
Operating Instructions 2Electrical & hydraulic systems
8.1 Circuit diagram
Please contact Blastrac for a complete manual containing the circuit
diagram of the electrical system.
Contact Blastrac to get more details about the electrical
requirements for the 2-45D machine.
Page 61

2-45D Operating Instructions
Electrical & hydraulic systems
8.2 Hydraulic diagram
Please contact Blastrac for a complete manual containing the
hydraulic diagram of the hydraulic system.
Contact Blastrac to get more details about the hydraulic
requirements for the 2-45D machine.
Page 62

2-45D Operating Instructions
Fault diagnosis
Contents Chapter 9
9.1 Fault diagnosis - blast machine
9.2 Fault diagnosis - hydraulic and electrical system
1
Page 63

45D
8 mm thick steel
cage until the hot spot is exactly in
Operating Instructions 2Fault diagnosis
9.1 Fault diagnosis - blast machine
Prior to any repair works on the machine or its drives the
machine must be secured against unintentional switching-on.
Put the machine to its Safety off position.
Fault diagnosis Possible cause Remedy
Unusual noises
Too little play or poor
alignment of the rotating
parts.
Check alignment of the rotating
parts (blast wheel and control
cage).
Reduced or no
blasting
performance
Inadequate abrasive supply
to the blast wheel.
Feeding of abrasive magnetic valve and
abrasive storage hopper.
Incorrect setting or control
cages.
Clean wire mesh, top up abrasive
if necessary.
Check and clean blocked feed
spout or magnetic valve.
Move the blast head of the blast
machine onto a 5plate and blast for 45 seconds at
full power without moving the
machine from the spot.
Move the machine from the blast
zone and carefully inspect the
steel plate. Adjust the control
the middle of the blast pattern.
When a concrete surface is to be
blasted, check the blast pattern
again after some meters and readjust slightly if necessary. The
blast pattern will change with an
increased wear of the tune-up kit
and when the size of the
employed abrasive is changed.
2
Worn blast wheel or control
cage.
Incorrect adjustment of the
magnetic valve.
Incorrect adjustment of the
blast wheel speed.
Replace if necessary.
Check the adjustment of the
magnetic valve.
Make sure that the blast wheel
speed under load is approx. 4000
RPM.
Page 64

2-45D Operating Instructions
Fault diagnosis
the blast process again and slowly
indication below the full load
sure that not too much abrasive is
. Recommended
Fault diagnosis Possible cause Remedy
Reduced or no
blasting
performance
"Shocked blast wheel". At
the start of the blast
process too much abrasive
at once hits the wheel.
Close the magnetic valve and
stop the blast wheel motor. Start
open the valve.
Abrasive loss on
the surface or
escaping
abrasive at the
blast head
An indication exceeding the
full load value means
overloading of the hydraulic
system, whereas an
value shows that there is
not enough abrasive fed to
the blast wheel.
The filter unit is not
generating enough airflow.
Building up of abrasive and
dust in the deflector.
Incorrect height adjustment
of the magnetic seals.
If necessary re-adjust the
magnetic valves or refill the
hopper with abrasive.
Check the filter unit (cartridges
and seals). Adjust the airflow so
that the abrasive doesn't drop
dead on the surface, but make
sucked into the filter unit.
Clean the deflector and the
magnetic drum. Increase the
vacuum of the airflow.
Adjust the magnetic seals. Check
the height adjustment (approx. 15
mm) of the blast cleaning
machine.
Contaminated
abrasive
Poor abrasive quality.
Worn blast wheel, impeller
or control cage.
The filter unit is not
generating enough suction
power so that dust remains
in the abrasive.
Contact Blastrac
for most applications Blastrac
Shot 550 and Shot 460.
Replace blast wheel, impeller or
control cage.
Check the filter unit (cartridges
and seals).
3
Page 65
45D
. Recommended
Operating Instructions 2Fault diagnosis
Fault diagnosis Possible cause Remedy
Excessive wear
in blast housing
and rebound
plenum
Wrong abrasive.
Low airflow capacity.
Incorrect setting of the
control cage
Every surface to be treated is different and has its own blast cleaning
characteristics. Blastrac is always available to help you choosing the
right settings.
Contact Blastrac
for most applications Blastrac
Shot 550 / 460
Increase the airflow of the vacuum
The thrown abrasive blasts the
housing and not the surface to be
blasted. Adjust the blast pattern.
9.2 Fault diagnosis - hydraulic and electrical system
Prior to any repair works on the machine or its drives the
machine must be secured against unintentional switching-on.
Put the machine to its Safety off position.
Please contact Blastrac for a complete manual describing the fault
diagnosis of the hydraulic and electrical system.
4
Page 66

2-45D Operating Instructions
parts
Spare
Contents Chapter 10
10.1 Blast wheel unit
10.2 Blast wheel drive
10.3 Blast housing and liners
10.4 Base seals
10.5 Shot valve
10.6 Separator
10.7 Separator seals
10.8 Rebound plenum and swivel castors
1
Page 67

45D
Operating Instructions 2Spare parts
10.1 Blast wheel unit
Fig. 10.1
Item Part no. Description QTY.
1 493966B Cage clamp 4
2 500-1010 Control cage 2
3 RB100A/24 Control cage adjuster 2
4 RB100A/191 Front plate 2
5 BE0199 Impeller bolt M12x40 2
6 BE0042 Impeller washer M12 2
7 600-1015 Impeller 2
8 500-1005 Blades (set of 6) 2
9 E00718 Taper lock bush 2
10 222-2265 Taper lock adapter 2
11 500-1025 Blast wheel 2
2
Page 68
2-45D Operating Instructions
parts
Spare
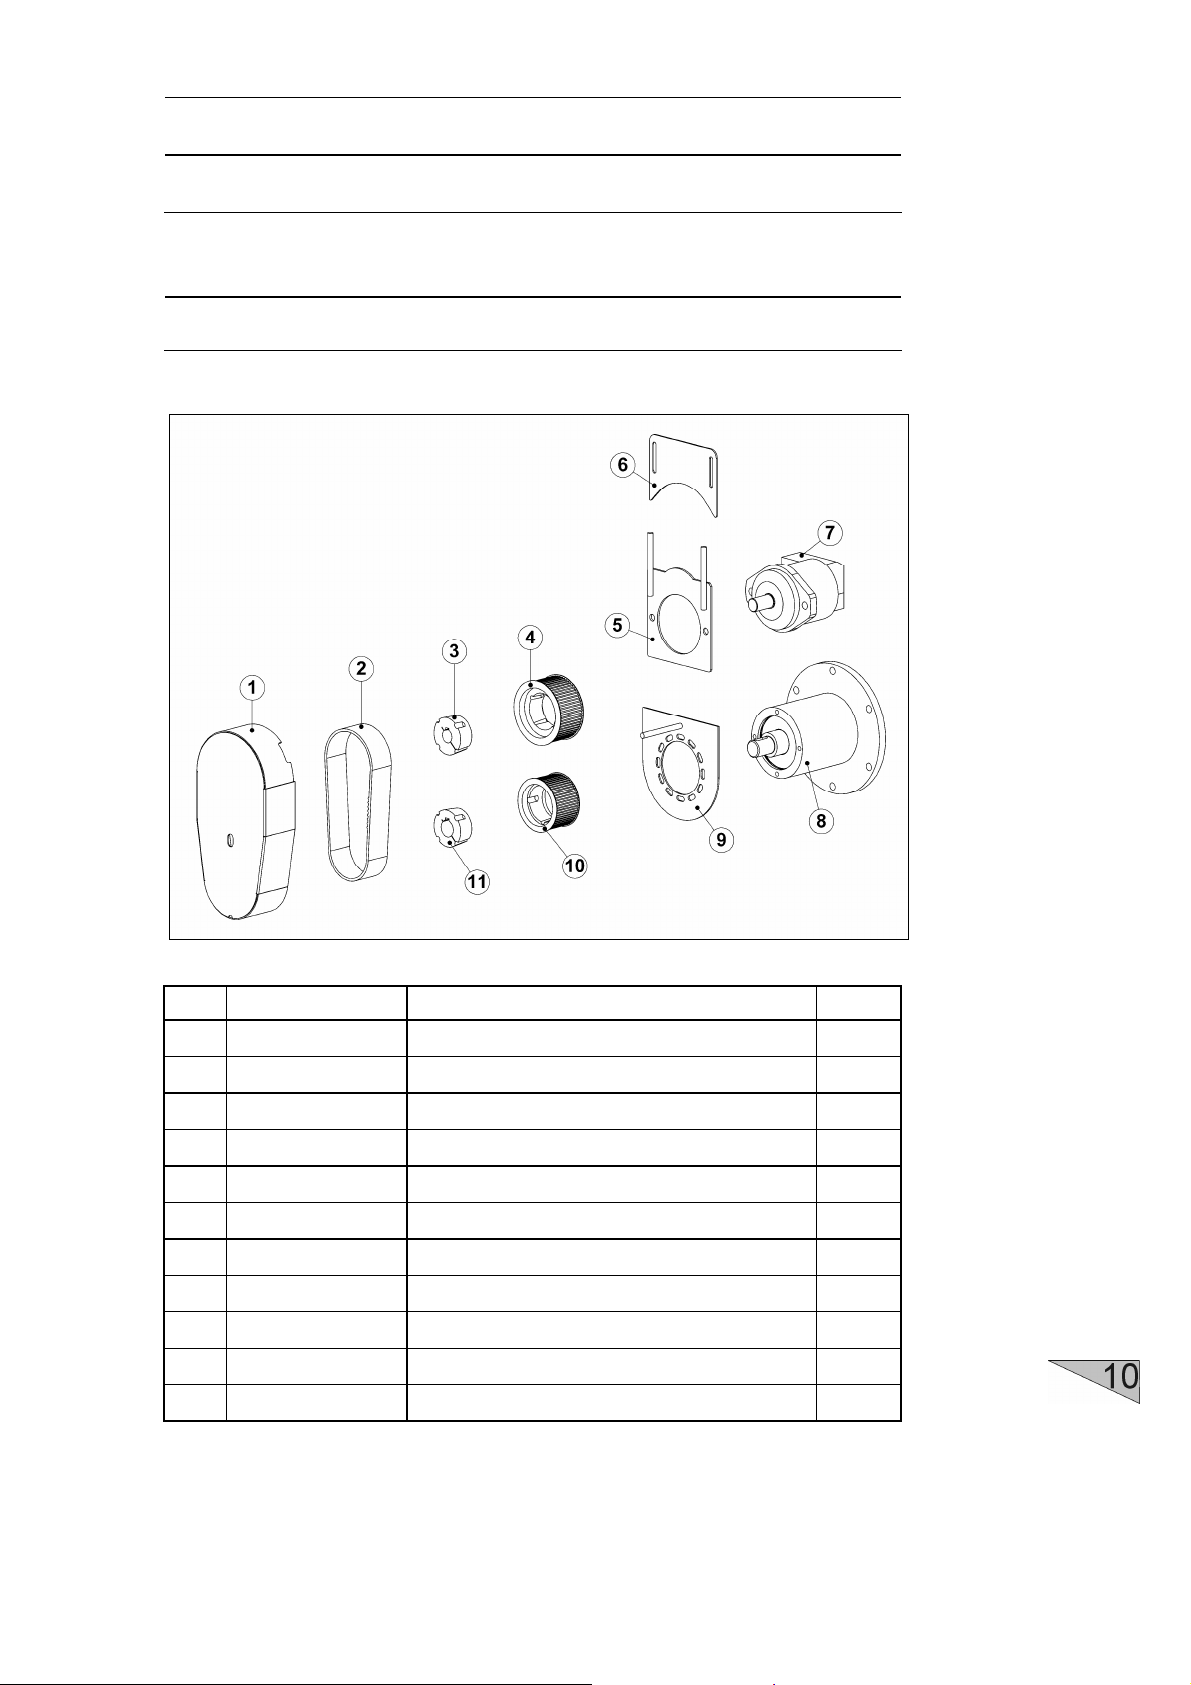
10.2 Blast wheel drive
Fig. 10.2
Item Part no. Description QTY.
1 E02435 Belt guard 2
2 RB165/1 HTD Belt 2
3 RB165/3 Taper lock bush 2
4 RB165/2 HTD pulley 2
5 E02433 Blast motor fill up plate 2
6 E02178 Wheel motor protection plate 2
7 RB165 Hydraulic motor 2
8 E01907 Bearing unit 2-45D 2
9 E02434 Belt guard bottom plate 2
10 RB165/4 HTD pulley 2
11 RB165/5 Taper lock bush 2
3
Page 69
45D
Operating Instructions 2Spare parts
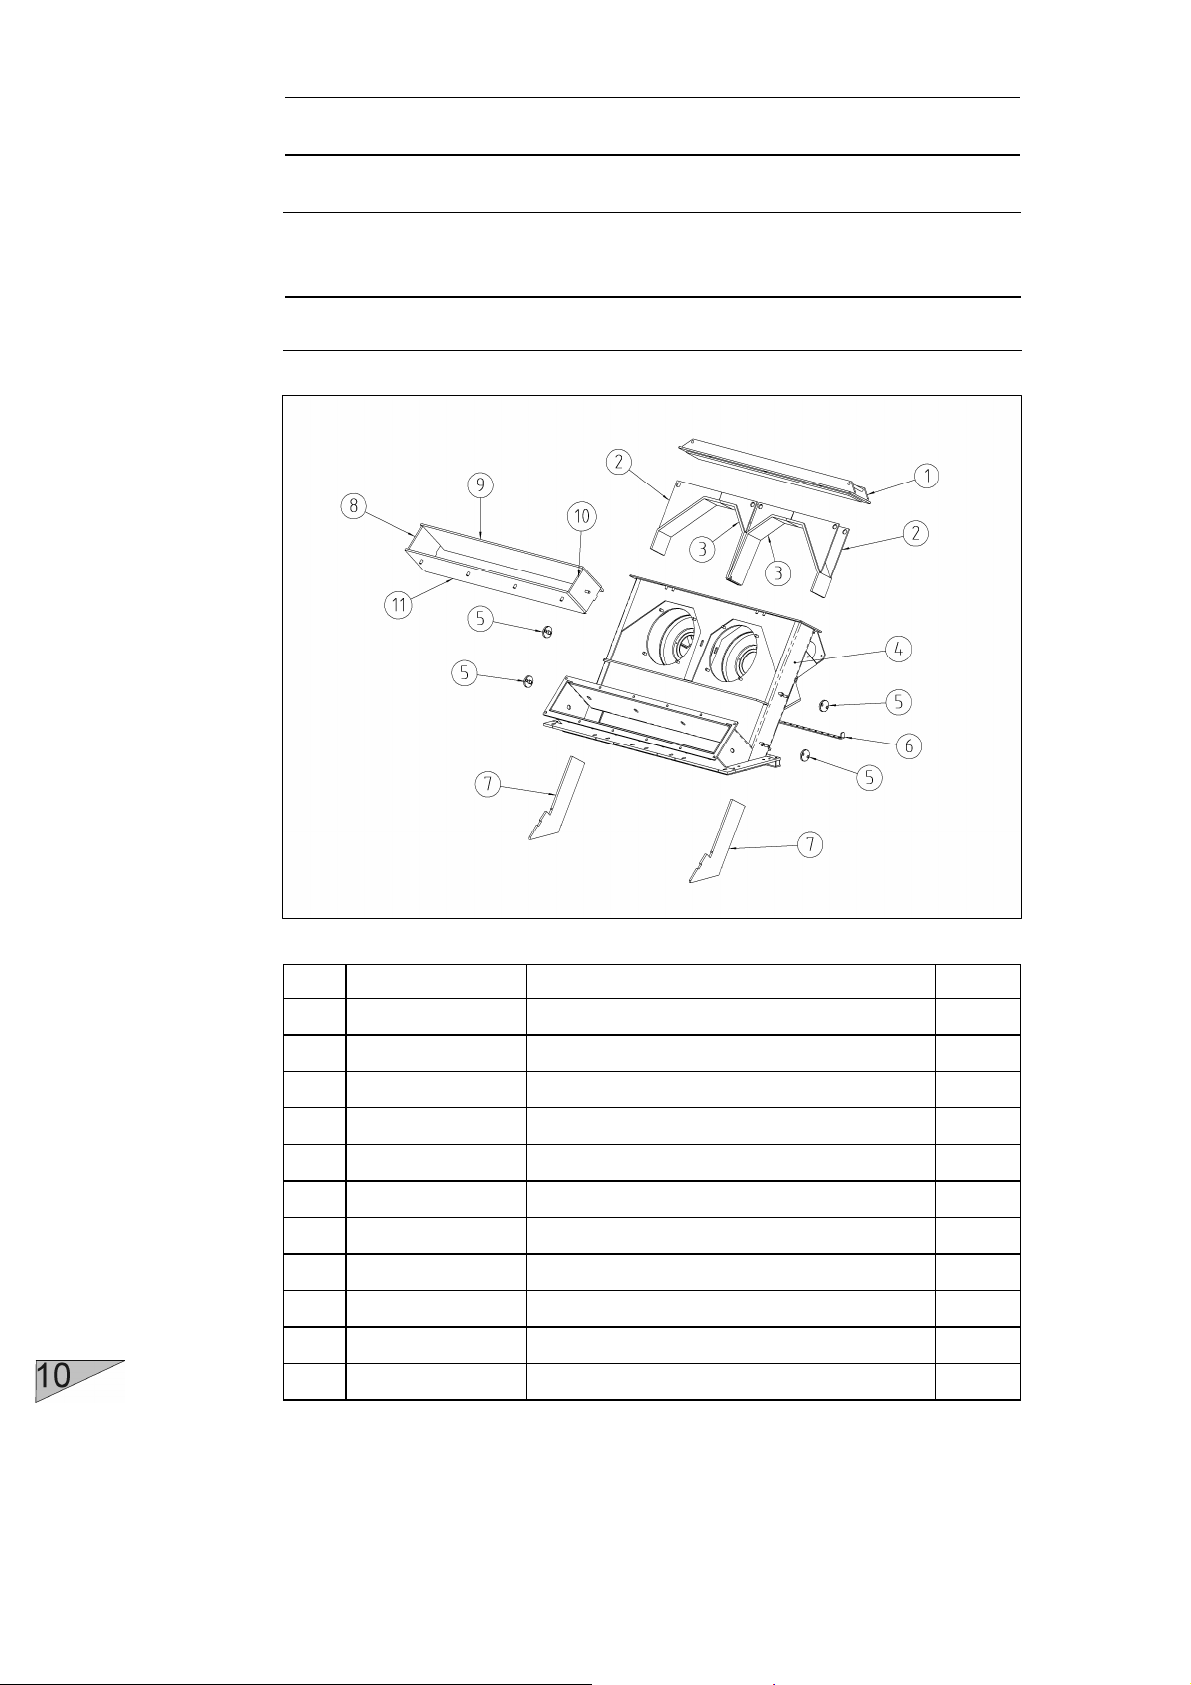
10.3 Blast housing and liners
Fig. 10.3
Item Part no. Description QTY.
1 RB100A/1 Blast housing cover 1
2 RB100A5/3 Top outer liner 2
3 RB100A5/2 Top inner liner 2
4 E02430 Blast housing 2-45D 1
5 RB100A/25 Liner fixing block 4
6 E02343 Airflow adjuster 1
7 RB100A5/4 Side liner 2
8 RB100A5/5L Rebound side liner LH 1
9 RB100A5/6 Rebound top liner 1
10 RB100A5/5R Rebound side liner RH 1
11 E01849 Rebound bottom liner 1
4
Page 70

2-45D Operating Instructions
parts
Spare
10.4 Base seals
Fig. 10.4
Item Part no. Description QTY.
1 E10297 Brush housing 2
2 RB117 Side magnet 4
3 RB118A Front magnet 2
4 E10310 Front brush 3
5 E02198 Rear brush 1
6 E10278 Side brush outer 2
7 E10279 Side brush inner 2
8 E02081 Side seal rubber 2
5
Page 71

45D
Operating Instructions 2Spare parts
10.5 Shot valve
6
Fig. 10.5
Item Part no. Description QTY.
1 E02120 Cylinder mount bracket 1
2 E01839RH Magnetic valve RH 1
3 E01839LH Magnetic valve LH 1
4 RB100A/19 Clamping ring 2
5 RB100A/20 Feed spout seal 2
6 RB100A/10 Feed spout 2
7 E02121 Valve lever 2
8 E01838 Linear actuator 2
9 RB170/1 Valve shaft 2
10 E02199 Valve disc steel 4
11 E01840 Valve disc PU 2
12 RB170/3 Valve housing 2
Page 72

2-45D Operating Instructions
parts
Spare
10.6 Separator
Fig. 10.6
Item Part no. Description QTY.
1 RB100A31B27 Separator cover 1
2 1.2502.014-50 Drum magnet 1
3 RB100A4B Deflector 1
4 RB100A3/31 Hydraulic motor 1
5 RB100A31B Separator 1
6 RB100A3/32 Belt pulley 1
7 RB100A3/34 Drum pulley 1
8 222-2301-V Taper lock bush 1
9 RB100A3/350 Taper lock bush 1
10 RB100A3/360 Belt 3
11 RB100A3/37 Magnet drum belt guard 1
12 RB100A3/28 Tray clamp 2
13 RB100A3/23 Separator tray 2
14 E02345 Hose connection LH 150 1
15 483551 Toggle clamp 2
16 E02346 Hose connection RH 150 1
7
Page 73

45D
Operating Instructions 2Spare parts
10.7 Separator seals
8
Fig. 10.7
Item Part no. Description QTY.
1 E10309 Rubber air guide 2
2 RB100A34/9 Deflector seal 1
3 RB100A3/340 Top seal strip 1
4 RB100A3/330 Top seal edge 2
6 E10292 Side seal magnetic drum 2
7 RB100A3/370 Slide seal 2
8 RB100A3/380 Flow adjuster 1
Page 74

2-45D Operating Instructions
parts
Spare
10.8 Rebound plenum and swivel castors
Fig. 10.8
1 E02197 Steering handle 1
2 Ironware Spring cotter 4 mm 2
3 E02196 Steering bracket 1
4 E02202 Locking pin 1
5 Ironware M8x16 bolt - DIN 933 1
6 E02201 Steering bracket ring 1
7 E02181 Transport castor bracket 1
8 E02200 Steering bracket bolt 1
9 E02203 Locking pin 1
10 E02125 Swivel castor 5
11 E02427 Rebound plenum 1
12 E02429 Fill up plate swivel castor 5mm 12
13 E02428 Fill up plate swivel castor 3mm 12
9
Page 75

Service Manual
Side shift & adapter 2-45D
MAN-SA2-45D-EN
Page 76

Technical Data
Safety Instructions
General
Transport
Initial Operation
Operation
Maintenance
Hydraulic System
Fault Diagnosis
Spare parts
Design and specicati ons are subject to
change w ithout notice - November 2008
Page 77

Side shift & adapter 2-45D Service Manual
Technical data
Contents Chapter 1
1.1 Rating
1.2 Unit specifications
1.3 Operative range and correct usage
1.4 Advice for operators
1
Page 78

Service Manual Side shift & adapter 2-45D
Technical data
1.1 Rating
Unit / designation : Blastrac side shift & machine adapter
Machine type : Side shift & machine adapter 2-45D
Manufacturer : Blastrac BV
Utrechthaven 12
NL-3433PN Nieuwegein
THE NETHERLANDS
1.2 Unit specifications
Dimensions:
Side shift & adapter 2-45D
Length 1050 mm
Width 2350 mm
Height 2000 mm
Weight 1000 kg
Angular movement:
2
Fig. 1.1
The hydraulic cylinder of the machine adapter can swivel the
Blastrac 2-45D blast cleaning machine 8° up and 8° down.
Page 79

Side shift & adapter 2-45D Service Manual
Technical data
1.3 Operative range and correct usage
The side shift and machine adapter are exclusively
designed to mount a Blastrac 2-45D blast cleaning
machine on a truck. The side shift and machine
adapter may not be used for other purposes. The
manufacturer will not be liable for damage resulting
from such incorrect usage. In these cases the user
assumes all risks.
1.4 Advice for operators
In accordance with the accident prevention
regulations for blast cleaning work (VBG 48) the
operator must provide operating instructions for
blast cleaning work in a form and language that is
understandable.
The side shift and machine adapter Service Manual
is only part of these operating instructions. Please
consult the current accident prevention regulations
for the precise content.
3
Page 80

Side shift & adapter 2-45D Service Manual
Safety instructions
Contents Chapter 2
2.0 Warnings and symbols
2.1 Organisational measures
2.2 Personnel selection and qualification
2.3 Safety precautions applicable to different operating conditions
2.4 Special work within the scope of use of the equipment and
maintenance activities as well as repairs during operation
2.5 Definition of the Safety off position
2.6 Particular dangerous aspects of the equipment
2.7 Hydraulic engineering regulations
1
Page 81
Service Manual Side shift & adapter 2-45D
Safety instructions
2.0 Warnings and symbols
The following denominations and symbols are used in the Operating
Instructions to highlight areas of particular importance:
Symbol of operational safety.
In this Service Manual this symbol will be shown
next to all safety precautions that are to be taken in
order to ensure prevention to life and injury. Follow
these instructions and take special care in these
circumstances. In addition to these instructions, the
general safety precautions and accident prevention
guidelines are also to be followed.
Particular details regarding the economical use of
the equipment.
Information, instructions and restrictions with
regard to possible risks to persons or to extensive
material damages.
Indications where consultation with the
manufacturer is required.
Instructions relating to periodical checks.
Reference to important instructions contained in the
Service Manual.
2
Page 82

Side shift & adapter 2-45D Service Manual
Safety instructions
2.1 Organisational measures
The Service Manual is to be kept near the location where the
side shift and machine adapter is located and must be within
reach at all times!
In addition to the Service Manual general and legal regulations
regarding accident prevention and environmental protection must be
complied with and indicated!
Such duties may for example relate to the compliance with traffic
regulations.
The Service Manual must be supplemented by instructions
including the duty to supervise and report relating to particular
working practices, for example work organisation, work procedures
and personnel allocation.
Personnel entrusted with working with the side shift and machine
adapter must have read the Service Manual before starting work, in
particular the Safety Instructions chapter. To read these
instructions during work is too late. This particularly applies to
incidental activities such as setting up the equipment, carrying out
maintenance work or training staff to work with the machine.
From time to time the working practices of the staff are to be checked
regarding awareness of safety and hazards.
Take notice of all safety and hazard notices on the machine! All
safety and hazard notices at or on the machine must be kept
complete and legible!
If safety-critical changes occur to the side shift and machine
adapter or its working method, the work must be stopped
immediately! The cause of the fault must be established
immediately!
Changes, add-ons or conversions to the side shift and machine
adapter which might impair safety must not be undertaken without
the manufacturer’s permission!
This applies in particular to the fitting and adjustment of safety
devices as well as to welding on load-bearing parts.
3
Page 83

Service Manual Side shift & adapter 2-45D
Safety instructions
Spare parts must comply with the technical requirements specified by
the manufacturer. This is always guaranteed if original spare parts
are used.
Intervals for recurring checks and inspections specified in this
Service Manual must be complied with!
To perform maintenance work correctly it is imperative to be equipped
with the proper tools for the task in question.
2.2 Personnel selection and qualification
Fundamental duties :
Work on the machine adapter may only be undertaken by reliable
personnel.
Only trained personnel may be deployed. Note the statutory
minimum age! Specify clearly the responsibilities of personnel for
operation, setting up, servicing and maintenance work!
Make sure that only authorised personnel operate or work on the
machine!
Define responsibilities of the side shift and machine operator also
regarding to traffic safety regulations and empower him to decline
instructions from third parties which are not complying with the safety
requirements!
Personnel being trained or made acquainted with the equipment may
only be deployed on the machine under constant supervision of an
experienced person!
4
2.3 Safety precautions applicable to different operating
conditions
Ban any method of working that impairs safety!
Only operate the side shift and machine adapter when all safety
devices and related safety equipment are present and
operational!
Page 84

Side shift & adapter 2-45D Service Manual
Safety instructions
Check the side shift and machine adapter visually for any damage
and defects at least once a day!
In the event of operational malfunctions the work must be stopped
immediately and the side shift and machine adapter secured, and
the fault must be rectified!
Secure the work area around the side shift and machine adapter
in public areas providing a safety distance of at least 2m from
the machine adapter.
Before operating the side shift and machine adapter make sure that
no-one can be endangered during operation!
All persons in the proximity of the side shift and machine adapter
must wear safety shoes. The operator is obliged to wear closefitting protective clothing.
2.4 Special work within the scope of use of the equipment and
maintenance activities as well as repairs during operation
Mechanical servicing work:
Put the side shift and machine adapter in the Safety off position as
described in chapter 2.5 for any servicing work on the side shift and
machine adapter in order to prevent the side shift and machine
adapter from being operated accidentally.
Please follow any special safety instructions in the various chapters
on servicing the machine. See chapter 7.1 - 7.4.
Adjustment, servicing and inspection work and time limits
specified in this Service Manual as well as any information on the
replacement of parts and equipment must be undertaken and/or
complied with!
These activities may only be undertaken by qualified personnel.
Do not use any aggressive cleaning materials!
Use lint-free cleaning cloths!
Always tighten any screw connections that are undone during
servicing and maintenance work!
5
Page 85

Service Manual Side shift & adapter 2-45D
Safety instructions
If safety devices need to be dismantled during setting up, servicing
and repairs, these safety devices must be reinstalled and inspected
immediately after completion of the servicing and repair work.
Make sure that process materials and replaced parts are
disposed of safely and in an environmentally-friendly manner!
Hydraulic servicing work:
Make sure that hydraulic components used for replacement purposes
comply with the original parts and are correctly adjusted if necessary.
For safety notes see 2.7 Hydraulic engineering regulations.
2.5 Definition of the Safety off position
Definition:
The side shift and machine adapter is in a safe condition when it
cannot generate any hazard.
Putting the equipment in the Safety off position means:
; Switch off the blast machine.
; Make sure the blast machine rests fully on its wheels.
; Switch off the dust collector.
; Stop the truck.
; Wait for standstill of all drives.
; Pull out mains plug - switch off PTO.
6
Page 86

Side shift & adapter 2-45D Service Manual
Safety instructions
2.6 Particular dangerous aspects of the equipment
Any equipment, if it is not used according the regulations, may
be hazardous for operating, setting-up and service personnel. The
operating authority is responsible for compliance with the
safety regulations during operation and maintenance of safety
devices supplied with the machine adapter as well as the
provision of appropriate additional safety devices!
1. Swivel brackets
Danger of injury!
Moving parts!
It is not allowed to stay within
the working radius of the
machine!
2. Wheels
3. Sprocket and gear rack
4. Load bearings
Danger of injury!
Moving parts!
It is not allowed to stay within
the working radius of the
machine!
7
Page 87

Service Manual Side shift & adapter 2-45D
Safety instructions
2.7 Hydraulic engineering regulations
Work on hydraulic equipment or operating materials may only be
undertaken by a skilled hydraulic engineer or by trained persons
under the guidance and supervision of a skilled hydraulic
engineer as well as in accordance with the hydraulic engineering
regulations.
Hoses and pipe work can be under hydraulic pressure.
Temperature of the components can be above 37° C. Use only
hoses and pipe work that are sized and marked in accordance with
the overall power consumption of the side shift and machine
adapter.
The hydraulic equipment for the plant must be inspected regularly.
Please note in particular the specified recurring inspections.
Defects such as loose connections or scorched hoses must be
rectified immediately. Call a skilled hydraulic engineer or our
Customer Services.
A second person must be deployed who can switch off the truck or
PTO in an emergency if work on live parts is necessary. The work
area must be sealed off using a red and white safety chain and a
danger sign.
Only start work once you are familiar with the hydraulic engineering
regulations that apply to your area.
8
Page 88

Side shift & adapter 2-45D Service Manual
General
Contents Chapter 3
3.1 Introduction
3.2 Operating instructions
3.3 Hydraulic connections
3.4 Care and maintenance
3.5 Scope of supply
3.6 Description
1
Page 89

Service Manual Side shift & adapter 2-45D
General
3.1 Introduction
Blastrac wants to thank you for your decision to employ the side shift
and machine adapter for the 2-45D blast cleaning machine.
The side shift and machine adapter is designed to mount a Blastrac
2-45D blast cleaning machine on a truck.
3.2 Operating instructions
This manual has been written to support the operating personnel on
learning the functioning of the side shift and machine adapter and to
guarantee optimum operation and maintenance.
Therefore it is important that all persons operating and
maintaining the side shift and machine adapter read this manual
carefully and understand it fully.
The supplied side shift and machine adapter has been manufactured
for being employed in the user’s country. All descriptions and notes
have been formulated in the language of the user’s country or in
English in accordance with the statutory regulations, or shown as
pictograms. If the customer deploys personnel with little knowledge of
the language of the user’s country, appropriate instruction and
training must be provided.
Before using the side shift and machine adapter personnel must
be familiar with how to operate the side shift and machine
adapter, with all important components, with the method of
working and with its dimensions.
Blastrac offers a course on the use of the side shift and machine
adapter in order to make the operating and maintenance personnel
familiar with all elements of the 2-45D side shift and machine adapter.
2
Page 90

Side shift & adapter 2-45D Service Manual
A
General
Initial commissioning of the side shift and machine adapter must be
carried out very carefully. The side shift and machine operator must
fully understand the sequence of commissioning of the individual
parts and their functioning.
ll persons in the proximity of the side shift and machine adapter in
operation must wear safety shoes. The machine operator must
wear close-fitting protective clothing.
3.3 Hydraulic connections
Pressure
Swivel cylinder max. 250 bar
Lift cylinder max. 210 bar
Please contact Blastrac to get more details about requirements for
the 2-45D side shift and machine adapter.
3.4 Care and maintenance
Special attendance and regular maintenance of the side shift and
machine adapter and its parts are imperative for functioning and
safety.
In order to prevent unnecessary downtimes it is recommended to
keep original spare and wear parts on stock as listed in the
maintenance box.
A list of contents of the maintenance box is provided in Chapter 10 to
enable the above-mentioned work to be carried out quickly.
3
Page 91

Service Manual Side shift & adapter 2-45D
General
3.5 Scope of supply
Scope of supply of the side shift and machine adapter:
Machine adapter for 2-45D blast cleaning machine
Side shift for 2-45D blast cleaning machine
Lift unit for 2-45D blast cleaning machine
Adapter frame
Service manual (2 x)
3.6 Description
Fig. 3.1
1 Connection plate 4 Swivel bracket RH
2 Hydraulic cylinder 5 Swivel bracket LH
3 Adapter plate arm 6 Hydraulic motor
4
Page 92

Side shift & adapter 2-45D Service Manual
General
Fig. 3.2
1 Machine adapter complete 6 Lift cylinder bolt
2 Side shift unit complete 7 M24 nut + SLW + PW
3 Split pin 8 Lift unit complete
4 Plain washer 9 Adapter frame
5 Hydraulic cylinder 10 M24x80 bolt + PW
5
Page 93

Service Manual Side shift & adapter 2-45D
General
The Blastrac side shift and machine adapter is designed to mount a
2-45D blast cleaning machine on a truck.
6
Fig. 3.3
Because the side shift and machine adapter is only designed for the
above configuration, don't use the equipment for other purposes!
Page 94

Side shift & adapter 2-45D Service Manual
Transport
Contents Chapter 4
4.1 General notes
4.2 Transport
4.3 Operation
4.4 Unit specifications
1
Page 95

d means risk to people in the
Service Manual Side shift & adapter 2-45D
Transport
4.1 General notes
Before the side shift and machine adapter is used for the first time,
Blastrac authorised dealers offer a course to familiarise maintenance
and operating personnel with all elements of the equipment. We are
not liable for damage caused by incorrect use of the side shift and
machine adapter by personnel not trained by Blastrac.
4.2 Transport
When transporting the 2-45D blast machine proceed in such a
manner that damage due to the effects of the use of force or incorrect
loading and unloading is avoided.
The side shift and machine adapter is only designed to use in
combination with a 2-45D blast cleaning machine during blast
cleaning operation! Driving the truck with the blast machine
mounted on the side shift and machine adapter without
supporting the blast machine can cause damage to the
construction, resulting in weakness of parts! This can cause
damage to the blast machine an
surrounding of the equipment!
Fig. 4.1
2
Page 96

Side shift & adapter 2-45D Service Manual
Transport
Maintenance and inspection of the side shift and machine adapter
and its parts is of utmost importance. See chapter 7.2 for a detailed
description of the periodical checks!
Because of traffic safety, a truck mounted 2-45D must be stored
inside the truck before it is transported. Local and general safety
precautions and accident prevention guidelines are to be followed.
4.3 Operation
The side shift and machine adapter is operated in accordance with
the instructions given in Chapter 5 ”Initial operation“.
Whenever the side shift and machine adapter is not used for blast
cleaning, the mounted blast cleaning machine must rest fully on its
wheels!
Please note that the illustrations are simplified.
4.4 Unit specifications
The main dimensions and unit specifications of the side shift and
machine adapter when assembled are shown in Chapter 1 "Technical
data“.
3
Page 97

Side shift & adapter 2-45D Service Manual
Initial operation
Contents Chapter 5
5.1 Preparations for initial operation
5.2 Initial operation
1
Page 98

Service Manual Side shift & adapter 2-45D
Initial operation
5.1 Preparations for initial operation
All persons in the proximity of the side shift and machine adapter
must wear safety shoes. The operator is obliged to wear closefitting protective clothing.
Handle all hoses and operating devices with care.
Works on the hydraulic system must only be carried out by qualified
specialists.
Check the surface to be treated for loose parts (stones, screws, etc.).
The surface must be swept if necessary. Make sure that the blast
cleaning machine can travel over all inequalities on the surface. Small
inequalities like weld seams or floor joints are no barriers for the
machine and its adapter.
Regular inspection is important in order to avoid downtimes. Carry
out the following checks before any start-up:
; Check whether all side shift and machine adapter parts are
assembled safely and correctly.
; Check all screws and other fasteners for tight seat.
; Check all hydraulic connections and hoses for oil leakage.
Before start-up the operating personnel must be familiar with the
safety regulations given in this manual and with the service
manual supplied with this blast machine.
5.2 Initial operation
All persons in the proximity of the side shift and machine
adapter must wear safety shoes. The operator is obliged to
wear close-fitting protective clothing.
2
For illustrations and detailed description of the controls please contact
your truck supplier.
Page 99
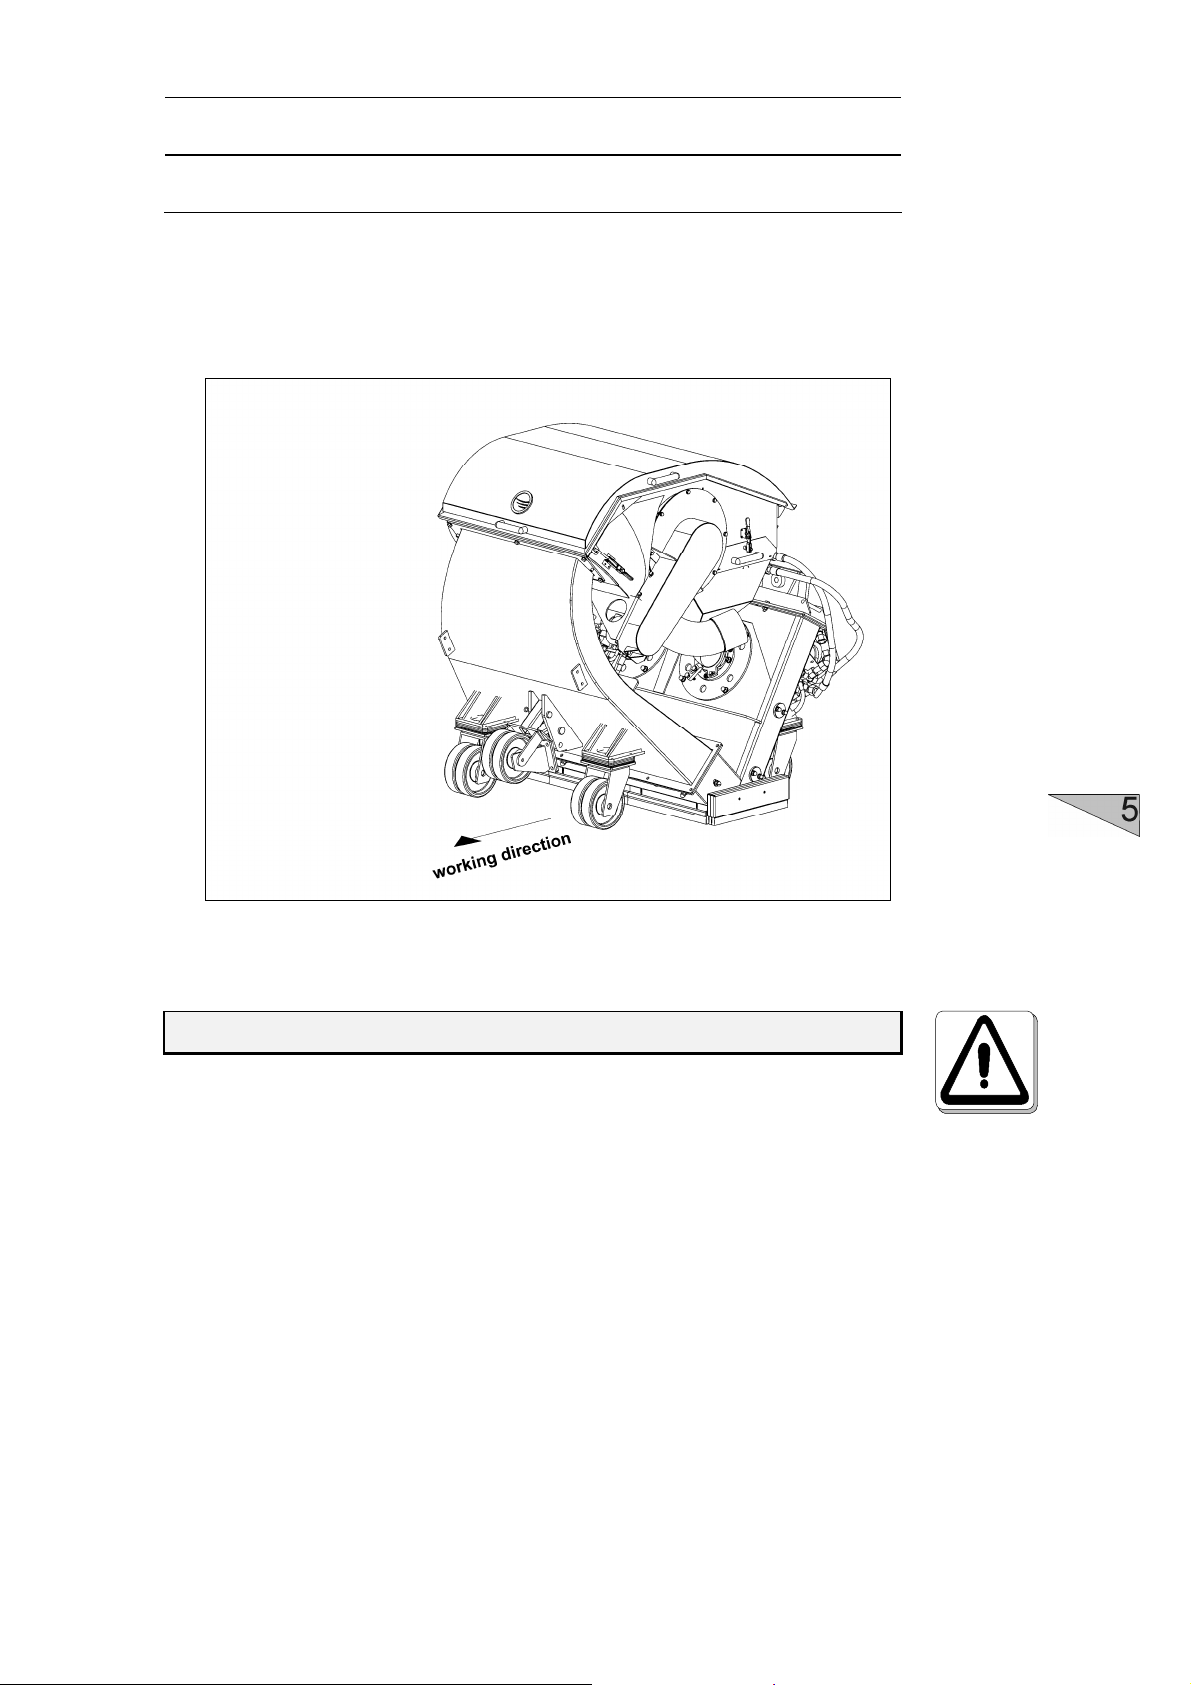
Side shift & adapter 2-45D
Service Manual
Initial operation
Start driving in the working direction and set the travel speed.
Fig. 5.1
Alter the travel direction only after a full standstill.
3
Page 100

Side shift & adapter 2-45D Service Manual
Operation
Contents Chapter 6
6.1 Operation
6.2 Hydraulic system
6.3 What to do if a fault occurs
6.4 Safety shutdown
6.5 Restarting after a fault
6.6 Measures before and after long standstills
1
 Loading...