

Page 1
BLAKESLEE
Division of The Legacy Companies
UNDERCOUNTER DISHWASHER
UC20
Blakeslee – Division of The Legacy Companies
1228 Capitol Drive
Addison, IL 60101
Phone (630) 532-5021
Fax (630) 532-5020
www.blakesleeinc.com
service@blakesleeinc.com
OWNER’S
MANUAL
Page 2

Page 3

2
ELECTRICAL WARNINGS
THIS MANUAL HAS BEEN PREPARED FOR PERSONNEL QUALIFIED
TO INSTALL ELECTRICAL EQUIPMENT.
PERSONNEL SHOULD PERFORM THE INITIAL FIELD STARTUP AND ADJUSTMENTS
OF THE EQUIPMENT COVERED IN THIS MANUAL.
READ THIS MANUAL THOROUGHLY BEFORE OPERATING, INSTALLING OR PERFORMING
MAINTENANCE ON THE EQUIPMENT.
WARNING: Failure to follow all the instructions in this manual can cause property damage, injury
or death.
WARNING: Improper installation, adjustment, alteration, service or maintenance can cause
property damage, injury or death.
WARNING: Electrical connections should be performed only by a certified professional.
WARNING: Electrical and grounding connections must comply with the applicable portions of the
National Electric Code and/or all local electric codes. Failure to comply with this
procedure can cause property damage, injury or death.
WARNING: Before connecting the unit to the electrical supply, verify that the electrical and
grounding connections comply with the applicable portions of the National Electric
Code and/or all local electrical codes. Failure to comply with this procedure can cause
property damage, injury or death.
WARNING: Before connecting the unit to the electrical supply, verify that the electrical connection
agrees with the specifications on the data plate. Failure to comply with this procedure
can cause property damage, injury or death.
WARNING: UL73 Grounding Instructions: This appliance must be connected to a grounded,
metal, permanent wiring system; or an equipment-grounding conductor must be run
with the circuit conductors and be connected to the equipment-grounding terminal or
lead on the appliance. Failure to comply with this procedure can cause property
damage, injury or death.
WARNING: Appliances equipped with a flexible electric supply cord are provided with a three-
prong grounding plug. It is imperative that this plug be connected into a properly
grounded three-prong receptacle. Failure to comply with this procedure can cause
property damage, injury or death.
WARNING: If the receptacle is not the proper grounding type, contact an electrician. Do not
remove the grounding prong from the plug. Failure to comply with this procedure can
cause property damage, injury or death.
Page 4

3
WARNING: Before performing any service that involves electrical connection or disconnection
and/or exposure to electrical components, always perform the Electrical
LOCKOUT/TAGOUT Procedure. Disconnect all circuits. Failure to comply with this
procedure can cause property damage, injury or death.
WARNING: Before removing any sheet metal panels, always perform the Electrical
LOCKOUT/TAGOUT Procedure. Be sure all circuits are disconnected. Failure to
comply with this procedure can cause property damage, injury or death.
WARNING: Do not operate this equipment without properly placing and securing all covers and
access panels. Failure to comply with this procedure can cause property damage,
injury or death.
WARNING: Do not use or store gasoline or other flammable vapors or liquids in the vicinity of this
or any other appliance. Failure to comply can cause property damage, injury or death.
WARNING: In the event of a power failure, do not attempt to operate this appliance. Failure to
comply can cause property damage, injury or death.
ELECTRICAL LOCKOUT/TAGOUT PROCEDURE
WARNING:
Before performing any service that involves electrical connection or disconnection and/or
exposure to electrical components, always follow the Electrical LOCKOUT/TAGOUT Procedure.
Disconnect all circuits. Failure to comply with this procedure can cause property damage, injury
or death.
The Electrical LOCKOUT/TAGOUT Procedure is used to protect personnel working on an electrical
appliance. Before performing any maintenance or service that requires exposure to electrical
components, follow these steps:
1. In electrical box, place appliance circuit breaker into OFF position.
2. Place a lock or other device on electrical box cover to prevent someone from placing circuit
breaker ON.
3. Place a tag on electrical box cover to indicate that appliance has been disconnected for service
and power should not be restored until tag is removed by maintenance personnel.
4. Disconnect appliance power cord from electrical outlet.
5. Place a tag on the cord to indicate that unit has been disconnected for service and power should
not be restored until tag is removed by maintenance personnel.
Page 5

4
TABLE OF CONTENTS
GENERAL DESCRIPTION……………………… …………………… …………………………………….. 5
Model UC20…………………………………………………………………………………………… 5
Door Safety Switch…………………………………………………………………………………… 5
Digital Display………………………………………………………………………………………… 5
Detergent Pumps…………………………………………………………………………………….. 5
Heater…………………………………………………………………………………………………. 5
Scrap Screen Filters…………………………………………………………………………………. 5
Wash Cycles………………………………………………………………………………………….. 5
Pump…………………………………………………………………………………………………… 5
Motor…………………………………………………………………………………………………… 5
Control Circuit…………………………………………………………………………………………. 5
Automatic Tank Fill……………………………………………………………………………………. 5
Final Rinse Booster…………………………………………………………………………………… 5
Racks per Hour………………………………………………………………………………………... 5
Power Saving Mode…………………………………………………………………………………... 5
Wash & Rinse Arms…………………………………………………………………………………... 5
Insulation………………………………… …………………… ………………………………………. 5
INSTALLATION………………………… …………………… ……………………………………………….. 6
Visual Inspection……………………………………………………………………………………… 6
Unpacking the Dishwasher………………………………………………………………………….. 6
Leveling the Dishwasher……………………………………………… …………………………….. 6
Plumbing the Dishwasher………………………………………………........................................ 6
Fill/Rinse…………………………………………………… …… …… ………………………………. 6
Drains…………………………………………………………………….……………………………. 6
Electrical Connections……………………………………………………...................................... 7
OPERATION………………………………………………………………………………………………….. 8
Preparing the Dishwasher for Use…………………………………………………………………. 8
Soiled Ware Operation………………………………………………………………………………. 9
Loading the Dishwasher…………………………………………………………………………….. 9
Detergent………………………………………………................................................................ 10
Operating the Dishwasher………………………………………………………………………….. 10
Programmable Mode………………………………………………….…………………………….. 11
Shutdown, Cleaning & Maintenance……………………………………...................................... 11
TROUBLESHOOTING………………………………………………………………………………………. 12
Error Codes…………………………………………………………………………………………… 13
WIRING DIAGRAM………………………………………………………………………………………….. 14-18
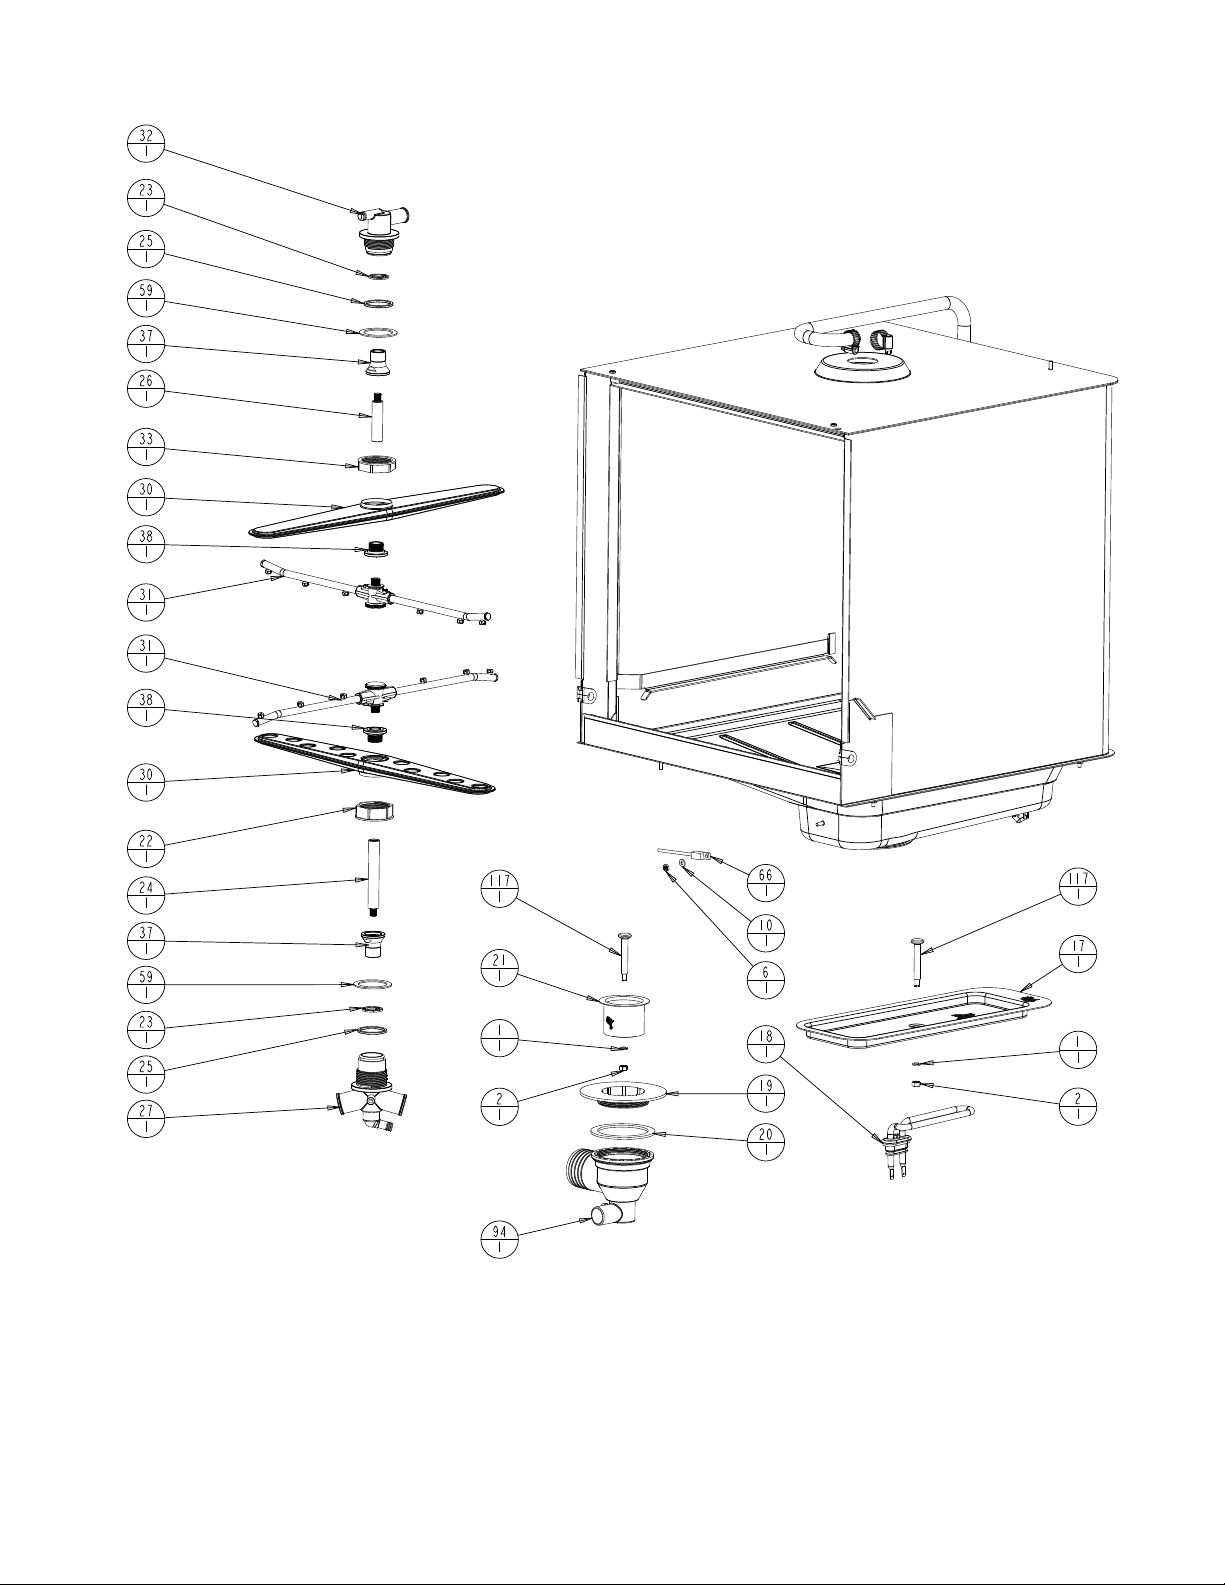
EXPLODED VIEWS…………………………………………………………………………………………. 19-27
WARRANTY………………………………………………………………………………………………….. 28
Page 6

5
GENERAL DESCRIPTION
Model UC20
The UC20 undercounter dishwasher is constructed of 18 gauge stainless steel. An 18-5/16” door
opening allows for oversized ware such as 18’ x 26” sheet pans to be washed.
Door Safety Switch
The UC20 is equipped with a door safety
switch. The machine will not operate when the
door is open. If the door is accidently opened
during a cycle, the machine will stop operating.
Digital Display
The unit is equipped with a digital display
allowing simplified operational instructions.
Detergent Pumps
All units are equipped with built in detergent
dispensers and rinse dispensers.
Heater
Wash tank water is heated by electricity and
are available in 208, 240, 440, or 480 VAC.
Scrap Screen Filters
Stainless steel scrap filters are used to protect
wash pump. These filters should be cleaned
periodically throughout the washing period.
Wash Cycles
All units contain seven independent cycles:
economy, economy plus, glassware, flatware,
dishware, pot & pan, and programmable.
Control Circuit
All units are supplied with a 24 VAC control
circuit.
Automatic Tank Fill
All machines are supplied with automatic wash
tank fill.
Final Rinse Booster
Machines are equipped with a built-in electric
booster. These boosters are designed to raise
the rinse water temperature from 140°F to
180F°-185°F.
Racks per Hour
Unit is capable of washing up to 50 racks per
hour in the economy modes.
Wash & Rinse Arms
Upper and lower wash and rinse arms are
constructed of stainless steel and are
interchangeable. Periodic cleaning is required.
Insulation
The unit is fully insulated to protect the user
from excessive heat and allow the unit to
operate quietly.
Power Saving Mode
All machines have an automatic power saving
mode that regulates and reduces energy
consumption if the unit is left unattended for
over 30 minutes.
Pump Motor
The unit is equipped with a 0.9 HP motor.
Page 7

6
INSTALLATION
Visual Inspection
Before installing the unit, inspect the shipping container and machine for damage. A damaged container
may indicate there is damage to the machine. If there is damage to both the container and machine, do
not throw away the container. The dishwasher has been inspected and packed at the factory and is
expected to arrive in an undamaged condition. However, rough handling by carriers or others may
result in damage to the unit while in transit. If such a situation occurs, do not return the unit to
Blakeslee; instead, contact the carrier and ask them to send a representative to the site to inspect the
damage to the unit and to complete an inspection report. You must contact the carrier within 48 hours
of receiving the machine. Also, contact the dealer where you purchased the unit.
Unpacking the Dishwasher
Once the machine has been removed from the container, make sure that there are no parts missing
from the machine. This may not be obvious at first. If an item is missing, contact Blakeslee immediately
to have the missing item shipped to you.
Leveling the Dishwasher
The dishwasher must be level to operate correctly. This allows the door to open and close properly and
ensures the best results while washing. The unit comes with adjustable feet. Ensure that the unit is
level from side to side and from front to back before making any service connections.
Plumbing the Dishwasher
All plumbing connections must comply with all applicable local, state, and national plumbing codes. The
installing plumber must flush the incoming water line thoroughly prior to connecting it to the dishwasher.
Any valves that are fouled as a result of foreign matter left in the water line, and any expenses resulting
from this fouling, are not covered under the manufacturer’s warranty.
Fill/Rinse
Final Rinse water is used to fill the dishwasher’s booster and wash tank. The water supply must have
an incoming water temperature of 140°F with a dynamic flow pressure of 15 to 25 PSI at the
dishwasher.
If the incoming water supply pressure is below the required 15 PSI, an optional pressure booster pump
will be required. If the incoming water supply pressure is greater than 25 PSI, a pressure reducing valve
will be needed.
Drains
Drain connections must comply with all local and national code requirements.
Connect the tank drain to the building drain connection using 1/2 inch hose with 3/4 NPT fitting.
Page 8
7
ELECTRICAL CONNECTIONS
WARNING
Before performing any service that involves electrical connection or disconnection and/or
exposure to electrical components, always perform the Electrical LOCKOUT/TAGOUT
Procedure. Disconnect all circuits. Failure to comply with this procedure can cause property
damage, injury or death.
Refer to the unit’s data plate before making any electrical connections.
Any connections must correspond to the information specified on the data plate. A fused disconnect
switch or circuit breaker (not supplied) MUST be installed in the electrical supply line for the
dishwasher.
This service connection must meet all local and national electrical code requirements. All connections
are made at one common location in the control box. The control box cover is lipped and can be
opened by removing two (2) #10-32 screws.
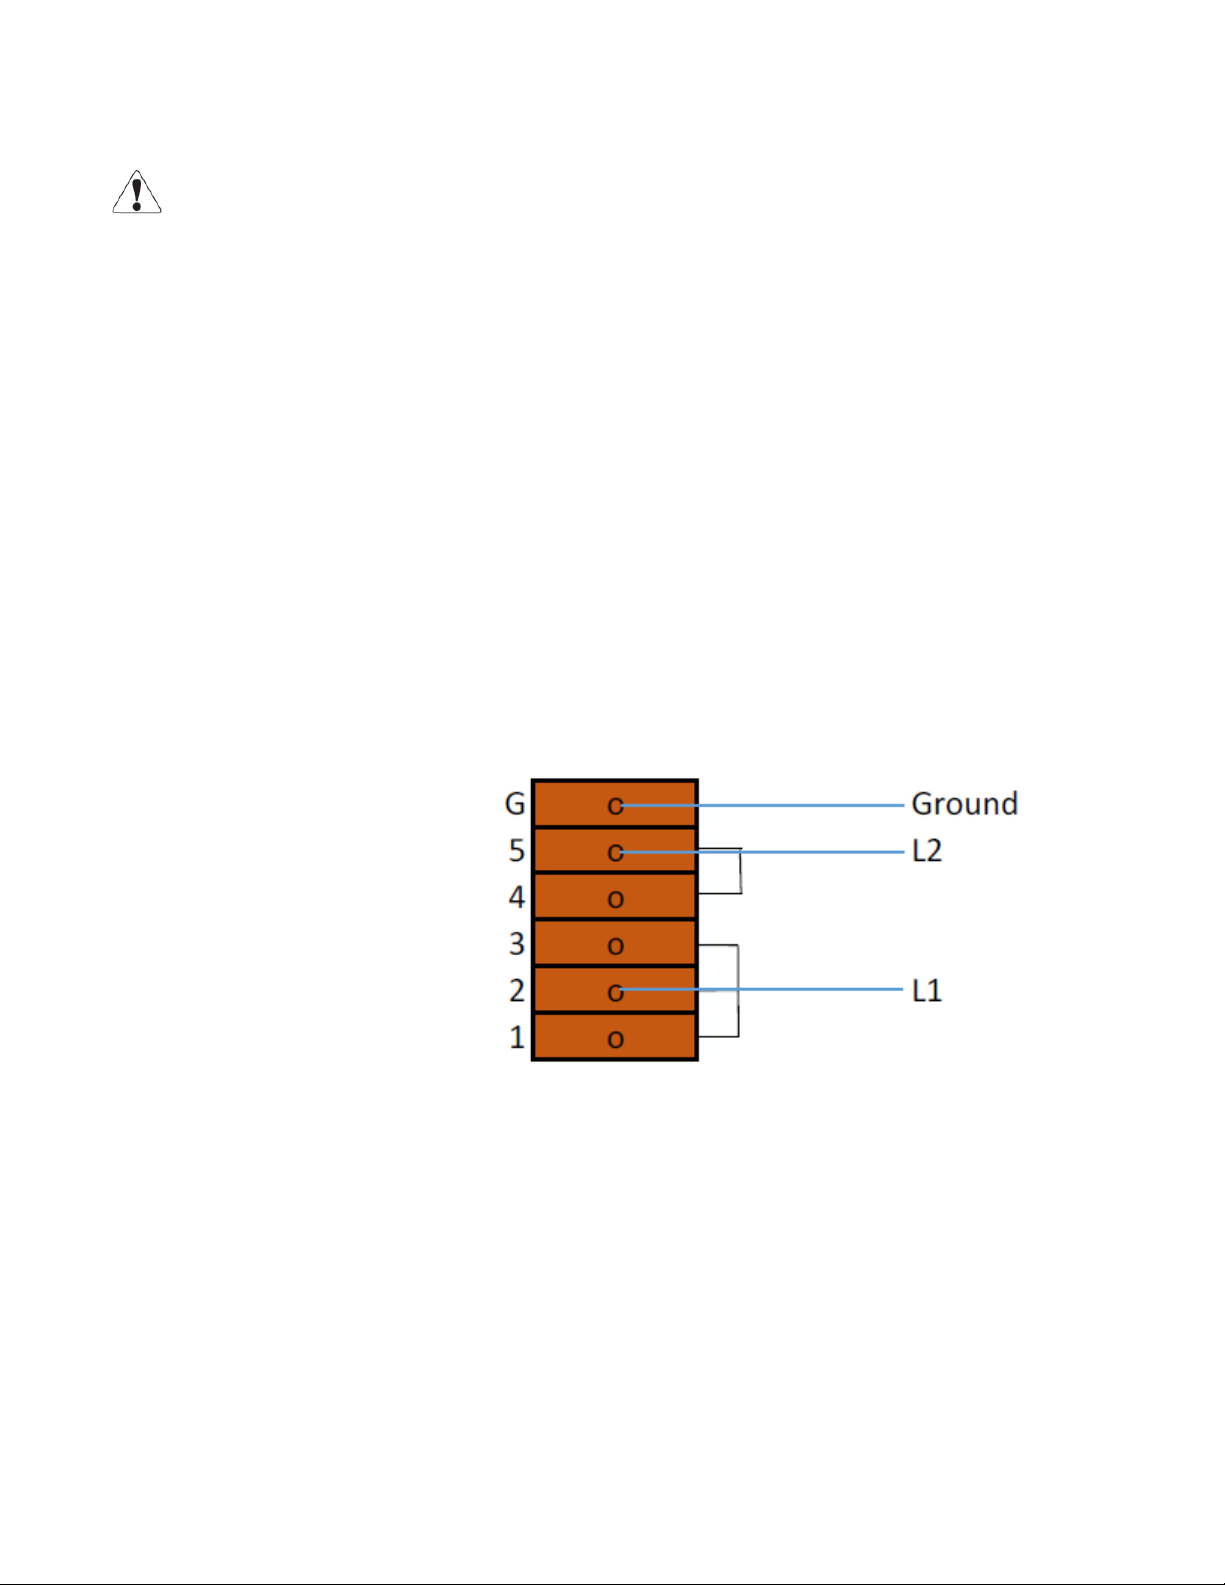
Use ¾ ” knockout hole in back of dishwasher to connect to terminal block located on front of unit.
Incoming connection shown below.
240 Volt 1 Phase
Page 9
8
OPERATION
Preparing the Dishwasher for Use
1. Ensure that all spray arms spin freely and that scrap filter is properly installed.
2. Close dishwasher door.
3. Turn on main water supply to dishwasher.
4. Turn on main power supply to dishwasher.
5. Press dishwasher Power On/Off switch to fill dishwasher. Blue indicator light will appear.
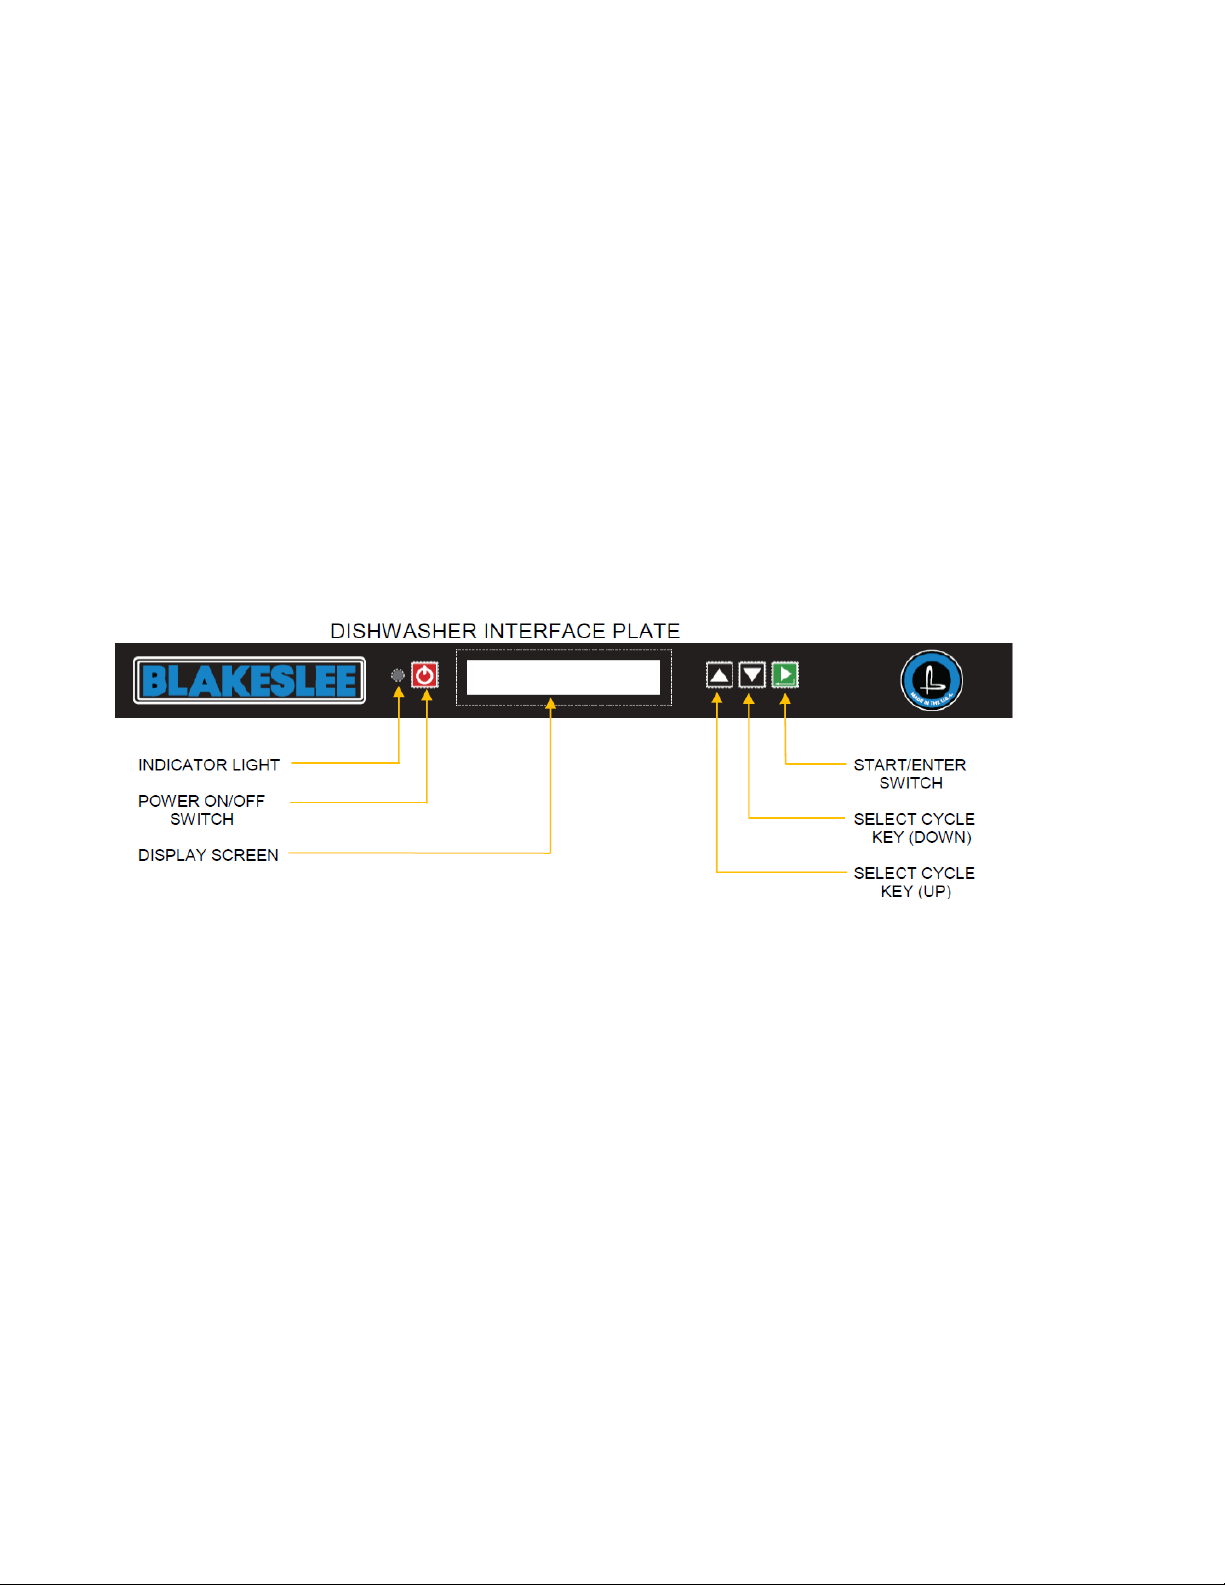
6. The default language that appears on the display screen is set to English. The default
temperature that appears on the display screen is set to Fahrenheit. To change either one of
these settings, press and hold the Select Cycle Up and Down Keys simultaneously for fifteen
seconds. This will prompt the dishwasher into a setup screen.To change language, press the
Select Cycle Down Key until the desired language appears on the display screen. Press the
Select Cycle Up Key to save language setting. Repeat for temperature setting. When all
selections have been made, depress the Start/Enter switch to exit the setup screen.
7. Load Washer (see proper procedures for scraping and loading ware)
8. Close dishwasher door.
Page 10
9
SOILED WARE OPERATION
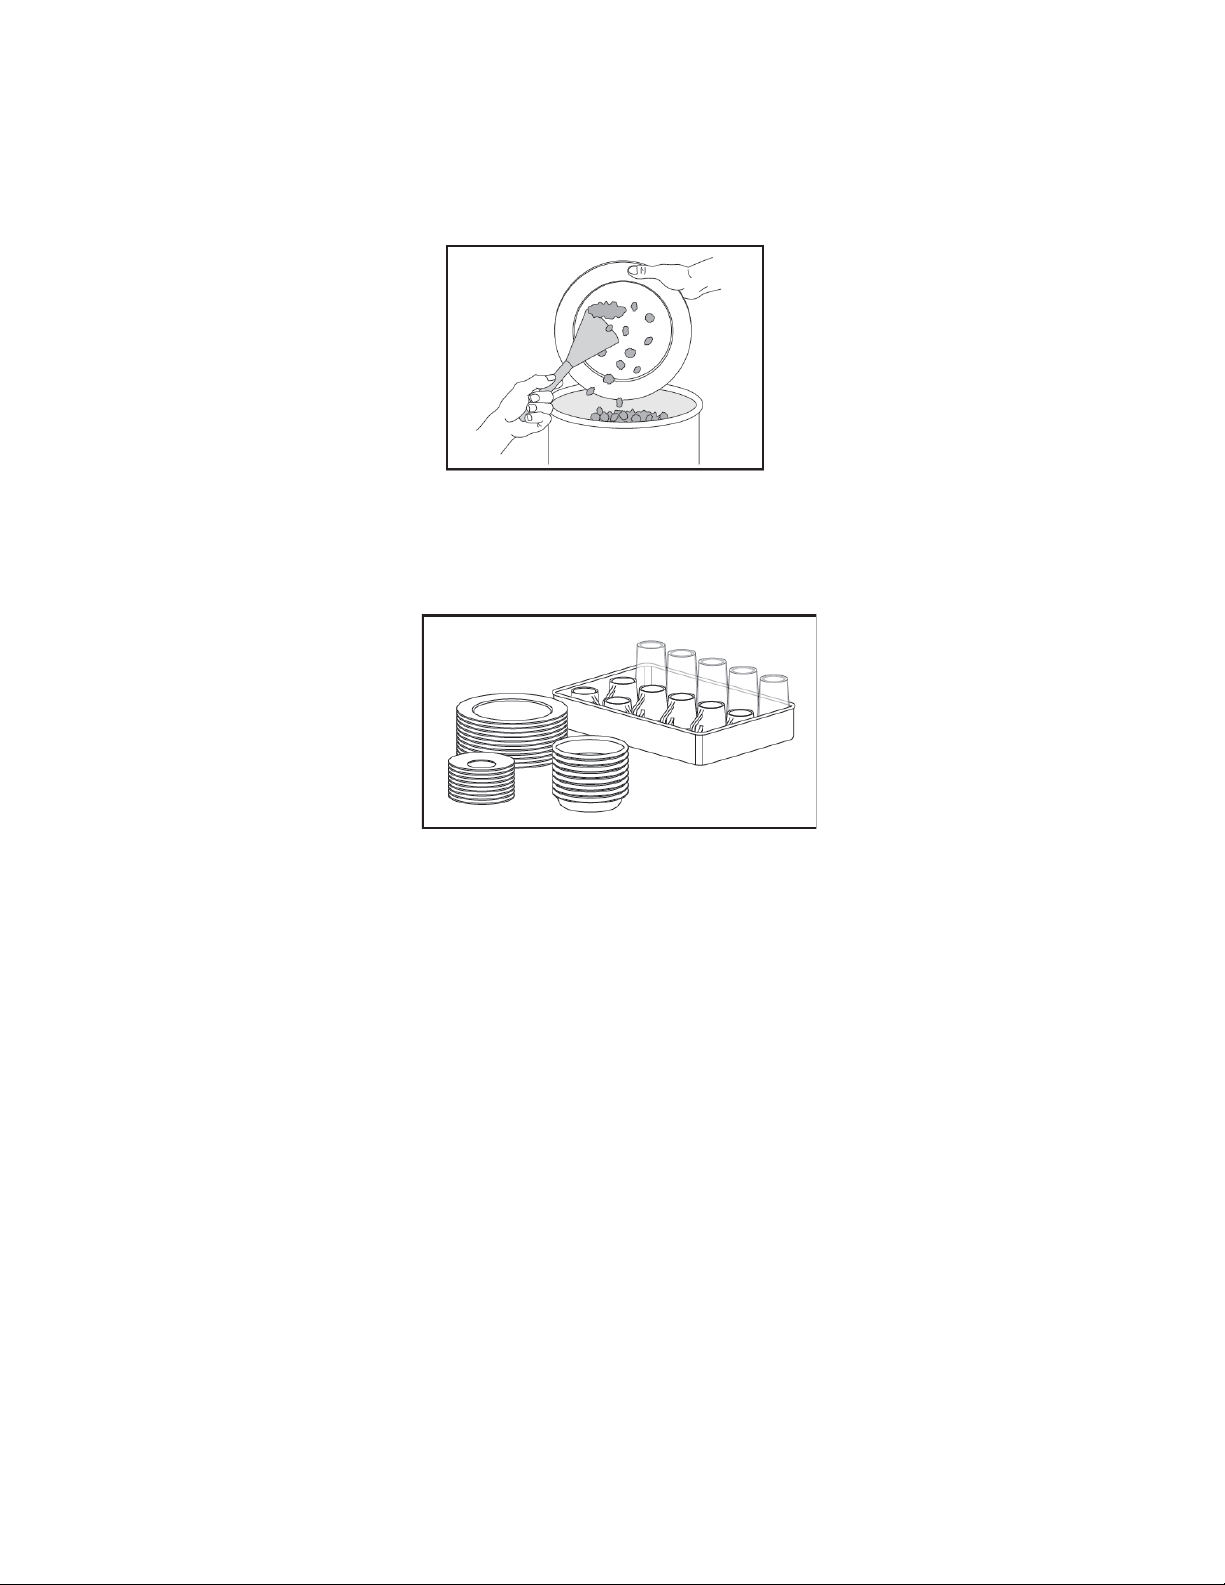
To increase speed and efficiency and reduce breakage, a few simple rules need to be observed:
• All food must be removed from dishware before placing them in stacks. This will maintain cleaner
wash water and reduce detergent usage.
• Stackable ware, such as dishes and trays, should have food debris removed and be placed in
manageable stacks. A “buildup” area should be designated for these stacks until dish racks are filled.
• Items such as coffee cups, glasses and bowls, do not stack well and should be placed directly into
racks for transport.
• When racks are filled, they should be kept in the buildup area until they can be washed.
• Good organization is key to speed and efficiency in dish room operation, as well as reduced
breakage.
• Silverware should be presoaked in a sink or other container to keep food particles from drying out.
Silverware should then be placed in an appropriate rack and sent through the dishwasher.
Note: When placing silverware in flat racks, do not overload. The silverware should be spread out
evenly in the rack so the surfaces are exposed and can be cleaned by the dishwasher’s spray.
Note: As much as possible, keep soil from entering the dishwasher. This will help maintain cleaner
wash water and reduce detergent usage.
LOADING THE DISHWASHER
Wash similar dishes at the same time, as often as possible, to reduce sorting once the dishes have
been cleaned. When several racks in the buildup area have been filled, run them through the
dishwasher one after the other. This will allow the loading operator to return to scrapping and stacking
.
Page 11

10
DETERGENT
Use a low-suds, good commercial grade detergent. Never use a foaming soap or soap flakes. Your
local detergent representative knows the capabilities of their detergents and can determine the proper
treatment of your water for proper use with the manufacture’s product. The wash water must be kept at
an effective strength to obtain good washing results. Ask your local detergent supplier for their advice.
OPERATING THE DISHWASHER
Once the wash tank is filled and the dishwasher is properly loaded, choose a cycle mode per the following
instructions:
1. Use the up/down arrows on the Select Cycle Key to choose the desired ware-washing cycle. The
choices are: Economy (default), Economy Plus, Glassware, Flatware, Dishware, Pots and Pans,
and Programmable.
2. “HEATING UP WATER”. The indicator light is red and the wash cycle cannot start until the
dishwasher reaches the required temperature. An exception to waiting period is the Economy cycle;
in which, the wash cycle can be started regardless of water temperatures.
3. When proper temperatures are reached, a green indicator light appears and the dishwasher is
ready for a washing cycle. To start the washing cycle, press the Start/Enter switch.
4. At the beginning of the wash cycle, a detergent pump will systematically add detergent into the
wash tank.
5. At the end of the wash cycle, a blue indicator light appears. The final rinse is now in process. The
dishwasher will perform a slight draining operation prior to the final rinse cycle. Towards the end of
the rinse cycle, a rinse aid will automatically inject the additive into the final rinse water line.
6. Operation is complete when the blue indicator light turns off.
7. The dishwasher is ready for the next loading session.
NOTE: It is important to check and clean the strainer when prompted to do so.
A “CLEAN STRAINER” prompt will appear after:
a. Several loads have been washed in the same washing mode.
b. Washing mode has been changed (e.g. changing from a dishware mode to a flatware mode).
Page 12

11
PROGRAMMABLE MODE
The programmable mode allows an operator to manually select and program a custom wash and rinse
cycle. Selections include:
Wash and rinse mode
• Low
• Medium
• Heavy
Temperature Modes
• Wash - 150°F to 170°F
• Rinse - 180°F to 190°F
The default in the wash mode is “low”. The default in the temperature mode is 150°F wash and 180°F
rinse. To change either one of these settings, press and hold the Select Cycle Up and Down Keys
simultaneously for fifteen seconds. This will prompt the dishwasher into a setup screen. To change
Wash and rinse mode, press the Select Cycle Down Key until the desired cycle appears on the display
screen. Press the Select Cycle Up Key to save the cycle. Repeat for wash and rinse temperature
settings. When all selections have been made, press the Start/Enter switch to exit the setup screen.
Shutdown and Cleaning
An important part of maintaining the dishwasher is keeping it clean. A thorough cleaning before shutting
the unit down will help keep it working at peak performance.
Shutdown
1. Press dishwasher once to allow dishwasher to fully drain.
2. Press Power On/Off switch a second time to power down the unit.
Cleaning
1. Open door and allow interior to cool down before cleaning.
2. Remove the scrap filter screens and empty them. Take them to a sink and clean them using a
suitable brush. Make sure all debris is removed. Rinse thoroughly.
3. Inspect the rotating wash arms for blockage of any opening and free rotation. Remove and
clean as needed.
4. Thoroughly wash and rinse the interior of the dishwasher.
5. Leave door open to dry interior.
Page 13

12
TROUBLESHOOTING
Problem(
Possible(Cause(
Corrective(Action(
Dishwasher does not run
Main power off
Check breaker panel
Dishwasher does not fill
Main water off
Open supply valve
Rinse nozzles clogged
Clean rinse nozzles
Solenoid filter clogged
Clean filter
Lime build-up
De-Lime rinse line
Defective pressure switch
Replace pressure switch
Indicator light flashing and/or error code
is displayed on screen
See error codes
Poor wash results
No detergent supplied
Add detergent supply
Ware loaded incorrectly
Load ware correctly
Clogged spray arms
Clean spray arms
Detergent dispenser defective
Contact factory
Wash water dirty
Drain and refill tank
Insufficient wash time
Select a longer wash mode or repeat
cycle
Low water temperature
Contact factory
Foam developing
Use a low suds detergent or reduce the
amount of rinse aid by adjusting the
dispenser screw
Clogged sump filter
Clean sump filter
Streaks and spotting on
dishes and glasses
Too much rinse aid being dispensed
Reduce the amount of rinse aid by
adjusting the dispenser screw
Water too hard
Contact detergent representative
Clogged rinse nozzles
Clean rinse nozzles
Insufficient flow pressure
Increase incoming flow pressure to
20-25 psi
Page 14

13
ERROR CODES
Resetting an error code
An error code can be reset by pressing the Power On/Off switch three consecutive times. If the error
code fails to reset, refer to the below chart before contacting factory.
ERROR CODES
B1
heat alarm
Check power connection to booster element
B2
rinse failed
Check incoming water supply and flow pressure
B3
overheating
Contact factory
E1
water load
Open the main water supply valve. Contact factory
T1
heating
Check power connection to tank heating element
T2
overheating
Contact factory
T3
drain
Check drain pump operation and sump filter
T4
sensor
Check for proper polarity connection and/or loose connection
T5
high level
Drain and load tank
T6
low level
Drain and load tank
Check incoming water and flow pressure
Page 15

14
Page 16

15
Page 17

16
Page 18

17
Page 19

18
Page 20

19
Page 21

20
Page 22

21
Page 23

22
Page 24

23
Page 25

24
Page 26
252627
Page 27

Page 28

Page 29

Date of Installation
Serial No.
Model No.
Limited Warranty
Your new Blakeslee dishwashing machine is warranted for one year from date of installation shown above
against defective materials and workmanship. If any defects are found within the warranty period; parts, and
labor involved with their replacement will be covered free of charge. Service must be performed by a Blakeslee
authorized service agency. All labor to be performed during regular working hours. Overtime premium will be
charged to the customer. All warranty parts are shipped by surface transportation. If other means of
transportation is requested the customer is required to pay the premium. This warranty does not apply to
damages resulting from errors in installation on the part of other contractors, nor does it apply to machines
which have been subject to accident, misuse, or abuse. It is understood that Blakeslee’s warranty obligation
with respect to machines located outside of the United States or located in the state of Alaska is limited to the
furnishing of replacement parts only. In the state of Hawaii, repair labor is provided free of charge; travel time
and expenses paid by the customer. On the island of Oahu, repair labor, travel time and expenses are provided
free of charge. This is the entire and only warranty of Blakeslee. We neither assume nor authorize anyone else
to assume for us any other obligation or liability in connection with Blakeslee Machines.
•
In no case can this warranty exceed eighteen (18) months from the
date of shipment from our plant at Addison, Illinois
Items NOT Covered Under Warranty
1. Replacing Fuses or resetting Overloads.
Replacing a blown fuse or resetting an open overload breaker is a very simple procedure and is the
owner’s responsibility. If the machine continues to blow fuses or open the overload breaker, contact
your nearest authorized Blakeslee Service Center.
2. Adjusting Tank Heats.
Heat adjustments are covered in The Owners Manual and must be adjusted depending upon desired
results.
3. Proper Loading of Dishes.
It is important that the machine owner’s personnel observe the instructions outlined in The Owners
Manual.
4. Cleaning Drain Valves.
Foreign articles lodged in the drain valve seat should be removed as a part of the normal daily cleaning.
5. Cleaning Rinse or Wash Nozzles and Line Strainers.
Keeping a dishwasher clean and removing obstructions from the nozzles and line strainers will be a
periodic function of the machine owner’s personnel. The cleaning periods will vary depending upon
impurities in the water supply and cleanliness of the washing operation.
6. Final Rinse Water.
Most frequent of all complaints in any dishwashing machine is that of poor final rinse. It is the
responsibility of the owner to provide 180 to 195 degree (plus) water at 20-25 lb. flow pressure through
clean unobstructed water lines. If the machine has a factory equipped final rinse water booster, the
owner must supply the booster with a minimum of 140 degree temperature water.
28
Page 30

Notes:
29
Page 31

Page 32

MADE IN USA
PROTECT YOUR EQUIPMENT
USE GENUINE BLAKESLEE PARTS
 Loading...