

Page 1
DR380-HD / DR380G-HD / DR400G-HD / DR400G-HD II
User's Manual
www.blackvue.com
BlackVue_Eng_0726.indd 1 2012-07-26 �� 4:00:45
Page 2

BlackVue_Eng_0726.indd 2 2012-07-26 �� 4:00:45
Page 3

Table of Contents
Preparations
BlackVue Usage
BlackVue Software
Others
2 Before Reading the User's Manual
3 Safety Instructions
5 Product Features
6 What's included
7 BlackVue At a Glance
8 Installation
12 Recording
14 Playing Recorded Videos
17 Running BlackVue Software
18 Screen At a Glance
19 Playing Recorded Files
23 Saving as an Image File / Printing
24 Configuring BlackVue Settings
34 Installing the BlackVue Software
35 Upgrading the Firmware
36 Product Specifications
BlackVue_Eng_0726.indd 1 2012-07-26 �� 4:00:45
Page 4

Preparations
Before Reading the User's Manual
Thank you for purchasing Pittasoft's BlackVue. This product is a video event
data recorder ( VEDR) for vehicles.
X
Please read the User's Manual carefully before using the BlackVue.
X
Pitt as of t is p lan ni ng to s up ple me nt i ts produ ct a nd add ne w feat ures via
firmware on a constant basis. All information and specifications in this manual
are subject to change without a prior notice.
X
Screens and pictures of the User's Manual may be different from the actual obje ct.
Descriptions of Symbols Used in the Manual
Symbo l Name Descr iptio n
Cases where the d evice fails to wor k prope rly or its settings are
Caution
disabled.
Tip Additional note s that are h elpful in working the device
Warranty and Disclaimer
X
We shall take no responsibility for accidental damage, injuries and other losses
caused by improper use of the product.
X
This product is a video event data recorder for vehicles but does not guarantee
tha t all a cc idents wil l b e reco rd ed. T hi s devi ce may fail to record a mino r
accide nt caused by too light an impact to trigger the impact sensor.
X
This product creates a record of video to help determine what happened before,
during and after the crash or event.
Pittasoft Co. shall not take any responsibilit y for damages (property, business
and/or indirect damages).
2
BlackVue_Eng_0726.indd 2 2012-07-26 �� 4:00:45
Page 5

Preparations
Safety Instructions
This manual is about what should be done to protect the user's safety and
prevent property damage.
Please make sure to read it thoroughly before using the product.
Do not disassemble, repair and /or alter the product.
This may cause a fire, an electric shock and/or malfunction. Contact the service
center if you need to have the product fixed. User may not be entitled to fre e
service if and when product malfunction is caused by user's fault.
Do not spray water on each parts of the product when cleaning it . Make
sure not to wet the product.
This may cause a fire, an electric shock and/or malfunction.
Do not spray a cleansing agent on the surface of the product.
This ma y caus e disc oloration an d/or cr acks o n the s ur f ac e and resu lt in
malfunction.
Do not give the product a shock, and make sure forei gn matte r does not
enter the product.
This may re sult in malfunction.
Do not operate the product while driving.
This may cause a traf fic accident because it distracts you from keeping your
eyes on the road. Use af ter stopping/parking your car in a safe place.
Do not install the product in a location where it may interrupt a safe driving
or block your view while driving.
This may cause a traffic accident.
Excessively dark tinting on the windshield may make recorded images look
blurr y or distorted.
The optimum tem peratur e for picture quality rang es from 0 to 50 °C. The
picture quality may var y according to seasons, especially in midsummer or
winter season.
Thi s p ro duct is fitted with a camera. Drastic ch an ge s i n brightne ss (on
entry/exit of tunnels), strong backlight in the daytime, and no light source at
midnight may result in defective recorded images.
If power supply to the device is interrupted by a crash or accident, it may
cause video not to be recorded.
3
BlackVue_Eng_0726.indd 3 2012-07-26 �� 4:00:45
Page 6

Preparations
Safety Instructions
Cautions for GPS Usage GPS models Only
X
Poor GPS reception will not affect video recording.
It will only lead to a failure to record a vehicle's coordinates and spee d.
X
Plea se maintain the optimum temperature, which ranges 0 to 50 º C from for
proper working of GPS. GPS reception may get unstable or its connection time
may be delayed in the midsummer or wintertime.
X
When you use the pr od uc t for the first time or you ha ve not used it fo r a n
extended period of time (over 3 days), it may take some time for GPS to identify
the current location. (at least 1 to 5 minutes)
X
Instal l the p rod uc t avoid ing th e fo llowi ng instances w here G PS receptio n is
interrupted, and check the GPS reception.
yAn instance where an object in put on top of GPS
yAn instance where the windshield is ti nted with metall ic substance s
yAn instance wh ere devices producing RF radiation interru pting GPS signa ls are installed
in a car (certai n models of remote car alarms and MP3/CD players)
yAn instance where another device usi ng GPS is used
yAn instance where it is dark and overcast
yAn instan ce where GPS is used under an overpass; in a tunnel, under pass, underground
parking lot, and an a rea co ncen trated w ith large buildin gs; and near a p ower station,
barracks, and broadcast relay station
Cautions for BlackVue Installation
X
Instal ling or op erating the d evice whi le drivi ng may cause an acc ident. Pleas e
install or operate the device after stopping/parking your car in a safe place.
X
If th e ciga ret te lighter re ceptacle emits fumes or a fu nny smell, sto p usin g th e
product immediately and contact us or our dealerships.
X
Dust and built-up dirt on the cigarette lighter receptacle may c ause heat or a fire.
Clean it on a regular basis.
X
Check frequently if the product is installed properly. Due to vibration, the BlackVue
comes of f, resulting in an injur y or damage.
X
We do not take any re sp onsib il it y for malfu nctio n, an inj ur y or dam ag e to the
product caused by inappropriate use.
4
BlackVue_Eng_0726.indd 4 2012-07-26 �� 4:00:45
Page 7

Preparations
Product Features
High-d efinition Vid eo
The BlackVue uses hig h qualit y mega-p ixel lenses, which produce cl ear and sha rp
images even at night.
Smar tphone/PC Viewer
The product comes with a PC viewer and applications for smartphones (running on
Android). You can check images easi ly and customize variou s settings.
Normal Recording
The product makes a high-definitio n video recording of all the events while driving.
Parking Mode Recording
The produc t automatic ally shif ts to the par king mode. If there is no m ovement of
a vehicle for a ce rtain period of tim e, the device au tomatic ally s hifts to the parking
mode; and if the movement of a vehic le continues, the par king mode becom es
automatically deactivated. In the parkin g mode, only if the ca mera d etects motion
or an impact occurs, recording gets star ted. (T he product is equipped with motion
detection techn ology developed by Pit tasof t, whic h specialize s in IP cameras.)
Event (G-s ensor) Recording
If the veh icle is give n an impact, the G-sensor built in the BlackVue detects the
impact a nd star ts recording the event.
Sound Recordi ng
The micro phone bu ilt in the Blac kVue reco rds surro undin g sounds wh ile recording
video.
Check Images o n Various Devices
You can check record ed imag es on a var iety of devices that ca n play MP4 file s.
Refined and Easy-to -Use De sign
The Blac kVue with its sleek and cylin drical design makes the vehicle's interior look
even bet ter.
In addition, you c an easily adjust the camera angl e so that it can re cord th e inside
of the car.
Voice Guide
The voic e guide provides infor mation a bout th e curre nt status of the BlackVue.
GPS Driving Re cord GPS mod els only ( DR380G -HD, DR400G-H D, DR400G -HD II )
The built-in hi gh-sensitivity GPS creates a re cord of the sp eed and location of the
vehicl e at the time of recordin g. You can che ck the driving records v ia BlackVue
software. (when conn ected to th e Intern et)
5
BlackVue_Eng_0726.indd 5 2012-07-26 �� 4:00:46
Page 8

Preparations
What's included
Check the product and the accompanied accessories contained in the product
package.
Please contact your dealership if there is a problem with the components.
*Components provided and optional items may vary depending on a model.
Components provided and optional items are subject to change without a prior
notice.
BlackVue User Manual
Video O UT Cable* Video I N Cable* Power Cable
Cable Clips Double-sided Tape
Micro SD Card
6
BlackVue_Eng_0726.indd 6 2012-07-26 �� 4:00:46
(inclu ding Bl ackVue s oftware)
(spare ite m for mounting the
BlackVue on the wi ndscreen)
Micro SD Card Reader*
Page 9

Preparations
BlackVue At a Glance
Check the main body of the BlackVue.
For more information on the use of each part, refer to the relevant page.
Record ing Mod e LED
Micro SD Card Slot
[VIDEO OUT ] terminal
(X See pag e 11)
GPS Reception LED
GPS models on ly
Holder lock button
(X See pag e 11)
[DC IN] ter minal (X See pag e 9)
Camera Lens
Holder
Microp hone
Main Body Button (Park ing
Mode Recording Butto n)
(X See pag e 12)
7
BlackVue_Eng_0726.indd 7 2012-07-26 �� 4:00:47
Page 10
BlackVue Usage
Installation
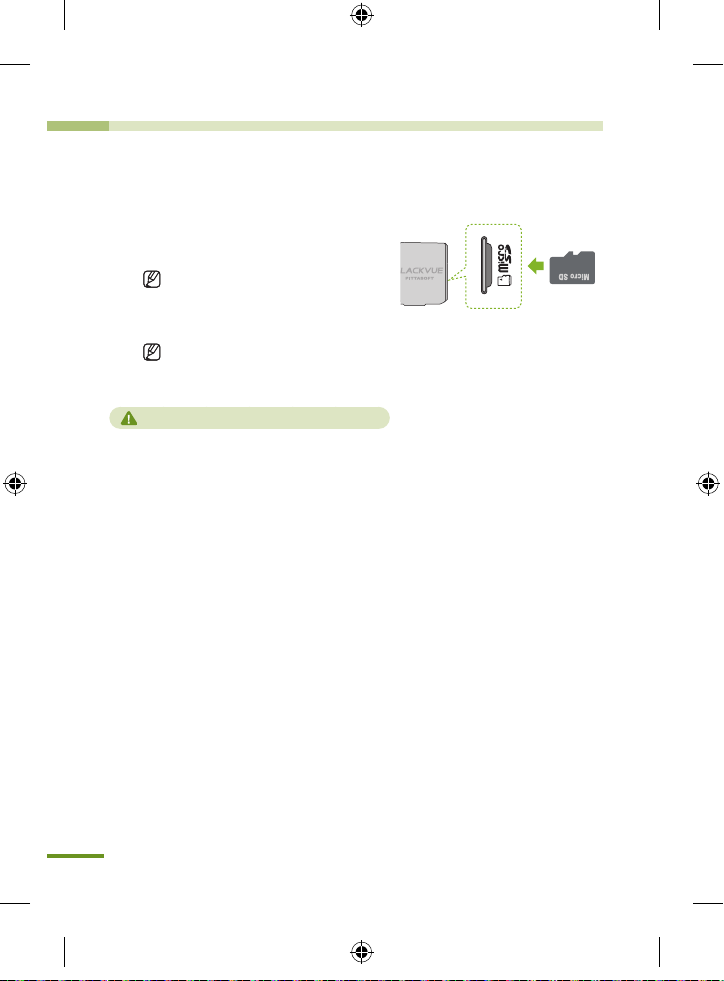
Insert the Micro SD Card into the BlackVue
Insert the Micro SD card into the
1.
Micro SD slot in the same direction
as shown in the picture.
Pre ss th e card agai n to r em ove
it. While doing this, be careful so
that the Micro SD card won't pop
out.
Tu r n of f the Bl ackVu e b e f o r e
inser ting the card into it.
Cautions for Using the Micro SD Card
yInser t/rem ove the Micro SD card with the B lackVue off.
(Check to see if all the LEDs on the Blac kVue are of f.)
yDo not remove the Micro SD card whil e saving data on the card or reading data from
it. This may cause d ata loss and product malfunction.
yCheck the data stored on the M icro SD card to see if the product is wor king properly.
yWe recommend you use the genuine memo ry cards prov ided by Pitta soft. We d o not
take any responsibility for problems cause d by the use of other memory cards.
yThe Micro SD card i s consu mable. Replace it with a new one af ter a longtime use.
yMake sure to store impor tant data on another storag e medium. We do not take any
responsibil ity for data los s cause d by user's fa ult.
8
BlackVue_Eng_0726.indd 8 2012-07-26 �� 4:00:47
Page 11
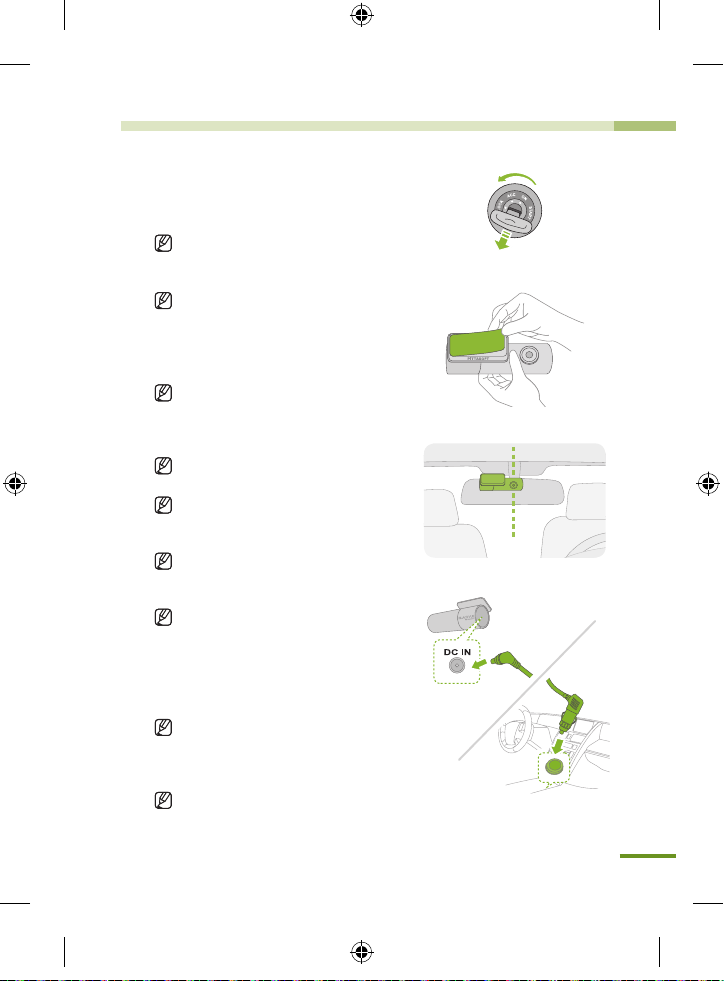
Install the BlackVue in the Car
Turn off the ignition and pull out the car key.
1.
Install the device in a bright and safe place.
Insert the Micro SD Card into the BlackVue.
2.
For i ns tr uctio ns fo r use of Mi cro SD c ar d,
please refer to page 8.
Attach the BlackVue on the vehicle's window
3.
using double-sided tape.
We recommend you install the device on the
bac kside of the re ar view mirro r s o that the
BlackVue camera le ns is at the center of the
vehicle.
Install the device in an area where it does not
block the driver's view.
Clean the area, on which a double-sided tape
wil l be put, w it h a dr y cloth to remove any
foreign matter and moisture.
I f mo un t e d on th e el e c tr i c al ly he at e d
windscreen, the product may cause damage
to the heating grid when demounted later.
If th e mount of the Black Vue has come off,
see Page 11.
Connect the BlackVue's [DC IN] connector
4.
to the cigarette lighter receptacle using the
power cable.
Wh en rec or di ng i n the park ing mo de, you
are advised to connect the Power Magic, an
uninterrupted power supply (UPS) unit, to the
product.
If you intend to use th e BlackVue along with
othe r car a cce sso rie s usi ng the cig ar ett e
lighter rec ept acle, you are advised to use a
multi-socket outlet (cigar socket).
9
BlackVue_Eng_0726.indd 9 2012-07-26 �� 4:00:47
Page 12
BlackVue Usage
Organize the power cable.
5.
Adjust the position of the BlackVue's
6.
camera lens.
Start the engine.
7.
Check to see if the product is properly
installed.
Installation
Use the provided cable clips if necessary.
Insta ll the product in such a way that
th e B L AC K V U E l ogo in the b utto n
sec ti on faces slig htly lower than the
level.
Che c k the st o r e d da t a af t e r te s t
driving, an d adjust the position of the
lens if necess ary.
If you connect the product to portable
video de v i c e s (s m a r t p h o n e , GPS
navigator, etc.), you can adjust the lens
angle checking video. (X See Page 11)
If the BlackVue's LED is turned on, it is
properly installed.
The type of LED may vary de pending
on the model.
10
BlackVue_Eng_0726.indd 10 2012-07-26 �� 4:00:47
Page 13
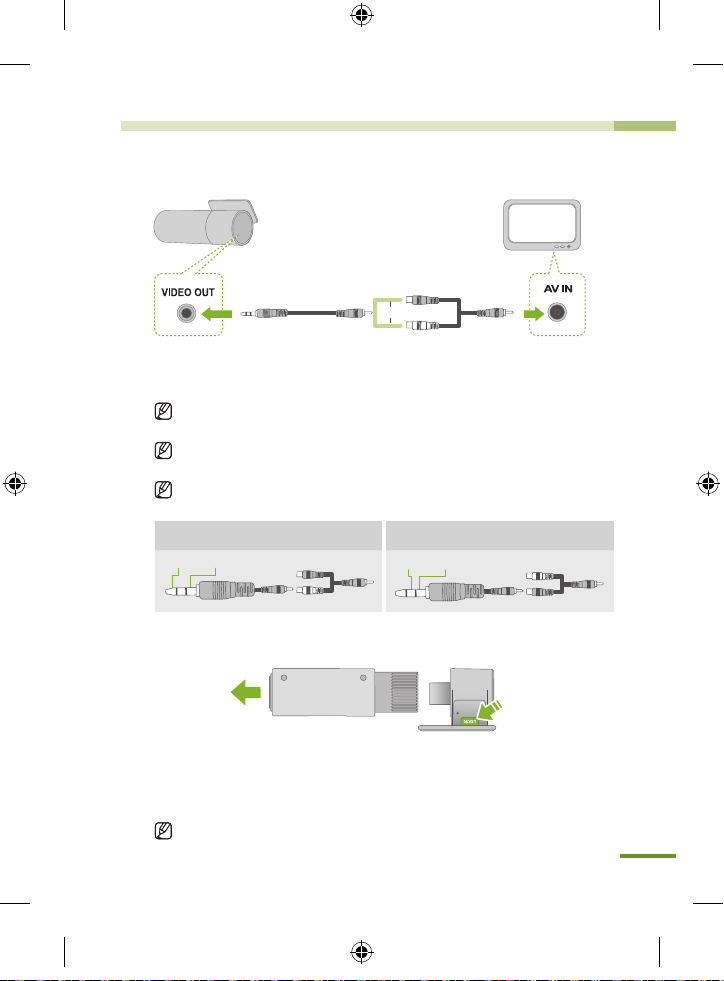
Connecting the BlackVue to AV Product
Or
Video OU T Cable Video IN C able*
Connect the BlackVue's [VIDEO OUT] terminal, to the AV product using
1.
the Video OUT/IN cable (accessory).
You can chec k the Blac kVue's real -tim e vide o on the conne ct ed AV
product.
If you use the B lac kVue's [VIDEO OUT ] port, you can redu ce the video
frame rate.
The Vide o IN* cable may not be compatible with certain GPS navigators.
Check the compatibility before use.
When con nected to the white co nnector o f the
Video IN c able*
GroundVideo
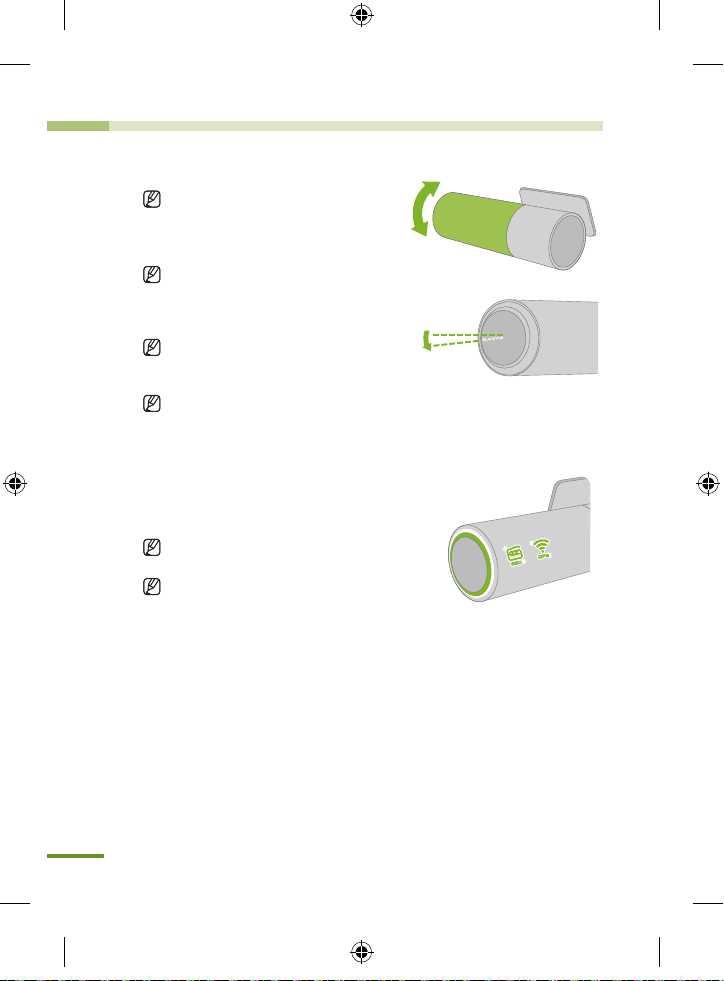
Disconnecting from the Holder
When con nected to the yellow c onnecto r of the
Video IN c able*
GroundVideo
Pull the BlackVue's main body holding down the [LOCK] button on the
1.
mount as shown in the picture.
The BlackVue's main body will be easily disconnected from the mount.
2.
Connect to the Mount : Insert the BlackVue's main body into the groove
on the mount until the ‘click’ sound.
BlackVue_Eng_0726.indd 11 2012-07-26 �� 4:00:47
11
Page 14

BlackVue Usage
Recording
Normal Recording
Start the ignition.
Doing this will turn on the BlackVue and start the normal recording. Recording
will go on as long as the BlackVue is on.
Connected to the Power Magic (UPS unit), the BlackVue will remain on.
If you set [Set Normal Recording] in the configuration to [Normal Recording
Off ], normal recording becomes deactivated. (
See Page 27)
X
Parking Mode Recording
This product has [Automatic Shift to
Parking Mode] as a default setting.
(X See Page 28)
If there is no movement of a vehicle for
over 10 minutes, the device automatically
shifts to the parking mode.
If t he movem en t of a vehic le co ntinu es
for about 30 seconds, the park ing
becomes automatically deactivated.
If you want to activate the parking mode
or turn it off, press the button on the
main body of the BlackVue.
In the parking mode, only if the camera detects motion (motion detection) or
an impact occurs (G-sensor), recording gets started.
For recording in the parking mode, you are advised to connect the BlackVue
to the Power Magic (UPS unit).
mode
Motion D etection Algorithms
yThis is a technology of capturin g motion in the camera.
yThe product i s equipped w ith security solution tech nologies devel oped by Pittasoft,
which specia lizes in IP came ras.
12
BlackVue_Eng_0726.indd 12 2012-07-26 �� 4:00:47
Page 15

Event Recording
If the BlackVue detects an impact above the threshold, the device automatically
records video before/after the event.
You ca n adju st the sensi tivity of the BlackVue detectin g an im pact i n [S et
Sensitivity]
You c an se t diff er en t s en si ti vi ti es be twee n norm al re co rd in g m od e and
parking mode.
G-sensor (3 -axis Acceleration Sensor)
yThe BlackVue records event video with its G-sensor detecting an impact.
yThe G-s ens or, a 3-axi s ac celer ation sensor, i s co mpo se d of X-axis (front / re ar),
yYou can chec k the G -sen so r i nformation of th e file s reco rd ed in th e Blac kVu e
yYou c an n ot u se G-sen sor v al u es mea su r ed b y the B la c kV ue as e vi d enc e to
Turning off BlackVue
Turn off the ignition.
The BlackVue will turn off in about 5 seconds.
All LEDs of the BlackVue will turn off.
If t he BlackVu e is connec ted to Power
Magic (UPS unit), unplug the power cable
that is connected to the BlackVue.
. (X See Page 29)
Y-axis (right / left), and Z-axis (top / bottom).
Software, a viewer for the BlackVue.
determine the co ntext of an accid ent.
13
BlackVue_Eng_0726.indd 13 2012-07-26 �� 4:00:47
Page 16

BlackVue Usage
Recorded files of the BlackVue are saved in MP4 format. You can easily
check the recorded video on media players (PC, smartphone, and GPS
navigator) without converting the files.
Re c o r d e d f i l e s o f the Black V u e a r e
saved in the ‘Record’ folder of the Micro
SD card.
Playing Recorded Videos
Playing videos on your smart phone
Download BlackVue Application
yWe p rovid e an app lication for the BlackVue. Using this
application, you can easily play and manage video clips
record ed by the Bl ackVue.
yAcc ess Googl e Pl ay Sea rch for Bla ckVue Sel ect
Application Download
Turn off the BlackVue and remove the Micro SD
1.
card from it.
Insert the Micro SD card into your smartphone.
2.
You can che ck video on a smartphone supporting
Micro SD card.
Go to the smartphone's main menu, and press the
3.
BlackVue App icon. The BlackVue viewer will be
launched.
You can also play the video in video player applications
for smar tphone.
Press the desired video file, and playback will start.
4.
If there are many files in the Micro SD card, it may
take some time to load the file.
There may be some mobi le devices that do not
suppor t Full HD v id eo. F or mobile d ev ices t ha t
14
suppor t Full HD video, pleas e vi sit the Bl ackVue
website. (w ww.blackvue.com)
BlackVue_Eng_0726.indd 14 2012-07-26 �� 4:00:48
Page 17

Playing videos on GPS Navigator
Insert the Micro SD card into the SD card adapter.
1.
Insert the SD card adapter into the SD card reader.
Connect the SD card reader to your GPS navigator.
2.
Select a video play icon, and select the removable drive containing
3.
video files.
Press the desired video file, and playback will start.
4.
The way of playing video may va ry depending on the product. For more
information, see the user's manual for your navigator.
If there are many files in the Micro SD card, it may take some time to load
the file.
15
BlackVue_Eng_0726.indd 15 2012-07-26 �� 4:00:48
Page 18

BlackVue Usage
Playing Recorded Videos
Check Video on PC
Insert the Micro SD card into the SD card adapter.
1.
Insert the SD card adapter into the SD card reader.
Connect the SD card reader to your PC.
2.
Double-click the ‘BlackVue.exe’ file in the ‘Application’ folder in the
3.
Micro SD card, and the BlackVue will be launched.
Select the desired video file to play it.
4.
For a PC media player, you have to install H.264 video codec and AAC
audio codec to play the video properly.
You are advised to use the BlackVue software to check the v ideo on your
PC. (X See Page 17)
16
BlackVue_Eng_0726.indd 16 2012-07-26 �� 4:00:49
Page 19

BlackVue Software
Use the BlackVue player to play files recorded by the BlackVue on your PC.
Running BlackVue Software
The BlackVue software allows
by the BlackVue.
You can use the BlackVue player without installation.
Insert the Micro SD card into the SD card adapter.
1.
Insert the SD card adapter into the SD card reader.
Connect the SD card reader to your PC.
2.
Double-click the ‘BlackVue.exe’ file in the ‘Application’ folder in the
3.
Micro SD card, and the BlackVue will be launched.
To install the BlackVue software in your PC, please refer to Page 33.
you to easily play and manage video recorded
17
BlackVue_Eng_0726.indd 17 2012-07-26 �� 4:00:49
Page 20

BlackVue Software
Screen At a Glance
Playbac k
Pane
Full-screen Vi ew Button /
Reverse Scree n Button (X See Pag e 20)
Play Control But tons
Screen Zoom in/ou t
(Controll ed by scrolling
the mouse w heel)
G-sensor Pane
Play Speed Control /
Volume Control
Duration
MyWay Viewer, GPS information and map are only available for the GPS models.
Types of Recorded Files
: Recorded files in normal recordin g mode. They will be marked as green in the
Timeline.
: Recorded files in event recording mode. They will be marked as oran ge in the
Timeline.
: Recorded files in parking m ode. They will be marked a s blue in the Time line.
Play Control But tons
: Play the se lected file.
: Stop playing the fil e.
: Stop playing the fil e temporarily.
/ : Move forward /backward f rame
by frame.
/ : Play the previous /next file.
18
View BlackVue
Version
Information
MyWay Viewer
(X See Page 22) /
Save Imag e / Print
/ Set Configuration
GPS Infor mation
Pane
File List
Timeline
BlackVue_Eng_0726.indd 18 2012-07-26 �� 4:00:50
Page 21

BlackVue Software
Press the [ Browse] button to
1.
Playing Recorded Files
select the folder containing files.
The files in the selected folder will
appear on the list.
Double-click the desired file (Or,
2.
select the file and press the
button), and the file will be played
back.
Double -c li ck th e playback pane
for a full-sc re en vi ew. Pres s the
ESC button to return to the default
screen size.
Sc r o ll the mou s e w h e el in t he
playback pane to zoom in/out the
playback window. (from 0.5 times
up to 2.0 times)
Ri g h t-cl i c k the pl ayb a c k pan e ,
and a partially magnified pane will
appear.
You can adjust the playback speed
from 0.5 to 2.0 times.
If you se t [Fil e Typ e ], on l y t h e
selected type of files will appear on
the list. (All types are selecte d as
default setting.)
If you select [Filtering by date], only
the files on the date you select in
the time line will appear on the list.
Files will be recorded in MP4 format.
yThe Bl ac kVu e recor ds and s ave s files in MP4 format. You c an ea sily chec k th e
record ed video on media player or the BlackVue player suppor ting MP4 format.
19
BlackVue_Eng_0726.indd 19 2012-07-26 �� 4:00:50
Page 22

BlackVue Software
Playing Recorded Files
Display Settings
X
(Full-screen button)
Display the video in full screen.
X
(Reverse screen button)
Turns an image upside down.
Timeline Bar
Using the Timeline, you can check the recording status by the hour of the
selected date.
In addition, you can easily search/play the files recorded at the desired time.
X
Select date Select hour (able to identify the t ype of re corded file)
Select minute Select second View the video recorded at the selected
time
Red circle: date containing recorded files
Yellow circle: selected date
20
BlackVue_Eng_0726.indd 20 2012-07-26 �� 4:00:50
Page 23

Exporting/Deleting Files
From the player file list, select a file and rightclick it to display the context menu.
Select [Delete] to delete the selected file or
select [Export] to save it in a dif ferent location.
Video E xport set tings
Check this box to delete the sound whe n expor ting video.
Set the file name an d the location
to save the file to expor t vide o.
Set the se ction of v ideo you want
to expor t.
Checking the Map
GPS models only
Select the Map tab when playing a recorded file.
You can check GPS-recorded location of your car via a map service.
Connect to the Inter net to use the map service.
Data will be shown only for recorded files with GPS information.
GPS Reception
-Green: G PS information
-Red: No GP S informa tion
Map Zoom in/out
-Adjust by s crollin g the mouse
wheel
Drivi ng Speed and Co ordinates
: Change d riving speed un it
Select map ty pe
Car location
21
BlackVue_Eng_0726.indd 21 2012-07-26 �� 4:00:50
Page 24

BlackVue Software
Playing Recorded Files
Opening the MyWay Viewer
GPS models only
Press the button, and the MyWay Viewer window will appear.
The driving route will appear on the map.
X
Double-click the map, and the video of a driv ing route close to the clicked location
will be played back.
Speed
Move map
Map Zoom in/out
: Change d riving speed un it
Drivi ng route
- Current fil e / 2 previou s files/ 2 next files
Latitude/Longitude
Locate the vehicl e
Select map ty pe
Record ed file starting point
- Red: Curr ent file
- Blue: Prev ious/N ext file
Vehicle locatio n
22
BlackVue_Eng_0726.indd 22 2012-07-26 �� 4:00:50
Page 25

BlackVue Software
Saving as an Image File / Printing
Saving the Desired Screen as an Image File
Press the button during playback to stop the screen.
1.
Select the desired screen.
To search for the desired screen, select the Second unit in the Timeline, or
press the / button to navigate.
Press the button. Check the file saving path, and press the Save
2.
button. Save the selected screen as an image ( jpeg, bmp) file.
Printing the Selected Screen
Press the button during playback to stop the screen.
1.
Select the desired screen.
To search for the desired screen, select the Second unit in the Timeline, or
press the / button to navigate.
Press the button, and the selected screen will be printed out.
2.
23
BlackVue_Eng_0726.indd 23 2012-07-26 �� 4:00:51
Page 26

BlackVue Software
Insert the Micro SD card into your PC. (X See Page 16)
1.
Press the button, and the Configuration window will appear.
2.
You cannot set configuration if the SD card with the BlackVue Firmware
installed is not connected to the PC.
Customize your BlackVue experience.
3.
Press the [Save & Close] button.
4.
You cannot set configuration for BlackVue if the settings are not saved in
the Micro SD card.
Press the [Initialize Settings] button, and the settings will be initialized.
Remove the Micro SD card with the settings saved from the PC, and
5.
insert the card into the BlackVue.
The settings will be automatically saved into the BlackVue.
Configuring BlackVue Settings
24
BlackVue_Eng_0726.indd 24 2012-07-26 �� 4:00:51
Page 27

Basic Settings
[ DR400G-HD II ]
[ DR400G-HD ]
25
BlackVue_Eng_0726.indd 25 2012-07-26 �� 4:00:51
Page 28

BlackVue Software
[ DR380G-HD ]
[ DR380 -HD ]
Configuring BlackVue Settings
26
BlackVue_Eng_0726.indd 26 2012-07-26 �� 4:00:51
Page 29

Time Zone
Select the time zone where the BlackVue is used. This will be used as time
information for re corded files.
Image Setting
X
Image Quality: Set the image quality of a file to record.
Higher image quality will increase the file size.
Suppor ted Image qualify differs depending on the model.
X
Video Compression: Set the video compression.
Higher image compression will reduce the file size.
Some mobil e devic es may not be able to play recorded f iles with a hi gh
image compression.
X
Brightness: Set the brightness of a screen to record.
27
BlackVue_Eng_0726.indd 27 2012-07-26 �� 4:00:51
Page 30

BlackVue Software
Configuring BlackVue Settings
Recordable Time by Memory Capacity
The recordable time is one hour on the basis of continuous recording. In actuality, the tim e
may be slightly di fferent.
DR400G-HD / DR4 00G- HD II
Image Qu ality
Memor y Capacity
8GB
16GB
32GB
Image Qu ality
Memor y Capacity
8GB
16GB
32GB
Full HD
30fram es
2 hr. 15 min. 3 hr. 23 min. 3 hr. 23 min. 5 hr. 41 min. 8 hr. 30 min.
4 hr. 37 min. 6 hr. 54 min. 6 hr. 54 min. 11 hr. 29 mi n. 17 hr. 09 mi n.
9 hr. 24 min. 13 hr. 59 min. 13 hr. 59 min. 22 hr. 51 mi n. 34 hr. 0 9 min.
Full HD
30fram es
3 hr. 32 min. 4 hr. 16 min. 4 hr. 15 min. 5 hr. 50 min. 8 hr. 31 min.
7 hr. 02 min. 8 hr. 49 min. 8 hr. 41 min. 11 hr. 31 mi n. 17 hr. 12 mi n.
13 hr. 55 min. 17 hr. 11 min. 17 hr. 10 min. 23 hr. 18 mi n. 35 hr. 48 min.
Image Co mpress ion : Normal
Full HD
15 frames
Image Co mpress ion : High
Full HD
15 frames
HD
30 frame s
HD
30 frame s
HD
15 frames
HD
15 frames
D1
30fram es
D1
30fram es
DR380 -HD / DR380G-HD
Image Qu ality
Memor y Capacity
8GB
16GB
Image Qu ality
Memor y Capacity
8GB
16GB
Image Co mpress ion : Normal
HD
30 frame s
3 hr. 23 min. 5 hr. 41 min. 8 hr. 30 min.
6 hr. 54 min. 11 hr. 29 min. 17 hr. 09 min.
HD
30 frame s
4 hr. 15 min. 5 hr. 50 min. 8 hr. 31 min.
8 hr. 41 min. 11 hr. 31 min. 17 hr. 12 min.
HD
15 frames
Image Co mpress ion : High
HD
15 frames
D1
30fram es
D1
30fram es
Recording Settings
X
Normal Recording Set tings
• Normal Recording On: Records all the events while driving.
• Normal R ecord ing Of f : Saves f iles recorded in Event Recordin g/Parking
28
Mode Recording only.
BlackVue_Eng_0726.indd 28 2012-07-26 �� 4:00:51
Page 31

X
Voice Recording Settings: Whether to use the voice recording function or not.
X
Date and Time Display:
Displays date and time in the bottom left corner of the
screen while recording.
X
Speed Display
:
GPS mode ls only
Displays the speed of a vehicle in the bottom left corner of the screen.
Select the desired spe ed unit to display.
If you select [Display Off], the speed of a vehicle will not be displayed in the
recorded files.
X
Record File Unit: You can set the file saving unit when recording.
X
Recoding Storage Set ting :
The older record ed files will be deleted so that
new video can be re corded in a limited storage space.
• Time : If there is not enough storage space available, the older recorded files
will be automatically deleted.
• Type : Set memory usage propor tio n for each re cording ty pe when saving
reco rded files. Recorde d files for which the set storage space is fu ll will be
automatically deleted in sequence. Be careful since the files recorded in the
Event Recoding mode may be deleted as well.
If storage space for file s recorded in the Event Recording is full:
yFiles recorded in the Event Re cording mode will be automaticall y deleted in seque nce
as well. B e caref ul not to delete im portant files. Back up the impor tant files in another
storage medium.
X
Auto Switching to Par king Mode : Th e dev ice will shift to the Pa rki ng mode
automatically if there is no change in G-sensor for over 10 minutes. If G-sensor
is detected for ove r 30 seconds, the device will shif t to the Normal Recording
mode.
The automatic shif t to the Parking mode may be affected by the degree to
which each vehicle vibrates.
29
BlackVue_Eng_0726.indd 29 2012-07-26 �� 4:00:51
Page 32

BlackVue Software
Configuring BlackVue Settings
Setting the Sensitivity
Normal Recording Mode
Set the sensitivity of G-sensor by which event recording starts in the Normal
Recording mode.
Parking Mode
Set the se nsitivity of G-sensor and motion detection by which event recording
starts in the Parking mode.
30
BlackVue_Eng_0726.indd 30 2012-07-26 �� 4:00:51
Page 33

Advanced Settings of Sensitivity
Press the Advanced Setting for each setting. You can easily set sensitivity
viewing recorded video.
Load a recorded file (). Play the loaded file ().
1.
Set sensitivity viewing the video being played. Adjust the sensor area
2.
by moving the control bar up and down. ()
X
If the sensor area is wide, "insensitive", and if it's narrow, "sensitive".
If you want to re cord
the current event
If you don't wa nt to record
the current event
Narrow the sensitivity area so that
the curre nt G-sensor graph is out of
the sens or area.
If an image appe ars where event recording is triggered by the sensitivity
set by the user, the frame of the video playing screen blinks.
Press the [Save & Close] button.
3.
Widen the sensitivity area so that
the current G-se nsor graph is within
the sens or area.
31
BlackVue_Eng_0726.indd 31 2012-07-26 �� 4:00:52
Page 34

BlackVue Software
Configuring BlackVue Settings
Other Settings
[ DR400G-HD ]
X
LED On: You can turn on/off LED in the recording status display section.
X
Button LED: You can change the color of LED in the button section or turn it
off.
X
Voice Alar m : Th e BlackVu e p roduct plays vo ic e m es sa ge s during certain
events. This option allows you to selectively enable/disable the voice messages.
X
Alarm Volume : Allows you to adjust the volume of the voice messages
X
Vide o Out option : You can select the option of video output for connecti ng
video to an external device.
32
BlackVue_Eng_0726.indd 32 2012-07-26 �� 4:00:52
Page 35

[ DR380 -HD / DR380G-HD / DR400G-HD II ]
X
Recording Status LED: You can tur n on/off LED in the recording status display
section.
X
Button LED: You can turn on /off LED in the button section where appropriate.
X
Voice Alar m : Th e BlackVu e p roduct plays vo ic e messages duri ng ce rtain
events. This option allows you to selectively enable/disable the voice messages.
X
Alarm Volume: Adjust the volume of voice guide.
X
Vide o Out option : You can select the option of video output for connecti ng
video to an external device.
33
BlackVue_Eng_0726.indd 33 2012-07-26 �� 4:00:52
Page 36

Others
Installing the BlackVue Software
You can install the BlackVue software in your PC.
Connect the Micro SD card to your
1.
PC. (X See Page 16)
Double-click the BlackVueSetup(HD).
2.
exe file in the ‘Software’ folder in the
Micro SD card.
Complete the program installation
3.
as directed by the installation
program.
Check to see if a BlackVue sof tware
4.
shortcut is installed on your desktop.
Double-click the BlackVue software
shortcut to run the program.
34
BlackVue_Eng_0726.indd 34 2012-07-26 �� 4:00:52
Page 37

Others
Upgrading the Firmware
Firmware upgrade means upgrading the existing product by downloading a
new version of firmware. Upgrading to the latest firmware allows you to use the
BlackVue in a more optimum environment.
Insert the Micro SD card into your
1.
PC. (X See Page 16)
Download the firmware upgrade file
2.
at our website. (www.blackvue.com)
Double-click the firmware upgrade
3.
file. Execute the upgrade as directed
by the program.
Upgrade the SD card with a new
firmware.
This w i l l in i t i a l i z e th e Bl a c k Vu e
configuration set by the user.
Once the upgraded is finishe d, the
installation of the BlackVue software
wi ll be s tar ted . Pre ss the Can c el
button to stop the installation.
Insert the Micro SD card whose firmware has been upgraded into the
4.
BlackVue with its power off.
Turn on the BlackVue, and the BlackVue will be automatically upgraded.
5.
Make sure not to turn of f the power during the upgrade.
Format Micro SD Card
yYou are advised to format the Micro SD card every we ek.
yFormat the Micro SD card if there are interru ptions i n your rec orded v ideo.
yFormat the card u sing a p rogr am recomm ended by the S D card asso ciation for stab le
use. For mo re infor mation, visit our websi te. (ww w.blackvue.com)
ySave impo rtant data in yo ur PC befo re formatting the card.
yAfte r format is fi nis hed , upg rad e the firmwar e. Conne cting the Mic ro SD card with no
def aul t file s to the ma in body will au tom atica lly in iti alize the Mi cro SD and insta ll the
firmware.
35
BlackVue_Eng_0726.indd 35 2012-07-26 �� 4:00:52
Page 38

Others
Product Specifications
Model Name
Camera CMOS Sensor / 2,073,600 Pi xels
Resolution
Compre ssion Type H.264
Audio AAC LC
Record ing
Video O ut Composite
Memor y Micro SD c ard (Up to 32GB)
Opposite
Viewing
Angle
Power Consumption Max. 4W Max 3.3W Max 3.2W
Angle
Horizontal 98° 98° 98°
Vertical 55° 55° 55°
GPS Built-in Built-in -
Diameter 32.0 mm 32.0 mm 32.0 mm
Size
Length 102.8 mm 101.4 mm 101.4 mm
Weight 86 g 82 g 80 g
Power 12V / 24V DC 12V / 24V DC 12V / 24V DC
Operating
Temperature
DR400G-HD II /
DR400G-HD
FULL HD(1920x1080) /
Up to 30fps
Normal Recording, Event Recording (3-axis sensor),
Parking Mode Recording (motio n detection)
120° 120° 120°
DR380G-HD DR380 -HD
HD(1280X720) /
Up to 30fps
-20 °C ~ 60 °C
HD(1280X720) /
Up to 30fps
36
BlackVue_Eng_0726.indd 36 2012-07-26 �� 4:00:52
Page 39

Others
Product Specifications
❏
LED Status Display
Status
On Boot Off Blinking -
Record ing
No SD Card Off Rapid Bl inking -
Power Of f
Insuf ficient Storag e
GPS
LED
Normal Blinking (Orange) - -
Event Blinking (Red) - -
Parking Blinking (Green) - -
Space
Reception - Green
No
Reception
REC
Altern ate Blinking
(Red/Green)
On (Oran ge) - -
- -
Button S ectio n
- -
GPS
GPS models on ly
37
BlackVue_Eng_0726.indd 37 2012-07-26 �� 4:00:52
Page 40

Memo
38
BlackVue_Eng_0726.indd 38 2012-07-26 �� 4:00:52
Page 41

Memo
39
BlackVue_Eng_0726.indd 39 2012-07-26 �� 4:00:52
Page 42

Memo
40
BlackVue_Eng_0726.indd 40 2012-07-26 �� 4:00:52
Page 43

Warranty Certificate
yThe war rant y period of this product is one yea r f rom the purchasi ng date. (6 months for
acces sories such a s batte ry/Mi cro SD ca rd)
yWe p rovides warrant y for our pr oduc ts in accordan ce with the C onsumer Compla ints Se ttle ment St andards
(Noti fication of the Fair Trad e Comm ission). After-sal es ser vice w ill be offere d by Pitt asoft or our de sign ated
contrac tor s.
yIf the prod uct is use d for busi ness pur poses, its warra nty per iod shal l be reduc ed by half.
Product N ame
(Model N ame)
Purchas ing Date Purcha sing Place
Custome r
Informa tion
Type of Consum er Complaints
Cases wh ere
malfun ction
occurs i n terms
of perfo rmance/
functi on under
normal c onditions
of use:
Cases wh ere malfunctio n is attributabl e to consumer's defau lt:
- Where malf unction or damag e to the product occu rs due to car eless
handli ng (fall, sh ock, damage, abu se, etc.) or misu se
- Where malf unction occur s due to the use o f items that h ave not been
design ated by us
- Where malf unction occur s after th e consum er or third p arty tries to
repair o r alter the p roduct
- Malfunc tion or da mage to the pr oduct at tributable to con sumer's
intentio n or default
Other ca ses
- Where ma lfunction occu rs due to natural dis asters
- Where the l ife of a consumabl e part co mes to an end
yThis war ranty c ertifi cate is vali d only in a country w here you purchase t he produc t.
When a maj or repair is neede d within 10 days
of purcha se
When maj or repair is neede d within 10 days of
exchang e
When mal function occur s three times or mor e for
the same d efect
When mal function occur s four times or more fo r
the same d efect
If an empl oyee lose s a product a consum er has
left for r epair
If a repair i s impossible due to l ack of
replac ement pa rts under warra nty
If a repair i s impossible de spite rep laceme nt
parts i n stock
Serial N o.
Address / P hone No.
Warrant y Action
Within War ranty
Period
Exchan ge/Refund N/A
Refund N/A
Free Repa ir Paid Repair
Exchan ge/Refund Paid Repa ir
Exchan ge/Refund
Exchan ge/Refund N/A
Exchan ge/Refund N/A
Paid Repa ir Pa id Repai r
After War ranty Period
Refund by a dding 10%
to flat-rate dep reciation
amount
BlackVue_Eng_0726.indd 41 2012-07-26 �� 4:00:52
Page 44

Pitta soft Headqua rter s in Korea
Addres s #371-17, 7th fl., BYC Hi City C enter A, Gasan- dong, Geumche on-gu, S eoul, Korea
Home Page www.bla ckvue.c om E-mail as@pittasof t.com
Servi ce Center 1599-2772 Fax 02-6947-4697
BlackVue_Eng_0726.indd 42 2012-07-26 �� 4:00:54
 Loading...