

Page 1

ENGLISH/РУССКИЙ
DR900X-1CH
Page 2

BLACKVUE
DR900X-1CH
For manuals, customer support and FAQs go to www.blackvue.com
Руководства, служба технической поддержки и часто задаваемые вопросы
представлены на сайте www.blackvue.com
Page 3

Important safety information
For user safety and to avoid property damage, read through this manual and follow
these safety instructions to use the product correctly.
yDo not disassemble, repair, or modify the product yourself.
Doing so may cause re, electric shock, or malfunction. For internal inspection and
repair, contact the service center.
yDo not adjust the product while driving.
Doing so may cause an accident. Stop or park your car in a safe place before
installing and setting up the product.
yDo not operate the product with wet hands.
Doing so may cause electric shock.
yIf any foreign matter gets inside the product, detach the power cord immediately.
Contact the service center for repair.
yDo not cover the product with any material.
Doing so may cause external deformation of the product or re. Use the product
and peripherals in a well-ventilated location.
yIf the product is used outside the optimal temperature range (-20°C - 70°C / -4°F - 158°F),
performance can decline or malfunctions may occur.
yWhen entering or exiting a tunnel, when directly facing into bright sunlight, or when
recording at night without lighting the quality of recorded video may deteriorate.
yIf the product is damaged or the power supply is cut due to an accident, video may
not be recorded.
yDo not remove the microSD card while the microSD card is saving or reading data.
yThe data can be damaged or malfunctions may occur.
DR900X-1CH 3
Page 4

FCC Compliance Information
This equipment has been tested and found to comply with the limits for a Class B
digital device, pursuant to Part 15 of the FCC Rules. These limits are designed to provide
reasonable protections against harmful interference in a residential installation.
This equipment generates, uses and can radiate radio frequency energy and, if not
installed and used in accordance with the instructions, may cause harmful interference
to radio communications. However, there is no guarantee that interference will not
occur in a particular installation.
If this equipment does cause harmful interference to radio or television reception
which can be determined by turning the equipment o and on, the user is encouraged
to ty to correct the interference by one or more of the following measures.
yReorient or relocate the receiving antenna.
yIncrease the separation between the equipment and receiver.
yConnect the equipment into an outlet on a circuit dierent from that to which the
receiver is connected.
yConsult the dealer or an experienced radio, TV technician for help.
yOnly shielded interface cable should be used.
Finally, any changes or modifications to the equipment by the user not expressly
approved by the grantee or manufacture could void the user’s authority to operate
such equipment.
This device complies with Part 15 of the FCC Rules. Operation is subject to the following
two conditions:
(1) This device may not cause harmful interference, and
(2) This device must accept any interference received, including interference that may
cause undesired operation of this device.
FCC ID: YCK-DR900X-2CH
4 BLACKVUE
Page 5

CAUTION
Any changed or modications in construction of this device which are not expressly
approved by the party responsible for compliance could void the user’s authority to
operate the equipment.
There is a risk of explosion if the battery is replaced by an incorrect type.
Dispose of used batteries according to the instructions.
CE WARNING
yChanges and modifications not expressly approved by the party responsible for
compliance could void the user’s authority to operate the equipment.
yIt is desirable that it be installed and operated with at least 20cm or more between
the radiator and a person’s body (excluding extremities: hand, wrists, feet, and
ankles).
Disposal of your BlackVue dashcam
1. All electrical and electronic products should be disposed of
separately from the municipal waste stream via designated
collection facilities appointed by the government or the local
authorities. Contact local authorities to learn about disposal and
recycling options available in your area.
2. The correct disposal of your BlackVue dashcam will help prevent
potential negative consequences for the environment and human
health.
3. For more detailed information about disposal of your BlackVue
dashcam, please contact your city oce, waste disposal service or
the shop where you purchased the product.
DR900X-1CH 5
Page 6

ICC Compliance
This Class [B] digital apparatus complies with Canadian ICES-003.
This radio transmitter has been approved by Industry Canada to operate with the
antenna types listed below with the maximum permissible gain and required antenna
impedance for each antenna type indicated. Antenna types not included in this list,
having a gain greater than the maximum gain indicated for that type, are strictly
prohibited for use with this device.
- IC Warning
This device complies with Industry Canada licence-exempt RSS standard(s).
Operation is subject to the following two conditions:
(1) this device may not cause interference, and
(2) this device must accept any interference, including interference that may cause
undesired operation of the device.
Le présent appareil est conforme aux CNR d’Industrie Canada applicable aux appreils
radio exempts de license.
L’exploitation est autoriséee aux deux conditions suivantes:
(1) l’appareil ne doit pas produire de brouillage, et
(2) l ’utilisateur de l’appareil doit accepter tout brouillage radioélectrique subi, méme si
le brouillage est susceptible d’encompromettre le fonctionnement.
6 BLACKVUE
Page 7

In the box
ENGLISH
Check the box for each of the following items before installing the BlackVue dashcam.
Front camera Quick start guide
Cigarette lighter
power cable
Double-sided
tapefor the
Mounting Bracket
microSD Card
Pry tool
powercable
Hardwiring
Cable clips
(5 EA)
microSD
card reader
Need help?
Download the manual (including FAQs) and the latest firmware from www.blackvue.com
Or contact a Customer Support expert at cs@pittasoft.com
DR900X-1CH 7
Page 8

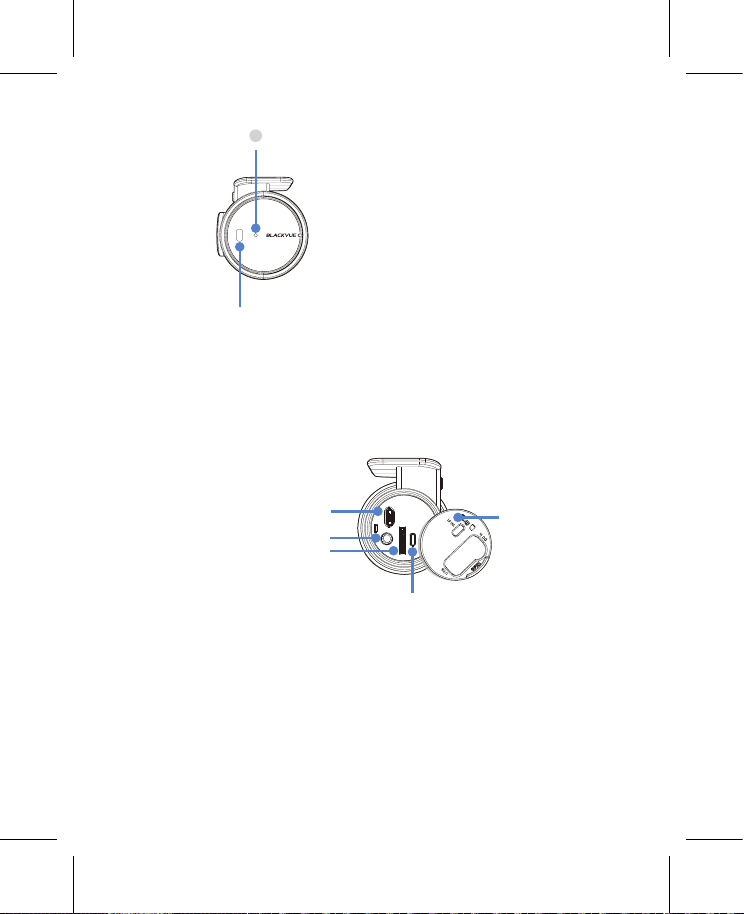
At a glance
The following diagrams explain each part of the BlackVue dashcam.
Front camera
118.5 mm
Lock button
55 mm
Camera lens
36 mm
8 BLACKVUE
Mounting bracket Front security LED
: Lights on during (i) normal mode,
(ii) an event is being recorded (impactdetected),
(iii) manual recording has started, or (iv) motion
is detected in parking mode.
: Blinks slowly during parking mode motion
detection standby.
Page 9

GPS/BT LED
ENGLISH
: Lights blue when (i) GPS is on, and/or (ii) Bluetooth is paired.
: Blinks blue slowly when bluetooth is in pairing mode.
: Blinks blue quickly when (i) GPS is turning o, and/or (ii) Bluetooth is turning o.
Speaker
LTE/Wi-Fi LED
: Lights yellow when LTE is connected.
: Lights white when Wi-Fi is connected.
: Blinks white slowly when connecting to Wi-Fi.
: Blinks white quickly when Wi-Fi is turning o.
Recording LED
: Lights orange in normal mode.
: Lights red when (i) an event is being recorded (impact detected),
or (ii) manual recording has started.
: Lights green in parking mode when motion is detected.
Connectivity details label:
- Default Wi-Fi SSID
- Default Wi-Fi password
- Cloud code
- QR code
Serial number label
DR900X-1CH 9
Page 10

Proximity Sensor LED
: Lights when proximity sensor is triggered.
Proximity Sensor:
Touch or wave a nger within 20mm of the sensor to
trigger a customizable function.
Available options:
- Turn on/o audio recording (default)
- Manual recording trigger
- O
DC in (power connector)
10 BLACKVUE
Micro USB port
microSD card slot
Cover
Wi-Fi button:
- Press once to turn on/o Wi-Fi.
Page 11

STEP 1
ENGLISH
Install and power up
Install the front camera behind the rear view mirror. Remove any foreign matter and
clean and dry the windshield before installation.
Warning
yDo not install the product in a location where it can obstruct the driver's eld
of vision.
Turn o the engine. Open the cover of the microSD card slot, gently push the
card into the slot until it locks into place and close the cover.
Peel off the protective film from the double-sided tape and attach the front
camera to the windshield behind the rear-view mirror.
DR900X-1CH 11
Page 12

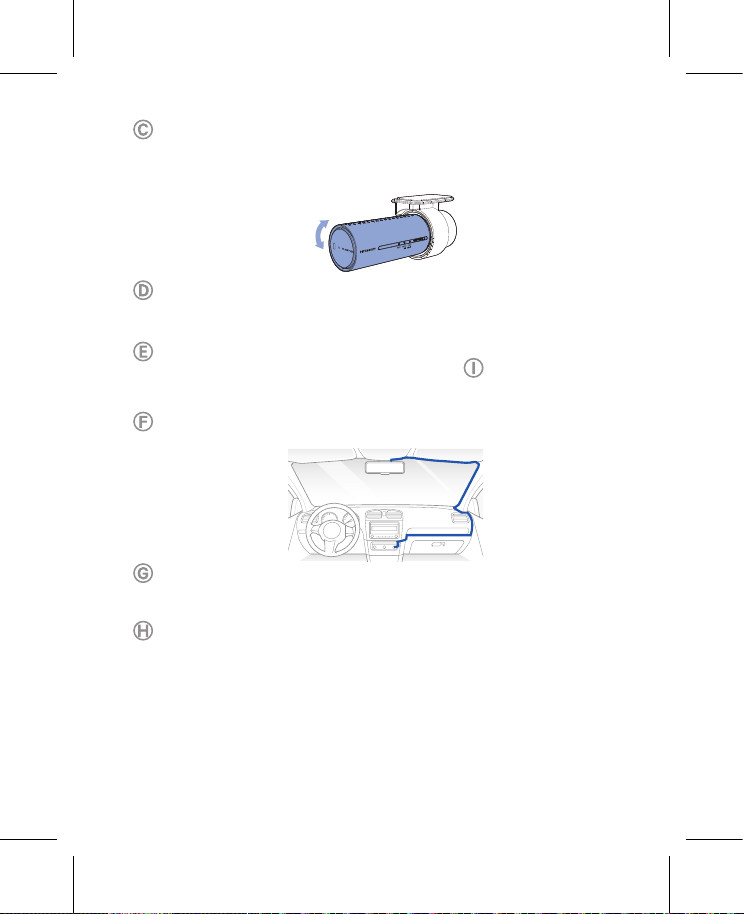
Adjust the angle of the lens by rotating the body of the front camera.
We recommend pointing the lens slightly downwards (≈10° below horizontal),
so as to record video with a 6:4 road to background ratio.
Connectivity Module (Optional): Connect the connectivity module to the front
camera and attach it to the edge of the window. Use the pry tool to tuck in the cable.
Plug the cigarette lighter power cable into the cigarette lighter socket and the
front camera. Skip to for Hardwiring Power Cable setup.
Use the pry tool to lift the edges of the windshield trim/molding and tuck in the
power cord.
Turn on the engine. The BlackVue dashcam will power up and start recording.
Video les are stored on the microSD card.
Turn o the engine. The dashcam will automatically stop recording and power
down. To record in parking mode while the engine is off please connect the
Hardwiring Power Cable (included in the box) or install a Power Magic Battery
Pack (sold separately). A Hardwiring Power Cable uses the automotive battery
to power your dashcam when the engine is off. A low voltage power cut-off
function and a parking mode timer to protect the automotive battery from
discharge is installed in the device. Settings can be changed in the BlackVue App
or Viewer.
12 BLACKVUE
Page 13

Locate the fuse box to connect the hardwiring power cable.
ENGLISH
Note
Location of the fuse box dier by manufacturer or model. For details, refer to the
vehicle owner's manual.
After removing fuse panel cover, nd a fuse that powers on when engine
1
-
is turned on(ex.cigarette lighter socket, audio, etc) and another fuse that
remains powered on after the engine is turned o (ex.hazard light, interior
light). Connect the ACC+ cable to a fuse that powers on after engine start,
and BATT+ cable to a fuse that remains powered on after engine is turned o.
Note
yTo use battery saver feature, connect the BATT+ cable to the hazard light
fuse. Functions of fuse dier by manufacturer or model. For details refer
to the vehicle owner's manual.
Connect the GND cable to metal ground bolt.
-
2
Connect the power cable to the DC in terminal of the front camera. BlackVue
will power up and start recording. Video les are stored on the microSD card.
DR900X-1CH 13
Page 14

Note
yWhen you run the dashcam for the first time the firmware is automatically
loaded onto the microSD card. After the firmware has been loaded onto
the microSD card you can customize settings using BlackVue Viewer on a
computer.
14 BLACKVUE
Page 15

STEP 2
ENGLISH
Playback
Playing video les on your smartphone (Android/iOS)
Search for the BlackVue app in the Google Play Store or Apple App Store and
install it on your smartphone.
“Pair” your smartphone with the BlackVue dashcam via direct Wi-Fi:
(i) Go to your smartphone’s Settings then select Wi-Fi, and make sure Wi-Fi is
turned on.
(ii) Choose your BlackVue dashcam from the network list. The dashcam’s default
SSID begins with its model number (e.g. BlackVue900X-******).
(iii) Enter the password and tap join.
* To find the default Wi-Fi password, unplug the cables and remove the
front camera from its mount. The default Wi-Fi SSID, password and cloud
code are printed on the dashcam's connectivity details label.
DR900X-1CH 15
Page 16

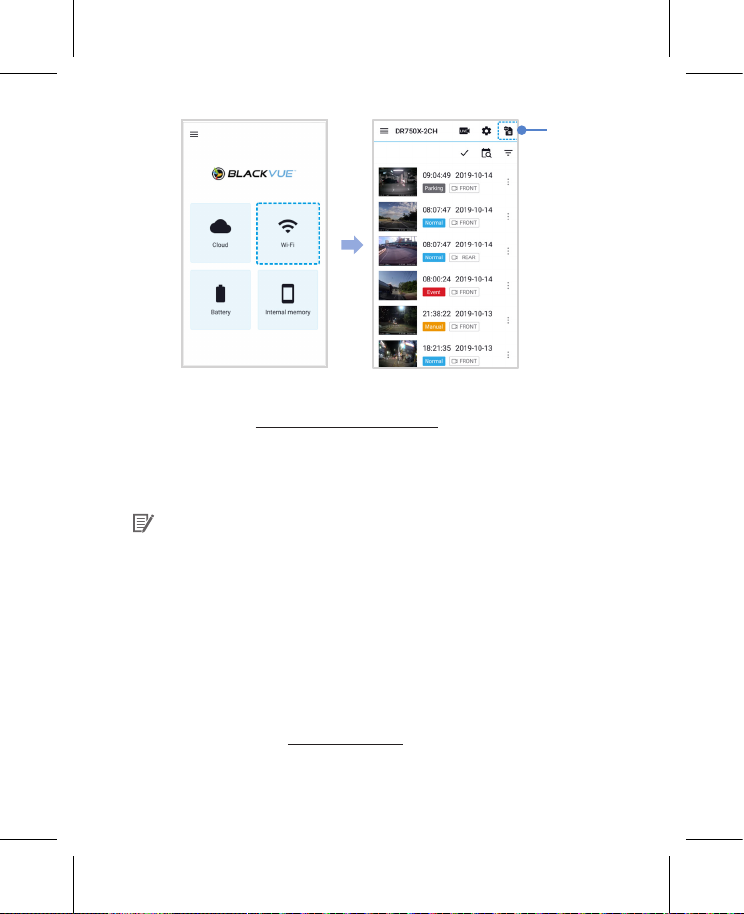
(iv) Open the BlackVue app and select WI-FI.
Select the video le you want to play from the video list.
Note
yThe playback of 4K UHD resolution, 'Highest' image quality and/or H.265
coded videos depends on your device's hardware and software. Older devices
may not support 4K UHD, 'Highest' image quality or H.265 video playback. If
you encounter issues please check your device's video playback capabilities.
yDirect Wi-Fi lets you connect your smartphone to your dashcam via Wi-Fi
within a range of 10m.
yFor quick playback and download of the recordings, you can select the
"Quick play le" option from App settings.
yAll image shown are for illustration purposes only. Actual App may dier from
images shown.
16 BLACKVUE
Page 17

Playing video les on your computer (Windows/macOS)
ENGLISH
Remove the microSD card from the dashcam.
Open side cover To remove
Insert the card into the microSD card reader and connect it to a computer.
Download BlackVue Viewer program from www.blackvue.com > Support >
Downloads and install it on your computer.
DR900X-1CH 17
Page 18

Run BlackVue Viewer. To play, select a video and click on the play button or
double click the selected video.
Windows/macOS Viewer
Note
yThe playback of 4K UHD resolution and/or H.265 coded videos depends on
your computer's hardware and software. Older computers may not support
4K UHD or H.265 video playback. If you encounter issues please check your
computer's video playback capabilities.
yAll images shown are for illustration purpose only. Actual program may dier
from images shown.
18 BLACKVUE
Page 19

STEP 3
ENGLISH
Changing dashcam's time zone, Wi-Fi password and
other settings.
The dashcam's time zone is initially set to (GMT-11). To display the correct time please
select your time zone.
Using your smartphone (Android/iOS)
“Pair” your smartphone with the BlackVue dashcam via direct Wi-Fi (for details see
STEP 2 ‘Playing video les on your smartphone’).
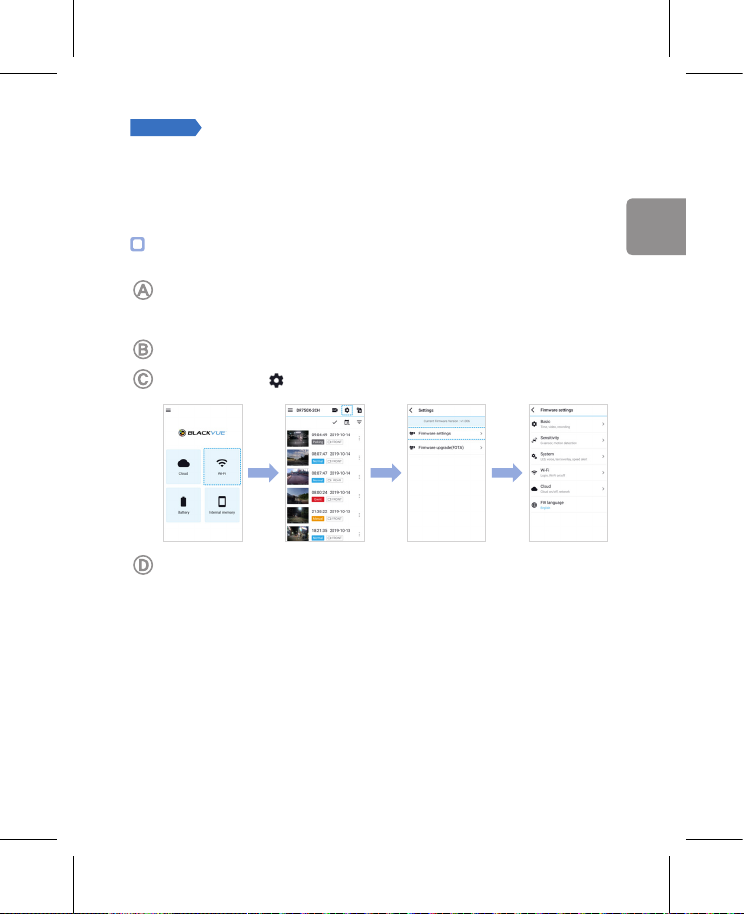
Open the BlackVue app and select WI-FI.
Tap the button to access the Firmware settings menu.
(i) Select Firmware settings > Basic > Time.
(ii) Select your time zone to auto-sync with GPS time or you can set the time and
date manually after enabling Manual time setting.
DR900X-1CH 19
Page 20
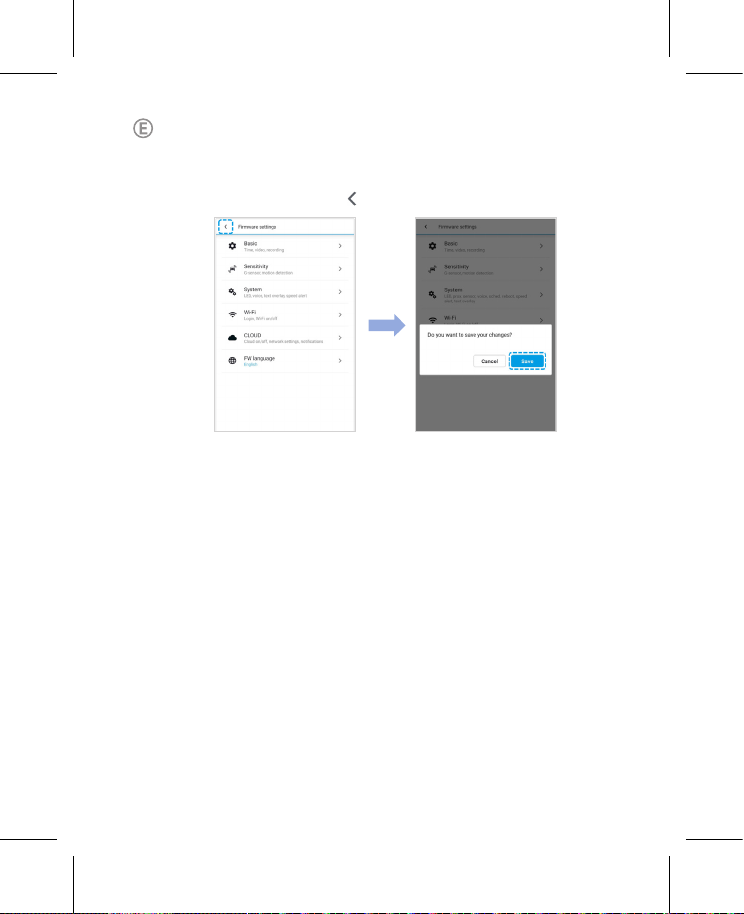
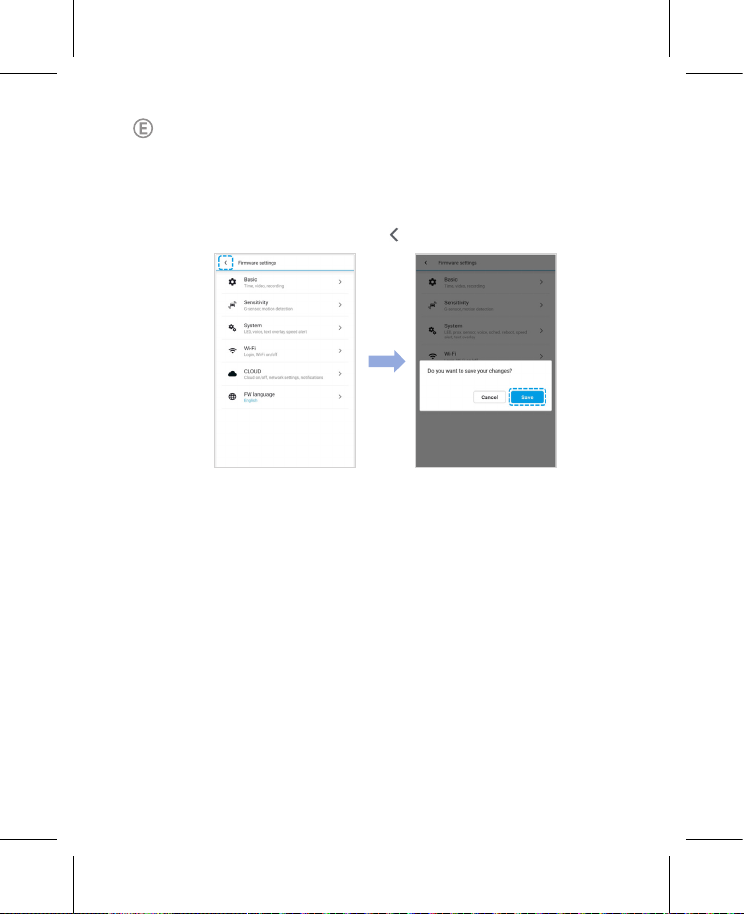
Go back to the Firmware settings menu and congure other desired settings.
Settings that can be changed include Wi-Fi SSID & password, image quality,
sensitivity settings, voice recording on/off, speed unit (km/h, MPH, off),
LEDs on/o, voice guidance volume, Cloud settings etc.
Once settings are congured, tap and tap Save.
20 BLACKVUE
Page 21

Changing the dashcam's time zone and other firmware settings on
ENGLISH
your computer (Windows/macOS)
Run BlackVue Viewer program after connecting dashcam's microSD card to your
computer. Click on the button to open the BlackVue settings panel.
Settings that can be changed include Wi-Fi SSID & password, image quality, sensitivity
settings, voice recording on/off, speed unit (km/h, MPH, off), LEDs on/off, voice
guidance volume, Cloud settings etc.
For more information about changing the settings in BlackVue Viewer, please download
the manual from www.blackvue.com > Support > Downloads.
Settings
DR900X-1CH 21
Page 22

STEP 4
If you don’t have a mobile Wi-Fi hotspot, Blackvue connectivity module or if you don’t
want to use the BLACKVUE CLOUD service, you can skip this step.
If you have a mobile Wi-Fi hotspot (also known as a portable Wi-Fi router), BlackVue
connectivity module (CM100LTE), a car-embedded wireless internet network or a Wi-Fi
network near your car, you can use the BlackVue app to connect to BLACKVUE CLOUD
and see in real-time where your car is and the dashcam’s live video feed.
For more information about using the BlackVue app, please download the Cloud
Manual from www.blackvue.com > Support > Downloads.
Connect to BLACKVUE CLOUD (optional)
Create an account
(i) Open the BlackVue app.
(ii) Tap the button in the top-left corner and select Create account.
(iii) Enter your name, e-mail address and choose a password. Re-enter your
password and press Sign up.
(iv) You will receive an e-mail. Click the link in the email to nish creating your
account.
Register your dashcam with your account
(i) In the BlackVue app select CLOUD and login to your account.
(ii) Tap Ye s to enable push notications (this setting can be adjusted at any time later).
(iii) Select Register new camera.
(iv) Register your camera using one of the following methods:
22 BLACKVUE
Page 23

QR Code: Press Scan QR Code and line up the QR Code on your smartphone’s
ENGLISH
screen.
QR code / Cloud code / Serial number
or
Manual registration: Enter your camera’s Serial number and Cloud code and
press Register.
Connect your BlackVue dashcam to a Wi-Fi hotspot for Cloud connectivity
(i) Make sure your BlackVue dashcam and mobile Wi-Fi hotspot are on.
(ii) “Pair” your smartphone with the BlackVue dashcam via direct Wi-Fi
(for details see STEP 2 ‘Playing video les on your smartphone’)
(iii) Open the BlackVue app. Select WI-FI > > Firmware settings > CLOUD.
DR900X-1CH 23
Page 24

(iv) Ensure Enable Cloud service is on. Select Cloud service hotspot settings.
(v) Choose your Wi-Fi hotspot from the list. Enter the password and tap OK.
Note
yUp to 3 Wi-Fi hotspot SSIDs can be saved (e.g. home, portable hotspot and work).
24 BLACKVUE
Page 25

(vi) Go back to the Firmware settings menu, tap and tap Save.
ENGLISH
After rebooting, your dashcam will automatically establish internet connection.
If internet connection was not established, please ensure Wi-Fi information was
inserted correctly.
Select CLOUD from the main screen to access all of the Cloud features.
Note
yIf LTE and Wi-Fi hotspot is available for internet connection, Wi-Fi hotspot will
be in priority. If LTE connection is preferred at all times, please remove Wi-Fi
hotspot information.
Connect your BlackVue dashcam to Cloud connectivity (Using CM100LTE)
Make sure your BlackVue dashcam and connectivity module is connected.
Then, follow the below steps for SIM registration.
(i) Locate the SIM card slot. Unscrew the bolt from SIM slot cover. Then,
unmount the SIM slot by using a SIM eject tool. Insert SIM in the SIM slot.
Mount the SIM slot back in the connectivity module, then, screw the bolt to
hold SIM slot cover.
(ii) "Pair" your smartphone with the BlackVue dashcam via direct Wi-Fi.
(iii) Open the BlackVue app and select WI-FI > .
DR900X-1CH 25
Page 26
SIM card
activation
(iv) Congure the APN settings to activate the SIM card. For detailed information,
please check "SIM activation guide" in the packaging box or visit BlackVue
Help Center: www.helpcenter.blackvue.com -> LTE connectivity guide.
(v) Once your dashcam is connected to the internet, you can go to the CLOUD
menu to use BlackVue Cloud features.
Note
yFor full details, refer to the "SIM activation guide" that is included in the
CM100LTE package.
yTo use the BlackVue Cloud Service, SIM card must be properly activated for
Internet access via LTE network.
yWhen the dashcam is connected to internet, you can use BlackVue Cloud
features such as remote Live View and Video playback, Real-time location,
push notication, Auto-upload, remote Firmware update etc. on BlackVue app
and PC Viewer.
ySome Cloud features may not work when surrounding temperature is high
or/and LTE speed is slow.
yFor more information about using the BlackVue app, please download the
Cloud Manual from www.blackvue.com > Support > Downloads.
26 BLACKVUE
Page 27
Tips for optimal performance
ENGLISH
For stable operation of the dashcam, it is recommended to format the microSD
card once a month.
Format using BlackVue Viewer (Windows):
Download BlackVue Windows Viewer from www.blackvue.com > Support >
Downloads and install it on your computer. Insert the microSD card into the microSD
card reader and connect the reader to your computer. Launch the copy of BlackVue
Viewer that is installed on your computer. Click the Format button, select the card
drive and click OK.
Format using BlackVue Viewer (macOS):
Download BlackVue Mac Viewer from www.blackvue.com > Support >
Downloads and install it on your computer. Insert the microSD card into the
microSD card reader and connect the reader to your computer. Launch the
copy of BlackVue Viewer that is installed on your computer. Click the Format
button and select the microSD card from the list of drives in the left frame. After
selecting your microSD card select the Erase tab in the main window. Select
“MS-DOS (FAT)” from the Volume Format drop-down menu and click Erase.
Only use ocial BlackVue microSD cards. Other cards may have compatibility issues.
Regularly upgrade the rmware for performance improvements and updated features.
Firmware updates will be made available for download at www.blackvue.com >
Support > Downloads.
Customer Support
For customer support, manuals and rmware updates please visit www.blackvue.com
You can also email a Customer Support expert at cs@pittasoft.com
DR900X-1CH 27
Page 28

Product specications:
Model Name DR900X-1CH
Color/Size/Weight
Memory microSD Card (32 GB / 64 GB / 128 GB / 256 GB)
Recording Modes
Camera
Viewing Angle Diagonal 162°, Horizontal 136°, Vertical 77°
Resolution/
FrameRate
Video Codec
Image Quality
Video Compression
Mode
Wi-Fi Built-in (802.11 a.b.g.n.ac)
GPS
Bluetooth Built-in (V2.1+EDR/4.2)
LTE External
Microphone
Black / Width 118.5 mm x Height 36 mm / 104 g
Normal recording, Event recording (when impact is detected
in normal and parking mode), Manual recording and Parking
recording (when motion is detected)
* When using Hardwiring Power Cable, ACC+ will trigger
parking mode. When using other methods, G-sensor will
trigger parking mode.
8-Megapixel CMOS Sensor
4K UHD (3840x2140) @30fps
* Frame rate may vary during Wi-Fi streaming.
H.265 (HEVC), H.264 (AVC)
Highest (Extreme), Highest, High, Normal
MP4
Built-in (Dual Band : GPS, GLONASS)
Built-in
28 BLACKVUE
Page 29

Speaker
ENGLISH
(Voice Guidance)
LED Indicators
Button
Sensor
Backup Battery
Input Power
Power Consumption
Operation
Temperature
Storage
Temperature
High Temperature
Cut-O
Certications
Built-in
Recording LED, GPS/BT LED, LTE/Wi-Fi LED, Front Security LED,
Proximity Sensing indicator LED
Wi-Fi button:
* Press once to turn on/o Wi-Fi.
Proximity sensor:
Touching the proximity sensor turns on/o audio recording or
triggers manual recording depending on the rmware settings.
3-Axis Acceleration Sensor
Built-in super capacitor
DC 12V-24V (DC Plug (Ø3.5 x Ø1.35)) to Wires
(Black: GND / Yellow: B+ / Red: ACC)
Normal Mode (WiFi On / GPS On) : 350mA / hour
Normal Mode (WiFi O / GPS On) : 310mA / hour
Parking Mode (WiFi On / GPS O ) : 265mA / hour
Parking Mode (WiFi O / GPS O ) : 225mA / hour
* Actual power consumption may vary depending on use
conditions and environment.
-20 °C − 70 °C (-4 °F − 158 °F)
-20 °C − 90 °C (-4 °F − 194 °F )
Approx. 75 °C (167 °F)
FCC, CE, RoHS, Telec, WEEE, IC
DR900X-1CH 29
Page 30

Software
Application
Others Adaptive Format Free File Management System
BlackVue Viewer
* Windows 7 or higher and Mac Yosemite OS X (10.10) or higher
BlackVue Application (Android 5.0 or higher, iOS 9.0 or higher)
30 BLACKVUE
Page 31

Комплектация изделия
РУССКИЙ
Перед установкой видеорегистратора BlackVue проверьте комплектацию изделия.
Передняя камера
Кабель питания для
прикуривателя
двусторонняя
клейкая лента для
кронштейна
Карта microSD
Рычажок
Краткое
руководство
пользователя
Кабель питания
Кабельные зажимы
(5 EA)
Считыватель карт
microSD
В помощь пользователю
Руководство (вместе с часто задаваемыми вопросами) и последнюю версию
программной прошивки можно скачать с сайта www.blackvue.com
или получить у специалиста службы технической поддержки, отправив ему
сообщение по адресу cs@pittasoft.com
DR900X-1CH 31
Page 32

Внешний вид
На схемах ниже представлены все части видеорегистратора BlackVue.
Передняя камера
118,5мм
кнопка блокировки
55мм
Объектив камеры
36мм
32 BLACKVUE
Кронштейн Передний индикатор безопасности
: Светится: (i) обычный режим работы,
(ii) регистрируется событие
(обнаружено воздействие), (iii) запущена
запись вручную или (iv) обнаружено
движение в режиме парковки.
: Медленно мигает во время ожидания
обнаружения движения в режиме
парковки.
Page 33

Индикатор GPS/BT
РУССКИЙ
: Светится синим цветом, когда (i) включен режим GPS и/или (ii) выполнено
сопряжение Bluetooth.
: Медленно мигает синим цветом, когда выполнятся сопряжение Bluetooth.
: Быстро мигает синим цветом, когда выключен режим (i) GPS и/или (ii) Bluetooth.
Динамик
Индикатор LTE/Wi-Fi
: Светится желтым цветом при подключении LTE.
: Светится белым цветом при подключении Wi-Fi.
: Медленно мигает белым цветом в процессе
подключения к Wi-Fi.
: Быстро мигает белым цветом, когда сеть Wi-Fi
Индикатор записи
: Светится оранжевым цветом в обычном режиме.
: Светится красным цветом, если (i) выполняется запись события (обнаружено
воздействие) или (ii) начата запись вручную.
: Светится зеленым цветом в режиме парковки при обнаружении движения.
Табличка сведений о подключении:
- SSID Wi-Fi по умолчанию
- Пароль Wi-Fi по умолчанию
- код Cloud
- QR-код
Табличка с серийным номером
отключена.
DR900X-1CH 33
Page 34
Индикатор датчика близости
: Загорается, когда срабатывает датчик
близости.
Датчик близости:
Коснитесь датчика или проведите пальцем на расстоянии
20мм от него, чтобы запустить пользовательскую функцию.
Доступные опции:
- Включение/выключение записи звука (по умолчанию)
- Включение записи вручную
- Откл.
Вход для внешнего блока питания
Порт micro-USB
(силовой разъем)
гнездо для карты microSD
34 BLACKVUE
крышка
Кнопка WI-FI:
- Нажмите один раз, чтобы
включить/выключить Wi-Fi.
Page 35

ШАГ1
РУССКИЙ
Установите переднюю камеру над зеркалом заднего вида. Перед установкой
удалите все посторонние предметы с ветрового стекла, очистите его и протрите
насухо.
Установка и подключение питания
Внимание
yНе устанавливайте видеорегистратор в месте, где он будет загораживать
водителю обзор.
Остановите двигатель. Откройте крышку слота карты microSD, аккуратно
вставьте карту в слот, пока она не займет нужное положение, а затем
закройте крышку.
Снимите защитную пленку с двусторонней клейкой ленты и закрепите
переднюю камеру над зеркалом заднего вида.
DR900X-1CH 35
Page 36
Откорректируйте угол объектива, вращая корпус передней камеры.
Рекомендованное положение камеры — с небольшим наклоном вниз
(на ≈10° ниже горизонтального положения). Это позволяет записывать видео
с соотношением заднего плана и дорожного полотна 6:4.
Соединительный модуль (дополнительно): Подключите соединительный
модуль к передней камере и прикрепите его к краю окна. Используйте
рычажок, чтобы проложить кабель.
Вставьте кабель питания в разъем прикуривателя и подключите другой
конец кабеля к передней камере. Перейдите к , чтобы подключить
силовой кабель.
С помощью специального рычажка приподнимите края резинового
уплотнителя по краю ветрового стекла и подоткните под него кабель питания.
Запустите двигатель. Видеорегистратор BlackVue включится и начнет запись.
Файлы видеозаписи сохраняются на карте microSD.
Остановите двигатель. Видеорегистратор автоматически остановит запись
и выключится. Чтобы сделать запись в режиме парковки, когда двигатель
выключен, подключите силовой кабель (включен в комплект поставки) или
установите Power Magic Battery Pack (приобретается отдельно). Силовой
кабель используется для подключения видеорегистратора к аккумулятору
автомобиля, когда двигатель выключен. Чтобы аккумулятор не разрядился
полностью, на устройстве предусмотрены функция отключения питания
при низком напряжении и таймер режима парковки. Настройки могут быть
изменены в приложении BlackVue или Viewer.
36 BLACKVUE
Page 37

Определите местонахождение блока предохранителей, чтобы подключить
РУССКИЙ
силовой кабель.
Примечание
Местоположение блока предохранителей зависит от бренда и модели
автомобиля. Для получения дополнительной информации обратитесь к
руководству владельца транспортного средства.
-
1
После снятия крышки блока предохранителей найдите предохранитель,
который находится по напряжением, когда двигатель включен
(это могут быть цепи, питающие прикуриватель, аудиосистему и
т.д.), а также другой предохранитель, который подает питание после
отключения двигателя на такие цепи, как аварийный свет и внутреннее
освещение). Подключите клемму ACC+ кабеля к предохранителю,
который находится под напряжением после запуска двигателя, а клемму
BATT+ кабеля подключите к предохранителю, который остается под
напряжением после выключения двигателя.
Примечание
yЧтобы использовать функцию защиты аккумулятора, подключите
клемму BATT+ кабеля к предохранителю цепи аварийных фонарей.
Функции предохранителей зависят от бренда и модели автомобиля.
Для получения дополнительной информации обратитесь к
руководству владельца транспортного средства.
-
2
Прикрутите клемму кабеля GND к металлическому болту заземления.
DR900X-1CH 37
Page 38

Подключите кабель питания к порту DC передней камеры.
Видеорегистратор BlackVue включится и начнет запись. Файлы
видеозаписи сохраняются на карте microSD.
Примечание
yПри первом запуске видеорегистратора программная прошивка
автоматически загружается на карту microSD. После загрузки
программной прошивки на карту microSD можно управлять настройками
видеорегистратора через программу BlackVue Viewer на ПК.
38 BLACKVUE
Page 39

ШАГ2
РУССКИЙ
Воспроизведение
Воспроизведение файлов видеозаписи на смартфоне (Android/iOS)
Найдите приложение BlackVue в магазине Google Play или App Store и
установите его на своем смартфоне.
Выполните сопряжение смартфона с видеорегистратором BlackVue с
помощью Wi-Fi Direct. Для этого:
(i) перейдите в меню Настройки в вашем смартфоне, выберите Wi-Fi и
убедитесь, что сеть Wi-Fi включена.
(ii) Выберите видеорегистратор BlackVue в списке сетей. SSID
видеорегистратора по умолчанию начинается с номера модели
(например, BlackVue900X-******).
(iii) Введите пароль и нажмите «Присоединиться».
* Чтобы узнать пароль Wi-Fi по умолчанию, отключите кабели и снимите
переднюю камеру с держателя. SSID и пароль Wi-Fi по умолчанию,
а также код Cloud указаны на табличке сведений о подключении
видеорегистратора.
DR900X-1CH 39
Page 40

(iv) Откройте приложение BlackVue и выберите WI-FI.
Выберите в списке файл видеозаписи, который вы хотите воспроизвести.
Примечание
yВозможность воспроизведения видео с разрешением 4K UHD, просмотра
изображений "наивысшего" качества и/или видео с кодировкой
H.265 зависит от характеристик вашего компьютера и программного
обеспечения. Более ранние устройства могут не поддерживать
разрешение 4K UHD, "наивысшее" качество изображения или видео с
кодировкой H.265. Если у вас возникла проблема с воспроизведением,
убедитесь, что системные характеристики вашего компьютера позволяют
проигрывать такие видео.
yВы можете подключить смартфон к видеорегистратору с помощью Wi-Fi в
радиусе 10 метров.
yДля быстрого воспроизведения и загрузки записей можно выбрать
опцию «Быстрое воспроизведение файла» в настройках приложения.
yВсе иллюстрации приведены только для примера. Фактический
интерфейс приложения может отличаться.
40 BLACKVUE
Page 41

Воспроизведение видеозаписей на ПК (Windows/Mac)
РУССКИЙ
Извлеките карту microSD из видеорегистратора.
Откройте боковую
крышку
Извлечение карты
Вставьте карту в устройство для считывания карт microSD и подключите
устройство к ПК.
Загрузите программу BlackVue Viewer по адресу www.blackvue.com >
Support > Downloads и установите ее на компьютер.
DR900X-1CH 41
Page 42

Запустите BlackVue Viewer. Для воспроизведения выберите видео и нажмите
кнопку воспроизведения либо дважды щелкните видео.
Viewer для Windows/macOS
Примечание
yВозможность воспроизведения видео с разрешением 4K UHD и/или
видео с кодировкой H.265 зависит от характеристик вашего компьютера
и программного обеспечения. Более ранние устройства могут не
поддерживать разрешение 4K UHD или видео с кодировкой H.265. Если
у вас возникла проблема с воспроизведением, убедитесь, что системные
характеристики вашего компьютера позволяют проигрывать такие видео.
yВсе иллюстрации приведены только для примера. Фактический внешний
вид программы может отличаться от приведенных здесь изображений.
42 BLACKVUE
Page 43
ШАГ3
РУССКИЙ
Изменение часового пояса видеорегистратора,
пароля Wi-Fi и других настроек.
Часовой пояс видеорегистратора исходно установлен на GMT-11. Чтобы время
отображалось корректно, выберите свой часовой пояс.
Использование смартфона (Android/iOS)
Выполните сопряжение смартфона с видеорегистратором BlackVue через
Wi-Fi Direct (подробнее см. ШАГ2 «Воспроизведение файлов видеозаписи на
смартфоне»).
Откройте приложение BlackVue и выберите WI-FI.
Коснитесь кнопки , чтобы войти в меню настроек программной прошивки.
(i) Выберите Настройки прошивки > Базовые > Время.
(ii) Выберите часовой пояс для автоматической синхронизации с временем
GPS или задайте время и дату вручную после активации параметра
Настройка времени вручную.
DR900X-1CH 43
Page 44
Перейдите в меню настроек прошивки и настройте другие необходимые
параметры.
Вы можете изменять такие параметры, как имя и пароль сети Wi-Fi, качество
изображения, настройки чувствительности, запись звука вкл / выкл, единицы
скорости (км/ч, миль/ч, выкл.), включение/выключение индикаторов,
громкость голосового управления, настройка Cloud и др.
После настройки параметров нажмите и выберите «Сохранить».
44 BLACKVUE
Page 45

Изменение часового пояса видеорегистратора и других настроек
РУССКИЙ
прошивки на компьютере (Windows/macOS)
Запустите программу BlackVue Viewer после подключения карты microSD
видеорегистратора к компьютеру. Нажмите кнопку , чтобы открыть панель
настроек BlackVue.
Настройки
Вы можете изменять такие параметры, как имя и пароль сети Wi-Fi, качество
изображения, настройки чувствительности, запись звука вкл / выкл, единицы
скорости (км/ч, миль/ч, выкл.), включение/выключение индикаторов, громкость
голосового управления, настройка Cloud и др.
Дополнительная информация об изменении настроек в BlackVue Viewer есть в
руководстве, которое можно скачать с сайта www.blackvue.com > Support >
Downloads.
DR900X-1CH 45
Page 46

ШАГ4
Вы можете пропустить этот шаг, если у вас нет точки доступа к Wi-Fi на мобильном
устройстве или соединительного модуля BlackVue, а также если вы не хотите
использовать сервис BLACKVUE CLOUD.
Если у вас есть точка доступа к Wi-Fi на мобильном устройстве (переносной
маршрутизатор Wi-Fi), соединительный модуль BlackVue (CM100LTE), встроенная
беспроводная сеть в автомобиле или сеть Wi-Fi в зоне нахождения автомобиля, вы
можете использовать приложение BlackVue, чтобы подключиться к сервису BLACKVUE
CLOUD для просмотра местонахождения вашего автомобиля в режиме реального
времени или передачи видео с видеорегистратора в режиме реального времени.
Дополнительная информация об использовании приложения BlackVue есть в
руководстве BlackVue Cloud, которое можно загрузить на сайте www.blackvue.com >
Support > Downloads.
Подключение к BLACKVUE CLOUD (опционально)
Создание учетной записи
(i) Откройте приложение BlackVue.
(ii) Коснитесь кнопки в верхнем левом углу экрана и выберите
Регистрация.
(iii) Укажите свое имя, адрес своей электронной почты и придумайте пароль.
Повторно введите пароль и нажмите кнопку Регистрация.
(iv) Вам будет отправлено электронное сообщение. Перейдите по ссылке в
сообщении, чтобы завершить создание учетной записи.
Регистрация видеорегистратора в учетной записи
(i) В приложении BlackVue выберите CLOUD и зайдите в свою учетную
запись.
(ii) Коснитесь «Да», чтобы включить push-уведомления (этот параметр вы
можете изменить в любое время).
(iii) Выберите «Зарегистрировать новую камеру».
(iv) Зарегистрируйте свою камеру одним из следующих способов:
46 BLACKVUE
Page 47

QR-код: нажмите «Сканировать QR-код» и направьте экран своего
РУССКИЙ
смартфона на наклейку с QR-кодом на корпусе камеры;
QR-код / Код Cloud / Серийный номер
или
Регистрация вручную: введите серийный номер своей камеры и код Cloud
и нажмите «Зарегистрировать».
Подключите видеорегистратор BlackVue к точке доступа Wi-Fi, чтобы
связаться с сервисом Cloud
(i) Убедитесь, что ваш видеорегистратор BlackVue и точка доступа к Wi-Fi на
мобильном устройстве включены.
(ii) Выполните сопряжение смартфона с видеорегистратором BlackVue
через Wi-Fi Direct (подробнее см. ШАГ2 «Воспроизведение файлов
видеозаписи на смартфоне»)
(iii) Откройте приложение BlackVue. Выберите WI-FI > > Настройки
прошивки > CLOUD.
DR900X-1CH 47
Page 48

(iv) Убедитесь, что опция Включить Cloud активна. Выберите Настройки
точки подключения к Cloud.
(v) Выберите из списка свою точку доступа Wi-Fi. Введите пароль и
коснитесь OK.
Примечание
yМожно сохранить до трех SSID точек доступа Wi-Fi (например, домашней
сети, переносного устройства и рабочей сети).
48 BLACKVUE
Page 49

(vi) Вернитесь в меню настроек прошивки, коснитесь и выберите
РУССКИЙ
Сохранить.
После перезагрузки видеорегистратор автоматически подключится к
Интернету. Если подключение к Интернету не установлено, убедитесь, что
информация Wi-Fi была введена корректно.
Чтобы воспользоваться функциями сервиса Cloud, выберите CLOUD на
главном экране.
Примечание
yЕсли для подключения к Интернету доступны точки доступа LTE и Wi-Fi,
точка доступа Wi-Fi будет использоваться в приоритетном порядке. Если
вы предпочитаете соединение LTE, вы можете в любое время удалить
информацию о точке доступа Wi-Fi.
Подключение видеорегистратора BlackVue к облаку (с использованием
CM100LTE)
Убедитесь, что ваш видеорегистратор BlackVue имеет возможность
подключения соединительного модуля. Затем выполните указанные ниже
действия для регистрации SIM-карты.
(i) Найдите гнездо для SIM-карты. Открутите болт крышки гнезда SIM-карты.
Затем извлеките гнездо SIM-карты с помощью специального инструмента.
Вставьте карту в гнездо SIM-карты. Установите на место гнездо SIM-карты
в соединительный модуль, а затем завинтите болт, который фиксирует
крышку гнезда SIM-карты.
(ii) Выполните сопряжение смартфона с видеорегистратором BlackVue с
помощью Wi-Fi Direct. Для этого.
(iii) Откройте приложение BlackVue и выберите WI-FI > .
DR900X-1CH 49
Page 50

(iv) Настройте параметры APN, чтобы активировать SIM-карту. Для
получения более подробной информации см. «Руководство по
активации SIM-карты», которое находится в упаковочной коробке, или
посетите справочный центр BlackVue: www.helpcenter.blackvue.com ->
Руководство по подключению LTE.
(v) После подключения видеорегистратора к Интернету вы можете перейти
в меню CLOUD и использовать функции облака BlackVue Cloud.
Примечание
yДля получения более подробной информации см. «Руководство по
активации SIM-карты», которое входит в состав пакета CM100LTE.
yЧтобы использовать службу BlackVue Cloud, SIM-карта должна быть
активирована для доступа в Интернет через сеть LTE.
yКогда видеорегистратор подключен к Интернету, вы можете использовать
функции BlackVue Cloud, такие как удаленный просмотр в реальном
времени Live View, воспроизведение видео, геолокация в реальном
времени, push-уведомления, автозагрузка, удаленное обновление
прошивки и т.д., используя приложения BlackVue или Viewer для ПК.
yНекоторые функции облачной службы могут не работать, когда
температура окружающей среды слишком высока или/и скорость LTE
слишком медленная.
yДополнительная информация об использовании приложения BlackVue
приведена в руководстве BlackVue Cloud, которое можно загрузить на
сайте www.blackvue.com > Support > Downloads.
50 BLACKVUE
Активация
SIM-карты
Page 51

Советы по оптимизации производительности
РУССКИЙ
Для стабильной работы видеорегистратора рекомендуется форматировать
карту microSD раз в месяц.
Форматирование с помощью BlackVue Viewer (Windows):
Загрузите программу BlackVue Windows Viewer на сайте www.blackvue.com>
Support> Downloads и установите ее на компьютер. Вставьте карту в
устройство для считывания карт microSD и подключите устройство к ПК.
Запустите копию BlackVue Viewer, установленную на вашем ПК. Нажмите
кнопку «Форматировать» , выберите устройство для считывания карт и
нажмите OK.
Форматирование с помощью BlackVue Viewer (macOS):
Загрузите программу BlackVue Mac Viewer на сайте www.blackvue.com>
Support> Downloads и установите ее на компьютер. Вставьте карту в
устройство для считывания карт microSD и подключите устройство к ПК.
Запустите копию BlackVue Viewer, установленную на вашем ПК. Нажмите
кнопку «Форматировать» и выберите карту microSD в списке дисков на
левой вкладке. После выбора карты microSD нажмите вкладку «Очистить»
в основном окне. Выберите «MS-DOS (FAT)» из выпадающего меню
«Форматирование хранилища» и нажмите «Очистить».
Используйте только фирменные карты microSD от BlackVue. При
использовании других карт могут возникнуть проблемы с совместимостью.
Регулярно обновляйте программную прошивку, чтобы улучшить
производительность и обновить функции устройства. Обновления прошивки
будут доступны для скачивания на сайте www.blackvue.com > Support >
Downloads.
Техническая поддержка
Техническую поддержку, руководства и обновления программной прошивки
можно получить на сайте www.blackvue.com
Также вы можете написать сообщение специалисту технической поддержки
по адресу cs@pittasoft.com
DR900X-1CH 51
Page 52

Технические характеристики устройства:
Модель DR900X-1CH
Цвет/размер/вес Черный/ширина 118,5 мм x высота 36 мм/104 г
Память Карта памяти microSD (32 ГБ/64 ГБ/128 ГБ/256 ГБ)
Обычная запись, запись событий (при обнаружении
воздействия в нормальном режиме и режиме парковки),
запись вручную и в режиме парковки (при обнаружении
Режимы записи
Камера Датчик CMOS 8 Мп
Угол обзора По диагонали 162°, по горизонтали 136°, по вертикали 77°
Разрешение/
частота кадров
Видео Codec H.265 (HEVC), H.264 (AVC)
Качество
изображения
Режим сжатия
видео
Wi-Fi Встроенный (802.11 a.b.g.n.ac)
GPS Встроенный (двухдиапазонный: GPS, GLONASS)
Bluetooth Встроенный (V2.1+EDR/4.2)
LTE Внешний
движения)
* При использовании силового кабеля клемма ACC+
включает режим парковки. При использовании других
методов режим парковки включается с помощью
гироскопа.
4K UHD (3840x2140) с частотой 30 кадров в секунду
* Частота кадров может меняться во время потоковой
передачи по Wi-Fi.
Наивысшее (Экстрим), Наивысшее, высокое, нормальное
MP4
52 BLACKVUE
Page 53

Микрофон Встроенный
РУССКИЙ
Динамик
(Голосовое
Встроенный
управление)
Светодиодные
индикаторы
Индикаторы записи, GPS/BT, LTE/Wi-Fi, системы
безопасности передней камеры, датчика близости
Кнопка WI-FI:
* Нажмите один раз, чтобы включить/выключить Wi-Fi.
Кнопки
Датчик близости:
При касании датчика присутствия включается/
отключается аудиозапись или запускается запись вручную
в зависимости от настроек программной прошивки.
Датчик 3-осевой датчик ускорения
Резервная батарея Встроенный конденсатор
Входное
напряжение
12–24В пост. тока (разъем пост.тока [Ø3,5 x Ø1,35]) для
кабелей (черный: GND/желтый: B+ / красный: ACC)
Обычный режим (Wi-Fi вкл. / GPS вкл.): 350мА/час
Обычный режим (Wi-Fi выкл. / GPS вкл.): 310мА/час
Режим парковки (Wi-Fi вкл. / GPS выкл.): 265мА/час
Потребление тока
Режим парковки (Wi-Fi выкл. / GPS выкл.): 225мА/час
* Фактическое потребление энергии может различаться
в зависимости от условий использования и
окружающей среды.
Рабочая
температура
Температура
хранения
-20 °C − 70 °C (-4 °F − 158 °F)
-20 °C − 90 °C (-4 °F − 194 °F)
DR900X-1CH 53
Page 54

Выключение
питания при
перегреве
Сертификаты
соответствия
Программное
обеспечение
Приложение Приложение BlackVue (Android 5.0 или выше, iOS 9.0 или выше)
Прибл. 75°C (167°F)
FCC, CE, RoHS, Telec, WEEE, IC
Программа BlackVue Viewer
* Поддерживаются Windows 7 или более поздние версии
и Mac Yosemite OS X (10.10) или более поздние версии
Другое
54 BLACKVUE
Адаптивная система управления файлами, не требующая
форматирования
Page 55

Notes
Page 56

Notes
Page 57

Notes
Page 58

Product Warranty
The term of this product warranty is 1 year from the purchase date. (Accessories such as an External Battery/microSD
Card: 6 Months)
We, PittaSoft Co., Ltd., provide the product warranty according to the Consumer Dispute Settlement Regulations
(drawn up by the Fair Trade Commission). PittaSoft or designated partners will provide the warranty service upon request.
Circumstances
For serious repair required within 10days of
purchase
For serious repair required within 1month of
purchase
For serious repair required within 1month of
exchange
When not exchangeable Refund
For performance/
functional
problems under
normal use
conditions
1) Malfunction due to customer fault
- Malfunc tion & damage caused by user negligence (fall, shock,
damage, unreasonable operation, etc.) or careless use
- Malfunc tion & damage after being serviced/repaired by an
unauthorized third party, and not through Pittasoft’s Authorized
Service Center.
- Malfunc tion & damage due to the use of unauthorized components,
consumables, or separately sold parts
2) Other Cases
- Malfunc tion due to natural disasters (re, ood, earthquake, etc.)
- Expired life span of a consumable part
- Malfunc tion due to external reasons
This warranty is only valid in the country where you purchased the product.
Repair
(If Available)
Repair
(If Unavailable)
For Defect Free Repair
Repeated problem with the
same defect (up to 3times)
Repeated trouble with dierent
parts (up to 5times)
For the loss of a product while
being serviced/repaired
When repair is unavailable due
to lack of spare parts within the
component holding period
When repair is unavailable
even when spare parts are
available
Warranty
Within the
Term
Exchange/
Refund
Exchange
Exchange/
Refund
Exchange/
Refund
Paid Repair Paid Repair
Outside of
theTerm
N/A
Paid Repair/
Paid Product
Exchange
Refund after
depreciation
plus an
additional 10%
(Maximum:
purchase price)
Exchange/
Refund after
depreciation
Page 59

Гарантия
Срок гарантии на данное устройство составляет 1 год с даты покупки. (для аксессуаров, таких как
батарея/карта памяти microSD: 6 месяцев)
Мы, компания PittaSoft Co., Ltd, предоставляем гарантию на продукт в соответствии с правилами урегулирования
потребительских споров (составленными Комиссией по справедливой торговле). PittaSoft или авторизованные
партнеры обязуются обеспечивать сервисные услуги по запросу.
Название продукта
(название модели)
Дата покупки Место покупки
Информация о клиенте Адрес/телефон
Повреждения, полученные во время эксплуатации
Если требуется крупный ремонт в первые
14 дней со дня покупки
При невозможности замены возмещение
Для дефектов
ремонт при
Если неисправность
возникла не по
вине клиента
(производственный
дефект)
1) Неисправности, возникшие по вине пользователя
- Неисправности и повреждения, вызванные небрежностью пользователя
(падение, удары, повреждения, неправильное использование и т.д.)
- Неисправности и повреждения, возникшие после ремонта,
произведенного не в авторизованном сервисном центре
- Неисправности и повреждения, полученные в результате
несанкционированного использования компонентов, расходных
материалов или частей, продающихся отдельно.
2) Другие случаи
- Неисправности, полученные в результате стихийных бедствий (пожар,
наводнение, землетрясение и т.д.)
- Истечение срока службы расходных материалов
- Неисправности, полученные вследствие внешних причин
наличии
возможности
если ремонт
невозможен
Повторное обращение в связи
с одинаковой неисправностью
(до3раз)
Повторное обращение с
различной неисправностью
(до 5 раз)
Невозможность выполнения
сервисного обслуживания
При невозможности ремонта
из-за отсутствия запасных
частей в течение срока ремонта
При невозможности ремонта
даже при наличии запасных
частей
Эта гарантия действительна только в той стране, где был приобретен продукт.
Серийный номер
во время
гарантийного
срока
Замена/
возврат
стоимости
Бесплатный
ремонт
Замена/
возмещение
Платный
ремонт
Гарантия
по истечении
гарантийного
Отсутствует
платная замена
срока
Платный
ремонт/
устройства
Платный
ремонт
Page 60

020-200098
FCC ID : YCK-DR900X-2CH / HVIN : DR900X-1CH / IC : 23402-DR900X2CH
DR900X-1CH
Address
4F ABN Tower, 331, Pangyo-ro, Bundang-gu, Seongnam-si,
Gyeonggi-do, Republic of Korea, 13488
instagram.com/blackvueofficial
2020
©
 Loading...