

Page 1
DR750S-2CH IR
Page 2

BLACKVUE
DR750S-2CH IR
For manuals, customer support and FAQs go to www.blackvue.com
Page 3
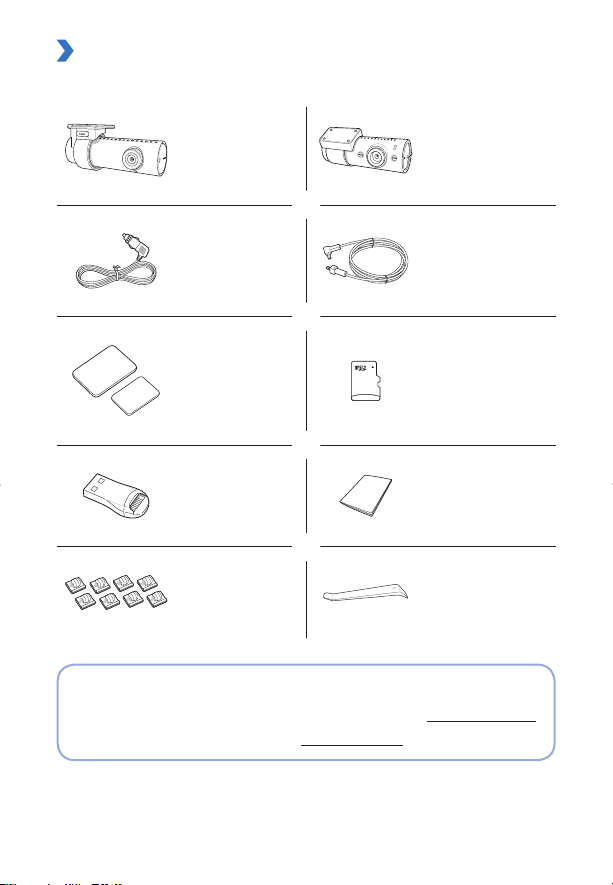
In the box
Check the box for each of the following items before installing the BlackVue dashcam.
Front camera
Power cord
Double-sided tape for
the Mounting Brackets
microSD card reader User guide
Cable clips (8 EA) Pry tool
Infrared Interior/Rear
camera
Rear camera
connection cable
microSD Card
Need help?
Download the manual (including FAQs) and the latest rmware from www.blackvue.com
Or contact a Customer Support expert at cs@pittasoft.com
*The DR750S-2CH IR model uses the same rmware as the DR750S-2CH model.
DR750S-2CH IR 3
Page 4
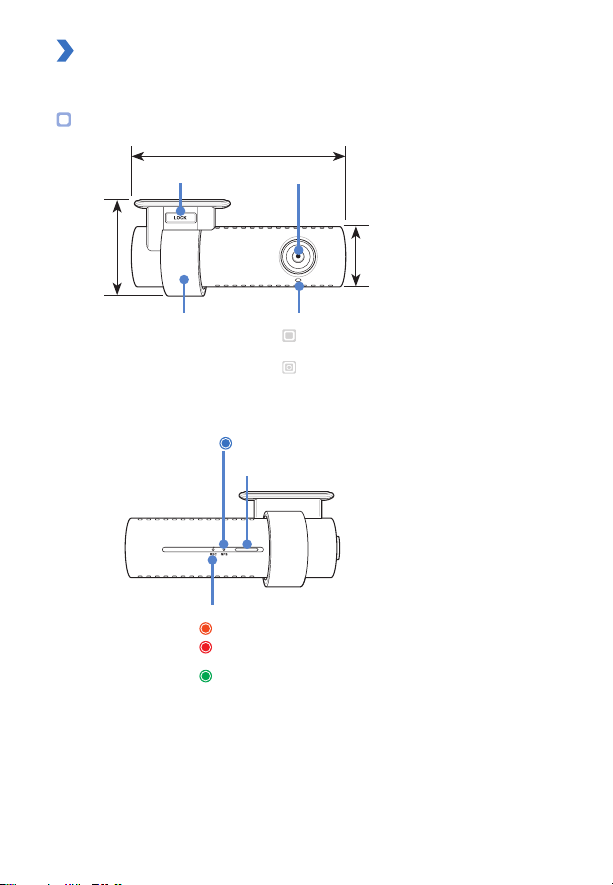
At a glance
The following diagrams explain each part of the BlackVue dashcam.
Front camera
118.5 mm
Lock button
55 mm
Camera lens
36 mm
4 BLACKVUE
Mounting bracket Front security LED
GPS LED
: GPS is on
Recording LED
: Blinks orange in normal mode.
: Blinks red when (i) an event is being recorded (impact
detected), or (ii) manual recording has started.
: Blinks green in parking mode when motion is detected.
: Blinks slowly during normal mode and
parking mode motion detection standby.
: Blinks quickly when (i) an event is being
recorded (impact detected), (ii) manual
recording has started, or (iii) motion is
detected in parking mode.
Speaker
Page 5

Connectivity details label:
- Default Wi-Fi SSID
- Default Wi-Fi password
- Cloud code
- QR code
Serial number label
Wi-Fi/Internet LED
: Direct Wi-Fi is on.
: Blinks when connected to the internet
(Cloud connected).
Proximity Sensor:
Touch or wave a nger within 20mm of the
sensor to turn on/o audio recording.
Alternatively, it can be set as a manual
recording trigger in the rmware settings.
DR750S-2CH IR 5
Page 6

Rear camera connection port
DC in (power connector)
Rear/secondary camera
Mounting bracket Camera lens
31 mm
V out (Front camera
connection port)
Cover
microSD card slot
Wi-Fi / Format button:
- Press once to turn on/o Wi-Fi.
- Press and hold for 5 seconds and once voice instructions
start, release the button. Then press once again to
reset the Wi-Fi SSID and password or press and hold for
5seconds to format the microSD card.
Illumination sensor
25 mm
67.4 mm
IR LED
Security LED
: Stays ON in all
recording modes.
The illumination sensor detects when it is dark and activates the IR LEDs for optimal
interior recording.
6 BLACKVUE
Page 7

STEP 1
Install the front camera behind the rear view mirror. Install the rear/secondary camera at
the top of the front or back windshield.
Install and power up
Front camera Secondary camera mounting options
Warning
yDo not install the product in a location where it can obstruct the driver's eld of
vision.
Turn o the engine.
Peel o the protective lm from the double-sided tape and attach the front camera
to the windshield behind the rear-view mirror.
Adjust the angle of the lens by rotating the body of the front camera. We
recommend pointing the lens slightly downwards (≈10° below horizontal), so as to
record video with a 6:4 road to background ratio.
DR750S-2CH IR 7
Page 8

Peel off the protective film from the double-sided tape and attach the rear/
secondary camera to the front or rear windshield. Adjust the angle of the lens by
rotating the body of the camera.
Connect the front camera ('Rear' port) and the rear camera ('V out') using the rear
camera connection cable.
Use the pry tool to lift the edges of the rubber window sealing and/or molding and
tuck in the rear camera connection cable.
Plug the power cord into the cigarette lighter socket and the front camera.
Use the pry tool to lift the edges of the windshield trim/molding and tuck in the
power cord.
Rear/secondary camera
connection cable
Power cord
8 BLACKVUE
Page 9

Turn on the engine. The BlackVue dashcam will power up and start recording. Video
files are stored on the microSD card. When the microSD card fills up, the newest
video les will start to replace the oldest video les (called loop recording) – so you
will always have the most recent video les.
Turn off the engine. The dashcam will automatically stop recording and power
down. To record in parking mode while the engine is off please install a Power
Magic Battery Pack (sold separately) or a Power Magic Pro (sold separately). A
Power Magic Pro powers your dashcam when the engine is o by hardwiring it to
the automotive battery. A low voltage power cut-o function and a parking mode
timer protect the automotive battery from discharge.
Note
– When you run the dashcam for the rst time the rmware is automatically loaded
onto the microSD card. After the firmware has been loaded onto the microSD
card you can customize settings using BlackVue app on a smartphone or
BlackVue Viewer on a computer.
DR750S-2CH IR 9
Page 10

Product specications
Model Name DR750S-2CH IR
Color/Size/Weight
Memory microSD Card (16 GB/32 GB/64 GB/128 GB)
Recording Modes
Camera
Viewing Angle
Resolution/Frame
Rate
Image Quality Highest, High, Normal
Video Compression
Mode
Wi-Fi Built-in (802.11n(2.4~2.4835GHz))
GPS Built-in
Microphone Built-in
Speaker (Voice
Guidance)
LED Indicators
Wavelength of
Interior camera IR
light
Front: Black / Width 118.5mm x Height 36mm / 90g
Rear: Black / Width 67.4mm x Height 25mm / 26g
Normal recording, Event recording (when impact is
detected in normal and parking mode), Manual recording
and Parking recording (when motion is detected)
For Parking mode recording, a Parking Mode Battery Pack
*
(Power Magic Battery Pack) or a Parking Mode Hardwiring
Kit (Power Magic Pro) is required.
Front: STARVIS™ CMOS Sensor (Approx. 2.1 M Pixel)
Rear: CMOS Sensor (Approx. 2.1 megapixels)
Front: Diagonal 139°, Horizontal 116°, Vertical 61°
Rear: Diagonal 145°, Horizontal 118°, Vertical 59°
<Front - Rear>
Full HD (1920x1080) @60fps - Full HD (1920x1080) @30fps
Full HD (1920x1080) @30fps - Full HD (1920x1080) @30fps
Full HD (1920x1080) @30fps - HD (1280x720) @30fps
HD (1280x720) @30fps - HD (1280x720) @30fps
Frame rate may vary during Wi-Fi streaming.
*
MP4
Built-in
Front: Recording LED, GPS LED, Wi-Fi LED, Front Security LED
Rear: Rear Security LED
940 nm (2 Infrared (IR) LEDs)
10 BLACKVUE
Page 11

Wi-Fi / Format button:
Press once to turn on/o Wi-Fi.
Press and hold for 5 seconds and once voice commands
start, release the button. Then press once again to reset the
Button
Wi-Fi SSID and password or press and hold for 5 seconds to
format the microSD card.
Proximity sensor:
Touching the proximity sensor turns on/o audio recording
or triggers manual recording depending on the rmware
settings.
Sensor 3-Axis Acceleration Sensor
Backup Battery Built-in super capacitor
Input Power
DC 12 V − 24 V (DC Plug:
12 V)
Avg. 370 mA (4.4 W at 12 V, when GPS and Wi-Fi is On)
Avg. 310 mA (3.72 W at 12 V, when GPS and Wi-Fi is O)
Power Consumption
* Approx. 60mA increase in current when IR LEDs are ON.
* Actual power consumption may vary depending on use
conditions and environment.
Operation
Temperature
Storage
Temperature
High Temperature
Cut-Off
-20 °C − 70 °C (-4 °F − 158 °F)
-20 °C − 70 °C (-4 °F − 158 °F)
Approx. 80 °C (176 °F)
Certifications FCC, CE, RoHS, Telec, WEEE, IC
BlackVue Viewer
Software
Application
Windows XP or higher and Mac Yosemite OS X (10.10) or
*
higher
BlackVue Application (Android 4.4.2 or higher, iOS 9.0 or
higher)
Others Adaptive Format Free File Management System
(Ø3.5 x Ø1.35), MAX 1 A/
* STARVIS is a trademark of Sony Corporation.
The DR750S-2CH IR model uses the same rmware as the DR750S-2CH model and has all
of the same great features. For more information about using the DR750S-2CH IR, please
download the DR750S-2CH manual from www.blackvue.com > Support > Downloads.
DR750S-2CH IR 11
Page 12

DR750S-2CH IR
 Loading...