

Page 1
Page 2

Table of Contents
Introduction ...................................................................................3
Important safety information
Overview
In the box .........................................................................................................................7
At a glance .......................................................................................................................8
Front camera ......................................................................................................................................... 8
Removing and inserting the front camera ..................................................................................... 9
Rear camera ........................................................................................................................................10
Removing and inserting the rear camera .....................................................................................10
........................................................................................7
......................................................4
Installation .................................................................................. 11
Installing the BlackVue dashcam ..............................................................................11
Playing and Managing Videos ................................................... 15
Removing the microSD card ......................................................................................15
Opening video les in BlackVue Viewer...................................................................16
For Windows users ............................................................................................................................. 16
For Mac users ...................................................................................................................................... 17
Viewer screen composition ........................................................................................18
Windows Viewer ................................................................................................................................. 18
Mac Viewer .......................................................................................................................................... 19
Playing video.................................................................................................................20
Playing back videos ........................................................................................................................... 20
Identify video les by recording type ............................................................................................ 20
Checking the displayed time ........................................................................................................... 21
Using BlackVue Viewer......................................................................................................................21
Exploring the timeline ...................................................................................................................... 21
Zoom options .....................................................................................................................................22
Viewing the G-Sensor graph ............................................................................................................ 22
Checking the GPS data .....................................................................................................................23
GPS tracking .......................................................................................................................................23
GPS tracking – Advanced mode ...................................................................................................... 24
Managing videos ..........................................................................................................25
Capturing or printing a still image from video ............................................................................25
Deleting videos .................................................................................................................................. 26
Exporting videos ................................................................................................................................ 27
Verifying videos .................................................................................................................................29
Keeping the BlackVue dashcam updated ................................. 30
Formatting the microSD card ....................................................................................30
Format using Windows Viewer ........................................................................................................ 30
Format using Mac Viewer ................................................................................................................. 32
Upgrading the rmware .............................................................................................34
Changing settings ...................................................................... 36
BlackVue Viewer language setting ...........................................................................36
BlackVue settings .........................................................................................................36
Basic settings ...................................................................................................................................... 37
Sensitivity settings ............................................................................................................................ 39
Other settings ..................................................................................................................................... 42
Applying the settings ........................................................................................................................42
Optional accessories .................................................................. 43
Padlock (Optional) .......................................................................................................43
GPS receiver (Optional)
...............................................................................................44
Parking mode hardwiring kit (Optional) .................................................................45
Troubleshooting ......................................................................... 46
Running the time setting program ...........................................................................46
Frequently asked questions .......................................................................................47
About using the BlackVue dashcam...............................................................................................47
About the microSD card ...................................................................................................................47
About recording videos .................................................................................................................... 48
About playing back videos ..............................................................................................................48
About changing the settings ........................................................................................................... 48
Product specications ................................................................ 50
Recording time
Disposal and recycling information
........................................................................... 52
.......................................... 53
BLACKVUE
2
Page 3

Introduction
Thank you for purchasing this BlackVue dashcam made by Pittasoft Co., Ltd.
This instruction manual contains information on how to operate your dashcam.
Before using your dashcam, we recommend that you read through this manual to ensure correct usage.
To improve the performance of the product, the contents of this manual are subject to change without prior notice.
Note
y
A formatted microSD card is provided in the BlackVue dashcam when you purchase the product. After turning on the power of
the dashcam, the microSD card will be initialized and programs such as BlackVue Viewer will be installed.
DR430-2CH
3
Page 4

Important safety information
For user safety and to avoid property damage, read through this manual and follow these safety instructions to use the product correctly.
DANGER
y
Do not disassemble, repair, or modify the product yourself.
Doing so may cause re, electric shock, or malfunction. For internal inspection and repair, contact the service center.
y
If any foreign matter gets inside the product, detach the power cord immediately.
Contact the service center for repair.
y
Do not adjust the product while driving.
Doing so may cause an accident. Stop or park your car in a safe place before installing and setting up the product.
y
Do not install the product in a location where the product can interfere with the driver's eld of vision.
Doing so may cause an accident.
y
Do not use a damaged or modied power cord. Only use the cords provided by the manufacturer.
Damaged or modied power cords may cause an explosion, re, or malfunction.
Failure to observe the following directions could result in death or property damage:
y
y
BLACKVUE
4
Do not operate the product with wet hands.
Doing so may cause electric shock.
Do not install the product in an environment with high humidity, or combustible gases or liquids.
Doing so may cause an explosion and/or re.
Page 5

WARNING
y
Do not leave the product near infants, children, or pets.
There is a risk of them swallowing small components, and/or their saliva may get into the product, causing an explosion due to a short
circuit.
y
Do not spray water or wax directly onto the product while cleaning the inside of the car.
Doing so may cause re, electric shock, or malfunction.
y
If smoke or an unusual smell is emitted from the power cord, detach the power cord immediately.
Contact the service center or your distributor.
y
Keep the terminals of the power cord clean.
Failure to do so may cause excessive heat and re.
y
Use the correct input voltage.
Failure to observe the following directions could result in death or serious injury:
Failure to do so may cause explosion, re, or malfunction.
y
Plug in the power cord rmly so that it cannot easily be disconnected.
Failure to do so may cause re.
y
Do not cover the product with any material.
Doing so may cause external deformation of the product or re. Use the product and peripherals in a well-ventilated location.
DR430-2CH
5
Page 6

CAUTION
y
Do not spray cleaning products directly onto the product.
Doing so may cause discoloration, cracks, or malfunction.
y
If the product is used outside the optimal temperature range (-20°C – 60°C / -4°F – 140°F), performance can decline or
malfunctions may occur.
y
Make sure that the product is installed properly.
If installed incorrectly, vibrations may cause the product to fall, and may cause physical injury.
y
When entering or exiting a tunnel, when directly facing into bright sunlight, or when recording at night without lighting the
quality of recorded video may deteriorate.
y
If the product is damaged or the power supply is cut due to an accident, video may not be recorded.
y
Excessively tinted windshield glass can distort the recorded video or cause recorded video to be indistinct.
Failure to observe the following directions could result in injury or property damage:
y
Prolonged use of the product can increase the interior temperature and cause burns.
y
microSD cards are consumables, so replace microSD cards after prolonged use.
microSD cards may not record video correctly after extended use, so check the microSD card's recording capability periodically and
replace as necessary.
y
Clean the lens regularly.
Foreign material attached to the lens can aect the recording quality.
y
Do not remove the microSD card while the microSD card is saving or reading data.
The data can be damaged or malfunctions may occur.
y
It is recommended that you install the software and rmware from the BlackVue download page. You can access the BlackVue
download page on the BlackVue website (www.blackvue.com).
y
It is recommended that you remove the power cord if the product (BlackVue dashcam/Parking Mode Hardwiring Kit) is not used
for an extended period of time.
BLACKVUE
6
Page 7
Overview
In the box
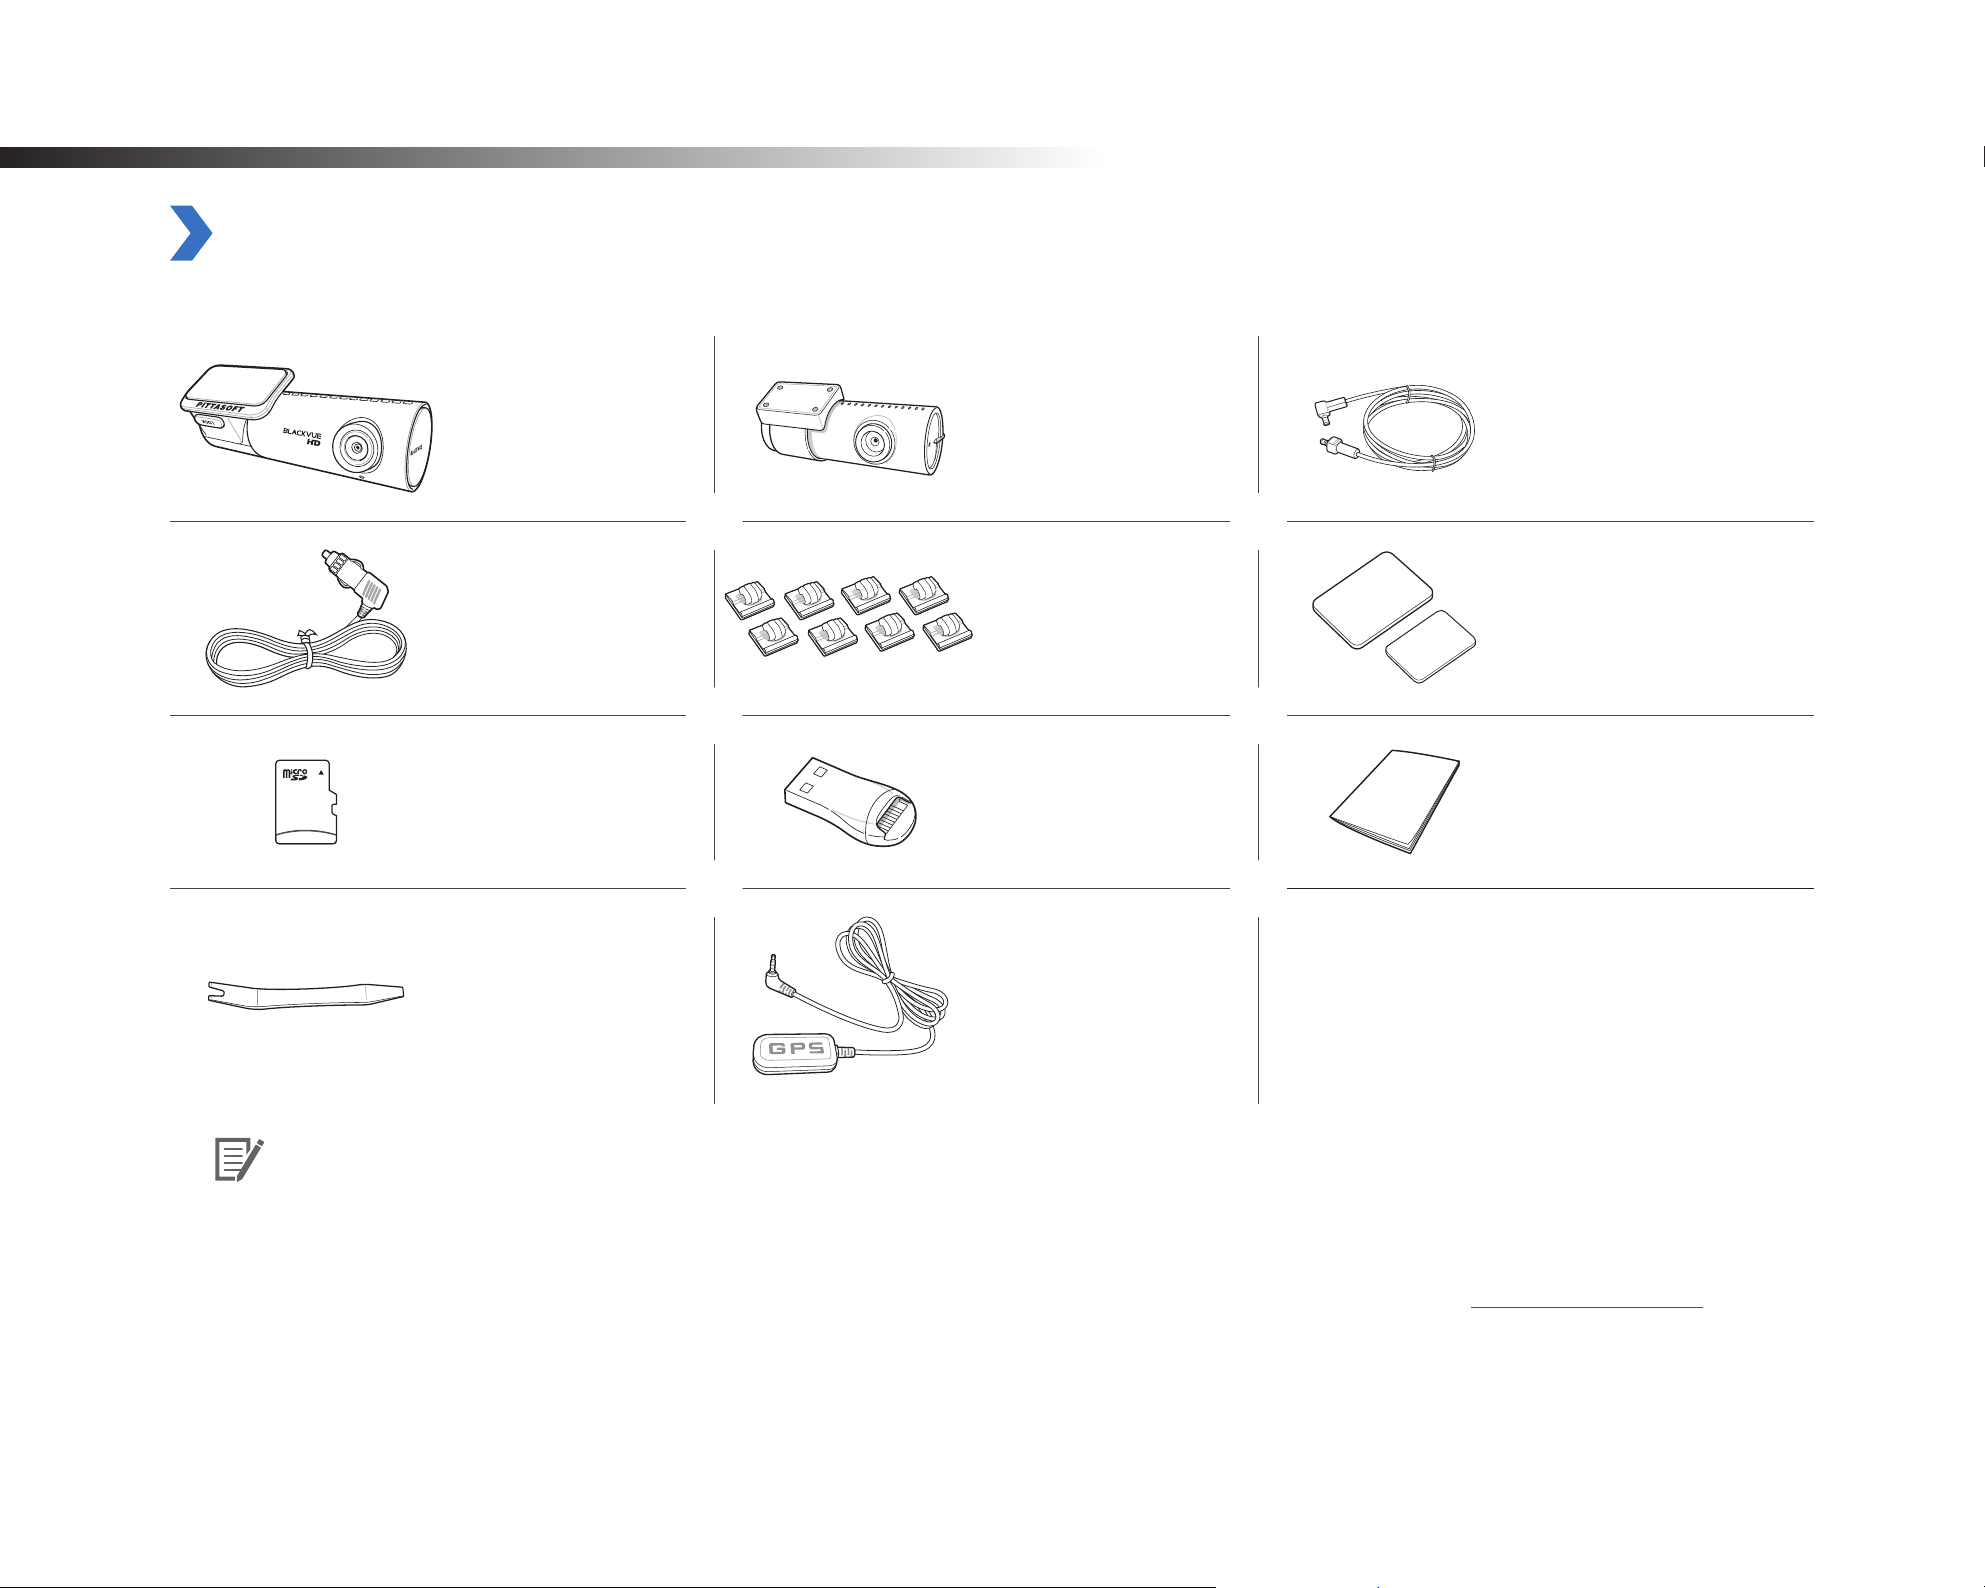
Check the box for each of the following items before installing the BlackVue dashcam.
Front camera Rear camera
Power cord Cable clips (8 EA)
Rear camera
connection cable
Double-sided tape for
the Mounting Brackets
microSD card microSD card reader Quick start guide
External GPS
Pry tool
(Optional)
Note
y
The illustrations in this manual may dier from the product.
y
To improve the performance of the product, the contents of this manual are subject to change without prior notice.
y
For more information about the package components and accessories, visit the BlackVue website (www.blackvue.com).
y
You can nd the microSD card in the BlackVue dashcam.
DR430-2CH
7
Page 8
At a glance
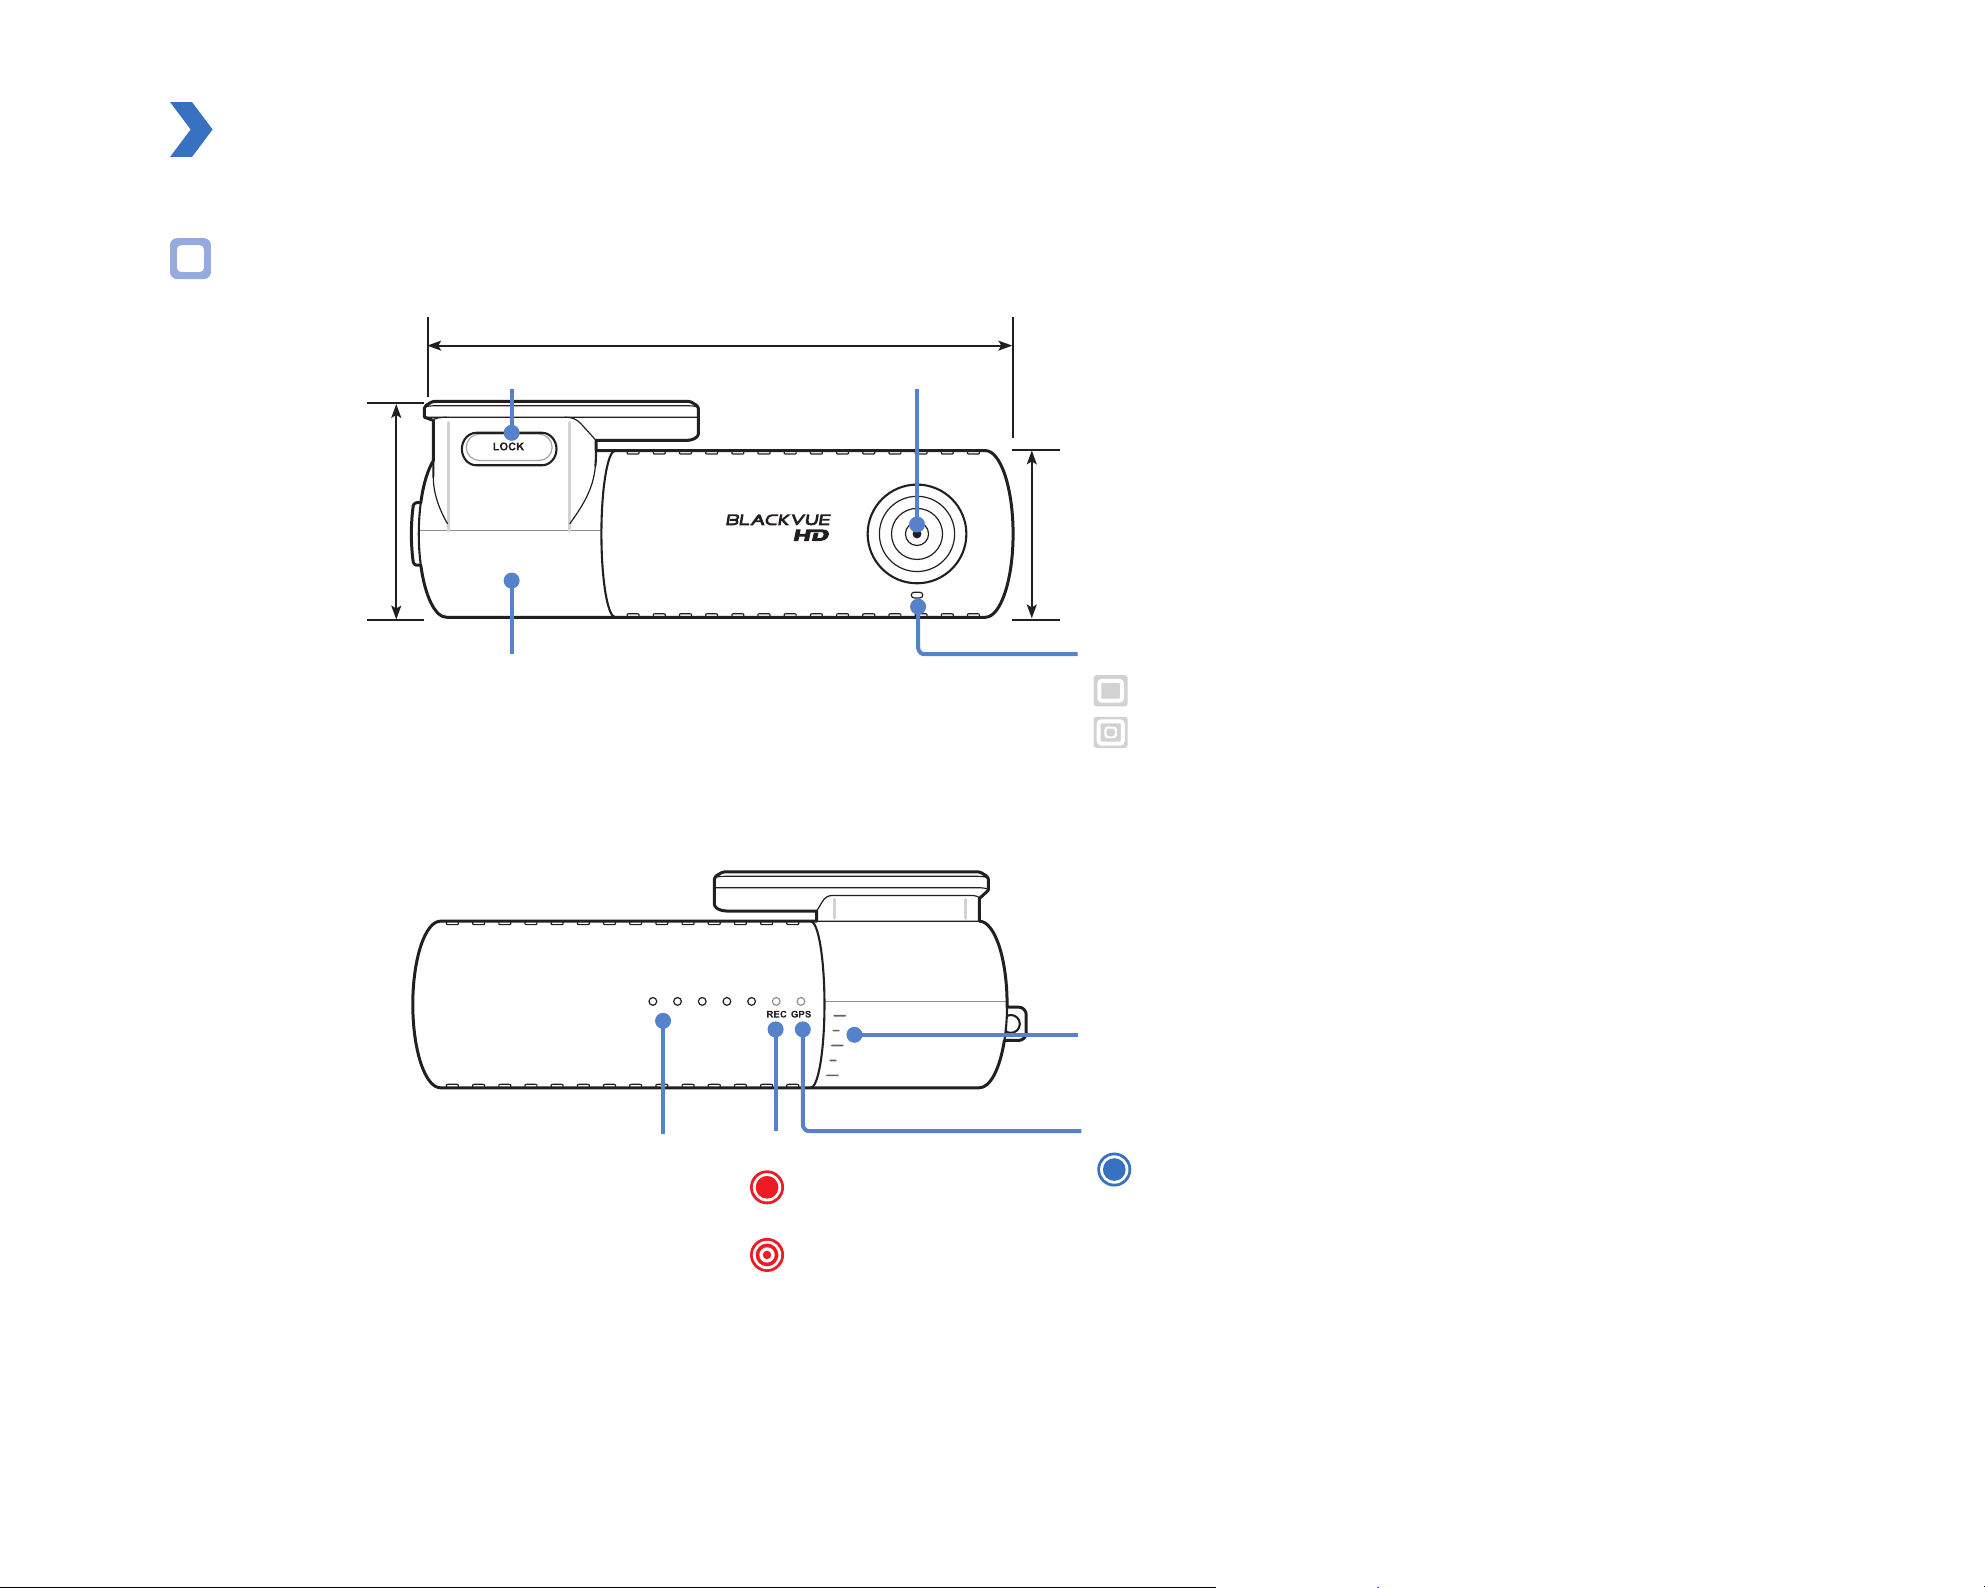
The following diagrams explain each part of the BlackVue dashcam.
Front camera
115.9 mm
42.6 mm
Lock button
Mounting bracket
Camera lens
34 mm
Front security LED
: Blinks slowly in normal and parking mode.
: Blinks quickly when an event is being recorded
(impact detected) or motion is detected in
parking mode.
BLACKVUE
8
Speaker
Angle indicator: You can easily set up your preferred
camera angle using the white lines.
GPS LED
Recording LED
: GPS is on.
: Blinks slowly in normal
and parking mode.
: Blinks quickly when an
event is being recorded
(impact detected) or
motion is detected in
parking mode.
Page 9
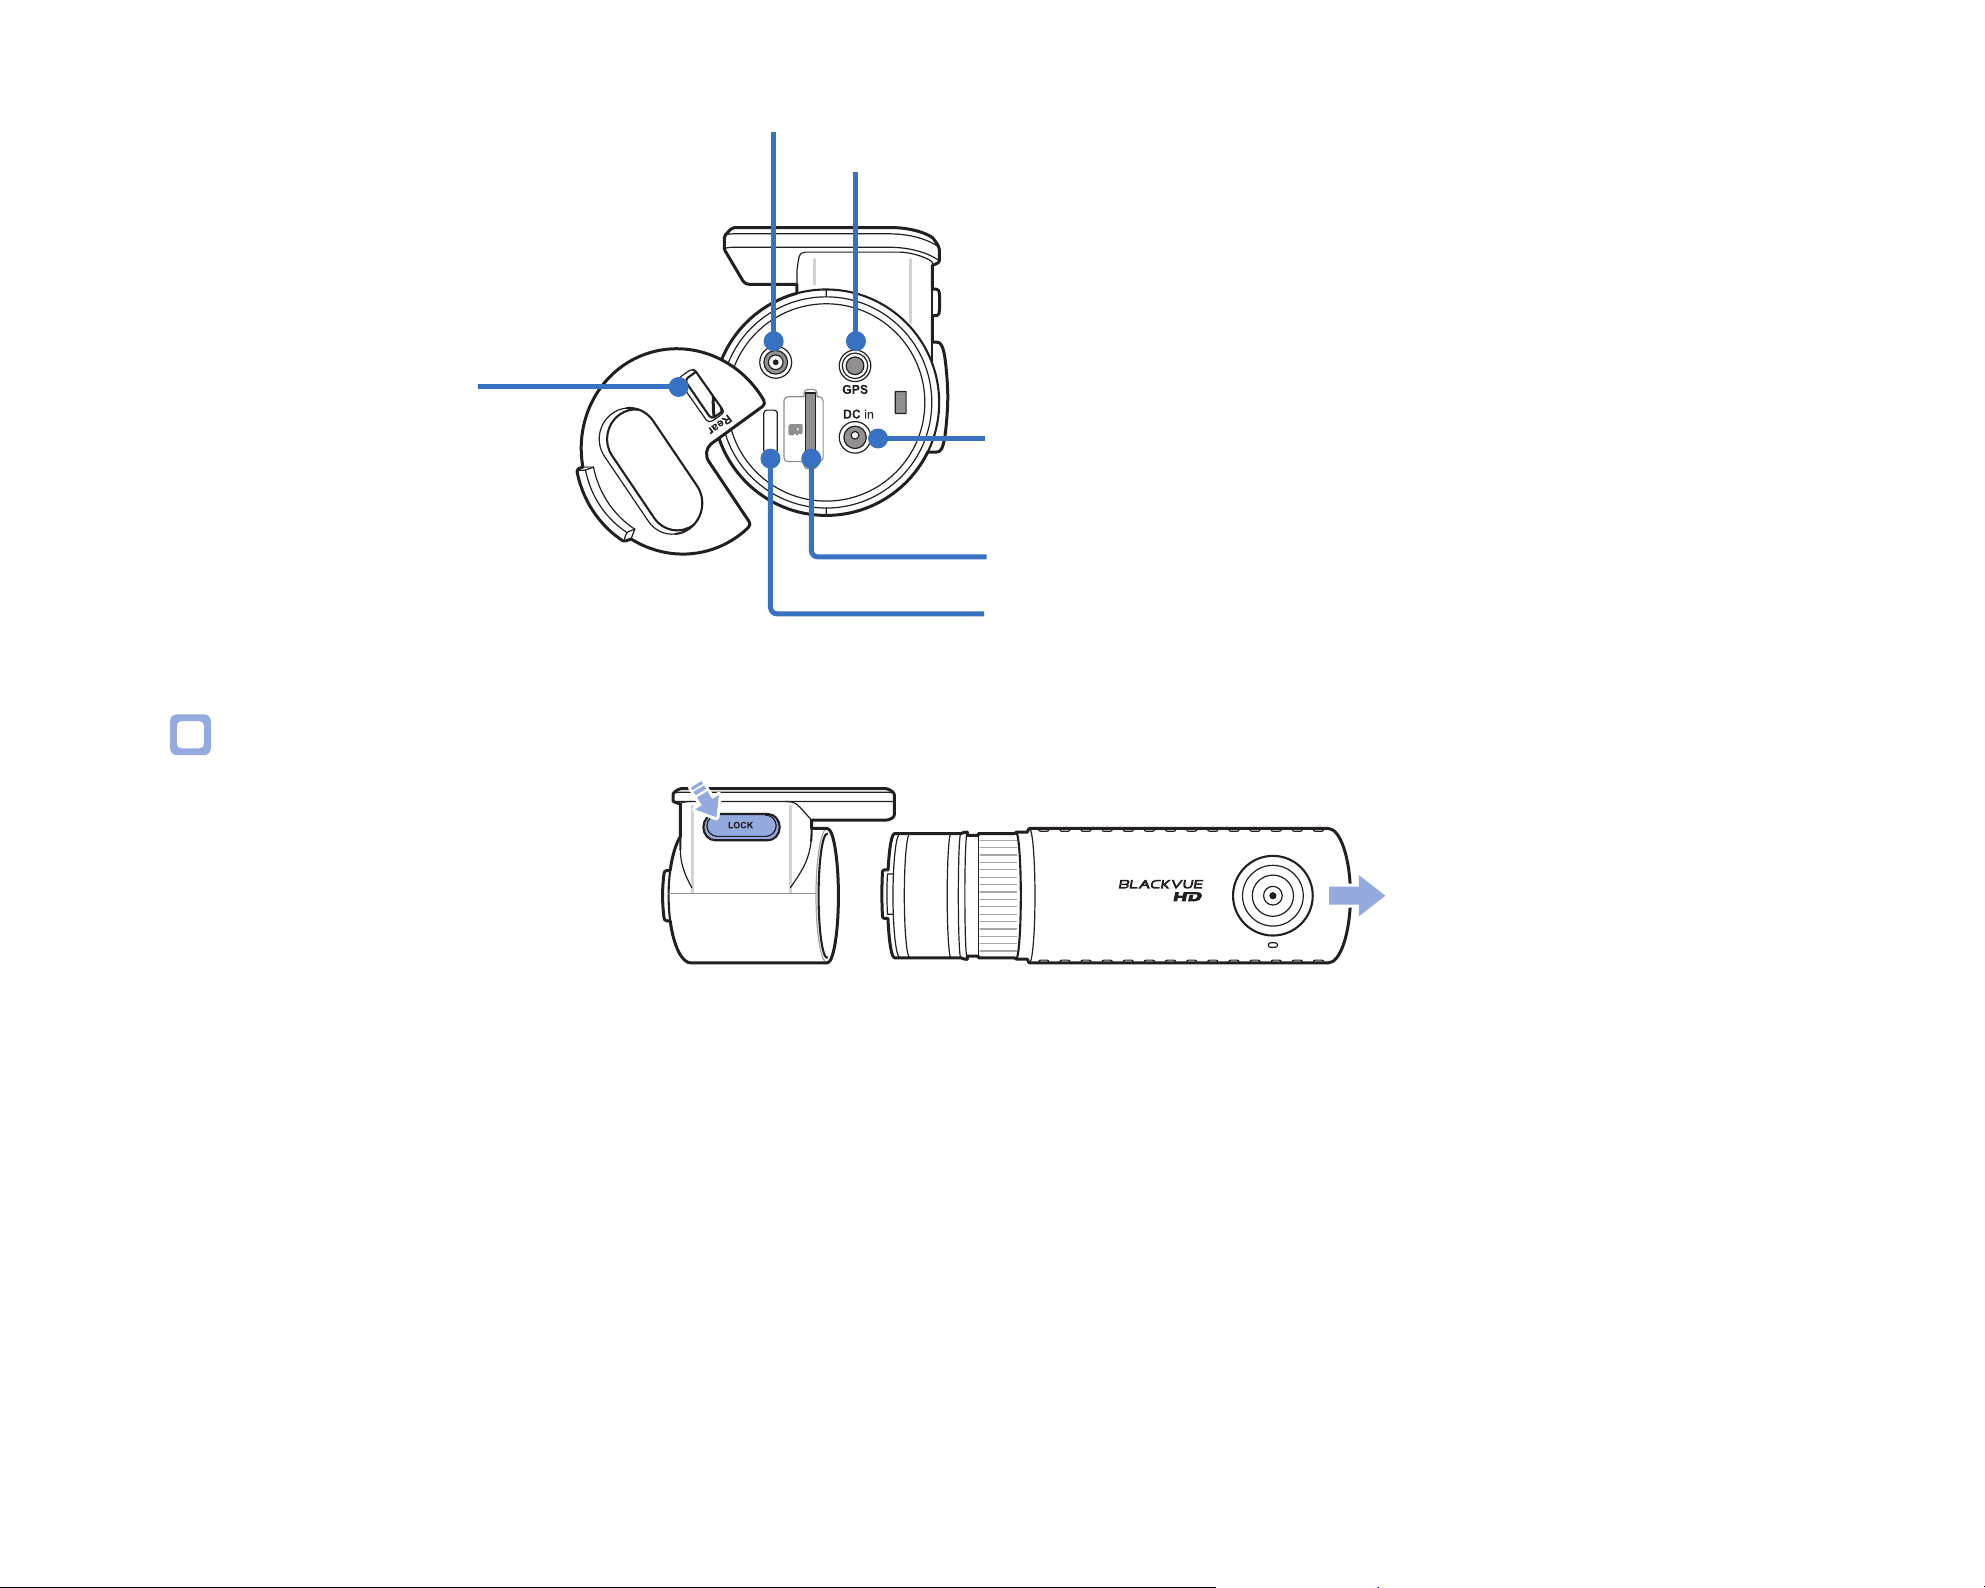
Cover
Rear (rear camera connection port)
GPS connection port
DC in (power socket)
microSD card slot
microSD lock loop: You can protect the microSD card using
a padlock (see "Padlock (Optional)" on page 43.)
Removing and inserting the front camera
y
To remove the front camera from its bracket, press the LOCK button and pull the front camera out of the mounting bracket.
y
To insert the front camera into its bracket, push the front camera into the mounting bracket until it "clicks" in.
DR430-2CH
9
Page 10

Rear camera
67.4 mm
Mounting bracket Camera lens
25 mm
30.8 mm
V out
(Front camera
connection port)
Rear security LED
: Rear camera is on
(on in all recording modes).
Removing and inserting the rear camera
y
To remove the rear camera from its bracket, hold the mounting bracket and pull the rear camera out.
y
To insert the rear camera into its bracket, push the rear camera into the mounting bracket until it "clicks" in.
BLACKVUE
10
Page 11

Installation
Installing the BlackVue dashcam
Install the front camera behind the rear view mirror. Install the rear camera at the top of the back windshield. Remove any foreign matter
and clean and dry the windshield before installation.
1
2
Warning
y
Do not install the product in a location where it can obstruct the driver's eld of vision.
Turn o the engine.
Peel o the protective lm from the double-sided tape and attach the front camera to the windshield behind the rear-view mirror.
DR430-2CH
11
Page 12

3
Peel o the protective lm from the double-sided tape and attach the rear camera to the rear windshield.
4
5
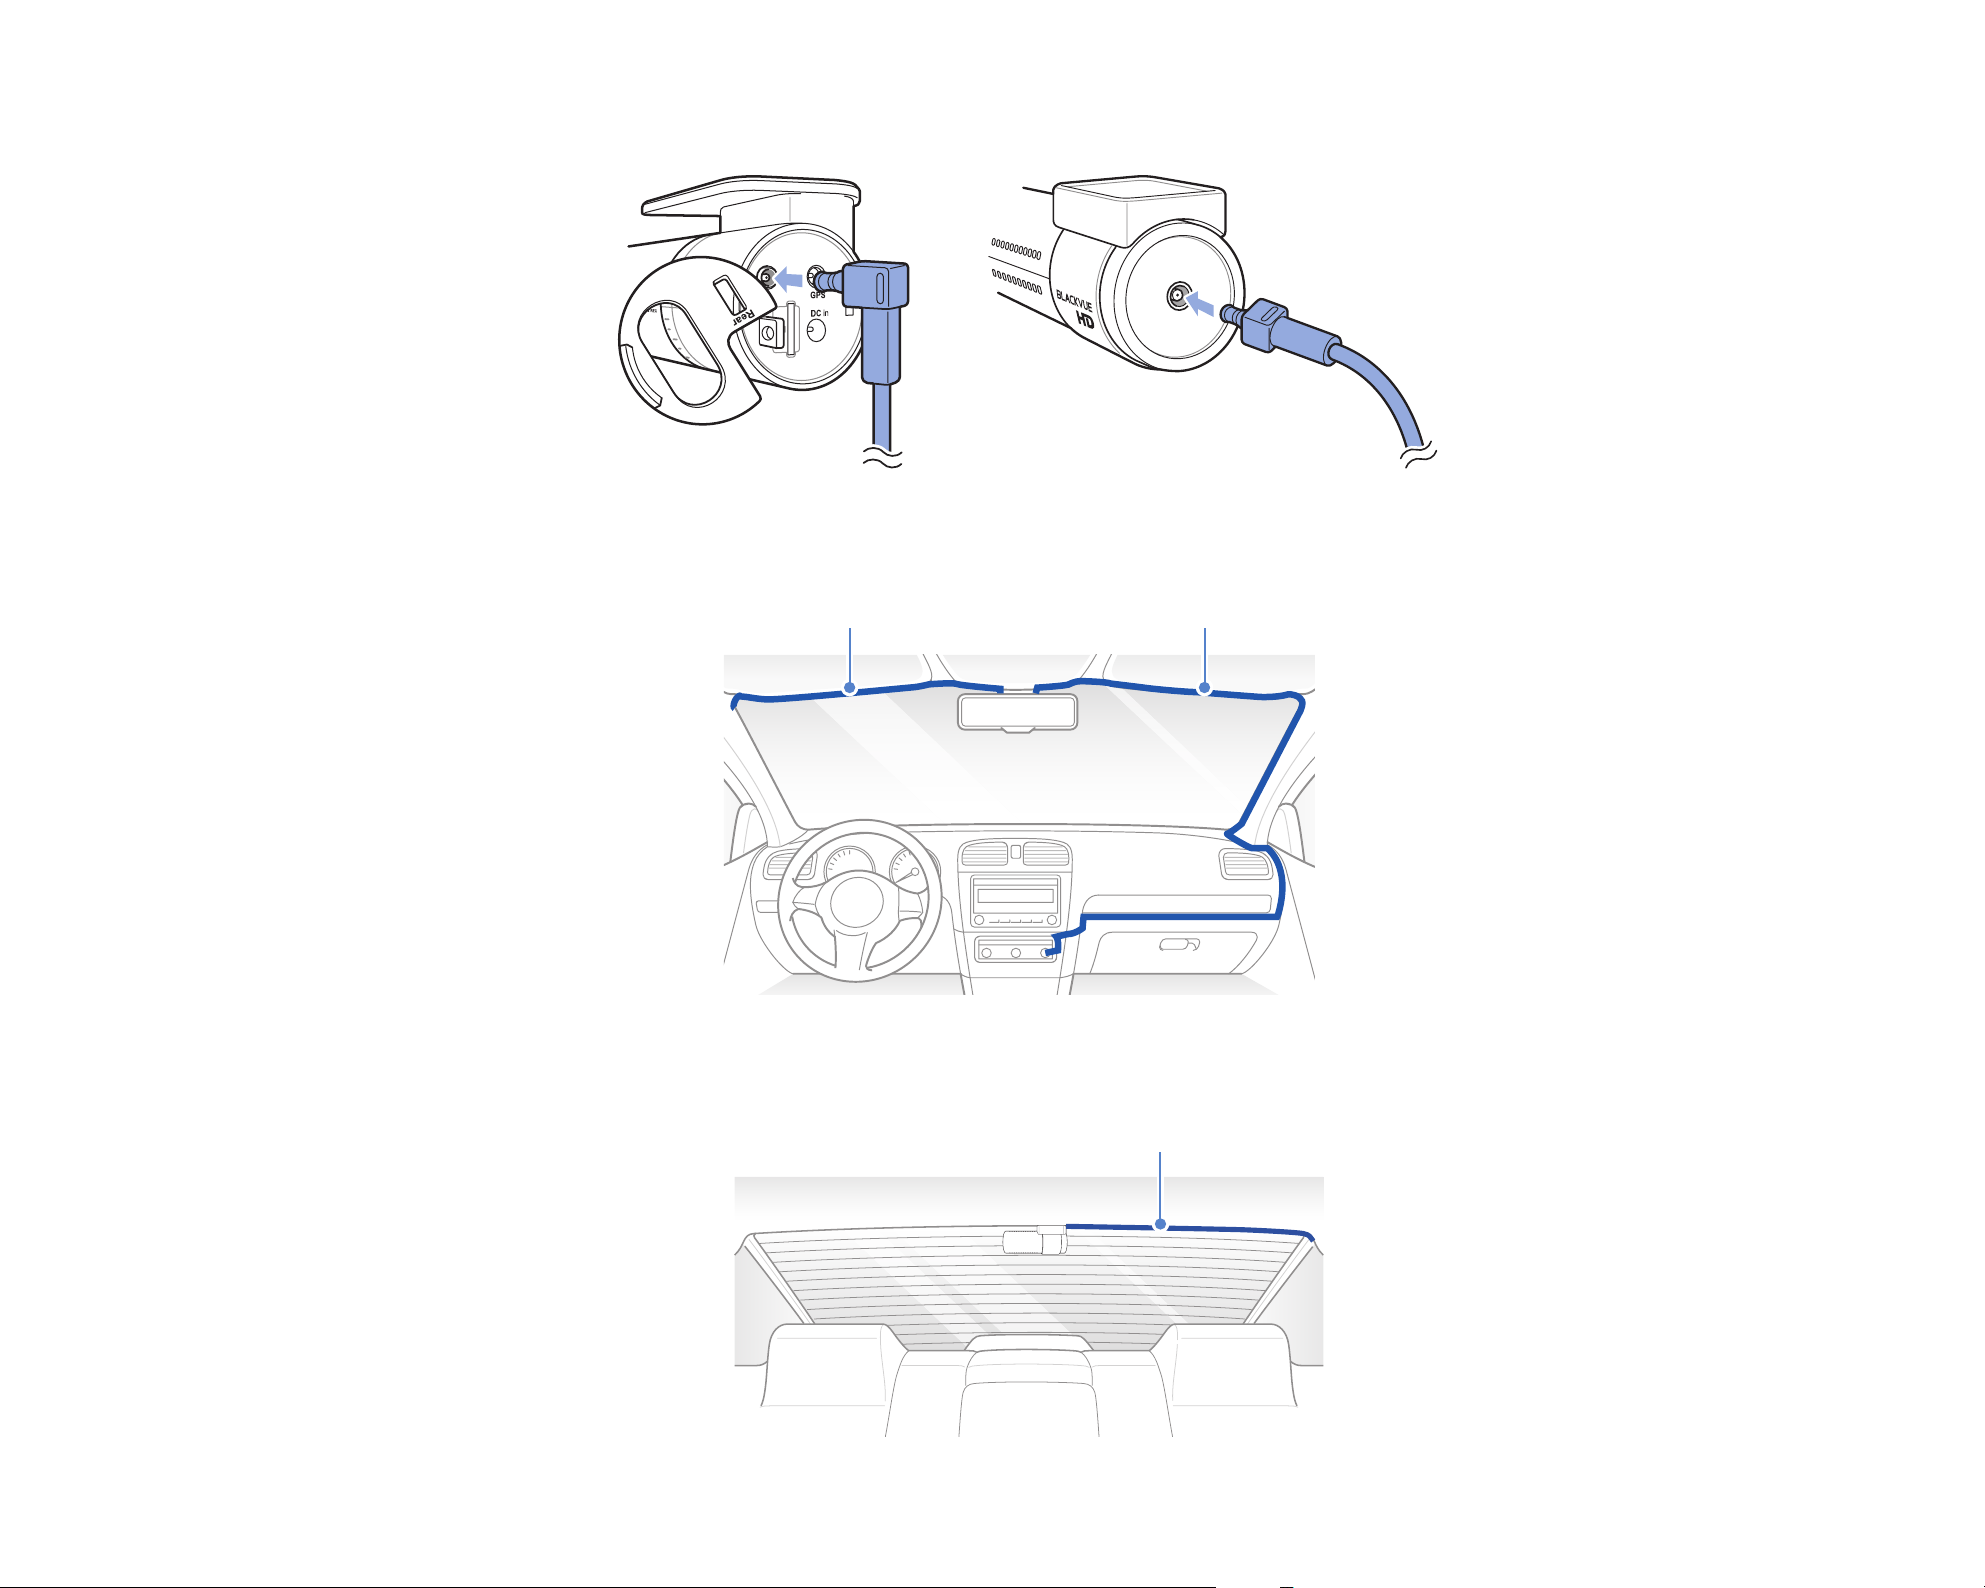
Optional GPS receiver: Plug in the GPS receiver and attach it in a corner of the windshield. Tuck the cable into the windshield trim
using the pry tool.
Adjust the angle of the lens by rotating the body of the camera. We recommend pointing the lens slightly downwards (≈10° below
horizontal), so as to record video with a 6:4 road to background ratio.
6
BLACKVUE
12
Peel o the protective lens cover.
Page 13
7
Connect the front camera ('Rear' port) and the rear camera ('V out') using the rear camera connection cable.
8
9
Use the pry tool to lift the edges of the windshield trim/molding and tuck in the power cord. You can also make use of the cable clips
to neatly arrange the power cord.
Rear camera connection cable Power cord
Use the pry tool to lift the edges of the rubber window sealing and molding and tuck in the rear camera connection cable as you
work your way towards the rear. You can also make use of the cable clips to neatly arrange the cable.
Rear camera connection cable
DR430-2CH
13
Page 14

10
Plug the power cord into the cigarette lighter socket and the front camera.
11
12
Turn on the engine. The BlackVue dashcam will power up and start recording. Video les are stored on the microSD card. When the
microSD card lls up, the newest video les will start to replace the oldest video les (called loop recording) - so you will always
have the most recent video les.
Note
y
The recording LED blinks while recording (default setting) and the GPS LED is on when a GPS signal is received. There are 3
recording modes: Normal, Event and Parking. The dashcam starts recording in normal mode, switches to event mode when an
impact is detected, and switches to parking mode if the vehicle is stationary for 5 minutes.
y
When you run the dashcam for the rst time the rmware is automatically loaded onto the microSD card. After the rmware
has been loaded onto the microSD card you can customize settings using BlackVue Viewer on a computer.
Turn o the engine. The dashcam will automatically stop recording and power down. To record in parking mode while the engine
is o please install a Power Magic Pro (sold separately). A Power Magic Pro powers your dashcam when the engine is o by
hardwiring it to the automotive battery. A low voltage power cut-o function and a parking mode timer protect the automotive
battery from discharge.
BLACKVUE
14
Page 15
Playing and Managing Videos
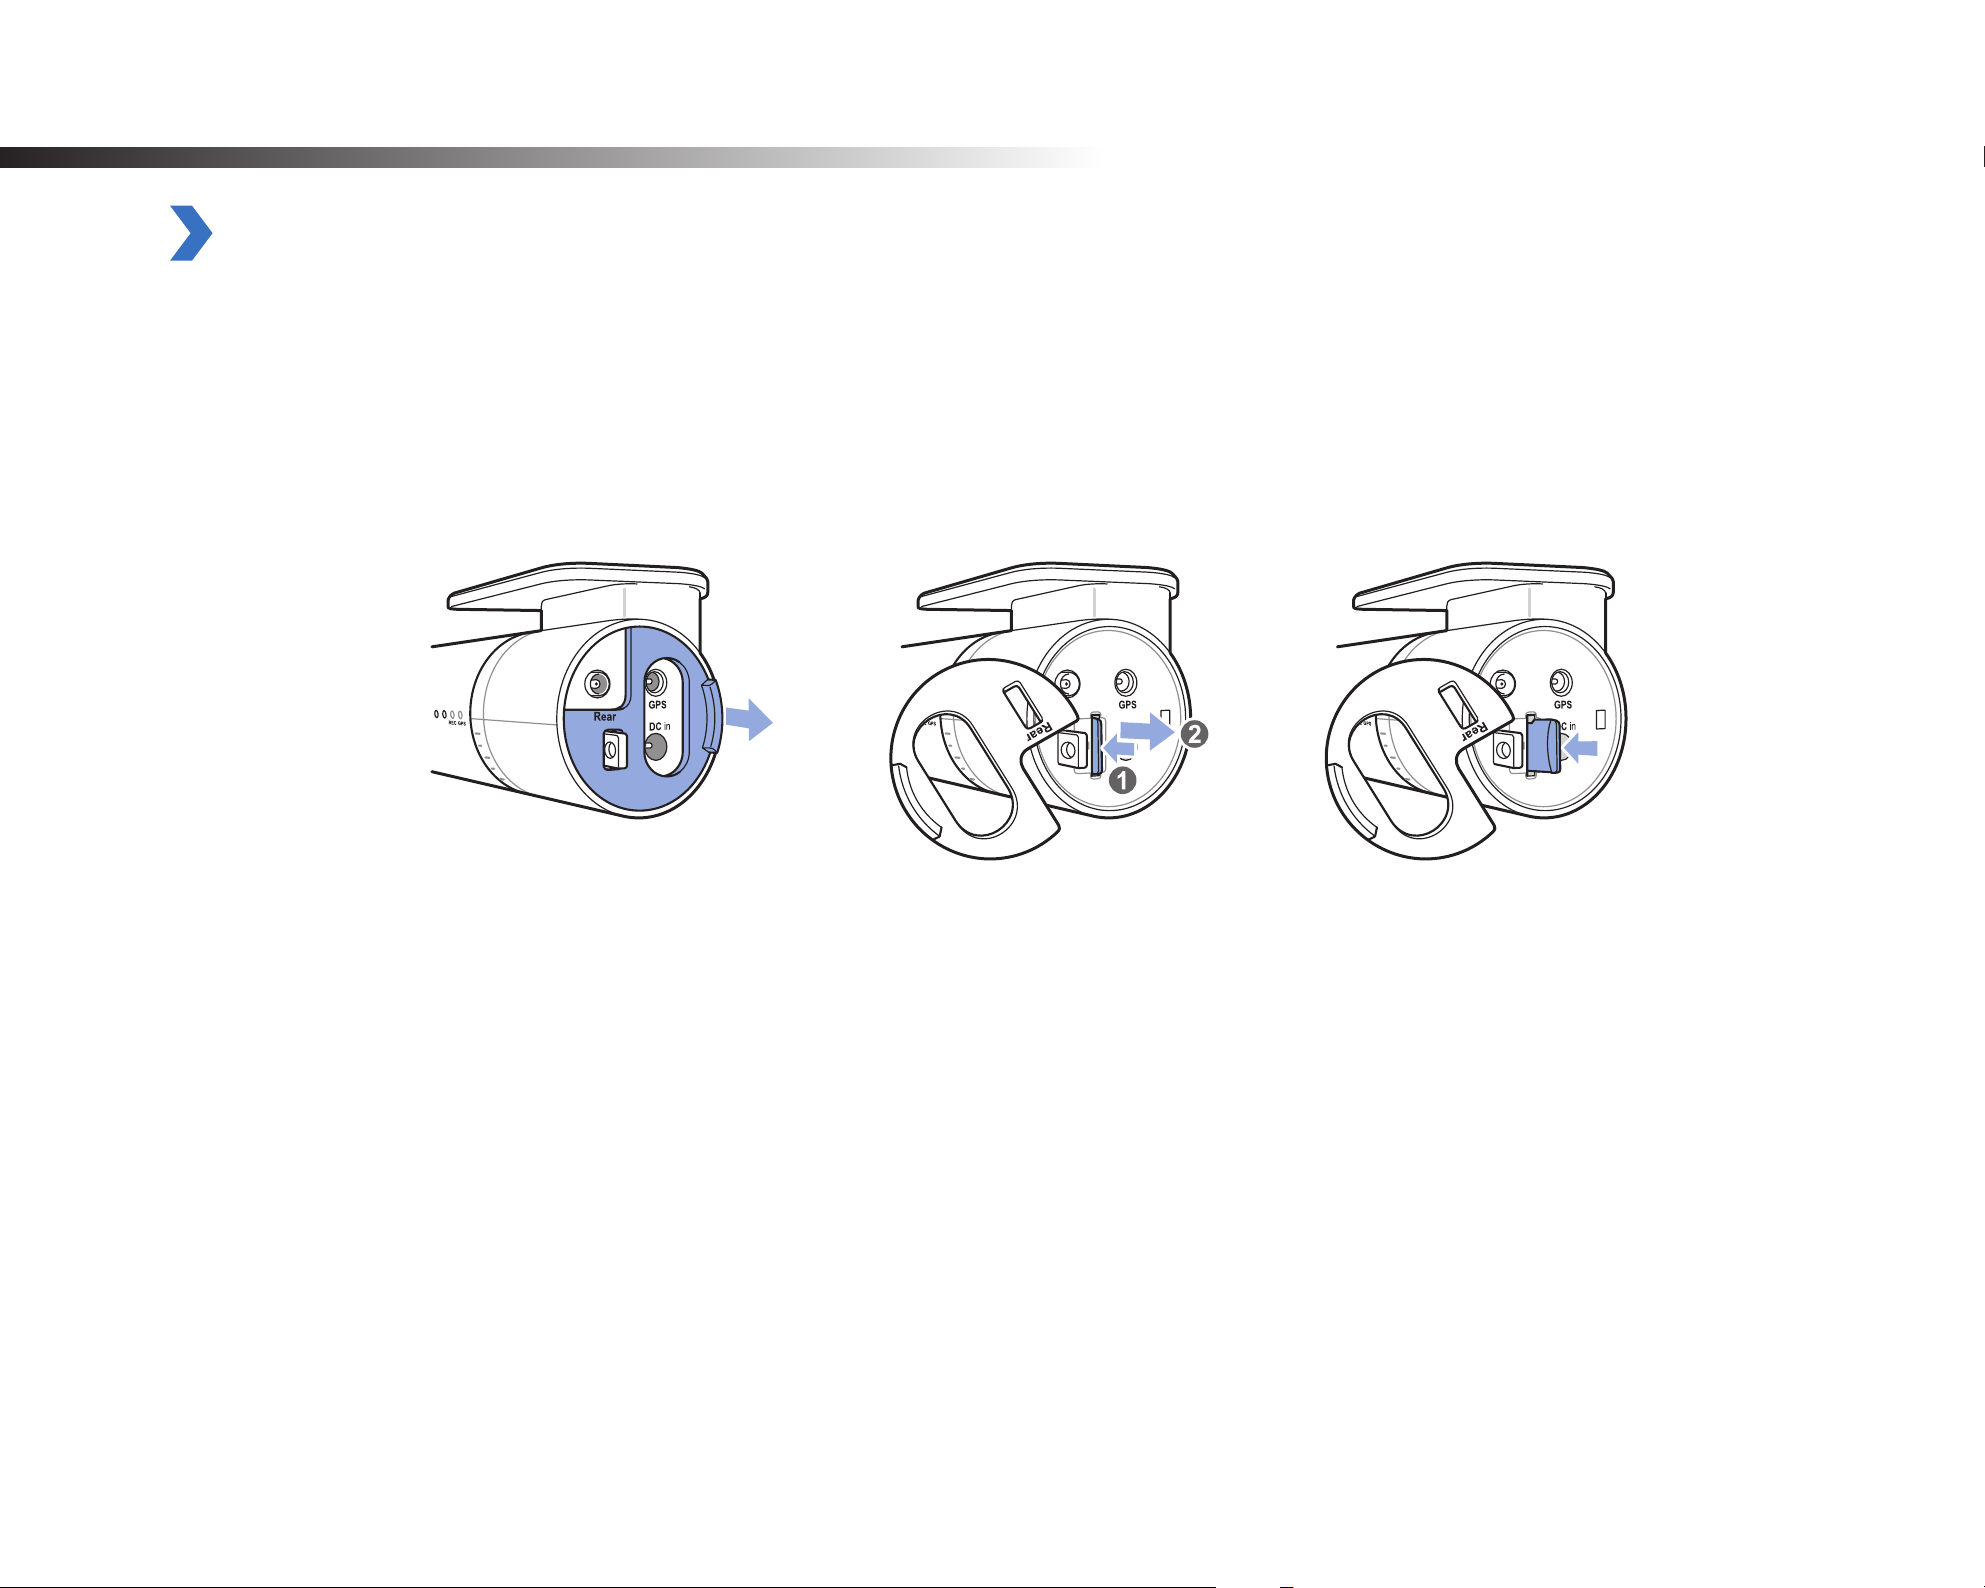
Removing the microSD card
1
2
3
Unplug the power cord to turn o the dashcam.
Open the side cover of the front camera.
To remove the microSD card, gently press on the card to release the lock then carefully pull the card out.
To insert the microSD card, gently push the card into the slot until it locks into place and close the side cover.
Open side cover To remove To insert
DR430-2CH
15
Page 16

Opening video les in BlackVue Viewer
1
2
3
Remove the microSD card from the dashcam.
Insert the card into the microSD card reader and connect it to a computer.
Find and run the BlackVue Viewer program.
For Windows users
Open Windows Explorer and click on the microSD card (Removable Disk (F:), or the name of your card location). Go to F:\BlackVue\
Application\Viewer for Windows\ and run BlackVue.exe.
BLACKVUE
16
Page 17

For Mac users
Open Finder and select the microSD card reader from the list in the left frame. Go to \BlackVue\Application\Viewer for Mac\ and run
BlackVue Viewer.
DR430-2CH
17
Page 18

Viewer screen composition
Windows Viewer
Playback S
(front camera)
creen
MyWay Viewer
Program info.
Capture
Format
Print
Settings
Playback Screen
(rear camera)
Previous frame
Play previous le
Front/Rear reverse view
Front/Rear screen mode
Flip horizontally
View upside-down
Full Scr
een view
G-Sensor Information
GPS Data
Recorded File list
BLACKVUE
18
Timeline for sec selection
Playback/Pause Playback speed control
Stop Volume control
Next frame Timeline for min selection
Play next le
Page 19

Mac Viewer
MyWay Viewer
Settings
Playback S
(front camera)
Playback Screen
(rear camera)
Play previous le
Normal screen size
Front/Rear reverse view
Front/Rear screen mode
Flip horizontally
View upside-down
Full Scr
creen
een view
Format
Capture
Print
G-Sensor Information
GPS Data
Recorded File List
Previous frame
Timeline for min selection
Playback/Pause Volume control
Next frame
Play next le
Playback time
Playback speed control
Timeline for sec selection
DR430-2CH
19
Page 20

Playing video
Playing back videos
In BlackVue Viewer select a video and click or double click the selected video to play.
BlackVue Viewer shows by default the les in the microSD card. To see les in another folder click (Windows) or (Mac) and set the
folder path.
Identify video les by recording type
Front camera
Rear camera
: The dashcam starts normal recording by default.
: The dashcam starts event recording with a 5-second prerecording when it detects an impact during normal mode or parking mode.
: The dashcam starts parking recording with a 5-second prerecording when it detects motion in the camera during parking mode.
Parking mode recording starts when the vehicle does not move for 5 minutes or longer.
Note
y
The dashcam requires a constant power source to record in parking mode. See "Parking mode hardwiring kit (Optional)" on
page 45 for more information.
y
To install the BlackVue Viewer program on your computer, go to the BlackVue website (www.blackvue.com) and download the
installable version of the BlackVue Viewer.
y
Using the File type buttons (
model), Normal recording, Event recording, and Parking mode recording.
, , , , ) you can lter the le list by Front camera, Rear camera (only in the 2CH
BLACKVUE
20
Page 21

Checking the displayed time
The time the video was recorded is displayed in the lower left corner of the video in the playback screen. If the displayed time in the
recorded videos is incorrect please see "Setting your time zone" on page 38.
Using BlackVue Viewer
You can customize the playback options of the recorded videos, such as the screen size, playback speed, and volume using the playback
option buttons.
Play previous le
View upside-down
Full screen view
Flip horizontally
Front/Rear screen mode
Front/Rear reverse view
Previous frame
Playback/
Pause
Next frame
Stop
Play next le
Playback speed control
Playback time
Volume control
Exploring the timeline
You can explore the timeline for the playback of the recorded videos by date, hour, minute, and second using the timeline option buttons.
Year selection
Month selection Timeline for sec
Timeline for min
selection
selection
DR430-2CH
21
Page 22

Zoom options
y
Full-screen view: Double click on the video image to enter full-screen view. Double click again or tap ESC to return to the default view.
y
Zoom to 100%: Right-click on the video image to view at 100% zoom. Click and drag to move the video image around.
Windows Mac
Viewing the G-Sensor graph
You can check the impact sensitivity (G-Sensor) information in the main window.
BLACKVUE
22
Page 23

Checking the GPS data
You can check the GPS data of the recorded video in the BlackVue Viewer while video is playing back.
MyWay Viewer
Switch Speed Unit
Map Type Selection
Car Location
Map Zoom-in/out
GPS tracking
You can check the vehicle's speed and the location of the recorded video in BlackVue Viewer while a video is playing back (GPS tracking).
1
2
Double click a le in the le list to play.
Click the Map tab.
Note
y
An external GPS receiver is required to obtain GPS data. See "GPS receiver (Optional)" on page 44.
DR430-2CH
23
Page 24

GPS tracking – Advanced mode
Combine 4 consecutive videos and GPS data to build a driving route and see your car’s speed and location as well as any event recorded,
while watching the video footage at any point of the route.
1
2
Double click a le in the le list to play.
Click the button.
Switch Speed Unit
Map Type Selection
Car Location
Latitude & Longitude
Car Location
Red icon indicates the
starting point of the
playing back le
BLACKVUE
24
Driving Route
Red line indicates event recording
Page 25

Managing videos
You can manage the recorded videos through the BlackVue Viewer program. You can also format the microSD card and upgrade the
rmware.
Note
y
If the microSD card is full, by default the dashcam will record over the oldest videos rst.
Capturing or printing a still image from video
1
2
3
Double click a le in the le list to play.
Click the button to pause the video.
Select the G button to capture the image or the button to print directly.
DR430-2CH
25
Page 26

Deleting videos
For Windows users
1
2
3
Select the video from the recorded video list.
Right-click the video.
Click Delete.
For Mac users
1
2
3
Go to \BlackVue\Record\.
Select the video from the recorded video list.
Click Move to Trash.
BLACKVUE
26
Page 27

Exporting videos
For Windows users
1
2
3
4
Select the video from the recorded video list.
Right-click the video.
Click Export.
Enter a le name and the start and end points (min:sec) of the segment you want to export. To export without audio select “Sound
O ”.
5
6
7
Click the OK button.
Select the folder in which to save the le and enter the le name.
Click the Save button.
DR430-2CH
27
Page 28

For Mac users
1
2
3
Go to \BlackVue\Record\.
Select the video from the recorded video list.
Click Copy "le name".
BLACKVUE
28
Page 29

Verifying videos
The following function is only available in BlackVue Viewer for Windows.
1
2
3
Select the video from the recorded video list.
Right-click the video.
Click Verication.
4
Click the OK button.
DR430-2CH
29
Page 30

Keeping the BlackVue dashcam updated
Formatting the microSD card
Format the microSD card once a month, or when the BlackVue dashcam tells you the card needs maintenance.
Please format the microSD card using BlackVue Windows or Mac Viewer.
Format using Windows Viewer
1
2
3
4
5
Download BlackVue Viewer from www.blackvue.com > Support > Downloads and install the program on your computer.
Insert the microSD card into the microSD card reader.
Connect the microSD card reader to your computer.
Launch the copy of BlackVue Viewer that is installed on your computer.
Click the Format button.
BLACKVUE
30
Page 31

6
Select the microSD card drive and click OK.
DR430-2CH
31
Page 32

Format using Mac Viewer
1
2
3
4
5
6
Download BlackVue Viewer from www.blackvue.com > Support > Downloads and install the program on your computer.
Insert the microSD card into the microSD card reader.
Connect the microSD card reader to a Mac.
Launch the copy of BlackVue Viewer that is installed on your computer.
Click the Format button.
Select the microSD card from the list of drives in the left frame.
BLACKVUE
32
Page 33

7
After selecting your microSD card select the Erase tab in the main window.
8
Select “MS-DOS (FAT)” from the Volume Format dropdown menu and click Erase.
Caution
y
If you format the microSD card, all the video les stored in the microSD card will be deleted.
y
Back up important video les such as event recording les before formatting the microSD card. PittaSoft Co., Ltd. will not be
responsible for the loss of video les that were not backed up.
y
Formatting the microSD card once a month is recommended.
y
Format the microSD card if the recorded video quality appears to be poor.
y
Only use ocial BlackVue microSD cards. Other cards may have compatibility issues.
y
PittaSoft Co., Ltd. will not be held responsible for any problems caused by using another manufacturer's microSD card.
DR430-2CH
33
Page 34

Upgrading the rmware
Keep your BlackVue dashcam updated by upgrading the rmware to the latest version. Visit the BlackVue website (www.blackvue.com) to
check for any new rmware releases for your BlackVue dashcam model.
1
2
3
4
Insert the microSD card into the microSD card reader.
Connect the microSD card reader to a PC.
Launch BlackVue Viewer and click on the About button.
y
For Mac users, click
Check the current rmware version of your BlackVue dashcam and proceed only if your version is not the latest one.
and select About BlackVue from the menu.
5
BLACKVUE
34
MacWindows
Format the microSD card. See "Formatting the microSD card" on page 30.
Page 35

6
Go to the BlackVue website (www.blackvue.com > Support > Download) and download the latest rmware for your BlackVue
dashcam model in zip format.
7
Unzip the downloaded le and copy the BlackVue folder to the microSD card.
8
Insert the microSD card into the dashcam and connect the power to initiate the rmware upgrade. Make sure the power remains
on until the upgrade is completed. Any power interruption may prevent the rmware upgrade from completing, resulting in
malfunction.
Note
y
Do not insert or remove the microSD card when the dashcam is turned on. Doing so may damage the data and cause a
malfunction of the microSD card.
y
After a rmware upgrade all settings are reset to the defaults to ensure stable operation. Please recongure your personal
settings (such as time zone, etc.).
DR430-2CH
35
Page 36

Changing settings
BlackVue Viewer language setting
Select your preferred language for the BlackVue Viewer interface from the dropdown list.
BlackVue settings
Click on the button or the menu to open the BlackVue settings panel. You will be able to change most of the
BlackVue settings to customize its operation.
Select a Language
Settings
BLACKVUE
36
Page 37

Basic settings
You can set the basic conguration in the Basic tab of the Settings.
1
2
3
4
Click the button or the menu.
Click the Basic tab.
Change the settings.
Click Save & Close.
Firmware
Select your preferred language for the rmware from the language dropdown list. The audio announcements by the dashcam will be in the
selected language.
DR430-2CH
37
Page 38

Setting your time zone
The initial time zone is set to Pacic/Midway_Midway Islands(GMT-11). Select your time zone in the dropdown list. If your city is not in the
list, select any other city within the same time zone.
When you change the time zone and save the setting, the next time you insert the microSD card into the dashcam it will format the
microSD card and restart automatically. Please backup any important videos that are in the microSD card before changing the time zone.
If the displayed time in the recorded videos has repeated issues with accuracy please see "Running the time setting program" on page 46.
Image brightness setting
Adjust the brightness of the video image by selecting one of 5 brightness levels.
Recording settings
Video recording options Description
Normal recording on/o When turned o the dashcam does not record in normal mode.
Voice recording on/o When turned o the dashcam does not record audio.
Date and time display on/o Turn on/o the date and time display on videos.
Speed unit Select km/h, MPH, or turn o.
Video les duration (in minutes) Select video clip duration in minutes
If enabled, the dashcam switches from normal mode to parking mode when
Auto switching to parking mode on/o
the vehicle is stationary for 5 minutes.
BLACKVUE
38
Page 39

Sensitivity settings
You can set impact sensitivity (G-Sensor), motion detection, and the speed alert in the Sensitivity tab of the Settings.
1
2
3
4
Click the button or the menu.
Click the Sensitivity tab.
Change the settings.
Click Save & Close.
Sensitivity in normal and parking mode
Adjust the sensitivity of the G-Sensor while driving (normal mode) or parked (parking mode). Set the sensitivity to zero to turn o Event
recordings by impact detection.
DR430-2CH
39
Page 40

Sensitivity of the motion detection (parking mode)
Adjust the sensitivity of the camera’s motion detection while parked. Take into account your car's parking location when setting the
sensitivity of motion detection.
Advanced sensitivity settings for normal and parking mode
Advanced sensitivity settings allows you to ne-tune the event recording G-Sensor threshold, while watching pre-recorded G-Sensor data
and video as a reference.
1
2
3
4
Click the Advanced Settings button of the recording mode.
Select the reference video from the list that you want to use to set the threshold of event recording.
Click the button or double click the selected video.
Set the thresholds by adjusting the control bars next to each G-Sensor axis. Any G-Sensor data that crosses over the threshold on any
of the 3 axes will trigger an Event recording.
BLACKVUE
40
Page 41

Event recording will occur No event recording will occur
5
Set a speed limit (up to 300 km/h or 200 MPH) for the speed alert.
When the vehicle exceeds the speed limit, normal mode recording switches to an event recording (with a beep sound) and after a preset
duration switches back to normal mode recording.
Click Save & Close.
Speed alert
DR430-2CH
41
Page 42

Other settings
You can adjust other settings such as the LED indicators, voice guidance, volume, and user text overlay in the Other tab of the Settings
window.
1
2
3
4
Click the button or the menu.
Click the Other tab.
Change the settings.
Click Save & Close.
You can set the recording status
LED on/o.
You can adjust the volume
of the voice guidance
(announcements) or turn it o
You can set the security LED
on/o in normal mode and in
parking mode.
You can create a user text
overlay of up to 20 characters
using a combination of English
uppercase characters (A – Z),
numbers (0 – 9), and symbols
(:; ‘/ \ - _ () $ #). The text is
laid in the corner of the
over
recorded videos.
Applying the settings
You can automatically apply the conguration by inserting the microSD card into the BlackVue dashcam and turning it on. Congure the
settings before using the dashcam.
To reset all settings to their defaults press the reset button in the settings screen of the BlackVue Viewer program.
BLACKVUE
42
Page 43

Optional accessories
Padlock (Optional)
You can protect the microSD card using a padlock. To lock the microSD card slot purchase a padlock and lock the microSD lock loop.
Note
y
Check the size of the microSD lock loop on the BlackVue dashcam before purchasing a padlock.
y
Even when the microSD card slot is locked with a padlock, there is the possibility that the card may be forcibly removed by
breaking the lock loop, cover or dashcam.
y
Copy important videos from the microSD card to other storage media. PittaSoft Co., Ltd. will not be held liable for any loss of
videos due to theft of the microSD card.
DR430-2CH
43
Page 44

GPS receiver (Optional)
If you do not install an external GPS receiver, videos are recorded without GPS coordinates and driving speed information. To include speed,
recording location, and the driving route data in the videos, install an external GPS receiver.
Note
y
If you purchased the product without an external GPS receiver, please visit the BlackVue website (www.blackvue.com) for
information about purchasing a GPS receiver separately.
BLACKVUE
44
Page 45

Parking mode hardwiring kit (Optional)
The BlackVue dashcam will turn o when the engine is turned o. To record video while the engine is turned o, a hardwiring kit (such as
the Power Magic Pro) is required. The Power Magic Pro powers your dashcam when the engine is o by hardwiring it to the automotive
battery. A low voltage power cut-o function and a parking mode timer protect your vehicle's battery from discharge.
DR430-2CH
45
Page 46

Troubleshooting
Running the time setting program
1
2
3
4
5
Remove the microSD card from the dashcam and insert it into the microSD card reader.
Connect the microSD card reader to a PC.
Note
y
If you insert the microSD card into the dashcam after setting the time, the dashcam will automatically format the microSD card.
Therefore, please backup all important video les before setting the time.
Go to the BlackVue website (www.blackvue.com >Support > Download) and download the time setting program in zip format.
Unzip the downloaded le and run the time setting program.
Select the SD Card Folder (microSD card drive).
6
7
8
Set the time.
Note
y
Set the time to the estimated time in the future when you will start recording with the BlackVue dashcam. Please take into
account the time it will take to remove the microSD card from your computer, insert it into your dashcam and boot up.
y
Booting takes about 10-15 seconds after the dashcam turns on.
Click the Save button.
Remove the microSD card from your computer, insert the microSD card into the dashcam and turn it on. After booting up the new
time setting will be applied.
BLACKVUE
46
Page 47

Frequently asked questions
About using the BlackVue dashcam
y
How can I protect the microSD card?
See page 43.
y
How can I remove the camera from the mounting bracket?
See page 9.
y
When do the LEDS blink quickly?
See page 8.
About the microSD card
y
What should I do if the microSD card is full?
See page 30.
y
How do I remove or insert the microSD card?
See page 15.
y
How can I read the microSD card on a computer?
See page 16.
DR430-2CH
47
Page 48

About recording videos
y
For how long can I record videos?
See page 52.
y
How can I set the time zone?
See page 38.
About playing back videos
y
What is the meaning of the colors and letters used in the recorded le list?
See page 20.
y
How can I save (capture) an image from a video?
See page 25.
y
How can I print an image from a video?
See page 25.
y
How can I check the GPS data?
See page 23.
About changing the settings
y
How can I change the language?
See page 36.
y
How can I change the time?
See page 46.
y
How can I change the brightness of the video?
See page 37.
y
BLACKVUE
48
How can I turn o normal mode recording?
See page 37.
Page 49

y
How can I turn o voice recording?
See page 37.
y
How do I enable or disable the date and time display on videos?
See page 37.
y
How can I change the speed unit?
See page 37.
y
How can I change the duration of the video recording les?
See page 37.
y
How can I disable auto-switching between Normal and Parking modes?
See page 37.
y
How can I change the impact sensitivity?
See page 39.
y
How can I change the speed at which a speed alert is issued?
See page 39.
y
How can I adjust the voice guidance settings?
See page 42.
y
How can I adjust the volume of the voice guidance?
See page 42.
y
How can I upgrade the rmware?
See page 34.
DR430-2CH
49
Page 50

Product specications
Model Name DR430-2CH
Color/Size/Weight
Memory microSD Card (16 GB / 32 GB / 64 GB / 128 GB)
Front: Black / Width 115.9 mm x Height 34 mm / 68 g
Rear: Black / Width 67.4 mm x Height 25 mm / 28 g
Normal Recording, Event Recording (Impact Detection), and
Recording Modes
Camera
Viewing Angle
Resolution/Frame Rate
Video Compression Mode MP4
GPS External (optional)
Microphone Built-in
Speaker (Voice Guidance) Built-in
Parking Mode Recording (Motion & Impact Detection)
For Parking mode recording, a Parking Mode Hardwiring Kit (Power Magic Pro) is required.
*
Front: CMOS Sensor (Approx. 1M Pixel)
Rear: CMOS Sensor (Approx. 1M Pixel)
Front: Diagonal 129°, Horizontal 108°, Vertical 57°
Rear: Diagonal 129°, Horizontal 108°, Vertical 57°
Front: HD (1280x720)@30 Fps
Rear: HD (1280x720)@30 Fps
*
Frame rate changes during parking mode.
BLACKVUE
50
Front: Recording LED, GPS LED, Front Security LED
LED Indicators
Sensor
Backup Battery Built-in super capacitor
Input Power DC 12 V − 24 V (DC Plug:
Rear: Rear Security LED
3-Axis Acceleration Sensor
Temperature Sensor
*
Power off function in high temperature environment
(Ø3.5 x Ø1.35), MAX 1 A/12 V)
Page 51

Avg. 260 mA (3.12 W at 12 V, when there is no external GPS receiver)
Power Consumption
Avg. 280 mA (3.36 W at 12 V, when an external GPS receiver is connected)
Actual power consumption may vary depending on use conditions and environment.
*
Operation Temperature -20°C − 60°C (-4°F − 140°F )
Storage Temperature -20°C − 70°C (-4°F − 158°F )
High Temp. Cut-o Approx. 80°C (176°F )
Front: FCC, CE, RoHS, RCM, WEEE
Certications
Rear: FCC, CE, RoHS, RCM, WEEE
BlackVue Viewer
Software
Windows XP or higher (Windows 8 supported) and Mac Leopard OS X (10.5) or higher
*
DR430-2CH
51
Page 52

Recording time
Your dashcam will automatically turn on and start recording when it is connected to a power source.
Memory Capacity
16 GB 3 HR 20 MIN
32 GB 6 HR 40 MIN
64 GB 13 HR 20 MIN
128 GB 26 HR 40 MIN
Bit rate
Note
y
If the microSD card is full, older les are deleted rst to make space for newly-recorded videos. Copy important les, such as
event recording les, to other storage media.
y
Total recording time is dierent depending on the memory capacity of the microSD card and the resolution of the video.
Resolution
HD + HD @ 30fps
Front 6 Mbps
Rear 4 Mbps
BLACKVUE
52
Page 53

Disposal and recycling information
Disposal of your BlackVue dashcam
1. All electrical and electronic products should be disposed of separately from the municipal waste stream via
designated collection facilities appointed by the government or the local authorities. Contact local authorities to learn
about disposal and recycling options available in your area.
2. The correct disposal of your BlackVue dashcam will help prevent potential negative consequences for the environment
and human health.
3. For more detailed information about disposal of your BlackVue dashcam, please contact your city oce, waste
disposal service or the shop where you purchased the product.
DR430-2CH
53
Page 54

Customer Support
For customer support and rmware updates please visit www.blackvue.com
You can also email a Customer Support expert at cs@pittasoft.com
Before Requesting Service
Please back up all important les and data before requesting service. In order to service the dashcam it may be necessary to delete all
les and data from the dashcam. All servicing is provided on the basis that the user has backed up all necessary les and data before
requesting service. Therefore Pittasoft Co., Ltd. will not be responsible for the loss of any les or data.
Copyright & Trademark
y
This instruction manual is protected by Copyright Law, and all rights to it are protected by law.
y
It is prohibited to reproduce, copy, modify, or translate this instruction manual without permission.
BlackVue is the registered trademark of Pittasoft Co., Ltd. Pittasoft Co., Ltd. reserves all rights regarding all works
related to the BlackVue brand such as product design, trademarks, and product-promotional videos. It is prohibited to reproduce,
copy, modify, or use related works without permission. Any violation may be penalized in accordance with the relevant regulations.
BLACKVUE
54
Page 55

 Loading...