

Page 1

www.blackvue.comCOPYRIGHT@2016 Pittasoft Co., Ltd. All right reserved.
ENGLISH / ESPAÑOL /
中文
Page 2

For the latest version of the manual and customer support go to www.blackvue.com
Para consultar la última versión del manual y obtener soporte al cliente, vaya a
www.blackvue.com
如需最新版本的用户手册和客户支持,请访问网址 www.blackvue.com/cn
BLACKVUE
POWER MAGIC BATTERY PACK B-112
Page 3
POWER MAGIC BATTERY PACK B-112 3
ENGLISH
BLACKVUE Power Magic Battery Pack B-112
Enjoy your dashcam's Parking mode in all simplicity.
Save your vehicle's battery.
Safety Instructions
Incorrect use of the Power Magic Battery Pack can lead to poor performance and may
cause overheating, ignition, explosion, etc. To use the product correctly please observe the
following directions:
yFamiliarize yourself with the contents of the user manual before using the product.
yOnly use original BlackVue cables provided by the manufacturer. For replacements
contact our customer support.
yDo not expose the product to direct sunlight and/or heat.
yThe battery pack’s DC in power cable must be connected direct to the vehicle’s
cigarette lighter socket.
yDo not use a cigarette lighter multi-socket splitter (adapter) with the product.
yDo not put the product in a microwave oven or place it in a high pressure environment.
yDo not repair or modify the product yourself.
yIf the product emits an unusual odor during use, unplug it immediately and contact our
customer support.
yKeep the product away from children and/or pets.
yKeep the terminals of the power and output cables away from conductive elements.
yPittasoft Co., Ltd. is not liable for damage resulting from disassembling, opening or
modifying the product.
Page 4
4 BLACKVUE
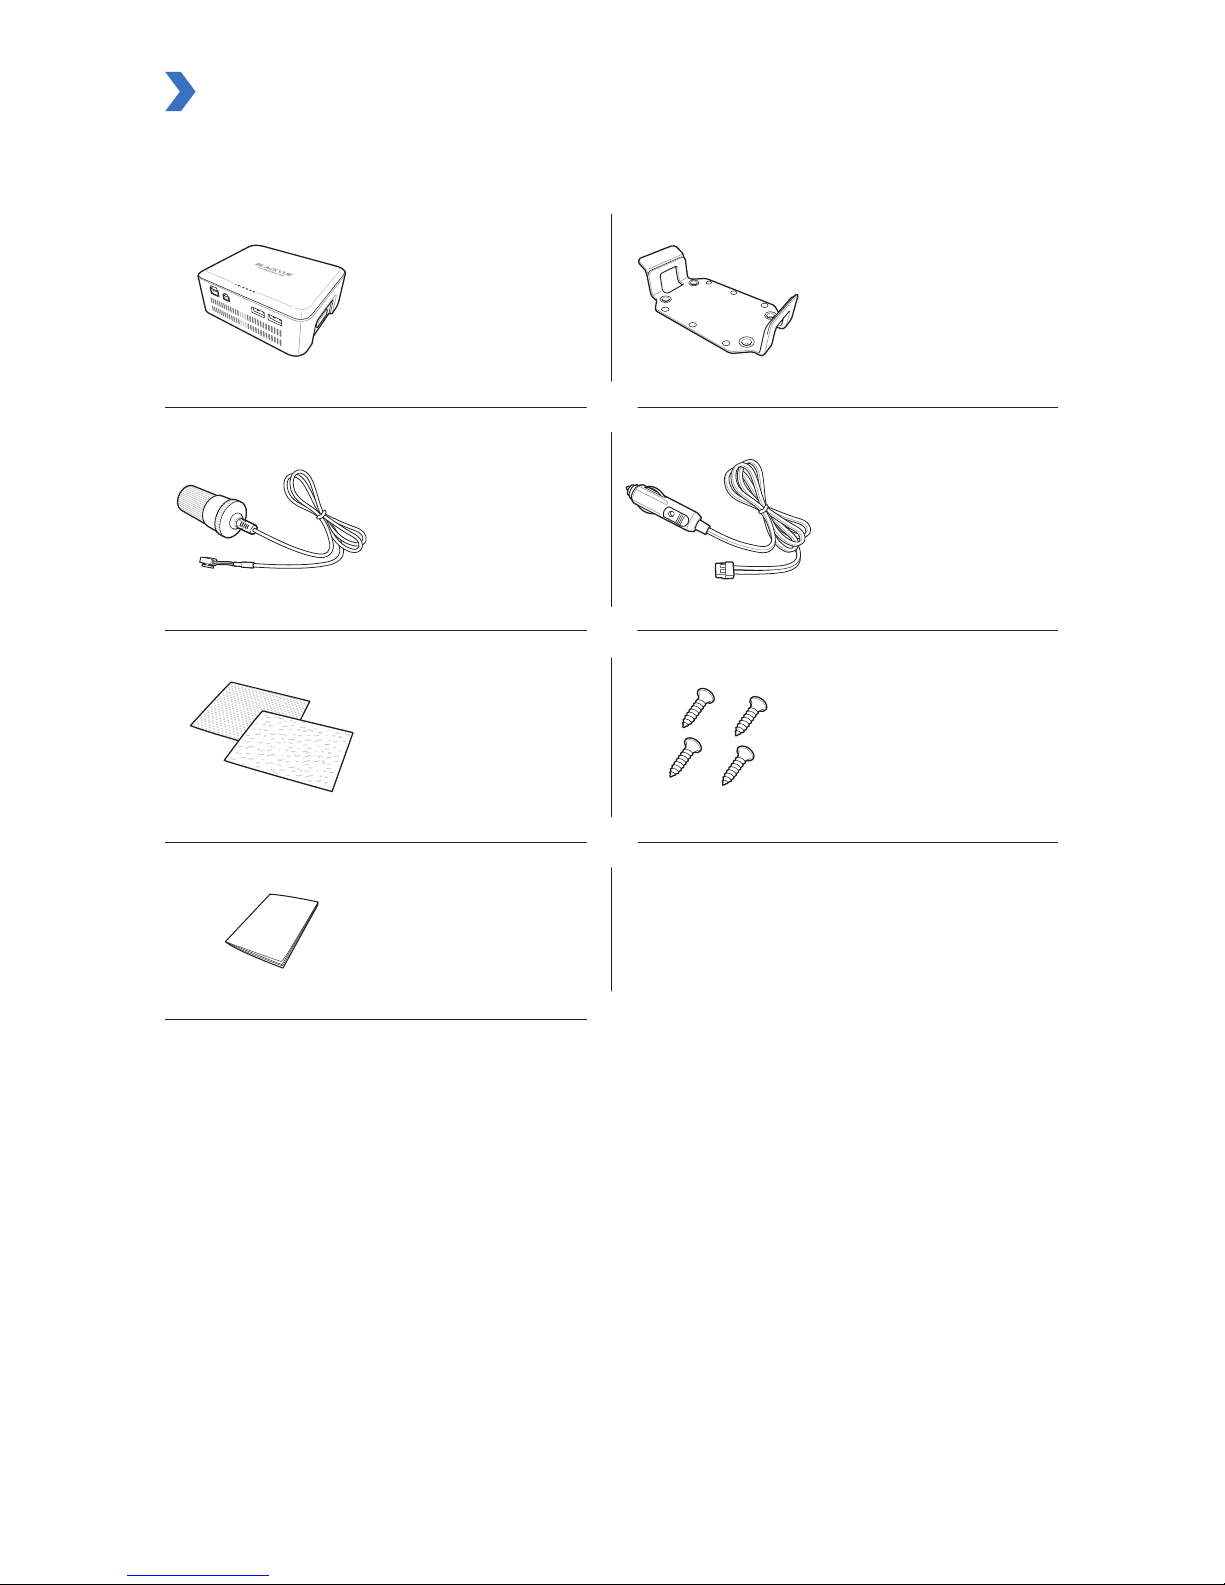
Components
Check the box for each of the following items before installing the Power Magic Battery
Pack.
Power Magic Battery
Pack (B-112)
Battery cradle mount
Output cable for
dashcam
(Cigarette lighter
socket)
DC in power cable
(Cigarette lighter plug)
Velcro strips (2 EA) Screws (4 EA)
User’s Manual
Page 5
POWER MAGIC BATTERY PACK B-112 5
ENGLISH
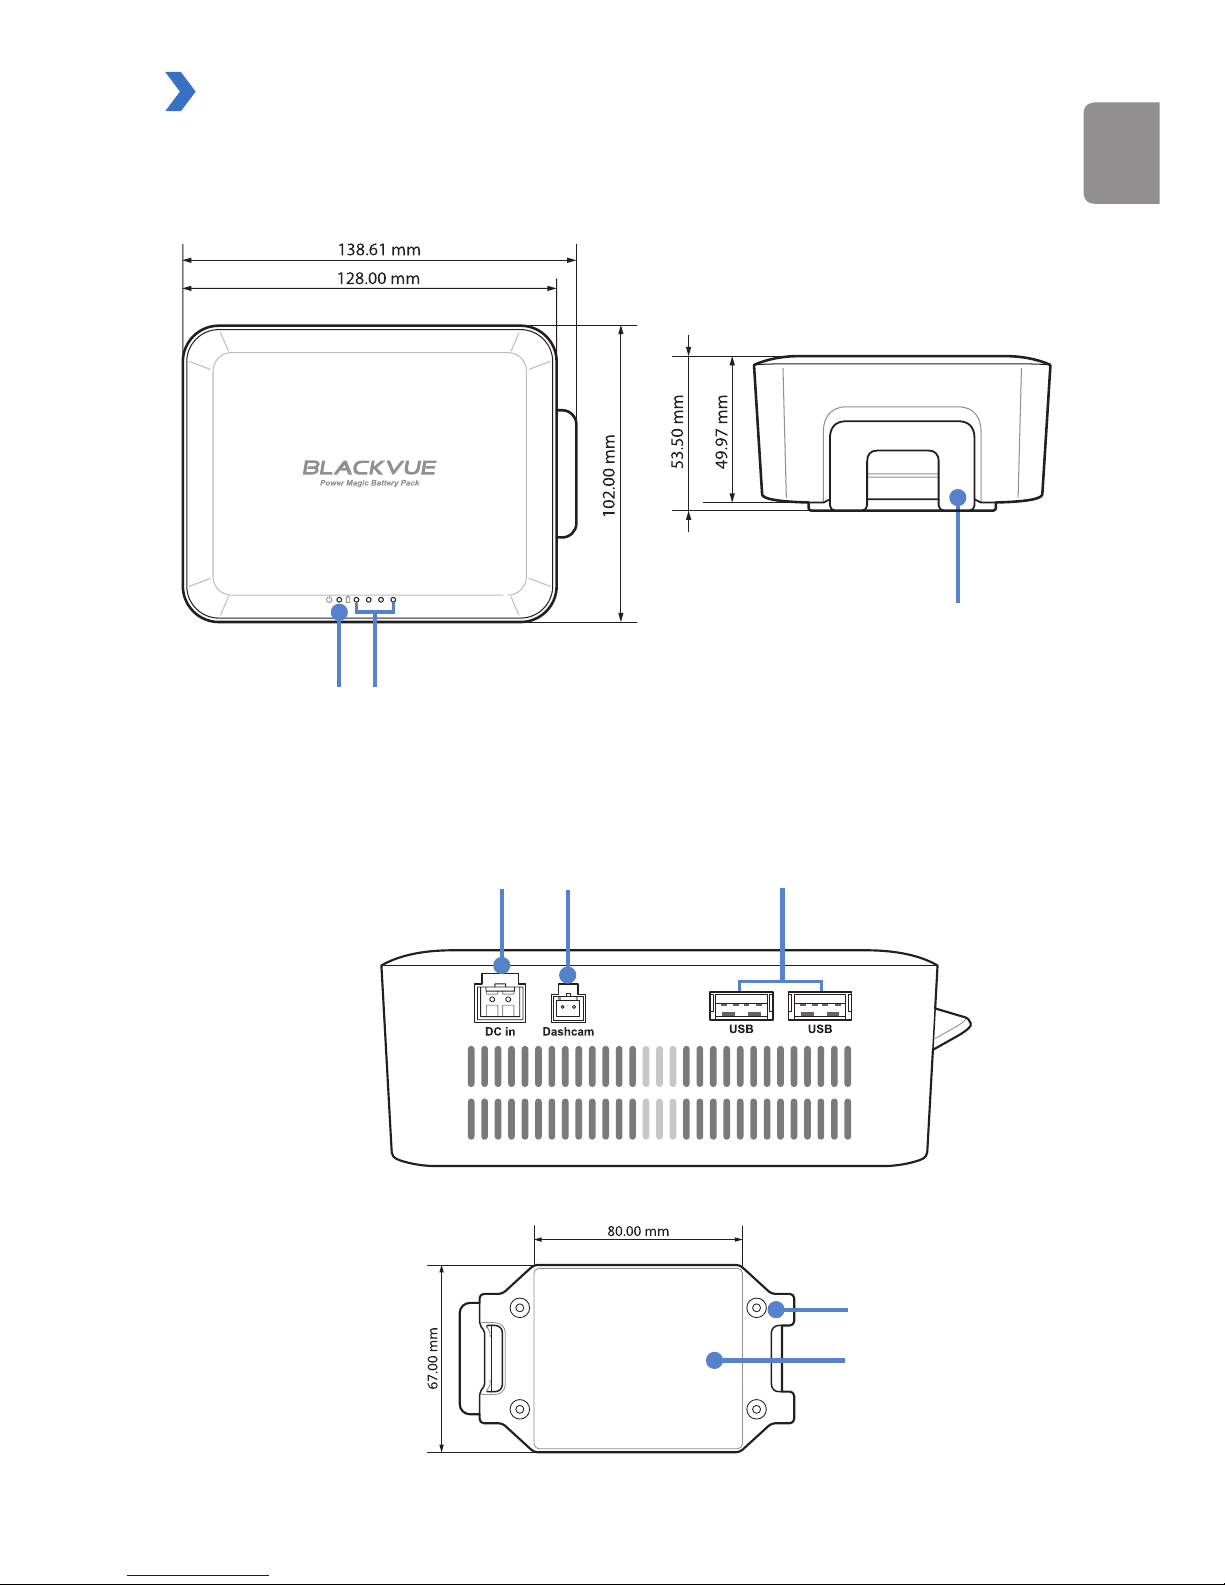
Power Magic Battery Pack (B-112) at a Glance
The following diagrams explain each part of the Power Magic Battery Pack.
Screw
Velcro
DC in
(To connect with a vehicle
cigarette lighter socket)
Dashcam
(To connect with the
dashcam)
USB output
Battery cradle mount
Power LED Battery Meter LED
Page 6
6 BLACKVUE
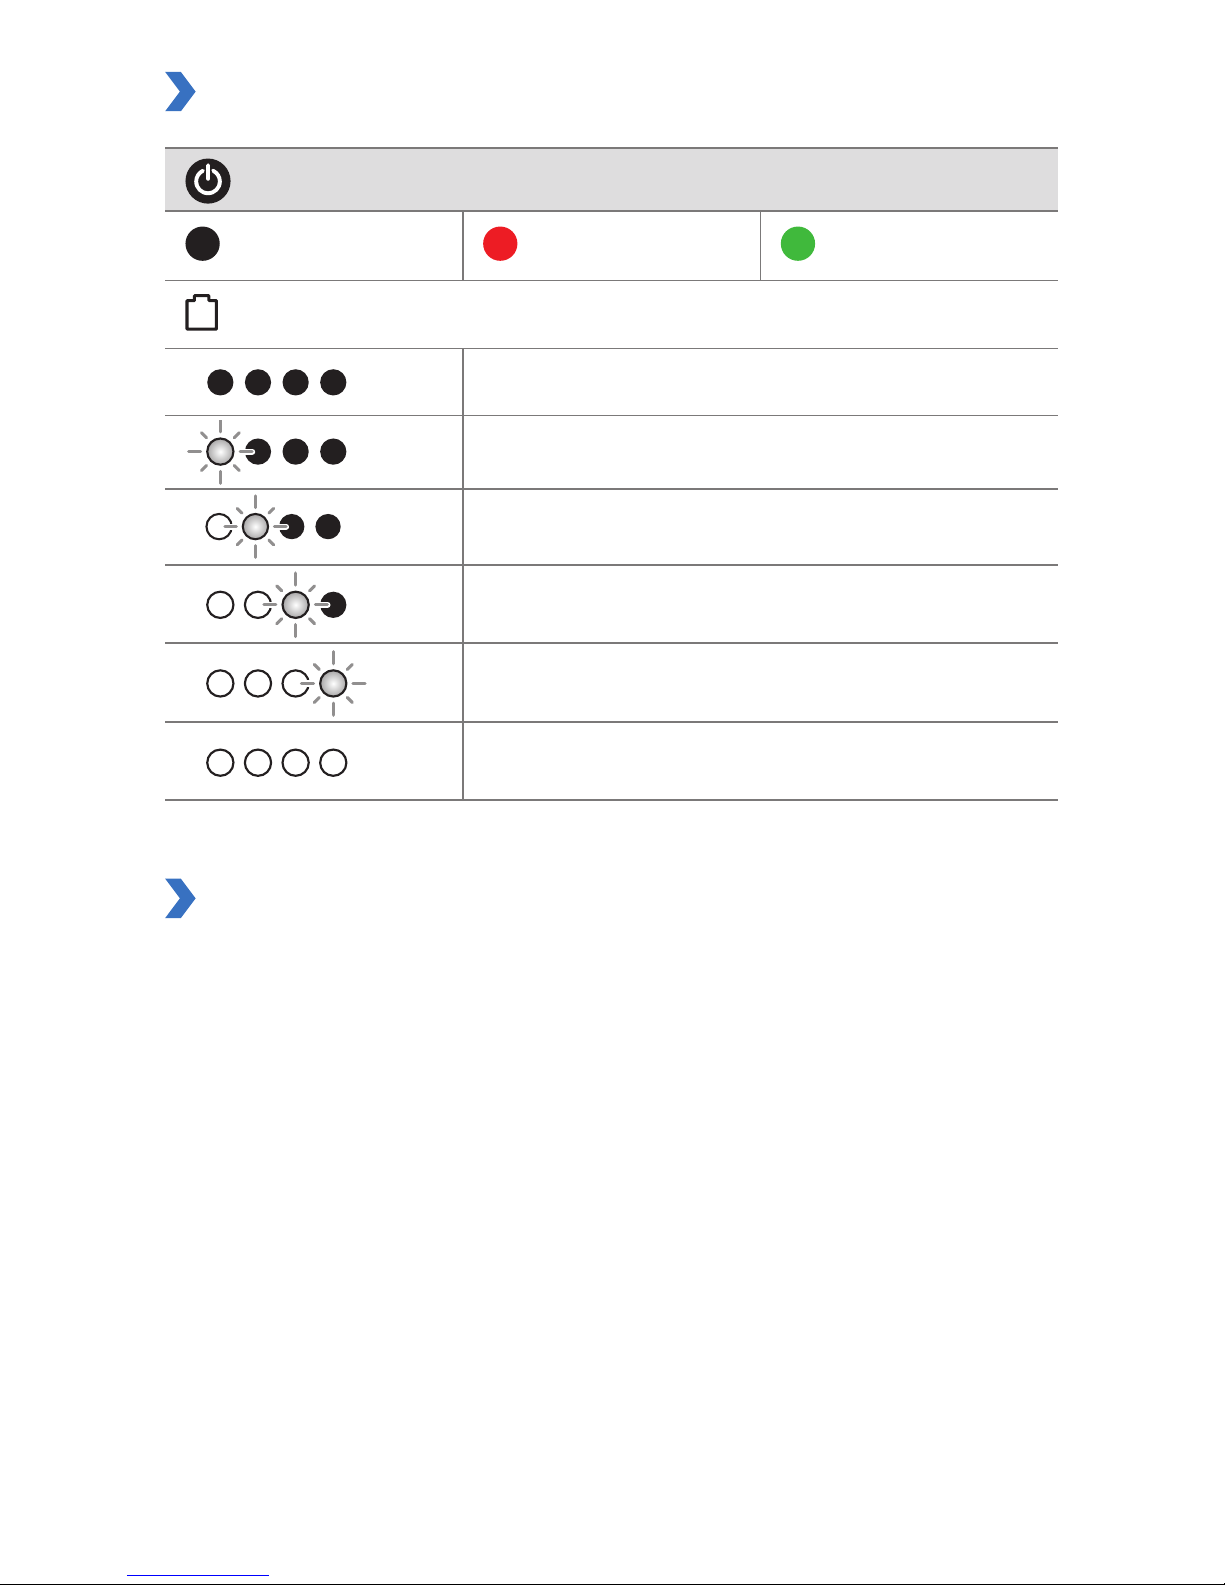
LED Indicators
Power LED Indicator
Discharged battery Charging battery Fully-charged battery
Battery Meter
Discharged battery
Battery Charging or in use (<25% charged)
Battery Charging or in use (<50% charged)
Battery Charging or in use (<75% charged)
Battery Charging or in use (<99% charged)
Battery fully-charged. DC Input connected.
Product Features
yUp to 12 hours use after 1 hour of rapid charging.
(Based on a single dashcam that consumes 12 V / 2.8 kWh of energy)
yCompatible with both car (12 V) and heavy vehicle (24 V) electrical systems.
yWhen the engine is on, the power supply to the dashcam bypasses the battery.
yWhen the engine is o, output automatically switches to draw power from the battery
pack.
yDIY installation – standard cigarette lighter socket and plug.
y2 USB sockets (5 V) to charge other devices (smartphone, mobile Wi-Fi hotspot, etc.).
Page 7
POWER MAGIC BATTERY PACK B-112 7
ENGLISH
Product Installation Guide (Recommended Steps)
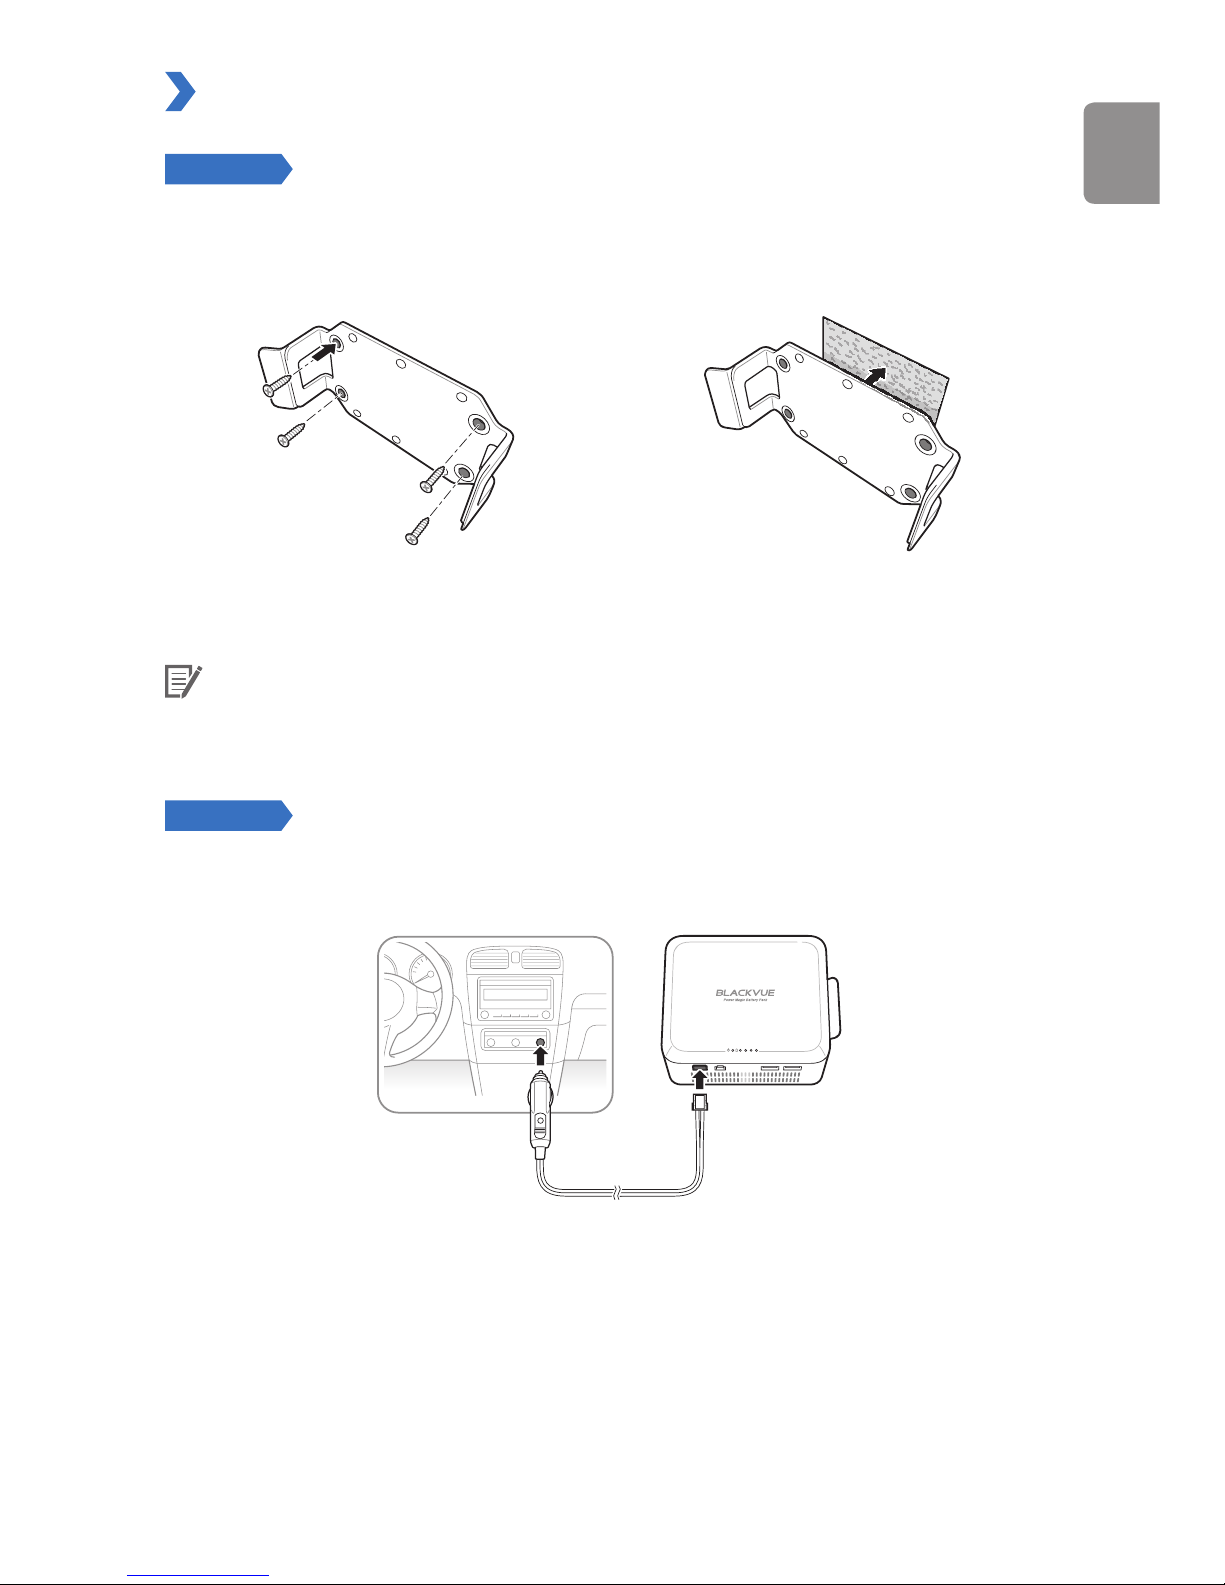
STEP 1
Fix the Power Magic Battery Pack in place.
We recommend attaching it to the side of the passenger side footwell (see step 5).
Use the supplied Velcro strips and/or screws to x the product in place.
Use the screws Use the Velcro strips
Note
Velcro strips cannot be attached to fabric material.
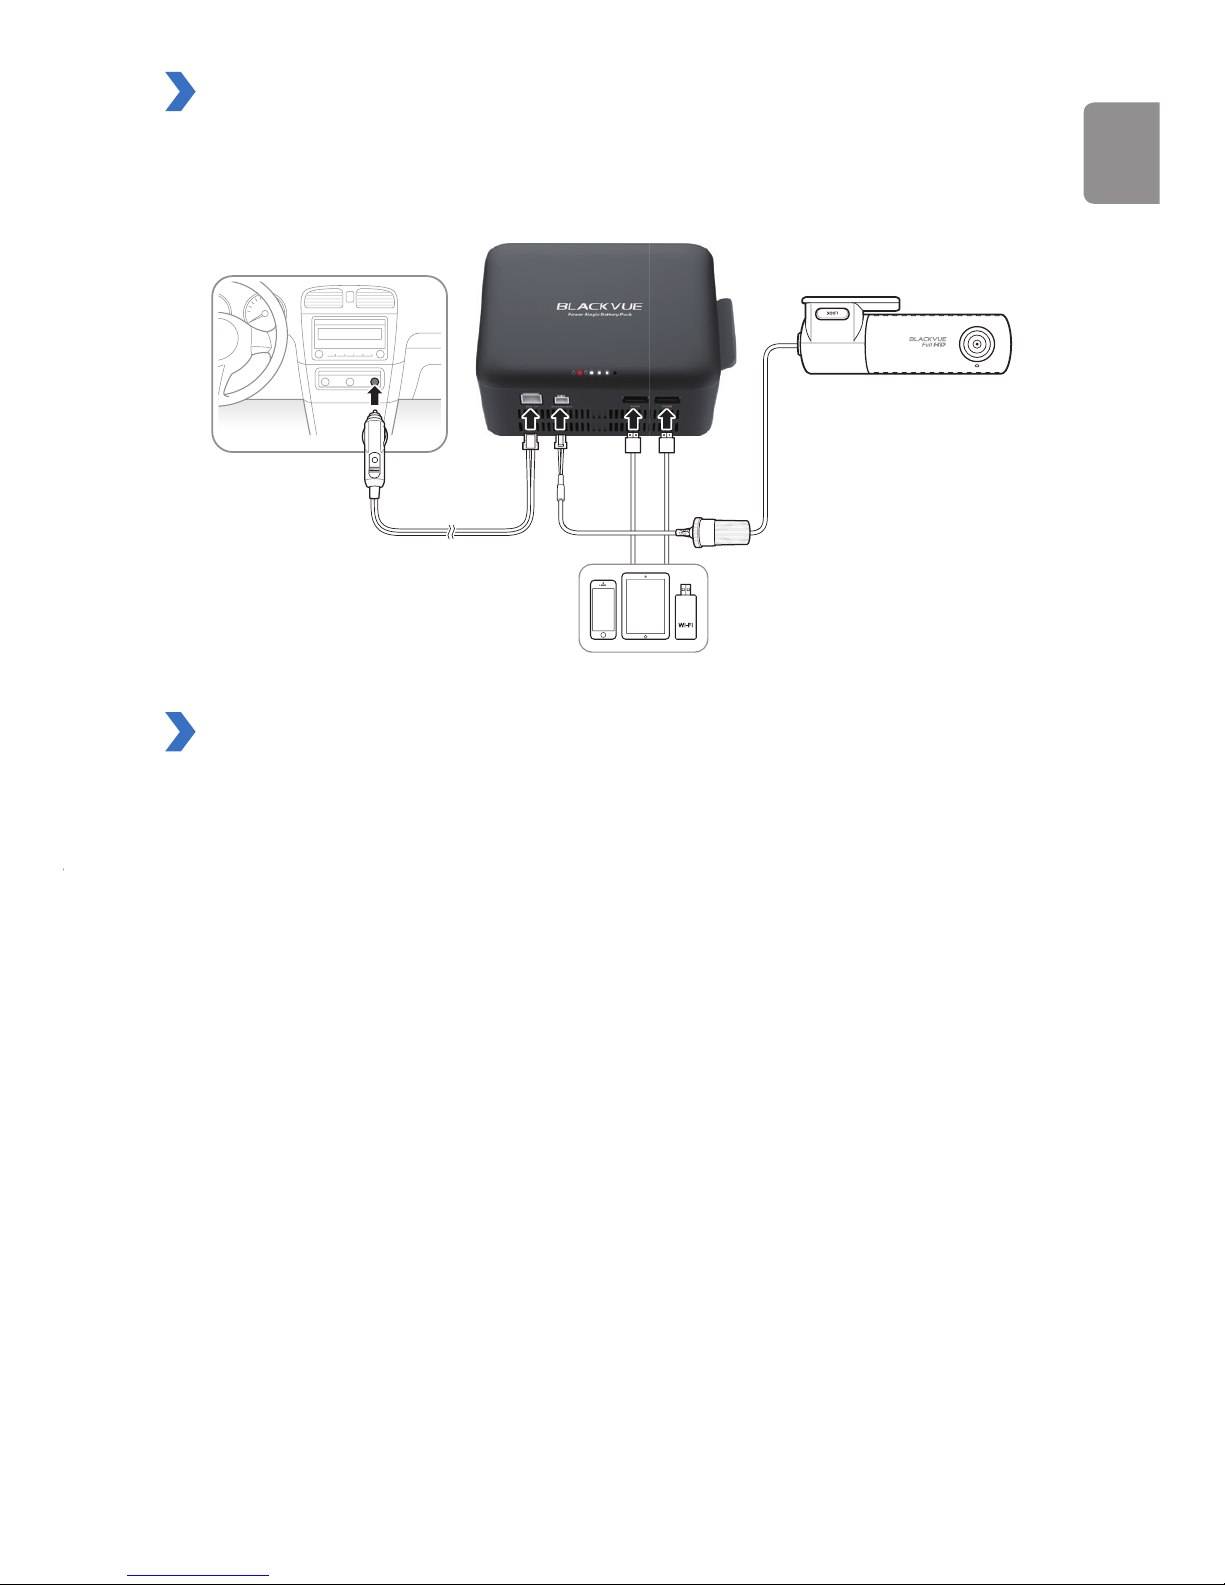
STEP 2
Plug the DC in power cable into the battery pack’s “DC in” port. Plug the other end of the
DC in power cable (the cigarette lighter plug) into the vehicle’s cigarette lighter socket.
Page 8
8 BLACKVUE
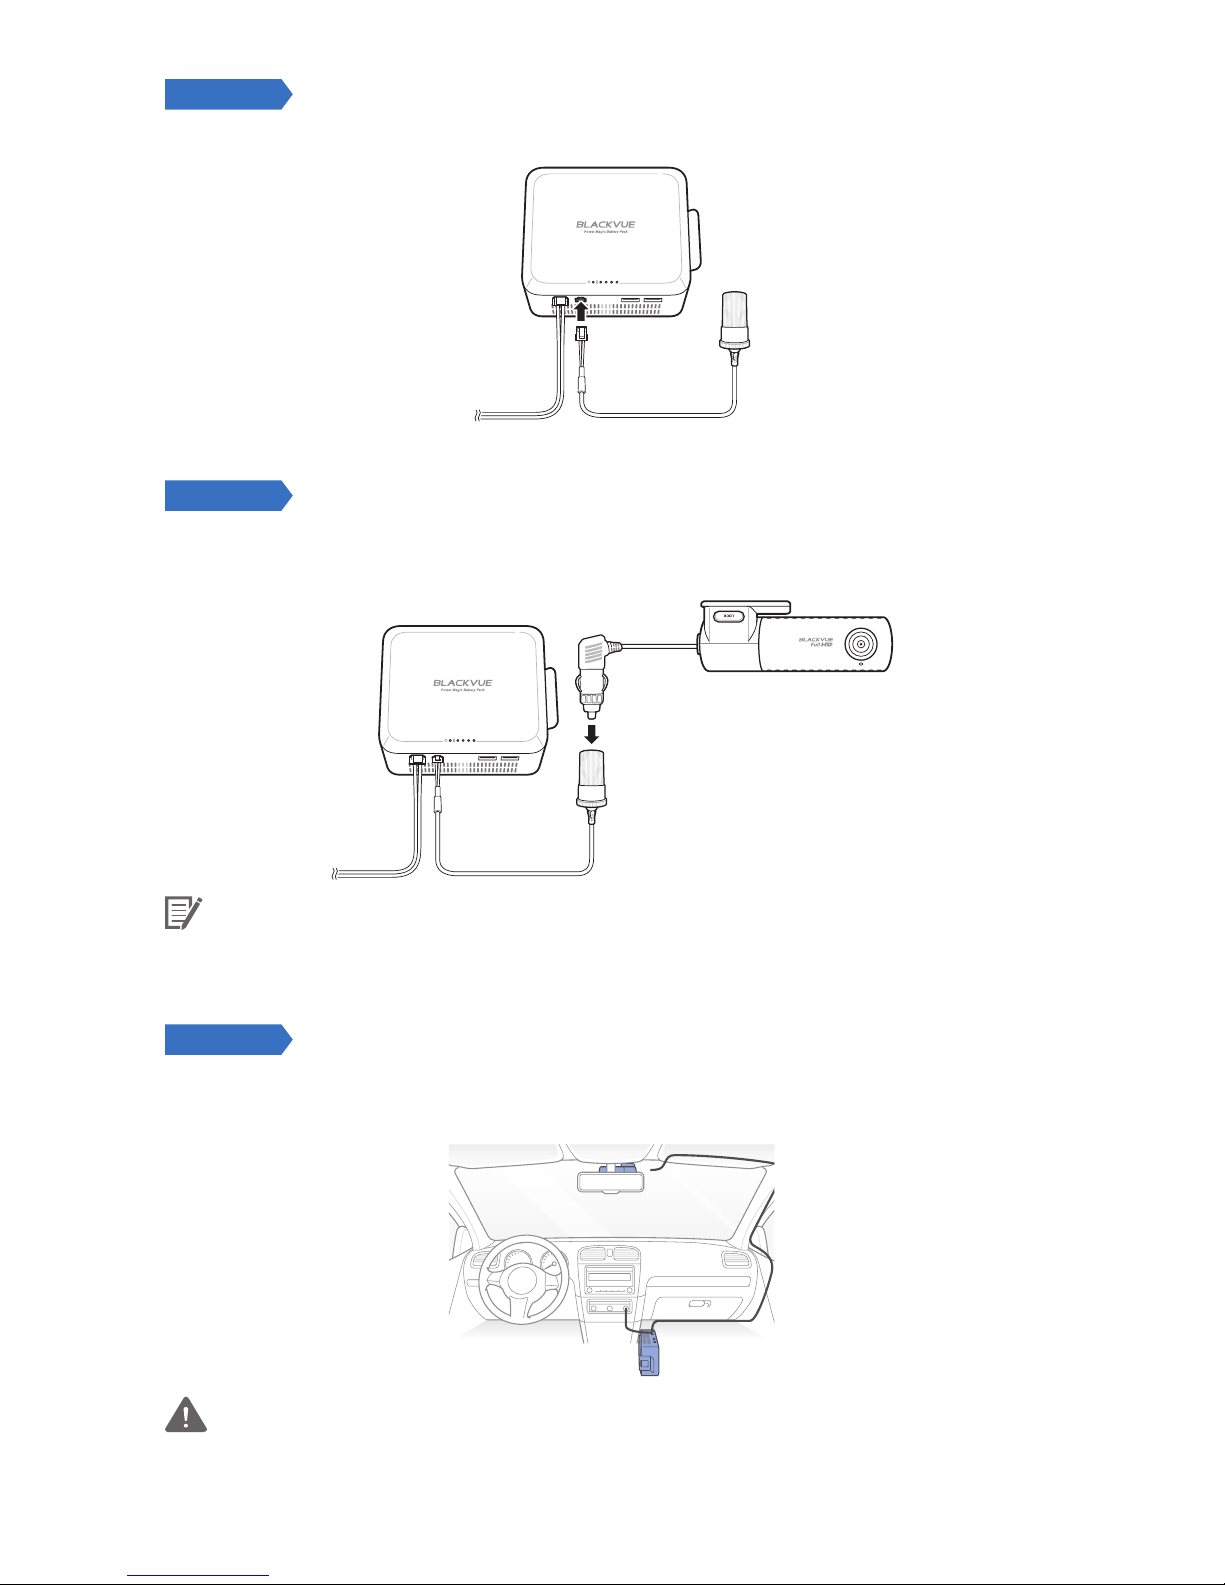
STEP 3
Plug the Output cable into the port labeled “Dashcam” on the battery pack.
STEP 4
Plug your dashcam’s power plug into the cigarette lighter socket on the battery pack’s
Output cable.
Note
To ensure good electrical contact you can use electrical tape to tape the plug and
socket together.
STEP 5
Use the pry tool to lift the edges of the windshield trim/molding and tuck in the power
cord.
Caution
Do not expose the product to direct sunlight and/or heat.
Page 9

POWER MAGIC BATTERY PACK B-112 9
ENGLISH
USB Power Sockets
yThe battery pack has 2 USB sockets(5 V) to charge other devices (smartphone, portable
Wi-Fi router, etc).
yThe battery pack can charge up to 2 devices and power the dashcam at the same time.
Product Specications
Specications
Model B-112
Color / Size / Weight Black / 128 mm (W)x102 mm (L)x50 mm (H) / 550 g
Battery Cell Type LiFePo4
Input Power Cigarette lighter plug: 9 V–24 V / 6.5 A (max)
Input Voltage / Current MIN: 9 V / 9.75 A, MAX: 24 V / 3.65 A
Charged Voltage / Current 14.6 V / 3.5 A
Charging Time Cigarette lighter plug: Approx. 1 hour
Hours of Use
Approx. 12 hours | 12 V / 2.8 kWh power consumption
1CH Dashcam
Operating Temperature
Charging Temperature: 0°C–45°C
Discharging Temperature: -20°C–60°C
Storage Temperature: -20°C–60°C
Capacity 12.8 V / 3000 mAh / 38.4 W
Quiescent Current 12.8 V / 20 mA
USB Power Output MIN: 5 V / 100 mA
Output Voltage
• When charging from a 12 V cigarette lighter socket:
- 2 USB sockets: each 5 V / 2 A
- Dashcam: 12 V / 1 A
• When charging from a 24 V cigarette lighter socket:
- 2 USB sockets: each 5 V / 2 A
- Dashcam: 24 V / 0.5 A
• When discharging the battery:
- 2 USB sockets: each 5 V / 2 A
- Dashcam: 12.8 V / 1 A
Page 10

10 BLACKVUE
Customer Support
For customer support, manual and any updates please visit www.blackvue.com.
You can also email a Customer Support expert at cs@pittasoft.com.
Limited Warranty
yThe warranty period of this product is 1 year from the purchase date.
yIf the product fails during normal and correct use within the warranty period, our
service center will repair the product free of charge.
yAny disassembly, modication or alteration of the product will void the warranty.
yThe cost to repair or x any malfunction or problem caused by incorrect usage during
the warranty period may be charged to the consumer.
yThe manufacturer shall not be responsible or liable for any loss or damage caused by
incorrectly using the product.
Page 11

BATERÍA POWER MAGIC B-112 11
ESPAÑOL
Batería Power Magic B-112 para BLACKVUE
Disfrute del modo de estacionamiento de su cámara para salpicadero con la mayor simplicidad.
Ahorre la batería de su vehículo.
Instrucciones de seguridad
El uso incorrecto de la batería Power Magic puede dar como resultado un mal
funcionamiento y podría provocar sobrecalentamiento, ignición, explosión, etc. Siga estas
instrucciones para usar el producto correctamente:
yFamiliarícese con el contenido del manual del usuario antes de usar el producto.
yUtilice únicamente los cables de BlackVue suministrados por el fabricante. Póngase en
contacto con atención al cliente para obtener cables de repuesto.
yNo exponga el producto a la luz del sol directa ni a fuentes de calor.
yLa CC del cable de alimentación de la batería debe estar conectada directamente al
mechero del vehículo.
yNo use un divisor de múltiples tomas (adaptador) para mechero con el producto.
yNo coloque el producto en un horno microondas ni en un lugar con una presión
ambiental elevada.
yNo repare ni modique el producto usted mismo.
ySi el producto emite un olor extraño durante el uso, desenchúfelo inmediatamente y
póngase en contacto con nuestro servicio al cliente.
yMantenga el producto alejado de niños y/o mascotas.
yMantenga las terminales de los cables de alimentación y de salida alejados de
elementos conductores.
yPittasoft Co., Ltd. no será responsable de los daños causados al desmontar, abrir o
modicar el producto.
Page 12

12 BLACKVUE
Componentes
Compruebe que los siguientes objetos están incluidos en la caja antes de instalar la batería
Power Magic.
Batería Power
Magic (B-112)
Soporte de la batería
Cable de salida
de la cámara
para salpicadero
(mechero)
CC del cable de
alimentación
(enchufe para
mechero)
Tiras de velcro
(2 EA)
Tornillos (4 EA)
Manual del usuario
Page 13

BATERÍA POWER MAGIC B-112 13
ESPAÑOL
Batería Power Magic (B-112) de un vistazo
Los siguientes diagramas explican cada pieza de la batería Power Magic.
Tornillo
Velcro
Entrada CC
(para conectar a una toma de
mechero de vehículo)
Cámara para salpicadero
(para conectar a la cámara
para salpicadero)
Salida USB
Soporte de la batería
LED de encendido LED de carga de batería
Page 14

14 BLACKVUE
Indicadores LED
Indicador LED de alimentación
Batería descargada Batería en carga
Batería completamente
cargada
Medidor de la batería
Batería descargada
Batería en carga o en uso (<25% de carga)
Batería en carga o en uso (<50% de carga)
Batería en carga o en uso (<75% de carga)
Batería en carga o en uso (<99% de carga)
Batería completamente cargada. Entrada de CC
conectada.
Características del producto
yHasta 12 horas de uso tras 1 hora de carga rápida
(según una cámara para salpicadero única que consume 12 V/2,8 kWh de energía)
yCompatible con sistemas eléctricos de coche (12 V) y vehículos pesados (24 V).
yCuando el motor está encendido, la alimentación eléctrica de la cámara para
salpicadero omite la batería.
yCuando el motor está apagado, la batería suministra energía automáticamente al
dispositivo.
yFácil instalación: toma de mechero y enchufe estándar.
y2 puertos USB (5 V) para cargar otros dispositivos (Smartphone, punto de acceso Wi-Fi
móvil, etc.
Page 15

BATERÍA POWER MAGIC B-112 15
ESPAÑOL
Guía de instalación del producto (pasos recomendados)
PASO 1
Fije la batería Power Magic en su lugar.
Se recomienda colocarla en el reposapies del copiloto (consultar paso 5).
Utilice las tiras de velcro y/o tornillos para jar el producto en su lugar.
Utilice los tornillos Utilice las tiras de velcro
Nota
No se puede enganchar las tiras de velcro a tejidos.
PASO 2
Conecte el cable de alimentación CC al puerto "DC in (entrada CC)" de la batería. Conecte
el otro extremo del cable de alimentación CC (conector del mechero) a la toma del
mechero del vehículo.
Page 16

16 BLACKVUE
PASO 3
Conecte el cable de salida al puerto con la etiqueta "Dashcam (Cámara para salpicadero)"
de la batería.
PASO 4
Conecte el cable de alimentación de la cámara para salpicadero a la toma del mechero del
cable de salida de la batería.
Nota
Para garantizar un buen contacto eléctrico, puede usar cinta aislante para sujetar el
enchufe y la toma.
PASO 5
Utilice una palanca para levantar el borde del embellecedor del parabrisas e introduzca el
cable de alimentación.
Precaución
No exponga el producto a la luz del sol directa ni a fuentes de calor.
Page 17

BATERÍA POWER MAGIC B-112 17
ESPAÑOL
Tomas de alimentación USB
yLa batería tiene 2 tomas USB (5 V) para cargar otros dispositivos (Smartphone, router
Wi-Fi portátil, etc.).
yLa batería puede cargar hasta 2 dispositivos y alimentar a la cámara de alimentación al
mismo tiempo.
Especicaciones del producto
Especicaciones
Modelo B-112
Color/Tamaño/Peso Negro/128 mm (A) x 102 mm (L) x 50 mm (Al)/550 g
Tipo de celda de batería LiFePo4
Potencia de entrada Conector de mechero: 9 V–24 V/6,5 A (máx)
Tensión/corriente de entrada Mín: 9 V/9,75 A, Máx: 24 V/3,65 A
Tensión/corriente de carga 14,6 V/3,5 A
Tiempo de carga Conector de mechero: Aprox. 1 hora
Horas de uso
Aprox. 12 horas | Consumo 12 V/2,8 kWh Cámara para
salpicadero 1 canal
Temperatura de
funcionamiento
Temperatura de carga 0 °C–45 °C
Temperatura de descarga: -20 °C–60 °C
Temperatura de almacenamiento: -20 °C–60 °C
Capacidad 12,8 V/3000 mAh/38,4 W
Corriente inactiva 12,8 V/20 mA
Potencia de salida del USB Mín: 5 V/100 mA
Tensión de salida
• Al cargar con una toma de mechero de 12 V:
- 2 tomas USB: cada una 5 V/2 A
- Cámara para salpicadero: 12 V/1 A
• Al cargar con una toma de mechero de 24 V:
- 2 tomas USB: cada una 5 V/2 A
- Cámara para salpicadero: 24 V/0,5 A
• Al descargar la batería:
- 2 tomas USB: cada una 5 V/2 A
- Cámara para salpicadero: 12,8 V/1 A
Page 18

18 BLACKVUE
Soporte al cliente
Para obtener soporte al cliente, manuales y actualizaciones de rmware, visite
www.blackvue.com.
También puede enviar un correo electrónico a un experto de Soporte al cliente en
cs@pittasoft.com.
Garantía limitada
yEl periodo de garantía de este producto es de 1 año a partir de la fecha de compra.
ySi el producto falla realizando un uso normal y correcto durante el periodo de garantía,
nuestro centro de mantenimiento reparará el producto sin ningún coste.
yDesmontar, modicar o alterar el producto invalidará la garantía.
yEl coste de la reparación o corregir un mal funcionamiento o problema causado por un
uso incorrecto durante el periodo de garantía correrá a cargo del usuario.
yEl fabricante no se hará responsable de ninguna pérdida o daños derivadosde un uso
incorrecto del producto.
Page 19

POWER MAGIC
电池组
B-112
19
中文
BLACKVUE Power Magic 电池组 B-112
便利地享用行车记录仪停车模式。
节省汽车蓄电池。
安全说明
不正确使用 Power Magic 电池会引起性能不佳,可能导致过热、着火、爆炸等。为正
确使用本产品,请遵守以下用法:
y使用产品之前熟悉用户手册内容。
y只能使用制造商提供的 BlackVue 原厂线缆。如需更换,请联系客户支持中心。
y请勿使产品受到阳光直射和/或加热。
y电池的直流电源线必须直接连接汽车点烟器插口。
y请勿使用点烟器多插座分离器(适配器)连接产品。
y请勿将产品放在微波炉或高压环境中。
y请勿自行维修或改装产品。
y如果使用过程中产品发出异常味道,应立即拔掉电源,并联系客户支持中心。
y使产品远离儿童和/或宠物。
y使电源端子和输出线缆远离导电元件。
yPittasoft Co., Ltd.对于因拆卸、打开或改装产品而导致的损坏概不负责。
Page 20

20
BLACKVUE
部件
安装 Power Magic 电池之前请检查包装盒内的以下部件。
Power Magic
电池组 (B-112)
Battery 安装支架
行车记录仪输出线
缆(点烟器插口)
直流电源线
(点烟器插头)
魔术贴 (2 EA) 螺丝 (4 EA)
用户手册
Page 21

POWER MAGIC
电池组
B-112
21
中文
Power Magic 电池组 (B-112) 简介
以下图示介绍了 Power Magic 电池组的每个部分。
螺丝
魔术贴
DC in
(用于连接汽车的
点烟器插口)
Dashcam
(用于连接行车记录仪)
USB 输出
Battery 安装支架
电源 LED 电池电量指示表 LED
Page 22

22
BLACKVUE
LED 指示灯
电源 LED 指示灯
用尽的电池 电池正在充电 电池完全充满
电池电量指示表
电池电量用尽
电池正在充电或使用(电量<25%)
电池正在充电或使用(电量<50%)
电池正在充电或使用(电量<75%)
电池正在充电或使用(电量<99%)
电池完全充满。连接直流输入。
产品特性
y1 小时快速充电后可使用长达 12 小时。
(单部行车记录仪消耗 12V/2.8kWh 能量)
y兼容于小汽车 (12V) 和重型车辆 (24V) 电气系统。
y发动机启动时,行车记录仪的电源可绕过电池。
y发动机关闭时,输出自动切换以消耗电池电量。
y自己安装 – 标准点烟器插口和插头。
y2 个 USB 插口 (5V),用来为其他设备(智能手机、移动 Wi-Fi 等)充电。
Page 23

POWER MAGIC
电池组
B-112
23
中文
产品安装指南(推荐步骤)
步骤 1
将 Power Magic 电池固定就位。
建议固定在副驾驶搁脚空间的侧面(见步骤 5)。
使用魔术贴和/或螺丝将产品固定到位。
使用螺丝 使用魔术贴
注意
魔术贴无法粘贴在织物材料上。
步骤 2
将直流电源线插入电池的“DC in”端口。将直流电源线的另一端(点烟器插头)插入
汽车的点烟器插口。
Page 24

24
BLACKVUE
步骤 3
将输出线缆插入电池上标有“Dashcam”字样的端口。
步骤 4
将行车记录仪的电源插头插入电池输出线缆上的点烟器插座。
注意
为确保电接触良好,您可以使用电工胶带将插头和插口绑在一起。
步骤 5
使用撬具撬起挡风玻璃密封条/模塑的边缘,并塞入电源线。
警示
请勿使产品受到阳光直射和/或加热。
Page 25

POWER MAGIC
电池组
B-112
25
中文
USB 电源插口
y电池上有 2 个用来为其他设备(智能手机、便携 Wi-Fi 路由器等)充电的 USB 插
口 (5V)。
y电池可以为行车记录仪供电的同时给 2 个设备充电。
产品规格
规格
型号 B-112
颜色/尺寸/重量 黑色 / 128mm(宽)x 102mm(长)x 50mm(高) / 550g
电池单元类型 LiFePo4
输入电源 点烟器插头:9V–24V / 6.5A(最大)
输入电压/电流 最小:9V / 9.75A,最大:24V / 3.65A
充电后电压/电流 14.6V / 3.5A
充电时间 点烟器插头:约 1 小时
使用时间 约 12 小时 | 12V / 2.8kWh 功耗 1CH 行车记录仪
工作温度
充电温度:0°C–45°C
放电温度:-20°C–60°C
储存温度:-20°C–60°C
容量 12.8V / 3000mAh / 38.4W
静态电流 12.8V / 20mA
USB 电源输出 最小:5V / 100mA
输出电压
• 当通过 12V 点烟器插口充电:
-2 个 USB 插口:每个 5V / 2A
-行车记录仪:12V / 1A
• 当通过 24V 点烟器插口充电:
-2 个 USB 插口:每个 5V / 2A
-行车记录仪:24V / 0.5A
• 当电池放电:
-2 个 USB 插口:每个 5V / 2A
-行车记录仪:12.8V / 1A
Page 26

26
BLACKVUE
客户支持
如需客户支持、用户手册以及内容更新,请访问网址 www.blackvue.com/cn。
您还可以给客户支持专家发送电子邮件,邮件地址:cs@pittasoft.com。
有限质量保证
y产品质保期为 1 年,从购买日开始。
y如果质保期内产品在正常和正确使用下出现故障,我们的服务中心将免费维修产品。
y对产品进行拆解、改装和改造将使质保无效。
y对于质保期内因不正确使用导致的故障或问题,相应维修成本由客户承担。
y对于不正确使用产品所导致的任何损失或损坏,制造商概不负责。
Page 27

MEMO
Page 28

www.blackvue.comCOPYRIGHT@2016 Pittasoft Co., Ltd. All right reserved.
Product I Battery pack
Model Name I B-112
Manufacturer I Pittasoft Co., Ltd.
Address I 7F, BYC HIGHCITY Building A 131, Gasan Digital 1-ro,
Geumcheon-gu, Seoul, Republic of Korea, 08506
Customer Support I cs@pittasoft.com
Product Warranty I One-Year Limited Warranty
facebook.com/BlackVueOfficial
www.blackvue.com
Made in Korea
 Loading...