


ID Core Stereo 10

ID:CORE STEREO 10, ID:CORE STEREO 20, ID:CORE STEREO 40
Owner’s Manual
Designed and Engineered by
Blackstar Amplification UK

IMPORTANT SAFETY INSTRUCTIONS
1. Read these instructions.
2. Keep these instructions.
3. Heed all warnings.
4. Follow all instructions.
5. Do not use this apparatus near water.
6. Clean only with dry cloth.
7. Do not block any ventilation openings.
8. Install in accordance with the manufacturer’s instructions.
9. Do not install near any heat sources such as radiators, heat registers, stoves, or
other apparatus (including ampliers) that produce heat.
10. Do not defeat the safety purpose of the polarized or grounding-type plug. A
polarized plug has two blades with one wider than the other. A grounding type
plug has two blades and a third grounding prong. The wide blade or the third
prong are provided for your safety. If the provided plug does not t into your
outlet, consult an electrician for replacement of the obsolete outlet.
11. Protect the power cord from being walked on or pinched particularly at plugs,
convenience receptacles, and the point where they exit from the apparatus.
12. Only use attachments/accessories specied by the manufacturer.
13. Unplug this apparatus during lightning storms or when unused for long periods
of time.
14. Refer all servicing to qualied service personnel. Servicing is required when the
apparatus has been damaged in any way, such as power-supply cord or plug is
damaged, liquid has been spilled or objects have fallen into the apparatus, the
apparatus has been exposed to rain or moisture, does not operate normally, or
has been dropped.
“TO COMPLETELY DISCONNECT THIS APPARATUS FROM THE AC MAINS,
DISCONNECT THE POWER-SUPPLY CORD PLUG FROM THE AC RECEPTACLE”.
“WARNING: TO REDUCE THE RISK OF FIRE OR ELECTRIC SHOCK, DO NOT
EXPOSE THIS APPARATUS TO RAIN OR MOISTURE. THE APPARATUS SHALL
NOT BE EXPOSED TO DRIPPING OR SPLASHING AND THAT OBJECTS FILLED
WITH LIQUIDS, SUCH AS VASES, SHALL NOT BE PLACED ON APPARATUS".
USA / Canada
This symbol is intended to alert the user to the presence of important
operation and maintenance (servicing) instructions in the literature
accompanying the appliance.
This symbol is intended to alert the user to the presence of
uninsulated “dangerous voltage” within the product’s enclosure that
may be of sucient magnitude to constitute a risk of electric shock
to persons.
3
English
Warning!
Important safety information!
READ THE FOLLOWING INFORMATION CAREFULLY. SAVE ALL
INSTRUCTIONS FOR FUTURE REFERENCE!
Follow all warnings and instructions marked on the product!
Do not open the equipment case. There are no user serviceable parts in this
equipment. Refer all servicing to qualied service personnel.
Clean only with a dry cloth.
Condensation can form on the inside of an amplier if it is moved from a cold
environment to a warmer location. Before switching the unit on, it is recommended
that the unit be allowed to reach room temperature.
Unauthorised modication of this equipment is expressly forbidden by Blackstar
Amplication Ltd.
Do not expose this apparatus to rain, liquids or moisture of any type.
Do not place this product on an unstable trolley, stand or table. The product may
fall, causing serious damage to the product or to persons!
This unit must only be used in a well ventilated area and never switched on when it
is within a poorly ventilated space, such as a bookcase.
This product should not be placed near a source of heat such as a stove, radiator,
or another heat producing amplier.
Use only the supplied power cord which is compatible with the mains voltage supply
in your area.
Power supply cords should always be handled carefully and should be replaced if
damaged in any way.
Never break o the earth (ground) pin on the power supply cord.
The power supply cord should be unplugged when the unit is to be unused for long
periods of time.
An apparatus with Class I construction should be connected to a mains socket
outlet with a protective earthing connection.
The mains plug of the power supply cord should remain readily accessible.
Before the unit is switched on, the loudspeaker should be connected as described
in the handbook using the lead recommended by the manufacturer.
Always replace damaged fuses with the correct rating and type.
Never disconnect the protective mains earth connection.
High loudspeaker levels can cause permanent hearing damage. You should
therefore avoid the direct vicinity of loudspeakers operating at high levels. Wear
hearing protection if continuously exposed to high levels.
If the product does not operate normally when the operating instructions are
followed, then refer the product to a qualied service engineer.
The U.S. Government's Occupational Safety and Health Administration (OSHA) has
specied the following permissible noise level exposures:
Duration Per Day In Hours Sound Level dBA, Slow Response
8 90
6 92
4 95
3 97
2 100
1½ 102
1 105
½ 110
¼ or less 115
According to OSHA, any exposure in excess of the above permissible limits could
result in some hearing loss.
Ear plug protectors in the ear canals or over the ears must be worn when operating
this amplication system in order to prevent a permanent hearing loss if exposure is
in excess of the limits as set forth above. To ensure against potentially dangerous
exposure to high sound pressure levels, it is recommended that all persons
exposed to equipment capable of producing high sound pressure levels such as
this amplication system be protected by hearing protectors while this unit is in
operation.
English
All electrical and electronic products should be disposed of separately
from the municipal waste stream via designated collection facilities
appointed by the government or the local authorities.
4
5

English
Introduction
Thank you for purchasing this Blackstar ID:Core amplifier. Like all our products, this
amp is the result of countless hours of painstaking Research and Development by
our world-class design team. Based in Northampton (UK), the Blackstar team are
all experienced musicians themselves and the sole aim of the development process
is to provide guitarists with products which are the ultimate tools for self-expression.
All Blackstar products are subjected to extensive laboratory and road testing to
ensure that they are truly uncompromising in terms of reliability, quality and above
all TONE.
ID:Core represents a truly ground-breaking achievement, combining unique
innovations, an intuitive, traditional control set and the versatility of programmability.
Please read through this handbook carefully to ensure you get the maximum benefit
from your new Blackstar product.
If you like what you hear and want to find out more about the Blackstar range of
products please visit our website at www.blackstaramps.com.
Thanks!
The Blackstar Team
Features
In the seven years since its launch, Blackstar has led the way in the innovation of
guitar amplification. ID:Core represents the culmination of more than seven years
technical Research and Development. These amps have an intuitive control set like
a traditional amp, but have the versatility of programmability. The unique controls
allow you, the guitarist, to custom design your own sound.
The Voice control has six different settings – Clean Warm, Clean Bright, Crunch,
Super Crunch, OD 1, OD 2. When used together with Blackstar’s patented ISF
control you can get the exact tone you’re thinking of.
The effects section delivers studio quality Super Wide Stereo modulation, delay and
reverb effects simultaneously that you can store with your sound.
Deep editing and storing of patches is simple using the Blackstar INSIDER software.
Patches can be shared, uploaded and downloaded via the online community. The
USB connector also allows you to record from your amp directly to your computer.
An emulated output and MP3/line input complete the package.
By using the unique Voice control and the patented ISF, ID:Core Series amplifiers
allow unparalleled flexibility and ease of use, enabling you to design the sound in
your head and deliver it at home, in the studio or in rehearsal.
English
6
7
English
AUK
Factory Reset
The default factory patches and settings can be restored to your amplier at any
time. Simply hold down the MOD, DLY and REV switches simultaneously, whilst
switching on the amplier.
The voice LED will count down to indicate that a factory reset is imminent. If any of
the MOD, DLY and REV switches are released before the Voice LEDs have switched
o, then the operation is cancelled and the amplier will remain unaected.
IMPORTANT NOTE:
This process will overwrite any user saved patches and settings.
Front Panel
1. Input
Plug your guitar in here.
Always use a good quality screened guitar lead.
2. Voice
The Voice control changes the preamp voicing, ranging from ultra clean to extremely
overdriven.
Clean Warm – Classic clean, dynamic
Clean Bright – ‘Boutique’, will break up when pushed hard
Crunch – Classic medium gain overdrive
Super Crunch – More gain and punch than Crunch
OD 1 – Hot-rodded Master Volume overdrive
OD 2 – Mid boosted overdrive
This setting is saved when you store a patch.
3. Gain
The Gain control adjusts the amount of overdrive or distortion. Low settings (counter
clockwise) will deliver a clean sound on the edge of break-up. As the Gain control is
turned clockwise the sound will become more overdriven, moving through beautiful
crunch tones until, at its maximum position, a full distorted tone is achieved. This
setting is saved when you store a patch.
4. Volume
This controls the preamp volume. High levels of volume will introduce the effect of
valve power amp distortion and compression. This is a global setting and not saved
when storing a patch.
English
8
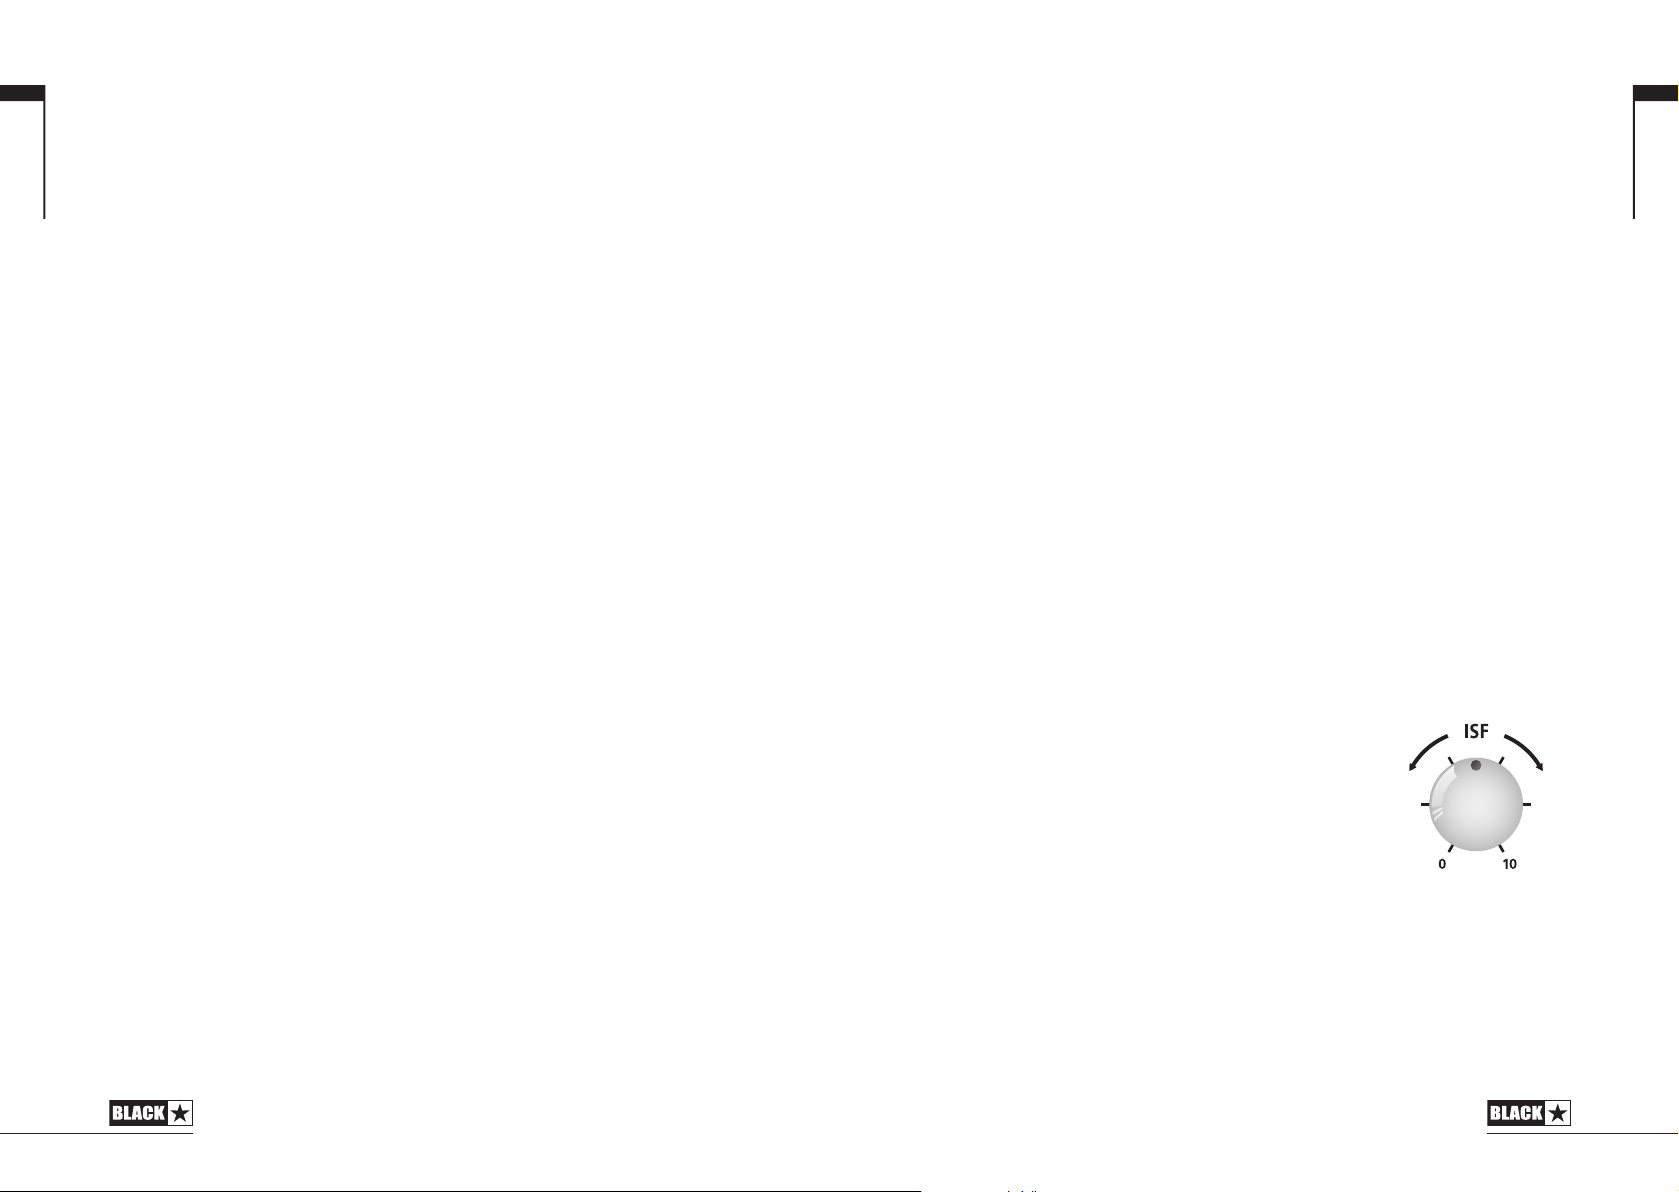
5. ISF
The patented ISF control allows you to choose the
exact tonal signature you prefer. Fully counter clockwise
has a more American characteristic with a tight bottomend and more aggressive middle, and fully clockwise
has a British characteristic which is more ‘woody’ and
less aggressive. This leads to a very familiar, musical
response. This setting is saved when you store a patch.
6. MOD (Modulation)
Press this switch to turn the stereo modulation effect on, off, or focus the effect for
editing. This setting is saved when you store a patch.
7. DLY (Delay)
Press this switch to turn the stereo delay effect on, off, or focus the effect for editing.
This setting is saved when you store a patch.
US
9
English
8. REV (Reverb)
Press this switch to turn the stereo reverb effect on, off, or focus the effect for
editing. This setting is saved when you store a patch.
For all three effect switches/buttons, the LED shows what state the effect is in:
LED Eect State Description
LED not on Eect o Eect not active
LED red Eect on but not ‘focused’ for editing Eect is active, but not aected by the front
LED green Eect on and ‘focused’ for editing Eect active and aected by the front panel
panel eect controls
eect controls
Repeatedly pressing each effect switches on the front panel has the following effect:
Current Eect State Next Eect State
Eect o Turns the eect on and ‘focuses’ the eect. Any previously focused eect
Eect on but not ‘focused’ Focuses the eect. Any previously focused eect reverts to an ‘on’ state
Eect on and ‘focused’ Turns the eect o. If any other eect(s) are on, the previously ‘focused’ eect
reverts to an ‘on’ state
resumes being ‘focused’
NOTE: Only one effect may be ‘focused’ at any time.
9. Effect Type
This changes the effect type and edits a parameter of the currently ‘focused’ effect
(modulation, delay, or reverb).
Each segment represents a different effect (four for each type of effect). An
LED shows which effect type is currently active. The distance travelled through
the ‘segment’ modifies an effect parameter. The Effects Table below shows the
modifiable parameters.
This setting is saved when you store a patch.
11. Tap
The Tap switch is used to set the rate/time of the current ‘focused’ effect. The time
between each press of the tap button defines the rate set.
Once set, the Tap LED will flash in time with the set rate of the currently ‘focused’
effect.
The Effects Table below shows the modifiable parameters:
Effects Table
Eect Segment Parameter Level Parameter Tap Parameter
MODULATION
Phaser Mix Depth Speed
Flanger Feedback Depth Speed
Chorus Mix Depth Speed
Tremolo Frequency modulation depth Amplitude modulation depth Speed
DELAY
Linear Feedback Delay level Time
Analogue Feedback Delay level Time
Tape Feedback Delay level Time
Multi Feedback Delay level Time
REVERB
Room Size Reverb level -
Hall Size Reverb level -
Spring Size Reverb level -
Plate Size Reverb level -
This setting is saved when you store a patch.
English
10. Effect Level
This modifies an effect parameter. For modulation and delay effects, turning the Level
control while holding down the Tap button (11) modifies the rate/time of the effect.
The Effects Table below shows the modifiable parameters.
This setting is saved when you store a patch.
12. Power Switch
This switch is used to turn the amplifier on and off; the white dot marks the ON
position.
13. USB
Plug a USB cable in here to connect the amplifier to a Windows PC or Mac.
Blackstar’s INSIDER software offers a host of features and can be downloaded
from: www.blackstarinsider.co.uk
See the USB Audio section on page 15 for more information.
NOTE: The amplifier will appear on a personal computer as an audio capture device
within recording software.
10
11
English
14. Manual
Press this switch to toggle between Patch and Manual Mode. When the amplifier
is in Manual Mode, the sound will reflect the current physical position of the knobs.
This is applicable to the Voice, Gain, Volume and ISF knobs. Any effects that are
active when switching to Manual Mode will be turned off.
While in Manual Mode any of the controls can still be modified by the Blackstar
INSIDER software but this means that the sound will not represent the positions of
the knobs on the front panel
15. Footcontroller (ID:CORE STEREO 20 and ID:CORE STEREO 40 only)
Connect a Blackstar FS-11 footcontroller (not supplied) to control your ID:Core in
one of the following modes:
FS-11 Switch 1 Switch 2
Default Mode Toggles between 2 patches,
Alternative Mode Patch down Patch up
selectable via INSIDER
Toggles all saved patch eects
on/o
English
Patch Mode
Patch mode is indicated by the Manual LED (14) being unlit. See Programmability
section on page 14 for more information.
Tuner Mode
Holding the Tap (11) and Manual (14) switches together for one second will engage
the tuner. The Recall Indicator LED (18) will flash continuously to indicate the
amplifier is in Tuner Mode. The amplifier output will be muted whilst in Tuner Mode.
The Voice LEDs will indicate the closest note to the note being played.
Clean Warm String 1 (E)
Clean Bright String 2 (A)
Crunch String 3 (D)
Super Crunch String 4 (G)
OD 1 String 5 (B)
The MOD, DLY and REV LEDs act as indicators to show how close the played note
is to the tuned note.
MOD LED red Note is sharp (above pitch)
DLY LED green Note is in tune
REV LED red Note is at (below pitch)
All other LEDs on the front panel will be off in Tuner Mode.
Pressing any button will exit Tuner Mode.
In Alternative Mode (selected via INSIDER) patches will cycle on a ʻloopʼ.
e.g switching up from OD2 will move to Clean Warm.
When in Manual Mode, the effect of any footcontroller switch will depend on its last
state. Pressing Switch 1 will return the amplifier to Patch Mode. Pressing Switch 2
will toggle the effects off and on without returning to Patch Mode.
16. MP3/Line In
Connect the output of your MP3 or CD player here. Adjust the player’s volume to
match that of your guitar to enable you to play along.
17. Emulated/Headphone Out
This output emulates the tonal characteristics of a guitar speaker cabinet and
provides a natural tone for connection to headphones, a recording device, PA
system or mixing desk.
To make full use of the Super Wide Stereo effects, use a ‘stereo 3.5mm jack to
two mono jacks’ splitter lead to feed two channels of the recording device or mixer.
Always use a good quality screened lead.
Turning the Volume knob will control the Emulated Output level.
NOTE: The
Amplifer
speakers will mute when a cable is connected to the Output.
18. Recall Indicator
12
13

English
The Recall Indicator shows if there is a mismatch between the current value of a
parameter within the amplifier and the corresponding physical front panel control.
For example, when you change to a different patch the controls on the front panel
may not always reflect the setting you are hearing.
To prevent unexpected level jumps in the control you are adjusting, the front panel
knobs will have no effect on the sound until the knob reaches the current parameter
value. Once reached the Recall Indicator flashes twice and the knob ‘takes control’
of the value and can increase or decrease the value.
The recall indicator will flash each time the physical knob ‘passes through’ the
currently active value that you are hearing.
Recall is active for Gain and ISF.
When the Tuner is active the Recall Indicator will flash continuously.
Rear Panel
1. DC Input
The supplied detachable DC power supply is connected here. Always ensure the
Power Switch (12) is in the OFF position before connecting the power supply. The
lead should only be connected to a power outlet that is compatible with the voltage,
power and frequency requirements stated on the power supply. If in doubt seek
advice from a qualified technician.
Programmability
Storing Patches
Your ID:Core amplifier stores 6 patches (1 patch per Voice setting).
To store the current sound as a patch press and hold the Manual switch for two
seconds. The currently selected Voice LED will flash to indicate the patch has been
stored.
Storing a patch will overwrite any previous patch in that location.
Patches can also be stored via Blackstar’s INSIDER software.
NOTE: Each patch on your ID:Core must use the Voice setting assigned to that
patch i.e. the Clean Warm patch uses the Clean Warm voice.
Recalling Patches
When in Patch Mode turn the Voice control to choose the desired Voice patch.
Patches can also be recalled via the Blackstar INSIDER software or a connected
footcontroller (ID:CORE STEREO 20 & ID:CORE STEREO 40 only).
NOTE:To recall a patch, the Manual LED must be off to indicate Patch Mode.
Turning the Voice control while the Manual LED is on (in Manual Mode) will only
select the indicated voice.
Standard audio drivers are used to connect the amplifier to a PC or Mac. No specific
drivers are required. For a guide on low-latency USB recording visit:
www.blackstaramps.com/usbrecording
NOTE: Always connect the amplifier via a main USB port, often found on the rear
of the computer.
The amplifier will appear as an audio capture device within recording software.
The output of the audio over USB can be changed via the Blackstar INSIDER
software, and can be one of the following:
Speaker emulated stereo effected audio channels
2 x mono audio channels
- Left – effected amplifier signal
- Right – unprocessed guitar signal
Reamping Mode
Reamping
The amplifier can be switched into Reamping Mode via the Blackstar INSIDER
software. This is a non-storable setting and will be switched off either when the
USB cable is removed, or when the amplifier power is switched off.
When activated, Reamping Mode allows the amplifier to accept a pre-recorded, dry
guitar signal via USB and return a fully processed audio signal. This return signal can
then be captured using recording software on the connected PC or Mac.
Firmware Update
Firmware updates are initiated via the Blackstar INSIDER software. A new version
of the Blackstar INSIDER software will be released whenever an update is available.
When the amplifier is connected (via USB) to a version of the Blackstar INSIDER
software containing newer firmware, a message will be displayed prompting you
to install the latest files. Whilst updating, the amplifier controls will be unresponsive.
Front panel voice LEDs will cycle to indicate data activity during the update process.
The amplifier power should not be switched off during a firmware update. If the
amplifier is switched off during an update, the controls may be unresponsive after
the power is reapplied and the amplifier will produce no sound. The voice LEDs will
cycle to indicate that the amplifier contains no valid firmware.
If you are experiencing problems with the firmware update process the amplifier
can be forced to power up in Update Mode. Hold down the Manual (14) & MOD (6)
switches simultaneously, whilst switching on the amplifer to enter this mode with the
voice LEDs cycling to indicate Update Mode. Connect the amplifier to the Blackstar
INSIDER software to begin a firmware updae.
The amplifier must be connected to the Blackstar INSIDER software to reinstall
valid firmware. The update process will start automatically if the Blackstar INSIDER
software detects that the amplifier is in this state.
English
Technical Specification
USB Audio
14
15
English
ID:CORE STEREO 10
Power: 2 x 5 Watts (Stereo 10 Watts)
Weight (kg): 3.7
Dimensions (mm): 340(W) x 265(H) x 185(D)
ID:CORE STEREO 20
Power: 2 x 10 Watts (Stereo 20 Watts)
Weight (kg): 5.2
Dimensions (mm): 375(W) x 292(H) x 185(D)
Footcontroller (not supplied): FS-11 footcontroller
ID:CORE STEREO 40
Power: 2 x 20 (Stereo 40 Watts)
Weight (kg): 6.2
Dimensions (mm): 434(W) x 336(H) x 185(D)
Footcontroller (not supplied): FS-11 footcontroller
Français
Cet appareil doit être utilisé dans un environnement bien ventilé et ne doit jamais être
mis sous tension si l'endroit est conné.
16
17
Français
La loi américaine sur la santé et la sécurité du travail indique la durée d'exposition
autorisée à différents niveaux sonores:
8 90
6 92
4 95
3 97
2 100
1½ 102
1 105
½ 110
¼ or less 115
Introduction
Merci d’avoir acheté cet amplificateur Blackstar ID:Core. Comme tous nos
produits, cet amplificateur est le résultat d’innombrables heures de recherche et
développement minutieux par notre équipe de conception de classe mondiale.
Français
Basée à Northampton (Royaume-Uni), l’équipe Blackstar est composée de
musiciens chevronnés et l’unique objectif du processus de développement est de
fournir aux guitaristes les outils ultimes pour s’exprimer.
Tous les produits Blackstar sont soumis à des tests intensifs en laboratoire et en
conditions réelles pour s’affranchir véritablement de tout compromis en termes de
fiabilité, de qualité et avant tout de SON.
L’ID:Series est véritablement révolutionnaire, combinant des innovations uniques, un
jeu de commandes intuitives et traditionnelles, et la souplesse de programmation.
Veuillez lire attentivement la totalité de ce mode d’emploi pour tirer le bénéfice
maximal de votre nouveau produit Blackstar.
Si vous aimez ce que vous entendez et voulez en découvrir plus sur la gamme de
produits Blackstar, veuillez visiter notre site web à l’adresse www.blackstaramps.
com.
Merci !
L’équipe Blackstar
Tous les produits électriques et électroniques doivent être jetés
séparément, dans le ux de déchets municipaux, dans les lieux de
collecte désignés par le gouvernement ou les autorités locales.
1918

Français
Caractéristiques
Dans les cinq ans qui ont suivi son lancement, Blackstar a montré la voie de
l’innovation dans l’amplification de guitare. L’ID:Core représente le point culminant
de plus sept ans de recherche et développement techniques. Ces amplis ont le jeu
de commandes intuitif d’un ampli traditionnel, mais offrent une grande souplesse de
programmation. Les commandes uniques vous permettent à vous, le guitariste, de
concevoir votre propre son, de le mémoriser et d’être sûr de la façon dont l’ampli
se comportera en live.
La commande Voice a six réglages différents – Clean Warm, Clean Bright, Crunch,
Super Crunch, OD 1, OD 2. Quand on les utilise avec la commande ISF brevetée de
Blackstar, vous pouvez obtenir exactement le son auquel vous pensiez.
La section d’effets offre simultanément des effets de qualité studio comme la
modulation Stereo Ultra Large, le delay et la reverb, que vous pouvez mémoriser.
L’édition en profondeur et la mémorisation des patches est simple grâce au logiciel
Insider de Blackstar. Les patches peuvent être partagés, mis à disposition et
téléchargés grâce à la communauté en ligne. Le connecteur USB vous permet
aussi d’enregistrer directement de votre ampli vers votre ordinateur.
La Sortie simulateur de HP et l'entrée MP3/ligne complètent l’ensemble.
Avec l'exceptionnelle commande Voice et l’ISF brevetée, les amplificateurs ID:Core
offrent une flexibilité et une simplicité sans égales, vous permettant de concevoir
véritablement le son que vous avez en tête et de le ressortir à la maison, en studio
ou en répétition.
Réinitialisation d’usine
Les patches et réglages d’origine par défaut peuvent être à tout moment
restaurés dans votre amplicateur. Maintenez simplement pressés simultanément
les boutons MOD, DLY et REV, pendant que vous allumez l’amplicateur. Les
LED de la commande 'Voice' servant à choisir la tonalité de l’ampli s’allumeront
successivement en rouge pour indiquer l’imminence de la réinitialisation d’usine. Ce
processus prend un total de 2 secondes. Si n’importe lequel des boutons MOD, DLY
ou REV est relâché avant que la LED Bank n’ait passé en revue toutes ces couleurs,
alors l’opération est annulée et l’amplicateur ne subit aucune modication.
NOTE IMPORTANTE:
Ce processus écrasera tout contenu créé par l’utilisateur.
Français
2120
 Loading...