

Page 1

HT-DELAY
VALVE DELAY
Owner’s Manual
Page 2
Warning!
Important safety information!
Read the following information carefully. Save all
English
instructions for future reference.
Danger! High internal operating voltages
Do not open the equipment case. There are no user serviceable
parts in this equipment. Refer all servicing to qualified service
personnel.
Unauthorised modification of this equipment is expressly
forbidden by Blackstar Amplification Limited.
Never push objects of any kind into ventilation slots on the
equipment casing.
Do not expose this apparatus to rain, liquids or moisture of any
type.
Only use the correct Blackstar approved DC adapter supplied.
Unplug the DC adapter from the mains supply when not in use.
Introduction
Thank you for purchasing this Blackstar HT-DELAY stereo valve
effects pedal. Like all our products, this pedal is the result of
countless hours of painstaking Research and Development by our
world-class design team. Based in Northampton (UK), the
Blackstar team are all experienced musicians themselves and the
sole aim of the development process is to provide guitarists with
products which are the ultimate tools for self expression.
All Blackstar products are subjected to extensive laboratory and
road testing to ensure that they are truly uncompromising in terms
of reliability, quality and above all TONE.
If you like what you hear and want to find out more about the
Blackstar range of products please visit our website at
www.blackstaramps.com.
Thanks!
The Blackstar Team
English
All electrical and electronic products should be
disposed of separately from the municipal waste
stream via designated collection facilities appointed
by the government or the local authorities.
3
4
Page 3
Features
The HT-DELAY combines the flexibility of digital technology with
the unique valve Saturation control to deliver eight stunning digital
delay effects with the natural tone and feel of a genuine high
English
voltage valve circuit.
The Blackstar team are all musicians themselves and have years
of gigging and recording experience. So when they embarked on
the journey to design the ultimate digital effects pedals, they
wanted to develop products that had none of the harshness of
some digital products and provide the warmth and musicality of
vintage effects pedals which players love.
The Blackstar designers acquired some of the most revered valve
and vintage effects pedals and set to work distilling the ingredients
that make these old designs so special. The valve Saturation
control is one result of this exhaustive research. The Saturation
control is in simple terms a valve gain and compression circuit
which acts in the digital effects ‘side chain’ to impart the valve
dynamics and harmonics typical of a vintage tape delay input
circuit.
The features on the HT-DELAY have been selected to be
particularly suited to live performance and that is why the Tap
Time feature has been included, to allow the adjustment of delay
time during performance. Some of the effects are quite traditional
and some like the amazing Loop functions may be less familiar.
Each of the eight delay effects has been designed by technical
reference to vintage effects equipment and then hours of honing
‘by ear’ to provide effects that are both natural sounding and
inspirational to the player.
Controls
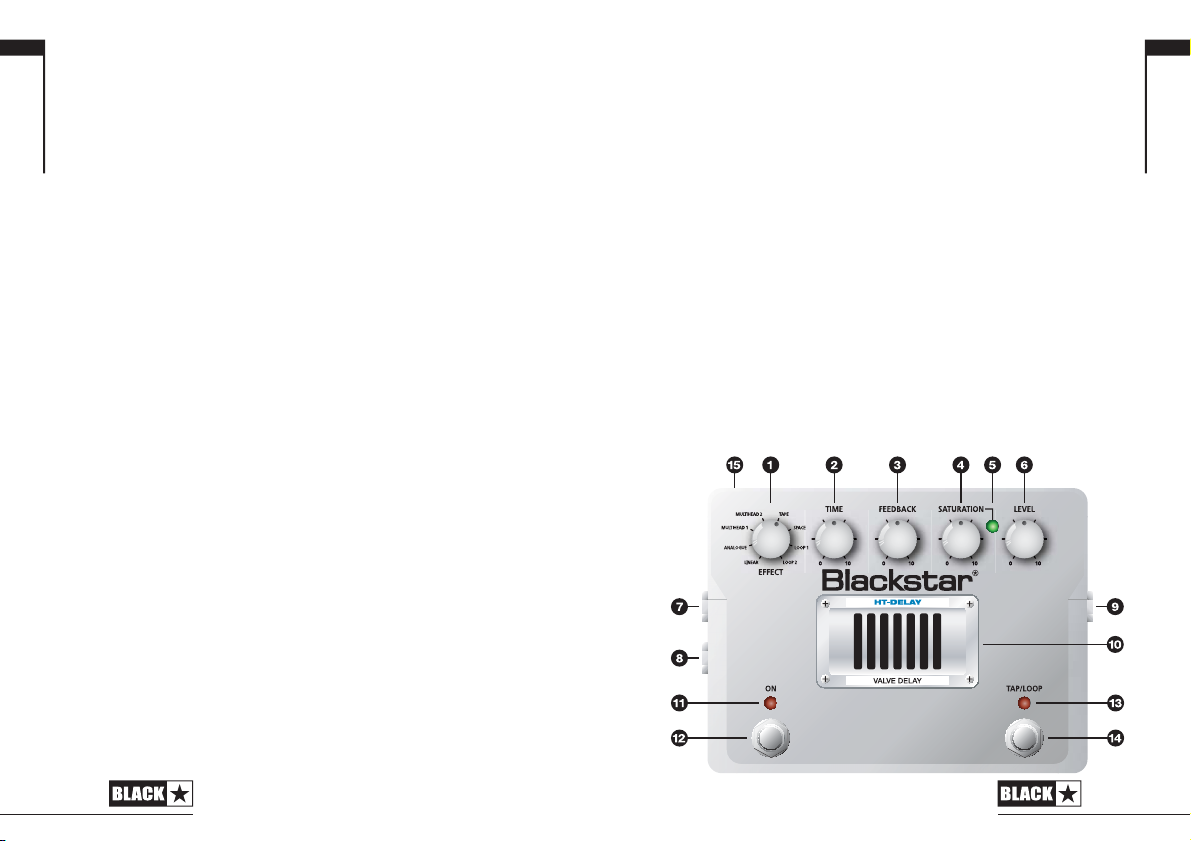
1. Effect
The Effect rotary switch selects one of the eight delay effects.
Effect Name Description Notes
1 Linear Full bandwidth or ‘hi-fi’ delay.
2 Analogue Based on the natural sound Always MONO
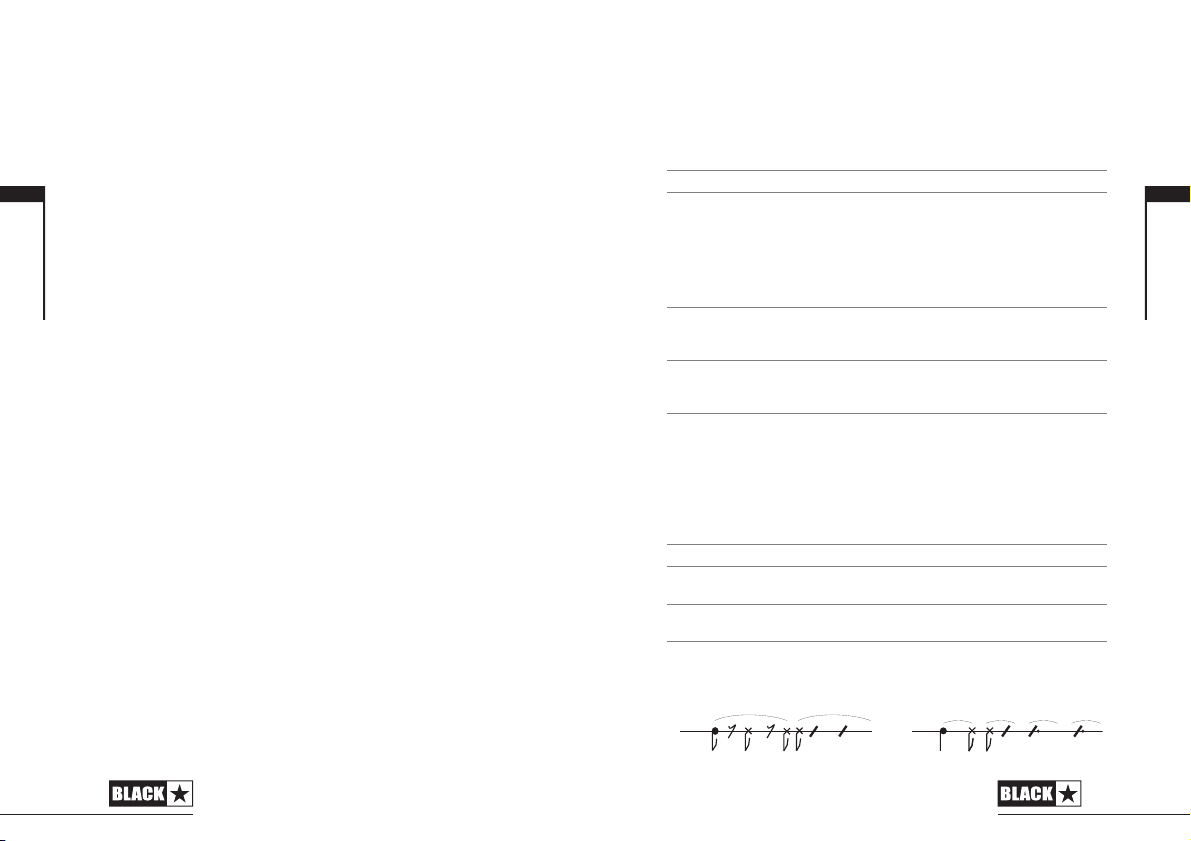
3 Multihead 1 A rhythmic delay based on See Diagram 1
4 Multihead 2 A rhythmic delay based on See Diagram 2
5 Tape A tape delay based on certain Always MONO
6 Space Complex vintage tape echo
7 Loop 1 One shot / Loop playback delay. Always MONO
8 Loop 2 Sound on sound delay looper. Always MONO
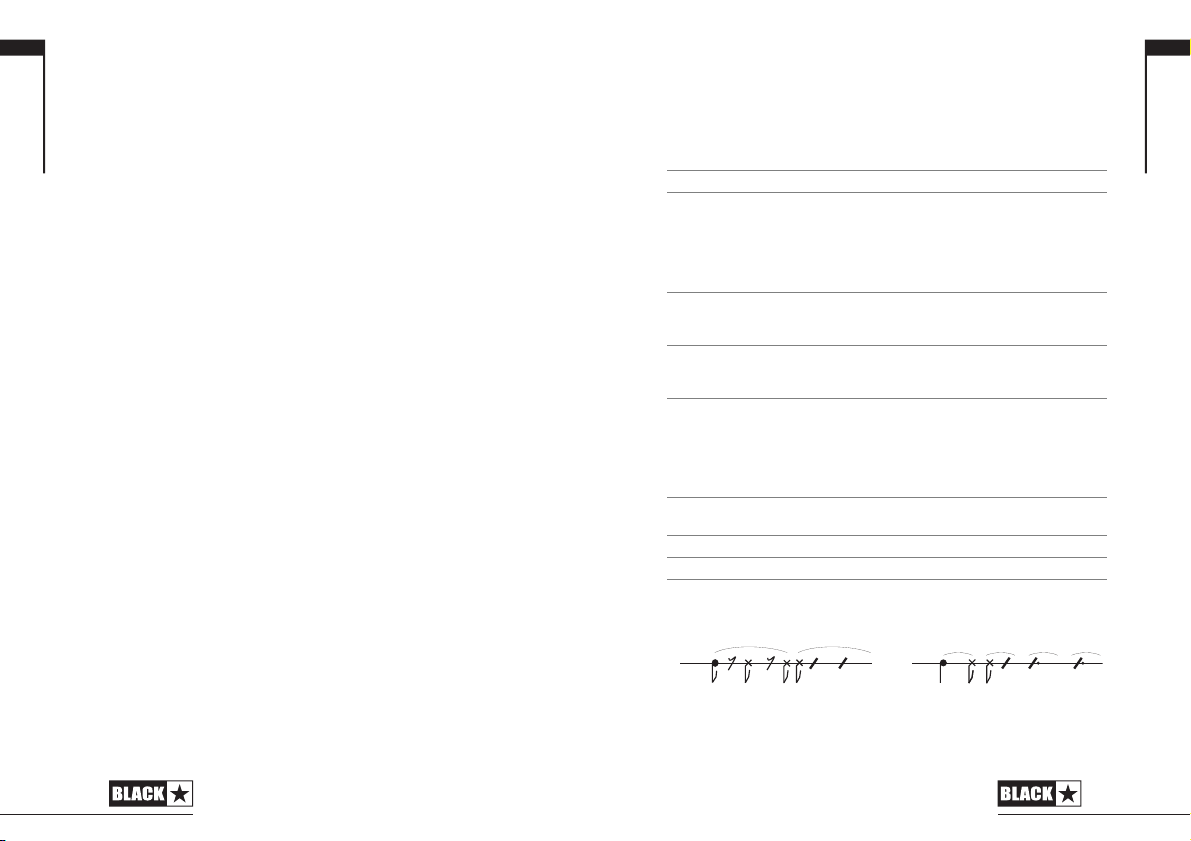
Diagram 1 Diagram 2
Tap
1
4
4
Original
produced by vintage analogue
or ‘Bucket Brigade Delay’
pedals. The top treble of the
repeats is subtly filtered for a
musical feel.
the effect produced by below
multi-head tape delays.
the effect produced by below
multi-head tape delays.
vintage models that displayed
‘wow and flutter’ due to
variations in tape speed. This
introduces a complex modulation
sound to the repeats.
effect.
3
2
5 5
Tap
4
12
8
Delays
3
2
1
3333
Original
Delays
4
English
65
Page 4

2. Time
This control varies the time between the delay repeats. At
minimum settings there is a ‘slapback’ effect ideal for rockabilly
riffing. As the delay time is increased the effect becomes more
English
spacial. The most recent change either by the Tap switch (14) or
Time knob sets the delay time. The Tap Time / Loop LED (13)
always blinks at the current delay time.
Note: When adjusting time via the Time knob, the maximum
delay time is 1.5 seconds. If you want over 1.5 seconds delay,
use the Tap switch (14) for access to the full 3 second maximum
delay time.
The maximum delay time in Multihead 1 is 1.5 seconds.
3. Feedback
This control adjusts the number of delay repeats. At minimum
settings, there is a single delay repeat, at maximum setting
continuous repeats will occur.
4. Saturation
By adjusting the drive to the high voltage valve circuit in the effect
side chain, the Saturation control affects the amount of valve
compression and harmonics present in the effect. This is similar
to how vintage style tape echo input circuits worked, adding
warmth and mild overdrive/compression, due to the tape and
valve characteristics.
At low levels the effect will sound more linear, but as the control
is increased the valve circuit becomes more saturated and the
effect becomes denser and richer in valve compression and
harmonics. At maximum settings the delay repeats will have a
crunchy, valve driven quality.
The Saturation circuitry is optimised to work at guitar or -10dBV
loop operating levels. Operation at +4dBV loop levels is not
recommended.
5. Saturation Indicator LED
The Saturation Indicator LED works in conjunction with the
Saturation control (4) to indicate the amount of saturation in the
valve circuit. When the LED is green there is little or no saturation
and the effect response will be quite linear. When the LED is
orange, there is mild to moderate saturation in the valve circuit.
Once the LED colour becomes red it indicates full saturation in
the valve circuit and maximum saturation is reached.
6. Level
This controls the amount of effect that is mixed in with the direct
signal. The level control is somewhat interactive with the
Saturation control.
Note: With the Saturation control level set high, the effect will
become denser and therefore a reduced amount of Level will be
required.
7. Output – Right
This is the right hand signal for use in a stereo set-up. Always use
a good quality screened guitar lead (see Suggested Set-ups
section).
8. Output – Left (Mono)
This is the main output in a mono set-up or the left hand signal for
use in a stereo set-up. If you use the HT-DELAY in the effects loop
of a guitar amplifier this is where to connect the effects return
signal to the amplifier. Always use a good quality screened guitar
lead (see Suggested Set-ups section).
9. Input
Plug your guitar in here. Alternatively, if using the HT-DELAY in
the effects loop of a guitar amplifier this is where to connect the
effects send signal from the amplifier. Always use a good quality
screened guitar lead (see Suggested Set-ups section).
10. Valve Viewing Window
Through this grille you can see the ECC83 valve at the heart of
your pedal. The valve is backlit with an LED, which is also the
power-on LED and indicates that the power has been connected.
WARNING: Do not attempt to remove the fixing screws or grille.
No user serviceable parts inside.
English
7
8
Page 5
11. Effect On/Off LED
When the RED LED is on the effect is present. When the RED
LED is off the pedal is in bypass.
English
12. Effect On/Off Footswitch
Press this switch to turn the effect on or off.
13. Tap / Loop LED
In Linear, Analogue, Multihead 1, Multihead 2, Tape and Space
modes this LED blinks at the current delay time. The most recent
change either by the Tap switch or Time knob sets the delay time.
In Loop mode this LED indicates the loop status as described in
Loop 1 and Loop 2 Mode sections below.
14. Tap / Loop Footswitch
In Linear, Analogue, Multihead 1, Multihead 2, Tape and Space
modes pressing the Tap switch more than 2 times with the same
intervals will adjust the delay time.
Loop 1 Mode – One shot / Loop playback
This mode allows for a phrase of up to 7.2 seconds to be
recorded and played back at any time during a performance. The
Loop footswitch can be used to retrigger the phrase for a
sampling effect.
How to use Loop 1
a. When Loop 1 is selected, the Loop LED will blink slowly RED.
b. Pressing the Loop switch puts the pedal into RECORD READY
mode and the Loop LED flashes quickly RED.
c. Recording starts automatically as soon as you start to play the
guitar and the LOOP LED lights solid RED.
d. To finish recording press the Loop switch and the Loop LED will
turn to solid GREEN (if the recorded phrase lasts more than
7.2sec, the recording will stop automatically when that time is
reached).
e. To playback your recorded phrase, press the Loop switch.
Holding the Loop switch down will loop the phrase, alternatively
pressing the Loop switch at anytime will retrigger the phrase
for a sampling effect.
f. At any time pressing the Effect On/Off switch will turn the
sampled phrase on or off.
Loop 2 Mode – Sound on sound delay looper
In this mode you can overdub a new sound on to the recorded
sound as many times as you want.
How to use Loop 2
a. When Loop 2 is selected, the Loop LED blinks slowly RED.
b. Pressing the Loop switch puts the pedal into RECORD READY
mode and the Loop LED flashes quickly RED.
c. Recording starts automatically as soon as you start to play the
guitar and the Loop LED is lit solid RED.
d. Pressing the LOOP switch will complete the recording and the
pedal goes into PLAYBACK mode automatically and the LED is
lit solid GREEN.
e. In this mode, when the LED is GREEN, you can play along with
the looping sound.
f. When you press the Loop switch again, the Loop LED lights
ORANGE to show you are in OVERDUBBING mode. As you
play the new phrase it is overdubbed onto the existing recorded
sound.
g. Pressing the Loop switch again will complete the overdub. The
LED will return back to GREEN and you are back in PLAYBACK
mode.
h. By repeating steps (f) and (g), you can overdub the looping
sound as many times as you want .
Note: Loop time is determined by the length of the first recorded
phrase.
English
9
10
Page 6
MEMORY CLEAR and Effect On/Off function - Loop
1 and Loop 2
When you press the Effect On/Off switch (12), the loop continues
playing ‘silently in the background’ until you press the Effect
English
On/Off switch again.
When you press the Effect On/Off switch for more than 1 second,
playback stops and the memory is cleared ready for a new
recording.
15. DC Inlet
For the input of the 22V DC / 1.1A adapter supplied. Always use
a Blackstar approved adapter.
Technical Specification
Power: 22V DC
Maximum Current Draw: 1.1A
Controls: Effect, Time, Feedback, Saturation, Level
Delay Time: 3.0 seconds in delay modes, 7.2 seconds in loop
modes
Valve: ECC83 (12AX7)
Switches: Effect On/Off Switch, Tap/Loop switch
Indicator: Effect On/Off, Saturation, Tap Time/Loop Status,
Power On/Off (Valve Backlight LED)
Jacks: Input, Left (Mono) Output, Right Output
Input Impedance: 1MOhm
Output Impedance: <1kOhm
Nominal Operating Level: -10dBV
Dimensions (mm): 160 X 119 X80
Weight: 1.3kg
DC Adapter: ADA Series Supplied
English
11
12
Page 7
WARNUNG!
Wichtige Sicherheitsinformationen!
Lesen Sie sich bitte die folgenden Informationen
gründlich durch. Bewahren Sie alle
Bedienungsanleitungen, um zukünftig nachschlagen zu
können.
Achtung! Hohe interne Betriebsspannungen.
Öffnen Sie nicht das Gerätsgehäuse. Dieses Gerät verfügt über
keine benutzerbrauchbaren Teile. Alle Wartungsarbeiten sollten
qualifiziertem Kundendienstpersonal überlassen werden.
Deutsch
Unberechtigte Änderungen dieses Geräts werden von Blackstar
Amplification Limited ausdrücklich verboten.
Gegenstände aller Art müssen nie in Ventilationsschlitzen auf dem
Gerätsgehäuse geschoben werden.
Setzen Sie dieses Gerät weder Regen noch Flüssigkeiten noch
sonstiger Feuchtigkeit aus.
Verwenden Sie nur den richtigen von Blackstar anerkannten
Adapter. Bei Nichtgebrauch des Geräts ziehen Sie den DC
Adapter aus der Stromversorgung heraus.
Einleitung
Vielen Dank, dass Sie sich für das Blackstar StereoRöhreneffektpedal HT-DELAY entschieden haben. Dieses
Effektpedal ist wie alle unsere Produkte das Ergebnis unzähliger
Stunden akribischer Arbeit durch unser erstklassiges EntwicklerTeam. Blackstar hat seinen Sitz in Northampton (UK) und setzt
sich aus einem Team erfahrener Musiker zusammen, die nur ein
Ziel verfolgen: Gitarristen mit den Werkzeugen zu versorgen, die
ihnen dabei helfen, sich selbst zu verwirklichen.
Alle Blackstar-Produkte wurden sowohl in unseren Labors als
auch im Live-Betrieb auf Herz und Nieren getestet, um
sicherzustellen, dass sie in punkto Zuverlässigkeit, Qualität und
KLANG absolut kompromisslose Ergebnisse liefern.
Wenn Sie mehr über die Blackstar-Produktreihe erfahren
möchten, besuchen Sie unsere Webseite unter
www.blackstaramps.com.
Vielen Dank!
Ihr Blackstar-Team
Deutsch
Alle Elektro- und Elektronik-Altgeräte müssen
getrennt vom Hausmüll über dafür staatlich
vorgesehenen Stelen entsorgt werden.
1413
Page 8
Merkmale
Das HT-DELAY kombiniert die Flexibilität der Digitaltechnik mit
einer einzigartigen Steuerung zur Röhrensättigung und erzeugt so
acht umwerfend klingende digitale Delay-Effekte, die den
Klangcharakter einer echten Röhrenschaltung absolut natürlich
und authentisch erzeugen.
Alle im Blackstar-Team sind selbst Musiker, die jahrelang
Erfahrungen bei Auftritten oder im Studio gesammelt haben.
Oberstes Ziel bei der Entwicklung der ultimativen digitalen
Effektgeräte war es daher, Produkte zu entwickeln, die anstelle
der Härte digitaler Geräte die Wärme und Musikalität klassischer
Effekte bieten, die Musiker so schätzen.
Deutsch
Die Blackstar-Entwickler haben sich dazu einige der begehrtesten
Röhren- und Vintage-Effekte vorgenommen, um herauszufinden,
was genau diese klassischen Schaltungen so speziell klingen
lässt. Ein Ergebnis dieser intensiven Analyse ist der SaturationRegler. Der Saturation-Regler arbeitet, vereinfacht gesagt, als
Schaltkreis zur Röhrenanpassung und -kompression im 'Side
Chain' des digitalen Effekts und dient dazu, das dynamische
Verhalten und die Obertöne einer klassischen Tape-DelaySchaltung umzusetzen.
Die gesamte Funktionalität des HT-DELAY ist speziell für den
Einsatz im Live-Betrieb ausgelegt, weshalb eine Tap-TimeFunktion integriert wurde, mit der sich die Delay-Zeit während
dem Spielen anpassen lässt. Einige der Effekte sind sehr
traditionell gehalten, wohingegen Ihnen die fantastischen LoopFunktionen eventuell weniger vertraut sind. Jeder der acht
Delay-Effekte wurde technisch auf Basis klassischer VintageEffekte entwickelt und dann in stundenlanger Arbeit 'per Gehör'
optimiert, um Effektsounds anzubieten, die Musiker
gleichermaßen als natürlich und inspirierend empfinden.
Bedienelemente
1. Effect
Mit dem Drehregler Effect wählen Sie einen der acht Delay-Effekte aus.
Effect Name Beschreibung Anmerkungen
1 Linear Volle Bandbreite oder ‘Hi-Fi'-Delay.
2 Analogue Basiert auf dem natürlichen Immer MONO
3 Multihead 1 Ein rhythmisches Delay Diagram 1
4 Multihead 2 Ein rhythmisches Delay auf Diagram 2
5 Tape Ein Bandecho-Effekt auf Basis Immer MONO
6 Space Komplexer Vintage-Bandecho-Effekt.
7 Loop 1 Delay mit One-Shot-/Loop Immer MONO
8 Loop 2 Looper für Sound-on-Sound Immer MONO
Diagram 1 Diagram 2
Tap
1
4
4
Original
Sound klassischer Analog- oder
so genannter 'Eimerketten'
-Delay-Effekte. Für eine
musikalischere Abbildung
werden die Wiederholungen in
den Höhen subtil gefiltert.
-Effekt auf Basis von Multi
-Head-Bandechos.
Basis des Effekts, den Multi
-Head-Bandechos erzeugen.
bestimmter Vintage-Geräte,
die den bekannten 'Wow and
Flutter'-Sound durch
Schwankungen in der
Bandlaufgeschwindigkeit erzielen.
Dadurch werden die
Wiederholungen komplex moduliert.
-Wiedergabe
-Delays.
3
2
5 5
Delays
4
Tap
12
2
1
3333
8
Original
Delays
3
4
Deutsch
1615
Page 9
2. Time
Hier steuern Sie das Zeitintervall zwischen den DelayWiederholungen. Bei niedrigen Werten entsteht ein
'Slapback'-Effekt, der für Rockabilly-Riffs typisch ist. Wenn Sie
die Delay-Zeit anheben, klingt der Effekt immer räumlicher. Die
Delay-Zeit wird dabei immer auf die letzte Eingabe, wahlweise
über den Tap-Schalter (14) oder den Time-Regler, eingestellt. Die
LED Tap Time / Loop (13) blinkt dabei immer im Intervall der
aktuellen Delay-Zeit.
ANMERKUNG: Wenn Sie die Zeit über den Time-Regler
einstellen. liegt die maximale Delay-Zeit bei 1,5 Sekunde. Wenn
Sie Delays mit einer Dauer von über einer Sekunde erzeugen
Deutsch
möchten, verwenden Sie den Tap-Schalter (14): Dieser bietet
Zugriff auf die maximale Delay-Zeit von 3 Sekunden.
Die maximale Verzögerungszeit des "Multihead 1" Effektes beträgt
1,5 Sekunden.
3. Feedback
Hier steuern Sie die Anzahl der Delay-Wiederholungen. Bei
niedrigen Werten wird lediglich eine Wiederholung erzeugt, bei
maximalen Einstellungen entstehen Endlos-Wiederholungen.
4. Saturation
Durch Ansteuerung der Röhrenschaltung im Sidechain des Effekts
beeinflusst der Saturation-Regler die Röhrenkompression und den
Obertongehalt im Effektsignal. Dieses Verhalten wurde von den
Eingangsschaltungen klassischer Bandechos übernommen, die
durch das Tonband und die Röhren einen warmen und oft leicht
übersteuerten/komprimierten Klang hatten.
Bei niedrigen Pegel klingt der Effekt linearer: Je höher Sie den
Regler aufdrehen, desto mehr fährt der Röhrenschaltkreis in die
Sättigung, wodurch der Effekt durch die einsetzende
Röhrenkompression und die Obertöne intensiver und kräftiger
klingt. Bei maximalen Einstellungen bieten die DelayWiederholungen eine angezerrte, röhrengesättigte Klangqualität.
Die Saturation-Schaltung ist zur Ansteuerung mit Gitarrenpegel
oder einem Arbeitspegel von -10 dBV ausgelegt. Eine
Ansteuerung mit Pegeln von +4dBV ist nicht empfohlen.
5. LED Saturation
Die Saturation-LED arbeitet in Verbindung mit dem SaturationRegler (4) und zeigt das Maß der Sättigung im Röhrenschaltkreis
an. Wenn die LED grün leuchtet, wird das Signal nicht oder nur
geringfügig gesättigt: Der Frequenzgang des Effektsignals ist
weitgehend linear. Wenn die LED orange leuchtet, wird der
Röhrenschaltkreis dezent bis gemäßigt übersteuert. Sobald die
LED rot leuchtet, wird der Röhrenschaltkreis vollständig
übersteuert und die maximale Sättigung erzielt.
6. Level
Hier steuern Sie den Effektpegel aus, der mit dem Direktsignal
gemischt wird. Der Level- und der Saturation-Regler arbeiten
interaktiv zusammen.
Anmerkung: Wenn der Saturation-Regler auf einen hohen Wert
eingestellt ist, wird der Effekt intensiver, weshalb er niedriger im
Pegel ausgesteuert werden kann.
7. Output – Right
Hier wird das Signal für den rechten Kanal in einem Stereo-Setup
ausgegeben. Verwenden Sie in jedem Fall ein hochwertiges
geschirmtes Gitarrenkabel (siehe Abschnitt Empfohlene Setups).
8. Output – Left (Mono)
Verwenden Sie diesen Anschluss als Hauptausgang in einem
Mono-Setup oder als linken Signalausgang in einem StereoSetup. Wenn Sie das HT-DELAY im Effekt-Loop eines
Gitarrenverstärkers einschleifen, geben Sie hier das Effekt-ReturnSignal an den Verstärker aus. Verwenden Sie in jedem Fall ein
hochwertiges geschirmtes Gitarrenkabel (siehe Abschnitt
Empfohlene Setups).
9. Input
Hier schließen Sie Ihre Gitarre an. Wenn Sie das HT-DELAY
dagegen im Effekt-Loop eines Gitarrenverstärkers einschleifen,
Deutsch
17
18
Page 10

speisen Sie hier das Effekt-Send-Signal vom Verstärker ein.
Verwenden Sie in jedem Fall ein hochwertiges geschirmtes
Gitarrenkabel (siehe Abschnitt Empfohlene Setups).
10. Röhrensichtfenster
Durch dieses Gitter sehen Sie das Herzstück Ihres Effektpedals eine ECC83-Röhre. Die Röhre wird von hinten mit einer LED
beleuchtet, die gleichzeitig als Power-LED dient und anzeigt, dass
das Effektgerät mit Strom versorgt wird.
WARNUNG: Entfernen Sie in keinem Fall die Schrauben oder das
Gitter. Das Gerät enthält keine Bauteile, die vom Anwender
gewartet werden können.
Deutsch
11. LED Effekt an/aus
Wenn die ROTE LED leuchtet, ist der Effekt aktiv. Wenn die ROTE
LED nicht leuchtet, ist der Effekt auf Bypass geschaltet.
12. Fußschalter Effekt an/aus
Drücken Sie diesen Fußschalter, um den Effekt an/auszuschalten.
13. LED Tap / Loop
In den Modi Linear, Analogue, Multihead 1, Multihead 2, Tape und
Space blinkt diese LED jeweils im Tempo der aktuellen Delay-Zeit.
Die Delay-Zeit wird dabei immer auf die letzte Eingabe, wahlweise
über den Tap-Schalter (14) oder den Time-Regler, eingestellt.
Im Loop-Modus signalisiert diese LED den Loop-Status. Eine
Beschreibung finden Sie in den Abschnitten zu den Modi Loop 1
und Loop 2 weiter unten.
14. Fußschalter Tap / Loop
In den Modi Linear, Analogue, Multihead 1, Multihead 2, Tape und
Space stellen Sie die Delay-Zeit ein, indem Sie den Tap-Schalter
mindestens dreimal im selben Intervall drücken.
Modus Loop 1 – One-Shot-/Loop-Wiedergabe
In diesem Modus können Sie eine Phrase mit bis zu 7,2 Sekunden
Länge aufnehmen und zu jedem Zeitpunkt während der
Darbietung wiedergeben. Der Loop-Fußschalter dient dabei zum
erneuten Antriggern der Phrase als Sampling-Effekt.
So verwenden Sie Loop 1
a Wenn Loop 1 angewählt ist, blinkt die Loop-LED in langsamen
Intervallen ROT.
b. Durch Drücken des Loop-Schalters versetzen Sie das Gerät in
AUFNAHMEBEREITSCHAFT: Die Loop-LED blinkt nun schnell
ROT.
c. Die Aufnahme beginnt automatisch, wenn Sie auf Ihrer Gitarre
spielen: Die Loop-LED leuchtet nun dauerhaft ROT.
d. Um die Aufnahme abzuschließen, drücken Sie den Loop-
Schalter: Die Loop-LED leuchtet nun dauerhaft GRÜN (bei
längeren Phrasen stoppt die Aufnahme automatisch nach 7,2
Sek.).
e. Um die aufgenommene Phrase wiederzugeben, drücken Sie
den Loop-Schalter. Wenn Sie den Loop-Schalter gedrückt
halten, wird die Phrase im Loop wiedergegeben. Wenn Sie den
Loop-Schalter dagegen neu drücken, wird die Phrase als
Sampling-Effekt neu getriggert.
f. Durch Drücken des Effekt an/aus-Schalters können Sie die
gesampelte Phrase zu jeder Zeit an- und abschalten.
Loop 2 Mode – Looper für Sound-on-Sound-Delays
In diesem Modus können Sie neue Sounds per Overdub beliebig
oft über den bereits aufgenommenen Sound legen.
So verwenden Sie Loop 2
a. Wenn Loop 2 angewählt ist, blinkt die Loop-LED ROT
(langsam).
b. Durch Drücken des Loop-Schalters versetzen Sie das Gerät in
AUFNAHMEBEREITSCHAFT und die Loop-LED blinkt ROT
(schnell).
c. Die Aufnahme beginnt automatisch, wenn Sie auf Ihrer Gitarre
spielen: Die Loop-LED leuchtet nun dauerhaft ROT.
Deutsch
19
20
Page 11

d. Durch Drücken des Loop-Schalters wird die Aufnahme beendet
und das Gerät wechselt automatisch in den
PLAYBACK/Wiedergabe-Modus: Die LED leuchtet nun
dauerhaft GRÜN.
e. Wenn die LED GRÜN leuchtet, können Sie in diesem Modus zu
dem geloopten Sound dazu spielen.
f. Wenn Sie den Loop-Schalter erneut auslösen, leuchtet die
Loop-LED ORANGE und signalisiert damit, dass der
OVERDUBBING-Modus aktiv ist. Wenn Sie nun eine neue
Phrase einspielen, wird diese als Overdub über den bereits
aufgenommenen Klang gelegt.
Deutsch
g. Durch erneutes Drücken des Loop-Schalters schließen Sie die
Overdub-Aufnahme ab. Die LED leuchtet nun wieder GRÜN:
Das Gerät ist nun wieder im PLAYBACK-Modus.
h. Indem Sie die Schritte (f) und (g) wiederholen, können Sie
beliebig viele Loops overdubben.
ANMERKUNG: Die Loop-Zeit hängt von der Länge der ersten
aufgenommen Phrase ab.
MEMORY-CLEAR- und Effekt an/aus-Funktion Loop 1 und Loop 2
Wenn Sie den Fußschalter Effekt an/aus (12) drücken, wird der
Loop weiter 'unhörbar im Hintergrund' wiedergegeben, bis Sie
den Fußschalter Effekt an/aus erneut auslösen.
Wenn Sie den Fußschalter Effekt an/aus für mehr als eine
Sekunde gedrückt halten, wird die Wiedergabe beendet und der
Speicher wird für eine neue Aufnahme geleert.
15. DC Zuleitung
Zur Zuleitung der 22V DC / 1.1A Adapter vorhanden. Immer einen
von Blackstar anerkannten Adapter verwenden.
Technische Spezifikationen
Leistungsaufnahme: 22V DC
Maximaler Strombedarf: 1.1 A
Bedienelemente: Effect, Time, Feedback, Saturation, Level
Delay-Zeit: 3 Sekunden in den Delay-Modi, 7.2 Sekunden in
den Loop-Modi
Röhre: ECC83 (12AX7)
Schalter: Effect On/Off-Schalter, Tap/Loop-Schalter
Anzeigen: Effect On/Off, Saturation, Tap Time/Loop-Status,
Power an/aus (LED zur Hintergrundbeleuchtung der Röhre)
Buchsen: Input, Left (Mono) Output, Right Output
Eingangsimpedanz: 1mOhm
Ausgangsimpedanz: <1kOhm
Nomineller Arbeitspegel: -10dBV
Abmessungen (mm): 160 x 119 x 80
Gewicht: 1.3 kg
Netzteil: ADA Series im Lieferumfang
Deutsch
21
22
Page 12

ATTENTION!
Informations importantes relatives à la sécurité !
Lisez les informations suivantes avec attention.
Conservez ce manuel pour pouvoir vous y référer quand
vous en aurez besoin.
Danger! Produit fonctionnant à des voltages élevés.
Ne pas ouvrir le boîtier métallique de votre pédale. Vous ne
trouverez pas de pièces détachées de rechange et les réparations
doivent être effectuées par du personnel qualifié. Nous vous
invitons donc à prendre contact avec votre revendeur habituel.
Les modifications non autorisées sont formellement interdites par
Blackstar Amplification Limited.
Ne jamais introduire d’objets dans les fentes de ventilation de
votre pédale Blackstar.
Ne pas exposer cet appareil à des substances liquides, ou à des
taux d’humidité trop élevés.
Français
Veillez à utiliser uniquement l’adaptateur secteur fourni par
Blackstar. Débranchez l’adaptateur de la prise secteur quand
vous ne l’utilisez pas.
Introduction
Merci d'avoir choisi cette pédale d'effets stéréo à lampe HTDELAY Blackstar. Comme tous nos produits, cette pédale est le
résultat d'innombrables heures de recherche et de
développement minutieux par notre équipe de conception, une
des meilleures du monde. Basée à Northampton (R-U), l'équipe
Blackstar est composée de musiciens chevronnés dont le seul
but est de fournir aux guitaristes des produits qui soient leurs
outils d'expression ultimes.
Tous les produits Blackstar sont soumis à des tests intensifs en
laboratoire et sur la route afin d’assurer une fiabilité et une qualité
sans compromis, et par dessus tout LE son !
Si vous aimez ce que vous entendez et voulez en savoir plus sur
la gamme de produits Blackstar, veuillez visiter notre site internet
à l'adresse www.blackstaramps.com.
Merci !
L'équipe Blackstar
Français
Les éléments électriques et électroniques doivent
être jetés séparément, dans les vide-ordures
prévus à cet effet par votre municipalité.
2423
Page 13

Caractéristiques
La HT-DELAY associe la flexibilité de la technologie numérique à
une commande unique de saturation à lampe pour produire huit
effets de delay (retard) numérique sensationnels avec le son
naturel et les sensations d'un authentique circuit à lampe haute
tension.
Les membres de l'équipe Blackstar sont tous eux-mêmes des
musiciens ayant des années d'expérience de la scène et de
l'enregistrement. Donc quand ils se sont lancés dans la
conception du nec plus ultra des pédales d'effets numériques, ils
ont voulu développer des produits débarrassés de la rugosité de
certains produits numériques et apportant la chaleur et la
musicalité de ces pédales d'effets vintage que les musiciens
adorent.
Les concepteurs de Blackstar se sont procurés quelques-unes
des pédales d'effets vintage et à lampes les plus vénérées et ont
cherché à distiller les ingrédients qui rendent ces modèles anciens
si spéciaux. La commande de saturation à lampe est un des
résultats de cette recherche exhaustive. La commande Saturation
Français
est, pour simplifier, un circuit de gain et de compression à lampe
qui agit dans le circuit de déclenchement ou "side chain" des
effets numériques pour donner la dynamique d'une lampe et les
harmoniques caractéristiques d'un circuit d'entrée de delay à
bande vintage.
Les caractéristiques de la HT-DELAY ont été sélectionnées pour
particulièrement bien convenir au jeu "live" et c'est la raison d'être
de la fonction Tap Time, qui permet le réglage du temps de retard
durant le jeu. Certains des effets sont assez traditionnels et
d'autres comme les incroyables fonctions de bouclage Loop
peuvent vous être moins familières. Chacun des huit effets de
delay a été conçu par référence technique à des équipements
d'effets vintage suivie d'heures d'optimisation "à l'oreille" afin de
produire des effets au son naturel qui soient en même temps
sources d'inspiration pour l'instrumentiste.
Commandes
1. Effect
Le sélecteur rotatif Effect permet de choisir un des huit effets de
delay.
Effect Nom Description Notes
1 Linear Bande passante complète ou
2 Analogue Basé sur le son naturel produit Toujours MONO
3 Multihead 1 Un retard rythmique basé sur Diagram 1
4 Multihead 2 Un retard rythmique basé sur Diagram 2
5 Tape Un delay à bande basé sur Toujours MONO
6 Space Effet complexe d'écho à bande vintage.
7 Loop 1 Delay à lecture unique/en Toujours MONO
8 Loop 2 Bouclage de retard son sur son. Toujours MONO
Diagram 1 Diagram 2
Tap
1
4
4
Original
delay "Hi-Fi".
par les pédales analogiques
vintage ou "Bucket Brigade
Delay" (lignes à retards). Les aigus
supérieurs des répétitions sont
subtilement filtrés pour une
sensation plus musicale.
l'effet produit par les delays à
bande multitêtes.
l'effet produit par les delays à
bande multitêtes.
certains modèles vintage
souffrant de "pleurage et
scintillement" dus aux variations
de vitesse de la bande. Cela
introduit un son de modulation
complexe dans les répétitions.
boucle
3
2
5 5
Delays
4
Tap
12
2
1
3333
8
Original
Delays
3
4
Français
2625
Page 14

2. Time (temps)
Détermine l'intervalle de temps séparant les répétitions du delay.
Les réglages minimaux donnent un effet de "doublage" idéal pour
les riffs rockabilly. Quand on augmente le temps de retard, l'effet
devient plus ample. Le temps de retard est fixé par le
commutateur Tap (14) ou le bouton Time, le dernier employé
ayant priorité. La DEL Tap Time/Loop (13) clignote toujours à la
cadence actuelle du retard.
Note : via le bouton Time, le réglage maximal du temps de retard
est de 1.5 seconde. Si vous voulez un retard supérieur à 1.5
seconde, utilisez le commutateur Tap (14) donnant accès au
temps de retard maximal possible de 3 secondes.
Le temps de delai maximum en mode Multihead est de 1.5
secondes.
3. Feedback (réinjection)
Détermine le nombre de répétitions du delay. Les réglages
minimaux donnent une seule répétition, le réglage maximal
entraînant des répétitions continues.
Français
4. Saturation
En réglant la polarisation du circuit à lampe haute tension dans le
circuit de déclenchement ou "side chain" de l'effet, la commande
Saturation affecte l'ampleur de la compression à lampe et la
quantité d'harmoniques présentes dans l'effet. C'est similaire à la
manière dont fonctionnent les circuits d'entrée d'écho à bande
de style vintage, ajoutant de la chaleur et une légère
saturation/compression dus aux caractéristiques de la bande et
de la lampe.
À faible niveau, l'effet sonne de façon plus linéaire, mais quand la
commande est montée, le circuit à lampe sature plus et l'effet
devient plus dense et plus riche en termes de compression et
d'harmoniques de la lampe. Avec les réglages maximaux, les
répétitions du delay ont le côté "crunchy" des lampes.
Le circuit Saturation est optimisé pour fonctionner aux niveaux
d'une guitare ou d'une boucle à -10 dBV. Le fonctionnement dans
des boucles de niveau +4 dBV n'est pas recommandé.
5. DEL témoin Saturation
La DEL témoin Saturation fonctionne en conjonction avec la
commande Saturation (4) pour indiquer l'ampleur de la saturation
dans le circuit à lampe. Quand la DEL est verte, il y a peu ou pas
de saturation et la réponse de l'effet sera assez linéaire. Quand la
DEL est orange, la saturation dans le circuit à lampe est légère à
modérée. La DEL devient rouge pour indiquer une saturation
totale dans le circuit à lampe, la saturation maximale étant atteinte.
6. Level (niveau)
Détermine la quantité d'effet mixée avec le signal direct. Cette
commande de niveau interagit quelque peu avec la commande
Saturation.
Note : avec la commande Saturation réglée haut, l'effet devient
plus dense et un réglage réduit de Level est par conséquent
nécessaire.
7. Sortie – Droite
C'est la partie droite du signal pour l'emploi dans une
configuration stéréo. Utilisez toujours un câble de guitare blindé de
bonne qualité (voir la section Configurations suggérées).
8. Sortie – Gauche (Mono)
C'est la sortie générale dans une configuration mono ou la partie
gauche du signal pour l'emploi dans une configuration stéréo. Si
vous utilisez la HT-DELAY dans la boucle d'effets d'un
amplificateur pour guitare, c'est là que doit être pris le signal de
retour d'effets à destination de l'amplificateur. Utilisez toujours un
câble de guitare blindé de bonne qualité (voir la section
Configurations suggérées).
9. Entrée
Branchez ici votre guitare. Sinon, si vous utilisez la HT-DELAY
dans la boucle d'effets d'un amplificateur pour guitare, c'est là
que doit arriver le signal de départ d'effets venant de
l'amplificateur. Utilisez toujours un câble de guitare blindé de
bonne qualité (voir la section Configurations suggérées).
Français
27
28
Page 15

10. Fenêtre de visualisation de la lampe
Au travers de cette grille, vous pouvez voir la lampe ECC83 au
cœur de votre pédale. La lampe est rétroéclairée par une DEL,
qui sert aussi de DEL témoin d'alimentation.
AVERTISSEMENT : n'essayez pas de retirer les vis de fixation
ni la grille. Aucune pièce n'est réparable par l'utilisateur à
l'intérieur.
11. DEL d'effet On/Off
Quand la DEL rouge est allumée, l'effet est en service. Quand la
DEL rouge est éteinte, la pédale est court-circuitée.
12. Commutateur d'effet On/Off
Pressez ce commutateur pour mettre l'effet en ou hors service.
13. DEL Tap/Loop
Dans les modes Linear, Analogue, Multihead 1, Multihead 2, Tape
et Space, cette DEL clignote toujours à la cadence actuelle du
retard. Le temps de retard est fixé par le commutateur Tap ou le
bouton Time, le dernier employé ayant priorité.
Français
En mode Loop, cette DEL indique le statut de bouclage décrit
dans les sections Loop 1 et Loop 2 ci-dessous.
14. Pédale commutateur Tap/Loop
Dans les modes Linear, Analogue, Multihead 1, Multihead 2, Tape
et Space, presser plus de deux fois le commutateur Tap à
intervalles réguliers détermine le temps de retard.
Mode Loop 1 – Lecture unique/en boucle
Ce mode permet d'enregistrer une phrase pouvant atteindre 7,2
secondes et de la reproduire à tout moment durant une
prestation. La pédale commutateur Loop peut servir à
redéclencher la phrase pour un effet "sampler".
Comment utiliser Loop 1
a. Quand Loop 1 est sélectionné, la DEL Loop clignote lentement
en ROUGE.
b. Presser le commutateur Loop arme la pédale pour
l'enregistrement et la DEL clignote rapidement en ROUGE.
c. L'enregistrement démarre automatiquement dès que vous
commencez à jouer de la guitare et la DEL LOOP s'allume
fixement en ROUGE.
d. Pour arrêter l'enregistrement, pressez le commutateur Loop et
la DEL Loop s'allume fixement en VERT (après 7,2 s
d'enregistrement de la phrase, l'enregistrement s'arrête
automatiquement).
e. Pour lire la phrase que vous avez enregistrée, pressez le
commutateur Loop. Maintenir enfoncé le commutateur Loop fera
lire la phrase en boucle, sinon une simple pression du
commutateur Loop redéclenchera la phrase pour un effet
"sampler".
f. À tout moment, presser le commutateur d’effet On/Off activera
ou désactivera la phrase enregistrée.
Mode Loop 2 – Bouclage de retard son sur son
Dans ce mode, vous pouvez superposer de nouveaux sons sur
celui enregistré, autant de fois que désiré.
Comment utiliser Loop 2
a. Quand Loop 2 est sélectionné, la DEL Loop clignote lentement
en ROUGE.
b. Presser le commutateur Loop arme la pédale pour
l'enregistrement et la DEL clignote rapidement en ROUGE.
c. L'enregistrement démarre automatiquement dès que vous
commencez à jouer de la guitare et la DEL LOOP s'allume
fixement en ROUGE.
d. Presser le commutateur LOOP termine l'enregistrement et la
pédale passe automatiquement en mode LECTURE, la DEL
s'allument fixement en VERT.
e. Dans ce mode, quand la DEL est VERTE, vous pouvez jouer
par dessus le son bouclé.
Français
29
30
Page 16

f. Quand vous pressez à nouveau le commutateur Loop, la DEL
Loop s'allume en ORANGE pour signaler que vous êtes en mode
de superposition (OVERDUB). Quand vous jouez la nouvelle
phrase, celle-ci se superpose à l'enregistrement existant.
g. Presser à nouveau le commutateur Loop termine
l'enregistrement de la superposition. La DEL redeviendra VERTE
et vous retrouverez le mode LECTURE.
h. En répétant les étapes (f) et (g), vous pouvez superposer des
enregistrements dans votre boucle autant de fois que désiré.
Note : la durée de la boucle est déterminée par celle de la
première phrase enregistrée.
Fonctions d'effacement de mémoire et de mise en
veille (Commutateur d'effet On/Off) - Loop 1 et
Loop 2
Quand vous pressez le commutateur Commutateur d'effet On/Off
(12), la lecture de la boucle continue mais "en silence en arrièreplan" jusqu'à ce que vous pressiez à nouveau le commutateur
Commutateur d'effet On/Off.
Français
Quand vous maintenez le commutateur Commutateur d'effet
On/Off enfoncé plus d'une seconde, la lecture s'arrête et la
mémoire est effacée (vidée) en vue d'un nouvel enregistrement.
15. Prise d'alimentation
Entrée pour l'adaptateur secteur CC 22 V/1.1 A fourni. Utilisez
toujours un adaptateur agréé par Blackstar.
Caractéristiques techniques
Alimentation : CC 22 V
Appel maximal de courant : 1.1 A
Commandes : Effect, Time, Feedback, Saturation, Level
Temps de retard : 3 secondes en modes de retard, 7.2
secondes en modes de bouclage
Lampe : ECC83 (12AX7)
Commutateurs : Effect On/Off, Tap/Loop
Témoins : Effect On/Off, Saturation, Statut de Tap Time/Loop,
Alimentation On/Off (DEL de rétroéclairage de lampe)
Prises jack : entrée, sortie gauche (Mono), sortie droite
Impédance d'entrée : 1 Mohm
Impédance de sortie : <1 kohm
Niveau de fonctionnement nominal : -10 dBV
Dimensions (mm) : 160 X 119 X 80
Poids : 1.3 kg
Adaptateur secteur : série ADA, fourni
Français
31
32
Page 17

¡AVISO!
Información de seguridad importante
Lea con detenimiento la siguiente información. Guarde
todas las instrucciones para futuras consultas.
¡Peligro! Altas tensiones de funcionamiento internas.
No abra la caja del equipo. Este equipo no contiene piezas que
puedan ser reparadas por el usuario. Para asuntos relacionados
con el mantenimiento, diríjase al personal de mantenimiento
cualificado.
La modificación no autorizada de este equipo queda
expresamente prohibida por Blackstar Amplification Limited.
No introduzca nunca objetos de ningún tipo en las ranuras de
ventilación de la carcasa del equipo.
No exponga este aparato a la lluvia, a líquidos ni a humedad de
ningún tipo.
Utilice únicamente el adaptador de DC correcto aprobado por
Blackstar. Desenchufe el adaptador de DC de la red eléctrica
cuando no se esté utilizando.
Español
Introducción
Gracias por adquirir este pedal de efecto estereo a válvula
Blackstar HT-DELAY. Como todos nuestros productos, este pedal
es el resultado de innumerables horas de laboriosa investigación
y desarrollo por nuestro renombrado equipo de diseño. Con base
en Northampton (UK), el equipo Blackstar son todos
experimentados músicos y el único objetivo del proceso de
desarrollo es suministrar a los guitarristas productos que resulten
las herramientas definitivas para su propia expresión.
Todos los productos Blackstar son sometidos a intensas pruebas
tanto de laboratorio como en directo para asegurar que
verdaderamente no tienen compromiso en cuanto a fiabilidad ,
calidad y sobre todo , TONO.
Si te gusta lo que oyes y quieres averiguar más sobre la gama de
productos Blackstar, por favour visita nuestra web
www.blackstaramps.com .
¡ Gracias !
El equipo Blackstar.
Español
Todos los aparatos eléctricos o electrónicos se
deben desechar de forma distinta del servicio
municipal de recogida de basura, a través de
puntos de recogida designados por el gobierno o
las autoridades locales.
33
34
Page 18

Características
El HT-DELAY combina la flexibilidad de la tecnología digital con el
exclusivo control Saturación ( Saturation ) de válvula para
proporcionar ocho impresionantes efectos de retardo digital con
la sensación y tono natural de un genuine circuito de válvula de
alto voltaje.
El equipo Blackstar está totalmente compuesto de músicos con
años de experiencia en conciertos y grabaciones
Por lo tanto , cuando se embarcaron en el viaje para diseñar los
pedales de efectos digitales definitivos, querían desarrollar
productos que no tuvieran nada de la rasposidad de algunos
productos digitales y proporcionaran la calidez y musicalidad de
los pedals de efectos antiguos ( vintage ) que tanto gustan a los
músicos.
Los diseñadores de Blackstar adquirieron algunos de los más
reverenciados pedals de efecto “vintage” y a válvulas y
empezaron a trabajar destilando los ingredientes que hacían estos
viejos diseños tan especiales. El control de válvula Saturation es
un resultado de esta exhaustiva investigación. El control
Saturation es en términos sencillos un circuito de ganancia y
compresión a válvula que actúa en la “cadena lateral” de efectos
digitales para impartir la dinámica de válvulas y armónicos típicos
del circuito de entrada de un eco de cinta antiguo.
Las características del HT-DELAY han sido seleccionadas para
ser especialmente adecuadas para el directo y es por eso que se
ha incluido el control, Tap Time , para permitir el ajuste del tiempo
Español
de delay durante la actuación. Algunos de los efectos son un
tanto tradicionales y otros como la fascinante función Loop
pueden resultar menos familiares. Cada uno de los ocho efectos
de retardo ( delay ) ha sido diseñado por referencia técnica a
efectos “vintage” y tras horas de afinar “de oído” para
proporcionar efectos que son tan naturales sonando como
inspiradores para el músico.
35
Controles
1. Effect
El selector rotatorio Effect elige uno de los ocho efectos de retardo
( delay ).
Effect Nombre Descripción Notas
1 Linear Lineal . Retardo de ancho de
2 Analogue Analógico. Basado en el sonido
3 Multihead 1 Un delay normal rítmico basado Diagram 1
4 Multihead 2 Un delay normal rítmico basado Diagram 2
5 Tape Cinta. Un eco de cinta basado
6 Space Espacio. Complejo efecto de
7 Loop 1 One shot / Loop playback delay.
8 Loop 2 Sound on sound delay looper.
Diagram 1 Diagram 2
Tap
1
4
4
Original
banda completo o “hi-fi”
natural producido por pedales
analógicos “vintage” o “Bucket
Brigade Delay”. La parte aguda
de las repeticiones es sutilmente
filtrada para una sensación muy
musical.
en el efecto producido por los
ecos de cinta de varias cabezas.
en el efecto producido por los
ecos de cinta de varias cabezas.
en determinados modelos
“vintage” que ocasionaban “wow”
y “flutter” debido a variaciones
en la velocidad de la cinta. Esto
incorpora un complejo sonido
modulado en las repeticiones.
eco de cinta “vintage”.
3
2
5 5
Delays
4
Tap
12
2
1
3333
8
Original
Delays
Siempre en MONO
Siempre en MONO
Siempre en MONO
Siempre en MONO
3
4
Español
36
Page 19

2. Time ( Tiempo )
Controla el tiempo entre las repeticiones del delay. En ajustes
mínimos genera un efecto “slapback” ideal para “riffs” rockabilly.
A medida que el tiempo de delay aumenta , el efecto se hace más
espacial. El ajuste más reciente tanto del pulsador Tap (14) como
del botón Time establecen el tiempo de delay. El LED Tap Time /
Loop (13) parpadea al tiempo de delay establecido.
Nota: Al ajustar el tiempo a través del potenciómetro Time , el
tiempo máximo de delay es 1.5 segundoS. Si quieres más de un
Segundo de delay , usa el botón Tap (14) para acceder a los 3
segundos completos de tiempo máximo de delay.
El tiempo máximo de retardo (Delay) en modo Multihead 1 es de
1.5 segundos.
3. Feedback ( Retroalimentación )
Controla el número de repeticiones de delay. En su ajuste mínimo
, hay solamente una repetición , al máximo , las repeticiones son
contínuas.
4. Saturation ( Saturación )
Ajustando la ganancia al circuito de válvula de alto voltaje en la
cadena lateral del efecto . el control de Saturation afecta a la
cantidad de compresión valvular y armónicos presentes en el
efecto. De manera similar a cómo trabajaban los circuitos de
entrada de los antiguos ecos de cinta, añadiendo calidez y una
suave compresión/overdrive debido a las características de la
cinta y las válvulas.
Español
A niveles bajos el efecto sonará más lineal , pero a medida que se
incrementa , el circuito de válvula satura más y el efecto se vuelve
más denso y rico en compresión valvular y armónicos. En ajustes
máximos las repeticiones del delay tendrán una crujiente
sonoridad de válvula excitada.
La circuitería del control Saturation está optimizada para trabajar
a niveles de guitarra o de loop de -10dBV . No se recomienda
operar a niveles de loop de +4dBV .
5. LED Indicador de Saturación
Este LED trabaja junto con el control Saturation (4) para indicar la
cantidad de saturación en el circuito de válvula. Cuando el LED
está verde hay muy poca o ninguna saturación y la respuesta del
efecto será bastante lineal. Cuando el LED es naranja , hay una
saturación de suave a moderada en el circuito valvular. Una vez
que el LED se vuelve rojo , esto indica saturación completa del
circuito valvular al máximo.
6. Level ( Nivel )
Controla la cantidad de efecto que se mezcla con la señal directa.
El control Level es de alguna manera interactivo con el control
Saturation.
Nota: Con el control de Saturation en un ajuste alto , el efecto se
vuelve más denso y por lo tanto se necesitará menor cantidad de
nivel ( Level ).
7. Output ( salida ) – Right ( derecha )
Esta es la señal de la derecha para usar en un montaje estéreo.
Usar siempre un cable de guitarra apantallado de calidad ( ver la
sección Montajes Sugeridos ).
8. Output ( salida ) – Left ( izquierda ) MONO
Esta es la salida principal en un montaje MONO o la izquierda al
usar el pedal en estéreo. Si se usa el HT-DELAY en el loop de
efectos de un amplficador de guitarra aquí es donde debe
conectar el retorno ( return ) de señal del amplificador. Usar
siempre un cable de guitarra apantallado de calidad ( ver la
sección Montajes Sugeridos ).
9. Input ( entrada )
Conecta tu guitarra aquí. Si se usa el HT-DELAY en el loop de
efectos de un amplificador de guitarra , aquí es donde debe
conectarse el envío de señal ( send ) del amplificador. Usar
siempre un cable de guitarra apantallado de calidad ( ver la
sección Montajes Sugeridos ).
10. Ventana de Vista de la Válvula
A través de esta rejilla se puede ver la válvula ECC83 del corazón
Español
37
38
Page 20

del pedal. La válvula está retroiluminada con un LED , que
también actúa de LED de encendido e indica que la corriente del
pedal ha sido conectada
ADVERTENCIA : No intente quitar los tornillos de sujección o la
rejilla. No hay partes a disposición del usuario en el interior.
11. LED de encendido de efecto On/Off
Cuando el LED rojo está encendido el efecto se hace presente .
Cuando el LED rojo está apagado el pedal está en bypass.
12. Pulsador de pié On/Off del efecto
Accione este interruptor para encender o apagar el efecto.
13. Tap / Loop LED
En modo Linear, Analogue, Multihead 1, Multihead 2, Tape y
Space este LED siempre parpadea al tiempo de delay actual. El
cambio más reciente bien en el pulsador Tap o en el
potenciómetro Time ajusta el tiempo de delay.
En modo Loop este LED indica el estado del bucle ( loop ) como
se describe en las secciones debajo Modo Loop1 y Loop2.
14. Pulsador de pié Tap / Loop.
En los modos Linear, Analogue, Multihead 1, Multihead 2, Tape y
Space, pretar el pulsador Tap más de dos veces con el mismo
intervalo ajustará el tiempo de delay.
Modo Loop 1 – One shot / Loop playback (
reproducción de un solo blucle )
Español
Este modo permite grabar una frase de hasta 7.2 segundos y
reproducirla en cualquier momento durante la actuación. El
pulsador Loop se puede usar para relanzar la frase para un efecto
de muestreo ( sampling )
Cómo usar Loop 1
a. Cuando se selecciona Loop 1 , el LED Loop parpadeará en
rojo lentamente.
b. Pulsando el interruptor Loop se activa el modo del pedal
RECORD READY ( preparado para grabar ) y el LED Loop
parpadea en rojo rápidamente.
c. La grabación empieza automáticamente tan pronto como
empieces a tocar la guitarra y el Loop LED quede encendido en
rojo ( sin parpadear ).
d. Para finalizar la grabación pulsar el interruptor Loop y el LED
Loop se encenderá en verde ( sin parpadear ) . Si la frase grabada
dura más de 7.2 segundos , la grabación se parará
automáticamente cuando se alcance dicho tiempo.
e. Para reproducer tu frase grabada , pulsar el interruptor Loop.
Manteniendo pulsado Loop , se “loopeará” la frase ( se reproduce
en bucle contínuo ) , alternativamente , pulsando Loop en
cualquier momento se relanzará la frase para un efecto de
“sampleo”.
f. Pulsando On/Off del efecto en cualquier momento se enciende
o apaga la frase “sampleada” ( muestreada )
Modo Loop 2 – Sound on sound delay looper (
bucle de retardo de sonido sobre sonido )
En este modo se puede sobregrabar un nuevo sonido sobre el ya
grabado tantas veces como desee.
Cómo usar Loop 2
a. Cuando se selecciona Loop 2 , el LED Loop parpadea en rojo
lentamente.
b. Pulsando el interruptor Loop se activa el modo del pedal
RECORD READY ( preparado para grabar ) y el LED Loop
parpadea en rojo rápidamente.
c. La grabación empieza automáticamente tan pronto como
empieces a tocar la guitarra y el Loop LED quede encendido en
rojo ( sin parpadear ).
d. Pulsando el interruptor Loop se completa la grabación y el
pedal se pone en modo reproducción ( playback )
automáticamente y el LED se enciende en verde sin parpadear.
Español
39
40
Page 21

e. En este modo , cuando el LED está verde , puedes tocar a la
vez que suena el sonido grabado.
f. Cuando pulsas Loop de nuevo el LED Loop se enciende naranja
para indicar que estás en modo de sobregrabación (
OVERDUBBING ). Mientras tocas , la nueva frase se añade sobre
el sonido grabado anteriormente.
g. Pulsando Loop de nuevo se completa la sobregrabación. El
LED vuelva a lucir verde y estás de vuelta en modo PLAYBACK (
reproducción ).
h. Repitiendo los pasos (f) y (g) puedes sobregrabar el sonido del
bucle ( loop ) tantas veces como desses.
Nota: El tiempo de “Loop” se determina por la duración de la
primera frase grabada.
Limpieza de memoria y function On/Off
del efecto – Loop 1 y Loop 2
Cuando pulsas el interruptor Pulsador de pié On/Off del efecto
(12) , el “loop” continua reproduciendose silenciosamente hasta
que pulses Pulsador de pié On/Off del efecto de nuevo.
Cuando se pulsa Pulsador de pié On/Off del efecto durante más
de un segundo , la reproducción cesa y la memoria se limpia y se
prepara para una nueva grabación.
15. DC Inlet
Para introducir el adaptador de 22 V DC / 1.1A suministrado.
Utilice siempre un adaptador aprobado por Blackstar.
Español
Especificaciones técnicas
Potencia: 22V DC
Corriente Máxima: 1.1A
Controles: Effect, Time, Feedback, Saturation, Level
Tiempo de Delay: 3 segundos en los modos delay, 7.2
segundos en los modos Loop
Válvula: ECC83 (12AX7)
Conmutadores: Effect On/Off Switch, Tap/Loop switch
Indicador: Effect On/Off, Saturation, Tap Time/Loop Status,
Power On/Off (LED de retroiluminación de la válvula)
Jacks: Input, Left (Mono) Output, Right Output
Impedancia de entrada: 1MOhm
Impedancia de Salida: <1kOhm
Nivel Operativo Nominal: -10dBV
Dimensiones (mm): 160 X 119 X80
Peso: 1.3kg
Adaptador DC: ADA Series Incluido
Español
41
42
Page 22

Japanese
ోߩߏᵈᗧޕ
⼊๔㧍
ෂ㒾㧍ޓຠౝㇱߦߪ㜞㔚ㇱ߇ሽߒ߹ߔޕ
ٌޓߎߩࡑࠢߪޔᯏེߩౝㇱߦ⛘✼ߐࠇߡߥޟෂ㒾ߥ㔚ޠ߇ሽ
ߒޔᗵ㔚ߩෂ㒾߇ࠆߎߣࠍ⼊๔ߒߡ߹ߔޕ
ٌޓߎߩࡑࠢߪޔᵈᗧ༐ࠪࡦࡏ࡞ߢࠅޔขᛒ⺑ᦠߥߤߦޔ৻⥸
⊛ߥᵈᗧޔ⼊๔ޔෂ㒾ߩ⺑߇⸥タߐࠇߡࠆߎߣࠍߒߡ߹ߔޕ
ٌޓ⼊๔
ߎߩ␜ࠍήⷞߒߡ⺋ߞߚขᛒࠍߔࠆߣޔ߇ᱫ߹ߚߪ㊀்ࠍ⽶߁น
⢻ᕈ߇ᗐቯߐࠇࠆౝኈࠍ␜ߒߡ߹ߔޕઃዻߩ&%ࠕ࠳ࡊ࠲ߩജ㔚
ߪޔ&%8એᄖߩ㔚ߢ↪ߒߥߢߐޕ
ౝㇱߦߪ࡙ࠩ߇឵น⢻ߥㇱຠߪࠅ߹ߖࠎޕߔߴߡߩୃℂޔ߅ࠃ
߮ࠕࡈ࠲ࠨࡆࠬߪޔ߅⾈ߍ⽼ᄁᐫޔ߹ߚߪᱜⷙߩࠨࡆࠬࡑࡦ
ߦߏ⋧⺣ߐޕ
ᱜߥᡷㅧߪޔ$NCEMUVCT#ORNKHKECVKQP␠ߦࠃߞߡ෩㊀ߦᱛߐࠇߡ
߹ߔޕ
ߎߩຠߪᱜᏱߦേߒߡࠆߣ߈ߢ߽ޔ⌀ⓨ▤ߥߤߩ㕙ߪ㜞ߦߥ
ࠅ߹ߔޕἫ்ߩᕟࠇ߇ࠆߩߢຠߩߦᚻࠍࠇߥߢߐޕ
&%ࠕ࠳ࡊ࠲ߩࠦ࠼ߩߦ㊀߽ߩࠍߖߚࠅߒߥߢߐޕ&%ࠕ
࠳ࡊ࠲߿ࠦ࠼߇⎕៊ߒߡޔἫἴޔᗵ㔚ߩේ࿃ߣߥࠅ߹ߔޕ
ຠㇱࠤࠬߩᾲⓣ㧔ࠬ࠶࠻㧕߆ࠄޔ߆ߥࠆ‛߽ຠౝㇱ߳
ࠇߥߢߊߛߐޕ৻ޔ⇣‛߇ߞߚࠅޔᶧ߇ߎ߷ࠇߚߣ߈ߪޔ⋥
ߜߦ&%ࠕ࠳ࡊ࠲ࠍᄖߒޔ߅⾈ߍߩ⽼ᄁᐫߦୃℂࠍଐ㗬ߒߡߊߛߐ
ޕ
㔗߇⊒↢ߒߡ㔗㡆߇⡞ߎ߃ࠆߣ߈ߪޔߔߋߦ&%ࠕ࠳ࡊ࠲ࠍࠦࡦࡦ࠻
߆ࠄᛮߡޔ↪ࠍᱛߒߡߐޕ⋥ធߩ⪭㔗ߢߥߊߣ߽ޔㄭ〒㔌ߦ
⪭㔗߇ߞߚߣ߈ߪޔࠦࡦࡦ࠻ߦ㜞㔚߇⊒↢ߒޔᗵ㔚ߔࠆෂ㒾߇
ࠅ߹ߔޕ
㔎߿ޔ߆ߥࠆᶧޔ߹ߚߪ᳓ಽ㧔㜞Ḩᐲ㧕ߦߐࠄߐࠇߚ႐ᚲޔ⁁ᴫߢ
ߩ↪ࠍᱛߒ߹ߔޕޓ
Ứࠇߚᚻߢ&%ࠕ࠳ࡊ࠲ࡊࠣߦ⸅ࠇߥߢߐޕᗵ㔚ߩෂ㒾߇ࠅ
߹ߔޕ
ᵈᗧ
㔚Ḯࠦ࠼㧔&%ࠕ࠳ࡊ࠲㧕ࠍᛮ߈Ꮕߒߔࠆߣ߈ߪޔᔅߕ㔚Ḯࡊࠣࠍᜬߞߡⴕߞ
ߡߐޕࠦ࠼߇்ߟ߈ޔἫἴޔᗵ㔚ߩේ࿃ߣߥࠆߎߣ߇ࠅ߹ߔޕ
$NCEMUVCT␠ߦᛚߐࠇߡࠆޔઃዻߩ&%ࠕ࠳ࡉ࠲ߩߺࠍ↪ߒߡߊߛߐޕ
߹ߚޔᧄຠࠍ↪ߒߥߣ߈ߪޔᔅߕ㔚Ḯࠦࡦࡦ࠻߆ࠄ&%ࠕ࠳ࡉ࠲ࠍᛮ
ߡߊߛߐޕ
⌀ⓨ▤ߩ឵ߪޔ߅ቴ᭽⥄りߢߪߥߐࠄߕߦޔ߅⾈ߍߩ⽼ᄁᐫߦ឵ޔୃℂ
ࠍଐ㗬ߒߡߊߛߐޕ߅ቴ᭽⥄りߢ឵ߒߚ႐วޔ㊀ᄢߥ㓚ߩේ࿃ߣߥࠆᕟࠇ
߇ࠅޔෂ㒾ߢߔޕ
⸥タߩᵈᗧ㗄ࠍචಽߦℂ⸃ߒޔ෩ߔࠆߣߣ߽ߦޔ
ᧄขᛒ⺑ᦠࠍᔅߕ▤ߔࠆࠃ߁ߦߒߡߊߛߐޕ
ߎߩ␜ࠍήⷞߒߡޔ⺋ߞߚขᛒࠍߔࠆߣޔ߇៊்ࠍ⽶
߁น⢻ᕈ߇ᗐቯߐࠇࠆౝኈ߮‛⊛៊ኂߩ⊒↢߇ᗐቯߐࠇࠆ
ౝኈࠍ␜ߒߡ߹ߔޕ
ߪߓߦ
HT-Delayࠬ࠹ࠝࡃ࡞ࡉࠛࡈࠚࠢ࠻ࡍ࠳࡞ࠍ߅⾈ߍߚ
ߛ߈ࠅ߇ߣ߁ߏߑ߹ߔޕߎߩຠߪޔઁߩᒰ␠ߩຠห᭽ޔᚒ
ޘߩ⇇⊛ߦ߽࠻࠶ࡊࡌ࡞ߩ⸳⸘࠴ࡓߦࠃࠅޔ㐳ᦼ㑆ߦࠊߚࠆ
ᔀᐩߒߚ⎇ⓥޔ⺞ᩏࠍరߦ⸳⸘ߒߡࠅ߹ߔޕ
⧷࿖ࡁࠩࡦࡊ࠻ࡦࠍὐߣߔࠆޔࡉ࠶ࠢࠬ࠲␠ߪోຬ߇ࡒࡘ
ࠫࠪࡖࡦߣߒߡߩ⚻㛎߇ࠅޔࠡ࠲ࠬ࠻ߩࡌࠬ࠻ࡄࡈࠜࡑࡦ
ࠬࠍታߔࠆߚߩޟⓥᭂߩࠡ࠲࠷࡞ޠࠍឭଏߔࠆߎߣࠍ໑৻
ߩ⋡⊛ߣߒߡ߹ߔޕ
ోߡߩࡉ࠶ࠢࠬ࠲ຠߪޔຠ⾰ޔߣࠅࠊߌࠨ࠙ࡦ࠼ࠢࠝ࠹ࠖ
ߦ߅ߡᅷදߖߕޔᄙߊߩᬌᩏᯏ㑐ߢߩ⹜㛎ޔ߅ࠃ߮ࡠ࠼࠹ࠬ࠻
㧔ታᣉ࠹ࠬ࠻㧕ࠍⴕߞߡ߹ߔޕ
ߐࠄߦBlackstarຠߦ㑐ߒߡ⥝߇ࠆ႐วߪޔࠗࡦ࠲ࡀ࠶࠻ߩ
ࠨࠗ࠻ࠍߏⷩߊߛߐޕޓURL: www.blackstaramps.com
ࡉ࠶ࠢࠬ࠲࠴ࡓࠃࠅ
Japanese
43
44
Page 23

ߥ․ᓽ
ࠦࡦ࠻ࡠ࡞
*6&'.#;ߪ⒳㘃ߩ࠺ࠫ࠲࡞࠺ࠖࠗࠛࡈࠚࠢ࠻ߦ࠽࠴ࡘ࡞ߥ࠻
ࡦࠍ↢ߺߔ⌀ⓨ▤ࠨࠠ࠶࠻ࠍ⚵ߺวࠊߖޔᨵエᕈߩࠆ࠺ࠫ࠲
࡞࠹ࠢࡁࡠࠫߣ࡙࠾ࠢߥࡃ࡞ࡉࠨ࠴ࡘ࡚ࠪࡦࠦࡦ࠻ࡠ
࡞ࠍ૬ߖᜬߟࡍ࠳࡞ߢߔޕ
ࡉ࠶ࠢࠬ࠲࠴ࡓߪోຬ߇ࡒࡘࠫࠪࡖࡦߢࠅޔᄙߊߩ
ࠦ࠺ࠖࡦࠣ߿ࠗࡉߩ⚻㛎߇ࠅ߹ߔޕⓥᭂߩ࠺ࠫ࠲࡞ࡍ࠳࡞㐿
⊒ࠍࠬ࠲࠻ߔࠆߦߚࠅޔ࠴ࡓߪ࠺ࠫ࠲࡞․ߩ಄ߚ㖸ߩߒ
ߥޔࡊࡗ߇ᗲߔࠆ߆ߊ㖸ᭉ⊛ߥࡆࡦ࠹ࠫ࠻ࡦߩߔࠆ
ࡍ࠳࡞ࠍ⋡ᮡߣߒ߹ߒߚޕ
ࡉ࠶ࠢࠬ࠲ߩ࠺ࠩࠗ࠽ߪߊߟ߆ߩઍ⊛ߥࡃ࡞ࡉ߿ࡆࡦ࠹
ࠫࠛࡈࠚࠢ࠻ࡍ࠳࡞ࠍ⺞ᩏ⎇ⓥߒޔߎ߁ߞߚࠛࡈࠚࠢ࠲
ߩฎ࠺ࠩࠗࡦࠍ․ߦߒߡࠆⷐ⚛ࠍߒߚߩߢߔޕࡃ࡞ࡉ
5CVWTCVKQPࠦࡦ࠻ࡠ࡞ߪᔀᐩ⊛ߥ⺞ᩏ⚿ᨐߩ߭ߣߟߥߩߢߔޕ
5CVWTCVKQPࠦࡦ࠻ࡠ࡞ߣߪ࠺ࠫ࠲࡞ࠛࡈࠚࠢ࠻ߩࠨࠗ࠼࠴ࠚࡦ
ߣߒߡᯏ⢻ߔࠆࡃ࡞ࡉࠥࠗࡦߣࠦࡦࡊ࠶࡚ࠪࡦߩ࿁〝ߢࠅޔౖ
ဳ⊛ߥࡆࡦ࠹ࠫࡃ࡞ࡉ࠹ࡊᑼ࠺ࠖࠗߢࠄࠇࠆࠃ߁ߥ࠳
ࠗ࠽ࡒࠢࠬߣࡂࡕ࠾ࠢࠬࠍ↢ߺߔߩߢߔޕ
*6&'.#;ߩ․ᓽߣߒߡࠗࡉࡄࡈࠜࡑࡦࠬߦᦨㆡߥ࠺ࠖࠗࠍㆬ
ᛯߒ߹ߒߚޕߘߩߚޔࠗࡉࡄࡈࠜࡑࡦࠬߩ㑆ߢ߽⺞ᢛߢ߈ࠆ
ࠃ߁ߦ࠲࠶ࡊ࠲ࠗࡓࠍขࠅࠇ߹ߒߚޕ
ᭂߡ࠻࠺࡚ࠖࠪ࠽࡞ߥࠛࡈࠚࠢ࠻߽ࠅ߹ߔߒޔ࡞ࡊᯏ⢻ߩ
ࠃ߁ߥ߹ࠅߥߓߺߩߥࠛࡈࠚࠢ࠻߽ࠅ߹ߔޕߟߩ࠺ࠖࠗࠛ
ࡈࠚࠢ࠻ߩߘࠇߙࠇ߇ࡆࡦ࠹ࠫࠛࡈࠚࠢ࠲ࠍෳ⠨ߦߒߚᛛⴚߦ
ࠃߞߡ࠺ࠩࠗࡦߐࠇߡ߅ࠅޔᤨ㑆߽ߩࡕ࠾࠲࠹ࠬ࠻ࠍ⚻ߡ⥄ὼ
ߥࠨ࠙ࡦ࠼ߢߥ߅߆ߟࡊࠗࡗߦࠗࡦࠬࡇ࡚ࠪࡦࠍ߃ࠆࠨ
࠙ࡦ࠼ࠍឭଏߚߒ߹ߔޕ
1. Effect
Rotary Switchߢ8ߟߩ࠺ࠖࠗࠛࡈࠚࠢ࠻ࠍㆬᛯߒ߹ߔޕ
Effect Name Description Notes
1 Linear ోᏪၞߩࡂࠗࡈࠔࠗ࠺ࠖࠗ
2 Analogue ࡆࡦ࠹ࠫࠕ࠽ࡠࠣ߹ߚߪBBDᑼ࠺ Ᏹߦࡕࡁ࡞ߢߔޕ
ࠖࠗߩ⥄ὼߥࠨ࠙ࡦ࠼ࠍరߦߒߡ
߹ߔޕࡇ࠻㖸ߩ࠻ࡉ࡞ߦᓸᅱ
ߦࡈࠖ࡞࠲ࠍដߌߡࡈࠖࡦࠣ
ࠍߒߡ߹ߔޕ
3 Multihead 1 ࡑ࡞࠴ࡋ࠶࠼࠹ࡊ࠺ࠖࠗ &KCITCO
ߦࠃࠆࠛࡈࠚࠢ࠻ࠍరߦߒߚㅢᏱ
ߩ࠺ࠖࠗޕ
4 Multihead 2 ࡑ࡞࠴ࡋ࠶࠼࠹ࡊ࠺ࠖࠗലᨐ &KCITCO
ࠍరߦߒߚ࠭ࡒ࠶ࠢߥ࠺ࠖࠗޕ
5 Tape ࠹ࡊࠬࡇ࠼ߩᄌൻߦࠃࠆំࠄ߉ Ᏹߦࡕࡁ࡞ߢߔޕ
ᗵߩࠆࡆࡦ࠹ࠫࡕ࠺࡞ࠍరߦߒߚ
࠹ࡊ࠺ࠖࠗޕࡇ࠻㖸ߦⶄ㔀
ߥࡕࠫࡘ࡚ࠪࡦ߇߆߆ࠅ߹ߔޕ
6 Space ⶄ㔀ߥࡆࡦ࠹ࠫ࠹ࡊࠛࡈࠚࠢ࠻
7 Loop 1 ࡢࡦ࡚ࠪ࠶࠻ߩ࡞ࡊౣ↢࠺ࠖࠗ Ᏹߦࡕࡁ࡞ߢߔޕ
8 Loop 2 ࠨ࠙ࡦ࠼ࠝࡦࠨ࠙ࡦ࠼࠺ࠖࠗ Ᏹߦࡕࡁ࡞ߢߔޕ
࡞ࡄ
Diagram 1 Diagram 2
Tap
4
4
1
Original
3
2
5 5
Delays
Tap
4
1
3333
12
3
2
4
8
Original
Delays
Japanese
Japanese
45
46
Page 24

2. Time
࠺ࠖࠗ࠲ࠗࡓߩ⺞▵ߢߔޕᦨዊߩ࠶࠹ࠖࡦࠣߢߪࡠࠞࡆ
ࡈߦᦨㆡߥࠬ࠶ࡊࡃ࠶ࠢࠛࡈࠚࠢ࠻ߦߥࠅ߹ߔޕ࠺ࠖࠗ࠲ࠗ
ࡓ߇Ⴧ߃ࠆߦߟࠇߡޔࠃࠅࠬࡍࠪߥലᨐ߇ߖ߹ߔޕ6CR
59ࠆߪ6KOGࡁࡉࠍ࿁ߔߎߣߦࠃߞߡ࠺ࠖࠗ࠲ࠗࡓࠍ࠶
࠻ߒ߹ߔޕ6CR6KOG.QQR.'&߇࠺ࠖࠗ࠲ࠗࡓߦᔕߓߡὐṌߒ߹
ߔޕ
ᵈᗧ㧦ޓ6KOGࡁࡉࠍ࿁ߔߎߣߦࠃߞߡᦨᄢ⑽ߩ࠺ࠖࠗ࠲ࠗࡓ߇
࠶࠻ߢ߈߹ߔޕ⑽એߩ࠺ࠖࠗ࠲ࠗࡓ߇ᔅⷐߥ႐วߪޔ6CR
ࠬࠗ࠶࠴㧔㧕ߩ↪ߦࠃࠅᦨᄢ⑽ߦ࠺ࠖࠗ࠲ࠗࡓࠍ࠶࠻ߔ
ࠆߎߣ߇ߢ߈߹ߔޕ
ߣࠎߤࡠߩ⁁ᘒߢࠛࡈࠚࠢ࠻ߪᭂߡࡈ࠶࠻ߢߔޕLED߇ࠝ
ࡦࠫߦߥࠇ߫⌀ⓨ▤࿁〝ౝ߇✭߿߆ߥ㘻⁁ᘒߦߥߞߡࠆߎߣࠍ
␜ߒߡ߹ߔޕLED߇⿒ߦߥࠇ߫⌀ⓨ▤࿁〝ౝߩSaturation߇ࡈ࡞ߦ
ߥࠅᦨᄢߩ㘻⁁ᘒߦ㆐ߒߚߎߣࠍ␜ߒ߹ߔޕ
6. Level
࠳ࠗࠢ࠻ାภߣࡒ࠶ࠢࠬߔࠆࠛࡈࠚࠢ࠻ࡌ࡞ࠍࠦࡦ࠻ࡠ࡞ߒ
߹ߔޕLevelࠦࡦ࠻ࡠ࡞ߪSaturationࠦࡦ࠻ࡠ࡞ߣߦࠆ⒟
ᐲᓇ㗀ߒว߹ߔޕ
ᵈᗧ㧦ޓSaturationࠦࡦ࠻ࡠ࡞ࠍ㜞࠶࠹ࠖࡦࠣߦߔࠆߣޔࠛࡈ
ࠚࠢ࠻߇ࠃࠅߊߥࠆߩߢࡌ࡞ࠍߍࠆߣࠃߢߒࠂ߁ޕ
3. Feedback
࠺ࠖࠗࡇ࠻㧔࿁ᢙ㧕ࠍ⺞▵ߒ߹ߔޕᦨዊߩ࠶࠹ࠖࡦࠣߢ
ࠪࡦࠣ࡞࠺ࠖࠗߩࡇ࠻ޔᦨᄢߩ࠶࠹ࠖࡦࠣߢࡇ࠻߇ㅪ
⛯ߒ߹ߔޕ
4. Saturation
Saturationࠦࡦ࠻ࡠ࡞ߪ㜞㔚ߩ⌀ⓨ▤࿁〝ߩ࠼ࠗࡉ⁁ᘒࠍ⺞ᢛ
ߔࠆߎߣߦࠃߞߡޔࠛࡈࠚࠢ࠻ࠨ࠙ࡦ࠼ߦࠦࡦࡊ࠶࡚ࠪࡦߩౕว
ߣࡂࡕ࠾ࠢࠬߩ⼾߆ߐߦᓇ㗀ࠍ߃߹ߔޕߎࠇߦࠃࠅ࠹ࡊߣࡃ
࡞ࡉࠍ↪ߒߚࠠࡖࠢ࠲ߦ↱᧪ߔࠆ࠙ࠜࡓߢࡑࠗ࡞࠼ߥࠦࡦ
ࡊ࠶࡚ࠪࡦߣࠝࡃ࠼ࠗࡉࠍ㉯ߒߔߎߣߩߢ߈ࠆࡆࡦ࠹
ࠫࠬ࠲ࠗ࡞ߩ࠹ࡊࠛࠦߣหߓ߈ࠍߔࠆߩߢߔޕ
ૐߴ࡞ߢߪലᨐߪࡈ࠶࠻ߢߔ߇ޔࡁࡉࠍ࿁ߔߦߟࠇߡ⌀ⓨ▤
࿁〝ౝߪࠃࠅ㘻⁁ᘒߦߥࠅࠦࡦࡊ࠶࡚ࠪࡦߣࡂࡕ࠾ࠢࠬߩኒ
ᐲ߇ࠃࠅ㜞ߊߥࠅ࠶࠴ߥലᨐ߇↢ߺߖ߹ߔޕᦨᄢߩ࠶࠹ࠖࡦ
ࠣߦߔࠆߣ࠺ࠖࠗߩࡇ࠻㖸߇⌀ⓨ▤ߩ࠼ࠗࡉലᨐߦࠃࠆࠢ
ࡦ࠴ࠨ࠙ࡦ࠼ߦߥࠅ߹ߔޕ
Saturation࿁〝ߪࠡ࠲߹ߚߪ-10dbߩloopࡌ࡞ߢലᨐ߇ࠅ߹ߔ
ޕ+4dbએߩloopࡌ࡞ߩ᭽ߪ߅൘ߢ߈߹ߖࠎޕ
5. Saturation Indicator LED
ߎߩLEDߪ⌀ⓨ▤࿁〝ౝߩSaturationߩ㊂ࠍ␜ߔߚSaturation ࠦࡦ
Japanese
࠻ࡠ࡞㧔4㧕ߦ㑐ㅪߒߡ߈߹ߔޕLED߇✛ߩᤨߪSaturation ߪ߶
47
7. Output-Right
ࠬ࠹ࠝធ⛯ߔࠆ㓙ߩฝାภߩജߢߔޕᏱߦ⦟⾰ߩࠡ࠲ࠤ
ࡉ࡞ࠍ߹ߒࠂ߁ޕ㧔ផᅑ࠶࠻ࠕ࠶ࡊ࡚ࠢࠪࡦ߽ෳᾖߊߛߐ
㧕
8. Output-Left (Mono)
ࡕࡁ࡞ធ⛯ߔࠆ㓙ߩജߢߔޕࠬ࠹ࠝធ⛯ߩ㓙ߩᏀାภߩ
ജ߽↪ߒߡ߹ߔޕ߽ߒᧄᯏ⒳ࠍࠡ࠲ࠕࡦࡊߣ࡞ࡊធ⛯ߔࠆ
႐วࠕࡦࡊ࠲ࡦߣߎߎࠍធ⛯ߒߡߊߛߐޕᏱߦ⦟⾰ߩࠡ࠲
ࠤࡉ࡞ࠍ߹ߒࠂ߁ޕ㧔ផᅑ࠶࠻ࠕ࠶ࡊ࡚ࠢࠪࡦ߽ෳᾖ
ߊߛߐ㧕
9. Input 㧔ࠗࡦࡊ࠶࠻㧦ࠡ࠲ജ┵ሶ㧕
ࠡ࠲߆ࠄߩࡊࠣߪߎߎߦធ⛯ߒߡߊߛߐޕᧄᯏ⒳ࠍࠡ࠲ࠕ
ࡦࡊߣ࡞ࡊធ⛯ߔࠆ႐วߪࠕࡦࡊࡦ࠼ߣߎߎࠍធ⛯ߒߡߐ
ޕᏱߦ⦟⾰ߩࠡ࠲ࠤࡉ࡞ࠍ߹ߒࠂ߁ޕ㧔ផᅑ࠶࠻ࠕ࠶
ࡊ࡚ࠢࠪࡦ߽ෳᾖߊߛߐ㧕
10. Valve View Window
ߎߩࠣ࡞⓹߆ࠄ⌀ⓨ▤ECC83߇ࠆߎߣ߇ߢ߈߹ߔޕ⌀ⓨ▤߇
ࠆߊἮࠇ߫ࡄࡢ߇ធ⛯ߐࠇߚߎߣߦߥࠅ߹ߔޕ
Japanese
48
Page 25

⼊๔㧦ޓ࿕ቯߒߡࠆࡀࠫ߿ࠣ࡞⓹ࠍขࠅᄖߐߥߢߊߛߐޕ
࡙ࠩߦࠃࠆㇱຠߩ឵ߪߢ߈߹ߖࠎޕ
11. Effect On/Off LED
ߎߩLED߇⿒ߊὐἮߒߡࠆߣ߈ߪࠛࡈࠚࠢ࠻ࠝࡦߢޔᶖ߃ߚߣ߈
ࠛࡈࠚࠢ࠻ࠝࡈߩ⁁ᘒߢߔޕ
12.ޓEffect On/Off Footswitch
ߎߩࠬࠗ࠶࠴ࠍߔߚ߮ߦࠛࡈࠚࠢ࠻ߩࠝࡦ/ࠝࡈ߇ಾࠅᦧࠊࠅ߹
ߔޕ
ߦὐἮߒ߹ߔޕ
d. Loo pࠬࠗ࠶࠴ࠍߔߣ㍳㖸߇⚳ߐࠇLoop LED߇✛⦡ߦὐἮߒ߹
ߔޕ㧔㍳㖸ᤨ㑆߇7.2⑽ࠍ߃ࠆ႐วޔ7.2⑽ߦ㆐ߒߚᤨὐߢ⥄േ⊛
ߦ㍳㖸߇⚳ߒ߹ߔ㧕
e. ㍳㖸ࠍࡊࠗࡃ࠶ࠢߔࠆߦߪLoopࠬࠗ࠶࠴ࠍߒ߹ߔޕLoopࠬࠗ
࠶࠴ࠍߔߚ߮ߦ㍳㖸ߒߚࡈ࠭ࠍ➅ࠅߒ߹ߔޕ߹ߚߪޔߟ
ߢ߽Loopࠬࠗ࠶࠴ࠍߔߎߣߦࠃࠅ㍳㖸ߒߚࡈ࠭ࠍߟߢ߽ᒁ
߈ߔߎߣ߇ߢ߈߹ߔޕ
f. Effect On/Offࠬࠗ࠶࠴㧔On/Offࠬࠗ࠶࠴㧕ࠍߔߎߣߦࠃߞߡࡈ
࠭ߩOn/Off߇ߢ߈߹ߔޕ
13. Tap / Loop LED
Linear, Analogue, Multihead 1, Multihead 2, Tape, Spaceࡕ࠼ߢ࠺ࠖ
ࠗ࠲ࠗࡓߦᔕߓߡὐṌߒ߹ߔޕTap ࠬࠗ࠶࠴߆Timeࡁࡉߢ࠺ࠖࠗ
࠲ࠗࡓࠍᄌᦝߔࠆߎߣߦࠃߞߡὐṌߩ㑆㓒߇ᄌࠊࠅ߹ߔޕ
Loopࡕ࠼ߢߪLoop1ߣ㧸oop2ߩ㗄⋡ߢ⺑⋡ߒ߹ߔޕ
14. Tap / Loop Footswitch
Linear, Analogue, Multihead 1, Multihead 2, Tape, Spaceࡕ࠼ߢޔหߓ
㑆㓒ߢ2࿁એTap ࠬࠗ࠶࠴ࠍߔߎߣߦࠃߞߡ࠺ࠖࠗ࠲ࠗࡓࠍ⺞
ᢛߢ߈߹ߔޕ
Loop 1 Mode – One Shot / Loop playback
ߎߩࡕ࠼ߢߪᦨᄢ7.2⑽㍳㖸ߢ߈Ṷᄼߩ㑆ߟߢ߽ࡊࠗࡃ࠶ࠢߢ
߈߹ߔޕLoop ࡈ࠶࠻ࠬࠗ࠶࠴ߢࠨࡦࡊࡦࠣലᨐߩ࠻ࠟߣߒߡ
↪ߢ߈߹ߔޕ
Loop 1ߩᣇ
a. Loop1ࠍㆬᛯߔࠆߣLoop LED߇ࠁߞߊࠅߣ⿒ߊὐṌࠍ㐿ᆎߒ߹ߔ
ޕ
b. Loo pࠬࠗ࠶࠴ࠍߒߡRECORD READYߩࡕ࠼ߦߔࠆߣޔLoop
LEDߩ⿒ὐṌ߇ㅦߊߥࠅ߹ߔޕ
Japanese
c. ࠡ࠲ߩṶᄼࠍᆎࠆߣߔߋߦ㍳㖸߇㐿ᆎߐࠇޔLoop LED߇⿒⦡
49
Loop 2 Mode – Sound on sound delay looper
ߎߩࡕ࠼ߢߪ㍳㖸ߒߚࠨ࠙ࡦ࠼ߦᐲߢ߽ᔅⷐߥߛߌᣂߒࠨ࠙
ࡦ࠼ࠍ㊀ߨࠆߎߣ߇ߢ߈߹ߔޕ
Loop2ߩᣇ
a. Loop2ࠍㆬᛯߔࠆߣLED߇⿒ߊࠁߞߊࠅὐṌࠍ㐿ᆎߒ߹ߔޕ
b. Loo pࠬࠗ࠶࠴ࠍߒRECORD READYࡕ࠼ߦߔࠆߣޔLoop LEDߩ
⿒ὐṌ߇ㅦߊߥࠅ߹ߔޕ
c. ࠡ࠲ߩṶᄼࠍᆎࠆߣߔߋߦ㍳㖸߇㐿ᆎߐࠇޔLoop LED߇⿒⦡
ߦὐἮߒ߹ߔޕ
d. LOOPࠬࠗ࠶࠴ࠍߔߣ㍳㖸߇ቢߒ⥄േ⊛ߦPlay Backࡕ࠼ߦߥ
ࠅLED߇✛⦡ߦὐἮߒ߹ߔޕ
e. ߎߩࡕ࠼ߢߪLED߇✛⦡ߦὐἮߒߡࠆߣ߈࡞ࡊࠨ࠙ࡦ࠼ߦ
วࠊߖߡṶᄼߔࠆߎߣ߇ߢ߈߹ߔޕ
f. Loo pࠬࠗ࠶࠴ࠍౣᐲߔߣLoop LED߇ࠝࡦࠫ⦡ߦὐἮߒࠝࡃ
࠳ࡉࡕ࠼ߦߞߚߎߣࠍ␜ߒ߹ߔޕᣂߒࡈ࠭ࠍṶᄼߔࠆ
ߚ߮ߦ㍳㖸ߐࠇߚࠨ࠙ࡦ࠼ߩߦࡈ࠭߇㊀ߥߞߡ߈߹ߔޕ
g. ᦝߦLoopࠬࠗ࠶࠴ࠍߔߣࠝࡃ࠳ࡉ߇⚳ߒ߹ߔޕLEDߪ✛
⦡ߩὐἮߦᚯࠅޔPLAYBACKࡕ࠼ߦߥࠅ߹ߔޕ
h. 㨒ߣ㨓ߩࠬ࠹࠶ࡊࠍ➅ࠅߔߎߣߦࠃࠅᐲߢ߽࡞ࡊࠨ࠙ࡦ࠼
ࠍࠝࡃ࠳ࡉߔࠆߎߣ߇ߢ߈ࠆߩߢߔޕ
ᵈᗧ㧦Loop࠲ࠗࡓߪᦨೋߦ㍳㖸ߒߚࡈ࠭ߩ㐳ߐߢቯߐࠇ߹ߔޕ
Japanese
50
Page 26

MEMORY CEAR and Effect On/Off function – Loop 1 and Loop 2
Effect On/Offࠬࠗ࠶࠴ (12)ࠍߔߣޔloopߪౣᐲࠬࠗ࠶࠴ࠍࡊࠬߔ
ࠆ߹ߢṶᄼࠍ⛮⛯ߒ߹ߔޕ
Effect On/Offࠬࠗ࠶࠴ࠍ1⑽એߒ⛯ߌࠆߣޔౣ↢߇⚳ߒࡔࡕ
߽ᶖߐࠇߡᣂߒ㍳㖸߇ߢ߈ࠆ⁁ᘒߦߥࠅ߹ߔޕ
15. DC INLET㧔DCࠕ࠳ࡊ࠲ࠫࡖ࠶ࠢ㧕
22V DC/1.0A ߩޓDCࠕ࠳ࡊ࠲ࠍធ⛯ߒ߹ߔޕޓ
ᵈᗧ㧍㧍ޓᔅߕᧄຠߦઃዻߩDCࠕ࠳ࡊ࠲ࠍ↪ߊߛߐޕ
Technical Specification
Power: 22V DC
Maximum Current Draw: 1.0A
Controls: Effect, Time, Feedback, Saturation, Level
Delay Time: 3 seconds in delay modes, 7.2 seconds in loop modes
Valve: ECC83 (12AX7)
Switches: Effect On/Off Switch, Tap/Loop switch
Indicator: Effect On/Off, Saturation, Tap Time/Loop Status, Power On/Off
(Valve Backlight LED)
Jacks: Input, Left (Mono) Output, Right Output
Input Impedance: 1MOhm
Output Impedance: <1kOhm
Nominal Operating Level: -10dBV
Dimensions (mm): 160 X 119 X80
Weight: 1.3kg
DC Adapter: ADA Series Supplied
Japanese
Japanese
51
52
Page 27

Suggested Settings
Visit the Blackstar website at www.blackstaramps.com for the latest
suggested settings and audio clips.
You’ll also find the latest information on products and artists.
HBK-1026 03/10
Blackstar Amplification Ltd, Beckett House, 14 Billing Road, Northampton, NN1 5AW, UK
For the latest information go to: www.blackstaramps.com
The specifications and information in this publication are subject to change without prior notice.
 Loading...