

Page 1
April 2021
Installation and Operation Manual
Blackmagic
Web Presenter
Blackmagic Web Presenter
Page 2

Languages
To go directly to your preferred language, simply click on the hyperlinks listed in the
contents below.
English 3
日本語 40
Français 78
Deutsch 116
Español 154
中文 192
한국어 230
Русский 268
Italiano 306
Português 344
Türkçe 382
Page 3

English
Welcome
Thank you for purchasing your Blackmagic Web Presenter!
Blackmagic Web Presenter plugs directly into any SDI equipment, converts the signal
into H.264 and lets you stream it on popular streaming services such as YouTube Live,
Facebook Live and Twitch. You can also transmit broadcast quality video point to point
using an optional ATEM Streaming Bridge. This makes transmission of professional video
toremote locations easy using the internet!
This instruction manual shows you everything you need to know to get started with
Blackmagic Web Presenter and how to use all the features and controls, including how
toset everything up for YouTube Live, Facebook Live, Twitch, Zoom, Skype and more.
Check the support page on our website at www.blackmagicdesign.com for the latest
version of this manual and for updates to your Blackmagic Web Presenter’s internal
software. When downloading the software, be sure to register with your information so
wecan keep you updated when new software is released.
We are continually working on new features and improvements, so we are keen
hear from you!
Grant Petty
CEO Blackmagic Design
Page 4

Contents
Getting Started 5
Using Web Presenter’s Front Panel 7
LCD Display 9
Using the Monitor Output 10
Using Web Presenter Setup 15
Live Stream Tab 16
Setup Tab 17
Network Settings 18
Setting Internet Sharing forDirectStreaming 18
Streaming Using Your Smartphone 19
Using Blackmagic Web Presenter as a Webcam 19
Setting up Open Broadcaster 20
Creating Video Links with ATEM Streaming Bridge 22
Teranex Mini Rack Shelf 23
Updating the Internal Software 24
Developer Information 25
Blackmagic Web Presenter Ethernet Protocol 25
Protocol Blocks 27
Help 36
Regulatory Notices 37
Safety Information 38
Warranty 39
4Blackmagic Web Presenter
Page 5
Getting Started
Getting started with your Blackmagic Web Presenter is quick and easy! All you need to do
isconnect power, connect video and audio, connect the unit to your computer, then connect to
the internet.
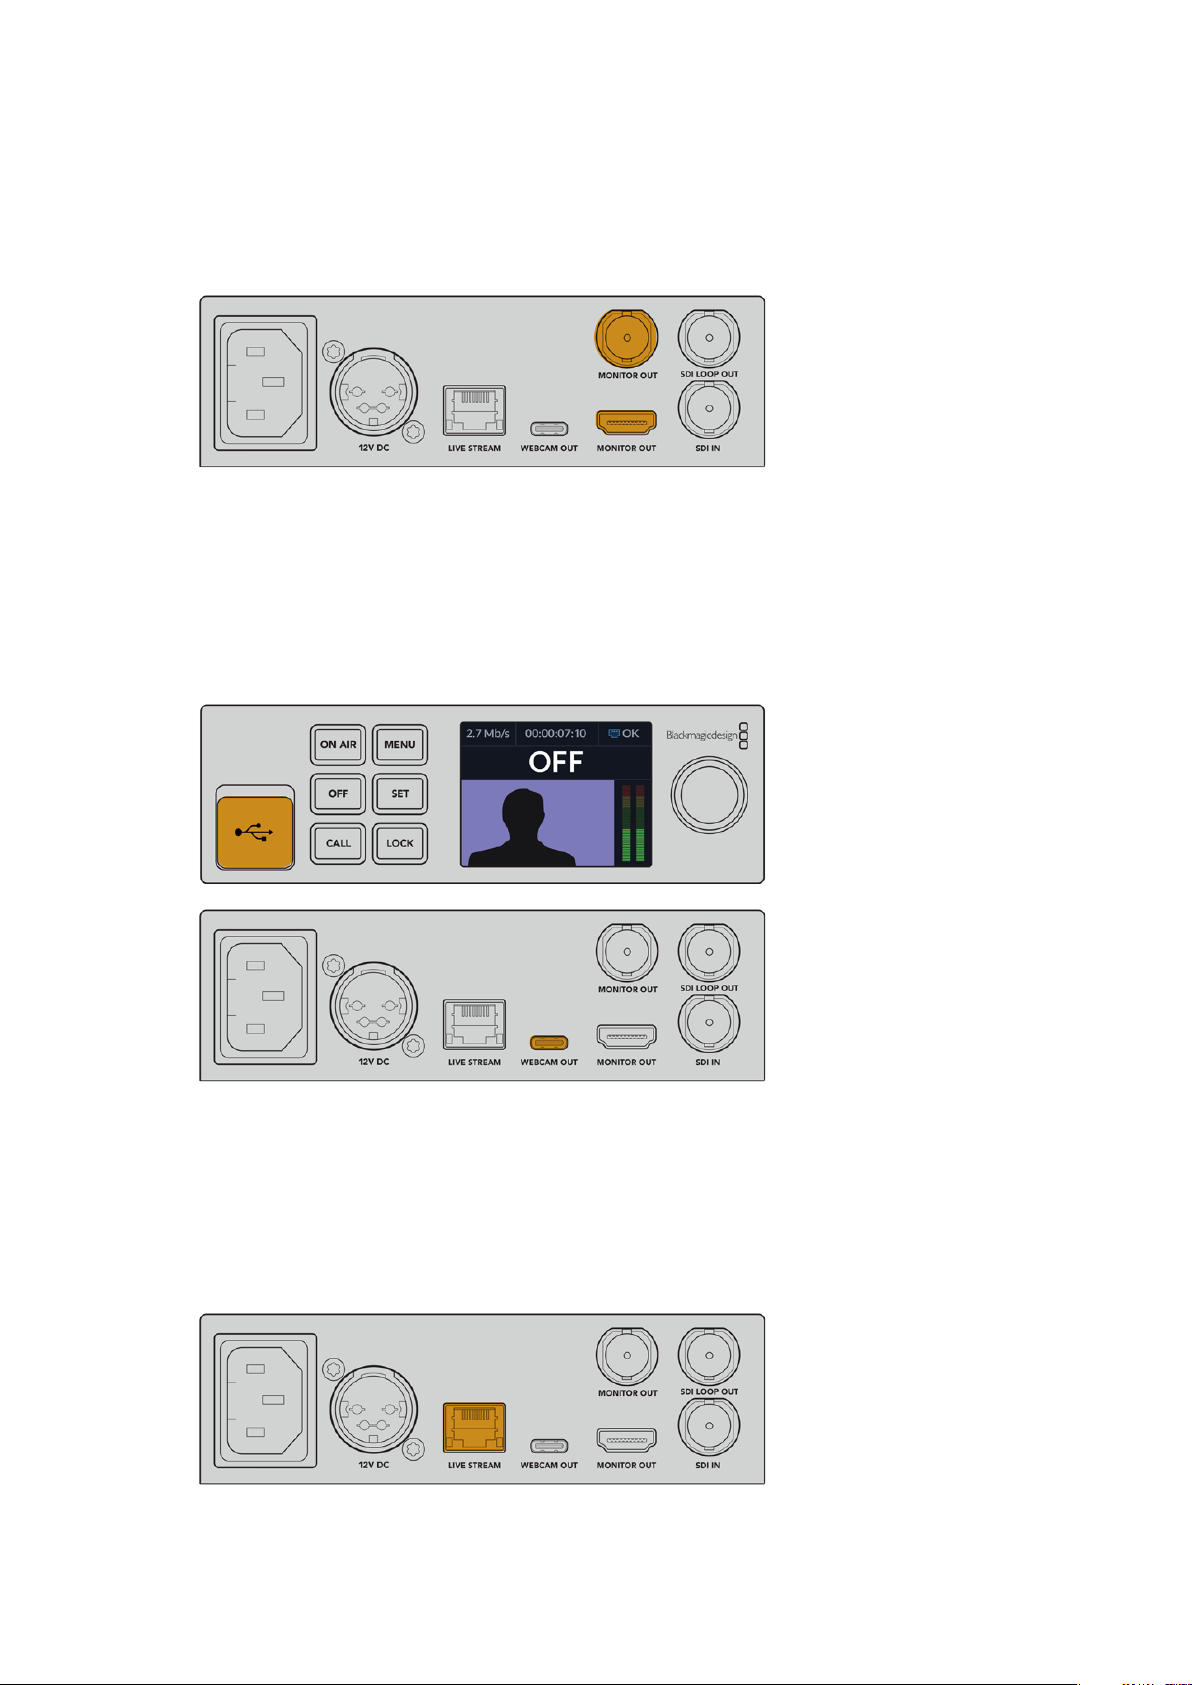
Blackmagic Web Presenter front panel
Connecting Power
Plug a standard IEC power cable into your Blackmagic Web Presenter’s powerinput on the
rear panel.
Blackmagic Web Presenter can be powered using the IEC or 12V DC power input
Web Presenter also has an additional 12V DC power input. You can use this input if you want to
connect external power or redundancy via an external power supply, for example a UPS or
external 12V battery.
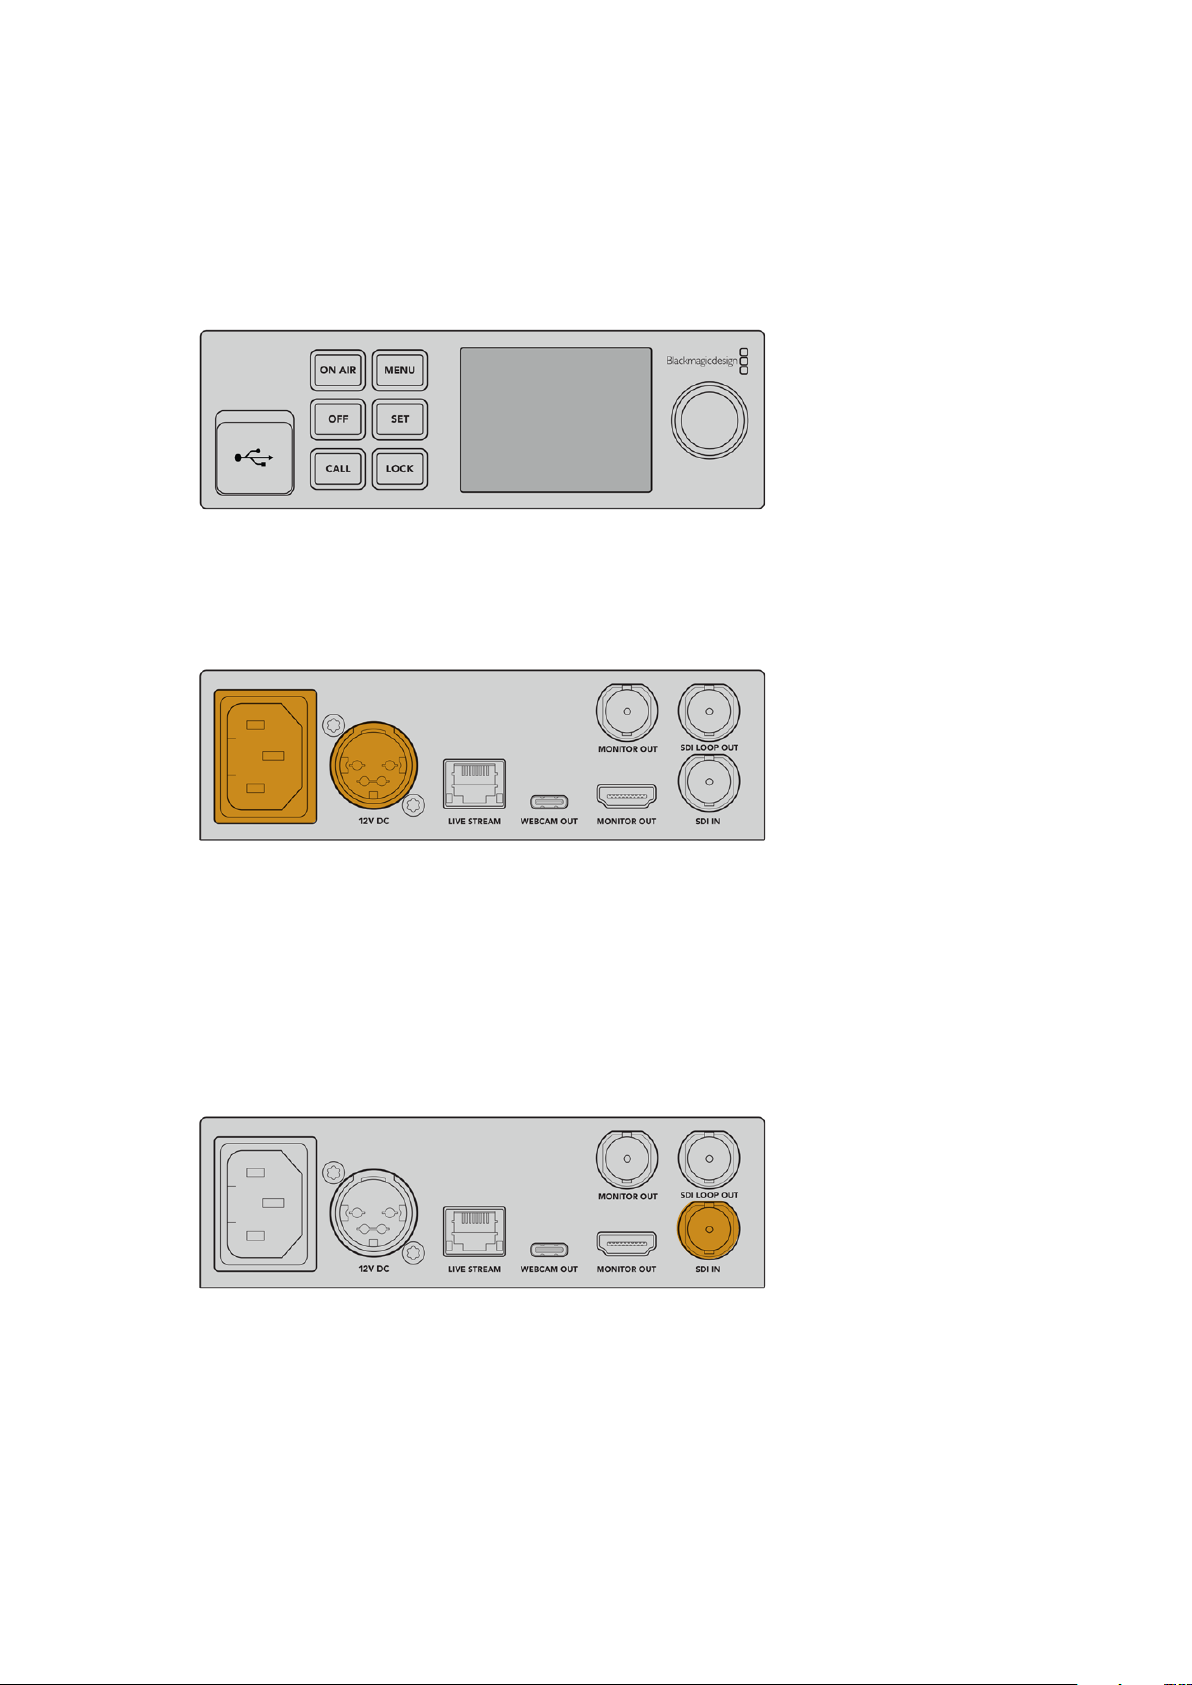
Connecting Video and Audio
Plug your video source into Blackmagic Web Presenter’s SDI input. When video is connected it
will be displayed on your web presenter’s built in LCD. Audio is embedded with the video on
the SDI video signal and you can confirm it by observing the audio meters on the LCD.
Connect video to your Blackmagic Web Presenter’s SDI input
Blackmagic Web Presenter supports 12G-SDI and will automatically switch between HD
and Ultra HD all the way up to 2160p60 when the video input changes. While Blackmagic
WebPresenter4K can stream in Ultra HD, Blackmagic Web PresenterHD will take virtually any
video signal and convert down to 1080p.
5Getting Started
Page 6
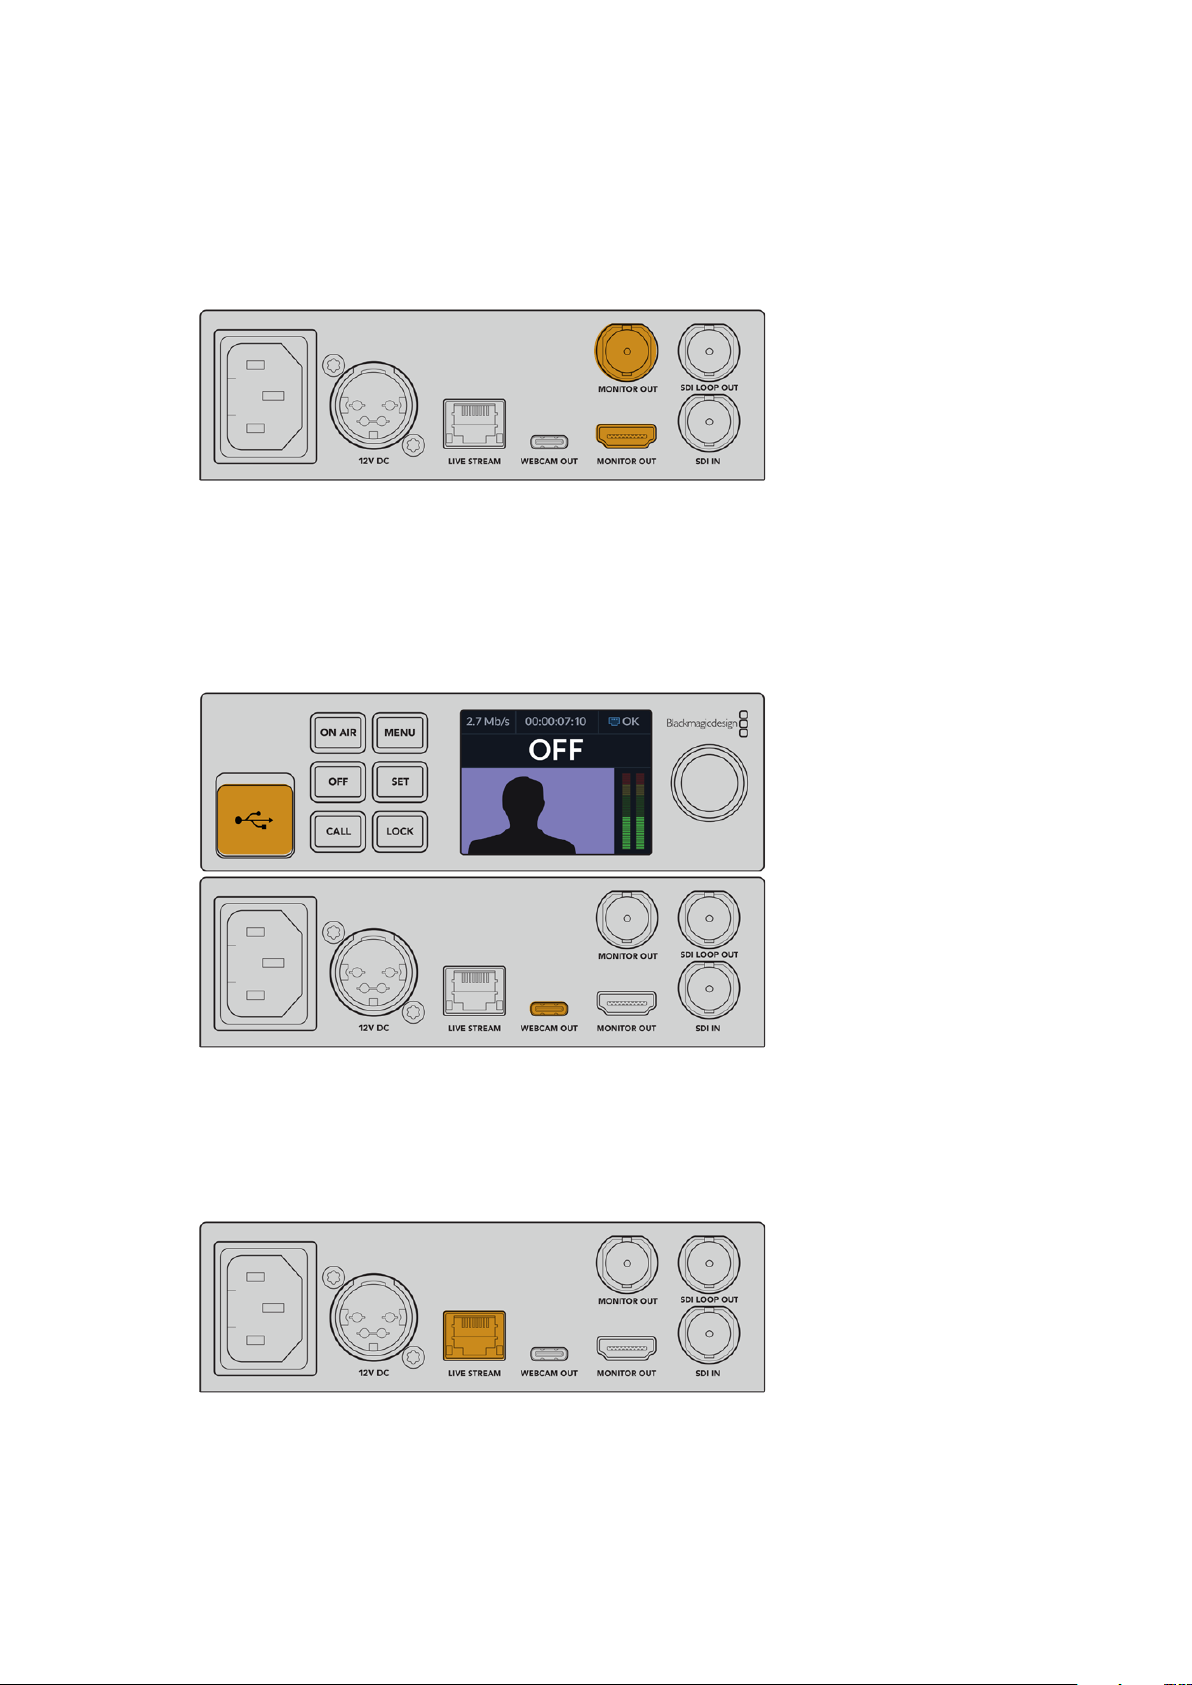
Connecting a Monitor
Plug your HDMI television or SDI monitor into one of the monitor outputs. This lets you monitor
your broadcast and observe important status information that updates constantly with your
video stream. For more information on how to use the monitor output, refer to the ‘Using the
Monitor Output’ section.
Connect a monitor to your web presenter’s monitor output
Connecting to a Computer via USB
Connect your Web Presenter to your computer using the USB-C port on the front or rear panel.
These USB ports are used for updating the unit and configuring it with the Blackmagic Web
Presenter Setup utility. Once you have configured your Web Presenter for the first time, you can
then disconnect the unit from the computer.
Connect your Blackmagic Web Presenter to your computer
using the USB port on the front or rear panel
Connecting to the Internet
Connect your Blackmagic Web Presenter to the internet by plugging a network cable from the
‘live stream’ Ethernet port to an internet router or a network switch.
Connect your Blackmagic Web Presenter to your
network via the Ethernet port on the rear panel
6Getting Started
Page 7
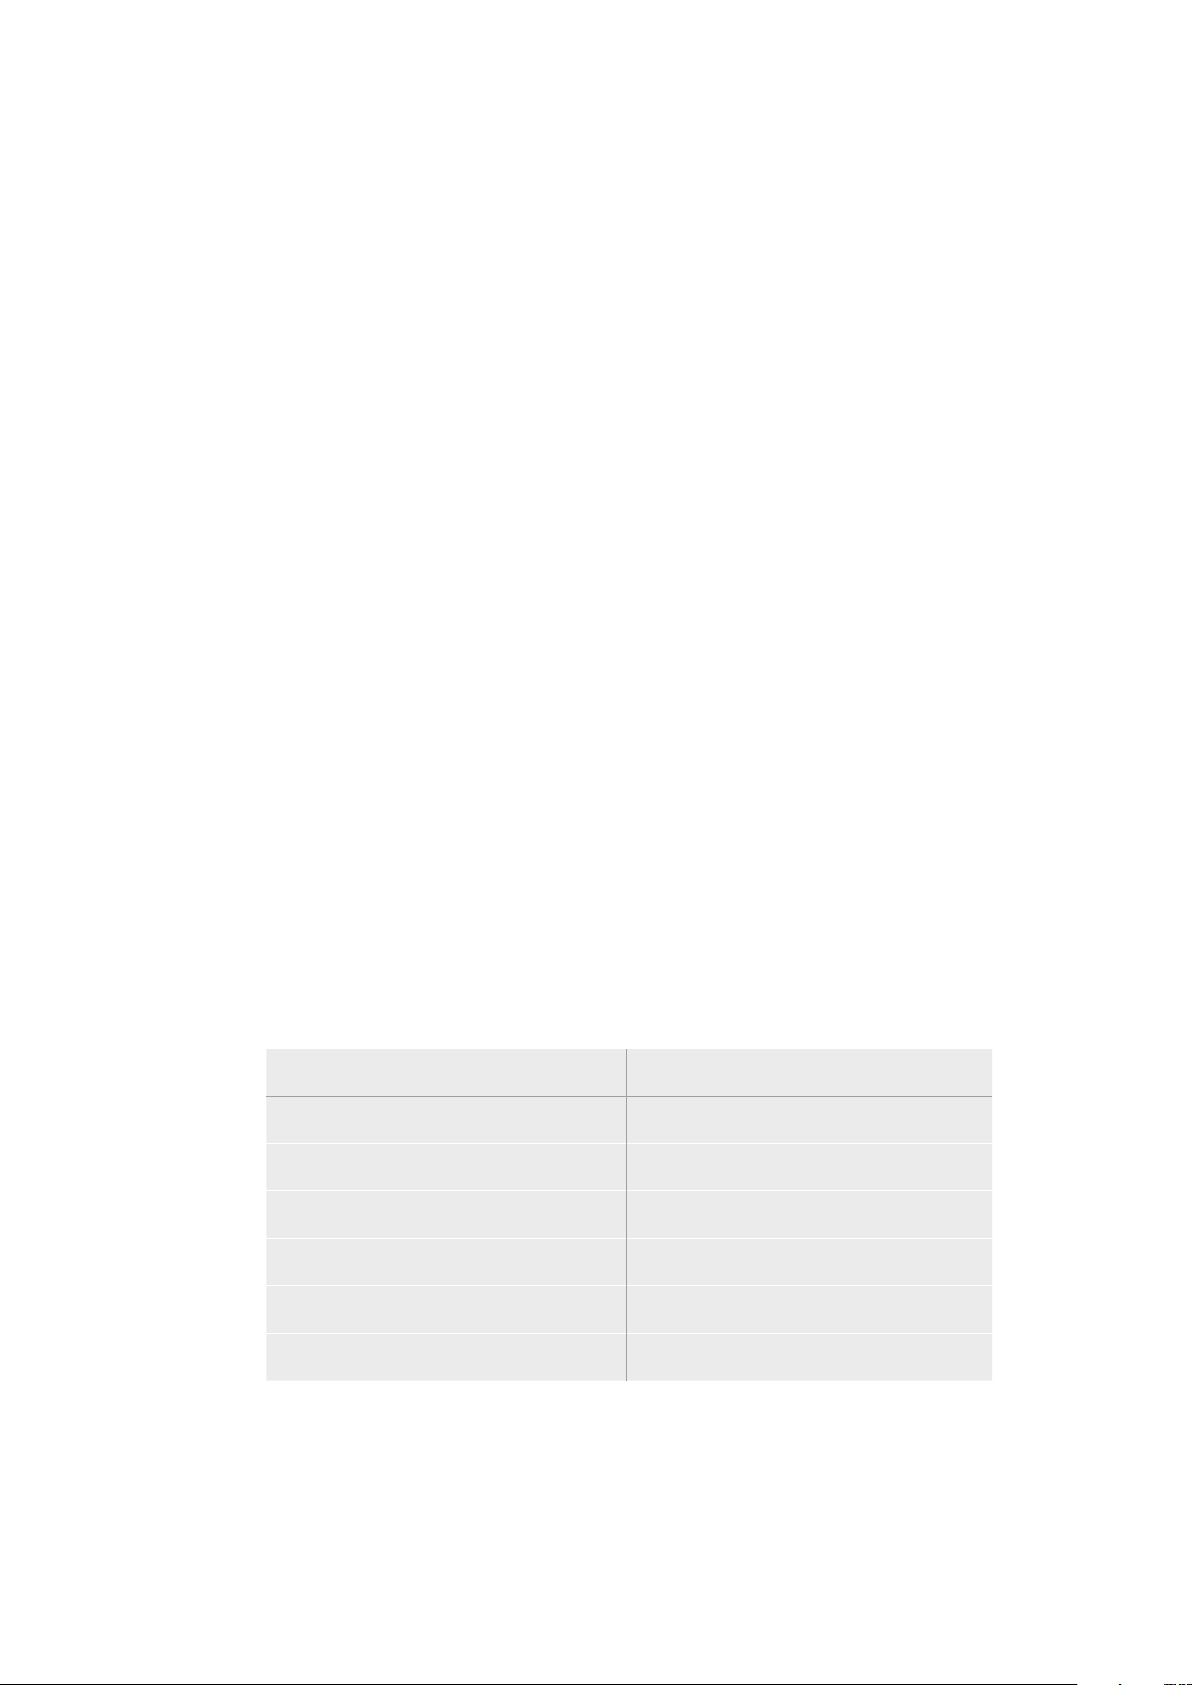
Setting up a Live Stream
You can now setup your Web Presenter to stream via any streaming platform such as YouTube
Live, Facebook Live, Twitch and more. For this example, we will set up for a YouTube
Live stream.
1 Copy your stream key from your YouTube Studio account.
2 Download the Blackmagic Web Presenter Setup utility from
www.blackmagicdesign.com/support and install it on your computer.
This software lets you configure streaming settings for the first time.
3 Launch the Blackmagic Web Presenter Setup utility and go to the ‘live stream’ page.
4 Set the platform to YouTube and the server to ‘primary’. Paste your YouTube stream key
into the ‘key’ field and select a streaming quality. Click ‘save’.
5 You’re now ready to start streaming to the world! Click the ‘on air’ button or press the
‘on air’ button on the unit’s front panel. When your production has finished, press the
‘off’ button to stop your broadcast.
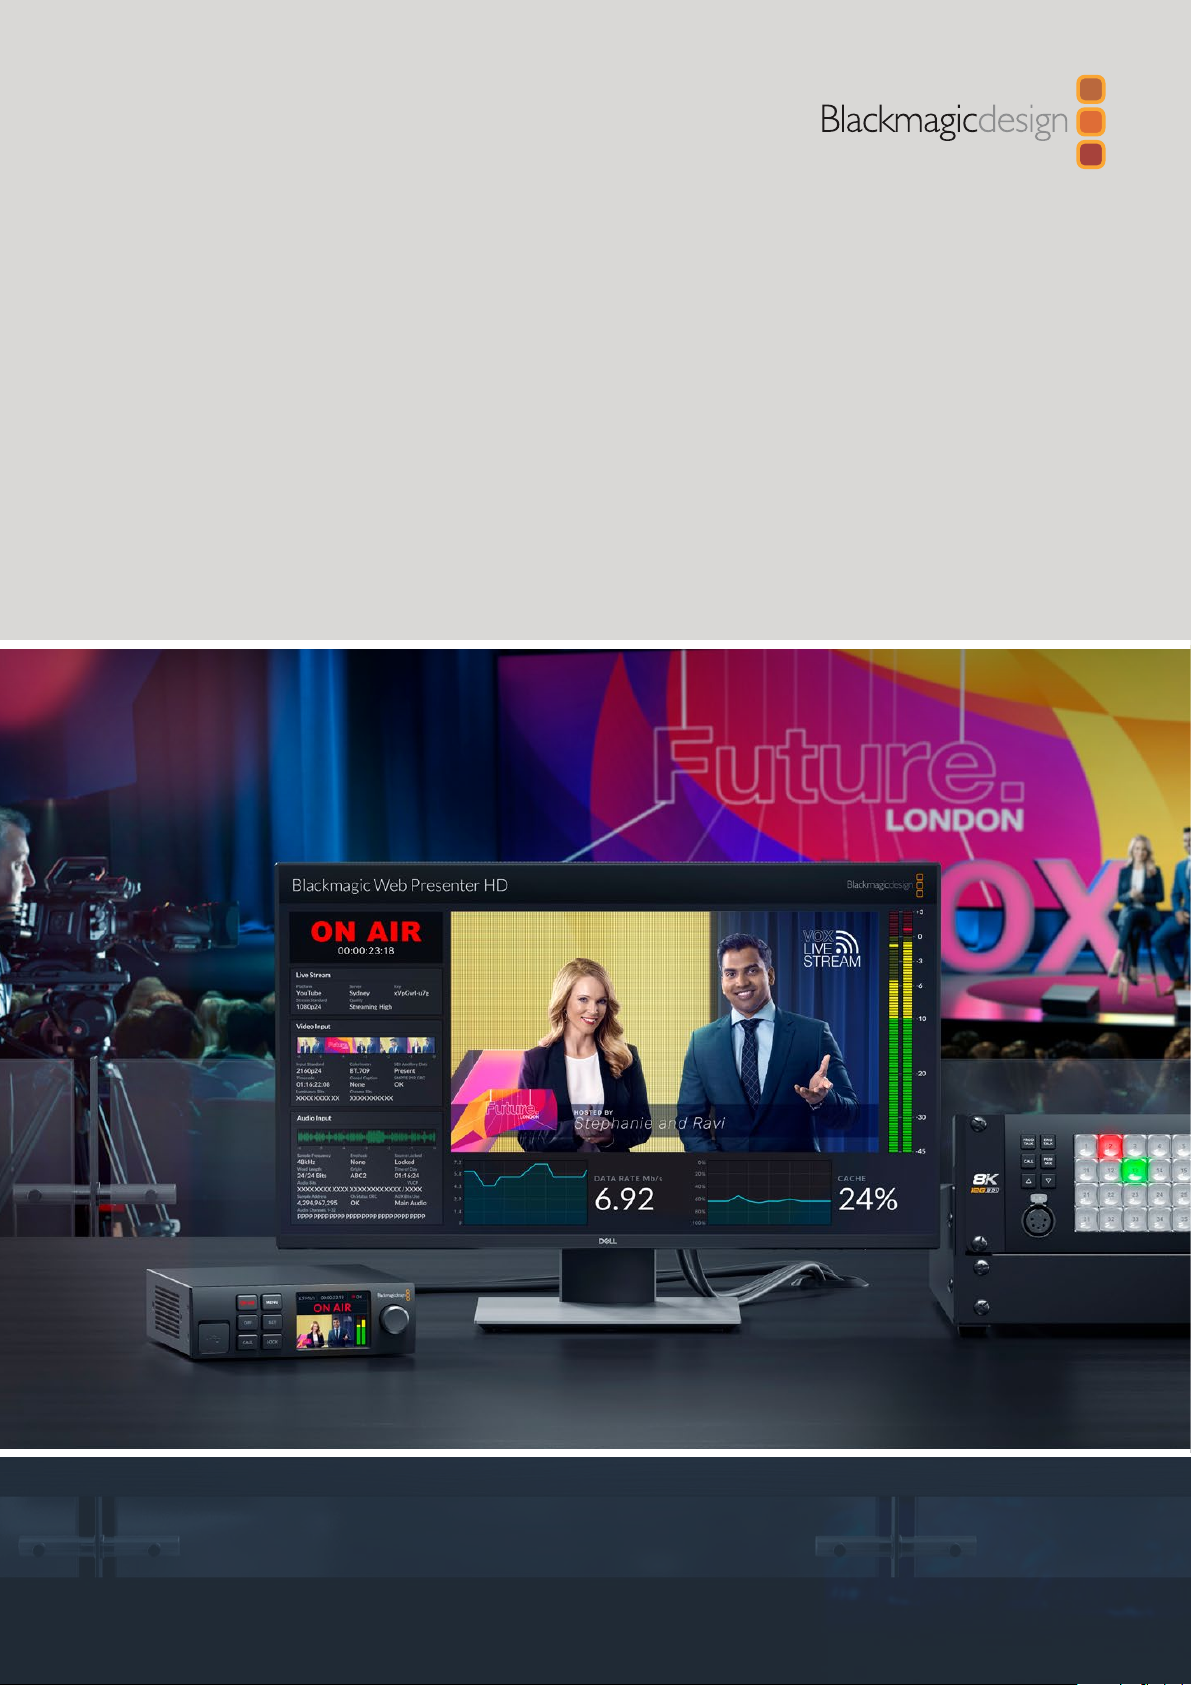
Using Web Presenter’s Front Panel
Use Blackmagic Web Presenter’s front panel controls to start and stop streaming and
change settings.
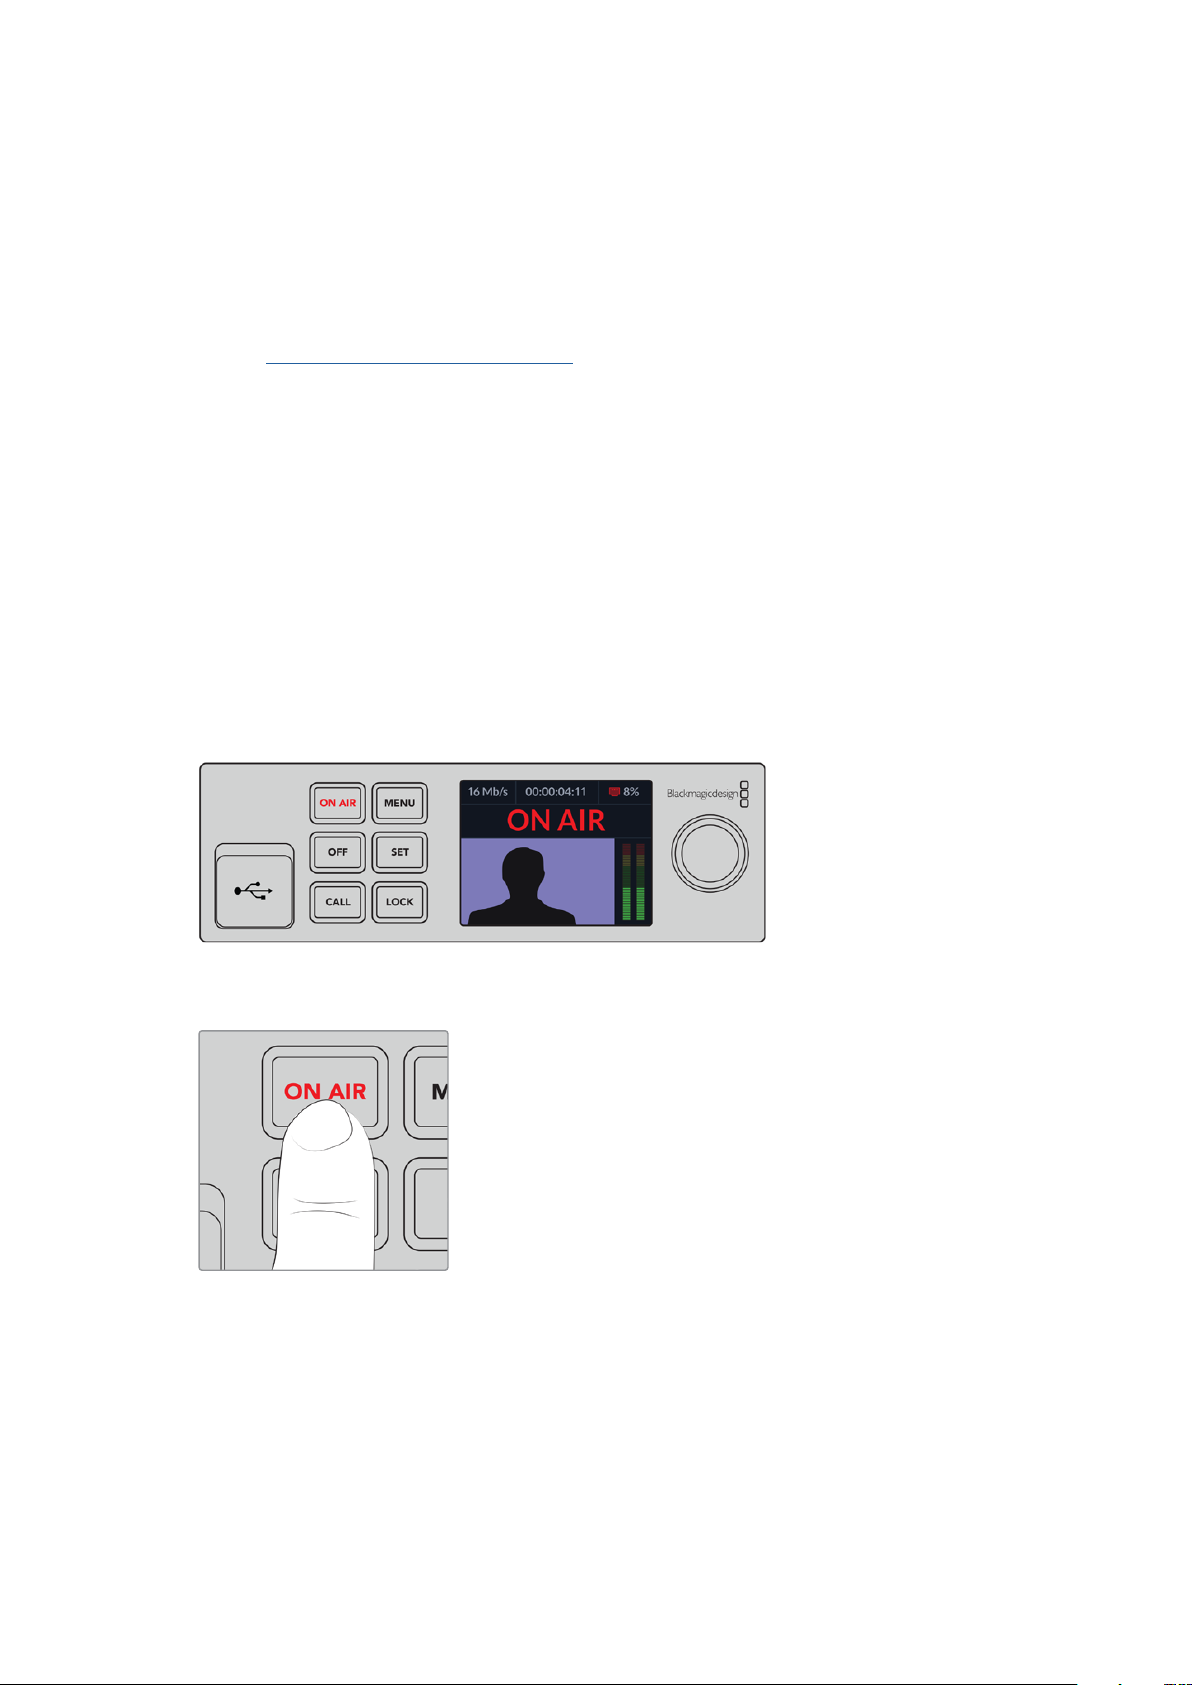
On Air - To start streaming, simply press the ‘on air’ button. The button will highlight red while
streaming on air.
If the on air button flashes, it means a live stream has failed to start, or has stopped
unexpectedly. This might be due to a problem with your internet connection or streaming
settings. Check that your internet connection is working and your streaming settings
are correct.
Off - To stop streaming, press the ‘off’ button.
7Using Web Presenter’s Front Panel
Page 8
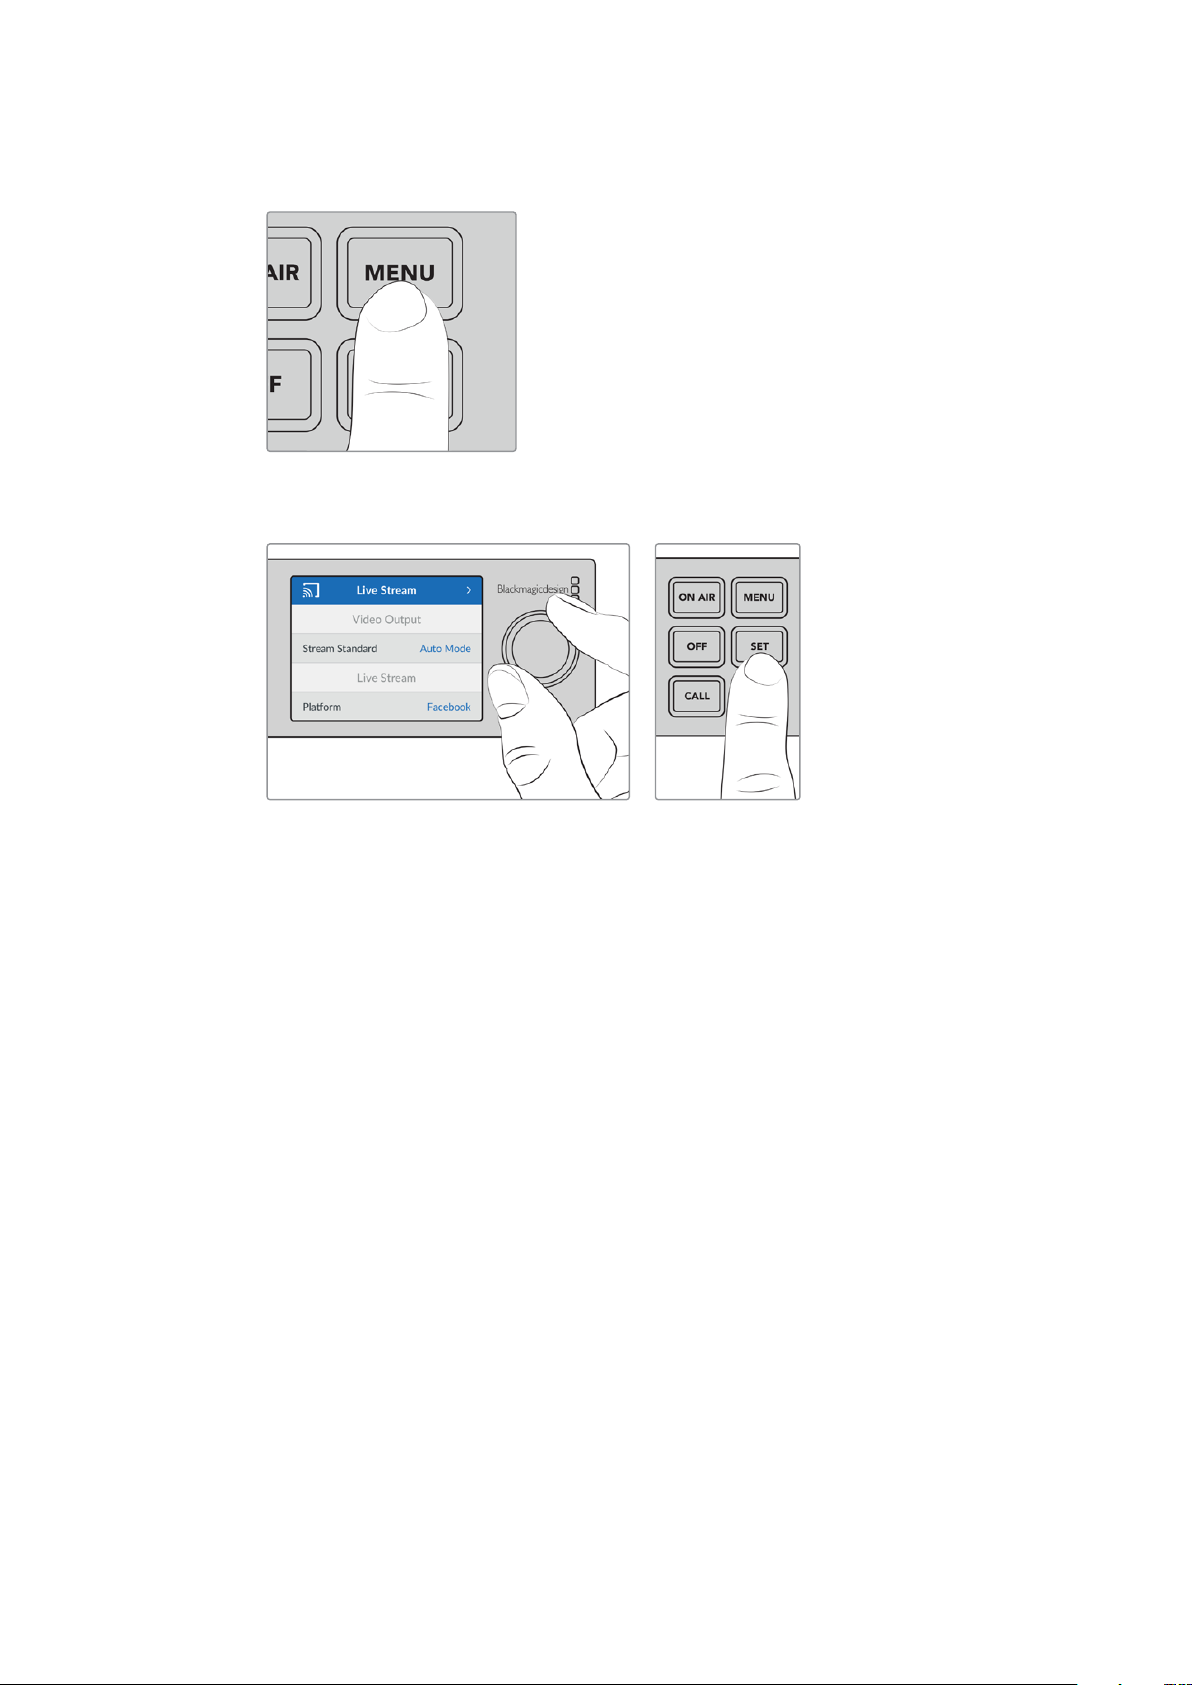
Menu - Press the menu button to open the settings on the LCD.
To change a setting:
1 Rotate the knob to select the setting you want to change, then press ‘set’.
2 Rotate the knob to change your setting.
3 Press ‘set’ again to confirm the change.
Press the menu button to step back through the menu items and return to the home screen.
Call - This feature will be enabled in a future update.
Lock - Press and hold this button for 1 second to lock the panel. This disables the buttons,
preventing anyone from accidentally going on air or stopping a stream. The button will
illuminate red when active.
Press and hold for 2 seconds to unlock the panel.
8Using Web Presenter’s Front Panel
Page 9
LCD Display
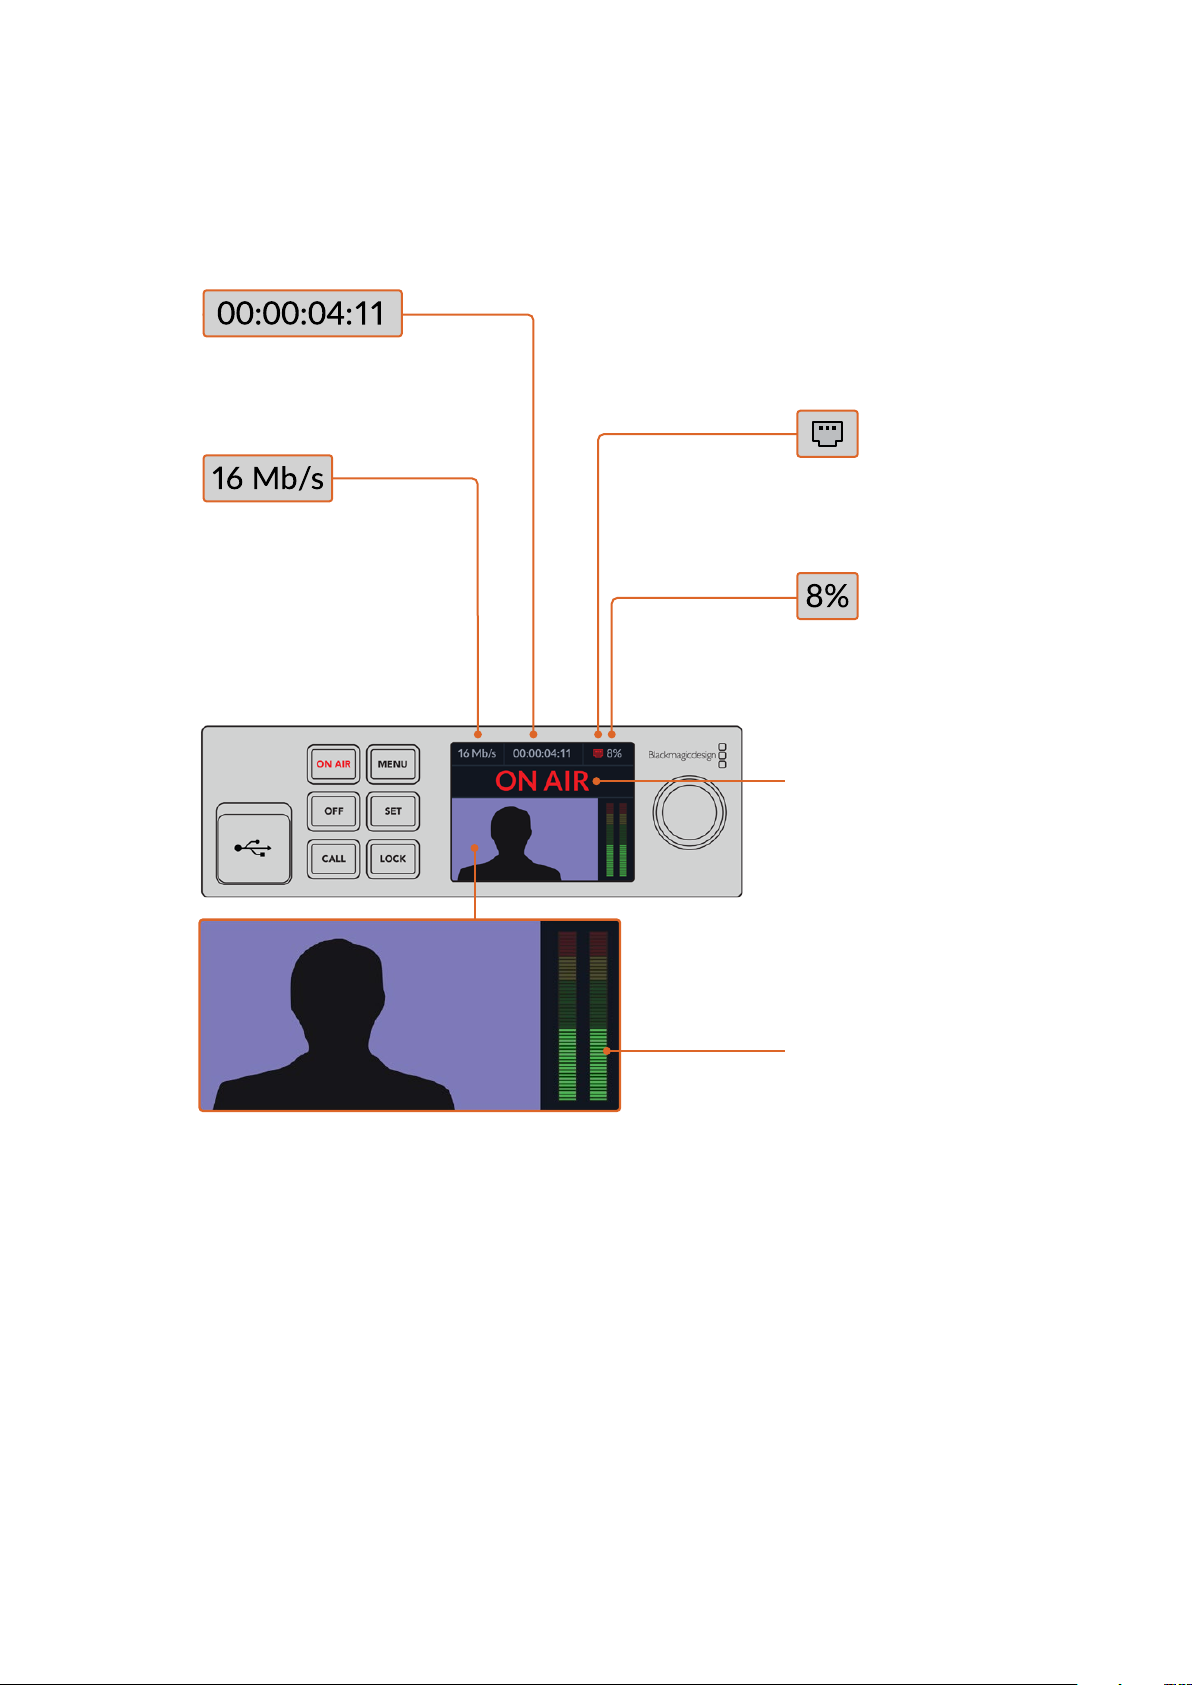
The home screen is the first feature you’ll see when you power up your Web Presenter.
The home screen displays important information, including:
Duration Counter – Shows the
current duration of your live
stream. The counter will start when
you press the ‘on air’ button.
Internet Connection –
Asmall icon is displayed
Data Rate – Shows
the data rate of the
encoder whether or
not your WebPresenter
is streaming. You can
connect your video
source to an input and
quickly see the bit rate
required to stream
your live video feed.
whenyour Web Presenter is
connected to the network.
Cache – Showsthe
percentage of your Web
Presenter’s built in memory
cache that is currently in use.
Video Monitor – Displays the input video source
that is connected to your Web Presenter.
On Air Status – A bright red on
air indicator will be displayed
when your live stream is running.
When the unit is standing by
ready to start streaming ‘off’ will
be displayed. Aflashing red and
white on air indicator means that
there has been an interruption
during the stream, such as a
slow internet connection.
Audio Meters – Displays
the audio levels of the
video source connected
to your Web Presenter.
9Using Web Presenter’s Front Panel
Page 10
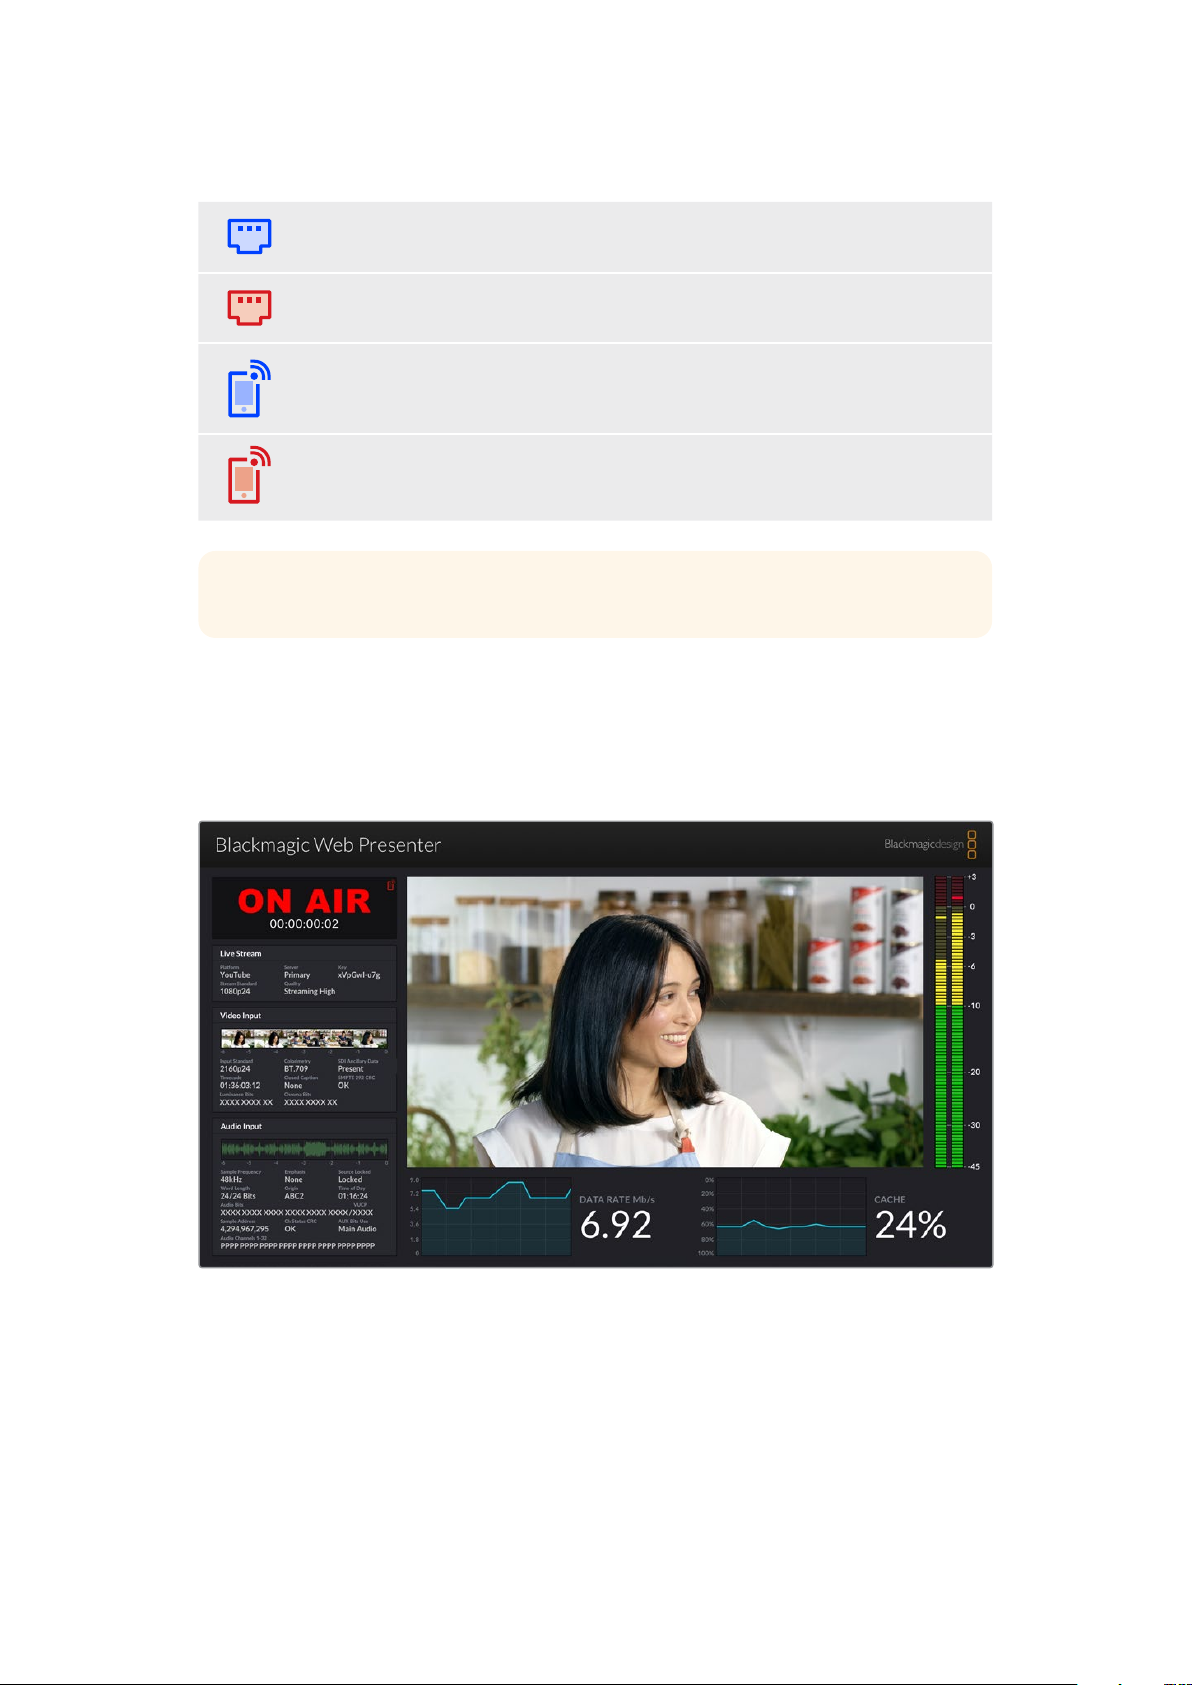
Internet Connection Icons
A blue Ethernet icon is displayed when an Ethernet cable is connected and the
Ethernetconnection will be used for streaming.
A red Ethernet icon is displayed when on air and streaming via Ethernet.
A blue smartphone icon is displayed when a tethered smartphone’s internet
connectionwill be used for streaming.
A red smartphone icon is displayed when on air and streaming via a tethered
smartphone.
TIP If no icon is displayed then your Web Presenter is not connected to the network.
Using the Monitor Output
The monitor output lets you monitor the video input, audio levels, on air status, data rate and
cache levels, plus technical information about the SDI input.
The monitor out on Blackmagic Web Presenter provides comprehensive
information including data rate and cache status.
10Using the Monitor Output
Page 11
The monitor output display is made up of 8 panels. Below is a description of each panel and the
information it displays.
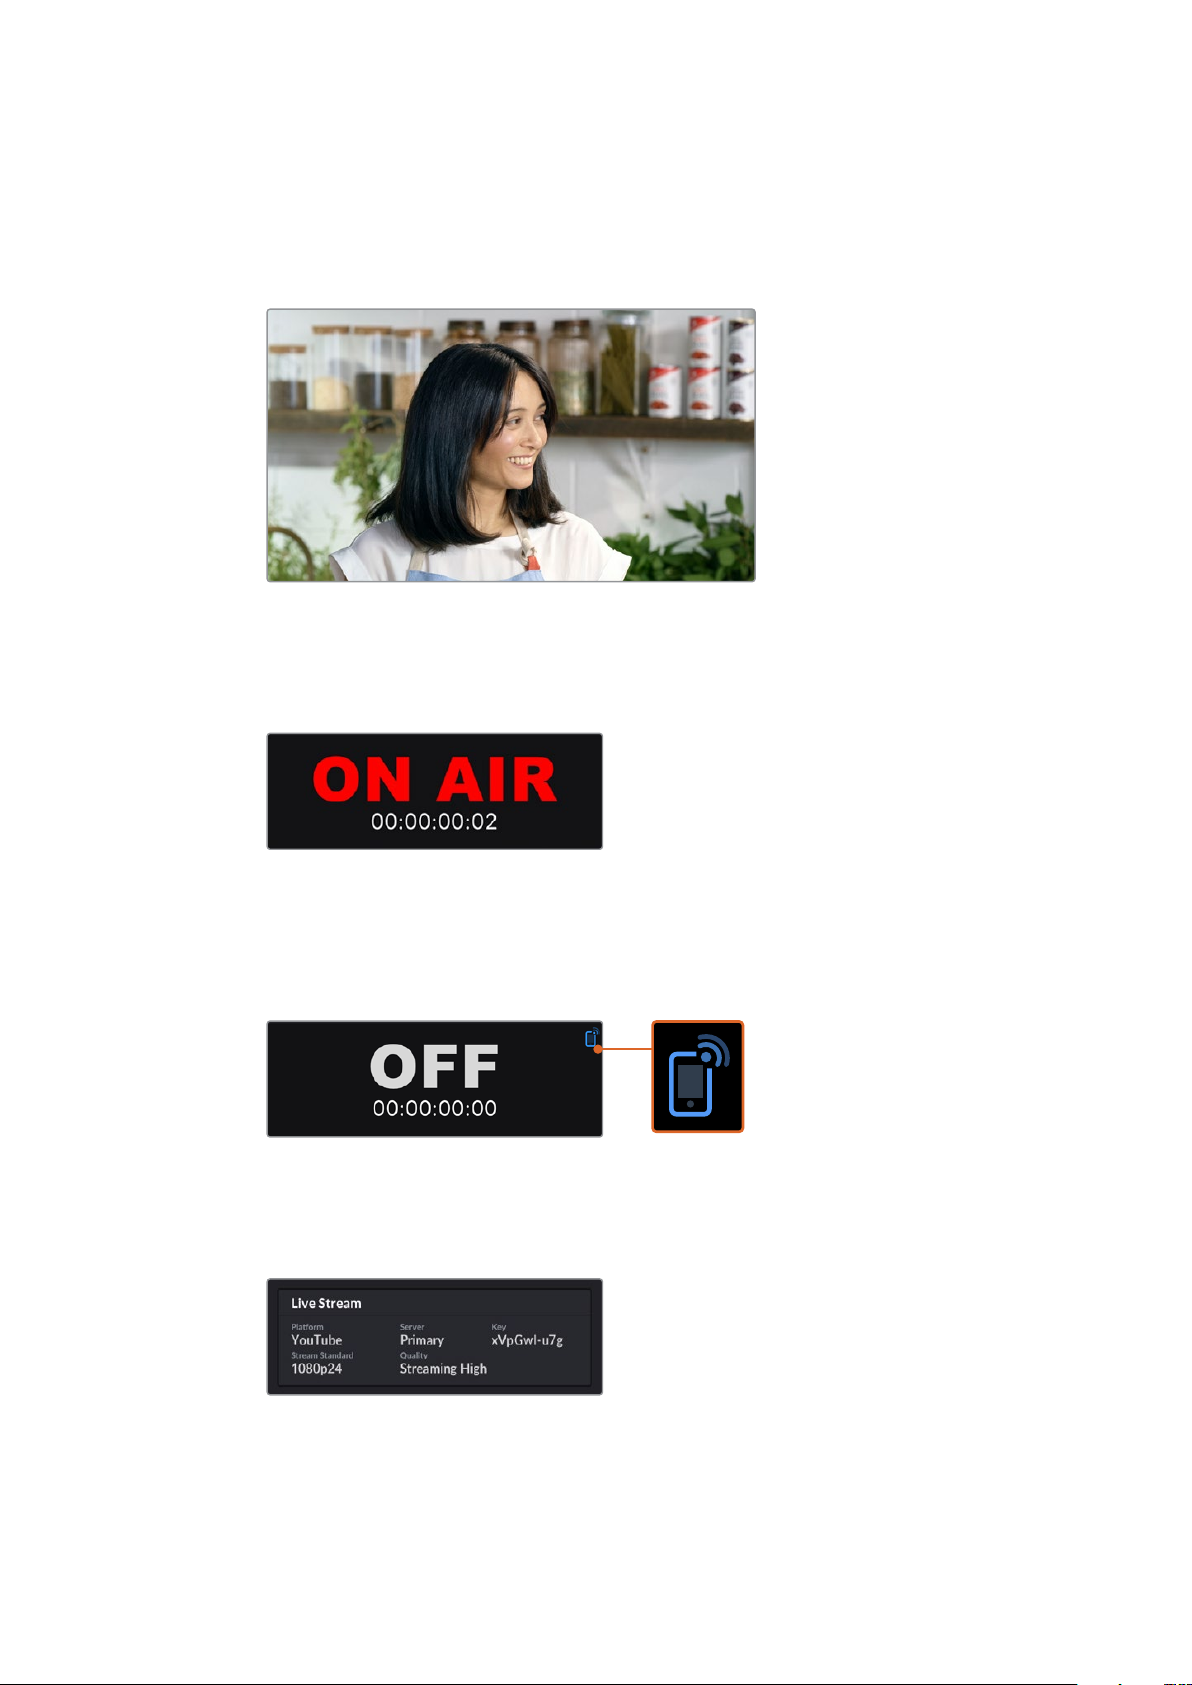
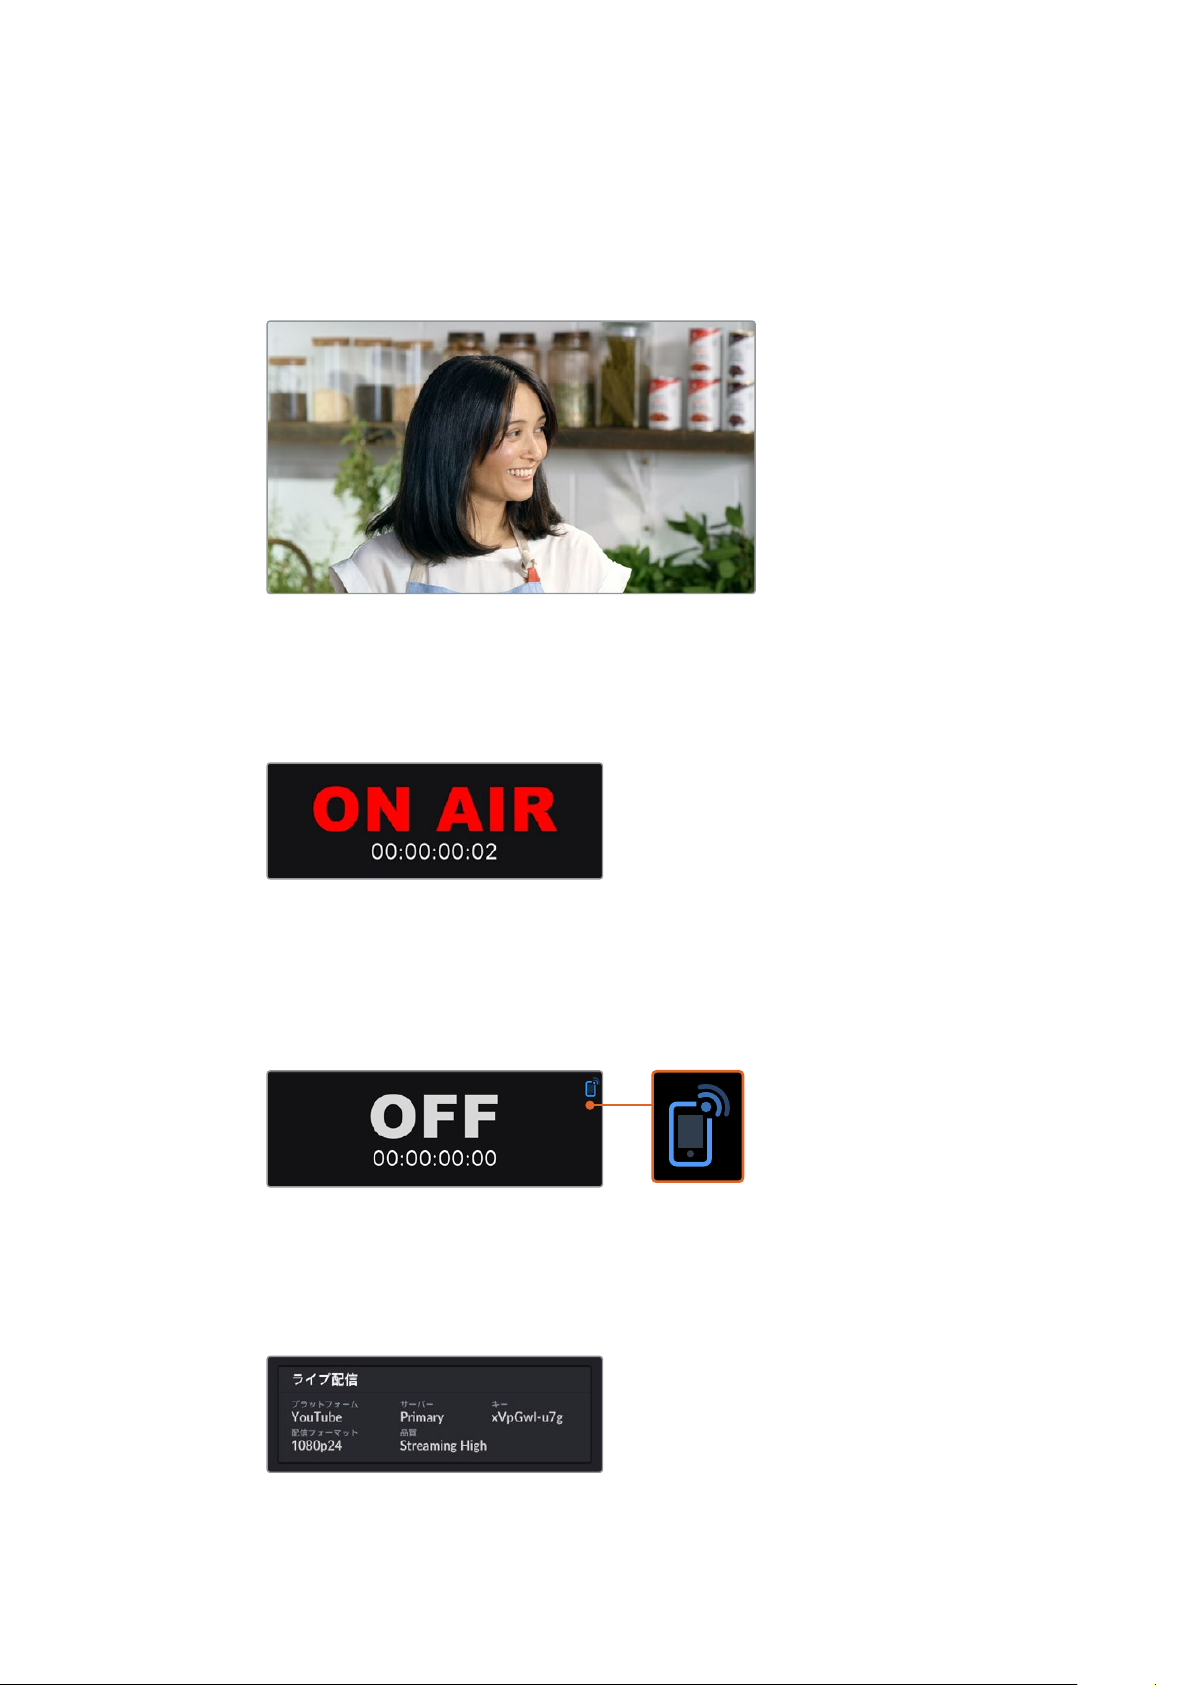
Input View
The main panel displays your current video input from the connected SDI video source.
On Air Status
Prior to streaming, the on air status indicator will display ‘off’ to let you know
Web Presenter is standing by and ready to broadcast. When streaming begins,
theindicator will display a bright red ‘on air’ status until streaming is stopped.
Underneath the on air indicator is the duration counter. When you press the on air
button on your Web Presenter, the duration counter will start running.
If your Web Presenter is off air but will stream via a tethered smartphone, the ‘off’
indicator includes a blue smartphone icon in the corner. When on air, the smartphone
icon will illuminate red.
Live Stream
The live stream panel displays information about your live stream settings. This includes
the streaming platform, server and the first 10 digits of your streaming key. It also
displays the stream resolution and quality settings.
11Using the Monitor Output
Page 12

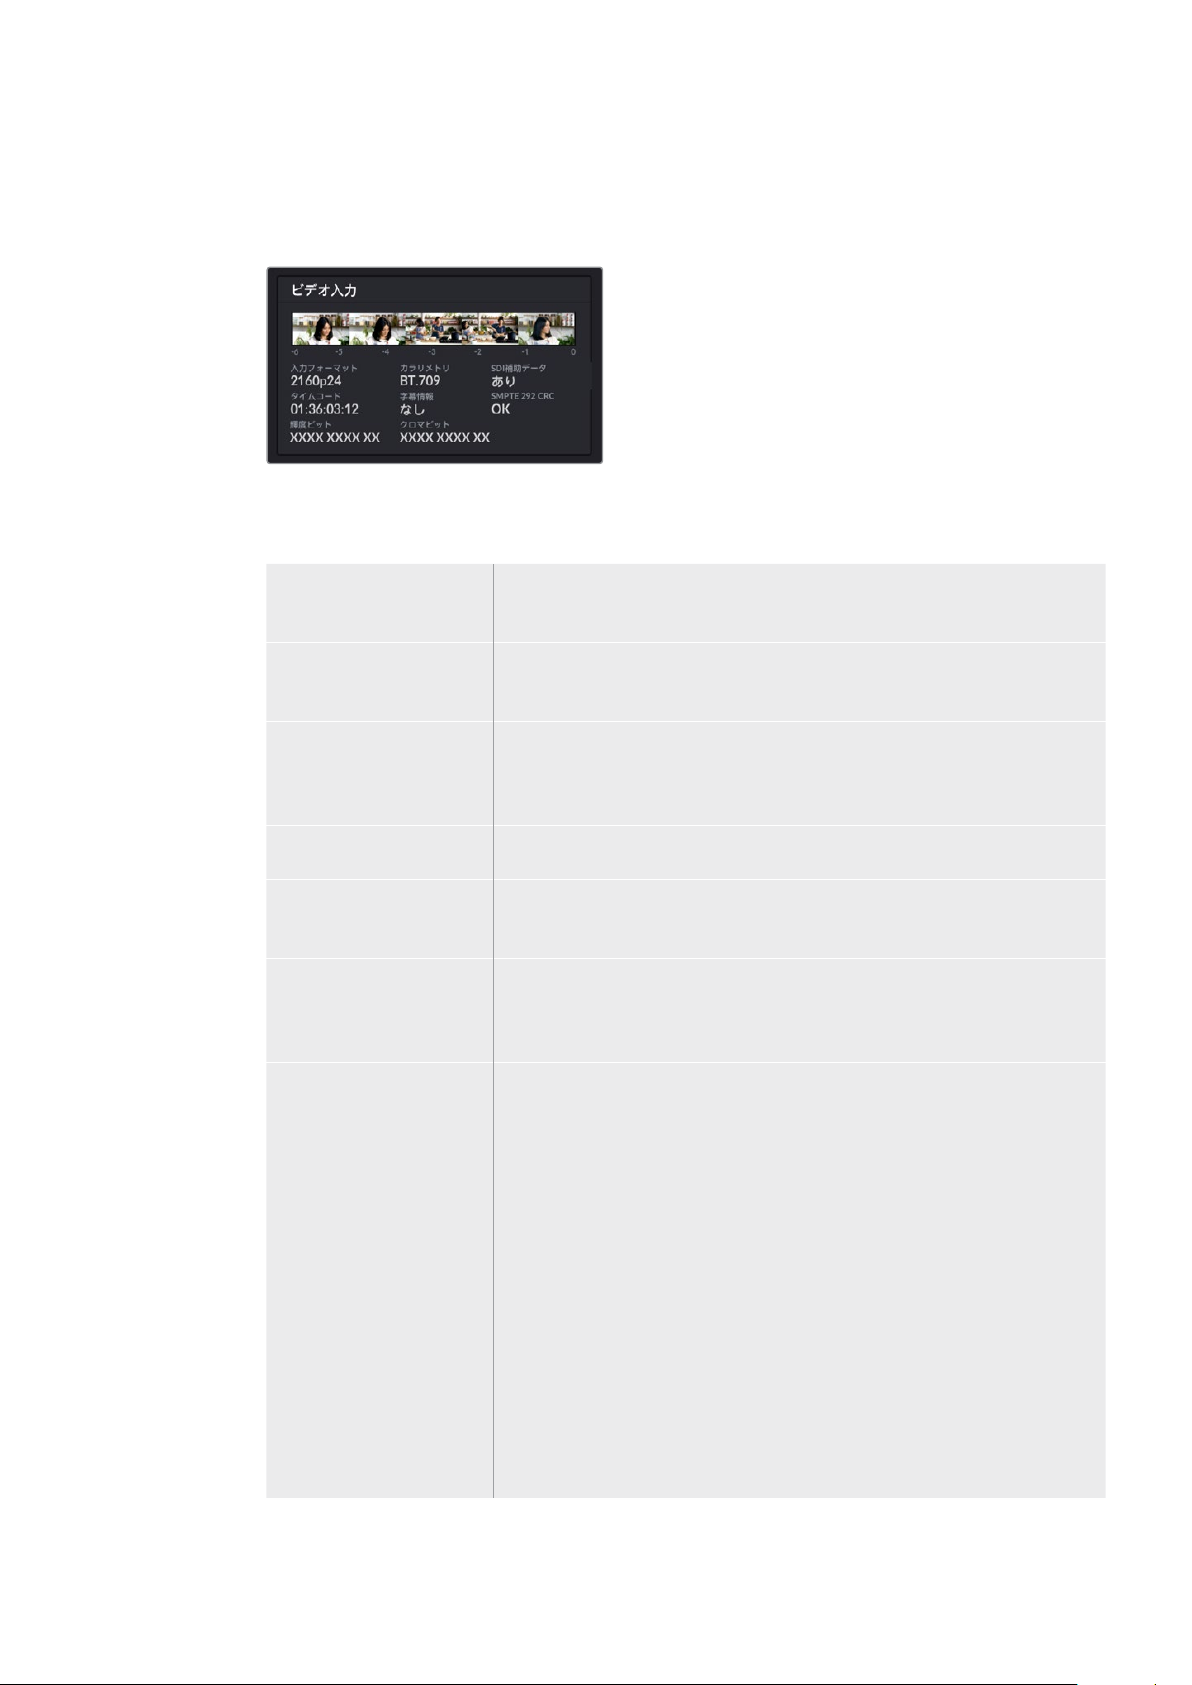
Video Input
The 5 mini viewers at the top of the video input panel show the previous 6 seconds of
your live stream, each mini viewer represents 1.2 seconds of streaming time.
Below the mini viewers you can view detailed technical information about the video
input source connected to your Web Presenter’s SDI input.
Input Standard Displays the resolution and frame rate of the SDI video input.
Web Presenter supports up to 2160p60.
Colorimetry Shows the color space of the SDI video input. Web Presenter
supports Rec.601, Rec.709 and Rec.2020 color spaces.
SDI Ancillary Data Ancillary data is data carried in the SDI video input that is in
addition to video. This includes embedded audio, timecode and
closed captions. If your SDI input includes ancillary data then
‘Present’ will be displayed.
Timecode Displays the timecode from the SDI video input source.
Closed Captions If your SDI video input includes Closed Captions the format will be
displayed here. CEA-608 and CEA-708 formats are supported.
SMPTE 292 CRC This is an error checking function for SDI video. If your
Web Presenter detects a problem in the SDI video input it will
display an error. CRC errors are usually caused by a faulty SDI cable
or a cable that is too long.
Luminance Y Bits
and Chroma Bits
The indicators for ‘luminance y bits’ and ‘chroma bits’ show you
the activity of the SDI video input signal. Each letter represents the
state of one bit of the video signal.
X - An ‘X’ indicates a constantly changing bit.
L - A low bit.
H - A high bit.
SDI offsets are subtracted to make it easy to understand. For
example, all bits are low when video is black.
Generally, all 10 bits for your SDI video input will show ‘X’ to mean
all the bits on your video stream are changing constantly. If your
SDI input is 8 bit video, the two rightmost bits will always be ‘L’ as
they don’t have any data. If a bit stays ‘L’ or ‘H’ when you expect
itto be ‘X’, this indicates a ‘stuck bit’ and could be the result of a
fault in the upstream video.
12Using the Monitor Output
Page 13
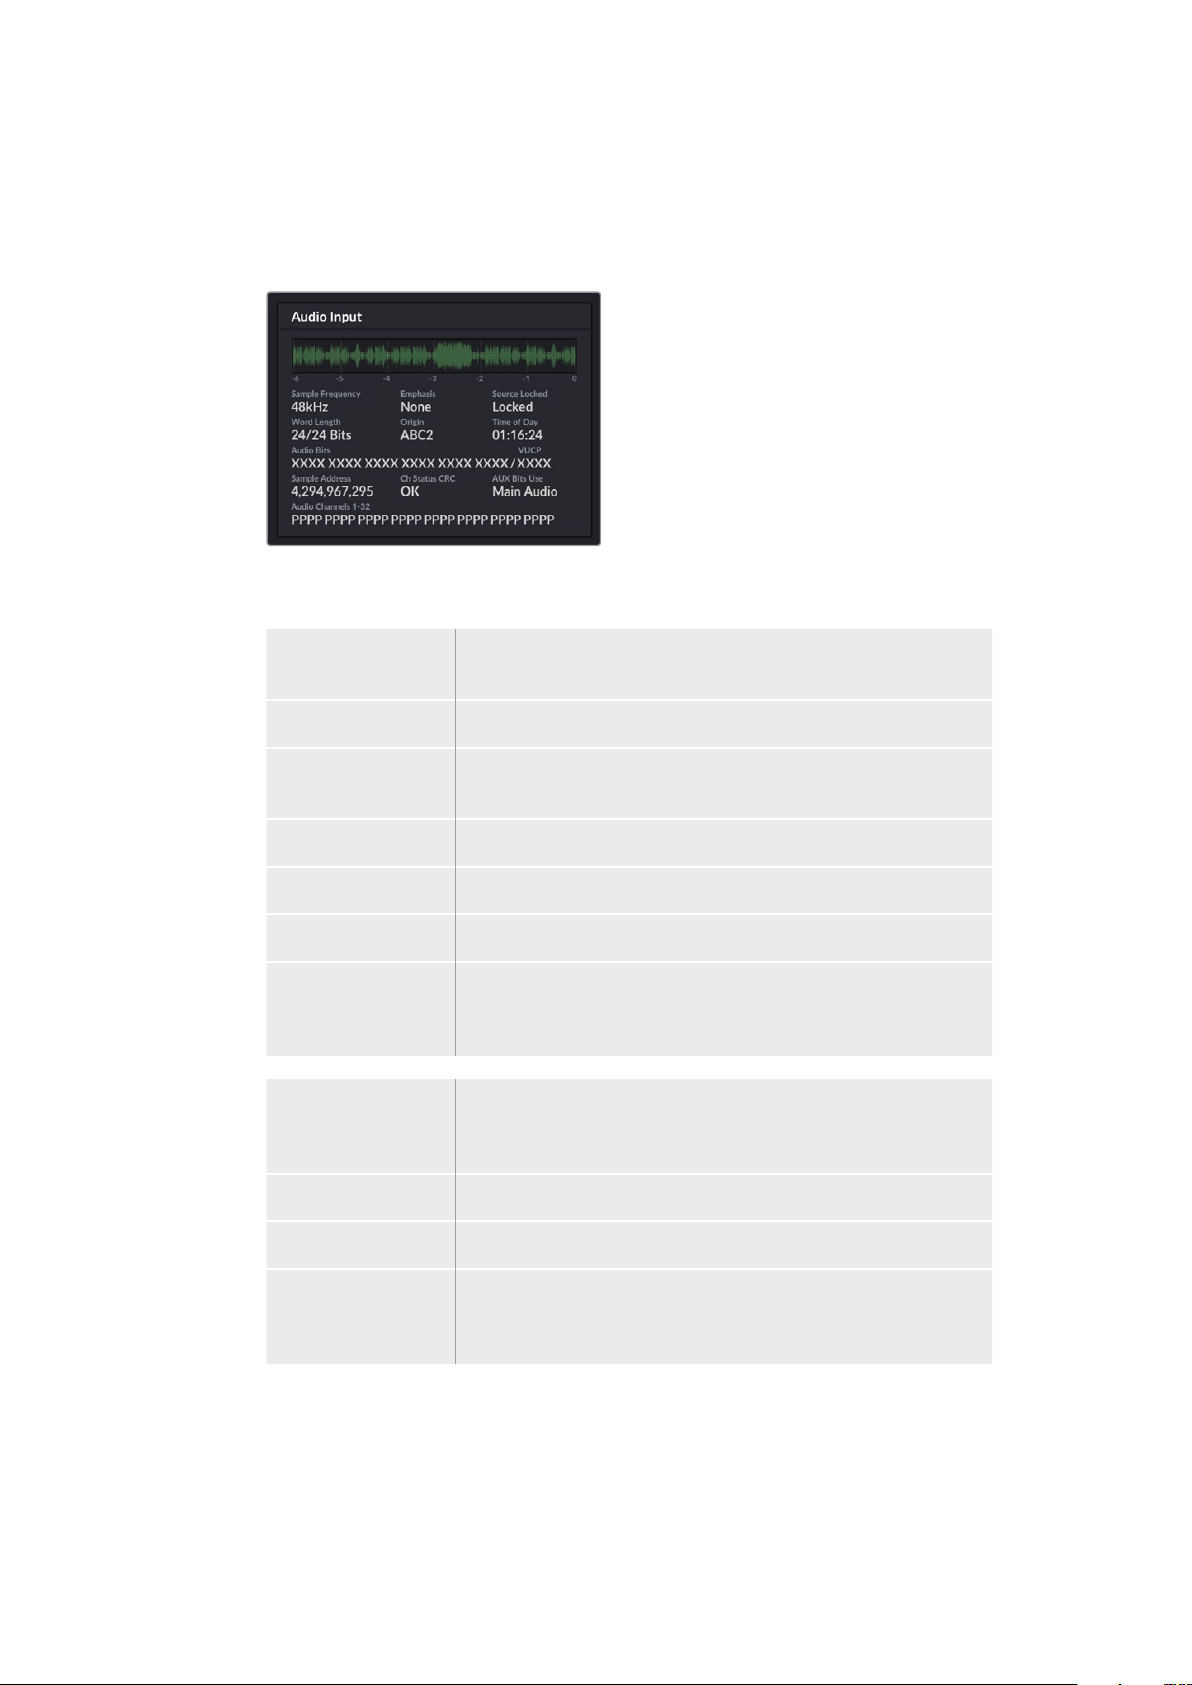
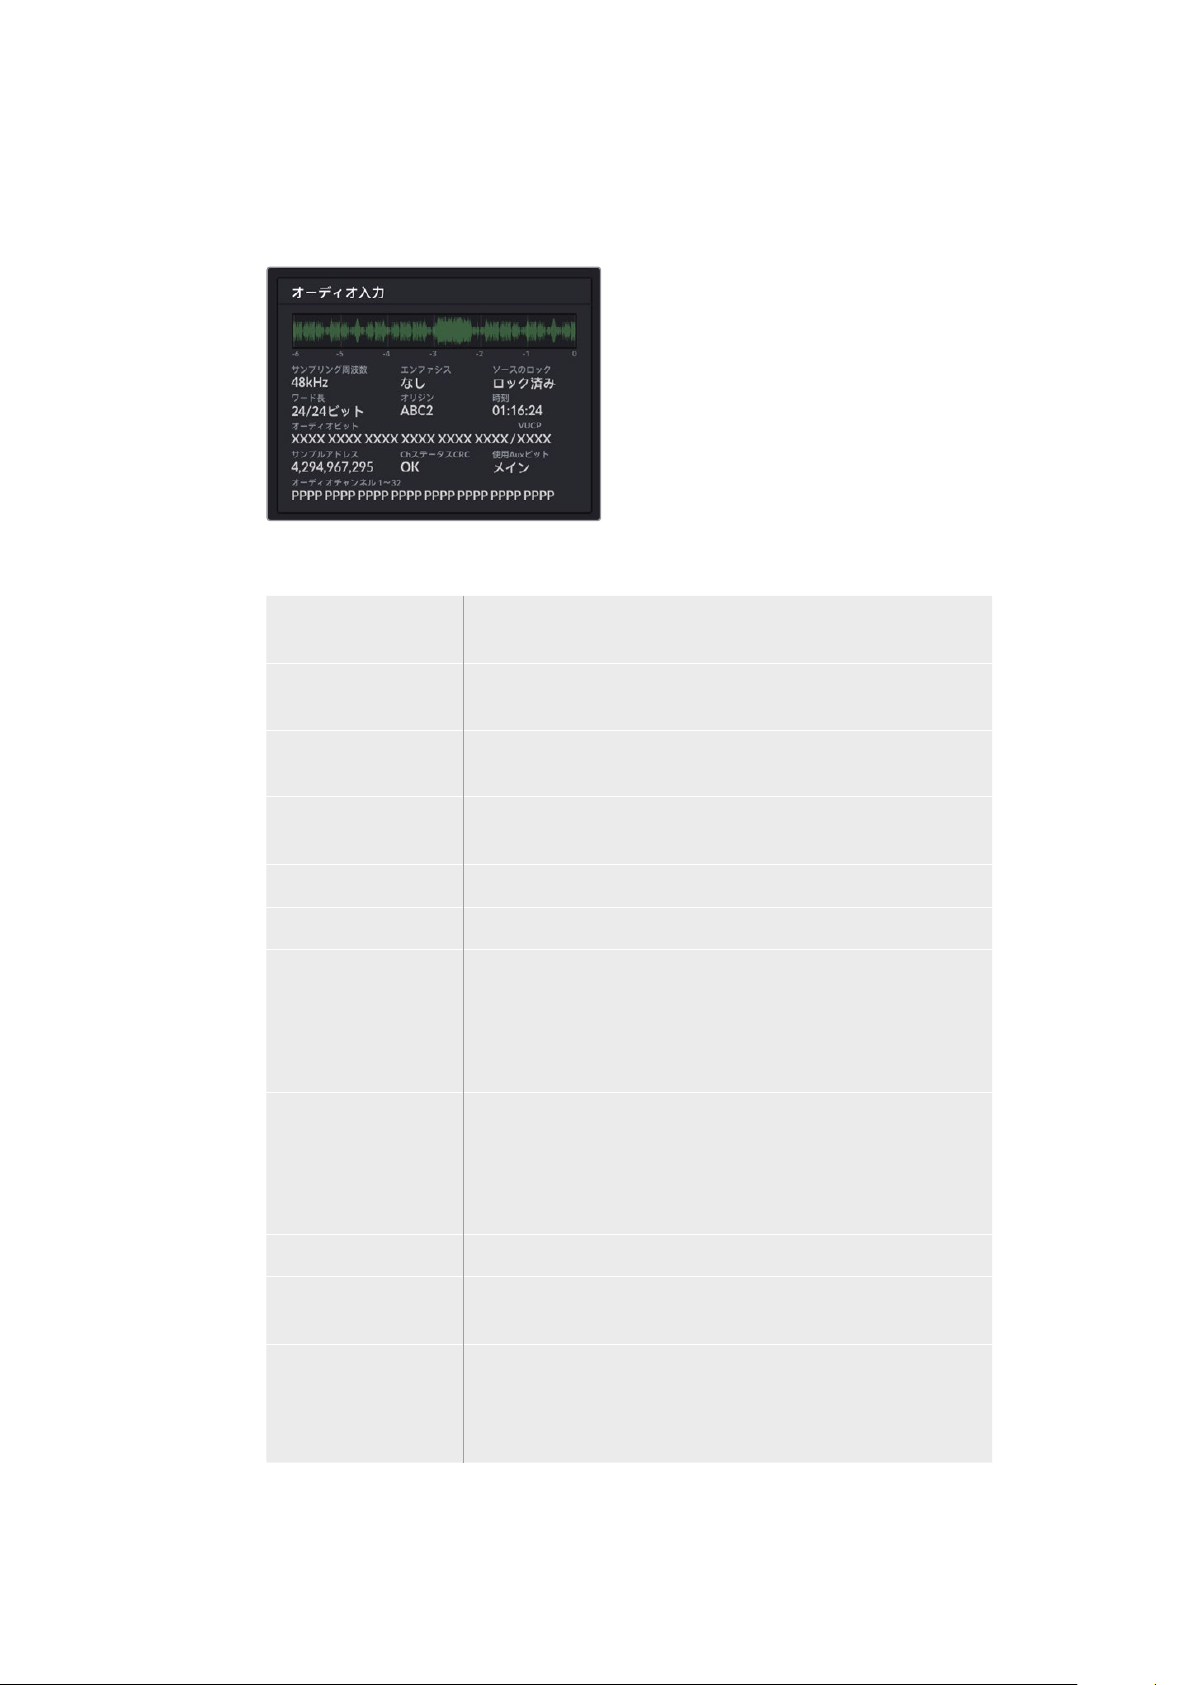
Audio Input
The audio waveform display at the top of the audio input panel shows the audio
information for the past 6 seconds of your live stream. This is continually updated and
scrolls from right to left.
Below the audio waveform display you can view detailed technical information about
the audio input.
Sample Frequency Displays the sample frequency rate of the audio embedded
in the SDI input.
Emphasis Indicates if your audio source has its emphasis option enabled.
Audio Source Lock Indicates whether the audio source frequency is locked to an
external reference source.
Word Length Shows the bit depth of the audio embedded in the SDI input.
Origin These four characters indicate the channel origin.
Time of Day Free run timecode.
Audio Bits Shows the bit activity in the audio samples embedded in the
SDI connection. Even if the audio channel status says you have
16, 20 or 24 bit audio, the audio bit activity will confirm it.
VUCP Reading VUCP bits from left to right: the ‘V’ bit indicates ‘valid’,
‘U’is the ‘user’ bit, ‘C’ is the ‘channel status’ bit, and ‘P’ is for
‘parity’. This field is like ‘audio bits’.
Sample Address Audio sample counter.
AUX Bits Use Indicates whether AUX bits are used for main audio.
Audio Channels 1-32 Each digit represents an embedded audio channel on the SDI input.
A ‘P’ shows that an audio channel is in use and a ‘-’ means that
there is no audio on that channel.
13Using the Monitor Output
Page 14
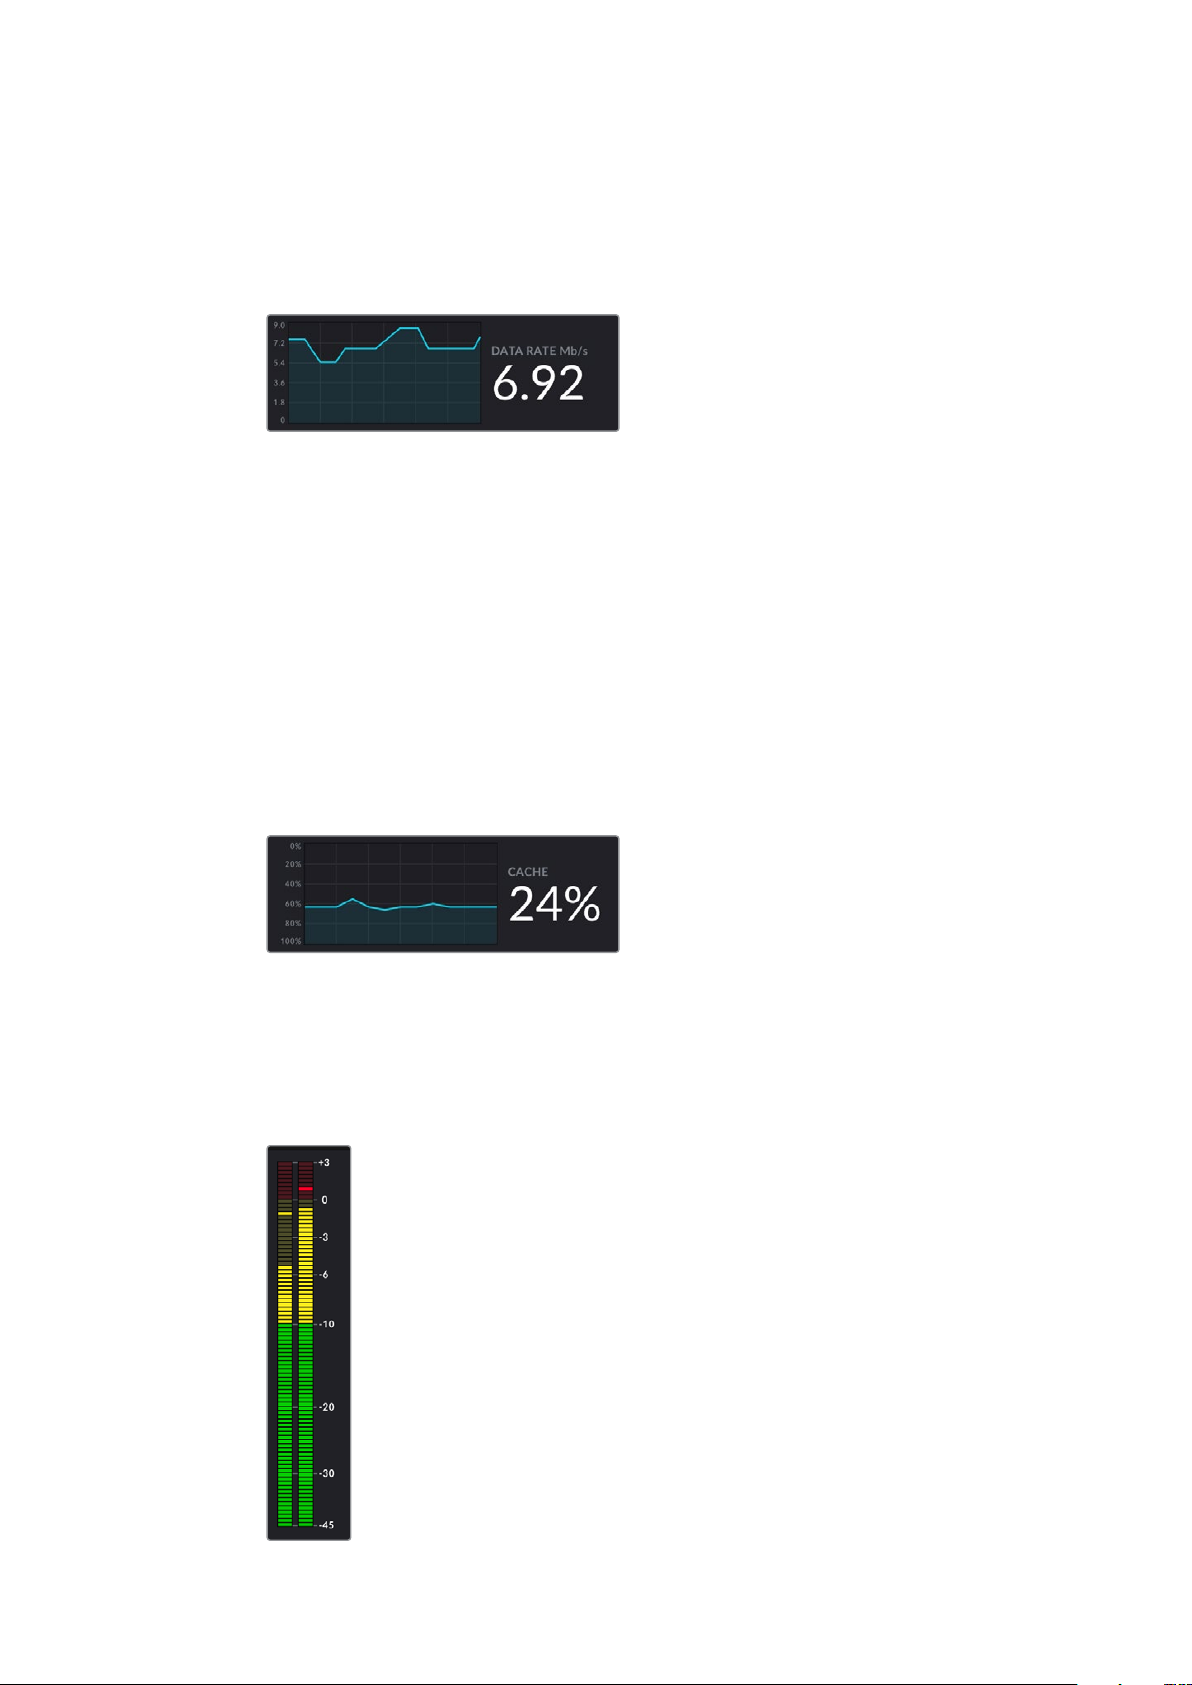
Data Rate Display
The data rate display shows the current data rate of of the encoder over the past
60 seconds. The data rate is measured in megabits per second. This indicator runs
consistently, even when off air, so you can accurately gauge your bandwidth before
going on air.
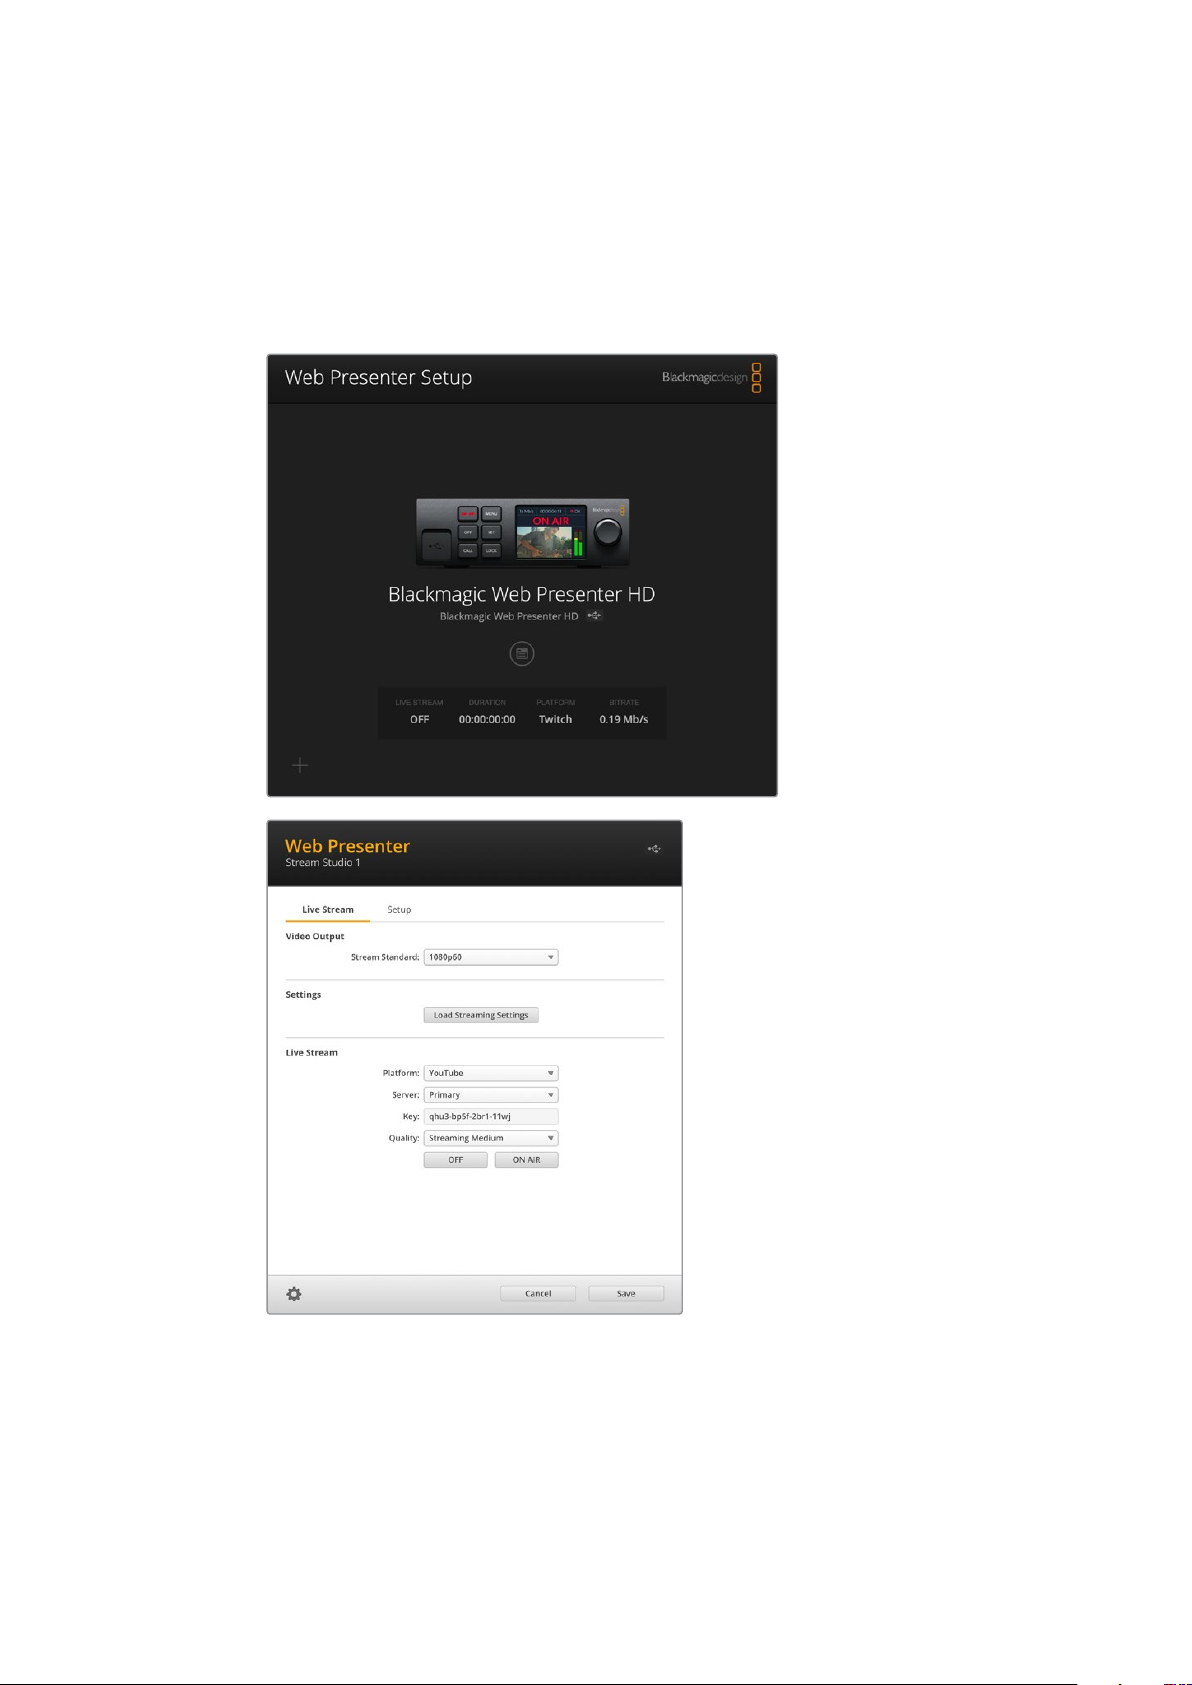
Cache Display
The cache display shows the percentage of Web Presenter HD’s built in memory buffer
that is currently in use and the graph shows the amount used over the past 60 seconds.
The cache is a small amount of internal memory that continuously records and plays the
program output. It acts as a safety measure if the streaming data rate decreases below
a level able to sustain video.
The variable nature of the internet is mostly due to network activity or wireless signal
strength, so if the broadcast data rate decreases, the buffer data will increase
accordingly. If the connection speed becomes slow enough that it cannot support the
video stream, the cache will fill with video frames to compensate. However, once the
cache is 100% full, the video stream will be compromised, so you will want to avoid a
full cache where possible. You can run a test by connecting a video feed and watching
the cache display in the monitor output without having to start the stream. If the cache
frequently approaches 100%, choose a lower quality in the live stream settings.
Audio Meters
You can monitor the levels of your audio source using the audio meters. These can be
set to display either PPM or VU levels in the Web Presenter’s menu settings. If your
audio levels are too high the meters will illuminate red and may mean that the audio in
your live stream could become distorted or clipped. Ideally try to keep your audio
towards the top of the green section and occasionally in to the yellow section.
14Using the Monitor Output
Page 15
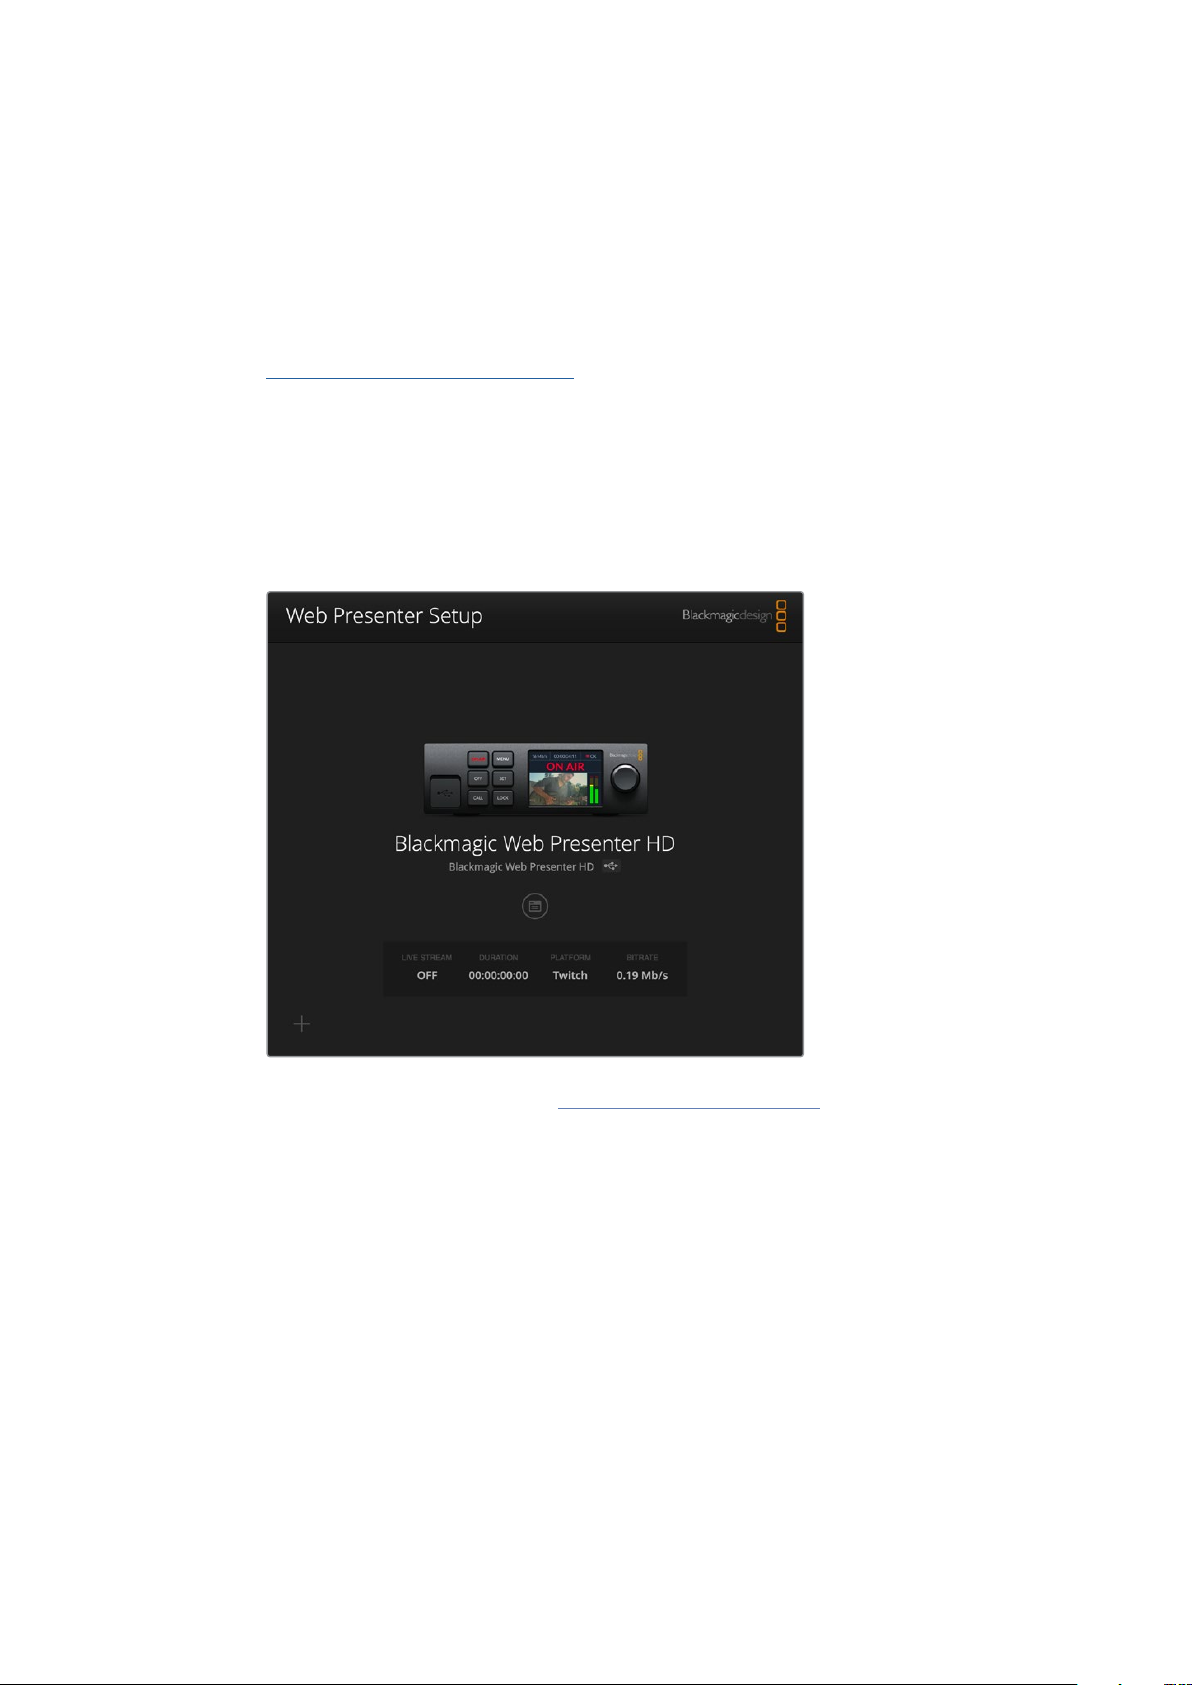
Using Web Presenter Setup
When your Blackmagic Web Presenter is connected to a network, any computer connected to
the same network can be used to control your Web Presenter remotely. With Blackmagic Web
Presenter Setup, you can access the same controls and settings that are available on the unit’s
front panel.
15Using Web Presenter Setup
Page 16
Live Stream Tab
Video Output
Stream Standard
Click on the ‘stream standard’ menu to select the video resolution setting for your
stream. Youcan choose from 720p25 up to 1080p60 or 2160p60 depending on which
WebPresenter model you are using.
Settings
If you have custom streaming settings, for example an XML file from a Blackmagic
ATEM Streaming Bridge, you can import them by clicking the ‘load streaming
settings’ button.
For more information on creating custom settings and connecting to ATEM Streaming
Bridge, refer to the ‘Creating Video Links with ATEM Streaming Bridge’ section later in
this manual.
Live Stream
Platform
Click the ‘Platform’ menu to select the streaming platform for your broadcast. Options
include YouTube, Facebook and Twitch. If you have imported custom streaming settings
they will also appear in the platform list.
Server
Select the server that is closest to your location by selecting it from the list. The server
list will vary depending on your chosen streaming platform.
Key
Enter the streaming key that has been assigned to your broadcast from the
streaming platform.
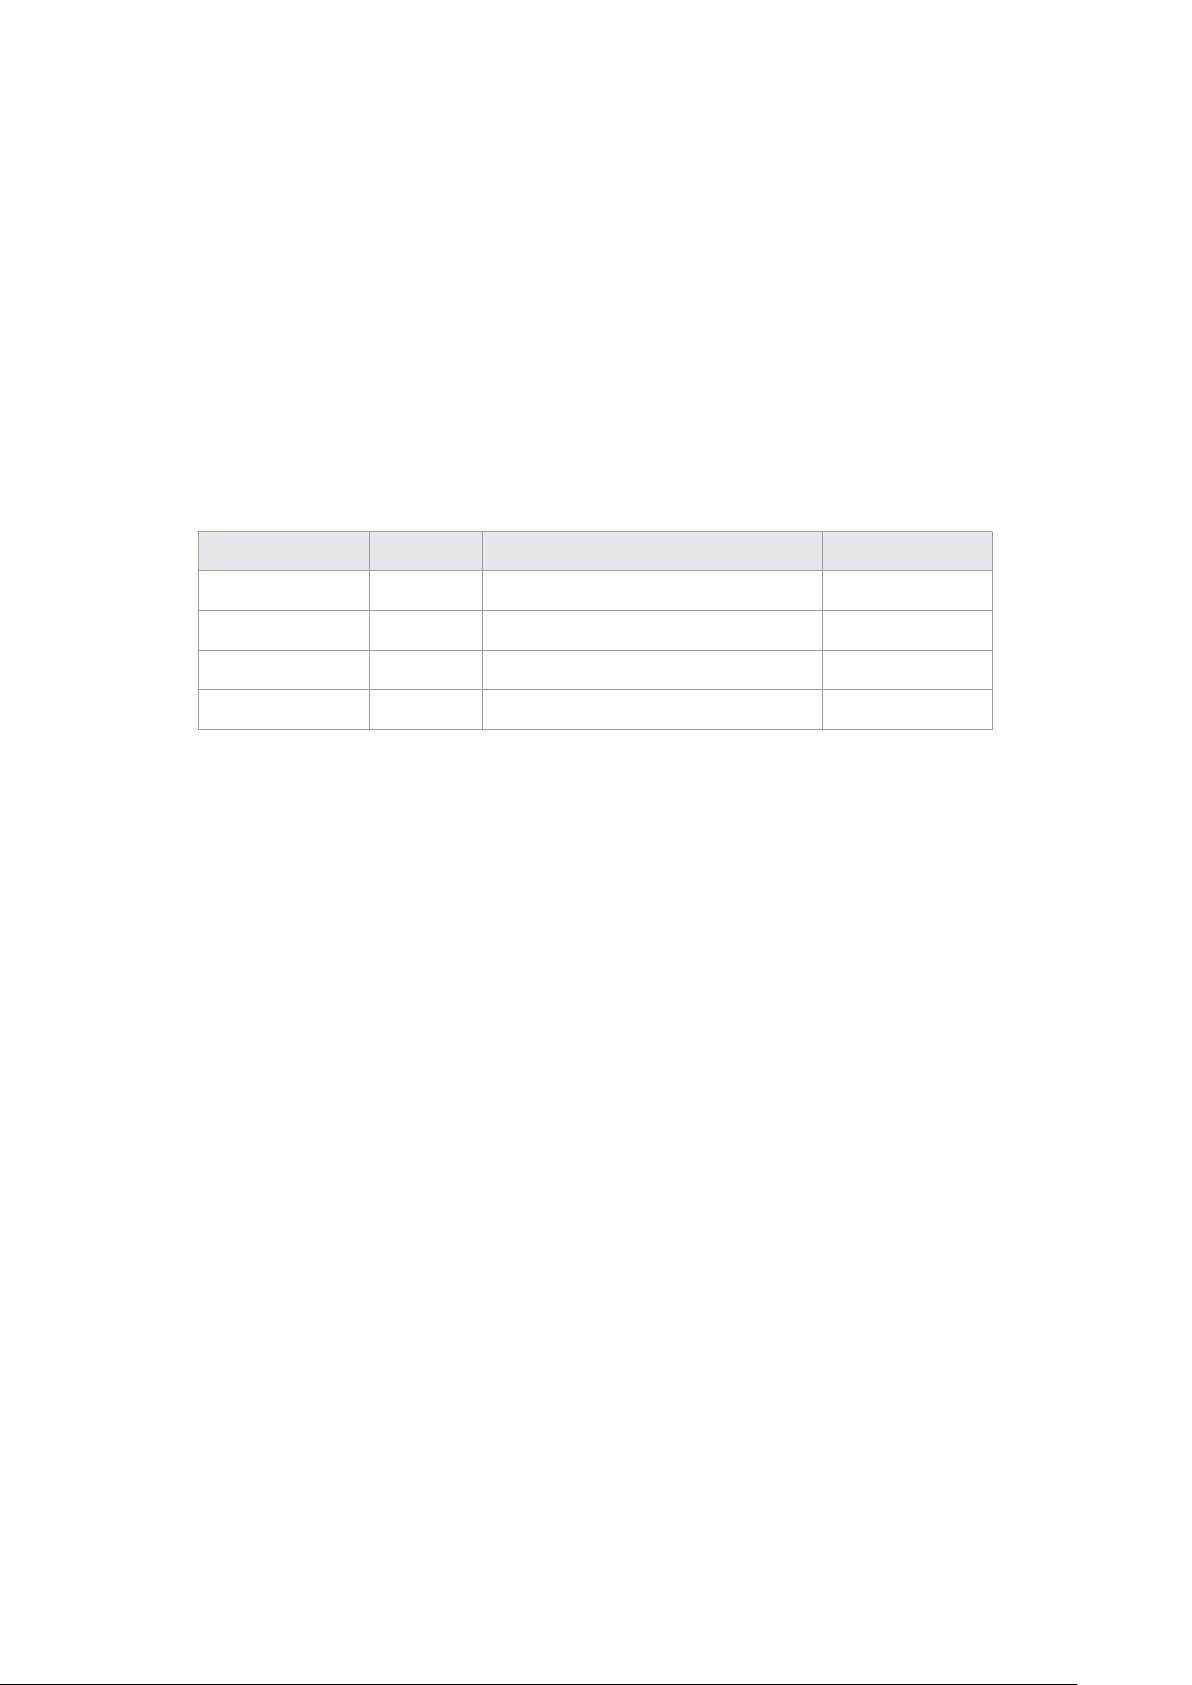
Quality
Select the streaming quality for HD or 4K, depending on which Web Presenter model
you are using.
HD 4K
HyperDeck High 45 to 70 Mb/s HyperDeck High 95 to 220 Mb/s
HyperDeck Medium 25 to 45 Mb/s HyperDeck Medium 66 to 150 Mb/s
HyperDeck Low 12 to 20 Mb/s HyperDeck Low 38 to 80 Mb/s
Streaming High 6 to 9 Mb/s Streaming High 34 to 51 Mb/s
Streaming Medium 4.5 to 7 Mb/s Streaming Medium 23 to 35 Mb/s
Streaming Low 3 to 4.5 Mb/s Streaming Low 13 to 20 Mb/s
The data rate used by the quality setting will change depending on the video standard
Web Presenter is using. For example, if you select ‘streaming high’ quality and are
running at 1080p24 then it would use the 6 Mb/s data rate.
16Using Web Presenter Setup
Page 17
As you can see in the table, the streaming data rates are lower compared to the
HyperDeck rates. This allows for transmitting data over the internet which typically uses
a lower bandwidth compared to recording data on a disk.
You will notice that each setting has 2 data rates mentioned. The lower number is used
for the lower frame rates of 24p, 25p and 30p, while the higher data rates are used
when you are running higher frame rates of 50p and 60p. It’s also worth noting that the
default setting for the streaming quality is Streaming High, as this gives a very high
quality streaming channel.
Off and On Air buttons
You can start or stop a live stream by using the ‘off’ and ‘on air’ buttons. The ‘on air’ button
illuminates red when a live stream is in progress.
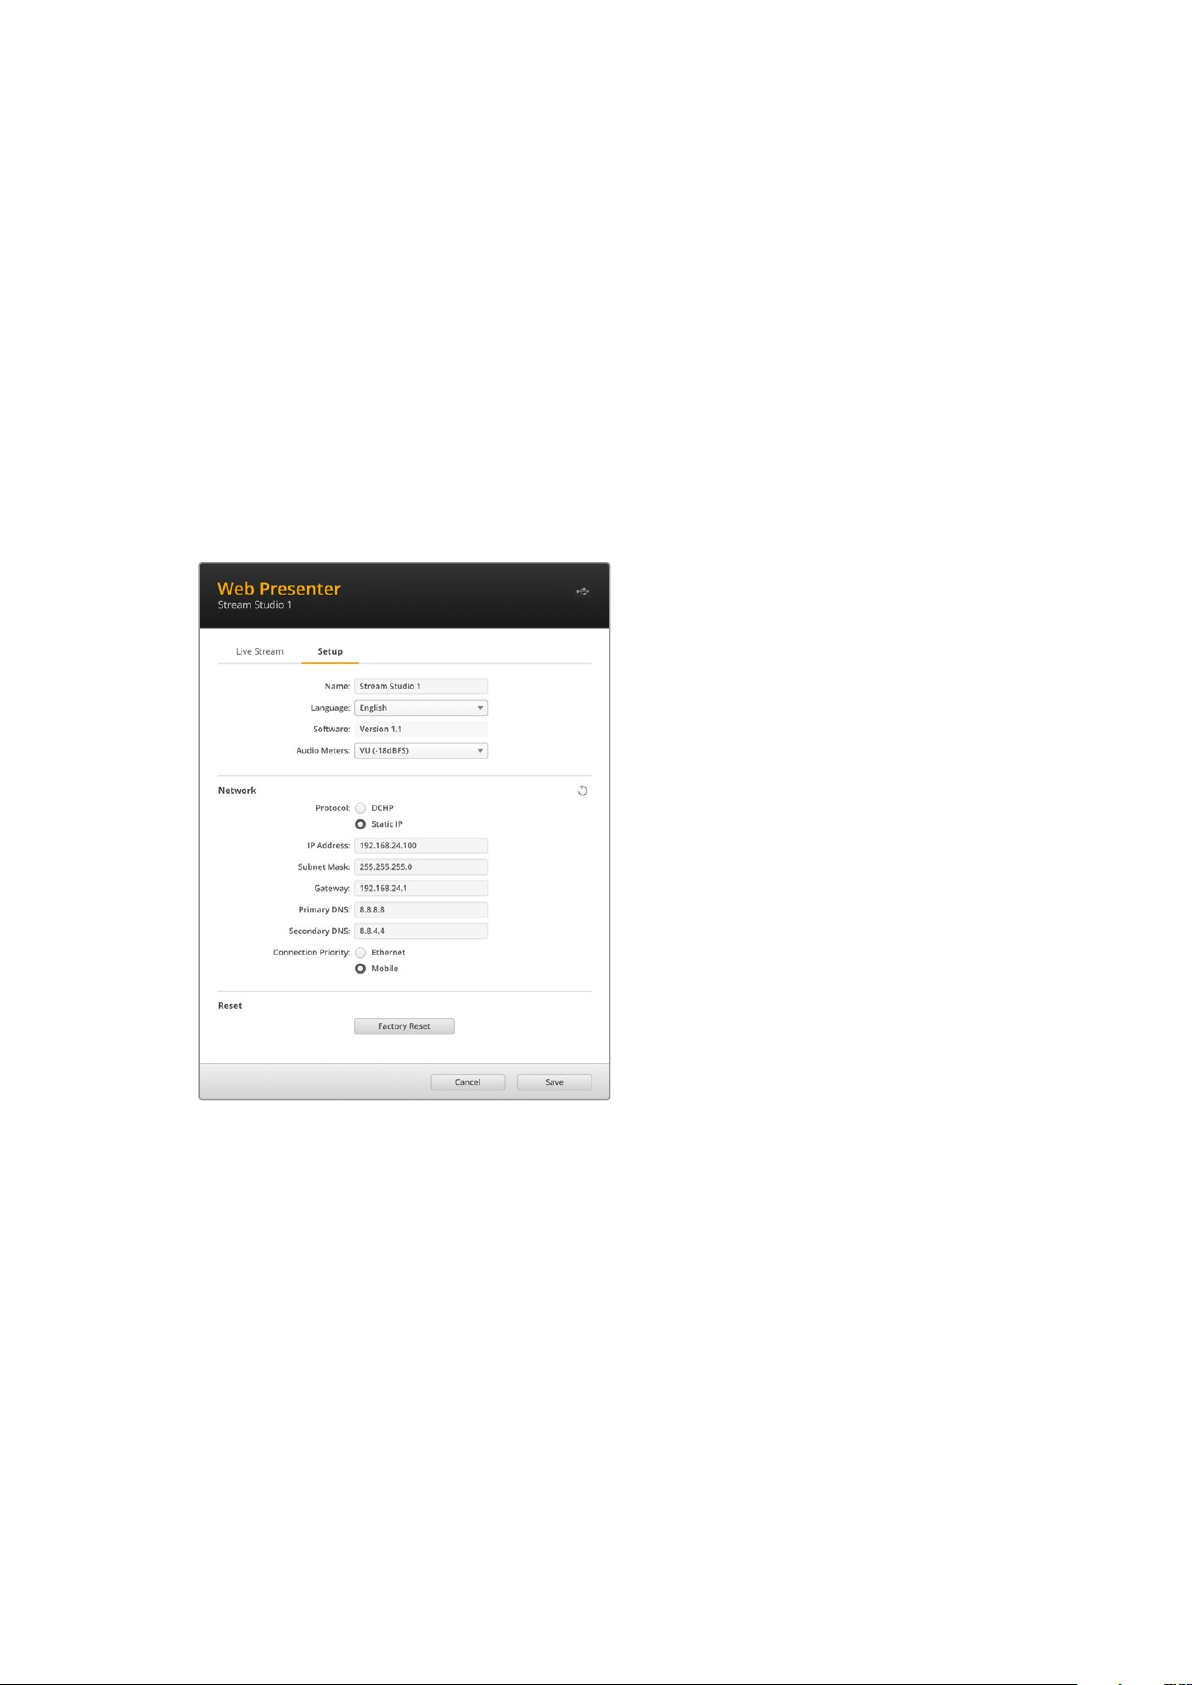
Setup Tab
Name
If you want to rename your Web Presenter, type a new name into the box and click ‘save’.
Language
Lets you change the unit’s language setting.
Software
Displays Web Presenter’s current software version.
Audio Meters
Use the menu to choose the type of audio meter to display. Choose from VU -18dBFS,
VU-20dBFS, PPM -18dBFS or PPM -20dBFS reference levels.
17Using Web Presenter Setup
Page 18

Network
These settings allow you to configure options such as choosing between connecting to a
network over DHCP or using a static IP address. For more information on connecting your
WebPresenter to a network, refer to the ‘network settings’ section.
Connection Priority - When Ethernet and a mobile phone are both connected to
theWeb Presenter, this setting lets you choose which connection will be used for
streaming. For more information on mobile tethering, refer to the ‘streaming using
yoursmartphone’ section
Reset
Reset your Web Presenter by clicking the ‘factory reset’ button.
Network Settings
Your Web Presenter can connect to the network using a static IP address or by using DHCP.
DHCP - will automatically set an IP address for your unit and connect it to your network without
any settings changed.
The dynamic host configuration protocol, or DHCP, is a service on network servers and routers
that automatically finds your Web Presenter and assigns an IP address. DHCP makes it easy to
connect equipment via Ethernet and make sure that IP addresses do not conflict with each
other. Most computers and network switches support DHCP.
Static IP - If you want to set the IP address yourself, simply set the protocol setting to ‘static IP’
and change the IP settings manually.
A static IP address is one that won’t change even if your Web Presenter is rebooted.
Using a static IP address might be necessary if your connecting your Web Presenter to a
corporate network. If you have a network administrator, it’s possible your network might have
custom IP addresses for all the equipment connected to it. It’s best to check with your network
administrator if they are managing your computers and network in your company.
Setting Internet Sharing
forDirectStreaming
If you are unable to plug Web Presenter directly into a network switch or internet router, youcan
share your computer’s internet connection with Web Presenter through its Ethernet port.
To set up Blackmagic Web Presenter for direct streaming:
1 Set your Web Presenter to use DHCP.
2 Configure your computer to share its internet connection through its Ethernet port.
Mac: in System Preferences, click ‘sharing’ then select ‘internet sharing’ from the
‘service’ list. In the ‘share your connection from’ menu, choose ‘wi-fi’ if your Mac is
connected to the internet over wifi. In the ‘to computers using’ list, select ‘ethernet’.
Inthe ‘service’ list, tick the ‘internet sharing’ checkbox. When you are asked if you are
sure you want to turn on internet sharing, click ‘start’.
18Setting Internet Sharing forDirectStreaming
Page 19

Windows: right click the ‘start’ icon and select ‘network connections’. The ‘network
status’ screen appears. Click on ‘change adapter options’. This lists your computer’s
network connections. Right click on the internet connection and select ‘properties’.
Onthe ‘sharing’ tab, tick ‘allow other network users to connect through this computer’s
internet connection’. Select a network connection in the menu then click ‘OK’.
3 Plug Web Presenter into your computer’s Ethernet port. After a few seconds,
DHCPassigns an IP address to Web Presenter.
4 Confirm your Web Presenter is connected to the internet via Ethernet by observing
Ethernet icon in the top right corner on the unit’s LCD screen.
Streaming Using Your Smartphone
Blackmagic Web Presenter is able to stream by tethering to your smartphone. This means you
can stream to the world from any location where your smartphone has a cellular connection.
To set up mobile tethering:
1 Connect your smartphone to Blackmagic Web Presenter using a USB-C cable. You can
use the USB-C connector on the front or back panel.
2 Enable your smartphone’s internet hotspot.
On your iOS device open settings > personal hotspot and make sure ‘allow others to join’
option is on. On your Android device swipe the screen to display the quick menu. Press and
hold the hotspot icon and then turn on USB tethering.
Now you can press the ‘on air’ button on your Blackmagic Web Presenter to go live.
TIP Once you’ve finished streaming, we recommend you switch off tethering
connections to save your smartphone’s battery life.
If your Web Presenter had an Ethernet cable connected, you are advised to confirm it is
configured to use mobile internet tethering. Open the Web Presenter Setup utility and go to the
‘setup’ tab. In the ‘network’ section, set the connection priority to ‘mobile’.
Using Blackmagic Web Presenter as a Webcam
Software such as Skype or Zoom should automatically set Web Presenter as the webcam, so
when you launch the application you will see video from your Web Presenter immediately. If the
application doesn’t select Web Presenter automatically, manually set it touse Web Presenter as
the webcam and microphone.
Below is an example of how to set the webcam settings on Skype.
1 In Skype’s menu bar, open the ‘video and audio settings’.
2 Click on the ‘Camera’ menu and select your Web Presenter from the list. You will see
the video from Web Presenter appear in the preview window.
3 Go to the ‘Microphone’ menu and select your Web Presenter as your audio source.
19Using Blackmagic Web Presenter as a Webcam
Page 20
Setting up Open Broadcaster
Open Broadcaster is an open source application that works as a streaming platform between
your Web Presenter and your favorite streaming software like YouTube, Twitch, Facebook Live
and others. Broadcaster compresses your video to a bit rate that is easily managed by your
streaming app.
Below is a demonstration of how to set up Open Broadcaster to stream the webcam output
from your Web Presenter using YouTube Live as the streaming service.
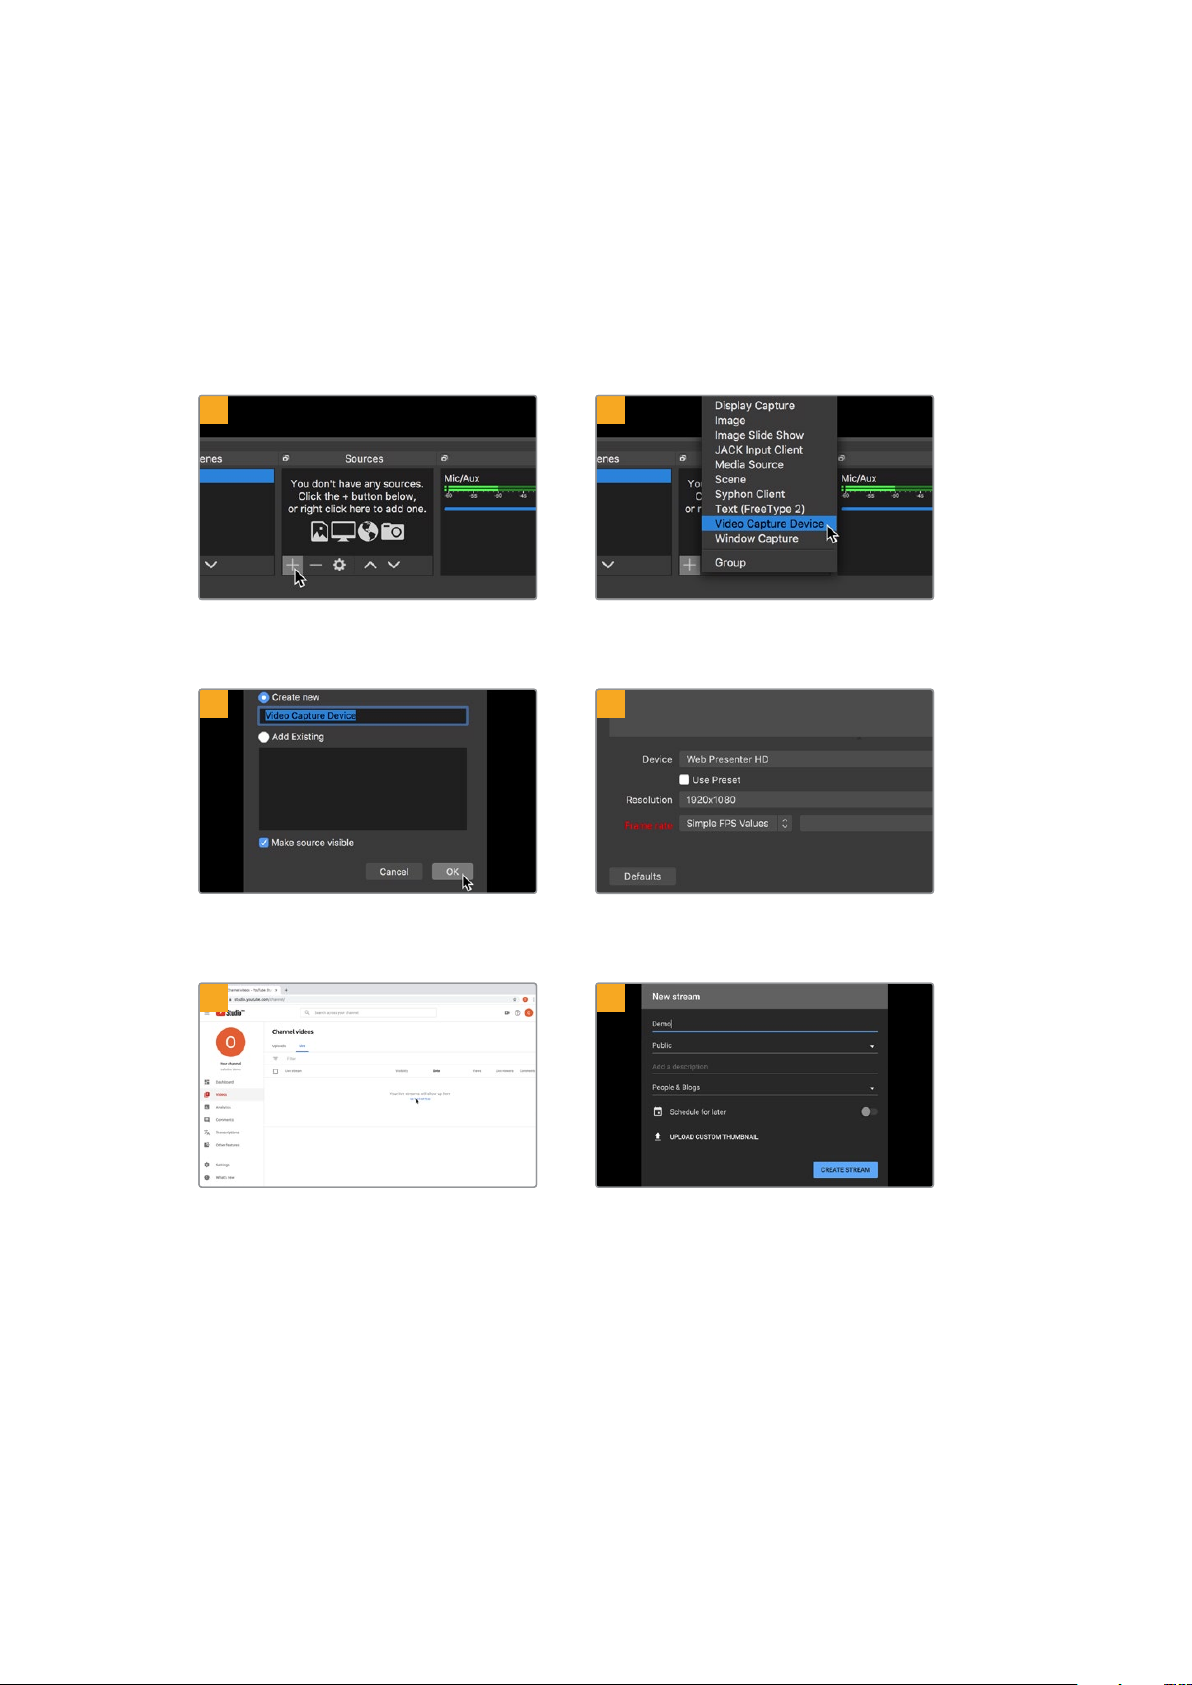
1 2
Launch Open Broadcaster and click on the
plussymbol in the ‘sources’ box.
3
Name the new source and click ‘OK’. In the device menu, select your WebPresenter
Select ‘Video Capture Device’.
4
model and click ‘OK’.
5 6
Now go to your YouTube account. Click on the
‘golive’ button then click ‘stream’.
In the YouTube ‘stream’ options, enter your
broadcast details and click ‘create stream’.
20Using Blackmagic Web Presenter as a Webcam
Page 21
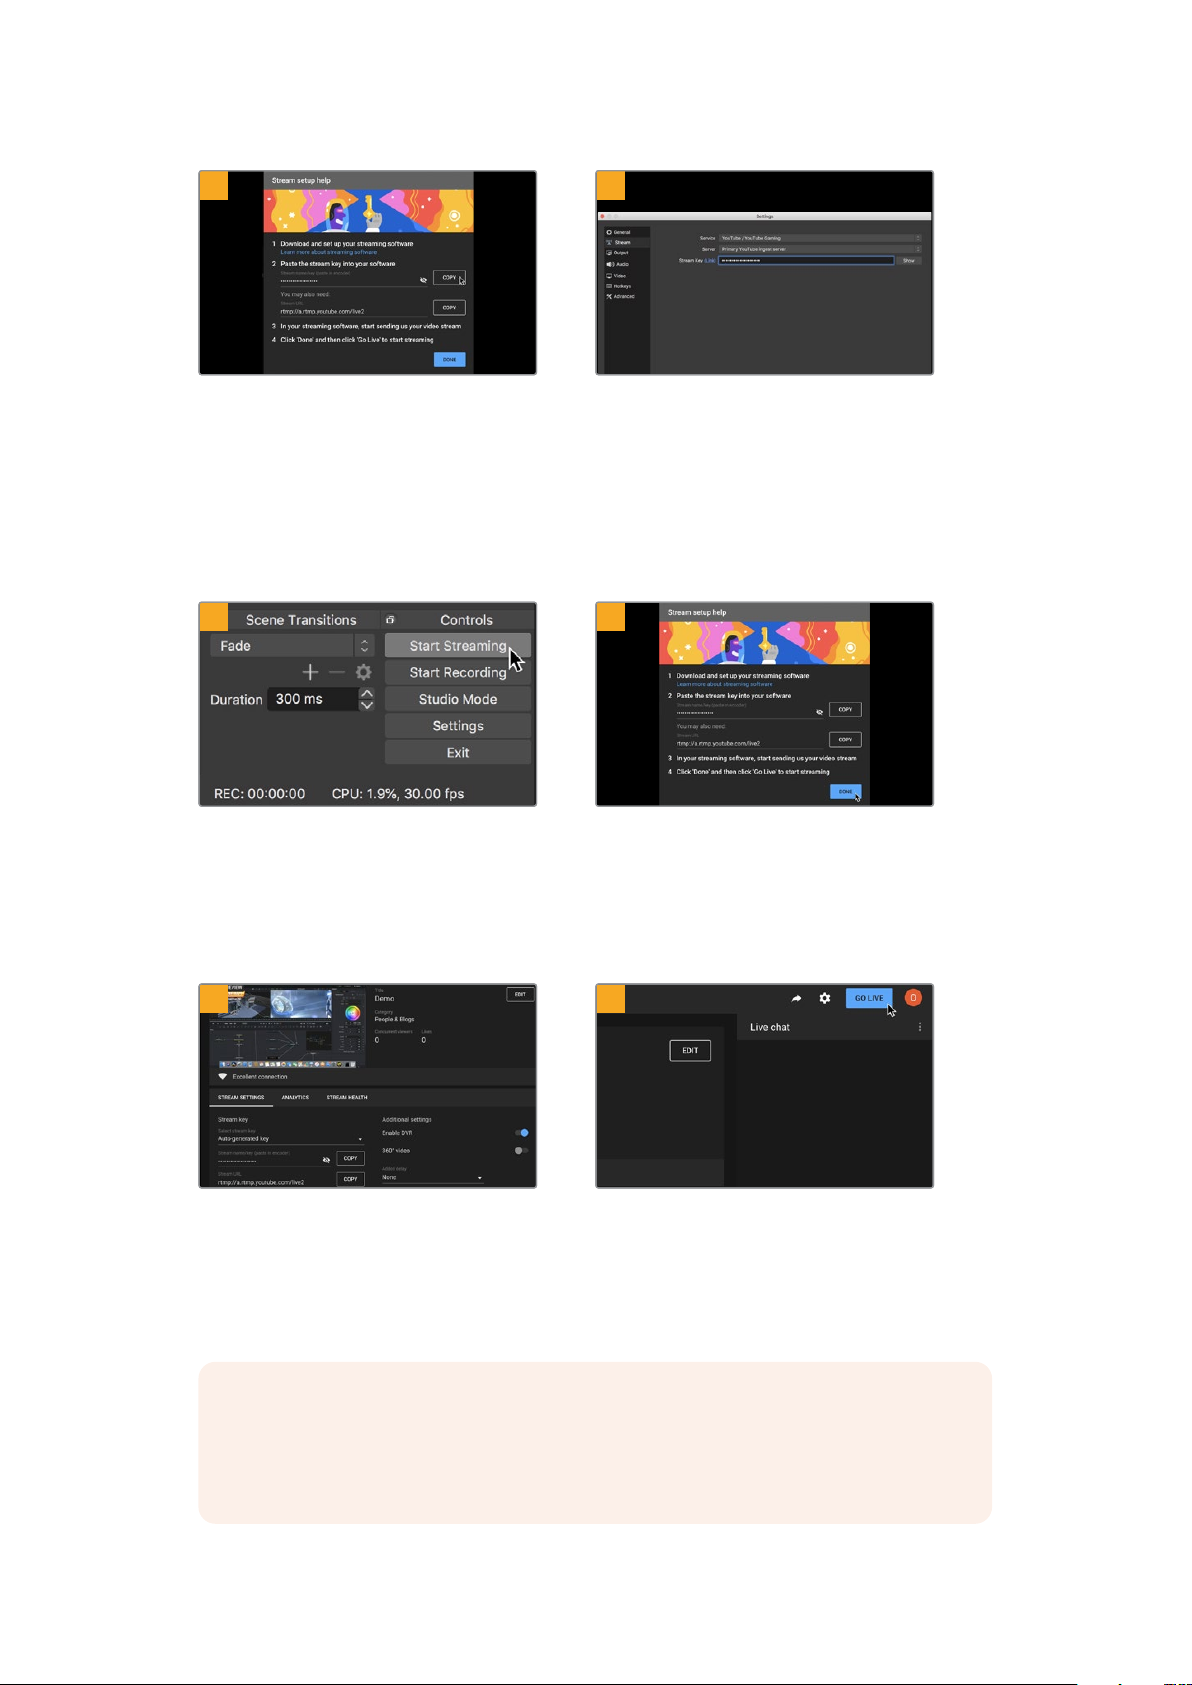
7 8
YouTube will now generate a stream key
that will direct Open Broadcaster to your
YouTube account.
Click the ‘copy’ button next to the stream key.
Copy the stream key that you will now paste
intoOpen Broadcaster.
9 10
To connect Open Broadcaster’s broadcast
link to YouTube, click ‘start streaming’
in the bottom right corner of the screen.
This establishes the link to YouTube from
Open Broadcaster and from here everything
will now be set using YouTube Live.
Return to Open Broadcaster and open the
preferences by clicking on ‘OBS/preferences’
in themenu bar. Select ‘stream’. Now paste
in the stream key you copied from YouTube
and click ‘OK’.
You will now see the video from your
Web Presenter in the Open Broadcaster streaming
preview window.
Go back to YouTube Live and you will
see the webcam program output from your
Web Presenter in the background. Click ‘done’.
11 12
With Open Broadcaster now communicating
with YouTube Live, you are ready to begin your
broadcast. Now it’s time to perform your final
checks and make sure everything is good.
You are now broadcasting live on YouTube with Open Broadcaster.
NOTE Due to the nature of internet streaming there can often be a delay, so it’s
important to watch the stream on YouTube and confirm your program has finished
before clicking ‘end stream’ to make sure you don’t accidentally cut the end of your
broadcast short.
If you are all set, you can now begin your
broadcast by clicking ‘go live’.
21Using Blackmagic Web Presenter as a Webcam
Page 22
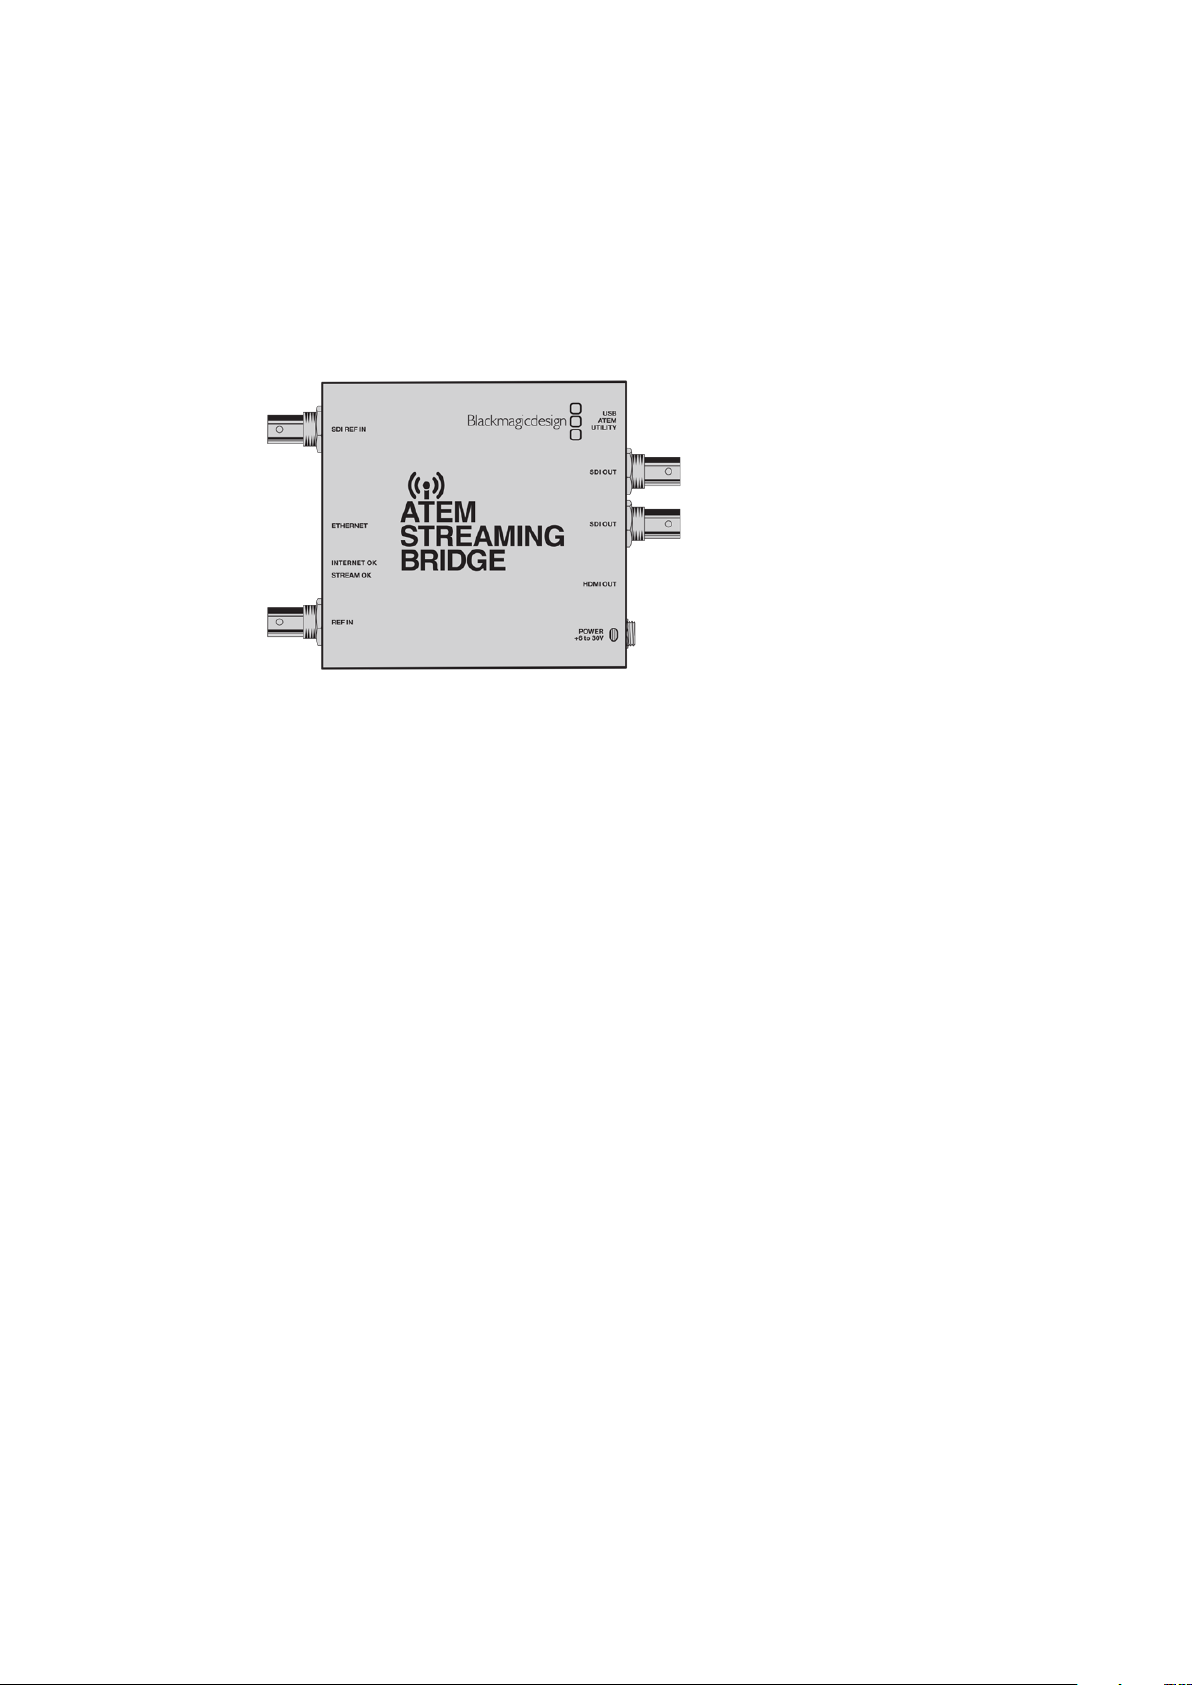
Creating Video Links with ATEM Streaming Bridge
The ATEM Streaming Bridge allows you to decode the streaming video from any Web Presenter
and convert it back to SDI or HDMI video. It allows you to send video over your local network,
or to anywhere in the world via the internet.
If your ATEM Streaming Bridge is connected to the same local network as your WebPresenter,
it will be listed in the ‘platform’ menu on the live stream tab in WebPresenter Setup.
Otherwise, you can load a streaming setting XML file on a USB drive connected to the
WebPresenter or via your computer using Web Presenter Setup.
A good example of how Blackmagic Web Presenter can work with ATEM Streaming Bridge is
transmitting a weather report to a studio from a remote location. All you need for transmission
from location is a Web Presenter and an internet connection, which could be your smartphone
or by connecting to a network.
Back at the studio, the ATEM Streaming Bridge takes the internet feed and converts it to SDI
soit can be connected to the main switcher at the studio.
The workflow setup for this example would be:
1 On location, the Blackmagic Web Presenter is connected to the Program SDI output
onthe switcher. For example an ATEM Television Studio HD.
2 Blackmagic Web Presenter is then connected to a Smartphone.
3 Back at the studio, ATEM Streaming Bridge is also connected to the internet
via Ethernet.
4 The ATEM Streaming Bridge then sends the converted SDI video feed from the internet
to the studio switcher’s SDI input for the main news broadcast.
For your studio to connect ATEM Streaming Bridge to the Web Presenter’s internet feed, you
will need to launch the ATEM Setup utility and configure the internet settings. This includes
generating an XML file containing all the streaming settings which are then loaded into the Web
Presenter on location.
Refer to the ATEM Mini instruction manual for details on how to connect ATEM Streaming Bridge
to the internet and generate the streaming XML file.
22Creating Video Links with ATEM Streaming Bridge
Page 23
Loading the Streaming XML File into the Remote Web Presenter
With the settings file emailed to the location, the location crew simply loads the XML into the
Web Presenter using Blackmagic Web Presenter setup, then presses on air to start streaming
the weather report to the studio!
It’s important to mention that once you have loaded the streaming XML file, you can then start
and stop streaming without ever having to load it again. This makes it easy to set up a constant
video link between the Web Presenter and the ATEM Streaming Bridge.
As long as the ATEM Streaming Bridge at the studio hasn’t changed the streaming and network
settings and is still looking for that Web Presenter, it will always find it no matter where it is on
the internet. At any location, you can simply plug your Web Presenter into the internet, press
‘onair’, and it will immediately be streaming to the ATEM Streaming Bridge back at the studio.
You can find more details on how to use ATEM Streaming Bridge in the ATEM Mini manual
which can be downloaded at www.blackmagicdesign.com/support
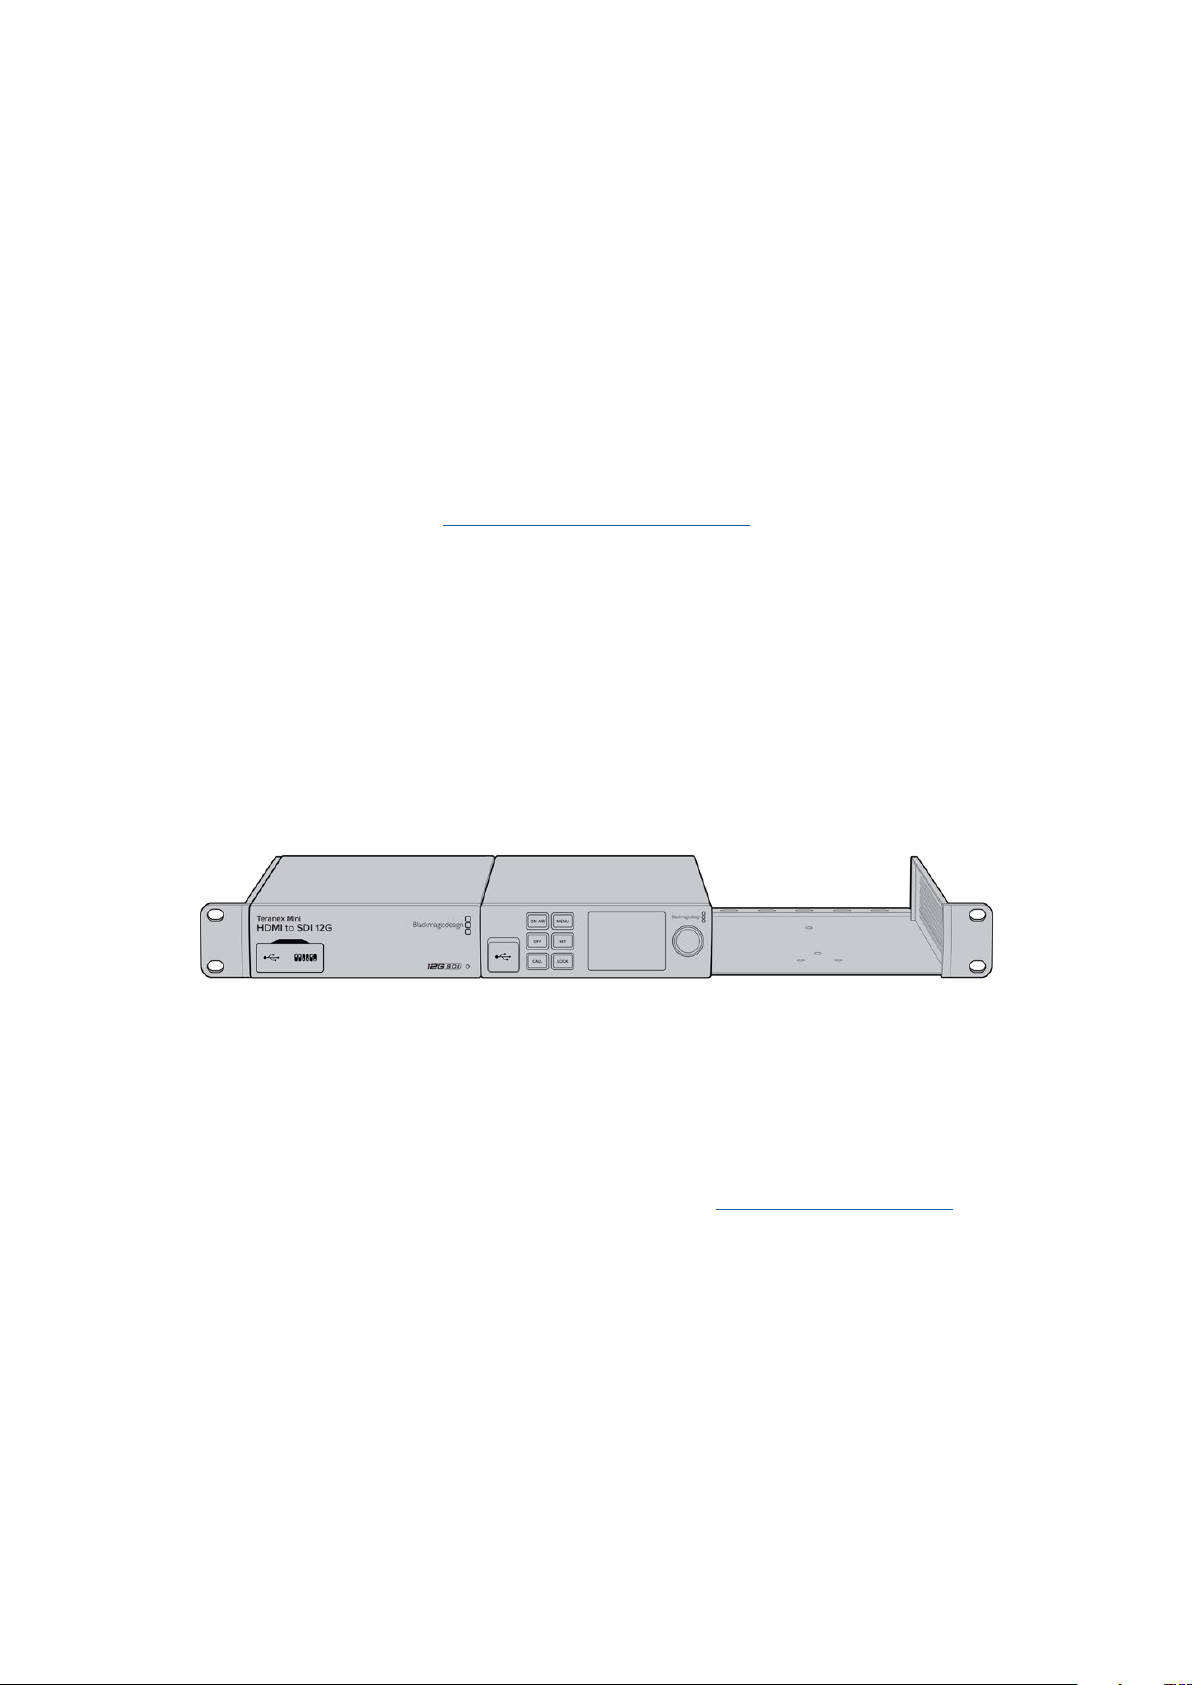
Teranex Mini Rack Shelf
Teranex Mini Rack Shelf is a 1 RU shelf that lets you install your Blackmagic Web Presenter into a
broadcast rack or road case. Your Web Presenter is so small, you can install it next toother
Blackmagic Design equipment that shares a similar form factor, such as Teranex Mini
converters, Blackmagic MultiView 4 and HyperDeck Studio Mini. For example, installing a
Blackmagic Web Presenter together with ATEM Television Studio HD gives you the ability
toswitch eight video inputs and live stream the program output through your Web Presenter.
This modular design lets you build your own custom video solutions that are portable and
easy to use!
Teranex Mini Rack Shelf lets you rack mount your Blackmagic Web Presenter
with other Blackmagic Design equipment that shares the same form factor,
such as Teranex Mini Converters and ATEM Television Studio HD
Installing your Blackmagic Web Presenter into a Teranex Mini Rack Shelf is as easy as removing
the unit’s rubber feet, if installed, and fastening the unit to the base of the shelf using the
supplied screws. The Teranex Mini Rack Shelf ships with two original blank panels which you
can use to cover gaps if you don’t need to install additional Blackmagic Design equipment.
For more information check the Blackmagic Design website at www.blackmagicdesign.com
23Teranex Mini Rack Shelf
Page 24
Updating the Internal Software
The setup utility lets you update your Web Presenter’s internal software in addition to
configuring the streaming settings, network settings and streaming quality.
To update the internal software:
1 Download the newest Blackmagic Web Presenter installer from
www.blackmagicdesign.com/support.
2 Run the Blackmagic Web Presenter installer and follow the onscreen instructions.
3 After installation is complete, connect your Web Presenter to the computer via the USB
connector on the rear panel or on the front panel under the plastic dust cover.
4 Launch Blackmagic Web Presenter Setup and follow any onscreen prompt to update
the internal software. If no prompt appears, the internal software is up to date and there
is nothing further you need to do.
Download the latest setup utility for your BlackmagicWeb Presenter from
theBlackmagic Design support center at www.blackmagicdesign.com/support
24Updating the Internal Software
Page 25

Developer Information
Blackmagic Web Presenter Ethernet Protocol
v1.0
Overview
The Blackmagic Web Presenter Ethernet Protocol is a line-oriented, text-based protocol to
control a Web Presenter. The Blackmagic Web Presenter Ethernet Protocol is available for
Blackmagic Web Presenter HD. Lines from the Web Presenter server will be separated by an
ASCII LF sequence. Messages from the user may be separated by LF or CR LF.
Connection
The Web Presenter server is accessed by connecting to TCP port 9977 on a Web Presenter.
Connection Response
Upon connection, the Web Presenter server sends a dump of the device’s state. The Web
Presenter server sends information in blocks, with each having an identifying header followed
by a colon. A block spans multiple lines and is terminated by a blank line. Each line in the
protocol is terminated by a newline character.
Following the header, a block contains either a single multi-line string or a sequence of key/
value pairs arranged one per line. The first colon on a line is used to delimit the key and the
value. A value may be a comma separated list. In this case, values in the list must have the “,”
and “\” characters escaped with a “\” character.
To be resilient to future protocol changes, clients should ignore blocks they do not recognize,
up to the trailing blank line. Within recognized blocks, clients should ignore keys they do not
recognize.
The protocol preamble block is always the first block sent by the Web Presenter server:
PROTOCOL PREAMBLE:
Legend
End of line
↵
... and so on
Orange Text Client Generated
Grey Text Server Generated
Ve r s io n: 1.0
↵
The version field indicates the protocol version. When the protocol is changed in a compatible
way, the minor version number will be updated. If incompatible changes are made, the major
version number will be updated.
The initial status dump is concluded by the end prelude block:
END PRELU DE:
↵
↵
↵
↵
25Developer Information
Page 26

Status Updates
When any device parameter is changed on the Web Presenter server by any client, such as the
Blackmagic Web Presenter Setup utility, the Web Presenter server resends the applicable
status block, containing only the items that have changed. Status updates can also occur due to
external changes such as tethering to a smartphone or when a streaming service is
disconnected.
For example. if the input video mode is set to Auto, the following block will be sent:
ST R EA M SETT I NGS:
Video Mode: Auto
↵
↵
↵
Requesting Changes
To change one or more parameters in a block, the client should send the appropriate block
header in the same form the Web Presenter server sends, followed by the key/value pairs to be
changed. For example, to change the input video format to 1080p59.94, the user should send
the following block:
ST R EA M SETT I NGS:
Video Mode: 1080p59.94
↵
The block must be terminated by a blank line. On receipt of a blank line, the Web Presenter
server will either acknowledge the request by responding:
ACK
↵
↵
or if unable to parse the block responding with:
NACK
↵
↵
↵
↵
After a positive response, the client should expect to see a status update from the Web
Presenter server showing the status change. This is likely to be the same as the command that
was sent, sometimes followed by other blocks providing data specific to the change.
ST R EA M SETT I NGS:
Video Mode: 1080p59.94
↵
↵
↵
If the Web Presenter server does not understand a key in the requested block, the key will be
ignored. If an invalid value is provided for a known key, then the request is ignored and the Web
Presenter will respond with the existing value for the key. In both cases the Web Presenter
server will still respond with an ACK.
ST R EA M SETT I NGS:
Video Mode: UnsupportedMode
↵
ACK
↵
↵
ST R EA M SETT I NGS:
Video Mode: 1080p59.94
↵
↵
↵
↵
↵
26Developer Information
Page 27

Requesting a Status Dump
The user may request that the Web Presenter server resend the complete state of any status
block by sending the block header, followed by a blank line. In the following example, the user
requests the Web Presenter server resend the stream settings:
ST R EA M SETT I NGS:
↵
ACK
↵
↵
ST R EA M SETT I NGS:
Video Mode: 1080p59.94
...
↵
↵
↵
↵
Protocol Blocks
Identity Block
The identity block contains information to identify the connected Web Presenter.
Block Syntax
The following example shows the Identity Block for a Blackmagic Web Presenter HD.
IDE N T I T Y:
Model: Blackmagic Web Presenter HD
Label: Blackmagic Web Presenter HD
Unique ID: 00112233445566778899A ABBCCDDEEFF
↵
↵
↵
↵
↵
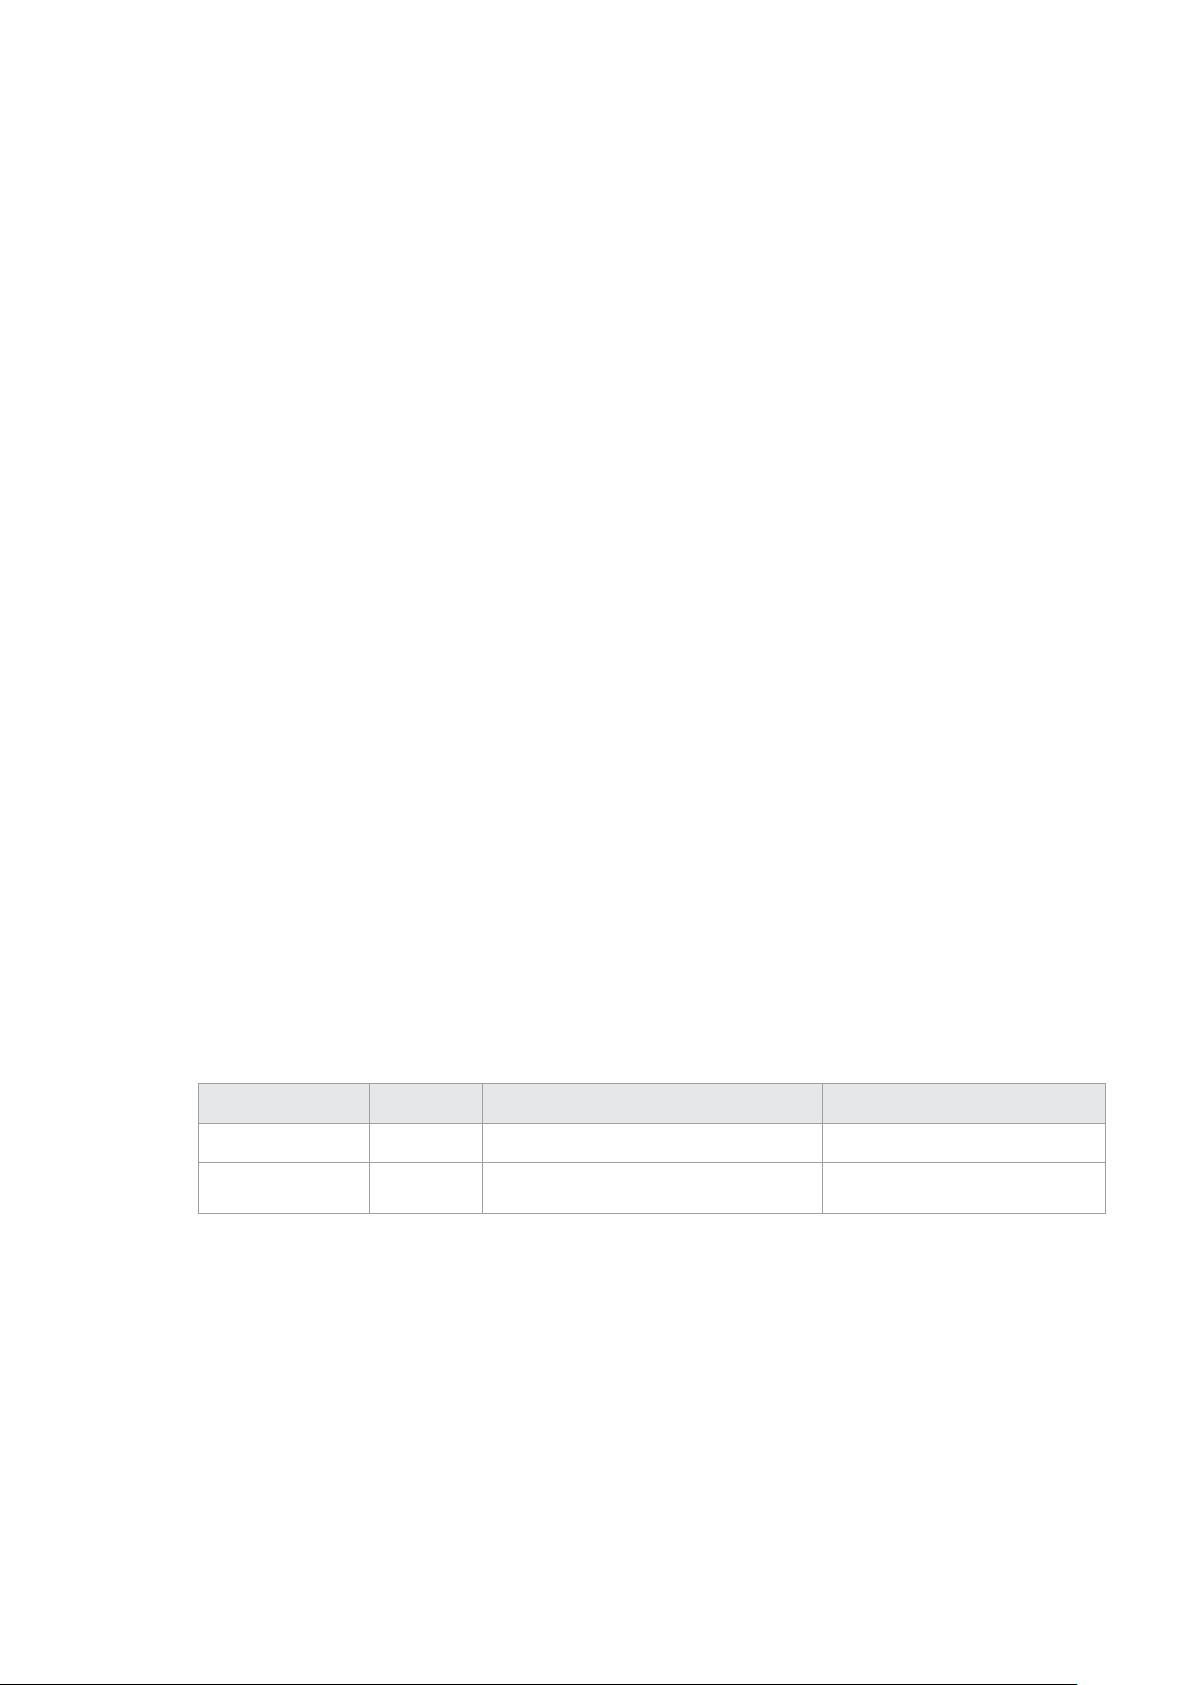
Parameters
Key Read/Write Description Valid Values
Model Read only The Web Presenter model name String
Label Read/Write A display name for the Web Presenter String
Unique ID Read only A device specific unique identifier Hexadecimal ID
Changing Device Label
A device label to identify the Web Presenter can be changed by sending an identity block with
label key.
IDE N T I T Y:
Label: My Web Presenter
↵
ACK
↵
↵
↵
↵
27Developer Information
Page 28
Version Block
The version block contains hardware and software version information for the connected
Web Presenter.
Block Syntax
VERSION:
Product ID: BE73
Hardware Version: 0100
Software Version: 48858B6F
Software Release: 2.0
↵
Parameters
Key Read/Write Description Valid Values
Product ID Read only The Web Presenter product ID Hexadecimal ID
Hardware Version Read only The Web Presenter hardware version Hexadecimal version
Software Version Read only The Web Presenter software version Hexadecimal version
Software Release Read only The Web Presenter software release version Version Number
↵
↵
↵
↵
↵
Network Blocks
The network block contains the TCP/IP networking configuration for the connected Web
Presenter.
Block Syntax
This example shows the output for a connected Web Presenter. It displays 2 networking
interfaces - the Gigabit Ethernet interface and option for a tethered smartphone.
The network settings prefixed with Current show the active TCP/IP settings, and are read-only.
The Current settings reflect either the DHCP or Static configuration, depending on the
Dynamic IP flag.
NET WOR K:
Interface Count: 2
Default Interface: 0
St a tic D N S S er v ers: 8.8.8.8, 8.8.4.4
Current DNS Servers: 192.168.1.1, 8.8.4.4
↵
NETWORK INTERFACE 0:
Name: Cadence GigE Ethernet MAC
Priority: 1
M A C A d dress: 00:11:22:33:44:55
Dynamic IP: true
Cu r r e nt A d d resse s: 1 92.168.1.10/255.255.255.0
Current Gateway: 192.168.1.1
Stat i c A d d re sses: 10.0.0.2/255.255.255.0
Stat i c G a t e w a y: 10.0.0.1
↵
↵
↵
↵
↵
↵
↵
↵
↵
↵
↵
↵
↵
↵
↵
28Developer Information
Page 29

NETWORK INTERFACE 1:
Name: USB Ethernet
Priority: 0
↵
M A C A d d ress: 00:00:00:00:00:00
Dynamic IP: true
Cu r re nt A d d ress e s: 0.0.0.0/255.255.0.0
Cu r re nt G ate w ay: 0.0.0.0
Stat i c A d d re sses: 10.0.0.2/255.255.255.0
Stat i c G a t e w a y: 10.0.0.1
↵
↵
↵
↵
↵
↵
↵
↵
↵
Parameters
Network Block
Key Read/Write Description Valid Values
Interface Count Read only
Default Interface Read only The default networking interface Integer
Static DNS Servers Read only The IP addresses of the static DNS servers
Current DNS Servers Read only The IP addresses of the current DNS servers
Network Interface Block
Key Read/Write Description Valid Values
Name Read only The name of the networking interface String
Priority Read/Write
MAC Address Read Only MAC address of the networking interface IEEE 802 MAC address
Dynamic IP Read/Write Selects DHCP or Static IP configuration
Current Addresses Read Only The current IP address and Subnet mask {IPv4 address}/{Subnet Mask}
Current Gateway Read Only The current IP gateway address IPv4 address
The number of networking interfaces
supported by the Web Presenter
The priority of the network interface. When
multiple network interfaces are available,
the high priority interface will become the
default
Integer
Comma separated list of
IPv4 addresses
Comma separated list of
IPv4 addresses
Unsigned integer. The higher
number is the higher priority
true - DHCP enabled
false - Static IP
Static Addresses Read/Write
Static Gateway Read/Write Static gateway address when DHCP disabled IPv4 address
Status IP address and subnet mask when
DHCP disabled
{IPv4 address}/{Subnet Mask}
Changing Networking Settings
The network can be configured to use either DHCP or a static configuration. To enable DHCP
on Network Interface 0:
NETWORK INTERFACE 0:
Dynamic IP: true
↵
↵
↵
29Developer Information
Page 30

ACK
↵
↵
NETWORK INTERFACE 0:
Dynamic IP: true
↵
↵
↵
To set a fixed IP address, supply all static parameters:
NETWORK INTERFACE 0:
Dynamic IP: false
St a t ic Add resse s: 192.168.1.2/255.255.255.0
Static G at e w a y: 192.168.1.1
↵
↵
↵
↵
↵
ACK
↵
↵
NETWORK INTERFACE 0:
Dynamic IP: false
St a t ic Add resse s: 192.168.1.2/255.255.255.0
Static G at e w a y: 192.168.1.1
↵
↵
↵
↵
↵
Changing network settings may cause the IP connection to be dropped.
UI Settings Block
The UI settings block contains the front panel LCD and monitor output settings for the
connected Web Presenter.
Block Syntax
UI S ETTIN G S:
Available Locales: en_US.UTF-8, zh_CN.UTF-8, ja_JP.UTF-8, ko_KR.UTF-8, es_
ES.UTF-8, de_DE.UTF-8, fr_FR.UTF-8, ru_RU.UTF-8, it_IT.UTF-8, pt_BR.UTF-8,
tr_TR.UTF-8
Current Locale: en_US.UTF-8
Available Audio Meters: PPM -18dB, PPM -20dB, VU -18dB, VU -20dB
Current Audio Meter: PPM -20dB
↵
↵
↵
↵
↵
↵
Parameters
Key Read/Write Description Valid Values
Available Locales Read only The locales available in the Web Presenter Comma separated list of locales
Current Locale Read/Write The current locale for Web Presenter
Available Audio Meters Read only
Current Audio Meter Read/Write The current audio meter
The available audio meters supported by the
Web Presenter
Refer to the locales from the
Available Locales field
Comma separated list of audio
meter types
Refer to the audio meters from the
Available Audio Meters field
30Developer Information
Page 31

Stream Settings Block
The stream settings block contains the stream configuration for the connected Web Presenter.
Block syntax
This example shows the output for a connected Web Presenter. The stream settings prefixed
with Current show the active stream settings and are writable. The stream settings prefixed by
Available show the available stream settings for the device or platform and are read-only. To
view the available servers or quality levels for a stream service, the Current Platform stream
setting should be set first.
ST R EA M SETT I NGS:
↵
Available Video Modes: Auto, 1080p23.98, 1080p24, 1080p25, 1080p29.97,
1080p30, 1080p50, 1080p59.94, 1080p60, 720p25, 720p30, 720p50, 720p60
Video Mode: 1080p59.94
Current Platform: YouTube
Current Server: Primary
Current Quality Level: Streaming Medium
Stream Key: abc1-def2-ghi3-jkl4-mno5
↵
↵
↵
↵
↵
Available Default Platforms: Facebook, Twitch, YouTube, Twitter /
Periscope, Restream.IO
Available Custom Platforms: My Platform
Available Servers: Primary, Secondary
↵
↵
↵
Available Quality Levels: HyperDeck High, HyperDeck Medium, HyperDeck Low,
Streaming High, Streaming Medium, Streaming Low
↵
↵
Parameters
Key Read/Write Description Valid Values
Available Video Modes Read only
Video Mode Read/Write The current video mode
Current Platform Read/Write The selected streaming platform
Current Server Read/Write
Current Quality Level Read/Write The current streaming quality level
Stream Key Read/Write
Available Default Platforms Read only
Available Custom Platforms Read only
Available Servers Read only
Available Quality Levels Read only
The video modes available
in the Web Presenter
The current server for the
streaming platform
The stream key for the streaming
platform
The available default
streaming platforms
The custom streaming platforms
loaded in the Web Presenter
The available servers for the
selected streaming platform
The available quality levels for the
selected streaming platform
Comma separated list of video modes
Refer to the video modes from the
Available Video Modes field
Refer to the platforms from the
Available Default Platforms and
Available Custom Platforms fields
Server is dependent on selected
Current Platform
Quality level is dependent on
selected Current Platform
String
Comma separated list of default
platforms
Comma separated list of custom
platforms
Comma separated list of servers
Comma separated list of quality levels
31Developer Information
Page 32
Changing Stream Settings
The stream settings can be changed by providing a stream settings block. The following is an
example of streaming a 1080p59.94 input on Twitch with a medium stream quality.
ST R EA M SETT I NGS:
Video Mode: 1080p59.94
Current Platform: Twitch
Current Server: US West: Los Angeles, CA
Current Quality Level: Streaming Medium
Strea m Key: live_123456789_1aB2cD3eF4gH5iJ6kL7mN8oP9qR0sT
↵
ACK
↵
↵
ST R EA M SETT I NGS:
Video Mode: 1080p59.94
Current Platform: Twitch
Current Server: US West: Los Angeles, CA
Current Quality Level: Streaming Medium
Strea m Key: live_123456789_1aB2cD3eF4gH5iJ6kL7mN8oP9qR0sT
↵
↵
↵
↵
↵
↵
↵
↵
↵
↵
↵
↵
↵
Stream XML Block
The stream XML block allows users to configure the Web Presenter with a custom configuration
file in XML format.
Block syntax
The following example shows an XML file - Custom.xml has been loaded to configure the
stream settings in the Web Presenter.
ST R EA M XML:
Files: C u sto m.x ml
↵
↵
↵
Parameters
Key Read/Write Description Valid Values
Files Read/Write The XML files loaded in Web Presenter Comma separated list of filenames
Action Write only The stream XML action
Remove
Remove All
Adding a Stream XML file
An XML file can be loaded onto a Web Presenter by sending the stream xml command with a
filename, then provide the contents of the XML file. After adding the XML file, the Available
Custom Platforms field in the STREAM SETTINGS block will be updated with the new platforms,
however the Current items will remain unchanged.
32Developer Information
Page 33

For the Stream XML block to be parsed correctly, any blank lines should be removed from the
XML files.
STREAM XML Custom.xml:
<?xml version=”1.0” encoding=”UTF-8”?>
<streaming>
<service>
<name>My Custom Platform</name>↵
...
</s e r v i c e >
</s t r e a m ing>
↵
ACK
↵
↵
STREAM XML Custom.xml:
<?xml version=”1.0” encoding=”UTF-8”?>
<streaming>
<service>
<name>My Custom Platform</name>↵
...
</s e r v i c e >↵
</s t r e a m ing>
↵
ST R EA M XML:
Files: C u sto m.x ml
↵
ST R EA M SETT I NGS:
Available Custom Platforms: My Custom Platform
↵
↵
↵
↵
↵
↵
↵
↵
↵
↵
↵
↵
↵
↵
↵
↵
Removing a Stream XML file
An XML file can be removed from the Web Presenter by sending the stream xml command with
the remove action.
ST R EA M XML:
Action: Remove
Files: C u sto m.x ml
↵
ACK
↵
↵
ST R EA M XML:
Files:
↵
ST R EA M SETT I NGS:
Available Custom Platforms:
↵
↵
↵
↵
↵
↵
↵
↵
33Developer Information
Page 34

Removing all Stream XML files
All XML files can be removed from the Web Presenter by sending the stream xml command with
the remove all action. In the example, following the remove all action, the loaded stream XML
files and available custom platforms are both displayed as empty.
ST R EA M XML:
Action: Remove All
↵
↵
↵
ACK
↵
↵
ST R EA M XML:
Files:
↵
↵
↵
ST R EA M SETT I NGS:
Available Custom Platforms:
↵
↵
↵
Stream State Block
The stream state block provides the streaming status of the Web Presenter.
The Web Presenter server will send a stream state block update whenever there is a change to
the Status field. Due to frequency of changes to Duration and Bitrate fields, these fields need to
be polled by the client by requesting a Stream State block.
Block syntax
STREAM STATE:
St atus: Idle
↵
↵
↵
Parameters
Key Read/Write Description Valid Values
Status Read only The stream state of the Web Presenter,
updated when the stream status changes
Action Write only The Web Presenter shutdown action. Start
Duration Read only The duration of the active stream String in format of DD:HH:MM:SS
Bitrate Read only The bitrate of the active stream Integer bits per second
Idle
Connecting
Streaming
Interrupted
Stop
Starting Stream
The stream is started by providing a stream state block with start action.
STREAM STATE:
Action: Start
↵
↵
↵
34Developer Information
Page 35

ACK
↵
↵
STREAM STATE:
Status: Connecting
↵
STREAM STATE:
Status: Streaming
↵
↵
↵
↵
↵
Stopping stream
The stream is stopped by providing a Stream State block with stop action.
STREAM STATE:
Ac tion: Stop
↵
ACK
↵
↵
STREAM STATE:
St atus: Idle
↵
↵
↵
↵
↵
Shutdown Block
The Shutdown block provides power control of the Web Presenter. The Shutdown block is
write-only and not presented in the preamble.
Parameters
Key Read/Write Description Valid Values
Action Write only The Web Presenter shutdown action. Reboot
Factory Reset
Reboot
The Web Presenter can be rebooted by providing a Shutdown block with reboot action.
SH U TDOWN:
Action: Reboot
↵
ACK
↵
↵
↵
↵
On reboot action, the Web Presenter server will be stopped and clients will be disconnected.
Factory Reset
The Web Presenter can be factory reset by providing a Shutdown block with factory reset
action. On factory reset action, all settings are set to factory defaults.
SH U TDOWN:
Action: Factory Reset
↵
ACK
↵
↵
↵
↵
35Developer Information
Page 36

Help
Getting Help
The fastest way to obtain help is to go to the Blackmagic Design online support pages and
check the latest support material available for your Blackmagic Web Presenter.
Blackmagic Design Online Support Pages
The latest manual can be found at the Blackmagic Design support center at
www.blackmagicdesign.com/support
Blackmagic Design Forum
The Blackmagic Design forum on our website is a helpful resource you can visit for
more information and creative ideas. This can also be a faster way of getting help as
there may already be answers you can find from other experienced users and
Blackmagic Design staff which will keep you moving forward. You can visit the forum at
https://forum.blackmagicdesign.com
Contacting Blackmagic Design Support
If you can’t find the help you need in our support material or on the forum, please use the
‘send us an email’ button on the support page to email a support request. Alternatively,
click on the ‘find your local support team’ button on the support page and call your nearest
Blackmagic Design support office.
36Help
Page 37

Regulatory Notices
Disposal of waste of electrical and electronic equipment within the European union.
The symbol on the product indicates that this equipment must not be disposed of with other
waste materials. In order to dispose of your waste equipment, it must be handed over to a
designated collection point for recycling. The separate collection and recycling of your waste
equipment at the time of disposal will help conserve natural resources and ensure that it is
recycled in a manner that protects human health and the environment. Formore information
about where you can drop off your waste equipment for recycling, please contact your local
city recycling office or the dealer from whom you purchased the product.
This equipment has been tested and found to comply with the limits for a Class A digitaldevice,
pursuant to Part 15 of the FCC rules. These limits are designed to provide reasonable
protection against harmful interference when the equipment is operated in a commercial
environment. This equipment generates, uses, and can radiate radio frequency energy and,
if not installed and used in accordance with the instructions, maycause harmful interference to
radio communications. Operation of this product in a residential area is likely to cause harmful
interference, in which case the user will be required to correct the interference at
personal expense.
Operation is subject to the following two conditions:
1 This device may not cause harmful interference.
2 This device must accept any interference received, including interference that may cause
undesired operation.
R-R-BMD-20201201001
R-R-BMD-20201201002
ISED Canada Statement
This device complies with Canadian standards for Class A digital apparatus.
Any modifications or use of this product outside its intended use could void compliance
tothese standards.
Connection to HDMI interfaces must be made with high quality shielded HDMI cables.
This equipment has been tested for compliance with the intended use in a commercial
environment. If the equipment is used in a domestic environment, it may cause radio
interference.
37Regulatory Notices
Page 38

Safety Information
This equipment must be connected to a mains socket outlet with a protectiveearthconnection.
To reduce the risk of electric shock, do not expose this equipment to drippingorsplashing.
This equipment is suitable for use in tropical locations with an ambient
temperatureofup to 40ºC.
Storage temperature range is -20°C to 60°C and relative humidity 0% to 90% non-condensing.
Ensure that adequate ventilation is provided around the product and is not restricted.
When rack mounting, ensure the ventilation is not restricted by adjacent equipment.
No operator serviceable parts inside. Refer servicing to your local Blackmagic Design
service centre.
Use only at altitudes not more than 2000m above sea level.
State of California statement
This product can expose you to chemicals such as trace amounts of polybrominated biphenyls
within plastic parts, which is known to the state of California to cause cancer and birth defects
or other reproductive harm.
For more information go to www.P65Warnings.ca.gov.
38Safety Information
Page 39

Warranty
36 Month Limited Warranty
Blackmagic Design warrants that Blackmagic Web Presenter will be free from defects in materials
and workmanship for a period of 36 months from the date of purchase excluding connectors,
cables, fiber optic modules, fuses and batteries which will be free from defects in materials and
workmanship for a period of 12 months from the date of purchase. If the product proves to be
defective during this warranty period, Blackmagic Design, at its option, either will repair the
defective product without charge for parts and labor, or will provide a replacement in exchange
for the defective product.
In order to obtain service under this warranty, you the Customer, must notify Blackmagic Design
of the defect before the expiration of the warranty period and make suitable arrangements for the
performance of service. The Customer shall be responsible for packaging and shipping the
defective product to a designated service center nominated by Blackmagic Design, with shipping
charges pre paid. Customer shall be responsible for paying all shipping charges, insurance, duties,
taxes, and any other charges for products returned to us for any reason.
This warranty shall not apply to any defect, failure or damage caused by improper use or improper
or inadequate maintenance and care. Blackmagic Design shall not be obligated to furnish service
under this warranty: a) to repair damage resulting from attempts by personnel other than
Blackmagic Design representatives to install, repair or service the product, b) to repair damage
resulting from improper use or connection to incompatible equipment, c) to repair any damage or
malfunction caused by the use of non Blackmagic Design parts or supplies, or d) to service a
product that has been modified or integrated with other products when the effect of such a
modification or integration increases the time or difficulty of servicing the product. THIS WARRANTY
IS GIVEN BY BLACKMAGIC DESIGN IN LIEU OF ANY OTHER WARRANTIES, EXPRESS OR IMPLIED.
BLACKMAGIC DESIGN AND ITS VENDORS DISCLAIM ANY IMPLIED WARRANTIES OF
MERCHANTABILITY OR FITNESS FOR A PARTICULAR PURPOSE. BLACKMAGIC DESIGN’S
RESPONSIBILITY TO REPAIR OR REPLACE DEFECTIVE PRODUCTS IS THE WHOLE AND EXCLUSIVE
REMEDY PROVIDED TO THE CUSTOMER FOR ANY INDIRECT, SPECIAL, INCIDENTAL OR
CONSEQUENTIAL DAMAGES IRRESPECTIVE OF WHETHER BLACKMAGIC DESIGN OR THE
VENDOR HAS ADVANCE NOTICE OF THE POSSIBILITY OF SUCH DAMAGES. BLACKMAGIC
DESIGN IS NOT LIABLE FOR ANY ILLEGAL USE OF EQUIPMENT BY CUSTOMER. BLACKMAGIC
IS NOT LIABLE FOR ANY DAMAGES RESULTING FROM USE OF THIS PRODUCT. USER OPERATES
THIS PRODUCT AT OWN RISK.
© Copyright 2021 Blackmagic Design. All rights reserved. ‘Blackmagic Design’, ‘DeckLink’, ‘HDLink’, ‘Workgroup Videohub’,
‘Multibridge Pro’, ‘Multibridge Extreme’, ‘Intensit y’ and ‘Leading the creative video revolution’ are registered trademarks in the
US and other countries. All other company and product names may be trade marks of their respective companies with which
they are associated.
Thunderbolt and the Thunderbolt logo are trademarks of Intel Corporation in the U.S. and/or other countries.
39Warranty
Page 40

2021年4月
インストール/オペレーション マニュアル
Blackmagic
Web Presenter
Blackmagic Web Presenter
Page 41

ようこそ
このたびはBlackmagic Web Presenterをお買い求めいただき誠にありがとうございました。
Blackmagic Web Presenterは 、あ ら ゆ る SDI機 器 に 直 接 接 続 で き 、信 号 を H.264に変換
し、YouTube Live、Facebook Live、Twitchなどの人気の配信サービスでビデオを配信できま
す 。ま た 、
きます。これにより、インターネットを使用して、プロフェッショナルなビデオを離れた場所に簡
単に 送 信 で きます。
ATEM Streaming Bridgeを使 用することで、放 送品質のビデオを2地点間で発信で
このマニュアル に は 、
れ て い ま す 。ま た 、YouTub e Live、Facebook Live、Twitch、Zoom、Skypeなどを 使 用するた
め の セットアップ 方 法 な ど 、あらゆ る 機 能 とコントロ ー ル の 使 用 方 法 も説 明 して いま す。
弊 社ウェブサイト
新バージョン、および
きま す。ソフトウェ ア を ダウンロード する 際 に ユ ー ザ ー 登 録していた だけ れば 、新しいソフトウェ
アの リリース 時 に お 知らせい たします。
常に新機能の開発および製品の改善に努めていますので、ユーザーの皆様からご意見をいた
だけれ ば 幸 いです。
Blackmagic Web Presenter
を使用する上で必要な情報がすべて記載さ
www.blackmagicdesign.com/jp のサポートページ で、このマニュアルの最
Blackmagic Web Presenter
の 内 部 ソ フト ウ ェ ア のア ップ デ ート を 確 認で
Blackmagic Design CEO
グ ラ ン ト・ペ ティ
Page 42

目次
始めに 43
Web
Presenterのフロントパネルの使 用 方 法 45
LCD
ディス プ レ イ 47
モニター出力 の 使 用 48
Web
PresenterSetupの使用 53
Live
Stream( ラ イ ブ 配 信 )タ ブ 54
Setup
( セ ッ ト ア ッ プ )タ ブ 55
ネットワ ー ク 設 定 56
直 接 配 信の た め に インター ネット の 共 有 を設 定 す る 56
スマートフォン を 使 用 した 配 信 57
Blackmagic
Open
ATE M
Teranex
内部ソフトウェアのアップデート 62
Developer
Blackmagic
Protocol
ヘルプ 74
規制に関する警告 75
安全情報 76
保証 77
WebPresenterHDをウェブカメラとして使 用 する 57
Broadcasterの セ ットアップ 58
StreamingBridgeでビデオリンクを構築 60
MiniRackShelf 61
Information 63
WebPresenterEthernetProtocol 63
Blocks 65
Blackmagic Web Presenter
42
Page 43

始めに
Blackmagic Web Presenter
オーディオを接続し、コンピューターにユニットを接続し、その後インターネットに接続するだけです。
BlackmagicWebPresenterのフロ ントパ ネル
電源の接続
は簡単に使い始められます!必要な作業は、電源につなぎ、ビデオおよび
Blackmagic Web Presenterのリアパネルの電源入力に標準IEC電源 ケーブル を 接 続しま す。
BlackmagicWebPresenterは、IECまたは12VDC電源入力から給 電可能
Web Presenter
電源(連続電力供給可能なUPSや外付け12Vバッテリーなど )からのリダンダント電源を接 続したい場合
は 、こ の 12V DC入 力 を 使 用で きます。
ビデオとオーディオを接続
ビデオソースを Blackmagic Web PresenterのSDI入力に接続 ビデオが接続されると、Web Presenter
の内蔵
LCD
のオーディオメーターで確認できます。
ビデオをBlackmagicWebPresenterのSDI入力に接 続
には、
12V DC
電源 入力も搭載されています。外部電源を接続したい場合、あるいは外部
に 表 示 さ れ ま す 。オ ー デ ィ オ は 、
SDI
ビデオ信号でビデオにエンベッドされます。これは、
LCD
Blackmagic Web Presenterは12G-SDIに対応しており、ビデオ入力が変わった場合に、HDとUltra HD(
最大
2160p60
き、Blackmagic Web Presenter HDでは事実上あらゆるビデオ信号を1080pに変 換 で きま す。
まで)を自動的に切り替えます。
Blackmagic Web Presenter 4KはUltra HD
を配信で
始めに
43
Page 44
モニターを接 続
HDMIテレビまたはSDIモニターをモニター出力のひとつに 接 続しま す。これにより、放 送をモニタリング
でき、重要なステータス情報も 確 認できます。ステー タスは、ビデオストリームと共に表 示され、常に更
新され ます。モニター出力の使 用 方 法の詳 細 は 、「モニター出力の 使 用 」セクションを参 照してください 。
WebPresenterのモ ニター 出力にモニター を接続
USB
経由でコンピューターを接続
Web Presenterのフロントパネルまたはリアパネル の USBポ ー ト を 使 用 し て 、コ ン ピ ュ ー タ ー に 接 続 し ま
す 。こ れ ら の USBポートは 、ユ ニットのアップデートとBlackmagic Web Presenter Setup Utilityでのコ
ンフィギュレーションに使 用します。
ュー ター と ユ ニット の 接 続 を 外せ ま す。
Web Presenter
の最初のコンフィギュレーションを行ったら、コンピ
BlackmagicWebPresenterのフロントパネルまたはリアパネル
のUSBポー トを使 用 してコンピュー タ ー に 接 続
イン タ ー ネットに 接 続
Blackmagic Web Presenterの「LIVE STREAM
ットワー ク ケ ーブル を、インターネットル ー ターまた は ネットワ ー クスイッチと接 続し 、インター ネットに
接 続 します。
BlackmagicWebPresenterをリアパ ネ ル の イーサネットポ ー トで ネットワー クに 接 続
」というラベルが付いたイーサネットポートに繋いだネ
始めに
44
Page 45

ライブ 配 信 の セ ットアップ
次は、Web Presenterをセ ットアップして、YouTube Live、Facebook Live、Twitchな ど の 配 信プ ラットフ
ォームを介して配信できます。この例では、YouTube Liveでの 配 信 用 の セットアップ を 行 い ま す。
1 YouTu be Studioのアカウントからストリームキーをコピーします。
2
Blackmagic Web Presenter Setup Utilityをwww.blackmagicdesign.com/jp/support
ウンロードし、コンピューターにインストールします。このソフトウェアで、最 初の配信設定をコ
ンフィギュレ ー ション で きます。
からダ
3 Blackmagic Web Presenter Setup Utilityを 立 ち 上 げ 、「 Live Stream( ラ イ ブ 配 信 )」ペ ー ジ に
進 み ま す。
4
プ ラ ットフ ォ ーム を
ス ト リ ー ム キ ー を コ ピ ー し 、「 Key(キー)」フィールドにペーストして、配信品質を選択します。
「Save」を ク リ ッ クし ま す。
5
これで、世界に向けて配信する準備が整いました!「ON
ト パ ネ ル の「ON
止で きま す。
YouTub e
AIR
、サ ー バ ー を 「
」ボタンを押します。放送が終了したら、「
Primary
(プライマリー)」に設 定します。
YouTub e
AIR
」ボ タ ン を ク リ ッ ク す る か 、フ ロ ン
OFF
」ボ タ ン を 押 す と 配 信 を 停
の
Facebook LiveやTwitch
ブ 配 信 サ ー ビ ス の 使 用 」を 参 照 してく だ さ い 。
Web Presenter
Blackmagic Web Presenter
更を行えます。
ON AIR
- 「ON AIR」ボタンを 押 すと配 信 を開 始 で きま す。オンエア 中は ボタン が 赤 に 点 灯しま す。
など、その他のサービスでのライブ配信を行うための設定方に関しては、「ライ
のフロントパネル の 使 用方法
のフロントパ ネルコントロールを 使 用して、配信の開始と停止や設 定の変
「ON
AIR
」ボタンが点滅している場合、ライブ配信の開始に失敗したか、予期せずライブ配信が停止した
ことを意味します。これは、インターネット接続または配信設定が原因となっている可能性があります。
インターネット接続が機能しているか、配信設定が適切か確認してください。
OFF
- 「OFF」ボタンを押すと配信を停止できます。
WebPresenterのフロントパネルの使用方法
45
Page 46

MENU
- 「MENU」ボ タ ン を 押 し て LCDの 設 定 を 開きま す。
設 定 を 変 更 する:
1 ノブを 回 転させ て、変更したい設定を選 択し、「SET」ボ タ ン を 押 し ま す。
2 ノブを回して、設定を変更します。
3 「SET」を 押 し て 変 更 を 確 定 し ま す。
メニューを遡ってホームスクリーンに戻るには「
CALL
- この機能は、将来的なアップデートで使用可能になる予定です。
LOCK
- パネルをロックするには、このボタンを1秒間長押しします。これにより、ボタンが使 用 できなく
なるため、誤ってオンエアになったり、配信が止まることを防げます。アクティブになっている場合は、ボ
タン が 赤 に 点 灯しま す。
パネルのロックを解除するには、
2秒間長押ししま す。
MENU」ボ タ ン を 使 用 し ま す。
WebPresenterのフロントパネルの使用方法
46
Page 47

LCD
ディスプレイ
ホーム スクリーンは 、
Web Presenter
以下の情報が表示されます:
継続 時間カウンター –ライブ配 信の現在の継
続 時 間 を 表 示 。「ON
ウンターが表 示を開始。
デー タレ ート–
信 中 か ど う か に 関 わ ら ず 、エ ン コ ー ダ
ー の デ ー タ レ ー ト を 表 示 。入 力 に ビ デ
オ ソ ー ス を 接 続 し て 、ラ イ ブ ビ デ オ フ ィ
ード を 配 信 す る た め に 必 要 なビットレ
ートをす ばやく確 認 可能。
AIR
」ボ タ ン を 押 す と 、カ
WebPresenterが配
を 起 動 し た 際 に 最 初 に 表 示 さ れ る 画 面 で す。ホ ーム ス ク リ ー ン に は
イン タ ー ネット 接 続 –Web Presenterがネッ
トワークに接続されている場合、小さなアイコ
ンを表示。
キャッシュ – Web Presenterの内蔵メモリ
ーキャッシュの現 在 の 使 用率を パー セン テージ
で表示。
ON AIR
ステータス –ライブ配 信 が行 われてい
る 場 合 、明 る い 赤 い 文 字 で 「ON
ユニットの配信準備ができておりスタンバイ状態
の 場 合 は「
ー が 赤 と 白 に 点 滅 す る 場 合 、イ ン タ ー ネ ッ ト の 速
度が遅い ことなどが 原 因で、配 信 が 中 断したこと
を意 味します。
OFF
」と 表 示 。ON
AIR
」と 表 示 。
AIR
インジケー タ
ビデオモニター –
WebPresenterに接続された入力ビデオソースを表示。
WebPresenterのフロントパネルの使用方法
オー ディオメー ター-WebPresenterに接続
されたビデオソースのオー ディオレベ ルを表 示 。
47
Page 48

インター ネット 接 続 アイコン
青 の イーサ ネットアイコ ン は 、イーサ ネットケ ーブ ル が 接続 さ れ て お り、イーサネット 接 続
での配信準備ができている場合に表示されます。
赤 の イーサ ネットアイコ ン は 、オンエア中 で 、イー サ ネット経 由 で 配 信 さ れ て い る 場 合 に
表 示 さ れ ま す。
青 のス マ ー トフ ォン アイコ ン は 、テ ザ リン グ して い るス マートフォン の イ ン ター ネット 接 続
が配信に使用される準備ができている場合に表示されます。
赤 のス マ ー トフ ォン アイコ ン は 、オ ン エ ア 中 で 、テ ザ リ ン グ して い る ス マートフォン を 介 し
て配信されている場合に表示されます。
作業のこつ アイコン が表 示 さ れ な い 場 合 、Web Presenterがネットワークに接続されていません。
モニター出 力の使 用
モニター出力は、ビデオ入力、オーディオレベル、オンエア・ステータス、データレートおよびキャッシュ
レベル、SDI入力の技術情報などをモニタリングできます。
BlackmagicWebPresenterのモニター出力は、データレートおよびキャッシュステータスなどの総合的な情報を表示
モニター出力の 使 用
48
Page 49
モニター出 力 の 表 示 画 面 は8つのパネルで構成されています。以下は各パネルの説明とそれぞれに表示
される情 報 で す。
入 力ビュー
メインパネルは、接続されているSDIビデオソースからの現在のビデオ入力を表示します。
オンエア·ステ ー タス
配信が行われていない状態では、インジケーターは「
る準備ができていて、スタンバイ状態であることを示します。配信が始まると、インジケーターは
明 る い 赤 で「 ON AIR」と表示され、配信が停止されると表示が変わります。
OFF
」と 表 示 し 、
Web Presenter
が放送す
ON AIRインジケーターの下は、継続時間カウンターです。Web Presenterで「 ON AIR」ボ タ ン
を押すと、継 続 時 間カウンターがスタートします。
Web Presenter
文字の 横に青のスマートフォンアイコン が 表示されます。オンエア 中は 、スマートフォンのアイ
コン は 赤 に 点 灯しま す。
がオフエアで、携帯電話でテザリングして配信される予定の場合、「
OFF
」の
ライブ配信
ライブ配信パネルには、ライブ配信の設定に関する情報が表示されます。これには、配信プラ
ットフォーム、サーバー 、ストリームキーの最初の10文字などが含まれます。また、配信の解像
度および品 質 設 定も 表 示します。
モニター出力の 使 用
49
Page 50
ビデオ入 力
ビデオ入力パネル上部に表示される5つのミニビューアは、ライブ 配 信の過去6秒を 表 示します。
各ミニ ビ ューアは 1.2秒 の 配 信 時 間 を 表 します。
ミニ ビューアの 下で は 、
情 報 の詳 細 が 確 認 で きます。
入 力 フォーマット
Web PresenterのSDI
SDIビデオ入力の 解 像 度とフレームレートを表 示します。Web Presenterは
入力に接続されたビデオ入力ソースに関する技術
2160p60まで 対 応 して い ま す。
カラリメトリ
SDIビデ オ入 力のカラ ースペースを表 示します。Web Presenterは、Rec.601、
Rec.709、Rec.2020カラースペースを サ ポートしています。
SDI
補助データ 補助データは、SDIビデオ入力でビデオに加えて送信されるデータです。これに
は、エンベデッドオーディオ、タイムコード、クローズドキャプションが含まれま
SDI入力に補助データが含まれている場合、「あり」と表示されます。
す。
タイム コ ード
クローズドキャプション
SMPTE 292 CR
Yビットおよび クロマ
輝度
ビット
SDIビデ オ入 力ソース から の タイム コ ード を 表 示します。
SDIビデオ入力にクローズドキャプションが含まれる場 合、フォーマットが表示さ
れます。
SDI
で問題を検出すると、エラーを表示します。
問題がある場合やケーブルが長過ぎる場合に生じます。
「輝度
号のアクティビティを 表 示しま す。各文 字 は 、ビデオ信号の
ます。
CEA-608およびCEA-708フォ ーマットが サ ポ ートさ れ て い ます。
ビデオに対するエラーチェック機能です。Web PresenterがSDIビデオ入 力
CRCエ ラ ー は 、通 常 、SDIケーブルに
Yビット」および「クロマビット」のインジケーターは、SDIビデオ入 力 信
1ビットの 状 態を表し
X
- 「X」は、絶えず変化するビットを意味します。
L
- 低ビット
H
- 高ビット
理 解しやすいように、
ラ ッ ク の 場 合 、す べ て の ビ ッ ト が 低 く な り ま す 。
SDIビデオ入力の全 10ビットは Xで 表 示 さ れ ま す 。こ れ は 、ビ デ オ ス ト リ ー
通常、
ムのすべてのビットが常に変化していることを意味します。
ビ デ オ で あ る 場 合 、右 端
表 示 さ れ ま す。ビ ッ ト が「
る場合、”変化のないビット”であることを意味し、アップストリームビデオに問題
がある可能性があります。
SDIオ フ セ ッ ト は 取 り 除 か れ て い ま す 。例 え ば 、ビ デ オ が ブ
SDI入力が8ビット の
2桁のビットにはデータが存在しないため、常に「L」と
X」 で あ る べ き な の に 、「 L」や「 H」と し て 表 示 さ れ 続 け
モニター出力の 使 用
50
Page 51
オー ディオ入 力
オー ディオ入力パネル の上部 のオー ディオ波 形 は 、ライブ配 信の 過 去 6秒 間 のオー ディオ情 報
を表示します。波形は継続的に更新され、右から左にスクロールします。
オー ディオ 波 形 表 示の下で は 、オーディオ入 力に関 する技 術 情 報の詳 細 を 確 認できます。
サンプリング周波数
エンファシス
ソースのロック
ワード長
オリジン
時刻
オー ディオビット
VUCP
SDI
入 力に エ ン ベッドされている オ ー ディオの サ ン プ リング 周 波 数
レートを 表 示します。
オーディオソースのエンファシスオプションが 有 効になっている
か 表 示しま す。
オー ディオソース 周 波 数 が 外 部リファレンスソースに ロックさ れて
いるか 確 認 で きま す。
SDI入力にエンベッドされているオーディオのビット深度を表示
しま す。
4文 字 で チ ャン ネ ル の 起 点を 表しま す。
フリ ー ランタイム コード 。
オー ディオ ビット
ルのビットアクティビティを表示します。オーディオチャンネル の
ステ ー タスでオーディオ が 16、20、24ビットのいず れ かで 表 示 さ
れていて も 、オ ー ディ オ ビットアクティビティ で 、実際 のビット 数
を確 認 で きます。
SDI
接 続 に エンベッド さ れ た オー ディオ サ ン プ
VUCPビットは 左 か ら 右に 読 み ま す。
V 」は「 Valid(有効性)」、「U 」は「 User
「
( ユ ー ザ ー ) 」 、「 C」は「 Channel Status(チ ャンネ ル ス テ ー タス)
」 、「P」は「
ー ディオ ビットと 同 様 に機 能します。
Parity
(パリティ)」を意味します。このフィールドはオ
サンプルアドレス
Aux
使用
オー ディオ チャンネ ル
ビット
オー ディオ サンプルカウンター。
メインオー ディオに
しま す。
Aux
ビットが 使 用さ れ て い るかどうか を 表 示
1〜32 各文字は、SDI入 力 に エ ンベッドさ れた オ ー ディオチ ャン ネ
ル を 意 味 し ま す 。「P」は、オーディオチャンネルが使用されてい
ることを示し、「 -」は 該 当の チャンネル に オー ディオがな いことを
意 味しま す。
モニター出力の 使 用
51
Page 52

データレート
過去60秒間のエンコ ー ダー の 現 在 のデータレートを 表 示します。デ ータレートは 、メガ ビッ
ト / 秒(Mb/s)で 測 定 さ れ ま す 。こ の イ ン ジ ケ ー タ ー は 、オ フ エ ア で も 常 に 表 示 さ れ ま す。こ れ
により、オンエア前に帯域幅を正確に確認できます。
キャッシュ
Web Presenter HD
去60秒間の使用量を示します。キャッシュは、小容量の内蔵メモリーで、プログラム出力を継
続的に収録および再生します。これは、配信データレートがビデオを持続できるレベルを下回
っ た 場 合 に 、安 全 対 策 と し て 機 能 し ま す。
インターネットの不安定さは、多くの場合、ネットワークの使用状況やワイヤレス信号の弱さが原
因です。そのため、データレートが下がった場合、それに応じてバッファデータが増加します。接
続 速 度 が ビ デオ配 信をサ ポ ートできなくなるま で 遅 くなった 場 合、キ ャッシュがビ デ オ フレーム
を埋 め 合わせます。しかし、キャッシュが
キャッシュがフルになることは可能な限り回 避 するべ きです。ビデオフィードを接 続し、配 信 を
始めない 状 態 で、モニター出力の キャッシュ表 示を確認することでテストで きます。キャッシュが
頻繁に100%に近づくようであれば、ライブ配信設定で低品質を選択します。
に内蔵されたメモリーバッファの現在の使用率を表示します。グラフは過
100
%フルに達すると、ビデオ配信に影響が出るため、
Audio Meters
オー ディオソースのレベルは、オー ディオメー ターで モニタリング で きます。メーターは 、Web
Presenter
ベルが高 過ぎる場合、メーターが 赤くなります。これは、ライブ 配 信のオーディオが 歪んだり、
クリッピングが 生じている可能性 が あ ることを意味しま す。オー ディオが緑のセクションの上部
付近に留まり、たまに黄色のセクションに達するように保つことが 理 想的です。
(オーディオメーター)
のメニュー設定で
PPM
またはVUレベルで表示するように設定できます。オーディオレ
モニター出力の 使 用
52
Page 53

Web Presenter Setup
Blackmagic Web Presenterがネットワークに接続されている場合、同じネットワーク上のあらゆるコン
ピューターを使 用して、リモートで
では 、ユ ニットのフロントパネル に 搭 載 されているのと同じコントロールと設 定にアクセスで きま す。
Web Presenterを操 作 できます。Blackmagic Web Presenter Setup
の使用
WebPresenterSetupの使用
53
Page 54

Live Stream
( ラ イ ブ 配 信 )タ ブ
VideoOutput(ビデオ出力)
Stream Standard
使 用 するビ デ オ 解 像 度 を選 択します。
で 、ま た は 2160p60まで を 選 択で きます。
( 配 信 フォ ーマ ット) 「
Settings(設定)
カ ス タム 配 信 設 定(
合 、「
Load Streaming Settings
行で きます。
カスタム 設 定の 作 成 方 法 お よ び ATEM Streaming Bridgeへ の 接 続 方 法 は 、後 述 の「 ATEM
Streaming Bridgeでビデオリンクを構築」セクションを参照してください。
Blackmagic ATE M Streaming Bridge
LiveStream(ライブ配 信)
Platform
ットフ ォ ーム を 選 択しま す 。
配 信 設 定を読 み込 んでいる 場 合、ここにリストアップ され ま す。
Server
配信プラットフォームにより異なります。
( プ ラ ットフォ ーム ) 「
YouTub e、Facebook、Twitch
(サーバー) 最 寄りの サーバーをリストか ら 選 択します。サ ーバー のリストは 、選 択した
Stream Standard
Web Presenter
( 配 信 設 定 を ロ ー ド )」ボ タ ン を ク リ ッ ク す る と 読 み 込 み を 実
Platform
」メニューをクリックして、放送に使用する配信プラ
」メ ニュ ー を クリ ッ ク し て 、配 信 に
の 機 種 に よって 、
からの
などのオプションがあります。カスタム
720p25から1080p60
XML
フ ァ イ ル な ど )が あ る 場
ま
Key
(キー) 配 信プラットフォームから配信用に割り当てられたストリームキー を入 力します。
Quality
品質 設 定に使 用 されるデータレートは 、
よって 変 わ り ま す 。例 え ば「
は、6 Mb/sのデー タレートが 使 用されます。
(品質) Web Presenterの 機 種によって 、HDまたは4Kから配信品質を選択します。
HD 4K
HyperDeck
HyperDeck
HyperDeck
Streaming
Streaming
Streaming
High 45 to 70 Mb/s HyperDeck High 95 to 220 Mb/s
Medium 25 to 45 Mb/s HyperDeck Medium 66 to 150 Mb/s
Low 12 to 20 Mb/s HyperDeck Low 38 to 80 Mb/s
High 6 to 9 Mb/s Streaming High 34 to 51 Mb/s
Medium 4.5 to 7 Mb/s Streaming Medium 23 to 35 Mb/s
Low 3 to 4.5 Mb/s Streaming Low 13 to 20 Mb/s
Web Presenter
Streaming High
」の 品 質 を 選 択 し 、
が使用しているビデオフォーマットに
1080p24
を 使 用している 場 合
WebPresenterSetupの使用
54
Page 55
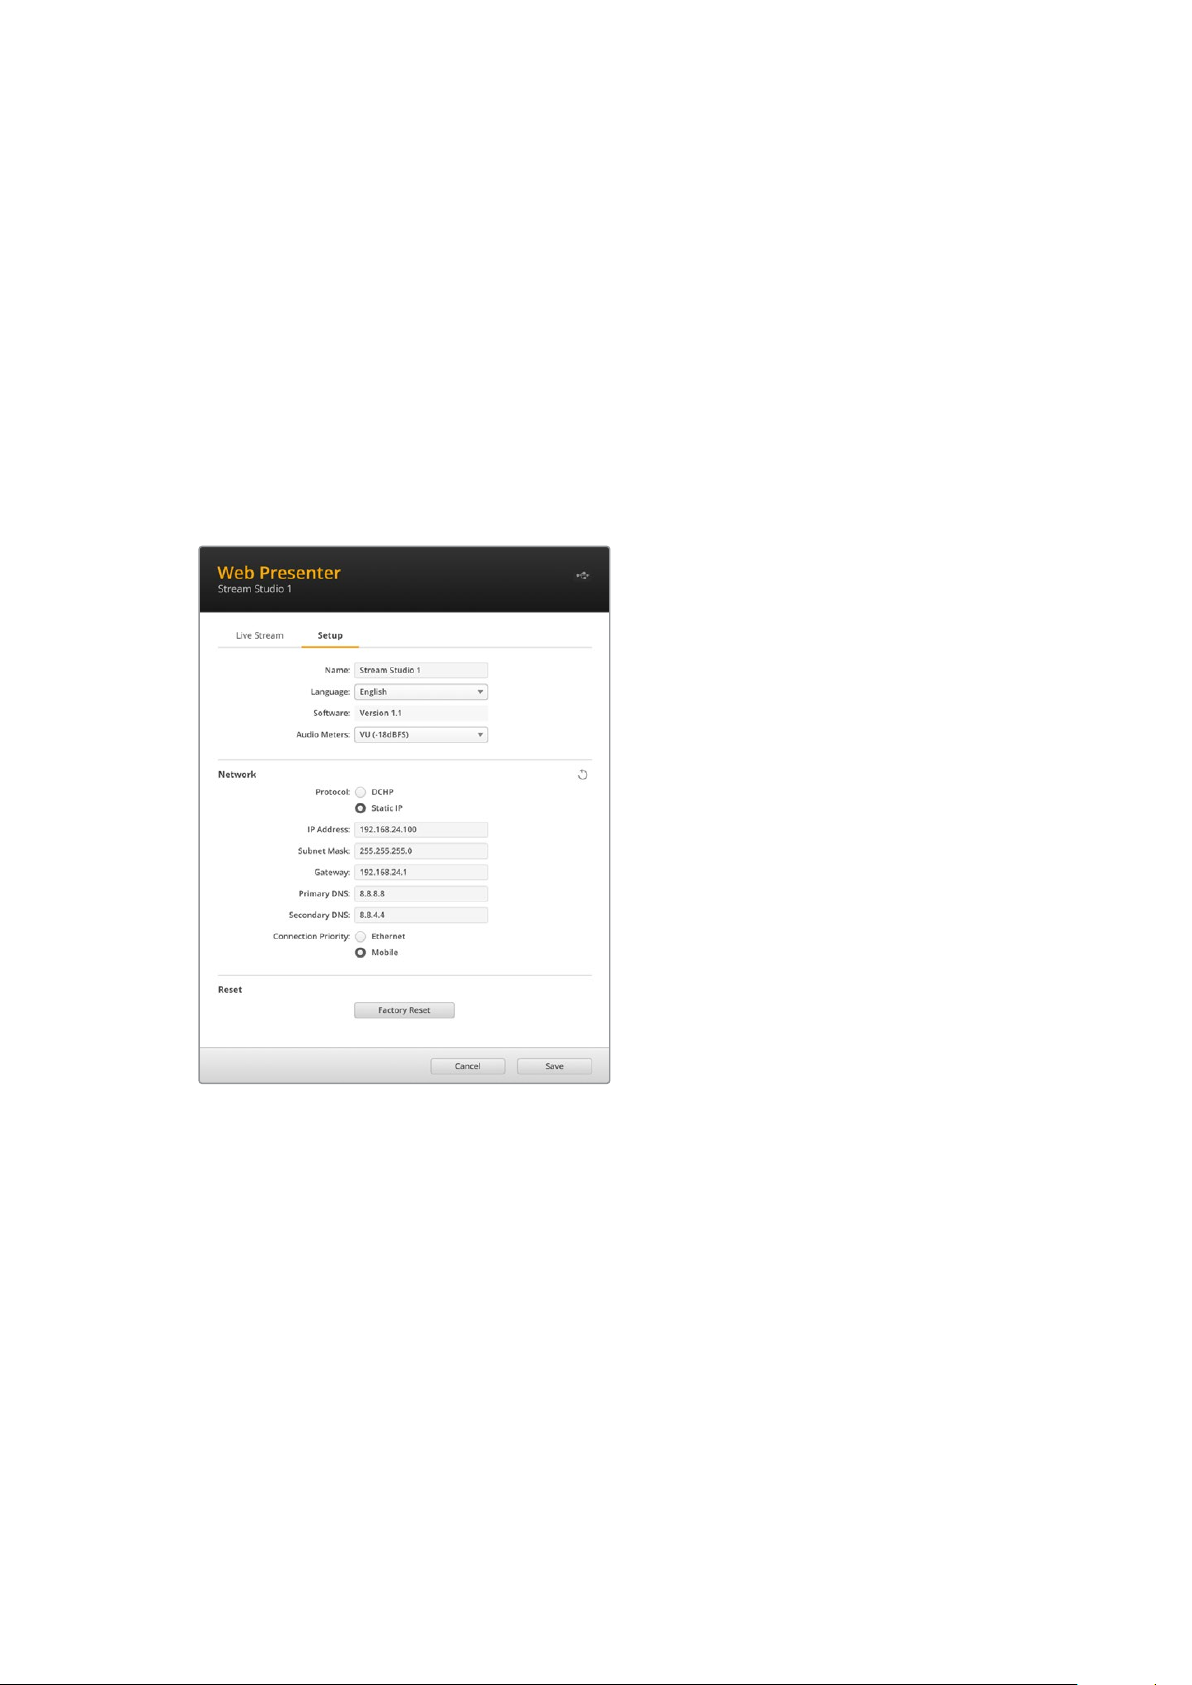
表を見て分かる通り、配信データレートはHyperDeckレートより低くなっています。これによ
り、ディスクにデ ータを記 録 する の と 比 較して、概して低 い 帯 域 幅を 使 用 する インター ネットを
介してデ ータを 送 信 できます。
各設 定で、2つの 数値がデータレートとして記 載 されていま すが、低い方の数値は低いフレ ーム
レ ー ト(
されます。配信品質のデフォルト設定は、「
のチ ャンネル 配 信 が 可 能 で す。
24p、25p、30p
)に 使 用 さ れ 、高 い 方 の 数 値 は 高 い フ レ ー ム レ ー ト(
Streaming High
」で す 。こ の 設 定 は 、非 常 に 高 品 質
50p、60p
)に 使 用
OFF
およびON
ラ イ ブ 配 信 の 開 始 と 停 止 は「
ボタンは 赤 く点 灯 します。
Setup
AIR
ボタン
( セ ッ ト ア ッ プ )タ ブ
OFF
」お よ び「ON
AIR
」ボタンで操作できます。ライブ配信中、「ON
AIR
」
Name
(名前) Web Presenterに名前を付けたい場合は、ボックスに新しい名前を入力し、「Save」を
クリックしま す。
Language
Software
Audio Meters
ス レ ベ ル を「VU -
(言語) Web Presenter HDの言語設定を変更できます。
(ソ フトウェア) Web Presenterの現在のソフトウェアのバージョンを表示します。
(オーディオメーター) 表示するオーディオメー ター のタイプ を選 択します。リファレン
18dBFS
」 、「VU -
20dBFS
」 、「
PPM -18dBFS
」 、「
PPM -20dBFS
」か ら 選 択 で きま す。
WebPresenterSetupの使用
55
Page 56

Network(ネットワ ー ク)
ネットワークのコンフィギュレーション に関するオプション(
は静的IPアドレスの 使 用など)を選 択で きます。
は「ネットワーク設定」セクションを参照してください。
Web Presenter
DHCP
を 介 し た ネ ッ ト ワ ー ク へ の 接 続 、ま た
をネットワ ー ク に 接 続 する方 法 に 関して
Connection Priority
れている場 合、配信に使用する接 続をこの設定で選択で きます。携 帯 電 話でのテ ザリングに関
しては「スマートフォンを使 用した配信」セクションを参照してください。
(優先接続)
Web Presenter
にイーサネットと 携 帯 電 話 の 両 方 が 接 続さ
Reset(リ セ ット)
「
Factory Reset
(出荷 時 設 定にリセット)」ボタンをクリックすると、
Web Presenter
をリ セ ットで き ま す。
ネットワー ク 設 定
Web Presenterは 、静 的 IPアドレスまたはDHCPでネットワークに 接 続 で き ま す。
DHCP
- 使用しているユニットに自動的にIPアドレスを設定し、その他の設定を変更することなくネッ
トワークに 接 続 します。
DHCP
(ダイナミック·ホスト·コンフィギュレーション·プロトコル)は、ネットワークサーバー上のサービス
で、
Web Presenter
簡単に接続し、IPアドレスの競合が生じません。コンピューターやネットワークスイッチの多くは、DHCP
をサポートしています。
Static IP Address
ル )」設 定 を「 Static IP Address」 に 設 定 し 、マ ニ ュ ア ル で IP設 定 を 変 更しま す。
静的
IPアドレスは 、Web Presenterを再 起 動しても変わりません 。
を自 動 的 に検 出してIPアドレスを割り当 て ま す。
(静的IPアドレス) - IPア ド レ ス を 自 分 で 設 定 し た い 場 合 は 、「
DHCP
は 、イ ー サ ネ ッ ト 経 由 で 機 材 を
Protocol
(プロトコ
Web Presenterを 企 業 の ネ ッ ト ワ ー ク に 接 続 す る 際 は 、静 的 IPアドレスを使用する必要がある場合があ
ります。ネットワーク管理者がいる場合、ネットワークに接続されたすべての機器にカスタムIPアドレスが
割り当てられている可能性があります。ネットワーク管理者が会社のコンピューターおよびネットワーク
を管理している場合は 、ネットワーク管理者に確認するのが 一番です。
直接配信のためにインターネットの共有を 設定する
Web Presenter
ー ター の インター ネット 接 続を イーサネット を 介して Web Presenterと共 有 することが 可 能で す。
Blackmagic Web Presenter
1 Web PresenterがDHCPを使 用 するように 設 定しま す。
2
をネットワー ク スイッチ や インターネットル ー ターに 直 接 接 続 で き な い 場 合は 、コン ピ ュ
で直接配信を実行できるように設定する:
イーサネットポートを通じてインターネット接続を共 有できるようにコンピューターを設定します。
Mac
:シ ス テ ム 環 境 設 定 で「
を 選 択 し ま す。使 用 し て い る
connection from
を 選 択 し ま す 。「
ンターネットの共有をオンにしたいか確認されるので、「Start」を ク リ ッ ク し ま す 。
」メ ニ ュ ー で「
Service
Sharing
MacがWifi
Wifi
」リ ス トで「
」 を ク リ ッ ク し 、「
でインターネットに接続されている場合、「
」 を 選 択 し ま す 。「To
Internet Sharing
Service
」リ ス ト か ら「
computers using
」のチェックボックスをチェックします。イ
Internet Sharing
Share your
」リ ス トで「
Ethernet
」
」
直接配信のためにインターネットの共有を設定する
56
Page 57

Windows
スクリーンが表示されます。「アダプターのオプションを変更する」をクリックします。コンピューターの
ネットワ ー ク 接 続 が リストアップさ れ ま す。イン ター ネット 接 続を右クリックし、「プ ロ パ ティ」を 選 択しま
す。「 共 有」タ ブ で「ネットワー クの ほ か の ユーザー に 、このコン ピ ューター の イン タ ー ネット 接 続 をと お し
ての接続を許可する」をクリックします。メニューでネットワーク接続を選択して「OK」を ク リ ッ ク し ま す。
:スタートボタ ン を 右 クリックし 、「ネットワーク 接 続 」を 選 択しま す。「ネットワ ー クの 接 続 」
3 Web Presenterをコンピューターの イーサネットポートに接続します。数 秒後、DHCPがWeb Presenter
にIPアドレスを 割 り当てます。
4
ユ ニット の
サネット 経 由 で インターネット に 接 続 してい る か チェックしま す。
LCD
スクリーンの右上 にイーサネットアイコンが表示されるか 確認して、
Web Presenter
スマ ートフ ォン を 使 用 し た 配 信
が イー
Blackmagic Web Presenter
サービスエリア内であれば、あらゆる場所から世界に向けて配信が行えます。
携帯電話のテザリングをセットアップする:
1
スマ ー トフ ォンを
ロントまたは バックパネル のどちらでも使 用できます。
は 、ス マ ー ト フ ォ ン で テ ザ リン グ して 配 信 を 実 行 で き ま す 。つ ま り 、ス マ ー トフ ォン の
USB-C
ケーブルで
Blackmagic Web Presenter
に接 続します。
USB-C
コ ネ ク タ ー は 、フ
2 スマートフォン の インターネットホットス ポ ット を 有 効に します。
iOSデ バ イ ス で は「 Settings」 に 進 み 、「 Personal Hotspot」 を 開 き ま す 。「 Allow Others to Join」を 有 効 に し ま
す。
Android
ンを長 押 しして、USBテザリングを有効にします。
Web Presenterの「 ON AIR」ボタンを押すと、ライブ配信を行う準備が 整います。
作業のこつ 配 信 が 終了したら、スマートフォンのバッテリーを節約するためにテ ザリング接続をオフに
することをお 勧 めしま す。
Web Presenter
うに設 定されていることを確認するメッセージ が 表 示されます。
ブ に 進 み ま す 。「
デバイスで は 、スクリーンをスワ イ プ して、クイック 設 定 パネ ル を 表 示します。ホットス ポットアイコ
にイーサネットケーブルが接続されている場合、携 帯電話のインターネットテザリングを使用するよ
Network
」セ ク シ ョ ン で「
Connection Priority
Web Presenter Setup Utility
( 優 先 接 続 )」で「
Mobile
を 開 き 、「
( 携 帯 )」を 選 択 し ま す 。
Setup
」タ
Blackmagic Web Presenter HD
を
ウェブ カメラとして 使 用 する
SkypeやZoomなどのソフトウェアは 、Web Presenterをウェブカメラとして自動的に設 定するので、アプリケーシ
ョンを立ち上げると、
を自動的に選択しない場合、アプリケーションが
ニュアルで 設 定しま す。
以下は、
Skypeでウェブカメラ を 設 定 する方 法 で す。
1 Skypeの メ ニ ュ ー バ ー で 、「 Audio & Video Settings」を 開 き ま す。
2
「Camera」メニューをクリックし 、リストからWeb Presenterを 選 択 し ま す 。プ レ ビ ュ ー ウ ィ ン ド ウ に Web
Presenterの映 像 が 表 示 されます。
3 「Microphone」メ ニ ュ ー で Web Presenterをオー ディオソースとして選 択します。
Web Presenter
か ら の ビ デ オ が 即 座 に 表 示 さ れ ま す。ア プ リ ケ ー シ ョ ン が
Web Presenter
BlackmagicWebPresenterHDをウェブカメラとして使用する
をウェブ カメラとマイクとして 使 用 するようにマ
Web Presenter
57
Page 58
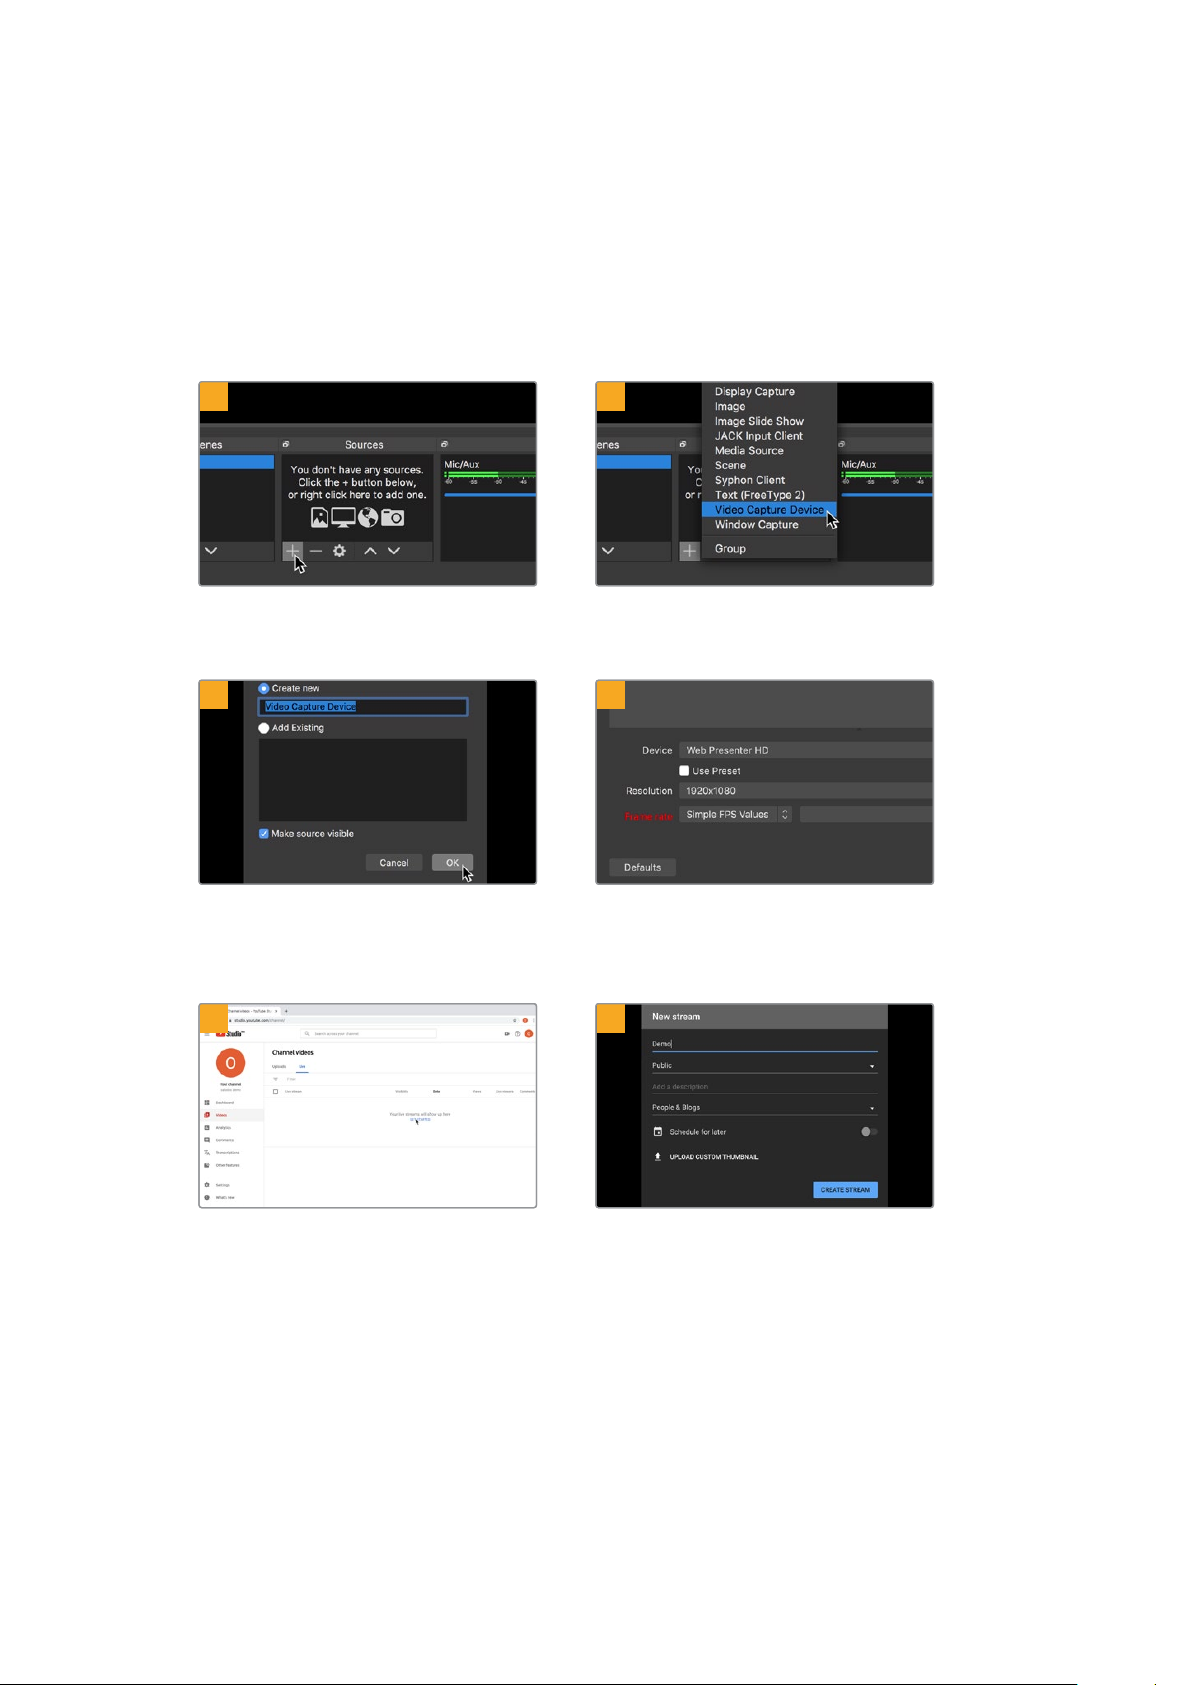
Open Broadcaster
Open Broadcasterは、オープンソースのアプリケーションです。YouTube、Twitch、Facebook Liveなど
のお 気 に 入りの 配 信ソフトウェアと
Broadcasterは 、配 信 ア プ リ が 管 理 し や す い ビッ ト レ ー ト に ビ デ オ を 圧 縮 し ま す 。
の セットアップ
Web Presenter
の間で配信プラットフォームとして機能します。
Open
こ こ で は 、配 信 サ ー ビ ス と し て
ように、Open Broadcasterを セ ットアップ する方 法 を 説 明 しま す。
YouTub e Live
を 使 用して、
Web Presenter
1 2
Open Broadcasterを 起 動 し 、「 Sources」ボ ッ
クスのプラスボタンを押します。
3
「Video Capture Device」を 選 択 し ま す 。
4
のウェブカム 出 力 を配信 する
新しいソースに名前を付けて「OK」を ク リ ッ ク
しま す。
5 6
YouTub eの ア カ ウ ン ト へ 行 き ま す 。「 Go live」ボ
タ ン を 押 し て 、「
Stream」を ク リ ッ ク し ま す。
「Device」メ ニ ュ ー で 使 用 し て い る Web
Presenterの 機 種 を 選 択 し て「 OK」を ク リ ッ ク
しま す。
YouTub eの「 Stream」オ プ シ ョ ン で 、配 信 の 詳
細 を 入 力 し 、「
しま す。
Create Stream」を ク リ ッ ク
BlackmagicWebPresenterHDをウェブカメラとして使用する
58
Page 59

7 8
YouTub eは 、使 用 す る YouTub eアカウントに
Open Broadcasterが アクセスで きるようにす
るた め のストリーム キ ーを生 成しま す。
ストリームキーの横にある「
リックします。コピーしたストリームキーは、次
のス テ ップ で
ます。
Open Broadcasterにペーストし
COPY」ボ タ ン を ク
9 10
Open Broadcasterの放 送リンクをYouTu be
に接 続 するには、スクリーン右下で「Start
Streaming」を クリ ッ ク し ま す 。こ れ で 、Open
BroadcasterからYouTubeへ のリンクが 構 築さ れ
ま し た 。こ こ か ら は 、す べ て が
って 設 定 さ れ ま す。
YouTub e Liveを使
Open Broadcasterに 戻 り 、メ ニ ュ ー バ ー の「
OBS/Preferences」を クリ ッ ク し て 環 境 設 定 を 開
き ま す 。「
したストリームキーを「
て「
Stream」を 選 択 し ま す 。YouTub eでコピー
Stream Key」に ペ ー ス ト し
OK」を ク リ ッ ク し ま す。
Open Broadcasterの配 信プレビュー ウィンドウに
Web Presenterの 映 像 が 表 示 され ま す。
YouTub e Liveに戻ると、Web Presenterのウェ
ブカムプログラム出力がバックグラウンドに表示
さ れ ま す 。「
DONE」を ク リ ッ ク し ま す。
11 12
Open BroadcasterがYouTu be Liveと通信し
て い る 状 態 に な っ た の で 、放 送 を 開 始 で き ま す。
すべてが適切に設定されているか、最終チェッ
クを 行 ってくださ い 。
準備が整ったら、「
送を開 始 します。
Open Broadcasterを使ったYouTub eでのライブ配信が始まりました。
メモ インターネットの性 質上、配信に遅延が生じることが多々あります。放送の最後の部分
を カ ッ ト し て し ま わ な い よ う 、「
見て、プ ログラムが 終了したことを確認することが 重 要です。
End Stream
」を ク リ ッ ク す る 前 に 、実 際 の
GO LIVE」を ク リ ッ クし て 放
YouTub e
の配信を
BlackmagicWebPresenterHDをウェブカメラとして使用する
59
Page 60

ATEM Streaming Bridge
構築
でビデオリンクを
ATE M Streaming Bridgeは、Web Presenter
に変 換 します。こ れ により、ロ ーカ ル ネットワー ク を 介して、ま た は 世 界 中 にインター ネット を 介 して、ビ
デオを 送 信 で きま す。
ATE M Streaming BridgeがWeb Presenter
Presenter Setupの「Live Stream
示されます。
別 の 方 法 と し て 、配 信 設 定 の
Presenter Setupを 使 用してコンピューターを 介して、ファイルの 設 定をロード することも可能です。
例えば、
らスタジオに送信できます。ロケ先から送信するために必要なものは、
ト接続だけです。スマートフォンでのテザリング、またはネットワークへの接続のいずれかでインターネ
ットに接 続します。
Blackmagic Web PresenterをATE M Streaming Bridge
(ライブ 配 信)」タブの「
XML
ファイル が 保 存 された
からの配信ビデオをデコードし、
と同じローカルネットワークに接続されている場合、
USB
ドライブを
Platform
( プ ラ ッ ト フ ォ ー ム )」メ ニ ュ ー に 表
Web Presenter
と 使 用 す る と 、天 気 予 報 を 遠 隔 地 か
Web Presenter
SDI
または
に接 続 するか、
とインターネッ
HDMI
ビデオ
Web
Web
スタジオで は 、
ジオにあるメインのスイッチャーに接続できます。
この 例のワー クフロ ー を セットアップ する:
ATE M Streaming Bridge
がインターネットフィードを受信し、
SDI
に 変 換 す る の で 、ス タ
1 ロケ地で、Blackmagic Web Presenterをスイッ チャ ー の SDIプ ロ グ ラ ム 出 力 に 接 続 し ま す。例 え
ATE M Television Studio HDなどを 使 用 で きま す。
ば、
2 Blackmagic Web Presenterをスマートフォンに接続します。
3 スタジオで、ATEM Streaming Bridgeを イー サ ネットで インターネットに 接 続します。
4
ATEM Streaming Bridge
タジ オ のスイッ チ ャ ー の SDI入 力 に 送 信 しま す。
スタジオで
Setup Utility
信の全設定を含む
でロード できます。
ATE M Streaming Bridge
細は、ATEM Miniマニュアルを参照してください。
ATE M Streaming BridgeをWeb Presenter
を起 動し、インターネット設 定をコンフィギュレーション する 必 要があります。これには、配
XML
フ ァ イ ル の 生 成 も 含 ま れ ま す。こ の
はイン ター ネットか ら の
の インターネット へ の 接 続 方 法 および 配 信 用 の
SDI
ビデオフィード変換し、ニュース放送用にス
のインターネットフィードに接続するには、
XML
ファイルは、ロケ地にある
Web Presenter
XML
ファイル の生 成 方 法 の詳
ATE M
ATEMStreamingBridgeでビデオリンクを構築
60
Page 61

配信用の
ロケ先に設 定ファイルを電子メールで送 信 すると、ロケ 地 のスタッフはBlackmagic Web Presenter Setup
を 使 用して、
気予 報 の 配 信 を 開 始で きま す!
XML
ファイル を 遠隔 地 に あ る
XMLをWeb Presenter
Web Presenter
に ロ ー ド で き ま す 。そ の 後 は 、ON
にロードする
AIR
を 押 す だ け で 、ス タ ジ オ へ の 天
配信用の
す 。こ れ に よ り 、
にセットアップ で きます。
スタジオにあるATEM Streaming Bridgeの配信およびネットワーク設定が変更されず、またATEM
Streaming BridgeがWeb Presenter
Presenter
続 し 、「 ON AIR」を 押 す と 、ス タ ジ オ の ATEM Streaming Bridgeに即 座 に配 信 を開 始 します。
XML
ファイルを一 度 ロードしたら、その後ロ ードを繰り返すことなく配 信 を開始 · 停止で きま
Web Presenter
を見つけることができます。ロケ先など、場所を問わず、
および
ATEM Streaming Bridge
を探し続ける限り、インターネット上の場所に関わらず、必ず
を繋ぐ、継続的なビデオリンクを簡単
Web Presenter
をイン タ ー ネットに 接
Web
ATE M Streaming Bridgeの使用方法の詳細は、ATEM Miniマニュアルを参 照してください。同マニュア
www.blackmagicdesign.com/jp/supportからダ ウン ロ ードできます。
ルは、
Teranex Mini Rack Shelf
Teranex Mini Rack Shelfは、1U
Presenter
器( Teranex MiniコンバーターやBlackmagic MultiView 4、HyperDeck Studio Miniなど)と並べてマウ
ン ト で き ま す 。例 え ば 、Blackmagic Web PresenterをATEM Television Studio HDと共に設 置すること
で、
モジュラー方 式 なので、持ち運 び 可能で 使 い方が 簡 単 なビデオソリューションをカスタマイズ で きま す。
を設 置 で きます。
8つのビデオ入力を切り替えられ、Web Presenterを通してプログラム出力をライブ配信できます。
サイズの棚なので放 送用ラックやロードケースに
Web Presenter
は非常に小型なので、同じ形状の他の
Blackmagic Web
Blackmagic Design
機
TeranexMiniRackShelfは、BlackmagicWebPresenterと、TeranexMiniConverterやATE MTelevisionStudio
HDなど、同じ形 状の他のBlackmagicDesign機 器 と並べ て マウント可 能 。
Teranex Mini Rack ShelfへのBlackmagic Web Presenterの取り 付 け は 非 常 に 簡単で す。Web Presenter
の ゴ ム 製 の 脚 を 取 り 外 し( 使 用 さ れ て い る 場 合 )、
取り 付 け ま す。
Teranex Mini Rack Shelf
に は 、オ リ ジ ナ ル の カ バ ー パ ネ ル を2枚 同 梱しており、
Teranex Mini Rack Shelf
の底にユニットを同梱のネジで
Blackmagic
Design機器を1台だけ使用する場合でもラックの隙間を埋められます。
詳細は、
Blackmagic Designウェブサイトwww.blackmagicdesign.com/jpを 参 照 してく だ さい 。
BlackmagicWebPresenterHDをウェブカメラとして使用する
61
Page 62

内 部 ソフトウェアのアップ デ ート
Setup Utilityでは、Web Presenterの 内 部 ソ フ ト ウェ ア を ア ップ デ ート で き 、配 信 、ネッ ト ワ ー ク 、配 信 品
質の設定も行えます。
内部 ソフトウェアのアップデート:
1
最新の
Blackmagic Web Presenter
らダ ウ ンロードしま す。
2 Blackmagic Web Presenterインストーラーを起動し、画面に表示される指示に従います。
3
インストールが完了したら、
カ バ ー 付 き )の USBコネクター経由でコンピューターに 接 続します。
4
Blackmagic Web Presenter Setup
アップデートします。内部ソフトウェアが最新で何もする必要がない場合、指示は表示されません。
インストーラーを
Web Presenter
を起動し、画面に表示される指示に従って内部ソフトウェアを
をリアパネルまたはフロントパネル(プラスチックの
www.blackmagicdesign.com/jp/support
か
Blackmagic Web Presenter用の最新のSetup Utilityは、Blackmagic Designサポートセンター
(www.blackmagicdesign.com/jp/support)で ダ ウ ン ロ ー ド 可 能 。
内 部 ソフトウェアのアップ デ ー ト
62
Page 63

Developer Information
Blackmagic Web Presenter Ethernet Protocol
v1.0
Overview
The Blackmagic Web Presenter Ethernet Protocol is a line-oriented, text-based protocol to
control a Web Presenter. The Blackmagic Web Presenter Ethernet Protocol is available for
Blackmagic Web Presenter HD. Lines from the Web Presenter server will be separated by an
ASCII LF sequence. Messages from the user may be separated by LF or CR LF.
Connection
The Web Presenter server is accessed by connecting to TCP port 9977 on a Web Presenter.
Connection Response
Upon connection, the Web Presenter server sends a dump of the device’s state. The Web
Presenter server sends information in blocks, with each having an identifying header followed
by a colon. A block spans multiple lines and is terminated by a blank line. Each line in the
protocol is terminated by a newline character.
Following the header, a block contains either a single multi-line string or a sequence of key/
value pairs arranged one per line. The first colon on a line is used to delimit the key and the
value. A value may be a comma separated list. In this case, values in the list must have the “,”
and “\” characters escaped with a “\” character.
To be resilient to future protocol changes, clients should ignore blocks they do not recognize,
up to the trailing blank line. Within recognized blocks, clients should ignore keys they do not
recognize.
The protocol preamble block is always the first block sent by the Web Presenter server:
PROTOCOL PREAMBLE:
Legend
End of line
↵
... and so on
Orange Text Client Generated
Grey Text Server Generated
Ve r s io n: 1.0
↵
The version field indicates the protocol version. When the protocol is changed in a compatible
way, the minor version number will be updated. If incompatible changes are made, the major
version number will be updated.
The initial status dump is concluded by the end prelude block:
END PRELU DE:
↵
↵
↵
↵
DeveloperInformation
63
Page 64

Status Updates
When any device parameter is changed on the Web Presenter server by any client, such as the
Blackmagic Web Presenter Setup utility, the Web Presenter server resends the applicable
status block, containing only the items that have changed. Status updates can also occur due to
external changes such as tethering to a smartphone or when a streaming service is
disconnected.
For example. if the input video mode is set to Auto, the following block will be sent:
ST R EA M SETT I NGS:
Video Mode: Auto
↵
↵
↵
Requesting Changes
To change one or more parameters in a block, the client should send the appropriate block
header in the same form the Web Presenter server sends, followed by the key/value pairs to be
changed. For example, to change the input video format to 1080p59.94, the user should send
the following block:
ST R EA M SETT I NGS:
Video Mode: 1080p59.94
↵
The block must be terminated by a blank line. On receipt of a blank line, the Web Presenter
server will either acknowledge the request by responding:
ACK
↵
↵
or if unable to parse the block responding with:
NACK
↵
↵
↵
↵
After a positive response, the client should expect to see a status update from the Web
Presenter server showing the status change. This is likely to be the same as the command that
was sent, sometimes followed by other blocks providing data specific to the change.
ST R EA M SETT I NGS:
Video Mode: 1080p59.94
↵
↵
↵
If the Web Presenter server does not understand a key in the requested block, the key will be
ignored. If an invalid value is provided for a known key, then the request is ignored and the Web
Presenter will respond with the existing value for the key. In both cases the Web Presenter
server will still respond with an ACK.
ST R EA M SETT I NGS:
Video Mode: UnsupportedMode
↵
ACK
↵
↵
ST R EA M SETT I NGS:
Video Mode: 1080p59.94
↵
↵
↵
↵
↵
DeveloperInformation
64
Page 65

Requesting a Status Dump
The user may request that the Web Presenter server resend the complete state of any status
block by sending the block header, followed by a blank line. In the following example, the user
requests the Web Presenter server resend the stream settings:
ST R EA M SETT I NGS:
↵
ACK
↵
↵
ST R EA M SETT I NGS:
Video Mode: 1080p59.94
...
↵
↵
↵
↵
Protocol Blocks
Identity Block
The identity block contains information to identify the connected Web Presenter.
Block Syntax
The following example shows the Identity Block for a Blackmagic Web Presenter HD.
IDE N T I T Y:
Model: Blackmagic Web Presenter HD
Label: Blackmagic Web Presenter HD
Unique ID: 00112233445566778899A ABBCCDDEEFF
↵
↵
↵
↵
↵
Parameters
Key Read/Write Description Valid Values
Model Read only The Web Presenter model name String
Label Read/Write A display name for the Web Presenter String
Unique ID Read only A device specific unique identifier Hexadecimal ID
Changing Device Label
A device label to identify the Web Presenter can be changed by sending an identity block with
label key.
IDE N T I T Y:
Label: My Web Presenter
↵
ACK
↵
↵
↵
↵
DeveloperInformation
65
Page 66

Version Block
The version block contains hardware and software version information for the connected
Web Presenter.
Block Syntax
VERSION:
Product ID: BE73
Hardware Version: 0100
Software Version: 48858B6F
Software Release: 2.0
↵
Parameters
Key Read/Write Description Valid Values
Product ID Read only The Web Presenter product ID Hexadecimal ID
Hardware Version Read only The Web Presenter hardware version Hexadecimal version
Software Version Read only The Web Presenter software version Hexadecimal version
Software Release Read only The Web Presenter software release version Version Number
↵
↵
↵
↵
↵
Network Blocks
The network block contains the TCP/IP networking configuration for the connected Web
Presenter.
Block Syntax
This example shows the output for a connected Web Presenter. It displays 2 networking
interfaces - the Gigabit Ethernet interface and option for a tethered smartphone.
The network settings prefixed with Current show the active TCP/IP settings, and are read-only.
The Current settings reflect either the DHCP or Static configuration, depending on the
Dynamic IP flag.
NET WOR K:
Interface Count: 2
Default Interface: 0
St a tic D N S S er v ers: 8.8.8.8, 8.8.4.4
Current DNS Servers: 192.168.1.1, 8.8.4.4
↵
NETWORK INTERFACE 0:
Name: Cadence GigE Ethernet MAC
Priority: 1
M A C A d dress: 00:11:22:33:44:55
Dynamic IP: true
Cu r r e nt A d d resse s: 1 92.168.1.10/255.255.255.0
Current Gateway: 192.168.1.1
Stat i c A d d re sses: 10.0.0.2/255.255.255.0
Stat i c G a t e w a y: 10.0.0.1
↵
↵
↵
↵
↵
↵
↵
↵
↵
↵
↵
↵
↵
↵
↵
DeveloperInformation
66
Page 67
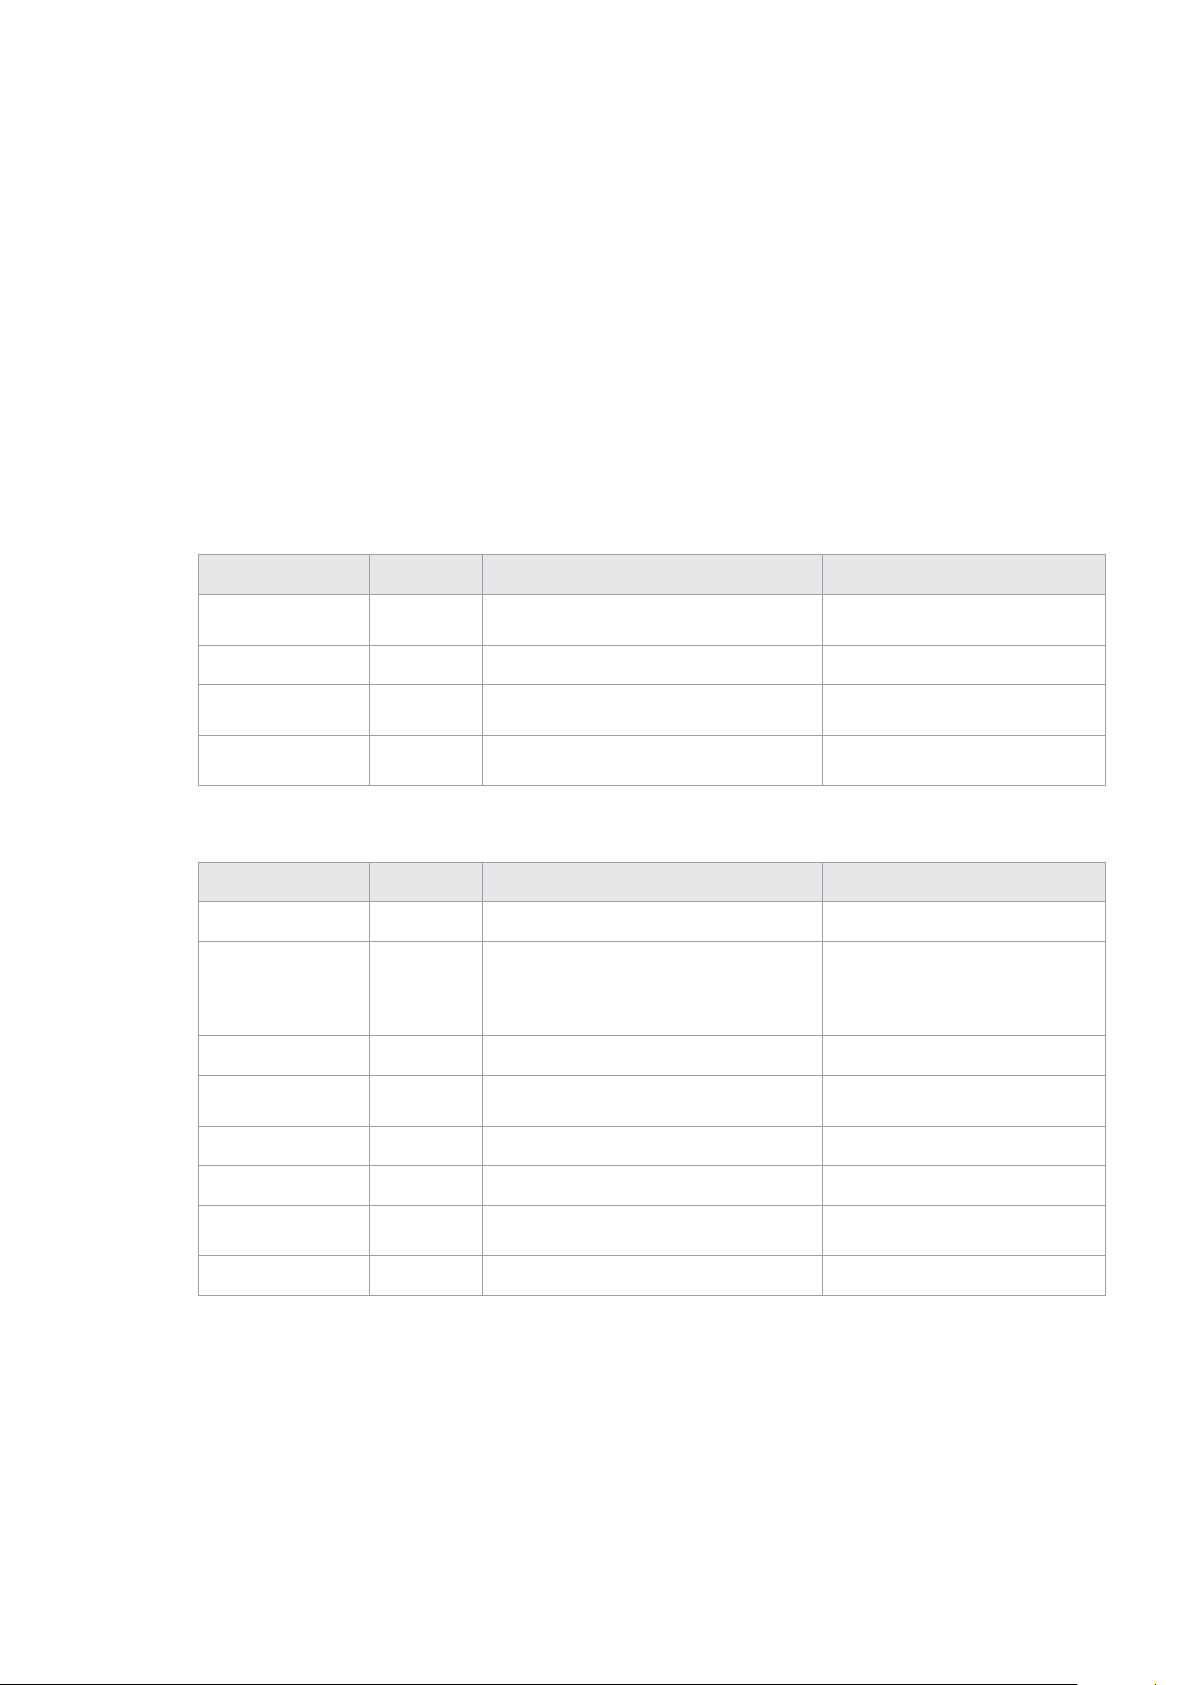
NETWORK INTERFACE 1:
Name: USB Ethernet
Priority: 0
↵
M A C A d d ress: 00:00:00:00:00:00
Dynamic IP: true
Cu r re nt A d d ress e s: 0.0.0.0/255.255.0.0
Cu r re nt G ate w ay: 0.0.0.0
Stat i c A d d re sses: 10.0.0.2/255.255.255.0
Stat i c G a t e w a y: 10.0.0.1
↵
↵
↵
↵
↵
↵
↵
↵
↵
Parameters
Network Block
Key Read/Write Description Valid Values
Interface Count Read only
Default Interface Read only The default networking interface Integer
Static DNS Servers Read only The IP addresses of the static DNS servers
Current DNS Servers Read only The IP addresses of the current DNS servers
Network Interface Block
Key Read/Write Description Valid Values
Name Read only The name of the networking interface String
Priority Read/Write
MAC Address Read Only MAC address of the networking interface IEEE 802 MAC address
Dynamic IP Read/Write Selects DHCP or Static IP configuration
Current Addresses Read Only The current IP address and Subnet mask {IPv4 address}/{Subnet Mask}
Current Gateway Read Only The current IP gateway address IPv4 address
The number of networking interfaces
supported by the Web Presenter
The priority of the network interface. When
multiple network interfaces are available,
the high priority interface will become the
default
Integer
Comma separated list of
IPv4 addresses
Comma separated list of
IPv4 addresses
Unsigned integer. The higher
number is the higher priority
true - DHCP enabled
false - Static IP
Static Addresses Read/Write
Static Gateway Read/Write Static gateway address when DHCP disabled IPv4 address
Status IP address and subnet mask when
DHCP disabled
{IPv4 address}/{Subnet Mask}
Changing Networking Settings
The network can be configured to use either DHCP or a static configuration. To enable DHCP
on Network Interface 0:
NETWORK INTERFACE 0:
Dynamic IP: true
↵
↵
↵
DeveloperInformation
67
Page 68
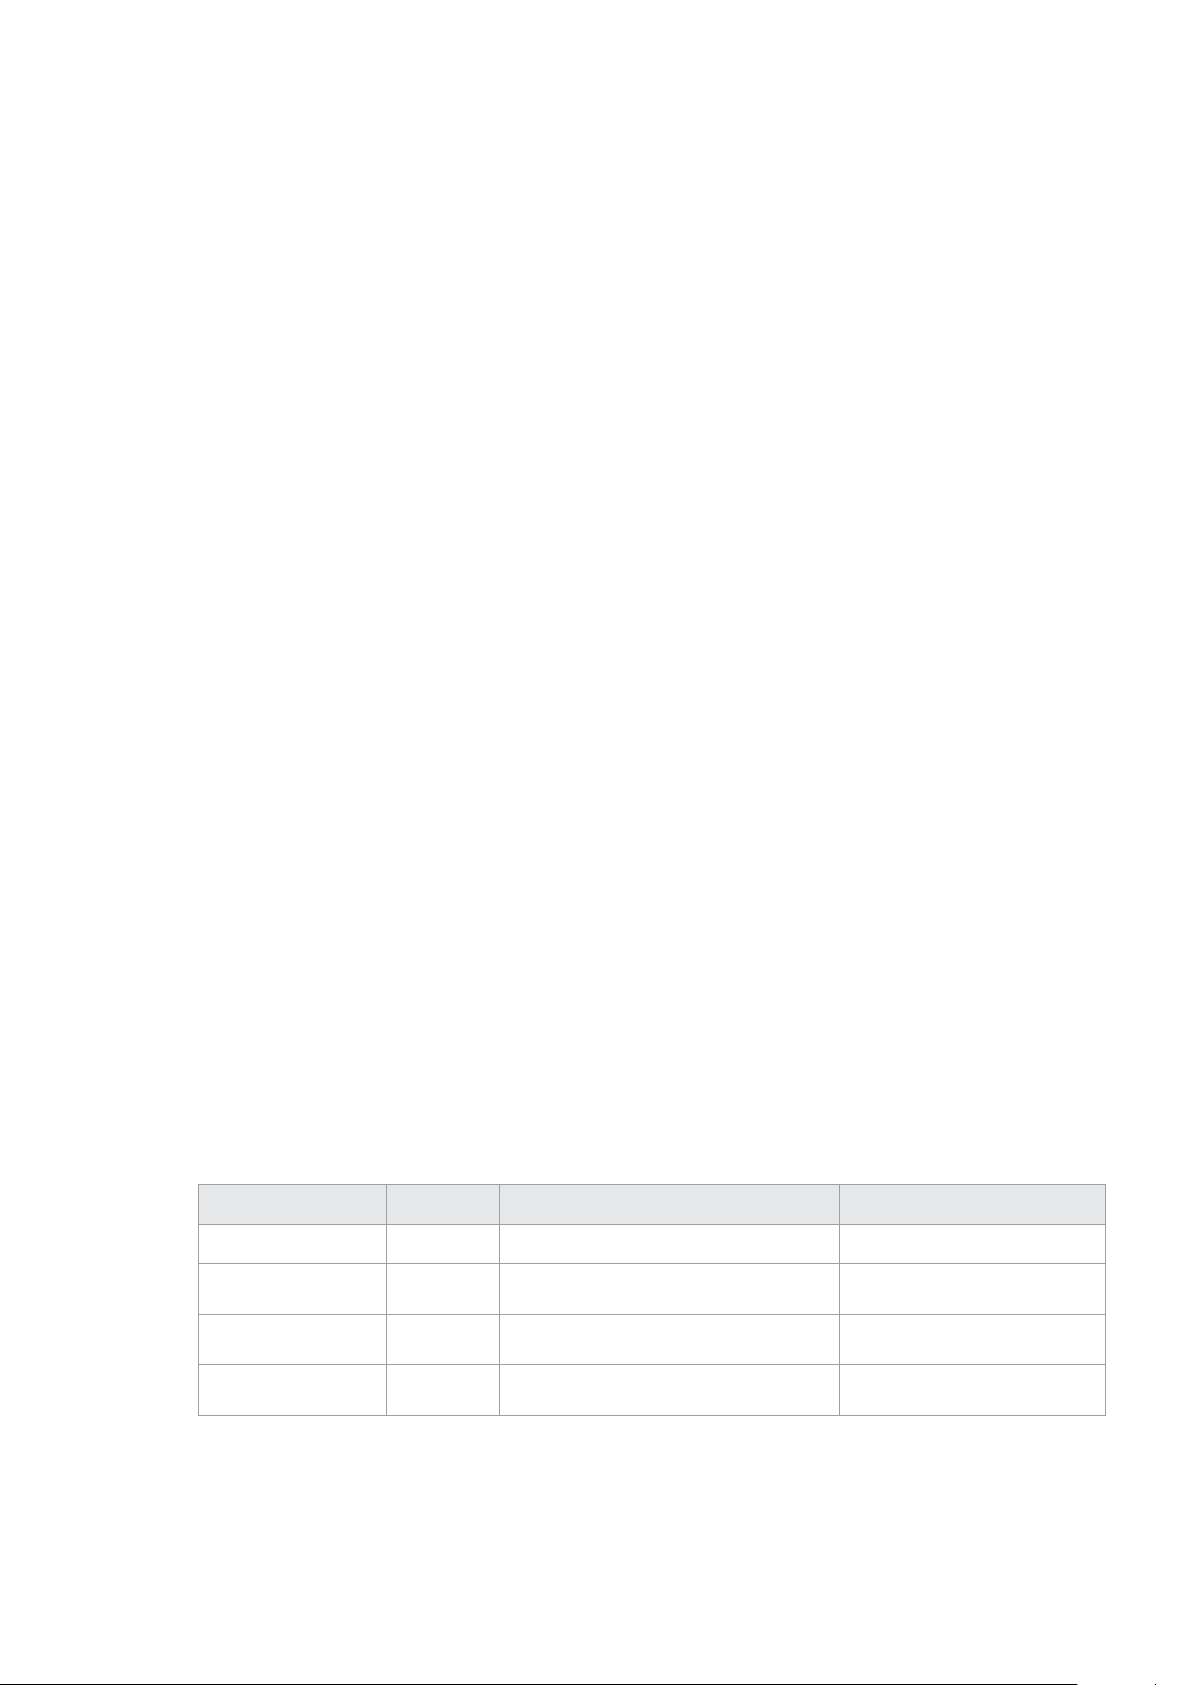
ACK
↵
↵
NETWORK INTERFACE 0:
Dynamic IP: true
↵
↵
↵
To set a fixed IP address, supply all static parameters:
NETWORK INTERFACE 0:
Dynamic IP: false
St a t ic Add resse s: 192.168.1.2/255.255.255.0
Static G at e w a y: 192.168.1.1
↵
↵
↵
↵
↵
ACK
↵
↵
NETWORK INTERFACE 0:
Dynamic IP: false
St a t ic Add resse s: 192.168.1.2/255.255.255.0
Static G at e w a y: 192.168.1.1
↵
↵
↵
↵
↵
Changing network settings may cause the IP connection to be dropped.
UI Settings Block
The UI settings block contains the front panel LCD and monitor output settings for the
connected Web Presenter.
Block Syntax
UI S ETTIN G S:
Available Locales: en_US.UTF-8, zh_CN.UTF-8, ja_JP.UTF-8, ko_KR.UTF-8, es_
ES.UTF-8, de_DE.UTF-8, fr_FR.UTF-8, ru_RU.UTF-8, it_IT.UTF-8, pt_BR.UTF-8,
tr_TR.UTF-8
Current Locale: en_US.UTF-8
Available Audio Meters: PPM -18dB, PPM -20dB, VU -18dB, VU -20dB
Current Audio Meter: PPM -20dB
↵
↵
↵
↵
↵
↵
Parameters
Key Read/Write Description Valid Values
Available Locales Read only The locales available in the Web Presenter Comma separated list of locales
Current Locale Read/Write The current locale for Web Presenter
Available Audio Meters Read only
Current Audio Meter Read/Write The current audio meter
The available audio meters supported by the
Web Presenter
Refer to the locales from the
Available Locales field
Comma separated list of audio
meter types
Refer to the audio meters from the
Available Audio Meters field
DeveloperInformation
68
Page 69
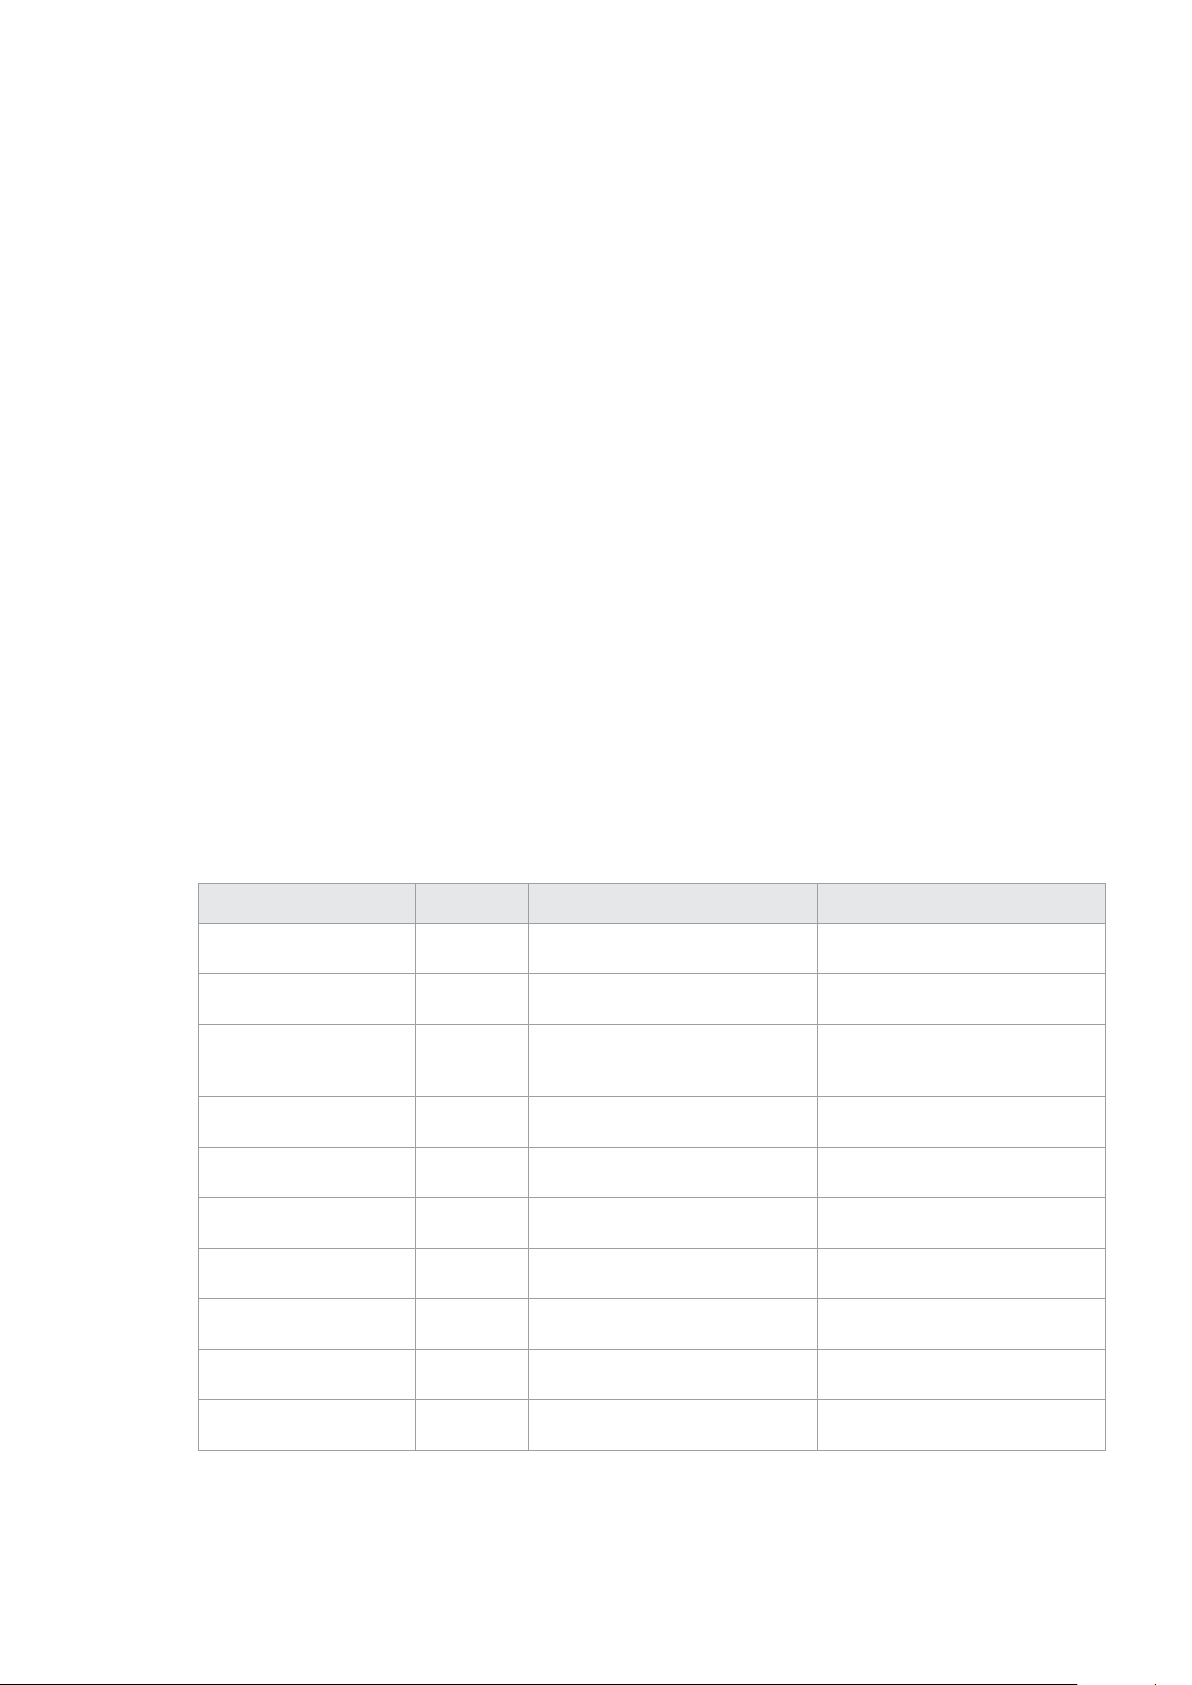
Stream Settings Block
The stream settings block contains the stream configuration for the connected Web Presenter.
Block syntax
This example shows the output for a connected Web Presenter. The stream settings prefixed
with Current show the active stream settings and are writable. The stream settings prefixed by
Available show the available stream settings for the device or platform and are read-only. To
view the available servers or quality levels for a stream service, the Current Platform stream
setting should be set first.
ST R EA M SETT I NGS:
↵
Available Video Modes: Auto, 1080p23.98, 1080p24, 1080p25, 1080p29.97,
1080p30, 1080p50, 1080p59.94, 1080p60, 720p25, 720p30, 720p50, 720p60
Video Mode: 1080p59.94
Current Platform: YouTube
Current Server: Primary
Current Quality Level: Streaming Medium
Stream Key: abc1-def2-ghi3-jkl4-mno5
↵
↵
↵
↵
↵
Available Default Platforms: Facebook, Twitch, YouTube, Twitter /
Periscope, Restream.IO
Available Custom Platforms: My Platform
Available Servers: Primary, Secondary
↵
↵
↵
Available Quality Levels: HyperDeck High, HyperDeck Medium, HyperDeck Low,
Streaming High, Streaming Medium, Streaming Low
↵
↵
Parameters
Key Read/Write Description Valid Values
Available Video Modes Read only
Video Mode Read/Write The current video mode
Current Platform Read/Write The selected streaming platform
Current Server Read/Write
Current Quality Level Read/Write The current streaming quality level
Stream Key Read/Write
Available Default Platforms Read only
Available Custom Platforms Read only
Available Servers Read only
Available Quality Levels Read only
The video modes available
in the Web Presenter
The current server for the
streaming platform
The stream key for the streaming
platform
The available default
streaming platforms
The custom streaming platforms
loaded in the Web Presenter
The available servers for the
selected streaming platform
The available quality levels for the
selected streaming platform
Comma separated list of video modes
Refer to the video modes from the
Available Video Modes field
Refer to the platforms from the
Available Default Platforms and
Available Custom Platforms fields
Server is dependent on selected
Current Platform
Quality level is dependent on
selected Current Platform
String
Comma separated list of default
platforms
Comma separated list of custom
platforms
Comma separated list of servers
Comma separated list of quality levels
DeveloperInformation
69
Page 70

Changing Stream Settings
The stream settings can be changed by providing a stream settings block. The following is an
example of streaming a 1080p59.94 input on Twitch with a medium stream quality.
ST R EA M SETT I NGS:
Video Mode: 1080p59.94
Current Platform: Twitch
Current Server: US West: Los Angeles, CA
Current Quality Level: Streaming Medium
Strea m Key: live_123456789_1aB2cD3eF4gH5iJ6kL7mN8oP9qR0sT
↵
ACK
↵
↵
ST R EA M SETT I NGS:
Video Mode: 1080p59.94
Current Platform: Twitch
Current Server: US West: Los Angeles, CA
Current Quality Level: Streaming Medium
Strea m Key: live_123456789_1aB2cD3eF4gH5iJ6kL7mN8oP9qR0sT
↵
↵
↵
↵
↵
↵
↵
↵
↵
↵
↵
↵
↵
Stream XML Block
The stream XML block allows users to configure the Web Presenter with a custom configuration
file in XML format.
Block syntax
The following example shows an XML file - Custom.xml has been loaded to configure the
stream settings in the Web Presenter.
ST R EA M XML:
Files: C u sto m.x ml
↵
↵
↵
Parameters
Key Read/Write Description Valid Values
Files Read/Write The XML files loaded in Web Presenter Comma separated list of filenames
Action Write only The stream XML action
Remove
Remove All
Adding a Stream XML file
An XML file can be loaded onto a Web Presenter by sending the stream xml command with a
filename, then provide the contents of the XML file. After adding the XML file, the Available
Custom Platforms field in the STREAM SETTINGS block will be updated with the new platforms,
however the Current items will remain unchanged.
DeveloperInformation
70
Page 71

For the Stream XML block to be parsed correctly, any blank lines should be removed from the
XML files.
STREAM XML Custom.xml:
<?xml version=”1.0” encoding=”UTF-8”?>
<streaming>
<service>
<name>My Custom Platform</name>↵
...
</s e r v i c e >
</s t r e a m ing>
↵
ACK
↵
↵
STREAM XML Custom.xml:
<?xml version=”1.0” encoding=”UTF-8”?>
<streaming>
<service>
<name>My Custom Platform</name>↵
...
</s e r v i c e >↵
</s t r e a m ing>
↵
ST R EA M XML:
Files: C u sto m.x ml
↵
ST R EA M SETT I NGS:
Available Custom Platforms: My Custom Platform
↵
↵
↵
↵
↵
↵
↵
↵
↵
↵
↵
↵
↵
↵
↵
↵
Removing a Stream XML file
An XML file can be removed from the Web Presenter by sending the stream xml command with
the remove action.
ST R EA M XML:
Action: Remove
Files: C u sto m.x ml
↵
ACK
↵
↵
ST R EA M XML:
Files:
↵
ST R EA M SETT I NGS:
Available Custom Platforms:
↵
↵
↵
↵
↵
↵
↵
↵
DeveloperInformation
71
Page 72

Removing all Stream XML files
All XML files can be removed from the Web Presenter by sending the stream xml command with
the remove all action. In the example, following the remove all action, the loaded stream XML
files and available custom platforms are both displayed as empty.
ST R EA M XML:
Action: Remove All
↵
↵
↵
ACK
↵
↵
ST R EA M XML:
Files:
↵
↵
↵
ST R EA M SETT I NGS:
Available Custom Platforms:
↵
↵
↵
Stream State Block
The stream state block provides the streaming status of the Web Presenter.
The Web Presenter server will send a stream state block update whenever there is a change to
the Status field. Due to frequency of changes to Duration and Bitrate fields, these fields need to
be polled by the client by requesting a Stream State block.
Block syntax
STREAM STATE:
St atus: Idle
↵
↵
↵
Parameters
Key Read/Write Description Valid Values
Status Read only The stream state of the Web Presenter,
updated when the stream status changes
Action Write only The Web Presenter shutdown action. Start
Duration Read only The duration of the active stream String in format of DD:HH:MM:SS
Bitrate Read only The bitrate of the active stream Integer bits per second
Idle
Connecting
Streaming
Interrupted
Stop
Starting Stream
The stream is started by providing a stream state block with start action.
STREAM STATE:
Action: Start
↵
↵
↵
DeveloperInformation
72
Page 73

ACK
↵
↵
STREAM STATE:
Status: Connecting
↵
STREAM STATE:
Status: Streaming
↵
↵
↵
↵
↵
Stopping stream
The stream is stopped by providing a Stream State block with stop action.
STREAM STATE:
Ac tion: Stop
↵
ACK
↵
↵
STREAM STATE:
St atus: Idle
↵
↵
↵
↵
↵
Shutdown Block
The Shutdown block provides power control of the Web Presenter. The Shutdown block is
write-only and not presented in the preamble.
Parameters
Key Read/Write Description Valid Values
Action Write only The Web Presenter shutdown action. Reboot
Factory Reset
Reboot
The Web Presenter can be rebooted by providing a Shutdown block with reboot action.
SH U TDOWN:
Action: Reboot
↵
ACK
↵
↵
↵
↵
On reboot action, the Web Presenter server will be stopped and clients will be disconnected.
Factory Reset
The Web Presenter can be factory reset by providing a Shutdown block with factory reset
action. On factory reset action, all settings are set to factory defaults.
SH U TDOWN:
Action: Factory Reset
↵
ACK
↵
↵
↵
↵
DeveloperInformation
73
Page 74

ヘ ルプ
ヘ ルプライン
すぐに情報が必要な方は、
の最新サポート情報を確認できます。
Blackmagic Design
オンライン サ ポートページで、
Blackmagic Web Presenter
BlackmagicDesignオンラインサポートページ
最新のマニュアルは、Blackmagic Designサポートセンターで確認できます。
www.blackmagicdesign.com/jp/support
BlackmagicDesignフォー ラム
弊 社 ウェブ サイトの
る 有 益 なリ ソ ー ス で す。経 験 豊 富 な ユ ー ザ ー や
解決 策 が 公 開されていますので、このフォーラムを参 考にすることで、現在の問題をすばやく解決できるこ
と が あ り ま す 。ぜ ひ ご 利 用 く だ さ い 。
らアク セ スできま す。
Blackmagic Design
Blackmagic
フ ォ ー ラ ム は 、様 々 な 情 報 や ク リ エ イ テ ィ ブ な ア イ デ ア を 共 有 で き
Blackmagic Design
フォーラム に は 、
スタッフによって、すでに多くの問題の
http
://
forum.blackmagicdesign.com
か
BlackmagicDesign サポートへ連 絡
サポートページやフォーラムで必 要な情報を得 られなかった場 合 は 、サ ポートページの「メール を 送 信」
ボ タ ン を 使 用 し て 、サ ポ ー ト の リ ク エ ス ト を メ ー ル 送 信 し て く だ さ い 。 あ る い は 、サ ポ ー ト ペ ー ジ の 「 お 住
まいの地域のサポートオフィス」をクリックして、お住まいの地域の
に電 話 でお問い合 わ せください 。
Blackmagic Design
サ ポ ートオ フィス
ヘルプ
74
Page 75

規制に関する警告
欧州連合内での電気機器および電子機器の廃棄処分
製品に記載されている記号は、当該の機器を他の廃棄物と共に処分してはならないことを示しています。
機器を廃棄するには、必ずリサイクルのために指定の回収場所に引き渡してください。機器の廃棄におい
て個別回収とリサイクルが行われることで、天然資源の 保 護につな がり、健 康と環境を守る方 法でリサイ
クルが 確 実 に 行 われるようになります。廃 棄 する 機 器 のリサイクルのた め の回 収 場 所 に 関して は 、お住 ま
いの地方自治体のリサイクル部門、または製品を購入した販売業者にご連 絡ください。
この機器は、
ています。これらの制限は、商用環境で機器を使 用している場合に有害な干渉に対する妥当な保護を
提 供するた め の も の で す。この 機 器 は 無 線 周 波エネル ギ ー を 生 成 、使 用 、放 出 する可能 性 が ありま す。
また、指示に従ってインストールおよび使用しない場合、無線通信に有害な干渉を引き起こす恐れがあ
ります。住 宅 地 域 で 当製品を使 用すると有 害 な干渉を引き起こす可能 性 があり、その 場 合はユーザーが
自己責任で干渉に対処する必要があります。
動作は次の
FCC
規定の第15部 に 準 拠 し 、ク ラ スAデジタル機器の制限に適合していることが確認され
2つを 条 件 とします:
1 本機は、有害な干渉を起こさない。
2
本機は希望しない動作を発生しかねない干渉を含む、いかなる受信干渉も受け入れる必要がある。
R-R-BMD-20201201001
R
-R-BMD-20201201002
ISED Canada
本 機 は 、カ ナ ダ の ク ラ ス Aデジタル機器の規格に準拠しています。
本機のいかなる改造、あるいは目的の用途以外での使用は、これらの規格への順守を無効にすること
があります。
ステートメント
HDMIインターフェースへの接続は、必ず 高品 質のシールドHDMIケーブルを使用する必要があります。
本機は、商用環境で目的の用途に順守した使用においてテストを行なっています。非商用環境で使用さ
れた場合、無線妨害を引き起こす可能性があります。
規制に関する警告
75
Page 76

安全情報
必ず保護接地のあるコンセントに接続してください。
感電のリスクを減らすため、水が跳ねたり、滴るような場所には置かないでください。
こ の 機 器 は 、周 囲 温 度 が 最 高
気温-
20°Cから60°C、相 対 湿 度 の 0%から90%( 結 露 な し )の 場 所 に 保 管 して く だ さ い 。
通気が妨げられないように、当製品の周囲は通気に十分なスペースを開けるようにしてください。
ラックマウントする場 合 は 、隣 接する機器により通 気 が妨げられ ないようにしてください。
ユーザーが 保守できる部品はありません。サービスに関しては、お近くの
スセンター にお問い合 わ せください 。
海抜
2000m以上では使用しないでください。
カリフォルニ ア州ステ ートメント
この製品のユーザーは、プラスチック部品内の微量の多臭素化ビフェニルなどの化学物質にさらされる
可能性があります。カリフォルニア州は、多臭素化ビフェニルは発がん性があり、先天異常や生殖機能へ
危害を及ぼす物質であると認識しています。
詳細は、以下のウェブサイトをご確認ください。
40°Cまでの熱帯地区での使用に対応しています。
Blackmagic Design
www.P65Warnings.ca.gov
のサービ
安全情報
76
Page 77

保証
36
ヶ月限 定 保 証
Blackmagic Designは、お買い上げの日から36ヶ月間 、Blackmagic Web Presenterの部 品および 仕 上
がりについて瑕 疵 が ないことを 保 証します。しかし、コネクター、ケーブル、光ファイバーモジュール、ヒュ
ーズ、バッテリーについては、それらの部品および仕上がりに瑕疵がないことに対する保 証は12ヶ月間で
す。この保証期間内に製品に瑕疵が見つかった場合、
および人件費無料で該当製品の修理、あるいは製品の交換のいずれかで対応いたします。
Blackmagic Design
は弊社の裁量において部品代
この保証に基づいたサービスを受ける際、お客 様は必ず保証期限終了前に
通知し、保証サービスの手続きを行ってください。お客様の責任において不良品を梱包し、
Design
が指 定 するサ ポートセンターへ配 送 料前 払で 送 付いた だきますようお 願 い 致します。理 由 の 如
何を問 わず、
用は お 客 様の自己負 担 となります。
不適切な使用、または不十分なメンテナンスや取扱いによる不具合、故障 、損傷に対しては、この保証は適
用されません。
す。a)製品のインストールや修理、サービスを行う
た損傷の修理、b)不適切な使用や互換性のない機器への接続によって生じた損傷の修理、c)
Design
統合により時間増加や製品の機能低下が生じた場合のサービス。この保証は
証するもので、明 示または黙示を問わず他の保 証すべてに代わるものです。Blackmagic Designとその
販売社は、商品性と特定目的に対する適合 性のあらゆる黙示保証を拒否します。
の不良品の修理あるいは交換の責任が、特別に、間接的、偶発的、または結果的に生じる損害に対し
て、
Blackmagic Design
かに関わらず、お客様に提供される完全唯一の救 済手段となります。
機器のあらゆる不法使用に対して責任を負いません。
あらゆる損害に対して責任を負いません。使用者は自己の責任において本製品を使用するものとします。
© Copyright 2021 Blackmagic Design 著作権所有、無断複写・転載を禁じます。「Blackmagic Design」、「DeckLink」、「HDLink」、
「Workgroup Videohub」、「Multibridge Pro」、「Multibridge Extreme」、「Intensity」、「Leading the creative video
revolution」は、米国ならびにその他諸国での登録商標です。その他の企業名ならびに製品名全てはそれぞれ関連する会社の登録商
標である可能性があります。
Blackmagic Design
Blackmagic Design
への製品返送のための配送料、保険、関税、税金、その他すべての費
は こ の 保 証 で 、以 下 に 関 し て サ ー ビ ス 提 供 義 務 を 負 わ な い も の と し ま
Blackmagic Design
の部品や供給品ではない物を使用して生じたすべての損傷や故障の修理、d)改 造 や 他 製 品 と の
あるいは販売社がそのような損害の可能性についての事前通知を得ているか否
Blackmagic Design
Blackmagic Design
に瑕疵を
Blackmagic
販 売 代 理 人 以 外 の者 に よって 生じ
Blackmagic
Blackmagic Design
Blackmagic Design
Blackmagic Design
は本製品の使用により生じる
はお 客 様による
が保
ThunderboltおよびThunderboltのロゴは、米国またはその他諸国のIntel Corporationの登録商標です。
保証
77
Page 78

Avril 2021
Manuel d’installation et d’utilisation
Blackmagic
Web Presenter
Blackmagic Web Presenter
Page 79

Bienvenue
Nous vous remercions d’avoir fait l’acquisition d’un Blackmagic Web Presenter.
Le Blackmagic Web Presenter se branche directement aux équipements SDI, convertit le
signal en H.264 et vous permet de streamer sur des plateformes de streaming populaires,
telles que YouTube Live, Facebook Live et Twitch. Vous pouvez également transmettre de
la vidéo de qualité broadcast point à point à l’aide de l’ATEM Streaming Bridge en option.
Ainsi, il est facile de transmettre de la vidéo professionnelle à distance via Internet.
Ce manuel d’utilisation explique comment mettre en route le Blackmagic Web Presenter
et utiliser toutes les fonctionnalités et les commandes. Il décrit par exemple la façon de
configurer l’appareil pour YouTube Live, Facebook Live, Twitch, Zoom, Skype et autres.
Consultez notre page d’assistance sur www.blackmagicdesign.com/fr pour obtenir la
dernière version du manuel et les mises à jour du logiciel interne du Blackmagic Web
Presenter. Enfin, veuillez enregistrer votre équipement lors du téléchargement du logiciel
afin que nous puissions vous tenir informé des mises à jour.
Nous souhaitons continuer à améliorer nos produits, n’hésitez donc pas à nous faire part
de vos commentaires !
Grant Petty
PDG de Blackmagic Design
Page 80

Sommaire
Mise en route 81
Utiliser le panneau avant du WebPresenter 83
Écran LCD 85
Utiliser la sortie de monitoring 86
Utiliser le Web Presenter Setup 91
Onglet Live stream (stream en direct) 92
Onglet Setup (réglages) 93
Network Settings (Paramètresduréseau) 94
Régler le partage de connexion Internetpour le streaming direct 94
Streamer à l’aide de votre smartphone 95
Utiliser le Blackmagic Web Presenter comme une webcam 95
Configurer Open Broadcaster 96
Créer des liens vidéo avec l’ATEMStreaming Bridge 98
Teranex Mini Rack Shelf 99
Mise à jour du logiciel interne 100
Developer Information 101
Blackmagic Web Presenter Ethernet Protocol 101
Protocol Blocks 103
Assistance 112
Avis règlementaires 113
Informations de sécurité 114
Garantie 115
Blackmagic Web Presenter
80
Page 81
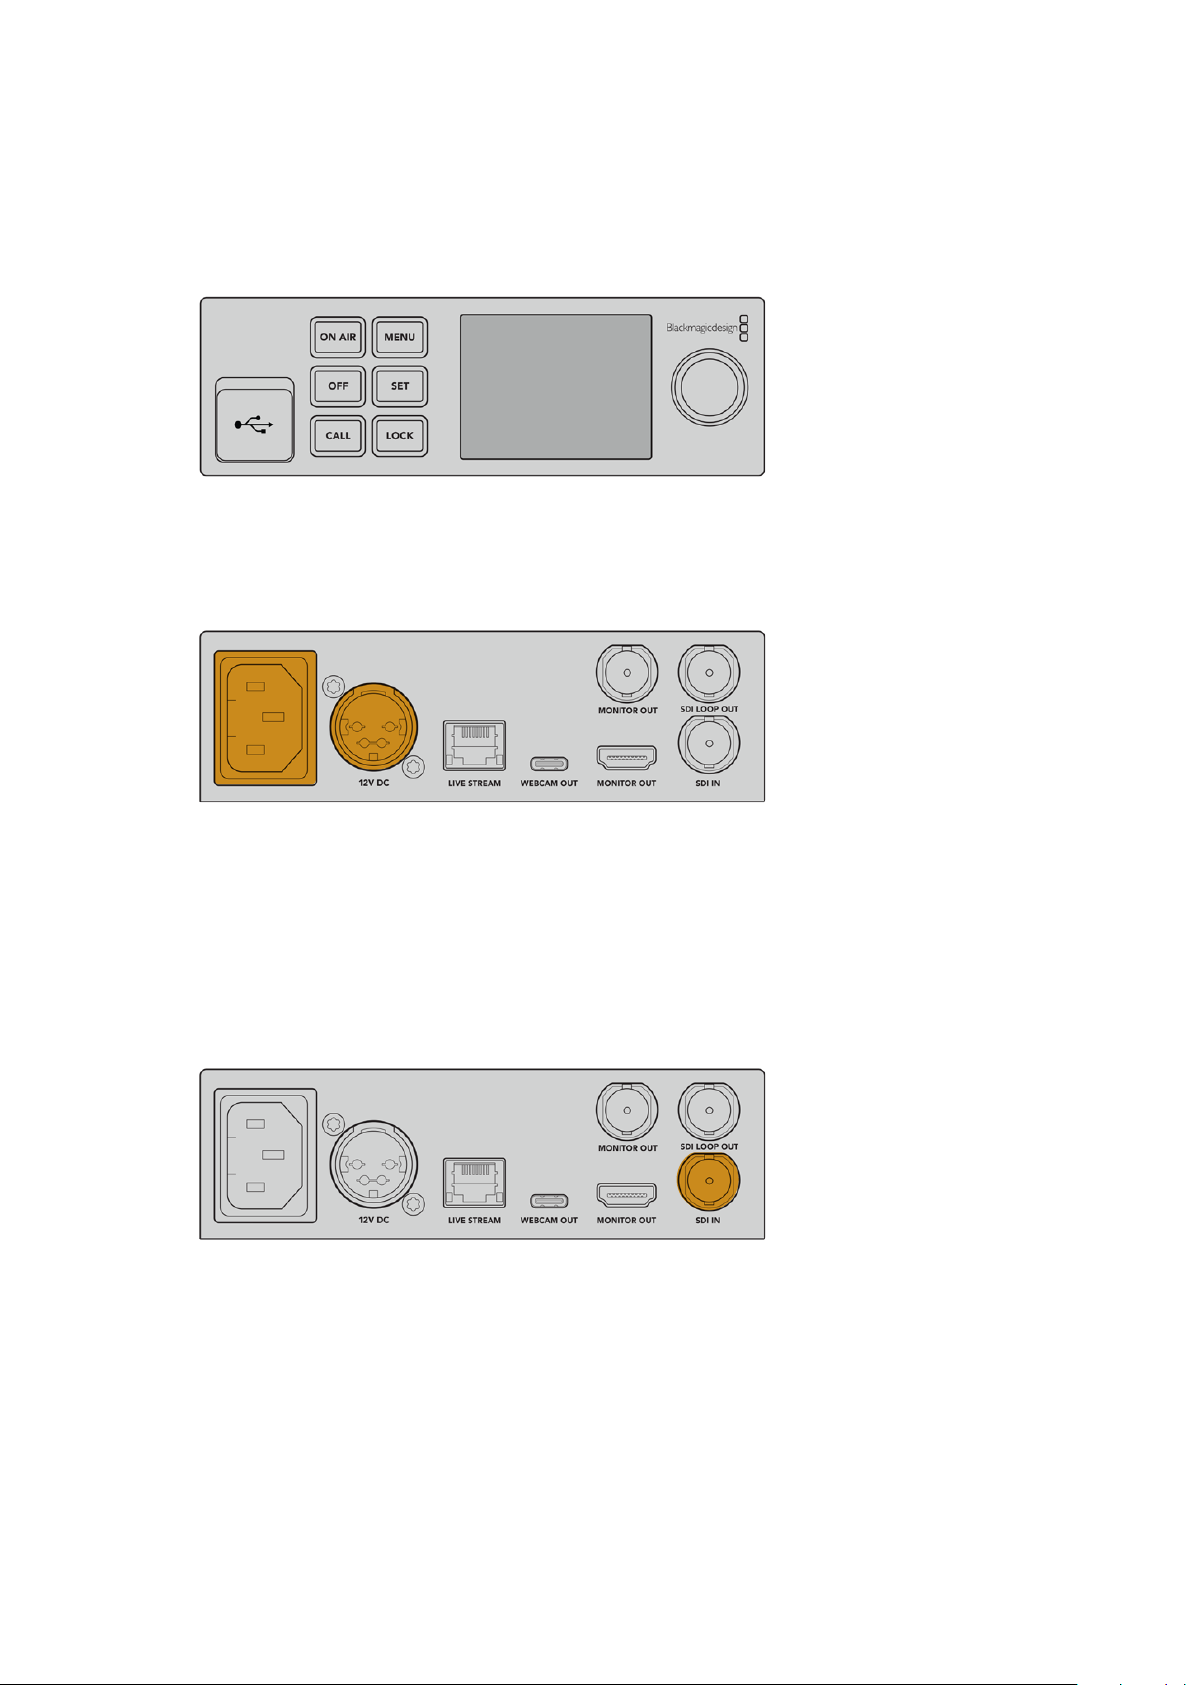
Mise en route
Il est très facile de mettre en route le Blackmagic Web Presenter ! Il suffit de connecter l’alimentation
ainsi qu’une source vidéo et audio, puis de connecter l’appareil à votre ordinateur et à Internet.
Panneau avant du Blackmagic Web Presenter
Connecter l’alimentation
Branchez un câble d’alimentation CEI standard à l’entrée d’alimentation située sur le panneau arrière
du Blackmagic Web Presenter.
Le Blackmagic Web Presenter peut être alimenté à l’aide de l’entrée d’alimentation CEI ou DC 12V.
Le Web Presenter possède également une entrée d’alimentation DC 12V supplémentaire. Vous
pouvez utiliser cette entrée si vous souhaitez connecter une alimentation externe ou redondante,
comme un système d’alimentation sans coupure ou une batterie externe 12V.
Connecter une source vidéo et audio
Branchez votre source vidéo à l’entrée SDI du Blackmagic Web Presenter. Une fois la vidéo
connectée, elle s’affichera sur l’écran LCD intégré du Web Presenter. L’audio est intégré à la vidéo
sur les signaux vidéo SDI, ce qui se confirme en observant les indicateurs audio sur l’écran LCD.
Connectez la vidéo à l’entrée SDI du Blackmagic Web Presenter.
Le Blackmagic Web Presenter prend en charge le 12G-SDI et commute automatiquement entre les
normes HD et Ultra HD jusqu’à 2160p60 lorsque l’entrée vidéo change. Le Blackmagic Web
Presenter 4K peut streamer en Ultra HD, tandis que le Blackmagic Web Presenter HD prend en
charge presque tous les signaux vidéo et les down-convertit en 1080p.
Mise en route
81
Page 82

Connecter un moniteur
Branchez votre télévision HDMI ou moniteur SDI à l’une des sorties de monitoring. Cela vous permet
de visionner votre émission et d’observer les informations d’état importantes qui sont constamment
mises à jour d’après le stream vidéo. Pour plus d’informations sur la façon d’utiliser la sortie de
monitoring, consultez la section « Utiliser la sortie de monitoring » de ce manuel.
Connectez un moniteur à la sortie de monitoring du Web Presenter.
Connecter l’appareil à un ordinateur via USB
Connectez le Web Presenter à votre ordinateur via le port USB-C situé sur le panneau avant ou
arrière. Ces ports USB permettent de mettre à jour l’appareil et de le configurer avec l’utilitaire
Blackmagic Web Presenter Setup. Une fois que vous avez configuré le Web Presenter pour la
première fois, vous pouvez déconnecter l’appareil de l’ordinateur.
Connectez le Blackmagic Web Presenter à votre ordinateur via
le port USB situé sur le panneau avant ou arrière.
Connecter l’appareil à Internet
Connectez le Blackmagic Web Presenter à Internet en branchant un câble réseau du port Ethernet
Live stream à un routeur Internet ou un commutateur réseau.
Connectez le Blackmagic Web Presenter à votre réseau via
le port Ethernet situé sur le panneau arrière.
Mise en route
82
Page 83

Configurer un stream en direct
Vous pouvez maintenant configurer votre Web Presenter pour streamer via n’importe quelle
plateforme de streaming, telles que YouTube Live, Facebook Live, Twitch et autres. Dans cet
exemple, nous allons utiliser YouTube Live.
1 Copiez votre clé de stream depuis votre compte YouTube Studio.
2 Téléchargez l’utilitaire Blackmagic Web Presenter Setup sur
www.blackmagicdesign.com/fr/support et installez-le sur votre ordinateur. Ce logiciel vous
permet de configurer les paramètres de streaming pour la première fois.
3 Lancez l’utilitaire Blackmagic Web Presenter Setup et allez sur la page Live stream.
4 Réglez la plateforme sur YouTube et le serveur sur Primary. Collez la clé de stream YouTube
dans le champ Key et sélectionnez une qualité pour le streaming. Cliquez sur Save.
5 Vous êtes maintenant prêt à streamer partout dans le monde ! Cliquez sur le bouton On air
ou appuyez sur le bouton On air du panneau avant de l’appareil. Une fois votre production
terminée, appuyez sur le bouton Off pour arrêter la diffusion.
Utiliser le panneau avant du
WebPresenter
Utilisez les commandes du panneau avant du Blackmagic Web Presenter pour démarrer/arrêter
le streaming et pour modifier les paramètres.
On air – Pour démarrer le streaming, il suffit d’appuyer sur le bouton On air. Le bouton s’allumera
en rouge pendant le direct.
Si le bouton clignote, le stream en direct n’a pas démarré ou s’est arrêté de manière inattendue.
C’est peut-être dû à un problème avec votre connexion Internet ou les paramètres de streaming.
Il vous faudra donc vérifier que votre connexion Internet fonctionne et que les paramètres de
streaming sont corrects.
Off - Pour arrêter le streaming, appuyez sur le bouton Off.
Utiliser le panneau avant du WebPresenter
83
Page 84

Menu - Appuyez sur le bouton Menu pour ouvrir les paramètres sur l’écran LCD.
Pour modifier un paramètre :
1 Faites tourner la molette pour sélectionner le paramètre que vous souhaitez modifier et
appuyez sur Set.
2 Utilisez la molette pour modifier le paramètre.
3 Appuyez à nouveau sur Set pour confirmer le changement.
Appuyez sur le bouton Menu pour revenir en arrière et accéder à l’écran d’accueil.
Call - Cette fonction sera disponible lors d’une future mise à jour.
Lock - Pour verrouiller le panneau, appuyez et maintenez ce bouton enfoncé pendant une seconde.
Cela désactive les boutons afin d’éviter l’arrêt d’un stream ou un passage en direct accidentel. Ce
bouton s’allume en rouge lorsqu’il est actif.
Appuyez et maintenez ce bouton enfoncé pendant deux secondes pour déverrouiller le panneau.
Utiliser le panneau avant du WebPresenter
84
Page 85

Écran LCD
L’écran d’accueil est la première chose que vous verrez lorsque vous allumerez le Web Presenter.
Ilaffiche des informations importantes, notamment :
Compteur de la durée – Affiche
la durée du stream en cours. Le
compteur s’enclenche lorsque vous
appuyez sur le bouton On air.
Connexion Internet – Une
petite icône s’affiche lorsque
Débit de données – Affiche le débit
de données de l’encodeur, que
votre Web Presenter soit en train
de streamer ou pas. Vous pouvez
connecter votre source vidéo à
une entrée et voir rapidement
le débit de données requis pour
streamer votre flux vidéo en direct.
votre Web Presenter est
connecté au réseau.
Cache – Affiche la mémoire
cache intégrée au Web
Presenter en utilisation
en pourcentage.
Moniteur vidéo – Affiche l’entrée vidéo
connectée au Web Presenter.
On air – Lorsque le streaming
commence, un indicateur
nair rouge s’affiche. Lorsque
l’appareil est en attente et
prêt à démarrer le streaming,
l’indicateur Off s’affiche. En cas
d’interruption du streaming, par
exemple si la connexion Internet
est trop lente, l’indicateur Onair
clignotera en rouge et en blanc.
Indicateurs audio –
Affichent les niveaux
audio de la source
vidéo connectée à
votre Web Presenter.
Utiliser le panneau avant du WebPresenter
85
Page 86
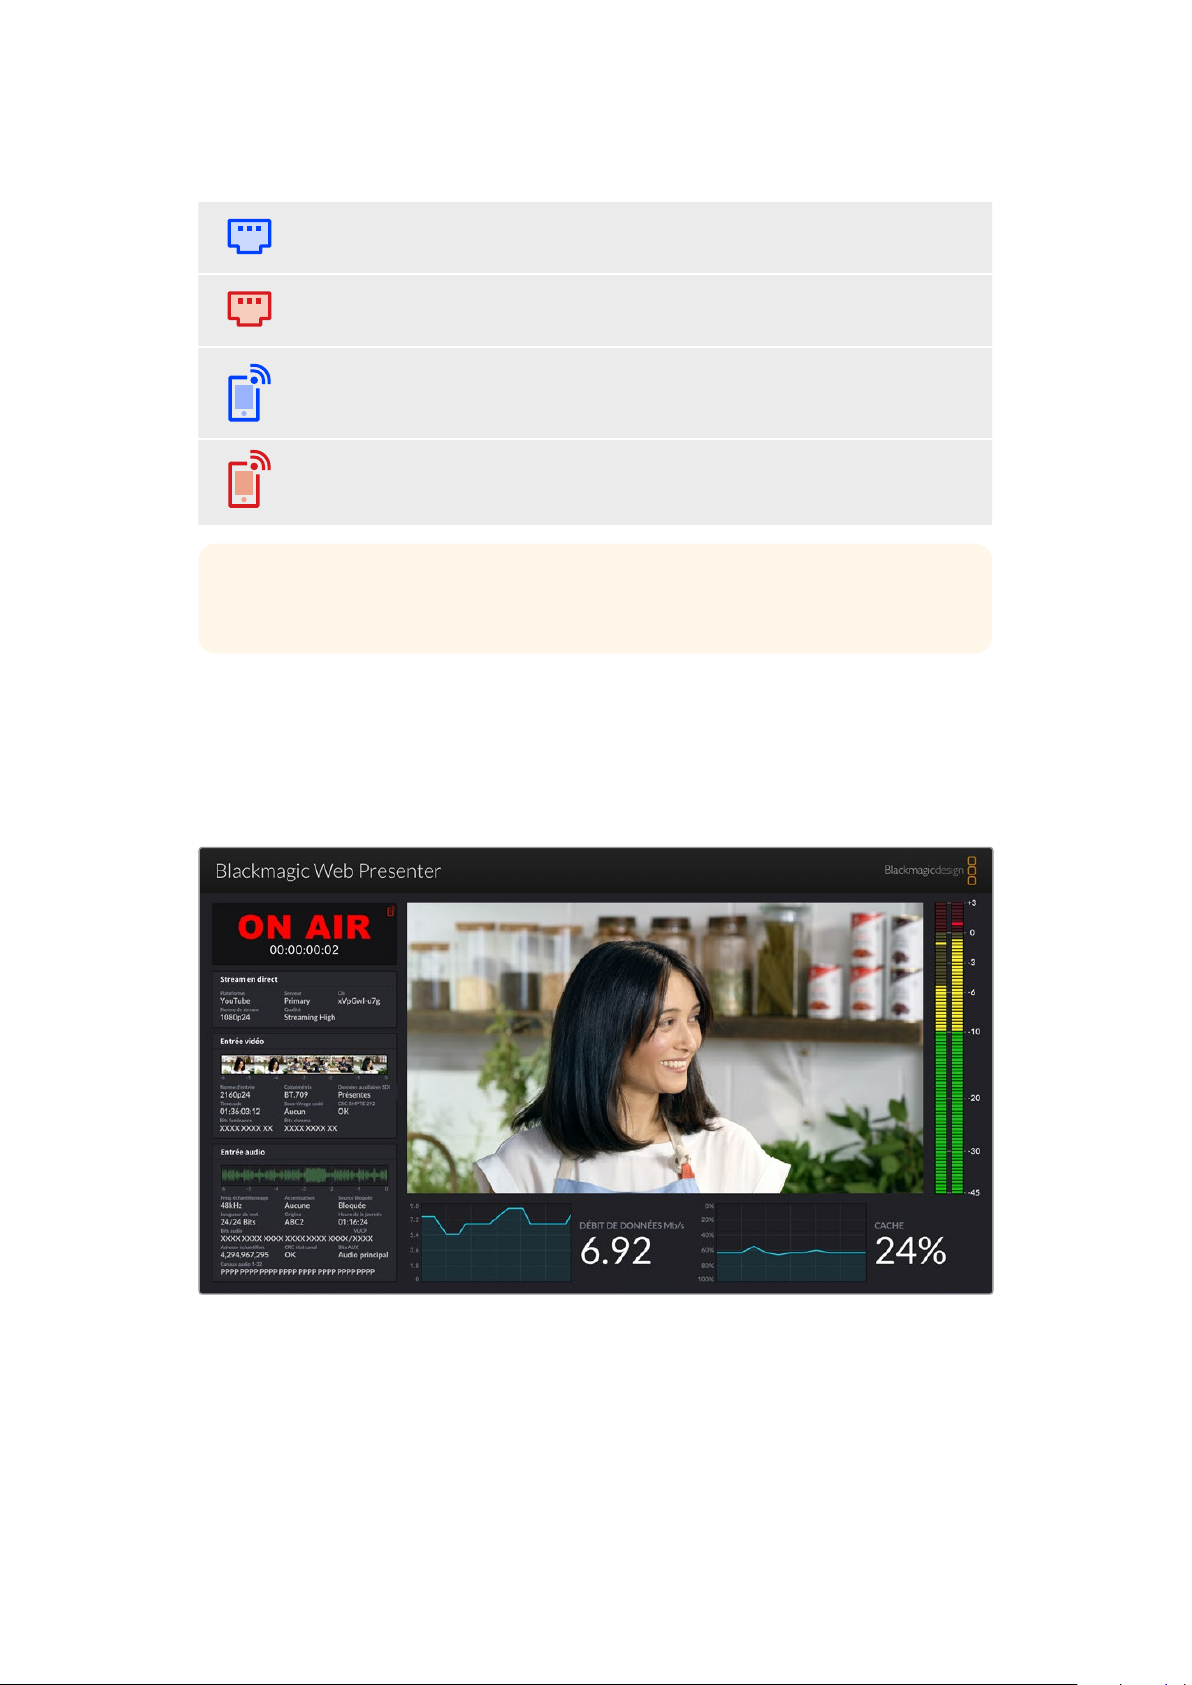
Icônes de connexion Internet
Une icône Ethernet bleue s’affiche lorsqu’un câble Ethernet est connecté et que la
connexion Ethernet sera utilisée pour le streaming.
Une icône Ethernet rouge s’affiche lorsque le signal est à l’antenne et que le streaming
est effectué via Ethernet.
Une icône smartphone bleue s’affiche lorsque la connexion Internet d’un smartphone
connecté sera utilisée pour le streaming.
Une icône smartphone rouge s’affiche lorsque le signal est à l’antenne et que le
streaming est effectué via un smartphone connecté.
CONSEIL Si aucune icône n’est affichée, votre Web Presenter n’est pas connecté
auréseau.
Utiliser la sortie de monitoring
La sortie de monitoring vous permet de visionner l’entrée vidéo, les niveaux audio, l’état de
l’indicateur On air, le débit de données et les niveaux du cache, ainsi que des informations
techniques sur l’entrée SDI.
La sortie de monitoring du Blackmagic Web Presenter fournit de nombreuses
informations dont le débit de données et l’état du cache.
Utiliser la sortie de monitoring
86
Page 87

L’affichage de la sortie de monitoring comprend 8 zones. Vous trouverez ci-dessous une description
de chaque zone et des informations qu’elle affiche.
Affichage de l’entrée
La zone principale affiche l’entrée vidéo de la source vidéo SDI connectée.
Indicateur On air
Avant le streaming, l’indicateur affichera Off pour vous informer que le Web Presenter est
en attente et prêt à diffuser. Lorsque le streaming commence, l’indicateur affiche l’état
Onair en rouge, jusqu’à l’arrêt du streaming.
Le compteur de la durée se trouve sous l’indicateur On air. Lorsque vous appuyez sur le
bouton On air du Web Presenter, le compteur de la durée s’enclenche.
Si votre Web Presenter est hors antenne, mais qu’il streame via un smartphone connecté,
une icône smartphone bleue s’affiche au coin de l’indicateur Off. L’icône smartphone
s’allume en rouge lors du passage à l’antenne.
Stream en direct
La zone du stream en direct affiche des informations sur les paramètres de ce dernier,
dont la plateforme de streaming, le serveur et les 10 premiers chiffres de votre clé de
stream. Elle affiche également la résolution du stream et les paramètres de qualité.
Utiliser la sortie de monitoring
87
Page 88

Entrée vidéo
Les 5 mini viewers en haut de la zone de l’entrée vidéo affichent les 6 dernières secondes
de votre stream en direct. Chaque mini viewer représente 1,2 seconde de temps de
streaming.
Au-dessous des mini viewers, vous trouverez des informations techniques sur la source
d’entrée vidéo connectée à l’entrée SDI du Web Presenter.
Norme d’entrée Affiche la résolution et la fréquence d’images de l’entrée vidéo SDI.
Le Web Presenter supporte les formats jusqu’à 2160p60.
Colorimétrie Affiche l’espace colorimétrique de l’entrée vidéo SDI. Le Web
Presenter supporte les espaces Rec.601, Rec.709 et Rec.2020.
Données
auxiliaires SDI
Timecode Affiche le timecode de la source d’entrée vidéo SDI.
Sous-titrage codé Si votre entrée vidéo SDI comprend le sous-titrage codé, son format
SMPTE 292 CRC C’est une fonction de vérification des erreurs pour la vidéo SDI.
Bits luminance
Y et Bits chroma
Les données auxiliaires sont des données acheminées au sein de
l’entrée vidéo SDI en plus de la vidéo. Elles incluent l’audio intégré,
le timecode et le sous-titrage codé. Si votre entrée SDI comprend
des données auxiliaires, la mention Présentes s’affichera.
s’affichera ici. Les formats CEA-608 et CEA-708 sont supportés.
Sivotre Web Presenter détecte un problème dans l’entrée vidéo SDI,
une erreur s’affichera. Les erreurs CRC sont en général causées par
des câbles SDI défectueux ou par un câble trop long.
Les indicateurs Bits luminance Y et Bits chroma affichent l’activité du
signal d’entrée vidéo SDI. Chaque lettre représente l’état d’un bit du
signal vidéo.
X – Un X indique un bit en constant changement.
L – Un bit bas.
H – Un bit haut.
Le décalage SDI est soustrait pour faciliter la compréhension.
Par exemple, tous les bits sont bas lorsque la vidéo est noire.
En général, les 10 bits de votre entrée vidéo SDI afficheront la
mention X. Cela signifie que tous les bits de votre stream vidéo
changent constamment. Si votre entrée SDI est une vidéo 8 bits,
les deux bits les plus à droite seront toujours bas (L), car ils ne
contiennent pas de données. Si un bit reste sur L ou sur H, et que
vous vous attendiez à ce qu’il soit sur X, cela indique un « bit bloqué »
qui est peut-être causé par un défaut dans la vidéo en amont.
Utiliser la sortie de monitoring
88
Page 89

Entrée audio
La forme d’onde audio en haut de la zone Entrée audio affiche les informations audio des
6 dernières secondes de votre stream en direct. Elle est continuellement mise à jour et se
défile de droite à gauche.
Au-dessous de l’affichage de la forme d’onde, vous trouverez des informations techniques
détaillées concernant l’entrée audio.
Fréquence
d’échantillonnage
Accentuation Indique si l’option d’accentuation de la source audio est activée.
Source bloquée Indique si la fréquence de la source audio est verrouillée sur une
Longueur de mot Affiche la profondeur de bits de l’audio intégré à l’entrée SDI.
Origine Ces quatre caractères indiquent l’origine du canal.
Heure de la
journée
Bits audio Affiche l’activité des bits des échantillons audio intégrés à la
VUCP Lorsque vous lisez les bits VUCP de gauche à droite : le bit V signifie
Affiche la fréquence d’échantillonnage de l’audio intégré à l’entrée
SDI.
source de référence externe.
Timecode continu.
connexion SDI. Même si l’état du canal audio indique que vous avez
16, 20 ou 24 bits audio, l’activité des bits audio le confirmera.
Valid (valide), le U signifie User (utilisateur), le C signifie Channel
status (état du canal) et le P signifie Parity (parité). Ce champ
ressemble à celui de Bits audio.
Adresse
d’échantillonnage
Bits AUX Indique si des bits AUX sont utilisés pour l’audio principal.
Canaux audio 1-32 Chaque chiffre représente un canal audio intégré à l’entrée SDI.
Compteur d’échantillons audio.
Un P indique qu’un canal audio est utilisé et un - signifie qu’il n’y pas
d’audio sur ce canal.
Utiliser la sortie de monitoring
89
Page 90

Affichage du débit de données
L’affichage du débit de données indique le débit de données de l’encodeur durant les
60 dernières secondes. Le débit de données est mesuré en mégabits par seconde.
Cet indicateur est tout le temps actif, même hors antenne, afin que vous puissiez mesurer
votre bande passante avant le direct.
Affichage du cache
L’affichage du cache indique la mémoire tampon intégrée du Web Presenter HD en
pourcentage et le graphique indique la quantité utilisée durant les 60 dernières secondes.
Le cache est une petite mémoire interne qui enregistre et lit en continu la sortie
programme. Il agit en mémoire de secours si le débit de données du streaming est trop
bas et qu’il n’est plus capable de traiter la vidéo.
Le débit Internet peut être aléatoire, car il dépend principalement de l’activité du réseau ou
de la force du signal sans fil. Si le débit de diffusion diminue, les données mises en tampon
vont augmenter en conséquence. Si le débit Internet devient trop bas pour supporter le
streaming, le cache va se remplir avec les images vidéo pour compenser. Cependant, une
fois le cache rempli à 100 %, le streaming sera compromis. Il faut donc éviter d’atteindre la
capacité maximum du cache. Vous pouvez effectuer un test en connectant un flux vidéo et
en observant l’affichage du cache sur la sortie de monitoring sans démarrer le stream. Si le
cache s’approche fréquemment de 100 %, choisissez une qualité de streaming plus basse.
Indicateurs audio
Vous pouvez visionner les niveaux de votre source audio à l’aide des indicateurs audio.
Ilspeuvent être réglés sur des niveaux PPM ou VU dans les menus de configuration du
WebPresenter. Si vos niveaux audio sont trop élevés, les indicateurs s’allumeront en rouge.
Le cas échéant, il se peut que l’audio de votre stream en direct soit distordu ou écrêté.
Idéalement, essayez de maintenir l’audio vers le haut de la section verte et
occasionnellement dans la section jaune.
Utiliser la sortie de monitoring
90
Page 91
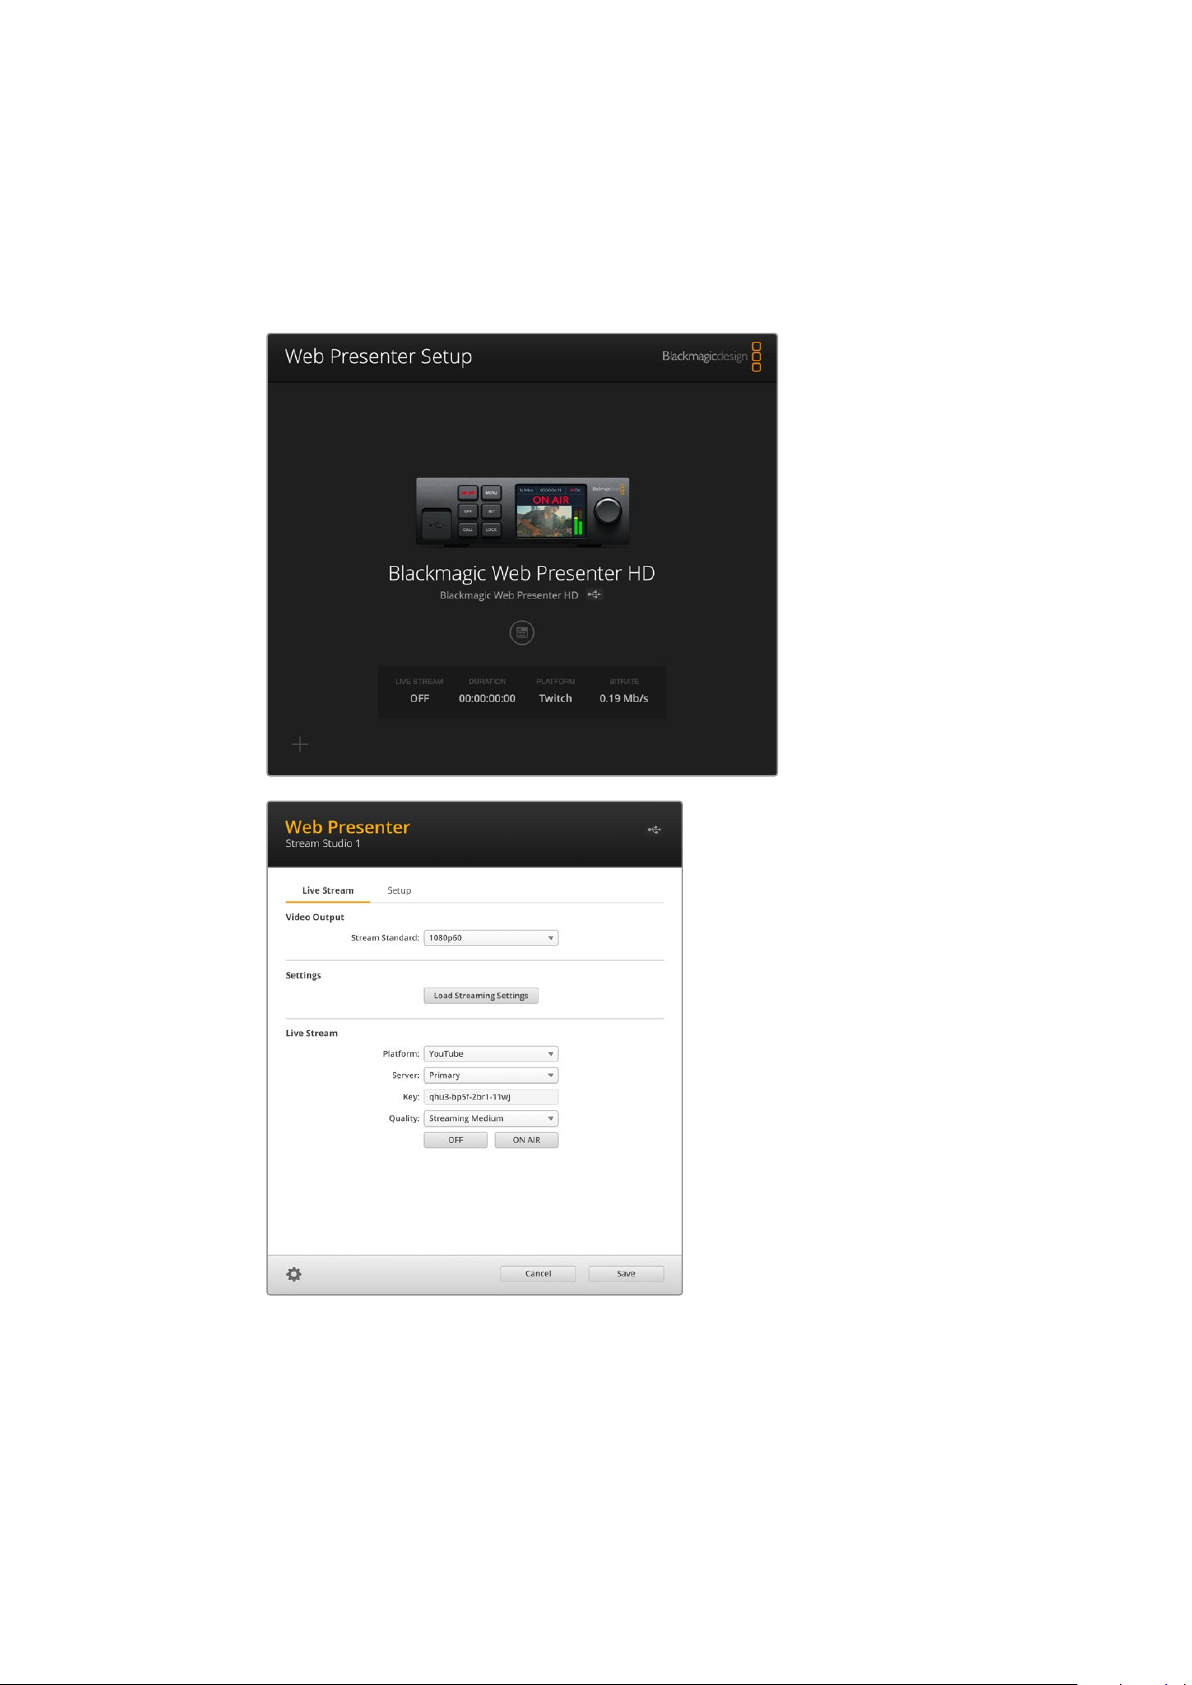
Utiliser le Web Presenter Setup
Lorsque votre Blackmagic Web Presenter est connecté à un réseau, n’importe quel ordinateur
connecté au même réseau peut être utilisé pour contrôler le Web Presenter à distance. Avec le
Blackmagic Web Presenter Setup, vous pouvez accéder aux mêmes commandes et paramètres
disponibles sur le panneau avant de l’appareil.
Utiliser la sortie de monitoring
91
Page 92

Onglet Live stream (stream en direct)
Video output (sortie vidéo)
Stream standard
Cliquez sur le menu de la norme de stream pour sélectionner les paramètres de résolution
vidéo pour votre stream. Vos choix s’étendent de 720p25 à 1080p60 ou 2160p60 selon le
modèle de Web Presenter que vous utilisez.
Settings (réglages)
Si vous avez personnalisé vos paramètres de streaming, par exemple avec un fichier XML
depuis un Blackmagic ATEM Streaming Bridge, vous pouvez les importer en cliquant sur le
bouton Load streaming settings.
Pour plus d’informations sur la personnalisation des paramètres et la connexion avec l’ATEM
Streaming Bridge, veuillez consulter la section « Créer des liens vidéo avec l’ATEM
Streaming Bridge » de ce manuel.
Live stream (stream en direct)
Platform
Cliquez sur ce menu et sélectionnez la plateforme de streaming pour votre diffusion. Vous
avez le choix entre YouTube, Facebook et Twitch. Si vous avez importé des paramètres de
streaming personnalisés, ils apparaîtront également dans la liste de ce menu.
Server
Sélectionnez le serveur le plus proche de vous depuis la liste. La liste des serveurs varie
selon la plateforme de streaming que vous avez choisie.
Key
Entrez la clé de stream qui a été assignée à votre diffusion par votre plateforme de
streaming.
Quality
Sélectionnez la qualité de streaming pour la HD ou la 4K selon le modèle de Web Presenter
que vous utilisez.
HD 4K
HyperDeck High 45 to 70 Mb/s HyperDeck High 95 to 220 Mb/s
HyperDeck Medium 25 to 45 Mb/s HyperDeck Medium 66 to 150 Mb/s
HyperDeck Low 12 to 20 Mb/s HyperDeck Low 38 to 80 Mb/s
Streaming High 6 to 9 Mb/s Streaming High 34 to 51 Mb/s
Streaming Medium 4.5 to 7 Mb/s Streaming Medium 23 to 35 Mb/s
Streaming Low 3 to 4.5 Mb/s Streaming Low 13 to 20 Mb/s
Le débit de données utilisé par le paramètre de qualité change selon la norme vidéo du
Web Presenter. Par exemple, si vous sélectionnez une qualité de streaming élevée
(Streaming high), et que vous opérez à 1080p24, le débit de données sera de 6 Mb/s.
Utiliser la sortie de monitoring
92
Page 93

Comme le montre le tableau, les débits de données du streaming sont plus basses que
celles de l’HyperDeck. Cela permet de transmettre des données via Internet, ce qui utilise
moins de bande passante que d’enregistrer des données sur un disque.
Vous remarquerez que chaque option comprend 2 débits. Le débit le plus bas est utilisé
pour les fréquences d’images les plus basses de 24p, 25p et 30p. Le débit le plus élevé est
utilisé pour les fréquences d’images les plus élevées de 50p et 60p. Veuillez noter que le
débit pour le streaming est réglé par défaut sur Streaming High, car il offre une très haute
qualité de streaming.
Boutons Off et On air
Vous pouvez lancer et arrêter le streaming live en utilisant les boutons On air et Off. Le bouton
Onair s’allume en rouge lorsque le streaming live est en cours.
Onglet Setup (réglages)
Name
Si vous souhaitez renommer votre Web Presenter, saisissez un nouveau nom dans la boîte et
cliquez sur Save.
Language
Permet de changer la langue de l’appareil.
Software
Affiche la version logicielle du Web Presenter.
Audio meters
Utilisez ce menu pour sélectionner le type d’indicateur audio à afficher. Vous avez le choix entre
les niveaux de références VU -18dBFS, VU -20dBFS, PPM -18dBFS et PPM -20dBFS.
Utiliser la sortie de monitoring
93
Page 94

Network (réseau)
Ces paramètres vous permettent de configurer les options réseau, comme le choix de connexion à
un réseau via DHCP ou via une adresse statique IP. Pour plus d’informations sur la connexion de
votre Web Presenter à un réseau, veuillez consulter la section « Connexion à un réseau ».
Connection Priority – Lorsqu’Ethernet et un téléphone portable sont tous les deux
connectés au Web Presenter, ce paramètre permet de sélectionner quelle connexion est
prioritaire pour le streaming. Pour plus d’informations sur le partage des données mobiles,
veuillez consulter la section « Streamer à l’aide de votre smartphone ».
Reset (Réinitialiser)
Réinitialisez votre Web Presenter en cliquant sur le bouton Factory reset.
Network Settings (Paramètresduréseau)
Votre Web Presenter peut se connecter au réseau avec une adresse IP statique ou un DHCP.
DHCP – Réglera automatiquement une adresse IP pour votre appareil et le connectera à votre
réseau sans changer les paramétrages.
Le Dynamic Host Configuration Protocol, ou DHCP, est un service de serveurs et de routeurs réseau
qui détecte automatiquement votre Web Presenter et lui attribue une adresse IP. Le DHCP facilite la
connexion des équipements via Ethernet et veille à ce que leur adresse IP ne soit pas en conflit
l’une avec l’autre. La plupart des ordinateurs et des commutateurs réseau supportent le DHCP.
Static IP – Pour régler l’adresse IP vous-même, configurez les paramètres du protocole sur Static IP
afin de modifier les réglages IP manuellement.
Une adresse IP statique ne changera pas, même si vous redémarrez le Web Presenter.
Utiliser une adresse IP statique peut être nécessaire si vous connectez votre Web Presenter à un
réseau d’entreprise. Si vous avez un administrateur réseau, il est possible que votre réseau ait des
adresses IP personnalisées pour tous les équipements connectés. Il est conseillé de vérifier cela
auprès de votre administrateur réseau s’il gère vos ordinateurs et le réseau dans votre entreprise.
Régler le partage de connexion
Internetpour le streaming direct
Si vous ne pouvez pas brancher directement le Web Presenter à un commutateur réseau ou un
routeur Internet, il est possible de partager la connexion Internet depuis votre ordinateur via le port
Ethernet du Web Presenter.
Pour régler le Blackmagic Web Presenter pour le streaming direct via Ethernet :
1 Réglez votre Web Presenter pour qu’il utilise le DHCP.
2 Configurez votre ordinateur pour qu’il partage sa connexion Internet via son port Ethernet.
Mac : Dans Préférences Système, cliquez sur Partage, puis sélectionnez Partage Internet
dans la liste Service. Dans le menu Partager votre connexion depuis, choisissez Wi-Fi si
votre Mac est connecté à Internet via WiFi. Dans la liste Aux ordinateurs via, sélectionnez
Ethernet. Dans la liste Service, cochez la case Partage Internet. Lorsque l’on vous
demande si vous êtes sûr de vouloir activer le partage Internet, cliquez sur Démarrer.
Network Settings (Paramètresduréseau)
94
Page 95

Windows : Faites un clic droit sur l’cône Démarrer, puis sélectionnez Connexions réseaux.
L’état du réseau s’affiche. Cliquez sur Modifier les options d’adaptateur pour afficher une
liste des connexions réseau de votre ordinateur. Faites un clic droit sur la connexion Internet
et sélectionnez Propriétés. Dans l’onglet Partage, cochez Autoriser d’autres utilisateurs
duréseau à se connecter via la connexion Internet de cet ordinateur. Sélectionnez une
connexion réseau dans le menu, puis cliquez sur OK.
3 Branchez le Web Presenter au port Ethernet de votre ordinateur. Après quelques secondes,
le DHCP assigne une adresse IP au Web Presenter.
4 Vérifiez que le Web Presenter HD est connecté à Internet via Ethernet en regardant l’icône
Ethernet en haut à droite de l’écran LCD de l’appareil.
Streamer à l’aide de votre smartphone
Le Blackmagic Web Presenter peut streamer depuis la connexion Internet de votre smartphone.
Ainsi, vous pouvez streamer dans le monde entier d’où vous le voulez, du moment que votre
smartphone capte une connexion Internet.
Pour régler le partage de connexion mobile :
1 Connectez votre smartphone au Blackmagic Web Presenter à l’aide d’un câble USB-C.
Vouspouvez utiliser le connecteur USB-C à l’avant ou à l’arrière du panneau.
2 Activez le partage de connexion Internet sur votre smartphone.
Sur votre appareil iOS ouvrez Réglages> Partage de connexion et veillez à ce que l’option Autoriser
d’autres utilisateurs soit activée. Sur votre appareil Android, balayez l’écran pour afficher le menu.
Appuyez longuement sur l’icône de point d’accès, puis activez le partage de connexion via USB.
Maintenant, vous pouvez appuyer sur le bouton On air de votre Blackmagic Web Presenter pour
lancer le direct.
CONSEIL Une fois le streaming terminé, nous vous recommandons de désactiver le
partage de connexion afin d’économiser la batterie de votre smartphone.
Si un câble Ethernet est connecté à votre Web Presenter, vérifiez qu’il est configuré pour utiliser le
partage de connexion Internet depuis votre téléphone. Ouvrez l’utilitaire Web Presenter Setup et
allez sur l’onglet Setup. Dans la section Network, réglez la priorité de connexion (connection
priority) sur Mobile.
Utiliser le Blackmagic Web Presenter comme une webcam
Les logiciels comme Skype ou Zoom règlent généralement le Web Presenter en tant que webcam
automatiquement. Ainsi, quand vous lancez l’application, la vidéo de votre Web Presenter apparaît
automatiquement. Si l’application ne sélectionne pas le Web Presenter automatiquement, réglez-la
manuellement pour qu’elle utilise le Web Presenter en tant que webcam et microphone.
Vous trouverez ci-dessous un exemple pour régler les paramètres de la webcam sur Skype.
1 Dans la barre de menu de Skype, ouvrez les paramètres Audio et Vidéo.
2 Dans le menu Caméra, sélectionnez votre Web Presenter dans la liste. La vidéo du Web
Presenter apparaîtra dans la fenêtre de prévisualisation.
3 Allez dans le menu Micro et sélectionnez le Web Presenter en tant que source audio.
Streamer à l’aide de votre smartphone
95
Page 96

Configurer Open Broadcaster
Open Broadcaster est une application open source qui fait office de plateforme de streaming entre
votre Web Presenter et votre logiciel de streaming favori, tel que YouTube, Twitch ou encore
Facebook. Open Broadcaster compresse la vidéo en un débit binaire facilement gérable par votre
application de streaming.
Ci-dessous, vous trouverez les étapes pour configurer Open Broadcaster afin de diffuser la sortie
webcam de votre Web Presenter à l’aide du service de streaming YouTube Live.
1 2
Ouvrez Open Broadcaster et cliquez sur le
symbole + dans la boîte de dialogue Sources.
3
Nommez la nouvelle source et cliquez sur OK. Dans le menu Device, sélectionnez le modèle
Sélectionnez Video Capture Device.
4
devotre Web Presenter et cliquez sur OK.
5 6
Allez sur votre compte YouTube. Cliquez sur le
bouton Go live, puis sur Stream.
Dans les options de flux de YouTube,
saisissez les informations de votre diffusion
et cliquez sur Create stream.
Utiliser le Blackmagic Web Presenter comme une webcam
96
Page 97

7 8
YouTube va générer une clé de stream qui va
diriger Open Broadcaster vers votre compte
YouTube. Cliquez sur le bouton Copy à côté
de la clé de stream. Copiez la clé de stream
pour la coller dans Open Broadcaster.
9 10
Pour connecter le lien de diffusion d’Open
Broadcaster à YouTube, cliquez sur Start
Streaming en bas à droite de l’écran.
Cela établit un lien d’Open Broadcaster à
YouTube. À partir de là, tout sera réglé avec
YouTu be Live.
Retournez sur Open Broadcaster et ouvrez les
préférences en cliquant sur OBS/preferences
dans la barre de menu. Sélectionnez Stream.
Collez la clé de stream que vous avez copiée
de YouTube et cliquez sur OK.
La vidéo du Web Presenter apparaît dans
la fenêtre de prévisualisation du streaming
d’OpenBroadcaster.
Retournez sur YouTube Live. Vous verrez la
sortie programme webcam depuis votre Web
Presenter en arrière-plan. Cliquez sur Done.
11 12
Maintenant qu’Open Broadcaster communique
avec YouTube Live, vous pouvez commencer
votre diffusion. Il est temps de faire les
dernières vérifications afin de vous assurer
que tout fonctionne.
Vous diffusez maintenant du contenu en direct sur YouTube avec Open Broadcaster.
REMARQUE En raison de la nature du streaming sur Internet, il se peut qu’il y ait un retard,
c’est pourquoi il est important de regarder la diffusion sur YouTube pour confirmer que
votre programme est terminé avant de cliquer sur End stream. Vous éviterez ainsi de
couper accidentellement la fin du programme.
Lorsque vous êtes prêt, vous pouvez
commencer la diffusion en cliquant sur Go live.
Utiliser le Blackmagic Web Presenter comme une webcam
97
Page 98

Créer des liens vidéo avec
l’ATEMStreaming Bridge
L’ATEM Streaming Bridge permet de décoder un stream vidéo depuis n’importe quel Web Presenter
et de le reconvertir en vidéo SDI et HDMI. Ainsi, vous pouvez envoyer de la vidéo à travers votre
réseau local ou partout dans le monde via Internet.
Si votre ATEM Streaming Bridge est connecté au même réseau local que votre Web Presenter,
ilsera listé dans le menu Platform de l’onglet Live stream du Web Presenter Setup.
Sinon, vous pouvez charger un fichier XML de paramétrage du streaming depuis un disque USB
connecté au Web Presenter ou via le Web Presenter Setup installé sur votre ordinateur.
Transmettre un bulletin météo au studio depuis le lieu de tournage est un bon exemple de la façon
dont le Blackmagic Web Presenter fonctionne avec l’ATEM Streaming Bridge. Tout ce dont vous avez
besoin pour une transmission à distance est d’un Web Presenter et d’une connexion Internet qui
peut provenir d’un smartphone ou d’une connexion réseau.
Au studio, l’ATEM Streaming Bridge convertit le flux Internet en SDI afin qu’il puisse être connecté
aumélangeur principal du studio.
Voici la configuration du workflow pour cet exemple :
1 Sur le lieu de tournage, le Blackmagic Web Presenter est connecté à la sortie programme
SDI du mélangeur, par exemple, celle de l’ATEM Television Studio HD.
2 Le Blackmagic Web Presenter est connecté à un smartphone.
3 Au studio, l’ATEM Streaming Bridge est également connecté à Internet via Ethernet.
4 L’ATEM Streaming Bridge envoie le flux vidéo SDI converti d’Internet vers l’entrée SDI du
mélangeur situé dans le studio pour la diffusion.
Pour que votre studio connecte l’ATEM Streaming Bridge au flux Internet du Web Presenter, il vous
faudra ouvrir l’utilitaire ATEM Setup et configurer les paramètres Internet. Il sera également
nécessaire de générer un fichier XML contenant tous les paramètres du streaming qui seront
chargés dans le Web Presenter sur site.
Pour plus d’informations sur la façon de connecter l’ATEM Streaming Bridge à Internet et de générer
le fichier de streaming XML, consultez le manuel d’utilisation de l’ATEM Mini.
Créer des liens vidéo avec l’ATEMStreaming Bridge
98
Page 99

Charger le fichier de streaming XML dans le Web Presenter situé à distance
Une fois le fichier de paramètres envoyé sur le lieu de tournage, l’équipe pourra le charger dans le
Web Presenter à l’aide du Web Presenter Setup, puis appuyer sur On air pour démarrer le streaming
du bulletin météo au studio.
Il est important de mentionner qu’une fois que vous aurez chargé le fichier de streaming XML, vous
pourrez démarrer et arrêter le streaming sans avoir à le recharger. Ainsi, il sera facile de configurer
un lien vidéo constant entre le Web Presenter et l’ATEM Streaming Bridge.
Tant que l’ATEM Streaming Bridge au studio n’a pas changé de paramètres de streaming et de
réseau, et qu’il cherche toujours le Web Presenter, il le trouvera peu importe son emplacement sur
Internet. Il vous suffira de brancher votre Web Presenter à Internet et d’appuyer sur On air pour
streamer immédiatement vers l’ATEM Streaming Bridge au studio.
Pour plus d’informations sur la façon d’utiliser l’ATEM Streaming Bridge, consultez le manuel
ATEMMini qui peut être téléchargé sur www.blackmagicdesign.com/fr/support
Teranex Mini Rack Shelf
Le Teranex Mini Rack Shelf mesure une unité de rack, ainsi, si vous choisissez d’y installer un
Blackmagic Web Presenter, vous pourrez l’utiliser dans un rack broadcast ou dans une caisse de
transport. Le Web Presenter peut être installé sur le Teranex Mini Rack Shelf aux côtés d’autres
appareils Blackmagic Design de la même taille, vous pouvez ainsi l’utiliser avec un convertisseur
Teranex Mini, un MultiView 4 ou un HyperDeck Studio Mini. Par exemple, en installant un Blackmagic
Web Presenter avec un ATEM Television Studio HD, vous pourrez commuter huit entrées vidéo et
streamer la sortie programme en direct via votre Web Presenter. Ce design modulaire vous permet
de créer des solutions personnalisées qui sont portables et faciles à utiliser !
Le Blackmagic Web Presenter peut être installé sur un Teranex Mini Rack
Shelf avec un autre appareil Blackmagic Design de la même taille, comme
un convertisseur Teranex Mini ou un ATEM Television Studio HD.
L’installation du Blackmagic Web Presenter sur le Teranex Mini Rack Shelf est extrêmement rapide.
Ilsuffit de retirer les pieds en caoutchouc du Web Presenter HD et de les visser sur les pas de vis du
rack. Le Teranex Mini Rack Shelf est vendu avec deux panneaux avant que vous pouvez utiliser pour
couvrir les zones vides du rack.
Pour plus d’informations, consultez le site Internet de Blackmagic Design :
www.blackmagicdesign.com/fr
Teranex Mini Rack Shelf
99
Page 100
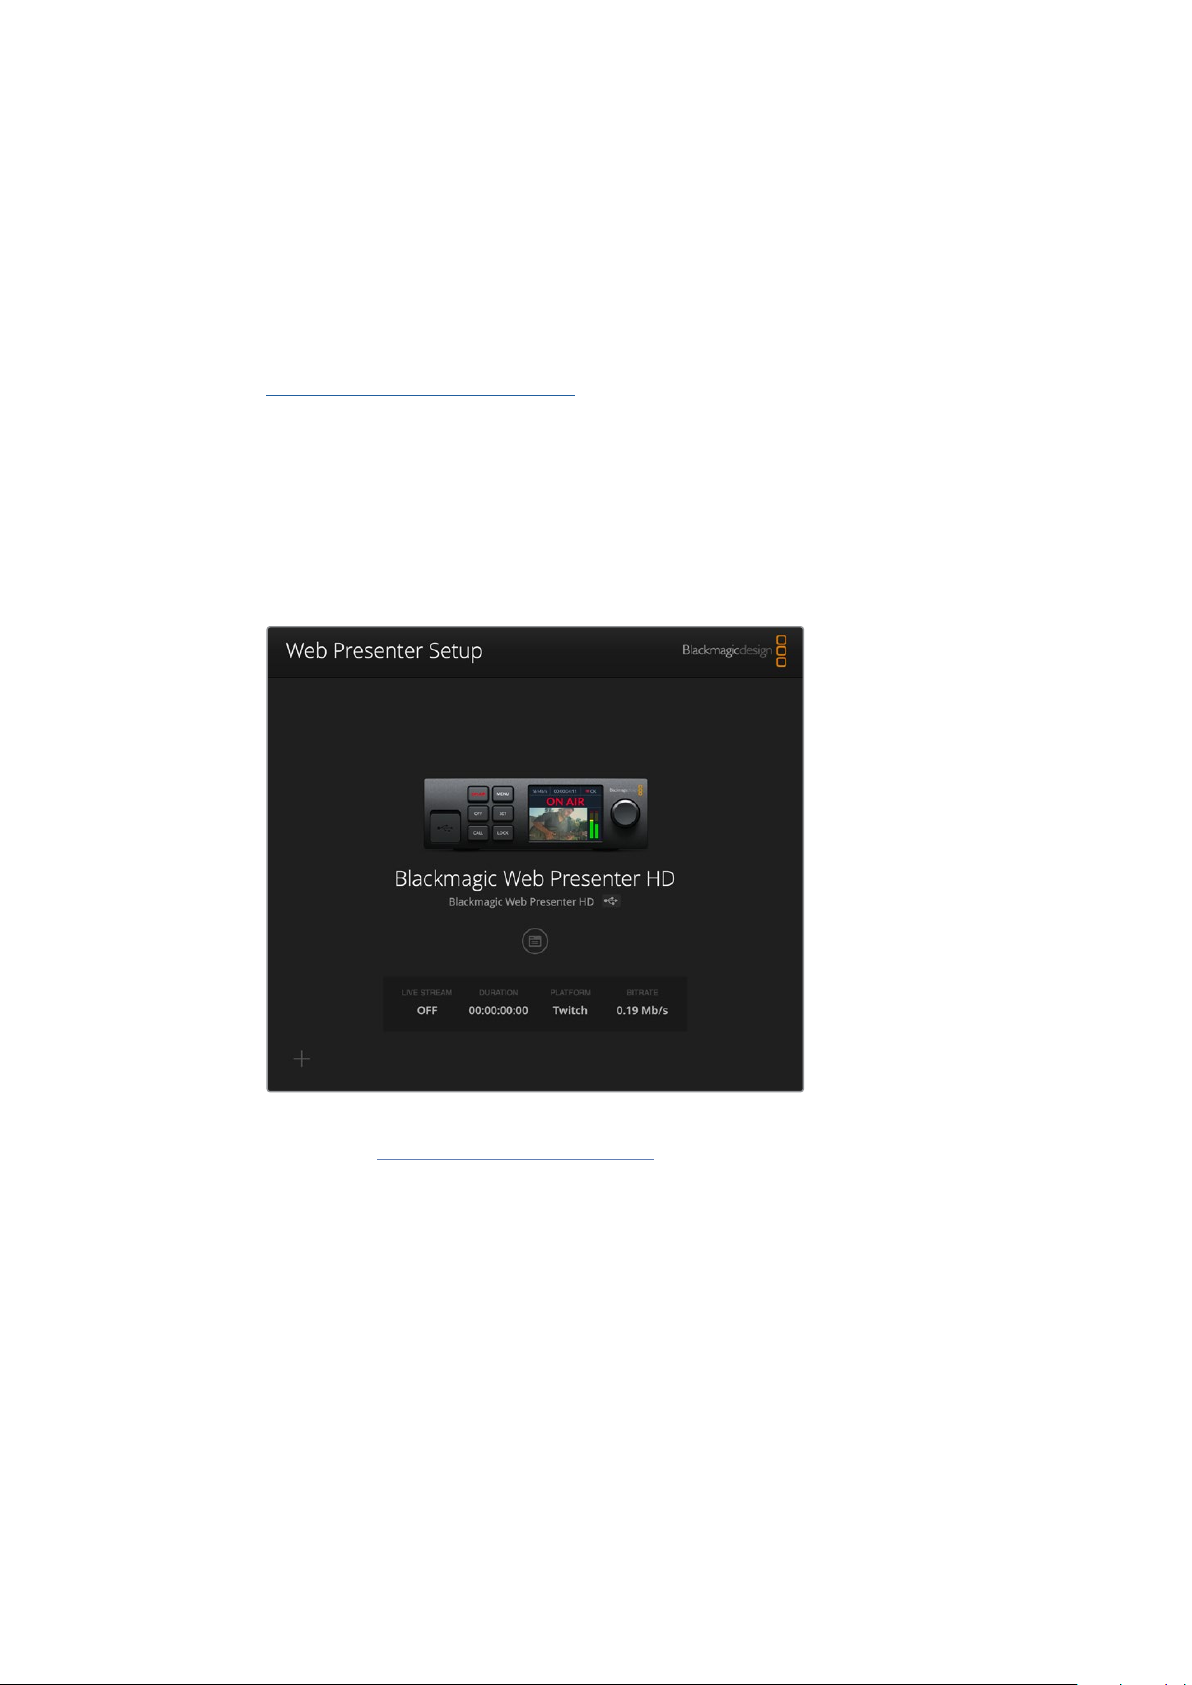
Mise à jour du logiciel interne
L’utilitaire Web Presenter Setup vous permet de mettre à jour le logiciel interne de votre Web
Presenter, mais également de configurer les paramètres de streaming, les paramètres réseau et la
qualité du streaming.
Mettre à jour le logiciel interne :
1 Téléchargez le nouveau programme d’installation du Blackmagic Web Presenter sur
www.blackmagicdesign.com/fr/support.
2 Lancez le programme d’installation du Blackmagic Web Presenter et suivez les instructions
à l’écran.
3 Une fois l’installation terminée, connectez le Web Presenter à votre ordinateur via le port
USB du panneau arrière ou le port du panneau avant situé sous la protection en plastique.
4 Lancez le Blackmagic Web Presenter Setup et suivez les instructions affichées à l’écran
pour mettre à jour le logiciel interne. Si aucune mise à jour n’apparaît, cela signifie que le
logiciel interne est à jour.
Téléchargez la dernière version de l’utilitaire pour le
Blackmagic Web Presenter à partir de la page d’assistance
Blackmagic sur www.blackmagicdesign.com/fr/support.
Mise à jour du logiciel interne
100
 Loading...