

www.fdtimes.com
Apr 2017
Jon Fauer, ASC
Special Report
Blackmagic Design
URSA Mini Pro Introduction
&
URSA Mini 4.6K Quick Start Guide
2 April 2017 • Blackmagic Special Report
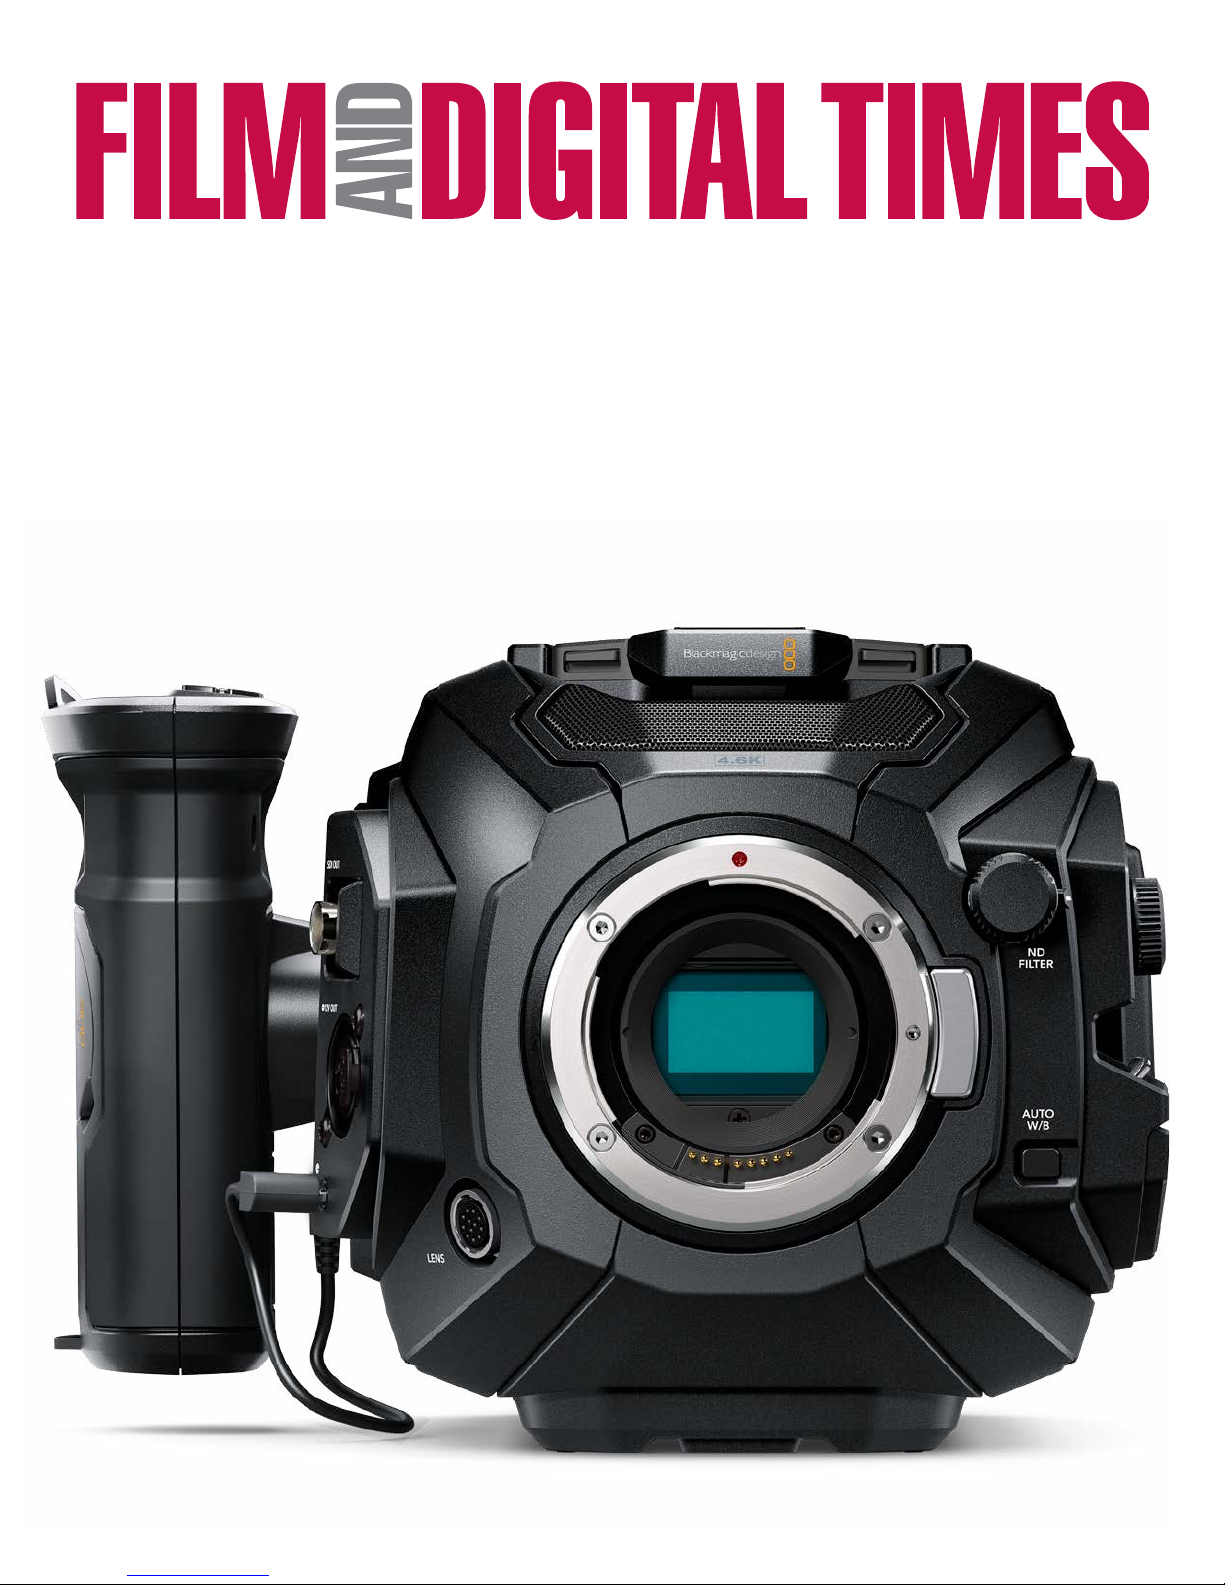
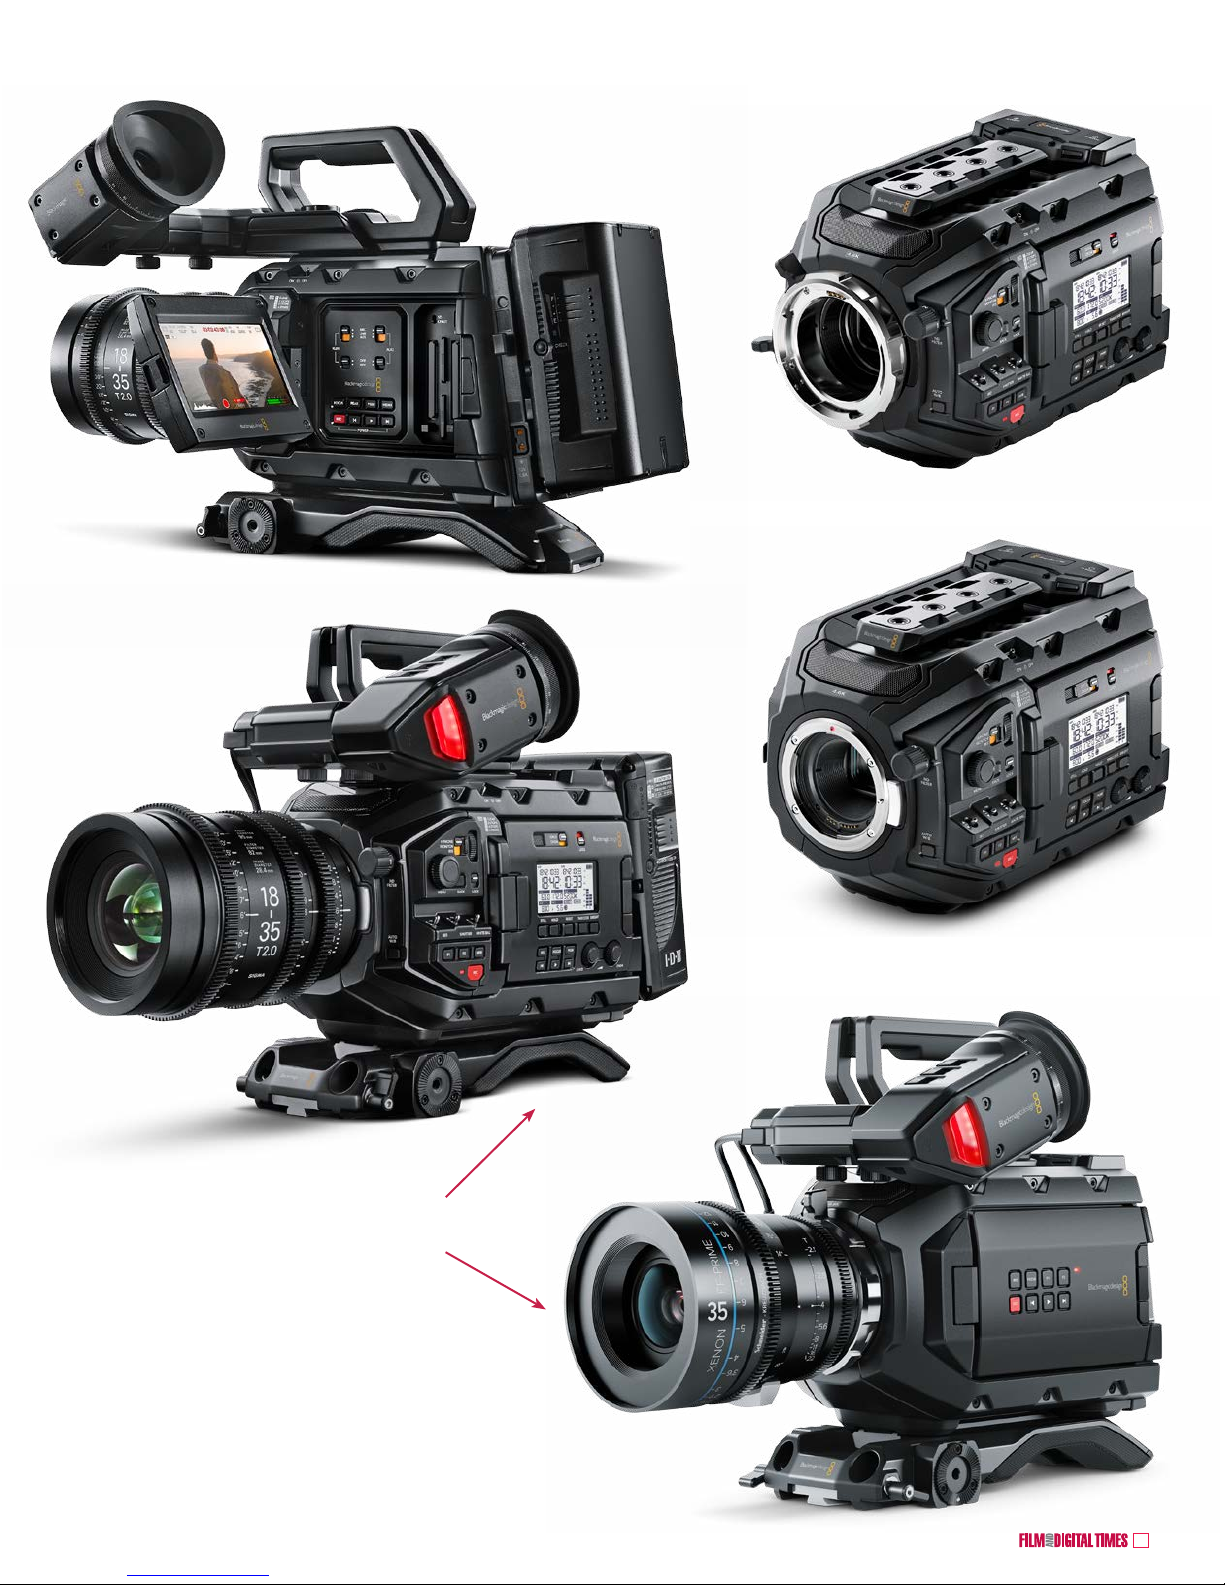
Blackmagic Design URSA Mini Pro
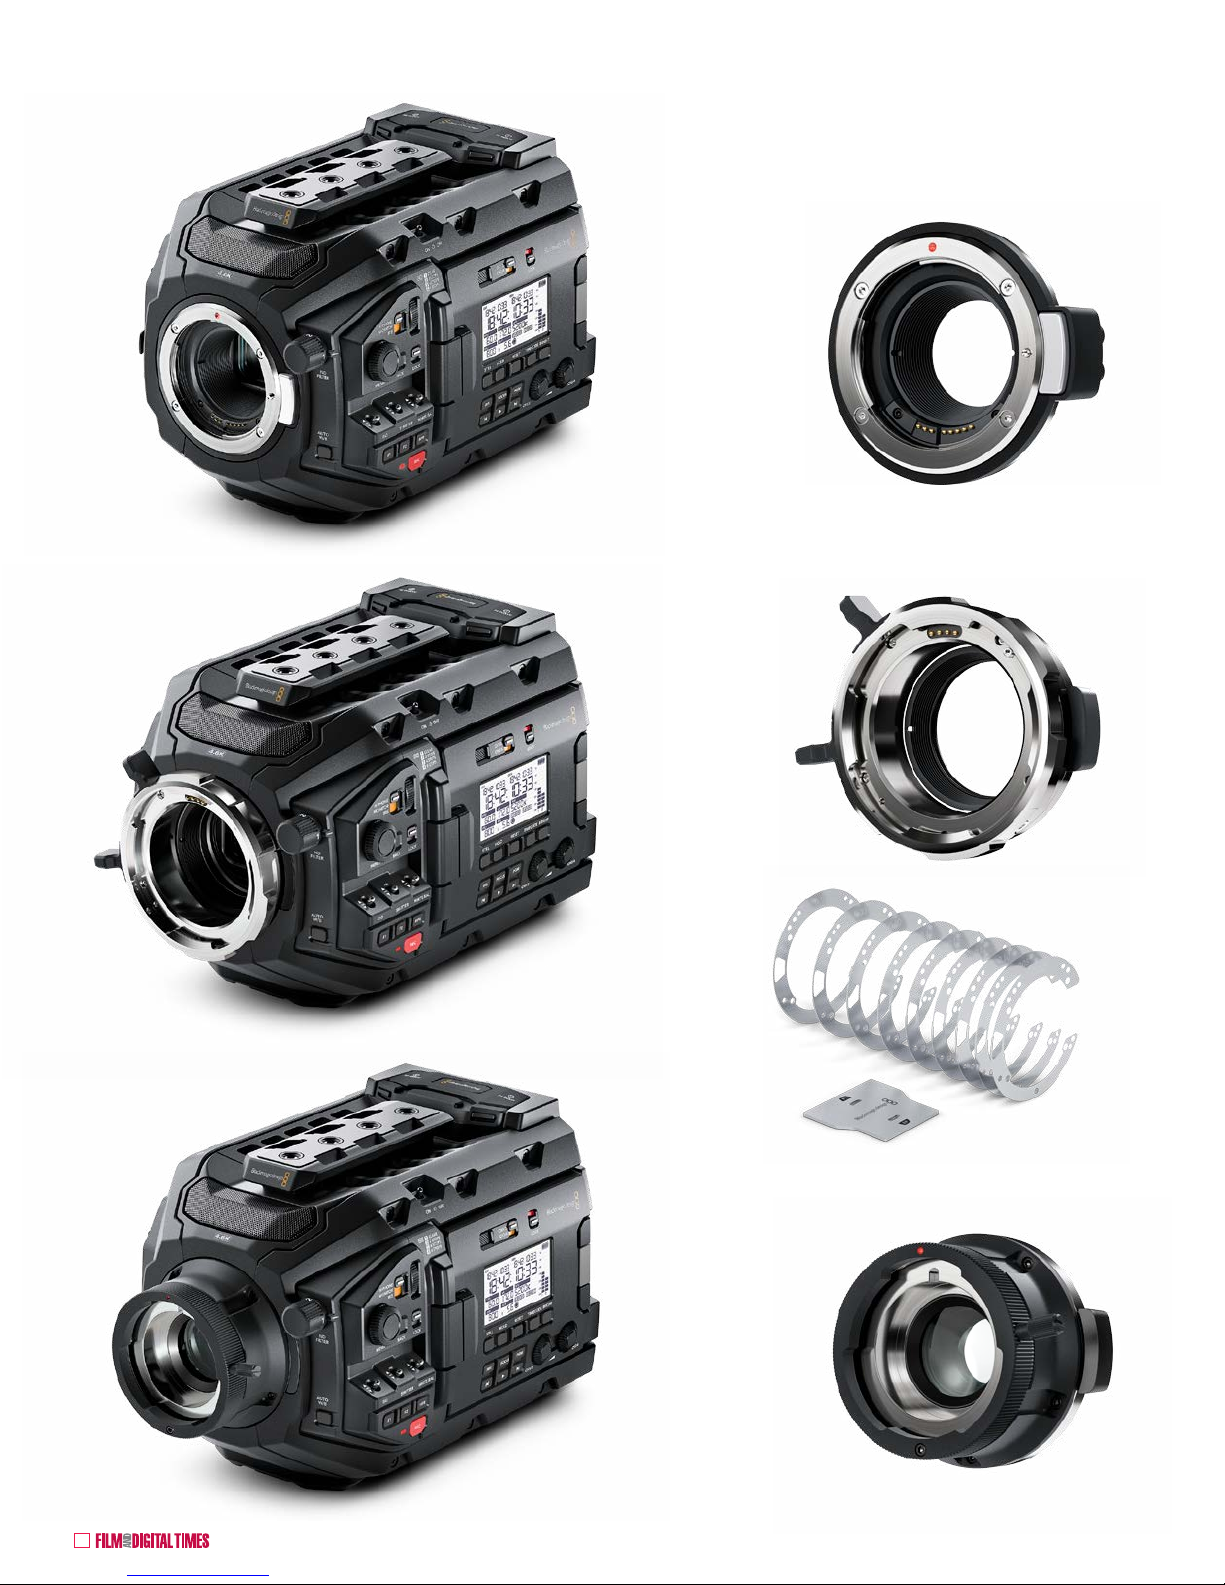
The new Blackmagic Design URSA Mini Pro comes standard with an EF
mount. PL and B4 lens mounts are sold separately as is the shim kit to
adjust flange focal depth.
EF Mount
PL Mount
B4 Mount
Shim Kit
3Blackmagic Special Report • April 2017
URSA Mini Pro
Blackmagic Design URSA Mini Pro
in comparison: URSA Mini 4.6K
• Sensor Size: 25.34mm x 14.25mm
• Max Res: 4608 x 2592
• Filter dial: Clear, ND.6, 1.2, 1.8 (0, 2, 4, 6 stops)
• Media slots: 2 x CFast 2.0
2 x SD UHS-II
• Lens Mounts: Comes standard with EF
Interchangeable PL, EF, B4
(PL with /i shown here)
• Monitor: 4” fold-out touchscreen
• Sensor Size: 25.34mm x 14.25mm
• Max Res: 4608 x 2592
• Media: 2 x CFast 2.0
• Lens Mounts: PL or EF (PL shown here)
• Monitor: 5” fold-out touchscreen
Blackmagic Design had a nice pre-NAB surprise in March: URSA
Mini Pro 4.6K.
It is much more than a mere evolution of the URSA Mini 4.6K.
ey made all the right moves with all kinds of great details.
e new URSA Mini Pro gets built-in ND lters, interchangeable
lens mounts, camera le-side outside LCD display and control
panel, thoughtful ergonomic switches and dials for faster and
easier operating. e body is the same size as URSA Mini 4.6K, so
all the existing accessories will t and work.
e sensor is the same as URSA Mini 4.6K: up to 4608 x 2592
resolution with 15 stops of dynamic range and the same wide color
gamut. ree ND lters with IR compensation can be summoned
up with the twist of a dial: Clear, 2, 4 or 6 stops.
URSA Mini Pro’s main display on the surface of the camera’s le
side shows timecode, shutter and lens settings, battery, recording
status, and audio levels. e display is backlit and designed to be
visible in both dimly lit studios and outside in direct sunlight.
Open the display door and a 4-inch LCD touchscreen monitor
resides on the other side. (In comparison, the URSA Mini 4.6K
monitor is 5-inches. Something had to give—one inch—to make
room for the new ND lters and controls.)
4 April 2017 • Blackmagic Special Report
• Support for CinemaDNG 4.6K RAW les and ProRes 4444
XQ, ProRes 4444, ProRes 422 HQ, ProRes 422, ProRes 422 LT,
ProRes 422 Proxy recording at Ultra HD and HD resolutions.
• Supports up to 60 fps 4.6K resolution capture in RAW.
• Standard connectors, including dual XLR mic/line audio inputs
with phantom power, 12G-SDI output for monitoring with
camera status graphic overlay and separate XLR 4 pin power
output for viewnder power, headphone jack, LANC remote
control and standard 4 pin 12V DC power connection.
• Built in stereo microphones.
URSA Mini Pro is available from Blackmagic Design resellers
worldwide for US $5,995. Also available: optional URSA Mini Pro
PL lens mount for US $245 or optional URSA Mini Pro B4 HD
lens mount for US $385. URSA Mini Pro comes standard with an
EF lens mount, and additional replacement mounts can also be
purchased for US $175.
Blackmagic URSA Mini Shoulder Kit has built-in industrystandard Hirth-tooth rosettes, rail mounts, viewnder mount,
integrated tripod quick lock release and top handle. is is an
essential accessory.
Blackmagic URSA Viewnder is an excellent, high resolution
viewnder with a full HD OLED display and glass elements. e
image is so crisp and good you can easily check focus by eye. is
EVF is also a must-have.
For broadcast and multi-cam, Blackmagic URSA Studio Viewnder
has a 7” screen, variable tension mounting points, grab handles,
and external controls.
ere’s an URSA V-Lock Battery Plate for V-Mount batteries.
URSA Mini Pro has a great new interchangeable lens mount
system for PL, EF and B4 lenses. Standard-issue is an EF mount.
PL and B4 lens mounts are sold separately. Lens metadata is
supported from electronic EF, B4 and i/Technology compatible
PL lenses, with automatic recording of camera settings and slate
data such as project, scene number, take and special notes.
PL mounts have /i Technology lens metadata contacts in the
usual 12 o’clock position. e camera body has a standard 12-pin
Hirose lens control connector.
Beneath the swing-out main control panel/monitor door, there
are dual C-Fast 2.0 and dual SD/UHS-II card slots. C-Fast cards
are essential for full rez RAW recording. UHS-II SD cards are
inexpensive, readily available, and suited for ProRes Ultra HD
les or RAW HD les. With dual slots for each media type, the
camera never has to stop recording because when the rst card
is full, it automatically continues on to the next card. Full cards
can be hot-swapped for empty ones without stopping the camera.
URSA Mini Pro can record lossless 12-bit CinemaDNG RAW
les or 10-bit ProRes.
Like the URSA Mini 4.6K, URSA Mini Pro includes the full
version of DaVinci Resolve Studio soware for importing, editing,
color correcting, nishing and delivering. DaVinci Resolve Studio
works natively with the RAW and ProRes les from the camera,
without having to convert or change them.
Additional Blackmagic URSA Mini Pro Features
• Helpful dials, buttons and switches for direct access to the
most important camera include: external power switch, ND
lter wheel, ISO, shutter, white balance, record button, audio
gain, lens control, high frame rate, and more.
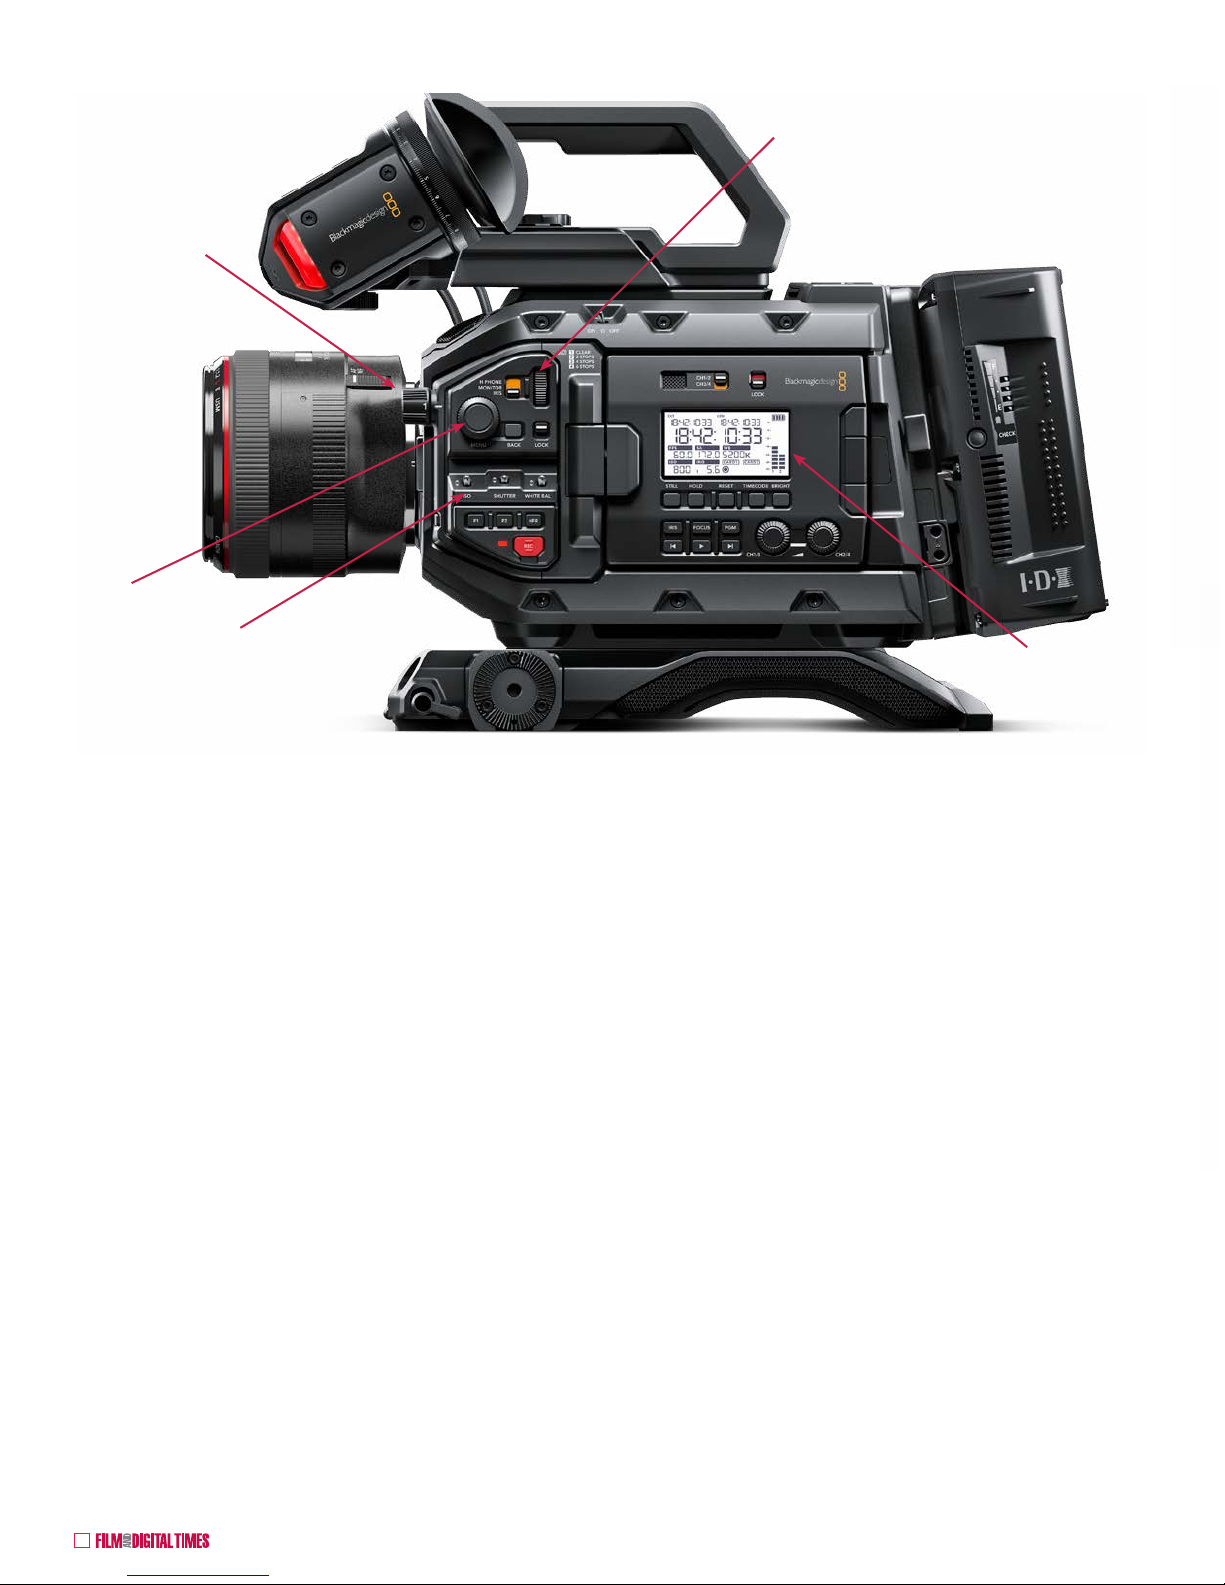
Blackmagic Design URSA Mini Pro
URSA Mini Pro with EF mount
URSA Viewfinder
and Shoulder Kit
Filter Dial: Clear, ND.6,
1.2, 1.8 (0, 2, 4, 6 stops)
Menu Dial
Iris/Headphone Dial
ISO, Shutter, White
Balance Buttons
Main Display
5Blackmagic Special Report • April 2017
Blackmagic Design URSA Mini Pro
URSA Mini 4.6K with PL mount
URSA Mini Pro’s 4” fold-out touchscreen
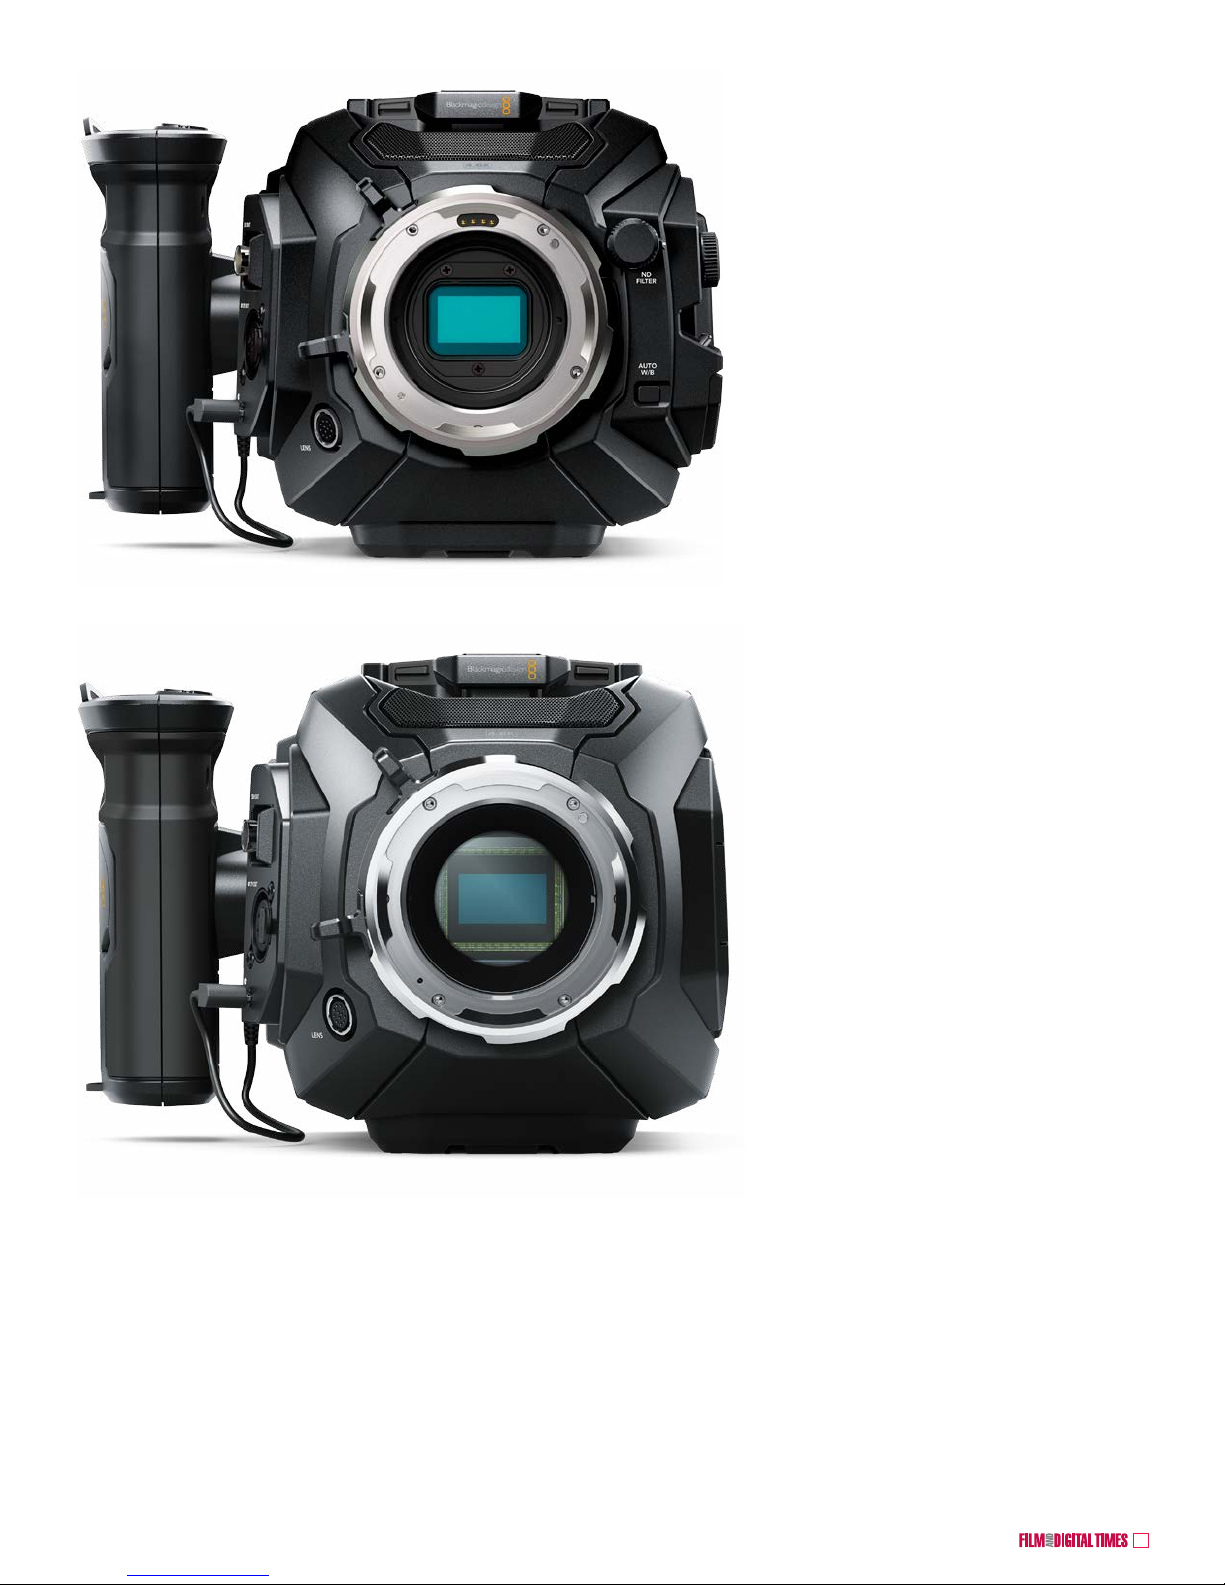
URSA Mini Pro with PL mount and /i lens data pins
URSA Mini Pro with EF mount and Canon lens data pins
URSA Mini Pro with EF mount
Compare URSA Mini Pro
with USA Mini 4.6K
And on the next pages, let’s begin our
URSA Mini 4.6K Quick Guide Jump Start
6 April 2017 • Blackmagic Special Report
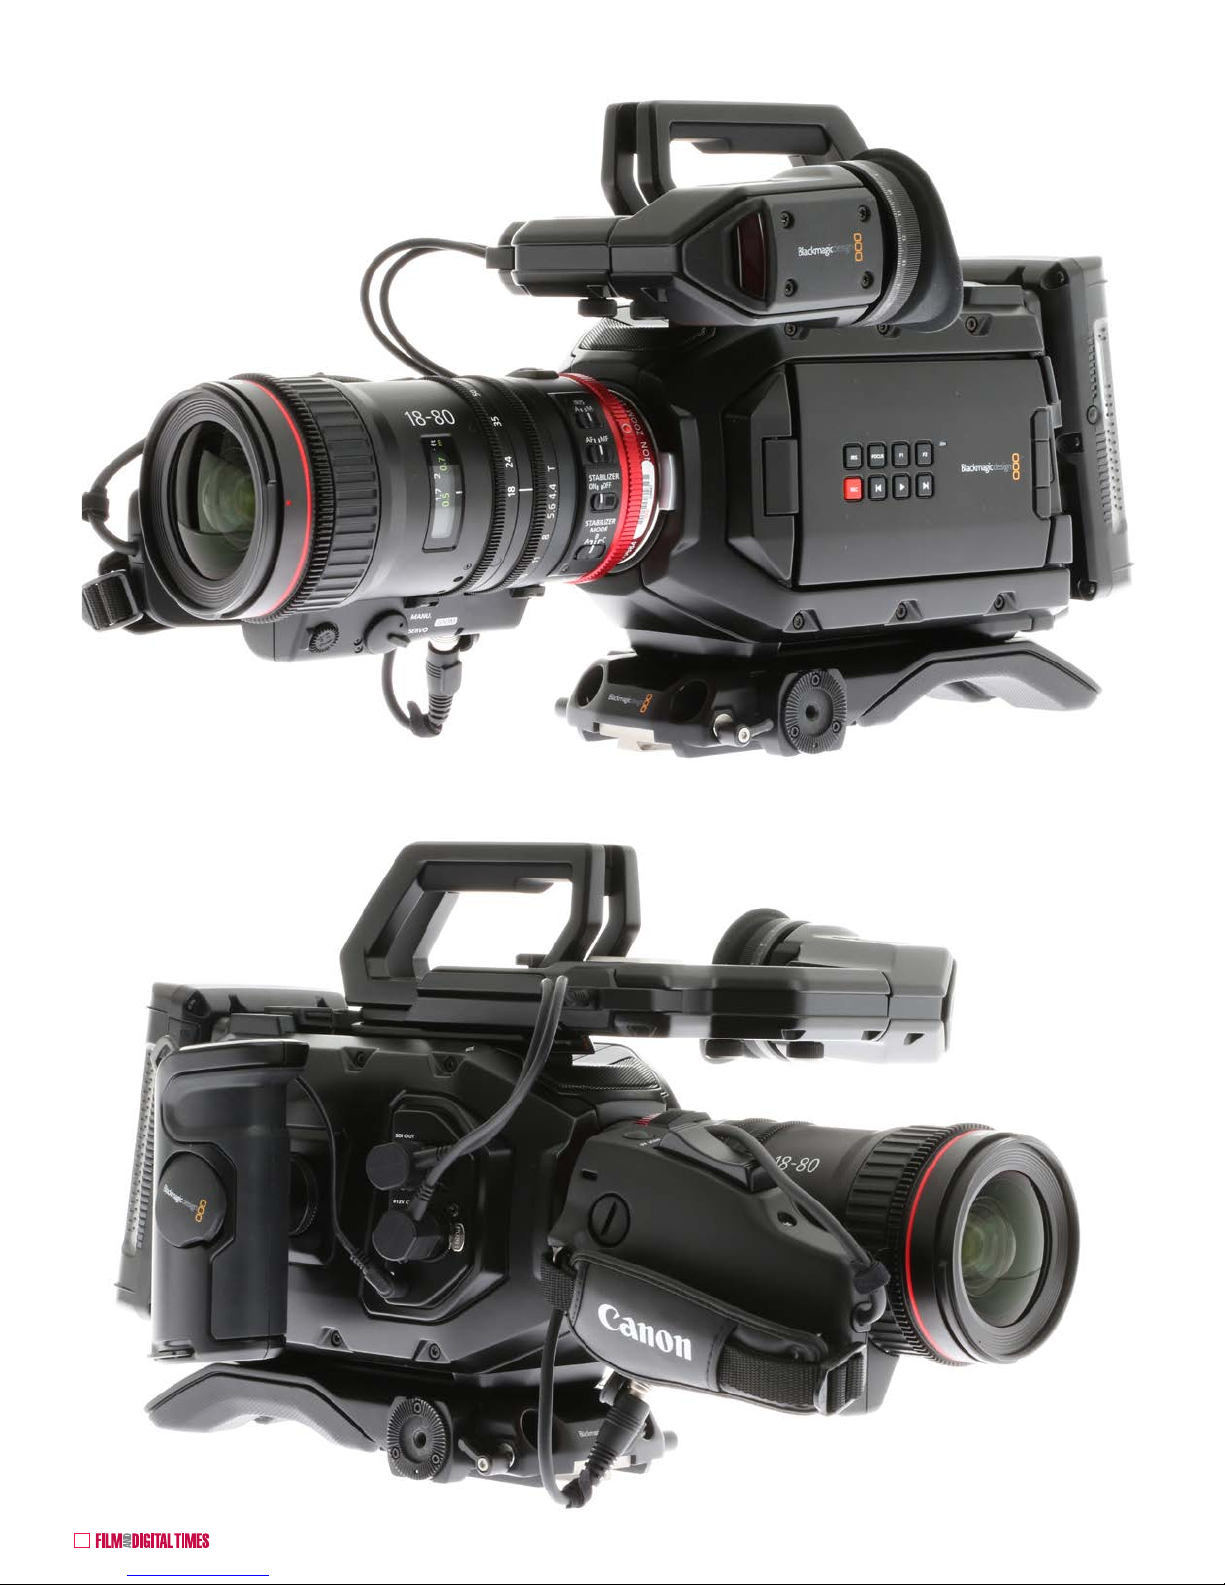
Blackmagic Design URSA Mini 4.6K Quick Start
Blackmagic Design URSA Mini 4.6K camera with
URSA Viewfinder, URSA Mini Shoulder Kit, and
Canon Compact Servo 18-80mm T4.4 EF-mount zoom
7Blackmagic Special Report • April 2017
Blackmagic URSA Mini 4.6K Quick Start
EF Mount URSA Mini 4.6K
Blackmagic Design’s URSA Mini 4.6K camera is lightweight,
compact, easy to use and aordable. e Super35 (25.34 x 14.25
mm) CMOS sensor delivers beautiful images that can be recorded
internally onto inexpensive CFast 2.0 Cards—from HD through
4.6K CinemaDNG RAW or UHD ProRes.
ere are two models: EF or PL mount. You’ll want the EF model
if you work with Canon EF, Sigma EF or ZEISS ZE lenses and like
lens data readout in the viewnder as well as auto exposure and
auto focus on some models.
FDTimes usually wriggles out of price discussions—but this is a
camera system clearly intended for independents where cost is an
important concern. So here goes.
e camera body is around $4,995. It’s a complete camera/
production/post-production package in a box—with the full
DaVinci Resolve Studio soware and USB dongle inside.
ere are three essential accessories that you will want as constant companions. Blackmagic Design’s URSA Viewnder is a really good deal and a steal at $1,495. e optics have an indexed
diopter and the 1920x1080 OLED display is crisp enough to actually determine focus clearly. e eyepiece rotates and adjusts
to many viewing angles. It positions in and out from the camera
body which is helpful for both le and right-eyed operators.
Unless you plan on leaving the camera attached to a tripod or
drone, Blackmagic’s URSA Mini Shoulder Kit ($395) is another
essential accessory. It has an ergonomic, adjustable shoulder pad,
rosettes on both sides, a handgrip extension, and a top handle.
PL Mount URSA Mini 4.6K
• Sensor Size: 25.34mm x 14.25mm
• Media: 2 x CFast 2.0
formatted HFS+ (Mac) or ExFAT (Windows/Mac)
• Lens Mounts: PL or EF
• Monitor: 5” fold-out touchscreen on camera left side
• Video Output: 1x SDI, 1x Monitoring SDI with info overlays
• Shooting Resolutions
4608 x 2592
4096 x 2304 (4K 16:9)
4608 x 1920 (4K 2.4:1)
4096 x 2160 (4K DCI)
3840 x 2160 (Ultra HD)
3072 x 2560 (3K Anamorphic)
2048 x 1152 (2K 16:9)
2048x1080 (2K DCI)
1920 x 1080 (HD)
• Frame Rates: Dependent on resolution and codec selected,
23.98, 24, 25, 29.97, 30, 50, 59.94 and 60 fps supported.
Off-speed frame rates up to 60 fps in 4.6K, 120 fps in 2K windowed.
• Lossless CinemaDNG RAW, RAW 3:1 and RAW 4:1 at
4608 x 2592, 4608 x 1920, 4096 x 2304, 4096 x 2160,
3072 x 2560, 2048 x 1152 and 2048 x 1080.
• Apple ProRes 3840 x 2160 and 1920 x 1080.
• Storage Rates (based on 30 frames per second)
• 4608 x 2592
CinemaDNG RAW Uncompressed 513 MB/s
CinemaDNG RAW 3:1 180 MB/s
CinemaDNG RAW 4:1 135 MB/s
• 3840 x 2160
Apple ProRes 444 XQ 250 MB/s
Apple ProRes 444 165 MB/s
Apple ProRes 422 HQ 110 MB/s
Apple ProRes 422 73.6 MB/s
Apple ProRes 422 LT 51 MB/s
Apple ProRes Proxy 22.4 MB/s
• 1920 x 1080
Apple ProRes 444 XQ 62.5 MB/s
Apple ProRes 444 41.25 MB/s
Apple ProRes 422 HQ 27.5 MB/s
Apple ProRes 422 18.4 MB/s
Apple ProRes 422 LT 12.75 MB/s
Apple ProRes Proxy 5.6 MB/s
• Analog Audio Input: 2x XLR (mic, line, phantom power
• LANC 2.5 mm (2x) : for rec start/stop, EF iris, focus control
URSA Mini 4.6K Camera Quick Specs
For a few dollars more ($895), you should add a Blackmagic
Video Assist 4K 7-inch HDMI/6G-SDI Recorder/Monitor. It can
trigger-record every take. In other words, whenever the camera
starts or stops recording internally, the Video Assist 4K will automatically record a ProRes or DNx copy onto SD cards, via SDI or
HDMI, up to 3840x2160 30p.
Although the Backmagic URSA Mini 4.6K is one of the most intuitive cameras available, and passes the 10-minute rule for being able to gure it out without an instruction manual, here are
a few pages of quick-start notes to reduce the learning curve to 5
minutes.

8 April 2017 • Blackmagic Special Report
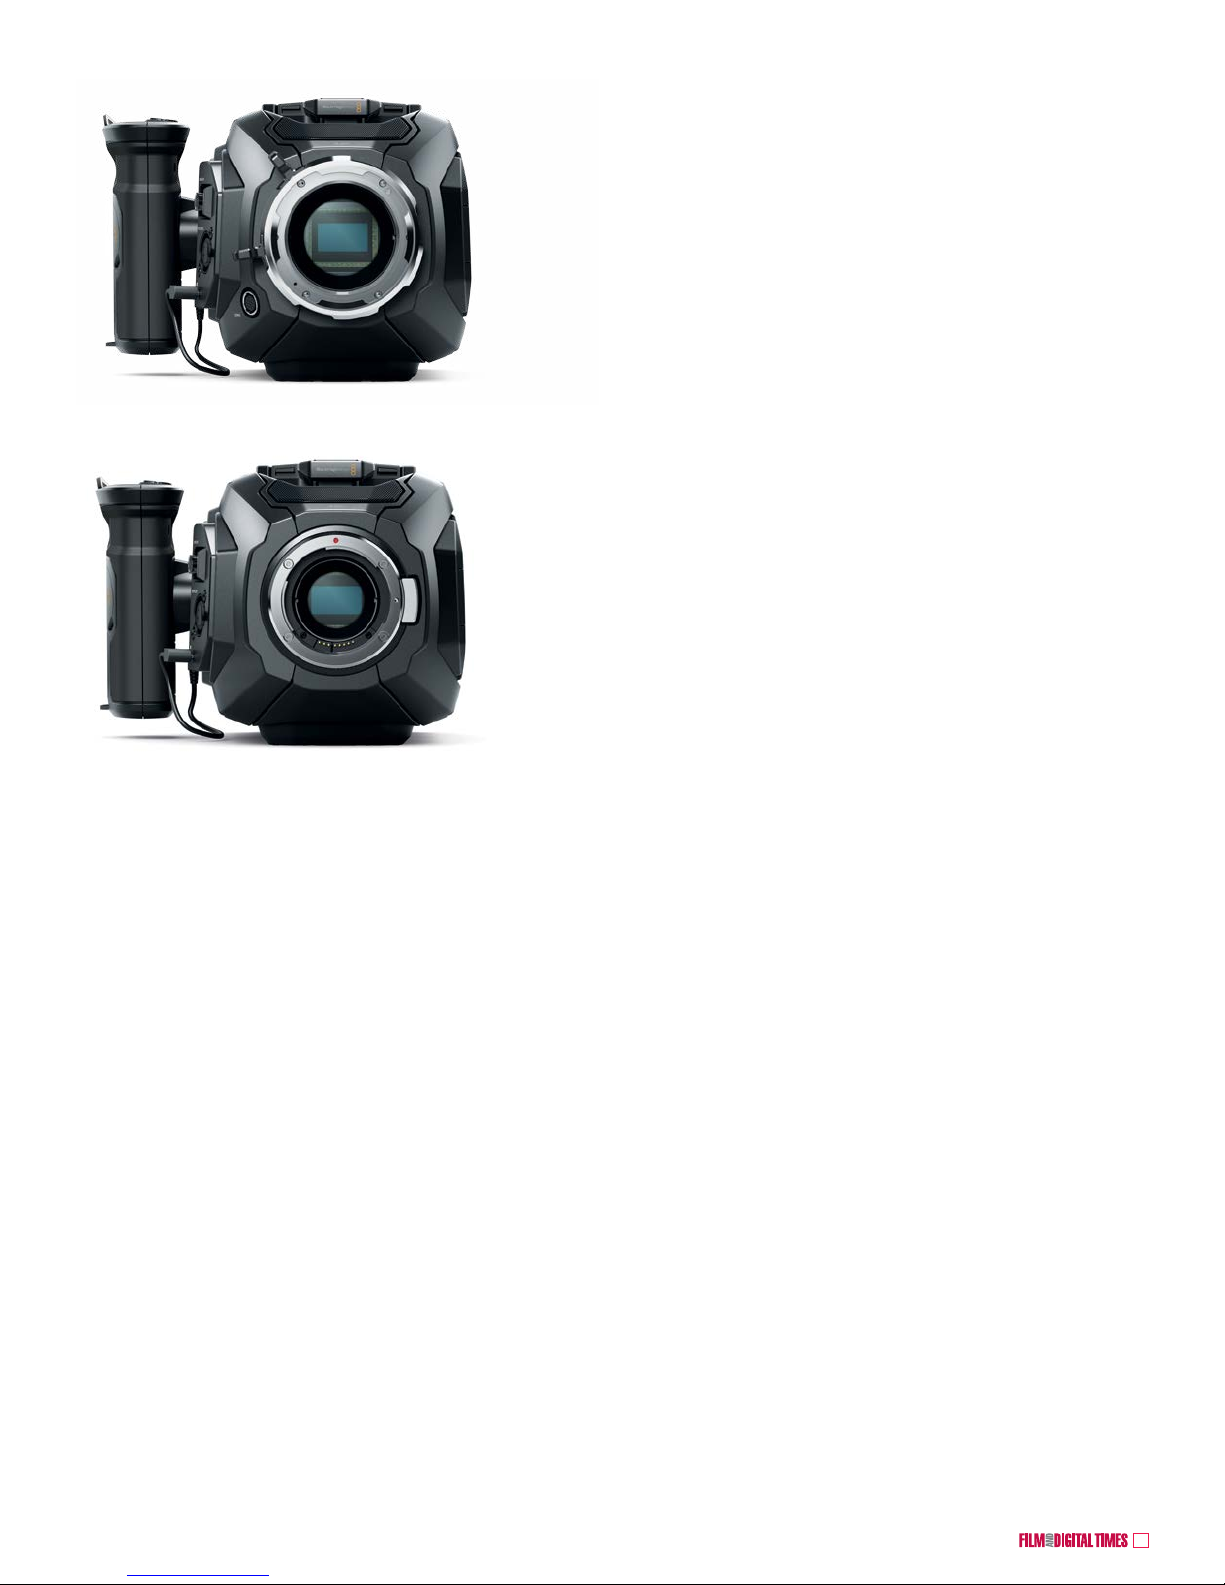
Let's begin our quick tour by
looking at the URSA Mini 4.6K
modular body, pictured here.
It’s 8.23” long x 5.78” high x
5” wide and weighs 5 lb 2 oz.
Front - EF mount model Rear with V-Lock Battery Bracket
Left side Left side with monitor/side cover open
Blackmagic URSA Mini 4.6K

9Blackmagic Special Report • April 2017
Blackmagic URSA Mini 4.6K
Left side with monitor/side cover open Right side
Top
Bottom

10 April 2017 • Blackmagic Special Report
EVF and Top Handle
Blackmagic URSA Mini 4.6K
ZOOM to enlarge
for focus
DISPLAY
PEAK
EVF Power: 4-pin
XLR +12VDC
EVF Video:
1920x1080
Diopter
adjustment
The Blackmagic Design URSA Mini 4.6K system
has an excellent 1920x1080 OLED viewfinder
that should be the archetype for other affordable
S35 digital cine cameras.
It’s an important accessory that makes easy
work of checking focus.
1. Attach the top handle and EVF to the top
of the URSA Mini 4.6K Camera’s 3/8-16
threaded mounting sockets with the two
supplied screws and a 3/16” hex driver.
There are four sockets to select for the best
balance. I suggest starting with the rear two.
2. View from camera left
side with EVF installed
The top handle comes with Blackmagic's URSA
Mini Shoulder Kit. We'll get to that in a minute.

11Blackmagic Special Report • April 2017
3. Connect the EVF’s
SDI and power cables
into the camera right
side.
4. Attach the
handgrip to the
camera body’s
rosette.
5. Tighten with the
winged thumbscrew
beneath the rubber
Blackmagic logo
cover.
6. Adjust the top
handle’s forward-aft
position with this
thumbscrew
3G-SDI OUT: connect URSA EVF video cable
or external monitors.
Provides down-converted 1920x1080 HD.
4-pin XLR +12VDC OUT: connect EVF power
LANC: connect URSA Mini handgrip cable for
REC start/stop, iris and focus of EF lenses
2nd LANC connector: Record
Start /Stop, Remote; Iris and
Focus Control for EF lenses
12G-SDI OUT
12G-SDI IN
Timecode IN and REF IN
+12VDC IN 4-pin XLR
Headphones
EVF and Top Handle, cont’d
Blackmagic URSA Mini 4.6K

12 April 2017 • Blackmagic Special Report
EVF Monitor cable plugs into the SDI OUT BNC connector
EVF’s 4-pin XLR
power cable plugs into
the +12 V DC OUT
connector
The handgrip adjustment
thumbscrew is beneath this
rubber cover
Attach the handgrip
extension to the
camera right rosette.
Attach the shoulder mount to the camera’s base with two supplied
3/8-16 screws. The shoulder pad slides forward and back for
best balance. The rear two threads on the camera base seem to
balance best.
Handgrip
LANC cable
Blackmagic URSA Mini Shoulder Kit
Blackmagic URSA Mini 4.6K
Plug in the handgrip’s LANC
connector
3/8-16 tripod mounting thread
V-Lock
Thumbscrew to
tighten EVF rotation
Thumbscrew to lock
EVF in-out position

13Blackmagic Special Report • April 2017
Blackmagic URSA Mini 4.6K
Front view of URSA Mini 4.6K
Camera with URSA Viewfinder,
URSA Mini Shoulder Kit with
15mm rod holder, handgrip
extender, and top handle
Camera right side of URSA Mini
4.6K showing URSA Mini Shoulder
Kit’s adjustable pad, handgrip
extender, handgrip with LANC
start/stop, iris and focus control
Camera left side of the URSA Mini
Shoulder Kit has a rosette for
additional handgrip
Rear view with 5” swingout touchscreen monitor
in viewing position
Handgrip
Handgrip
Extender
Top Handle
Blackmagic URSA Mini Shoulder Kit, cont'd

14 April 2017 • Blackmagic Special Report
LANC: Start/
Stop, Iris and
Focus Control
12G-SDI OUT
12G-SDI IN
Timecode IN
and REF IN
+12VDC IN
4-pin XLR
Headphones
EF Mount Lens Data
and Power Contacts
Red dot to line up
Full Frame EF lenses.
To help mount
APS-C EF lenses,
add a white dot with
nail polish here.
Blackmagic URSA Mini 4.6K
Fold-out 5”
Monitor /
Touchscreen
RECORD Stop/Start
IRIS: push for auto
exposure on EF
lenses. For manual
exposure of EF
lenses, adjust with
the FWD and REV
arrow buttons.
REV in playback.
IRIS closing down in
Standby or Record
FWD in playback.
IRIS opening up in
Standby or Record
FOCUS: push for Auto
Focus of EF lenses
5” Monitor /
Touchscreen
opened
ON / OFF:
Press to turn
ON. Hold for
3 seconds to
turn off.
CFast slots 1
and 2.
MENU: activates
menu on the
swing-out
touchscreen for
most functions
PROGRAM
toggles between
live view and SDI
input (e.g. live
broadcast)
USB
12 VDC 1.6A
P-Tap
AUDIO levels
Swing-out touchscreen 5” monitor / side cover in the open
position. Some of the buttons on the swing-away 5” monitor cover
are redundant with the buttons underneath. Others are unique.
PEAK: focus
peaking
F1 & F2 can
be mapped
from Setup
Menu
Battery release
V-Mount Battery
Plate. Gold Mount also
available.
Front
Rear
Camera Left - Operator Side
Camera Essentials

15Blackmagic Special Report • April 2017
Blackmagic URSA Mini 4.6K
Top
RECORD
Stop/Start
Auto focus on EF lenses
Auto iris on EF lenses
Audio IN 1 &
2: 3-pin XLR
connectors
Eyepiece diopter
adjustment
Standard size
rubber eyecup:
accepts eyepiece
chamois covers
PEAKING: to
check focus
DISPLAY: toggles
overlay view
ZOOM:
to
focus
Bottom
Thumbscrew
to tighten EVF
rotation
Thumbscrew
to lock EVF
in-out position
Eyepiece diopter
adjustment
Five 3/8-16
mounting
threads on
bottom
Cooling fan. The URSA Mini 4.6K is cooled
like a Mac Pro: air is drawn from the
bottom and blown out the top. Electronics
are sealed outside the cooling “tower”
so moisture is isolated. Nevertheless, in
locations like Vancouver, it’s always good to
use a rain cover.
• 10-bit 4:2:2 REC 709
• UHD: 160p23.98, 2160p24, 2160p23.98, 2160p25, 2160p29.97,
2160p30
• HD: 720p50, 720p59.94, 1080p23.98, 1080p24, 1080p25,
1080p29.97, 1080p30, 1080p50, 1080p59.94, 1080p60, 1080i50,
1080i59.94, 1080i60
• Codecs: ProRes 422 HQ, ProRes 422, ProRes 422 LT, ProRes Proxy,
DNxHD 220x, DNxHD 145, DNxHD 45, DNxHD 220x MXF, DNxHD 145
MXF, DNxHD 45 MXF, DNxHR HQX MXF, DNxHR HQX, DNxHR SQ,
DNxHR LB, DNxHR SQ MXF, DNxHR LB MXF
• Media: Two UHS-II SD slots
• SDI Input/Output: 270Mb, 1.5G, 3G, 6G
• Screen: 7” 1920 x 1200 capacitive touchscreen LCD
• Built-in speaker, 3.5mm stereo output connector
• Two mini XLR audio inputs with phantom power
At left on top of camera: Blackmagic Video Assist 4K. It has a 7” touchscreen 1920 x
1200 display. HDMI and 6G-SDI inputs record ProRes or DNx onto SD cards. (Recommended: UHS-II SD cards).
Blackmagic’s Video Assist 4K 7-inch Recorder/Monitor works with almost any SDI
or HDMI camera—not just the URSA Mini 4.6K. It records 1080 HD up to 2160 30p
(3840 x 2160) UHD, in 10-bit 4:2:2 ProRes, DNxHD and DNxHR files (Quicktime and
MXF formats).
In trigger-record mode (shown here, connected to the URSA Mini 4.6K’s SDI output), the
Video Assist 4K will automatically create a simultaneous copy of the camera’s internal
recording—which is helpful as a backup or edit-ready proxy.
Blackmagic Video Assist 4K Specs

16 April 2017 • Blackmagic Special Report
Blackmagic Video Assist 4K
Two LP-E6 Canon
style 7.2 V DC onboard
battery holders
Battery release buttons
Two SD Card slots
ON / OFF microswitch
under rubber cover:
push on, hold 3 seconds
to turn off.
External 12 V DC input
Headphones
LANC
Two Analog
Audio Inputs:
3-pin mini XLR
SDI IN
SDI OUT
HDMI IN
HDMI OUT
Format SD Cards
1. To format SD Cards, tap here
2. Select STORAGE
3. FORMAT:
Choose
HFS+ for
Mac or
exFAT for
Windows
and Mac
4. Format
Card 1
and/or
Card 2
Tip: to avoid a smudgy screen after
helping yourself to a sticky donut at
Craft Services, or in cold weather with
heavy gloves, attach an iPhone-style
touchscreen Stylus to the top of the
Video Assist 4K with Velcro.

17Blackmagic Special Report • April 2017
Swipe the touchscreen up or
down to access record and
playback.
Red square in circle shows recording is under way.
Tap the red square to stop. In tethered recording
mode, it stops when the camera stops
Standby: tap the red circle to start recording.
In tether recording mode, the Video Assist 4K starts
automatically when you push the camera’s record button.
Tap CODEC to select: Apple ProRes
422 HQ, ProRes 422, ProRes LT,
ProRes Proxy, Avid DNxHD, DNxHR
OVERLAYS: Zebra, Peaking,
Frame lines, aspect ratio,
grids, etc.
Of course, FORMAT on the top left main screen is
different from Formatting. This FORMAT indicates
input signal. Here, 2160p23.89 identifies UHD
3840 x 2160 at 23.98 fps
Tap TRIGGER REC to enable automatic start-stop
of recorder when camera records.
Blackmagic Video Assist 4K Touchscreen
Main settings are controlled
by tapping in the top row of
text and icons.
Storage
(SD Card)
settings and
formatting.
Also Monitor,
Display,
Audio and
Setup.
Display
(below)
controls
monitor
brightness,
contrast and
saturation.

18 April 2017 • Blackmagic Special Report
Blackmagic URSA Mini 4.6K
For access to the camera’s “Dashboard,” push MENU — pages of
touchscreen menu settings. The home page includes RECORDING
settings: codecs, resolutions from HD to 4.6K, RAW (including
compressed RAW), ProRes, DNx, etc.
Swipe up or down to display text and icons for
touchscreen adjustment of:
Overlays, FPS, Shutter Angle, Iris, Timecode,
ISO, White Blance, Tint, etc.
It’s usually a good idea to RESET all camera settings at the beginning
of a job to get back to factory defaults. It’s also a fail-safe when time is
short and something just isn’t working properly.
Red indicates camera is
recording

19Blackmagic Special Report • April 2017
Insert a CFast 2.0 card in one or both slots
Tap either CFast icon at the bottom of the touchscreen to format card.
Select a card to format
Choose OS X Extended for Mac format
Choose exFAT for Windows or Mac.
Confirm and format.
Gray and blue indicate
camera is in standby
Blackmagic URSA Mini 4.6K

20 April 2017 • Blackmagic Special Report
Data Wrangling from URSA Mini 4.6K to DaVinci Resolve
Buying a Blackmagic URSA Mini 4.6K Camera is like having a production and post production studio in a convenient box. The full DaVinci Resolve Studio
is included, complete with dongle and software. What better way to be a Renaissance Filmmaker: DP, DIT, Editor, Colorist, Archivist and Deliverables
Deliverer?
There are many different ways for work to flow. This is just one example to follow when your URSA Mini 4.6K CFast 2.0 Card is full. We were shooting
4K CinemaDNG RAW, 2.39:1 widescreen, 4608 x 1920 at 23.98 fps. That filled up a 64 GB CFAst 2.0 Card in about 4.5 minutes.
1. Remove the CFast Card from the camera.
2. Insert it into a card reader (like Lexar’s CFast 2.0 Thunderbolt/USB 3.0) and connect to your computer. Start or open a Project in DaVinci Resolve.
First step: Clone your CFast Card.
3. Click on the CLONE tool.
4. At the left side of Resolve’s
Media Storage Browser, right
click the CFast Card icon (A001)
and SET AS CLONE SOURCE.
5. Next, you’ll simultaneously
clone the CFast Card onto your
computer and an external
backup drive. In the Media
Storage Browser, right click
the DAVINCI RESOLVE folder
on your computer and click on
ADD AS CLONE DESTINATION.
Do the same thing for your
external drive.
6. Click the Clone Tool Panel’s
option menu and PRESERVE
FOLDER NAME. The nice thing
about this is that, unlike copying
from the desktop, the entire
volume and file structure is
preserved. So a root-level volume
named A001 stays that way.
7. Now, clone the SD card that you
diligently used to simultaneously
record an edit-ready Quicktime
proxy backup. Use the same
procedure of SETTING A CLONE
SOURCE and ADDING AS
DESTINATION two locations.
8. Review both the “Camera
Original Digital Negative”
CinemaDNG RAW and the
proxy by dragging the clips into
Resolve’s MEDIA POOL.
9. Go to “Page 3” — COLOR — in
Resolve for grading.
For a well-written and comprehensive guide to working with Resolve,
get Paul Saccone’s “The Definitive
Guide to Editing with DaVinci
Resolve 12.5.”
Download software updates and
the “DaVinci Resolve 12 Reference
Manual” from
blackmagicdesign.com

21Blackmagic Special Report • April 2017
Blackmagic Mini and Micro Panels for DaVinci Resolve
Blackmagic Design has two new portable hardware control
panels for DaVinci Resolve. e new DaVinci Resolve
Micro Panel and the DaVinci Resolve Mini Panel have the
consistent layout, look and feel of a traditional DaVinci
Resolve Advanced Panel. e new panels are portable and
easy to move between locations or take on location. is
should be especially appealing to freelance colorists.
Both panels provide ergonomic, hands-on control that are
beyond reach of a standard mouse and keyboard. Both
have 3 high-resolution weighted trackballs, and a row of
12 knobs provide access to the most powerful primary
correction features: Y Li, Y Gamma, Y Gain, Contrast,
Pivot, Mid-tone Detail, Color Boost, Shadow, Highlight,
Saturation, Hue Rotation and Luminance Mix.
e new panels also have 18 transport and navigation
control buttons on the right side for the most important
and commonly-used commands, thus avoiding the hunt
through menus to change a setting.
e smaller DaVinci Resolve Micro Panel is not much
larger than a computer keyboard and is powered from its
USB connection. It is excellent for editing and working on
primary color correction. It easily ts on a DIT cart.
e DaVinci Resolve Mini Panel includes the same features
as the Micro. But it adds an upper deck with enough
controls for a colorist to do professional work on any
DaVinci workstation or advanced laptop into which it is
attached. ere are 2 high-resolution screens with dozens
of menus for fast access to most of the advanced color
grading features of DaVinci Resolve, with information
and parameter settings for the currently selected tool.
ere are 8 so knobs and 8 so buttons, dedicated keys
for switching tools, working with nodes, grabbing stills,
navigating the timeline and more.
e DaVinci Resolve Micro and Mini panels both use
USB-C to connect with the latest laptops and workstations.
For computers with conventional USB 3.0 connections, a
USB 3 to USB-C cable is included. As already mentioned,
the DaVinci Resolve Micro Panel is fully powered over
USB so it can be run directly from a laptop on location,
without requiring external power, making it an excellent
choice for a DIT cart and on-set grading.
e DaVinci Resolve Mini Panel has both AC power and
4-pin XLR 12V DC powers connections. e Mini Panel
also has built-in Ethernet to connect with a DaVinci
Resolve workstation using either USB or a network. e
Ethernet also supports PoE (Power over Ethernet ) so it
can be powered via the network connection from a PoE
compatible router.
e DaVinci Resolve Micro Panel is $995 and the DaVinci Resolve Mini Panel is $2,995. Both panels are available
now from Blackmagic Design resellers worldwide.
blackmagicdesign.com/products/davinciresolve
Davinci Resolve Mini Panel
DaVinci Resolve Micro Panel
Start here: 12 knobs for
primaries—sometimes
called “the bread and butter
of color correcting.”
Nicely balanced trackballs
provide RGB balance adjustments for lift, gamma and
gain, each with an outer ring
master level control
18 dedicated
navigation
and transport
buttons
Davinci Resolve Mini Panel connected to Mac Pro and Eizo 32” monitors

© 2017 Film and Digital Times, Inc.
by Jon Fauer
www.blackmagicdesign.com
Australia
11 Gateway Court
Port Melbourne VIC 3207
T: +61 3 9682 4770
United States
2875 Bayview Drive
Fremont, CA 94538
T: +1 408 954 0500
Europe
Mere Hall Business Centre
Unit 3 Bucklow Hill Lane Mere
Knutsford Cheshire, WA16 6LE
T: +44(0) 1565 830049
Japan (Tokyo Office)
Regional Sales Office
4F Take bldg. II, 1-9-1 Shinjuku
Shinjuku-ku, Tokyo 160-0022
T: +81 3 5361 6312
Japan (Tokyo Office)
Technical Support/Shipping
8F OS Building, 3-6-4 Sotokanda
Chiyoda-ku, Tokyo 101-0021
T: +81 3 5295 5660
Japan (West Office)
4F A2 Tsuruta Keyaki Building 1-1-5 Akasaka
Chuo-ku Fukuoka-shi
Fukuoka 810-0042
T: +81 92 406 9780
Asia
31 Tannery Lane #08-01
HB Centre II
Singapore 347788
T: +65 6339 2171
Asia (China Sales Office)
D-1003 Floor, Brewery International Art Garden,
Beihuqu, Anwai Beiyuan Chaoyang District, Beijing
China 100012
T: +86 10 5166 1116
 Loading...