


G7
Technical User Manual

CONTENTS
OVERVIEW
Real-time connected safety ............................................................................................................... 4
Blackline Safety Network .................................................................................................................... 4
Blackline Live web portal .................................................................................................................... 5
G7 models .................................................................................................................................................. 6
Device comparison ................................................................................................................................. 7
What’s in the box .................................................................................................................................... 8
Hardware details ...................................................................................................................................... 9
INTERACTION
How it works ............................................................................................................................................... 10
OPERATING
Charging ...................................................................................................................................................... 11
Wearing ........................................................................................................................................................ 11
Power on ..................................................................................................................................................... 12
Power o ..................................................................................................................................................... 12
Connectivity light .................................................................................................................................... 13
GAS DETECTION
Bump test ....................................................................................................................................................14
Calibration .................................................................................................................................................. 16
Zero sensors ................................................................................................................................................17
GAS DETECTION FEATURES
Yellow warning alarm gas features ................................................................................................18
Low warning alarm for gas ...................................................................................................... 18
Under limit ..................................................................................................................................... 19
Sensor error ..................................................................................................................................... 19
Calibration ....................................................................................................................................... 19
Bump test .......................................................................................................................................... 19
Red alert gas features ............................................................................................................................ 20
High alert for gas ........................................................................................................................... 20
STEL (short term exposure limit) alert ............................................................................... 20
TWA (time weighted average) alert ....................................................................................21
OL (over limit) alert ...................................................................................................................... 21
CONFIGURATION MODES
Available modes ....................................................................................................................................... 22
Entering a mode ....................................................................................................................................... 22
Exiting a mode .......................................................................................................................................... 23
CARTRIDGES
Gas Cartridge replacement program ............................................................................................ 24
Changing cartridges .............................................................................................................................. 24

Cartridge care ............................................................................................................................................ 25
Cartridge safety precautions ............................................................................................................. 25
Caution ............................................................................................................................................... 25
Multi-gas pump cartridge ................................................................................................................... 26
Using pump ..................................................................................................................................... 26
Pump options ................................................................................................................................. 26
REALTIME FEATURES
Yellow pending alarm features ........................................................................................................ 28
Potential Fall detected ............................................................................................................... 28
Potential no-motion detected ...............................................................................................29
Check-in request ........................................................................................................................... 29
Yellow warning alarm features .........................................................................................................30
Messages ........................................................................................................................................... 30
Speaker phone ............................................................................................................................... 31
Network connection interruption ....................................................................................... 31
Low battery ...................................................................................................................................... 31
Red alert features ..................................................................................................................................... 32
Fall detected .................................................................................................................................... 32
No-motion detected ................................................................................................................... 32
Missed check-in ............................................................................................................................. 33
SOS alert ............................................................................................................................................. 33
LiveResponse ............................................................................................................................................. 34
Push-to-talk (PTT) .................................................................................................................................... 35
Transmitting ..................................................................................................................................... 35
Receiving ........................................................................................................................................... 35
Available channels........................................................................................................................35
Changing channels ...................................................................................................................... 36
PTT audio accessories ................................................................................................................ 37
FIRMWARE UPDATES
Over-the-air (OTA) rmware updates ........................................................................................... 38
SUPPORT
Learn more .................................................................................................................................................. 39
Customer Care ........................................................................................................................................... 39
SPECIFICATIONS
Detailed specications .......................................................................................................................... 40
LEGAL NOTICES AND CERTIFICATIONS
Legal notices .............................................................................................................................................. 42
Intrinsically safe ......................................................................................................................................... 43

OVERVIEW
THE WORLD’S FIRST EVERYTHING DETECTOR
What is G7 Insight?
G7 Insight is a simple solution that bundles industry-leading gas detection with
automated compliance and business analytics tools. For the rst time ever, the days of
manually collecting data from the eld, reviewing spreadsheets and compiling reports
are behind you.
With just a few minutes of connectivity per day, all data automatically recorded by
G7 devices in the eld is uploaded to the Blackline Safety Network for automatic
compilation and report generation.
What are real-time features?
Real-time safety monitoring leverages location technology, communications and live
data to provide complete transparency and control over your safety program. Real-time
features utilize G7 devices’ cellular or satellite connectivity, connecting people in the
eld with live monitoring teams in real time — ensuring no call for help will ever go
unanswered again.
In the event of an safety incident or gas exposure, monitoring personnel can see what
has happened, and communicate with workers directly via two-way voice calling or text
messaging through their G7 device.
BLACKLINE SAFETY NETWORK
How am I connected?
The Blackline Safety Network is a cloud-hosted system comprised of 2G/3G cellular
networks, satellite networks, our Blackline Live™ web portal application, your monitoring
account and your G7.
G7 devices require an active service plan in order to connect to the Blackline Safety
Network. Depending on your needs and requirements, various service plan options are
available such as 24/7 safety monitoring by Blackline’s Safety Operations Center and
two-way voice communication. Contact your organization’s safety professional for more
information regarding the details of your service plan.
4 || G7 TECHNICAL USER MANUAL

BLACKLINE LIVE WEB PORTAL
What is Blackline Live?
G7 utilizes the cloud-hosted Blackline Live web portal to monitor and manage all your
workers and devices, as well as deliver reports and business analytics insights.
With Blackline Live’s real-time alerting and live map with employee locations, you can
quickly locate and respond to a worker in distress. Real-time alerts show the employees
location on the map with the type of alert, enabling your team to eciently send help.
Blackline Live also allows you to create and customize conguration proles that
determine how a device or a group of devices operates in the eld. Similarly, alert
proles are set up to determine what contacts should be notied in the event of an
incident and what response protocol monitoring personnel will follow to ensure your
team gets the help it needs.
Blackline Live keeps track of alert history, calibrations and bump tests, eliminating the
need to manually retrieve data logs from the eld.
Blackline Live allows you to tailor user access depending on employee roles: employee,
supervisor, administrator and monitoring team. This ensures that everyone has access to
the right tools to accommodate their role in a comprehensive monitoring program.
What is Blackline Analytics?
With Blackline Analytics, review data collected from your device eet to make decisions,
follow up with your team and ensure everything is running smoothly. Choose from a
number of dierent reports and lters to explore your data.
Blackline Analytics is built directly into the Blackline Live portal, allowing anyone with
login access to see their own organization’s data, as well as client data. If users have
only been given access to specic groups of devices, they will only see data attached to
those particular devices.
G7 TECHNICAL USER MANUAL || 5

G7 MODELS
G7
C
G7
X
What G7 model do I have?
There are two G7 models: G7c and G7x. The main dierence between them is how they
connect to the Blackline Safety Network.
If you are unsure of which G7 model you have, refer to the logo on the front of your G7.
G7c works anywhere with 2G/3G
cellular coverage in over 200 countries
to connect you directly to the Blackline
Safety Network. Depending on your
service plan, your G7c may have
two-way voice capabilities.
6 || G7 TECHNICAL USER MANUAL
G7x works in conjunction with Blackline’s
G7 Bridge — a portable satellite base
station that keeps you connected in
remote locations outside cellular coverage.
G7x uses a 900 MHz radio to communicate
with G7 Bridge up to 2km away. One G7
Bridge can link up to ve G7x devices
to the Blackline Safety Network through
Iridium satellite or cellular data.
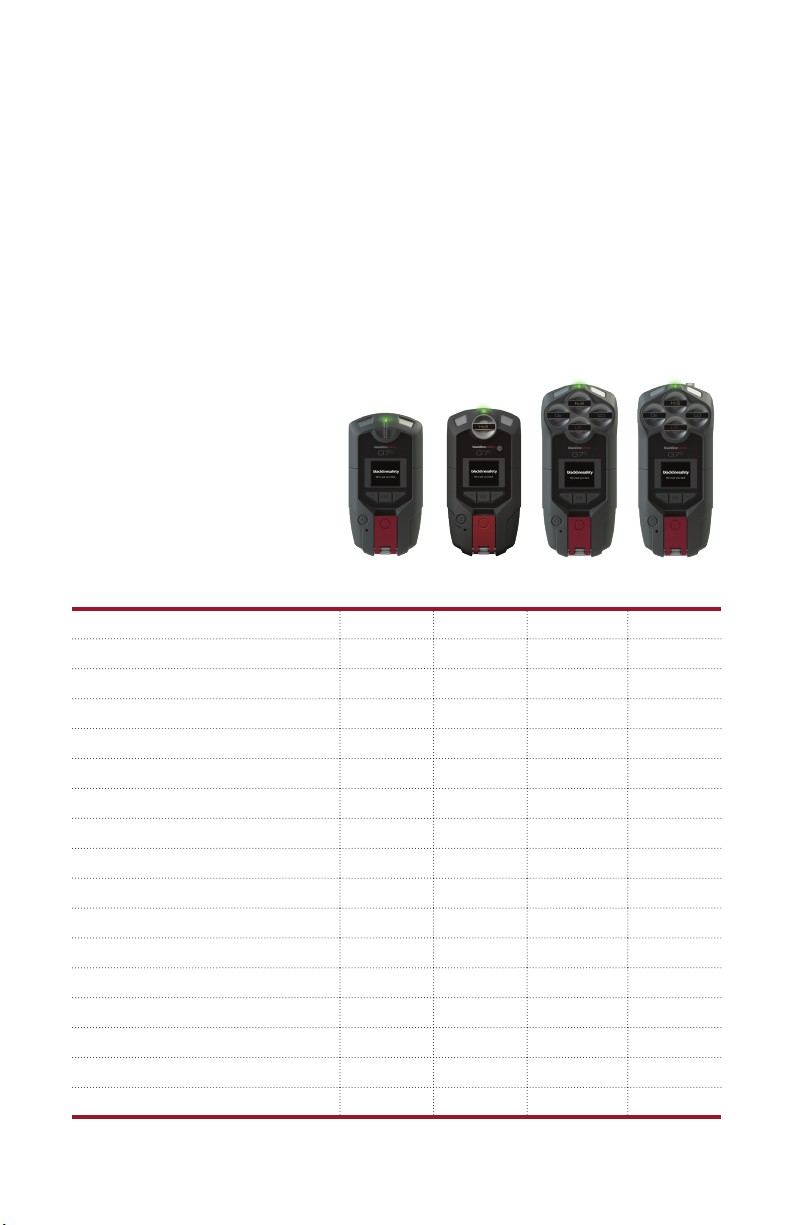
DEVICE COMPARISON
What features does my G7 have?
G7c and G7x are customized with one of four cartridge types. Cartridge selections
include Standard, Single-gas, Multi-gas diusion and Multi-gas pump cartridges.
The following comparison chart summarizes the features of each cartridge.
Text messaging
Fall detection
No-motion detection
SOS alert
Check-in timer
Conguration modes
Receive voice calls*
Push-to-talk enabled*
Single gas detection
Multi gas detection
Pump enabled
Low warning alarm for gas
Under limit alarm for gas
High alert for gas
STEL alert for gas
TWA alert for gas
Over limit alert for gas
*G7c devices only
Standard
Single
Multi
(diusion)
l l l l
l l l l
l l l l
l l l l
l l l l
l l l
l l l l
l l l l
l
l l
l l l
l l l
l l l
l l l
l l l
l l l
Multi
(pump)
l
G7 TECHNICAL USER MANUAL || 7

WHAT’S IN THE BOX
Your G7 device comes with the following components:
G7 personal safety monitoring device
Pre-installed cartridge (Standard, Single-gas or Multi-gas cartridge)
Getting started guide
Optional real-time features guide
Charging system
• Removable charging clip
• USB cable
• USB power adapter
Certication and support card
If you have a Single-gas or Multi-gas cartridge you will also receive:
Single-gas or Multi-gas calibration cap (depending on your cartridge)
Calibration gas tubing
8 || G7 TECHNICAL USER MANUAL

HARDWARE DETAILS
OK
Cartridge (Standard,
Single-gas or Multi-gas)
Top lights
Pending and
warning
Alerts
LiveResponse
Connectivity
light
LCD screen
Up button
OK button
Power button
Microphone (G7c only)
Metal belt clip
Speaker
Down button
Latch pull
Latch push button
Charging light
Cartridge label
Product label
Charging port
G7 TECHNICAL USER MANUAL || 9

INTERACTION
HOW IT WORKS
Interacting with G7 is easy with its high-visibility LCD display and three-button
menu system.
OK button
Press OK to enter the main menu on
the LCD screen and to conrm a
menu selection.
Latch pull
Pull down the latch to call for help when
assistance is required.
Up and down arrow buttons
Press up or down to navigate the menu.
Press and hold both simultaneously to mute
a yellow warning alarm or red alert.
Latch push button
Push the latch in to check in and tell your
G7 that you are safe.
10 || G7 TECHNICAL USER MANUAL

OPERATING
CHARGING
How do I charge my G7?
Insert the micro USB plug into the removable charging clip, then slide the clip onto the
charging port at the bottom of your G7. A solid red light at the bottom of the device
conrms your G7 is charging. The LCD screen will let you know when it is fully charged,
which can take up to four hours.
Blackline recommends that you fully charge your device after every shift.
WEARING
Where do I wear my device?
G7 monitors you best when clipped to your belt or chest pocket.
G7 TECHNICAL USER MANUAL || 11
Charging port
Removable charging clip
Charging cable

POWER ON
How do I turn on my G7c?
Press and hold the power button, and wait for the blinking green connectivity light to
turn solid. When connected, the green light will remain solid.
How do I turn on my G7x?
Press and hold the power button on your G7 Bridge to turn it on rst, and wait for the
blinking green connectivity light to turn solid, It takes approximately two minutes for G7
Bridge to connect to the Blackline Safety Network. When connected, the green light will
remain solid.
Press and hold the power button on your G7x. Wait for the blinking green connectivity
light to turn solid. When connected, the green light will remain solid.
NOTE: For best results, ensure your G7 Bridge is turned on before your G7x. If you are having
diculties connecting your G7x to G7 Bridge, please refer to your G7 Bridge manual.
POWER OFF
How do I turn o my G7c?
Press and hold the power button. The device will go into shutdown sequence, once all
the lights and vibrations have stopped, you have been logged o from the Blackline
Safety Network.
How do I turn o my G7x?
Press and hold the power button of your G7x. The device will go into shutdown
sequence, sending your log off status to G7 Bridge.
When suitably powered, G7 Bridge can remain on at all times. When G7 Bridge is o, all
connected devices will no longer be monitored. Before powering down, ensure there
are no other G7x devices connected. Once conrmed, press and hold the power button
on the G7 Bridge. The device will go into shutdown sequence. Your safety is no longer
being monitored.
NOTE: For more information, please refer to the G7 Bridge technical user manual.
12 || G7 TECHNICAL USER MANUAL

CONNECTIVITY LIGHT
Are you connected to the Blackline Safety Network?
G7 lets you know your connection status.
Blinking/Solid
Blinking green light
A blinking connectivity light indicates that your G7 is storing data. It is not currently
connected to the network and will send data when the light is solid.
Solid green light
A solid connectivity light indicates that G7 is actively transmitting data and is connected
to the Blackline Safety Network.
Sound and vibration
Congurable to sound an alarm if connection is lost after 5 minutes.
NOTE: If you are using real-time features, your safety is only monitored when the
connectivity light is solid.
G7 TECHNICAL USER MANUAL || 13

GAS DETECTION
Included with your G7 Single-gas or Multi-gas cartridge is a calibration cap and
tubing for bump tests and calibrations. Alternatively, bump tests and calibrations can
be completed using a G7 Dock. Only perform bump test and calibrations in a safe
environment. For more information and instructions on bumping or calibrating with
G7 Dock, refer to the G7 Dock technical user manual.
BUMP TEST
What is a bump test?
It is safe practice to regularly test gas sensors by applying the target gas. G7’s bump test
also tests the operation of light, sound and vibration indicators. The bump test schedule
depends on your company’s safety policy. G7 automatically communicates bump test
data to the Blackline Safety Network, and will remind you when a bump test is overdue.
The bump test schedule is congurable.
NOTE: To meet CSA LEL performance standard, you are required to bump test before
each day’s use. Blackline recommends you do not exceed 30 days without a bump test.
How do I bump test?
1. Attach tubing to the calibration cap
2. Ensure the other end of the tubing is attached to a xed ow regulator on the gas tank
3. On your G7, press the OK button to enter the main menu
4. Use the arrow buttons to navigate to gas options, press OK
5. Use the arrow buttons to navigate to bump test, press OK
6. Press the up arrow to continue
7. G7 preforms an automatic audio and visual assessment to test vibration and lights
8. You can individually choose which sensors to test. By default, G7 will test all sensors.
9. Attach the calibration cap to your device
10. G7 will begin to count down from 60. Apply the gas within this time window.
11. Turn gas o when prompted on your G7 screen
12. Press the OK button to complete bump test
13. G7 will let you know if the bump test has passed or failed, and when your next
bump test is due
14. Remove the calibration cap and let your G7 sit until the readings stabilize and your
G7 has returned to baseline
NOTE: If you see a bump test fail message on your LCD screen, try the calibration again. If
the error persists, please contact our Customer Care team.
14 || G7 TECHNICAL USER MANUAL

Tubing
Single-gas calibration cap
Tubing
Multi-gas calibration cap
G7 TECHNICAL USER MANUAL || 15

CALIBRATION
What is calibration?
Gas sensors periodically need to be calibrated by applying a known concentration of
gas for a set amount of time. This procedure ensures the gas sensor can accurately
detect gas levels throughout its operating life. The calibration schedule depends on
your company’s safety policy. Blackline recommends not exceeding 180 days without
a calibration.
How do I calibrate?
1. Attach tubing to the calibration cap
2. Ensure the other end of the tubing is attached to a xed ow regulator on the gas tank
3. On your G7, press the OK button to enter the main menu
4. Use the arrow buttons to navigate to gas options, press OK
5. Use the arrow buttons to navigate to calibration, press OK
6. Press the up arrow to continue
7. G7 preforms an automatic audio and visual assessment to test vibration and lights
8. You can individually choose which sensors to test. By default, G7 will test all sensors.
9. Attach the calibration cap to your device
10. G7 will begin to count down from 60. Apply the gas within this time window and
continue to apply gas for 2 minutes.
11. Turn gas o when prompted on your G7 screen
12. Press the OK button to complete calibration
13. G7 will let you know if the calibration has passed or failed, and when your next
calibration is due
14. Remove the calibration cap and let your G7 sit until the readings stabilize and your
G7 is calibrated
NOTE: If you see a calibration fail message on your LCD screen, try the calibration again. If
the error persists, please contact our Customer Care team.
16 || G7 TECHNICAL USER MANUAL

ZERO SENSORS
What is zeroing?
If G7 is not reading zero and you know you are in an atmosphere with no gas, your gas
sensor readings may have shifted. If this happens, it is best to calibrate your sensors. If
you are unable to preform a calibration, you can zero your sensors to reset the baseline.
G7 can be congured to automatically zero on start-up when you turn on your device in
Blackline Live.
NOTE: The baseline reading for oxygen is 20.9.
How do I zero sensors?
1. On your G7, press the OK button to open the main menu
2. Press the arrow buttons to navigate to gas options, press OK
3. Use the arrow buttons to navigate to zero sensors, press OK
4. Press the up arrow to begin zeroing. Do not apply any gas.
5. The LCD screen will let you know once zero is complete
NOTE: If you see a zero incomplete message on your LCD screen you may be in an
environment with gas levels, or your cartridge may need replacement.
G7 TECHNICAL USER MANUAL || 17

GAS DETECTION FEATURES
Once you have completed a bump test and calibration, G7 is ready to monitor and notify
you of gas exposure. Gas detection alarms will notify you with either a yellow warning alarm
or a red alert depending on the gas level measured. All settings are customizable in Blackline
Live. Speak to your safety supervisor to learn about how your gas features are congured.
YELLOW WARNING ALARM GAS FEATURES
Rapid Blinking
LOW WARNING ALARM FOR GAS
When does G7 trigger a low yellow warning alarm for gas?
When gas levels reach the low concentration threshold configured by your safety
supervisor, G7 will inform you with a yellow warning alarm every two minutes until
gas levels are reduced.
NOTE: A G7 with O
oxygen-enriched atmospheres. An oxygen-decient atmosphere poses a risk of
insucient oxygen for breathing. An oxygen-enriched atmosphere presents an
increased risk of explosion.
18 || G7 TECHNICAL USER MANUAL
sensors will trigger low warning alarms in oxygen-decient and
2

UNDER LIMIT
When does G7 trigger an under limit yellow warning alarm?
If a gas sensor’s baseline shifts, it’s reading will shift accordingly and become
unreliable. When this happens, the presence of gas can still be measured, but cannot
be converted into an accurate reading. G7 will inform you of such an event with
a yellow warning alarm. A calibration will be required to ensure the sensors are
accurately detecting gas levels. If you are unable to perform a calibration and are in a
clean atmosphere, you can zero your sensors to reset the baseline.
SENSOR ERROR
When does G7 trigger a sensor error yellow warning alarm?
If a gas sensor stops working for any reason, G7 will inform you with a yellow warning
alarm. An X on your LCD screen will indicate which sensor or sensors are generating the
error message. Power o and restart your G7. If the sensor error warning persists, perform
a calibration. If this does not correct the problem, you will need to replace your cartridge.
CALIBRATION
When does G7 trigger a calibration yellow warning alarm?
When gas sensors are due for a calibration, G7 will inform you with a yellow warning alarm.
BUMP TEST
When does G7 trigger a bump test yellow warning alarm?
When gas sensors are due for a bump test, G7 will inform you with a yellow warning alarm.
PUMP BLOCK
When does G7 trigger a pump block yellow warning alarm?
If your pump inlet is blocked, G7 will inform you with a yellow warning alarm.
What do I do in the case of a yellow warning alarm?
Read your G7 screen. Press and hold the
up and down arrow buttons at the same
time to let your G7 know you have read
the message.
Yellow warning alarms are between
you and G7, and will not notify
monitoring personnel if you are
using real-time features.
G7 TECHNICAL USER MANUAL || 19

RED ALERT GAS FEATURES
Rapid Blinking
HIGH ALERT FOR GAS
When does G7 trigger a high alert for gas?
If a gas sensor detects gas levels above the high gas concentration threshold congured by
your safety supervisor.
NOTE: A G7 with O
enriched situations.
sensors will trigger red alerts in both oxygen-decient and oxygen-
2
STEL SHORT TERM EXPOSURE LIMIT ALERT
When does G7 trigger a STEL alert?
If a gas sensor detects you have reached the short-term exposure limit configured by
your safety supervisor. This limit is the gas concentration that you can be continuously
exposed to for a 15-minute time frame without suffering adverse health effects.
20 || G7 TECHNICAL USER MANUAL

TWA TIME WEIGHTED AVERAGE ALERT
When does G7 trigger a TWA alert?
If a toxic sensor detects you have exceeded the average allowable amount of gas during
an eight-hour period.
NOTE: The two TWA measuring methods available for use on your G7 are:
OSHA (United States Department of Labor Occupational Safety and Health Administration)
or ACGIH (American Conference of Governmental Industrial Hygienists).
OSHA is defined as a rolling average of gas exposure accumulated over an eight-hour
period of operation. If the worker is in the field longer, the most recent eight-hour
cumulative value is used.
ACGIH is dened as the total accumulated average, from four to 16 hours as congured
by your safety supervisor.
OL OVER LIMIT ALERT
When does G7 trigger an OL alert?
If a gas sensor detects an excessive amount of gas and can no longer give you an
accurate reading.
What do I do in the case of a red alert?
Evacuate the area and follow your
emergency safety protocol. Read the
information on your G7 screen. Press and
hold the up and down arrow buttons at the
same time to mute the sound and vibration.
The sound and vibration will return after one
minute. This will continue until gas levels
or averages have reduced or returned to
acceptable concentrations.
For real-time users, red alerts are immediately
communicated to monitoring personnel.
Muting sound and vibration does not cancel
the remote alert sent to monitoring personnel.
G7 TECHNICAL USER MANUAL || 21

CONFIGURATION MODES
Conguration modes are customized in the G7 conguration prole on Blackline Live. Each
prole supports up to a total of ve ‘modes’ . These modes allow G7 to temporarily change
its behavior for dierent situations, and can be turned on and o through G7’s interface.
AVAILABLE MODES
Normal
This mode is the configuration you determine for everyday operation. G7 will operate
using this mode as a default.
Pre-entry
Pre-entry mode is used before entering a space that could potentially contain
dangerous gas. This mode can be used with or without a pump cartridge, which will
actively draw surrounding air to its sensors and test gas levels.
SCBA
This mode is meant to be used when the device user is wearing a self-contained or
supplied air breathing apparatus (SCBA/SABA) and is entering an area that is known to
have high gas levels.
Leak check
Leak check mode can be used when checking for gas leaks in a particular area. This
mode – like pre-entry mode – can be used with or without a pump cartridge.
High risk
This mode is unique in that it is meant for general high-risk situations, such as an
evacuation or travelling through a dangerous area. Unlike the other modes, you will
never be timed out and must exit it manually.
ENTERING A MODE
How do I enter a mode?
To use a mode, it must first be enabled in G7’s configuration profile on
Blackline Live. Entering a mode can be done from G7’s main menu or main status screen.
To enter a mode from the modes menu:
1. Press OK to enter G7’s main menu
2. Use the up and down arrows to navigate to modes
3. Press OK to enter the modes menu
4. Select the mode you wish to enter
5. Conrm that you want to enter the mode by selecting yes
6. G7’s screen will invert and your information banner will display your current mode
22 || G7 TECHNICAL USER MANUAL

To enter a mode from the main status screen:
1. Press the up or down arrow to open G7’s secondary menu
2. Continue to press the up or down arrow until you reach your desired mode
3. Press OK to enter the mode
4. G7’s screen will invert and your information banner will display your current mode
EXITING A MODE
How do I exit a mode?
When you’d like to return the device to normal operation, you will need to exit the
configuration mode you are currently in. Exiting a mode can be done from G7’s main
menu or main status screen.
To exit from the modes menu:
1. Press OK to enter G7’s main menu
2. Use the up and down arrows to navigate to modes
3. Press OK to enter the modes menu
4. Select normal mode
5. Conrm that you want to return to normal mode by selecting yes
6. G7 will return to normal function
To exit from the main status screen:
1. Press the up or down arrow to open G7’s secondary menu
2. Press OK to exit the mode
3. G7 will return to normal function
What is a mode timeout?
Each configuration mode (excluding normal and high risk mode) has a timeout
period. After this time period has elapsed, you will be asked if you would like to
continue in this mode. If you select yes, your mode will be extended. If you select no,
G7 will return to normal operation. If you do not make a selection within 30 seconds,
G7 will automatically return to normal operation. If you have a check-in timer enabled,
G7 will immediately ask you to check in.
G7 TECHNICAL USER MANUAL || 23

CARTRIDGES
GAS CARTRIDGE REPLACEMENT PROGRAM
What do I do when I need a new gas cartridge?
If you have an uninterrupted service plan for your G7 gas cartridge, Blackline will replace
expired cartridges for you free of charge. To inquire about or request new cartridges,
please contact our Customer Care team or your distributor.
CHANGING CARTRIDGES
How do I change my G7 cartridge?
1. Power o G7
2. Using a Phillips #1 screwdriver, remove the screws on each side of the device
3. Pull up on the cartridge
4. Slide a new cartridge onto G7, ensuring the cartridge clicks into place
5. Replace screws into each side of the device
NOTE: Cartridges should always be replaced with a manual (not electric) screwdriver in
order to avoid damage to the device’s plastics.
24 || G7 TECHNICAL USER MANUAL

CARTRIDGE CARE
Sensor contaminants
Gas sensors are susceptible to contamination by a variety of common chemicals,
reducing or eliminating their sensitivity. Care should be taken when using silicones,
cleaners, solvents and lubricants in close proximity to sensors as exposure may
cause permanent damage to the sensor. If a device is exposed to a new chemical or
compound, it is best practice to bump test and calibrate units to ensure proper sensor
function is maintained.
CARTRIDGE SAFETY PRECAUTIONS
CAUTION
For safety reasons this equipment must be operated and serviced by qualied personnel
only. Read and understand instruction manual completely before operating or servicing.
To meet the CSA LEL performance standard, the following safety precautions should be
considered:
Before each day’s usage sensitivity must be tested on a known concentration of
methane equivalent to 25-50% of full scale concentration. Accuracy must be within
0 and 20% of actual. Accuracy may be correct by calibration.
Any rapid up-scale reading followed by declining or erratic reading may indicate a
gas concentration beyond upper scale limit which may be hazardous.
High o-scale readings may indicate an explosive concentration.
This area must be free of ammable gases during calibration.
G7 TECHNICAL USER MANUAL || 25

MULTIGAS PUMP CARTRIDGE
USING PUMP
How do I use pump?
Attach a pump cartridge to your G7 device and enter a
pumped mode (for step-by-step instructions on entering
and exiting pump modes, see page 22-23 of this guide).
Pump will turn on automatically. When pump is on, the
pump icon will be visible on G7’s main screen.
Where do I see my pump details?
When a pump cartridge is attached to G7, you can see
the pump status screen by pressing the up or down
arrow from G7’s main status screen. Here you can see if
pump is on or o, your hose length, ow rate and sample
time (if enabled).
How do I bump test or calibrate my pumped cartridge?
Manually bump testing and calibrating pump cartridges is done using the same
calibration cap and method as G7’s multi-gas cartridge. Please refer to page 14-16 of this
manual for step-by-step instructions.
Bump testing and calibrating with a G7 Dock requires an updated G7 Dock unit. If you
are unsure if you have an updated Dock, please contact our Customer Care team.
Pump on
Hose L: 5m
~300 ml/min.
Sample 75 sec.
1:48
How do I perform a block test?
A block test should always be performed after entering a pumped mode to ensure that
your pump and tubing are working properly. Perform a manual block test by entering
a pumped mode and blocking your inlet. This will cause G7 to go into yellow warning
alarm, and your screen will let you know that your pump is blocked. Unblock your inlet,
and if the warning alarm silences, you know that your equipment is safe to use.
What is ow rate?
Flow rate is the speed at which air is passing over your device’s sensors. In order to
provide accurate gas readings, ow rate needs to be above 150 ml/min. A ow rate less
than 150 ml/min will result in a pump block yellow warning alarm. By default, Blackline’s
pump aims to maintain a ow rate of 300ml/min and G7 will automatically adjust its
pump speed to maintain this rate.
26 || G7 TECHNICAL USER MANUAL

PUMP OPTIONS
Settings for pump can be found in G7’s main menu, under settings > pump options.
What is the sample timer?
The sample timer is the amount of time it takes for one air sample to be pumped to
your sensors. This calculation is based on your hose length and ow rate. If sample
timer is enabled, the pump status screen will show a countdown and beep once when
a sample cycle has completed. The sample cycle will repeat continuously until you turn
pump o. If disabled, the sample timer will not show and the device will not beep, but
pump will continue to function normally.
How do I enable the sample timer?
1. Press OK to enter G7’s main menu
2. Use the up and down arrows to navigate to settings, press OK
3. Use the up and down arrows to navigate to pump options, press OK
4. Select sample timer o
5. Select yes to conrm that you would like to enable the sample timer
How do I disable the sample timer?
1. Press OK to enter G7’s main menu
2. Use the up and down arrows to navigate to settings, press OK
3. Use the up and down arrows to navigate to pump options, press OK
4. Select sample timer on
5. Select yes to conrm that you would like to disable the sample timer
What is hose length?
Hose length is an estimate of how long the tubing attached to pump is. This value is
customizable from the pump options menu, and factors in to sample time.
How do I change hose length?
1. Press OK to enter G7’s main menu
2. Use the up and down arrows to navigate to settings and press OK
3. Use the up and down arrows to navigate to pump options and press OK
4. Select hose length
5. Use the up and down arrows to choose your units, meters or feet, and press OK
6. Use the up and down arrow to enter the first digit of your length and press OK
7. Use the up and down arrow to enter the second digit of your length and press OK
8. Select yes to confirm your length or select edit to make changes to your choice
G7 TECHNICAL USER MANUAL || 27

REALTIME FEATURES
Your G7 can be equipped with many features to monitor your safety. They are categorized
into the type of notications they trigger — yellow pending alarms, yellow warning alarms,
and red alerts. All are customizable in Blackline Live to best t your needs. Speak to your
safety supervisor to learn about how your G7 features are congured.
YELLOW PENDING ALARM FEATURES
Blinking
POTENTIAL FALL DETECTED
What is a potential fall detected?
Your device is constantly monitoring you for falls. If a potential fall is
detected, G7 will initiate a yellow pending alarm. The fall detection
sensitivity is congurable.
28 || G7 TECHNICAL USER MANUAL

POTENTIAL NOMOTION DETECTED
What is a potential no-motion detected?
Your device is constantly monitoring your motion. It will automatically detect
if you do not move within a pre-set duration, and will initiate a yellow pending
alarm. The no-motion period and sensitivity are congurable.
CHECKIN REQUEST
What is a check-in?
If enabled, you can congure your device to request periodic check-ins
throughout your shift. The check-in countdown is displayed at the top right
of the LCD screen. At the end of the timer, your G7 will initiate a yellow
pending alarm to conrm you are safe. The check-in timer and pending
alarm time are congurable.
NOTE: Your device can be congured to check-in early, before the yellow
pending alarm sounds. If enabled, you can push and hold the red latch
button for the duration of three vibrations to reset your check-in timer
before the audible alarm. An early check-in cannot be congured if Silent
SOS alert is enabled.
What do I do in the case of a yellow pending alarm?
If you are safe, push the red latch button.
If you do not push the latch within the
congured amount of time, your yellow
pending alarm will communicate a red
alert to monitoring personnel.
NOTE: G7 can be congured to mute
pending alarms while driving at
speeds above 35 km/hr (22 mph)
or while charging.
G7 TECHNICAL USER MANUAL || 29

YELLOW WARNING ALARM FEATURES
Rapid Blinking
MESSAGES
How do I receive a message?
Your device can receive messages from monitoring personnel. When there is
an incoming message, G7 will inform you with a yellow warning alarm.
How do I send a message?
You can choose from a list of 10 pre-programmed messages to send to
monitoring personnel. The messages are customizable from Blackline Live.
Press the OK button to enter the main menu, the up or down arrow buttons to
navigate the menu, highlight your selection, and the OK button to send.
How do I send a custom message?
At the bottom of the pre-programmed message list is an option to send
a 16-character custom message to monitoring personnel. Press the up or
down arrow buttons to scroll through the alphabet and numbers, press the
OK button to move to the next character, press the OK button again to send.
NOTE: In the conrmation screen of your custom message, you have the
ability to edit the current message by pressing the up arrow button, send
the message by pressing the OK button or cancel the message by pressing
the down arrow button.
30 || G7 TECHNICAL USER MANUAL
SPEAKER PHONE
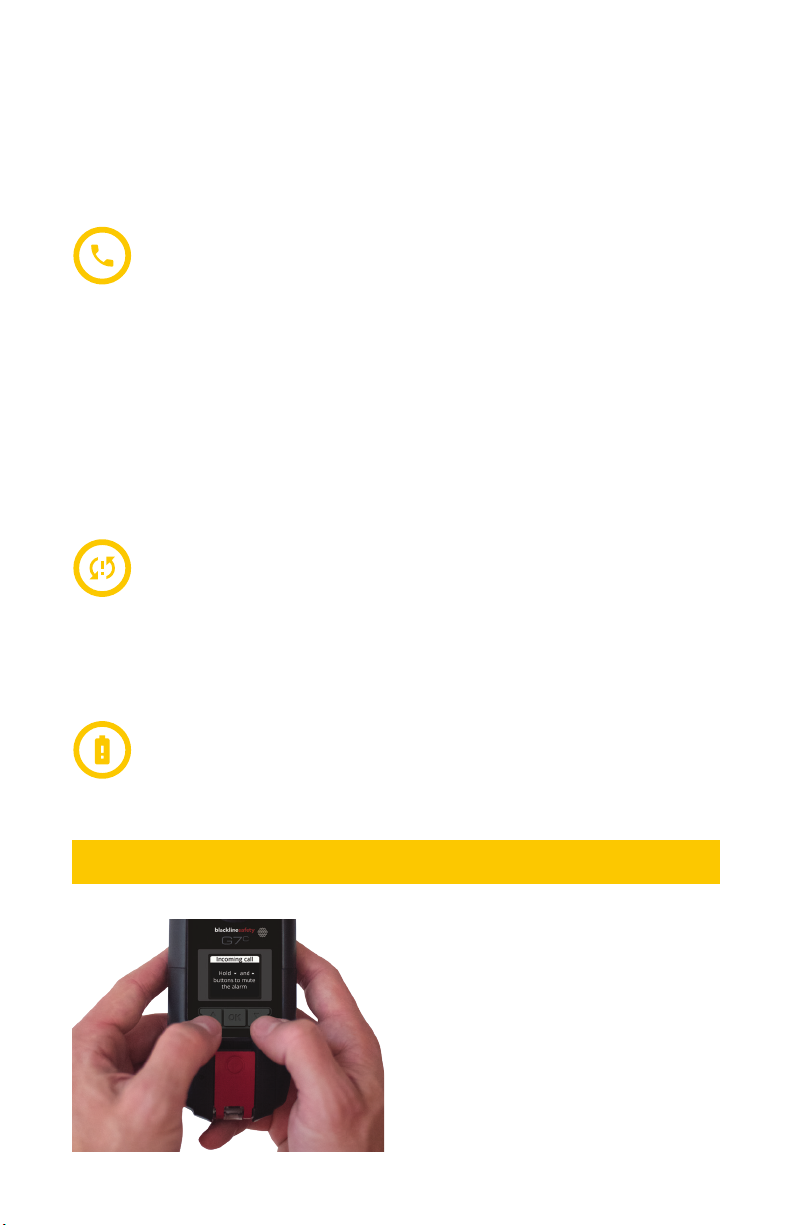
How do I use two-way voice calling?
If you have a G7c with a voice-enabled service plan, your speakerphone will
automatically answer a call from monitoring personnel. G7 will inform you
of an incoming call with a yellow warning alarm and you will hear a beep
signifying the two-way voice call has been connected. In a noisy environment,
it may be necessary to remove and hold the device near your ear, as you
would a two-way radio.
NETWORK CONNECTION INTERRUPTION
How do I know if the connection to my device is lost?
If your device loses connection with the Blackline Safety Network, it will inform you
with a yellow warning alarm after 5 minutes. This amount of time is congurable.
LOW BATTERY
How do I know if my device battery is low?
If your battery level goes below 20%, it will inform you with a yellow
warning alarm. This percentage level is congurable.
What do I do in the case of a yellow warning alarm?
Read your G7 screen. Press and hold the
up and down arrow buttons at the same
time to let G7 know you have read the
message.
Yellow warning alarms are between you
and G7, and will not notify monitoring
personnel.
G7 TECHNICAL USER MANUAL || 31

RED ALERT FEATURES
Rapid Blinking
FALL DETECTED
What is fall detected?
If your device detects a fall and you have not responded to the yellow
pending alarm, G7 will communicate a red alert to monitoring personnel.
The fall detection sensitivity is congurable.
NOMOTION DETECTED
What is no-motion detected?
If you are not moving and you have not responded to the yellow
pending alarm, G7 will communicate a red alert to monitoring personnel.
The no-motion period and sensitivity are congurable.
32 || G7 TECHNICAL USER MANUAL

MISSED CHECKIN
What is a missed check-in?
If enabled and you are unable to check-in during the yellow pending alarm
time, your device will communicate a red alert to monitoring personnel.
SOS ALERT
What is an SOS Alert?
If you require assistance, you can manually send an SOS alert to monitoring
personnel and request immediate help to your location by pulling the red latch.
NOTE: Your device can be congured to send a Silent SOS alert to monitoring
personnel without light, sound and vibration.
What do I do in the case of a red alert?
Red alerts are immediately communicated
to monitoring personnel. Read the
information on your G7 screen. Press and
hold the up and down arrow buttons at
the same time to mute the sound and
vibration. This does not cancel the red
alert sent to monitoring personnel.
G7 TECHNICAL USER MANUAL || 33

LiveResponse
When monitoring personnel have acknowledged your red alert, the blue LiveResponse
light will shine on your device.
Blinking
This light lets you know that remote monitoring personnel are responding by following
your team’s emergency protocol. Once monitoring personnel have resolved the red
alert, the blue LiveResponse™ light will shut o.
Depending on your response protocol, a G7c with voice enabled service plan will
automatically connect your speaker phone to monitoring personnel.
34 || G7 TECHNICAL USER MANUAL

PUSHTOTALK PTT
If you have a G7c with a PTT service plan and PTT is enabled in your device’s conguration
prole, push-to-talk allows you to send and receive voice messages to other G7c device
users, similar to a walkie-talkie. Push-to-talk is only available on G7c devices.
TRANSMITTING
How do I send a PTT message?
1. Press and hold the red latch
2. When G7c finishes beeping, continue to hold and begin talking with
the device about 6 inches from your mouth.
NOTE: If you are using an O sensor, be sure that you are talking into G7’s
microphone, not the cartridge, as this could cause gas alarms.
3. When you’re finished talking, release the latch. G7 allows PTT messages
up to 30 seconds in length.
4. G7c will beep once more to let you know it’s done listening
RECEIVING
How do I receive a PTT message?
1. G7c will beep twice to signal an incoming PTT message
2. G7c will play the message
3. G7c will beep once more when the message is done
NOTE: G7c’s screen will display which channel you are transmitting to or receiving from.
AVAILABLE CHANNELS
Channel 0-99
Channels 0 through 99 are available for everyday use. When on a specific channel, you
will only be able to communicate with devices that are on the same channel, and will
receive transmissions from all call.
All call
All call is a channel where G7c will transmit to all PTT devices in your organization,
and will only hear transmissions from all call. This channel is recommended for safety
supervisors or managers.
Receive only
The receive only channel only hears transmissions from all call, and can’t transmit to
other devices.
G7 TECHNICAL USER MANUAL || 35

CHANGING CHANNELS
How do I change my channel?
Changing your PTT channel is done from the PTT channel menu.
To change to a specific channel number:
1. Press the OK button to enter G7c’s main menu
2. Use the up and down arrows to navigate to PTT channels, and select OK.
3. Select enter channel #
4. Use the up and down arrows to enter the first digit of your channel. For example,
for channel 40, the first digit is 4.
5. Press OK
6. Use the up and down arrow to enter the second digit of your channel. For
example, for channel 40, the second digit is 0.
7. Press OK
8. Select yes to confirm and change G7c’s channel or select edit to make changes
To change to receive only or all call:
1. Press the OK button to enter G7c’s main menu
2. Use the up and down arrows to navigate to PTT channels, and select OK.
3. Select receive only or all call
4. Read the message on the screen
5. Select yes to confirm
NOTE: You can also navigate to the PTT channels menu by pressing the up or down
arrow from the main screen, and pressing OK when the current PTT channel shows.
36 || G7 TECHNICAL USER MANUAL

PTT AUDIO ACCESSORIES
G7c is equipped with audio pairing in order to use an audio accessory
with push-to-talk. All settings for audio devices can be found in G7’s
main menu, under settings > audio pairing.
How do I pair a new audio device?
1. Press OK to enter the main menu
2. Use the up and down arrows to navigate to settings
3. Navigate to audio pairing, and press OK
4. Use the up and down arrows to navigate to pair new, and press OK
5. Put your accessory into pairing mode as per its instructions
6. Select your device from the list
7. G7 will give you a successful connection message when your device is connected,
and you will see an audio accessory icon in the info bar of G7c’s main screen
How do I reconnect to an audio device?
G7 will remember your audio accessory and pair automatically when both are
powered on. In the case that it doesn’t, you can reconnect to your accessory from
the audio pairing menu.
1. Press OK to enter the main menu
2. Use the up and down arrows to navigate to settings
3. Navigate to audio pairing, and press OK
4. Use the up and down arrows to navigate to reconnect, and press OK
5. Ensure your accessory is on
6. G7c will reconnect to your audio accessory, and you will see an audio accessory
icon in the info bar of G7c’s main screen when the connection is successful
How do I forget a paired device?
1. Press OK to enter the main menu
2. Use the up and down arrows to navigate to settings
3. Navigate to audio pairing, and press OK
4. Use the up and down arrows to navigate to forget device, and press OK
5. Select yes to confirm that you would like to forget your accessory
NOTE: Audio accessories can only be used for push-to-talk purposes, and cannot be used
for early check-ins or conrming pending alarms.
G7 TECHNICAL USER MANUAL || 37

FIRMWARE UPDATES
OVERTHEAIR OTA FIRMWARE UPDATES
How does G7 get updated?
To oer new features, Blackline Safety periodically releases over-the-air (OTA) rmware
updates. Your G7 device will automatically download and install the new rmware.
Blackline Safety will contact you directly for specic information about new updates. If you
have any questions, please contact our Customer Care team.
NOTE: OTA rmware updates are only available for G7 Bridge when it is brought into
cellular range. If G7 Bridge cannot be removed from satellite only reception, contact
Customer Care to receive a rmware update kit.
38 || G7 TECHNICAL USER MANUAL

SUPPORT
LEARN MORE
Visit support.BlacklineSafety.com to nd support and training materials for G7.
CUSTOMER CARE
For technical support, please contact our Customer Care team.
North America (24 hours)
Toll Free: 1-877-869-7212 | support@blacklinesafety.com
United Kingdom (8am-5pm GMT)
+44 1787 222684 | eusupport@blacklinesafety.com
International (24 hours)
+1-403-451-0327 | support@blacklinesafety.com
G7 TECHNICAL USER MANUAL || 39

SPECIFICATIONS
DETAILED SPECIFICATIONS
Standard G7 safety features
Fall detection and No-motion detection:
Tri-axis accelerometer, tri-axis gyro, software
processing, congurable sensitivity, congurable
time window
(1-30 mins, or o) for no-motion detection
Emergency latch: Pull latch to trigger
Silent emergency: Press and hold latch to
trigger
Low-battery: congurable threshold
Worker check-in: Congurable timer (5–180
min, or o), automatic check-in when driving
Additional gas cartridge features
Time-weighted average (TWA)
Short-term exposure limit (STEL)
High gas alert
Low gas alert
Bump test and calibration notication
Bump test and calibration failure alert
Size & weight
G7 with Standard Cartridge
Size: 64 mm x 124 mm x 27 mm (2.5” x 4.9” x 1.1”)
Weight: 162 g (5.7 oz)
G7 with Single-gas Cartridge
Size: 64 mm x 128 mm x 27 mm (2.5” x 5.0” x 1.1”)
Weight: 167 g (5.9 oz)
G7 with Quad-gas Cartridge
Size: 66 mm x 150 mm x 27 mm (2.5” x 5.9” x 1.1”)
Weight: 192 g (6.8 oz)
Gas sensor options
H2S (hydrogen sulphide)
Sensor type: Electrochemical
Range: 0-100 ppm
Resolution: 0.1 ppm
LEL combustible
Sensor type: NDIR and pellistor options
Range: 0-100% LEL
Resolution: 1% LEL
CO (carbon monoxide)
Sensor type: Electrochemical, hydrogen resistant
option available
Range: 0-500 ppm
Resolution: 1 ppm
O2 (oxygen, lead-free)
Sensor type: Long-life pumped electrochemical
Range: 0-25% vol
Resolution: 0.1 %vol
NH3 (ammonia)
Sensor type: Electrochemical
Range: 0-100 ppm
Resolution: 0.1 ppm
SO2 (sulfur dioxide)
Sensor type: Electrochemical
Range: 0-100 ppm
Resolution: 0.1 ppm
Cl2 (chlorine)
Sensor type: Electrochemical
Range: 0-20 ppm
Resolution: 0.1 ppm
COSH (CO + H2S)
Sensor type: Electrochemical
Range: 0-500 CO, 0-100 ppm H2S
Resolution: 1 ppm CO, 0.1 ppm H2S
CO2 (carbon dioxide)
Sensor type: NDIR
Range: 0-50,000 ppm
Resolution: 50 ppm
PID (photoionization detector)
Sensor type: PID
Range: 0-6,000 ppm
Resolution: 0.1 ppm at 0 to 100 ppm, 2 ppm at 100
to 6,000 ppm
User interface
168 by 144 pixel graphical, high contrast, liquid
crystal display with front lighting, menu system
driven by a three-button keypad, power button (on/
o), check-in button (check-in/silent emergency),
emergency latch (send emergency alert)
40 || G7 TECHNICAL USER MANUAL

Multi-language support: Yes, EN, FR, ES, NL, DE,
IT, PT
User notication
Green SureSafe® light: Blinking (powered),
continuous (connected)
Yellow top and front lights: Personal pending
alarm and personal warning alarm
Red top and front lights: Remote alert
communicated
Blue LiveResponse™ top and front lights:
Monitoring team conrmation that alert has
been acknowledged
Personal alarm Indicators: speaker, LEDs and
vibration motor
Speaker sound pressure level: ~90 dB @ 10 cm
(~90 dB @3.94”)
Voice calling: Speakerphone and phone modes
G7c wireless radio
Wireless coverage: 100 countries
North America: 2G/3G radio, GSM 850 MHz, PCS
1900 MHz, 3G UMTS bands 2, 5 and 6
International: 2G/3G radio, E-GSM 900 MHz, DSC
1800 MHz, 3G UMTS bands 1 and 8
Antenna: Internal dual-band
G7x wireless radio
Works with G7 bridge satellite base station
Radio: 902.0–928.0 MHz, 1 Watt
Antenna: Internal
Radio link range: 2 km (1.25 mi) real-world
Wireless updates
Device conguration changes: Yes,
Device rmware upgrade over-the-air (FOTA):
Yes
Location technology
GPS Radio: 48-channel high sensitivity
Assisted-GPS: Yes
GPS Accuracy: ~5 m (16 ft) Outdoors
Indoor location technology: Blackline Safety
location beacons
Location update frequency: G7c 10 sec, G7x
15 min
Power & battery
Rechargeable Li-ion battery: 1250 mAh Li-ion
Battery Life: 18 hours continuous use at 20° C (68° F)
Charge time: 4 hours
Environmental
Storage temp.: -30°C to 75°C (-22°F to 167°F)
Operating temp.: -20°C to 55°C (-4°F to 131°F)
Charging temp.: 0°C to 45°C (32°F to 113°F)
Ingress Protection: IP67
Approvals
G7c: SAR, RoHS, CE, RCM
Unit ID 3567xxxxxx
FCC ID: W77G7C IC: 8255A-G7C
Contains FCC ID: XPY1CGM5NNN, IC: 8595A-1CGM5NNN
or
Unit ID 3566xxxxxx
Contains FCC ID: XPY1CGM5NNN, IC: 8595A-1CGM5NNN
Canada and USA: Class I Division 1 Gr A,B,C,D T4; Class I
Zone 0 AEx ia IIC T4; Ex ia IIC T4 Ga
IECEx: Ex ia IIC T4 Ga
ATEX: Ex ia IIC T4 Ga
LEL-NDIR: -20°C to 45°C; CSA C22.2 No.152;
ISA 12.13.01
G7x: SAR, RoHS, RCM
FCC ID: W77G7X | IC ID: 8255A-G7X
Canada and USA: Class I Division 1 Gr A,B,C,D T4;
Class I Zone 0 AEx ia IIC T4; Ex ia IIC T4 Ga
IECEx: Ex ib IIC T4 Gb
LEL-NDIR: -20°C to 45°C; CSA C22.2 No.152;
ISA 12.13.01
Warranty
G7: two years
Cartridges: Lifetime
G7 complete plan: three years
Blackline Live web application
Cloud-hosted safety monitoring web application is
highly customizable for every customer requirement.
Includes live map, employee address book, user roles,
alert management, device congurations, alert setups
and reporting.
* Check with Blackline for approval status. All specications subject to change.
G7 TECHNICAL USER MANUAL || 41

LEGAL NOTICES AND CERTIFICATIONS
LEGAL NOTICES
Information in this document is subject to change without notice. This document is provided “as is” and Blackline Safety Corp. (“Blackline”) and
its aliated companies and partners assume no responsibility for any typographical, technical or other inaccuracies in this document. Blackline
reserves the right to periodically change information that is contained in this document. However, Blackline makes no commitment to provide
any such changes, updates, enhancements or other additions to this document to you in a timely manner or at all.
Copyright © 2016 Blackline Safety Corp. All rights reserved.
Except as expressly provided herein, no part of this manual may be reproduced, copied, transmitted, disseminated, downloaded, or stored
in any storage medium, for any purpose without the express prior written consent of Blackline Safety Corp (“Blackline” ). Blackline hereby
grants permission to download a single copy of this manual onto some form of electronic storage medium to be viewed and to print one
copy of this manual or any revision hereto, provided that such electronic or printed copy of this manual must contain the complete text of
this copyright notice. Further, any unauthorized commercial distribution of this manual or any revision hereto is strictly prohibited.
The Blackline, Alert. Locate. Respond. families of related marks, images and symbols, including Blackline, G7, G7c, G7x, LiveResponse,
Loner, Loner IS, Loner IS+, Loner M6, Loner M6i, Loner Mobile, Loner 900, and SureSafe are the exclusive properties and trademarks
of Blackline Safety Corp. All other brands, product names, company names, trademarks and service marks are the properties of their
respective owners.
Warranty
Your G7 device is warranted against defects in materials and workmanship for up to two years from date of purchase. For further details regarding
your Blackline warranty, please refer to your terms and conditions of service.
FCC Compliance
This equipment has been tested and found to comply with the limits for a Class B digital device, pursuant to part 15 of the FCC rules.
These limits are designed to provide reasonable protection against harmful interference in a residential instal lation.
Operation is subject to the following two conditions: (1) This device may not cause harmful interference, and (2) this device must
accept any interference received, including interference that may cause undesired operation. Note: the grantee is not responsible for
any changes or modications not expressly approved by the party responsible for compliance. Such modications could void the user’s
authority to operate the equipment.
This equipment generates, uses and can radiate radio frequency energy and, if not installed and used in accordance with the instructions,
may cause harmful interference to radio communications. However, there is no guarantee that interference will not occur in a particular
installation. If this equipment does cause harmful interference to radio or television reception, which can be determined by turning the
equipment o and on, the user is encouraged to try to correct the interference by one or more of the following measures:
Reorient or relocate the receiving antenna.
Increase the separation between the equipment and receiver.
Connect the equipment into an outlet on a circuit dierent from that to which the receiver is connected.
Consult the dealer or an experienced radio/TV technician for further assistance.
Industry Canada Compliance
This device complies with Industry Canada licence-exempt RSS standard(s). Operation is subject to the following two conditions:
(1) this device may not cause interference, and (2) this device must accept any interference, including interference that may cause
undesired operation of the device.
Notication d’Industrie Canada
Ce dispositif est conforme au(x) format(s) RSS libre(s) d’Industrie Canada. Son fonctionnement est assujetti aux deux conditions
suivantes : (1) Cet appareil ne peut causer d’interférences nuisibles, et (2) cet appareil doit accepter toute interférence reçue, y compris
les interférences pouvant provoquer un mauvais fonctionnement du dispositif.
Warning
Do not operate Blackline Safety products where you are not able to safely operate your mobile/cellular phone.
Electrical equipment may be hazardous if misused. Operation of this product, or similar products, must always be supervised by an
adult. Do not allow children access to the interior of any electrical product and do not permit them to handle any cables.
Do not operate or store Blackline products outside their specied operating or storage temperatures. Consult the specications section
for more information.
Blackline products may contain an internal lithium-ion battery pack. Seek advice from your local electronics recycling authority
regarding the disposal of your device. Do not dispose Blackline products in your household trash.
42 || G7 TECHNICAL USER MANUAL
INTRINSICALLY SAFE
Intrinsically Safe
This device is certied Intrinsically Safe for use in Class I Division 1 Groups
A,B,C,D T4; Ex da ia IIC T4 Ga; Class I Zone 0 AEx da ia Group IIC T4 Ga
hazardous (classied) locations. G7x is certied as Ex ib IIC T4 Gb under IECEx.
Sécurité intrinsèque
Cet appareil est certié à sécurité intrinsèque pour l’usage en classe I division
1 groupe A,B,C,D T4; Ex da ia IIC T4 Ga; classe I zone 0 AEx da ia groupe IIC T4
Ga dans les lieux classés comme dangereux.
-20°C ≤ Ta ≤ +55°C
G7c Portable Toxic Gas Detectors combining a Base Unit with a Gas Car tridge
Base unit P/N “G7*-#” (* = c or x; # = NA, EU or AZ)
Gas Cartridge – Where # = Electro chemical sensor identier or “X” indicating no sensor
No Gas Module P/N “Z” | Single Gas Module P/N “S-#” | Multi Gas Module P/N “Q-####”
Battery powered (3.8V nominal Lithium); Temperature Code T4, Ambient
Temperature Range -20°C ≤ Ta ≤ +45°C. 0-100% LEL.
The equipment shall only be charged
when in the non-hazardous area using
a charger specically supplied for use
with the unit (for example part number
SAW06D-050-1000xx, manufactured
by Shenzhen Shi Ying Yuan Electronics
Co., Ltd.), approved as SELV or Class
2 equipment against IEC 60950, IEC
61010-1 or an equivalent IEC standard.
The maximum voltage and current
from the charger shall not exceed
5.625Vdc and 2A respectively.
Caution: For safety reasons this
equipment must be operated and
serviced by qualied personnel only.
High o-scale readings may indicate
explosive concentration.
L’équipement ne doit être chargé que dans la
zone non dangereuse à l’aide d’un chargeur
spéciquement fourni pour l’utilisation avec
l’appareil (par exemple, la référence SAW06D-
050-1000xx, fabriquée par Shenzhen Shi Ying
Yuan Electronics Co., Ltd.) SELV ou Classe 2
selon IEC 60950, IEC 61010-1 ou une norme
IEC équivalente. La tension et le courant
maximum du chargeur ne doivent pas
dépasser respectivement 5.625Vdc et 2A.
Attention: Pour des raisons de sécurité,
cet équipment doit être utilisé, entretenu
et réparé uniquement par un personnel
qualié. Des lectures supérieures
à l’échellepeuvent indiquer des
concentration explosives.
Consult with your organization’s
safety professional for further
information regarding the topic
of intrinsic safety and any policies,
procedures, facilities, or locations
within facilities that may be related
to intrinsic safety.
S’il vous plaît consulter professionnel de la
sécurité de votre organisation pour de plus
amples informations concernant le sujet
de la sécurité intrinsèque et les politiques,
les procédures, les installations, ou
emplacements au sein des établissements
qui peuvent être liés à la sécurité intrinsèque.
Blackline Safety | Suite 101, 1215 - 13 Street SE | Calgary, AB T2G 3J4 | Canada
CSA: 70098755
UL 60079
Class I Division 1 Groups A,B,C,D; T4
Class I Zone 0 AEx da ia IIC T4 Ga
CAN/CSA C22.2 No. 60079
Ex da ia IIC T4 Ga
IECEx/ATEX: IECEx CSA 17.0005;
Sira 17ATEX2083X
IEC 60079; EN 60079
G7c: Ex da ia IIC T4 Ga
G7x: Ex ib IIC T4 Gb
0518
Standards:
CSA C22.2 No 60079-0:15
CSA C22.2 No 60079-11:14
CSA C22.2 No 60079-1:16
C22.2 No. 152 - M1984 (R2011)
UL 913, Eighth Edition
UL 60079-0 Sixth Edition
UL 60079-11 Sixth Edition
UL 60079-1 Seventh Edition
ANSI / ISA 12.13.01: 2000
IEC 60079-0 : 2011 Edition:6.0
IEC 60079-1 : 2014-06 Edition:7.0
IEC 60079-11 : 2011 Edition:6.0
EN 60079-0:2012/A11:2013
EN 60079-11:2012
EN 60079-1:2014
II 1 G
0187/R4/2018-09-13
G7 TECHNICAL USER MANUAL || 43

www.BlacklineSafety.com
0149/R12/2018-06-01
 Loading...