

BLACKHAWK! Talon 190 3.0, LITE 125 2.0 Engine Manual And Maintenance Manual

Engine Guide and
Maintenance Manual
BlackHawk Paramotors USA Inc.
Phone: (209) 418-5990
Email: Team@BlackHawkParamotor.Com
Address: 8591 Hogan Dam Road Valley Springs CA 95252
Engine Manual Ve rsion 1.00 – Last Updated Apr 12, 2019

Thank You from BlackHawk…
Thank you for choosing BlackHawk Paramotors. We strive to produce the finest Paramotor
Engines available, and hope the Lite 125 and Talon 190 will provide you with years of amazing
flight experiences. This manual will provide the necessary information to properly care for your
engine. Please read this entire manual before using your Paramotor. A thorough understanding of
this manual will help to keep you safe and maximize the engines full life span.
Please retain a copy of this manual for future reference, and to pass it down to the next owner,
should you decide to sell this Paramotor.
Fly safe, and enjoy all this sport has to offer.
-The BlackHawk Team
SAFETY NOTICE:
This sport is as safe as YOU make it. By purchasing BlackHawk equipment, you are fully responsible
for being a certified Paramotor Pilot, and accept all risks inherent with this type of activity (including
possible serious injury or death). Using this equipment in any other way than what it was originally
designed for and/ or intended use greatly increases these risks. BlackHawk Paramotor USA Inc., it's
employees, representatives, or dealers, shall not be held liable for personal, third party, or property
damages or injuries in any way.
Note: BlackHawk is not accountable or responsible for the engine work that you perform on your or
any other Paramotor engine. If you damage your Paramotor while you are performing the work on it,
then you are accountable for the damage. If you feel you are not qualified to perform the work, then
please contact us or a qualified BlackHawk Dealer for assistance.
Note: If you do not fully understand all the contents of this manual, contact your primary Powered
Paragliding Instructor or qualified BlackHawk Dealer prior to use. Pilot safety is paramount and our
first priority.
Note: Make sure you completely read and fully understand the entire contents of this Lite 125 and
Talon 190 Engine manual prior to using this equipment in any way.
Engine Manual Talon 190 and Lite 125 Ver .99b 4/08/2019
pg. 2

Table of Contents
Thank You from BlackHawk… .................................................................................................................. 2
SAFETY NOTICE: ..................................................................................................................................... 2
Preface: ....................................................................................................................................................... 6
Lite 125 Engine Component List ................................................................................................................ 7
Talon 190 Engine Component List ............................................................................................................. 7
The Basics of How a 2-Stroke Engine Works ............................................................................................. 8
How to use a Torque Wrench .....................................................................................................................11
How to set the Torque Wrench ...............................................................................................................11
How to Store the Torque Wrench .......................................................................................................... 12
Fuel to Oil mixture .................................................................................................................................... 13
How to Use the Fuel Mixture Jar .......................................................................................................... 13
Using a Tachometer and Temperature Sensor ........................................................................................... 14
Temperature Sensor .............................................................................................................................. 14
Tachometer Sensor ................................................................................................................................ 14
Tips and Tricks to keep your 2 stroke motor fine-tuned: .................................................................... 15
Torque Settings for each Engine ........................................................................................................... 15
Propeller Bolts .................................................................................................................................. 15
Cylinder Head Bolts .......................................................................................................................... 16
Cylinder Head Temperature .................................................................................................................. 17
125 Lite Engine Temp Specs: ........................................................................................................... 17
Talon 190 Engine Temp Specs: ......................................................................................................... 17
What to Adjust if your Engine is running to HOT ............................................................................. 18
Spark Plug: ........................................................................................................................................ 18
Elevation Change: ............................................................................................................................. 18
Inlet Carb Filter could be clogged: ................................................................................................... 19
Vacuum Leak around the engine: ...................................................................................................... 19
Spark Plug ............................................................................................................................................. 20
Spark Plug 15-min Flight Check....................................................................................................... 20
Spark Plug Pictures for Lean to Rich running Engines .................................................................... 21
How to Start and Stop your Paramotor ..................................................................................................... 23
Prime the Carburetor: ............................................................................................................................ 23
Carburetor Primer with a Zip Tie: ..................................................................................................... 23
Prime the Fuel to the Carburetor:...................................................................................................... 23
Engine Manual Talon 190 and Lite 125 Ver .99b 4/08/2019
pg. 3

How to Stop the Paramotor Engine with the Kill Switch ..................................................................... 25
Starting Your Paramotor........................................................................................................................ 25
Electric Starter: ................................................................................................................................. 25
Pull Start: .......................................................................................................................................... 26
Starting the Paramotor after it has been Primed ............................................................................... 26
When to Store your Paramotor ............................................................................................................. 27
Short Term Storage – Less than 30 days ........................................................................................... 27
Best way to Store your Paramotor .................................................................................................... 27
Long Term Storage – More than 30 days .......................................................................................... 27
Tips and Tricks when you motor won’t start ............................................................................................ 28
2-Stroke troubleshooting ....................................................................................................................... 28
Step 1 – Check the Air ...................................................................................................................... 28
Step 2 – Check the Spark Plug .......................................................................................................... 28
Step 3 – Check the Fuel / Carburetor ................................................................................................ 29
Engine Maintenance.................................................................................................................................. 31
Maintenance Window for Active Pilots ................................................................................................ 31
Maintenance Window for Seasonal Pilots ............................................................................................ 33
Break In a New Paramotor Engine ........................................................................................................... 34
Carburetor Check .................................................................................................................................. 34
Startup ................................................................................................................................................... 36
Mid-Range to Idle RPM Test ................................................................................................................ 36
Engine RUN-IN Test ............................................................................................................................. 37
Full Power RPM Test ............................................................................................................................ 37
Post Break-In Check List ...................................................................................................................... 37
Initial Break-in Period....................................................................................................................... 38
Your First Flights .................................................................................................................................. 38
15-min flights and spark plug check ................................................................................................. 38
Flight Checks ............................................................................................................................................ 39
Post Flight Checks ................................................................................................................................ 39
Pre Flight Check ................................................................................................................................... 40
Troubleshooting Matrix ............................................................................................................................ 41
Engine Repair Section............................................................................................................................... 43
Carburetor Section ................................................................................................................................ 43
Zip Tie Primer Setup ............................................................................................................................. 43
Engine Manual Talon 190 and Lite 125 Ver .99b 4/08/2019
pg. 4

Remove the Carburetor from the Talon 190 Engine: ............................................................................ 43
Re-Install the Carburetor on the Engine: .......................................................................................... 45
Talon 190 Carburetor Rebuild Kit and the diaphragms used ................................................................ 46
Talon 190 Carburetor Diaphragm Replacement: .............................................................................. 46
Remove the Carburetor from the Lite 125 ............................................................................................ 48
Re-Install the Carburetor on the Engine: .......................................................................................... 50
Lite 125 Carburetor Rebuild Kit and the diaphragms used .................................................................. 51
Lite 125 Carburetor Diaphragm Replacement: ................................................................................. 52
Carburetor Complete Rebuild Video................................................................................................. 53
Fuel Line Section .................................................................................................................................. 54
Fuel Line Replacement Instructions: ................................................................................................ 54
Exhaust Port Couplings Section............................................................................................................ 59
Warranty .................................................................................................................................................... 60
Duration of Warranty ............................................................................................................................ 60
The Following Situations Void the BlackHawk Warranty .................................................................... 60
Engine Manual Talon 190 and Lite 125 Ver .99b 4/08/2019
pg. 5

Preface:
The information in this manual focuses on using BlackHawk 125 Lite and Talon 190 motors, but the
mechanical principals and maintenance techniques that we are using with our engines could be applied
to other manufacturer’s engines as long as you have those specific engine settings for what we are
discussing in this manual. If you’re a novice with motors, then 2 stroke motors can seem like they are
notorious unreliable. Any expert would disagree and say that is because you just do not understand
them. The goal of this manual is to help give you that basic understanding so that you have the most
fun with your Paramotor. We understand that not all Paramotor enthusiasts are mechanically inclined,
and that is why we have tried to explain this information in a straight forward and simple way. Is there a
more complicated way to explain this information to you, of course there is, but it’s not necessary.
One thing to keep in mind, as you become familiar with your Paramotor you will begin to understand
the characteristics of your engine, what it sounds like and how it feels as you rev your engine through
the different RPM ranges. Understanding the feel and sound of your engine as it operates normally is
important, this is quickest way to determine if something is changing with how your engine performs. If
something does not feel or sound right as you perform a pre-flight engine check, then do not fly. The
last thing you want is for your engine to fail while you are in flight.
We will say this multiple times throughout this manual as we want to make sure you understand BlackHawk is not accountable or responsible for the engine work that you perform on your or any other
Paramotor engine. If you damage your Paramotor while you are performing the work on it, then you
are accountable for the damage. If you feel you are not qualified to perform the work, then please
contact us or a qualified BlackHawk Dealer for assistance.
Engine Manual Talon 190 and Lite 125 Ver .99b 4/08/2019
pg. 6
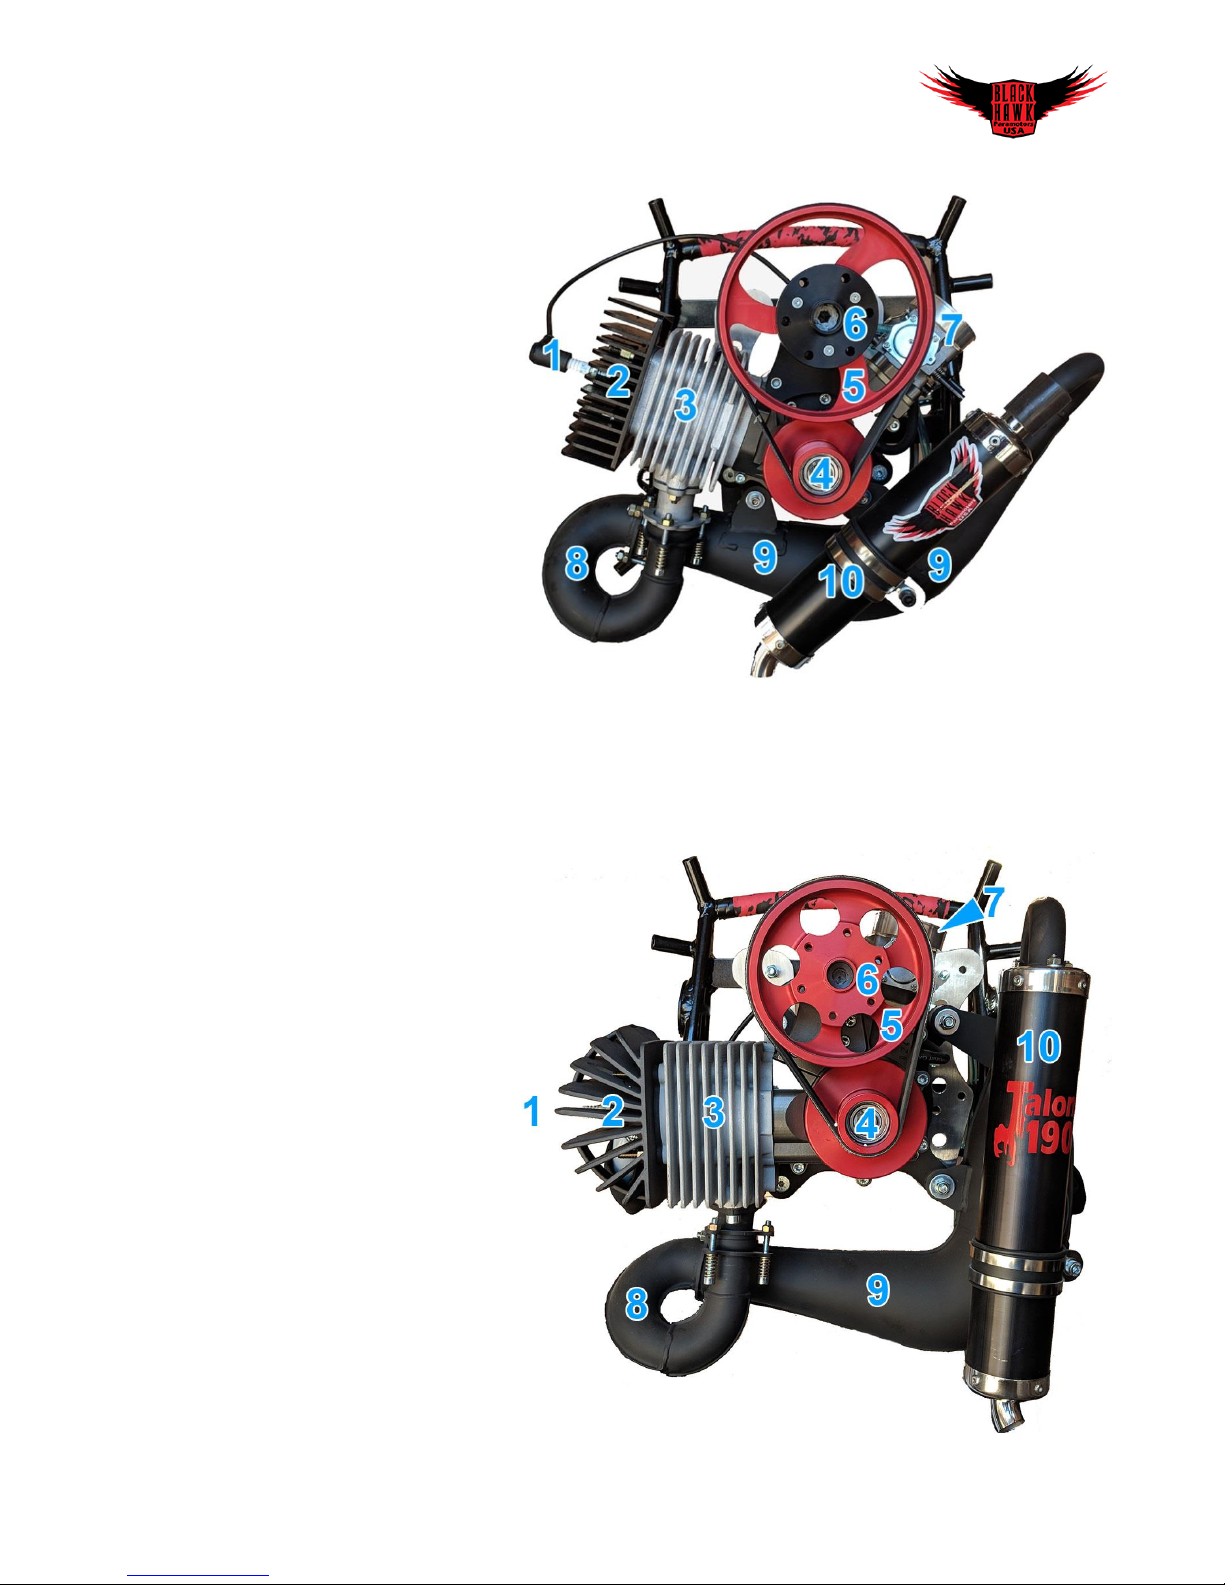
Lite 125 Engine Component List
1. Spark Plug
2. Cylinder Head
3. Cylinder chamber
4. Clutch and Lower
Pulley Array
5. Upper Pulley
6. Propeller Mount
7. Carburetor
8. J-Pipe
9. Expansion Chamber
10. Stinger Exhaust
Silencer
Talon 190 Engine Component List
1. Spark Plug
2. Cylinder Head
3. Cylinder chamber
4. Clutch and Lower
Pulley Array
5. Upper Pulley
6. Propeller Mount
7. Carburetor
8. J-Pipe
9. Expansion Chamber
10. Stinger Exhaust
Silencer
Engine Manual Talon 190 and Lite 125 Ver .99b 4/08/2019
pg. 7
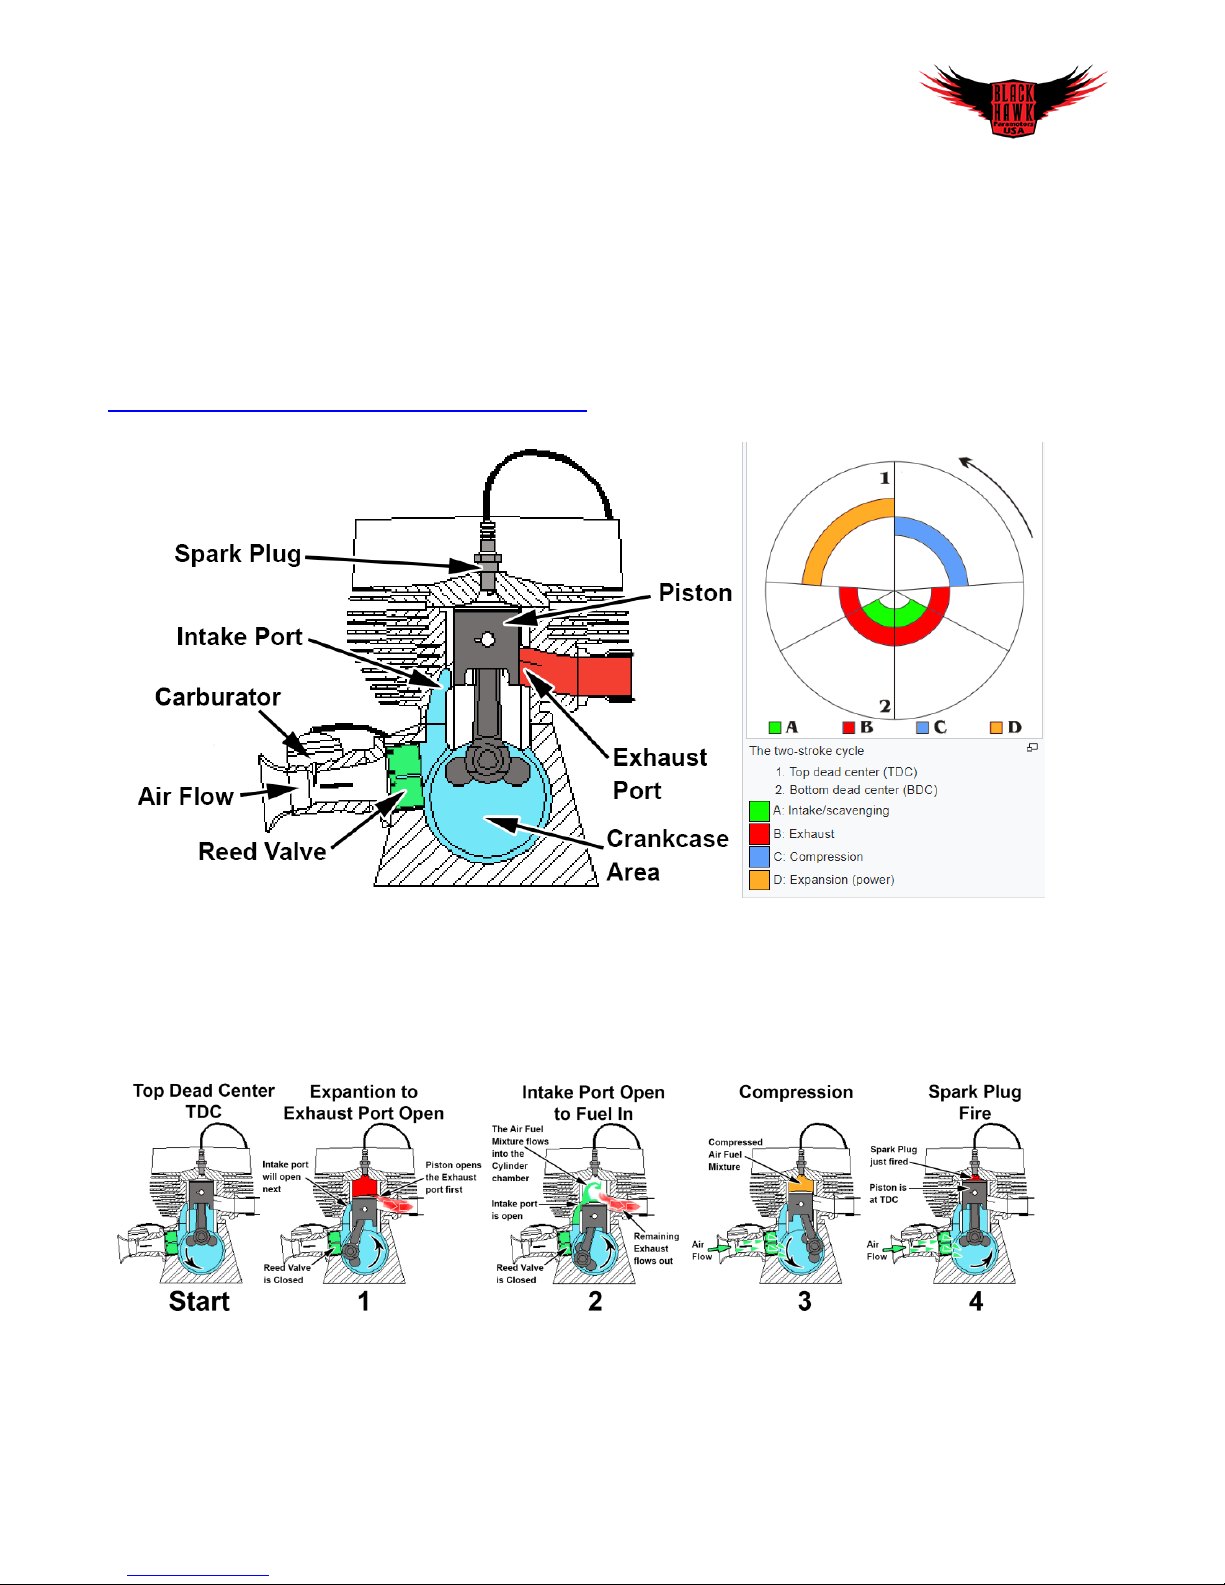
The Basics of How a 2-Stroke Engine Works
A 2 Stroke engine is the simplest form of an engine design. There are very few moving parts, and they
provide more horsepower for their size and weight compared to a 4 stroke engine. In order to
understand how to work on your Paramotor you need to understand the basics of how a 2 stroke
engine works. The explanation we provide in this manual is a simple explanation in order to provide a
person who does not understand a 2 stroke engine enough information to use this manual
competently. If you want to understand more about 2 Stroke engines, then visit the Wiki page at
https://en.wikipedia.org/wiki/Two-stroke_engine
Above is a diagram of a 2 stroke engine. You can see there are no belts, gears, or other moving parts
except for the piston and the crankcase area. The reed valves only allow the air fuel mixture to flow
into the crankcase area, and the control of the intake and exhaust ports are handled by the position of
the piston as it moves up and down in the cylinder wall.
The diagram above shows the 4 different phases the engine goes through as it performs one revolution
or cycle.
Engine Manual Talon 190 and Lite 125 Ver .99b 4/08/2019
pg. 8
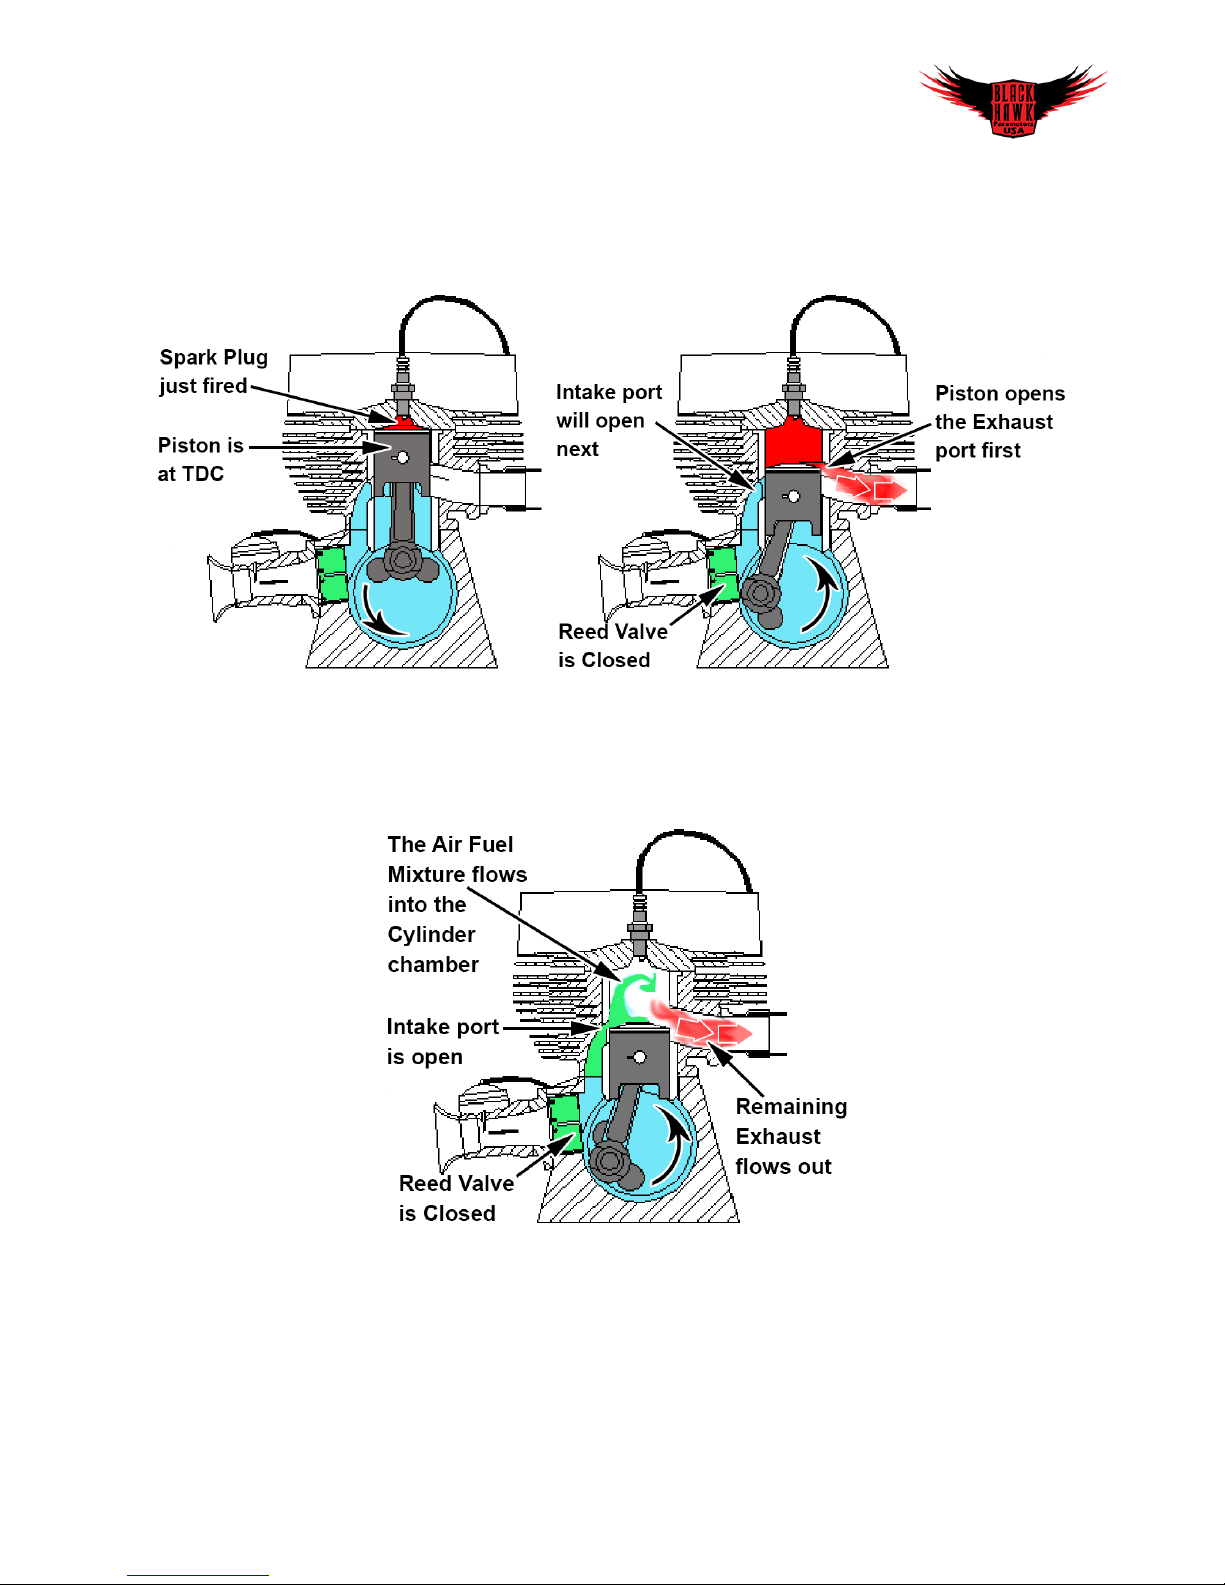
When thinking about the operation of a 2 Stroke motor, the piston in the diagram should start at Top
Dead Center (TDC). This is the starting and ending point of a full cycle or revolution of the engine
crankcase. Just before the piston reaches the top of the stroke (TDC) the spark plug ignites the air fuel
mixture as shown in the picture below.
The expanding mixture drives the piston downward until it begins to uncover the exhaust port. The
majority of the pressure in the cylinder is released after the port begins to open, and the burnt air fuel
mixture begins to flow out of the engine.
During the down stroke, the falling piston creates a positive pressure in the crankcase area which
causes the reed valve to close. The air fuel mixture in the crankcase is compressed until the piston
travels down far enough to uncover the intake port opening, at which point the new air fuel mixture
flows up into the cylinder chamber. As the cylinder is letting the new air fuel mixture in, the final
residual exhaust gases are pushed out of the exhaust port.
Engine Manual Talon 190 and Lite 125 Ver .99b 4/08/2019
pg. 9
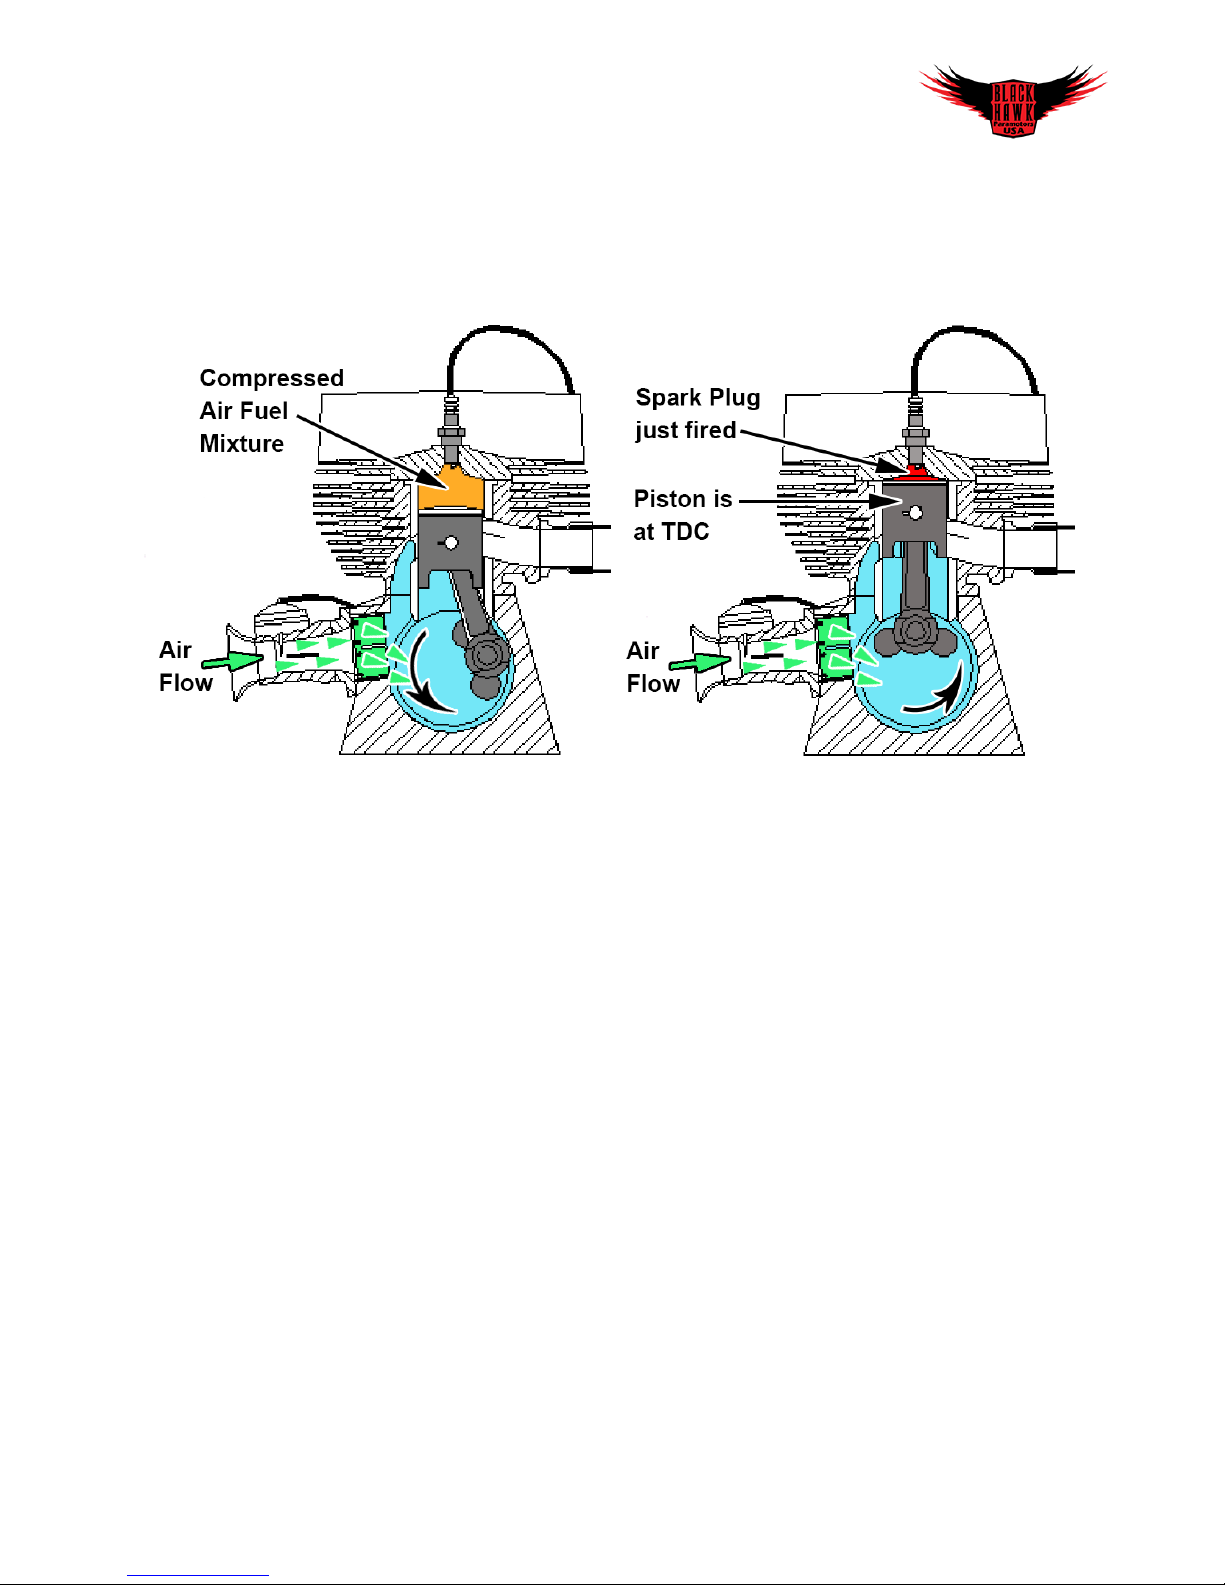
As the engine finishes the down stroke, the engine begins its up stroke. The piston moves up the
cylinder wall, and this will shut off the intake port first and then the exhaust port last. The piston is now
compressing the air fuel mixture in the cylinder chamber. During the up stroke, the piston creates a
vacuum in the crankcase area, and this causes the reed valve to open, and pulls the new air fuel
mixture into the engine crankcase area.
The 2 Stroke engine is now back at the beginning of its engine cycle where the piston is at TDC. The
spark plug has just fired, and the engine is just beginning its down stroke again.
Engine Manual Talon 190 and Lite 125 Ver .99b 4/08/2019
pg. 10

How to use a Torque Wrench
If you do not own one of these tools you will need to get one to perform the work on your Paramotor
engine. These allow you to tighten the bolt to a specific tightness without over or under tightening the
bolt. This is very important, because if a bolt is over tightened, they can shear off when the bolt
expands due to the heat of the engine. It’s also just as dangerous if the bolt is not tightened enough
and it becomes loose while in flight. By using the Torque setting that is called out in this manual for the
bolt that you are working on you will avoid these types of issues.
Important to remember, that when working on Paramotor engines the Torque settings is in
Inch/Pounds (In/lbs) and not Foot/Pounds (Ft/lbs). If you apply Foot/Pounds to the bolts on the
engine; you will strip and break them off.
You can find torque wrenches on Amazon for a good price, make sure to buy a torque wrench that
measures the force by Inch/ Pounds
How to set the Torque Wrench
When you get the Torque Wrench it should be set to zero inch / pounds as shown in the picture. When
you go to set the torque on the wrench you will turn the handle to the right (clockwise) to add torque.
There are 2 measure points on the torque wrench.
The major torque settings are located on the bar of the
wrench and are divided by 10 or 15 inch/pound marks
depending on the wrench you have.
The minor torque settings are located on the handle
that you twist. At the top of the handle you will see the
single pound settings. When you start at the zero mark
that means zero pounds are added to the major mark
setting. If the handle is on the 5 mark, then that would
mean you are adding 5 torque inch /pounds to the
major torque setting that handle has reached or
crossed over. If the handle is under a major torque
setting bar, then it has not reached that major torque
setting.
o Note, when the handle is at the zero mark, then the major torque setting should be
aligned with the center line on the bar that defines the major torque setting.
As an example in the picture above the Torque Wrench on the right is set to 25 inch/pounds. You can
Engine Manual Talon 190 and Lite 125 Ver .99b 4/08/2019
pg. 11
see the minor torque setting on the handle aligns to the 5 mark, and the major torque setting is above
the 20 mark on the bar. This adds up to 25 inch/pounds on the torque wrench settings.
When using the Torque wrench you want to use an even smooth pulling force as you tighten the bolt.
Do Not jerk on the wrench or use a high burst of force as you will over tighten the bolt.
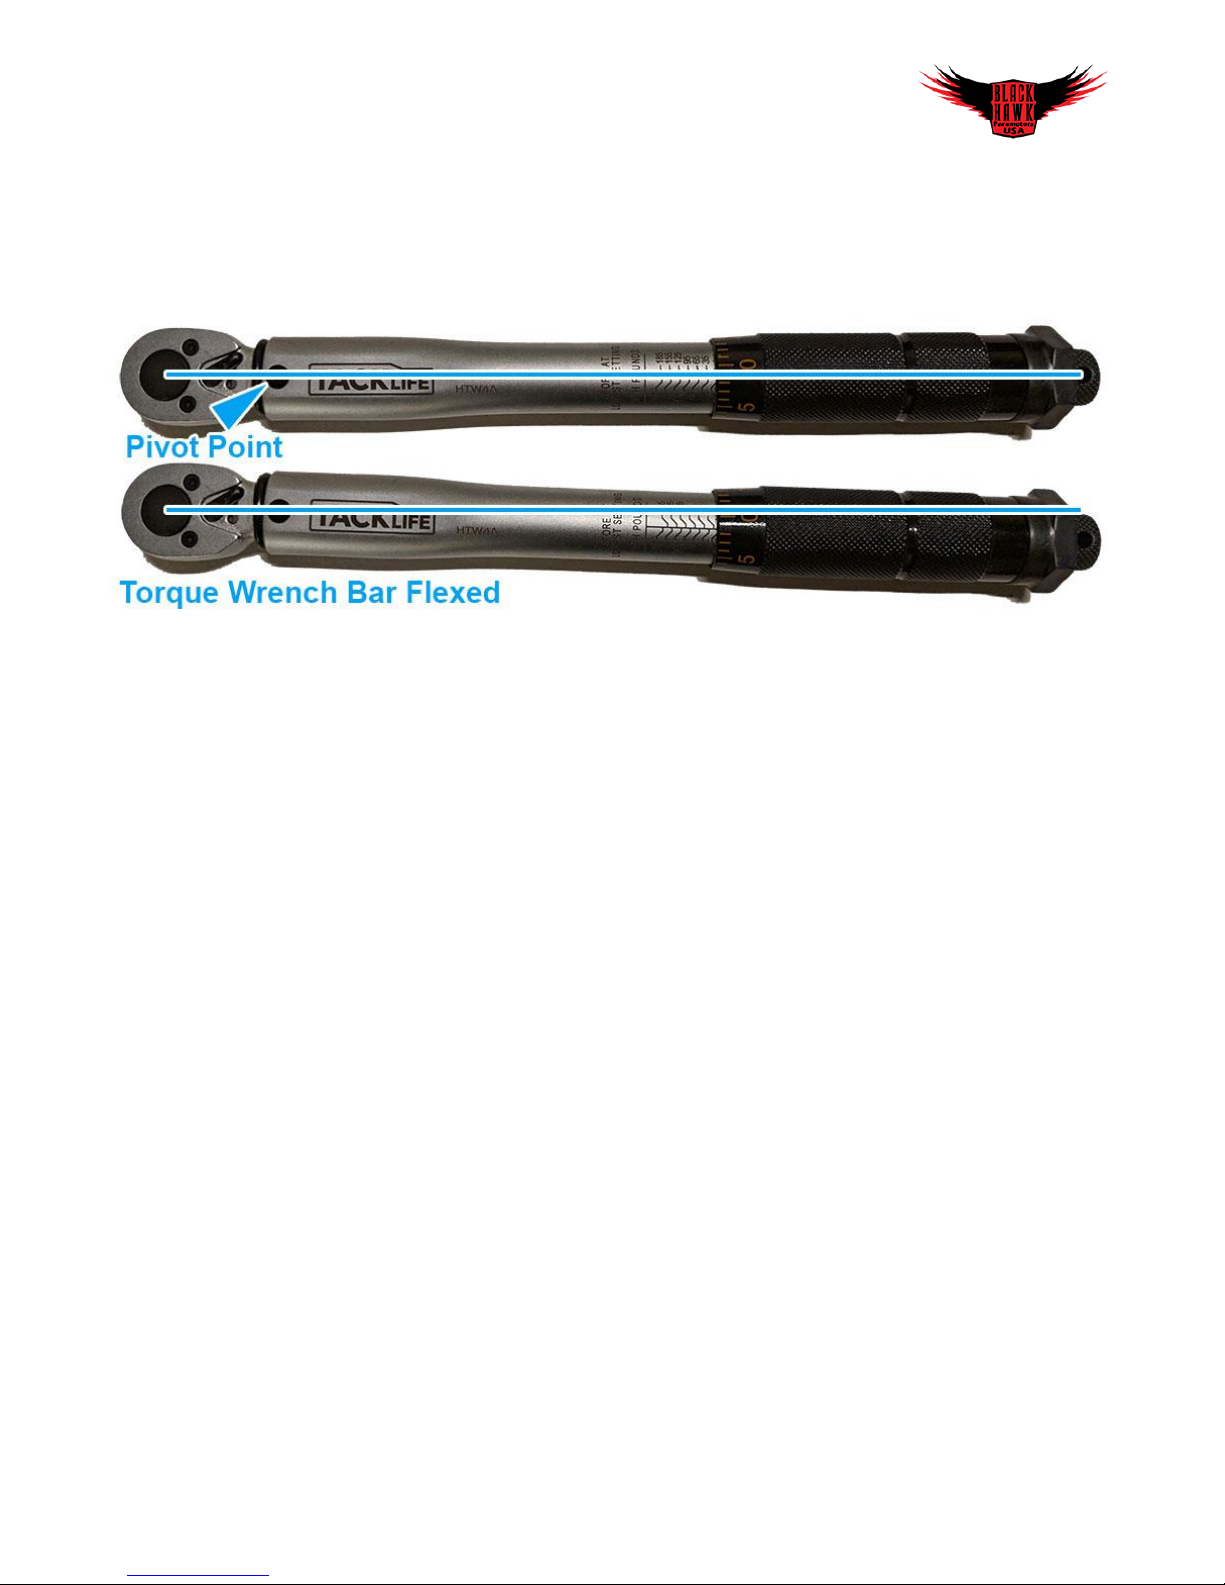
1. As you are tightening the bolt, and when the Torque wrench reaches the torque force setting,
the wrench will make a tink sound, and the bar at the top of the wrench head will flex around
its pivot point so it does not apply any more force to the bolt.
2. You want to stop at this point, and then try again to make sure you have reached the correct
torque force setting
3. Apply a slow force to retry tightening the bolt again to make sure the bolt has reached the
correct torque force setting. The torque wrench should make a tink sound, and flex again as it
did before.
a. If you can tighten the bolt a little more before it reaches the torque setting, then that is
OK and this is why you try again to make sure it’s done right.
b. Try to avoid over tightening the bolt. This can be done when you keep moving the
torque wrench after it makes a tink sound. Just because the torque wrench will flex, you
can move it past this point and apply more torque to the bolt then what is specified by
the torque wrench.
How to Store the Torque Wrench
Once you are done using the Torque wrench it is very important to set the torque setting back to zero.
Most people do not realize that if you leave and store the torque wrench at a higher torque setting
then zero, then over the life time of the wrench the spring that applies the torque force gets
compressed, and will not measure the torque force correctly. This is very dangerous when you think
about the issues this could cause. Are you going to break the Torque wrench if you store it wrong once
or twice, probably not, but its more about how long it was stored for in that condition. It also depends
on the setting you left it at. If the torque setting was left on the highest setting for over a year, then yes
that could be a problem. Either get a new one, or have it tested by a mechanic.
Engine Manual Talon 190 and Lite 125 Ver .99b 4/08/2019
pg. 12

Fuel to Oil mixture
The Oil to Fuel mixture you use with your
BlackHawk Paramotor will always be a 40 to
1 mixture ratio, or 2.5% by volume.
BlackHawk engines are designed to use this
fuel mixture to help assure the lifespan of
the engine can reach 150-200hrs.
Please be aware that other Paramotor
manufacturer may use a different fuel to oil
mixture ratio. Please do not assume to use a
different fuel to oil mixture because your
friend told you it would be better, or you
read it on the internet that some famous
person uses this fuel mixture. BlackHawk has
done a lot of testing with our engines, and
the 40 to 1 mixture works the best from cold
to hot conditions when flying high or low in
altitude.
How to Use the Fuel Mixture Jar
BlackHawk provides a fuel mixture jar that
will easily help you measure the correct
amount of oil for the fuel. The fuel you
should be using is regular Super Unleaded
gas for your car (the higher the octane the better). You will then mix in the oil so that it will work
correctly for your Paramotor 2 stroke engine.
The orange bar across the top of the mixture jar has different fuel to oil mixture ratios columns, and the
one you want to use says 2.5% 40-1. There are 2 sets of numbers in that column. The numbers on the
left are used for Liter measurements, and the numbers on the right are used for Gallon measurements.
Gallons Example - If you had 5 gallons of gas, you would use the mixture jar and pour enough oil in the
mixture jar so that it reaches the 5 gallon mark as shown in the picture above. You would then pour the
oil from the mixture jar into the container of gas, and mix this around thoroughly. You now have gas
with a 40 to 1 oil mixture.
Liter Example - If you had 20 liters of petrol, you would use the mixture jar and pour enough oil in the
mixture jar so that it reaches the 20 liter mark as shown in the picture above. You would then pour the
oil from the mixture jar into the container of gas, and mix this around thoroughly. You now have gas
with a 40 to 1 oil mixture.
Engine Manual Talon 190 and Lite 125 Ver .99b 4/08/2019
pg. 13
Using a Tachometer and Temperature Sensor
BlackHawk highly recommends that you get a digital Tachometer and Temperature Sensor for your
Paramotor engine. This will allow you to monitor your engines performance while in flight and prevent
a major problem from occurring if you’re paying attention to them. Imagine your car without an engine
temp or check engine light, the same is true for your Paramotor engine.
Temperature Sensor
This will allow you to monitor the temperature of engine while in flight and will help prevent you from
overheating the engine. If you are performing a full throttle climb you can use the temp sensor to
monitor the engine, and if the engine reaches 400℉ you can lower your throttle input to reduce the
stress on the engine and that will lower the engine temperature. Never let you engine go over 400℉,
and never keep your engine at the 400℉ temperature for an extended amount of time, we recommend
you keep it below 90 seconds at 400℉ to keep the maximum engine lifespan.
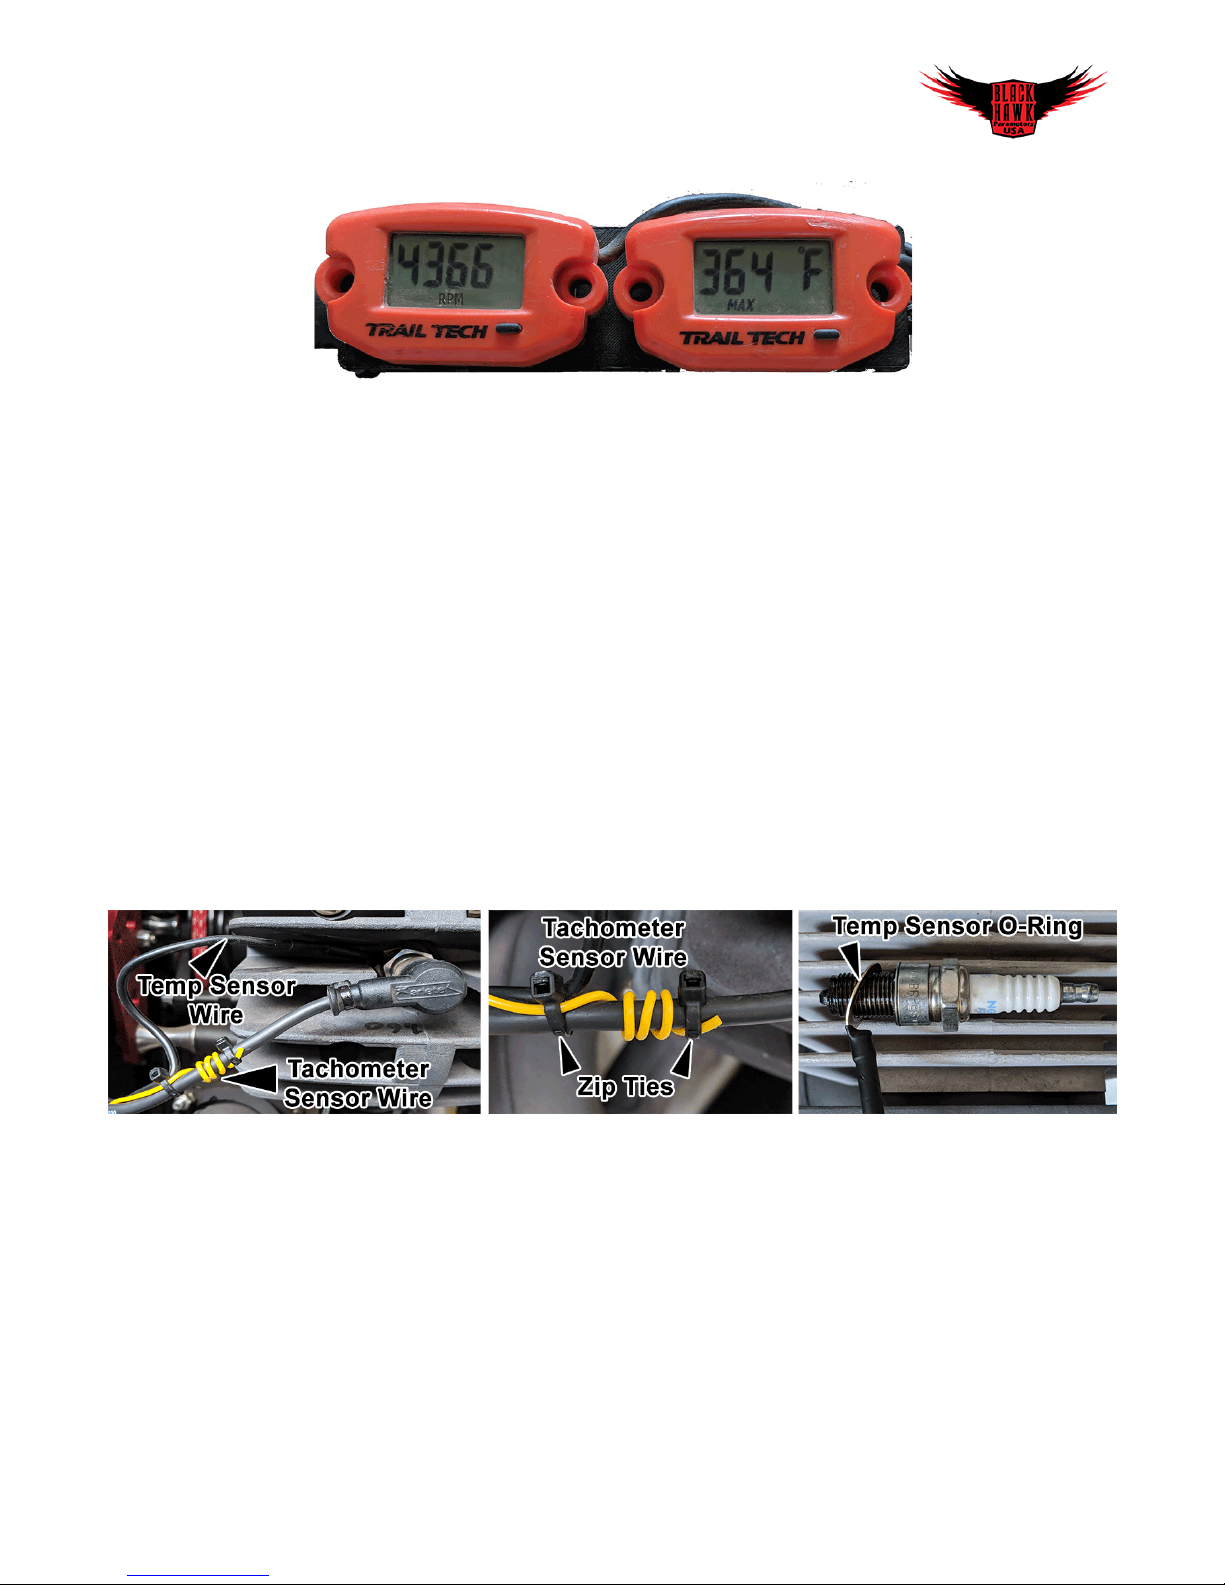
Installation: The temperature sensor is an O-ring that will fit around Spark Plug, and will fit between the
Cylinder head and where the Spark Plug screw together. Make sure the temperature sensor wire does
not touch the cooling fins on the Cylinder head as it could cause the sensor to not work correctly due to
the high heat. Zip tie the sensor wire to the Spark Plug wire to keep it safe as shown in the picture.
Tachometer Sensor
This will allow you to monitor how the engine performs based on the RPM engine is running at. This
sensor will allow you to determine when the clutch on the propeller begins to engage. You can also
know when the power band of the engine begins based on the RPM range. If for some reason you are
not getting the high RPM range you normally get with your engine, this is the first sign that something
is not adjusted right on your engine.
Installation: The Tachometer sensor is just a wire that wraps around the spark plug wire going to the
spark plug. You want to make 3 to 4 wraps around the spark plug wire as close to the spark plug boot.
Then test and make sure you are getting a RPM reading. Once the RPM sensor is working you can take
Engine Manual Talon 190 and Lite 125 Ver .99b 4/08/2019
pg. 14
2 zip ties to hold the wrapped wire in place. In some cases the instructions for these tachometer
sensors will tell you to make 10 wraps around the spark plug wire. Do Not Do This as it will cause an
electrical drain of the current that should be going to the Spark Plug itself. If you have a weak spark,
then your engine will underperform and run weak. The setup instructions for the tachometer can be
found on the packaging if you need more information about how to set it up.
Tips and Tricks to keep your 2 stroke motor fine-tuned:
The Tips and Tricks of this manual come from the most common questions we get at BlackHawk. This
section is designed to give you the specific information that you regularly check with your engine either
as a post flight check or as one of the more commonly performed maintenance windows. These Tips
and Tricks will help make sure your engine is in great working condition and assure you get the longest
lifespan from your engine.
Torque Settings for each Engine
There are 2 major torque settings that you regularly need to check on your Paramotor engine. The
Propeller bolts and the Cylinder Head bolts. These bolts are put under a lot of pressure and stress
during a normal flight and can become loss due to that stress.
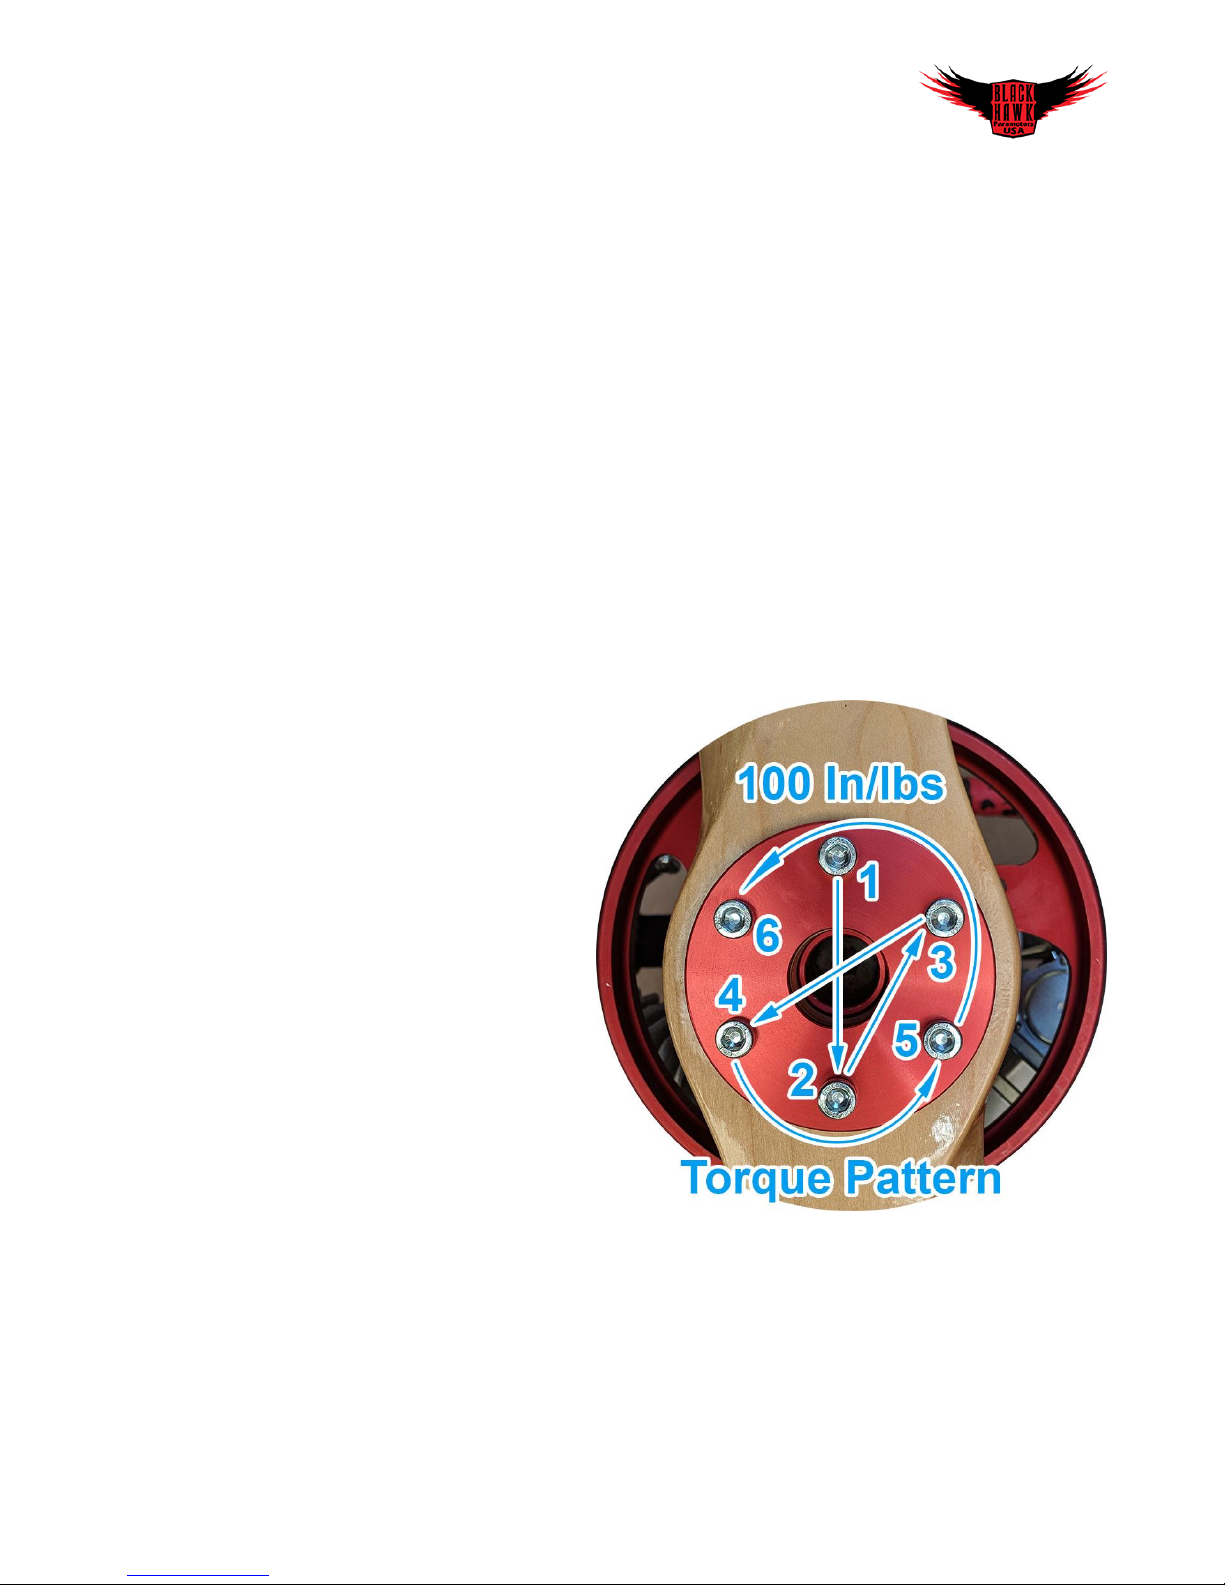
Propeller Bolts
The Propeller Bolts use a torque settings of 100
In/lbs on a 6mm hex bolt, and there are 6 bolts
that hold the propeller to the pulley. You want
to make sure you use the mounting plate that is
basically a giant washer to spread the pressure
of the 6 bolts across the propeller. In some
cases the propeller will use a spacer plate
between the propeller and the pulley. The rule
of thumb is the prop bolt should screw into the
propeller mount by at least 1/2" to securely
hold the prop in place. Do not remove any
spacer plates thinking it will make the motor, or
propeller perform better.
When you tighten the bolts on the propeller
you need to use a cross tightening pattern as
shown in the picture. Begin by putting all 6 bolts in place. You want to use a little force when tightening
the bolts so the mounting plates are snug, but nothing is tight. Then begin with bolt 1, use the torque
wrench and tighten this bolt to 100 In/lbs. Now you can move to bolt 2, and tighten it in the same way,
then move to bolt 3, then 4, then, 5, and 6. Once you have completed the first round, then go through
and do a second round, and confirm the bolts are tightened to the correct torque setting. In most cases
the first and second bolt will turn a little more to reach the correct torque setting. This is because they
reach the torque setting faster because they are under a higher load holding the weight of the
Engine Manual Talon 190 and Lite 125 Ver .99b 4/08/2019
pg. 15
propeller until the rest of the bolts are tightened. Any time you have a torque pattern you want to run
through the pattern until all the bolts do not move when using the torque wrench. You should only
hear one click from the torque wrench when the bolt has reached the correct torque setting. Do not
over-tighten the bolt, this can be done by apply more force to the torque wrench after you hear the
click, and the wrench may click multiple times to let you know you are applying to much force.
Cylinder Head Bolts
The Engine Cylinder Head Nut should be checked often to assure they are at the proper tightness.
When these nuts become lose you will lose engine compression, and you will begin to see oil leaks
around the cylinder. These nuts should only be tightened when the engine is cold to ensure you are
setting them at the proper torque settings. The best time to check the Engine Head Nuts is in the
morning before you do any flights, and the engine has been off for at least 8hrs. This will assure your
engine is at room temperature. Do not attempt to adjust or tighten the cylinder head nuts after a flight,
this will cause you to over-tighten the nuts due to the elevated temperature of the engine. Depending
on the engine you are working on they use different torque settings:
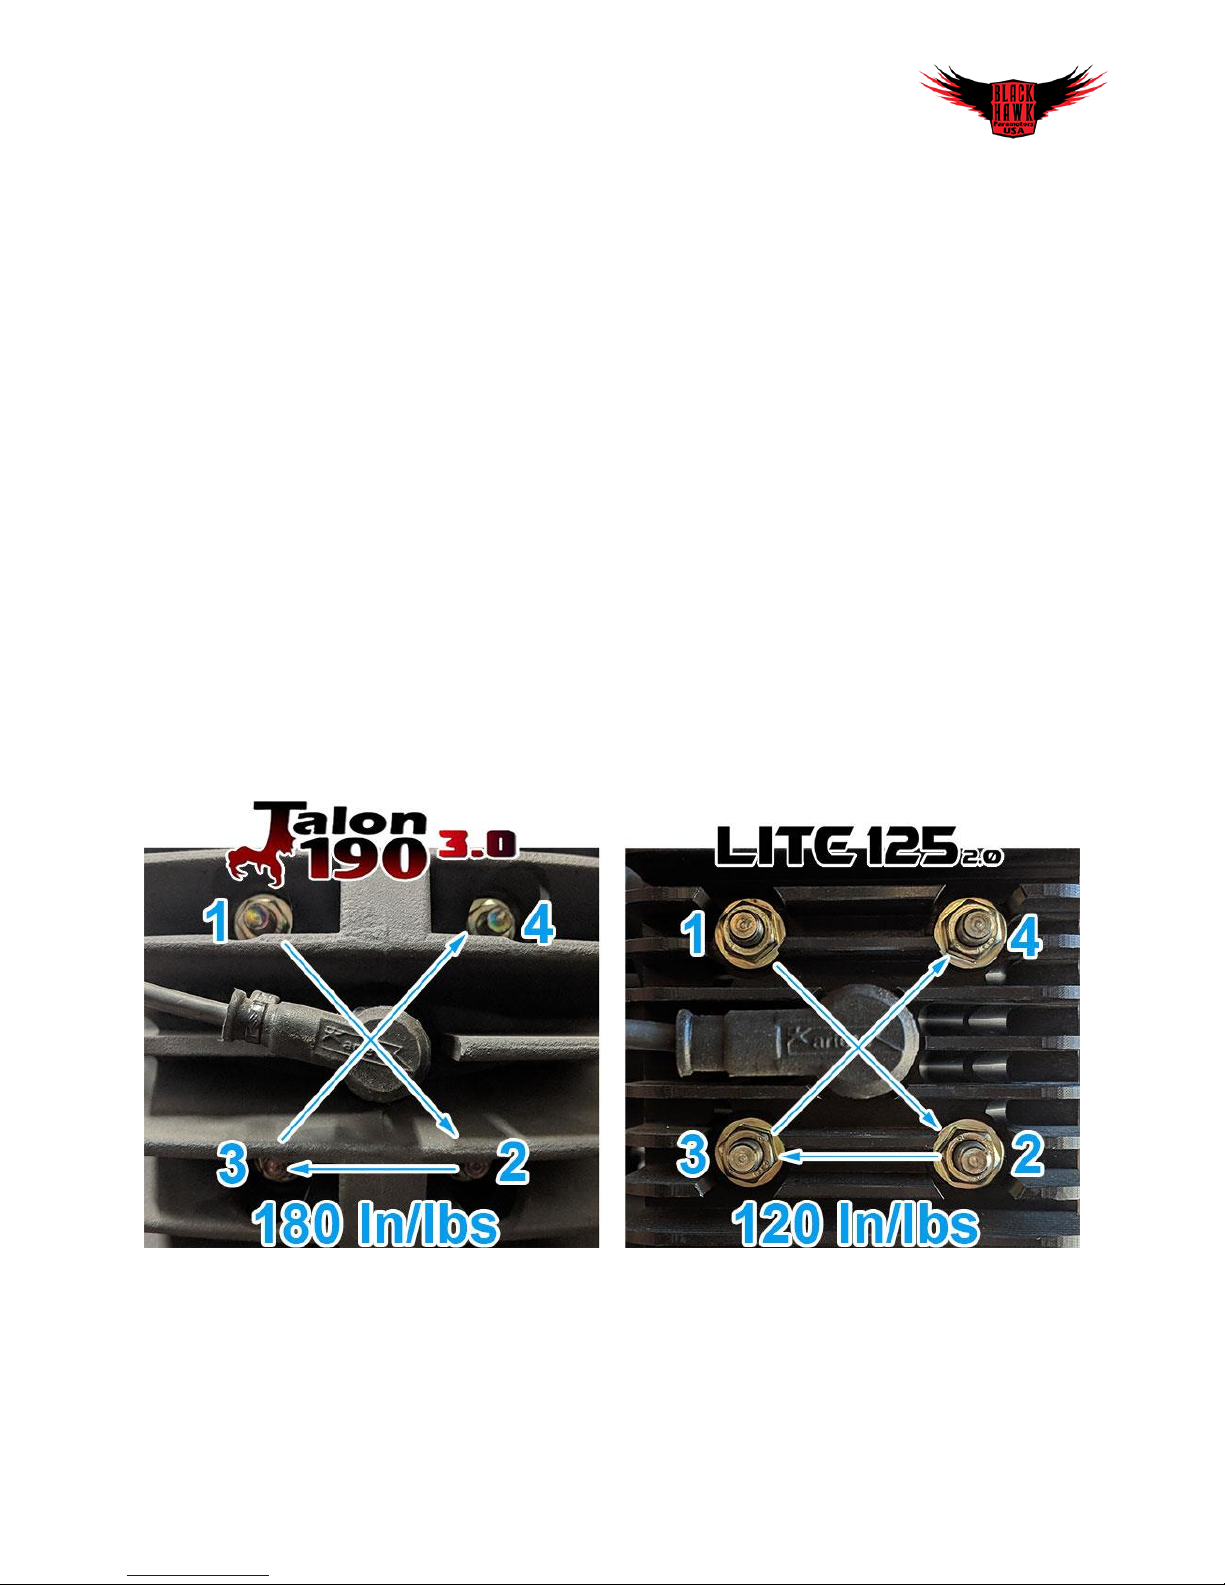
125 Lite = 120 In/lbs on a 13mm nut
Talon 190 = 180 In/lns on a 13mm nut
Titan 210 = 180 In/lns on a 13mm nut
Airmax 220 = 180 In/lns on a 13mm nut
Just like the propeller bolts you want to use a cross pattern when checking the tightness of the nuts on
the head cylinder. Start with nut 1 and work you way through to nut 4. This will assure they are evenly
tightened across the cylinder head. Use the picture below as a guide to tighten the cylinder head nuts.
Just like the propeller bolts, you want to make sure you are using Inch / Pounds and not Foot / Pounds
on the torque wrench when adjusting the nuts, and you want to make sure you run through the cross
pattern until there is no movement from the wrench when testing the torque of the nut.
Engine Manual Talon 190 and Lite 125 Ver .99b 4/08/2019
pg. 16

Cylinder Head Temperature
The Cylinder Head temperature on your Paramotor can cause the most stress on your engine. The
higher the temperature of the engine the more wear you put on the cylinder and piston chamber. High
temperature is often known as an engine killer, and for the 2 Stroke Engine the highest engine
temperature the engine can handle is 464℉ / 240℃. You never want to have your engine reach that
temperature because in most cases it will already have seized.
When flying your Paramotor keep these general rules in mind to help assure your engine does not over
heat:
Do not run engine at max power / full throttle, for more than 60sec without a temperature
sensor. This will help assure you do not go over 410℉ / 210℃.
If you have a temperature sensor on your engine you can use this, and when the engine reaches
410℉ / 210℃ you will need to back off the throttle.
o Just reducing the throttle by a little (300 rpm) will greatly reduce the cylinder head
temperature on your engine
If you are flying on a hot day, hotter than your normally fly, this is when you want to pay
attention to engine temperature as it will climb up to 15℉ / 8℃ hotter than normal.
Keep in mind that if you change the propeller on your engine for a larger size or different pitch;
that this can greatly increase the running temperature
of your engine.
125 Lite Engine Temp Specs:
The average running engine temperature during flight
should be anywhere from 330℉ / 166℃ to 360℉ /
182℃. This temperature can fluctuate due to the
ambient outside temperature by +/- 15℉ / 8℃.
Talon 190 Engine Temp Specs:
The average running engine temperature during
flight should be anywhere from 270℉ / 132℃ to
360℉ / 182℃. This temperature can fluctuate due to
the ambient outside temperature by +/- 15℉ / 8℃.
Engine Manual Talon 190 and Lite 125 Ver .99b 4/08/2019
pg. 17
What to Adjust if your Engine is running to HOT
The most common reason that your 2 stroke engine will run hotter than normal is usually due to the
Fuel Air mixture, and that you do not have enough Fuel in the mixture (also known as the engine is
running lean). You would think not having enough fuel would cause the engine to run weak or cooler,
but just the opposite occurs. The more air you add to the fuel mixture the hotter it will burn, and can
make the engine run so hot it will melt a hole in the piston head. When you add more fuel to the fuel
air mixture (also known as running a little rich) it does not completely burn all the fuel, and this acts as
a coolant to help moderate and cool the combustion temperature. If your engine has been running
normally and it just started to run hot, then there are a couple of things we want to check to make sure
the Fuel to Air mixture is set correctly.
Spark Plug:
The Spark Plug is the fastest way to check if your engine is running to hot. In most cases you will have a
Spark Plug that has a greyish white tip. This is all explained in our Spark Plug section of this manual.
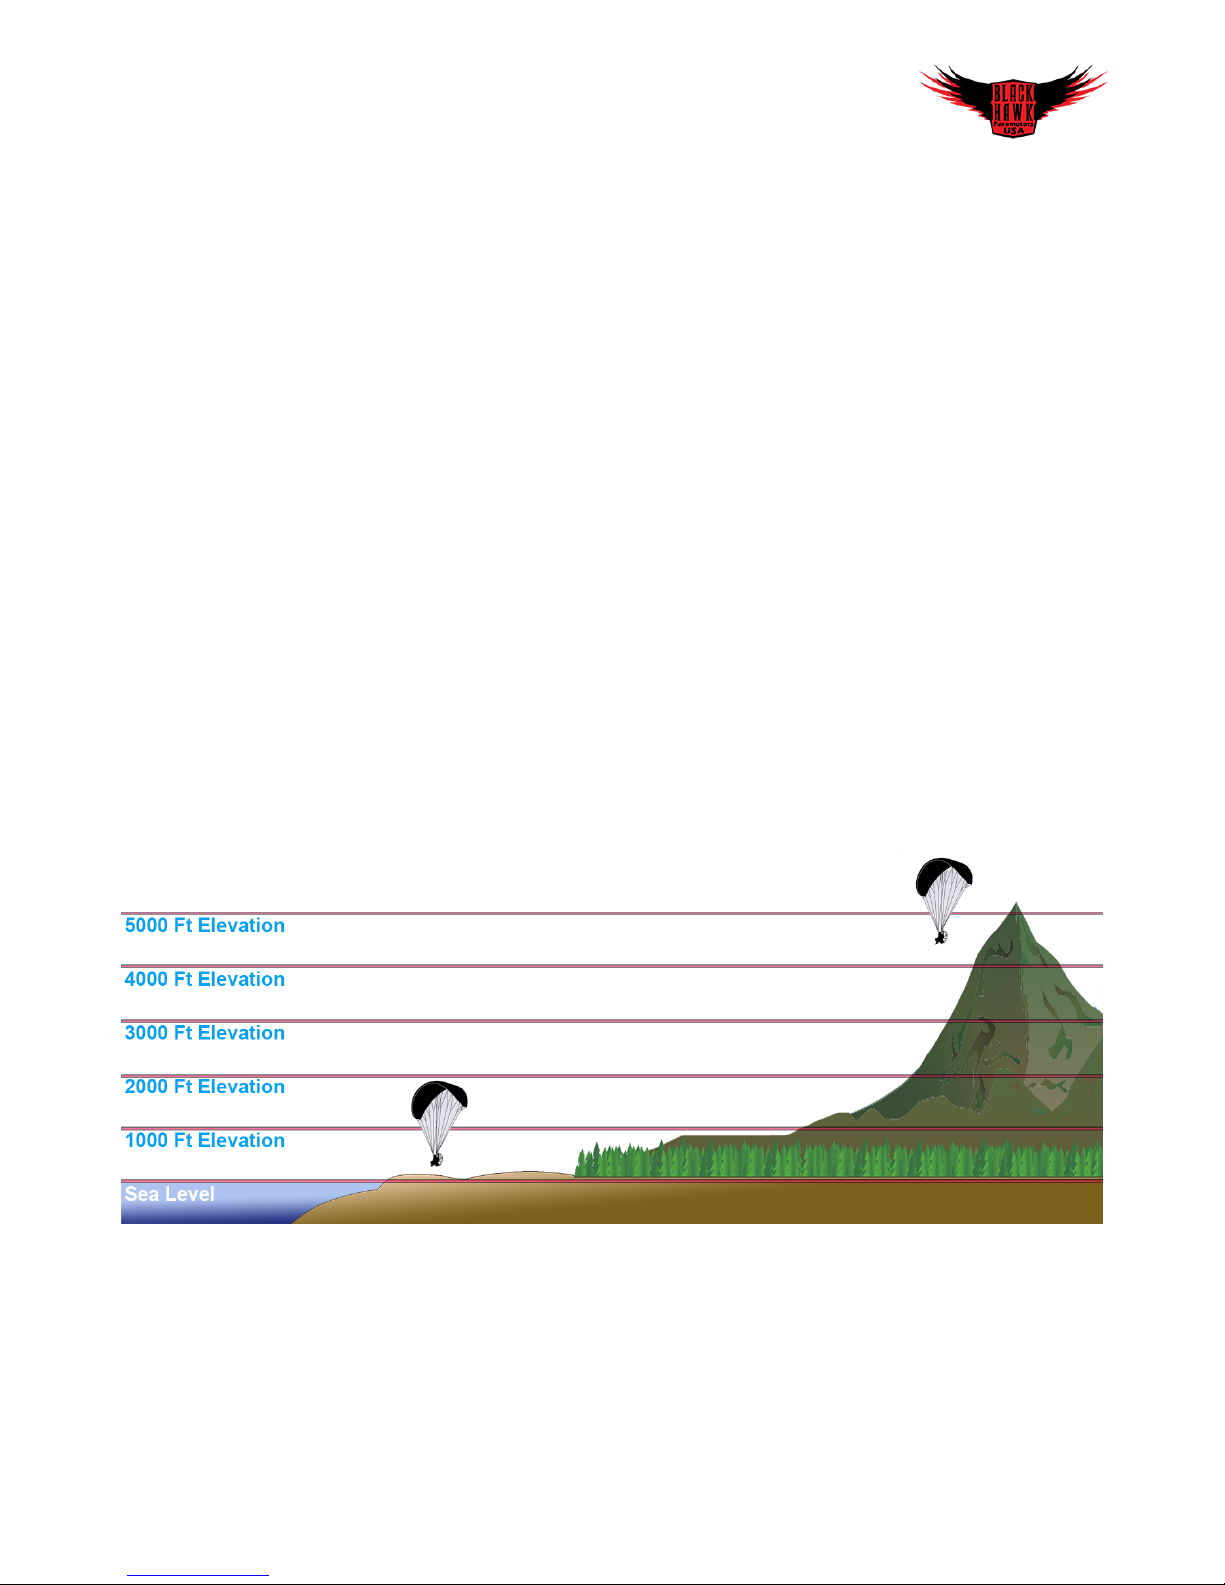
Elevation Change:
If you normally fly at the beach, and then you travelled to the mountains you want to make sure you
adjust the Fuel to Air mixture on the carburetor. This is a common mistake with new pilots to not
adjusting the Fuel to Air mixture based on the starting elevation. This is something each pilot will learn
about their engine, and were to adjust the Fuel to Air mixture based on the elevation they launch from.
This does not affect how you fly, but will help assure you engine is running correctly. If you have
travelled to a different location, and there is a significant elevation change, it’s best to make a quick
15min flight, and then pull the spark plug to make sure you are not running to rich or to lean. Use the
Spark Plug guide on page (21) to get better idea of how to judge the spark plug based on it color.
Flying at the Beach
A common mistake with new Paramotor pilots is not understanding what happens to the fuel air
mixture as you fly at different starting elevations. If you fly at a lower elevation like the beach, the
engine will need to run richer because there is more oxygen in the air. If you have been flying in the
mountains your mixture will be a little leaner because there is less oxygen in the air at higher altitudes.
The danger occurs when you normally fly at a higher elevation, and you go fly at the beach for a special
Engine Manual Talon 190 and Lite 125 Ver .99b 4/08/2019
pg. 18
 Loading...