

Black & Decker WM1404S Use And Care Book Manual
FLIP WAFFLE MAKER
MODEL
❍ WM1404S
Customer Care Line:
USA 1-800-231-9786
Accessories/Parts (USA)
1-800-738-0245
For online customer service
and to register your product, go to
www.prodprotect.com/applica

3
2
Please Read and Save this Use and Care Book.
IMPORTANT SAFEGUARDS
When using electrical appliances, basic safety precautions should always be
followed, including the following:
❍
Read all instructions.
❍
Do not touch hot surfaces. Use handles or knobs.
❍
To protect against electric shock do not immerse cord, plugs or appliance
in water or other liquid.
❍
Close supervision is necessary when any appliance is used by or near
children.
❍
Unplug from outlet when not in use and before cleaning. Allow to cool
before putting on or taking off parts, and before cleaning the appliance.
❍
Do not operate any appliance with a damaged cord or plug, or after the
appliance malfunctions or has been damaged in any manner. Return
appliance to the nearest authorized service facility for examination, repair
or adjustment. Or, call the appropriate toll-free number on the cover of
this manual.
❍
The use of accessory attachments not recommended by the appliance
manufacturer may cause injuries.
❍
Do not use outdoors.
❍
Do not let cord hang over edge of table or counter, or touch hot surfaces.
❍
Do not place on or near a hot gas or electric burner, or in a heated oven.
❍
Extreme caution must be used when moving an appliance containing hot oil
or other hot liquids.
❍
Always attach plug to appliance first, then plug cord into the wall outlet.
To disconnect, turn any control to OFF, then remove plug from wall outlet.
❍
Do not use appliance for other than intended use.
SAVE THESE INSTRUCTIONS.
This product is for household use only.
POLARIZED PLUG (120V Models Only)
This appliance has a polarized plug (one blade is wider than the other). To reduce
the risk of electric shock, this plug is intended to fit into a polarized outlet only one
way. If the plug does not fit fully into the outlet, reverse the plug. If it still does not
fit, contact a qualified electrician. Do not attempt to modify the plug in any way.
TAMPER-RESISTANT SCREW
Warning: This appliance is equipped with a tamper-resistant screw
to prevent removal of the outer cover. To reduce the risk of fire or
electric shock, do not attempt to remove the outer cover. There are
no user-serviceable parts inside. Repair should be done only by
authorized service personnel.
ELECTRICAL CORD
a) A short power-supply cord (or detachable power-supply cord) is to
be provided to reduce the risk resulting from becoming entangled
in or tripping over a longer cord.
b) Longer detachable power-supply cords or extension cords are
available and may be used if care is exercised in their use.
c) If a long detachable power-supply cord or extension cord is used,
1) The marked electrical rating of the detachable power-supply
cord or extension cord should be at least as great as the
electrical rating of the appliance,
2) If the appliance is of the grounded type, the extension cord
should be a grounding-type 3-wire cord, and
3) The longer cord should be arranged so that it will not drape over
the countertop or tabletop where it can be pulled on by children
or tripped over.
Note: If the power supply cord is damaged, it should be replaced by
qualified personnel; in Latin America, by an authorized service center.
This symbol is placed near information that
requires your special attention.
ENGLISH
5
4
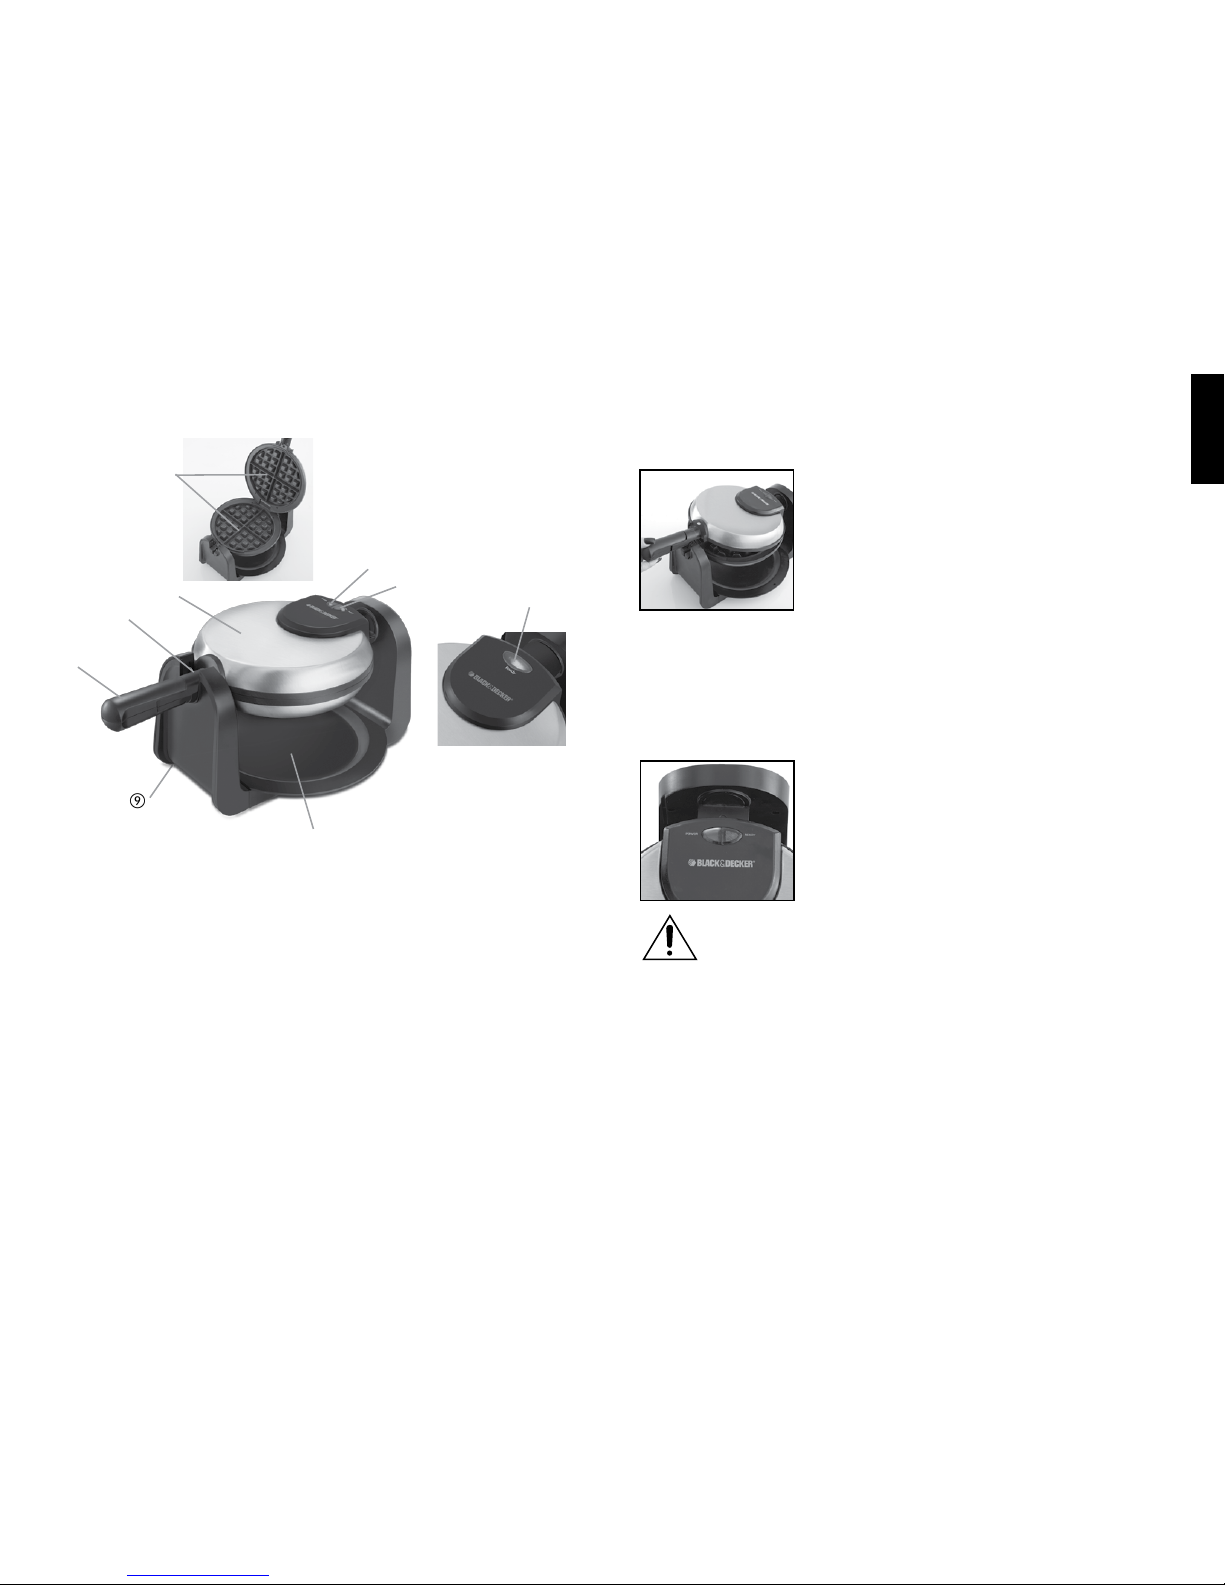
Product may vary slightly from what is illustrated.
1. Cool-touch handle
2. Handle lock
3. Rotate & cook system
4. Nonstick waffle plates (inside unit)
5. Power indicator light
6. Temperature ready indicator light
7. Waffle ready indicator light (on flip side)
† 8. Drip tray (Part # 1404S-01)
9. Unit base
Note: † indicates consumer replaceable/removable parts
ENGLISH
How to Use
This product is for household use only.
GETTING STARTED
• Remove all packing material and any stickers.
• Remove and save literature
• Please go to www.prodprotect.com/applica to register your
warranty.
• Open the waffle maker by lifting the cool-touch handle (A).
• This appliance has no removable parts. Wipe the waffle
plates and the outside with a damp cloth or sponge to remove
any dust. Wipe dry with a soft cloth or paper towels.
• Select a location where this appliance is to be used and allow
enough space between the back of the appliance and the
wall. This allows heat to flow without damage to cabinets and
walls.
PREHEATING THE WAFFLE MAKER
1. Before first use, condition the nonstick waffle plates by brushing or wiping a light
coating of cooking oil (vegetable, canola or corn oil) onto the entire cooking surface.
Wipe off excess oil with a paper towel.
Important: Do not use aerosol cooking spray because the chemicals that allow the spray
to come out of the can will build up on the surface of the waffle plates and reduce their
effectiveness.
2. Close the waffle maker by using the cool-touch handle.
3. Remove tie, unwind the cord and plug it into a standard
electrical outlet.
4. The red power indicator light comes on and the waffle maker
begins to preheat (B). This light remains illuminated until the
waffle maker is unplugged.
Important: This waffle maker gets hot. When in use or until it has cooled
completely do not touch any of the metal surfaces. Use the cool-touch handle to
open and close the waffle maker.
5. Allow the appliance to preheat. The green temperature ready indicator light illuminates
when the waffle maker is ready for use.
Note: During the initial preheating, you may notice smoke and a slight odor. This is normal
and should cause no concern.
Important: The green temperature ready indicator light next to the power indicator light,
only lets you know when the waffle maker has reached the cooking temperature. It cycles
on and off during cooking. It is not an indication that the waffle has finished cooking.
BAKING WAFFLES
1. Preheat waffle maker as described above.
2. Open the waffle maker by lifting the cool-touch handle, and pour about ¾ cup
(177 ml) into the center of the lower waffle plate.
Note: To avoid batter running over the edges do not overfill.
3. Close the waffle maker by using the cool-touch handle, but do not force it shut.
A
B
 Loading...