

Page 1
WARNING: Important Safety Warnings and Instructions
TO REDUCE RISK OF INJURY :
• Before any use, be sure everyone using this tool reads and understands all safety instructions and other
information contained in this manual.
• Save these instructions and review frequently prior to use and in instructing others.
WARNING: When using electric tools, basic safety precautions should always be followed to
reduce risk of fire, electric shock, and personal injury, including the following.
READ ALL INSTRUCTIONS
General Safety Warnings and Instructions for All Tools
• KEEP WORK AREA CLEAN. Cluttered areas and benches invite injuries.
• CONSIDER WORK AREA ENVIRONMENT. Don’t expose power tools to rain. Don’ t use power tools in
damp or wet locations. Keep work area well lit. Do not use in presence of flammable liquids or gases.
Motors in these tools normally spark, and the sparks may ignite the fumes.
• GUARD AGAINST ELECTRIC SHOCK. Prevent body contact with grounded surfaces. For example; pipes,
radiators, ranges, refrigerator enclosures. Use extreme caution when drilling, driving, or cutting into walls,
floors, ceilings or other areas or wherever live electrical wires may be contacted, do not touch any metal
parts of the tool. Hold the tools only by the plastic handle to prevent electric shock.
• KEEP CHILDREN AWAY .Do not let children and visitors contact tool or extension cord. All children and
visitors should be kept away from work area.
• STORE IDLE TOOLS. When not in use, tools should be stored in dry, and high or locked-up place–out of
reach of children.
• DON’T FORCE TOOL. It will do the job better and safer at the rate for which it was intended.
• USE RIGHT TOOL. Don’t force small tool or attachment to do the job of a heavy-duty tool. Don’t use tool
for purposes not intended.
• DRESS PROPERLY . Do not wear loose clothing or jewelry . They can be caught in moving parts. Rubber
gloves and non-skid footwear are recommended when working outdoors. Wear protective hair covering
to contain long hair.
• USE SAFETY GLASSES AND OTHER SAFETY EQUIPMENT. Use safety goggles or safety glasses with side
shields, complying with applicable safety standards and, when needed, a face shield. Also use face or
dust mask if cutting operation is dusty. This applies to all persons in the work area. Also use a hard hat,
hearing protection, gloves, safety shoes and dust collection systems when specified or required.
• DON’T ABUSE CORD. Never carry tool by cord or yank it to disconnect from receptacle. Keep cord from
heat, oil, and sharp edges.
• SECURE WORK. Use clamps or a vise to hold work. It’s safer than using your hand and it frees both hands
to operate tool.
• DON’T OVERREACH. Keep proper footing and balance at all times.
• MAINTAIN TOOLS WITH CARE. Keep tools sharp and clean for better and safer performance. Follow
instructions for lubricating and changing accessories. Inspect tool cords periodically and if damaged, have
repaired by authorized service facility. Inspect extension cords periodically and replace if damaged. Keep
handles dry, clean, and free from oil and grease.
• DISCONNECT TOOLS. Unplug the tool when not in use, when moving tool from place to place, before
servicing, and when changing accessories (such as blades, bits, cutters) or making adjustments.
• REMOVE ADJUSTING KEYS AND WRENCHES. Form habit of checking to see that keys and adjusting
wrenches are removed from tool before turning it on.
• AVOID UNINTENTIONAL STARTING. Don’t carry tool with finger on switch. Be sure switch is off when
plugging in.
• EXTENSION CORDS. Make sure your extension cord is in good condition. When using an extension cord,
be sure to use one heavy enough to carry the current your product will draw.An undersized cord will
cause a drop in line voltage resulting in loss of power and overheating. The following table shows the
correct size to use depending on cord length and nameplate ampere rating. If in doubt, use the next
heavier gage. The smaller the gage number, the heavier the cord.
• STAY ALERT. Watch what you are doing. Use common sense. Do not operate tool when you are tired or
otherwise impaired.
• CHECK DAMAGED PARTS.Before further use of the tool, a guard or other part that is damaged should be
carefully checked to determine that it will operate properly and perform its intended function. Check for
alignment of moving parts, binding of moving parts, breakage of parts, mounting, and any other
conditions that may affect its operation. A guard or other part that is damaged should be properly
repaired or replaced by an authorized service center. Do not use tool if switch does not turn it on and off.
• REPAIRS AND SERVICE.Repairs, maintenance and any adjustments not specified in this manual should be
performed by Black & Decker authorized service centers or other qualified service organizations, always
using identical replacement parts.
• USE OF ACCESSORIES AND ATTACHMENTS. The use of any accessory or attachment not recommended
for use with the tool could be hazardous. Note: Refer to the accessory section of this manual for further
details.
Safety Warnings and Instructions: Double Insulation
Double insulated tools are constructed throughout with two separate layers of electrical insulation or a
double thickness of insulation between you and the tool’s electrical system. Tools built with double insulation
are not intended to be grounded. As a result, your tool is equipped with a two prong plug which permits
you to use extension cords without concern for maintaining a ground connection.
Double insulation does not take the place of normal safety precautions when operating this tool. The
insulation system is for added protection against injury resulting from a possible electrical insulation failure
within the tool.
REPLACEMENT PARTS: When servicing use only identical replacement parts. Repair or replace damaged
cords.
Safety Warnings and Instructions: Polarized Plugs
Polarized plugs (one blade is wider than the other) are used on equipment to reduce the risk of electric
shock. When provided, this plug will fit into a polarized outlet only one way. If the plug does not fit fully
into the outlet, reverse the plug. If it still does not fit, contact a qualified electrician to install the proper
outlet. Do not change the plug in any way.
Motor
Your tool is powered by a Black & Decker built motor. Be sure your power supply agrees with the
nameplate marking. A marking of 120 volts, 50/60 Hz or 120 volts AC only means than the tool is
designed to operate on normal 120 volt house current. Voltage decrease of more than 10% will cause loss
of power and overheating. All Black & Decker tools are factory tested. If this tool does not run,
check the power supply.
R
Q270
INSTRUCTION MANUAL
1/2" (12.7 MM) 5.0 AMP
KEYLESS CHUCK DRILL
KEY INFORMATION YOU SHOULD KNOW:
•Hand tighten keyless chuck firmly after each bit
change.
•In order to operate, the drill must be in either the
hammer or drill mode.
1-800-54-HOW-TO
BEFORE RETURNING THIS PRODUCT
FOR ANY REASON PLEASE CALL
IF YOU SHOULD EXPERIENCE A PROBLEM
WITH YOUR BLACK & DECKER PURCHASE,
CALL 1-800-54-HOW-TO.
IN MOST CASES, A BLACK & DECKER REPRESENTATIVE
CAN RESOLVE YOUR PROBLEM OVER THE PHONE.
IF YOU HAVE A SUGGESTION OR COMMENT,
GIVE US A CALL. YOUR FEEDBACK IS VITAL
TO THE SUCCESS OF BLACK & DECKER'S QUALITY
IMPROVEMENT PROGRAM.
VEA EL ESPAÑOL EN LA CONTRAPORTADA.
SAVE THIS MANUAL FOR FUTURE REFERERENCE.
INSTRUCTIVO DE OPERACIÓN, CENTROS DE SERVICIO Y PÓLIZA DE
GARANTÍA. ADVERTENCIA: LÉASE ESTE INSTRUCTIVO ANTES DE USAR EL
PRODUCTO.
CAT. NO. Q270 FORM NO. 373925 PRINTED IN ENGLAND (JAN98 -1)
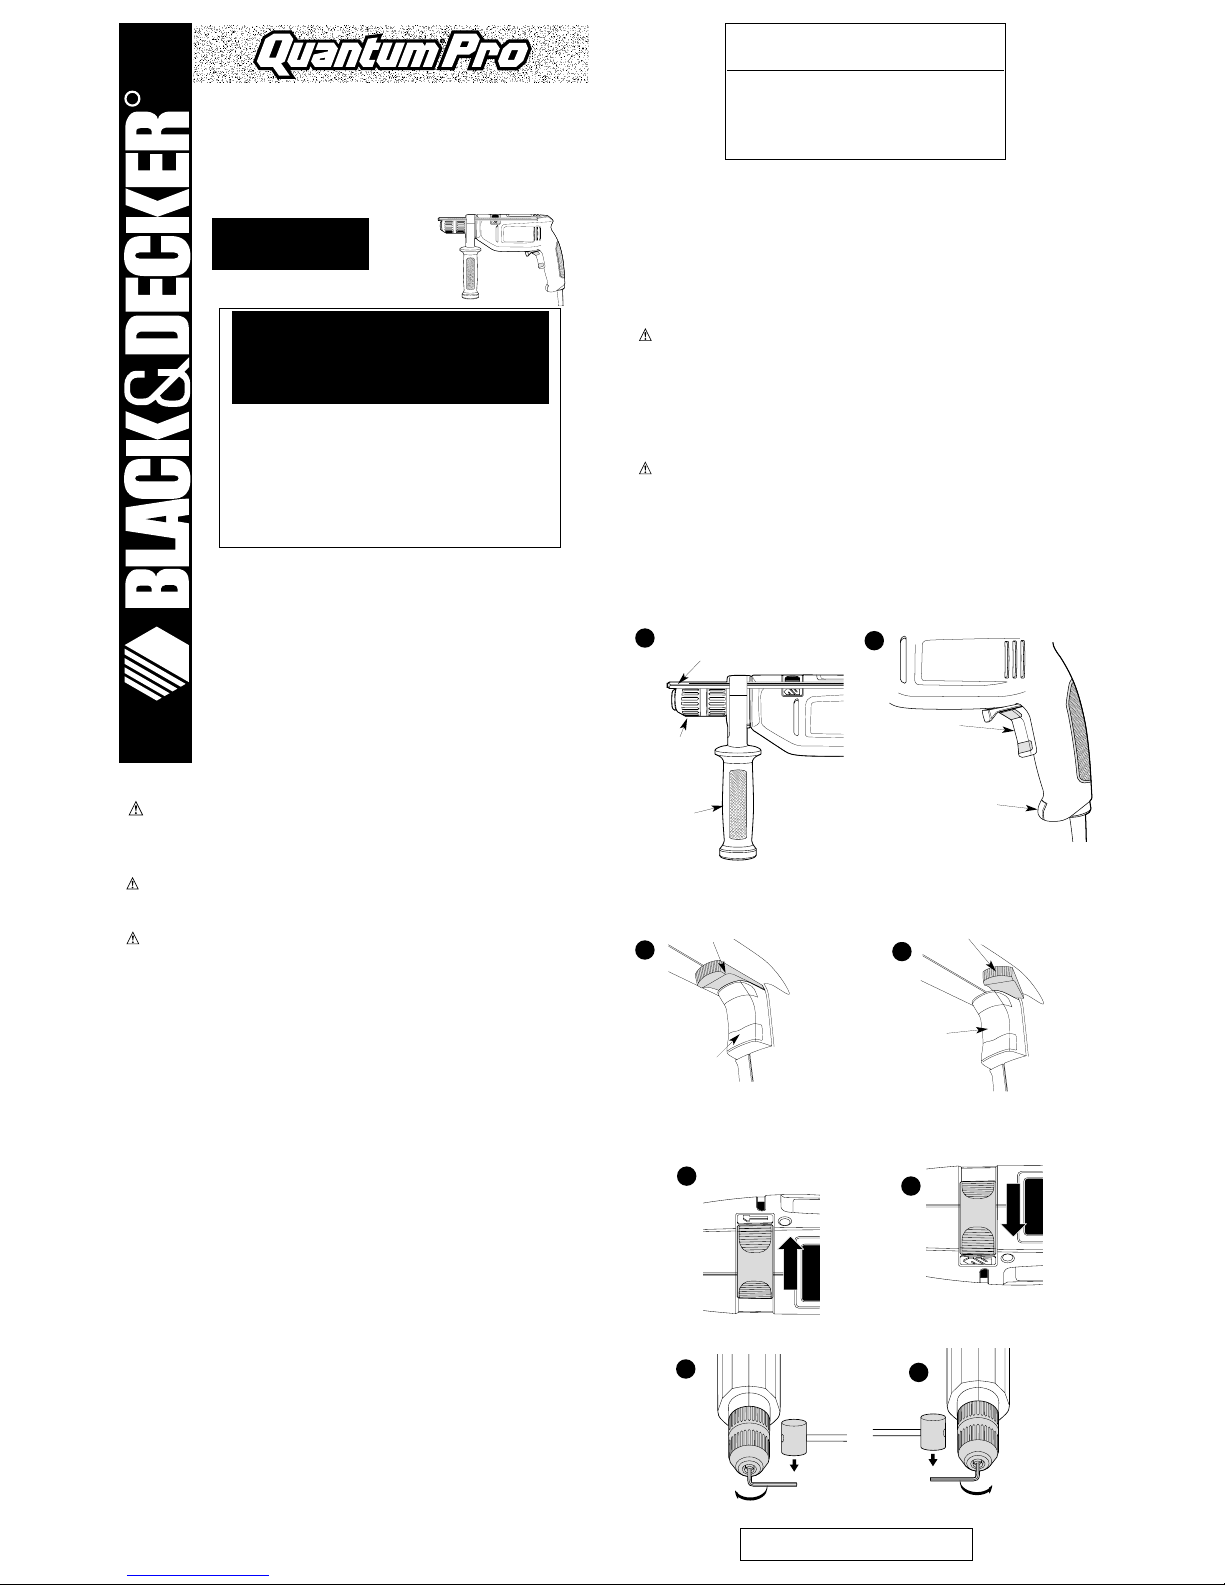
1
Depth rod
Limiteur de profondeur
Varilla de profundidad
ESPECIFICACIONES
C# DR700 120V~ 580 W 60Hz 5,0A
Side handle
Poignée latérale
Mango lateral
Keyless chuck
Mandrin sans clé
Portabrocas sin llave
2
3A
Trigger switch
Interrupteur à détente
Gatillo Interruptor
Lock-on button
Bouton de verrouillage
Boton de encendido permanente
3B
Variable speed switch
Régulateur à cadran
Control de veloidad variable
Reversing switch
Inverseur de marche
Interruptor de reversa
REVERSE POSITION
MARCHE ARRIÈRE
POSICION DE REVERSA
FORWARD POSITION
MARCHE AVANT
POSICION DE MARCHA
Reversing switch
Inverseur de marche
Interruptor de reversa
Variable speed switch
Régulateur à cadran
Control de veloidad variable
4A
4B
5
6
Hammering position
Mode de percussion
Posicion de rotomartillo
Drilling position
Mode de perçage
Posicion de taladrado
Minimum Gage for Cord Sets
Volts Total Length of Cord in Feet
120V 0-25 26-50 51-100 101-150
240V 0-50 51-100 101-200 201-300
Ampere Rating
More Not more American Wire Gage
Than Than
0-6 18 16 16 14
6 - 10 18 16 14 12
10 - 12 16 16 14 12
12 - 16 14 12 Not Recommended
Page 2
Operating Instructions
Side Handle (Figure 1)
ALW AYS USE THE SIDE HANDLE.
The side handle is assembled and ready to be placed on the drill. Slide the handle over the keyless chuck
and move it onto the collar just behind the chuck. Be sure the handle is on the front of the tool, not touching
the chuck. A back and forth motion will make the process easier. The side handle can be rotated anywhere
around the tool for right hand or left hand use.
NOTE: It may be necessary to remove the depth rod when rotating the side handle.
To adjust the depth rod, loosen (counterclockwise) the side handle and slide the depth rod to the desired
position. Tightening the side handle (clockwise) will secure the depth rod in place.
The depth rod will allow you to drill or drive screws to a desired depth. Once the depth rod makes contact
with the surface of the material, the bit will stop drilling. (Bit will continue to rotate.)
Switches
To start drill, depress trigger switch; to stop drill, release trigger. To lock trigger in ON position for
continuous operation, depress trigger and push lock-on button shown in Figure 2, then gently release
trigger. To release locking mechanism, depress trigger fully, then release it. Before using the tool (each time)
be sure that the lock-on button release mechanism is working freely. Do not lock the switch ON when
drilling by hand so that you can instantly release the trigger switch if the bit binds in the hole. The lock-on
button is for use only when the drill is mounted in a drill press stand or otherwise held stationary. Be sure to
release the lock-on button before disconnecting the plug from the power supply. Failure to do so will cause
the tool to start immediately the next time it is plugged in. Damage or injury could result.
Variable Speed Switch
This permits FREE HAND speed control—the further the trigger is depressed, the higher the R.P.M. Use
lower speeds for starting holes without a center punch, drilling in metal, plastics, and ceramics, or driving
screws. Higher speeds are better for drilling wood and composition boards, and for using abrasive and
polishing accessories.
Reversing Switch
To operate your drill in reverse, a reversing switch has been provided, as shown in Figure 3A. To operate
the drill in forward (most drilling operations and driving screws) slide the reversing switch to the left, as
viewed from the chuck end (Figure 3A). To operate in reverse (removing screws or jammed drill bits) slide
the reversing switch to the right (Figure 3B). Do not move the switch while the drill is running. This can
damage the drill.
Hammer Action
Your drill has hammer action which is engaged by sliding the hammer/drill selector lever. To select
hammering, turn off the drill and slide the lever toward the hammer symbol on the drill housing, as shown
in Figure 4A. To select drilling, turn off the drill and slide the lever toward the drill symbol on the drill
housing, as shown in Figure 4B.
Operation
1. Always unplug the drill when attaching or changing bits or accessories.
2. Use sharp drill bits only. For WOOD, use twist drill bits, spade bits, power auger bits, or hole saws.
For METAL, use high speed steel twist drill bits or hole saws. For MASONRY, such as brick, cement,
cinder block, etc., use carbide-tipped bits and hammer action.
3. Be sure the material to be drilled is anchored or clamped firmly. If drilling thin material, use a wood
“back-up” block to prevent damage to the material.
4. Always apply pressure in a straight line with the bit. Use enough pressure to keep drill biting, but do
not push hard enough to stall the motor or deflect the bit.
5. Hold drill firmly to control the twisting action of the drill.
6. IF DRILL STALLS, it is usually because it is being overloaded or improperly used. RELEASE TRIGGER
IMMEDIATELY, remove drill bit from work, and determine cause of stalling. DO NOT CLICK TRIGGER
OFF AND ON IN AN ATTEMPT TO START A STALLED DRILL—THIS CAN DAMAGE THE DRILL.
7. To minimize stalling on breaking through the material, reduce pressure on drill and ease the bit
through the last fractional part of the hole.
8. Keep the motor running when pulling the bit back out of a drilled hole. This will help prevent jamming.
9. With variable speed drills there is no need to center punch the point to be drilled. Use a slow speed to
start the hole and accelerate by squeezing the trigger harder when the hole is deep enough to drill without the bit skipping out.
DRILLING IN METAL
Use a cutting lubricant when drilling metals. The exceptions are cast iron and brass which should be drilled
dry. The cutting lubricants that work best are sulphurized cutting oil or lard oil; bacon-grease will also
serve the purpose.
NOTE: Large 5/16" (7.9mm) to 3/8" (9.5mm) holes in steel can be made easier if a pilot hole 5/32"
(4mm) to 3/16" (4.8mm) is drilled first.
DRILLING IN WOOD
Holes in wood can be made with the same twist drills used for metal. These bits may overheat unless pulled
out frequently to clear chips from the flutes. For larger holes, use power drill wood bits. Work that is apt to
splinter should be backed up with a block of wood.
DRILLING IN MASONRY
Select "Hammer Action." Use carbide-tipped masonry bits. Keep even force on the drill but not so much
that you crack the brittle materials. A smooth, even flow of dust indicates the proper drilling rate.
Chuck Removal
UNPLUG DRILL.
NOTE: Before attempting to remove chuck, shift the drill into the drilling mode (not hammer).
Tighten the chuck around the shorter end of a hex key (not supplied) of 1/4" (6.4mm) or greater size.
Using a soft hammer, strike the longer end in the clockwise direction, as shown in Figure 5. This will loosen
the screw inside the chuck.
Open chuck jaws fully, insert screwdriver (or T orx tool if required) into front of chuck between jaws to
engage screw head. Remove screw by turning clockwise (left-hand-thread). Place hex key in chuck as
shown in Figure 6. Using a soft hammer, strike key sharply in the counterclockwise direction. This will
loosen the chuck so that it can be unscrewed by hand.
Chuck Installation
Screw chuck on by hand as far as it will go. Tighten the chuck around the shorter end of a 1/4" (6.4mm)
or larger hex key (not supplied). Strike the longer end in the clockwise direction with a soft hammer, as
shown in Figure 6. Firmly tighten screw inside chuck.
HIGH-SPEED HOLE SAWS Use with Mandrels
SAW OUTSIDE FOR CONDUIT FOR PIPE TAP
DIAMETER SIZES SIZES
5/8" (15.9mm) — —
3/4" (19mm) 3/8" (9.5mm) —
7/8" (22mm) 1/2" (12.7mm) —
15/16" (24mm) — 3/4" (19mm)
1 1" (25.4mm) — —
1-1/16" (27mm) — —
1-1/8" (28.5mm) 3/4" (19mm) —
ROUND-SHANK MASONRY BITS
These bits are carbide-tipped for top performance and extra-long
life in most masonry-drilling applications
BIT DIAMETER USABLE DRILLING SHANK
(IN.) DEPTH (IN.) (IN.)
3/16" (4.8mm) 1-1/2" (38.1mm) 3/16" (4.8mm)
1/4" (6.4mm) 2" (50mm) 1/4" (6.4mm)
5/16" (8mm) 2-1/4" (57.1mm) 1/4" (6.4mm)
3/8" (9.5mm) 2-1/2" (63.5mm) 1/4" (6.4mm)
1/2" (12.7mm) 2-1/2" (63.5mm) 1/4" (6.4mm)
Maximum Recommended Capacities
DRILL CAPACITY 1/2" (12.7mm)
R.P.M. 0–3,000
BITS, METAL DRILLING 1/2" (12.7mm)
WOOD, FLAT BORING 1-1/4" (31.8mm)
BITS, MASONRY DRILLING 5/8" (15.9mm)
ACCESSORY MUST BE RATED FOR USE AT SPEED EQUAL TO OR HIGHER THAN NAMEPLATE R.P.M. OF
TOOL WITH WHICH IT IS BEING USED.
WIRE WHEEL BRUSHES 4" (101.6mm) Diameter Maximum
WIRE CUP BRUSHES 3" (76.2mm) Diameter Maximum
BUFFING WHEELS 3" (76.2) Diameter Maximum
RUBBER BACKING PADS 4-5/8" (117.5mm) Diameter Maximum
Maintenance
Use only mild soap and damp cloth to clean the tool. Never let any liquid get inside the tool; never immerse
any part of the tool into a liquid.
IMPORTANT: To assure product SAFETY and RELIABILITY , repairs, maintenance and adjustment should be
performed by authorized service centers or other qualified service organizations, always using identical
replacement parts.
Accessories
Recommended accessories for use with your tool are available from your local dealer or authorized service
center. If you need assistance regarding accessories, please call: 1-800-54-HOW TO.
WARNING: The use of any accessory not recommended for use with this tool could be hazardous.
Service Information
Black & Decker offers a full network of company-owned and authorized service locations throughout North
America. All Black & Decker Service Centers are staffed with trained personnel to provide customers with
efficient and reliable power tool service.
Whether you need technical advice, repair, or genuine factory replacement parts, contact the Black &
Decker location nearest you. To find your local service location, refer to the yellow page directory under
"Tools—Electric" or call: 1-800-54-HOW TO.
FULL TWO-YEAR HOME USE WARRANTY
Black & Decker (U.S.) Inc. warrants this product for two years against any defects in material or
workmanship. The defective product will be replaced or repaired at no charge in either of two ways.
The first, which will result in exchanges only, is to return the product to the retailer from whom it was
purchased (provided that the store is a participating retailer). Returns should be made within the time
period of the retailer’s policy for exchanges (usually 30 to 90 days after the sale). Proof of purchase may
be required. Please check with the retailer for their specific return policy regarding returns that are beyond
the time set for exchanges.
The second option is to take or send the product (prepaid) to a Black & Decker owned or authorized
Service Center for repair or replacement at our option. Proof of purchase may be required. Black & Decker
owned and authorized Service Centers are listed under "Tools-Electric" in the yellow pages of the phone
directory.
This warranty does not apply to accessories. This warranty gives you specific legal rights and you may
have other rights which vary from state to state. Should you have any questions, contact the manager of
your nearest Black & Decker Service Center.
See ‘Tools-Electric’
– Yellow Pages –
for Service & Sales
Imported by
Black & Decker (U.S.) Inc.,
701 E. Joppa Rd.
Towson, MD 21286 U.S.A.
YOU'VE GOT THE TOOL
NOW GET THE KNOW-HOW
http://www.blackanddecker.com
Q270
GUIDE D’UTILISA TION
PERCEUSE DE 12,7 MM (1/2 PO)
ET DE 5 A
RENSEIGNEMENTS IMPORTANTS
•Bien serrer à la main le mandrin sans clé après
chaque remplacement de foret.
•La perceuse doit être en mode de perçage ou de
percussion afin de fonctionner.
CONSERVER LE PRÉSENT GUIDE À TITRE DE RÉFÉRENCE.
FRANÇAIS
AVERTISSEMENT : IMPORTANTES MESURES DE SÉCURITÉ
AFIN DE RÉDUIRE LES RISQUES DE BLESSURES :
• Avant toute utilisation, s’assurer que tous ceux qui se servent de l’outil lisent et comprennent toutes les
mesures de sécurité et tout autre renseignement contenu dans le présent guide.
• Conserver ces mesures et les relire fréquemment avant d’utiliser l’outil et d’en expliquer le fonctionnement
à d’autres personnes.
A VERTISSEMENT : Afin de réduire les risques d’incendie, de secousses électriques ou de blessures
lorsqu’on utilise des outils électriques, il faut toujours respecter les mesures de
sécurité suivantes.
LIRE TOUTES LES DIRECTIVES.
MESURES DE SÉCURITÉ POUR TOUS LES OUTILS
• BIEN DÉGAGER LA SURFACE DE TRAVAIL. Des surfaces et des établis encombrés peuvent être la cause de
blessures.
• TENIR COMPTE DU MILIEU DE TRAVAIL. Protéger les outils électriques de la pluie. Ne pas s’en servir dans
des endroits humides ou mouillés. Bien éclairer la surface de travail. Ne pas se servir de l’outil en
présence de liquides ou de vapeurs inflammables. En effet, le moteur de tels outils génère habituellement
des étincelles et celles-ci peuvent enflammer les vapeurs.
• SE PROTÉGER CONTRE LES SECOUSSES ÉLECTRIQUES. Éviter tout contact avec des objets mis à la terre,
comme des tuyaux, radiateurs, cuisinières, réfrigérateurs et autres objets du genre. Prendre soin lorsqu’on
AVANT DE RETOURNER LE PRODUIT, PEU IMPORTE
LA RAISON PRIÈRE DE COMPOSER
1-800 544-6986
Page 3

perce, visse ou coupe des murs, planchers, plafonds ou autres endroits qui pourraient cacher des fils
électriques sous tension. Ne pas toucher aux composants métalliques de l’outil. Saisir celui-ci seulement
par sa poignée en plastique afin d’éviter les secousses électriques.
• ÉLOIGNER LES ENFANTS. Tous les visiteurs doivent être tenus à l’écart de l’aire de travail et il faut les
empêcher de toucher à l’outil ou au cordon de rallonge.
• RANGER LES OUTILS INUTILISÉS. Il faut ranger les outils dans un endroit sec, situé en hauteur ou fermé à
clé, hors de la portée des enfants.
• NE JAMAIS FORCER L’OUTIL. Afin d’obtenir un rendement sûr et efficace, utiliser l’outil à son rendement
nominal.
• UTILISER L’OUTIL APPROPRIÉ. Ne jamais exiger d’un petit outil ou d’un accessoire le rendement d’un outil
de fabrication plus robuste. Se servir de l’outil selon l’usage prévu.
• PORTER DES VÊTEMENTS APPROPRIÉS. Éviter de porter des vêtements amples et des bijoux qui peuvent
être happés par les pièces en mouvement. Porter des gants de caoutchouc et des chaussures à semelle
antidérapante pour travailler à l’extérieur. Protéger la chevelure si elle longue.
• PORTER DES LUNETTES DE SÉCURITÉ ET AUTRE ÉQUIPEMENT DE SÉCURITÉ. Porter des lunettes de
protection ou de sécurité à écrans latéraux, conformément aux normes de sécurité appropriées, et, au
besoin, un écran facial. Porter également un masque respiratoire si le travail de coupe produit de la
poussière. La présente mesure vaut pour toute personne dans la zone de travail. Il faut également porter un
casque, des protège-tympans, des gants et des chaussures de sécurité ainsi qu’utiliser des systèmes de
dépoussiérage lorsque spécifié ou exigé.
• NE PAS MANIPULER LE CORDON DE FAÇON ABUSIVE. Ne pas transporter l’outil par le cordon ni tirer
sur ce dernier pour le débrancher de la prise. Éloigner le cordon des sources de chaleur, des flaques
d’huile et des arêtes tranchantes.
• ASSUJETTIR LA PIÈCE. Immobiliser la pièce à l’aide de brides ou d’un étau. On peut alors se servir des
deux mains pour faire fonctionner l’outil, ce qui est plus sûr.
• NE PAS DÉPASSER SA PORTÉE. T oujours demeurer dans une position stable et garder son équilibre.
• PRENDRE SOIN DES OUTILS. Conserver les outils propres et affûtés pour qu’ils donnent un rendement
supérieur et sûr. Suivre les directives concernant la lubrification et le remplacement des accessoires.
Inspecter régulièrement le cordon de l’outil et le faire réparer au besoin à un atelier d’entretien autorisé.
Inspecter régulièrement les cordons de rallonge et les remplacer lorsqu’ils sont endommagés. S’assurer
que les poignées sont toujours propres, sèches et libres de toute tache d’huile ou de graisse.
• DÉBRANCHER LES OUTILS. Débrancher l’outil lorsqu’on ne s’en sert pas, qu’on doit le déplacer d’un
endroit à un autre et qu’on doit le réparer, en changer un accessoire (comme une lame, un foret ou un
couteau) ou le régler.
• ENLEVER LES CLÉS DE RÉGLAGE. Prendre l’habitude de vérifier si les clés de réglage ont été retirées avant
de faire démarrer l’outil.
• ÉVITER LES DÉMARRAGES ACCIDENTELS. Ne pas laisser le doigt sur l’interrupteur lorsqu’on transporte
l’outil. S’assurer que l’interrupteur est à la position hors circuit lorsqu’on branche l’outil.
• CORDONS DE RALLONGE. S’assurer que le cordon de rallonge est en bon état. Lorsqu’on se sert d’un
cordon de rallonge, s’assurer qu’il est de calibre approprié pour la tension nécessaire au fonctionnement
de l’outil. L’utilisation d’un cordon de calibre inférieur occasionne une baisse de tension entraînant
une perte de puissance et la surchauffe. Le tableau suivant indique le calibre approprié selon la longueur
du cordon et les mentions de la plaque signalétique de l’outil. En cas de doute, utiliser un cordon de
calibre supérieur. Le chiffre indiquant le calibre est inversement proportionnel au calibre du cordon.
• DEMEURER VIGILANT. Travailler avec vigilance et faire preuve de bon sens. Ne pas se servir de l’outil
lorsqu’on est fatigué ou autrement affaibli.
• VÉRIFIER LES PIÈCES ENDOMMAGÉES. Avant de continuer à utiliser l’outil, il faut vérifier si le protecteur
ou toute autre pièce endommagée remplit bien la fonction pour laquelle il a été prévu. Vérifier
l’alignement et les attaches des pièces mobiles, le degré d’usure des pièces et leur montage, ainsi que tout
autre facteur susceptible de nuire au bon fonctionnement de l’outil. Faire réparer ou remplacer tout
protecteur ou toute autre pièce endommagée dans un centre de service autorisé. Ne jamais se servir d’un
outil dont l’interrupteur est défectueux.
• RÉPARATIONS ET ENTRETIEN. Confier l’outil à un centre de service Black & Decker autorisés ou à tout
autre atelier d’entretien qualifié utilisant toujours des pièces de rechange identiques lorsqu’il doit subir des
réparations ainsi que des travaux d’entretien ou de réglage qui ne sont pas spécifiés dans le présent
guide.
• ACCESSOIRES. L’utilisation d’accessoires non recommandé pour l’outil peut être dangereuse. Note :
Consulter la rubrique relative aux accessoires du présent guide pour obtenir de plus amples
renseignements à ce sujet.
MESURES DE SÉCURITÉ : DOUBLE ISOLATION
Les outils à double isolation comportent deux couches distinctes d’isolant électrique ou une double
épaisseur d’isolant qui protègent l’utilisateur contre les risques de blessures provenant du système
électrique de l’outil. Ce système de double isolation élimine le besoin de mettre les outils à la terre. En effet,
l’outil est muni d’une fiche à deux broches, ce qui permet d’utiliser une rallonge ordinaire sans avoir à se
soucier d’assurer la mise à la terre.
La double isolation ne dispense pas des mesures de sécurité normales lors de l’utilisation de l’outil. Elle vise
à procurer une protection supplémentaire contre les blessures que peut entraîner une défectuosité de
l’isolant électrique à l’intérieur de l’outil.
PIÈCES DE RECHANGE : Lors de l’entretien, n’utiliser que des pièces de rechange identiques. Réparer ou
remplacer les cordons endommagés.
MESURES DE SÉCURITÉ : FICHE POLARISÉE
Afin de réduire les risques de secousses électriques, l’outil est muni d’une fiche polarisée (une lame plus
large que l’autre). Ce genre de fiche n’entre que d’une façon dans une prise polarisée. Lorsqu’on ne peut
insérer la fiche à fond dans la prise, il faut tenter de le faire après avoir inversé les lames de côté. Si la
fiche n’entre toujours pas dans la prise, il faut communiquer avec un électricien certifié. Il ne faut en aucun
cas modifier la fiche.
Moteur
Un moteur Black & Decker entraîne l’outil. Veiller à ce que la tension d’alimentation soit conforme aux
exigences de la plaque signalétique de l’outil. La mention 120 volts, 50/60 Hz ou 120 volts c.a.
seulement signifie que l’outil fonctionne seulement sur une alimentation domestique standard de 120 volts.
Une baisse de tension de plus de 10 p. 100 entraîne une perte de puissance et la surchauffe. Tous les
outils Black & Decker sont essayés avant de quitter l’usine. Lorsque celui-ci refuse de fonctionner, vérifier la
source de courant électrique.
Fonctionnement
Poignée latérale (Figure 1)
TOUJOURS UTILISER LA POIGNÉE LATÉRALE.
La poignée latérale est assemblée et prête à être installée sur la perceuse. Faire glisser la poignée au-
dessus du mandrin sans clé et la déplacer jusqu’à sur la bague juste derrière le mandrin. S’assurer que la
poignée se trouve à l’avant de l’outil et qu’elle ne touche pas au mandrin. On peut faciliter son installation
en lui imprimant un mouvement avant-arrière. La poignée latérale se place partout autour de l'outil afin de
servir aux droitiers comme aux gauchers. NOTE: Il peut étre nécessaire d'enlever le limiteur de profondeur
lorsqu'on déplace la poignée latérale.
Pour ajuster le limiteur de profondour, desserrer la poignée latérale (sens antihoraire) et glisser le limiteur à
la position voulue. Resserrer la poignée (sens horaire) pour bloquer le limiteur en place comme illustre.
Le limiteur de profondeur permet de percer ou de visser à la profondeur voulue. Lorsque le limiteur de
profondeur entre en contact avec la surface du matériau, le foret arrête de percer. (Le foret continue
toutefois de tourner.)
Interrupteurs
Enfoncer l’interrupteur à détente pour mettre l’outil en marche. Pour l’arrêter, il suffit de relâcher
l’interrupteur. Pour assurer le fonctionnement continu de l’outil, il suffit d’enfoncer la détente et le bouton
de verrouillage (fig. 2), puis de relâcher doucement l’interrupteur. Pour arrêter l’outil lorsqu’il est en mode
de fonctionnement continu, enfoncer l’interrupteur à fond et le relâcher. Toujours s’assurer que le bouton
de verrouillage fonctionne bien avant d’utiliser l’outil (chaque fois). Ne pas verrouiller l’interrupteur
lorsqu’on effectue des travaux de perçage manuels de manière à relâcher instantanément l’interrupteur si
le foret reste coincé. Il faut seulement utiliser le bouton de verrouillage lorsque la perceuse est installée sur
un établi ou fixée de toute autre façon. Veiller à ce que le bouton de verrouillage soit dégagé avant de
débrancher l’outil, sinon celui-ci se remettra immédiatement en marche la prochaine fois qu’on s’en servira
et cela présente des risques de dommages et de blessures.
Régulateur de vitesse
On assure ainsi la maîtrise «MAINS LIBRES» de l’outil; à savoir, plus on enfonce la détente de
l’interrupteur, plus la vitesse augmente. Se servir des basses vitesses pour amorcer des trous sans poinçon
et pour percer les métaux, les plastiques et la céramique, ainsi que pour enfoncer des vis. Les vitesses
élevées conviennent mieux au perçage du bois et des panneaux d’agglomérés, ainsi qu’à l’utilisation
d’accessoires pour le ponçage et le polissage.
Inverseur de marche
L’outil peut fonctionner en marche arrière grâce à l’inverseur de marche, comme le montre la figure3A.
Pour actionner la marche avant (pour effectuer la plupart des travaux de perçage et pour enfoncer des vis),
faire glisser l’inverseur vers la gauche, lorsqu’on regarde l’extrémité du mandrin (fig. 3B). Pour actionner
la marche arrière (pour retirer des vis ou des forets coincés), faire glisser l’inverseur vers la droite(fig. 3B).
Ne pas déplacer le sélecteur lorsque la perceuse fonctionne, au risque de l’endommager.
Perçage à percussion
On peut actionner le mode de perçage à percussion de l’outil en faisant glisser le sélecteur de percussion
ou de perçage. Pour choisir le perçage à percussion, débrancher l’outil et faire glisser le sélecteur vers le
symbole du marteau imprimé sur le boîtier de l’outil (fig. 4A). Pour choisir le perçage, débrancher l’outil et
faire glisser le sélecteur vers le symbole du foret imprimé sur le boîtier de l’outil, comme le montre la
figure 4B.
Fonctionnement
1. Toujours débrancher l’outil lorsqu’on en change les forets ou les accessoires.
2. N’utiliser que des forets bien affûtés. Pour le BOIS : forets hélicoïdaux, à langue d’aspic, de tarière
ou des emporte-pièce; pour le MÉTAL : forets hélicoïdaux en acier de coupe rapide ou des empor tepièce; pour la MAÇONNERIE (brique, ciment et béton, etc.) : forets au carbure pour le mode de percussion.
3. Veiller à ce que la pièce à percer soit solidement retenue ou fixée en place. Afin d’éviter les avaries
aux matériaux minces, les adosser à un bloc de bois épais.
4. Toujours exercer la pression en ligne directe avec le foret. N’user que de la force qu’il faut pour que
le foret continue de percer; éviter de trop forcer, ce qui pourrait faire caler le moteur ou dévier le
foret.
5. Saisir fermement la perceuse afin de contrer l’effet de torsion de l’outil en marche.
6. LA PERCEUSE S’ÉTOUFFE habituellement lorsqu’elle est surchargée ou utilisée de façon inappropriée.
RELÂCHER IMMÉDIATEMENT L’INTERRUPTEUR À DÉTENTE, retirer le foret du matériau et déter miner
la cause du blocage. ÉVITER DE METTRE EN MARCHE ET HORS CIRCUIT L’OUTIL À L’AIDE DE L’INTERRUPTEUR À DÉTENTE DANS LE BUT DE FAIRE DÉMARRER LA PERCEUSE BLOQUÉE, CELA
POURRAIT L’ENDOMMAGER.
7. Afin de minimiser l’étouffement du moteur ou le défoncement de la pièce, réduire la pression et faire
avancer plus doucement le foret vers la fin de sa course.
8. Laisser le moteur en marche lorsqu’on retire le foret d’un trou afin d’éviter qu’il se coince.
9. Il n’est pas nécessaire de pratiquer un creux de guidage avec les perceuses à régulateur de vitesse.
Utiliser plutôt une basse vitesse pour commencer le trou, puis accélérer en enfonçant plus profondément l’interrupteur à détente lorsque le foret est suffisamment inséré dans la pièce.
PERÇAGE DANS LE MÉTAL
Utiliser de l’huile de coupe pour percer dans les métaux, sauf la fonte et le laiton qui se percent à sec.
L’huile de coupe la plus efficace est l’huile sulfurisée ou l’huile de lard; la graisse de bacon est parfois
suffisante.
NOTE : Il peut être plus facile de percer de gros trous dans l’acier (de 7,9 mm à 9,5 mm (de 5/16 po
à 1/2 po)) lorsqu’on perce un trou de guidage (de 4 mm à 4,8 mm (de 5/32 po à 3/16 po)) au
préalable.
PERÇAGE DANS LE BOIS
Les forets hélicoïdaux à métal peuvent servir à percer le bois, mais il faut les retirer souvent du trou pour
chasser les copeaux et rognures des goujures afin d’éviter qu’ils ne surchauffent. Pour percer de gros
trous, utiliser les forets à bois d’une perceuse électrique. Adosser les matériaux friables à un bloc de bois
quelconque.
PERÇAGE DANS LA MAÇONNERIE
Choisir le mode de perçage à percussion. Utiliser des forets à maçonnerie à pointe au carbure. Exercer
une pression constante à basse vitesse, sans forcer afin d’éviter de casser les matériaux friables. Une
production uniforme de poussière à débit moyen indique un perçage convenable.
Retrait du mandrin
DÉBRANCHER LA PERCEUSE.
NOTE : S’assurer que la perceuse est en mode de perçage (et non de percussion) avant d’en retirer le
mandrin.
Insérer la courte extrémité d’une clé hexagonale (non comprise) d’au moins 6,4 mm (1/4 po) dans le
mandrin. Utiliser un marteau doux pour frapper d’un coup sec la longue extrémité de la clé dans le sens
horaire (fig. 6). On desserre ainsi la vis qui se trouve dans le mandrin.
Ouvrir complètement les mâchoires du mandrin et insérer un tournevis (ou un tournevis Torx, le cas
échéant) entre les mâchoires du mandrin afin d’atteindre la tête de la vis. Retirer la vis en la faisant tourner
dans le sens horaire (filet à gauche). Insérer la clé hexagonale dans le mandrin (fig. 6). Utiliser un
marteau doux pour frapper d’un coup sec la clé dans le sens antihoraire. On desserre ainsi le mandrin
suffisamment pour le dévisser à la main.
Installation du mandrin
Visser à fond le mandrin à la main. Insérer la courte extrémité d’une clé hexagonale (non comprise) d’au
moins 6,4 mm (1/4 po) dans le mandrin. Frapper la longue extrémité de la clé dans le sens horaire à
l’aide d’un marteau doux (fig. 6). Bien serrer la vis à l’intérieur du mandrin.
EMPORTE-PIÈCE DE COUPE RAPIDE Utiliser avec des mandrins.
DIAMÈTRE EXTÉRIEUR POUR TUYAUX POUR TARAUDAGES
DE L’EMPORTE-PIÈCE DE DE
15,9 mm (5/8 po) — —
19 mm (3/4 po) 9,5 mm (3/8 po) —
22 mm (7/8 po) 12,7 mm (1/2 po) —
24 mm (15/16 po) — 19 mm (3/4 po)
25,4 mm (1 po) — —
27 mm (1 1/16 po) — —
28,5 mm (1 1/8 po) 19 mm (3/4 po) —
FORETS DE MAÇONNERIE À TIGE RONDE
Ces forets ont des pointes au carbure afin d’en optimiser le rendement et d’en
prolonger la durée pour la plupart des utilisations relatives au perçage de la
maçonnerie.
DIAMÈTRE DU PROFONDEUR TIGE
FORET (po) UTILISABLE (po) (po)
4,8 mm (3/16 po) 38,1 mm (1 1/2 po) 4,8 mm (3/16 po)
6,4 mm (1/4 po) 50 mm (2 po) 6,4 mm (1/4 po)
8 mm (5/16 po) 57,1 mm (2 1/4 po) 6,4 mm (1/4 po)
9,5 mm (3/8 po) 63,5 mm (2 1/2 po) 6,4 mm (1/4 po)
12,7 mm (1/2 po) 63,5 mm (2 1/2 po) 6,4 mm (1/4 po)
ENTRETIEN
Nettoyer l’outil seulement à l’aide d’un savon doux et d’un linge humide. Ne laisser aucun liquide s’infiltrer
dans l’outil et ne jamais immerger l’outil.
IMPORTANT: Pour assurer la SÉCURITÉ D’EMPLOI et la FIABILITÉ de l’outil, n’en confier la réparation,
l’entretien et les rajustements qu’à un centre de service ou à un atelier d’entretien autorisé n’utilisant que
des pièces de rechange identiques.
Accessoires
Les détaillants et le centre de service de la région vendent les accessoires recommandés pour l’outil. Pour
trouver un accessoire, composer le1 800 544-6986.
A VERTISSEMENT : L’utilisation de tout accessoire non recommandé pour l’outil peut être dangereuse.
Calibre minimal des cordons de rallonge
Tension Longueur totale du cordon en pieds
120 V De 0 à 25 De 26 à 50 De 51 à 100 De 101 à 150
240 V De 0 à 50 De 51à 100 De 101 à 200 De 201 à 300
Intensité (A)
Au Au Calibre moyen de fil
moins plus
0-6 18 16 16 14
6 - 10 18 16 14 12
10 - 12 16 16 14 12
12 - 16 14 12 Non recommandé
Page 4

Capacité maximale recommandée
CAPACITÉ DE LA PERCEUSE 12,7 mm (1/2 po)
TRS/MIN De 0 à 3 000
FORETS À MÉTAUX 12,7 mm (1/2 po)
FORETS À BOIS 31,8mm (1 1/4 po)
FORETS À MAÇONNERIE 15,9 mm (5/8 po)
LA VITESSE NOMINALE DES ACCESSOIRES DOIT ÊTRE ÉGALE OU SUPÉRIEURE AU RÉGIME DE L’OUTIL
(INDIQUÉ SUR LA PLAQUE SIGNALÉTIQUE DE CE DERNIER) AVEC LEQUEL ILS SONT UTILISÉS.
MEULES MÉTALLIQUES 101,6 mm (4 po) max. de diamètre
MEULES BOISSEAUX MÉTALLIQUES 76,2 mm (3 po) max. de diamètre
MEULES À POLIR 76,2mm (3 po) max. de diamètre
TAMPONS D’APPUI EN
CAOUTCHOUC 117,5 mm (4 5/8 po) max. de diamètre
Garantie complète de deux ans pour utilisation domestique
Black & Decker garantit le produit pour une période de deux ans contre tout vice de matière ou de
fabrication. Le produit défectueux sera réparé ou remplacé sans frais en vertu de l'alternative suivante.
Le premier choix ne donne droit qu'à un échange; il s'agit de retourner le produit chez le détaillant d'où il
provient (si celui-ci participe au programme d'échange). Il faut alors retourner le produit dans le délai
imparti par le détaillant (habituellement, entre 30 et 90 jours de la date d'achat). Le détaillant peut exiger
une preuve d'achat. Prière de vérifier avec le détaillant quant à sa politique relative aux retours au-delà
des délais accordés pour l'échange.
Le second choix consiste à retourner le produit (port payé) à un centre de service Black & Decker où il
sera réparé ou remplacé, à notre gré. Une preuve d'achat peut être exigée. Les coordonnées des centres
de service Black & Decker se trouvent à la rubrique «Outils électriques» des Pages jaunes.
La présente garantie ne couvre pas les accessoires. Les modalités de la présente garantie donnent des
droits légaux spécifiques. L'utilisateur peut se prévaloir d'autres droits selon l'état ou la province qu'il
habite. Pour obtenir de plus amples renseignements, communiquer avec le directeur du centre de service
Black & Decker de la région.
Renseignements relatifs au service
Black & Decker exploite un réseau complet de centres de service et d’ateliers d’entretien autorisés par toute
l’Amérique du Nord. Le personnel de tous les centres de service Black & Decker a reçu la formation voulue
pour assurer l’entretien efficace et fiable des outils électriques.
Pour obtenir des renseignements d’ordre technique, des conseils relatifs aux réparations ou des pièces de
rechange d’origine, communiquer avec le centre de service Black & Decker de la région.
On peut trouver l’adresse du centre de service de la région dans l’annuaire des Pages Jaunes à la rubrique
«Outils électriques» ou en composant le numéro suivant : 1 800 544-6986
ADVERTENCIAS E INSTRUCCIONES GENERALES DE SEGURIDAD PARA
TODAS LAS HERRAMIENTAS.
• CONSERVE LIMPIA EL AREA DE TRABAJO. Las áreas y los bancos con objetos acumulados en desorden
propician los accidentes.
• OTORGUE PRIORIDAD AL AMBIENTE DE TRABAJO. No exponga las herramientas eléctricas a la lluvia ni
las utilice en lugares húmedos o inundados. Ilumine bien la zona de trabajo. No utilice las herramientas
eléctricas en presencia de líquidos o gases inflamables. Los motores de estas herramientas producen
chispas, que pueden encender los vapores.
• PROTEJASE CONTRA EL CHOQUE ELECTRICO. Evite el contacto corporal con superficies aterrizadas, por
ejemplo; tuberías, radiadores, hornos, gabinetes de refrigeración, etc. Tenga precaución extrema cuando
taladre, atornille o corte en muros, pisos, techos u otras áreas en donde pueda encontrar cables eléctricos
vivos, no toque ninguna parte metálica de la herramienta. Sujete las herramientas solamente por las
empuñaduras de plástico para evitar descargas eléctricas.
• CONSERVE APARTADOS A LOS NIÑOS. No permita que niños ni otros visitantes toquen la herramienta ni
los cables de extensión. Todos los niños y otros visitantes deben apartarse del área de trabajo.
• GUARDE LAS HERRAMIENTAS QUE NO EMPLEE.Siempre que no use las herramientas, debe guardarlas
en un lugar seco y elevado o bajo llave, fuera del alcance de los niños.
• NO FUERCE LA HERRAMIENTA.Esta hará el trabajo mejor y de manera más segura bajo las condiciones
para las que se diseñó.
• EMPLEE LA HERRAMIENTA ADECUADA.No fuerce a una herramienta pequeña o a sus dispositivos de
montaje en una tarea destinada a una herramienta de alto rendimiento. No utilice la herramienta para
tareas para las que no ha sido diseñada.
• VISTASE DE MANERA ADECUADA.No utilice ropas sueltas ni joyas, pueden quedar atrapadas en las
partes móviles. Se recomienda el uso de guantes y calzado antiderrapante cuando trabaje a la
intemperie. Cúbrase el cabello si lo tiene largo.
• UTILICE GAFAS Y OTRO EQUIPO DE SEGURIDAD.Utilice anteojos de seguridad con cubiertas protectoras
laterales, que cumplan con los estándares de seguridad aplicables y, cuando se requiera, una máscara.
También utilice una mascarilla contra polvo si la operación de corte lo produce. Esto se aplica a todas las
personas en el área de trabajo. Utilice también un casco, protección para los oídos, guantes, calzado de
seguridad y sistemas recolectores de polvo cuando se especifiquen o se requieran.
• NO MALTRATE EL CORDON ELECTRICO.Nunca cargue la herramienta por el cable ni tire de éste para
desconectarlo de la toma de corriente. Aléjelo de calor, aceite y bordes afilados.
• ASEGURE LAS PIEZAS DE TRABAJO. Utilice prensas para sujetar su pieza de trabajo; es más seguro que
usar su mano y le deja ambas manos libres para operar la herramienta.
• NO SE SOBREEXTIENDA. Apoye bien los pies y conserve el equilibrio siempre.
• CUIDE SUS HERRAMIENTAS. Conserve sus herramientas limpias y afiladas para un rendimiento mejor y
más seguro. Siga las instrucciones de lubricación y cambio de accesorios. Revise la herramienta
periódicamente y si está dañada, hágala reparar por una estación de servicio autorizada. Revise los
cables de extensión periódicamente y reemplácelos si están dañados. Conserve las empuñaduras secas,
limpias y libres de aceite y grasa.
• DESCONECTE LAS HERRAMIENTAS.Desconecte la herramienta cuando no la utilice, cuando la cambie de
lugar, antes de darle servicio y cuando le cambie accesorios (como brocas, puntas, cortadores) o le haga
ajustes.
• QUITE LAS LLAVES DE AJUSTE Y LAS HERRAMIENTAS DE MANO. Acostúmbrese a verificar que se hayan
retirado todas las llaves antes de encender la unidad.
• EVITE EL ENCENDIDO ACCIDENTAL.No acarree la herramienta con el dedo en el interruptor. Asegúrese
que el interruptor esté en posición de apagado antes de conectar la unidad.
• CORDONES DE EXTENSION. Asegúrese que su extensión esté en buenas condiciones. Cuando utilice una
extensión, asegúrese que tenga el calibre suficiente para conducir la corriente que su herramienta
necesita. Una extensión con calibre menor al necesario causará una caída en el voltaje de la línea,
resultando en pérdida de potencia y sobrecalentamiento. La tabla siguiente muestra el calibre correcto
para usarse, de acuerdo con la longitud de la extensión y el amperaje en la placa de identificación. Si
tiene dudas, utilice el calibre siguiente. Mientras menor sea el número del calibre, mayor será la
capacidad del cable.
• CORDONES DE EXTENSION PARA INTEMPERIE.Cuando utilice la herramienta a la intemperie, utilice
únicamente extensiones destinadas para este uso y marcadas así.
• ESTE ALERTA.Concéntrese en lo que hace. Utilice el sentido común. No opere la herramienta si está
cansado o discapacitado de alguna manera.
• REVISE LAS PARTES DAÑADAS. Antes de seguir usando la herramienta, debe revisar las guardas y otras
partes para determinar realizarán su función adecuadamente. Revise la alineación de las partes móviles,
la manera en que están sujetas, que no haya piezas o soportes rotos, y cualesquiera otras condiciones
que puedan afectar la operación. Una guarda u otra pieza que esté dañada debe ser reparada o
reemplazada en un centro de servicio autorizado. No use la herramienta si el interruptor no enciende y
apaga.
• SERVICIO Y REPARACIONES.Las reparaciones, el mantenimiento y cualquier ajuste no especificados en
este manual deben ser realizados por los centros de servicio autorizado Black & Decker u otras estaciones
de servicio calificadas, que siempre utilicen refacciones idénticas.
• EMPLEO DE ACCESORIOS Y DISPOSITIVOS. El uso de cualquier accesorio o dispositivo no recomendado
para emplearse con esta herramienta puede ser peligroso. Nota: Consulte la sección referente a los
accesorios de este manual para obtener más detalles.
ADVERTENCIAS E INSTRUCCIONES DE SEGURIDAD:
DOBLE AISLAMIENTO
Las herramientas con doble aislamiento están construidas con dos capas separadas de aislamiento
eléctrico o una capa de espesor doble entre usted y el sistema eléctrico de la herramienta. Las
herramientas con doble aislamiento no necesitan conectarse a tierra. Como resultado, su herramienta está
equipada con una clavija de dos patas que le permite utilizar extensiones sin preocuparse por tener una
conexión a tierra.
El doble aislamiento no reemplaza las precauciones normales de seguridad cuando se opere la
herramienta. El sistema de aislamiento le proporciona protección añadida contra las lesiones resultantes
de posibles fallas en el aislamiento eléctrico de la herramienta.
PARTES DE REPUESTO:Solamente emplee refacciones idénticas cuando haga servicio. Repare o
reemplace los cordones eléctricos dañados.
ADVERTENCIAS E INSTRUCCIONES DE SEGURIDAD:
CLAVIJAS POLARIZADAS
Las clavijas polarizadas (con una pata más ancha que la otra) se utilizan en los equipos para reducir el
riesgo de choque eléctrico. Estas clavijas solamente se ajustan a las tomas de corriente de una manera. Si
la clavija no se ajusta completamente a la toma de corriente, inviértala. si aún así no ajusta, comuníquese
con un electricista calificado para que le instale la toma de corriente adecuada. Por ningún motivo cambie
la clavija en ninguna manera.
Motor
Su herramienta funciona con un motor Black & Decker interconstruido. Asegúrese que su alimentación de
corriente concuerde con la marcada en la placa de identificación. 120 volts, 50/60 Hz o 120 volts CA
significa que la herramienta está diseñada para funcionar con corriente doméstica de 120 volts.
Disminuciones en el voltaje mayores al 10% causarán pérdida de potencia y sobrecalentamiento. Todas
las herramientas Black & Decker se prueban en la fábrica. Si la herramienta no funciona, verifique la
alimentación de corriente.
Operación
Mango lateral (Figura 1)
UTILICE SIEMPRE EL MANGO LATERAL.
El mango lateral está ensamblado y listo para colocarse en el taladro. Deslice el mango sobre portabrocas
sin llave y muévalo en el collar justo por detrás del portabrocas. Asegúrese que el mango esté al frente de
la herramienta, sin tocar el portabrocas. Este procedimiento se facilita al hacer movimientos hacia atrás y
hacia adelante. Si la abertura del mango es demasiado pequeña para librar el portabrocas, afloje la
mariposa de plástico (en sentido contrario a las manecillas del reloj). Esto le permitirá aumentar el tamaño
de la abertura y deslizar el mango sobre el portabrocas.
Imported by / Importé par
Black & Decker Canada Inc.
100 Central Ave.
Brockville (Ontario) K6V 5W6
Voir la rubrique “Outils électriques”
des Pages Jaunes
pour le service et les ventes.
ESPAÑOL
MANUAL DE INSTRUCCIONES
TALADRO DE 12,7 MM (1/2")
DE 5,0 AMPERES
Q270
ANTES DE DEVOLVER ESTE PRODUCTO POR CUALQUIER
RAZON POR FAVOR LLAME
326-7100
INFORMACION QUE DEBE SABER
•Apriete firmemente a mano el portabrocas sin llave después de
cada cambio de broca.
•Para funcionar, el taladr o debe estar en modo de taladro o de
rotomartillo.
CONSERVE ESTE MANUAL PARA REFERENCIAS FUTURAS
INSTRUCTIVO DE OPERACIÓN, CENTROS DE SERVICIO Y PÓLIZA DE GARANTÍA.
ADVERTENCIA: LÉASE ESTE INSTRUCTIVO ANTES
DE USAR EL PRODUCTO. SI TIENE DUDAS, POR FAVOR LLAME. 326-7100
Calibre mínimo para cordones de extensión
Volts Longitud total del cordón en metros
120V 0-7.62 7.63-15.24 15.25-30.48 30.49-45.72
240V 0-15.24 15.25-30.48 30.49-60.96 60.97-91.44
AMPERAJE
Más No más Calbre del cordón
de de
0-6 18 16 16 14
6 - 10 18 16 14 12
10 - 12 16 16 14 12
12 - 16 14 12 No Recomendado
ADVERTENCIA: ADVERTENCIAS E INSTRUCCIONES IMPORTANTES DE
SEGURIDAD
PARA REDUCIR EL RIESGO DE LESIONES:
• Antes de cualquier uso, asegúrese que cualquier persona que vaya a utilizar esta herramienta lea y
comprenda todas las instrucciones de seguridad y la información contenida en este manual.
• Conserve estas instrucciones y repáselas con frecuencia antes de usar la herramienta e instruir a otras
personas.
ADVERTENCIA: Siempre que utilice herramientas eléctricas debe seguir ciertas precauciones
básicas de seguridad, a fin de reducir los riesgos de incendio, choque eléctrico y
lesiones personales, entre las que se encuentran las siguientes.
LEA TODAS LAS INSTRUCCIONES
Page 5

Para ajustar la varilla de profundidad, afloje (en sentido contrario a las manecillas del reloj) el mango
lateral y deslice la varilla de profundidad hasta la posición deseada.
La varilla de profundidad le permitirá taladrar o atornillar hasta una profundidad específica. Una vez que
la varilla de profundidad haga contacto con la superficie del material, la broca dejará de taladrar (pero
continuará girando).
Interruptor
Para encender el taladro, oprima el gatillo interruptor; para apagarlo, libérelo. Para asegurar el gatillo en
posición de encendido para operación continua, oprima el gatillo interruptor y empuje el botón de trabado
mostrado en la figura 2, y libere el gatillo suavemente a continuación. Para liberar el mecanismo de
encendido permanente, oprima a fondo el gatillo, y libérelo a continuación. Antes de usar la herramienta
(cada vez), asegúrese que el mecanismo de liberación del seguro de encendido funciona correctamente. No
asegure el taladro en posición de operación continua cuando taladre a mano, de manera que pueda liberar
el gatillo interruptor instantáneamente si la broca se atasca en el barreno. El mecanismo de operación
continua se debe usar únicamente cuando el taladro se encuentra montado en un soporte, o es sujetado de
alguna manera para conservarlo estacionario. Asegúrese de liberar el mecanismo de operación continua
antes de desconectar la clavija de la toma de corriente. No hacer esto causará que la herramienta se
encienda inmediatamente la próxima vez que lo conecte, con el consiguiente riesgo de daños y lesiones.
INTERRUPTOR DE VELOCIDAD VARIABLE
Esto le permitirá controlar la velocidad a MANO LIBRE—mientras más a fondo oprima el gatillo, mayores
serán las rpm. Utilice velocidades bajas para iniciar barrenos sin marca de centro, para barrenar metales,
plásticos y cerámica, o atornillar. Las velocidades altas son mejores para perforar madera y aglomerados,
y para utilizar accesorios abrasivos y de pulido.
Interruptor de reversa
Su herramienta cuenta con un interruptor para operar el taladro en reversa, como se ilustra en la figura
3A. Para operar el taladro hacia adelante (para casi todas las operaciones de taladrado y atornillado),
deslice el interruptor de reversa hacia la izquierda, visto desde el portabrocas, figura 3B. Para operar el
taladro en reversa (para sacar tornillos o brocas atascadas) deslice el interruptor de reversa hacia la
derecha. No mueva el interruptor mientras el taladro esté en funcionamiento, ya que puede dañar el
taladro.
Acción de rotomartillo
Su taladro cuenta con acción de percusión que se acciona al deslizar el selector de modo. Para
seleccionar el modo de rotomartillo, apague el taladro y deslice el selector hacia el símbolo del martillo
que se encuentra en la carcaza del taladro, como se ilustra en la figura 4A. Para seleccionar el modo de
taladro, apague el taladro y deslice el selector hacia el símbolo de taladro, como se muestra en la figura
4B.
Operación
TALADRADO
1. Desconecte el taladro siempre que cambie brocas o accesorios.
2. Utilice exclusivamente brocas afiladas. PARA MADERA utilice brocas helicoidales, brocas de horquil-
la, brocas de poder o brocas sierra. PARA METAL utilice brocas helicoidales de alta velocidad. PARA
MAMPOSTERÍA, en superficies como ladrillo, cemento, tabique, etc., utilice brocas con punta de carburo.
3. Asegúrese que el material que va a barrenar esté firmemente anclado o asegurado. Si va a trabajar
con materiales de poco espesor, utilice un bloque de madera como respaldo para evitar daños en el
material.
4. Siempre aplique presión al taladro en línea recta con la broca. Haga suficiente presión para que la
broca siga perforando paro no tanta para que el motor se atasque o la broca se desvíe.
5. Sujete el taladro firmemente para contrarrestar la acción de torsión de la broca.
6. SI EL TALADRO SE ATASCA, esto se deberá probablemente a que está sobrecargado. SUELTE EL
GATILLO DE INMEDIATO, retire la broca de la pieza de trabajo y deter mine la causa del atascamiento. NO APRIETE EL GATILLO PARA HACER GIRAR LA BROCA CUANDO ESTA ATORADA,
ESTO PUEDE DAÑAR LA HERRAMIENTA.
7. Para reducir el peligro de que se atasque el taladro, reduzca la presión y deje ir suavemente la
broca hacia el final del barreno.
8. Conserve el motor trabajando al retirar la broca del interior del barreno, de esta manera evitará
que se atasque.
9. Con los taladros de velocidad variable no hay necesidad de hacer marcas de centro para iniciar el
barreno. Empiece con una velocidad baja, y auméntela cuando sienta que la broca ha penetrado lo
suficiente para evitar que salga del barreno.
TALADRADO EN METAL
Utilice un lubricante para corte cuando perfore metales, excepto en los casos de hierro fundido o latón en
los que se deberá taladrar en seco. Los lubricantes más adecuados son los de aceite sulfúrico y la manteca
de cerdo; la grasa de tocino también funciona.
NOTA: los barrenos grandes (de 3,1 mm a 9,5 mm [5/16" a 3/8"]) se pueden hacer de manera más
sencilla si se barrena primero un agujero guía.
TALADRADO EN MADERA
Se puede utilizar el mismo tipo de brocas helicoidales que se emplean para metal cuando haga barrenos
en madera. Debe sacar las brocas con frecuencia del barreno para quitar las virutas acumuladas en las
estrías y evitar que se sobrecalienten. Para barrenos más grandes, utilice brocas de poder para madera.
Los trabajos que sean susceptibles de astillarse deben respaldarse con un bloque de madera.
TALADRADO EN MAMPOSTERIA
Utilice brocas para mampostería con punta de carburo a velocidad baja. Conserve presión uniforme en el
taladro, pero no tanta como para estrellar los materiales quebradizos. La salida uniforme de polvo indica
la que la velocidad de perforación es la adecuada.
Remoción del portabrocas
DESCONECTE EL TALADRO.
NOTA:antes de intentar quitar el portabrocas, coloque el selector de modo en la posición de taladro (no
rotomartillo).
Apriete el portabrocas alrededor de una llave allen (no provista con la unidad) de 6 mm (1/4") o mayor.
Utilizando un martillo de madera o un objeto similar, golpee con firmeza el extremo largo de la llave en el
sentido de las manecillas del reloj, como se observa en la figura 5. Esto aflojará el tornillo que se
encuentra en el interior del portabrocas.
Abra completamente las mordazas en introduzca la punta de un destornillador plano por el frente del
portabrocas entre las mordazas hasta alcanzar la cabeza del tornillo. Afloje (en el sentido de las
manecillas del reloj, cuerda izquierda) y quite el tornillo. Coloque de nuevo la llave allen en el
portabrocas como muestra la figura 6. Utilizando un martillo de madera u otro objeto similar, de un
golpe seco a la llave en contra del sentido de las manecillas del reloj. Este procedimiento aflojará el
portabrocas para que pueda removerlo a mano.
Instalación del portabrocas
Atornille a mano el portabrocas tanto como le sea posible. Apriete el portabrocas alrededor del extremo
corto de una llave allen de 6 mm (1/4") o mayor (no suministrada). Utilizando un martillo de madera u
otro objeto similar, de un golpe seco al extremo largo de la llave allen en el sentido de las manecillas del
reloj, como se observa en la figura 6. Apriete con firmeza el tornillo que se encuentra en el interior del
portabrocas.
BOCAS SIERRA DE ALTA VELOCIDAD USO CON MANDRIL
DIAMETROPARA CONDUITPARA TUBOS ROSCADOS
EXTERNO TAMAÑOS TAMAÑOS
15.9 mm (5/8") — —
19 mm (3/4") 9.5 mm (3/8") —
22 mm (7/8") 12.7 mm (1/2" ) —
24 mm (15/16") — 19 mm (3/4")
25.4 mm (1") — —
27 mm (1-1/16") — —
28.5 mm (1-1/8") 19 mm (3/4") —
BROCAS PARA MAMPOSTERIA CON VASTAGO REDONDO
Estas brocas tienen punta de carburo para el máximo rendimiento y extra larga
duración en la mayor parte de las aplicaciones de taladrado en mampostería
DIAMETRO PROFUNDIDAD VASTAGO
cm (IN.) UTILIZABLE cm (IN.) cm (IN.)
4.8 mm (3/16") 38.1 mm (1-1/2") 4.8 mm (3/16")
6.4 mm (1/4") 50 mm (2") 6.4 mm (1/4")
8 mm (5/16") 57.1 mm (2-1/4") 6.4 mm (1/4")
9.5 mm (3/8") 63.5 mm (2-1/2") 6.4 mm (1/4")
12.7 mm (1/2") 63.5 mm (2-1/2") 6.4 mm (1/4")
Capacidades máximas recomendadas
CAPACIDAD DEL T ALADRO 12.7 mm (1/2")
RPM 0–3,000
BROCAS PARA MET AL 12.7 mm (1/2")
BROCAS PARA MADERA 31.8 mm (1-1/4")
BROCAS PARA MAMPOSTERIA 15.9 mm (5/8")
LOS ACCESORIOS DEBEN ESTAR F ABRICADOS PARA EMPLEARSE A UNA VELOCIDAD IGUAL O
SUPERIOR QUE LAS RPM CITADAS EN LA PLACA DE IDENTIFICACION DE LA HERRAMIENT A QUE SE
VA A EMPLEAR.
CEPILLOS CIRCULARES DE ALAMBRE 101.6 mm (4") Diámetro máximo
CEPILLOS CONICOS DE ALAMBRE 76.2 mm (3") Diámetro máximo
RUEDAS PARA PULIR 76.2 mm (3") Diámetro máximo
RESPALDOS DE GOMA 117.5 mm (4-5/8") Diámetro máximo
MANTENIMIENTO
Solamente utilice jabón suave y un trapo húmedo para limpiar la herramienta. Nunca permita que ningún
líquido se introduzca en la herramienta; nunca sumerja ninguna parte de la herramienta en ningún
líquido.
IMPORTANTE:Para garantizar la SEGURIDAD y la CONFIABILIDAD del producto, las reparaciones, el
mantenimiento y los ajustes deben ser realizados por centros de servicio autorizados u otras
organizaciones de servicio calificadas, que siempre utilicen partes de repuesto idénticas.
Accesorios
Los accesorios recomendados para emplearse con su herramienta se encuentran a su disposición con su
distribuidor local o en los centros de servicio autorizado. Si necesita ayuda en relación con los accesorios,
por favor llame 326-7100.
ADVERTENCIA: El uso de cualquier accesorio no recomendado para emplearse con esta
herramienta puede ser peligroso.
CEPILLO CONICO DE ALAMBRE DE 76 MM (3")
Se usa para limpiar y remover óxido y pintura vieja (vástago recto). RPM máximas seguras—5,000.
PARAREPARACION YSERVICIO DE SUS HERRAMIENTAS ELECTRICAS FAVOR DE
DIRIGIRSE ALCENTRO DE SERVICIO MAS CERCANO
CULIACAN
Av. Nicolas Bravo #1063 Sur (91 671) 242 10
GAUDALAJARA
Av. La Paz #1779 (91 3) 826 69 78.
MEXICO
Eje Lázaro Cárdenas No. 18 Local D, Col. Obrera 588-9377
MERIDA
Calle 63 #459-A (91 99) 23 54 90
MONTERREY
Av. Francisco I. Madero Pte. 1820-A (91 83) 72 11 25
PUEBLA
17 Norte #205 (91 22) 46 37 14
QUERETARO
Av. Madero 139 Pte. (91 42) 14 16 60
SAN LOUIS POTOSI
Pedro Moreno #100 Centro (91 48) 14 25 67
TORREON
Blvd. Independencia, 96 pte. (91 17) 16 52 65
VERACRUZ
Prolongación Diaz Miron #4280 (91 29) 21 70 16
VILLAHERMOSA
Constitucion 516-A (91 93) 12 53 17
PARAOTRAS LOCALIDADES LLAME AL: 326 7100
Información de servicio
Black & Decker ofrece una red completa de centros de servicio propiedad de la compañía y franquiciados
a través de toda Norteamérica. Todos los centros de servicio Black & Decker cuentan con personal
capacitado para proporcionar el servicio a herramientas más eficiente y confiable.
Siempre que necesite consejo técnico, reparaciones o partes de repuesto genuinas, comuníquese con el
centro Black & Decker más cercano a usted.
Para encontrar su centro de servicio local, consulte la sección amarilla bajo “Herramientas eléctricas”, o
llame al: 326-7100.
POLIZA DE GARANTIA
IDENTIFICACION DEL PRODUCTO:
Sello firma del Distribuidor.
Nombre del producto:_____________ Mod/Cat.: ____________________
Marca: _________________________ Núm. de serie: _________________
(Datos para ser llenados por el distribuidor)
Fecha de compra y/o entrega del producto: ____________________________
Nombre y domicilio del distribuidor donde se adquirió el producto:
_________________________________________________________________
Este producto esta garantizado por dos años a partir de la fecha de entrega, contra cualquier defecto en
su funcionamento, así como en materiales y mano de obra empleados para su fabricación. Nuestra
garantía incluye la reparación o reposición del producto y/o componentes sin cargo alguno para el
cliente, incluyendo mano de obra, así como los gastos de transportación razonablemente erogados
derivados del cumplimiento de este certificado.
Para hacer efectiva esta garantía deberá presentar su herramienta y esta póliza
sellada por el establecimiento comercial donde se adquirió el producto, de no contar con ésta, bastará la
factura de compra.
EXCEPCIONES.
Esta garantía no será válida en los siguientes casos:
• Cuando el producto se hubiese utilizado en condiciones distintas a las normales;
• Cuando el producto no hubiese sido operado de acuerdo con el instructivo de uso que se acompaña;
• Cuando el producto hubiese sido alterado o reparado por personas distintas a las enlistadas al final
de este certificado.
Anexo encontrará una relación de sucursales de servicio de fábrica, centros de servicio autorizados y
franquiciados en la República Mexicana, donde podrá hacer efectiva su garantía y adquirir partes,
refaciones y accesorios originales.
Todas las herramientas Black & Decker son de la mejor calidad
IMPORTADO: BLACK & DECKER S.A. DE C.V.
BOSQUES DE CIDROS ACCESO RADIATAS NO. 42
COL. BOSQUES DE LAS LOMAS.
05120 MÉXICO, D.F
TEL. 3-26-71-00
SECCI N
AMARILLA
Si funciona…
y funciona muy bien.
Para servicio y ventas consulte
“HERRAMIENTAS ELECTRICAS”
en la sección amarilla.
 Loading...