

Black & Decker PS3250, PS3350, PS3525, PS3550, PS3625 Instruction Manual
...
GENERAL SAFETY RULES - FOR ALLBATTERY OPERATED TOOLS
WARNING!READ AND UNDERSTAND ALLINSTRUCTIONS.
Failure to follow all instructions listed below, may result in electric shock, fire and/or serious
personal injury.
SAVE THESE INSTRUCTIONS
Work Area
• Keep your work area clean and well lit. Cluttered benches and dark areas invite accidents.
• Do not operate power tools in explosive atmospheres, such as in the presence of
flammable liquids, gases, or dust. Power tools create sparks which may ignite the dust or
fumes.
• Keep bystanders, children, and visitors away while operating a power tool.
Distractions can cause you to lose control.
Electrical Safety
• Do not abuse the cord. Never use the cord to carry the tool. Keep cord away from
heat, oil, sharp edges or moving parts. Replace damaged cords immediately.
Damaged cords may create a fire.
• A battery operated tool with integral batteries or a separate battery pack must be
recharged only with the specified charger for the battery. Acharger that may be suitable
for one type of battery may create a risk of fire when used with another battery.
• Use battery operated tool only with specifically designated battery pack. Use of any
other batteries may create a risk of fire.
Personal Safety
• Stay alert, watch what you are doing and use common sense when operating a power
tool. Do not use tool while tired or under the influence of drugs, alcohol, or
medication. A moment of inattention while operating power tools may result in serious
personal injury,
• Dress properly. Do not wear loose clothing or jewelry. Contain long hair. Keep your
hair, clothing, and gloves away from moving parts. Loose clothes, jewelry, or long hair
can be caught in moving parts.
• Avoid accidental starting. Be sure switch is in the locked or off position before
inserting battery pack. Carrying tools with your finger on the switch or inserting the battery
pack into a tool with the switch on invites accidents.
• Remove adjusting keys or wrenches before turning the tool on.Awrench or a key that is
left attached to a rotating part of the tool may result in personal injury.
• Do not overreach. Keep proper footing and balance at all times. Proper footing and
balance enable better control of the tool in unexpected situations.
• Use safety equipment. Always wear eye protection. Dust mask, non-skid safety shoes,
hard hat, or hearing protection must be used for appropriate conditions.
Tool Use and Care
• Use clamps or other practical way to secure and support the workpiece to a stable
platform. Holding the work by hand or against your body is unstable and may lead to loss of
control.
• Do not force tool. Use the correct tool for your application. The correct tool will do the
job better and safer at the rate for which it is designed.
• Do not use tool if switch does not turn it on or off.Atool that cannot be controlled with the
switch is dangerous and must be repaired.
• Disconnect battery pack from tool or place the switch in the locked or off position
before making any adjustments, changing accessories, or storing the tool. Such
preventive safety measures reduce the risk of starting the tool accidentally.
• Store idle tools out of reach of children and other untrained persons. Tools are
dangerous in the hands of untrained users.
• When battery pack is not in use, keep it away from other metal objects like: paper
clips, coins, keys, nails, screws or other small metal objects that can make a
connection from one terminal to another. Shorting the battery terminals together may
cause sparks, burns, or a fire.
• Maintain tools with care. Keep cutting tools sharp and clean. Properly maintained tools,
with sharp cutting edge are less likely to bind and are easier to control.
• Check for misalignment or binding of moving parts, breakage of parts, and any other
condition that may affect the tool’s operation. If damaged, have the tool serviced
before using. Many accidents are caused by poorly maintained tools.
• Use only accessories that are recommended by the manufacturer for your model.
Accessories that may be suitable for one tool may create a risk of injury when used on
another tool.
Service
• Tool service must be performed only by qualified repair personnel. Service or
maintenance performed by unqualified personnel may result in a risk of injury.
• When servicing a tool, use only identical replacement parts. Follow instructions in the
Maintenance section of this manual. Use of unauthorized parts or failure to follow
Maintenance Instructions may create a risk of shock or injury.
SPECIFIC SAFETY RULES
• Hold tool by insulated gripping surfaces when performing an operation where the
cutting tool may contact hidden wiring or its own cord. Contact with a "live" wire will
make exposed metal parts of the tool "live" and shock the operator.
The label on your tool may include the following symbols.
V ..........................volts A..........................amperes
Hz ........................hertz W ........................watts
min ........................minutes ......................alternating current
......................direct current
n
o........................no load speed
..........................
Class II Construction
........................earthing terminal
........................safety alert symbol .../min ..................revolutions or
reciprocations
per minute
WARNING: Some dust created by power sanding, sawing, grinding, drilling, and other
construction activities contains chemicals known to cause cancer, birth defects or other
reproductive harm. Some examples of these chemicals are:
• lead from lead-based paints,
• crystalline silica from bricks and cement and other masonry products, and
• arsenic and chromium from chemically-treated lumber. (CCA)
Your risk from these exposures varies, depending on how often you do this type of work. To
reduce your exposure to these chemicals:work in a well ventilated area, and work with
approved safety equipment, such as those dust masks that are specially designed to filter
out microscopic particles.
VEA EL ESPAÑOL EN LA CONTRAPORTADA.
SAVE THIS MANUAL FOR FUTURE REFERENCE.
INSTRUCTIVO DE OPERACIÓN, CENTROS DE SERVICIO Y
PÓLIZA DE GARANTÍA. ADVERTENCIA: LÉASE ESTE
INSTRUCTIVO ANTES DE USAR ELPRODUCTO.
INSTRUCTION
MANUAL
Catalog Numbers PS3250, PS3350, PS3525,
PS3550, PS3625, PS3650, PS3725, PS3750
KEY INFORMATION YOU SHOULD KNOW :
• Battery pack must be charged for twelve hours before initial use.
•Charger may hum; batteries or charger may become warm during charging.
Cat No. PS3250, PS3350, PS3525, PS3550, PS3625, PS3650, PS3725, PS3750
Form No. 396333-01 (APR01) Printed in China Copyright©2001 Black &Decker
9999....6666,,,, 11112222,,,, 11114444....4444 &&&& 11118888 VVVVOOOOLLLLTTTT 3333////8888”””” CCCCOOOORRRRDDDDLLLLEEEESSSSSSSS DDDDRRRRIIIILLLLLLLLSS
SS
Safety Warnings and Instructions: Charging the Drill
1. This manual contains important safety and operating instructions.
2. Before using battery charger, read all instructions and cautionary markings on (1) battery
charger, (2) battery, and (3) product using battery.
3. CAUTION: To reduce the risk of injury, charge only Black & Decker Power Packs. Other
types of batteries may burst causing personal injury and damage.
4. Do not expose charger to rain or snow.
5. Use of an attachment not recommended or sold by Black & Decker may result in a risk
of fire, electric shock, or injury to persons.
6. To reduce risk of damage to electric plug and cord, pull by plug rather than cord when
disconnecting charger.
7. Make sure cord is located so that it will not be stepped on, tripped over, or otherwise subjected to damage or stress.
8. An extension cord should not be used unless absolutely necessary. Use of improper
extension cord could result in a risk of fire, electric shock or electrocution.
a. Two-wire cords can be used with 2-wire or 3-wire extension cords. Only round jacketed
extension cords should be used, and we recommend that they be listed by Underwriters
Laboratories (U.L.). If the extension is to be used outside, the cord must be suitable for
outdoor use. Any cord marked for outdoor use can also be used for indoor work. The letters "W" or "WA" on the cord jacket indicate that the cord is suitable for outdoor use.
b. An extension cord must have adequate wire size (AWG or American Wire Gauge) for
safety, and to prevent loss of power and overheating. The smaller the gauge number of
the wire, the greater the capacity of the cable; that is, 16 gauge has more capacity than
18 gauge. When using more than one extension to make up the total length, be sure
each extension contains at least the minimum wire size.
CHART FOR MINIMUM WIRE SIZE (AWG)OF EXTENSION CORDS
NAMEPLATE RATING AMPS – 0 – 10.0
Total Extension Cord Length(ft) 25 50 75 100 125 150
Wire Gauge 18 16 16 14 14 14
9. Use only the supplied charger when charging your drill. The use of any other charger
could damage the drill or create a hazardous condition.
10.Use only one charger when charging.
11.Do not attempt to open the charger or the drill. There are no customer serviceable parts
inside. Return to any authorized Black & Decker service center.
12.DO NOT incinerate the drill or battery packs even if they are severely damaged or completely worn out. The batteries can explode in a fire.
13.Do not incinerate the batteries. They can explode in a fire. A small leakage of liquid from
the battery cells may occur under extreme usage, charging or temperature conditions.
This does not indicate a failure. However, if the outer seal is broken and this leakage gets
on your skin:
a. Wash quickly with soap and water.
b. Neutralize with a mild acid such as lemon juice or vinegar.
c. If the battery liquid gets in your eyes, flush them with clean water for a minimum of 10
minutes and seek immediate medical attention. MEDICAL NOTE: The liquid is a 25-35%
solution of potassium hydroxide.
1
2
3
4
5
6
7
8
Depress for reverse (other side)
Enfoncer pour la marche arrière (edu côté droit)
Oprima para reversa (desde el lado derecho)
Depress for forward (this side)
Enfoncer pour la marche avant (du côté gauch)
Oprima para marcha hacia adelante (desde el lado izquierdo)

Charging the Power Pack
THE BATTERIES IN YOUR POWER PACK ARE NOT FULLY CHARGED AT THE
FACTORY. BEFORE ATTEMPTING TO CHARGE THEM, THOROUGHLYREAD ALL OF
THE SAFETY INSTRUCTIONS.
The 16 hour charger is designed to use standard household 120 volt 60 Hz power.
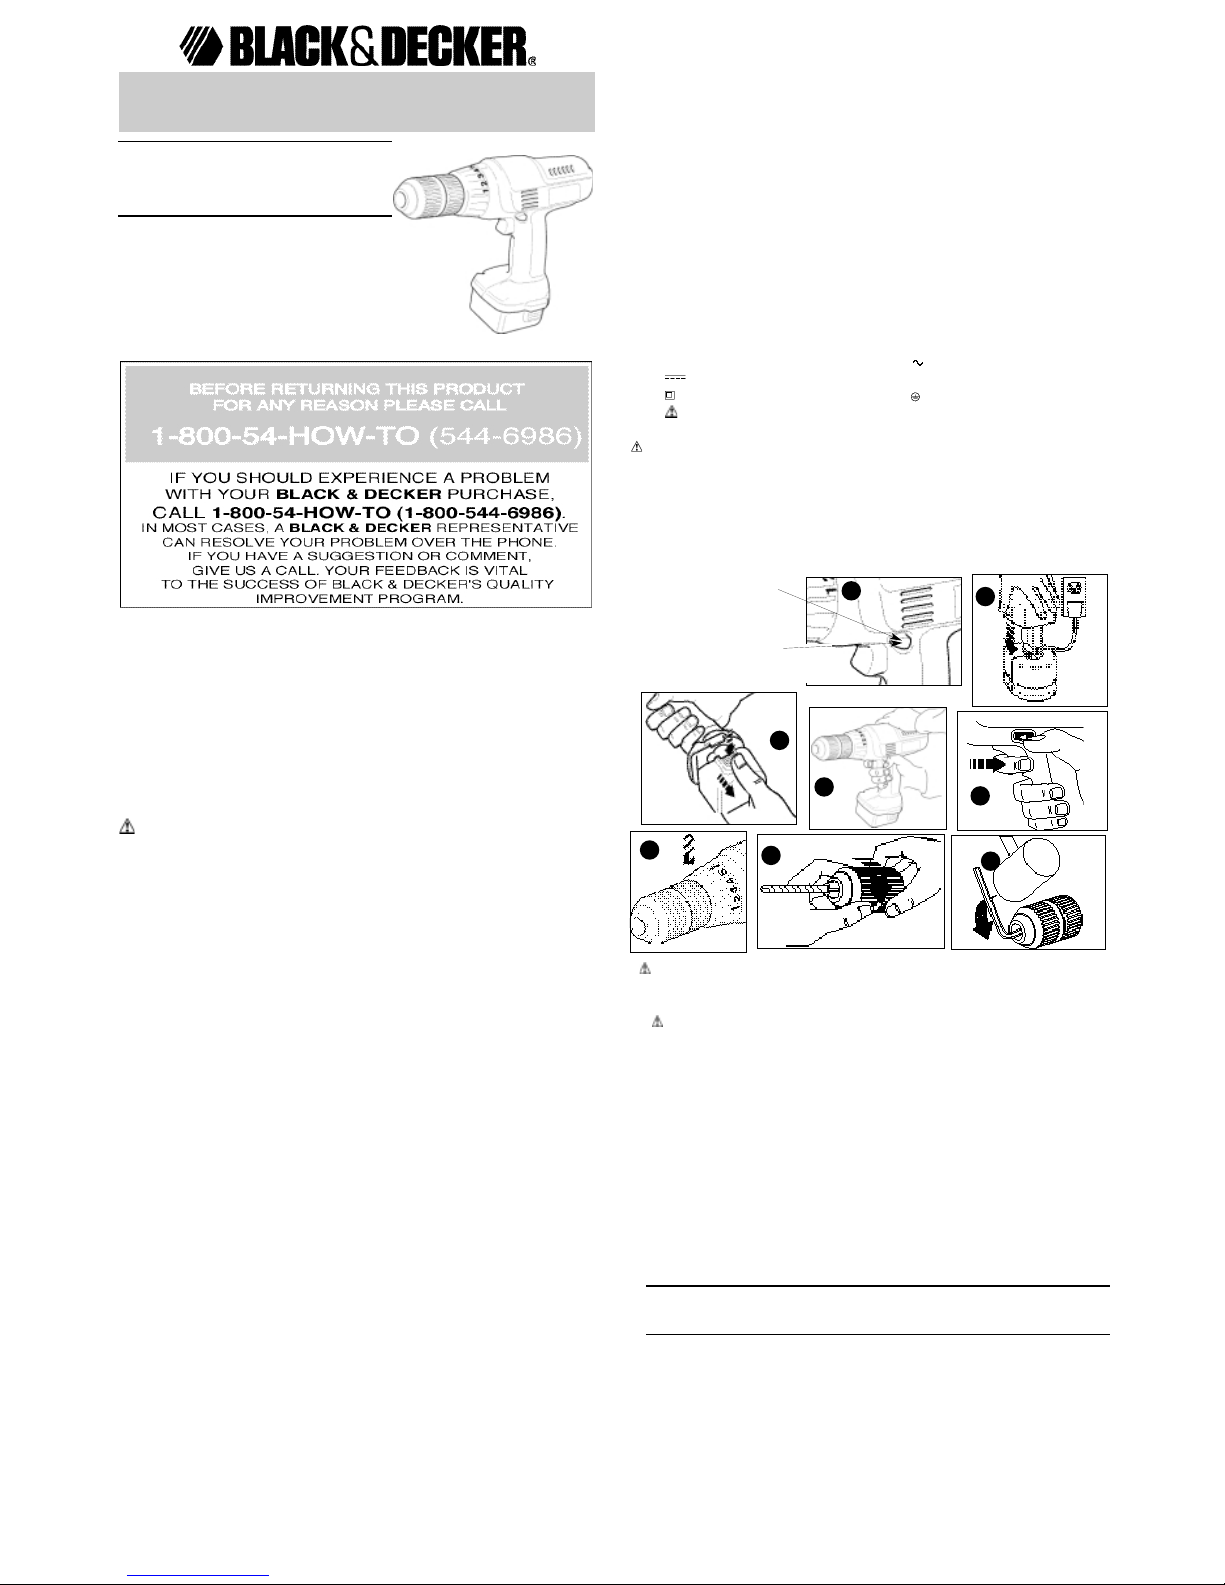
1. Put the switch control lever in the center OFF position (Fig. 1) and remove power pack
from the tool.
2. Plug the charger into any standard 120 Volt 60 Hz electrical outlet. (Fig. 2)
3. Insert the power pack into the charger and let it charge for 16 hours. (Fig. 2)
4. Remove pack from the charger and replace in tool. (Fig. 3)
Important Charging Notes
1. After normal usage, your power pack should be fully charged in 16 hours or less. Your
power pack was sent from the factory in an uncharged condition. Before attempting to use
it, it must be charged for at least 16 hours. Subsequent charging for most fix up jobs
will require 8-16 hours.
2. DO NOT charge the power pack in an air temperature below 40°F or above 105°F. This
is important and will prevent serious damage to the power pack. Longest life and best performance can be obtained if the power pack is charged when air temperature is about
75°F.
3. While charging, the charger may hum and become warm to touch. This is a normal condition and does not indicate a problem.
4. If the power pack does not charge properly—(1) Check current at receptacle by plugging
in a lamp or other appliance. (2) Check to see if receptacle is connected to a light switch
which turns power off when you turn out the lights. (3) Move charger and power pack to
a surrounding air temperature of 40°F to 105°F. (4) If the receptacle and temperature are
OK, and you do not get proper charging, take or send the power pack and charger to your
local Black & Decker service center. See "Tools Electric" in yellow pages.
5. The power pack should be recharged when it fails to produce sufficient power on jobs
which were easily done previously. DO NOTCONTINUE using drill with its power pack in
a depleted condition.
6. To prolong power pack life, avoid leaving the power pack on charge for more than 8 hours.
Although overcharging is not a safety concern, it can significantly reduce overall power
pack life.
Safety Warnings and Instructions: Drills
1. Hold drill firmly to control the twisting action of the drill.
2. When attaching accessories in the drill chuck, hand tighten the keyless chuck firmly.
WARNING: Drill may stall (if overloaded or improperly used) causing a twist. Always
expect the stall. Grip the drill firmly to control the twisting action (see Fig. 4) and prevent loss
of control which could cause personal injury. If a stall does occur, release the trigger
immediately and determine the reason for the stall before re-starting.
SAVE THESE INSTRUCTIONS FOR FUTURE USE
Operating Instructions
WARNING: To reduce the risk of serious personal injury, read, understand and follow all
important safety warnings and instructions prior to using tool.
FORWARD/REVERSE AND LOCK-OFF SWITCH
The forward/reverse and lock-off switch controls the direction of rotation of the chuck. (See
Figure 1) In the center position, it prevents starting of your drill when changing accessories or
during storage.
TWO SPEED OPERATION (PS3250, PS3525, PS3625, PS3725 )
Your drill is equipped for two speed drilling. To operate at low speed, squeeze the trigger
switch halfway. This will produce a low speed to be used for driving screws and starting holes
without a centerpunch. Squeezing the trigger switch all the way will produce a high speed for
normal drilling operation.
VARIABLE SPEED SWITCH ( PS3350, PS3550, PS3650, PS3750 )
To turn the drill ON squeeze the trigger switch. The farther the trigger is depressed, the higher
the speed of the drill. T o turn the tool OFF release the trigger switch.
TORQUE CONTROL (FIG. 6)
The torque adjustment collar has 5 positions and provides adjustment of the torque
necessary to seat screws of a given size in a particular material. To operate, set the torque
adjustment collar to the position marked 1. Fit and tighten the first screw. If the clutch of your
drill starts to slip before the screw is correctly seated, rotate the torque adjustment collar, as
necessary, until the clutch slips when the head of the screw is flush with the surface of the
material. Use this torque setting when fitting the remaining screws. The position after the
number 5 is the drill mode and is marked with the picture of a drill bit. In this position the
clutch will not operate. This permits heavy duty drilling/driving screws.
Warning: To control twisting action, place both hands on drill as shown in Fig.4.
KEYLESS CHUCK OPERATION
To attach accessories, grasp the rear half of the chuck shown in figure 7with one hand and
use your other hand to rotate the front half in the counterclockwise direction. Insert the bit or
other accessory fully into the chuck, and tighten securely by holding the rear half of the chuck
and rotating the front portion in the clockwise direction as viewed from the chuck end.
KEYLESS CHUCK REMOVAL
Make sure the forward/reverse switch is set to the center (lock-off) position. To remove the
chuck, open the jaws, hold it firmly in one hand and with a screwdriver held in the other hand,
turn the set screw in the chuck clockwise (left hand thread) approximately one turn , to loosen
it.
Place an allen key in the chuck and tighten the jaws. Strike the allen key in a
counterclockwise direction with a hammer to loosen the chuck on the spindle as shown in
figure 8. Remove the allen key. Turn the set screw clockwise again to completely remove it.
Remove the chuck from the spindle by rotating it counterclockwise. To fasten the chuck,
thread it on clockwise until it stops. Put in the screw and turn it counterclockwise until tight.
DRILLING
• Use sharp drill bits only.
• Support and secure work properly, as instructed in the Safety Instructions.
• Use appropriate and required safety equipment, as instructed in the Safety Instructions.
• Secure and maintain work area, as instructed in the Safety Instructions.
• Run the drill very slowly, using light pressure, until the hole is started enough to keep the
drill bit from slipping out of it.
• Apply pressure in a straight line with the bit. Use enough pressure to keep the bit biting
but not so much as to stall the motor or deflect the bit.
• Hold the drill firmly to control its twisting action.
• DO NOT CLICK THE TRIGGER OF A STALLED DRILLOFF AND ON IN AN ATTEMPT
TO STARTIT. DAMAGE TO THE DRILLCAN RESULT.
• Minimize stalling on breakthrough by reducing pressure and slowly drilling through last
part of hole.
• Keep the motor running while pulling the bit out of a drilled hole This will help reduce jamming.
• Use a cutting lubricant when drilling metals. The exceptions are cast iron and brass which
should be drilled dry. Lubricants that work best are sulphurized cutting oil or lard oil.
• When using twist drill bits to drill holes in wood, it will be necessary to pull the bits out frequently to clear chips from the flutes.
• Use carbide-tipped masonry bits when drilling in masonry. Keep even force on the drill but
not so much that you crack the brittle materials. Asmooth, even flow of dust indicates the
proper drilling rate.
• Make sure switch turns drill on and off.
WARNING: It is important to support work properly and to hold the drill firmly to prevent
loss of control which could cause personal injury If you have questions on how to operate
tool, call: 1-800-54-HOW-TO (544-6986)
Maintenance
Use only mild soap and damp cloth to clean the tool. Never let any liquid get inside the tool;
never immerse any part of the tool into a liquid. IMPORTANT: To assure product SAFETY
and RELIABILITY, repairs, maintenance and adjustment should be performed by authorized
service centers or other qualified service organizations, always using identical replacement
parts.
The RBRC™ Seal
The RBRC™ (Rechargeable Battery Recycling Corporation)Seal on the nickelcadmium battery (or battery pack) indicates that the costs to recycle the battery (or
battery pack) at the end of its useful life have already been paid by Black & Decker.
In some areas, it is illegal to place spent nickel-cadmium batteries in the trash or municipal
solid waste stream and the RBRC program provides an environmentally conscious
alternative.
RBRC in cooperation with Black & Decker and other battery users, has established programs
in the United States and Canada to facilitate the collection of spent nickel-cadmium batteries.
Help protect our environment and conserve natural resources by returning the spent nickelcadmium battery to an authorized Black & Decker service center or to your local retailer for
recycling. You may also contact your local recycling center for information on where to drop
off the spent battery, or call 1-800-8-BATTERY.
Accessories
Recommended accessories for use with your tool are available from your local dealer or If
you need assistance regarding accessories, please call: 1-800-54-HOW-TO (544-6986)
WARNING: The use of any accessory not recommended for use with this tool could be
hazardous.
Service Information
The nickel-cadmium rechargeable batteries used in the screwdriver will last through many
discharge cycles. When they eventually wear out, Black and Decker will replace them at a
reasonable charge. We offer a full network of company-owned and authorized service
locations throughout North America. All Black & Decker Service Centers are staffed with
trained personnel to provide customers with efficient and reliable power tool service.
Whether you need technical advice, repair, or genuine factory replacement parts, contact the
Black & Decker location nearest you. To find your local service location, refer to the yellow
page directory under "Tools—Electric" or call: 1-800-54-HOW T O (800-544-6986)
Full Two-Year Home Use Warranty
Black & Decker (U.S.) Inc. warrants this product for two years against any defects in material
or workmanship. The defective product will be replaced or repaired at no charge in either of
two ways. The first, which will result in exchanges only, is to return the product to the retailer
from whom it was purchased (provided that the store is a participating retailer). Returns
should be made within the time period of the retailer’s policy for exchanges (usually 30 to 90
days after the sale). Proof of purchase may be required. Please check with the retailer for
their specific return policy regarding returns that are beyond the time set for exchanges.
The second option is to take or send the product (prepaid) to a Black & Decker owned or
authorized Service Center for repair or replacement at our option. Proof of purchase may be
required. Black & Decker owned and authorized service centers are listed under "ToolsElectric" in the yellow pages of the phone directory.
This warranty does not apply to accessories. This warranty gives you specific legal rights and
you may have other rights which vary from state to state. Should you have any questions,
contact the manager of your nearest Black & Decker Service Center. This product is not
intended for commercial use.
See ‘Tools-Electric’
– Yellow Pages –
for Service & Sales
Imported by
Black & Decker (U.S.) Inc.,
701 E. Joppa Rd.
Towson, MD 21286 U.S.A.
AVANT DE RETOURNER LE PRODUIT, PEU IMPORTE LARAISON PRIÈRE DE COM-
POSER
1 800 544-6986
GUIDE D’UTILISA TION
IMPORTANTES MESURES DE SÉCURITÉ - POUR TOUS LES OUTILS
ALIMENTÉS PAR PILES
AVERTISSEMENT! Lire et comprendre toutes les directives. Le non-respect de toutes les
directives suivantes présente des risques de secousses électriques, d’incendie ou de
blessures graves.
CONSERVER CES MESURES.
ZONE DE TRAVAIL
• S’assurer que la zone de travail est propre et bien éclairée. Des établis encombrés et
des endroits sombres présentent des risques d’accidents.
• Ne pas utiliser des outils électriques en présence de vapeurs explosives (comme
celles dégagées par des liquides, des gaz ou des poussières inflammables). Les
étincelles générées par le moteur des outils électriques peuvent enflammer les poussières
ou les vapeurs.
• Éloigner les curieux, les enfants et les visiteurs de la zone de travail lorsqu’on utilise
un outil électrique. Une distraction peut entraîner la perte de maîtrise de l’outil.
MESURES DE SÉCURITÉ RELATIVES À L’ÉLECTRICITÉ
• Manipuler le cordon avec soin. Ne jamais se servir du cordon afin de transporter
l’outil . Éloigner le cordon des sources de chaleur, des flaques d’huile, des arêtes
tranchantes et des pièces mobiles. Remplacer immédiatement les cordons
endommagés. Les cordons endommagés augmentent les risques de secousses
électriques.
• Il faut charger un outil à piles intégrées ou un ensemble de piles seulement dans le
chargeur conçu à cet effet. Un chargeur convenant pour un type de piles peut présenter
un risque d’incendie lorsqu’on s’en sert avec un autre type de piles.
• Utiliser un outil alimenté par piles seulement avec la pile appropriée. L’utilisation de
toute autre pile présente des risques d’incendie.
SÉCURITÉ PERSONNELLE
• Demeurer vigilant, prendre soin et faire preuve de jugement lorsqu’on utilise un outil
électrique. Ne pas s’en servir lorsqu’on est fatigué ou affaibli par des drogues, de
l’alcool ou des médicaments. De graves blessures peuvent résulter d’un moment
d’inattention lors de l’utilisation d’un outil électrique.
• Porter des vêtements appropriés. Éviter de porter des vêtements amples ou des
bijoux. Recouvrir la chevelure si elle est longue. Éloigner les cheveux, les vêtements
et les gants des pièces en mouvement qui peuvent les happer.
• Éviter les démarrages accidentels. S’assurer que l’interrupteur est en position hors
tension ou verrouilleé avant d’insérer la pile. Afin d’éviter les risques de blessures, ne
pas transporter l’outil avec le doigt sur l’interrupteur ni insérer la pile dans un outil dont
l’interrupteur est en position sous tension.
• Enlever les clés de réglage avant de mettre l’outil sous tension. Une clé qui est laissée
sur une pièce rotative de l’outil présente des risques de blessures.
• Ne pas dépasser sa portée. Garder son équilibre en tout temps. On s’assure d’une
meilleure maîtrise de l’outil dans des situations imprévues grâce à une position stable et un
bon équilibre.
• Porter de l’équipement de sécurité. Toujours porter des lunettes de sécurité. Dans
certaines conditions, il faut porter des masques respiratoires, des chaussures
antidérapantes, un casque de sécurité ou des protège-tympans.
UTILISATION ET ENTRETIEN DE L’OUTIL
• Utiliser des pinces de serrage ou de tout autre moyen pratique afin de fixer et de
soutenir la pièce à ouvrer sur une plate-forme stable. La pièce est instable lorsqu’elle
est retenue par la main ou le corps de l’utilisateur. Cela présente des risques de perte de
maîtrise de l’outil.
• Ne pas forcer l’outil. Utiliser l’outil approprié à la tâche. L’outil approprié fonctionne
mieux et sûrement lorsqu’on s’en sert à son rendement nominal.
• Ne pas se servir de l’outil lorsque l’interrupteur est défectueux. Le cas échéant, l’outil
est dangereux et il faut le réparer.
• Enlever la pile de l’outil ou placer celui-ci en position hors tension ou verrouillée
avant de le régler, d’en remplacer les accessoires ou de le ranger. On minimise de la
sorte le risque de démarrage accidentel de l’outil.
 Loading...