

Page 1
www.blackanddecker.ae
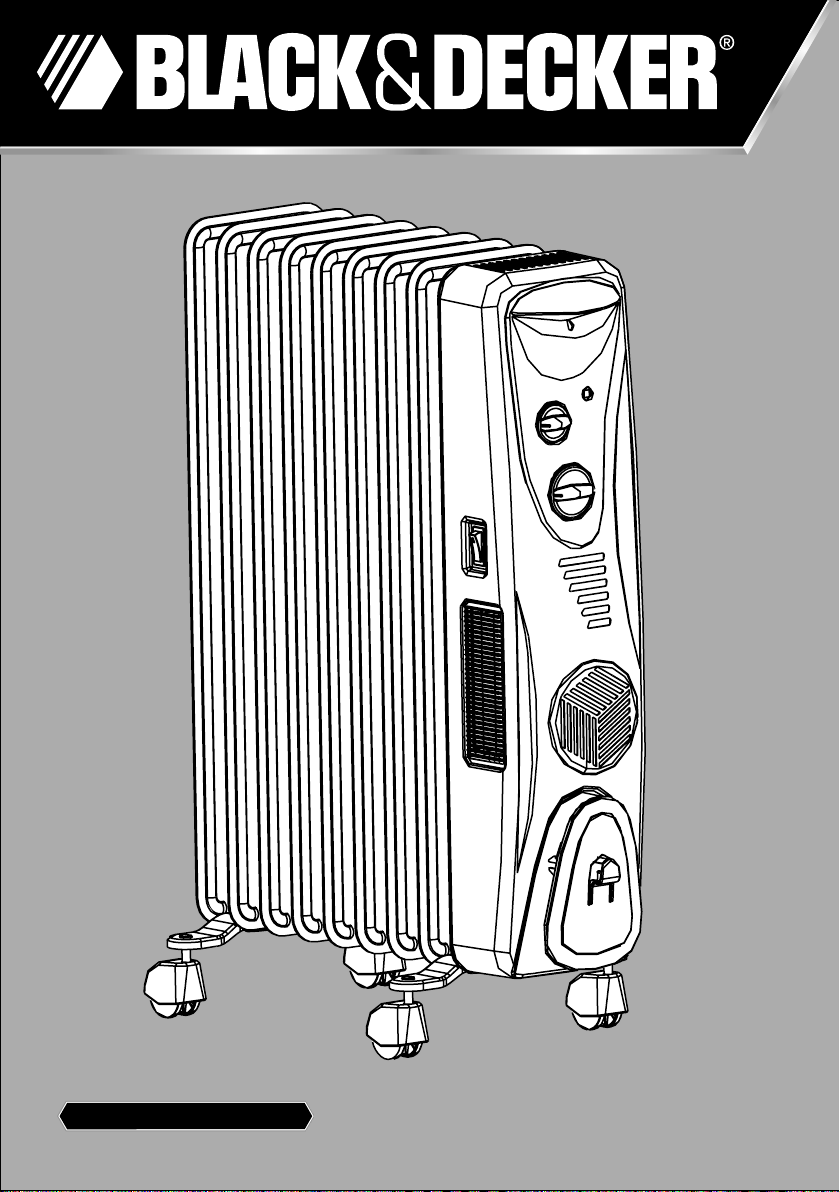
OR11FD/OR12FD/OR13FD
Page 2
Page 3

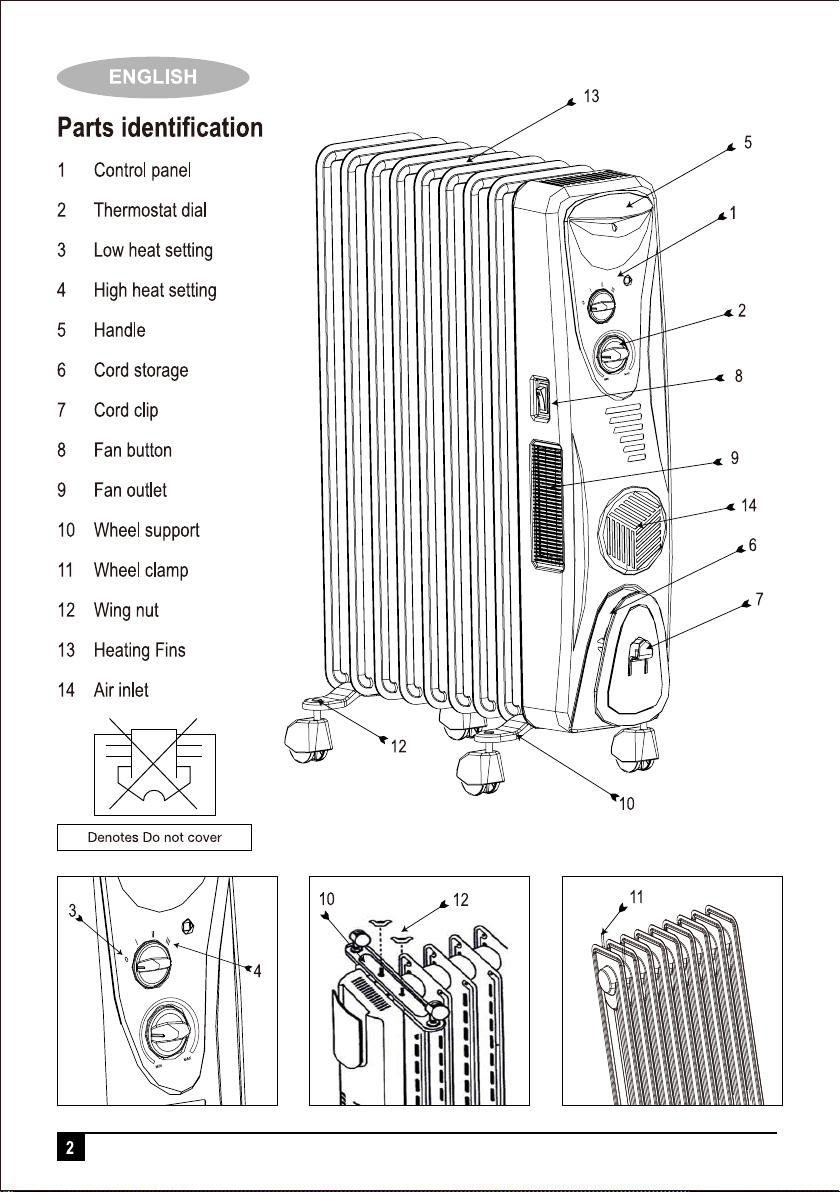
ENGLISH
Intended Use
This product is intended for heating rooms.
Do not use this appliance for any other purpose.
For indoor, domestic use only.
Safety Instructions
Warning! While using mains powered
appliances, basic safety precautions including
the following, should always be followed to
reduce the risk of fire, electric shock, personal
injury and material damage.
Read all instructions carefully, before
using the appliance.
• The intended use is described in this
manual. The use of any accessory or
attachment, or the performance of any
operation with this appliance other than
those recommended in this instruction
manual may present a risk of personal injury.
• Retain this manual for future reference.
• Always route the cord carefully to avoid a
tripping hazard
• Never operate the appliance directly below
the socket-outlet it is connected to.
Using your appliance
• Fully unwind the cord & place the unit on the
floor, away from any obstructions.
• As a safety mechanism, the oil radiator will
not function if the unit is not on a level
surface.
• Connect the heater to an electrical supply,
leaving sufficient space around it for
ventilation.
• Rotate the thermostat dial (2) to maximum
and press the heating buttons (3), (4) as
required.
• Low power is selected by pressing the low
heat button (3) only.
• Medium power is selected by pressing the
high heat button (4) only.
• High power is selected by pressing both
buttons (3) & (4).
• A lamp on each button will light up to indicate
the chosen heat setting.
• Once the room is at a comfortable
temperature, the thermostat dial (2) should
be slowly turned in the opposite direction
until the appliance just stops working.
• The temperature will be maintained at the
present level by the thermostat inside the
unit.
Safety of others
• This appliance is not intended for use by
persons (including children) with reduced
physical, sensory or mental capabilities, or
lack of experience and knowledge, unless
they have been given supervision or
instruction concerning use of the appliance
by a person responsible for their safety.
• Children must be supervised to ensure that
they do not play with the appliance.
• Do not allow children or any person
unfamiliar with these instructions to use the
appliance.
• Never leave the appliance unattended when
in use.
3
Page 4
ENGLISH
Inspection and repairs
• Before use, check the appliance for
damaged or defective parts. Check for
breakage of parts, damage to knob or
heating plate that may affect its operation.
• Do not use the appliance is any part is
damaged or defective.
• Any damages or defective parts must be
repaired or replaced by an authorized repair
agent.
• Before use, check the power supply cord for
signs of damage, ageing and wear.
• Do not use the appliance if the power supply
cord or mains plug is damaged or defective.
• If the power supply cord of mains plus is
damaged or defective, it must be repaired by
an authorized repair agent to avoid a hazard.
Do not cut the power cord and do not attempt
to repair it yourself.
• Never attempt to remove or replace any
parts other than those specified in this
manual.
Electrical Safety
This product must be earthed. Always
check that the power supply
corresponds to the voltage on the rating plate.
Power plugs must match the outlet. Never
modify the plug in any way. Do not use any
adapter plugs with earthed (Class 1) appliances.
Unmodified plugs and matching outlets will
reduce the risk of electric shock.
• To avoid risk of electric shock, do not
immerse the cord, plug or motor unit in water
or other liquid.
• Check that the supply voltage shown on the
rating plate of the appliance matches that of
your electrical system. Any connection error
will invalidate the guarantee.
Extension cables and Class I
product
A 3 core cable must be used as your
appliance is earthed and of Class I
construction. Up to 30m (100 ft) can be
used without loss of power.
Mains plug replacement
If a new mains plug needs to be fitted:
• Safely dispose of the old plug
• Connect the brown lead to the live terminal
of the new plug
• Connect the blue lead to the neutral terminal
• If the product is class I (earthed), connect the
green/yellow lead to the earth terminal.
Note: If your product is class II double insulated
(only 2 wires in the cord set), no connection is to
be made to the earth terminal.
Follow the fitting instructions supplied with good
quality plugs
Any replacement fuse must be of the same
rating as the original fuse supplied with the
product.
Warning! The above section on mains plug
replacement is for authorized service centre
personals.
4
Page 5

ENGLISH
Additional Safety Warnings
• Do not use this appliance with a
programmer, timer or any other device that
switches the heater on automatically, since a
fire risk exists if the heater is covered or
positioned incorrectly.
• Do not use this appliance in the immediate
surroundings of a bath, a shower or a
swimming pool.
• Use this appliance on a level surface, away
from steps of stairs.
• Combustible materials such as furniture,
pillows, bedding, papers, clothes and
curtains must be kept at least 1m from the
appliance. Keep loose clothing & long hair
away from vents.
• Do not allow anything to block the vents of
the appliance. A gap of at least 50cm is
advised.
• Always use and store in a dry area.
• Do not use in areas where gas, paint or
other flammable goods may be present.
• This heater is filled with a precise quantity of
special oil. Repairs requiring opening of the
oil container are only to be made by the
manufacturer or his service agent who
should be contacted if there is an oil leak.
• When disposing the heater, follow the local
regulations concerning the disposal of oil.
• Never pull the unit by the cord. Always use
the handle provided when moving the
appliance.
• Always disconnect the appliance from the
socket outlet before moving it to a new
location.
• Keep the cord set away from hot parts of the
appliance.
• This appliance must be earthed.
• This appliance is fitted with a safety device
which will prevent the heater working unless
it is in its normal, upright working position.
Note
• In case of overheating, a cut-out will operate
and the appliance will stop working. If the
appliance stops operating, return all heating
buttons to the off (0) position, unplug the
appliance and allow it to cool for at least 10
minutes before attempting to use it again.
• In extreme conditions, a back-up cut-out will
operate. This will not re-set & the appliance
will need to be repaired by a qualified person.
Assembly
• Fit the wheels before using the appliance.
Never use the appliance without the wheels
fitted.
• Place the heater on the floor upside down. It
is quite normal to hear the oil moving inside
the radiator.
• Fit the bent end of the first wheel clamp (11)
into the hole in the wheel support (10).
• Place the support between the last 2 heating
fins (13).
• Swing the clamp around the radiator & insert
the free end into the hole in the support (10).
• Fit the wing nut (12) onto the clamp & rotate
it in a clockwise direction until tight.
• Repeat this procedure to fit the other wheels
at the opposite end of the appliance.
• Put the heater into its normal upright position.
5
Page 6

ENGLISH
Warning: Wait for at least three minutes before
operating the appliance.
Use
• Fully unwind the cord & place the unit on a
flat, even floor away from any obstructions
and pointing towards the area of the room to
be heated.
• Press the fan heater button (8). Warm air will
be blown into the room from the vents (9).
• To stop the fan heater, return the button (8)
to the off (0) position.
Note: This appliance must be attended in use.
Warning In order to avoid overheating, do not
cover this appliance.
Maintenance and cleaning
Cleaning your Radiator
• Switch off the appliance before cleaning,
changing accessories or approaching parts
which move in use.
• Do not immerse the appliance, cord set or
plug in liquids
• Wipe the appliance with a damp cloth & dry
thoroughly before using.
• Never use detergents or abrasives to clean
this appliance.
Storing your Radiator
• When the appliance is to be stored, return
the heating buttons to the off (0) position and
unplug it from the mains supply.
• Wrap the cord around the cord storage (6)
and fasten the loose end of the cord in the
cord clip (7).
6
Page 7
ENGLISH
Protecting the environment
Separate collection. This product must not
be disposed of with normal household
waste.
Should you find one day that your Black &
Decker product needs replacement, or if it is of
no further use to you, do not dispose of it with
other household waste. Make this product
available for separate collection.
• Black & Decker provides a facility for
recycling Black & Decker products once they
have reached the end of their working life.
This service is provided free of charge. To
take advantage of this service please return
your product to any authorised repair agent
who will collect them on our behalf.
• You can check the location of your nearest
authorised repair agent by contacting your
local Black & Decker office at the address
indicated in this manual. Alternatively, a list of
authorized Black & Decker repair agents and
full details of our after-sales service and
contact are available on the Internet at:
www.2helpU.com.
Warranty
Black & Decker is confident of the quality of its
products and offers an outstanding warranty.
This warranty statement is in addition to and in
no way prejudices your statutory rights.
The warranty is valid within the territories of the
Member States of the European Union and the
European Free Trade Area.
If a Black & Decker product becomes defective
due to faulty materials, workmanship or lack of
conformity, within 24 months from the date of
purchase, Black & Decker warranty to replace
defective parts, repair products subjected to fair
wear and tear or replace such products to ensure
minimum inconvenience to the customer unless:
The product has been used for trade,
professional or hire purposes;
The product has been subjected to misuse
or neglect;
The product has sustained damage
through foreign objects, substances or
accidents;
Repairs have been attempted by persons
other than authorised repair agents or
Black & Decker service staff.
To claim on the warranty, you will need to submit
proof of purchase to the seller or an authorised
repair agent. You can check the location of your
nearest authorised repair agent by contacting
your local Black & Decker office at the address
indicated in this manual.
Alternatively, a list of authorised Black & Decker
repair agents and full details of our after-sales
service and contacts are available on the Internet
at: www.2helpU.com.
7
Page 8

Page 9

FRANÇAIS
Utilisation prévue
Cet appareil est conçu pour chauffer les pièces
d’habitation. Ne pas utiliser cet appareil à
d’autres fins.Pour un usage domestique en
intérieur uniquement.
Consignes de sécurité
Avertissement! Lorsqu’on utilise un appareil
électrique, il faut toujours respecter certaines
règles de sécurité fondamentales, notamment
les suivantes, afin de prévenir les risques
d’incendie, de décharges électriques, de
blessures corporelles ou de dégâts matériels.
Lire toutes les instructions
attentivement avant d’utiliser
l’appareil.
• Ce manuel décrit la manière d’utiliser cet
appareil. L’utilisation d’un accessoire ou
d’une fixation, ou l’utilisation de cet appareil
à d’autres fins que celles recommandées
dans ce manuel d’instruction peut présenter
un risque de blessures corporelles.
• Conservez ce manuel pour un usage
ultérieur.
• Positionnez toujours le cordon d’alimentation
avec soin afin d’éviter de trébucher dessus.
• Ne faites jamais fonctionner l’appareil
directement en-dessous de la prise sur
laquelle il est branché.
Utilisation de votre appareil
• Déroulez complètement le cordon et placez
l’appareil sur le sol, éloigné de toute
obstruction.
• Le radiateur est équipé d’un système de
sécurité qui empêche le fonctionnement du
radiateur à huile s’il ne repose pas sur une
surface horizontale.
• Branchez le radiateur dans une prise
électrique, en laissant suffisamment
d’espace autour pour la ventilation.
• Tournez le cadran du thermostat (2) jusqu’au
réglage maximum et appuyez sur les
boutons de réglage de la chaleur (3), (4)
comme souhaité.
• Pour une chaleur faible, appuyez uniquement
sur le bouton de réglage bas (3).
• Pour une chaleur moyenne, appuyez
uniquement sur le bouton de réglage haut
(4).
• Pour une chaleur forte, appuyez sur les deux
boutons (3) et (4).
• Un témoin lumineux s’allume sur chaque
bouton pour indiquer le réglage de la chaleur
choisie.
• Dès que la pièce a atteint une température
ambiante confortable, le cadran du
thermostat (2) doit être lentement tourné
dans le sens contraire des aiguilles d’une
montre jusqu’à l’arrêt de l’appareil.
• La température ambiante de la pièce sera
maintenue au même niveau grâce au
thermostat interne situé dans l’appareil.
Sécurité d’autrui
• Cet appareil ne doit pas être utilisé par des
personnes (y compris les enfants) ayant des
déficiences physiques, sensorielles ou
mentales. Cette consigne s’applique aussi
aux personnes manquant d’expérience ou de
connaissances du matériel, à moins que
celles-ci n’aient reçu les instructions
appropriées ou ne soient encadrées par une
personne responsable de leur sécurité pour
utiliser l’appareil.
• Ne laissez jamais les enfants sans
surveillance pour éviter qu’ils ne jouent avec
cet appareil.
• Ne laissez pas les enfants ou des personnes
non familières avec ces instructions utiliser
cet appareil.
• Ne laissez jamais fonctionner l’appareil sans
surveillance.
9
Page 10

FRANÇAIS
Inspection et réparations
• Avant l’utilisation, vérifiez l’état de l’appareil
et des pièces. Vérifiez la présence de pièces
cassées, l’état de l’interrupteur et de la
plaque chauffante ou d’anomalies
susceptibles de nuire au bon fonctionnement
de l’appareil.
• N’utilisez pas l’appareil si un élément est
endommagé ou défectueux.
• Toute pièce endommagée ou défectueuse
doit être réparée ou remplacée par un
réparateur agréé.
• Avant l’utilisation, vérifiez l’état du cordon
d’alimentation pour des signes de
dommages, de vieillissement ou d’usure.
• N’utilisez pas l’appareil si le cordon
d’alimentation ou la fiche secteur sont
endommagés ou défectueux.
• Si le cordon d’alimentation ou la fiche
secteur sont endommagés ou défectueux, ils
doivent être réparés par un réparateur agréé
pour éviter les risques d’accident. Ne coupez
pas le cordon d’alimentation et n’essayez
pas de le réparer vous-même.
• Ne tentez jamais d’enlever ou de remplacer
des pièces autres que celles citées dans ce
manuel.
Sécurité électrique
Cet appareil doit être mis à la terre.
Vérifiez toujours que la tension
électrique correspond à celle indiquée
sur l’étiquette signalétique.
Les fiches électriques doivent correspondre aux
prises de courant. Ne modifiez jamais la fiche
d’aucune façon. N’utilisez pas d’adaptateur avec
des appareils mis à la terre (classe 1).
L’utilisation de fiches inchangées avec des
prises correspondantes réduit le risque de
décharges électriques.
• Pour éviter les risques de décharges
électriques, ne plongez pas le cordon, la
fiche ou le bloc moteur dans l’eau ou tout
autre liquide.
• Vérifiez que la tension d’alimentation
indiquée sur l’étiquette signalétique de
l’appareil correspond bien à celle de votre
installation électrique. Toute erreur de
branchement annulerait la garantie.
Rallonges et appareils de
classe 1
Utilisez un cordon à 3 fils car votre
appareil est mis à la terre et de
fabrication classe 1. Une longueur
allant jusqu’à 30m (100 pieds) peut être utilisée
sans perte de puissance.
Remplacement de la fiche
électrique
En cas d’installation d’une nouvelle fiche:
• Jetez l’ancienne fiche avec prudence
• Connectez le fil marron sur la borne sous
tension de la nouvelle fiche
• Connectez le fil bleu sur la borne neutre
• Si l’appareil est de classe I (mis à la terre),
connectez le fil vert/jaune sur la borne terre.
Remarque: Si votre appareil est de classe II
double isolation (seulement 2 fils dans le
cordon), aucune connexion n’est à faire sur la
borne terre.
Suivez les instructions de montage fournies
avec les fiches de bonne qualité.
Tout fusible remplacé doit être du même calibre
que le fusible d’origine fourni avec l’appareil.
Avertissement! La section ci-dessus sur le
remplacement de la fiche concerne le personnel
des centres de service agréés.
10
Page 11

FRANÇAIS
Consignes de sécurité
supplémentaires
• N’utilisez pas cet appareil avec un
programmateur, un minuteur ou tout autre
système pouvant mettre le radiateur en
marche automatiquement, car le risque
d’incendie existe si le radiateur est couvert
ou positionné de façon incorrecte
• N’utilisez pas cet appareil dans les environs
immédiats d’une baignoire, d’une douche ou
d’une piscine.
• Utilisez cet appareil sur une surface plane,
loin de marches d’escalier.
• Laissez une distance d’au moins 1 mètre
entre le radiateur et des matériaux
combustibles, tels que meubles, oreillers,
literie, papiers, vêtements et rideaux.
Eloignez les vêtements amples et les
cheveux longs des ouvertures du radiateur.
• Ne laissez rien bloquer les ouvertures de
l’appareil. Une distance d’au moins 50 cm
est conseillée.
• Toujours utiliser et ranger dans un endroit
sec.
• Ne pas utiliser dans un lieu en présence de
gaz, de peintures ou d’autres produits
inflammables.
• Ce radiateur est rempli d’une quantité
précise d’huile spéciale. Toute réparation
exigeant l’ouverture du contenant d’huile doit
uniquement être effectuée par le fabricant ou
par son représentant, que vous devez
contacter si une fuite d’huile se produit.
• Lorsque vous jetterez le radiateur en fin de
vie, suivez la réglementation locale
concernant l’élimination de l’huile.
• Ne tirez jamais l’appareil par le cordon.
Utilisez la poignée prévue pour déplacer
l’appareil.
• Débranchez toujours l’appareil de
l’alimentation secteur avant de le déplacer
vers un nouvel emplacement.
• Eloignez le cordon d’alimentation des parties
chaudes de l’appareil.
• Cet appareil doit être mis à la terre.
• Cet appareil est équipé d’un dispositif de
sécurité qui empêche l’appareil de
fonctionner s’il n’est pas dans une position
debout normale.
Remarque
• En cas de surchauffe, un dispositif d’arrêt
s’enclenche et l’appareil cessera de
fonctionner. Si l’appareil cesse de
fonctionner, remettez tous les boutons de
réglage sur la position arrêt (0), débranchez
l’appareil de l’alimentation secteur et
laisse-le refroidir pendant au moins 10
minutes avant d’essayer de l’utiliser à
nouveau.
• En cas de conditions extrêmes, un dispositif
d’arrêt de secours s’enclenche. Ceci
empêchera une remise en route et l’appareil
devra être réparé par une personne qualifiée.
Assemblage:
• Montez les roues avant d’utiliser l’appareil.
N’utilisez jamais l’appareil sans les roues
montées.
• Tournez le radiateur à l’envers et posez-le
sur le sol. Il est tout à fait normal d’entendre
l’huile circuler à l’intérieur du radiateur.
• Insérez l’extrémité coudée de la première
bride de fixation des roulettes (11) dans le
trou de la barre de fixation des roulettes (10).
• Placez la barre entre les 2 dernières ailettes
du radiateur (13).
• Faites pivotez la bride autour du radiateur et
insérez l’extrémité libre dans le trou de la
barre (10).
11
Page 12

FRANÇAIS
• Vissez l’écrou papillon (12) sur la bride en
tournant dans le sens des aiguilles d’une
montre jusqu’à ce qu’il soit bien serré.
• Répétez cette procédure pour assembler les
autres roulettes à l’extrémité opposée de
l’appareil.
• Retournez le radiateur dans sa position
normale.
Avertissement: Attendez au moins trois
minutes avant de faire fonctionner l’appareil.
Utilisation
• Déroulez complètement le cordon et placez
l’appareil sur un sol horizontal, éloigné de
toute obstruction, pointant vers l’endroit de la
pièce à chauffer.
• Appuyez sur le bouton ventilateur (8). De
l’air chaud sera soufflé dans la pièce par la
sortie d’air ventilé (9).
• Pour arrêter le ventilateur, mettre le bouton
(8) sur la position arrêt (0).
Remarque: Ne laissez pas l’appareil sans
surveillance pendant son utilisation.
Avertissement: Afin d’éviter un risque de
surchauffe, ne pas couvrir cet appareil.
Rangement du radiateur
• Lorsque l’appareil doit être rangé,
positionnez les boutons de réglage de
chaleur sur la position arrêt (0) et
débranchez l’appareil de l’alimentation
secteur.
• Enroulez le cordon dans son espace de
rangement (6) et clipsez l’extrémité du
cordon avec le clip de fixation (7).
Nettoyage et entretien
Nettoyage du radiateur
• Eteignez l’appareil avant de le nettoyer, de
changer un accessoire ou d’approcher des
parties mobiles en cours de fonctionnement.
• N’immergez pas l’appareil, le cordon ou la
prise dans un liquide.
• Essuyez l’appareil avec un chiffon humide et
séchez-le soigneusement avant de l’utiliser.
• N’utilisez jamais de détergents ou de
produits abrasifs pour nettoyer cet appareil.
12
Page 13

FRANÇAIS
Protection de l'environnement
Collecte séparée. Ce produit ne doit
pas être jeté avec les déchets
domestiques normaux.
Si vous décidez de remplacer ce produit Black &
Decker, ou si vous n'en avez plus l'utilité, ne le
jetez pas avec vos déchets domestiques
Rendez-le disponible pour une collecte séparée.
• Black & Decker fournit un dispositif
permettant de collecter et de recycler les
produits Black & Decker lorsqu'ils ont atteint
la fin de leur cycle de vie. Pour pouvoir
profiter de ce service, veuillez retourner votre
produit à un réparateur agréé qui se chargera
de le collecter pour nous.
• Pour connaître l'adresse du réparateur agréé
le plus proche de chez vous, contactez le
bureau Black & Decker à l'adresse indiquée
dans ce manuel. Vous pourrez aussi trouvez
un liste des réparateurs agréés de Black &
Decker et de plus amples détails sur notre
service après-vente sur le site Internet à
l'adresse suivante : www.2helpU.com
Garantie
Black & Decker est confiant dans la qualité de
ses produits et vous offre une garantie très
étendue.
Ce certificat de garantie est un document
supplémentaire et ne peut en aucun cas se
substituer à vos droits légaux.
La garantie est valable sur tout le territoire des
Etats Membres de l'Union Européenne et de la
Zone de Libre Echange Européenne.
Si un produit Black & Decker s'avère défectueux
en raison de matériaux en mauvaises conditions,
d'une erreur humaine, ou d'un manque de
conformité dans les 24 mois suivant la date
d'achat, Black & Decker garantit le remplacement
des pièces défectueuses, la réparation des
produits usés ou cassés ou remplace ces
produits à la convenance du client, sauf dans les
circonstances suivantes :
Le produit a été utilisé dans un but
commercial, professionnel, ou a été loué.
Le produit a été mal utilisé ou avec
négligence.
Le produit a subi des dommages à cause
d'objets étrangers, de substances ou à
cause d'accidents.
Des réparations ont été tentées par des
techniciens ne faisant pas partie du
service technique de Black & Decker.
Pour avoir recours à la garantie, il est nécessaire
de fournir une preuve d'achat au vendeur ou à un
réparateur agréé. Pour connaître l'adresse du
réparateur agréé le plus proche de chez vous,
contactez le bureau Black & Decker à l'adresse
indiquée dans ce manuel.
Vous pourrez aussi trouver une liste des
réparateurs agréés de Black & Decker et de plus
amples détails sur notre service après-vente sur
le site Internet à l'adresse suivante :
www.2helpU.com
13
Page 14

ARABIC
¿Éª°†dG
Ékfɪ°V ¢Vô©Jh É¡JÉéàæe IOƒL ‘ ôµjO ófBG ∑ÓH ≥ãJ
.πLC’G πjƒW
»àdG ∂bƒ≤M ¤EG áaÉ°VE’ÉH ¿ƒµj Gòg ¿Éª°†dG ¿É«H
.∫GƒMC’G øe ∫ÉM …CÉH É¡H πîj ’h ¿ƒfÉ≤dG É¡ëæÁ
OÉ–’G ‘ AÉ°†YC’G ∫hódG º«dÉbCG ‘ ¿Éª°†dG …öùj
.á«HhQhC’G Iô◊G IQÉéàdG á≤£æeh »HhQhC’G
‘ Ö«Y ÖÑ°ùH ôµjO ófBG ∑ÓH èàæe ‘ π∏N OƒLh ádÉM ‘
24 ∫ÓN ,ÒjÉ©ŸG ™e ≥aGƒàdG ΩóY hCG áYÉæ°üdG hCG OGƒŸG
∫GóÑà°SG ôµjO ófBG ∑ÓH øª°†J ,AGöûdG ïjQÉJ øe Gkô¡°T
πcBЙаdG IЙYGфe ™e дЙйажŸG мУ°UEGh бС«©ŸG AGхLC’G
πbCG ¿Йª°†d дЙйажŸG √тg ∫GуСа°SG hCG »©«С£dG ≈∏СdGh
:⁄ Ée 𫪩∏d êÉYREG
;ÒLCÉJ ¢VGôZCG
;çOGƒM hCG
™HÉàdG áfÉ«°üdG ≥jôa hCG øjóªà©ŸG áfÉ«°üdG AÓch
.ôµjO ófBG ∑ÓH ácöûd
Ëó≤J ¤EG êÉà– ±ƒ°S ,¿Éª°†dG ÖLƒÃ áÑdÉ£e Ëó≤àd
∂æµÁh .óªà©ŸG áfÉ«°üdG π«ch hCG ™FÉÑ∏d AGöûdG π«dO
∫ÓN øe óªà©e áfÉ«°U π«ch ÜôbCG ™bƒe ≈∏Y ±ô©àdG
¿Gƒæ©dG ‘ »∏ëŸG ôµjO ófBG ∑ÓH Öàµe ≈∏Y ∫É°üJ’G
.π«dódG Gòg ‘ í°VƒŸG
áÄ«ÑdG ájɪM
Gòg øe ¢ü∏îàdG ΩóY Ωõ∏j .π°üØæŸG ™ª÷G
.ájOÉ©dG á«dõæŸG áeɪ≤dG ™e èàæŸG
ôµjO ófBG ∑ÓH èàæe ∫GóÑà°SG ΩÉjC’G øe Ωƒj ‘ Ωõd GPEG
™e ¬æe ¢ü∏îàJ Óa ,¬eóîà°ùJ ó©J ⁄ GPEG hCG ,∂H ¢UÉÿG
èàæŸG Gòg áMÉJEG øe ócCÉJ πH ,iôNC’G á«dõæŸG áeɪ≤dG
.π°üØæŸG ™ªé∏d
ôjhóJ IOÉYE’ ≥aôe ôµjO ófBG ∑ÓH ácöT ôaƒJ
бjЙ¡f ¤EG Й¡dƒ°Uh OфйГ фµjO уfBG ∑УH дЙйажe
√òg Ëó≤J ºàjh .πª©∏d É¡à«MÓ°U ΩóYh ÉgôªY
hCG á«æ¡e hCG ájQÉŒ ¢VGôZCG ‘ èàæŸG ΩGóîà°SG ºàj
≈Lôj ,áeóÿG √òg øe IOÉØà°SÓd .ÉkfÉ› áeóÿG
±ƒ°S …òdGh óªà©e áfÉ«°U π«ch …CG ¤EG èàæŸG IOÉYEG
;∫ɪgE’G hCG ΩGóîà°S’G Aƒ°ùd èàæŸG ¢Vô©àj
áÑjôZ OGƒe hCG AÉ«°TCG áé«àf ∞∏à∏d èàæŸG ¢Vô©àj
óªà©e áfÉ«°U π«ch ÜôbCG ™bƒe ≈∏Y ±ô©àdG ∂æµÁ
ÒZ ¢UÉî°TCG ᣰSGƒH èàæŸG ìÓ°UEG ádhÉfi ºàj
»∏ëŸG ôµjO ófBG ∑ÓH Öàµe ≈∏Y ∫É°üJ’G ∫ÓN øe
,∂dP øe k’óHh .π«dódG Gòg ‘ í°VƒŸG ¿Gƒæ©dG ‘
Ú©HÉàdG øjóªà©ŸG áfÉ«°üdG AÓcƒH áªFÉb óLƒJ
Ée äÉeóÿ á∏eɵdG π«°UÉØàdGh ôµjO ófBG ∑ÓH ácöûd
âfÎfE’G ≈∏Y ÉæH á°UÉÿG ∫É°üJ’G πFÉ°Shh ™«ÑdG ó©H
.www.2helpU.com :ÊhεdE’G ™bƒŸG ≈∏Y
.ЙжY бHЙ«f дЙйажŸG ™ªL √QhуH ¤ƒаj
•
•
øjóªà©ŸG áfÉ«°üdG AÓcƒH áªFÉb óLƒJ ,∂dP øe k’óHh
äÉeóÿ á∏eɵdG π«°UÉØàdGh ôµjO ófBG ∑ÓH ácöûd Ú©HÉàdG
âfÎfE’G ≈∏Y ÉæH á°UÉÿG ∫É°üJ’G πFÉ°Shh ™«ÑdG ó©H Ée
.www.2helpU.com :ÊhεdE’G ™bƒŸG ≈∏Y
14
Page 15

ARABIC
RÉ¡÷G øjõîJ á≤jôW
áÄaóàdG QGQRCG ™«ªL IOÉYEG øe óH ’ ,RÉ¡÷G øjõîJ óæY •
QÉ«àdG òNCÉe øe ¢ùHÉ≤dG ´õfh (0) ™°VƒdG ¤EG
∂∏°ùdG ±ôW ≥∏Y ºK (6) ∂∏°ùdG ¿õfl ∫ƒM ∂∏°ùdG ∞d •
(7) ∂∏°ùdG ∂Ñ°ûe ‘ ÖFÉ°ùdG
‘ iôNC’G äÓé©dG Ö«cÎd Iƒ£ÿG √òg QGôµàH ºb •
RÉ¡÷G øe ôNB’G ÖfÉ÷G
É¡°SCGQ ¿ƒµj å«ëH …OÉ©dG ™°VƒdG ¤EG ICÉaóŸG óYCG •
.≈∏YC’
RÉ¡÷G 𫨰ûJ πÑb πbC’G ≈∏Y ≥FÉbO áKÓK ô¶àfG :ôjò–
RÉ¡÷G ΩGóîà°SG
¿hO ¢VQC’G ≈∏Y RÉ¡÷G ™°V ºK kÓeÉc ∂∏°ùdG ∂ØH ºb •
OGôŸG á≤£æŸG ƒëf kÉ¡Lƒeh õLGƒM hCG ≥FGƒY …CG
áaô¨dG øe É¡àÄaóJ
AGƒ¡dG CGóÑ«°Sh (8) áMhôŸGh ICÉaóŸG QR ≈∏Y §¨°VG •
áÄaóàdG òaÉæe øe çÉ©Ñf’G ‘ ÅaGódG
≈∏Y (8) QõdG §Ñ°VG ,áMhôŸGh ICÉaóŸG πªY ±É≤jE’ •
(0) ™°VƒdG
ΩGóîà°S’G AÉæKCG RÉ¡÷G Gòg áÑbGôe Öéj :á¶MÓe
áLQO ™ØJôJ ’ ≈àM RÉ¡÷G á«£¨J ∫hÉ– ’ :ôjò–
.ÒÑc πµ°ûH ¬JQGôM
áfÉ«°üdGh ∞«¶æàdG
RÉ¡÷G ∞«¶æJ á≤jôW
á«∏ªY AGôLEG πÑb πª©dG øY RÉ¡÷G ±É≤jEÉH ºb •
AGõLC’G øe ÜGÎb’G hCG äÉ≤ë∏ŸG Ò«¨J hCG ∞«¶æàdG
.𫨰ûàdG AÉæKCG ∑ôëàJ »àdG
…CG ‘ ¢ùHÉ≤dG hCG ∑Ó°SC’G áYƒª› hCG RÉ¡÷G ôª¨J ’ •
.πFÉ°S
πÑb kGó«L ¬ØØL ºK á∏∏Ñe á°Tɪ≤H RÉ¡÷G í°ùeG •
ΩGóîà°S’G
‘ á∏cB’G OGƒŸG hCG äÉضæŸG ΩGóîà°SG ∫hÉ– ’ •
É≤∏£e RÉ¡÷G ∞«¶æJ
k
15
Page 16

ARABIC
áæNÉ°ùdG AGõLC’G øY ∂∏°ùdG áYƒª› OÉ©HEG ≈∏Y ¢UôMG •
RÉ¡÷G ‘
"¢†jQCÉJ" á«°VQCG á∏°UƒH RÉ¡÷G π«°UƒJ Öéj •
á¶MÓe
kÉ«FÉ≤∏J QÉ«àdG ™WÉb 𪩫°S ,RÉ¡÷G øî°ùj ÉeóæY •
RÉ¡÷G ∞bƒJ óæY .πª©dG øY RÉ¡÷G ±É≤jEÉH Ωƒ≤«°Sh
(0) ™°VƒdG ≈∏Y áÄaóàdG QGQRCG ™«ªL §Ñ°VG ,πª©dG øY
≥FÉbO 10 ô¶àfGh QÉ«àdG òNCÉe øe ¢ùHÉ≤dG ´õfG ºK
Iôe ¬∏«¨°ûJ ádhÉfi πÑb RÉ¡÷G OÈj ≈àM πbC’G ≈∏Y
.á«fÉK
QÉ«àdG ™WÉb πª©j ±ƒ°S ,Iójó°ûdG ä’É◊G ‘h •
§Ñ°V IOÉYEG …óéj ød ádÉ◊G √òg ‘h »WÉ«àM’G
ìÓ°UE’ πgDƒe »æa ¤EG Aƒé∏dG øe óH’h RÉ¡÷G
.RÉ¡÷G
RÉ¡÷G ™«ªŒ
∫hÉ– ’ .RÉ¡÷G ΩGóîà°SG πÑb äÓé©dG Ö«côJ Öéj •
äÓé©dG Ö«côJ ¿hO kÉ≤∏£e RÉ¡÷G ΩGóîà°SG
å«ëH ¢Sƒµ©e ™°Vh ‘ ¢VQC’G ≈∏Y ICÉaóŸG ™°V •
âjõdG 䃰U ™ª°ùJ ¿CG »©«Ñ£dG øe .πØ°SC’ É¡°SCGQ ¿ƒµj
ÎjOGôdG πNGO ∑ôëàj
‘ (11) ¤hC’G á∏é©dG ∂Ñ°ûŸ »æãŸG ±ô£dG πNOCG •
(10) äÓé©dG áeÉYóH OƒLƒŸG Ö≤ãdG
áÄaóàdG ∞fÉYR øe ÚàØæYR ôNBG ÚH áeÉYódG ™°V •
(13) IÒNC’G
‘ ôNB’G ±ô£dG πNOCG ºK ÎjOGôdG ∫ƒM ∂Ñ°ûŸG ∞d •
(10) áeÉYódÉH OƒLƒŸG Ö≤ãdG
ºbh ∂Ñ°ûŸG ∫ƒM (12) ìÉæ÷G ádƒeÉ°U âÑK •
É¡eɵMEG ºàj ≈àM áYÉ°ùdG ÜQÉ≤Y √ÉŒG ¢ùµY É¡Ø∏H
á«aÉ°VEG äGôjò–
»JÉ≤«e hCG º¶æe ™e ICÉaóŸG √òg ΩGóîà°SG ∫hÉ– ’ •
ICÉaóŸG 𫨰ûJ ≈∏Y πª©J iôNCG á∏«°Sh …CG hCG
óæY ≥FGô◊G ܃°ûf ô£N OƒLƒd kGô¶f kÉ«µ«JÉeƒJhCG
.ºFÓe ÒZ ¿Éµe ‘ ¬©°Vh hCG RÉ¡÷G á«£¨J
hCG Ωɪ◊G øe áHô≤e ≈∏Y ICÉaóŸG √òg ΩGóîà°SG ô¶ëj •
. áMÉÑ°ùdG ácôH hCG ¢TódG
§≤a ájƒà°ùŸG í£°SC’G ≈∏Y RÉ¡÷G Gòg ΩGóîà°SG Öéj •
º∏°ùdG êQO ≈∏Y É¡eGóîà°SG ô¶ëjh
çÉKC’G πãe ∫É©à°TÓd á∏HÉ≤dG OGƒŸG ™°Vh Öéj •
ôFÉà°ùdGh ¢ùHÓŸGh ¥GQhC’Gh äÉ°ThôØŸGh óFÉ°SƒdGh
RÉ¡÷G øe πbC’G ≈∏Y Îe 1 áaÉ°ùe ≈∏Y
OƒLƒŸG ∞jöüàdG òØæe ºàµj Å°T …CG ™°Vh ∫hÉ– ’ •
º°S 50 ∑ÎH í°üæj .RÉ¡÷G øe »Ø∏ÿG Aõ÷G ‘
.≥FÉY ÜôbCGh ∞jöüàdG òØæe ÚH πbC’G ≈∏Y
±ÉL ¿Éµe ‘ ¬æjõîJh RÉ¡÷G 𫨰ûJ ≈∏Y ¢UôMG •
≈∏Y …ƒà– »àdG ≥WÉæŸG ‘ RÉ¡÷G ΩGóîà°SG ô¶ëj •
∫É©à°TÓd á∏HÉb OGƒe hCG äÉfÉgO hCG äGRÉZ
äGP äƒjõdG óMCG øe á≤«bO ᫪c ≈∏Y ICÉaóŸG …ƒà– •
èàæà áfÉ©à°S’G Öéj Gòdh kGóL á°UÉÿG á«YƒædG
äÉ«∏ªY AGôLE’ ¬æe óªà©ŸG áeóÿG π«ch hCG RÉ¡÷G
Öéj ɪc âjõdG ¥hóæ°U íàa Ωõ∏à°ùJ »àdG ìÓ°UE’G
âjõdG ‘ ÜöùJ çhóM óæY ¬H ∫É°üJ’G
øe ¢ü∏îàdÉH á°UÉÿG á«∏ëŸG íFGƒ∏dG ´ÉÑJG ≈Lôj •
RÉ¡÷G øe ¢ü∏îàdG ‘ áÑZôdG óæY âjõdG
ΩGóîà°SG Öéj .kÉ≤∏£e ∂∏°ùdG øe RÉ¡÷G ó°T ∫hÉ– ’ •
.ôNBG ¤EG ¿Éµe øe RÉ¡÷G π≤f óæY kɪFGO ¢†Ñ≤ŸG
¬∏≤f ádhÉfi πÑb QÉ«àdG òNCÉe øe RÉ¡÷G π°üa Öéj •
.ôNBG ¤EG ¿Éµe øe
16
Page 17

ARABIC
∑Ó°SCG ôª¨J ’ ,á«FÉHô¡µdG áeó°üdG ô£N Öæéàd
øe √ÒZ hCG AÉŸÉH ∑ôëŸG IóMh hCG ¢ùHÉ≤dG hCG π«°UƒàdG
.πFGƒ°ùdG
áë«Ø°U ≈∏Y á«FÉHô¡µdG ájò¨àdG ó¡L á≤HÉ£e øe ≥≤–
…CG .∂jód Ωóîà°ùŸG »FÉHô¡µdG ájò¨àdG Ωɶæd öTDƒŸG
.¿Éª°†dG »¨∏«°S RÉ¡÷G π«°UƒJ ‘ CÉ£N
I ∞æ°üdG èàæeh »FÉHô¡µdG π«°UƒàdG äÓHÉc
¿C’ ,∂dÉ°ùŸG »KÓK π«°UƒJ πHÉc ΩGóîà°SG Öéj
.I ∞æ°üdGh ¢VQDƒŸG ´ƒædG øe RÉ¡÷G á«æH
100) kGÎe 30 ∫ƒ£H äÓHÉc ΩGóîà°SG øµÁh
.ábÉ£dG ‘ ó≤a ∫ƒ°üM ¿hO (Ωób
¢ù«FôdG QÉ«àdG ¢ùHÉb ∫GóÑà°SG
:ójóL ¢ùHÉb Ö«côJ ¤EG áLÉ◊G ádÉM ‘
.Ëó≤dG ¢ùHÉ≤dG øe øeBG πµ°ûH ¢üq∏îJ •
¢ùHÉ≤dG ‘ π°UƒŸG §ÿG ¤EG »æÑdG ∂∏°ùdG π«°UƒàH ºb •
.ójó÷G
.ójÉëŸG »FÉHô¡µdG §ÿG ¤EG ¥QRC’G ∂∏°ùdG π«°UƒàH ºb •
§ÿG π«°UƒàH ºb ,(¢VQDƒŸG) I ∞æ°üdG ádÉM ‘ •
.»°VQC’G §ÿG ¤EG ôØ°UC’G/ö†NC’G
•
AGõLCG OƒLh ΩóY øe ≥≤– ,RÉ¡÷G ΩGóîà°SG πÑb •
‘ QGöVCG hCG ¬FGõLCG ‘ Qƒ°ùc hCG áHƒ£©e hCG IQö†àe
•
.¬∏«¨°ûJ ‘ ôKDƒJ ób »àdG Úî°ùàdG áë«Ø°U hCG √QGQRCG
‘ π£Y hCG QöV OƒLh ádÉM ‘ RÉ¡÷G Ωóîà°ùJ ’
áHƒ£©e hCG IQö†àe AGõLCG ájCG ∫GóÑà°SG hCG ìÓ°UEÉH ºb •
.óªà©e áfÉ«°U π«ch ∫ÓN øe
á«FÉHô¡µdG ájò¨àdG ∂∏°S ¢üëa ΩGóîà°S’G πÑb Ωõ∏j •
.πcBÉàdG hCG Ωóp≤dG hCG ∞∏àdG äÉeÓY øe √ƒ∏N øe ócCÉà∏d
ájò¨àdG ∂∏°S ∞∏J ádÉM ‘ RÉ¡÷G ΩGóîà°SG ΩóY Öéj •
.ɪ¡æe …CÉH Ö«Y OƒLh hCG ¢ùHÉ≤dG hCG á«FÉHô¡µdG
hCG kÉØdÉJ ¢ù«FôdG QÉ«àdG ¢ùHÉb hCG QÉ«àdG ∂∏°S ¿Éc GPEG •
óªà©e áfÉ«°U π«ch áaô©Ã ¬MÓ°UEG Ú©àj ,kÉÑ«©e
ádhÉfih QÉ«àdG ∂∏°S ™£b ÖæŒ .ôWÉfl ájC’ kÉÑæŒ
IOóëŸG ∂∏J ÒZ AGõLCG ájCG ∫GóÑà°SG hCG ádGREG ∫hÉ– ’
ìÓ°UE’Gh ¢üëØdG
.¬FGõLCG óMCG
.∂°ùØæH ¬MÓ°UEG
.π«dódG Gòg ‘
•
•
∞YÉ°†e ∫õ©H II ∞ж°ьdG шe дЙйажŸG бdЙM ‘ :á¶MÓe
AGôLE’ »YGO ’ ,(§jöûdG ‘ §≤a ¿É«FÉHô¡c ¿Éµ∏°S)
.»°VQC’G §ÿG ¤EG π«°UƒJ
.IOƒ÷G äGP ¢ùHÉ≤ŸG ™e á≤aôŸG Ö«cÎdG äGOÉ°TQEG ™ÑqJG
¢ùØf øe ¢ùHÉ≤dG ‘ á∏jóH ᪰UÉa ájCG Ωóîà°ùoJ ¿CG Öéj
.èàæª∏d á«∏°UC’G ᪰UÉØdG ∞æ°U
á«FÉHô¡µdG ájò¨àdG ¢ùHÉb ∫GóÑà°SÉH ≥∏©àŸG Aõ÷G !ôjò–
óªà©ŸG äÉeóÿG õcôe »ØXƒŸ ¬Lƒe
á«FÉHô¡µdG áeÓ°ùdG
kɪFGO πµ°ûH ≥≤– .RÉ¡÷G Gòg ¢†jQCÉJ Öéj
»FÉHô¡µdG ó¡é∏d ≥HÉ£e ábÉ£dG OGóeEG ¿CG øe
.öTDƒŸG áë«Ø°U ≈∏Y
òNBɪ∏d á≤HÉ£e á«FÉHô¡c ¢ùHGƒb ΩGóîà°SG Öéj
øe ∫ÉM …CÉH ¢ùHÉ≤dG πjó©àH kGóHCG º≤J ’ .á«FÉHô¡µdG
Iõ¡LC’G ™e ¢ùHGƒ≤∏d äÓ«°UƒJ ájCG Ωóîà°ùJ ’ .∫GƒMC’G
ÒZ ¢ùHGƒ≤dG º¡°ùà°S .(1 ∞æ°üdG) ¢†jQCÉJ ∑Ó°SCG äGP
áeó°üdG ô£N ¢†«ØîJ ‘ á≤HÉ£ŸG ábÉ£dG òNBÉeh ádó©ŸG
.
.á«FÉHô¡µdG
17
Page 18

ARABIC
§¨°†dG ∫ÓN øe á°†ØîæŸG ábÉ£dG ™°Vh QÉ«àNG øµÁ •
§≤a á°†îæŸG áÄaóàdG QR ≈∏Y
§¨°†dG ∫ÓN øe ᣰSƒàŸG ábÉ£dG ™°Vh QÉ«àNG øµÁ •
§≤a á«dÉ©dG áÄaóàdG QR ≈∏Y
§¨°†dG ∫ÓN øe á«dÉ©dG ábÉ£dG ™°Vh QÉ«àNG øµÁ •
4 h 3 øjQõdG ≈∏Y
™°Vh ¤EG IQÉ°TEÓd QR πc ≈∏Y áÑŸ A»°†J ±ƒ°S •
√QÉ«àNG ” …òdG áÄaóàdG
,܃∏£ŸG iƒà°ùŸG ¤EG áaô¨dG IQGôM áLQO π°üJ ÉeóæY •
»°ùµ©dG √ÉŒ’G ‘ A§ÑH (1) IQGô◊G öTDƒe ôjhóàH ºb
IQGô◊G º¶æe 𪩫°S .πª©dG øY RÉ¡÷G ∞bƒàj ≈àM
áaô¨dG IQGôM áLQO â«ÑãJ ≈∏Y RÉ¡÷G πNGO OƒLƒŸG
.iƒà°ùŸG ¢ùØf ‘
§Ñ°†H ºb ,áaô¨dG áÄaóJ øY ∞bƒàdG ‘ áÑZôdG óæY •
πªY ±É≤jE’ "0" ™°VƒdG ≈∏Y (4) h (3) áÄaóàdG QGQRCG
.QÉ«àdG òNCÉe øe ¢ùHÉ≤dG ´õfG ºK RÉ¡÷G
ΩGóîà°S’G AÉæKCG RÉ¡÷G Gòg áÑbGôe Öéj :á¶MÓe
¬JQGôM áLQO ™ØJôJ ’ ≈àM RÉ¡÷G á«£¨J ∫hÉ– ’ :ôjò–
.ÒÑc πµ°ûH
øjôNB’G áeÓ°S
øÃ) OGôaC’G πÑb øe ΩGóîà°SÓd ºª°üe ÒZ RÉ¡÷G Gòg •
º¡JGQób ¢VÉØîfG øe ¿ƒfÉ©j øjòdG (∫ÉØWC’G º¡«a
IÈÿG ¤EG ¿hô≤àØj hCG º¡°SGƒM hCG á«∏≤©dG hCG á«fóÑdG
OÉ°TQE’G hCG ±GöTEÓd Gƒ©°†îj ⁄ Ée ,áaô©ŸGh
øY ∫hDƒ°ùe ¢üî°T πÑb øe RÉ¡÷G ΩGóîà°SG ¢Uƒ°üîH
.º¡àeÓ°S
.RÉ¡÷ÉH º¡ãÑY ΩóY ¿Éª°†d ∫ÉØWC’G áÑbGôe »¨Ñæj •
√ò¡H áaô©e ≈∏Y ¢ù«d ¢üî°T …CG hCG ∫ÉØWC’G ´óJ ’ •
.RÉ¡÷G Ωóîà°ùj äGOÉ°TQE’G
RÉ¡÷G ΩGóîà°SG
∫hÉ– ’ Gòdh §≤a ±ô¨dG áÄaóàd ó©e RÉ¡÷G Gòg
§≤a ‹õæŸG ΩGóîà°SÓd .ôNBG ¢VôZ …CG ‘ ¬eGóîà°SG
áeÓ°ùdG äGOÉ°TQEG
á«°SÉ°SC’G áeÓ°ùdG äÉWÉ«àMG ™«ªL PÉîJG »¨Ñæj !ôjò–
,á«FÉHô¡c ájò¨J QOÉ°üà á∏°üàŸG Iõ¡LC’G ΩGóîà°SG iód
´’ófG ô£N øe π«∏≤à∏d ∂dPh ,√ÉfOCG IQƒcòŸG ∂dP ‘ ÉÃ
á«°üî°T äÉHÉ°UEG hCG á«FÉHô¡c äÉeó°U çhóM hCG ¿GÒædG
.ájOÉe QGöVCGh
πÑb ájÉæ©H ká∏eÉc π«dódG äɪ«∏©J IAGôb ≈Lôj
.RÉ¡÷G ΩGóîà°SG
¿EG .π«dódG Gòg ‘ πeɵdÉH á∏°üØe RÉ¡÷G äÉeGóîà°SG
hCG á£ÑJôŸG ¬JGhOCG hCG RÉ¡÷G äÉ≤ë∏e øe m…CG ΩGóîà°SG
π«dO ‘ IQƒcòŸG ∂∏àd áØdÉfl á«∏ªY …CG AGôLEG
äÉHÉ°UEG ´ƒbh ô£N ¬æY ºéæj ¿CG øµÁ äGOÉ°TQE’G
.á«°üî°T
.kÓÑ≤à°ùe ¬«dEG ´ƒLô∏d π«dódG Gò¡H ßØàMG
kɪFGO QòM πµ°ûH »FÉHô¡µdG π«°UƒàdG QÉ°ùe OóM •
.Ì©àdG ôWÉfl …OÉØàd
ájò¨àdG êôfl â– öTÉÑe πµ°ûH kGóHCG RÉ¡÷G π¨°ûJ ’
.π«°UƒàdG ‘ Ωóîà°ùŸG á«FÉHô¡µdG
RÉ¡÷G ΩGóîà°SG á≤jôW
¿hO ¢VQC’G ≈∏Y RÉ¡÷G ™°V ºK kÓeÉc ∂∏°ùdG ∂ØH ºb •
õLGƒM hCG ≥FGƒY …CG
øµJ ⁄ GPEG âjõdG ÎjOGQ πª©j ød ,¿ÉeCÓd á«dBÉch •
ƒà°ùe í£°S ≈∏Y áYƒ°Vƒe IóMƒdG
r
™e Ö°SÉæŸG »Hô¡µdG QÉ«àdÉH ICÉaóŸG π«°UƒàH ºb •
íª°ùJ RÉ¡÷G ∞∏N á«aÉc áMÉ°ùe ∑ôJ IÉYGôe
AGƒ¡dG ∞jöüàH
•
•
•
18
.ΩGóîà°S’G óæY kGóHCG √óMh RÉ¡÷G ∑ÎJ ’ •
≈∏Y §¨°VG ºK √ôNBG ¤EG (2) IQGô◊G öTDƒe ôjhóàH ºb •
∂àÑZQ Ö°ùM (4) hCG (3) áÄaóàdG QR
Page 19

Page 20

Page 21

WARRANTY REGISTRATION CARD
YOUR NAME/
YOUR ADDRESS
POSTCODE
DATE OF PURCHASE
DEALER'S NAME & ADDRESS/
«ùßr
«∞FMu«Ê
«∞d±e «∞∂d¥bÍ
¢U¸¥a «∞Ad«¡
≈ßr Ë ´Mu«Ê «∞∂Uzl
PRODUCT MODEL NO.
OR11FD/OR12FD/OR13FD
Page 22

N a m e s & A d d r e s s e s f o r B l a c k & D e c k e r S e r v i c e C o n c e s s i o n a r ie s
ALGERIA: SARL Outillage Corporation, After Sale Service Center-08, Rue Mohamed Boudiaf - Cheraga, Algiers, Algeria, Tel:
+213 21 375131, Fax: +213-0-369667. AZERBAIJAN: Kontakt - NN LLC, M.Qashqay 43, Baku, Azerbaijan Az1000. Tel:
+994 12 4082050, Fax: +994 12 4117090. BAHRAIN: Alfouz Services Co. WLL., P.O. Box 26562, Tubli, Manama, Tel: +973-17783562/
17879987, Fax: +973-17783479. Kewalram & Sons Co. WLL P.O. Box 84, Manama, Kingdom of Bahrain, Tel: +973-17213110/ 17210617/
17210619, Fax: +973-17213211/ 17210627. BANGLADESH: Ultra Corporation, 8, Kushol Centre, Uttara, Dhaka 1230. Tel:
+880-2-8922144, Fax: +880-2-8951339. EGYPT: Anasia Egypt for Trading S.A.E, P.O. Box 2443, 9, Mostafa Refaat Street,
Sheraton Heliopolis 11361, Cairo, Tel: +202-22684159, Fax: +202-22684169. ETHIOPIA: Seif Sherif Trade PLC -Arada Sub City,
Kebele 01-02, Global Insurance Bldg., 2nd Flr. Room 43, P.O.Box 2525, Addis Ababa, Ethiopia, Tel: 00-251-11-1563968/ 1563969, Fax:
00-251-11-1558009. INDIA: Gryphon Appliances Ltd., D-6/4, Okhla Industrial Area, Phase-I, New Delhi-110020, Tel: +91-11-46731111,
Fax: +91-11-46731111. JORDAN: Bashiti Hardware, 93 King Abdullah 2nd St., Opp ELBA House, P.O. Box 3005, Tel: +962-6-5349098
ext.11, Fax: +962-6-5330731. KENYA: Leading Concepts, P.O. Box: 40877-00100, Nairobi, Kenya. Tel: +254 20 690 5000, Fax:
+254 20 690 5111. KUWAIT: Al Omar Technical Co., P.O. Box 4062, Safat 13041, Kuwait, Tel: 00965-24848595/ 24840039, Fax:
00965-24845652. The Sultan Centre, P.O. Box 26567-13126 Safat, Kuwait, Tel: 00965-24343155 Etn. 432, Fax: 00965-24319071.
LEBANON: Aces Service Centre, P.O. Box 90-102, Nahr El Mot, Seaside Highway, Pharaon Building, Beirut. Tel: 00961-1-898989, Fax:
00961-1-245880. LIBYA: Homeworld Co., Building No.5, Senidal St., Amr Ibn Elaas Road, Benghazi, Libya. Tel: 00218-61-9094183.
Service Center1 - Benghazi: Tel: +218-061-3383994, Fax: +218-092-7640688, Service Center2 - Tripoli: Tel: +218-021-3606430, Fax:
+218-092-6514813. MALTA: John G Cassar Ltd. 36-Victory Street, Qormi QRM 06, Malta. Tel: +356-21493251, Fax: +356-21483231.
MAURITIUS: J.M. Goupille & Co. Ltd., Rogers Industrial Park 1, Riche Terre, Mauritius, Tel: +230 206 9450/ +230 207 1700, Fax:
+230 206 9474/ +230 248 3188. MOROCCO: UATS 26 Rue Ennarjisse, Hay Erraihan, Beausejour - Hay Hassani-Casablanca, Morocco.
Tel: +212 522945114, Fax: +212 522942442. NEPAL: Universal Electrocom, Tripureshwor, Kathmandu, Nepal. Tel:+977-1-4265191.
NIGERIA: Dana Electronics Ltd. (Lagos) 116/ 120, Apapa Oshodi Express Way, Isolo, Lagos, Nigeria. Tel: +234-17431818/
+234-8037767774/ +234-8057445477. (Abuja) 18, A.E. Ekukinam Street, Off Obsfemi Awolowo Road, Utako, Abuja, Nigeria. Tel:
+234-8032276101/ +234-8037767774. (Kano) 9A - Mai Malari Road, Bompai, Kano, Nigeria. Tel: +234-8053294947/ +234-8037767774.
OMAN: Oman Marketing & Service Co. (Omasco), P.O. Box 2734, Behind Honda Showroom, Wattayah, Oman, Tel: +968-24560232/
24560255, Fax: +968-24560993. Oman Marketing & Service Co. (Omasco), Al Ohi, Sohar, Oman, Tel: +968-26846379, Fax:
+968-26846379. Oman Marketing & Service Co. (Omasco) - Sanaya, Salalah, Oman, Tel: 00968-23212290, Fax: +968-23210936.
PAKISTAN: Ammar Service & Spares - 60-Bank Arcade, Serai Road, Karachi, Pakistan, Tel: 0092-21-32426905, Fax: 0092-21-32427214.
PHILIPPINES: 476 J. P. Rizal St., cor Kakarong St. Brgy Olympia, Makati City, Tel: +632 403-5698. QATAR: Al Muftah Service Centre -
Al Wakrah Road, P.O. Box 875, Doha, Qatar. Tel: 00974-4650880/ 4650110/ 4446868, Fax: 00974-4441415/ 4662599. SAUDI ARABIA:
(Al Khobar) Al-Suwaiket Catering & Trading Co., P.O.Box 4228, King A.Aziz Street, Al Khobar, Tel: +966-3-8591088, Fax:
+966-3-8595648. Fawaz Ebrahim Al Zayani Trading Est. P.O. Box 76026, Al Khobar #31952, Tel: +966-3-8140914, Fax: +966-3-8140824.
(Jeddah) Banaja Trading Co. Ltd, P.O. Box 366, Jeddah-21411, Tel: +966-2-6511111, Fax: +966-2-6503668. (Riyadh) Banaja Trading Co.
Ltd, P.O. Box 566, Riyadh-11421, Tel: 00966-1-4124444, Fax: +966-1-4033378. SOUTH AFRICA: Trevco Power Tool Service 14
Steenbok Street, Koedoespoort, 0186, Pretoria, South Africa, Tel: +27-86-1873826, Fax: +27-86-5001771. SRI LANKA: Delmege
Construction Products (Pvt) Ltd., No 101 Vinayalankara Mawatha, Colombo-10, Sri Lanka, Tel: +94-11-2693361-7, Service hotline:
+94-77-2211111. TUNISIA: Société Tunisienne De Manutention - Rue de la Physique, Nouvelle Zone Industrielle de Ben Arous-2013
Tunisie, Tel: +216-71-386102/ 380620, Fax: +216-71380412 ext 216. UGANDA: Anisuma Investment and Services Ltd., J R complex,
Ware House No.5, Plot No 101, 3rd Street Industrial Area, Jinja Road, Kampala, Tel: +256-414237106. UAE: (Abu Dhabi)
Light House Electrical, P.O. Box 120, Abu Dhabi, Tel: +971-2-6726131, Fax: +971-2-6720667. (Al Ain) Zillion Equipment and Spare Parts
Trading LLC, P.O. Box 19740, Opp. Bin Sadal/Trimix Redymix Sanaiya, Al Ain. Tel: +971-3-7216690, Fax:+971-3-7216103 (Dubai)
Black & Decker (Overseas) GmbH, P.O. Box 5420, Dubai, Tel: +971-4-8127400/ 8127406, Fax: +971-4-2822765. (Musaffah) Light House
Electrical, P.O. Box 120, Abu Dhabi, Tel: +971-2-5548315, Fax: +971-2-5540461. (Sharjah) Mc Coy Middle East LLC, P.O. Box 25793,
Sharjah, Tel: +971-6-5395931, Fax: +971-6-5395932. (Ras Al Khaimah) Mc Coy Middle East LLC, P.O.Box 10584, Ras Al Khaimah, Tel:
+971-7-2277095, Fax: +971-7-2277096. YEMEN: (Aden) Muala St., Tel: +967 2 222670, Fax: +967 2 222670. (Sana'a) Middle East Trad.
Co. Ltd., P.O. Box 12363, Hayel Street, Sana'a. Tel: +967-1-204201, Fax: +967-1-204204. (Taiz) Middle East Trading Co. (METCO),
5th Flr.Hayel Saeed Anam Bldg, Al-Mugamma St. Taiz, Yemen, Tel: +967-4-213455, Fax: +967-4-219869.
 Loading...