

Page 1
CORDLESS18VOLTTRIMMER/EDGER
INSTRUCTIONMANUAL
Date Code
Catalog Number
NST2018
Thank you for choosing Black & Decker!
Go to www.BlackandDecker•com/NewOwner
to register your new product•
PLEASE READ BEFORE RETURNING THIS
PRODUCT FOR ANY REASON:
IfyouhaveaquestionorexperienceaproblemwithyourBlack&Deckerpurchase,goto
HTTP:IlWWW.BLACKANDDECKER.COMIINSTANTANSWERS
forinstantanswers24hoursaday.
Ifyoucan'tfindtheanswerordonothaveaccesstotheinternet,
call1-800-544-6986from8a.m.to5 p.m.ESTMon.-- Fri.tospeakwithanagent.
Pleasehavethecatalognumberavailablewhenyoucall.
KEY INFORMATION YOU SHOULD KNOW:
• Charge battery for 9 hours before attempting to use your trimmer/edger.
• To operate the trimmer, the lock out button must be pulled back.
• This is an automatic feed trimmer- Do not bump head against ground.
• Use only .065 inch diameter line.
• Install guard.
VEA EL ESPAI(IOL EN LA CONTRAPORTADA.
INSTRUCIIV©DE©PERAClON,CENTR©SDESERVIClOYP©LIZADEGARANTiA.
ADVERTENCIA:LI_ASEESTEINSTRUCIIV©ANTESDEUSARELPRODUCTO.
Page 2
WARNING: ImportantSafetyWarnings
and Instructions
TO REDUCE RISK OF INJURY:
• Before any use, be sure everyone using this toot reads and understands all safety
instructions and other information contained in this manual.
• Save these instructions and review frequently prior to use and in instructing others.
• Keep long hair and loose clothing away from openings and moving parts.
WARNING." When using electric gardening appliances, basic safety
precautions should always be followed to reduce risk of fire, electric shock, and
personal injury, including the following.
WAR N IN--{,_." Some dust created by this product contains chemicals
known to the State of California to cause cancer, birth defects or other reproductive
harm. Some examples of these chemicals are:
• compounds in fertilizers
• compounds in insecticides, herbicides and pesticides
To reduce your exposure to these chemicals, wear approved safety equipment such as
dust masks that are specially designed to filter out microscopic particles.
SAFETY GUIDELINES - DEFINITIONS
It is important for you to read and understand this manual.
The information it contains relates to protecting YOUR SAFETY and PREVENTING
PROBLEMS. The symbols below are used to help you recognize this information.
z_ DANGER: Indicates an imminently hazardous situation which, if not avoided, will
result in death or serious injury.
/_ WARNING; Indicates a potentially hazardous situation which, if not avoided, could
result in death or serious injury.
• arsenic and chromium from chemically treated lumber
READ AND UNDERSTAND ALL INSTRUCTIONS BEFORE USING.
CAUTION: Indicates a potentially hazardous situation which, if not avoided, may
result in minor or moderate injury.
CAUTION: Used without the safety alert symbol indicates a potentially hazardous
situation which, if not avoided, may result in property damage.
GENERALSAFETYWARNINGSAND
INSTRUCTIONSFORALLTOOLS
• READ and understand all instructions.
• A BATTERY OPERATED UNIT with integral batteries or a separate battery pack must
be recharged only with the specified charger for the battery. A charger that may be
suitable for one type of battery may create a risk of fire when used with another battery.
• USE BATTERY OPERATED UNIT ONLY with specifically designated battery pack. Use
of any other batteries may create a risk of fire.
• AVOID accidental starting. Be sure switch is inthe locked or off position before inserting
battery pack. Carrying units with your finger on the switch or inserting the battery pack
into a unit with the switch on invites accidents.
• DO NOT use unit if switch does not turn it on or off. A unit that cannot be controlled with
the switch is dangerous and must be repaired.
• DISCONNECT battery pack from unit or place the switch in the locked or off position
before making any adjustments, changing accessories, or storing the unit. Such
preventative safety measures reduce the risk of starting the unit accidentally.
Page 3

• ALWAYSWEAREYEPROTECTION- Wearsafetyglassesorgogglesatalltimes
whenthisunitisinuse.SafetyglassesareavailableatextracostatyourlocalBlack&
DeckerServiceCenterorauthorizedservicefacility.Alwaysusefaceordustmaskif
operationisdusty.
• GUARD- Donotusethisunitwithoutguardattached.
• DRESSPROPERLY- Donotwearlooseclothingorjewelry.Theycanbecaughtin
movingparts.Rubberglovesandsubstantialrubbersoledfootweararerecommended
whenworkingoutdoors.Don'toperatetheunitwhenbarefootorwearingopensandals.
Wearlongpantstoprotectyourlegs.Wearprotectivehaircoveringtocontainlonghair.
• NYLONLINE- Keepface,handsandfeetclearofrotatingnylonlineatalltimes.
•THEROTATINGLINEPERFORMSACUTTINGFUNCTION- Usecarewhentrimming
aroundscreensanddesirableplantings.
• KEEPCHILDRENAWAY-Allvisitorsshouldbekeptatsafedistancefromworkarea.
• IMPORTANTWARNING- Whenbeingusedasanedger,stones,piecesofmetaland
otherobjectscanbethrownoutathighspeedbythetine.Theunitandguardare
designedtoreducethedanger.However,thefollowingspecialprecautionsshouldbe
taken:
•z_ WARNING: Make sure that other persons and pets are at least 100 ft. (30.5m) away.
•/_ WARNING: To reduce the risk of rebound (ricochet) injury, work going away from any
nearby sotid object such as a wall, steps, large stone, tree, etc. Use great care when
working close to solid objects, and, where necessary, do edging or trimming by hand.
• AVOID ACCIDENTALLY STARTING - Don't carry unit with finger on trigger.
• DO NOT FORCE THE APPLIANCE - Itwill do the job better and with less likelihood of
a risk of injury at the rate for which it was designed.
• USE THE RIGHT APPLIANCE - Do not use this unit for any job except that for which it
is intended.
• DON'T OVERREACH - Keep proper footing and balance at all times.
• DAMAGE TO APPLIANCE - If you strike or become entangled with a foreign object,
stop toot immediately, check for damage and have any damage repaired before further
operation is attempted. Do not operate with a broken hub or spool.
• AVOID DANGEROUS ENVIRONMENTAL CONDITIONS - Do not use electric units in
damp or wet locations. Don't use the unit in the rain.
• DO NOT OPERATE trimmer/edgers in gaseous or explosive atmospheres. Motors in
these units normally spark, and the sparks might ignite fumes.
• STORE IDLE APPLIANCES INDOORS - When not in use, units should be stored
indoors in a dry locked-up place out of reach of children.
• STAY ALERT- Watch what you are doing. Use common sense. Do not operate unit
when you are tired.
• MAINTAIN APPLIANCES WITH CARE - Keep cutting edge sharp and clean for best
performance and to reduce the risk of injury. Follow instructions for lubricating and
changing accessories. Inspect appliance cord periodically, and ifdamaged, have it
repaired by an authorized service facility. Inspect extension cords periodically and
replace if damaged. Keep handles dry, clean, and free from oil and grease.
• CHECK DAMAGED PARTS - Before further use of the unit, a guard or other part that
is damaged should be carefully checked to determine that it will operate properly and
perform its intended function. Check for alignment of moving parts, binding of moving
parts, breakage of parts, mounting, and any other condition that may affect its
operation. A guard or other part that is damaged should be properly repaired or
replaced by an authorized service center unless otherwise indicated elsewhere in this
manual.
• KEEP GUARDS IN PLACE AND IN WORKING ORDER.
• KEEP HANDSAND FEETAWAY FROM CUTTING AREA.
• DO NOT CHARGE APPLIANCE IN RAIN OR IN WET LOCATIONS.
SAVE THESE INSTRUCTIONS
Page 4
0
Lengeeta
// \
O
Lock-out
Verrouillage hors tension
Seguro
Trigger Switch
Interrupteur & detente
Gatillo interruptor
Page 5

O
0
0
_D frz/_-_.!_J _
®
Page 6

/_ ADDITIONAL IMPORTANT SAFETY INSTRUCTIONS
• AVOID DANGEROUS ENVIRONMENT- Do not use or charge battery in damp or wet
locations.
• DO NOT USE OR CHARGE battery in rain.
• REMOVE BATTERY before servicing, cleaning or removing material from the trimmer.
Remove battery from your trimmer and carry by the front handle when not in use.
• EXERCISE CARE in handling batteries in order not to short the battery with
conducting materials such as rings, bracelets and keys. The battery or conductor may
overheat and cause burns.
• DO NOT OPEN OR MUTILATE the batteries. Released electrolyte is corrosive and
may cause damage to the eyes or skin. It may be toxic ifswallowed.
This device complies with Part 15 of the FCC Rules. Operation is subject to the
following two conditions: (1) this device may not cause harmful interference, and (2) this
device must accept any interference received, including interference that may cause
undesired operation.
NOTE: This equipment has been tested and found to comply with the limits for Class B
digital device, pursuant to part 15 of the FCC Rules. These limits are designed to
provide reasonable protection against harmful interference in a residential installation.
This equipment generates, uses and can radiate radio frequency energy and, if not
installed and used in accordance with the instructions, may cause harmful interference
to radio communications. However, there is no guarantee that interference wilt not occur
in a particular installation. If this equipment does cause harmful interference to radio or
television reception, which can be determined by turning the equipment off and on, the
user is encouraged to try to correct the interference by one or more of the following
measures:
Reorient or relocate the receiving antenna.
Increase the separation between the equipment and the receiver.
Connect the equipment into an outlet on a circuit different from that to which the
receiver is connected.
Consult the dealer or an experienced radio/TV technician for help.
SAVE THESE INSTRUCTIONS.
The label on your tool may include the following symbols.
V .............. volts
Hz ............ hertz
min ............ minutes
.... .......... direct current
[] .............. Class II Construction
/_ ............safety alert symbol
BATTERY CAP INFORMATION
Battery storage and carrying caps are provided for use whenever the battery is out of
the unit or charger. Remove cap before placing battery in charger or unit.
Z_ WARNING: Do not store or carry battery so that metal objects can contact exposed
battery terminals. For example, do not place battery in aprons, pockets, toot boxes,
product kit boxes, drawers, etc. with loose nails, screws, keys, etc. without battery cap.
Transporting batteries can possibly cause fires if the battery terminals inadvertently come
in contact with conductive materials such as keys, coins, hand tools and the like. The US
Department of Transportation Hazardous Material Regulations (HMR) actually prohibit
A ................ amperes
W................ watts
"_ .............. alternating current
no .............. no load speed
G ............ earthing terminal
.../min ......revolutions or
reciprocations per minute
BatteryCap
Page 7

transportingbatteriesincommerceoronairplanes(i.e.packedinsuitcasesandcarryon
luggage)UNLESStheyareproperlyprotectedfromshortcircuits.Whentransporting
individualbatteries,makesurethatthebatteryterminalsareprotectedandwellinsulated
frommaterialsthatcouldcontactthemandcauseashortcircuit."
/ SAFETY WARNINGSAND INSTRUCTIONS
CHARGING THE BATTERY
1. This manual contains important safety and operating instructions.
2. Before using battery charger, read all instructions and cautionary markings on (1)
battery charger,(2) battery, and (3) product using battery.
3. _, CAUTION: To reduce the risk of injury, charge only Black & Decker Power
Packs. Other types batteries may burst causing personal injury and damage.
4. Do not expose charger to rain or snow.
5. Use of an attachment not recommended or sold by Black & Decker may result in a
risk of fire, electric shock, or injury to persons.
6. To reduce risk of damage to electric plug and cord, pull by plug rather than cord when
disconnecting charger.
7. Make sure cord is located so that it will not be stepped on, tripped over, or otherwise
subjected to damage or stress.
8. An extension cord should not be used unless absolutely necessary. Use of improper
extension cord could result in a risk of fire, electric shock or electrocution.
a. Two-wire cords can be used with 2-wire or 3-wire extension cords. Only round
jacketed extension cords should be used, and we recommend that they be
listed by Underwriters Laboratories (U.L.). If the extension is to be used outside,
the cord must be suitable for outdoor use. Any cord marked for outdoor use can
also be used for indoor work. The letters "W" or "WA" on the cord jacket indicate
that the cord is suitable for outdoor use.
b. An extension cord must have adequate wire size (AWG or American Wire
Gauge) for safety, and to prevent toss of power and overheating. The smaller the
gauge number of the wire, the greater the capacity of the cable; that is, 16
gauge has more capacity than 18 gauge. When using more than one extension
to make up the total length, be sure each extension contains at least the
minimum wire size.
CHART FOR MINIMUM WIRE SIZE (AWG) OF EXTENSION CORDS
NAMEPLATE RATING AMPS - 0 - 10.0
Total Extension Cord Length (ft) 25
Wire Gauge 18 18
50 75 100 125 150
16 16 14 14
9. Use only the supplied charger when charging your unit. The use of any other
charger could damage the battery or create a hazardous condition.
10. Do not attempt to open the charger or the unit. There are no customer serviceable
parts inside. Return to any authorized Black & Decker service center.
11. DO NOT incinerate battery packs even if they are severely damaged or completely
worn out.
12. Do not incinerate the batteries. They can explode in a fire. A small leakage of liquid
from the battery cells may occur under extreme usage, charging or temperature
conditions. This does not indicate a failure. However, if the outer seal is broken and
this leakage gets on your skin:
a. Wash quickly with soap and water.
b. Neutralize with a mild acid such as lemon juice or vinegar.
c. If the battery liquid gets in your eyes, flush them with clean water for a minimum of
10 minutes and seek immediate medical attention. MEDICAL NOTE: The liquid is a
25-35% solution of potassium hydroxide.
SAVE THESE INSTRUCTIONS
Page 8

/ IMPORTANT CHARGING SAFETY
INSTRUCTIONS
CHARGING THE POWER PACK
THE BATTERIES IN YOUR POWER PACK ARE NOT FULLY CHARGED AT THE
FACTORY. BEFORE ATTEMPTING TO CHARGE THEM, THOROUGHLY READ ALL
OF THE SAFETY INSTRUCTIONS.
The charger is designed to use standard household 120 volt 60 Hz power.
1. Plug the charger into any standard 120 Volt 60 Hz electrical outlet. NOTE: Do not
charge by means of an engine generator or DO power source. Use only 120V
AC.
2. Slide the charger onto the power pack as shown in figure 7 & 8 and let the power
pack charge initially for 9 hours. After the initial charge, under normal usage, your
power pack should be fully charged in 6 to 9 hours.
3. Unplug charger, and remove the power pack. Place the power pack in the unit
and be certain that it is inserted fully into the battery cavity until it "clicks"
into place.
NOTE: To remove the power pack from the unit, press down on the release button
on the back of the pack (Figure 9) and slide out.
IMPORTANT CHARGING NOTES
1. After normal usage, your power pack should be fully charged in 6 to 9 hours. If the
power pack is run-down completely, it may take up to 9 hours to become fully
charged. Your power pack was sent from the factory in an uncharged condition.
Before attempting to use it, it must be charged for at least 9 hours.
2. DO NOT charge the power pack in an air temperature below +40°F(+4.5°C), or
above +105°F (+40.5°C). This is important and will prevent serious damage to the
power pack. Longest life and best performance can be obtained if power pack is
charged when air temperature is about 75°F (24°C).
3. While charging, the charger may hum and become warm to touch. This is a normal
condition and does not indicate a problem.
4. If the power pack does not charge propedy--(1) Check current at receptacle by
plugging in a lamp or other unit. (2) Check to see if receptacle is connected to a
light switch which turns power off when you turn out the lights. (3) Move charger
and power pack to a surrounding air temperature of 40°F (+4.5°C) to 105°F
(+40.5°C). (4) If the receptacle and temperature are OK, and you do not get proper
charging, take or send the power pack and charger to your local Black & Decker
service center. See Tools Electric in yellow pages.
5. The power pack should be recharged when it fails to produce sufficient power on
jobs which were easily done previously. DO NOT CONTINUE using unit with its
power pack in a depleted condition.
6. The power pack wilt reach optimum performance after being cycled 5 times during
normal usage. There is no need to run the batteries down completely before
recharging. Normal usage is the best method of discharging and recharging the
power pack.
LEAVING THE BATTERY PACK IN THE CHARGER
The charger and battery pack can be left connected with the red light glowing
indefinitely. The charger will keep the battery pack fresh and fully charged.
NOTE: A battery pack will slowly lose itscharge when kept out of the charger. If the
battery pack has not been kept on maintenance charge, it may need to be recharged
before use. A battery pack may also slowly boseits charge if left in a charger that is not
plugged into an appropriate AC source.
Page 9

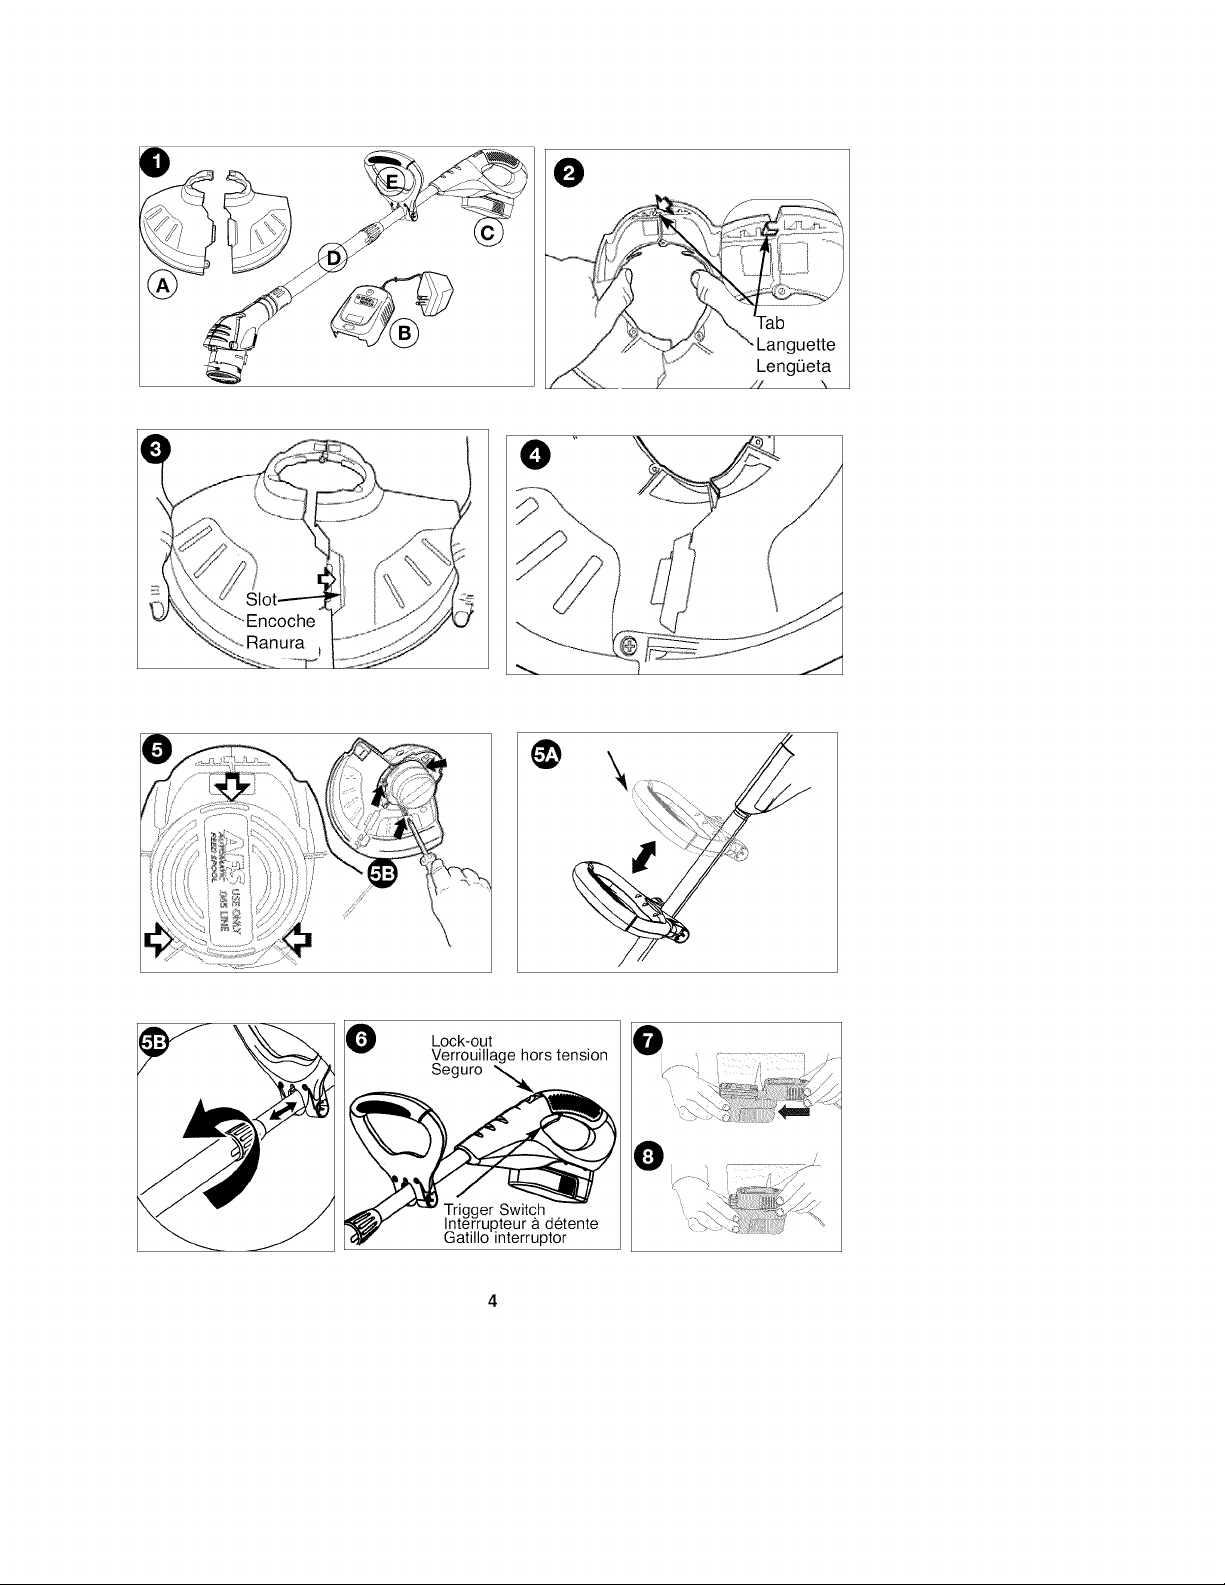
ASSEMBLY INSTRUCTIONS
Before assembling your Cordless String Trimmer, check that you have received the
following in the shipping carton. See figure 1.
A. Guard C. Nicad Battery Pack E. Auxiliary Handle
B. Charger D. Trimmer/Edger
ASSEMBLING AND ATTACHING THE TWO PIECE GUARD
z_ WARNING: Remove battery pack from tool before attempting to attach the guard
or make any adjustment. NEVER OPERATE TOOL WITHOUT GUARD FIRMLY IN
PLACE. The guard must always be on the tool to protect the user.
TO ASSEMBLE:
• Remove the two guard sections from the carton.
• Holding the sections as shown in figure 2, insert the tab from the first guard section
into the slot of the second guard section. See inset.
• Insert the side tab from the first guard section into the slot of the second guard section
until you hear them "snap" together (figure 3).
• Insert the 3/4inch (19mm) screw as shown in figure 4 to complete the guard assembly.
TO ATTACH:
• Place the assembled guard over the spool as shown in figure 5 and insert the
remaining three screws into the guard as indicated by the arrows.
• Once the guard is installed, remove the covering from the line cut-off blade, located on
the edge of the second guard section.
AUXILIARY HANDLE ADJUSTMENT
For maximum comfort and control, adjust the auxiliary handle to suit your height (figure
5A). Shorter users adjust handle to a lower position (away from you) and taller users,
adjust handle to an upper position (towards you). The handle should be adjusted so that
your front arm is straight as shown in figure 10.
HEIGHT ADJUSTMENT
The overall height of the trimmer can be adjusted by loosening the lock collar and
rotating it opposite to the arrow shown in figure 5B. The tubes can then be extended
shorter or longer. When the desired height is achieved tighten the collar by rotating in the
direction shown in figure 5B.
OPERATING INSTRUCTIONS
CAUTION: ALWAYS WEAR EYE PROTECTION.
/_ CAUTION: Inspect area to be trimmed and remove any wire, cord, or string-like
objects which could become entangled in the rotating line or spool. Be particularly
careful to avoid any wire which might be bent outwardly into the path of the toot, such as
barbs at the base of a chain link fence.
OPERATE THE TRIMMER/EDGER
• Toturn trimmer on, pull the lock out button, shown in figure 6, back and, then squeeze the
trigger switch. Toturn the tool off, release the trigger.
• Slowly swing trimmer side-to-side as shown in figure 10.
• Toconvert for maintenance edging, turn off the toot.As shown infigure 11, hold the trimmer
with one hand by the auxiliary handle, grasp the collar and push indirection of arrow and
rotate the trimmer head until it stops, (half turn), release your hand, (rotate clockwise when
viewed from the switch end). The toot is locked inthe edger position.
Rotate the wire edge guide forward and down into place before edging, as shown in
figure 12.
• Tooperate as a maintenance edger, position trimmer above sidewalk as shown in
figure 13.
• Return to trimming position byturning the toot off, push indirection of arrow and rotating the
Page 10

trimmerheadcounterclockwiseuntilitstops.Whenusingthetootinthetrimmermodeyou
maychoosetofoldthewireedgeguideupoutoftheway.
LINE FEEDING
Your trimmer uses .065 in. (1.65mm) diameter nylon line to cut grass and weeds quickly
and easily. In time, the tip of the nylon line wilt become worn and the auto feed
mechanism wilt automatically feed and trim a fresh length of line.
The cutting line will wear faster if the cutting is done along sidewalks or other abrasive
surfaces or heavier weeds are being cut. The automatic feed mechanism senses when
more cutting line is needed and feeds and trims the correct length of line whenever it is
required. You don't even have to think about it. Do not bump unit on ground in attempt to
feed line or for any other purpose.
REPLACING SPOOL/CLEARING JAMS AND TANGLED LINES
From time to time, especially when cutting thick or stalky weeds, the line feeding hub
may become clogged with sap or other material and the line will become jammed as a
result. To clear the jam, follow the steps listed below.
• Turn offthe trimmer and remove the battery.
• Press the release tabs on the line spool cover, as shown in figure 14 and remove the
cover by pulling it straight off.
• Lift the spool of nylon line out of the hub and clear any broken line or cutting debris from the
spool area.
• In case of jams and tangled line unwrap about one foot (30cm) of line to ensure that it is
undamaged. If it is OK rewind it and insert the line end through the eyelet in the spool hub,
asshown in figure 15. Pull the line through the hole to maintain tension while placing the
spool down into the hub with the notched side exposed, as shown in figure 16.
• Press the spool down GENTLY and rotate it until you feel it drop into place. (When in place,
the spool will turn a few degrees left and right freely.)
• Snap the spool cover back on, insert the battery and turn the toot on. In a few seconds or
less you'll hear the nylon line being cut automatically to the proper length.
REWINDING SPOOL FROM BULK LINE (USE ONLY .065 IN. DIAMETER LINE)
Bulk line for your trimmer/edger is available at extra cost from your local dealer or Black
& Decker Service Center.
To install bulk line, follow the steps below.
• Turn offthe trimmer and remove the battery.
• Press the release tabs on the line spool cover, as shown in figure 14 and remove the cover
by pulling it straight off.
• Remove the spool from the tool and remove and discard all line on the spool.
• Insert one end of the bulk line into the hole in the spool shown in figure 17 about 1/2 in.
(12mm).
• Hold the line in the hole and pull the rest of the line through the slot in the spool, shown
in figure 17.
• Snugly and evenly wind the bulk line onto the spool inthe direction of the arrow on spool in
figure 17 until it is nearly full. (The spool holds 50 ft. (15.2m) of line and bulk line is sold in
50 foot sections.)
• Insert the lineend through the eyelet inthe spool hub, as shown infigure 15. Pull the line
through the hole to maintain tension while placing the spool down into the hub with the
notched side exposed, as shown in figure 16.
• Press the spool down GENTLY and rotate it until you feel it drop into place. (When in place,
the spool will turn a few degrees left and right freely.)
• Snap the spool cover back on, insert the battery and turn the toot on. In a few seconds or
less you'll hear the nylon line being cut automatically to the proper length.
MAINTENANCE
CLEANING
• Use only mild soap and damp cloth to clean the toot. Never let any liquid get inside the toot;
never immerse any part of the tool into a liquid.
• _ WARNING: Remove or disconnect battery before servicing, cleaning or removing
material from the gardening appliance.
10
Page 11

ACCESSORIES
• Recommendedaccessoriesforusewithyourtootareavailablefromyourlocaldealeror
authorizedservicecenter.
Ifyouneedassistanceregardingaccessories,pleasecall:1-800-544-6986.
•UseBlack&DeckerreplacementspoolNo.AF-100.
•Reloadnylonline(eitherbulkorprewrappedreplacementspool)asshowninthismanual.
•USEONLY.065 in. (1.65mm) DIAMETER NYLON MONOFILAMENT LINE.
Heavier line wiltoverload the motor, cause overheating and will impair the automatic feed.
This line is available at your local dealer or authorized service center.
• Do not use fishing line or other lines that are not recommended.
• z_ WARNING: The use of any accessory not recommended for use with this toot could be
hazardous.
Problem
• Line won't feed.
• Line fails to cut off.
• Unit will not start.
• Battery will not charge.
For assistance with your product, visit our website www.blackanddecker.com for the
location of the service center nearest you or call the BLACK & DECKER help line at
1-800-544-6986.
TROUBLESHOOTING
Possible Cause
• Line tangled in spool.
• Line cutter in guard is
damaged or missing.
• Line extends past guard.
• Battery not installed properly.
• Battery not charged.
• Battery not inserted into charger.
• Charger not plugged in.
• Surrounding air temperature
too hot or too cold.
Possible Solution
• Unwrap 24 inches of line
and rewind.
• Return to service center
for repair.
• Rewind or trim line to line
cutter.
• Check battery
installation.
• Check battery charging
requirements.
• Insert battery into charger
until red LED appears.
• Plug charger into a
working outlet. Refer to
"Important Charging Notes"
for more details.
• Check current at
receptacle by plugging in a
lamp or other appliance.
• Check to see if receptacle
is connected to a light
switch which turns power
off when you turn out the
lights.
• Move charger and toot to
a surrounding air
temperature of above 40
degree F(4,5°C) or
below 105 degree F
(+40,5°C).
11
Page 12

THERBRCTM SEAL
The RBRC TM (Rechargeable Battery Recycling Corporation) /_"_
Seat on the nickel-cadmium battery (or battery pack) indicates that the costs I { _:_ } }
to recycle the battery (or battery pack) at the end of its useful life have _/_
already been paid by Black & Decker. In some areas, it is illegal to place spent
nickel-cadmium batteries in the trash or municipal solid waste stream and the RBRC
program provides an environmentally conscious alternative.
RBRC in cooperation with Black & Decker and other battery users, has established
programs in the United States and Canada to facilitate the collection of spent nickel-
cadmium batteries. Help protect our environment and conserve natural resources by
returning the spent nickel-cadmium battery to an authorized Black & Decker service
center or to your local retailer for recycling. You may also contact your local recycling
center for information on where to drop off the spent battery, or call 1-800-544-6986
IMPORTANT
To assure product SAFETY and RELIABILITY, repairs, maintenance and adjustment
should be performed by authorized service centers or other qualified service
organizations, always using identical replacement parts.
SERVICE INFORMATION
All Black & Decker Service Centers are staffed with trained personnel to provide
customers with efficient and reliable power toot service. Whether you need technical
advice, repair, or genuine factory replacement parts, contact the Black & Decker
location nearest you. To find your local service location, refer to the yellow page
directory under "Toots--Electric" or call:
1-800-544-6986 or visit www.blackanddecker.com
FULL TWO-YEAR HOME USE WARRANTY
Black & Decker (U.S.) Inc. warrants this product for two years against any defects in
material or workmanship. The defective product will be replaced or repaired at no
charge in either of two ways.
The first, which will result in exchanges only, is to return the product to the retailer from
whom it was purchased (provided that the store is a participating retailer). Returns
should be made within the time period of the retailer's policy for exchanges (usually 30
to 90 days after the sale). Proof of purchase may be required. Please check with the
retailer for their specific return policy regarding returns that are beyond the time set for
exchanges.
The second option is to take or send the product (prepaid) to a Black & Decker owned or
authorized Service Center for repair or replacement at our option. Proof of purchase
may be required.Black & Decker owned and authorized Service Centers are listed under
"Toots-Electric" in the yellow pages of the phone directory.
This warranty does not apply to accessories. This warranty gives you specific legal
rights and you may have other rights which vary from state to state or province to
province. Should you have any questions, contact the manager of your nearest Black &
Decker Service Center. This product is not intended for commercial use.
FREE WARNING LABEL REPLACEMENT: If your warning labels become illegible or
are missing, call 1-800-544-6986 for a free replacement.
Imported by
Black & Decker (U.S.)
Inc.,
701 E. Joppa Rd.
Towson, MD 21286
U.S.A.
See 'Tools-
Electric' _]
- Yellow Pages -
for Service &
Sales
Page 13

MODED'EMPLOI
COUPE-BORDURESANS FIL DE 18 VOLTS
Code de date
Numero de catalogue •
NST2018
Merci d'avoir choisi Black & Decker!
Consulter le site Web
www. Blackan dDecker.com/NewOwne r
pour enregistrer votre nouveau produit.
A LIRE AVANT DE RETOURNER CE PRODUIT
POUR QUELQUE RAISON QUE CE SOIT :
SidesquestionsoudesproblemessurgissentapresI'achatd'unproduitBlack&Decker,
consulterlesiteWeb
HTTP://WWW.BLACKANDDECKER.COM/INSTANTANSWERS
pourobtenirdesreponsesinstantanement24heuresparjour.
SilareponseestintrouvableouenI'absenced'accesa Internet,composerle
1-800-544-6986de8ha 17hHNE,dulundiauvendredi,pourparleravecunagent.
Priered'avoirlenumerodecataloguesouslamainIorsdeI'appel.
RENSEIGNEMENTS IMPORTANTS
•Charger I'ensemble de piles pendant 9 heures avant d'utiliser le coupe-
bordure.
II faut pousser le bouton de verrouillage vers I'arriere afin d'utiliser le
coupe-bordure.
L'alimentation du coupe-bordure est automatique; il ne faut pas en frapper
la t6te contre le sol.
Utiliser seulement du fil de 1,65 mm (0,065 po) de diametre.
Installer le protecteur.
13
Page 14

AVERTISSEMENT : Directives et consignes
de s curit importantes.
AFIN DE RI_DUIRE LES RISQUES DE BLESSURES :
• Avant toute utitisation, s'assurer qua tous ceux qui se servant de I'outit lisent et
comprennent toutes tes mesures de securit6 et tout autre renseignement contenus
dans le present guide.
• Conserver ces mesures et tes relire frequemment avant d'utitiser I'outil ou d'en
exptiquer lefonctionnement & d'autres personnes.
• Eloigner les cheveux longs etles v6tements amples des ouvertures et des pieces en
mouvement.
z AVERTISSEMENT :Af_nde reduire les risques d'incendie, de
secousses etectriques ou de blessures lorsqu'on utilise des outils electriques, il faut
toujours respecter tes mesures de securit6 suivantes.
zhAVERTISSEMENT : Le produit gen6re de la poassiere qui peat
renfermer des produits chimiques. Salon l'etat de la California, ces produits chimiques
peuvent causer le cancer ainsi qua des malformations congenitales, et its presentent
d'autres dangers au systeme reproductif humain. Voici des examples de tels produits
chimiques : • les composes d'engrais;
• les composes d'insecticides, d'herbicides et de pesticides;
Afin de minimiser tes risques, porter de l'equipement de securit6 approuve comma des
masques antipoussieres specialement con(_u pour fittrer les particules microscopiques.
LIRE ET COMPRENDRE TOUTES LES DIRECTIVES AVANT D'UTILISER
L'OUTIL.
LIGNES DIRECTRICES EN MATI#RE DE SI_CURITI_ - DI=FINITIONS
It est important que vous lisiez et comp.reniez ce mod.e d'emploi. Les inform.ations qu'il
contient concernent VOTRE SECURITE et visent & EVlTER TOUT PROBLEME. Les
symbotes ci-dessous servent a vous aider a reconnaTtre cette information.
DANGER ; Indique une situation dangereuse imminente qui, si elle n'est pas evit6e,
causera la mort ou des graves btessures.
/_' AVERTISSEMENT : Indique une situation potentiellement dangereuse qui, si elle n'est
pas evit6e, pourrait causer la mort ou de graves btessures.
/_ MISE EN GARDE : Indique une situation potentiellement dangereuse qui, si elle n'est
pas evit6e, pourrait causer des btessures mineures ou moder6es.
• I'arsenic et te chrome provenant de bois traite.
MISE EN GARDE : Utilise sans le symbole d'aterte a la securit6, indique une situation
potentieltement dangereuse qui, si elle n'est pas evit6e, peut resulter en des dommages
la propriet&
/ IMPORTANTES MESURES DE
SI CURITI POUR TOUS LES OUTILS
• LIRE et comprendre toutes les directives.
• UN OUTIL A PILES (A piles integr6es ou &ensemble de piles amovible) dolt seutement
6tre charge au moyen du chargeur specifique & I'outil. En effet, un chargeur con(_u pour
un type de pile peat presenter des risques d'incendie Iorsqu'utilise avec un autre type de
piles.
• UTILISER L'OUTIL .& PILES UNIQUEMENT avec I'ensemble de piles specifique & cat
effet. L'utitisation de tout autre type de piles presente un risque d'incendie.
• I_VlTER les demarrages accidentals. S'assurer qua I'outit est en position verrouille ou
14
Page 15

horstensionavantd'yinsererl'ensembledepiles.LefaitdetransporterI'outitavecles
doigtssurI'interrupteuroutefaitd'yinsererI'ensembledepilesIorsquel'outilestsous
tensionpresentedesrisques.
• NEPASutiliserunoutitdontt'interrupteurestdefectueux.Dansuntelcas,I'outil
presentedesrisquesetitfauttefairereparer.
• DEBRANCHERI'ensembledepilesdet'outiloumettrecedernierhorstensionouen
modeverrouilleavantdeleregler,d'enremptacerdesaccessoiresoudeleranger.De
tellesmesuresdepreventionreduisenttesrisguesdedemarragesaccidentelsdel'outil.
• TOUJOURS PORTER DES LUNETTES DE SECURITE. Porter de lunettes de securit6 en
tout temps torsque t'outit est branche. Les tunettes de securit6 sont vendues separ6ment
aux centres de service Black & Decker ou aux ateliers d'entretien autorises. Toujours porter
un masque respiratoire si le travail gen6re de ta poussiere.
• PROTECTEUR- Ne pas utiliser I'outil lorsgue le protecteur n'est pas en place.
• PORTER DES V#TEMENTS APPROPRIES. Eviter de porter des v6tements amptes et
des bijoux qui peuvent 6tre happes par les pieces en mouvement. Itest conseille de porter
des gants en caoutchouc et des chaussures robustes a.semelle en caoutchouc torsqu'on
travailte a.l'exterieur. Ne passe servir de t'outil pieds nus ou torsqu'on porte des sandates
ouvertes. Porter des pantalons pour se proteger les jambes. Proteger la chevelure si elle
est longue.
• FIL DE NYLON - t_loigner en tout temps tevisage, les mains et les pieds du fil en
mouvement.
• LE FIL ROTATIF SERT A COUPER. Maniputer I'outil avec soin autour de moustiquaires et
de ptantes b.conserver.
• ELOIGNER LES ENFANTS. S'assurer que tousles observateurs se trouvent b.une
distance sore de la zone decoupe.
• AVERTISSEMENT IMPORTANT- Lorsque l'outil sert a.taitler te rebord des pelouses, le fil
peut projeter des pierres, des morceaux de metaux ou tout autre objet a.grande vitesse.
L'outil et le protecteur sont congus pour minimiser ce risque. Itfaut toutefois prendre les
Tesures de precaution suivantes.
• LLkAVERTISSEMENT : S'assurer que les observateurs et les animaux domestiques se
t_ouvent b.plus de 30,5 m (100 pi) de la zone de coupe.
• zLkAVERTISSEMENT : Afin de reduire les risques de btessures dues aux rebonds
(ricochets), maniputer l'outit en s'eloignant de tout objet comme un mur, des marches, une
grosse roche ou un arbre. Prendre garde lorsqu'on coupe pros d'un tel objet et, lecas
ech6ant, tailler la bordure b.la main.
• I_VlTER LES DI_MARRAGES ACClDENTELS. Ne pas transporter I'outil avec le doigt sur
I'interrupteur.
• NE JAMAIS FORCER L'OUTIL. Utitiser I'outil b.son rendement nominal afin d'obtenir un
meilteur rendement a moindre risque de btessures.
• UTILISER L'OUTIL APPROPRIE. Utiliser I'outilseulement aux fins pour lesquelles il a et6
con(_u.
• NE PAS DI_PASSER SA PORTI_E. Toujours demeurer dans une position stable et garder
son equilibre.
• OUTIL ENDOMMAGI_ - Lorsque I'outilfrappe un corps etranger ou s'y coince, te mettre
immediatement hors tension, en verifier I'etat et le faire reparer au besoin avant de le
reutiliser. Ne passe servir de l'outil Iorsque la bobine ou le moyeu sont brises.
• I_VlTER LES CONDITIONS AMBIANTES DANGEREUSES. Ne passe servir d'outils
electriques darts des endroits humides ou mouilles. Ne passe servir de l'outil sous la ptuie.
• NE PAS UTILISER des outils electriques portatifs darts des endroits renfermant des
vapeurs inflammables ou explosives. Les etincelles que produit te moteur en marche
pourraient enflammer ces produits.
• RANGER LES OUTILS INUTILISES A L'INTI_RIEUR darts un endroit sec, ferme b.cte,
hors de ta portee des enfants.
• DEMEURER VIGILANT. Travailler avec vigilance et faire preuve de bon sens. Ne passe
servir de I'outil Iorsqu'on est fatigue.
• PRENDRE SOIN DES OUTILS. S'assurer que le rebord de coupe est propre et tranchant
afin d'optimiser le rendement et de minimiser les risques de btessures. Respecter tes
consignes relatives a.latubrification et au remptacement des accessoires. Inspecter
regulierement lecordon de t'outil et te faire reparer au besoin a.un atelier d'entretien
autorise. Inspecter regulierement les cordons de rallonge et les remptacer Iorsqu'ils sont
15
Page 16

endommages.S'assurerquelespoigneessonttoujourspropres,sechesetlibresdetoute
tached'huileoude.graisse.
• VERIFIERLESPIECESENDOMMAGf=ES.Avantdecontinuera.utiliserI'outil,ilfaut
verifiersileprotecteuroutouteautrepieceendommageeremptitbienlafonctionpour
laquelleilaet6prevu.Verifierralignementetlesattachesdespiecesmobiles,tedegre
d'usuredespiecesetteurmontage,ainsiquetoutautrefacteursusceptibledenuireaubon
fonctionnementderoutil.Fairereparerouremptacertoutprotecteurourouteautrepiece
endommageedansuncentredeserviceautorise,saulindicationcontrairedanslepresent
guide.
• S'ASSURERQUELESPROTECTEURSSONTENPLACEETENI_TATDE
FONCTIONNEMENT.
• I_LOIGNERLESMAINSETLESPIEDSDELAZONEDECOUPE.
• NEPASCHARGERL'OUTILSOUSLAPLUlENIDANSDESENDROITSMOUlLLf=S.
CONSERVER CES MESURES.
/_ IMPORTANTES MESURES DE SI_CURITI_ ADDITIONNELLES
• I_VITER LES CONDITIONS AMBIANTES DANGEREUSES. Ne pas utiliser ni
charger rensemble de piles dans des endroits humides ou mouilles.
• NE PAS UTILISER NI CHARGER rensembte de piles sous ta pluie ou dans un endroit
mouilte.
• RETIRER L'ENSEMBLE DE PILES avant de faire t'entretien de routit, de le nettoyer
ou d'en retirer un materiau. Retirer l'ensemble de piles de I'outil et et transporter ce
dernier par la poignee avant lorsqu'il ne sert pas.
• MANIPULER LES ENSEMBLES DE PILES AVEC SOIN AFIN de ne pastes court-
circuiter avec des materiaux conducteurs comme des bagues, des bracelets et des
ctes. L'ensemble de piles ou te conducteur pourrait alors surchauffer et causer des
br0tures.
• NE PAS OUVRIR NI MUTILER rensemble de piles. L'electrolyte qui s'en degagerait
est corrosive et elte pourrait blesser les yeux ou la peau. En outre, ce produit est
toxique lorsqu'inger6.
Cet appareit est conforme aux dispositions du paragraphe 15 des reglements de la
FCC. Son utilisation est sous reserve des deux conditions suivantes : (1) t'appareit ne
dolt provoquer aucun brouitlage nuisible; (2) t'appareit dolt accepter tout brouillage re(_u,
y compris un brouillage susceptible d'entraTner un fonctionnement indesirabte.
REMARQUE : ce materiet a et6 testa eta et6 declar6 conforme aux limites en vigueur
concernant les dispositifs numeriques de classe B, en vertu de ta partie 15 de la
reglementation FCC. Ces timites visent a.assurer une protection raisonnabte contre tout
brouitlage nuisibte darts une installation residentielle. Ce materiet produit, consomme et
peut emettre une energie de radiofrequence et, s'it n'est pas installe et utitise
conformement aux directives qui l'accompagnent, il peut entra'_ner un brouillage nuisibte
des communications radio. Cependant, nous ne garantissons pas l'absence de
brouillage darts tous tes types d'environnement. Si, apres avoir effectue une verification
en mettant t'appareit hors tension puis sous tension, I'utitisateur s'aper(_oit que ce
materiet provoque un brouillage nuisible a.la reception des signaux de radio ou de
tel6vision, il tui faudra essayer de corriger ce brouillage en prenant une ou plusieurs des
mesures ci-dessous :
Reorienter ou repositionner t'antenne de reception.
Eloigner te plus possible le materiet du recepteur.
Brancher le materiel darts une prise electrique situee sur un circuit different de celui du
recepteur.
Consulter le distributeur ou un technicien radio/tel6vision experiment6 pour obtenir de
I'aide.
CONSERVER CES MESURES.
16
Page 17

L'etiquette de Ibutil peut comporter les symboles suivants.
V ............................ volts A .......................... amperes
Hz .......................... hertz W.......................... watts
min .......................... minutes "_ ........................ courant altematif
.... ...................... courant continu no ........................ sous vide
[] ............................ construction de classe II
z_ .......................... symbole d'avertissement
INFORMATION CONCERNANT LE CAPUCHON DU BLOC-PILE
Un capuchon est fourni avec le bloc-pile en vue d'etre utilise chaque fois qu'on retire ce
dernier de l'outil ou du chargeur en vue de te ranger ou de le transporter; enlever le
capuchon avant de remettre le bloc-pile dans le chargeur ou dans t'outit.
.......................... borne de mise
la terre
.../min .................. tours ou courses
la minute
Capuchondu bloc-pile
z AVERTISSEMENT : S'assurer, au moment de ranger ou de
transporter un bloc-pile ou une pile, qu'aucun objet metatlique n'entre en contact avec
leurs bornes a decouvert de celui-ci. Par exemple, il faut eviter de placer un bloc-pile ou
une pile sans capuchon dans un tablier, une poche, une boite a outils ou un tiroir (etc.)
contenant des objets tels que des ctous, des vis ou des cles, car tout contact entre les
bornes a decouvert et un objet metattique comme une cle, une piece de monnaie, un outil
main. etc. pourrait causer un incendie. En effet, les reglements americains Hazardous
Material Regulations (HMR) du US Department of Transportation interdisent te transport
d'un bloc-pile ou d'une pile dans tout moyen de transport commercial ou aeronef (que ce
soit dans une valise ou le bagage de cabine) SAUF s'ils sont bien proteg6s contre les
courts-circuits. On doit donc s'assurer, Iorsqu'on transporte un bloc-pile ou une pile
separ6ment, de bien proteger et isoter les bornes contre tout materiau qui risque d'entrer
en contact avec eux et de causer un court-circuit.
ZLIMPORTANTES MESURES DE
SI CURITI RELATIVESAU
CHARGEMENT
CHARGEMENT DE LA PILE
1. Le present guide renferme des directives importantes relatives a la sQrete et au
fonctionnement.
2. Avant d'utiliser le chargeur, lire toutes les directives et les mises en garde sur 1) le
chargeur, 2) la pile et 3) le produit utilisant la pile.
3. ZL MISE EN GARDE :Afin de minimiser les risques de blessures, charger
seutement des ensembles de piles Black & Decker. Tout autre type de pile pourrait
exploser et causer des blessures ou des dommages.
4. Ne pas exposer te chargeur a la ptuie ni a la neige.
5. L'utilisation d'un accessoire non recommande ni vendu par Black & Decker
presente des risques d'incendie, de secousses electriques ou de blessures.
6. Afin de minimiser tes risques de dommages au cordon ou a la fiche, tirer sur la fiche
et non le cordon pour debrancher celui-ci.
17
Page 18

7. S'assurerquetecordonestplacequ'onnepuissemarcherdessus,ytrebucher,niy
exercertouteautrecontrainteoudommage.
8. Utiliseruncordonderallongeseulementencasdenecessit6absotue.L'utilisation
d'uneraltongeinapproprieepresentedesrisquesd'incendieoudesecousses
electriques.
a.Lescordonsbifilairespeuventutiliseruneratlongebifilaireoutrifilaire.Itfaudrait
seutementutiliserunerattongeagaineronde.Itestconseiltedeseservird'une
ratlongehomotogueeparI'organismeUnderwritersLaboratories(UL).Lorsqueta
rattongeesutiliseeat'exterieur,elledoit6treprevueaceteffet.Toutcordonpour
I'exterieurpeutegatementservir&I'interieur.Lesmentions,,W-ou,<WA- sur la
gaine du cordon indiquent que celui peut servir a t'exterieur.
b. Les cordons de rallonge doivent 6tre faits de conducteurs de calibre approprie
(AWG ou calibre americain des ills) par mesure de securit6 et afin de prevenir les
pertes de puissance et tes surchauffes. Le numero de calibre du fil est inversement
proportionnel b.la capacite du cordon. Ainsi, un cordon de calibre 16 a une capacite
superieure a un cordon de calibre 18. Lorsqu'il est necessaire d'utiliser plus d'un
cordon de rallonge, veiller ace que chaque cordon ait au moins le calibre minimal.
CALIBRE MINIMAL (AWG) DES CORDONS DE RALLONGE
INTENSITE NOMINALE DE LA PLAQUE SIGNALETIQUE - 0 -10
Longueur totatedelaraltonge (en pieds) 25 50 75 100 125 150
Calibre de la rallonge 18 18 16 16 14 14
9. Utiliser seutement le chargeur fourni pour charger I'outil.
10. Ne pas tenter d'ouvrir le chargeur ni t'outil. L'utilisateur ne peut remplacer aucune
piece interne. En confier la reparation au personnel d'un centre de service Black &
Decker autorise.
11. NE PAS incinerer I'ensemble de piles m6me s'il est tres endommage ou
completement & plat.
12. Ne pas incinerer t'ensembte de piles.La chateur des flammes peut le faire exploser. It
peut se produire une leg6re fuite du tiquide excitateur des piles dans des conditions
extremes. It ne s'agit pas d'une defaitlance.
Toutefois, si ce tiquide atteint la peau, faire ce qui suit.
a. Laver immediatement & t'eau et au savon.
b. Neutraliser &I'aide d'un acide doux comme du jus de citron ou du vinaigre.
c. Site liquide excitateur atteint les yeux, rincer immediatement A I'eau claire pendant
aumoins dix minutes et consulter un medecin. NOTE AU MI_DEClN : IIs'agit d'une
solution d'hydrogene de potassium & 25-35 p. 100.
CONSERVER CES MESURES.
IMPORTANTES MESURES DE SI CURITI
RELATIVES AU CHARGEMENT
CHARGEMENT DU BLOC-PILE
LE BLOC-PILE N'EST PAS COMPLETEMENT CHARGI_ EN USINE. IL IMPORTE
DONC DE LIRE ATTENTIVEMENT TOUTES LES CONSIGNES DE SI_CURITI_
AVANT DE LE CHARGER.
Le chargeur est congu pour 6tre branche dans une prise domestique standard de 120
volts et de 60 Hz.
1. Brancher le chargeur darts une prise murate appropriee. NOTE : Ne pas charger
I'aide d'une g_neratrice ni d'une source de courant continu. Utiliser seulement
du courant secteur de 120 V.
2. Faire glisser I'ensembte de piles dans te chargeur (fig. 6 et 7) et te charger pendant
9 heures. Apres la charge initiate, dans des conditions d'utilisation normates,
I'ensemble de piles devrait 6tre comptetement charge au bout de 3 & 9 heures.
3. Debrancher le chargeur et retirer I'ensembte de piles du chargeur. L'ins_rer dans
routil en s'assurant qu'il est compl_tement dans I'outil et qu'il s'enclenche
enplace.
18
Page 19

NOTE: PourretirerI'ensembledepilesdet'outil,appuyersurteboutonde
degagementsitueaI'arrieredeI'ensembledepiles(fig.8)etlefaireglisserhorsde
I'outit.
NOTESIMPORTANTES RELATIVES AU CHARGEMENT
1. Apres une utitisation normate, le chargement complet l'ensembte de piles de 3 a 9
heures. Lorsque I'ensemble de piles est completement a plat, cela peut prendre
jusqu'a 9 heures. L'ensemble de piles n'est pas charge a sa sortie de l'usine. Avant de
s'en servir, il faut doric le charger pendant au moins 9 heures.
2. NE PAS charger t'ensemble de piles lorsque la temperature ambiante est inferieure
4,5 °C (40 °F) ou superieure a 40,5 °C (105 °F). Cette mesure est importante et elle
previent de graves dommages aux ensembles de piles. On optimise ta duree et le
rendement de I'ensemble de piles Iorsqu'on le charge a une temperature ambiante
d'environ 24 °C (75 °F).
3. Le chargeur peut emettre des sons et devenir chaud au toucher pendant le
chargement. Cette situation est normate et ne pose aucun probleme.
4. Lorsque l'ensemble de piles n'est pas bien charge, faire ce qui suit.
(1) Verifier I'atimentation de la prise en y branchant une lampe ou un autre appareil.
(2) Verifier si ta prise est reliee a,un interrupteur pour t'ectairage qui met ta prise hors
circuit torsqu'on eteint les lumieres. (3) Deplacer I'ensemble de piles et le chargeur
darts un endroit o_ la temperature ambiante se situe entre
4,5 °C (40 °F) et 40,5 °C (105 °F). (4) Si le probleme persiste, il faut confier t'ensembte
de piles et te chargeur au personnel du centre de service Black & Decker de la region.
Consulter la rubrique <<Outilselectriques>> des Pages Jaunes.
5. It faut charger la pile Iorsqu'elle ne fournit plus ta puissance necessaire pour effectuer
les t&ches avec autant de facilite qu'auparavant. NE PLUS SE SERVIR de l'outil
lorsque l'ensembte de piles est a,plat.
6. L'ensemble de piles atteint son rendement optimal apres cinq cycles de chargement
darts des conditions d'utitisation normates. It n'est pas necessaire que l'ensembte de
piles soit completement a plat pour te recharger. Une utitisation normale consiste en la
meitleure maniere de decharger et de recharger les piles.
ENSEMBLE DE PILES DANS LE CHARGEUR
On peut laisser indefiniment t'ensembte de piles dans le chargeur avec le temoin rouge
atlume. Le chargeur maintient l'ensembte de piles completement charge.
NOTE : Un ensemble de piles perd lentenment de sa charge lorsqu'it n'est plus darts un
chargeur. I1faudra probablement doric recharger un tel ensemble avant de s'en servir.
Un ensemble de piles qui se trouve darts un chargeur non branche darts une prise de
courant secteur appropriee perdra egatement de sa charge.
DIRECTIVES RELATIVES AU MONTAGE
Avant d'assembter lecoupe-bordure sans ill, verifier si I'emballage comporte toutes les pieces
suivantes (fig. 1).
A. Protecteur
B. Chargeur
C. Ensemble de piles au nickel-cadmium
D. Coupe-bordure
E. Poignee auxiliaire
ASSEMBLAGE ET FIXATION DU DISPOSITIF DE PROTECTION A
DEUX PII_CES
AVERTISSEMENT : retirer le bloc-piles de I'outil avant d'essayer de fixer le
dispositif de protection ou d'effectuer tout r_glage. NE JAMAIS UTILISER UOUTIL
SANS LE DISPOSITIF DE PROTECTION SOLIDEMENT ATTACHI_. Le dispositif de
protection doit toujours _tre en place sur I'outil pour prot_ger I'op_rateur.
ASSEMBLAGE :
• Retirer les deux pieces qui composent le dispositif de l'embatlage.
• En tenant tes deux pieces comme t'iltustre la figure 2, inserer I'onglet de la premiere
section dans I'encoche de la deuxieme section. Voir I'encart.
19
Page 20

90541134 NST2018 9/24/08 8:38 AM
• Inserer I'onglet laterat de la premiere section dans I'encoche de la deuxieme section. Un
,, dectic ,_se fait entendre torsque les deux pieces sont bien engagees (figure 3).
• Inserer la vis de 19 mm (3/4 po) comme I'indique la figure 4 pour terminer I'assembtage
du dispositif de protection.
FIXATION :
• Placer le dispositif de protection assembte sur la bobine comme I'itlustre ta figure 5 et
inserer les trois vis restantes dans le dispositif de protection comme l'indiquent les
fteches.
• Une fois te dispositif de protection en place, retirer t'enveloppe de la tame, pour la coupe
du ill, situee sur le bord de la deuxieme section du dispositif de protection.
RC:GLAGE DE LA POIGNC:E AUXILIAIRE
• Afin de maximiser le confort de t'utilisateur et la ma_trise de t'outit, regler ta position de
la poignee auxiliaire b.sa hauteur (fig. 5A). Les personnes courtes ta reglent a une
position basse (loin de sol) tandis que les grandes personnes ta regtent a une position
elev0e (pros de sol). La poignee auxitiaire dolt 6tre placee de sorte que le bras de
I'utilisateur est droit (fig. 10).
RC:GLAGE DE LA HAUTEUR
• On peut regter la hauteur de t'outil en desserrant te collier de verrouiltage et en te
faisant tourner dans te sens oppose a la fteche (fig. 5B). On peut ators allonger les
tubes ou tes raccourcir. Lorsque l'outil est a ta hauteur voulue, il suffit de resserrer le
collier en lefaisant tourner dans le sens indique b.la figure 5B.
FONCTIONNEMENT
• Z_ MISE EN GARDE : TOUJOURS PORTER DES LUNETTES DE S¢:CURIT¢:.
• Z_ MISE EN GARDE : Inspecter le secteur et entever tout objet (comme des cordes et
des ills de fer) qui risque de se coincer dans le fil ou ta bobine. Porter une attention
,/T'_
particutiere aux bouts de fil de fer (p. ex., la base d'une cl6ture a maitles en tosange)
qui pourraient
0tre pties et se trouver sur le passage de I'outil.
UTILISATION DU COUPE-BORDURE
• Pour actionner lecoupe-bordure, tirer le bouton de verrouillage (fig. 6) vers l'arriere, puis
enfoncer l'interrupteur Adetente. Pour arr0ter I'outil, retb.cherl'interrupteur Adetente.
• Imprimer a I'outil un lent mouvement lateral de va-et-vient (fig. 10).
• Pour convertir I'outit pour couper le rebord des pelouses, le mettre hors tension, saisir
I'outit d'une main par sa poignee auxitiaire (fig. 11), de I'autre main, saisir le cotlet et
pousser dans te sens de ta fteche, puis faire pivoter la tote du coupe-bordure (dans te
sens horaire lorsqu'on regarde t'interrupteur de l'outit) jusqu'a ce qu'elle s'arr0te (demi-
tour). L'outit est alors verrouille pour couper des tranchees. Faire tourner le guide de
rebord vers l'avant et le bas avant de couper des tranchees (fig. 12).
• Pour tailler te rebord de la pelouse, placer le coupe-bordure au-dessus du rebord comme le
montre la figure 13.
• Pour revenir a la position initiate, mettre I'outit hors tension, pousser dans le sens de la
fleche et faire toumer la tote dans le sens antihoraire jusqu'a ce qu'elle s'arr0te. Dans
cette position, on peut relever le guide de rebord afin qu'it ne derange pas.
ALIMENTATION DU FIL
Le coupe-bordure utitise du fil de nylon de 1,65 mm (0,065 po) de diametre pour couper
I'herbe et tes mauvaises herbes rapidement et aisement. Lorsque le fil devient use, te
moyeu speciat alimente automatiquement t'outit en ill. Bien entendu, le fil s'use plus
rapidement torsqu'on taille te rebord des petouses ou d'autres surfaces abrasives et
Iorsqu'on coupe des mauvaises herbes tenaces. Le systeme d'alimentation automatique
du fil detecte le besoin en filet il atimente l'outil avec la Iongueur appropriee de fil au
besoin. II n'est pas necessaire d'y penser. Ne pas frapper I'outil contre le sot afin
d'alimenter I'outil en fil ni pour toute autre raison.
BLOCAGE ET FIL EMMEL¢:
Itarrive parfois que le moyeu se btoque surtout Iorsque I'herbe est haute ou imposante;
2O
Page 21

90541134 NST2018 9/24/08 8:38 AM
cela btoque ators te ill. Pour degager lefit et te moyeu, faire ce qui suit.
• Mettre te coupe-bordure hors tension et retirer l'ensembte de piles.
• Enfoncer les pattes de degagement du couvercte du moyeu (fig. 14) et retirer le
couvercle en le tirant hors de l'outil.
• Retirer le moyeu et degager tout morceau de fit casse ou tout autre debris.
• En cas de btocage ou de fitemm61e, derouter environ 30 cm (1 pi) de fil afin de
s'assurer qu'il n'est pas endommage. Lorsque le fil est bon, l'enrouler et en inserer
I'extr6mite darts t'oeillet du moyeu (fig. 15). Sortir te fil du trou afin de maintenir la
tension ators qu'on replace la bobine dans le moyeu en exposant la face avec des
encoches (fig. 16).
• Enfoncer DOUCEMENT ta bobine et ta faire tourner jusqu% ce qu'elle s'enclenche en
place. (Lorsqu'ette est en place, elte devrait tourner librement de quelques degres
gauche eta. droite.)
• Reenctencher le couvercle du moyeu en place, inserer t'ensemble de piles et remettre
I'outil sous tension. Au bout de quelques secondes, on entend la coupe automatique du
fil b.la Iongueur appropriee.
REBOBINAGE DU FIL EN VRAC (UTILISER SEULEMENT DU FIL DE 1,65 mm
(0,065 pc) DE DIAMI_TRE)
On peut se procurer en sus du fil en vrac chez les detailtants et aux centre de service
de la region. Faire ce qui suit pour installer le fit en vrac.
• Mettre te coupe-bordure hors tension et retirer l'ensembte de piles.
• Enfoncer lespattes de degagement du couvercle du moyeu (fig. 14) et retirer le couvercle en
le tirant hors de l'outil.
• Retirer ta bobine de t'outit. Entever et jeter tout fil qui reste dans la bobine.
• Inserer environ 12 mm (1/2 pc) d'une extr6mite du fil en vrac dans le trou de la bobine
(fig. 17}
• Tenir le fil qui depasse du trou et enrouter le reste du fil par la fente de la bobine
(fig. 17).
• Enrouler fermement et uniformement le fil dans la bobine dans le sens indique par la
fteche (fig. 17) jusqu'& ce que ta bobine soit presque pteine. (La bobine renferme
environ 15,2 m (50 pi) de filet te fiten vrac se vend dans cette quantite.)
• Inserer l'extr6mite du fit dans t'ceillet du moyeu (fig. 15). Sortir le fil du trou afin de
maintenir la tension ators qu'on replace la bobine dans le moyeu en exposant la face
avec des encoches (fig. 16).
• Enfoncer DOUCEMENT la bobine et ta faire tourner jusqu'a ce qu'ette s'enclenche en
place. (Lorsqu'etle est en place, elle devrait tourner librement de quelques degres
gauche eta. droite.)
• Reenctencher le couvercle du moyeu en place, inserer t'ensemble de piles et remettre
I'outil sous tension. Au bout de quelques secondes, on entend la coupe automatique du
fil a la Iongueur appropriee.
ENTRETIEN
NETTOYAGE
• Utiliser seulement du savon doux et un chiffon humide pour nettoyer t'outil. Ne jamais
laisser de liquide s'infiltrer darts l'outit et ne amais immerger tout composant de t'outil.
• Zh AVERTISSEMENT : Retirer ou debrancher t'ensembte de piles avant de faire l'entretien,
de nettoyer I'outilou d'en retirer un accessoire.
ACCESSOIRES
• On peut se procurer les accessoires recommandes pour l'outil chez les detaillants ou
au centre de service de la region. Pour trouver un accessoire, composer le numero
suivant : 1800 544-6986.
• Utiliser une bobine de rechange Black & Decker, modele n° AF-100.
• Rembobiner le fil de nylon (en vrac ou dans une bobine chargee de rechange) de la
fa(_on indiquee dans le present guide.
• UTILISER SEULEMENT DU FIL MONOFILAMENT DE NYLON DE 1,65 mm
(0,065 pc) DE DIAM#TRE. Du fil plus epais surchargera te moteur et provoquera ta
surchauffe de l'outit. On peut se procurer le fil chez les detailtants et au centre de
service de la region.
21
Page 22

90541134 NST2018 9/24/08 8:38 AM
• I_e pas utiliser du fil de canne a p6che ni tout autre fil non recommande.
_.' AVERTISSEMENT : L utilisation de tout accessoire non recommande pour I'outil
peut 6tre dangereuse.
DI_PANNAGE
Probl_me
• Le fil n'avance pas.
• Le fil n'est pas coupe.
• L'appareil refuse de
demarrer.
• La pile ne se charge pas.
Cause possible
• Le fil est bloque.
• La tame du protecteur est
endommagee ou manquante.
• Le fil depasse le protecteur.
• Mauvaise installation de la
batterie.
• Pile non chargee.
• Pile non inser6e dans le chargeur.
• Chargeur non branche.
•Temperature ambiante
trop chaude ou froide.
Solution possible
•Derouler 61 cm (24 po)
de filet le rebobiner.
• Retourner l'outil au
centre de service pour le
faire reparer.
• Rebobiner ou couper le fil
au niveau de la lame.
•Verifier rinstallation de la
batterie.
•Verifier les exigences de
charge pour la pile.
• Inserer la pile dans te
chargeur de sorte que le
voyant DEL
rouge apparaisse.
•Brancher le chargeur
dans une prise qui
fonctionne. Se reporter a la
rubrique ,<Remarques
importantesde chargement ,_
pour plus de
renseignements.
•Verifier te courant & la
prise en branchant une
lampe ou un autre appareil
electrique.
•Verifier si ta prise est reliee
un interrupteur qui coupe
le courant au moment
d'eteindre latumiere
• Deptacer le chargeur
et l'outil a une temperature
ambiante de plus de 4,5 °C
(40 °F) ou sous tes 40,5 °C
(105 °F) 105 degree F
(+4o,5°C).
Pour de I'aide avec I'outil, consulter notre site Web www.blackanddecker.com pour
I'emptacement du centre de reparation te plus pros ou communiquer avec I'assistance
BLACK & DECKER au 1-800-544-6986.
Le SCEAU SRPRC TM /_
Le sceau SRPRC TM appose sur lebloc-piles au nickel cadmium indique
que son coot de recyctage a la fin de sa vie utile sera paye par Black &
Decker. I1est illegat de jeter tes piles au nickel cadmium epuis6es dans tes
poubelles ou dans te systeme municipal d'etimination des residus solides. Le
programme RBRC represente donc une alternative sensibilisee a..I'environnement. La
SRPRC TM, en collaboration avec Black & Decker, ont etabti aux Etats-Unis et au
Canada des programmes facilitant ta cueitlette des piles au nickel cadmium epuis6s.
Black & Decker encourage ses utitisateurs a.participer a son programme de protection
de I'environnement en retournant les piles usagees a un centre de reparation autorise
Black & Decker. On peut egatement communiquer avec le centre de recyclage de ta
region pour savoir ot_deposer les piles usees ou composer le 1-800-544-6986
22
Page 23

90541134 NST2018 9/24/08 8:38 AM
IMPORTANT
Pour assurer la SECURITE et la FIABILITt _du produit, n'en confier tes reparations,
I'entretien et te reglage qu'au personnel des centres de services autorises qui
n'utitisent que des pieces de rechanges identiques.
INFORMATION SUR LES RI_PARATIONS
Tous les centres de reparation Black & Decker sont dotes de personnel qualifie en
matiere d'outillage electrique; ils sont donc en mesure d'offrir & leur clientele un service
efficace et fiable. Que ce soit pour un avis technique, une reparation ou des pieces de
rechange authentiques installees en usine, communiquer avec t'etabtissement Black &
Decker te plus pros de chez vous. Pour trouver t'etabtissement de reparation de votre
region, consulter le repertoire des Pages jaunes a ta rubrique <<Outits electriques >>ou
composer le numero suivant : 1-800-544-6986 ou consulter le site
www.blackanddecker.com
GARANTIE COMPLETE DE DEUX ANS POUR UNE UTILISATION DOMESTIQUE
Black & Decker (E.-U.) Inc. garantit ce produit pour une duree de deux ans contre tout
defaut de materiau ou de fabrication. Le produit defectueux sera remplace ou repar0
sans frais de t'une des deux fagons suivantes :
La premiere fagon consiste en un simple echange chez te detailtant qui I'a vendu
(pourvu qu'il s'agisse d'un detaitlant participant). Tout retour dolt se faire durant la
periode correspondant a ta potitique d'echange du detaillant (habituetlement, de 30 a 90
jours apres l'achat). Une preuve d'achat peut 6tre requise. Verifier aupres du detaillant
pour connaTtre sa potitique concernant les retours hors de la periode definie pour les
echanges.
La deuxieme option est d'apporter ou d'envoyer te produit (transport paye d'avance)
un centre de reparation autorise ou & un centre de reparation de Black & Decker pour
faire reparer ou echanger le produit, a notre discretion. Une preuve d'achat peut 6tre
requise. Les centres Black & Decker et les centres de service autorises sont repertori0s
dans tes pages jaunes, sous ta rubrique <<Outils etectriques >>.
Cette garantie ne s'apptique pas aux accessoires. Cette garantie vous accorde des
droits tegaux specifiques et vous pourriez avoir d'autres droits qui varient d'un E_tatou
d'une province &I'autre. Pour toute question, communiquer avec te directeur du centre de
reparation Black & Decker le plus pros de chez vous. Ce produit n'est pas destine a un
usage commercial.
REMPLACEMENT GRATUlT DES I_TIQUETTES D'AVERTISSEMENT : si les
etiquettes d'avertissement deviennent itlisibtes ou sont manquantes, composer le
1-800-544-6988 pour en obtenir le remplacement gratuit.
Imported by/Importe par
Black & Decker Canada Inc.
100 Central Ave.
Brockville (Ontario) K6V 5W6
Voir la rubrique "Outils
electriques"
des Pa.ges Jaunes
pour le service et les ventes.
23
Page 24

90541134 NST2018 9/24/08 8:38 AM
MANUAL DE INSTRUCCIONES
DESBROZADORA/ORILLADORA
INALAMBRICADE 18VOLTS
Codigo de fecha Cat&logo N° NST2018
Gracias por elegir Black & Decker!
Visite
www.Blackand Decker.com/NewOwner
para registrar su nuevo producto.
LEA EL MANUAL ANTES DE DEVOLVER
ESTE PRODUCTO POR CUALQUIER MOTIVO:
SitieneunaconsuitaoalgOninconvenienteconsuproductoBlack&Decker,visite
HTTP:IIWWW.BLACKANDDECKER.COMIINSTANTANSWERS
paraobtenerrespuestasinstanta.neaslas24horasdeldia.
SinoencuentralarespuestaonotieneaccesoaInternet,Ilameal1-800-544-6986de
lunesaviernesde8a.m.a5p.m.horadelEsteparahablarconunagente.
CuandoIlame,tengaamanoelnQmerodecata.logo.
INFORMACION CLAVE QUE DEBE SABER:
Cargue la bateria durante 9 horas antes de intentar usar su
desbrozadora/orilladora.
Para operar la desbrozadora, debe tirar hacia atras del bot6n del seguro.
Esta es una desbrozadora de alimentacion automa.tica - No golpee la
cabeza de la unidad contra el suelo.
Utilice t]nicamente linea de 0,065 pulg. (1,65 mm) de diametro.
Instale la guarda.
24
Page 25

90541134 NST2018 9/24/08 8:38 AM
zLADVERTENCIA: ADVERTENCIAS
IMPORTANTES DE SEGURIDAD E
INSTRUCCIONES
PARA REDUCIR EL RIESGO DE LESIONES:
• Antes de cualquier uso, asegurese que cualquier persona que vaya a utilizar esta
herramienta lea y comprenda todas las instrucciones de seguridad y la informaci6n
contenida en este manual.
• Conserve estas instrucciones y repaselas con frecuencia antes de usar la herramienta
e instruir a otras personas.
• Conserve et cabello largo y las ropas fiojas alejados de aberturas y partes m6viles.
Z ADVERTENCIA: Siempre que utitice herramientas electricas debe
seguir ciertas precauciones basicas de seguridad, a fin de reducir los riesgos de
incendio, choque electrico y lesiones personales, entre las que se encuentran tas
siguientes.
z ADVERTENCIA: Parte det potvo originado por este producto
contiene quimicos queen et Estado de California se consideran como causantes de
cancer, defectos congenitos u otros dafios reproductivos. Atgunos ejemplos de estos
quimicos son:
• compuestos en fertilizantes
• compuestos en insecticidas, herbicidas y pesticidas
• arsenico y cromo de madera tratada quimicamente
Para reducir su exposicion a estos quimicos, utitice equipo de seguridad aprobado
como mascaras contra potvo disefiadas especificamente para fittrar particutas
,sT_
microscopicas.
LEA Y COMPRENDA TODAS LAS INSTRUCClONES ANTES
DE USAR.
z ADVERTENCIA E INSTRUCCIONES
GENERALES DE SEGURIDAD PARA
TODAS LAS HERRAMIENTAS
• LEA y comprenda todas las instrucc.iones.
• UNA UNIDAD OPERADA A BATERIAS con baterias integradas o por separado,
debe recargarse unicamente con et cargador especifico para esa bateria. Un
cargador adecuado para un tipo de bateria puede crear riesgo de incendio at utitizarse
con otras baterias.
• USE LA UNIDAD OPERADAA BATER|AS 0NICAMENTE con la bateria disefiada
especificamente para ella. El uso de otras baterias puede crear riesgos de incendio.
• EVlTE et encendido accidental. Asegurese de que el interruptor este en posici6n de
apagado antes de insertar la bateria. Transportar las unidades con el dedo en el
interruptor, o insertar la bateria en una unidad con el interruptor en posici6n de
encendido propicia los accidentes.
• NO use la unidad si et interruptor no enciende y apaga. Una unidad que no puede
controlarse con el interruptor es peligrosa y debe repararse.
• DESCONECTE la bateria de la unidad o coloque et interruptor en posici6n e apagado
antes de hacer cualquier ajuste, cambio de accesorios, o guardar launidad. Dichas
medidas de seguridad preventiva reducen el riesgo de encender la unidad
accidentalmente.
• SIEMPRE UTILICE PROTECCION PARA LOS OJOS - Utilice anteojos o gafas de
seguridad siempre que utilice este aparato. Los anteojos de seguridad los encuentra a
su disposici6n con costo extra en el centro de servicio autorizado Black & Decker de
25
Page 26

90541134 NST2018 9/24/08 8:38 AM
su localidad. Utilice una mascarilla contra potvo si la operacion que va a realizar Io
produce.
• GUARDA - No utilice este aparato sin tener la guarda instatada.
• VISTASE APROPIADAMENTE - No utilice prendas de vestir flojas ni articutos de
joyeria. Pueden quedar atrapados en las piezas movites. Se recomienda el uso de
guantes de goma y calzado de seguridad con suela de goma para el trabajo a ta
intemperie. No utilice et aparato con los pies descalzos o cuando calce sandatias
abiertas. Vista pantalones largos para proteger sus piemas. Ct3brase el cabello si Io
tiene largo.
• LINEA DE NYLON - Conserve siempre cara, manos y pies alejados de la linea
giratqria.
• LA LINEA GIRATORIA DESEMPEI_iA UNA FUNClON DE CORTE - Tenga cuidado
at podar atrededor de matlas y ptantas que desee conservar.
• CONSERVE APARTADOS A LOS NINOS - Todos los visitantes deben permanecer a
d_tancia segura del b.rea de trabajo.
• _ ADVERTENClA IMPORTANTE - Cuando se utitice como orittadora, piedras,
piezas de metal y otros objetos pueden satir despedidos de la linea de corte a gran
velocidad. La herramienta y la guarda estan disefiadas para reducir el peligro. Sin
embargo, deben tomarse las siguientes precauciones:
Zt ADVERTENClA: Asegurese que otras personas y mascotas esten por Io menos
30 m (100 pies) de distancia.
ADVERTENClA: Para reducir el riesgo de lesiones por proyectiles, trabaje
alejb.ndose de objetos sotidos cercanos como muros, escatones, rocas grandes,
arbotes, etc. Tenga mucho cuidado al trabaje cerca de objetos sotidos y, cuando sea
necesario, recorte u oritte a mano.
• EVlTE EL ENCENDIDO ACCIDENTAL - No transporte la unidad con el dedo en el
interruptor.
• NO FUERCE LA HERRAMIENTA - Esta harb. mejor su trabajo y de manera mb.s
segura a ta vetocidad para la que rue disefiada.
ST_
• UTILICE LA HERRAMIENTA CORRECTA- No utitice esta herramienta para ningt3n
otro trabajo excepto para el que esta. destinada.
• NO SE SOBREEXTIENDA - Conserve siempre bien apoyados los pies para no
perder el equilibrio.
• DANOS AL APARATO - Si golpea ta herramienta o se enreda con un objeto extrafio,
apb.guela de inmediato, revise en busca de dafios y en caso de haberlos, hb.galos
reparar antes de seguir operando. No opere la herramienta con el cubo o el carrete
roto.
• EVlTE CONDIClONES AMBIENTALES PELIGROSAS - No utitice aparatos
electricos en lugares humedos o mojados. No se use bajo la ltuvia.
• NO OPERE desbrozadoras/oritladoras en atmosferas gaseosas o explosivas. Los
motores de estos aparatos emiten chispas en condiciones normales, que pueden
originar la ignicion de los vapores.
• GUARDE EL APARATO BAJO TECHO - Cuando no se usen, los aparatos deben
guardarse bajo techo, con tlave, fuera del atcance de los nifios.
• ESTE ALERTA - Concentrese en lo que hace. Utilice el sentido comt3n. No opere la
herramienta cuando este cansado.
• CUlDE SUS APARATOS - Conserve los bordes cortantes limpios y afilados para
obtener mejor rendimiento y disminuir el riesgo de lesiones. Siga tas instrucciones de
lubricacion y cambio de accesorios. Revise et cable del aparato periodicamente y, en
caso de estar dafiado, hagato reparar por una estacion de servicio autorizado.
Revise las extensiones periodicamente y reemplacelas si estan dafiadas. Conserve
los mangos limpios, secos.y libres de aceite y grasa.
• REVISE LAS PARTES DANADAS - Antes de seguir utilizando un aparato, debe
revisar las guardas u otras partes dafiadas para determinar si funcionaran
apropiadamente y cumpliran con su funcion. Revise la atineacion de las piezas
moviles, sus montajes, ruptura de piezas y cualesquiera otras condiciones que
pudiesen afectar ta operacion. Una guarda u otra parte dafiada debe repararse de
manera apropiada o debe reemptazarse en un centro de servicio autorizado, a menos
que se indique 1ocontrario en este manual.
• CONSERVE LAS GUARDAS EN SU LUGAR Y EN FUNClONAMIENTO.
• CONSERVE MANOS Y PIES ALEJADAS DEL AREA DE CORTE.
26
Page 27

90541134 NST2018 9/24/08 8:38 AM
• NO CARGUE EL APARATO BAJO LA LLUVIA NI EN LUGARES MOJADOS.
A
CONSERVE ESTAS INSTRUCCIONES
_" INSTRUCCIONES IMPORTANTES DE SEGURIDAD
ADICIONALES
• EVITE AMBIENTES PELIGROSOS - No use o cargue la bateria en lugares mojados
o inundados.
• NO USE O CARGU.E ta bateria bajo la lluvia
• RETIRE LA BATERIA antes de dar servicio, limpiar o remover material de las
desbrozadora. Saque ta bateria de la desbrozadora y sujetela por el mango frontal
cuando no este en uso.
• TENGA CUlDADO al manejar las baterias para no causar un corto entre la bateria y
materiales conductores como anillos, putseras y Ilaves. La bateria o el conductor
pueden catentarse y causar quemaduras.
• NO ABRA NI MUTILE la bateria. El electrotito liberado es corrosivo y puede causarle
dafios a sus ojos o a su piel. Puede ser toxico en caso de ingestion.
Este dispositivo cumple con ta parte 15 de las normas de la Comision Federal de
Comunicaciones de los Estados Unidos (FCC). La operacion esta sujeta alas dos
condiciones siguientes: (1) este dispositivo no puede causar interferencia perjudicial y
(2) este mecanismo debe aceptar cualquier interferencia recibida, inctuida la
interferencia que puede provocar una operacion no deseada.
NOTA: Este equipo ha sido probado y se encontro que cumpte con los limites para
dispositivo digital Clase B, segun la parte 15 de tas normas de ta FCC. Estos timites
estan disefiados para brindar proteccion razonabte contra interferencia perjudicial en
una instalacion residencial. Este equipo genera, usa y puede irradiar energia en
frecuencia de radio y, si no se instala y se usa de acuerdo con las instrucciones, puede
provocar interferencia perjudiciat en las comunicaciones de radio. Sin embargo, no hay
garantia de que la interferencia no ocurra en una instatacion en particular. Si este
equipo provoca interferencia perjudiciat en la recepcion de radio o television, Io que se
puede determinar al apagar y encender et equipo, et usuario debe tratar de corregir la
interferencia mediante una o mas de tas siguientes medidas:
Cambiar ta orientacion o la ubicacion de ta antena de recepcion.
Aumentar la separacion entre el equipo y el receptor.
Conectar el equipo a un tomacorriente sobre un circuito diferente de aquel al que esta
conectado el receptor.
Consuttar at vendedor o pedir la ayuda de un tecnico en radio y television con
experiencia.
La etiqueta en su producto puede incluir los siguientes simbotos.
V .............. volts
Hz ............ hertz
min ............ minutos
.... .......... corriente directa
[] .............. construccion clase II
z_ ............ simbolo de alerta
A ................ amperes
W................ watts
............ corriente alterna
no.............. velocidad sin carga
.......... terminales de conexion a tierra
.../min ...... revoluciones o reciprocaciones por
minuto seguridad
27
Page 28

90541134 NST2018 9/24/08 8:38 AM
INFORMACION SOBRE EL CAPUCHON DE LA BATER|A
Los capuchones para el atmacenamiento y transporte de las baterias son suministradas
para ser utilizadas mientras ta bateria se encuentre fuera de la herramienta o delcargador.
Retire el capuchon antes de cotocar la bateria en el cargador o en la herramienta.
Capuchon de la bateria
/ ADVERTENCIA: No guarde ni Ileve baterias, unidades de
alimentaci6n o pitas en un lugar donde sus terminales pudieran entrar en contacto con
algun objeto met#.lico. Por ejemplo, no ponga baterias, unidades de alimentaci6n o
pilas dentro de un detantal o botsillo, una caja de herramientas o de atmacenamiento
det producto, un cajon, etc., junto con clavos sueltos, tornillos, ttaves, etc. si no estan
debidamente protegidas. Et transporte de baterias, unidades de atimentaci6n o pilas
puede causar un incendio si sus terminates entran en contacto sin querer con
matedales conductores como tlaves, monedas, herramientas de mano y otros por el
estilo. De hecho, el reglamento sobre materiates peligrosos (HMR) del Ministerio de
Transporte de los Estados Unidos prohibe el transporte de baterias, unidades de
atimentaci6n o pilas en cualquier tipo de transporte terrestre o aereo (es decir,
embaladas en maletas y matetines de mano) A NO SER que esten debidamente
protegidas de hacer cortocircuito. Por Io tanto, cuando transporte baterias, unidades
de alimentaci6n o pilas individuates, asegurese que sus terminales esten protegidos y
debidamente aislados de materiales que pudieran entrar en contacto con eltos y
causar un cortocircuito.
ZLADVERTENClA E INSTRUCClONES DE
SEGURIDAD
CARGA DE LA BATER|A
1. Este manual contiene instrucciones importantes sobre seguridad y operacion.
2. Antes de usar el cargador de baterias, lea todas las instrucciones y marcas
precautorias en (1) el cargador de baterias, (2) la bateria, y (3) el producto que
utitiza la bateria.
3. Z_ PRECAUCl0N: Para reducir et riesgo de lesiones, cargue unicamente baterias
Black & Decker. Baterias de otros tipos pueden estallar ocasionando dafios y
lesiones personales.
4. No exponga el cargador a ta Iluvia o a ta nieve.
5. Et uso de dispositivos no recomendados o vendidos por Black & Decker puede
resuttar en riesgos de incendio, choque electrico o lesiones personates.
6. Para reducir et riesgo de dafiar el cable o la ctavija, tire de la ctavija en tugar de
tirar del cable para desconectar et cargador.
7. Asegurese de colocar el cable de manera que no Io pisen, se tropiecen con el, o se
someta a tension o dafios.
8. No deben utitizarse cables de extension a menos que sea absotutamente
necesario. El uso de una extension inapropiada puede resuttar en riesgos de
incendio, choque etectrico o etectrocucion.
a. Los cables con dos conductores pueden usarse con extensiones con dos o tres
conductores. Deben utitizarse unicamente cables con cubierta cilindrica, y
recomendamos que esten aprobados por Underwriters Laboratories (U.L.) (que
cumptan con la NOM en su caso). Si ta extension se usara fuera de casa,
debera ser apropiada para uso a ta intemperie. Cualquier cable marcado para
trabajo a la intemperie se puede utilizar bajo techo. Las siglas "W" o "WA" en la
cubierta de ta extension significan que el cable es adecuado para usarse a la
intemperie.
b. Un cable de extension debe tener el calibre adecuado (AWG o "American Wire
28
Page 29

90541134 NST2018 9/24/08 8:38 AM
Gauge") por seguridad, y para evitar perdida de potencia y sobrecalentamiento.
Mientras menor sea el numero det calibre del cable, mayor sera la capacidad;
esto es, una cable calibre 16 tiene mayor capacidad que uno con calibre 18.
Cuando emptee mas de una extension, asegurese de que cada una
contenga por Io menos el calibre minimo requerido.
TABLA PARA CALCULAR EL CALIBRE (AWG} MiNIMO REQUERIBO EN CABLES
AMPERAJE EN LA PLACA DE IDENTIFICACI(DN - 0 - 10.0
Longitud total del cable de extension (m) 7.6 15.2 22.8 30.5 38.1 45.7
Calibre del cable 18 18 16 16 14 14
9. Utilice unicamente el cargador suministrado para recargar su unidad. El empleo de
cualquier otro cargador podria dafiar la bateria o crear condiciones de petigro.
10. No intente abrir el cargador o la unidad. No hay partes susceptibles de ser
reparadas por et usuario en el interior. Envie la unida a un centro de servicio
autorizado Black & Decker.
11. NO incinere las baterias aun si estan muy dafiadas o comptetamente desgastadas.
12. No incinere las baterias. Pueden estallar con el fuego. Puede haber una pequefia
fuga del tiquido de las cetdas de ta bateria bajo condiciones extremas de uso, carga
o temperatura. Esto no imptica fattas, sin embargo, si el sello exterior se rompe y el
liquido fugado hace contacto con su piet:
a.
Lave rapidamente con agua y jabon.
b.
Neutralice con un acido teve como jugo de limon o vinagre.
C.
Si el liquido de la bateria se introduce en sus ojos, enjuaguelos con agua timpia
durante un minimo de 10 minutos y busque atencion medica de inmediato.
NOTA MI_DICA: El liquido es una sotucion de 25 a 35% de hidroxido de potasio
(potasa caustica).
CONSERVE ESTAS INSTRUCCIONES.
ST_
/klNSTRUCCIONES DE SEGURIDAD
IMPORTANTES SOBRE LA CARGA
CARGA DE LA BATER|A
LAS BATER|AS NO VIENEN COMPLETAMENTE CARGADAS DE FABRICA. ANTES
DE INTENTAR RECARGAR LAS, LEA CONCIENZUDAMENTE LAS SIGUIENTES
INSTRUCCIONES.
1. Conecte el cargador a una toma de corriente domestica estandar de 120 volts a 60
Hz. NOTA: no se cargue por medio de un generador o una fuente de corriente
directa, Utilice _nicamente CORRIENTE ALTERNA de 120 volts.
2. Deslice et cargador sobre la bateria como se observa en las figuras 6 y 7 y deje
que la bateria cargue inicialmente durante 9 horas. Despues de ta carga inicial, bajo
condiciones normales de uso, su bateria debera quedar completamente cargada en
3 a 9 horas.
3. Desconecte el cargador y retire la bateria. Coloque la bateria en la unidad y
aseg_rese de que quede correctamente insertada en su cavidad hasta
escuchar un chasquido al quedar en su sitio.
NOTA: Para sacar la bateria de la unidad, oprima et boton de liberacion de la parte
trasera de la bateria (Figura 8) y desticeta hacia fuera.
NOTAS IMPORTANTES SOBRE LA CARGA
1. Despues uso normal, su bateria deberb, quedar comptetamente cargada en 3 a 9
horas. Si la bateria se ha agotado por completo, puede tomarle hasta 9 horas cargar
completamente. Su bateria viene de fabrica descargada. Antes de intentar usarla,
debera cargarto durante horas.
2. NO cargue la bateria cuando la temperatura sea inferior a 5°C (40°F) o mayor a
41°C (105°F). Esto es importante y le evitara serios dafios a ta bateria. Se pueden
obtener mayor duracion y mejor rendimiento si se carga la bateria cuando la
temperatura sea de aproximadamente de 24°C (75°F).
3. Durante la carga, et cargador puede zumbar y calentarse al tacto. Esto es una
condicion normal y no indica ningun problema.
DE EXTENSION
29
Page 30

90541134 NST2018 9/24/08 8:38 AM
4. Si la bateria no carga apropiadamente -- (1) revise ta corriente en la toma
conectando una Ib.mpara u otro aparato. (2) Revise si la toma esta conectada a un
interruptor que corte ta corriente al apagar las tuces. (3) Lleva el cargador y ta
bateria a un sitio en el que la temperatura este entre 5°C (40°F) y 41°C (105°F).
(4) Si ta temperatura y la atimentacion son adecuadas, y usted no consigue la carga
correcta, Ileve su herramienta al centro de servicio de su tocalidad. Consutte
"herramientas etectricas" en ta seccion amaritla det directorio telefonico.
5. La bateria debera recargarse cuando deja de producir potencia suficiente en
trabajos que se hicieron con facilidad anteriormente. NO CONTINUE usando la
podadora con su bateria en estas condiciones.
6. La bateria atcanzara su rendimiento 6primo despues de 5 ciclos de uso normal. No
hay necesidad de agotar la carga de la bateria antes de cargarla de nuevo. El uso
normal es el mejor metodo para descargar y recargar la bateria.
DEJANDO LA BATER|A EN EL CARGADOR
El cargador y la bateria pueden dejarse conectados con la tuz roja encendida de
manera indefinida. El cargador conservara a la bateria con carga fresca y completa.
NOTA: Una bateria perdera tentamente su carga at estar fuera del cargador. Si no se
ha conservado a la bateria en carga de mantenimiento, pude ser necesario recargarla
antes de usarta. Una bateria puede tambien perder su carga tentamente si se deja en
un cargador que no esta conectado en una toma de corriente apropiada.
INSTRUCCIONES DE ENSAMBLAJE
Antes de ensamblar su desbrozadora de linea inalambrica, revise que haya recibido los
siguiente en el empaque. Observe la figura 1.
A. Guarda
B. Cargador
C. Bateria de niquel-cadmio
B. Desbrozadora/Oritladora
E. Mango auxiliar
ST_
ENSAMBLADO Y COLOCACI(DN DEL PROTECTOR DE DOS PIEZAS
Z_ADVERTENCIA: Retire el paquete de baterias de la herramienta antes de colocar el
protector o realizar cualquier tipo de ajuste. NUNCA OPERE LA HERRAMIENTA SIN
EL PROTECTOR ADECUADAMENTE INSTALADO. El protector siempre debe estar
instalado en la herramienta para proteger al usuario.
ENSAMBLADO:
• Retire de la caja las dos secciones del protector.
• Mientras sostiene tas secciones como se muestra en la figura 2, inserte la teng0eta de
la primera seccion det protector en la ranura de la segunda seccion del protector.
Consulte el recuadro.
• Inserte ta teng0eta lateral de la primera seccion del protector en la ranura de la segunda
seccion del protector hasta que escuche que encajen (figura 3).
• Para comptetar el ensambtado del protector, inserte el tornillo de 19 mm (3/4 pulgada)
como se muestra en la figura 4.
COLOCACION:
• Coloque et protector ensambtado sobre el carrete como se muestra en ta figura 5 e
inserte los tres tornillos restantes en el protector como 1oindican tas ftechas.
Una vez instalado, retire la cubierta de ta hoja de corte de la cuerda, ubicada en el
extremo de la segunda seccion del protector.
AJUSTE DEL MANGO AUXILIAR
Para tener comodidad y control at maximo, ajuste el mango auxiliar de acuerdo a su
estatura, figura 5A. A menor estatura debe a ustarse el mango a una posicion mas baja
(tejos de usted) y para usuarios mb.saltos a una posicion ma.sarriba (hacia usted). El
mango debe ajustarse de manera que su brazo quede recto como se muestra en ta
figura 10.
3O
Page 31

90541134 NST2018 9/24/08 8:38 AM
AJUSTE DE ALTURA
La attura total de ta desbrozadora puede ajustarse aftojando el cottar[n de seguridad y
girandolo en sentido opuesto a la flecha que se muestra en la figura 5B. Los tubos
pueden extenderse entonces a menor o mayor Iongitud. Cuando alcance ta altura
deseada, apriete el cotlarin girando en el sentido que se muestra en ta figura 5B.
INSTRUCCIONES DE OPERACION
• _ PRECAUCION: SIEMPRE UTILICE PROTECCION PARA LOS OJOS.
PRECAUCION: Inspeccione el area que vaya a recortar y retire cuatquier
alambre, cord6n y otros objetos similares que pudiesen enredarse con la tinea o con
et carrete. Sea particutarmente cuidadoso de evitar cuatquier atambre que pudiera
encontrarse en el camino de la herramienta, como las puas que se encuentran en ta
base de una cerca de estabones de cadena.
OPERACION DE LA DESBROZADORA/ORILLADORA
• Para encender la desbrozadora, tire del bot6n del seguro, ilustrado por la figura 6,
hacia arras y a continuaci6n oprima el gatitlo interruptor. Para apagar la herramienta,
suelte el gatillo.
• Batancee lentamente la desbrozadora de lado a lado, como se observa en ta figura
10.
• Para transformar ta unidad en orilladora de mantenimiento, apaguela (observe ta
figura 11). Sujete la desbrozadora con una mano por et mango auxitiar, sujete el
collarin y empuje en direcci6n de la fiecha y gire la cabeza de la desbrozadora hasta
que tope (media vuelta), retire su mano (gire en et sentido de tas manecittas del reloj
cuando se observe desde et extremo del interruptor). La herramienta quedara
asegurada en posici6n de oritladora.
Gire la guia de oriltado de atambre hacia adelante y hacia abajo a su sitio antes de
ST_
orillar, como se itustra en la figura 12.
• Para operar la unidad como oritladora de mantenimiento, cot6quela sobre la acera
como se muestra en la figura 13.
• Para devotver a la posici6n de desbrozadora apague ta unidad, empuje en direcci6n
de la ftecha y gire ta cabeza de ta desbrozadora en sentido opuesto alas manecitlas
del reloj hasta que tope. Cuando utilice la unidad en el modo de desbrozadora, usted
puede elegir ptegar el atambre guia fuera del camino.
ALIMENTAClON DE LA LJNEA
Su desbrozadora utiliza tinea de nylon de 0.065 putg. (1.65 mm) de diametro para cortar
et pasto y hierbas rapida y facilmente. Con el tiempo, la punta de la linea de nylon se
desgastara y el cubo de atimentaci6n automatica alimentara un tramo de tinea nuevo.
Por supuesto que la linea de corte se desgastara mas rapidamente y requerira de mas
atimentaci6n si se corta a Io largo de aceras y otras superficies abrasivas, o al cortar
hierbas mas pesadas. El avanzado mecanismo de atimentaci6n automatica de linea
siente cuando hace fatta mas linea y recorta la Iongitud apropiada siempre que se
requiera. Ni siquiera tiene que pensar en etlo. No golpee la unidad en el suelo para
intentar atimentar mas linea o por cualquier otro motivo.
CAMBIO DE CARRETE/LIMPIEZA DE ATASCADURAS Y LiNEA ENREDADA
De tiempo en tiempo, especialmente at cortar hierbas espesas, el cubo de
atimentaci6n de tinea puede btoquearse con savia y otros materiales, y como
resuttado la linea se atorara. Para limpiar la atascadura, siga los pasos mencionados a
continuaci6n.
• Apague la desbrozadora y retire ta bateria.
• Oprima tas lengeetas de tiberaci6n de la tapa del cubo, como se observa en la figura
14 y quite la tapa tirando de ella hacia fuera.
• Saque et carrete de linea de nylon del cubo y limpie cuatquier fragmento de linea y
desecho de corte del #.rea del carrete.
• En el caso de atascaduras y linea enredada, desenrotte aproximadamente 30 cm de
linea para asegurarse que no este dafiada. Siesta bien, embobineta de nuevo e
inserte el extremo por el ojilto del cubo del carrete, como se muestra en ta figura 15.
Tire de la linea a traves del orificio para conservar la tensi6n mientras cotoca el
31
Page 32

90541134 NST2018 9/24/08 8:38 AM
carrete dentro del cubo con et lado de las muescas expuesto, como se ilustra en la
figura 16.
Presione el carrete CON CUlDADO y girelo hasta que sienta que cae en su sitio.
(Cuando este en su sitio, el carrete girara pocos grados hacia izquierda y derecha
libremente.)
Cotoque ta tapa det cubo de nuevo, inserte la bateria y encienda ta unidad. En unos
cuantos segundos usted escuchara que la linea de nylon se corta automaticamente a
la Iongitud apropiada.
REEMBOBINADO DEL CARRETE CON LiNEA A GRANEL (UTILICE UNICAMENTE
LINEA DE 0.065 PULG. (1.65 mm) DE DIAMETRO
Encontrara linea a granel para su desbrozadora/orilladora con el distribuidor o centro de
servicio Black & Decker de su Iocatidad.
Para instatar la tinea a granet, siga los pasos que se describen a continuacion.
• Apague la desbrozadora y retire la bateria.
• Oprima tas tengOetas de liberacion de la tapa del cubo, como se observa en ta
figura 14 y quite ta tapa tirando de ella hacia fuera.
• Saque el carrete de la herramienta y deseche el sobrante de linea que quede en
este.
• Inserte el extremo de la linea a granet en el orificio del carrete que se muestra en ta
figura 17 aproximadamente 12 mm (1/2 putg.).
• Sujete la linea en et orificio y tire del resto de ella a traves de la ranura del carrete,
como se observa en ta figura 17.
• Enrotle firme y uniformemente la tinea en et carrete en ta direccion de ta fiecha de la
figura 17 hasta que este casi tleno. (El carrete tiene capacidad para 15,2 m (50 pies)
de linea, y esta se vende en secciones de 50 pies.)
• Inserte el extremo de la tinea a traves det ojillo del cubo, como se muestra en la
figura 15. Tire de la tinea a traves del orificio para conservar la tension mientras
coloca el carrete dentro del cubo con el lado de la muesca expuesto, como se
muestra en ta figura 16.
• Presione et carrete CON CUlDADO y girelo hasta que sienta que cae en su sitio.
(Cuando este en su sitio, el carrete girara pocos grados hacia izquierda y derecha
libremente.)
• Cotoque la tapa det cubo de nuevo, inserte la bateria y encienda ta unidad. En unos
cuantos segundos usted escuchara que la linea de nylon se corta automaticamente a
la Iongitud apropiada.
MANTENIMIENTO
LIMPIEZA
• Utilice unicamente jabon suave y un trapo humedo para limpiar la herramienta. No
permita nunca que lleguen tiquidos al interior de la herramienta, ni sumerja ninguna
parte en ningun tiquido.
Z_ADVERTENClA: Retire o desconecte la bateria antes de dar servicio, limpieza o
limpiar materia de la herramienta de jardineria.
ACCESORIOS
• Los accesorios recomendados para emptearse con su herramienta estan a su
disposicion con el distribuidor o centro de servicio de su locatidad. Si necesita ayuda en
relacion con los accesorios, Itame por favor: (55) 5326-7100.
• Utitice el carrete de repuesto Black & Decker No. AF-100.
• Recargue la linea de nylon (at granel o el carrete preembobinado) como se muestra
en este m,anuat.
• UTILICE UNICAMENTE LiNEA DE MONOFILAMENTO DE NYLON DE 0.065" (1,65
mm) DE DIAMETRO. Linea mas gruesa sobrecargara el motor y ocasionara
sobrecatentamiento. Esta tinea esta a su disposicion con el distribuidor de su
Iocatidad o en los centros de servicio autorizado.
• No utilice linea de pescar ni otro tipo de tineas no recomendadas.
• Z_ ADVERTENCIA: Et uso de cuatquier accesorio no recomendado para emplearse
con esta herramienta puede ser peligroso.
32
Page 33

90541134 NST2018 9/24/08 8:38 AM
Problema
• La linea no atimenta.
Causa posible
•Linea enredada en el carrete.
Solucion posible
•Desenrotle 60 cm de
lineay embobine de nuevo.
DETECCl0N DE PROBLEMAS
• Fallael cortede tinea.
• Launidad no enciende.
•La cuchilla de taguarda
estb.da5ada o fatta.
• La tinea se sale de taguarda.
•La bateria no est#.bien instalada.
•Lteve taunidad at centro
de servicio para
cambio/reparacion.
• Reembobine ocorte la
linea at ras de la cuchilla.
•Verifique la instatacionde
labateria.
•La bateria no carga.
•Verifique los requisitos de
carga de la bateria.
•La bateria no carga.
•La bateria no est#.insertada en
el cargador.
• Inserteta bateria en el
cargador hasta que se
encienda ta tuzroja (LED).
•Et cargador noest#.enchufado.
•Enchufe el cargador en un
tomacorriente que funcione.
Paraconocer mb.sdetatles,
consutte "Notas importantes
sobre la carga".
•Controle tacorriente del
tomacorriente enchufando
una tb.mparauotro artefacto.
•Verifique si el tomacorriente
est.&conectado a un
interruptorquecorta ta
energia cuando usted apaga
laluz.
•Temperatura ambientat
demasiado caliente o demasiado
fria.
•Mueva el cargador y la
herramienta a un ambiente
con una temperatura superior
a4,5 °C (40 °F) o inferior a
40,5 °C (105 °F).
Para conocer la ubicacion del centro de mantenimiento mas cercano a fin de recibir ayuda
con su producto, visite nuestro sitio Web www.blackanddecker.com o Ilame a la linea de
ayuda BLACK & DECKER al (55)5326-7100.
EL SELLO RBRC TM
E! selto RBRC TM en las baterias de niquel-cadmio indica que ,_
BlaCK& Decker participa voluntariamente en un programa industrial paral I _ ) }
recoiectar y reciclar estas baterias at termino de su vida util, cuando se \._k¢_@/
retiran de servicio dentro de los Estados Unidos. El programa RBRC TM
proporciona una conveniente attemativa para el deposito en los lores de
basura municipales de tas baterias de niquel-cadmio desgastadas, hecho que es
itegal en algunas regiones.
Los pagos de Black & Decker a RBRC TM hacen mb.s sencilto para usted deshacerse
de sus baterias desgastadas con los distribuidores de baterias de niquet-cadmio de
su Iocatidad, o en los centros de servicio autorizado Black & Decker. Tambien puede
comunicarse at centro de recictaje de su Iocalidad para que le informen de los lugares
a los que puede regresar tas baterias desgastadas. La entrada de Black & Decker a
este programa es parte de su compromiso para proteger nuestro medio ambiente y
conservar los recursos naturales.
33
Page 34

90541134 NST2018 9/24/08 8:38 AM
INFORMAClON DE MANTENINIIENTO
Todos los Centros de mantenimiento de Black & Decker cuentan con personal
altamente capacitado dispuesto a brindar a todos los ctientes un servicio eficiente y
confiabte en ta reparaci6n de herramientas electricas. Si necesita consejo tecnico,
reparaciones o piezas de repuesto originales de fabrica, p6ngase en contacto con el
centro de mantenimiento de Black & Decker m&s cercano a su domicitio. Para ubicar su
centro de servicio local, consulte ta secci6n "Herramientas electricas" (Toots-Electric) de
las ps.ginas amariltas, Ilame at (55)5326-7100 o visite nuestro sitio
www.blackanddecker.com.
GARANT|A COMPLI=TA DE DOS AI_IOS PARA USO I=N EL HOGAR
Black & Decker (Estados Unidos) Inc. ofrece una garantia de dos afios por cuatquier
defecto det material o de fabricaci6n de este producto. El producto defectuoso se
reparara o reemplazara sin costo alguno de dos maneras.
La primera opci6n, el reemptazo, es devolver el producto at comercio donde se lo
adquiri6 (siempre y cuando se trate de un comercio participante). Las devotuciones
deben reatizarse conforme a ta potitica de devotuci6n del comercio (generatmente,
entre 30 y 90 dias posteriores a laventa). Le pueden soticitar comprobante de compra.
Consulte en el comercio acerca de la potitica especial sobre devotuciones una vez
excedido el plazo establecido.
La segunda opci6n es llevar o enviar et producto (con flete pago) a un Centro de
mantenimiento propio o autorizado de Black & Decker para su reparaci6n o reemplazo
segun nuestro criterio. Le pueden soticitar el comprobante de compra. Los Centros de
mantenimiento autorizados y de propiedad de Black & Decker se detatlan en lasecci6n
"Herramientas etectricas" (Toots-Electric) de tas ps.ginas amariltas de la guia telef6nica.
Esta garantia no se extiende a los accesorios. Esta garantia le concede derechos
legates especificos; usted puede tener otros derechos que pueden variar segun el
estado o ta provincia. Si tiene alguna pregunta, comuniquese con el gerente del Centro
de mantenimiento de Black & Decker de su zona. Este producto no ests. disefiado para
uso comercial.
34
Page 35

90541134 NST2018 9/24/08 8:38 AM
Para reparacibn y servicio de sus herramientas electricas, favor de
dirigirse al Centro de Servicio mils cercano'.
CULIACAN, SIN
Av. Nicolas Bravo #1063 Sur
(667) 7 12 42 11
Cot. Industrial Bravo
GUADALAJARA, JAL
Av. La Paz #1779
(33) 3825 6978
Cot. Americana Sector Juarez
MEXICO, D.F.
Eje Central L,Czaro Cardenas
No. 18
(55) 5588 9377
Local D, Cot. Obrera
MERIDA, YUC
Calle 63 #459-A
(999) 928 5038
Cot. Centro
PARA OTRAS LOCALIDADES LLAME AL: (55) 5326 7100
Vea "Herramientas
electricas (Tools-Electric)"
- Pfiginas amarillas -
para Servicio y ventas
MONTERREY, N.L.
Av. Francisco I. Madero
No.831
(81) 8375 2313
Cot. Centro
PUEBLA, PUE
17 Norte #205
(222) 246 3714
Cot. Centro
QUERETARO, QRO
Av. Madero 139 Pte.
(442) 214 1660
Cot. Centro
SAN LUIS POTOSI, SLP
Av. Universidad 1525
(444) 814 2383
Cot. San Luis
BLACK & DECKER S.A. DE C.V.
,..__..,
SECCI_
BOSQUES DE CIDROS ACCESO
RADIATAS NO. 42
COL. BOSQUES. DE LAS LOMAS.
05120 MEXICO, D.F
TEL. 55-5326-7100
TORREON, COAH
Blvd. Independencia, 96 Pte.
(871) 716 5265
Cot. Centro
VERACRUZ, VER
Protongaci6n Diaz Mir6n #4280
(229)921 7016
Cot. Remes
VILLAHERMOSA, TAB
Constituci6n 516-A
(993) 312 5111
Cot. Centro
35
Page 36

90541134 NST2018 9/24/08 8:38 AM
Cat.No. NST2018 Form No. 90541134
Copyright@ 2008 Black & Decker
36
SEPT. '08
Printed in China
 Loading...