

Black & Decker NPS9010, NPS1018 Instruction Manual

1
VEA EL ESPAÑOL EN LA CONTRAPORTADA.
POUR LE FRANÇAIS, VOIR LA COUVERTURE ARRIÈRE.
SAVE THIS MANUAL FOR FUTURE REFERENCE.
INSTRUCTIVO DE OPERACIÓN, CENTROS DE SERVICIO Y
PÓLIZA DE GARANTÍA. ADVERTENCIA: LÉASE ESTE
INSTRUCTIVO ANTES DE USAR EL PRODUCTO.
INSTRUCTION MANUAL
NNNNPPPPSSSS000011118888 //// NNNNPPPPSSSS1111000011118888 CCCCoooorrrrddddlllleeeessssssss PPPPoooowwwweeeerrrr
SSSSccccrrrruuuubbbbbbbbeeeerr
rr
KEY INFORMATION YOU SHOULD KNOW:
• Charge battery for 9 hours before first use.
• When immersing Scrubber in water, DO NOT cover the
power head (brush end) with more than 1 meter (3 feet) of
water. Do not leave the Scrubber immersed for more than
30 minutes.
BEFORE RETURNING THIS PRODUCT
FOR ANY REASON PLEASE CALL
1-800-544-6986
BEFORE YOU CALL, HAVE THE CATALOG No. AND DATE
CODE AVAILABLE. IN MOST CASES, A BLACK & DECKER
REPRESENTATIVE CAN RESOLVE THE PROBLEM OVER THE
PHONE. IF YOU HAVE A SUGGESTION OR COMMENT, GIVE
US A CALL. YOUR FEEDBACK IS VITAL TO BLACK & DECKER.
T
T
HANK
HANK
YOU
YOU
FOR
FOR
CHOOSING
CHOOSING
B
B
LACK
LACK
&&D
D
ECKER
ECKER
!
!
G
G
OOTTOOWWW
WWW
.B
.B
LACKAND
LACKAND
D
D
ECKER
ECKER
.
.
COM
COM
/N
/N
EW
EW
O
O
WNER
WNER
TTOOREGISTER
REGISTER
YOUR
YOUR
NEW
NEW
PRODUCT
PRODUCT
.
.
90513658 NPS1018 1/15/07 2:02 PM Page 1

2
SAFETY GUIDELINES - DEFINITIONS
It is important for you to read and understand this manual.
The information it contains relates to protecting YOUR
SAFETY and PREVENTING PROBLEMS. The symbols below are
used to help you recognize this information.
DANGER: Indicates an imminently hazardous situation which,
if not avoided, will result in death or serious injury.
WARNING: Indicates a potentially hazardous situation which, if
not avoided, could result in death or serious injury.
CAUTION: Indicates a potentially hazardous situation which, if
not avoided, may result in minor or moderate injury.
CAUTION: Used without the safety alert symbol indicates
potentially hazardous situation which, if not avoided, may result in
property damage.
IMPORTANT SAFETY RULES
WARNING: Read and understand all instructions. Failure to
follow all instructions listed below may result in electric shock, fire
and/or serious personal injury.
SAVE THESE INSTRUCTIONS
Before Operating Power Scrubber
• Use Power Scrubber for scrubbing only. Do not use Power
Scrubber for purpose not intended.
• Only well-instructed adults should operate Power Scrubber. Never
allow children to operate.
• Do not allow children or untrained individuals to use this unit.
• Wear the following safety gear when operating Power Scrubber:
- footwear with non-skid soles
- safety glasses, goggles or face screen that are marked to
comply with ANSI Z87
- you may want to wear rubber gloves.
• Read and follow manufacturers instructions on cleaning agent
used.
- face or dust mask (if working in dusty areas)
• Wear heavy long pants and boots. Do not wear loose fitting
clothing, short pants, jewelry of any kind, or go barefoot.
• Secure long hair so it is above shoulder level to prevent
entanglement in any moving parts.
• Before scrubbing, always provide the following:
- clear work area
- secure footing
- planned retreat path from falling debris
• Before scrubbing always check that the brush is clean and does not
have any trapped dirt, sand or debris as that may scratch the
surface being scrubbed.
• Do not scrub with gasoline, solvents, acids, caustics, poisons, oils,
flammable liquids or similar products.
• Do not charge the product outdoors.
WARNING: Some cleaning products contain chemicals known to
the State of California to cause cancer, birth defects or other
reproductive harm. When using Power Scrubber be sure to read
cleaning product labels for any Proposition 65 warnings. Follow
directions on container of all such products.
90513658 NPS1018 1/15/07 2:02 PM Page 2

3
While Operating Power Scrubber
• Stay alert. Use common sense while operating the unit.
• Keep work area clean. Cluttered areas invite injuries.
• Keep children, animals and bystanders at least 50 ft. (15 m) away
from Power Scrubber. Only Power Scrubber user should be in work
area.
• Grip Power Scrubber securely with one hand on the pole and the
other on the handle, encircling both with thumbs and fingers.
• Before starting Power Scrubber, make sure user has firm grip on
Power Scrubber.
• Keep hair and all parts of body away from any moving part.
• Do not force Power Scrubber while scrubbing. Apply light pressure.
It will do the job better and safer at the rate for which it was intended.
• Carry Power Scrubber from one place to another
- with battery removed
- by holding pole at balance point
- with brush removed
• Do not operate in poor lighting.
• Keep firm footing and balance. Do not overreach. Overreaching
can result in loss of balance or exposure to hot surfaces.
• Always store indoors with battery removed and out of reach of
children.
• Do not, under any circumstance, use any attachment or accessory
on this product, which was not provided with the product, or
identified as appropriate for use with this product in this Instruction
Manual.
• This appliance is intended for household use and not for
commercial or industrial use.
• To protect yourself from falling objects do not stand directly under
the brush or area being scrubbed. This unit should not be held at an
angle over 60 degrees from ground level.
• Keep the handles dry, clean, and free of oil.
• Before you start the unit, make sure the brush is not contacting any
object.
• Make sure the brush has stopped before setting the unit down.
• Do not extend Power Scrubber handle above shoulder height.
• Only use replacement brushes and pole extensions specified by
the manufacturer or the equivalent.
• Keep the working area free from obstructions such as other trees,
branches, rocks, fences, stumps, etc. Eliminate or avoid any
obstruction that your brush could hit while you are cleaning a
particular area.
• This power unit is intended to be correctly orientated in a vertical or
floor mount position.
Do not operate Power Scrubber:
- while tired or under the influence of alcohol, medication, or drugs
- in rain
- where highly flammable liquids or gases are present
- if Power Scrubber is damaged, adjusted wrong, or not fully and
securely assembled
- while in a hurry
- while in tree or on a ladder
- while on aerial booms, buckets, scaffolds or platforms
- during high wind or storming weather
- if trigger does not turn Power Scrubber on and off. Brush must
stop moving when you depress the off (0) button. Remove battery
and have faulty switch replaced by authorized service center. See
“Service Information”.
• Do not use Power Scrubber with abrasive cleansers.
Service
• Tool service must be performed only by qualified repair personnel.
Service or maintenance performed by unqualified personnel could
result in a risk of injury. See “Service Information”.
• When servicing a tool, use only identical replacement parts. Follow
instructions in the Service Information section of this manual. Use
of unauthorized parts or failure to follow Maintenance Instructions
may create a risk of electric shock or injury.
90513658 NPS1018 1/15/07 2:02 PM Page 3
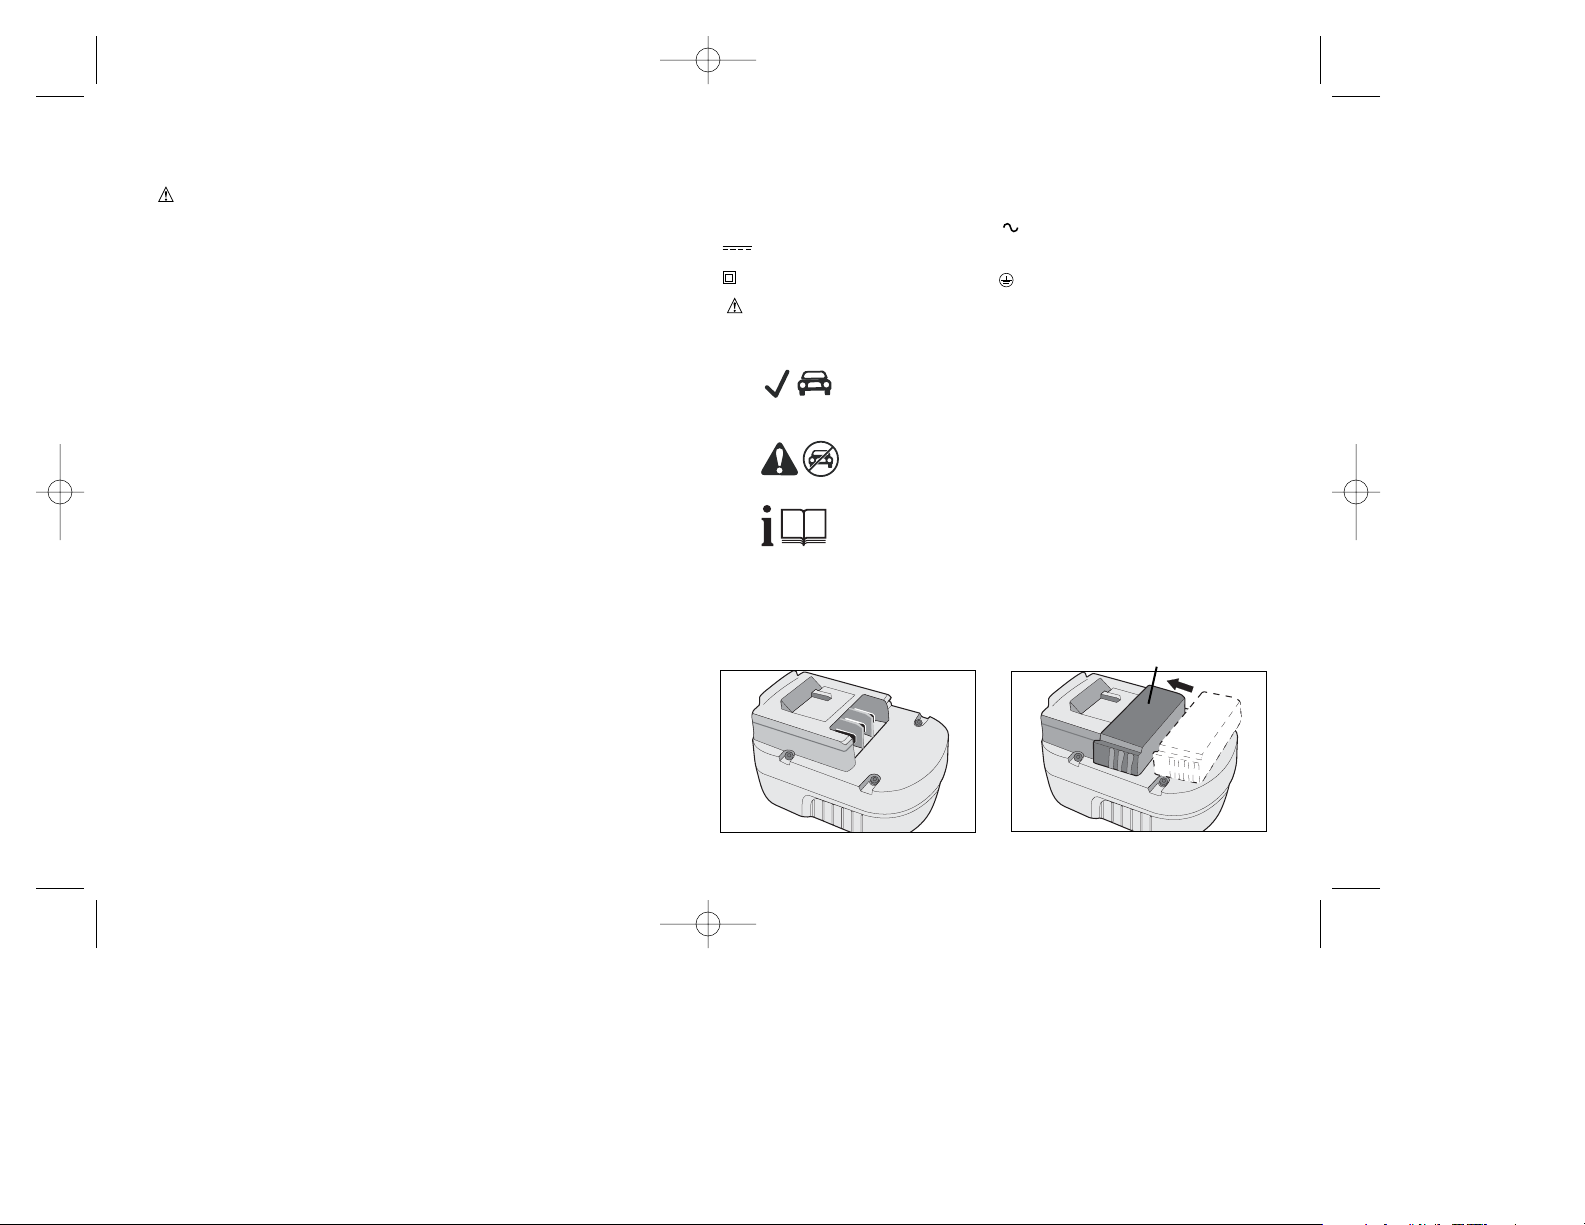
The label on your tool may include the following symbols.
V................volts A ....................amperes
Hz..............hertz W ..................watts
min ............minutes ..................alternating current
..........direct current
n
o ..................no load speed
..............
Class II Construction
....................
earthing terminal
............safety alert symbol .../min ............revolutions or
reciprocations per minute
Brush is recommended for use on most painted
surfaces.
Brush is not recommended for use on painted
surfaces.
Read the instruction manual for more information.
Battery Cap Information
Battery storage and carrying caps are provided for use whenever
the battery is out of the tool or charger. Remove cap before placing
battery in charger or tool.
4
General Safety Rules
WARNING:
Shock Hazard. To protect yourself from electrocution, do not operate
within 50 feet (15 m) of overhead electrical lines. Failure to do this
could result in severe personal injury.
• Hold tool by insulated gripping surfaces when performing an
operation where the cleaning tool may contact hidden wiring.
Contact with a "live" wire will make exposed metal parts of the tool
"live" and shock the operator.
• Some dust created by power sanding, sawing, grinding, drilling, and
other construction activities contains chemicals known to cause
cancer, birth defects or other reproductive harm. Some examples of
these chemicals are:
• lead from lead-based paints,
• crystalline silica from bricks and cement and other masonry
products, and
• arsenic and chromium from chemically-treated lumber. (CCA)
Your risk from these exposures varies, depending on how often you
do this type of work. To reduce your exposure to these chemicals:
work in a well ventilated area, and work with approved safety
equipment, such as those dust masks that are specially designed
to filter out microscopic particles.
• Avoid prolonged contact with dust from power sanding, sawing,
grinding, drilling, and other construction activities. Wear protective
clothing and wash exposed areas with soap and water. Allowing
dust to get into your mouth, eyes, or lay on the skin may promote
absorption of harmful chemicals.
• Use of this tool can generate and/or disburse dust, which may
cause serious and permanent respiratory or other injury. Always
use NIOSH/OSHA approved respiratory protection appropriate for
the dust exposure. Direct particles away from face and body.
SAVE THESE INSTRUCTIONS
Battery Cap
90513658 NPS1018 1/15/07 2:02 PM Page 4

a. Two-wire cords can be used with 2-wire or 3-wire extension
cords. Only round jacketed extension cords should be used, and
we recommend that they be listed by Underwriters Laboratories
(U.L.). If the extension is to be used outside, the cord must be
suitable for outdoor use. Any cord marked for outdoor use can
also be used for indoor work. The letters "W" or "WA" on the cord
jacket indicate that the cord is suitable for outdoor use.
b. An extension cord must have adequate wire size (AWG or
American Wire Gauge) for safety, and to prevent loss of power
and overheating. The smaller the gauge number of the wire, the
greater the capacity of the cable; that is, 16 gauge has more
capacity than 18 gauge. When using more than one extension to
make up the total length, be sure each extension contains at
least the minimum wire size.
CHART FOR MINIMUM WIRE SIZE (AWG)OF EXTENSION CORDS
NAMEPLATE RATING AMPS – 0 – 10.0
Total Extension Cord Length (ft) 25 50 75 100 125
(m) (7.6) (15.2) (22.9) (30.5) (38.1)
Wire Gauge 18 18 16 16 14
9. Use only the supplied charger when charging your tool. The use
of any other charger could damage the tool or create a
hazardous condition.
10. Use only one charger when charging.
11. Do not attempt to open the charger. There are no customer
serviceable parts inside. Return to any authorized Black &
Decker service center.
12. DO NOT incinerate the tool or battery even if they are severely
damaged or completely worn out. The batteries can explode in a
fire.
13. A small leakage of liquid from the battery cells may occur under
extreme usage, charging or temperature conditions. This does
not indicate a failure. However, if the outer seal is broken and this
leakage gets on your skin:
a. Wash quickly with soap and water.
b. Neutralize with a mild acid such as lemon juice or vinegar.
5
WARNING: Do not store or carry battery so that metal objects
can contact exposed battery terminals. For example, do not place
battery in aprons, pockets, tool boxes, product kit boxes, drawers,
etc. with loose nails, screws, keys, etc. without battery cap.
Transporting batteries can possibly cause fires if the battery
terminals inadvertently come in contact with conductive materials
such as keys, coins, hand tools and the like. “The US Department of
Transportation Hazardous Material Regulations (HMR) actually
prohibit transporting batteries in commerce or on airplanes (i.e.
packed in suitcases and carryon luggage) UNLESS they are
properly protected from short circuits. So when transporting
individual batteries, make sure that the battery terminals are
protected and well insulated from materials that could contact them
and cause a short circuit.”
Safety Warnings and Instructions: Charging
WARNING:
1. This manual contains important safety and operating
instructions.
2. Before using battery charger, read all instructions and cautionary
markings on (1) battery charger, (2) battery, and (3) product
using battery.
3. CAUTION: To reduce the risk of injury, charge only
Black & Decker Batteries. Other types of batteries may burst
causing personal injury and damage.
4. Do not expose charger to rain or snow.
5. Use of an attachment not recommended or sold by Black &
Decker may result in a risk of fire, electric shock, or injury to
persons.
6. To reduce risk of damage to electric plug and cord, pull by plug
rather than cord when disconnecting charger.
7. Make sure cord is located so that it will not be stepped on,
tripped over, or otherwise subjected to damage or stress.
8. An extension cord should not be used unless absolutely
necessary. Use of improper extension cord could result in a risk
of fire, electric shock or electrocution.
90513658 NPS1018 1/15/07 2:02 PM Page 5
3. While charging, the charger may hum and become warm to touch.
This is a normal condition and does not indicate a problem.
4. If the battery does not charge properly—(1) Check current at
receptacle by plugging in a lamp or other appliance. (2) Check to
see if receptacle is connected to a light switch which turns power
off when you turn out the lights. (3) Move charger and battery to a
surrounding air temperature of 40°F (4,5 °C) to 105°F.(40,5 °C) (4)
If the receptacle and temperature are OK, and you do not get
proper charging, take or send the battery and charger to your
local Black & Decker service center. See Tools Electric in yellow
pages.
5. The battery should be recharged when it fails to produce sufficient
power on jobs which were easily done previously. DO NOT
CONTINUE using product with its battery pack in a depleted
condition.
6. To prolong battery life, avoid leaving the battery on charge for
extended periods of time (over 30 days without use). Although
overcharging is not a safety concern, it can significantly reduce
overall battery pack life.
7. The battery will reach optimum performance after being cycled 5
times during normal usage. There is no need to run the batteries
down completely before recharging. Normal usage is the best
method of discharging and recharging the batteries.
6
c. If the battery liquid gets in your eyes, flush them with clean water
for a minimum of 10 minutes and seek immediate medical
attention. MEDICAL NOTE: The liquid is a 25-35% solution of
potassium hydroxide.
Charging the Battery
Use charger number FS18C, part number 5103069-12 only.
THE BATTERY IS NOT FULLY CHARGED AT THE FACTORY.
BEFORE ATTEMPTING TO CHARGE THE BATTERY,
THOROUGHLY READ ALL OF THE SAFETY INSTRUCTIONS.
The charger is designed to use standard
household 120 volt 60 Hz power.
1. Plug the charger into any standard 120
Volt 60 Hz electrical outlet. NOTE: Do
not charge by means of an engine
generator or DC power source. Use
only 120V AC.
2. Slide the charger onto the battery as
shown in figure 1 and let the battery
charge initially for 9 hours. After the
initial charge, under normal usage, your battery should be fully
charged in 3 to 9 hours.
3. Unplug charger, and remove the battery.
Important Charging Notes
1. After normal usage, your battery should be fully charged in 3 to 9
hours. If the battery is run-down completely, it may take up to 9
hours to become fully charged. Your battery was sent from the
factory in an uncharged condition. Before attempting to use it, it
must be charged for at least 9 hours.
2. DO NOT charge the battery in an air temperature below 40°F
(4,5 °C) or above 105°F.(40,5 °C) This is important and will
prevent serious damage to the battery. Longest life and best
performance can be obtained if battery is charged when air
temperature is about 75°F.(24°C).
1
90513658 NPS1018 1/15/07 2:02 PM Page 6

7
Features
Before using your Power Scrubber familiarize yourself with all
operating and safety features.
5
4
3
2
1
10
9
8
7
A. Handle Module
B. Center Extension 1 (orange connectors) for medium length
C. Center Extension 2 (green connectors) for long length (NPS1018
only)
D. Power Head Module
1. On/Off Switch 8. Release Ring
2. Battery Cover 9. Pivot Lock Mechanism
3. Battery 10. Charger
4. Foam Gripper 11. 8” Auto Brush (orange
5. Threaded Pole and grey bristles)
6. Threaded Sleeve 12. 8” General Purpose
7. Pivoting Power Head Scrub Brush (black bristles)
(NPS1018 only)
6
A
B
C
CAUTION: Do not use general purpose brushes (black bristles) on
painted surfaces.
CAUTION: Before using any brush wash and inspect the brush and
bristles for wear and debris. Do not use if bristles are worn or
washing does not remove the debris.
Installing and Removing Brush
WARNING: Remove battery from handle when installing and
removing brushes to prevent accidental operation.
• Place the Scrubber on a firm surface.
• Slide the release ring toward the Power
Head. Fig. 8
• Insert or remove the Brush Head from
the Power Head. Release the ring.
CAUTION: After installing a brush
ensure it is properly seated and restrained to prevent the brush from
falling off by pulling on the brush away from the Power Head.
D
11
12
8
90513658 NPS1018 1/15/07 2:02 PM Page 7
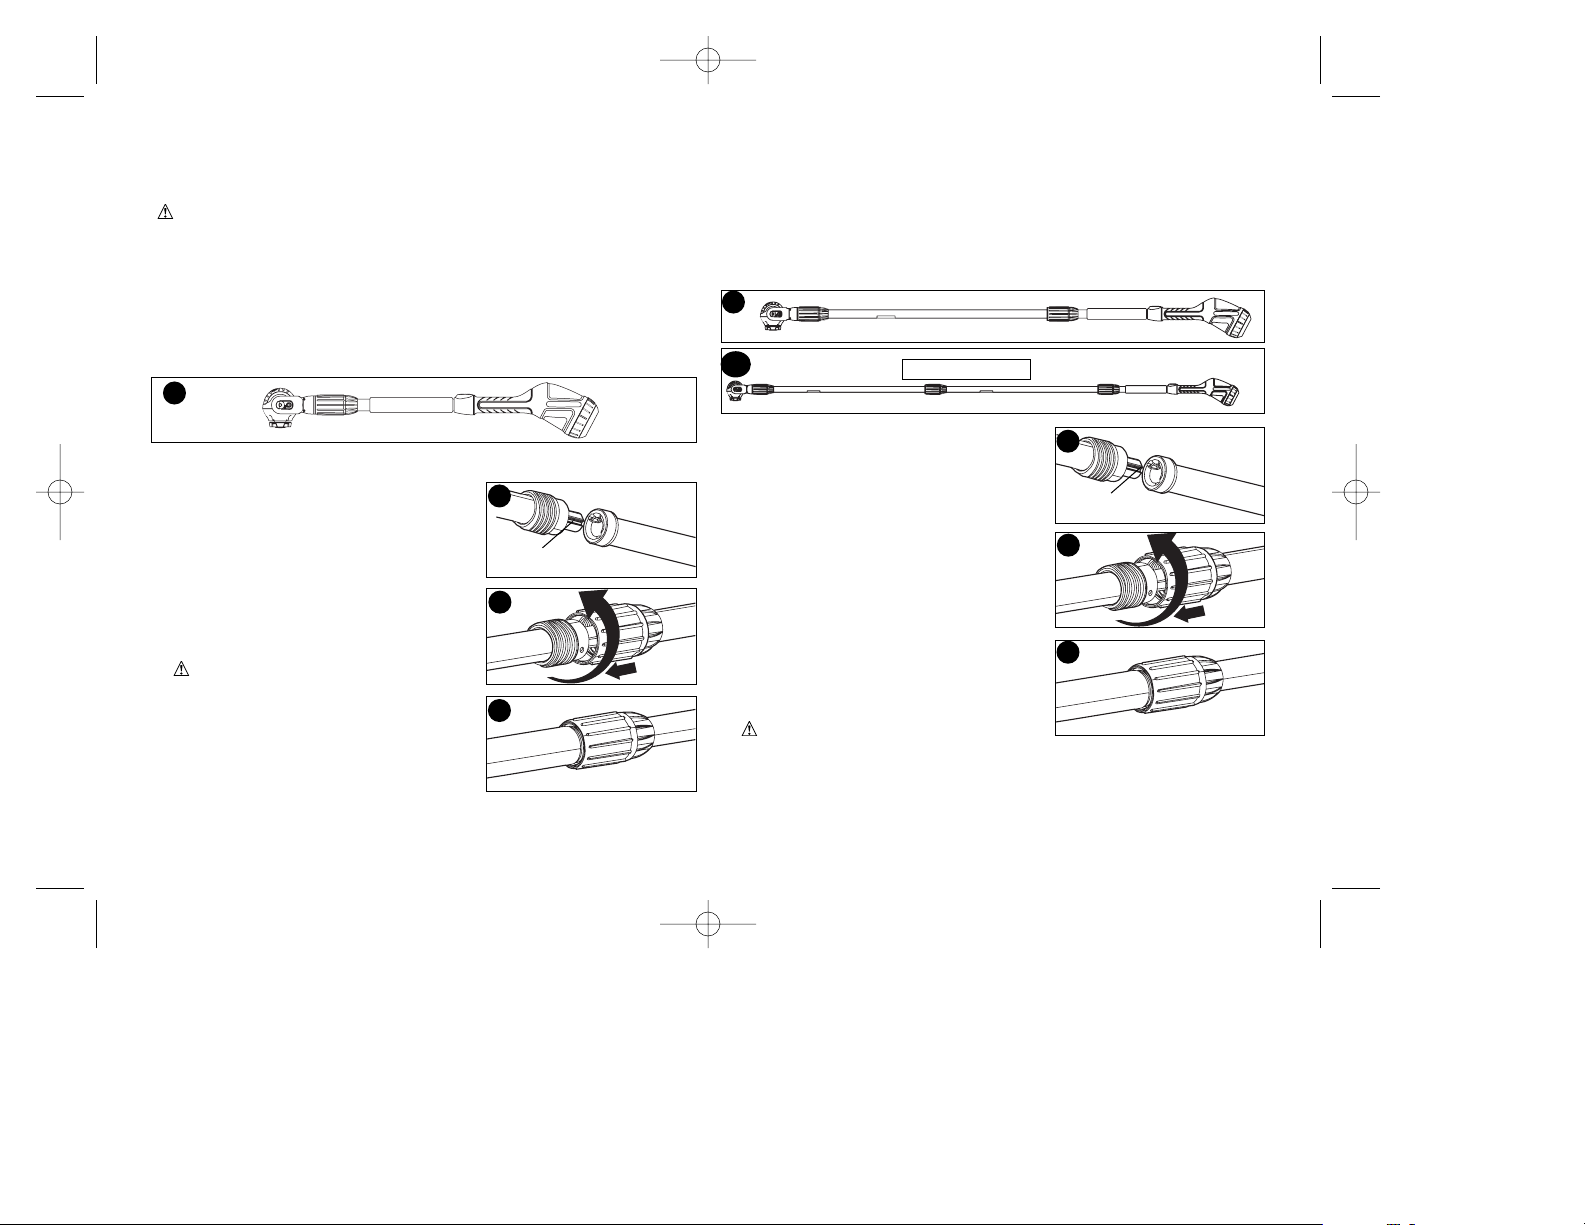
8
Joining the Center Extensions to Power Head
Module and Handle Module
Adding the extension (B) (orange connectors) to the handle module
(A) and power head module (D) creates a Power Scrubber that is
approximately 6 foot (182.9cm) in length as shown in figure 13, or
scrubber extension (B) (orange) and (C) (green) to make a 9ft.
(274.3cm) length as shown in figure 13B. (NPS1018 only)
To attach the middle module(s) to the
handle module and power head module:
1. Align the groove on the outside of the
coupling end of the power head module
(C) with the tongue on the inside of the
coupling end of the center extension (B).
See figure 14. Push the two sections
completely together.
2. Slide the threaded sleeve (6)
(figure 15) on the center extension
down as far as possible and rotate the
sleeve clockwise until it stops as shown
in figure 16.
3. Repeat steps 1 and 2 above to attach
the handle module to the center
extension.
WARNING: Always check to make
sure that the sleeve is completely threaded on.
Not threading the sleeve completely on could result in the modules
becoming disconnected creating a hazardous condition, and a
possible leakage point. Periodically check the connections to insure
that the connections are tight.
Groove
14
15
16
13
13B
Assembly
Joining Power Head Module to Handle Module
WARNING: To prevent accidental operation, insure that battery is
disconnected from the handle before performing the following
operations. Failure to do this could result in serious personal injury.
The four modules which make up the 18V Power Scrubber are keyed
to insure correct assembly. If a module does not smoothly attach to
another do not force fit.
Combining the handle module (A) to the power head module (D)
creates a pole scrubber that is approximately 3 foot (91.4 cm) in
length as shown in figure 9.
To attach the handle module to the power head module:
1. Align the groove on the outside of the
coupling end of the power head module
(D) with the tongue on the inside of the
coupling end of the handle module (A).
See figure 10. Push the two sections
completely together.
2. Slide the threaded sleeve (6) figure 11
on the handle head module down as far
as possible and rotate the sleeve
clockwise until it stops.
WARNING: Always check to make
sure that the sleeve is completely
threaded on. Not threading the sleeve
completely on could result in the
modules becoming disconnected
creating a hazardous condition and a
possible water leakage point.
Periodically check the connections for
tightness.
Groove
10
11
12
9
(NPS1018 only)
90513658 NPS1018 1/15/07 2:02 PM Page 8
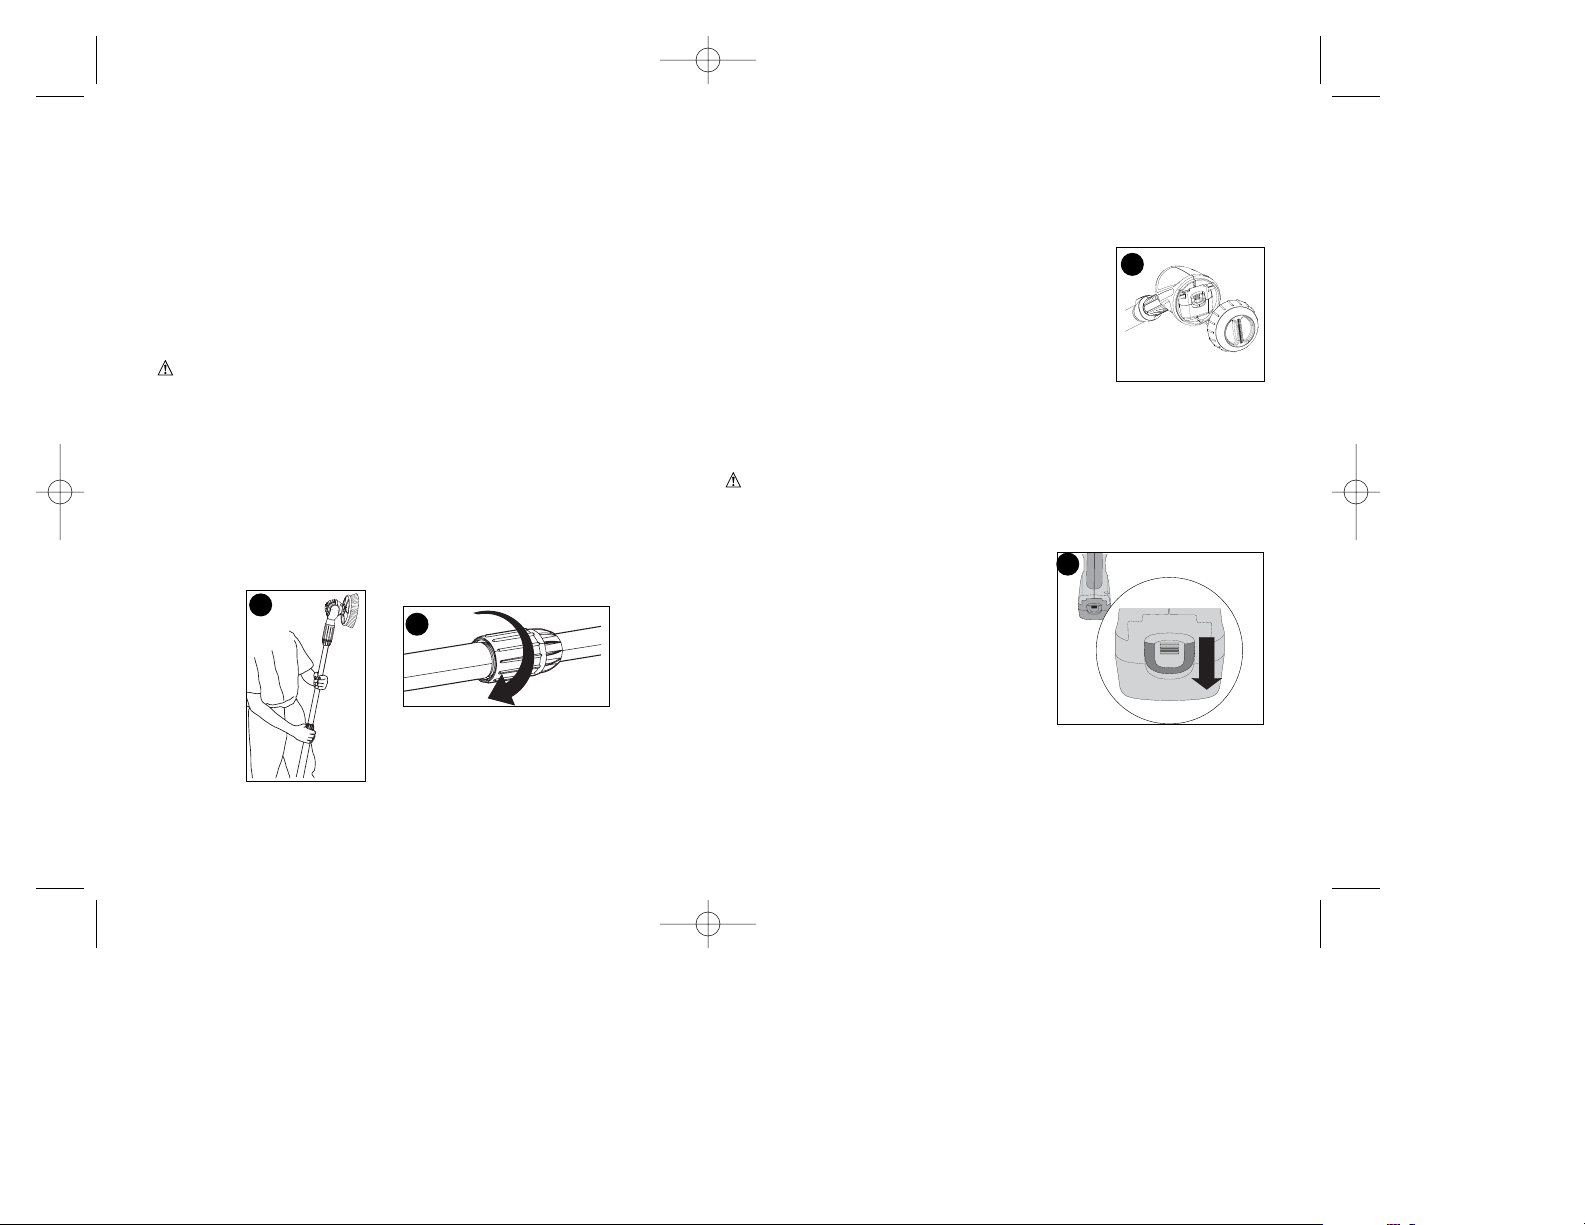
9
Operating the Power Scrubber
Connecting the Battery
• Unscrew the battery cover (2) counter-clockwise
from the Handle Module, 1/4 of a full revolution and then pull away
from handle.
• Insert the battery in the Handle, figure 19 and
be certain that it is fully into the handle cavity
until it “clicks” into place. Re-install the cover by
aligning the threads and screwing on in a
clockwise direction until firmly attached.
Transporting Power Scrubber
• Always remove the battery pack from the handle (figure 19) and
remove the brush (figure 8) when transporting the Power
Scrubber.
WARNING: Ensure that the Battery Cover is installed and fully
tightened. Failure to do so could allow water intrusion.
• To remove the battery, remove the cover as above, then press
down on the release button on the back of the battery (figure 20)
and slide out. Re-install the battery
cover.
The additional second center extension (C) (green connectors)
may not be included in all kits and is available as an accessory and
may be connected to the provided center extension (B) (orange).
The provided center extension has orange connectors. The
accessory center extension had green extensions. The orange
center extension may be connected to the handle, and the green
extension may be connected to the orange center extension The
green center extension WILL NOT fit into the Handle Module (A).
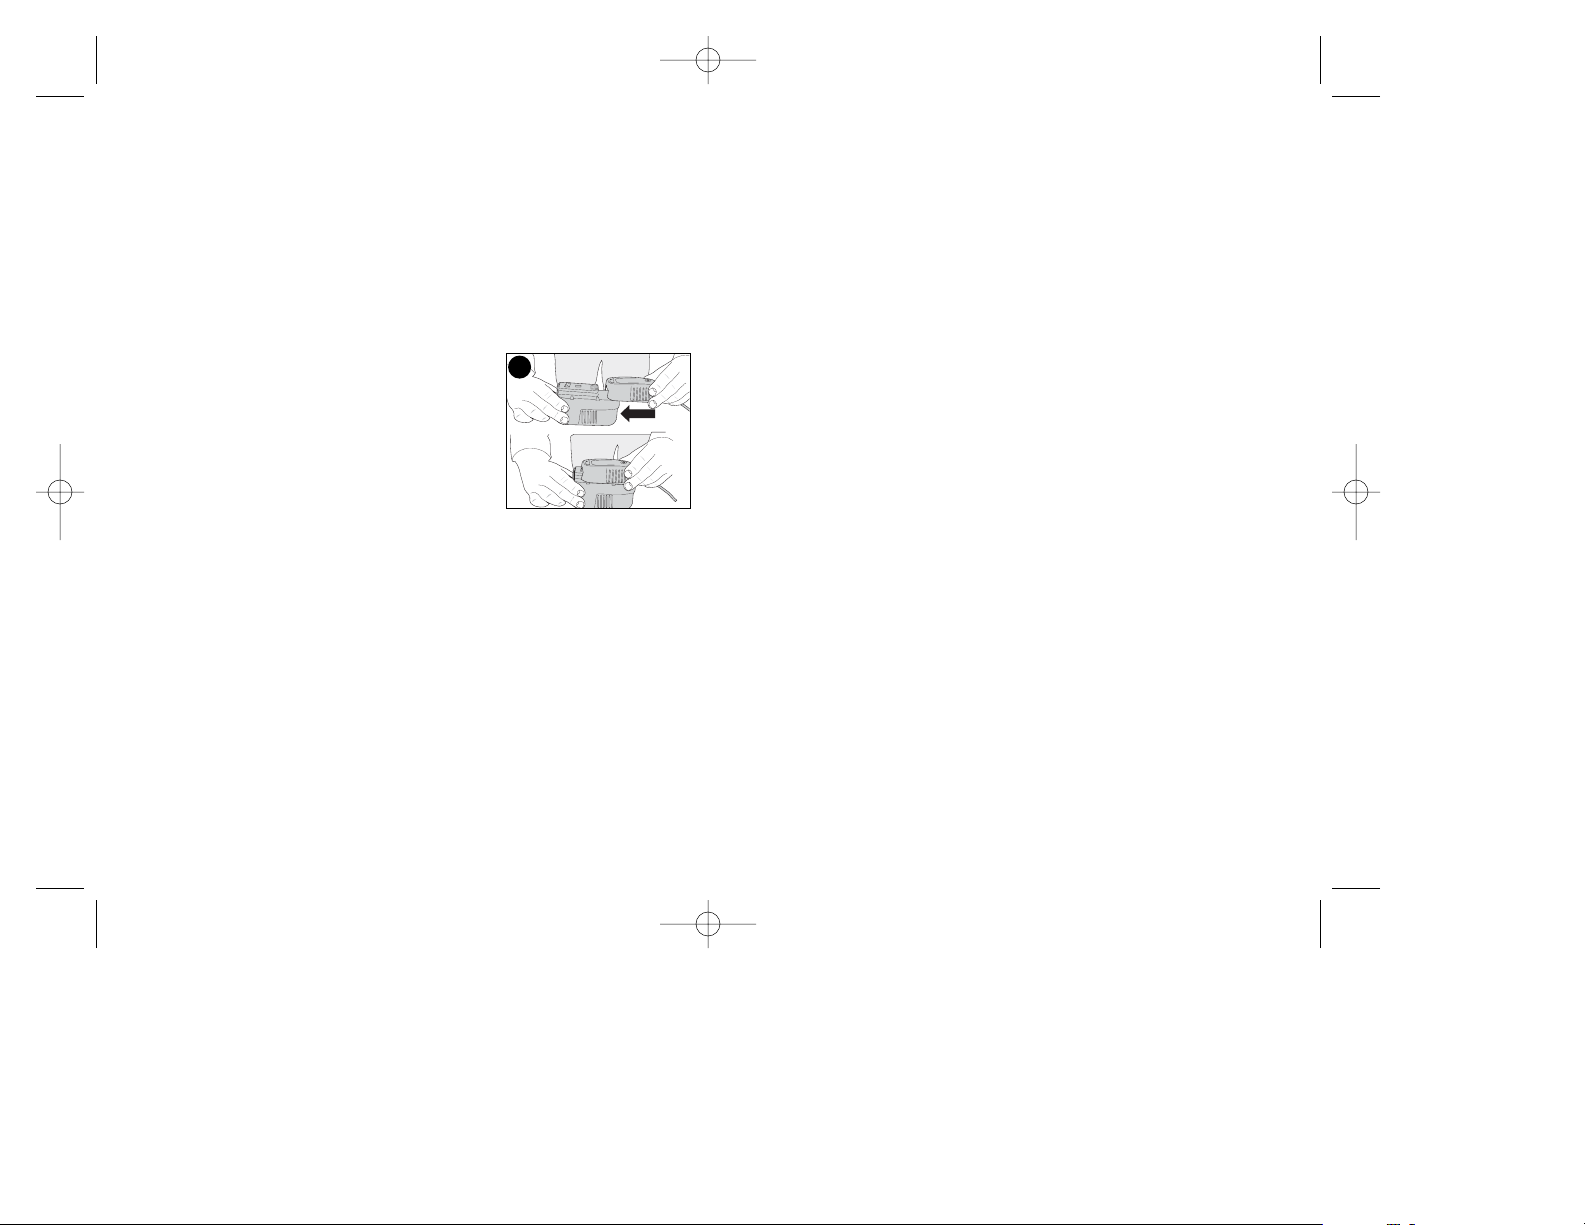
Disassembly
Detaching Modules
WARNING: To prevent accidental operation, insure that
battery is removed from the tool before performing the following
operations. Failure to do this could result in serious personal injury.
When detaching the modules, whether it is in the two, three or four
module mode, always detach the power head module first. To do this,
rest the handle module on the ground and grasp the center of the
power head module with one hand as show in figure 17. Use your
other hand to loosen the threaded sleeve as shown in figure 18 and
then pull the two halves apart. Repeat this process if the center
extensions were attached.
17
18
19
20
90513658 NPS1018 1/15/07 2:02 PM Page 9
Switch
Always be sure of your footing and grip the Power Scrubber firmly
with both hands with the thumb and fingers encircling the grip. To turn
the tool ON press the on button (I). To turn the Power Scrubber off
press the off button (0).
To avoid splatter from a Brush turn the scrubber off while the
attachment is still in contact with the surface.
Because this scrubber is powerful, you don’t have to apply excessive
pressure while operating.
Operating Position
The Power Scrubber works best with a wet and soapy surface. The
surface may be first sprayed or soaked with water, and/or detergent,
or the Power Scrubber may be dunked into a bucket of detergent
that is diluted to the recommended amount on it’s product label.
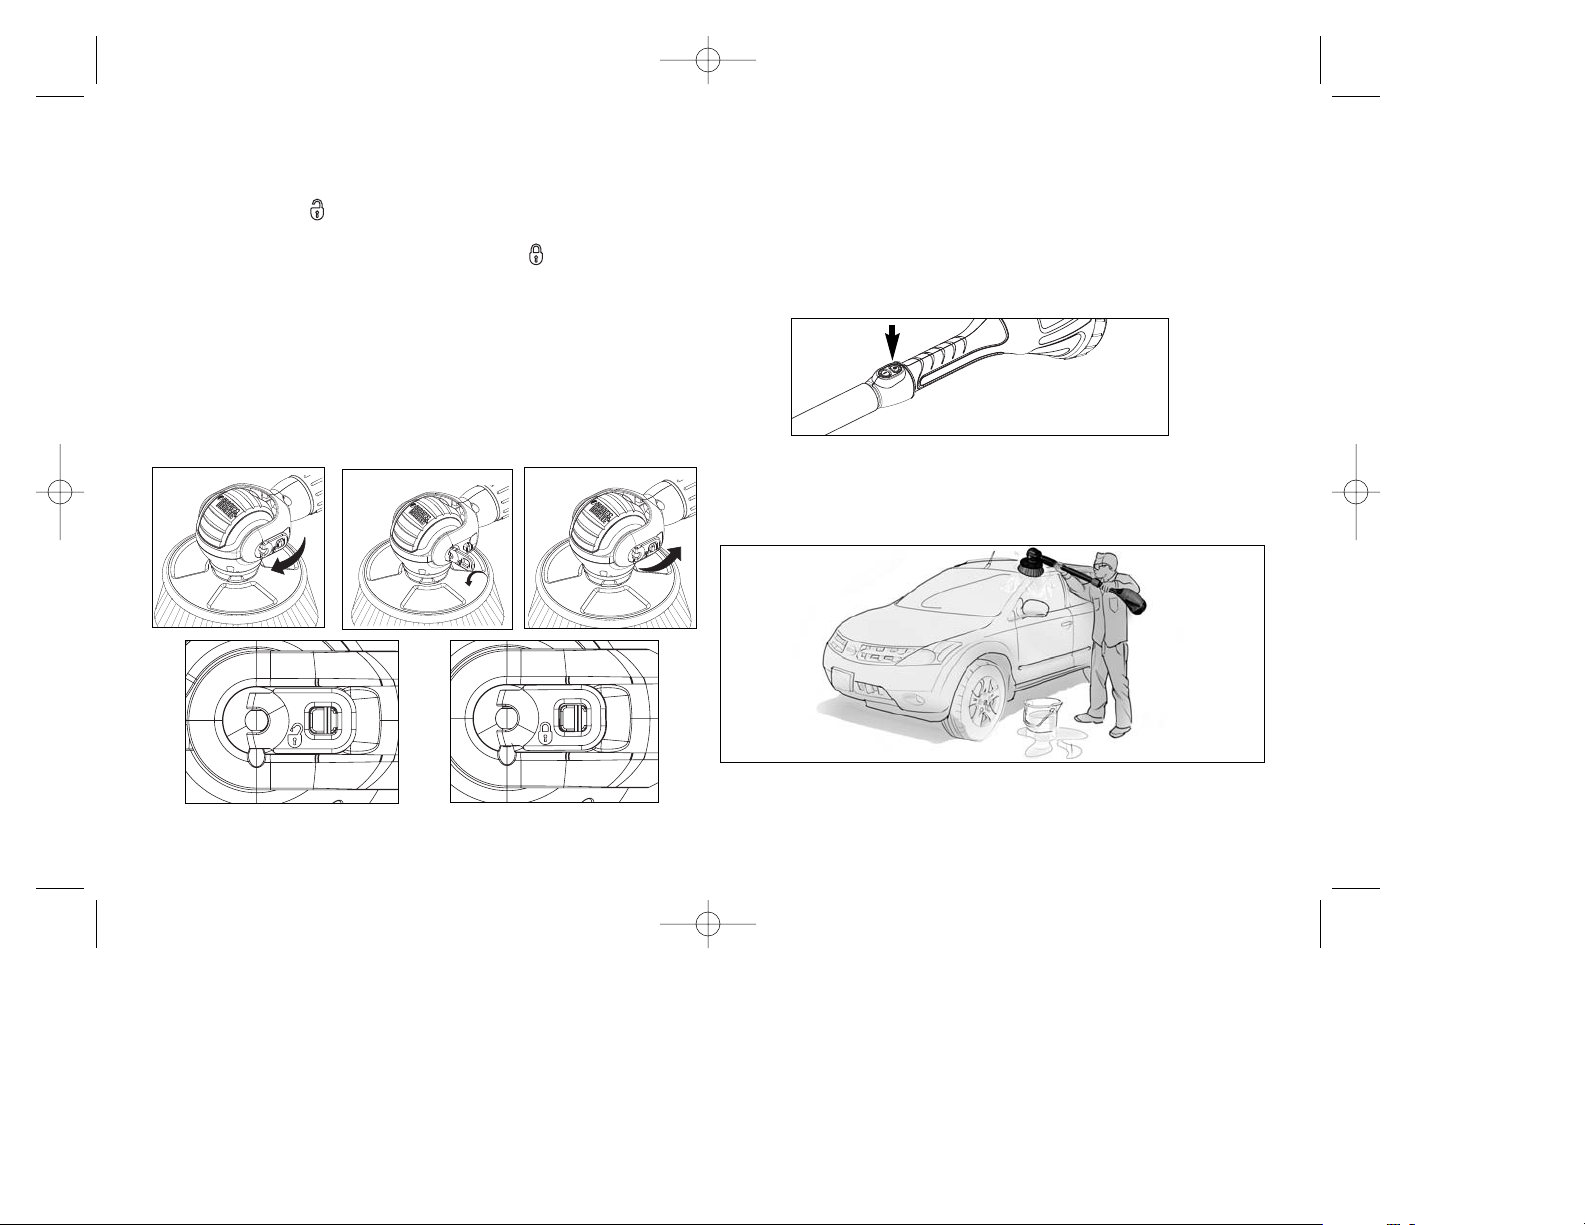
Use the Power Scrubber with no extensions for lower and very
contoured surfaces like cars, SUV’s, etc. With no extensions most
people can achieve an 8 foot reach.
10
Rotating or Locking the Power Head
The Power Head can be used in either a pivoting or fixed position.
The unlock symbol denotes that Power Head is in Pivot Mode.
This is useful for contoured surface and when cleaning large areas
with a back and forth motion. The Lock Symbol denotes that the
Power Head is in fixed position. This is useful for aggressive
scrubbing or when cleaning a large surface area with a side to side
motion. The user has a choice to use the power head in either pivot
mode or fixed mode. The power head may be fixed at any angle
within the 80º of rotation. To change the operating mode, flip lock
wing out from it’s storage position, twist to rotate the wing 180º, then
fold back to the storage position ensuring that it securely snaps back
into place.
Rotating Position Fixed Position
90513658 NPS1018 1/15/07 2:02 PM Page 10
11
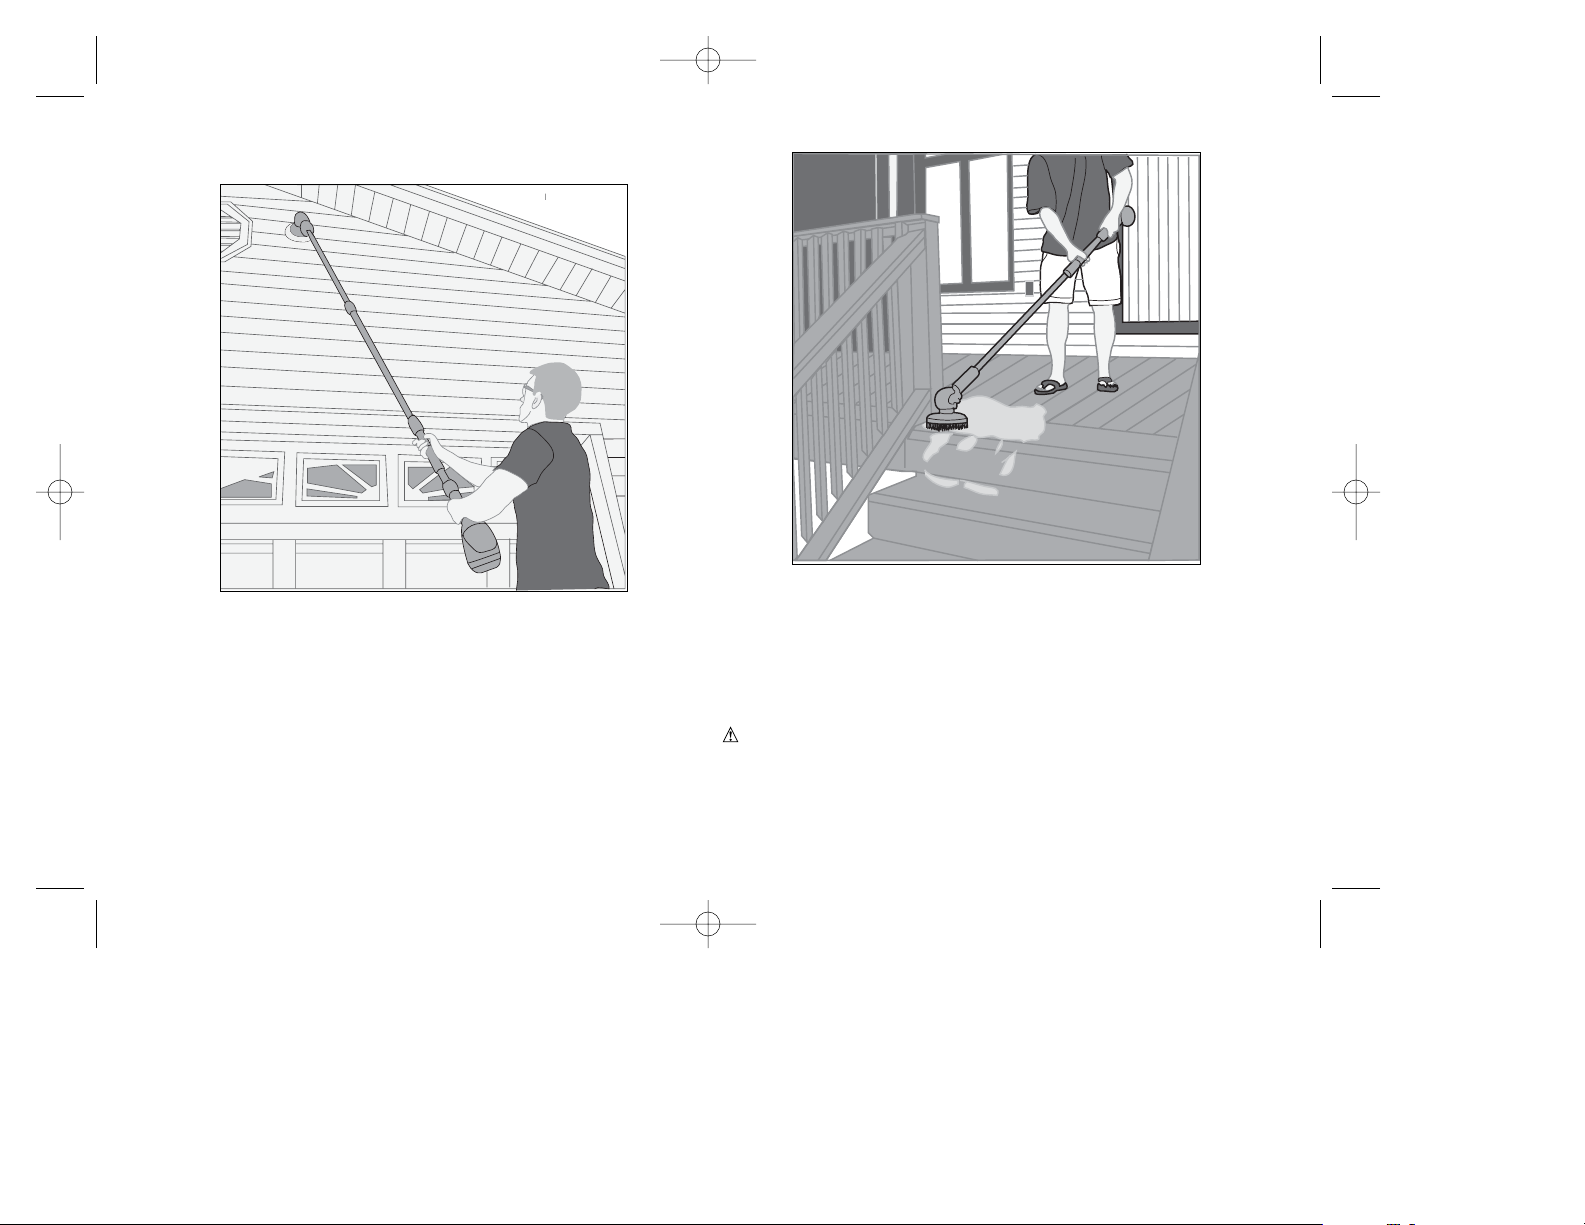
Use the Power Scrubber with 2 extensions (NPS1018 only) for extra
long reach applications like siding, windows, etc. With 2 extensions
most people can achieve a 14 foot reach.
Use the Power Scrubber with 1 extension for short reach applications
like 1st floor windows, RVs, boats, etc. With 1 extension the Power
Scrubber is also suited for horizontal applications like decks, patios,
driveways, etc. With 1 extension most people can achieve an 11 foot
reach.
Power Scrubber
Warnings:
• Never stand directly under the area you are cleaning. Always
position yourself out of the path of falling debris.
• Always wear eye and body protection. Wearing body protection
helps reduce the risk of injury when operating this unit.
90513658 NPS1018 1/15/07 2:02 PM Page 11
12
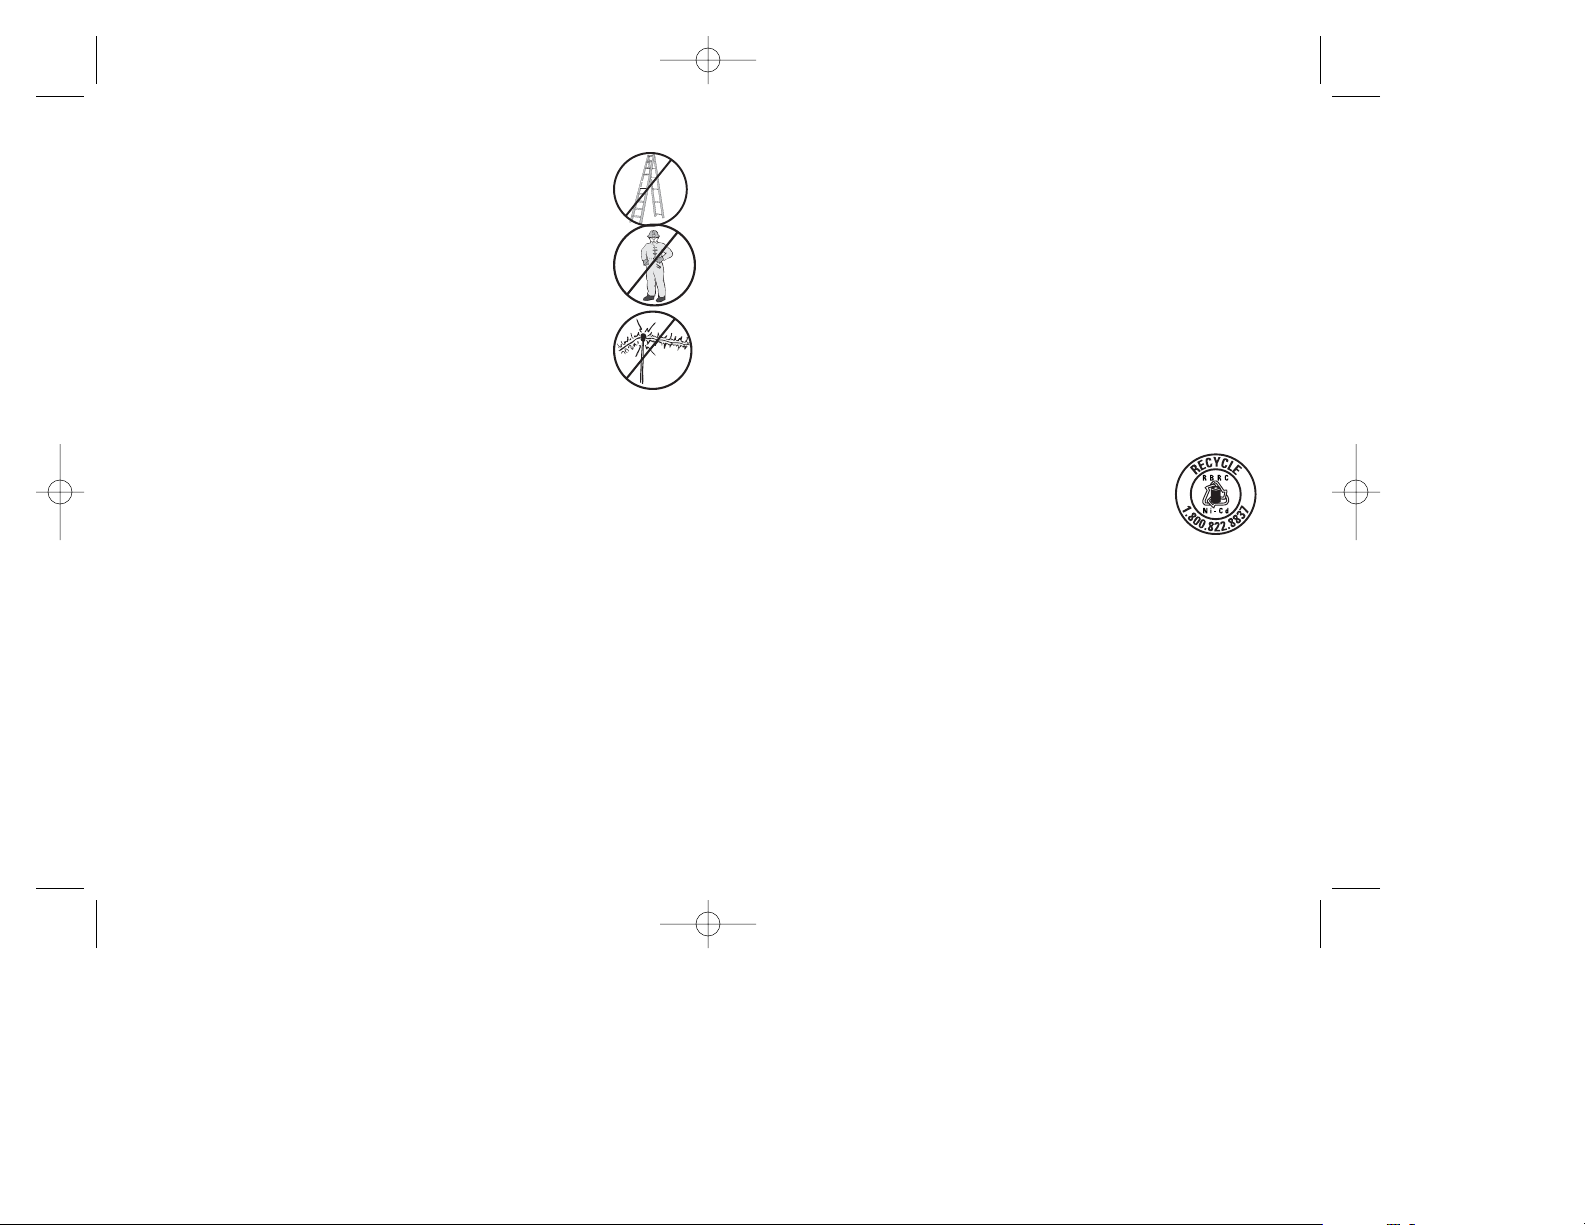
• Never stand on a ladder or other unstable support
while using the Power Scrubber. Always avoid any
position which can cause you to loose your balance and
cause severe injury.
• Keep other persons at least 50 feet (15m) from the
work area. Distractions can cause you to lose control.
• Electrocution Hazard. To prevent shock, do not
operate within 50 feet (15m) of overhead electrical
lines. Always check surrounding area for hidden
electrical lines.
• Do not extend Power Scrubber switch handle above
shoulder height.
Power Scrubber Cleaning and Storage
Note: Thoroughly clean the brushes before and after each use, and
inspect for trapped debris and wear. Replace brush if the bristles are
beginning to show signs of wear.
1. Clean the brushes in a mild detergent, rinse with water and air dry.
2. To clean the Scrubber unit, wipe with a damp sponge or cloth and
a mild soap.
3. Store the Scrubber and attachments/accessories indoors out of
reach of children.
Important: If some water leaks into the unit, it will not affect
performance. However, should the unit accidentally fall into water
without the connections or battery cover tightly in place, shake out
loose liquid and allow to air dry overnight while disassembled.
4. Do not store the tool on or adjacent to fertilizers or chemicals.
Accessories
NOTE: Some accessories may not be included in your model. Refer
to product packaging for contents. Additional accessories are
available at local retailers or by calling, toll-free 1-800-544-6986.
• Soap Dispensing Spray/Rinse Gun (connects to garden hose).
PSA-100
• 8” Auto Brush (grey outer bristles, orange center bristles) for cars,
boats, RV’s and other painted surfaces. PSA-110
• 4” Wheel Brush (grey outer bristles, orange cone shaped center
bristles) for tires and rims and other curved surfaces. PSA-130
• 8” General Purpose Scrub Brush (black bristles) for decks, patios,
siding, etc. PSA-120
• 4” General Purpose Scrub Brush (black bristles) for decks, patios,
siding, etc. PSA-140
The use of accessories not recommended in this manual may be
hazardous.
THE RBRC™ SEAL
The RBRC™ (Rechargeable Battery Recycling
Corporation) Seal on the nickel-cadmium battery
(or battery pack) indicates that the costs to recycle the battery (or
battery pack) at the end of its useful life have already been paid by
Black & Decker. In some areas, it is illegal to place spent nickelcadmium batteries in the trash or municipal solid waste stream and
the RBRC program provides an environmentally conscious
alternative.
RBRC in cooperation with Black & Decker and other battery users,
has established programs in the United States and Canada to
facilitate the collection of spent nickel-cadmium batteries. Help
protect our environment and conserve natural resources by
returning the spent nickel-cadmium battery to an authorized
Black & Decker service center or to your local retailer for recycling.
You may also contact your local recycling center for information on
where to drop off the spent battery, or call 1-800-8-BATTERY.
90513658 NPS1018 1/15/07 2:02 PM Page 12

13
Troubleshooting Section
If your Power Scrubber does not operate correctly check the
following:
Problem
Possible
Cause Possible Solution
• Tool will not
start.
• Unit will not
charge.
• Pole
extension will
not fit into
handle.
• Battery not
installed properly.
• Battery not
charged.
• Pole connections
not properly
tightened.
• Battery not inserted
into charger.
• Incorrect pole
extension (green
connectors
NPS1018 only)
• Check battery installation.
• Check battery charging
requirements.
• Refer to instruction manual
for pole connections.
• Insert battery into charger
until red LED appears.
Charge up to 9 hours if
battery totally drained.
• Use pole extension 1
(orange connectors) into
handle then pole extension
2 (green connectors
NPS1018 only) into pole 1.
• Brushes
deformed.
• Brush keeps
falling off.
• Brushes stored wet
in deformed shape.
• Release ring not
depressed.
• Brush not fully
seated.
• Rinse brush thoroughly in
hot running water and
allow to hang and air dry.
• Remove and reinsert brush
ensuring the hex is fully
seated and the release ring
returns to it’s original
position.
See ‘Tools-Electric’
– Yellow Pages –
for Service & Sales
Imported by
Black & Decker (U.S.) Inc.,
701 E. Joppa Rd.
Towson, MD 21286 U.S.A.
SERVICE INFORMATION
All Black & Decker Service Centers are staffed with trained
personnel to provide customers with efficient and reliable power tool
service. Whether you need technical advice, repair, or genuine
factory replacement parts, contact the Black & Decker location
nearest you. To find your local service location, refer to the yellow
page directory under "Tools—Electric" or call: 1-800-544-6986 or
visit www.blackanddecker.com
FULL TWO-YEAR HOME USE WARRANTY
Black & Decker (U.S.) Inc. warrants this product for two years
against any defects in material or workmanship. The defective
product will be replaced or repaired at no charge in either of two
ways.
The first, which will result in exchanges only, is to return the product
to the retailer from whom it was purchased (provided that the store
is a participating retailer). Returns should be made within the time
period of the retailer’s policy for exchanges (usually 30 to 90 days
after the sale). Proof of purchase may be required. Please check
with the retailer for their specific return policy regarding returns that
are beyond the time set for exchanges.
The second option is to take or send the product (prepaid) to a
Black & Decker owned or authorized Service Center for repair or
replacement at our option. Proof of purchase may be required.Black
& Decker owned and authorized Service Centers are listed under
"Tools-Electric" in the yellow pages of the phone directory.
This warranty does not apply to accessories. This warranty gives
you specific legal rights and you may have other rights which vary
from state to state or province to province. Should you have any
questions, contact the manager of your nearest Black & Decker
Service Center. This product is not intended for commercial use.
FREE WARNING LABEL REPLACEMENT: If your warning labels
become illegible or are missing, call 1-800-544-6986 for a free
replacement.
90513658 NPS1018 1/15/07 2:02 PM Page 13
14
MODE D’EMPLOI
CONSERVER CE MANUEL POUR UN USAGE ULTÉRIEUR.
AVANT DE RETOURNER CE PRODUIT
POUR QUELQUE RAISON QUE CE SOIT,
COMPOSER LE
1-800-544-6986
AVANT D’APPELER, AYEZ EN MAIN LE N° DE CATALOGUE ET LE CODE DE
DATE. DANS LA PLUPART DES CAS, UN REPRÉSENTANT DE BLACK &
DECKER PEUT RÉSOUDRE LE PROBLEME PAR
TÉLÉPHONE. SI VOUS AVEZ UNE SUGGESTION OU UN COMMENTAIRE,
APPELEZ-NOUS. VOS
IMPRESSIONS SONT CRUCIALES POUR BLACK & DECKER.
M
M
ERCI
ERCIDD
’
’
AAVOIR
VOIR
CHOISI
CHOISI
B
B
LACK
LACK
& D
& D
ECKER
ECKER
!
!
V
V
ISITEZ
ISITEZ
WWW
WWW
.B
.B
LACKAND
LACKAND
D
D
ECKER
ECKER
.
.
COM
COM
/N
/N
EW
EW
O
O
WNER
WNER
POUR
POUR
ENREGISTRER
ENREGISTRER
VOTRE
VOTRE
NOUVEAU
NOUVEAU
PRODUIT
PRODUIT
.
.
NNNNPPPPSSSS000011118888 //// NNNNPPPPSSSS1111000011118888 BBBBRRRROOOOSSSSSSSSEEEEUUUUSSSSEE
EE
ÉÉÉÉLLLLEEEECCCCTTTTRRRRIIIIQQQQUUUUEEEE SSSSAAAANNNNSSSS FFFFIIIILL
LL
VOICI DES RENSEIGNEMENTS IMPORTANTS
QU’IL VOUS FAUT SAVOIR :
• Charger le bloc-piles pendant 9 heures avant la première
utilisation.
• Lors de l’immersion de la brosseuse dans l’eau, NE PAS
couvrir le moteur (extrémité de la brosseuse) avec plus
d’un mètre (3 pi) d’eau. Ne pas laisser la brosseuse
immergée pendant plus de 30 minutes.
90513658 NPS1018 1/15/07 2:02 PM Page 14
 Loading...