

Page 1
GENERAL SAFETY RULES - FOR ALL BATTERY OPERATED
TOOLS
WARNING! READ AND UNDERSTAND ALL INSTRUCTIONS. Failure to follow all
instructions listed below, may result in electric shock, fire and/or serious personal injury.
SAVE THESE INSTRUCTIONS
Work Area
• Keep your work area clean and well lit. Cluttered benches and dark areas invite
accidents.
• Do not operate power tools in explosive atmospheres, such as in the presence of
flammable liquids, gases, or dust. Power tools create sparks which may ignite the dust or
fumes.
• Keep bystanders, children, and visitors away while operating a power tool.
Distractions can cause you to lose control.
Electrical Safety
• A battery operated tool with integral batteries or a separate battery pack must be
recharged only with the specified charger for the battery. Acharger that may be suitable
for one type of battery may create a risk of fire when used with another battery.
• Use battery operated tool only with specifically designated battery pack. Use of any
other batteries may create a risk of fire.
Personal Safety
• Stay alert, watch what you are doing and use common sense when operating a power
tool. Do not use tool while tired or under the influence of drugs, alcohol, or
medication. Amoment of inattention while operating power tools may result in serious
personal injury,
• Dress properly. Do not wear loose clothing or jewelry. Contain long hair. Keep your
hair, clothing, and gloves away from moving parts. Loose clothes, jewelry, or long hair
can be caught in moving parts.
• Avoid accidental starting. Be sure switch is in the locked or off position before
inserting battery pack. Carrying tools with your finger on the switch or inserting the battery
pack into a tool with the switch on invites accidents.
• Remove adjusting keys or wrenches before turning the tool on. A wrench or a key that
is left attached to a rotating part of the tool may result in personal injury.
• Do not overreach. Keep proper footing and balance at all times. Proper footing and
balance enable better control of the tool in unexpected situations.
• Use safety equipment. Always wear eye protection. Dust mask, non-skid safety shoes,
hard hat, or hearing protection must be used for appropriate conditions.
Tool Use and Care
• Use clamps or other practical way to secure and support the workpiece to a stable
platform. Holding the work by hand or against your body is unstable and may lead to loss of
control.
• Do not force tool. Use the correct tool for your application. The correct tool will do the
job better and safer at the rate for which it is designed.
• Do not use tool if switch does not turn it on or off. A tool that cannot be controlled with
the switch is dangerous and must be repaired.
• Disconnect battery pack from tool or place the switch in the locked or off position
before making any adjustments, changing accessories, or storing the tool. Such
preventive safety measures reduce the risk of starting the tool accidentally.
• Store idle tools out of reach of children and other untrained persons. Tools are
dangerous in the hands of untrained users.
• When battery pack is not in use, keep it away from other metal objects like: paper
clips, coins, keys, nails, screws or other small metal objects that can make a
connection from one terminal to another. Shorting the battery terminals together may
cause sparks, burns, or a fire.
• Maintain tools with care. Keep cutting tools sharp and clean. Properly maintained tools,
with sharp cutting edge are less likely to bind and are easier to control.
• Check for misalignment or binding of moving parts, breakage of parts, and any other
condition that may affect the tool’s operation. If damaged, have the tool serviced
before using. Many accidents are caused by poorly maintained tools.
• Use only accessories that are recommended by the manufacturer for your model.
Accessories that may be suitable for one tool may create a risk of injury when used on
another tool.
Service
• Tool service must be performed only by qualified repair personnel. Service or
maintenance performed by unqualified personnel may result in a risk of injury.
• When servicing a tool, use only identical replacement parts. Follow instructions in
the Maintenance section of this manual. Use of unauthorized parts or failure to follow
Maintenance Instructions may create a risk of shock or injury.
Specific Safety Rules
• Hold tool by insulated gripping surfaces when performing an operation where the
cutting tool may contact hidden wiring. Contact with a "live" wire will also make exposed
metal parts of the tool "live" and shock the operator.
The label on your tool may include the following symbols.
V ..........................volts A..........................amperes
Hz ........................hertz W ........................watts
min ........................minutes ......................alternating current
......................direct current
n
o........................no load speed
..........................
Class II Construction
........................earthing terminal
........................safety alert symbol .../min ..................revolutions or
reciprocations
per minute
WARNING: Some dust created by power sanding, sawing, grinding, drilling, and other
construction activities contains chemicals known to cause cancer, birth defects or other
reproductive harm. Some examples of these chemicals are:
• lead from lead-based paints,
• crystalline silica from bricks and cement and other masonry products, and
• arsenic and chromium from chemically-treated lumber (CCA).
Your risk from these exposures varies, depending on how often you do this type of work. To
reduce your exposure to these chemicals: work in a well ventilated area, and work with
approved safety equipment, such as those dust masks that are specially designed to filter out
microscopic particles.
• Avoid prolonged contact with dust from power sanding, sawing, grinding, drilling,
and other construction activities. Wear protective clothing and wash exposed areas
with soap and water. Allowing dust to get into your mouth, eyes, or lay on the skin may
promote absorption of harmful chemicals.
WARNING: Use of this tool can generate and/or disburse dust, which may cause serious
and permanent respiratory or other injury. Always use NIOSH/OSHA approved respiratory
protection appropriate for the dust exposure. Direct particles away from face and body.
Safety Warnings and Instructions: Charging
1. This manual contains important safety and operating instructions.
2. Before using battery charger, read all instructions and cautionary warnings on battery
charger and product using battery. CAUTION: To reduce the risk of injury, use charger
only with this product. Batteries in other products may burst causing personal injury or
damage.
3. Do not expose charger to rain or snow.
4. Use of an attachment not recommended or sold by Black & Decker may result in a risk
of fire, electric shock, or injury to persons.
5. To reduce risk of damage to electric plug and cord, pull by plug rather than cord when
disconnecting charger.
6. Make sure cord is located so that it will not be stepped on, tripped over, or otherwise
subjected to damage or stress.
7. An extension cord should not be used unless absolutely necessary. Use of improper
extension cord could result in a risk of fire, electric shock or electrocution.
a) Two-wire cords can be used with 2-wire or 3-wire extension cords. Only round jacketed
extension cords should be used, and we recommend that they be listed by Underwriters
Laboratories (U.L.). If the extension is to be used outside, the cord must be suitable for
outdoor use. Any cord marked for outdoor use can also be used for indoor work. The
letters "W" or "WA" on the cord jacket indicate that the cord is suitable for outdoor use.
b) An extension cord must have adequate wire size (AWG or American Wire Gauge) for
VEA EL ESPAÑOL EN LA CONTRAPORTADA.
SAVE THIS MANUAL FOR FUTURE REFERENCE.
INSTRUCTIVO DE OPERACIÓN, CENTROS DE SERVICIO Y
PÓLIZA DE GARANTÍA. ADVERTENCIA: LÉASE ESTE
INSTRUCTIVO ANTES DE USAR EL PRODUCTO.
INSTRUCTION MANUAL
NNNNMMMM333366660000 CCCCOOOORRRRDDDDLLLLEEEESSSSSSSS SSSSCCCCRRRREEEEWWWWDDDDRRRRIIIIVVVVEEEERR
RR
Cat No. NM360 Form No. 5119731-00 (SEPT-04) Copyright © 2004 Black & Decker Printed in China
BEFORE RETURNING THIS PRODUCT
FOR ANY REASON PLEASE CALL
1-800-544-6986
IF YOU SHOULD HAVE A QUESTION OR
EXPERIENCE A PROBLEM WITH YOUR
BLACK & DECKER PRODUCT,
CALL 1-800-544-6986
BEFORE YOU CALL, HAVE THE FOLLOWING INFORMATION AVAILABLE, CATALOG No.,
TYPE No., AND DATE CODE (e.g. 0130M). IN MOST CASES, A BLACK & DECKER REPRE-
SENTATIVE CAN RESOLVE YOUR PROBLEM OVER THE PHONE. IF YOU HAVE ASUGGES-
TION OR COMMENT, GIVE US A CALL. YOUR FEEDBACK IS VITAL TO BLACK & DECKER.
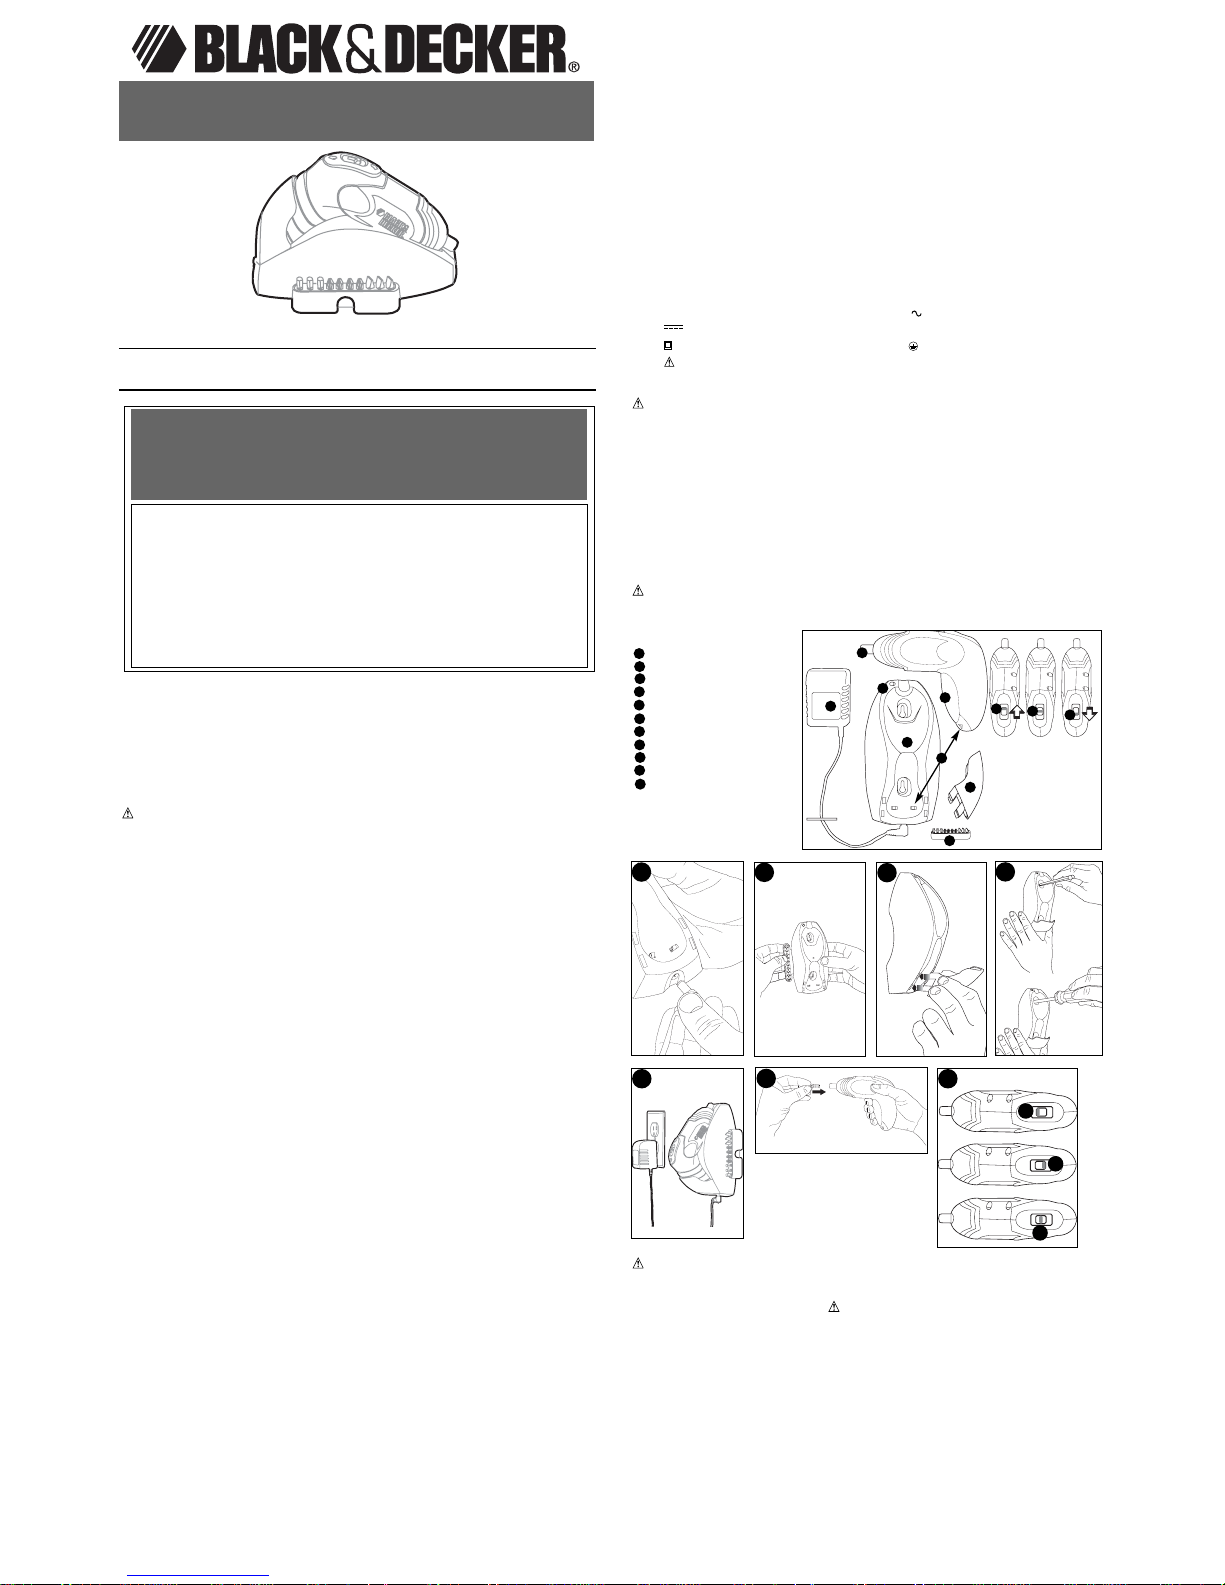
FEATURES
- Hex Spindle
- Trigger Switch
- Forward Position Switch
- Neutral / Spindle Lock
- Reverse Position Switch
- Charging Cradle
- Charger
- Charging Contacts
- Charge Indicator
-- Wall Mount Tool Support
-- Screwdriver Bit Tip Holder
A
B
F
A
B
C
D
E
F
C
D
E
6
7A
7B
7C
3
4
G
H
I
J
G
H
I
J
K
K
2
1
5
7
Page 2
safety, and to prevent loss of power and overheating. The smaller the gauge number of
the wire, the greater the capacity of the cable; that is, 16 gauge has more capacity than
18 gauge. When using more than one extension to make up the total length, be sure
each extension contains at least the minimum wire size.
8. Use only the supplied charger when charging your tool. The use of any other charger
could damage the tool or create a hazardous condition.
9. Use only one charger when charging.
10. Do not attempt to open the charger. There are no customer serviceable parts inside.
Return to any authorized Black & Decker service center.
11. DO NOT incinerate the tool or batteries even if they are severely damaged or completely worn out. The batteries can explode in a fire.
12. A small leakage of liquid from the battery cells may occur under extreme usage, charging or temperature conditions. This does not indicate a failure. However, if the outer
seal is broken and this leakage gets on your skin:
a. Wash quickly with soap and water.
b. Neutralize with a mild acid such as lemon juice or vinegar.
c. If the battery liquid gets in your eyes, flush them with clean water for a minimum of 10
minutes and seek immediate medical attention. MEDICAL NOTE: The liquid is a 25-35%
solution of potassium hydroxide.
Charging Procedure
THE BATTERIES IN YOUR TOOL ARE NOT FULLY CHARGED AT THE FACTORY.
BEFORE ATTEMPTING TO CHARGE THEM, THOROUGHLY READ ALL OF THE SAFETY
INSTRUCTIONS.
To charge your screwdriver, follow the steps below.
1. Plug the output cord of the charger into the socket in the back of the charger cradle as
shown in Figure 1.
2. Plug the charger into any standard 120 Volt 60 Hz electrical outlet.
3. Place the NM360 Screwdriver into the cradle making sure to match the charging
contacts on the handle of the screwdriver with the contacts in the charger. The red
(charging) light will illuminate indicating that the charging process has started.
4. Let the screwdriver charge initially for 9 hours. After the initial charge, under normal
usage, your tool should be fully charged in 3 to 6 hours.
Important Charging Notes
1. After normal usage, your tool should be fully charged in 3 to 6 hours. If the batteries are
run-down completely, it may take up to 6 hours to become fully charged. Your tool was
sent from the factory in an uncharged condition. Before attempting to use it, it must be
charged for at least 9 hours.
2. DO NOT charge the batteries in an air temperature below 40°F (4,5 °C) or above 105°F
(+40,5 °C). This is important and will prevent serious damage to the batteries. Longest
life and best performance can be obtained if batteries are charged when air
temperature is about 75°F.
3. While charging, the charger may hum and become warm to touch. This is a normal
condition and does not indicate a problem.
4. If the batteries do not charge properly—(1) Check current at receptacle by plugging in a
lamp or other appliance. (2) Check to see if receptacle is connected to a light switch
which turns power off when you turn out the lights. (3) Move charger and tool to a
surrounding air temperature of 40°F (4,5 °C) to 105°F (+40,5 °C). (4) If the charger is
mounted on a wall make sure the charge indicator light is on. If the indicator light
is not on, push unit down to make sure charging contacts are touching. (5) If the
receptacle and temperature are OK, and you do not get proper charging, take or send
the tool and charger to your local Black & Decker service center. See Tools Electric in
yellow pages.
5. The tool should be recharged when it fails to produce sufficient power on jobs which
were easily done previously. DO NOT CONTINUE using product with its batteries in a
depleted condition.
6. To prolong battery life, avoid leaving on charge for extended periods of time (over 30
days without use). Although overcharging is not a safety concern, it can significantly
reduce overall battery life.
7. The batteries will reach optimum performance after being cycled 5 times during normal
usage. There is no need to run the batteries down completely before recharging.
Normal usage is the best method of discharging and recharging the batteries.
Attaching Screwdriver Bit Tips Holder (Figure 2)
Attach the holder (K) to either side of the charging cradle (F) ( using the screw provided) as
shown in figure 2.
Wall Mounting (Figures 3, 4 & 5)
Use the hardware provided only if hanging on conventional sheet rock or plaster walls. If not
hanging on conventional sheet rock or plaster walls, please use the appropriate
fasteners for that material.
1. Attach the wall mount tool support (J) as shown in figure 3. CAUTION: The tool
support must be securely attached to the charging cradle when it is mounted on a
vertical surface.
2. Choose a location that is within reach of an electrical outlet. Fix the charging cradle (F)
as shown in figure 4 and 5.
NOTE: Avoid damaging the cord while fixing the charging cradle to the wall.
3. Plug in and place the product in position. Make sure the charge indicator light is on.
If the indicator light is not on, push unit down to make sure charging contacts are
touching.
Operating Instructions
Inserting an Accessory (Figure 6)
The NM360 compact screwdriver is designed for use with screwdriver bits. Do not use
double ended screwdriver bits.
To install a bit simply insert it into the cavity in the hex spindle as shown in figure 6. To
remove the bit pull it straight out.
Switch (Figure 7)
To turn the tool ON in a forward direction, push the switch to the forward position(7A),
squeeze the trigger and the tool will run. Release pressure from the trigger and the tool will
stop.
To turn the tool ON in a reverse direction, push the switch to the rearward position(7B),
squeeze the trigger and the tool will run. Release pressure from the trigger and the tool will
stop.
With the switch in the middle position, the trigger will not be active and the spindle will be
locked (7C). Use the tool in this mode as any conventional non-powered screwdriver.
Maintenance
Use only mild soap and damp cloth to clean the tool. Never let any liquid get inside the tool;
never immerse any part of the tool into a liquid.
IMPORTANT: To assure product SAFETY and RELIABILITY, repairs, maintenance and
adjustment (other than those listed in this manual) should be performed by authorized
service centers or other qualified service organizations, always using identical replacement
parts.
Lubrication
Black & Decker tools are properly lubricated at the factory and are ready for use.
Accessories
Recommended accessories for use with your tool are available from your local dealer or
authorized service center. If you need assistance regarding accessories, please call:
1-800-54-HOW-TO. (800-544-6986) CAUTION: The use of any accessory or attachment
not recommended may be hazardous.
Battery Removal
Before attempting to disassemble this tool, turn it on and run it in either direction until it stops
to ensure a complete discharge of the batteries. Using a phillips screwdriver, remove the
screws in the product housing and lift the housing half from the tool. Disconnect the terminal
clips from the batteries and lift the batteries out. See “Service Information” for battery
replacement.
The RBRC™ Seal
The RBRC™ (Rechargeable Battery Recycling Corporation) Seal on the nickelmetal hydride battery (or battery pack) indicates that the costs to recycle the
battery (or battery pack) at the end of its useful life have already been paid by
Black & Decker. In some areas, it is illegal to place spent nickel-metal hydride batteries in
the trash or municipal solid waste stream and the RBRC program provides an
environmentally conscious alternative.
RBRC in cooperation with Black & Decker and other battery users, has established
programs in the United States and Canada to facilitate the collection of spent nickel-metal
hydride batteries. Help protect our environment and conserve natural resources by returning
the spent nickel-metal hydride battery to an authorized Black & Decker service center or to
your local retailer for recycling. You may also contact your local recycling center for
information on where to drop off the spent battery, or call 1-800-8-BATTERY.
Service Information
All Black & Decker Service Centers are staffed with trained personnel to provide customers
with efficient and reliable power tool service. Whether you need technical advice, repair, or
genuine factory replacement parts, contact the Black & Decker location nearest you. To find
your local service location, refer to the yellow page directory under "Tools—Electric" or call:
1-800-544-6986 or visit www.blackanddecker.com
Full Two-Year Home Use Warranty
Black & Decker (U.S.) Inc. warrants this product for two years against any defects in material
or workmanship. The defective product will be replaced or repaired at no charge in either of
two ways.
The first, which will result in exchanges only, is to return the product to the retailer from
whom it was purchased (provided that the store is a participating retailer). Returns should be
made within the time period of the retailer’s policy for exchanges (usually 30 to 90 days after
the sale). Proof of purchase may be required. Please check with the retailer for their specific
return policy regarding returns that are beyond the time set for exchanges.
The second option is to take or send the product (prepaid) to a Black & Decker owned or
authorized Service Center for repair or replacement at our option. Proof of purchase may be
required. Black & Decker owned and authorized Service Centers are listed under
"Tools-Electric" in the yellow pages of the phone directory and available on our website
www.blackanddecker.com.
This warranty does not apply to accessories. This warranty gives you specific legal rights
and you may have other rights which vary from state to state. Should you have any
questions, contact the manager of your nearest Black & Decker Service Center. This
product is not intended for commercial use.
FREE WARNING LABEL REPLACEMENT: If your warning labels become illegible or are
missing, call 1-800-544-6986 for a free replacement.
See ‘Tools-Electric’
– Yellow Pages –
for Service & Sales
Imported by
Black & Decker (U.S.) Inc.,
701 E. Joppa Rd.
Towson, MD 21286 U.S.A.
Minimum Gage for Cord Sets
Volts Total Length of Cord in Feet
120V 0-25 26-50 51-100 101-150
240V 0-50 51-100 101-200 201-300
Ampere Rating
More Not more American Wire Gage
Than Than
0-6 18 16 16 14
6 - 10 18 16 14 12
10 - 12 16 16 14 12
12 - 16 14 12 Not Recommended
Page 3

RÈGLES DE SÉCURITÉ CONCERNANT LES OUTILS À PILES
- GÉNÉRALITÉS
AVERTISSEMENT : LIRE, COMPRENDRE ET SUIVRE TOUTES LES DIRECTIVES
précisées ci-dessous afin d’éviter les risques de choc électrique, d’incendie ou de blessure
grave.
CONSERVER CES DIRECTIVES
Aire de travail
• Garder l’aire de travail propre et bien éclairée; les établis encombrés et les endroits
sombres sont propices aux accidents.
• Ne pas faire fonctionner un outil électrique dans une atmosphère explosive, en
présence par exemple de poussières, gaz ou liquides inflammables. Les outils
électriques peuvent engendrer des étincelles qui pourraient enflammer toute émanation
ou poussière ambiante.
• Tenir les enfants, les visiteurs ou toute autre personne à l’écart lorsqu’on utilise un
outil électrique; les distractions peuvent faire perdre la maîtrise de ce dernier.
Sécurité – Électricité
• Un outil à piles intégrées ou à bloc-pile externe doit être rechargé seulement au
moyen du chargeur approprié, car un chargeur destiné à une pile particulière peut
entraîner un risque d’incendie lorsqu’il est utilisé avec une autre.
• N’utiliser l’outil à piles qu’avec le bloc-pile indiqué, car l’utilisation d’un autre type de
piles peut entraîner un risque d’incendie.
Sécurité personnelle
• Rester vigilant en tout temps et faire preuve de jugement lorsqu’on utilise un outil
électrique. Ne pas utiliser l’outil lorsqu’on est fatigué ou sous l’influence de
drogues, d’alcool ou de médicaments, car un moment d’inattention pourrait entraîner
des blessures graves.
• Porter des vêtements appropriés. Ne pas porter des vêtements amples ou des
bijoux. Couvrir ou attacher les cheveux longs. Garder les cheveux, les vêtements,
les bijoux et les gants éloignés des pièces mobiles, car ceux-ci peuvent s’y coincer.
• Éviter tout démarrage accidentel. S’assurer que l’interrupteur est verrouillé ou
placé en position d’arrêt avant d’insérer un bloc-piles. Le fait de transporter les outils
en appuyant sur la gâchette ou d’insérer le bloc-piles alors que l’interrupteur est en position de marche peut causer des accidents.
• Retirer les clés de réglage avant de démarrer l’outil. Toute clé laissée sur une pièce
rotative pourrait entraîner des blessures.
• Ne pas effectuer de travaux hors de portée. Les pieds doivent rester bien ancrés au
sol afin de maintenir son équilibre en tout temps. Le fait de maintenir stabilité et
équilibre permet de mieux maîtriser l’outil dans les situations imprévues.
• Utiliser le matériel de sécurité approprié; toujours porter des lunettes de
protection. Porter un masque anti-poussières, des chaussures antidérapantes, un
casque de sécurité ou des protecteurs auditifs lorsque la situation le requiert.
Utilisation et entretien de l’outil
• Fixer et soutenir la pièce sur une plate-forme stable au moyen d’une bride de
serrage ou de tout autre dispositif semblable. La pièce est instable lorsqu’on la retient
manuellement ou qu’on l’appuie contre le corps, ce qui pourrait faire perdre la maîtrise de
l’outil.
• Ne pas forcer l’outil ni l’utiliser pour des travaux autres que ceux pour lesquels il a
été conçu. L'outil approprié effectuera un meilleur travail, de façon plus sûre et à la
vitesse pour laquelle il a été conçu.
• Ne pas utiliser l’outil lorsque son interrupteur est défectueux. Un outil dont
l’interrupteur est défectueux est dangereux et doit être réparé.
• Déconnecter le bloc-piles de l'outil ou placer l'interrupteur en position d'arrêt ou de
verrouillage avant d'effectuer tout réglage, changement d'accessoires, ou de ranger
l'outil. Ces mesures de sécurité préventives réduisent les risques de démarrage
accidentel.
• Lorsqu’on n’utilise pas l’outil, le ranger hors de la portée des enfants ou des
personnes non qualifiées. Les outils sont dangereux entre les mains de personnes
inexpérimentées.
• Lorsqu’on n’utilise pas le bloc-pile, le ranger à l’écart des objets métalliques tels
que les trombones, les pièces de monnaie, les clés, les clous, les vis ou autres
petits objets susceptibles de conduire l’électricité entre les bornes et d’occasionner
ainsi un court-circuit pouvant provoquer des étincelles, des brûlures ou un incendie.
• Bien entretenir l’outil; s’assurer qu’il est toujours bien propre et aiguisé. Les outils
bien entretenus et affûtés sont moins susceptibles de se coincer et sont plus faciles à
contrôler.
• Vérifier les pièces mobiles afin de s’assurer qu’elles sont bien alignées et qu’elles
ne restent pas coincées. Vérifier également les pièces afin de s’assurer qu’il n’y a
aucun bris ni aucune autre condition susceptible de nuire au bon fonctionnement
de l’outil. Faire réparer l’outil si ce dernier est endommagé avant de s’en servir à
nouveau, car les accidents sont souvent causés par des outils mal entretenus.
• N’utiliser que les accessoires recommandés par le fabricant pour le modèle
concerné. Un accessoire destiné à un outil particulier peut être dangereux lorsqu’il est
utilisé avec un autre.
Entretien
• L’outil doit être entretenu par du personnel qualifié seulement; tout entretien effectué
par une personne non qualifiée pourrait entraîner des risques de blessure.
• Lors de l’entretien, n’utiliser que des pièces de rechange identiques et suivre les
directives précisées à la section « Entretien » du présent manuel afin de prévenir les
risques de choc électrique ou de blessure.
Consignes de sécurité particulières
• Tenir l’outil par les surfaces isolées prévues à cette fin lorsqu’il risque d’entrer en
contact avec des fils cachés, car de tels contacts peuvent mettre les pièces métalliques
de l’outil sous tension, engendrant des risques de choc électrique.
L’étiquette de l’outil peut comporter les symboles suivants.
V ................volts A ..............ampères
Hz ..............hertz W ..............watts
min..............minutes ............courant alternatif
............courant continu
n
o..............sous vide
..............
Construction de classe II
..............borne de mise à la minute
..............symbole d´avertissement .../min........tours à la minute
AVERTISSEMENT : Certains outils électriques, tels que les sableuses, les scies, les
meules, les perceuses ou certains autres outils de construction, peuvent produire de la
poussière contenant des produits chimiques susceptibles d’entraîner le cancer, des
malformations congénitales ou pouvant être nocifs pour le système reproductif. Parmi
ces produits chimiques, on retrouve :
• le plomb dans les peintures à base de plomb,
• la silice cristalline dans les briques et le ciment et autres produits de maçonnerie,
• l’arsenic et le chrome dans le bois de sciage ayant subi un traitement chimique (comme
l’arséniate de cuivre et de chrome).
Le risque associé à de telles expositions varie selon la fréquence avec laquelle on effectue
ces travaux. Pour réduire l’exposition à de tels produits, il faut travailler dans un endroit bien
aéré et utiliser le matériel de sécurité approprié, tel un masque anti-poussières spécialement
conçu pour filtrer les particules microscopiques.
• Éviter tout contact prolongé avec la poussière soulevée par cet outil ou tout autre
outil électrique. Porter des vêtements de protection et nettoyer les parties
exposées du corps à l’eau savonneuse. S’assurer de bien se protéger afin d’éviter
d’absorber par la bouche, les yeux ou la peau des produits chimiques nocifs.
AVERTISSEMENT : Cet outil peut produire et répandre de la poussière susceptible de
causer des dommages sérieux et permanents au système respiratoire. Toujours utiliser un
appareil respiratoire anti-poussières approprié approuvé par le NIOSH ou l’OSHA. Diriger
les particules dans le sens opposé du visage et du corps.
Directives et consignes de sécurité : Chargement
1. Le présent guide comprend d’importantes directives, dont un mode d’emploi et des
consignes de sécurité.
2. Avant d’utiliser le chargeur de pile, lire toute directive et tout avertissement apposés sur le
chargeur et l’appareil utilisant la-pile. MISE EN GARDE : Pour réduire tout risque de
blessure, n’utiliser ce chargeur qu’avec cet appareil. Les piles de tout autre appareil
pourrait éclater et causer des blessures et endommager l’appareil.
3. Ne pas exposer le chargeur à la pluie ou à la neige.
4. L’utilisation d’un accessoire n’étant ni recommandé ni vendu par Black & Decker peut
entraîner des risques d’incendie, de choc électrique ou de blessure.
5. Afin de réduire les risques de dommage à la fiche ou au cordon électrique, débrancher le
chargeur en saisissant la fiche, non le cordon.
6. S’assurer que le cordon est placé de manière à éviter qu’il ne subisse des dommages ou
des contraintes ou que les personnes s’y prennent les pieds et trébuchent.
7. Ne pas utiliser de rallonge à moins que cela ne soit absolument nécessaire, car l’usage
d’une rallonge ayant une puissance inadéquate pourrait causer des risques d’incendie, de
choc électrique ou d’électrocution.
a) Bien qu’on puisse utiliser un cordon bifilaire avec une rallonge bifilaire ou trifilaire, on ne
doit utiliser qu’une rallonge à cordon; il est recommandé que celle-ci soit approuvée par
l’organisme américain Underwriters Laboratories (UL). Lorsqu’on utilise un outil électrique
à l’extérieur, on ne doit utiliser que des rallonges conçues pour cet usage, comme celles
de type W-A ou W. Toute rallonge conçue pour un usage extérieur peut aussi être
employée à l’intérieur.
b) Afin d’éviter une perte de puissance ou une surchauffe et d’assurer la sécurité de
l’utilisateur, la rallonge doit être de calibre AWG approprié. Plus le calibre est petit, plus la
capacité est grande; autrement dit, une rallonge de calibre 16 est plus puissante qu’une
rallonge de calibre 18. Lorsqu’on utilise plusieurs rallonges pour obtenir la longueur
voulue, s’assurer que chacune d’elles présente les valeurs minimales requises.
8. Ne charger l’outil qu’au moyen du chargeur fourni, car l’usage de tout autre dispositif
pourrait endommager l’outil ou engendrer une situation dangereuse.
9. N’utiliser qu’un seul chargeur durant le chargement.
10.Ne pas ouvrir le chargeur; ces derniers ne contiennent aucune pièce pouvant être
réparée par le client et doivent être retournés à un centre de service Black & Decker, le
cas échéant.
11.N’incinérez PAS l’outil ou le bloc-pile, même s’il a subi des dommages importants ou il
est usé complètement, car les piles pourraient exploser en présence de flammes.
12.Les cellules peuvent subir une fuite légère par suite d’un usage extrême, du chargement
ou d’une exposition à certaines températures; cela n’indique pas un problème.
Cependant, si le scellant externe est percé et le liquide entre en contact avec la peau, on
doit:
a. se laver rapidement la partie du corps touchée avec de l’eau savonneuse;
b. neutraliser l’effet au moyen d’un acide doux tel que du jus de citron ou du vinaigre;
c. si les yeux sont touchés, les rincer à fond à l’eau claire pendant au moins 10 minutes
et consulter immédiatement un médecin. REMARQUE AUX FINS MÉDICALES : ce
liquide contient une solution composée de 25 à 35 % d’hydroxyde de potassium.
Méthode de chargement
LES PILES DE CET OUTIL NE SONT PAS TOTALEMENT CHARGÉES EN USINE. AVANT
TOUT CHARGEMENT, LIRE SOIGNEUSEMENT TOUTES LES DIRECTIVES DE
SÉCURITÉ.
Pour recharger votre tournevis, suivre les étapes ci-après.
1. Brancher le cordon de sortie du chargeur dans la prise à l’arrière du réceptacle du
chargeur (Fig. 1)
2. Brancher le chargeur directement dans une prise électrique standard de 120 volts et 60
Hz.
3. Insérer le tournevis NM360 dans le réceptacle du chargeur en s’assurant que les bornes
sur le tournevis coïncident bien avec celle du chargeur. Le voyant rouge (charge)
s’allumera pour indiquer que le cycle de chargement a commencé.
4. Initialement, laisser le tournevis se recharger pendant 9 heures. Une fois la charge initiale
terminée, après une utilisation normale, l’appareil devrait se recharger entre 3 à 6 heures.
CARACTÉRISTIQUES
- Broche hexagonale
- Gâchette
- Marche avant
- Neutre / Verrouillage de broche
- Marche arrière
- Réceptacle de chargement
- Chargeur
- Contacts de charge
- Voyant de charge
- Fixation murale du support de
l’appareil
- Dispensateur d’embouts de
tournevis
A
B
C
D
E
F
G
H
MANUEL DE L'UTILISATEUR
TTTTOOOOUUUURRRRNNNNEEEEVVVVIIIISSSS SSSSAAAANNNNSSSS FFFFIIIILLLL NNNNMMMM333366660000
AVANT DE RETOURNER CE PRODUIT POUR QUELQUE
RAISON QUE CE SOIT, APPELEZ BLACK & DECKER AU
1 800 544-6986
CONSERVER LE PRÉSENT GUIDE À TITRE DE RÉFÉRENCE
A
B
F
C
D
E
G
H
I
J
K
I
J
K
Calibre minimal des cordons de rallonge
Tension Longueur totale de la rallonge en mètres
120 V De 0 à 7,62 De 7,63 à 15,24 De 15,25 à 30,48 De 30,49 à 45,72
240 V De 0 à 15,24 De 15,25 à 30,48 De 30,49 à 60,96 De 60,97 à 91,44
Intensité nominale (en amperes)
Plus de Pas plus
de Calibre AWG
0 - 6 18 16 16 14
6 - 10 18 16 14 12
10 - 12 16 16 14 12
12 - 16 14 12 Non recommandé
Page 4

Conseils importants concernant le chargement
1. À la suite d’une utilisation normale, votre outil devrait prendre entre 3 à 6 heures pour se
charger complètement, et jusqu’à 6 heures s’il est complètement déchargé. Votre outil
n’est pas chargé au moment de quitter l’usine; on doit donc le charger pendant au moins
9 heures avant de l’utiliser.
2. NE PAS recharger les piles à une température inférieure à 4,5°C (40°F) ou supérieure à
40,5°C (105°F). C’est important pour prévenir tout dommage sérieux aux piles. Pour une
durée de vie prolongée et des performances optimales, recharger les piles à une
température ambiante d’environ 24°C (75°F).
3. Le chargeur peut émettre un bourdonnement ou devenir chaud au toucher durant le
chargement. Cela est normal et n’indique pas la présence d’un problème.
4. Si les piles ne se rechargent pas correctement : (1) Vérifier le courant à la prise en y
branchant une lampe ou tout autre appareil. (2) Vérifier que la prise n’est pas commandée par un interrupteur qui coupe le courant en éteignant les lumières. (3) Déplacer
le chargeur et l’outil dans un endroit dont la température ambiante est située entre 4,5°C
(40°F) et 40,5 °C (105°F). (4) Lorsque le chargeur est monté sur un mur, s’assurer
que le voyant de charge est allumé. Dans le cas contraire, pousser l’appareil à
fond dans le réceptacle pour s’assurer qu’il y a bien contact entre les bornes. (5) Si
la prise et la température ambiante sont adéquates, et que le chargement ne fonctionne
pas correctement, apporter ou envoyer l’outil et le chargeur chez votre centre de service
Black & Decker local. Consulter la rubrique des pages jaunes « Outils Électriques ».
5. Recharger l’outil lorsqu’il ne produit plus assez de puissance pour effectuer un travail qu’il
faisait facilement auparavant. NE PAS CONTINUER d’utiliser l’appareil si les piles sont
déchargées.
6. Pour augmenter la durée de vie des piles, éviter de les laisser sur le chargeur pendant
une durée prolongée (plus de 30 jours sans utilisation). Bien que cela ne pose pas un
problème de surcharge, cela réduit de façon significative la durée de vie des piles.
7. Les piles atteindront leur niveau de performances optimales après 5 cycles complets
d’utilisation normale. Il n’est pas nécessaire de vider complètement les piles avant de les
recharger. Une utilisation normale représente la meilleure méthode de
chargement/déchargement des piles.
Installation du dispensateur d’embouts à tournevis (Fig. 2)
Installer le dispensateur (K) de l’un ou de l’autre côté du réceptacle de chargement (F) à
l’aide de la vis fournie à cet effet comme illustré en Figure 2.
Fixation murale (Figures 3, 4 et 5)
N’utiliser la quincaillerie fournie à cet effet que pour accrocher l’appareil sur panneau de
plâtre ou placoplâtre conventionnel. Si l’appareil n’est pas accroché sur panneau de plâtre
ou placoplâtre conventionnel, utiliser les dispositifs de fixation appropriés au matériau.
1. Fixer la fixation murale du support de l’outil (J) comme illustré en Figure 3.
MISE EN GARDE : Le support de l’outil doit être solidement rattaché au réceptacle
de chargement lorsqu’il est monté sur une surface verticale.
2. Choisir un endroit à proximité d’une prise électrique. Fixer le réceptacle de chargement
(F) comme illustré en Figure 4 et 5.
REMARQUE : Attention à ne pas endommager le cordon lors de l’installation du
réceptacle de chargement au mur.
3. Brancher et mettre l’appareil en place. S’assurer que le voyant de charge est bien
allumé. Dans le cas contraire, pousser l’appareil à fond dans le réceptacle pour
s’assurer qu’il y a bien contact entre les bornes.
Mode d'emploi
Pour installer un accessoire (Figure 6)
Le tournevis compact NM360 est conçu pour être utilisé avec des embouts à tournevis. Ne
pas utiliser d’embouts à tournevis doubles.
Pour installer un embout simple, l’insérer dans la cavité hexagonale de la broche comme
illustré en Figure 6. Pour retirer l’embout, tirer droit devant.
Interrupteur (Figure 7)
Pour mettre l'appareil en marche avant, pousser l’interrupteur vers l’avant (7A). appuyer sur
la gâchette et l’outil fonctionnera. Relâcher la gâchette et l'outil cessera de fonctionner.
Pour mettre l'appareil en marche arrière, pousser l’interrupteur vers l’arrière (7B), appuyer
sur la gâchette et l’outil fonctionnera. Relâcher la gâchette et l'outil cessera de fonctionner.
Lorsque l’interrupteur est en position centrale, la gâchette sera inactive et la broche sera
verrouillée (7C). Utiliser l’appareil dans ce mode comme un tournevis conventionnel.
Entretien
Nettoyer l'outil à l'aide d'un savon doux et d’un linge humide. Ne laisser aucun liquide
pénétrer dans l'outil ; ne jamais immerger aucune partie de l'outil dans un liquide.
IMPORTANT : pour assurer la SÉCURITÉ et la FIABILITÉ de ce produit, toutes les
opérations de réparation, d’entretien et de réglage (autres que celles décrites aux
présentes) doivent être effectuées dans un centre de service autorisé ou par du personnel
qualifié; on ne doit utiliser que des pièces de rechange identiques.
Lubrification
Les outils Black & Decker sont lubrifiés en usine et sont donc prêts pour l’utilisation.
Accessoires
Des accessoires recommandés pour être utilisés avec cet outil sont vendus séparément
chez les dépositaires locaux ou les centres de service autorisés. Pour obtenir plus
d’informations sur les accessoires, composer le : 1 800 544-6986 (1-800-54-HOW-TO).
MISE EN GARDE : L’utilisation de tout accessoire non recommandé peut poser des
risques.
Retrait des piles
Avant de démonter cet appareil, le faire fonctionner en marche avant ou arrière jusqu’à arrêt
complet pour décharger complètement les piles. À l’aide d’un petit tournevis Phillips, retirer
les vis du boîtier de l’appareil et séparer ces derniers de moitié. Déconnecter les cosses des
piles puis retirer les piles du boîtier. Se reporter à la section « Informations sur les services »
pour remplacer les piles.
Sceau RBRC
MC
Le sceau RBRCMC de la Rechargeable Battery Recycling Corporation apposé sur
la pile au nickel-cadmium (ou le bloc-pile) indique que les coûts de recyclage de ce
dernier à la fin de sa vie utile ont déjà été payés par Black & Decker. En certains
endroits, la mise au rebut ou aux ordures municipales des piles au nickel-cadmium est
illégale; le programme de «RBRC» constitue donc une solution des plus pratiques et
écologiques.
La «RBRC», en collaboration avec Black & Decker et d’autres utilisateurs de piles, a mis
sur pied des programmes aux États-Unis et au Canada dans le but de faciliter la collecte
des piles déchargées. Black & Decker encourage ses utilisateurs à participer à son
programme de protection de l'environnement et de conservation des ressources naturelles
en retournant les piles usagées à un centre de service Black & Decker ou chez un
dépositaire local afin qu’elles puissent être recyclées. On peut en outre se renseigner
auprès d’un centre de recyclage local pour connaître d'autres sites les acceptant, ou
composer le 1 800 8-228-8379 pour obtenir de l'information sur le recyclage de ces piles
dans sa région.
Information sur les services
Tous les centres de service Black & Decker sont dotés de personnel qualifié en matière
d’outillage électrique; ils sont donc en mesure d’offrir à leur clientèle un service efficace et
fiable. Pour obtenir un conseil technique ou une pièce d’origine ou pour faire réparer un
outil, on peut communiquer avec le centre Black & Decker le plus près. Pour obtenir le
numéro de téléphone, consulter les pages jaunes sous la rubrique «Outils - électriques»,
composer le 1 800 544-6986 ou encore, visiter notre site Web www.blackanddecker.com.
Garantie complète de deux ans pour usage résidentiel
Black & Decker (U.S.) Inc. garantit ce produit pour une période de deux ans contre tout
défaut de matériel ou de fabrication. Le produit défectueux sera remplacé ou réparé sans
frais, suivant l’une des deux méthodes suivantes.
Imported by / Importé par
Black & Decker Canada Inc.
100 Central Ave.
Brockville (Ontario) K6V 5W6
Voir la rubrique “Outils électriques”
des Pages Jaunes
pour le service et les ventes.
MANUAL DE INSTRUCCIONES
DDDDEEEESSSSTTTTOOOORRRRNNNNIIIILLLLLLLLAAAADDDDOOOORRRR IIIINNNNAAAALLLLÁÁÁÁMMMMBBBBRRRRIIIICCCCOOOO NNNNMMMM333366660000
ANTES DE DEVOLVER ESTE PRODUCTO POR CUALQUIER
MOTIVO, LLAMAR AL
(55)5326-7100
GUARDE ESTE MANUAL PARA REFERENCIA FUTURA.
NORMAS GENERALES DE SEGURIDAD - PARA TODAS
LAS HERRAMIENTAS A BATERÍA
ADVERTENCIA: LEA TODAS LAS INSTRUCCIONES HASTA COMPRENDERLAS. El
incumplimiento con alguna de las instrucciones enumeradas más abajo puede resultar en
descarga eléctrica, incendio y/o lesiones corporales serias.
GUARDE ESTAS INSTRUCCIONES
Área de trabajo
• Mantenga su área de trabajo limpia y bien iluminada. Los accidentes abundan en las
mesas de trabajo desordenadas y áreas oscuras.
• No opere máquinas herramienta en ambientes explosivos, tales como en presencia
de líquidos, gases o polvos inflamables. Las máquinas herramienta generan chispas
que pueden inflamar el polvo o los gases.
• Mantenga alejados a observadores, niños y visitas cuanso opere una máquina
herramienta. Las distracciones pueden hacerle perder el control.
Seguridad eléctrica
• Una herramienta que funciona con baterías integradas o con una unidad de
alimentación independiente sólo debe recargarse con el cargador especificado para
la batería. Un cargador puede ser adecuado para un tipo de batería y, sin embargo, crear
riesgo de incendio cuando se usa con otro.
• Utilice la herramienta a batería sólo con la unidad de alimentación específicamente
indicada. El uso de cualquier otro tipo de pila puede causar incendios.
Seguridad personal
• Manténgase alerta, fíjese en lo que está haciendo y utilice su sentido común cuando
opere una máquina herramienta. No utilice una herramienta si está cansado o bajo
la influencia de drogas, alcohol o medicamentos. Sólo hace falta un momento de
distracción durante la operación de máquinas herramienta para causar lesiones corporales
serias.
• Vístase debidamente. No se ponga ropa suelta o joyas. Recójase el cabello largo.
Mantenga alejados de las piezas en movimiento su pelo, ropa y guantes. Las partes
móviles pueden atrapar las prendas de vestir sueltas, las joyas y el cabello.
• Evite encender la herramienta en forma accidental. Antes de insertar la batería
asegúrese de que el interruptor esté en posición de bloqueo o de apagado. El
transportar herramientas con el dedo sobre el conmutador o insertar la unidad de
alimentación en la herramienta con el conmutador encendido podría causar un accidente.
• Quite toda llave de ajuste antes de encender la herramienta. Una llave que se deje en
una pieza giratoria de la herramienta puede provocar lesiones.
• No se sobreextienda. Manténgase siempre bien apoyado y equilibrado. Si mantiene
el equilibrio podrá tener mejor control de la herramienta en situaciones inesperadas.
• Utilice equipo de seguridad. Utilice siempre protección ocular. Se debe usar máscara
antipolvo, calzado de seguridad antideslizante, casco de seguridad o protección auditiva,
dependiendo de las condiciones que apliquen.
Uso y cuidado de la herramienta
• Use abrazaderas u otra manera práctica de fijar y sujetar la pieza de trabajo a una
plataforma estable. No sujete su trabajo en forma manual o contra su cuerpo pues no
quedará estable y podría perder el control.
• No fuerce la herramienta. Use la herramienta correcta para su aplicación. La
herramienta apropiada hará un trabajo mejor y más seguro si se usa de la forma para la
cual fue diseñada.
• No use la herramienta si el conmutador no funciona bien. Una herramienta que no
pueda controlarse con el conmutador es peligrosa y se debe reparar.
• Desconecte la unidad de alimentación de la herramienta o ponga el conmutador en
posición de bloqueo o de apagado antes de realizar cualquier ajuste, cambiar
accesorios o guardar la herramienta. Estas medidas de seguridad preventiva reducen
el riesgo de poner en marcha la herramienta accidentalmente.
• Cuando no esté en uso, almacene su herramienta fuera del alcance de niños y otras
personas no capacitadas en su funcionamiento. Las herramientas son peligrosas en
manos de personas no capacitadas.
• Cuando la unidad de alimentación no esté en uso, manténgala alejada de otros
objetos metálicos tales como: sujetapapeles, monedas, llaves, clavos, tornillos u
otros objetos metálicos pequeños que podrían generar una conexión entre sus
terminales. Provocar un cortocircuito entre los terminales de la batería puede causar
chispas, quemaduras o incendios.
• Mantenga sus herramientas de corte afiladas y limpias. Las herramientas de corte
debidamente mantenidas y afiladas tienen menos probabilidades de trabarse y son más
fáciles de controlar.
• Revise la herramienta para verificar que no esté mal alineada, que sus piezas
móviles no estén trabadas o rotas y que no exista otra condición que pudiera afectar
su operación. Si está dañada, llévela a ser reparada antes de usarla. Muchos
accidentes son causados por usar herramientas que no han sido bien mantenidas.
• Utilice sólo aquellos accesorios que hayan sido recomendados por el fabricante
para su modelo. Un mismo accesorio puede ser adecuado para una herramienta, pero
puede crear riesgo de lesiones si se usa en otra.
La première méthode consiste en un échange seulement. On doit retourner le produit au
détaillant qui l’a vendu (pourvu qu’il s’agisse d’un détaillant participant), en respectant les
délais stipulés dans sa politique relative aux échanges (normalement de 30 à 90 jours après
la vente). Une preuve d’achat peut être requise. On doit vérifier la politique de retour du
détaillant pour tout produit retourné après le délai prescrit pour les échanges.
La deuxième méthode consiste à apporter ou à envoyer le produit (prépayé) à un centre
Black & Decker ou à un centre de service autorisé aux fins de réparation ou de
remplacement, selon notre choix. Une preuve d’achat peut être requise. Les centres Black &
Decker et les centres de service autorisés sont répertoriés dans les pages jaunes sous la
rubrique «Outils - électriques» et sur notre site Web www.blackanddecker.com.
Cette garantie ne s’applique pas aux accessoires. Elle confère des droits légaux particuliers
à l’acheteur, mais celui-ci pourrait aussi bénéficier d’autres droits variant d’un territoire à
l’autre. Toute question doit être adressée au gérant du centre Black & Decker le plus près.
Ce produit n’est pas destiné à un usage commercial.
REMPLACEMENT GRATUIT DE L’ÉTIQUETTE D’AVERTISSEMENT : En cas de perte ou
d’endommagement des étiquettes d’avertissement, composer le
1 800 544-6986 afin d’en obtenir de nouvelles sans frais.
Page 5

Servicio
• El servicio a la herramienta sólo deber ser realizado por personal de reparación
calificado. El servicio o mantenimiento realizados por personal no calificado podría crear
un riesgo de lesión.
• Cuando se repare una herramienta, sólo se deben usar repuestos originales. Siga
las instrucciones en la sección de mantenimiento de este manual. La utilización de
piezas no autorizadas o no respetar las Instrucciones de mantenimiento puede suponer un
peligro de choque eléctrico o de lesiones.
Normas específicas de seguridad
• Sujete la herramienta por las superficies aislantes si lleva a cabo una operación en
que la herramienta puede tocar un conductor oculto. El contacto con un conductor
activo también provocará que las piezas metálicas de la herramienta conduzcan
electricidad y que el operador reciba una descarga eléctrica.
La etiqueta de su herramienta puede incluir los siguientes símbolos.
V ..................volts A................amperes
Hz ................hertz W ..............watts
min ..............minutos ..............corriente alterna
..............corriente directano ..............velocidad sin carga
................construcción clase II
..............terminales de conexión a tierre
................símbolo de alerta .../min ........revoluciones o minuto seguridad
ADVERTENCIA: Algunos tipos de polvo, como aquellos generados por el lijado,
serruchado, pulido y taladrado mecánico y otras actividades de construcción, contienen
químicos que se sabe causan cáncer, defectos de nacimiento y otros daños reproductivos.
Algunos ejemplos de estos químicos son:
• plomo procedente de pinturas con base de plomo,
• óxido de silicio procedente de ladrillos, cemento y otros productos de mampostería, y
• arsénico y cromo provenientes de maderas tratadas con químicos (arseniato de cobre
cromado).
El peligro derivado de la exposición a estos materiales varía en función de la frecuencia con
que se realice este tipo de trabajo. Para reducir su exposición a estos químicos: trabaje en
una zona bien ventilada y llevando equipos de seguridad aprobados, como mascarillas
antipolvo especialmente diseñadas para filtrar partículas microscópicas.
• Evite el contacto prolongado con polvo generado por el lijado, serruchado, pulido y
taladrado mecánico y otras actividades de construcción. Vista ropas protectoras y
lave las áreas de la piel expuestas con agua y jabón. Si permite que el polvo se
introduzca en su boca o sus ojos, o que quede sobre la piel, puede favorecer la
absorción de químicos peligrosos.
ADVERTENCIA:La utilización de esta herramienta puede generar polvo o dispersarlo, lo
que podría causar lesiones graves y permanentes al sistema respiratorio, así como otros
problemas. Siempre use protección respiratoria aprobada por NIOSH (Instituto Nacional de
Seguridad y Salud en el Trabajo) u OSHA (Administración de Seguridad y Salud en el
Trabajo) apropiada para la exposición al polvo. Dirija las partículas en dirección contraria a
la cara y el cuerpo.
Advertencias e instrucciones de seguridad: Carga
1. Este manual contiene instrucciones importantes de seguridad y operación.
2. Antes de usar el cargador de baterías, lea todas las instrucciones y advertencias que
acompañan al cargador, a la batería y a los productos que usa la batería.
PRECAUCIÓN: Para reducir el riesgo de lesiones, use el cargador sólo con este
producto. Las baterías de otros productos podrían causar lesiones o daños.
3. No exponga el cargador a lluvia o nieve.
4. El uso de un accesorio no recomendado ni vendido por Black & Decker puede causar
incendios, descarga eléctrica o lesiones corporales.
5. Para reducir el riesgo de daños al enchufe y cable de alimentación, tire del enchufe y no
del cable cuando desenchufe el cargador.
6. Coloque el cable eléctrico de manera que no lo pise nadie, ni se enrede o quede
expuesto a una tensión que pueda dañarlo.
7. No se debería usar un alargador a no ser que sea absolutamente necesario. El uso de
un alargador no debido podría causar incendios, descarga eléctrica o electrocución.
a) Se pueden usar alargadores de dos o tres hilos con cables de alimentación de dos hilos.
Sólo deberían usarse alargadores con envoltura redonda y recomendamos que sean
clasificados por Underwriters Laboratories (U.L.). Si el alargador se utilizará a la
intemperie, el cable debe ser adecuado para uso a la intemperie. Cualquier cable
marcado para uso a la intemperie puede ser también usado al interior. Las letras "W" o
"WA" marcadas en la envoltura del cable indican que el cable puede ser usado a la
intemperie.
b) Los alargadores deben tener hilos de calibres adecuados (AWG o American Wire
Gauge) para su seguridad y para evitar la pérdida de potencia y el sobrecalentamiento
del mismo. Cuanto menor sea el calibre de un hilo, mayor su capacidad; es decir, el
calibre 16 tiene mayor capacidad que el calibre 18. Cuando utilice más de un alargador
para lograr la longitud deseada, asegúrese que cada alargador sea de al menos el
calibre mínimo.
8. Cuando cargue su herramienta, utilice sólo el cargador incluido. El uso de cualquier
otro cargador podría dañar el destornillador o ser peligroso.
9. Use sólo un cargador cuando cargue su herramienta.
10.No intente abrir el cargador. No contiene ninguna pieza que pueda ser reparada por el
usuario. Devuelva a cualquier centro de servicio autorizado de Black & Decker.
11.NO queme la herramienta o la batería, aunque esté gravemente dañada o completamente gastada. Las baterías pueden explotar si se queman.
12.En condiciones de temperatura o de uso extremas, puede presentarse un ligero goteo
del líquido de la batería. Esto no indica una falla. Sin embargo, si se rompe el sello
externo y su piel llegase a entrar en contacto con este líquido, siga estas indicaciones:
a. Lave rápidamente la zona afectada con agua y jabón.
b. Neutralice con un ácido débil, como jugo de limón o vinagre.
c. Si el líquido de la batería toca sus ojos, enjuáguelos con agua limpia por un tiempo
mínimo de 10 minutos y busque atención médica inmediata.
NOTA MÉDICA: El líquido es una solución de 25-35% de hidróxido de potasio.
Procedimiento de carga
LAS BATERÍAS DE SU HERRAMIENTA NO VIENEN COMPLETAMENTE CARGADAS DE
FÁBRICA. ANTES DE INTENTAR CARGARLAS, LEA BIEN TODAS LAS
INSTRUCCIONES DE SEGURIDAD.
Para cargar su destornillador, siga los pasos de más abajo.
1. Enchufe el cable de salida del cargador en el enchufe hembra de la parte de atrás de la
horquilla del cargador, como lo muestra la Figura 1.
2. Enchufe el cargador a cualquier toma de corriente estándar de 120 voltios y 60 Hz.
3. Coloque el destornillador NM360 en la horquilla del cargador verificando que los contactos
de carga del mango del destornillador correspondan con los del cargador. La luz roja (de
carga) se iluminará para indicar que se ha iniciado el proceso de carga.
4. Deje que el destornillador se cargue por 9 horas la primera vez. Luego de la carga inicial,
bajo condiciones normales de uso, su batería debería estar completamente cargada en 3
a 6 horas.
Notas importantes sobre la carga
1. Luego de un uso normal, su batería debería cargarse completamente en 3 a 6 horas. Si
la batería está completamente gastada, puede tomar hasta 6 horas para cargarse
completamente. Su batería viene de fábrica sin carga. Antes de intentar usarla debe
cargarse por al menos 9 horas.
2. NO cargue la batería a una temperatura ambiental inferior a +4,5 ºC (+40 °F) o superior
a +40,5 ºC (+105 °F). Esto es muy importante y se evitarán graves daños a la batería.
Se puede obtener una mayor duración y un mejor rendimiento si la batería se carga
cuando la temperatura ambiental está alrededor de los 24 ºC (75 °F).
3. Mientras se esté cargando, el cargador puede emitir un zumbido y sentirse caliente al
tacto. Esto es normal y no indica un problema.
4. Si la batería no se carga debidamente — (1) Revise la corriente en la toma de corriente
enchufando una lámpara u otro dispositivo en ella. (2) Revise que la toma de corriente
no esté conectada a un interruptor de luz que apague la corriente cuando corte la luz.
(3) Mueva el cargador y la batería a un lugar donde la temperatura ambiental sea
aproximadamente 4,5 ºC (40 ºF) a 40,5 ºC (105 ºF). (4) Si el cargador está montado
a una pared, verifique que la luz del indicador de carga esté encendida. Si la luz
del indicador no está encendida, empuje la unidad para abajo para asegurar que
los contactos de carga estén tocándose. (5) Si la toma de corriente y temperatura
están bien, y aún así no se está cargando debidamente, lleve o envíe la herramienta y el
cargador a su centro de servicio Black & Decker. Vea Herramientas eléctricas en las
páginas amarillas.
5. Se deberá recargar la herramienta cuando deje de producir suficiente energía para
tareas que se ejecutaban con facilidad anteriormente. NO SIGA utilizando el producto
con su batería gastada.
6. Para prolongar la duración de la batería, evite dejarla cargando por períodos de tiempo
extensos (más de 30 días, sin uso). A pesar que el sobrecargar la batería no causa
problemas de seguridad, reducirá significativamente la vida útil de la batería.
7. Las baterías alcanzarán su rendimiento óptimo una vez que hayan ciclado 5 veces
durante condiciones de uso normales. No es necesario agotar las baterías por
completo antes de recargarlas. El uso normal es la mejor forma de descargar y volver a
cargar las baterías.
Conexión del sujetador de puntas de broca del destornillador (Figura 2)
Conecte el sujetador (K) a cualquiera de los dos lados de la horquilla del cargador (F) (con
el tornillo que viene incluido) como lo muestra la figura 2.
Montaje a la pared (Figuras 3, 4 y 5)
Use la quincallería incluida sólo si lo colgará en una pared de panel de yeso o yeso
tradicional. Si no lo colgará en una pared de panel de yeso o yeso tradicional, por favor
utilice los tornillos apropiados para el material de la pared.
1. Conecte el soporte de la herramienta para montaje a la pared (J) como lo muestra la
figura 3. PRECAUCIÓN: El soporte de la herramienta debe estar firmemente
conectado a la horquilla del cargador cuando sea montado a una superficie vertical.
2. Elija un lugar donde el cable alcance una toma de corriente. Fije la horquilla del
cargador (F) como se muestra en las figuras 4 y 5.
NOTA: Evite dañar el cable al fijar la horquilla del cargador a la pared.
3. Enchufe y ponga el producto en su lugar. Verifique que la luz del indicador de carga esté
encendida. Si la luz del indicador no está encendida, empuje la unidad para abajo
para asegurar que los contactos de carga estén tocándose.
Instrucciones de funcionamiento
Conexión de accesorios (Figura 6)
El destornillador compacto NM360 está diseñado para utilizar brocas de destornillado. No
use brocas de destornillado con extremos dobles.
Para instalar una broca, simplemente insértela en la cavidad del eje hexagonal como lo
muestra la figura 6. Para retirar la broca, tire de ella.
Conmutador (Figura 7)
Para ENCENDER la herramienta, en dirección de atornillado, empuje el conmutador hacia
adelante (7A), apriete el gatillo y la herramienta arrancará. Libere el gatillo para
detenerla.
Para ENCENDER la herramienta, en dirección de destornillado, empuje el conmutador
hacia atrás (7B), apriete el gatillo y la herramienta arrancará. Libere el gatillo para
detenerla.
Con el conmutador en la posición del medio, el gatillo no se activará y el eje estará
bloqueado (7C). Use la herramienta en esta modalidad como si fuera cualquier
destornillador no eléctrico.
Mantenimiento
Para limpiar la herramienta, sólo utilice un paño húmedo y jabón suave. Jamás permita
que le entre líquido a la herramienta; nunca sumerja ninguna parte de la herramienta.
IMPORTANTE: Las reparaciones, el mantenimiento y los ajustes del dispositivo (fuera de
los mencionados en este documento) deberán ser realizados por centros de servicio
autorizados u otro personal de servicio calificado, utilizando siempre repuestos idénticos,
para garantizar la SEGURIDAD y FIABILIDAD del producto.
Lubricación
Las herramientas Black & Decker vienen debidamente lubricadas de fábrica y están listas
para utilizarse.
Accesorios
Los accesorios recomendados para ser utilizados con su herramienta se encuentran
disponibles donde su distribuidor o centro de servicio autorizado locales. Si tiene alguna
consulta acerca de estos accesorios, por favor llame al: (55)5326-7100
PRECAUCIÓN: El uso de cualquier accesorio no recomendado podría ser peligroso.
Retiro de la batería
Antes de intentar desmantelar esta herramienta, apáguela y hágala funcionar en ambas
direcciones hasta que se detenga para asegurarse que las baterías estén completamente
agotadas. Con un destornillador Phillips, retire los tornillos de la caja externa del producto y
separe la mitad de la caja de la herramienta. Desconecte los clips de los terminales de las
baterías y levante las baterías para sacarlas. Vea "Información de servicio” para ver cómo
cambiar las baterías.
Calibre mínimo para cordones de extensión
Volts Longitud total del cordón en metros
120V 0 - 7.62 7.63 - 15.24 15.25 - 30.48 30.49 - 45.72
240V 0 - 15.24 15.25 - 30.48 30.49 - 60.96 60.97 - 91.44
AMPERAJE
Más No más Calbre del cordón
de de
0-6 18 16 16 14
6 - 10 18 16 14 12
10 - 12 16 16 14 12
12 - 16 14 12 No Recomendado
CARACTERÍSTICAS
- Eje hexagonal
- Conmutador tipo gatillo
- Conmutador en posición de
atornillado
- Neutro / Seguro del eje
- Conmutador en posición de
destornillado
- Horquilla de carga
- Cargador
- Contactos de carga
- Indicador de carga
- Soporte para montaje en
paredes
- Sujetador de puntas de broca
de destornillado
A
B
C
D
E
F
G
H
A
B
F
C
D
E
G
H
I
J
K
I
J
K
Page 6

El Sello RBRC™
El sello RBRC™ (Rechargeable Battery Recycling Corporation) en las baterías
de níquelcadmio, indica que el costo de reciclaje de la batería (o grupo de
baterías) al final de su vida útil, ya ha sido pagado por Black & Decker. En
algunas áreas es ilegal colocar las baterías de níquelcadmio desgastadas en la
basura doméstica o en los basureros municipales y el programa RBRC proporciona una
alternativa ambiental conveniente.
La RBRC, en cooperación con Black & Decker y otros usuarios de baterías, han establecido
programas en los Estados Unidos y Canadá para facilitar la recolección de baterías de
níquelcadmio desgastadas. Al llevar sus baterías desgastadas de níquelcadmio a un centro
de servicio autorizado Black & Decker o a su minorista local para el reciclaje de su batería,
usted ayuda a proteger nuestro medio ambiente y a conservar nuestros recursos naturales.
Usted puede comunicarse con el centro de reciclaje de su localidad para que le informen
acerca de los lugares donde usted puede regresar las baterías desgastadas, o llamar al
1-800-8-BATTERY.
Información acerca de nuestros centros de servicio
Todos los centros de servicio Black & Decker disponen de personal entrenado para dar un
servicio eficiente y confiable a las herramientas eléctricas de sus clientes. De necesitar
orientación técnica, reparación o repuestos originales de fábrica, diríjase al centro Black &
Decker local. Para hallar la ubicación del centro de servicio más cercano, busque en las
páginas amarillas de la guía telefónica bajo "Herramientas—Eléctricas" o llame a:
1-800-544-6986 o visite www.blackanddecker.com.
Garantía completa de dos años para uso doméstico
Black & Decker (U.S.) Inc. garantiza este producto por dos años contra todo defecto de
material y fabricación. El producto defectuoso será reemplazado o reparado sin costo en
una de las dos formas siguientes.
La primera opción, que resultará en intercambio solamente, será devolviendo el producto al
minorista donde fue comprado (siempre que la tienda sea un minorista participante). Las
devoluciones deberán hacerse dentro del período de intercambio que el minorista tiene por
política (generalmente de 30 a 90 días después de la venta). La prueba de compra podrá
ser requerida. Favor informarse con el minorista sobre la política específica de devolución
en cuanto a devoluciones hechas en fecha posterior a la fijada para intercambios.
La segunda opción es llevar o enviar el producto (pre-pagado) a un centro de servicio Black
& Decker o un centro autorizado para reparaciones o reemplazo, a nuestra discreción. La
prueba de compra podrá ser requerida. Los centros de servicio Black & Decker o centros
autorizados se anuncian bajo "Herramientas - Eléctricas" en las páginas amarillas de la guía
telefónica así como en nuestro portal www.blackanddecker.com.
Esta garantía no aplica a los accesorios. Esta garantía le otorga a usted derechos legales
específicos y otros derechos que pueden variar de estado en estado. Si tiene alguna
pregunta, comuníquese con el gerente de su centro de servicio Black & Decker más
cercano.
Este producto no está destinado al uso comercial.
SUSTITUCIÓN GRATUITA DE LAS ETIQUETAS DE ADVERTENCIA: Si sus etiquetas de
advertencia se vuelven ilegibles o se pierden, llame al
1-800-544-6986 para conseguir repuestos gratuitos.
SECCI N
AMARILLA
Si funciona…
y funciona muy bien.
Para servicio y ventas consulte
“HERRAMIENTAS ELECTRICAS”
en la sección amarilla.
ESPECIFICACIONES
Cargador:
INPUT: 120 V AC 60 HZ 3W
OUTPUT: 9VAC 100mA
CULIACAN, SIN
Av. Nicolás Bravo #1063 Sur
(667) 7 12 42 11
Col. Industrial Bravo
GUADALAJARA, JAL
Av. La Paz #1779
(33) 3825 6978
Col. Americana Sector Juarez
MEXICO, D.F.
Eje Central Lázaro Cardenas
No. 18
(55) 5588 9377
Local D, Col. Obrera
MERIDA, YUC
Calle 63 #459-A
(999) 928 5038
Col. Centro
MONTERREY, N.L.
Av. Francisco I. Madero
No.831
(81) 8375 2313
Col. Centro
PUEBLA, PUE
17 Norte #205
(222) 246 3714
Col. Centro
QUERETARO, QRO
Av. Madero 139 Pte.
(442) 214 1660
Col. Centro
SAN LUIS POTOSI, SLP
Av. Universidad 1525
(444) 814 2383
Col. San Luis
TORREON, COAH
Blvd. Independencia, 96 Pte.
(871) 716 5265
Col. Centro
VERACRUZ, VER
Prolongación Díaz Mirón #4280
(229)921 7016
Col. Remes
VILLAHERMOSA, TAB
Constitución 516-A
(993) 312 5111
Col. Centro
PARA OTRAS LOCALIDADES LLAME AL: (55) 5326 7100
Para reparación y servicio de sus herramientas eléctricas, favor de dirigirse
al Centro de Servicio más cercano:
IMPORTADO: BLACK & DECKER S.A. DE C.V.
BOSQUES DE CIDROS ACCESO RADIATAS NO. 42
COL. BOSQUES DE LAS LOMAS.
05120 MÉXICO, D.F
TEL. (55)5326-71-00
 Loading...