

Page 1
Stand Mixer
Model M275
English, see page 2
Save this use and care book
Batidora de pedestal
Modelo M275
Español, consulte la página 7
Lease este instructivo antes de usar el producto
M275
Page 2

2
M275
English
■ Read all instructions carefully, even
if you are familiar with the appliance.
■ To protect against the risk of electric
shock, DO NOT IMMERSE the
appliance, cordset or plug in water or
other liquid.
■ To clean, wipe exterior with a damp
cloth.
■ Close supervision is necessary when
any appliance is used by or near children. Never leave an appliance unattended when in use.
■ Switch off and remove the Plug form
the Power Outlet when not in use,
before assembling or disassembling
parts and before cleaning. To unplug,
grasp Plug and pull from Power
Outlet. Never pull Cord.
■ Avoid contacting moving parts. Keep
hands, hair, clothing as well as spatulas and other utensils away during
operation to prevent injury and/or
damage to the appliance.
■ Do not operate any appliance with a
damaged Cord or Plug, or after the
appliance malfunctions, or is dropped
or damaged in any manner. Return the
complete appliance to your nearest
authorized service facility for examination, electrical repair, mechanical
repair or adjustment.
■ The use of attachments or accessories
not recommended or sold by this
appliance manufacturer may result in
fire, electric shock or personal injury.
■ Do not use outdoors.
■ Do not let Cord hang over edge of a
table or counter, or touch hot surfaces.
■ Remove Beaters from Mixer before
washing them.
■ Do not operate or place any part of
this appliance on or near any hot surfaces (such as gas or electric burner,
or in a heated oven).
■ Do not use appliance for mixing
paints or other flammable liquids or
in a location contaminated with
flammable gases or vapours.
■ Do not abuse the Cord. Never carry
the appliance by the Cord or yank it
to disconnect it form the outlet;
instead, grasp the Plug and pull to
disconnect.
■ When using an extension cord with
your appliance, make sure the extension cord is correctly wired and rated
for its use.
■ This product is intended for house-
hold use only.
■ Do not attempt to repair the appli-
ance yourself; instead, take it to your
Black & Decker-Owned or Authorized Service Center for repair.
IMPORTANT
SAFEGUARDS
SAVE THESE INSTRUCTIONS
When using electrical appliances, in
order to reduce the risk of fire, electric
shock, and/or injury to persons, basic
safety precautions should always be followed, including the following:
Page 3
3
Stand
Polarized Plug
This appliance has a polarized plug - one
blade is wider than the other. To reduce the
risk of electric shock, this plug will fit into a
polarized outlet only one way. If the plug does
not fit correctly into the outlet, reverse it. If
it still does not fit, contact a qualified electrician. Do not attempt to defeat this safety feature by modifying the plug in any way.
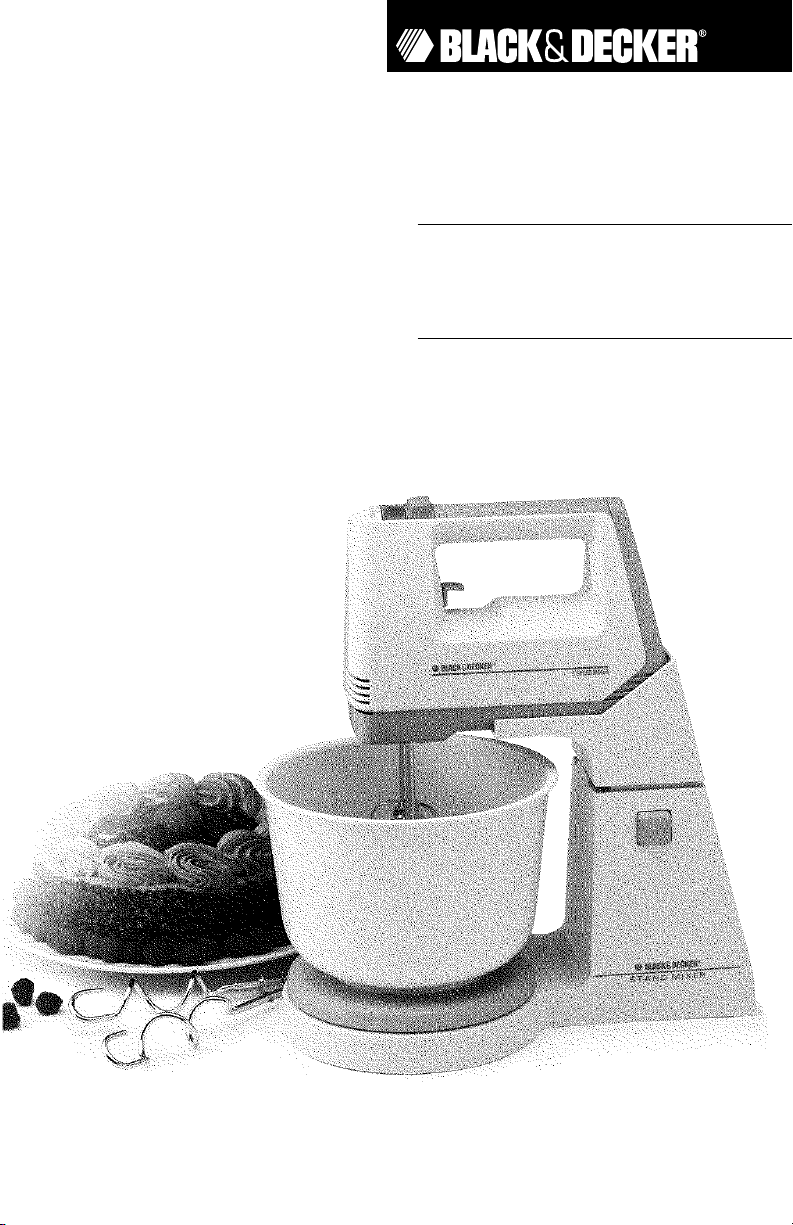
Convenient Features
of Your Mixer
5 Precision Speeds
The 5 speeds allow you to choose the
speed that best suits the foods that you are
preparing.
Power Boost
The Power Boost feature is specially
designed for tough mixing tasks.
Figure A
The Power Boost feature allows you to
increase the mixing speed to the maximum
power level from any speed by depressing the
Power Boost Button. When you feel the
Mixer slowing down or straining in touch
mixing tasks, just press the Power Boost
Button to obtain the maximum mixing performance. As soon as the Power Boost Button
is released, the Mixer will return to the speed
setting you were previously using.
Figure A
Speed Control Switch
Dough Hooks
Beaters
Mixing Bowl
Turntable
Power Cord
Overhead Arm
Lock Button
Beater Eject Button
Power Boost Button
0 1 2 3 4 5
POWER
BOOST
Page 4
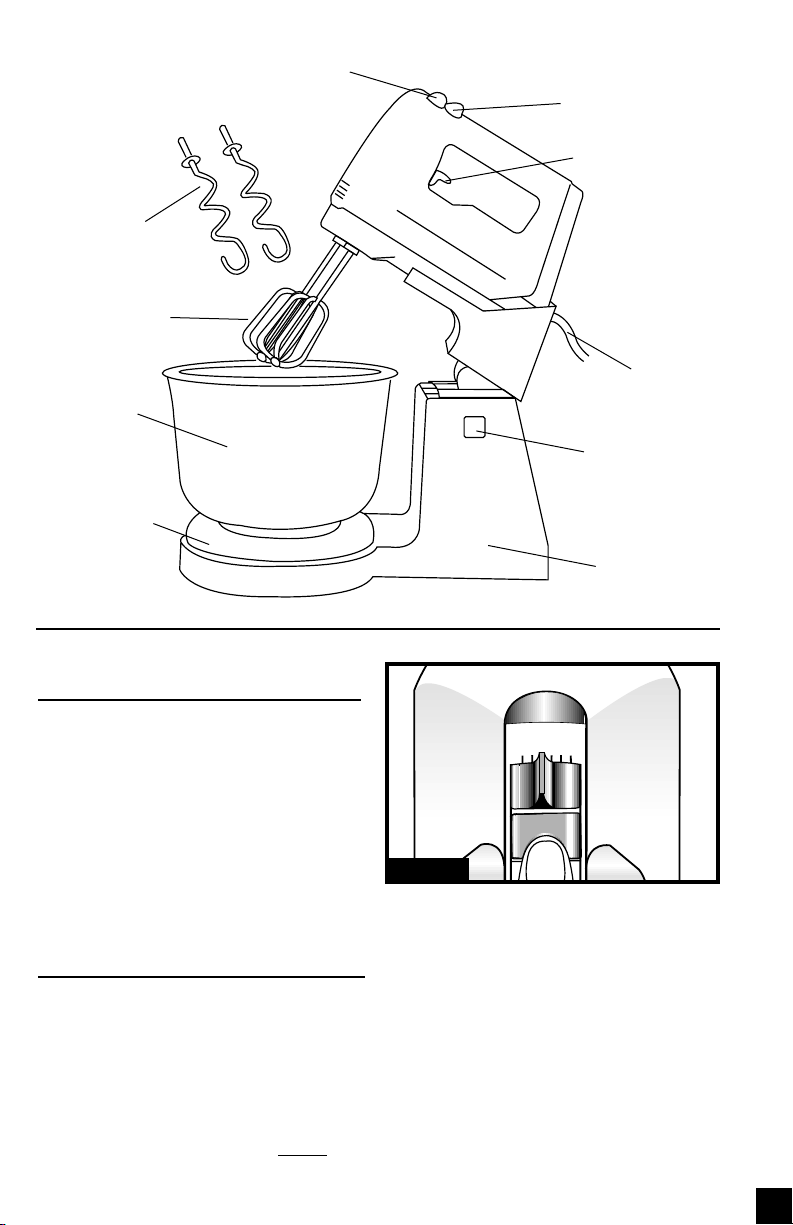
Beater Eject Lever
The Black & Decker Stand Mixer features
a convenient Beater Eject Lever which is
located below the handle. It allows for easy
release for the Beaters using the index finger.
Figure B
For safety, remove the Plug from power
outlet before ejecting Beaters.
Large Size Beaters
The large size Beaters enable you to obtain
fast, thorough mixing results. The Beaters are
dishwasher safe for easy cleaning.
Strong Dough Hooks
The strong dough Hooks are included for
kneading pastry and dough. The Dough
Hooks are dishwasher safe for easy cleaning.
Easy Glide Turntable
To allow smooth and thorough mixing.
Two Position Overhead Arm
When mixing, unit is locked securely into
position. On completion the Mixing Bowl
can be easily removed by depressing the Lock
Button and raising the Overhead Arm.
2.2 Litre Plastic Bowl
Easy to clean, dishwasher safe. (Place on
top shelf of dishwasher away from the element). Do not use in microwave oven.
Before First Use
Before using the Mixer for the first time,
wash Beaters, Dough Hooks and Bowl in
soapy warm water. Rinse thoroughly and dry.
How to Assemble
the Stand
If using the Stand, place on a level surface
and insert the Turntable into the Base plate.
To Insert the Mixer
Place Mixer on the overhead arm by aligning the slits on the bottom of the Mixer with
the tabs situated in the overhead arm and
slide inwards; the Mixer should lock into
position. Figure C
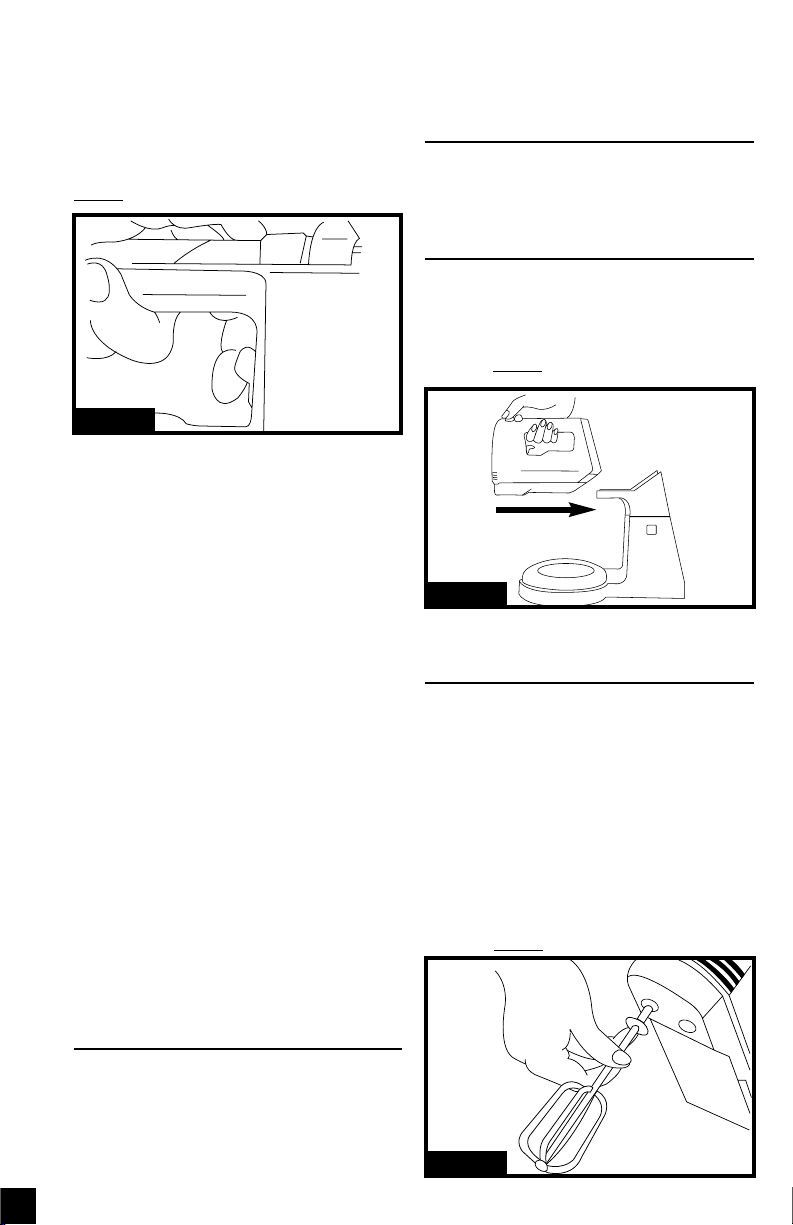
How to Use the Mixer
1. Before handling the Beaters, check to be
sure the Mixer is unplugged from the electrical outlet and the Speed Control Switch
is in the Off position. Insert the Beaters by
grasping the top of the Mixer with one
hand and the Beater Stem with the other
hand. Ensure the Beater openings are closest to you, i.e. facing you. Insert the Beater
with the bowl drive button into the left
side opening, rotating slightly until it locks
into place. Repeat to attach the other
Beater.
Figure D
Figure B
Figure C
Figure D
4
Page 5

Speed Function Use
1 Blend To combine liquids, fold in dry ingredients, egg whites
Low and whipped cream.
Knead Mix dough.
2 Stir To prepare sauces, gravies, puddings and muffins.
3 Mix To prepare batters and mixes.
Medium
4 Beat To cream butter and sugar, make biscuit mix, cake mixes
and icings.
5 Whip To whip light and fluffy mixtures, cream, beat eggs
High (whites, yolks, whole) and mashed potatoes.
POWER BOOST To obtain maximum power level from any
speed setting for tough mixing tasks.
Dough Hooks - Insert the Dough Hooks by
grasping the top of the Mixer with one
hand and the stem of the Dough Hook with
the other hand. Ensure the Beater openings
are closest to you, i.e. facing you. Insert the
Beater with the dough hook into the left
side opening, rotating slightly until it locks
into place. Repeat to attach the other
Dough Hook. Figure E
2. Plug the Cord into a standard electrical
outlet.
3. Place ingredients into the Bowl.
Figure E
4. Holding the overhead arm with one hand,
depress the overhead arm lock button with
the other hand, carefully lower the head
into the mixing bowl, then release the
unlock button to lock the overhead arm in
place.
5. Select the speed setting that matches your
mixing task.
6. Bowl rotation speed can be slowed by plac-
ing hand on the side of the bowl or
turntable.
How to Select the
Correct Mixing Speed
Refer to the following mixing guide for
speed selections. As you add ingredients, the
consistency of the mixture can change. It
may be desirable to use the Power Boost feature for short intervals and/or to select a
higher speed setting.
5
Mixing Tips
How to Beat Egg Whites
• Beaters and bowl must be thoroughly
clean.
• Be sure there is no egg yolk in the egg
whites.
• For maximum volume, egg whites should be
at room temperature.
• Beat with the Mixer set at its highest speed
until egg whites are the desired consistency.
• Beating time varies with the freshness of
eggs.
Page 6

How to Whip Cream
• Cream, Beaters and Bowl must be thoroughly chilled.
• Start with lowest setting (to minimise spatter); as the cream begins to thicken, gradually increase to WHIP (speed setting 5).
• Whipping time varies with fat content, age
and temperature of cream.
How to Knead Dough
• For best results use the Mixer on the stand.
• ALWAYS USE SPEED SETTING 1
WHEN USING DOUGH HOOKS.
• To help combine dry ingredients use a rubber or plastic spatula to scrape the side of
the Bowl. Keep spatula well away from the
moving parts.
• DO NOT attempt to feed the dough into
the Dough Hooks with your hands during
operation.
• When the bread dough is being kneaded, it
forms into an elastic ball (rather than
being spread out like a cake batter). The
Dough Hooks will move through the
dough as one mass as it nears the end of
the kneading process.
• During kneading, the overhead arm may
lift slightly and the Bowl may wobble a little. If these conditions occur excessively
you may need to reduce the load.
• DO NOT use a mixture containing more
than 2 cups of flour as this will overload
the Mixer.
• WE RECOMMEND KNEADING FOR
NO MORE THAN 4 MINUTES.
Removing Beaters or
Dough Hooks
Unplug the Mixer. Set the speed control
to OFF position. Scrape excess mixture from
the Beaters or Dough Hooks with a plastic
spatula.
Grasp stems of Beaters or Dough Hooks
with hand and lift the Beater Eject Lever.
Beaters or dough Hooks will unlock for easy
removal.
Removing Mixer
from Stand
Unplug the Mixer. Set the speed to OFF
position. Press the overhead arm unlock but-
ton and raise the arm. Slide the Mixer carefully away from the stand. The Mixer should
slide easily.
Care and Cleaning
Other than the care mentioned, no other
maintenance or servicing of this appliance is
required. Repairs, if necessary, must be performed by a Black & Decker Company
Owned or Authorised Service Centre.
General Cleaning
1. Before cleaning any part of the Mixer or
Stand, move the Speed Control Switch to
the OFF position, then unplug the Cord
from the outlet and eject the Beaters. Be
sure to dry all parts thoroughly before you
use them again.
2. The Beaters, Dough Hooks and Mixing
Bowl may be washed in hot, soapy water or
in a dishwasher. (Place on top shelf of
dishwasher).
3. The Stand, Mixer, Turntable and Cord can
be cleaned with a damp cloth. To remove
stubborn spots, wipe surfaces with a cloth
slightly dampened in soapy water or a
mild, non-abrasive cleaner. Follow with a
clean damp cloth. DO NOT use any abrasive cleaner or material to clean any part
of the Mixer or Stand as it may scratch the
finish.
NEVER IMMERSE THE MOTOR UNIT, CORD
OR TURNTABLE IN ANY LIQUID.
Service or Repair
Need Help?
Service, if necessary, must be performed by
a Black & Decker Household Appliance
Company-Owned or Authorized Service
6
Page 7

Center. The Service Center nearest you can
usually be found in the yellow pages of your
phone book under “Appliances - Small Repairing”. For your convenience, a complete listing of our Company-Owned Service
Centers can be found on insert sheet.
If shipping or mailing the Stand Mixer,
clean it, then pack the unit carefully in a sturdy carton with enough packing material to
prevent damage. The original carton is not
suitable for mailing. Include a note describing
the problem to our Service Center and be
sure to give your return address and phone
number. We also suggest that you insure the
package for your protection.
Full Two-Year Warranty
Black & Decker warrants this product
against any defects that are due to faulty
material or workmanship for a two-year period after the original date of consumer purchase. This warranty does not include damage to the product resulting from accident,
misuse or repairs performed by non-authorized repair shops. If the product should
become defective within the warranty period,
we will repair it or elect to replace it free of
charge. To honor this warranty, the product
with the correspondent registration card
and/or proof of purchase are required. This
warranty gives you specific legal rights and
you may have other rights which may vary in
your country. Should you have any questions,
contact your nearest Black & Decker owned
or authorized service center, see list included.
Note: Only in Mexico, this warranty includes
transportation charges originated within our
service network.
7
■ Por favor lea con cuidado todas las
instrucciones.
■ Para evitar el riesgo de un choque
eléctrico, NO sumerja la batidora, el
cable, ni el enchufe en agua o
cualquier otro líquido.
■ Limpie el exterior de la batidora con
un paño húmedo.
■ La supervisión de un adulto es nece-
saria cuando el aparato sea usado
cerca de o por un niño. Nunca desatienda la batidora mientras esté en
funcionamiento.
■ Apague la batidora y desconéctela
cuando no esté en uso, cuando le
quite o le ponga sus partes o antes de
limpiarla. Nunca tire del cable.
■ Evite el contacto con las aspas cuan-
do estén en movimiento. Mantenga
el cabello, las manos, ropa, al igual
que espátulas u otros utensilios de
mano, alejados de las aspas mientras
opere la batidora, para evitar lesiones
personales y/o daño a la batidora.
M275
Español
INSTRUCCIONES
DE SEGURIDAD
CONSERVE ESTAS INSTRUCCIONES
Cuando se usan aparatos eléctricos y
para reducir el riesgo de un incendio,
choque eléctrico y/o lesiones personales,
deben tomarse algunas precauciones,
incluyendo las siguientes:
Page 8

8
■ No opere ningún aparato eléctrico si
el cable y/o el enchufe han sido dañados. Si el aparato no funciona o ha
sufrido algún daño, devuélvalo a un
centro de servicio autorizado para
que lo examinen, reparen o ajusten.
■ El uso de accesorios no recomendados
o a la venta por el fabricante del
aparato puede causar incendio,
choque eléctrico o lesiones personales.
■ No use la batidora a la intemperie.
■ No permita que el cable cuelgue del
borde de la mesa o del mostrador o
tenga contacto con superficies
calientes.
■ Retire las aspas y la espátula de la
batidora antes de lavarlas.
■ No opere ni coloque ninguna parte
de la batidora cerca ni sobre de
ninguna superficie caliente (tales
como las hornillas eléctricas o de gas,
o de un horno caliente).
■ No use la batidora para mezclar pin-
turas u otros líquidos inflamables ni
cerca de lugares contaminados por
gases o vapores inflamables.
■ No maltrate el cable. Nunca sujete
la batidora por el cable ni la
desconecte jalando el cable del toma
corriente; sujete el enchufe firmemente y jálelo para desconectar.
■ Cuando use un cable de extensión,
asegúrese de que tenga un enchufe
polarizado y de que esté calificada
para no menos de 10 amperes y 120
volts.
■ Este producto ha sido diseñado sola-
mente para uso doméstico.
■ No trate de reparar la batidora per-
sonalmente, llévela a un centro
de servicio autorizado o propio de
Black & Decker.
Base
Control de velocidad
Aspas para amasar
Aspas
Tazón
Disco giratorio
Cable
Botón de seguridad
Palanca para extraer
las aspas
Botón de potencia-extra
Page 9

9
Enchufe Polarizado
Se emplean enchufes polarizados con un
contacto más ancho que el otro para reducir
los riesgos de choque eléctrico. Cuando el
cable tiene este tipo de enchufe, se ajusta únicamente a un contacto polarizado. Si el
enchufe no se ajusta en su contacto, inviértalo. Si aún así no se ajusta, busque la ayuda de
un electricista calificado para que instale un
contacto polarizado apropiado. Por ningún
punto trate de modificar o hacerle cambios al
enchufe.
Características prácticas
de su batidora
5 Velocidades de precisión
Las 5 velocidades le permiten seleccionar
la velocidad más conveniente para el tipo de
alimento que esté preparando.
Potencia extra
La característica “Power Boost” (potencia
extra) le permite aumentar la velocidad del
mezclado al nivel máximo desde cualquier
velocidad al oprimir el botón “Power Boost”.
Cuando sienta que la batidora está funcionando lentamente o se está esforzando al
mezclar, oprima el botón “Power Boost” para
obtener un rendimiento máximo. Al soltarse
este botón la batidora vuelve a la velocidad
inicial. Figure A
Palanca para extraer las aspas
La batidora de pedestal de Black & Decker
cuenta con una práctica palanca para extraer
las aspas que se encuentra debajo del mango.
Le permite extraer las aspas fácilmente con el
dedo índice.
Figure B
Como medida de seguridad, desenchufe
del tomacorriente antes de extraer las aspas.
Aspas grandes
Las aspas grandes le permiten obtener
resultados rápidos y consistentes al mezclar.
Las aspas pueden lavarse en la máquina
lavaplatos.
Fuertes aspas para masa
Se han incluido fuertes aspas para amasar
panes y repostería. Las aspas pueden lavarse
en la máquina lavaplatos.
Disco giratorio
El disco facilita un mezclado consistente.
Dos posiciones del brazo del pedestal
Al mezclar, la unidad permanece ajustada
en su base. Al finalizar el mezclado, el tazón
puede retirarse fácilmente al oprimirse el
“Lock Button” (seguro de cierre) y al alzarse
el brazo superior.
Tazón plástico de 2,2 litros
Fácil de limpiar y puede lavarse en la
máquina lavaplatos. (Colóquese en la bandeja superior de la máquina, alejado de la
resistencia). No debe ser usado dentro de un
horno microondas.
Antes del primer uso
Antes de usar la batidora por primera vez,
lave las aspas y el tazón en agua con jabón,
enjuague y seque bien.
Como ensamblar
el pedestal
Si usa el pedestal, colóquelo en una superficie plana y ajuste el disco giratorio a la base
Figure A
Figure B
0 1 2 3 4 5
POWER
BOOST
Page 10

Para instalar la batidora
Coloque la batidora en el pedestal,
alineando las ranuras en el inferior de la
batidora con las guías del brazo; deslice
hacia adentro hasta que la batidora
quede bien ajustada en su lugar.
Figure C
Como usar la batidora
1. Antes de manejar las aspas, asegúrese de
que la batidora esté desconectada del tomacorriente y de que el control de velocidad
esté en la posición “OFF” (apagada).
Instale las aspas sujetando la batidora con una
mano y el vástago del aspa con la otra.
Asegúrese de que las aberturas para las aspas
estén hacia Ud. Ajuste la aspa, rotando levemente hasta quedar ajustada en su lugar.
Repita la operación para instalar la otra aspa.
Figure D
Aspas para amasar - Ajuste las aspas para
amasar sujetando la batidora con una mano
y el vástago del aspa con la otra. Asegúrese
de que las aberturas para las aspas estén
hacia Ud. Ajuste la aspa, rotando levemente
hasta quedar ajustada en su lugar. Repita la
operación para colocar la otra aspa. Figure E
2. Enchufe el cable en un tomacorriente stan-
dard.
3. Coloque los ingredientes en el tazón.
4. Sujetando el brazo superior con una mano,
oprima el seguro de cierre con la otra mano,
baje la batidora dentro del tazón y suelte el
seguro de cierre para que el brazo quede
ajustado en su lugar.
5. Determine la velocidad adecuada para lo
que va a mezclar.
6. La velocidad de la rotación del tazón puede
mermarse sujetando el tazón con una mano.
Como determinar la
velocidad apropiada
Consulte la siguiente guía para determinar
la velocidad. A medida que se agregan los
ingredientes, cambia también la consistencia
de la mezcla. Deseará hacer uso de la
característica “Power Boost” (potencia extra)
a intervalos cortos y/o ajustar la velocidad a
una más alta.
Figure C
Figure D
Figure E
10
Page 11

Velocidad
Funcion Uso
1
Combinar Para combinar líquidos, ingredientes secos, claras
Baja de huevo y crema batida
Amasar Mezclar masa
2
Revolver Para preparar salsas, budines y muffins
3
Mezclar Para preparar mezclas
Media
4
Cremar Para acremar mantequilla y azúcar, para batir mezclas de
panes, pasteles y merengues
5
Batir Para batir mezclas ligeras y espumosas, huevos y puré de papa
Alta
POWER BOOST
Para obtener el nivel más alto de potencia a cualquier
velocidad para las mezclas pesadas
11
Consejos para batir
Como batir claras de huevo
• Las aspas y el tazón deben de estar bien
limpios.
• Asegúrese de que no haya yema de huevo
en las claras.
• Para obtener mayor volumen, las claras
deben de estar a temperatura ambiental.
• Bata las claras a la velocidad máxima hasta
conseguir la consistencia deseada.
• El tiempo de batido depende de la frescura
de los huevos.
Como batir crema
• La crema, las aspas y el tazón deben de estar
fríos.
• Inicie el batido a la velocidad mínima (para
no salpicar); a medida que la crema
comience a espesar, aumente la velocidad
a 5, WHIP (cremar).
• El batido varía de acuerdo con la cantidad
de grasa, la frescura y la temperatura de la
crema.
Como amasar
• Para obtener un mejor resultado, coloque
la batidora en el pedestal.
• CUANDO USE LAS ASPAS PARA
AMASAR SIEMPRE AJUSTE LA
VELOCIDAD AL # 1.
• Para ayudar a combinar los ingredientes
secos o para recoger la masa de los lados del
tazón, use una espátula plástica o de goma.
Mantenga la espátula alejada de las aspas.
• NO trate de usar las manos para empujar la
masa hacia las aspas.
• Cuando la mezcla para el pan está siendo
amasada se forma una bola elástica (a
diferencia de la mezcla para un pastel).
Las aspas penetran la mezcla para poderla
amasar.
• Al amasar, a veces el brazo o el tazón tienden a moverse un poco. Si esto ocurre
excesivamente deberá reducir la cantidad
de masa.
• NO use una mezcla que requiera más de
500ml (2 Tazas) de harina ya que puede
recargar la batidora.
• RECOMENDAMOS QUE SE AMASE
POR UN MÍNIMO DE 4 MINUTOS.
Como retirar las aspas
Desconecte la batidora y ajuste el control
a la posición “OFF” (apagada). Limpie el
exceso de mezcla con una espátula plástica.
Sujete las aspas por el vástago y oprima la
palanca que las suelta. Las aspas pueden retirarse fácilmente.
Como retirar la
batidora del pedestal
Desconecte la batidora y ajuste el control
a la posición “OFF” (apagada). Oprima el
botón del seguro de cierre en la parte superior
del brazo y alce el brazo de la batidora. La
batidora se deslizará con facilidad.
Page 12

Copyright © 1997 Black & Decker
Pub. No. 173814-00
Printed in China
Impreso en China
Cuidado y limpieza
Además del cuidado ya mencionado, esta
batidora no requiere de ningún otro servicio
ni mantenimiento. De ser necesaria alguna
reparación, deberá ser llevada a cabo por un
centro de servicio de Black & Decker o uno
autorizado por esta misma entidad.
General Cleaning
1. Antes de limpiar cualquier parte de la bati-
dora o del pedestal, ajuste el control a la
posición “OFF”(apagada), desconecte el
cable y retire las aspas. Asegúrese de secar
bien todas las partes antes de usarlas nuevamente.
2. Las aspas y el tazón pueden lavarse en agua
caliente con jabón o en la bandeja superior
de la máquina lavaplatos.
3. El pedestal, la batidora, el disco y el cable
pueden limpiarse con un paño húmedo.
Para sacar las manchas persistentes, limpie
las superficies con un paño humedecido
con agua y jabón o con un limpiador sin
abrasivos. Seque con un paño limpio. NO
use ningún líquido ni material abrasivo
para limpiar el pedestal o la batidora ya
que pueden dañar el acabado.
NUNCA SUMERJA EL MOTOR, EL CABLE NI
EL DISCO EN NINGÚN LIQUIDO.
Servicio o reparaciones
¿Necesita ayuda?
Si necesita ayuda, acuda a un centro de
servicio autorizado o propio de Black &
Decker. Puede encontrar un centro cercano a ud. buscando en las páginas amarillas de la guía telefónica bajo, “pequeñas
reparaciones de aparatos”, o consulte el
folleto incluído. Si envía por correo la
unidad, empáquela con cuidado dentro de
su caja original o una suficientemente
fuerte para evitar cualquier daño. Le
agradeceremos que incluya una nota para
nuestro centro de servicio describiendo el
problema. No se olvide de anotar su
dirección y número telefónico. Para su
propia protección le sugerimos enviar el
paquete asegurado.
Dos años completos de garantia
Black & Decker garantiza este producto
contra cualquier defecto originado por fallas en
los materiales o mano de obra por un período
de dos años a partir de la fecha original de
compra. Esta garantía no incluye daños al producto ocasionados por accidentes, mal uso o
reparaciones por talleres no autorizados por
Black & Decker. Si el producto resulta con
defectos dentro del período de garantía, lo
repararemos o reemplazaremos de ser necesario, sin cargo alguno. Para que esta garantía
sea válida debe presentar el producto con su
recibo de compra y/o la tarjeta de registro
correspondiente. Esta garantía le otorga
derechos legales específicos, y usted podría
tener otros que pueden variar en su país. Si
tiene cualquier pregunta, comuníquese con su
Sucursal o Centro de Servicio Black & Decker
más cercano, ver lista incluída.
Nota: Solamente en México, esta garantía
incluye los gastos de transportación que se
originen dentro de su red de servicio.
Importado por Black & Decker, S.A. de C.V., Bosques de Cidros,
Acceso Radiatas No. 42, Bosques de Las Lomas, 05120 México, D.F.
Tel: 326-7100
Black & Decker, S.A. de C.V.
175W 120V~ 60HZ
 Loading...