

Page 1
INSTRUCTION MANUAL
40v MAX* Lithium Trimmer/Edger
Thank you for choosing BLACK+DECKER!
PLEASE READ BEFORE RETURNING THIS PRODUCT FOR ANY REASON.
If you have a question or experience a problem with your BLACK+DECKER purchase, go to
http://www.blackanddecker.com/instantanswers
If you can’t find the answer or do not have access to the Internet, call 1-800-544-6986
from 8 a.m. to 5 p.m. EST Mon. - Fri. to speak with an agent. Please have the catalog
number available when you call.
SAVE THIS MANUAL FOR FUTURE REFERENCE.
VEA EL ESPANOL EN LA CONTRAPORTADA. INSTRUCTIVO DE OPERACIÓN, CENTROS DE SERVICIO Y
PÓLIZA DE GARANTÍA. ADVERTENCIA: LÉASE ESTE INSTRUCTIVO ANTES DE USAR EL PRODUCTO.
*Maximum initial battery pack voltage (measured without a workload) is 40 volts. The nominal voltage is 36.
CATALOG NUMBER
LST140
To register your new product, visit
www.BlackandDecker.com/NewOwner
KEY INFORMATION YOU SHOULD KNOW
WARNING:
Do not remove guard. The guard must be attached when
trimming. Operating this trimmer without the guard will violate the product warranty.
CAUTION:
When replacing the line, use only .065 inches (1.65 mm) diameter
round line. Other sizes may degrade performance or cause damage to the trimmer.
• For use only with BLACK+DECKER 40v batteries.
IF YOU HAVE ANY QUESTIONS OR COMMENTS ABOUT THIS OR ANY
BLACK+DECKER appliance, CALL US TOLL FREE AT: 1-800-544-6986.
Page 2

2
IMPORTANT SAFETY WARNINGS
WARNING:
When using electric
gardening appliances, basic safety
precautions should always be followed to
reduce risk of fire, electric shock, and
personal injury, including the following.
READ ALL INSTRUCTIONS
• ALWAYS WEAR EYE PROTECTION –
Wear safety spectacles or goggles at all
times when battery is installed. These
items are available for purchase.
• GUARD – Do not use this appliance
without guard attached.
• DRESS PROPERLY – Do not wear loose
clothing or jewelry. They can be caught
in moving parts. Gloves and substantial
rubber soled footwear are recommended
when working outdoors. Don’t operate
the appliance when barefoot or wearing
open sandals. Wear heavy long pants
to protect your legs. Wear protective hair
covering to contain long hair.
• NYLON LINE – Keep face, hands and feet
clear of rotating nylon line at all times.
• THE ROTATING LINE PERFORMS A
CUTTING FUNCTION – Use care when
trimming around screens and desirable
plantings.
• KEEP ALL BYSTANDERS AWAY – at a
safe distance from work area, especially
children.
•
IMPORTANT WARNING – When being
used as an Edger, stones, pieces of metal
and other objects can be thrown out at
high speed by the line. The appliance and
guard are designed to reduce the danger.
However, the following special precautions
should be taken: MAKE SURE that other
persons and pets are at least 100 feet
(30m) away.
• TO REDUCE THE RISK of rebound
(ricochet) injury, work going away from any
nearby solid object such as wall, steps,
large stone, tree, etc. Use great care when
working close to solid objects and where
necessary, do trimming by hand.
• AVOID ACCIDENTALLY STARTING –
Don’t carry with finger on trigger when
battery is installed.
• USE THE RIGHT APPLIANCE – Do not
use this appliance for any job except that
for which it is intended.
• DON’T OVERREACH
– Keep proper
footing and balance at all times.
•
DON’T FORCE APPLIANCE – It will do the
job better and with less likelihood of a risk of
injury at the rate for which it was designed
• DAMAGE TO UNIT – If you strike or
become entangled with a foreign object,
stop appliance immediately, remove
battery, check for damage and have
any damage repaired before further
operation is attempted. Do not operate
with a broken hub or spool.
• REMOVE BATTERY – when not in use,
when replacing line, or prior to cleaning.
• AVOID DANGEROUS
ENVIRONMENTAL CONDITIONS – Do
not use electric appliances in damp
or wet locations. Follow all instructions
in this Instruction Manual for proper
operation of your appliance. Don’t use
the appliance in the rain.
• DO NOT OPERATE portable electric
appliances in gaseous or explosive
atmospheres. Motors in these
appliances normally spark, and the
sparks might ignite fumes.
•
STORE IDLE APPLIANCES INDOORS
– When not in use, appliances should be
stored indoors in a dry, locked-up place out
of reach of children.
•
STAY ALERT – Do not operate this unit when
you are tired, ill, or under the influence of
alcohol, drugs, or medication.
• MAINTAIN APPLIANCES WITH CARE
– Follow instructions in maintenance
section. Keep handles dry, clean and
free from oil and grease.
• CHECK DAMAGED PARTS – Before
further use of the appliance, a guard or
other part that is damaged should be
carefully checked to determine that it will
operate properly and perform its intended
function. Check for alignment of moving
Definitions: Safety Alert Symbols and Words
This instruction manual uses the following safety alert symbols and words to alert you
to hazardous situations and your risks of personal injury or property damage.
DANGER: Indicates an imminently hazardous situation which, if not avoided, will
result in death or serious injury.
WARNING: Indicates a potentially hazardous situation which, if not avoided,
could result in death or serious injury.
CAUTION: Indicates a potentially haz ard ous situation which, if not avoided, may
result in minor or mod er ate injury.
NOTICE: Used without the safety alert symbol indicates potentially hazardous
situation which, if not avoided, may result in property damage.
Page 3

3
parts, binding of moving parts, breakage
of parts, mounting, and any other condition
that may affect its operation. A guard
or other part that is damaged should
be properly repaired or replaced by an
authorized service center unless otherwise
indicated elsewhere in this manual.
ADDITIONAL SAFETY WARNINGS
a ) Prevent unintentional starting.
Ensure the switch is in the off-position
before connecting to battery pack,
picking up or carrying the appliance.
Carrying the appliance with your finger
on the switch or energizing appliance
that have the switch on invites accidents.
b ) Disconnect the battery pack from
the appliance before making any
adjustments, changing accessories,
or storing appliance. Such preventive
safety measures reduce the risk of
starting the appliance accidentally.
c ) Recharge only with the charger
specified by the manufacturer. A
charger that is suitable for one type of
battery pack may create a risk of fire
when used with another battery pack.
d ) Use appliances only with specifically
designated battery packs. Use of any
other battery packs may create a risk of
injury and fire.
e )
When battery pack is not in use, keep
it away from other metal objects, like
paper clips, coins, keys, nails, screws
or other small metal objects, that can
make a connection from one terminal
to another. Shorting the battery terminals
together may cause burns or a fire.
f ) Under abusive conditions, liquid may
be ejected from the battery; avoid
contact. If contact accidentally occurs,
flush with water. If liquid contacts
eyes, additionally seek medical help.
Liquid ejected from the battery may
cause irritation or burns.
g )
Do not use a battery pack or
appliance that is damaged or modified.
Damaged or modified batteries may
exhibit unpredictable behavior resulting
in fire, explosion or risk of injury.
h ) Do not expose a battery pack
or appliance to fire or excessive
temperature. Exposure to fire or
temperature above 130°C may cause
explosion. The temperature of 130°C can
be replaced by the temperature of 265°F.
i ) Have servicing performed by a
qualified repair person using only
identical replacement parts. This will
ensure that the safety of the product is
maintained.
• DO NOT immerse appliance in water or
squirt it with a hose. DO NOT allow any
liquid to get inside it. If appliance does get
wet, allow to dry for a minimum of 48 hours.
•
DO NOT store the appliance on or
adjacent to fertilizers or chemicals.
• DO NOT clean with a pressure washer.
• Keep guards in place and in working order.
• Keep hands and feet away from cutting area.
• DO NOT charge appliance in rain, or in
wet locations.
• Use only with BLACK+DECKER LB
series 36V or 40V Max batteries.
• Use only with BLACK+DECKER LC
series 36V or 40V Max chargers.
•
DO NOT
dispose of the battery in a fire. The
cell may explode. Check with local codes for
possible special disposal instructions.
• DO NOT open or mutilate the battery.
Released electrolyte is corrosive and
may cause damage to the eyes or skin.
It may be toxic if swallowed.
WARNING: Do not use appliance if
the switch trigger does not turn the
appliance on or off. Any appliance that can
not be controlled with the switch trigger is
dangerous and must be repaired.
WARNING:
Some dust created by this
product contains chemicals known to the State
of California to cause cancer, birth defects or
other reproductive harm. Some examples of
these chemicals are:
• compounds in fertilizers
• compounds in insecticides,
herbicides and pesticides
• arsenic and chromium from
chemically treated lumber
To reduce your exposure to these chemicals,
wear approved safety equipment such as
dust masks that are specially designed to
filter out microscopic particles.
• The label on your appliance may include
the following symbols. The symbols and
their definitions are as follows:
V ..................volts
mW .............. milliwatts
nm ............... wavelength in nonometers
A ..................amperes
Hz ................ hertz
W .................watts
min ..............minutes
or AC ...... alternating current
or DC ...direct current
n
o ................ no load speed
................Class I Construction
(grounded)
................earthing terminal
............... safety alert symbol
................Class II Construction
(double insulated)
.../min or rpm...revolutions or
reciprocation per minute
.................
Use proper respiratory protection
Page 4

4
................. Read instruction manual before use
................Use proper eye protection
...................Use proper hearing protection
IMPORTANT SAFETY INSTRUCTIONS
FOR BATTERY CHARGERS
SAVE THESE INSTRUCTIONS: This
manual contains important safety
instructions for battery chargers.
• Before using charger, read all
instructions and cautionary markings
on charger, battery pack, and product
using battery pack.
WARNING:
SHOCK HAZARD.
Disconnect the charger from the AC outlet
before cleaning. Dirt and grease may be
removed from the exterior of the charger
using a cloth or soft non-metallic brush. Do
not use water or any cleaning solutions.
WARNING:
SHOCK HAZARD.
Do
not allow any liquid to get inside the
charger. Electric shock may result.
WARNING:
BURN HAZARD. Do not
submerge the battery pack in any liquid or
allow any liquid to enter the battery pack.
Never attempt to open the battery pack for
any reason. If the plastic housing of the
battery pack breaks or cracks, return to a
service center for recycling.
CAUTION: BURN HAZARD. To
reduce the risk of injury, charge only
BLACK+DECKER rechargeable battery
packs. Other types of batteries may
overheat and burst resulting in personal
injury and property damage.
CAUTION: Under certain
conditions, with the charger plugged into
the power supply, the charger can be
shorted by foreign material.
WARNING:
• DO NOT attempt to charge the battery
pack with any chargers other than
those specified by the manufacturer.
The charger and battery pack are
specifically designed to work together.
• These chargers are not intended for any
uses other than charging designated
BLACK+DECKER rechargeable
batteries. Any other uses may result in risk
of fire, electric shock or electrocution.
• Do not expose charger to rain or snow.
• Pull by plug rather than cord when
disconnecting charger. This will reduce
risk of damage to electric plug and cord.
•
Make sure that cord is located so that it
will not be stepped on, tripped over, or
otherwise subjected to damage or stress.
• When operating a charger outdoors,
always provide a dry location.
• If use of an extension cord is absolutely
necessary outdoors, use an extension
cord suitable for outdoor use. Use of a
cord suitable for outdoor use reduces the
risk of electric shock.
• An extension cord must have
adequate wire size (AWG or
American Wire Gauge) for safety. The
smaller the gauge number of the wire,
the greater the capacity of the cable,
that is 16 gauge has more capacity than
18 gauge. When using more than one
extension to make up the total length,
be sure each individual extension
contains at least the minimum wire size.
Recommended Minimum Wire Size
for Extension Cords
Minimum Gage for Cord Sets
Volts Total Length of Cord in Feet
120V 0-25 26-50 51-100 101-150
(0-7,6m) (7,6-15,2m) (15,2-30,4m) (30,4-45,7m)
Ampere Rating
More Not more American Wire Gage
Than Than
0 -6 18 16 16 14
6 -10 18 16 14 12
10 -12 16 16 14 12
12 -16 14 12 Not Recommended
• Do not place any object on top of
charger or place the charger on
a soft surface that might block
the ventilation slots and result in
excessive internal heat. Place the
charger in a position away from any
heat source. The charger is ventilated
through slots in the top and the bottom
of the housing.
• Do not mount charger on wall or
permanently affix charger to any
surface. The charger is intended to use
on a flat, stable surface (i.e., table top,
bench top).
• Do not operate charger with damaged
cord or plug — have them replaced
immediately.
• Do not operate charger if it has
received a sharp blow, been dropped,
or otherwise damaged in any way.
Take it to an authorized service center.
• Do not disassemble charger; take it
to an authorized service center when
service or repair is required. Incorrect
reassembly may result in a risk of
electric shock, electrocution or fire.
• Disconnect the charger from
the outlet before attempting any
cleaning. This will reduce the risk of
electric shock. Removing the battery
pack will not reduce this risk.
• NEVER attempt to connect 2
chargers together.
• The charger is designed to operate on
standard household electrical power
(120 Volts). Do not attempt to use it on
any other voltage.
IMPORTANT SAFETY INSTRUCTIONS
FOR BATTERY PACKS
WARNING:
READ ALL SAFETY
Page 5

5
WARNINGS and all instructions for the
battery pack, charger and power tool.
Failure to follow the warnings and
instructions may result in electric shock, fire
and/or serious injury.
The battery pack is not fully charged out
of the carton. Before using the battery
pack and charger, read the safety
instructions below. Then follow charging
procedures outlined.
READ ALL INSTRUCTIONS
• NEVER force the battery pack into
the charger. DO NOT modify the
battery pack in any way to fit into a
non-compatible charger as battery
pack may rupture causing serious
personal injury. Consult the chart at
the end of this manual for compatibility
of batteries and chargers.
• Do not incinerate the battery pack
even if it is severely damaged or is
completely worn out. The battery pack
can explode in a fire. Toxic fumes and
materials are created when battery
packs are burned.
•
Do not charge or use battery in explosive
atmospheres, such as in the presence
of flammable liquids, gases or dust.
Inserting or removing the battery from the
charger may ignite the dust or fumes.
•
If battery contents come into contact
with the skin, immediately wash area
with mild soap and water. If battery liquid
gets into the eye, rinse water over the open
eye for 15 minutes or until irritation ceases.
If medical attention is needed, the battery
electrolyte for Li-ion batteries is composed
of a mixture of liquid organic carbonates
and lithium salts.
• Contents of opened battery cells may
cause respiratory irritation. Provide
fresh air. If symptoms persist, seek
medical attention.
• Do not dispose of the battery in a fire. The
cell may explode. Check with local codes
for possible special disposal instructions.
• Do not open or mutilate the battery.
Released electrolyte is corrosive and
may cause damage to the eyes or skin.
It may be toxic if swallowed.
WARNING: BURN HAZARD.
BATTERY LIQUID MAY BE FLAMMABLE
IF EXPOSED TO SPARK OR FLAME.
• Charge the battery packs only in
BLACK+DECKER chargers.
• DO NOT splash or immerse in water
or other liquids. This may cause
premature cell failure.
• Do not store or use the appliance and
battery pack in locations where the
temperature may reach or exceed
105°F (40˚C) (such as outside sheds
or metal buildings in summer).
WARNING: NEVER ATTEMPT TO
OPEN THE BATTERY PACK FOR ANY
REASON. IF BATTERY PACK CASE IS
CRACKED OR DAMAGED, DO NOT
INSERT INTO CHARGER. DO NOT CRUSH,
DROP OR DAMAGE BATTERY PACK. DO
NOT USE A BATTERY PACK OR
CHARGER THAT HAS RECEIVED A
SHARP BLOW, BEEN DROPPED, RUN
OVER OR DAMAGED IN ANY WAY (I.E.,
PIERCED WITH A NAIL, HIT WITH A
HAMMER, STEPPED ON). DAMAGED
BATTERY PACKS SHOULD BE RETURNED
TO SERVICE CENTER FOR RECYCLING.
WARNING: FIRE HAZARD. DO NOT
STORE OR CARRY BATTERY SO THAT
METAL OBJECTS CAN CONTACT
EXPOSED BATTERY TERMINALS. FOR
EXAMPLE, DO NOT PLACE BATTERY IN
APRONS, POCKETS, APPLIANCE BOXES,
PRODUCT KIT BOXES, DRAWERS, ETC.,
WITH LOOSE NAILS, SCREWS, KEYS, ETC.
TRANSPORTING BATTERIES CAN
POSSIBLY CAUSE FIRES IF THE
BATTERY TERMINALS INADVERTENTLY
COME IN CONTACT WITH CONDUCTIVE
MATERIALS SUCH AS KEYS, COINS,
HAND APPLIANCES AND THE LIKE. THE
US DEPARTMENT OF TRANSPORTATION
HAZARDOUS MATERIAL REGULATIONS
(HMR) ACTUALLY PROHIBIT
TRANSPORTING BATTERIES IN COMMERCE
OR ON AIRPLANES (I.E., PACKED IN
SUITCASES AND CARRY-ON LUGGAGE)
UNLESS THEY ARE PROPERLY PROTECTED
FROM SHORT CIRCUITS. SO WHEN
TRANSPORTING INDIVIDUAL BATTERIES,
MAKE SURE THAT THE BATTERY
TERMINALS ARE PROTECTED AND WELL
INSULATED FROM MATERIALS THAT
COULD CONTACT THEM AND CAUSE A
SHORT CIRCUIT. NOTE: BATTERIES
SHOULD NOT BE PUT IN CHECKED
BAGGAGE.
STORAGE RECOMMENDATIONS
1. The best storage place is one that is
cool and dry away from direct sunlight
and excess heat or cold.
2. For long storage, it is recommended
to store a fully charged battery pack in
a cool dry place out of the charger for
optimal results.
NOTE: Do not store the battery packs
in a tool with the trigger switch locked
on. Never tape the trigger switch in the
ON position.
Page 6
6
NOTE: Battery packs should not be stored
completely depleted of charge. The battery
pack will need to be recharged before use.
CHARGING PROCEDURE
BLACK+DECKER chargers are designed to
charge BLACK+DECKER battery packs.
NOTE: To ensure maximum performance
and life of lithium ion BATTERY PACKS:
• Charge the battery pack fully before
first use.
• Recharge discharged batteries as
soon a possible after every use.
• Do not discharge batteries fully.
BLACK+DECKER Battery and Charger Systems
Chargers/Charge Time** (Hours) (0% - 100%
charge)
40V MAX*
Batteries
Watt
Hours
40V MAX* Chargers
LCS36 LCS40 LCS436
LBX36 47
1 1 3.25
LBXR36 60
1.25 1.25 3.75
LBX1540 60
1.25 1.25 3.75
LBXR2036 80
1.5 1.5 5
LBX2040 80
1.5 1.5 5
LBXR2540 100
1.75 1.75 6.25
LBX2540 100
1.75 1.75 6.25
**All charge times are approximate. Actual charge
time may vary.
1. Plug the charger into an appropriate
outlet before inserting the battery pack.
2. Insert the battery pack into the charger.
3. The green LED will flash indicating
that the battery is being charged.
4. The completion of charge is
indicated by the green LED
remaining on continuously. The pack is
fully charged and may be used at this
time or left on the charger.
Recharge discharged batteries as soon
as possible after use or battery life may
be greatly diminished.
CHARGER DIAGNOSTICS
This charger is designed to detect certain
problems that can arise with the battery packs
or the power source. Problems are indicated
by one LED flashing in different patterns.
BAD BATTERY
The charger can detect a weak or
damaged battery. The red LED
flashes in the pattern indicated on the
label. If you see this bad battery blink
pattern, do not continue to charge the
battery. Return it to a service center or a
collection site for recycling.
HOT/COLD PACK DELAY
When the charger detects a battery
that is excessively hot or excessively
cold, it automatically starts a Hot/Cold Pack
Delay, suspending charging until the
battery has normalized. After this happens,
the charger automatically switches to the
Pack Charging mode. This feature ensures
maximum battery life. The red LED flashes
in the pattern indicated on the label when
the hot / cold pack delay is detected.
LEAVING THE BATTERY IN THE CHARGER
The charger and battery pack can be left
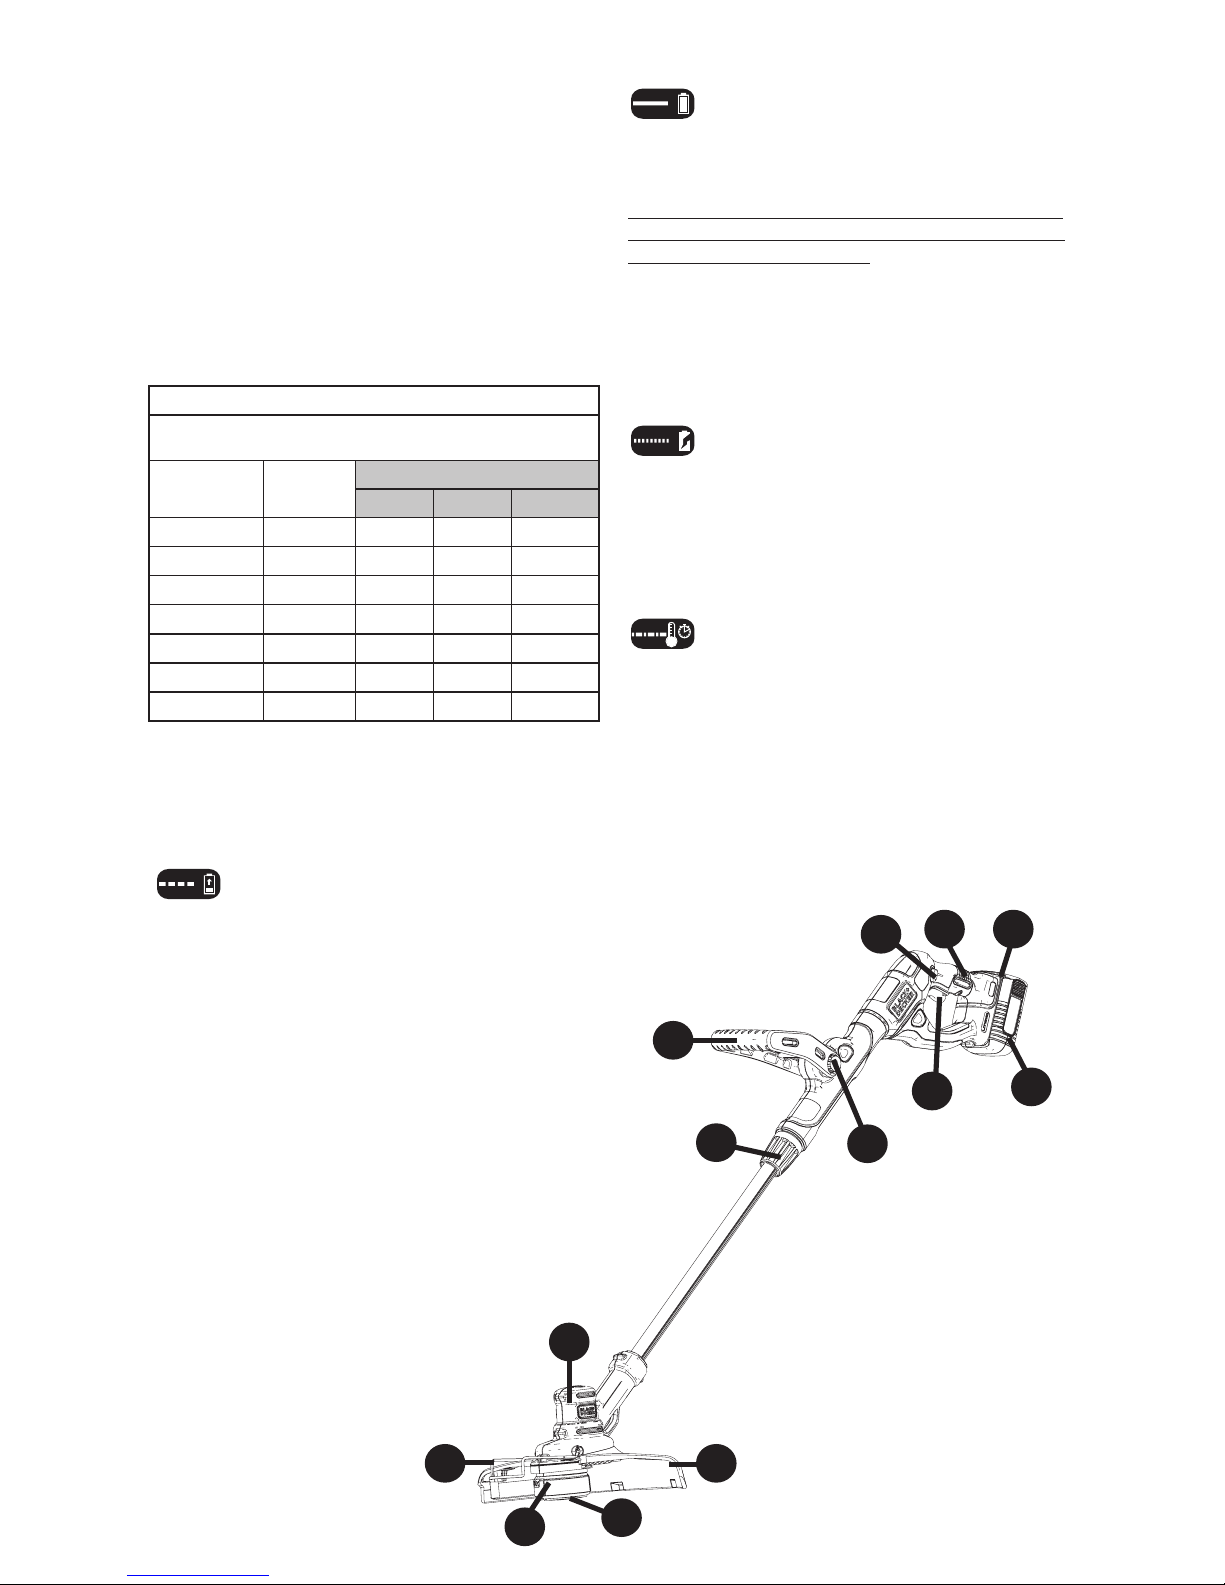
1. Variable speed trigger
2. Handle
3. Lock off button
4. Battery
5. Charge indicator
6. Auxiliary handle
7. Auxiliary handle button
8. Adjustment collar
9. Trimmer head
10. Edge guide
11. Guard
12. Spool housing
13. Spool cap
FUNCTIONAL DESCRIPTION
8
9
3
1
11
4
10
6
13
5
12
2
7
Page 7

7
connected with the green LED glowing
indefinitely. The charger will keep the battery
pack fresh and fully charged.
IMPORTANT CHARGING NOTES
1. Longest life and best performance can
be obtained if the battery pack is charged
when the air temperature is between 60°F
and 80°F (16°- 27°C). DO NOT charge the
battery pack in an air temperature below
+40°F (+4.5°C), or above +105°F (+40.5°C).
This is important and will prevent serious
damage to the battery pack.
2. The charger and battery pack may
become warm to touch while charging.
This is a normal condition, and does
not indicate a problem. To facilitate the
cooling of the battery pack after use,
avoid placing the charger or battery pack
in a warm environment such as in a metal
shed, or an uninsulated trailer.
3.
If the battery pack does not charge properly:
a. Check current at receptacle by
plugging in a lamp or other appliance
b. Check to see if receptacle is
connected to a light switch which
turns power off when you turn out
the lights.
c. Move charger and battery pack
to a location where the surrounding
air temperature is approximately 60°F
- 80°F (16° - 27°C).
d. If charging problems persist, take
the appliance, battery pack and
charger to your local service center.
4.
The battery pack should be recharged
when it fails to produce sufficient power
on jobs which were easily done previously.
DO NOT CONTINUE to use under these
conditions. Follow the charging procedure.
You may also charge a partially used pack
whenever you desire with no adverse affect
on the battery pack.
5
. Foreign materials of a conductive
nature such as, but not limited to, steel
wool, aluminum foil, or any buildup of
metallic particles should be kept away
from charger cavities. Always unplug the
charger from the power supply when there
is no battery pack in the cavity. Unplug
charger before attempting to clean.
6. Do not freeze or immerse charger in
water or any other liquid.
WARNING: SHOCK HAZARD. Do not
allow any liquid to get inside charger. NEVER
ATTEMPT TO OPEN THE BATTERY PACK
FOR ANY REASON. IF THE PLASTIC
HOUSING OF THE BATTERY PACK BREAKS
OR CRACKS, RETURN TO A SERVICE
CENTER FOR RECYCLING.
STATE OF CHARGE INDICATOR
The battery is equipped with a state
of charge indicator. This can be used
to display the current level of charge
in the battery while in the trimmer and
during charging. It does not indicate
appliance functionality and is subject to
variation based on product components,
temperature and end-user application.
Checking state of charge during use:
• Press the state of charge indicator
button (A1).
• The three LEDs (A2) will illuminate
indicating the percent of charge in the
battery. See chart in figure A.
• If LED light does not illuminate, charge
battery.
<18%
18% - 45%
45% - 72%
72% - 100%
A2
A1
A
INSTALLING AND REMOVING THE
BATTERY PACK
WARNING: MAKE SURE THE
SWITCH IS NOT ACTUATED WHEN
REMOVING OR INSTALLING BATTERY.
TO INSTALL BATTERY PACK:
Insert battery pack into trimmer until fully
seated and an audible click is heard
(figure B). Make sure battery pack is fully
seated and fully latched into position.
TO REMOVE BATTERY PACK: Depress
the battery release button in the back of
the battery pack and pull battery pack
out of trimmer (figure C).
B
C
Page 8
SAVE THESE INSTRUCTIONS
INTENDED USE
This string trimmer is designed for residential
trimming applications. DO NOT use under wet
conditions or in presence of flammable liquids
or gases.
This string trimmer is a residential appliance.
DO NOT let children come into contact
with the tool. Supervision is required when
inexperienced operators use this appliance.
ASSEMBLY AND ADJUSTMENT
WARNING:
BEFORE ASSEMBLY,
MAKE SURE THAT THE APPLIANCE IS
SWITCHED OFF AND THE BATTERY HAS
BEEN REMOVED.
ASSEMBLY TOOLS REQUIRED (NOT SUPPLIED):
- Phillips Screwdriver
WARNING:
REMOVE THE BATTERY
BEFORE ATTEMPTING TO ATTACH ANY OF
THE FOLLOWING COMPONENTS.
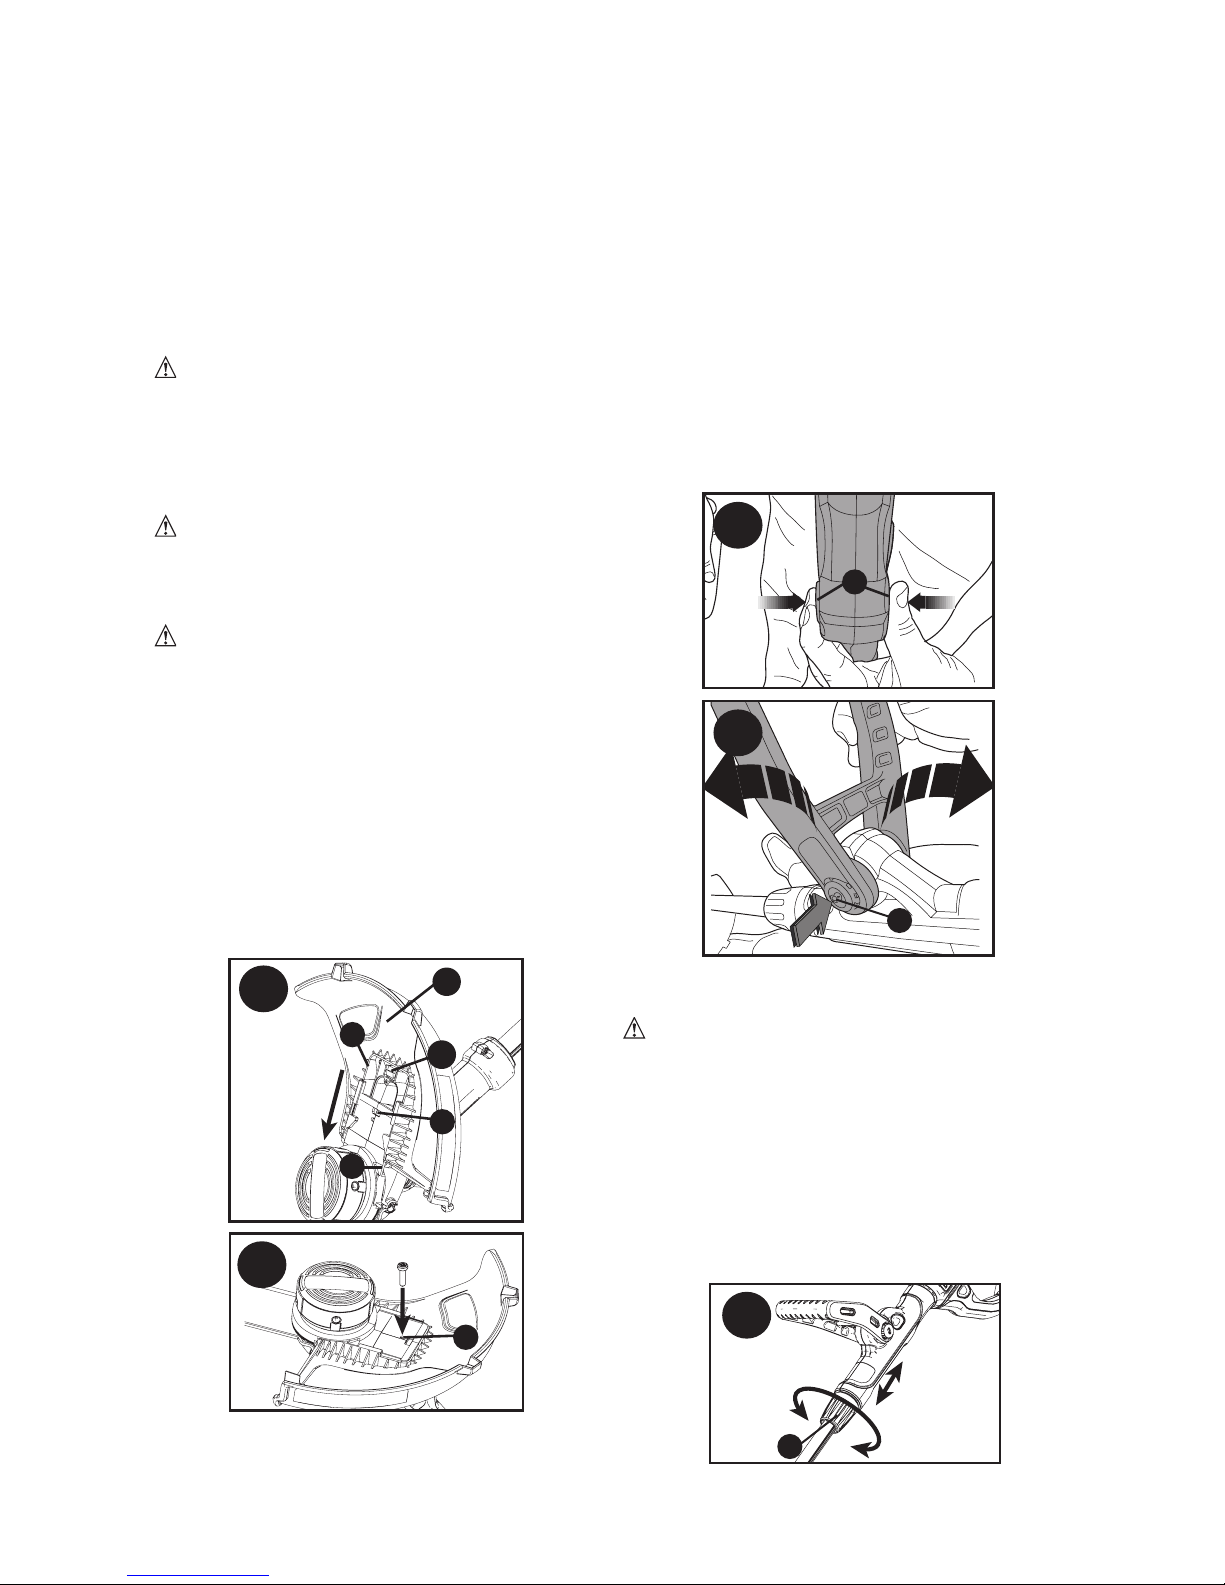
ATTACHING THE GUARD (FIGURES D AND E)
WARNING: NEVER OPERATE
APPLIANCE WITHOUT GUARD FIRMLY IN
PLACE. The guard must always be properly
attached on the appliance to protect the user.
• Remove the screw (E1) from the guard.
• Keeping the guard square to the trimmer
head slide it fully into place until the
retaining tab clicks into place (Ensure
that the guide rails (D1) on the guard (11)
are correctly aligned with the guide rails
(D2) on the trimmer head (figure D).
The
locking tab (D3) should snapped into the
housing slot (D4).
• Secure the guard with the screw (E1)
(figure E).
D
D2
D1
D3
11
D4
E
E1
ATTACHING THE AUXILIARY HANDLE (FIGURE F,
G)
The auxiliary handle can be adjusted to
provide optimum balance and comfort.
8
• To attach the handle (6), press in on the
buttons (13) on both sides of the upper
housing as shown in figure F.
• Position the handle as shown in figure
G, matching up the grooved side of the
handle with the grooved button. Partially
push the handle on so that it will hold the
buttons in when you release them with
your hand.
• Push the handle completely onto the
housing and position it until it “snaps” into
place (figure G).
• To adjust the handle up or down, press in
on the button (13) and raise or lower the
handle.
• The handle should be adjusted so that
your front arm is straight when the trimmer
is in the working position.
F
13
G
13
HEIGHT ADJUSTMENT (FIGURE H)
CAUTION: Adjust the length of the
trimmer to obtain proper working positions
as shown in figure M.
• The overall height of the trimmer can be
adjusted by loosening the collar (8) and
rotating it in the direction of the arrow
shown in figure H.
• Move the upper housing straight up or
down. When the desired height is achieved,
tighten the collar by rotating it opposite of
the direction shown in figure H.
8
H
RELEASING THE CUTTING LINE
In transit, the cutting line is taped to the
spool housing.
Page 9
9
• Remove the tape holding the cutting line
to the spool housing.
OPERATION
WARNING: ALWAYS USE PROPER
EYE PROTECTION THAT CONFORMS TO
ANSI Z87.1 (CAN/CSA Z94.3) WHILE
OPERATING THIS APPLIANCE.
WARNING:
To reduce the risk of
serious personal injury, turn unit off and
remove the battery pack before making
any adjustments or removing/installing
attachments or accessories. An accidental
start-up can cause injury.
CAUTION:
Before you begin trimming,
only use the appropriate type of cutting line.
CAUTION:
I
nspect area to be trimmed
and remove any wire, CORD, OR STRINGLIKE OBJECTS WHICH COULD BECOME
ENTANGLED IN THE rotating line or spool.
Be particularly careful to avoid any wire
which might be bent outwardly into the path
of the trimmer, such as barbs at the base of
a chain link fence.
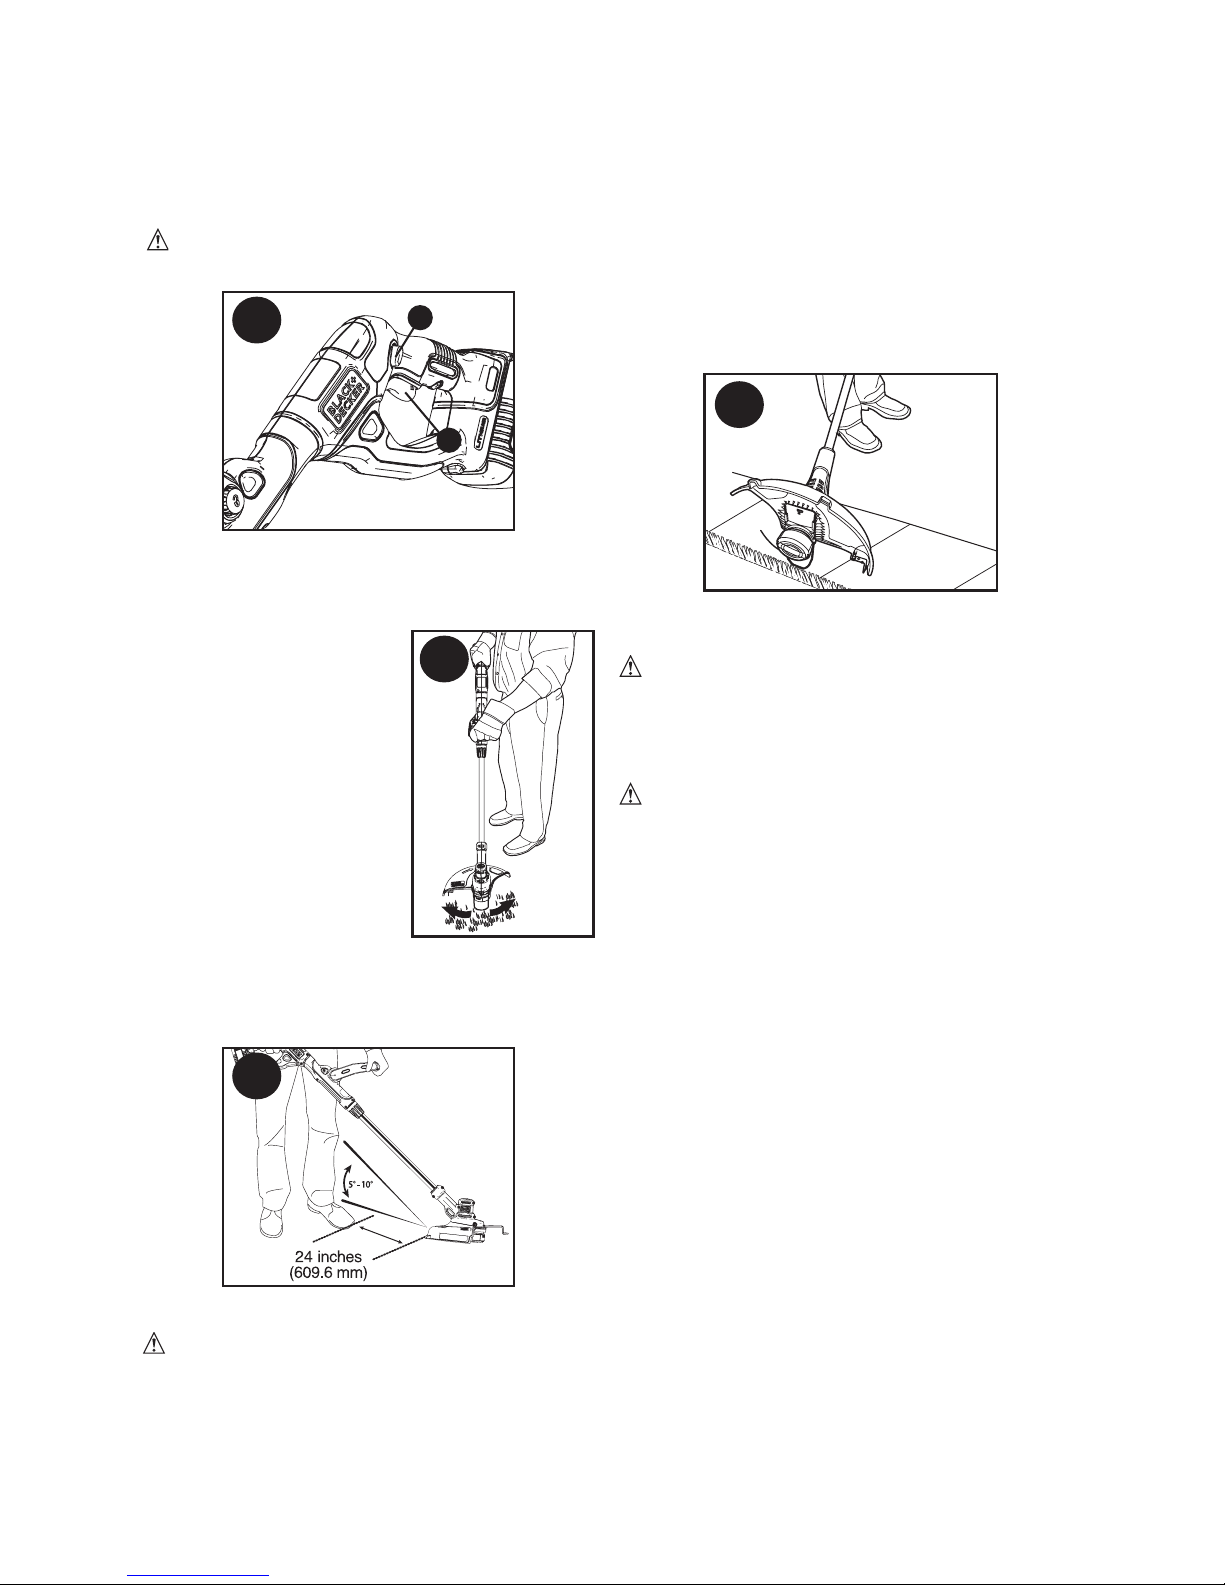
PROPER HAND POSITION
WARNING:
To reduce the risk of
serious personal injury, ALWAYS use proper
hand position as shown.
WARNING:
To reduce the risk of
serious personal injury, ALWAYS hold securely
in anticipation of a sudden reaction.
Proper hand position requires one hand on
the main handle (2) and one hand on the
auxiliary handle (6).
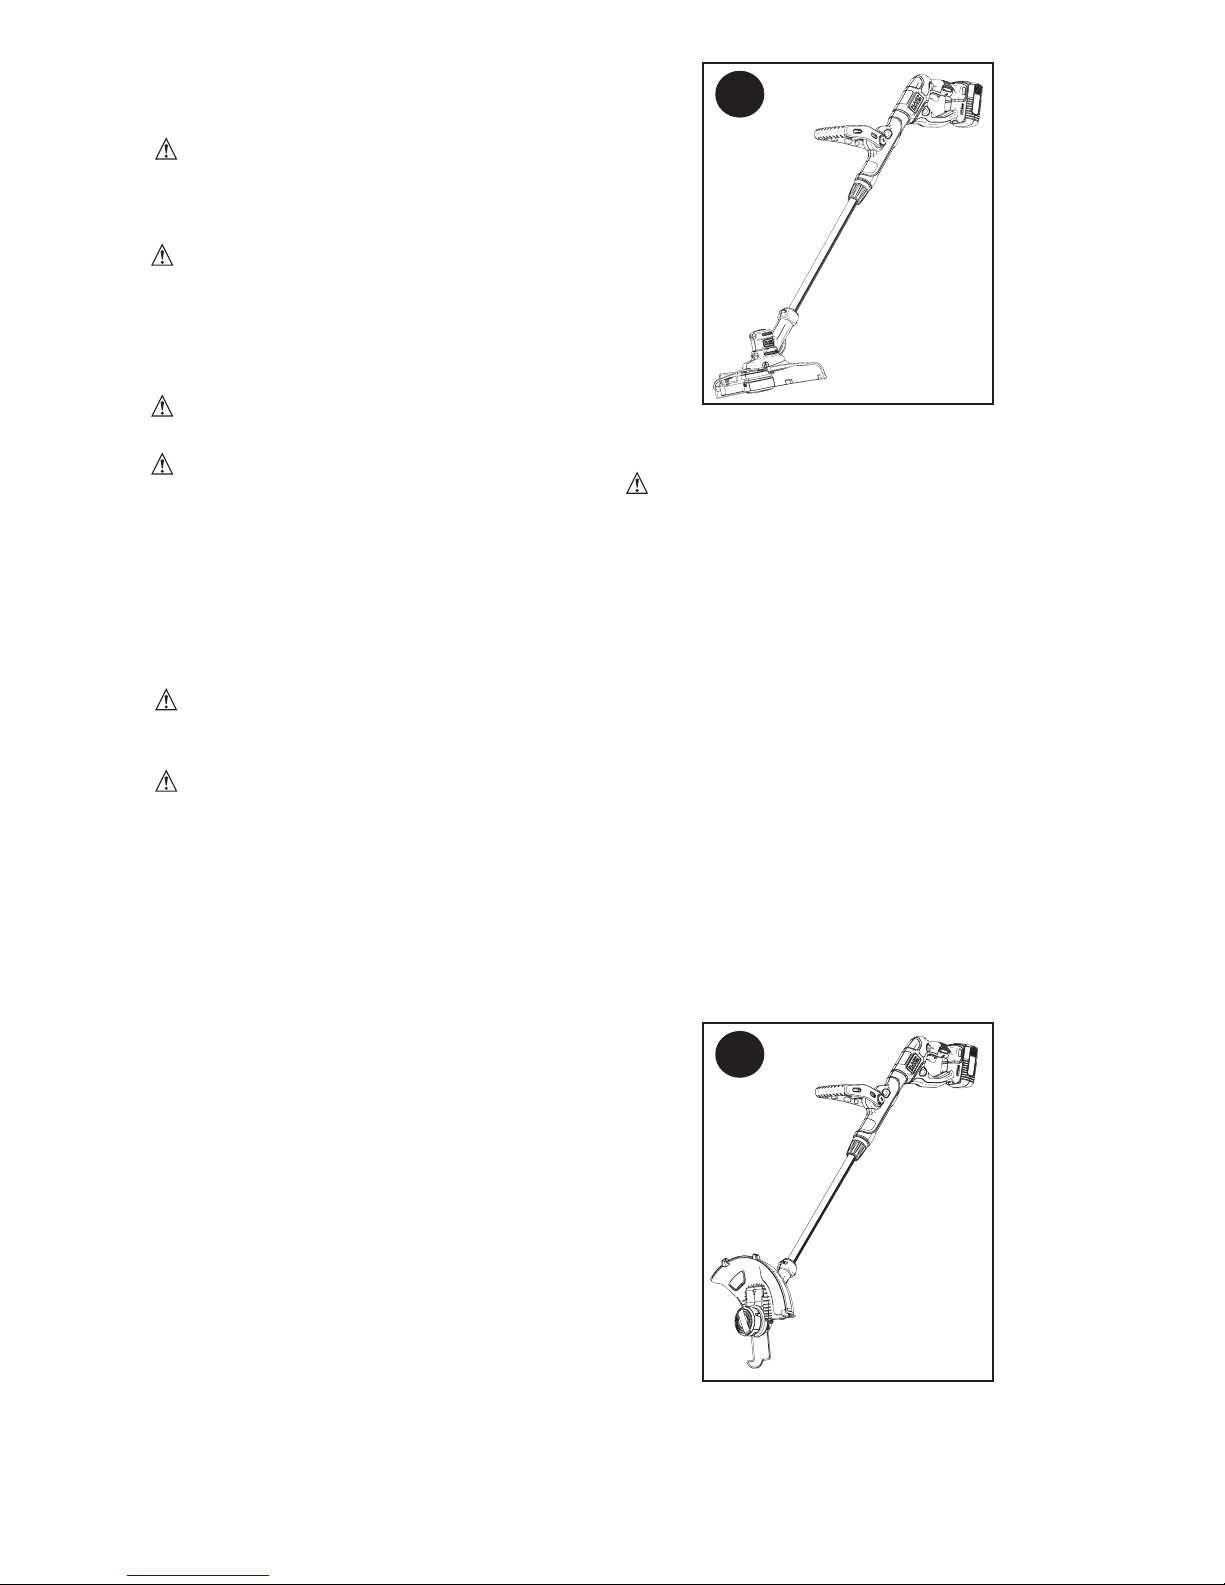
SETTING TRIMMING OR EDGING MODE
(FIGURE I, J)
• The trimmer can be used in trimming mode
as shown in figure I or in edging mode
to trim overhanging grass along lawn
edges and flower beds as shown in
figure J.
TRIMMING MODE
For trimming, the trimmer head should be in
the position shown in figure J. If it is not:
• Remove the battery from the trimmer.
•
Loosen the collar (8) as shown in figure H.
• Hold the metal shaft and rotate the
lower housing 180° until trimmer is in the
position shown in figure I.
• Tighten the collar (8) until tight.
I
EDGING MODE (FIGURE J)
WARNING:
When being used as an
Edger, stones, pieces of metal and other
objects can be thrown out at high speed by
the line. The trimmer and guard are designed
to reduce the danger. However, MAKE SURE
that other persons and pets are at least 100
feet (30m) away.
For edging, the trimmer head should be in the
position shown in figure J. If it is not:
• Remove the battery from the trimmer.
•
Loosen the collar (8) as shown in figure H.
• Hold the metal shaft and rotate the
lower housing 180° until trimmer is in the
position shown in figure J.
• Tighten the collar (8) until tight.
• Drop the edge guide (10) in to the open
position. Ensure that the edging guide is
all the way down, an audible click will be
heard.
NOTE: The head will only rotate in one
direction.
NOTE:
The Auto Feed System may not operate
correctly if edge guide is not used.
J
Page 10
10
SWITCHING ON AND OFF (FIGURE K)
• To switch the trimmer on, push the
lock off button (shown in inset, figure
J) across from either side and then
squeeze the trigger switch.
• To switch the trimmer off, release the
trigger switch.
WARNING: Never attempt to lock the
on/off button in the on position.
K
1
3
OPERATING THE TRIMMER (FIGURES L,M)
• With the unit on, angle unit and slowly
swing the trimmer side to side as shown
in figure L.
L
• Maintain a cutting
angle of 5° to 10° as
shown in figure M. Do
not exceed 10°. Cut
with the tip of the line.
To keep distance from
hard surfaces use edge
guide (10). Pull the
guide out until it snaps
securely into place.
• Maintain a minimum
distance of 24 inches
(609.6 mm) between
the guard and your
feet as shown in figure M. To acheive
this distance adjust the overall height of
the trimmer as shown in figure H.
M
CONVERT TO EDGING MODE
WARNING:
When being used as an
Edger, stones, pieces of metal and other
objects can be thrown out at high speed by
the line. The trimmer and guard are designed
to reduce the danger. However, MAKE SURE
that other persons and pets are at least 100
feet (30m) away.
• To operate as a maintenance edger, turn
the collar (8) as shown in figure H.
• Hold the metal shaft and rotate the lower
housing 180° until trimmer is in the position
shown in figure J.
• Turn the collar back until tight.
•
Position the trimmer with the edge guide (10)
along the surface as shown in figure N.
• Return to the trimming position by loosening
the collar and rotating the lower housing
back 180°.
• Turn the collar until tight. When using the
trimmer, retract the wire edge guide to the
original position, out of the way.
N
REPLACING THE SPOOL
(FIGURES O, P, Q)
WARNING:
Remove the battery from
the trimmer before making any assembly,
adjustments or changing accessories. Such
preventive safety measures reduce the risk
of starting the appliance accidentally.
CAUTION: To avoid appliance
damage, if the cutting line protrudes
beyond the trimming blade, cut it off so that
it just reaches the blade.
• Remove battery from trimmer.
• Depress the tabs (14) and remove the spool
cap (13) from the spool housing (12) in the
trimmer head (9) (figure O).
• For best results, replace spool with
BLACK+DECKER model # AF-100.
• Grasp empty spool with one hand and
spool housing with other hand and pull
spool out.
• If lever (15) in base of housing becomes
dislodged, replace in the position as shown
in figure P before inserting new spool into
housing.
• Remove any dirt and grass from the spool
and housing.
• Unfasten the end of the cutting line and
guide the line into the eyelet (18) figure Q.
• Take the new spool and push it onto the
boss (16) (figure P) in the housing. Rotate
the spool slightly until it is seated. The line
should protrude approximately 5-3/8 inches
(136mm) from the housing.
• Align the tabs (14) on the spool cap with the
slots (17) in the housing (figure Q).
• Push the cap onto the housing until it snaps
securely into place.
NOTE: The line should protrude
Page 11
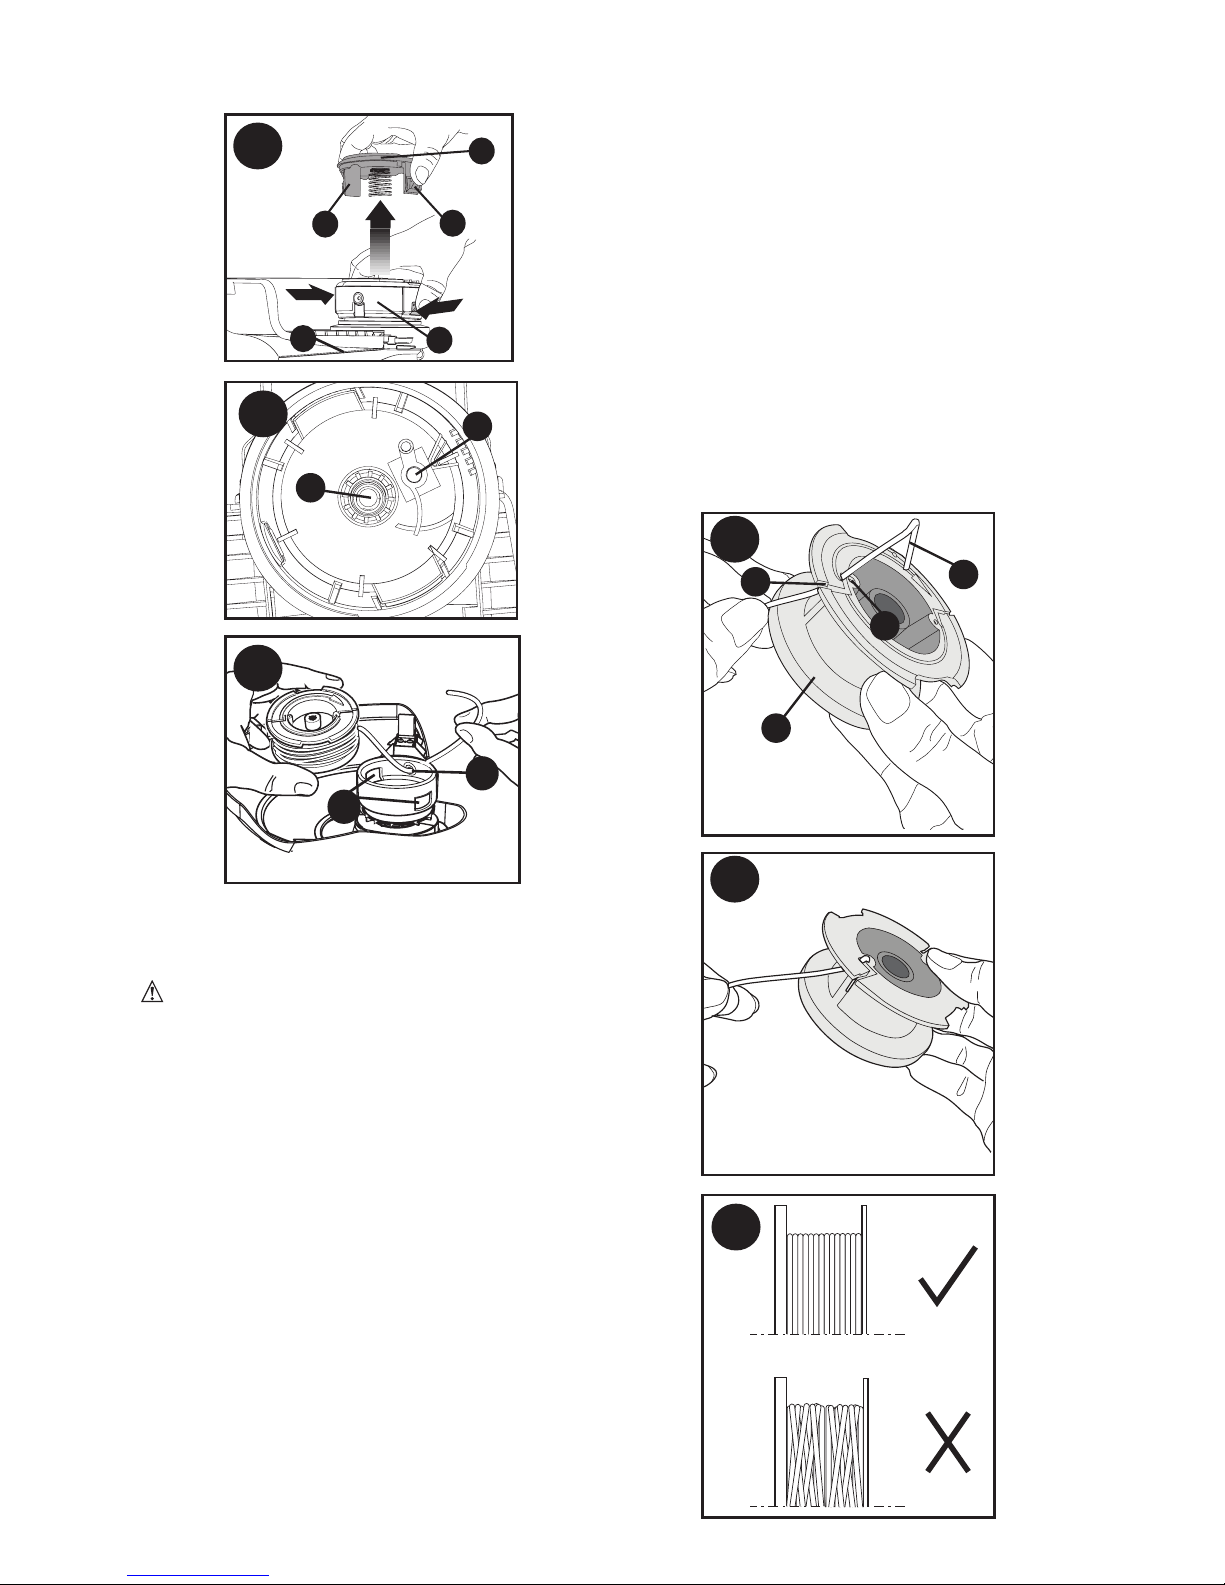
11
approximately 4-13/16 inches (122mm) from
the housing.
14
13
9
O
14
13
18
17
Q
P
15
16
REWINDING SPOOL FROM BULK LINE
(USE ONLY .065 IN. ROUND DIAMETER
LINE) (FIGURES R, S, T)
WARNING:
Remove the battery from
the trimmer before making any assembly,
adjustments or changing accessories. Such
preventive safety measures reduce the risk
of starting the appliance accidentally.
Bulk line is also available for purchase from
your local retailer.
NOTE:
Do not use square, star or other
shaped line or larger diameter. These may
cause feeding issues or overload the motor.
NOTE:
Hand wound spools from bulk line
are likely to become tangled more frequently
than BLACK+DECKER factory wound
spools. For best results, replace spool with
BLACK+DECKER model # AF-100.
TO INSTALL BULK LINE, FOLLOW THE
STEPS BELOW:
• Remove battery from trimmer.
• Remove the empty spool from
the trimmer as described in
“REPLACING THE SPOOL”.
• Remove any remaining cutting line from
the spool.
• Make a fold at the end of the cutting line
at about 3/4 inch (19mm) (19). Feed the
cutting line into one of the line anchoring
slots (20) as shown in figure R.
•
Insert the 3/4 inch (19mm) end of the
bulk line into the hole (21) in the spool
adjacent to the slot as shown in figure R.
Make sure the line is pulled tight against
the spool as shown in figure S.
•
Wind the cutting line onto the spool in the
direction of the arrow on the spool. Make
sure to wind the line on neatly and in
layers. Do not crisscross (
figure T
).
• When the wound cutting line reaches the
recesses (22), cut the line. (
figure R
).
• Fit the spool onto the trimmer as
described in “REPLACING THE SPOOL”.
S
19
20
21
R
23
T
Page 12

12
PROBLEM
Trimmer runs slowly.
Automatic line feed does not feed more
line.
Overfeeding
Line unravels when cap or spool is
removed.
SOLUTION
• Fully depress the variable speed
trigger. The level of trigger depression
affects speed.
• Remove battery from trimmer.
• Check that the spool housing can rotate
freely. Carefully clean it if necessary.
• Check that the cutting line
does not protrude more than
approximately 4-13/16 inches
(122mm) from the spool.
If it does, cut it off so that it just
reaches the line trimmingblade.
• More line is fed when the line shortens
to approximately 3 inches (76.2mm). To
determine if the line is not feeding, let line
wear past this point.
• Keep the tabs depressed and remove
the spool from the spool housing in the
trimmer head.
• Ensure that the line is not crisscrossed
on the spool as detailed in figure T. If it
is, unwind the cutting line, then wind it
back on the spool neatly so that the lines
do not cross.
• Inspect tracks at the bottom of spool for
damage. If damaged, replace spool.
• Pull the cutting line until it protrudes
approximately 4-13/16 inches (122mm)
from the spool. If insufficient cutting line
is left on the spool, install a new spool of
cutting line.
• Align the tabs on the spool cap with the
cut outs in the housing.
• Push the spool cap onto the housing
until it snaps securely into place.
• If the cutting line protrudes beyond the
trimming blade, cut it off so that it just
reaches the blade. If the automatic line
feed still does not work or the spool is
jammed, try the following suggestions:
• Carefully clean the spool and
housing.
• Make sure you are using correct line
size and diameter (065 inch (1.65 mm))
- smaller and larger line sizes will affect
the functionality of the auto feed system.
•
Remove the spool and check if the lever
in the spool housing can move freely.
•
Remove the spool and unwind the
cutting line, then wind it on neatly again.
Replace the spool into the housing.
• Ensure you are cutting with the tip of the
line (7 inches (177.8mm) from the spool).
Use the edge guide if needed to ensure
proper space is maintained.
• Ensure you are not exceeding a 10°
angle as shown in figure M.
• Make sure to park the lines in holding
slots (figure R) before removing.
Troubleshooting
Page 13

13
• Place spool and line into spool housing
with line “parked” in anchoring slot (20)
as shown in figure R.
• Fit the spool onto the trimmer as
described in“REPLACING THE SPOOL”.
NOTE: Make sure that cover is fully
positioned, listen for two audible clicks to
ensure both lugs are correctly located.
Power the appliance on. In a few seconds
or less you’ll hear the nylon line being cut
automatically to the proper length.
CAUTION: To avoid appliance
damage, if the cutting line protrudes
beyond the trimming blade, cut it off so
that it just reaches the blade.
NOTE: Other replacement parts (guards,
spool caps, etc.) are available through
BLACK+DECKER service centers. To find
your local service location call: 1-800-5446986 or visit www.blackanddecker.com.
WARNING: The use of any
accessory not recommended by
BLACK+DECKER for use with this
appliance could be hazardous.
MAINTENANCE
WARNING: To avoid serious injury,
remove the battery from the appliance
before performing any maintenance.
1. Keep the air intake slots clean to avoid
overheating.
2.
Your trimmer line can dry out over time.
To keep your line in top condition, store
spare pre-wound spools or bulk line in a
plastic, sealable bag with a tablespoon
of water.
3. Plastic parts may be cleaned by using a
mild soap and a damp rag.
4.
The line cutter on the edge of the guard
can dull over time. It is recommended you
periodically touch-up the sharpness of the
blade with a file.
The RBRC® Seal
The RBRC® (Rechargeable
Battery Recycling Corp oration)
Seal on the nickel cadmium,
nickel metal hydride or lithiumionbatteries (or battery packs) indicates
that the costs to recycle these batteries
(or battery packs) at the end of their
useful life have already been paid by
BLACK+DECKER. In some areas, it is
illegal to place spent nickel cadmium,
nickel metal hydride or lithium-ion batteries
in the trash or municipal solid waste
stream and the Call 2 Recycle® program
provides an environmentally conscious
alternative.
Call 2 Recycle, Inc., in cooperation with
BLACK+DECKER and other battery users,
HELPFUL CUTTING TIPS
• Use the tip of the string to do the
cutting; do not force string head into
uncut grass. Use edge guide along
such things as fences, houses and
flower beds for best practices.
• Wire and picket fences cause extra
string wear, even breakage. Stone and
brick walls, curbs, and wood may wear
string rapidly.
• Do not allow spool cap to drag on
ground or other surfaces.
• In long growth cut from the top down
and do not exceed 12 inches (304.8
mm) high.
• Keep trimmer tilted toward the area
being cut; this is the best cutting area.
• The trimmer cuts when passing the
unit from the right to left. This will avoid
throwing debris at the operator.
•
Avoid trees and shrubs. Tree bark, wood
moldings, siding, and fence posts can
easily be damaged by the string.
CUTTING LINE / LINE FEEDING
Your trimmer uses .065
inch (1.65 mm)
diameter, ROUND nylon line. During use,
the tips of the nylon lines will become
frayed and worn and the special self
feeding spool will automatically feed and
trim a fresh length of line. Do not bump on
ground in attempt to feed line or for any
other purposes.
Cutting line will wear faster and require
more feeding if the cutting or edging is
done along sidewalks or other abrasive
surfaces or heavier weeds are being cut.
CLEARING JAMS AND TANGLED LINE
(FIGURES O, P, R)
WARNING:
Remove the battery from
the trimmer before making any assembly,
adjustments or changing accessories.
Such preventive safety measures reduce
the risk of starting the appliance
accidentally. From time to time, especially
when cutting thick or stalky weeds, the
line spool housing may become clogged
with sap or other material and the line will
become jammed as a result. To clear the
jam, follow the steps listed below.
• Depress the tabs (14) and remove the
spool cap (13) from the spool housing
(12) in the trimmer head (figure O).
• Grasp spool with one hand and spool
housing with other hand and pull spool
out
and clear any broken line or cutting
debris,
dirt and grass
from the spool
area.
• If lever (15) in base of housing becomes
dislodged, replace in the position as
shown in figure P before inserting the
spool into housing.
Page 14

14
has established the program in the
United States and Canada to facilitate the
collection of spent nickel cadmium, nickel
metal hydride or lithium-ion batteries.
Help protect our environment and
conserve natural resources by returning
the spent nickel cadmium, nickel metal
hydride or lithium-ion batteries to an
authorized BLACK+DECKER service
center or to your local retailer for
recycling. You may also contact your local
recycling center for information on where
to drop off the spent battery. RBRC® is a
registered trademark of Call 2 Recycle,
Inc.
This Class B digital apparatus complies
with Canadian ICES-003.
This device complies with part 15 of the
FCC rules. Operation is subject to the
following two conditions: (1) This device
may not cause harmful interference,
and (2) this device must accept
any interference received, including
interference that may cause undesired
operation.
NOTE: This equipment has been tested
and found to comply with the limits for
a Class B digital device, pursuant to
Part 15 of the FCC Rules. These limits
are designed to provide reasonable
protection against harmful interference in
a residential installation. This equipment
generates, uses and can radiate radio
frequency energy and, if not installed and
used in accordance with the instructions,
may cause harmful interference to radio
communications. However, there is no
guarantee that interference will not occur
in a particular installation.
If this equipment does cause harmful
interference to radio or television
reception, which can be determined
by turning the equipment off and on,
the user is encouraged to try to correct
the interference by one or more of the
following measures:
• Reorient or relocate the receiving
antenna.
• Increase the separation between the
equipment and receiver.
• Connect the equipment into an outlet on
a circuit different from that to which the
receiver is connected.
• Consult the dealer or an experienced
radio/TV technician for help.
Changes or modifications to this unit
not expressly approved by the party
responsible for compliance could
void the user’s authority to operate
the equipment. This Class B digital
apparatus complies with Canadian ICES-
003.
SERVICE INFORMATION
All BLACK+DECKER Service Centers
are staffed with trained personnel to
provide customers with efficient and
reliable power tool service. Whether you
need technical advice, repair, or genuine
factory replacement parts, contact the
BLACK+DECKER location nearest you.
To find your local service location call:
1-800-544-6986 or visit
www.blackanddecker.com
THREE-YEAR LIMITED WARRANTY
Black & Decker (U.S.) Inc. warranties this
product to be free from defects in material
or workmanship for a period of three (3)
years following the date of purchase,
provided that the product is used in a
home environment. This limited warranty
does not cover failures due to abuse,
accidental damage or when repairs have
been made or attempted by anyone other
than Black+Decker and its Authorized
Service Centers. A defective product
meeting the warranty conditions set forth
herein will be replaced or repaired at no
charge in either of two ways:
The first, which will result in exchanges
only, is to return the product to the retailer
from whom it was purchased (provided
that the store is a participating retailer).
Returns should be made within the
time period of the retailer’s policy for
exchanges. Proof of purchase may be
required. Please check with the retailer
for its specific return policy regarding
time limits for returns or exchanges. The
second option is to take or send the
product (prepaid) to a Black+Decker
owned or authorized Service Center for
repair or replacement at Black+Decker’s
option. Proof of purchase may be
required. Black+Decker owned and
authorized service centers are listed
online at www.blackanddecker.com.
This warranty does not apply to
accessories. This warranty gives you
specific legal rights and you may have
other rights which vary from state to
state. Should you have any questions,
contact the manager of your nearest
Black+Decker Service Center. This
product is not intended for commercial
use, and accordingly, such commercial
use of this product will void this warranty.
All other guarantees, express or implied,
are hereby disclaimed.
LATIN AMERICA: This warranty does not
Page 15

15
apply to products sold in Latin America.
For products sold in Latin America, check
country specific warranty information
contained in the packaging, call the local
company or see the website for such
information.
Imported by
Black & Decker (U.S.) Inc.,
701 E. Joppa Rd.
Towson, MD 21286 U.S.A.
Page 16

16
Consulter le site Web www.BlackandDecker.com/NewOwner
pour enregistrer votre nouveau produit.
MODE D’EMPLOI
TAILLE-BORDURE / COUPE-BORDURE
AVEC PILE AU LITHIUM DE 40 V MAX*
Merci d’avoir choisi BLACK+DECKER! Consulter le site Web
www.BlackandDecker.com/NewOwner pour enregistrer votre nouveau produit.
ÀLIRE AVANT DE RETOURNER CE PRODUIT POUR QUELQUE
RAISON QUE CE SOIT :
Si des questions ou des problèmes surgissent après l’achat d’un produit
BLACK+DECKER, consulter le site Web www.blackanddecker.com/instantanswers
pour obtenir des réponses instantanément 24 heures par jour. Si la réponse est
introuvable ou en l’absence d’accès à l’Internet, composer le 1 800 544-6986 de 8 h à
17 h HNE, du lundi au vendredi, pour parler avec un agent. Prière d’avoir le numéro de
catalogue sous la main lors de l’appel.
CONSERVER CE MODE D’EMPLOI POUR UN USAGE ULTÉRIEUR.
NUMERO DE CATALOGUE
LST140
AVERTISSEMENT : ne pas retirer le carter. Le carter doit être
installé pendant la taille. Utiliser le taille-bordure sans son carter constitue
une violation de la garantie du produit.
MISE EN GARDE : pour remplacer le fil, utiliser exclusivement un fil
rond de 1,65 mm (0,065 po) de diamètre. Des tailles différentes pourront
appauvrir les performances du taille-bordure ou l’endommager.
• À utiliser seulement avec les blocs-piles BLACK+DECKER de 40 v.
POUR TOUTE QUESTION OU TOUT COMMENTAIRE SUR CET
APPAREIL OU TOUT AUTRE APPAREIL BLACK+DECKER,
COMPOSEZ GRATUITEMENT LE 1-800-544-6986.
Page 17

17
LIGNES DIRECTRICES EN MATIÈRE DE SÉCURITÉ - DÉFINITIONS
Il
est important que vous lisiez et compreniez ce mode d’emploi. Les informations qu’il
contient concernent VOTRE SÉCURITÉ et visent à ÉVITER TOUT PROBLÈME. Les
symboles ci-dessous servent à vous aider à reconnaître cette information.
DANGER : Indique une situation dangereuse imminente qui, si elle n’est pas évitée,
causera la mort ou des graves blessures.
AVERTISSEMENT : Indique une situation potentiellement dangereuse qui, si elle
n’est pas évitée, pourrait causer la mort ou de graves blessures.
MISE EN GARDE : Indique une situation potentiellement dangereuse qui, si elle
n’est pas évitée, pourrait causer des blessures mineures ou modérées.
AVIS : Utilisé sans le symbole d’alerte à la sécurité, indique une situation
potentiellement dangereuse qui, si elle n’est pas évitée, peut résulter en des
dommages à la propriété.
AVERTISSEMENTS DE SÉCURITÉ
ET DIRECTIVES DE PREMIÈRE
IMPORTANCE
AVERTISSEMENT : Lorsque des
outils de jardinage électriques sont
utilisés, des précautions de base en
matière de sécurité doivent toujours être
suivies afin de réduire le risque
d’incendie, de choc électrique et de
blessure corporelle, notamment les
suivantes.
Lire toutes les directives
• TOUJOURS PORTER UNE
PROTECTION OCULAIRE - Porter
des lunettes ou des lunettes
protectrices en tout temps lorsque cet
outil est branché.
• DISPOSITIF DE PROTECTION – Ne
pas utiliser cet outil sans les dispositifs
de protection en place.
• S’HABILLER DE MANIÈRE
APPROPRIÉE - Ne pas porter de
vêtements amples ni de bijoux. Ils
peuvent s’enchevêtrer dans les pièces
mobiles. Des gants en caoutchouc et
des chaussures adéquates à semelles
en caoutchouc sont recommandés
lors de travaux à l’extérieur. Ne pas
utiliser l’outil avec les pieds nus ou des
sandales ouvertes. Porter des pantalons
longs pour protéger vos jambes. Se
couvrir les cheveux s’ils sont longs.
• FIL EN NYLON - Tenir le visage, les
mains et pieds loin du fil de nylon rotatif
en tout temps.
• LE FIL EN ROTATION EXÉCUTE
UNE COUPE - Être attentif lors de
taillage autour de grillages et de
plates-bandes.
• TENIR ÉLOIGNÉ TOUS LES
SPECTATEURS - À une distance
sécuritaire de l’aire de travail,
particulièrement les enfants.
• AVERTISSEMENT IMPORTANT :
lorsque l’outil est utilisé comme coupe
bordure, des pierres, morceaux de
métal et autres objets peuvent être
projetés à haute vitesse par le fil.
L’outil et le dispositif de protection
sont conçus pour réduire le risque.
Toutefois, les précautions spéciales
suivantes doivent être prises
• S’ASSURER que toute personne et
animaux sont éloignés d’au moins 30 m
(100 pi).
• POUR RÉDUIRE LE RISQUE de
blessures par ricochet, travaillez en
vous éloignant de tout objet solide tel un
mur, des marches, de grosses pierres,
d’arbres, etc. Soyez très prudent lors de
travaux près d’objets solides et, le cas
échéant, taillez ou coupez manuellement.
• ÉVITER LES DÉMARRAGES
ACCIDENTELS - Ne pas transporter
d’outil branché avec le doigt sur la
détente.
• NE PAS FORCER L’OUTIL - à tourner à une
vitesse plus rapide que celle pour laquelle il
est capable de couper efficacement.
• UTILISER LE BON OUTIL - Ne pas utiliser
cet outil pour tout autre type de travail sauf
pour celui pour lequel il est prévu.
• NE PAS TROP TENDRE LES BRAS -
Conserver son équilibre en tout temps.
• OUTIL ENDOMMAGÉ - Si vous frappez
ou devenez enchevêtrer dans un
objet, arrêtez immédiatement l’outil,
débranchez-le puis inspectez pour toute
trace de dommages qui devront être
réparés avant une autre utilisation. Ne
pas utiliser avec un moyeu ou une bobine
brisés.
• DÉBRANCHER L’OUTIL – Lorsque
inactif, lors de remplacement de fil ou
avant un nettoyage.
• ÉVITER LES CONDITIONS
ENVIRONNEMENTALES
DANGEREUSES - Ne pas utiliser
d’outils électriques dans des lieux
humides ou mouillés. Suivre toutes les
directives de ce mode d’emploi pour
une utilisation adéquate de votre outil.
Ne pas utiliser l’outil sous la pluie.
• NE PAS UTILISER d’outils électriques
portatifs dans un milieu gazeux ou
Page 18

18
déflagrant. Les moteurs de ces outils
produisent normalement des étincelles
qui pourraient enflammer des vapeurs.
• RANGER LES OUTILS INUTILISÉS
À L’INTÉRIEUR – Lorsqu’ils ne sont
pas utilisés, les outils doivent être rangés à
l’intérieur, dans un endroit sec et verrouillé,
hors de portée des enfants.
• ÊTRE VIGILANT – Ne pas utiliser
l’appareil en cas de fatigue ou de
maladie ou sous l’influence d’alcool, de
drogues ou de médicaments.
• PRENDRE SOIN DES OUTILS
ÉLECTRIQUES – Suivre les directives
figurant à la section Entretien. Maintenir
les poignées sèches, propres et
exemptes d’huile et de graisse.
• VÉRIFIER LES PIÈCES
ENDOMMAGÉES – Avant toute
utilisation ultérieure de l’appareil
électrique, un dispositif de protection
endommagé, ou toute autre pièce
endommagée, doit être examiné
soigneusement afin d’assurer un
fonctionnement adéquat selon sa
fonction prévue. Vérifier l’alignement
des pièces mobiles, la présence de
grippage des pièces mobiles, de
rupture
CONSIGNES DE SÉCURITÉ
ADDITIONNELLES
a) Prévention des démarrages
accidentels. S’assurer que
l’interrupteur est en position d’arrêt
avant de connecter l’appareil à un
bloc-piles, et avant de le saisir ou de
le transporter. Transporter un appareil
le doigt sur l’interrupteur, ou l’alimenter
alors que l’interrupteur est en position
de marche, invite les accidents.
b) Déconnecter le bloc-piles de l’appareil
avant tout réglage, changement
d’accessoire, ou avant de le déplacer
ou l’entreposer. Ces mesures
préventives de sécurité réduisent les
risques de démarrage accidentel de
l’appareil.
c) Le recharger seulement avec le
chargeur spécifié par le fabricant. Un
chargeur propre à un type de blocpiles peut créer des risques d’incendie
lorsqu’utilisé avec d’autres blocs-piles.
d) Utiliser l’appareil uniquement avec les
blocs-piles spécialement conçus à cet
effet. L’utilisation de tout autre blocpiles comporte des risques de
dommages corporels et d’incendie.
e) Après utilisation, ranger le bloc-piles à
l’écart de tout objet métallique
comme trombones, pièces de
monnaie, clés, clous, vis ou autres
petits objets susceptibles de
conduire l’électricité entre les
bornes. Court-circuiter les bornes
comporte des risques de brûlures ou
d’incendie.
f) Sous certaines conditions
inappropriées, le bloc-piles pourra
perdre du liquide. Éviter tout contact
avec ce liquide. Si cela se produisait,
rincer à l’eau claire. En cas de
contact oculaire, consulter aussi un
médecin. Le liquide perdu par le bloc-
piles peut causer irritations ou brûlures.
g) Ne pas utiliser un bloc-piles ou un
appareil endommagé ou modifié. Un
bloc-piles endommagé ou modifié
pourrait se comporter de façon
imprévisible et poser des risques
d’incendie, d’explosion ou de
dommages corporels.
h) Ne pas exposer un bloc-piles ou un
appareil au feu, ou à des températures
excessives. Toute exposition au feu ou
à des températures supérieures à
130 °C (265 °F)pose des risques
d’explosion.
i) Faire entretenir cet appareil par un
réparateur qualifié qui n’utilisera que
des pièces de rechange identiques.
Cela permettra d’assurer l’intégrité du
produit et la sécurité de l’utilisateur.
• NE PAS immerger l’appareil dans de
l’eau ou l’arroser avec un tuyau. NE
laisser AUCUN liquide pénétrer dans
l’appareil. Si cela se produisait, laisser
l’appareil sécher un minimum de
48 heures.
• NE PAS entreposer l’appareil sur ou à
proximité d’engrais ou de produits
chimiques.
• NE PAS le nettoyer avec un nettoyeur à
pression.
• Maintenir les dispositifs de protection
en place et en bon état de marche.
• Protéger les mains et les pieds des
zones de coupe.
• NE PAS recharger l’appareil sous la
pluie ou dans un endroit humide.
• NE PAS jeter le bloc-piles au feu. La
cellule pourrait exploser. Vérifier les
réglementations locales pour obtenir
des instructions spécifiques à leur
élimination.
• NE PAS ouvrir ou endommager le bloc-
piles. Toute fuite d’électrolyte est
corrosive et pourra causer des
dommages corporels, oculaires ou
cutanés. Toute ingestion pourra être
toxique.
AVERTISSEMENT : ne pas
utiliser cet appareil si son interrupteur est
défectueux. Tout appareil dont
l’interrupteur est défectueux est
dangereux et doit être réparé.
Page 19

19
AVERTISSEMENT : Certaines
poussières produites par cet util
contiennent des produits chimiques
reconnus par l’État de la Californie comme
pouvant causer le cancer, les anomalies
congénitales et d’autres dangers pour la
reproduction. Voici quelques exemples de
ces produits chimiques :
• composés présents dans les engrais
• composés présents dans les
insecticides, herbicides et pesticides
• arsenic et chrome provenant de bois
traité chimiquement
Pour réduire votre exposition à ces
produits chimiques, porter un équipement
de sécurité approuvé comme un masque
anti-poussières conçu spécialement pour
filtrer les particules microscopiques
L’étiquette apposée sur votre outil ourrait
comprendre les symboles suivants.
Les symboles et leurs définitions sont
indiqués ci-après :
V ....................
volts
A ................. ampères
Hz ............... hertz
W ................watts
min ..............minutes
ou AC.....courant alternatif
ou DC......courant continu
n
o ...............sous vide
................Construction de classe I
(mis à la terre)
...............
Construction de classe II
................borne de mise à la minute
................ symbole
RPM ou .../min.......... tours à la minute
d´avertissement
.............. Lire le mode d’emploi
avant l’utilisation
........... Utiliser une protection
respiratoire adéquate.
........... Utiliser une protection
oculaire adéquate.
........... Utiliser une protection
auditive adéquate.
DIRECTIVES DE SÉCURITÉ
IMPORTANTES PROPRES AUX
CHARGEURS DE BLOCS-PILES
CONSERVER CES INSTRUCTIONS : ce
manuel contient des directives de sécurité
importantes propres aux chargeurs de piles.
• Avant d’utiliser le chargeur, lire toute
consigne et tout avertissement apposés
sur le chargeur, le bloc-piles et le
produit utilisant le bloc-piles.
AVERTISSEMENT : risques de
chocs électriques. Débrancher le
chargeur de la prise de courant alternatif
avant tout entretien. Éliminer toute saleté
ou graisse de la surface externe du
chargeur à l’aide d’un chiffon ou d’une
brosse non métallique douce. N’utiliser ni
eau ni aucun nettoyant liquide.
AVERTISSEMENT : risques de
chocs électriques. Ne laisser aucun
liquide pénétrer dans le chargeur, des
chocs électriques pourraient en résulter.
AVERTISSEMENT : risques de
brûlures. Ne submerger le bloc-piles
dans aucun liquide et le protéger de toute
infiltration de liquide. Ne jamais tenter
d’ouvrir le bloc-piles pour quelque raison
que ce soit. Si le boîtier plastique du
bloc-piles est brisé ou fissuré, le retourner
dans un centre de réparation pour y être
recyclé.
MISE EN GARDE : risques de
brûlures. Pour réduire tout risque de
dommages corporels, ne recharger que
des blocs-piles rechargeables
BLACK+DECKER. Tout autre type de
bloc-piles pourrait surchauffer et éclater
posant ainsi des risques de dommages
corporels et matériels.
MISE EN GARDE : sous
certaines conditions, lorsque le chargeur
est branché au bloc d’alimentation, des
matériaux étrangers pourraient courtcircuiter le chargeur.
AVERTISSEMENT
• NE PAS tenter de charger de blocpiles avec des chargeurs autres
que ceux décrits dans ce manuel.
Le chargeur et son bloc-piles ont
été conçus tout spécialement pour
fonctionner ensemble.
• Ces chargeurs n’ont pas été
conçus pour une utilisation autre
que recharger les blocs-piles
rechargeables BLACK+DECKER.
Toute autre utilisation comporte
des risques d’incendie, de chocs
électriques ou d’électrocution.
• Protéger le chargeur de la pluie ou
de la neige.
• Tirer sur la fiche plutôt que sur le
cordon pour débrancher le chargeur.
Cela permet de réduire les risques
d’endommager la fiche ou le cordon
d’alimentation.
• S’assurer que le cordon est protégé
de manière à ce que personne ne
marche ni ne trébuche dessus, ou
à ce qu’il ne soit ni endommagé ni
soumis à aucune tension.
• N’utiliser une rallonge qu’en cas
de nécessité absolue. L’utilisation
d’une rallonge inadéquate comporte
des risques d’incendie, de chocs
électriques ou d’électrocution.
Page 20

20
• Pour utiliser un chargeur a l’extérieur,
le placer systématiquement dans un
endroit sec.
• Si l’utilisation d’une rallonge est
absolument nécessaire à l’extérieur,
utiliser une rallonge adéquate pour
l’extérieur. Utiliser un cordon adéquat
pour l’extérieur réduit les risques de
chocs électriques.
• Pour la sécurité de l’utilisateur,
utiliser une rallonge de calibre
adéquat (AWG, American Wire Gauge
[calibrage américain normalisé des
fils électriques]). Plus le calibre est
petit, et plus sa capacité est grande. Un
calibre 16, par exemple, a une capacité
supérieure à un calibre 18. L’usage d’une
rallonge de calibre insuffisant causera
une chute de tension qui entraînera perte
de puissance et surchauffe. Si plus d’une
rallonge est utilisée pour obtenir une
certaine longueur, s’assurer que chaque
rallonge présente au moins le calibre de
fil minimum. Le tableau ci-dessous illustre
les calibres à utiliser selon la longueur de
rallonge et l’intensité nominale indiquée
sur la plaque signalétique. En cas de
doute, utiliser le calibre suivant. Plus le
calibre est petit, plus la rallonge peut
supporter de courant.
Calibre minimal des cordons de rallonge
Tension Longueur totale du cordon en pieds
120V 0-25 26-50 51-100 101-150
(0-7,6m) (7,6-15,2m) (15,2-30,4m) (30,4-45,7m)
Intensité (A)
Au Au Calibre moyen des fils (AWG)
moins plus
0 - 6 18 16 16 14
6 - 10 18 16 14 12
10 - 12 16 16 14 12
12 - 16 14 12 Non recommandé
• Ne poser aucun objet sur le chargeur.
Ne pas mettre le chargeur sur une
surface molle qui pourrait en bloquer
la ventilation et provoquer une
surchauffe interne. Éloigner le chargeur
de toute source de chaleur. Le chargeur
dispose d’orifices d’aération sur le
dessus et le dessous du boîtier.
• Ne pas le faire fonctionner avec un
cordon d’alimentation ou une fiche
endommagée.
• Ne pas utiliser le chargeur s’il a reçu
un coup, fait une chute ou a été
endommagé de quelque façon que
ce soit. Le ramener dans un centre de
réparation agréé.
• Ne pas démonter le chargeur. Pour tout
service ou réparation, le rapporter dans
un centre de réparation agréé. Le fait
de le réassembler de façon incorrecte
comporte des risques de chocs
électriques, d’électrocution et d’incendie.
• Débrancher le chargeur du secteur avant
tout entretien. Cela réduira tout risque de
chocs électriques. Le fait de retirer le bloc-
piles ne réduira pas ces risques.
• NE JAMAIS tenter de connecter 2
chargeurs ensemble.
• Le chargeur a été conçu pour être
alimenté en courant électrique
domestique standard de 120 volts. Ne
pas tenter de l’utiliser avec toute autre
tension. Cela ne s’applique pas aux
chargeurs de postes mobiles.
CONSIGNES DE SÉCURITÉ
IMPORTANTES PROPRES AUX
BLOCS-PILES
AVERTISSEMENT :
lire toutes
les instructions et toutes les consignes
de sécurité propres au bloc-piles,
au chargeur et à l’outil électrique.
Tout manquement aux avertissements
et consignes pose des risques de
décharges électriques, d’incendie et/ou
de dommages corporels graves.
Le bloc-piles n’est pas totalement chargé
d’usine. Avant d’utiliser le bloc-piles et le
chargeur, lire les consignes de sécurité
ci-dessous. Puis suivre la procédure de
charge indiquée.
LIRE TOUTES LES DIRECTIVES.
• NE JAMAIS forcer un bloc-piles
dans le chargeur. NE modifier un
bloc-piles en AUCUNE FAÇON
pour le faire rentrer dans un
chargeur incompatible, car le blocpiles pourrait éclater et causer
des dommages corporels graves.
Consulter le tableau en fin de manuel
pour connaître les compatibilités entre
chargeurs et blocs-piles.
• Ne pas incinérer le bloc-piles, même s’il
est très endommagé ou complètement
usé, car il pourrait exploser au contact
des flammes. Des vapeurs et des matières
toxiques sont dégagées lorsque les blocspiles sont incinérés.
• Ne pas charger ou utiliser de pile dans
un milieu déflagrant, en présence
de liquides, de gaz ou de poussière
inflammables. Insérer ou retirer la pile du
chargeur peut enflammer de la poussière
ou des émanations.
• Si le contenu de la pile entre en contact
avec la peau, laver immédiatement la
zone touchée au savon doux et à l’eau.
Si le liquide de la pile entre en contact
avec les yeux, rincer l’œil ouvert à l’eau
pendant 15 minutes ou jusqu’à ce que
l’irritation cesse. Si des soins médicaux
sont nécessaires, l’électrolyte des piles
au lithium-ion est composé d’un mélange
de carbonates organiques liquides et de
sels de lithium.
• Le contenu des éléments de pile
Page 21

21
ouverts peut provoquer une irritation
respiratoire. Exposer la personne à de
l’air frais. Si les symptômes persistent,
obtenir des soins médicaux.
• Ne pas jeter les batteries dans un feu.
La cellule peut exploser. Vérifiez les
codes locaux pour aucune instruction
spéciale possible.
• Ne pas ouvrir ou n’endommagez la
batterie. L’électrolyte est corrosif et peut
endommager les yeux et la peau. Il
peut être toxique si avalé.
AVERTISSEMENT : RISQUE DE
BRÛLURE. LE LIQUIDE DE LA PILE PEUT
S’ENFLAMMER S’IL EST EXPOSÉ À DES
ÉTINCELLES OU À UNE FLAMME.
• Charger uniquement les blocs-piles au
moyen de chargeurs
BLACK+DECKER
.
• NE PAS éclabousser le bloc-piles ni
l’immerger dans l’eau ou dans tout autre
liquide. Cela peut entraîner une défaillance
prématurée de l’élément.
• Ne pas ranger ni utiliser l’outil et
le bloc-piles dans un endroit où
la température peut atteindre ou
dépasser les 40 °C (105 °F) (comme
dans les remises extérieures ou les
bâtiments métalliques en été).
AVERTISSEMENT : NE JAMAIS
TENTER D’OUVRIR LE BLOC-PILES POUR
QUELQUE RAISON QUE CE SOIT. SI LE
BOÎTIER DU BLOC-PILES EST FISSURÉ OU
ENDOMMAGÉ, NE PAS L’INSÉRER DANS
UN CHARGEUR. NE PAS ÉCRASER,
LAISSER TOMBER OU
ENDOMMAGER LE BLOC-PILES. NE
PAS UTILISER UN BLOC-PILES OU UN
CHARGEUR QUI A REÇU UN CHOC
VIOLENT, QUI EST TOMBÉ, A ÉTÉ ÉCRASÉ
OU EST ENDOMMAGÉ DE QUELQUE
MANIÈRE QUE CE SOIT (P. EX. PERCÉ
PAR UN CLOU, FRAPPÉ D’UN COUP DE
MARTEAU, PIÉTINÉ). LES BLOCS-PILES
ENDOMMAGÉS DOIVENT ÊTRE ENVOYÉS
AU CENTRE DE RÉPARATION POUR ÊTRE
RECYCLÉS.
AVERTISSEMENT : RISQUE
D’INCENDIE. NE PAS RANGER OU
TRANSPORTER LES PILES DE MANIÈRE
À CE QUE DES OBJETS MÉTALLIQUES
PUISSENT ENTRER EN CONTACT AVEC
LES BORNES EXPOSÉES DES PILES.
PAR EXEMPLE, NE PAS METTRE DE PILE
DANS UN TABLIER, UNE POCHE, UNE
BOÎTE À OUTILS, UN BOÎTIER DE
RANGEMENT, UN TIROIR, ETC.
CONTENANT DES OBJETS TELS QUE DES
CLOUS, DES VIS OU DES CLÉS. LE
TRANSPORT DES PILES PEUT CAUSER
UN INCENDIE SI LES BORNES DES
PILES ENTRENT EN CONTACT
INVOLONTAIREMENT AVEC DES
MATIÈRES CONDUCTRICES COMME
DES CLÉS, DE LA MONNAIE, DES
OUTILS MANUELS ET D’AUTRES
ÉLÉMENTS SEMBLABLES. SELON LE
RÈGLEMENT HMR DU DOT (US
DEPARTMENT OF TRANSPORTATION
HAZARDOUS MATERIAL REGULATIONS),
IL EST EFFECTIVEMENT INTERDIT DE
TRANSPORTER DES PILES POUR LE
COMMERCE ET DANS LES AVIONS
(C.-À-D. DANS LES VALISES ET LES
BAGAGES À MAIN) À MOINS QU’ELLES NE
SOIENT BIEN PROTÉGÉES CONTRE LES
COURTS-CIRCUITS. POUR LE TRANSPORT
DE PILES INDIVIDUELLES, ON DOIT DONC
S’ASSURER QUE LES BORNES SONT
PROTÉGÉES ET BIEN ISOLÉES CONTRE
TOUTE MATIÈRE POUVANT ENTRER EN
CONTACT AVEC ELLES ET PROVOQUER
UN COURT-CIRCUIT. REMARQUE : IL NE
FAUT PAS LAISSER DE PILES AU LI-ION
DANS LES BAGAGES ENREGISTRÉS.
Recommandations de stockage
1. Le lieu idéal de rangement est un
lieu frais et sec, à l’abri de toute lumière
solaire directe et de toute température
excessive.
2. Pour un stockage prolongé, il est
recommandé d’entreposer le bloc-piles
pleinement chargé dans un lieu frais et
sec, hors du chargeur pour optimiser les
résultats.
REMARQUE : ne pas insérer de blocpiles dans un outil dont la gâchette
et verrouillée en position de marche.
Ne jamais bloquer l’interrupteur en
position de MARCHE.
REMARQUE : les blocs-piles ne devraient
pas être entreposés complètement déchargés.
Il sera nécessaire de recharger le bloc-piles
avant réutilisation.
Procédure de charge
Les chargeurs Black+Decker ont été
conçus pour recharger les blocs-piles
Black+Decker.
REMARQUE : pour optimiser les
performances et la durée de vie des blocspiles au lithium-ion :
• Recharger pleinement les blocs-piles
avant toute utilisation initiale.
• Recharger les blocs-piles déchargés
dès que possible après chaque
utilisation.
• Ne pas décharger complètement les
blocs-piles.
Page 22

22
BLACK+DECKER Systèmes batteries et chargeur
Chargeurs/Durée de charge** (Minutes) (0% - 100% charger)
Bloc-piles
40V MAX*
Heures
Watts
40V MAX* Chargeurs
LCS36 LCS40 LCS436
LBX36 47
1 1 3.25
LBXR36 60
1.25 1.25 3.75
LBX1540 60
1.25 1.25 3.75
LBXR2036 80
1.5 1.5 5
LBX2040 80
1.5 1.5 5
LBXR2540 100
1.75 1.75 6.25
LBX2540 100
1.75 1.75 6.25
**Les durées de charge sont approximatives; la durée de charge
rélle peut varier.
1. Brancher le chargeur dans une prise
appropriée avant d’insérer le bloc-piles.
2. Insérer le bloc-piles dans le chargeur.
3. Le voyant DEL vert clignotera
indiquant ainsi que la pile est en
cours de charge.
4. La fin de la charge est indiquée
par le voyant DEL vert qui demeure
allumé. Le bloc-piles est chargé à plein et
peut être utilisé ou laissé sur le chargeur.
Recharger les piles épuisées aussitôt que
possible après leur utilisation pour prolonger
leur durée de vie.
FONCTIONS DE DIAGNOSTIC DU
CHARGEUR
Ce chargeur est conçu pour détecter
certains problèmes pouvant être associés
au bloc-piles ou à la source d’alimentation.
Le type de clignotement de la DEL indique
les problèmes.
PILE EN MAUVAIS ÉTAT
Le chargeur est en mesure de
détecter une pile faible ou
endommagée. Le voyant DEL rouge clignote
selon la séquence indiquée sur l’étiquette. Si
la séquence code correspondant à une pile
en mauvais état est en clignotement, cesser
de recharger la pile. Retourner la pile à un
centre de réparation ou à un site de cueillette
pour le recyclage.
FONCTION DE SUSPENSION DU BLOCPILES CHAUD/FROID
Lorsque le chargeur détecte qu’une
pile est excessivement chaude ou
froide, il commence automatiquement la
suspension du bloc-piles chaud/froid, la
charge est ainsi interrompue jusqu’à ce
que l’état de la pile redevienne normal.
Une fois la température revenue à la
normale, le chargeur passe
automatiquement au mode de recharge du
bloc-piles. Cette fonction assure une durée
de vie maximale des piles. La DEL rouge
clignote de la manière indiquée sur
l’étiquette lorsque la suspension du blocpiles chaud/froid est détectée.
PILE LAISSÉE DANS LE CHARGEUR
Le chargeur et le bloc-piles peuvent
être laissés branchés, le voyant DEL
vert demeurant allumé. Le chargeur
maintiendra le bloc-piles en bon état et
DESCRIPTION FONCTIONNELLE
8
9
3
1
11
4
10
6
13
5
12
2
7
1. Gâchette à vitesse variable
2. Poignée
3. Bouton de verrouillage
4. Bloc-piles
5. Voyant de charge
6. Poignée auxiliaire
7. Bouton de la poignée auxiliaire
8. Collier de réglage
9. Tête de coupe
10. Guide de coupe de bordures
11. Carter
12. Boîtier de la bobine
13. Couvercle de la bobine
Page 23

23
complètement chargé.
REMARQUES IMPORTANTES SUR LE
CHARGEMENT
1. Pour augmenter la durée de vie du blocpiles et optimiser son rendement, le charger
à une température située entre 16 et 27 °C
(60 et 80 °F). NE PAS charger le bloc-piles
à des températures inférieures à 4,5 °C (40
°F) ou supérieures à 40,5 °C (105 °F). Ces
consignes sont importantes et permettent
d’éviter d’endommager gravement le blocpiles.
2. Le chargeur et le bloc-piles peuvent
devenir chauds au toucher pendant la
recharge. Il s’agit d’un état normal et cela
n’indique pas un problème. Pour faciliter
le refroidissement du bloc-piles après son
utilisation, éviter de mettre le chargeur
ou le bloc-piles dans un endroit chaud
comme dans une remise métallique ou une
remorque non isolée.
3. Si le bloc-piles ne se charge pas
adéquatement, on doit :
a. Vérifier le courant à la prise en
branchant une lampe ou un autre
appareil électrique.
b.
Vérifier si la prise est reliée à un
interrupteur d’éclairage qui coupe le
courant au moment d’éteindre la lumière.
c. Déplacer le chargeur et le bloc-piles à
un endroit où la température ambiante est
entre 16 °C et 27 °C (60 °F et 80 °F).
d. Si le problème persiste, apporter
ou envoyer l’outil, le bloc-piles et le
chargeur au centre de réparation de
votre région.
4. Le bloc-piles doit être rechargé lorsqu’il
n’arrive pas à produire suffisamment de
puissance pour des travaux qui étaient
facilement réalisés auparavant. NE PAS
CONTINUER à utiliser le bloc-piles dans
ces conditions. Suivre les procédures de
charge. On peut également recharger à
tout moment un bloc-piles partiellement
déchargé sans affecter sa longévité.
5. Tout corps étranger conducteur, tel
que notamment la laine d’acier, le papier
d’aluminium ou toute accumulation de
particules métalliques, doit être maintenu
à distance des ouvertures du chargeur.
Débrancher systématiquement celui-ci si
aucun bloc-piles n’y est inséré. Débrancher
le chargeur avant tout nettoyage.
6.
Ne pas congeler le chargeur, l’immerger
dans l’eau ou dans tout autre liquide.
AVERTISSEMENT : RISQUE DE
CHOC ÉLECTRIQUE.
ÉVITER LA
PÉNÉTRATION DE TOUT LIQUIDE DANS LE
CHARGEUR. NE JAMAIS TENTER D’OUVRIR LE
BLOC-PILES POUR QUELQUE RAISON QUE
CE SOIT. SI LE BOÎTIER EN PLASTIQUE DU
BLOC-PILES EST BRISÉ OU FISSURÉ, LE
RETOURNER À UN CENTRE DE RÉPARATION
POUR QU’IL SOIT RECYCLÉ.RETURN TO A
SERVICE CENTER FOR RECYCLING.
INDICATEUR DE L’ÉTAT DE
CHARGE- FIGURE A
La partie arrière du bloc-piles est pourvue
d’un indicateur d’état de charge. Cet
indicateur peut servir à afficher le niveau
actuel de charge d’un bloc-piles durant son
utilisation et durant sa charge. Il ne permet
pas de connaître la fonctionnalité de l’outil.
Par ailleurs, la lecture de l’indicateur peut
varier selon les composants du produit, la
température et l’application de l’usager.
Vérification de l’état de charge durant l’utilisation :
• Enfoncer le bouton de l’indicateur d’état
de charge (A1).
• Les quatre DEL (B2) s’allumeront pour
indiquer le pourcentage de charge du
bloc-piles. Consulter le tableau à la figure
A.
• Si le voyant à DEL ne s’allume pas,
charger le bloc-piles.
REMARQUE : Ce bloc-piles est conçu pour ne
pas fonctionner lorsque sa charge atteint moins de 20 %
de sa capacité. Une fois la charge du bloc-piles vidée,
l’outil ne fonctionnera pas tant que le bloc-piles n’a pas
été rechargé.
<18%
18% - 45%
45% - 72%
72% - 100%
A2
A1
A
Page 24

24
INSERTION ET RETRAIT DU BLOC-PILES
AVERTISSEMENT : VEILLER À NE PAS
ACTIONNER LA DÉTENTE LORS DE LA POSE OU DU
RETRAIT DU BLOC-PILES.
INSTALLATION DU BLOC-PILES :
Insérer le bloc-piles dans l’outil de manière
à bien l’enfoncer et à entendre un déclic
(figure B). S’assurer que le bloc-piles est
bien logé et enclenché.
RETRAIT DU BLOC-PILES : Enfoncer le
bouton de dégagement du bloc-piles situé
au dos du bloc-piles, puis retirer le blocpiles de l’outil (figure C).
B
C
CONSERVER CES MESURES.
USAGE PRÉVU
Ce taille-bordure a été conçu pour des
applications de taille résidentielle. NE PAS
l’utiliser en milieu ambiant humide ou en
présence de liquides ou de gaz inflammables.
Ce taille-bordure est un appareil résidentiel.
NE PAS le laisser à la portée des enfants.
Une supervision est nécessaire auprès de
tout utilisateur non expérimenté.
MONTAGE ET RÉGLAGE
AVERTISSEMENT : Avant le
montage, s’assurer que l’outil est éteint et
que le bloc-piles a été retiré.
OUTILS REQUIS POUR L’ASSEMBLAGE
(NON FOURNIS) :
- Tournevis cruciforme
AVERTISSEMENT : Retirer le bloc-
piles avant d’essayer de fixer l’un des
composants suivants.
FIXATION DU PARE-MAIN (FIGURES D ET E)
AVERTISSEMENT : NE JAMAIS
UTILISER L’OUTIL SANS LE PARE-MAIN
SOLIDEMENT FIXÉ. Le pare-main doit
toujours être attaché correctement à
l’outil pour protéger l’utilisateur.
• Retirer la vis du pare-main.
•
Tout en maintenant le pare-main à
l’équerre de la tête de coupe, le glisser
en place de manière à entendre le déclic
de la languette de retenue (s’assurer
que les guides (D1) du pare-main (11)
sont bien alignés sur ceux (D2) de la
tête de coupe (D3) (figure D).La patte
de verrouillage (D4) doit encliq
ueté dans
la fente de logement (D5).
• Bien fixer le pare-main au moyen de la
vis (E1) (figure E).
Installation de la poignée auxiliaire
(Figure F, G)
Pour optimiser l’équilibre et le confort, la
poignée auxiliaire peut être ajustée.
•
Pour rattacher la poignée (6), appuyez sur
les boutons (13) de chaque côté du boîtier
supérieur, comme illustré en figure F.
• Positionnez la poignée comme illustré
en figure G, en faisant coïncider la
partie rainurée de la poignée sur le
bouton rainuré. Poussez partiellement
la poignée de façon à ce qu’elle
maintienne les boutons lorsque vous
les relâcherez de la main.
• I
nsérez alors la poignée complètement
sur le boîtier et poussez-la jusqu’à ce
qu’elle s’enclenche en place (figure G).
• Pour ajuster la poignée vers le haut ou
le bas, appuyez sur le bouton (13) et
réglez-la sur la hauteur désirée.
• Elle devrait être ajustée de façon à ce
que votre avant-bras soit droit lorsque
le taille-bordure est en position de
travail.
F
13
G
13
Page 25

25
AVERTISSEMENT : pour réduire
tout risque de dommages corporels
graves, adopter SYSTÉMATIQUEMENT la
position des mains illustrée.
AVERTISSEMENT : pour réduire
tout risque de dommages corporels
graves, maintenir SYSTÉMATIQUEMENT
l’outil fermement pour anticiper toute
réaction soudaine de l’outil.
La position correcte des mains requiert
une main sur la poignée principale (2), et
l’autre sur la poignée auxiliaire (6).
Réglage du mode de taille ou d’entretien
des bordures (Figure I, J)
• Le taille-bordure peut être utilisé pour la
taille comme illustré en figure I ou pour
l’entretien des bordures pour couper
les herbes qui dépassent au bord des
pelouses ou des plates-bandes, comme
illustré en figure J.
Mode de taille
Pour la taille, la tête de coupe devrait
être orientée dans la position illustrée en
figure J. Si ce n’est pas le cas :
• Retirez le bloc-piles du taille-bordure.
• Desserrez le collier (8), comme illustré
en figure H.
• Maintenez l’arbre métallique et faites
pivoter le boîtier inférieur à 180° jusqu’à
ce que le taille-bordure soit dans la
position illustrée en figure I.
• Resserrez soigneusement le collier (8).
Mode d’entretien des bordures (Figure J)
AVERTISSEMENT : lorsque l’outil
est utilisé comme coupe-bordure, il peut
arriver que le fil projette avec force pierres
ou objets, métalliques ou autres. Le taillebordure et son carter ont été conçus pour
réduire ce danger. Cependant, ASSUREZVOUS que les tiers ou les animaux
domestiques se trouvent à au moins 30 m
(100 pieds) du travail en cours.
Pour l’entretien des bordures, la tête de
I
Réglage de la hauteur (Figure H)
MISE EN GARDE : ajustez la
longueur du taille-bordure jusqu’à obtenir
la position de travail adéquate, comme
illustré en figure M.
• La hauteur générale du taille-bordure
peut être ajustée en desserrant le
collier de réglage (8) et en le tournant
dans le sens de la flèche, comme
illustré en figure H.
• Déplacez le boîtier supérieur vers le
haut ou le bas. Lorsque la hauteur
désirée est atteinte, resserrez le
collier en le tournant dans la direction
opposée, comme illustré en figure H.
LIBÉRATION DU FIL DE COUPE
Durant le transport, le fil de coupe est
collé au boîtier de la bobine.
• Retirer le ruban adhésif retenant le fil
de coupe au boîtier de la bobine.
UTILISATION
AVERTISSEMENT :
utiliser
systématiquement une protection
oculaire adéquate agrée ANSI
Z87.1(CAN/CSA Z94.3) pendant
l’utilisation de cet appareil.
AVERTISSEMENT : pour réduire
tout risque de dommages corporels
graves, arrêter l’outil et retirer le blocpiles avant tout réglage ou avant de
retirer ou installer toute pièce ou tout
accessoire. Tout démarrage accidentel
comporte des risques de dommages
corporels.
MISE EN GARDE : avant de
commencer toute coupe, s’assurer que
le type approprié de fil de coupe est
utilisé.
MISE EN GARDE : vérifier la
zone à tailler et éliminer tout fil, cordon ou
tout objet similaire qui pourrait se prendre
dans le fil en rotation ou dans la bobine.
Faire particulièrement attention à éviter
tout fil de fer qui pourrait se plier vers
l’extérieur sur le chemin du taille-bordure,
comme les barbelés d’un grillage à
mailles losangées.
Position adéquate des mains
8
H
Page 26

26
coupe devrait se trouver dans la position
illustrée en figure J. Si ce n’est pas le
cas :
• Retirez le bloc-piles du taille-bordure.
• Desserrez le collier (8), comme illustré
en figure H.
• Maintenez l’arbre métallique et faites
pivoter le boîtier inférieur à 180°
jusqu’à ce que le taille-bordure soit
dans la position illustrée en figure J.
• Resserrez soigneusement le collier (8).
• Abaissez le guide de coupe de
bordures (10) sur sa position ouverte.
Assurez-vous que le guide de taille
bordure est complètement abaissé, un
clic se fera entendre.
REMARQUE : la tête ne peut tourner
que dans une seule direction.
REMARQUE : le système d’alimentation
automatique pourra fonctionner de
façon incorrecte si le guide de coupe de
bordures n’est pas utilisé.
Mise en marche et arrêt (Figure k)
• Pour mettre le taille-bordure en
marche, poussez le bouton de
verrouillage (comme illustré dans
l’encadré, figure J) indifféremment d’un
côté vers l’autre puis appuyez sur la
gâchette.
• Pour arrêter le taille-bordure, relâchez
la gâchette.
AVERTISSEMENT : ne jamais
tenter de verrouiller la gâchette en position
de marche.
K
1
3
Utilisation du taillebordure (Figures L, M)
• Alors que l’appareil
est en marche,
inclinez l’appareil
et faites-le osciller
lentement d’un côté
à l’autre, comme
illustré en figure L.
• Maintenez un angle
de coupe entre
5° et 10°, comme
illustré en figure
M. N’excédez pas 10°. Coupez avec
l’extrémité du fil. Pour vous maintenir à
distance des surfaces dures, utilisez le
guide de coupe de bordures (10). Tirez
le guide vers l’extérieur jusqu’à ce qu’il
s’enclenche fermement en place.
• Maintenez une distance minimum de
609,6 mm (24 po) entre le carter et
vos pieds, comme illustré en figure M.
Pour respecter cette distance, ajustez
la hauteur générale du taille-bordure
comme illustré en figure H.
M
POUR PASSER AU MODE
D’ENTRETIEN DES BORDURES
AVERTISSEMENT : lorsque l’outil
est utilisé comme coupe-bordure, il peut
arriver que le fil projette avec force pierres
ou objets, métalliques ou autres. Le taillebordure et son carter ont été conçus pour
réduire ce danger. Cependant, ASSUREZVOUS que les tiers et les animaux
domestiques se trouvent à au moins 30 m
(100 pieds) du travail en cours.
• Pour utiliser le taille-bordure pour
l’entretien des bordures, tournez le
collier (8) comme illustré en figure H.
• Maintenez l’arbre métallique et faites
pivoter le boîtier inférieur à 180° jusqu’à
ce que le taille-bordure soit dans la
position illustrée en figure J.
• Resserrez soigneusement le collier en
sens inverse.
• Positionnez le taille-bordure avec son
guide de coupe de bordures (10) le
long de la surface comme illustré en
figure N.
• Retournez le taille-bordure sur sa
J
L
Page 27

27
position de taille en desserrant le collier
puis en faisant pivoter le boîtier inférieur
à nouveau à 180°.
• Resserrez soigneusement le collier.
Lorsque vous utilisez le taille-bordure,
rétractez le guide de coupe de
bordures sur sa position initiale, pour le
mettre de côté.
N
CHANGEMENT DE BOBINE (Figures O,
P, Q)
AVERTISSEMENT : retirer le
bloc-piles du taille-bordure avant tout
assemblage, réglage ou changement
d’accessoire. Ces mesures préventives
de sécurité réduisent les risques de
démarrage accidentel de l’appareil.
Mise en garde : pour éviter
d’endommager l’appareil, si le fil de
coupe dépasse au-delà de la lame,
coupez-le au ras de la lame.
• Retirez le bloc-piles du taille-bordure.
• Appuyez sur les pattes (14) et retirez
le couvercle de la bobine (13) de son
boîtier (12) situé dans la tête de coupe
(9) (figure O).
• Pour optimiser les résultats, remplacez
la bobine avec le modèle # AF-100 de
BLACK+DECKER.
• Attrapez d’une main la bobine vide et
de l’autre le boîtier de la bobine, puis
sortez la bobine.
• Si le levier (15) dans la base du boîtier
venait à être délogé, remettez-le en
place comme illustré en figure P, avant
d’insérer la nouvelle bobine dans le
boîtier.
• Éliminez toute saleté ou herbe de la
bobine et du boîtier.
• Détachez l’extrémité du fil de coupe et
guidez le fil dans l’œillet (18), figure Q.
• Attrapez la bobine neuve et l’enfoncer
sur le tambour (16) (figure P) du boîtier.
Tournez la bobine légèrement pour
l’ancrer correctement. Le fil devrait
dépasser d’environ 136 mm (5-3/8 po)
du boîtier.
• Alignez les languettes (14) du couvercle
de la bobine sur les encoches (17) du
boîtier (figure Q).
• Poussez le couvercle à fond sur
le boîtier jusqu’à ce qu’il soit bien
enclenché.
REMARQUE : le fil devrait dépasser
d’environ 122 mm (4-13/16 po) du
boîtier.
14
13
9
O
14
13
18
17
Q
P
15
16
RECHARGER UNE BOBINE À
PARTIR DE FIL EN VRAC (utiliser
exclusivement du fil rond de 1,65 mm
[0,065 po] de diamètre) (figures R, S,
T)
AVERTISSEMENT : retirer le
bloc-piles du taille-bordure avant tout
assemblage, réglage ou changement
d’accessoire. Ces mesures préventives
de sécurité réduisent les risques de
démarrage accidentel de l’appareil.
Le fil en vrac est aussi vendu
séparément chez votre détaillant local.
REMARQUE : ne pas utiliser de fils
carrés, en forme d’étoile ou autre, ou
de diamètres différents. Cela pourrait
poser des problèmes d’alimentation et
surcharger le moteur.
REMARQUE : les bobines enroulées
à la main à partir de fil en vrac ont
tendance à s’emmêler plus fréquemment
que les bobines enroulées d’usine
BLACK+DECKER. Pour optimiser les
résultats, remplacez la bobine avec le
Page 28

28
.
S
19
20
21
R
23
T
Conseils pratiques de coupe
• Utilisez l’extrémité du fil pour couper.
Ne forcez pas la tête du fil dans l’herbe
non coupée. Pour optimiser les résultats,
utilisez un guide de coupe de bordures
le long des barrières, maisons, platesbandes, etc.
• Les fils de fer ou les barrières
augmentent l’usure ou les cassures du
fil. Les pierres, les murs de briques, les
trottoirs et le bois useront rapidement le
fil.
• Ne laissez pas trainer le couvercle de
la bobine sur le sol ou sur d’autres
surfaces.
• Lorsque les pousses sont longues,
coupez du haut vers le bas, et
n’excédez pas des hauteurs de
modèle # AF-100 de BLACK+DECKER.
Pour installer le fil en vrac, suivez les
étapes ci-après :
• Retirez le bloc-piles du taille-bordure.
• Retirez la bobine vide du taillebordure, comme expliqué à la section
« CHANGEMENT DE BOBINE ».
• Éliminez tout fil restant sur la bobine.
• Repliez l’extrémité du fil de coupe
d’environ 19 mm (3/4 po) (19). Alimentez
le fil de coupe dans l’une des entailles
d’ancrage du fil (20), comme illustré en
figure R.
• Insérez l’extrémité de 19 mm (3/4 po) du
fil en vrac dans le trou (21) de la bobine
adjacent à la fente, comme illustré en
figure R. Assurez-vous que le fil est bien
tiré contre la bobine, comme illustré en
figure S.
• - Enroulez le fil de coupe sur la bobine
dans le sens de la flèche sur cette
dernière. Assurez-vous d’enrouler
le fil soigneusement et en couches
régulières. Ne pas le faire s’enchevêtrer
(figure T).
• Lorsque le fil de coupe embobiné atteint
les rebords (22), coupez le fil (figure R).
• Installez la bobine sur le taillebordure, comme expliqué à la section
« CHANGEMENT DE BOBINE ».
Page 29

29
304,8 mm (12 po).
• Maintenez le taille-bordure incliné
vers la zone à couper. C’est la
meilleure façon de découper.
• Coupez en passant le taille-bordure
de droite à gauche. Cela évitera de
renvoyer les débris vers l’utilisateur.
• Évitez les arbres et les buissons.
L’écorce, les moulures de bois, les
revêtements, et les poteaux peuvent
facilement endommager le fil.
Fil de coupe/Alimentation du fil
Votre taille-bordure utilise exclusivement
un fil ROND en nylon de 1,65 mm
(0,065 po) de diamètre. Pendant
l’utilisation, les extrémités du fil de nylon
s’effilochent et s’usent et la bobine à
alimentation automatique alimente et
coupe automatiquement une nouvelle
longueur de fil. Ne cognez pas
l’appareil sur le sol pour l’alimenter en fil
ou pour toute autre raison.
Le fil de coupe s’usera plus rapidement
et nécessitera plus de fil si la coupe ou
la taille est effectuée le long des trottoirs
ou autres surfaces abrasives ou si des
herbes plus épaisses sont coupées.
DÉMÊLAGE ET DÉBLOCAGE DU FIL
(Figures O, P, R)
AVERTISSEMENT : retirer le
bloc-piles du taille-bordure avant tout
assemblage, réglage ou changement
d’accessoire. Ces mesures préventives
de sécurité réduisent les risques de
démarrage accidentel de l’appareil.
De temps en temps, particulièrement
lorsque l’on coupe des herbes hautes
et épaisses, le boîtier de la bobine
pourra s’encrasser de sève ou d’autres
matériaux, et provoquer le blocage
du fil. Pour le débloquer, suivez la
procédure ci-après.
• Appuyez sur les pattes (14) et retirez
le couvercle de la bobine (13) de son
boîtier (12) situé dans tête de coupe
(figure O).
• Attrapez d’une main la bobine et de
l’autre le boîtier de la bobine, puis
sortez la bobine et éliminez tout fil
cassé, débris, saleté ou herbes du
logement de la bobine.
• Si le levier (15) dans la base du boîtier
venait à être délogé, remettez-le en
place comme illustré en figure P, avant
de réinsérer la bobine dans le boîtier.
• Placez la bobine et le fil dans le
boîtier de la bobine en « garant » le
fil dans son encoche d’ancrage (20),
comme illustré en figure R.
• Réinstallez la bobine sur le taille-
bordure comme expliqué à la section
« CHANGEMENT DE BOBINE ».
REMARQUE : s’assurer que le couvercle
est bien positionné : deux clics se feront
entendre pour assurer que les pattes seront
correctement enclenchées. Mettez l’appareil
en marche. En juste quelques secondes
ou moins, le fil de nylon sera coupé
automatiquement à la longueur voulue.
REMARQUE :pour éviter d’endommager
l’appareil, si le fil de coupe dépasse au-delà
d
e la lame, coupez-le au ras de la lame.
REMARQUE : des pièces de rechange
(carters, bobines, couvercles, etc.) sont
vendues séparément auprès des centres
de services BLACK+DECKER. Pour
trouver votre centre de service local,
appelez le 1-800-544-6986 ou visitez
www. blackanddecker. com.
ENTRETIEN
AVERTISSEMENT: Pour éviter
des blessures graves, éteindre et
débrancher l’outil avant d’effectuer toute
opération d’entretien.
1. Maintenir les orifices de ventilation
dégagés pour éviter la surchauffe.
2.
Votre fil rotatif peut sécher avec le temps.
Pour tenir votre fil en excellente condition,
entreposer les bobines de rechange de fil
pré-enroulé ou le fil en vrac dans un sac
en plastique scellé contenant l’équivalent
d’une cuillerée d’eau.
3. Les pièces en plastique se nettoient avec
un savon doux et un chiffon humide.
4. Le coupe-fil sur le bord du dispositif
de protection peut s’émousser avec le
temps. Il est recommandé de s’assurer
régulièrement que la lame est bien
tranchante en utilisant une lime.
LE SCEAU SRPRC
MC
Le sceau SRPRC
MC
(Société
de recyclage des piles
rechargeables) sur la pile au
lithium-ion (ou sur le bloc-piles)
indique que son coût de recyclage (ou
celui du bloc-piles) à la fin de sa vie utile
est déjà payé par
BLACK+DECKER
.
La SRPRC
MC
, en collaboration avec
BLACK+DECKER
et d’autres utilisateurs
de piles, a établi aux États-Unis des
programmes facilitant le ramassage des
piles au LI-ION épuisées. Aidez-nous à
protéger l’environnement et à conserver
nos ressources naturelles en retournant
les piles LI-ION épuisées à un centre
de réparation
BLACK+DECKER
ou au
détaillant de votre région pour qu’elles
soient recyclées. Vous pouvez aussi
communiquer avec le centre de recyclage
de votre région pour obtenir des
informations sur l’endroit où éliminer vos
piles épuisées. SRPRC
MC
est une marque
Page 30

30
de commerce déposée de la Société de
recyclage des piles rechargeables.
Cet appareil numérique de la classe B est conforme à la
norme NMB-003 du Canada.
Cet appareil est conforme aux dispositions du
paragraphe 15 des règlements de la FCC. Son
fonctionnement est régi par les deux conditions
suivantes : (1) Cet appareil ne peut pas causer
d’interférence nuisible et (2) cet appareil doit
accepter toutes les interférences reçues, y compris
celles qui risquent d’en gêner le fonctionnement.
REMARQUE : ce matériel a été testé et a été déclaré
conforme aux limites en vigueur concernant les
dispositifs numériques de classe B, en vertu de la
partie 15 de la réglementation FCC. Ces limites
visent à assurer une protection raisonnable contre
tout brouillage nuisible dans une installation
résidentielle. Ce matériel produit, consomme et peut
émettre une énergie de radiofréquence et, s’il n’est
pas installé et utilisé conformément aux directives
qui l’accompagnent, il peut entraîner un brouillage
nuisible des communications radio. Cependant,
nous ne garantissons pas l’absence de brouillage
dans tous les types d’environnement. Si, après avoir
effectué une vérification en mettant l’appareil hors
tension puis sous tension, l’utilisateur s’aperçoit
que ce matériel provoque un brouillage nuisible à la
réception des signaux de radio ou de télévision, il lui
faudra essayer de corriger ce brouillage en prenant
une ou plusieurs des mesures ci-dessous :
• Réorienter ou repositionner l’antenne de réception.
• Éloigner le plus possible le matériel du récepteur.
• Brancher le matériel dans une prise électrique
située sur un circuit différent de celui du récepteur.
• Consulter le distributeur ou un technicien radio/
télévision expérimenté pour obtenir de l’aide.
Tout changement ou toute modification à cet appareil
qui n’est pas expressément approuvé par l’institution
responsable de la conformité peut faire annuler le
droit de l’utilisateur d’utiliser ce matériel. Cet appareil
numérique de la classe B est conforme à la norme
NMB-003 du Canada.
INFORMATION SUR LES
RÉPARATIONS
Tous les centres de réparation
BLACK+DECKER
sont dotés de
personnel qualifié en matière d’outillage
électrique; ils sont donc en mesure
d’offrir à leur clientèle un service efficace
et fiable. Que ce soit pour un avis
technique, une réparation ou des pièces
de rechange authentiques installées en
usine, communiquer avec l’établissement
BLACK+DECKER
le plus près de chez
vous. Pour trouver l’établissement de
réparation de votre région, composer le
numéro suivant :
1 800 544-6986 ou consulter le site
www.blackanddecker.com
GARANTIE LIMITÉE DE TROIS ANS
Black & Decker (É.-U.) Inc. garantit que le
produit est exempt de défauts de matériau
et de fabrication pendant trois (3) ans à
partir de la date d’achat, à condition que
le produit soit utilisé en milieu domestique.
La présente garantie limitée ne couvre
pas les défaillances provoquées par un
abus, un dommage accidentel ou des
réparations ou tentatives de réparations
effectuées par toute autre personne que
le personnel de Black+Decker et de ses
centres de réparation agréés. Un produit
défectueux qui remplit les conditions
stipulées par la présente garantie sera
remplacé ou réparé sans frais d’une des
deux façons suivantes :
La première façon consiste en un
échange chez le détaillant où le produit
a été acheté (à la condition que le
magasin soit un détaillant participant).
Tout retour doit se faire durant la période
correspondant à la politique d’échange
du détaillant. Une preuve d’achat peut
être requise. Prière de vérifier la politique
de retour du détaillant au sujet des délais
impartis pour les retours ou les échanges.
La deuxième option est d’apporter ou
d’envoyer le produit (en port payé) à
un centre de réparation agréé ou à un
centre de réparation Black+Decker pour
faire réparer ou échanger le produit, à la
discrétion de Black+Decker. Une preuve
d’achat peut être requise. Les centres
de réparation de Black+Decker et les
centres de réparation ou en ligne sur
www.blackanddecker.com.
Cette garantie ne s’applique pas aux
accessoires. Cette garantie accorde des
droits légaux propres au propriétaire de
l’outil. Ce dernier pourrait avoir d’autres
droits selon l’État ou la province qu’il
habite. Pour toute question, communiquer
avec le directeur du centre de réparation
Black+Decker le plus près. Ce produit
n’est pas destiné à un usage commercial.
L’usage commercial de ce produit annule
par conséquent cette garantie. Toutes
autres garanties, expresses ou implicites,
sont déclinées par la présente.
Imported by / Importé par
Black & Decker Canada Inc.
100 Central Ave.
Brockville (Ontario) K6V 5W6
Page 31

31
PROBLÈME
L’outil fonctionne lentement.
La alimentación automática de cuerda no alimenta
más cuerda.
Alimentation excédentaire
Le fil se déroule lorsque la bobine ou le
capuchon est enlevé.
SOLUTION
• Appuyer à fond sur la détente à vitesse
variable. Le niveau de pression sur la détente
influence la vitesse.
• Retirer la pile de l’outil. Vérifier que le
boîtier de la bobine peut tourner librement. Le
nettoyer avec précaution si nécessaire.
• S’assurer que le fil de coupe sort d’au
plus 122 mm ( 4-13/16 po) de la bobine. Le
cas échéant, le couper afin que sa longueur
atteigne juste la lame de coupe pour le fil.
• Ligne plus est alimenté lorsque la ligne
réduit à environ 3 pouces (76,2 mm). Pour
déterminer si la ligne n’est pas entraîné,
laisser ligne porter au-delà de ce point.
• Garder les onglets déprimés et et retirer la
bobine bobine dans la tête de coupe.
• Veiller à ce que la ligne n’est pas traversée
sur la bobine comme indiqué sur la figure T.
Si c’est le cas, déroulez le fil de coupe, puis
enrouler sur la bobine soigneusement afin que
les lignes ne se croisent pas.
• I
nspecter les titres en bas de la bobine pour les
dommages. Si endommagé, remplacer la bobine.
• Tirer la ficelle jusqu’à ce qu’il dépasse 4
13/16 po (122mm) de la bobine. Si la ligne de
coupe insuffisante est laissée sur la bobine,
installer une nouvelle bobine de fil de coupe.
• Aligner les languettes sur le capuchon de la
bobine avec la coupe outs dans le logement.
• Appuyer sur le capuchon de la bobine sur le
boîtier jusqu’à ce qu’il s’enclenche.
• Si la ligne de coupe fait saillie au-delà de la
lame de la tondeuse, coupe-la ce qu’il touche
juste la lame. Si le saut de ligne automatique
ne fonctionne toujours pas ou la bobine est
bloquée, essayez les suggestions suivantes :
•
Nettoyer soigneusement la bobine et du
logement.
• Prendre soin d’utiliser le bon diamètre de fil,
c.-à-d. 2,03 mm (0,08 po). Un diamètre inférieur
ou supérieur nuira au bon fonctionnement du
système d’alimentation automatique.
• Retirer la bobine et vérifier si le levier dans le
logement de la bobine peut se déplacer librement.
• Retirer la bobine et dérouler le fil de coupe,
puis enroulez-le sur parfaitement à nouveau.
Remplacer la bobine dans le boîtier.
•
S’assurer de couper avec le bout du fil (177,8
mm [7 po] de la bobine). Utilise le guide de coupe
si nécessaire pour maintenir la bonne distance.
• S’assurer de ne pas excéder un angle de 10°
comme le montre la figure M.
• S’assurer de fixer les fils dans les encoches
de retenue (figure R) avant le retrait.
DEPANNAGE
Pour de l’aide avec l’outil, consulter notre site Web
www.blackanddecker.com pour l’emplacement du centre de réparation le plus près
ou communiquer avec l’assistance Black+Decker au 1-800-544-6986.
Page 32

32
Visite www.BlackandDecker.com/NewOwner
para registrar su nuevo producto.
MANUAL DE INSTRUCCIONES
CORTADORA DE CÉSPED INALÁMBRICA CON
BATERÍA DE IONES DE LITIO DE 40 V MAX*
Gracias por elegir BLACK+DECKER!
Visite www.BlackandDecker.com/NewOwner para registrar su nuevo producto.
LEA EL MANUAL ANTES DE DEVOLVER ESTE PRODUCTO POR
CUALQUIER MOTIVO:
Si tiene una consulta o algún inconveniente con su producto BLACK+DECKER, visite
http://www.blackanddecker.com/instantanswers para obtener respuestas instantáneas
las 24 horas del día. Si no encuentra la respuesta o no tiene acceso a Internet, llame al
1-800-544-6986 de lunes a viernes de 8 a. m. a 5 p. m. hora del Este para hablar con un
agente. Cuando llame, tenga a mano el número de catálogo.
CONSERVE ESTE MANUAL PARA FUTURAS CONSULTAS.
SÓLO PARA USO DOMÉSTICO.
CATÁLOGO N°
LST140
VOICI DES RENSEIGNEMENTS IMPORTANTS QU’IL VOUS FAUT CONNAÎTRE :
ADVERTENCIA: No retire el protector. El protector debe estar
instalado al podar. Operar esta podadora sin el protector violará la garantía
del producto.
ATENCIÓN: Al reemplazar la cuerda, use solamente una cuerda
edonda de1,65 mm (0,065 pulgadas) de diámetro. Otros tamaños podrían
degradar el rendimiento o causar daño a la podadora.
• Para utilizarse solamente con baterías BLACK+DECKER de 40 v.
SI TIENE PREGUNTAS O COMENTARIOS SOBRE ESTE O CUALQUIER
OTRO APARATO BLACK+DECKER, LLÁMENOS GRATUITAMENTE AL:
1-800-544-6986
Page 33

33
ADVERTENCIAS E INSTRUCCIONES
IMPORTANTES SOBRE SEGURIDAD
ADVERTENCIA: Al utilizar
herramientas eléctricas para el jardín,
siempre se deben tomar ciertas
precauciones básicas de seguridad para
minimizar el riesgo de incendio, descarga
eléctrica y lesiones personales, entre
ellas:
Lea todas las instrucciones
• SIEMPRE UTILICE PROTECCIÓN
PARA LOS OJOS: utilice gafas
o anteojos de seguridad en todo
momento que esta herramienta esté
enchufada.
• PROTECTOR: nunca utilice esta
herramienta sin el protector.
• UTILICE LA VESTIMENTA
ADECUADA: no utilice ropa holgada
ni joyas. Pueden atascarse en las
piezas móviles. Se recomienda utilizar
guantes de goma y calzado con una
suela de goma considerable al trabajar
al aire libre. No opere la herramienta
descalzo ni con sandalias abiertas.
Utilice pantalones largos para
protegerse las piernas. Recójase y
cubra el cabello largo.
• CUERDA DE NYLON: mantenga la
cara, las manos y los pies lejos de
la cuerda de nylon giratoria en todo
momento.
• LA CUERDA GIRATORIA REALIZA
UNA FUNCIÓN DE CORTE: tenga
precaución al podar alrededor de pantallas
y plantas que desea.
• MANTENGA ALEJADOS A TODOS
LOS ESPECTADORES: a una distancia
segura, especialmente a los niños.
• ADVERTENCIA IMPORTANTE:
al utilizar la herramienta como
Bordeadora, las piedras, las piezas
de metal y otros objetos pueden ser
arrojados a alta velocidad por la acción
de la cuerda. La herramienta y el
protector están diseñados para reducir
el peligro. No obstante, se deben tener
en cuenta las siguientes precauciones
especiales:
• ASEGÚRESE de que las demás
personas y mascotas estén a no
menos de 30 m (100 pies) de
distancia.
• PARA REDUCIR EL RIESGO de
lesiones por repercusión (rebote),
trabaje lejos de cualquier objeto sólido
cercano, como pared, escalones,
piedras grandes, árboles, etc. Tenga
suma precaución al trabajar cerca de
objetos sólidos y, cuando sea necesario,
pode o recorte los bordes en forma
manual.
• EVITE EL ARRANQUE ACCIDENTAL:
nunca transporte la herramienta
enchufada con el dedo en el
interruptor.
• NO FUERCE LA HERRAMIENTA:
a una velocidad más rápida de la
velocidad para la que fue diseñada para
cortar en forma eficaz.
• UTILICE LA HERRAMIENTA
ADECUADA: no utilice esta herramienta
para un trabajo diferente a aquéllos para los
que fue diseñada.
• NO SE ESTIRE: conserve el equilibrio
adecuado y manténgase parado
correctamente en todo momento.
• DANO A LA UNIDAD: si golpea la
herramienta o ésta se atasca con
un objeto extraño, deténgala de
inmediato, desenchúfela, verifique que
no se haya dañado y repare cualquier
daño antes de seguir utilizándola. No
opere la herramienta si la bobina o el
carrete están dañados.
• DESCONECTE LA HERRAMIENTA:
cuando no la utilice, al reemplazar la
cuerda o antes de limpiarla.
• EVITE LAS CONDICIONES
AMBIENTALES PELIGROSAS: no
utilice herramientas eléctricas en
lugares húmedos o mojados. Siga
todas las instrucciones incluidas en
este Manual de instrucciones para una
operación adecuada de la herramienta.
No utilice la herramienta bajo la lluvia.
• NO OPERE herramientas eléctricas
portátiles en atmósferas gaseosas
o explosivas. Los motores de estas
herramientas normalmente chispean,
y las chispas pueden encender los
vapores.
• GUARDE LAS HERRAMIENTAS QUE
LIGNES DIRECTRICES EN MATIÈRE DE SÉCURITÉ - DÉFINITIONS
Il est important que vous lisiez et compreniez ce mode d’emploi. Les informations
qu’il contient concernent VOTRE SÉCURITÉ et visent à ÉVITER TOUT PROBLÈME.
Les symboles ci-dessous servent à vous aider à reconnaître cette information.
DANGER : Indique une situation dangereuse imminente qui, si elle n’est pas
évitée, causera la mort ou des graves blessures.
AVERTISSEMENT : Indique une situation potentiellement dangereuse qui,
si elle n’est pas évitée, pourrait causer la mort ou de graves blessures.
MISE EN GARDE : Indique une situation potentiellement dangereuse qui, si
elle n’est pas évitée, pourrait causer des blessures mineures ou modérées.
AVIS :
Utilisé sans le symbole d’alerte à la sécurité, indique une situation potentiellement
dangereuse qui, si elle n’est pas évitée, peut résulter en des dommages à la propriété.
Page 34

34
NO SE UTILICEN EN EL INTERIOR:
cuando no las utilice, las herramientas
deben guardarse en un lugar seco, alto
o bajo llave, fuera del alcance de los
niños. MANTÉNGASE ALERTA: No
haga funcionar esta unidad si está cansado,
enfermo o bajo la influencia del alcohol,
drogas o medicamentos.
• CONSERVE LAS HERRAMIENTAS
ADECUADAMENTE: siga las
instrucciones en la sección de
mantenimiento. Mantenga los mangos
secos, limpios y libres de aceite y grasas.
• VERIFIQUE LAS PIEZAS AVERIADAS:
antes de volver a utilizar la herramienta, se
debe controlar cualquier protección u otra
pieza que esté averiada para determinar
si funcionará correctamente y realizará la
función para la que fue diseñada. Verifique
la alineación y la sujeción de las piezas
móviles, la rotura de piezas, el montaje y
cualquier otra condición que pueda afectar
el funcionamiento. Cualquier protección
u otra pieza que esté dañada debe ser
reparada correctamente o reemplazada por
un centro de mantenimiento autorizado, a
menos que este manual indique otra cosa.
• NO sumerja la herramienta en agua ni la
salpique con una manguera. NO permita
que ningún líquido entre en ella.
• NO guarde la herramienta sobre o cerca
de fertilizantes o productos químicos.
• NO limpie con una lavadora a presión.
• Mantenga los protectores instalados
adecuadamente y en funcionamiento.
• Mantenga las manos y los pies alejados
del área de corte.
ADVERTENCIAS DE
SEGURIDAD ADICIONALES
a) Evite el arranque accidental.
Asegúrese de que el interruptor esté
en posición de apagado antes de
conectar con la batería, de levantar o
transportar el aparato. El transportar
el aparato con el dedo puesto en el
interruptor o enchufar el aparato con el
interruptor encendido puede provocar
accidentes.
b ) Desconecte la batería del aparato
antes de realizar ajustes, cambiar
accesorios o guardar el aparato.
Dichas medidas de seguridad
preventivas reducen el riesgo de
arrancar el aparato accidentalmente.
c ) Recargue solo con el cargador
especificado por el fabricante. Un
cargador que sea adecuado para un
tipo de batería puede ocasionar un
riesgo de incendio si se utiliza con otra
batería.
d ) Use aparatos solo con las baterías
designadas específicamente. El uso
de cualquier otro tipo de batería puede
crear un riesgo de lesión o de incendio.
e ) Cuando no se esté utilizando la
batería, manténgala alejada de otros
objetos metálicos, como los clips,
monedas, llaves, clavos, tornillos
u otros objetos pequeños de metal
que pueden hacer una conexión de
un terminal a otro. El provocar un
cortocircuito en los terminales de la
batería puede causar quemaduras o un
incendio.
f) En condiciones de abuso, el líquido
puede salirse de la batería; evite el
contacto. Si se produce un contacto
de forma accidental, enjuague con
agua. Si el líquido entra en contacto
con los ojos, busque atención médica.
El líquido que sale de la batería puede
causar irritación o quemaduras.
g) No utilice una batería o aparato
que esté dañado o modificado.
Las baterías dañadas o modificadas
pueden funcionar de forma imprevisible
y ocasionar un incendio, explosión o
riesgo de lesión.
h) No exponga una batería o aparato al
fuego ni a una temperatura excesiva.
La exposición al fuego o a una
temperatura superior a los 130°C puede
ocasionar una explosión. La temperatura
de 130 °C puede reemplazarse por la
temperatura de 265 °F.
i ) La reparación debe realizarse por
una persona calificada para realizar
reparaciones que use solamente
repuestos idénticos. Así se asegurará
que se mantenga la seguridad del
producto.
• NO sumerja el aparato en agua ni lo
moje con una manguera. NO permita
que ningún líquido entre dentro de él. Si
el aparato se moja, deje que se seque
por un mínimo de 48 horas.
• NO guarde el aparato o en o junto a
fertilizantes o productos químicos.
• NO lo limpie con una hidrolavadora.
• Mantenga los protectores en su sitio y
en buen estado.
• Mantenga las manos y los pies alejados
de la zona de corte.
• NO cargue el aparato bajo la lluvia o en
lugares mojados.
• NO deseche la batería en un fuego. El
elemento puede explotar. Consulte los
códigos locales para instrucciones sobre
una posible eliminación especial.
Page 35

35
• NO abra ni mutile la batería. El
electrolito liberado es corrosivo y puede
causar daño a los ojos o la piel. Puede
ser tóxico si se ingiere.
ADVERTENCIA: No utilice el
aparato si el interruptor de gatillo no lo
enciende y apaga. Todo aparato que
no pueda controlarse con el interruptor
de gatillo es peligroso y debe ser
reparado.
ADVERTENCIA: No utilice la
herramienta si el gatillo interruptor no
enciende o apaga la herramienta. Toda
herramienta que no pueda controlarse
mediante el gatillo interruptor es
peligrosa y debe repararse.
ADVERTENCIA: Parte del polvo
generado por este producto contiene
sustancias químicas reconocidas por el
Estado de California como causantes
de cáncer, defectos congénitos u otros
problemas reproductivos. Algunos
ejemplos de estas sustancias químicas:
• compuestos en los fertilizantes
• compuestos en los insecticidas,
herbicidas y pesticidas
• arsénico y cromo de la madera
con tratamiento químico
Para reducir su exposición a estas
sustancias químicas, utilice el equipo de
seguridad aprobado, como máscaras
para polvo especialmente diseñadas
para filtrar partículas microscópicas.
La etiqueta de su herramienta puede incluir
los siguientes símbolos. Los símbolos y sus
definiciones son los siguientes:
V .......................voltios
A .......................amperios
Hz .....................hertz
W ......................vatios
min ...................minutos
o AC.....corriente alterna
o DC.....corriente directa
n
o .....................no velocidad sin carga
.....................Construcción Clase I
(mis à la terre)
......................
terminal a tierra
.....................
Construcción de clase II
.....................simbolo de alerta
RPM o .../min.......revoluciones o minuto
seguridad
................Lea el manual de
instrucciones antes del uso
.....................Use protección adecuada
para las vías respiratorias
.....................Use protección adecuada
para los ojos
.....................Use protección adecuada
para los oídos
INSRUCCIONES DE
SEGURIDAD IMPORTANTES
PARA CARGADORES DE
BATERÍAS
CONSERVE ESTAS INSTRUCCIONES:
Este manual contiene instrucciones de
seguridad importantes para los cargadores
de baterías.
• Antes de utilizar el cargador, lea todas
las instrucciones y las prevenciones en
el cargador, en el paquete de baterías y
en el producto que utiliza el paquete de
baterías.
ADVERTENCIA: Riesgo de
descarga eléctrica. Desconecte el
cargador de la toma de corriente alterna
antes de limpiarlo. Para limpiar la
suciedad y grasa del exterior del
cargador puede usarse un paño o cepillo
suave no metálico. No use agua ni
soluciones limpiadoras.
ADVERTENCIA: Riesgo de
descarga eléctrica. No permita que
ningún líquido entre en el cargador.
Podrían provocarse descargas eléctricas.
ADVERTENCIA: Riesgo de
quemaduras. No sumerja la batería en
ningún líquido ni permita que se
introduzca ningún líquido en la misma.
No intente nunca abrir la batería por
ningún motivo. Si la caja protectora de
plástico de la batería se rompe o se raja,
devuélvala a un centro de servicio para
su reciclaje.
ATENCIÓN: Riesgo de
quemaduras. Para reducir el riesgo de
lesiones, cargue solo baterías
recargables BLACK+DECKER. Otros
tipos de baterías pueden calentarse en
exceso y explotar provocando lesiones
corporales y daños materiales.
ATENCIÓN: Bajo ciertas
condiciones, cuando el cargador está
enchufado a una toma de corriente,
algunas materias extrañas pueden
provocar un cortocircuito en el cargador.
ADVERTENCIA:
• NO intente cargar la batería con
otros cargadores que no sean los
especificados por el fabricante. El
cargador y la batería están diseñados
específicamente para funcionar juntos.
• Estos cargadores están diseñados
exclusivamente para la carga de
baterías recargables Black+Decker.
Cualquier otro uso puede provocar
riesgo de incendio, descarga eléctrica
o electrocución.
Page 36

36
• No exponga el cargador a la lluvia ni
a la nieve.
• Tire del enchufe y no del cable al
desconectar el cargador. De esta
manera se disminuirá el riesgo de
dañar el enchufe y el cable.
• Asegúrese de que el cable esté
ubicado de modo que no lo pise
nadie, ni se tropiece con él, y que no
esté sujeto a daños o tensiones.
• Al utilizar un cargador en el exterior,
hágalo siempre en un lugar seco.
• Si es absolutamente necesario
utilizar un alargador al aire libre,
use un alargador apropiado para
uso en exteriores. La utilización de
un alargador adecuado para uso
en exteriores reduce el riesgo de
descarga eléctrica.
• Los hilos del alargador deben ser de
un calibre apropiado (AWG o American
Wire Gauge) para su seguridad. Cuanto
más pequeño sea el número del calibre
del hilo, mayor será la capacidad del
cable, es decir el calibre 16 tiene más
capacidad que el calibre 18. Cuando
utilice más de un alargador para
completar el largo total, asegúrese de
que los hilos de cada alargador individual
tengan el calibre mínimo.
Calibre mínimo recomendado para
alargadores
Calibre mínimo para cables de extensión
Volts
Longitud total del cable en pies
120V 0-25 26-50 51-100 101-150
(0-7,6m) (7,6-15,2m) (15,2-30,4m) (30,4-45,7m)
Amperaje
Más No más American Wire Gage
de de
0 - 6 18 16 16 14
6 - 10 18 16 14 12
10 - 12 16 16 14 12
12 - 16 14 12 No se recomienda
• No coloque objetos en la parte
superior del cargador ni coloque el
cargador en una superficie blanda
que pueda bloquear las ranuras
de ventilación y provocar un calor
interno excesivo. Coloque el cargador
en una posición alejada de cualquier
fuente de calor. El cargador se ventila a
través de ranuras en la parte superior e
inferior de la cubierta.
• No monte el cargador en la pared ni
lo instale en forma permanente sobre
ninguna superficie. El cargador está
diseñado para ser utilizado sobre una
superficie plana y estable (p. ej., un
banco o una mesa).
• No opere el cargador con cables o
enchufes dañados: reemplácelos de
inmediato.
• No opere el cargador si éste ha
recibido un golpe fuerte, se ha
caído, o se ha dañado de cualquier
otra manera. Llévelo a un centro de
mantenimiento autorizado.
• No desarme el cargador; llévelo a un
centro de mantenimiento autorizado
cuando se requiera mantenimiento o
una reparación. El armado incorrecto
puede implicar un riesgo de descarga
eléctrica, electrocución o incendio.
• Antes de limpiarlo, desconecte el
cargador del tomacorriente. Esto
reducirá el riesgo de descarga eléctrica.
Quitar el paquete de baterías no reducirá
este riesgo.
• NUNCA intente conectar 2
cargadores juntos.
• El cargador está diseñado para operar
con corriente eléctrica doméstica
estándar (120 voltios). No intente
utilizarlo con otro voltaje.
INSTRUCCIONES DE
SEGURIDAD IMPORTANTES
PARA BATERÍAS
ADVERTENCIA: Lea todas las
advertencias de seguridad y todas las
instrucciones para la batería, el
cargador y la herramienta eléctrica. El
incumplimiento de las advertencias e
instrucciones podría provocar descarga
eléctrica, incendio y/o lesiones graves.
La batería no viene completamente
cargada de fábrica. Antes de utilizar la
batería y el cargador, lea las instrucciones
de seguridad a continuación. Luego siga
los procedimientos de carga descritos.
LEA TODAS LAS
INSTRUCCIONES
• No fuerce NUNCA la batería en el
cargador. NO modifique la batería de
ningún modo para que entre en un
cargador no compatible, ya que ésta
puede romperse y causar graves
lesiones corporales. Consulte la tabla
al final de este manual para información
sobre compatibilidad entre baterías y
cargadores.
• No incinere el paquete de baterías,
aun si tiene daños importantes o
está completamente desgastado. El
paquete de baterías puede explotar en el
fuego. Cuando se queman los paquetes
de baterías, se generan vapores y
materiales tóxicos.
• No cargue ni use la batería en
atmósferas explosivas, como
Page 37

37
ambientes en los que hay líquidos,
gases o polvo inflamables. Insertar
o retirar la batería del cargador puede
encender el polvo o los vapores.
• Si el contenido de las baterías entra
en contacto con la piel, lave el área
de inmediato con agua y jabón suave.
Si el líquido de la batería entra en
contacto con los ojos, enjuague con agua
manteniendo los ojos abiertos durante 15
minutos o hasta que la irritación cese. Si
se necesita atención médica, el electrolito
de las baterías de iones de litio contiene
una mezcla de carbonatos orgánicos
líquidos y sales de litio.
• El contenido de las células de la
batería abierta puede causar irritación
respiratoria. Respire aire fresco. Si los
síntomas persisten, busque atención médica.
ADVERTENCIA: RIESGO DE
QUEMADURAS. EL LÍQUIDO DE LA
BATERÍA PUEDE ENCENDERSE SI SE
EXPONE A CHISPAS O LLAMAS.
• Cargue los paquetes de baterías solamente
en cargadores BLACK+DECKER.
• NO salpique ni sumerja en agua u otros
líquidos. Esto puede causar una falla
prematura de las células.
• No almacene ni utilice la herramienta
y el paquete de baterías en lugares en
los que la temperatura pueda alcanzar
o superar los 40 °C (105 °F) (como en
toldos al aire libre o construcciones de
metal en verano).
• No deseche la batería en un incendio. La
célula puede explotar. Revise los códigos
locales para obtener instrucciones de
eliminación especial posible.
• No abra ni mutile las baterías. El
electrolito liberado es corrosivo y puede
causar daño a los ojos o la piel. Puede
ser tóxico si se ingiere.
ADVERTENCIA: NUNCA INTENTE
ABRIR EL PAQUETE DE BATERÍAS POR
NINGÚN MOTIVO. SI LA CAJA DEL
PAQUETE DE BATERÍAS ESTÁ
AGRIETADA O DAÑADA, NO LA
INTRODUZCA EN EL CARGADOR. NO
COMPRIMA, DEJE CAER NI DAÑE EL
PAQUETE DE BATERÍAS. NO UTILICE UN
PAQUETE DE BATERÍAS O UN
CARGADOR QUE HAYA RECIBIDO UN
GOLPE FUERTE, SE HAYA CAÍDO, ESTÉ
AGOTADO O DAÑADO DE ALGUNA
FORMA (POR EJEMPLO, PERFORADO
CON UN CLAVO, GOLPEADO CON UN
MARTILLO, PISADO). LOS PAQUETES DE
BATERÍAS DAÑADOS DEBEN
DEVOLVERSE AL CENTRO DE
MANTENIMIENTO PARA SU RECICLADO.
ADVERTENCIA: Riesgo de
incendio. No guarde o transporte la
batería de ninguna manera que permita
que los terminales expuestos de la
batería entren en contacto con objetos
metálicos. Por ejemplo, no coloque la
batería en delantales, bolsillos, cajas de
herramientas, cajas de juegos de
productos, cajones, con clavos, tornillos,
llaves sueltos, etc. Transportar baterías
puede provocar incendios si los
terminales de la batería entran en
contacto accidentalmente con
materiales conductores como llaves,
monedas, herramientas manuales y
similares. Las Normas para Materiales
Peligrosos del Departamento de
Transporte de los EE.UU. (HMR)
concretamente prohíben transportar
baterías comercialmente o en aviones
(es decir, empacadas en maletas y
equipaje de mano) A MENOS que estén
debidamente protegidas de cortocircuitos.
Por lo tanto, cuando transporte baterías
individuales, asegúrese de que los
terminales de la batería estén protegidos y
bien aislados de materiales que puedan
hacer contacto y causar un cortocircuito.
NOTA: Las baterías de IONES DE LITIO
no deben guardarse en el equipaje que se
despacha.
RECOMENDACIONES DE
ALMACENAMIENTO
1. El mejor lugar de almacenamiento es
uno que sea fresco y seco, que no esté
expuesto directamente a la luz del sol ni
a un exceso de frío o calor.
2. Para resultados óptimos
durante períodos prolongados de
almacenamiento, se recomienda guardar
la batería totalmente cargada en un lugar
fresco y seco fuera del cargador.
NOTA: No almacene las baterías en
una herramienta con el interruptor
de gatillo en posición de encendido.
No use nunca cinta adhesiva para
mantener el interruptor de gatillo en la
posición de ENCENDIDO.
NOTA: Las baterías no deben almacenarse
totalmente descargadas. La batería deberá
recargarse antes de usarse.
PROCEDIMIENTO DE CARGA
Los cargadores Black+Decker están
diseñados para cargar baterías
Black+Decker.
NOTA: Para garantizar un rendimiento y
vida útil máximos de las baterías de iones
de litio:
• Cargue la batería totalmente antes
de utilizarla por primera vez.
• Recargue las baterías descargadas
lo más pronto posible después de
cada uso.
• No descargue las baterías
totalmente.
Page 38

38
BLACK+DECKER Sistemas de cargador y batería
Cargadores de baterías/Tiempo de carga
(Minutos) (0% - 100% cargar)
Batería de
40V MAX*
Vatios
por
hora
40V MAX* Cargadores
LCS36 LCS40 LCS436
LBX36 47
1 1 3.25
LBXR36 60
1.25 1.25 3.75
LBX1540 60
1.25 1.25 3.75
LBXR2036 80
1.5 1.5 5
LBX2040 80
1.5 1.5 5
LBXR2540 100
1.75 1.75 6.25
LBX2540 100
1.75 1.75 6.25
**El tiempo de duración de carga es aproximado; la duración de
carga real puede variar.
1. Enchufe el cargador en un
tomacorriente adecuado antes de insertar
el paquete de baterías.
2. Introduzca el paquete de baterías en el
cargador.
3. El indicador LED verde destellará
indicando que la batería se está
cargando.
4. La batería está completamente
cargada cuando el indicador LED
verde permanece encendido
continuamente. El paquete está
completamente cargado y puede utilizarse
en este momento o dejarse en el cargador.
Después del uso, recargue las baterías
descargadas a la brevedad posible o de
lo contrario la vida útil de las baterías
podría acortarse en gran medida.
DIAGNÓSTICO DEL CARGADOR
Este cargador está diseñado para detectar
ciertos problemas que pueden surgir con
los paquetes de baterías o el cargador.
Los problemas se indican mediante el
indicador LED ámbar, que destella en
diferentes patrones.
BATERÍA DAÑADA
El cargador puede detectar una
batería débil o dañada. El indicador
LED destellará en el patrón indicado en la
etiqueta. Si observa este patrón de
destello de batería dañada, no continúe
cargando la batería. Devuélvala a un
centro de mantenimiento o a un lugar de
recolección para reciclado.
RETRASO POR PAQUETE CALIENTE/FRÍO
Cuando el cargador detecta que la
batería está excesivamente caliente
o fría, comienza un Retraso por paquete
caliente/frío, y suspende la carga hasta
que la batería se haya normalizado.
Después que ocurra esto, el cargador
cambia automáticamente al modo de
Paquete cargando. Esta función garantiza
la duración máxima de la batería. El
indicador LED rojo destellará en un patrón
indicado en la etiqueta cuando detecte el
retraso por paquete caliente / frío.
DEJAR EL PAQUETE DE BATERÍAS EN
EL CARGADOR
El cargador y el paquete de baterías se
pueden dejar conectados con la luz verde
encendida indefinidamente. El cargador
mantendrá el paquete de baterías como
nuevo y completamente cargado.
NOTAS IMPORTANTES SOBRE LA
CARGA
1. Se puede obtener una mayor duración y
óptimo rendimiento si se carga el paquete
de baterías cuando la temperatura del
aire está entre los 16°C y los 27°C (60°F
y 80°F). NO cargue el paquete de batería
con una temperatura ambiental por debajo
de +4,5 °C (+40 °F) o por encima de +40,5
°C (+105 °F). Esto es importante y evitará
daños graves en el paquete de baterías.
2. El cargador y el paquete de baterías
pueden estar calientes al tacto durante
la carga. Esto es una condición normal
y no indica un problema. Para facilitar el
enfriado del paquete de baterías después
de su uso, evite colocar el cargador o el
paquete de baterías en un ambiente cálido,
como debajo de un toldo de metal o en un
remolque sin aislamiento.
3. Si el paquete de baterías no se carga
adecuadamente:
a. Revise el tomacorriente enchufando
una lámpara u otro aparato
b. Verifique si el tomacorriente está
conectado a un interruptor que corta la
energía cuando usted apaga la luz.
c. Mueva el cargador y el paquete
de baterías a un lugar donde la
temperatura ambiental sea alrededor
de 16 °C a 27 °C (60 °F a 80 °F).
d. Si los problemas de carga persisten,
lleve la herramienta, el paquete de
baterías y el cargador al centro de
mantenimiento local.
4. Se debe recargar el paquete de baterías
cuando no produce energía suficiente
para tareas que previamente realizaba
con facilidad. NO CONTINÚE utilizando la
herramienta en estas condiciones. Siga el
procedimiento de carga. También se puede
cargar un paquete de baterías parcialmente
agotado cuando se desee, sin ningún efecto
negativo sobre éstas.
5. Se deben mantener lejos de las
cavidades del cargador los materiales
extraños de naturaleza conductora, entre
los que se incluyen la lana de acero, el
papel de aluminio o cualquier acumulación
de partículas metálicas. Siempre
desenchufe el cargador del tomacorriente
cuando no haya un paquete de baterías
en la cavidad. Desenchufe el cargador
antes de intentar limpiarlo.
6. No congele ni sumerja el cargador en
Page 39

39
agua ni en ningún otro líquido.
ADVERTENCIA: RIESGO DE
DESCARGA ELÉCTRICA. NO PERMITA
QUE NINGÚN LÍQUIDO ENTRE EN EL
CARGADOR. NUNCA INTENTE ABRIR EL
PAQUETE DE BATERÍAS POR NINGÚN
MOTIVO. SI LA CUBIERTA PROTECTORA
DE PLÁSTICO DEL PAQUETE DE
BATERÍAS SE ROMPE O AGRIETA,
DEVUÉLVALA A UN CENTRO DE
MANTENIMIENTO PARA SU RECICLADO.
INDICADOR DEL ESTADO DE
LA CARGA- FIGURE A
La parte posterior de la batería está
equipada con un indicador del estado
de la carga. Esto se puede utilizar para
visualizar el nivel actual de carga de
la batería durante el uso y durante la
carga. Éste no indica la capacidad de
funcionamiento de la herramienta y está
sujeto a variación en función de los
componentes del producto, la temperatura
y la aplicación del usuario final. Verificación
del estado de carga durante el uso:
• Oprima el botón del indicador del
estado de la carga (A1).
• L
os tres LED (A2) se encenderán para
indicar el porcentaje de carga de la
batería. Consulte la gráfica de la figura A.
• Si la luz LED no enciende, cargue la
batería.
NOTA: Esta batería está diseñada para
no funcionar cuando se alcanza una
carga inferior al 20% de su capacidad.
Una vez agotada la carga de la batería,
la herramienta no funcionará hasta
después de haber recargado la batería.
<18%
18% - 45%
45% - 72%
72% - 100%
A2
A1
A
INSTALACIÓN Y EXTRACCIÓN DEL
PAQUETE DE BATERÍAS
ADVERTENCIA: ASEGÚRESE DE
QUE EL INTERRUPTOR NO ESTÉ
ACCIONADO AL QUITAR O INSTALAR
LA BATERÍA.
PARA INSTALAR EL PAQUETE DE
BATERÍAS:
Inserte el paquete de baterías
en la herramienta hasta que esté
completamente asentado y se oiga un
clic (Figura B). Asegúrese de que el
paquete de baterías esté bien colocado y
completamente asegurado en su lugar.
PARA QUITAR EL PAQUETE DE
BATERÍAS: Oprima el botón de liberación
de la batería en la parte posterior del
1. Gatillo de velocidad variable
2. Mango
3. Botón de bloqueo en apagado
4. Batería
5. Indicador de carga
6. Mango auxiliar
7. Botón de mango auxiliar
8. Collar de ajuste
9. Cabezal de la podadora
10. Guía de borde
11. Protector
12. Cubierta del carrete
13. Tapa del carrete
DESCRIPCIÓN DE LAS FUNCIONES
8
9
3
1
11
4
10
6
13
5
12
2
7
Page 40

40
paquete de baterías y extraiga el paquete
de baterías de la herramienta (FIgura C).
B
C
CONSERVE ESTAS INSTRUCCIONES
USO DEBIDO
Esta podadora está diseñada para
aplicaciones de recorte residenciales.
NO utilice la herramienta en condiciones
húmedas ni en presencia de líquidos o
gases inflamables.
Esta podadora es un aparato residencial.
NO permita que los niños toquen la
herramienta. Si el usuario no tiene
experiencia utilizando este aparato,
deberá ser supervisado.
MONTAJE Y AJUSTE
ADVERTENCIA: Antes del
ensamblaje, asegúrese de que la
herramienta esté apagada y se haya
quitado la batería.
HERRAMIENTAS NECESARIAS
PARA EL ENSAMBLAJE (NO
SUMINISTRADAS):
- Destornillador Phillips
ADVERTENCIA: Quite la batería
antes de intentar la instalación de
cualquiera de los siguientes componentes.
INSTALACIÓN DEL PROTECTOR
(FIGURAS D Y E)
ADVERTENCIA: NUNCA
OPERE LA HERRAMIENTA SIN EL
PROTECTOR ADECUADAMENTE
INSTALADO. El protector siempre debe
estar correctamente instalado en la
herramienta para proteger al usuario.
• Quite el tornillo del protector.
• Mientras mantiene el protector alineado
con el cabezal de la podadora,
deslícelo a su posición hasta que la
lengüeta de retención encaje y haga
clic en su lugar (asegúrese de que los
rieles guía (D1) del protector (10) estén
correctamente alineados con los rieles
guía (D2) del cabezal de la podadora
(D3) (Figura D). La lengüeta de bloqueo
(D4) debe encajado en la ranura de la
caja (D5).
•
Fije el protector con el tornillo (E1) (Figura
E).
D
D2
D1
D3
11
D4
E
E1
INSTALACIÓN DEL MANGO
AUXILIAR (FIGURA F, G)
El mango auxiliar puede ajustarse para
proporcionar un equilibrio y comodidad
óptimos.
• Para instalar el mango (6), presione
los botones (13) en ambos lados de la
cubierta superior, como se muestra en
la figura F.
• Coloque el mango como se muestra
en la figura G, haciendo coincidir el
lado ranurado del mango con el botón
ranurado. Empuje parcialmente el
mango para que sostenga los botones
hacia adentro cuando los suelte con la
mano.
• Empuje el mango completamente en la
cubierta y colóquelo hasta que encaje
en su sitio (figura G).
• Para ajustar el mango hacia arriba o
hacia abajo, presione el botón (13) y
levante o baje el mango.
• El mango debería ajustarse de manera
Page 41

41
que su brazo delantero esté recto
cuando la podadora esté en posición
de funcionamiento.
F
13
G
13
AJUSTE DE ALTURA (FIGURA H)
ATENCIÓN: Ajuste la longitud de la
podadora para obtener posiciones de
funcionamiento adecuadas, como se
muestran en la figura M.
• La altura de la podadora puede
ajustarse aflojando el collar (8) y
girándolo en la dirección de la flecha,
como se muestra en la figura H.
• Mueva la cubierta superior hacia arriba
o hacia abajo. Cuando se logre la altura
deseada, ajuste el collar girándolo en la
dirección opuesta a la mostrada en la
figura H.
8
H
LIBERACIÓN DE LA CUERDA DE CORTE
Al despacharse de la fábrica, la cuerda de
corte está sujeta con cinta a la cubierta del
carrete.
• Quite la cinta que sujeta la cuerda de
corte a la cubierta del carrete.
FUNCIONAMIENTO
ADVERTENCIA: Use siempre
protección ocular apropiada de
conformidad con la norma ANSI Z87.1
(CAN/CSA Z94.3) mientras opera este
aparato.
ADVERTENCIA: Para disminuir el
riesgo de lesiones corporales graves,
apague la herramienta y extraiga la
batería antes de realizar cualquier ajuste o
de quitar o instalar accesorios. La puesta
en marcha accidental puede causar
lesiones.
ATENCIÓN: Antes de empezar a
podar, asegúrese de utilizar solamente el
tipo de cuerda de corte adecuado.
ATENCIÓN: Inspeccione el área que
vaya a recortar y saque todos los
alambres, cables u objetos similares a un
cordel que podrían enredarse en la
cuerda giratoria o el carrete. Tenga
especial cuidado a fin de evitar cables
que estén doblados hacia afuera en la
trayectoria de la podadora, como las púas
en la base de una cerca de alambre
eslabonado.
POSICIÓN ADECUADA DE LAS MANOS
ADVERTENCIA: Para reducir el
riesgo de lesiones corporales graves,
tenga SIEMPRE las manos en una
posición adecuada como se muestra.
ADVERTENCIA: Para reducir el
riesgo de lesión personal grave, sujete
SIEMPRE bien en caso de que haya una
reacción repentina.
Para tener una posición adecuada de las
manos, ponga una mano en el mango
principal ( 2 ) y la otra en el mango
auxiliar ( 6 ).
AJUSTE EN MODO DE PODA O
BORDEADO (FIGURA I, J)
• La podadora puede utilizarse en modo
de poda como se muestra en la figura
I o en modo de bordeado para cortar
el césped que sobresale a lo largo de
los bordes del pasto y los macizos de
flores, como se muestra en la figura J.
MODO DE PODA
Para podar, el cabezal de la podadora
debe estar en la posición que se muestra
en la figura J. Si no es así:
• Saque la batería de la podadora.
• Afloje el collar (8) como se muestra en
la figura H.
• Sujete el eje metálico y gire la cubierta
inferior 180° hasta que la podadora esté
en la posición que se muestra en la
figura I.
• Ajuste el collar (8) hasta que esté
apretado.
Page 42

42
J
ENCENDIDO Y APAGADO (FIGURA K)
• Para encender la podadora, empuje
el botón de bloqueo en apagado (que
se muestra en el recuadro de la figura J)
desde el otro lado y apriete el interruptor
de gatillo
• Para apagar la podadora, suelte el
interruptor de gatillo.
ADVERTENCIA: No intente nunca bloquear
el botón de encendido/apagado en la
posición de encendido.
K
1
3
FUNCIONAMIENTO DE LA PODADORA
(FIGURAS L, M)
• Con la unidad encendida, póngala en
ángulo y mueva lentamente la podadora
de un lado a otro como se muestra en la
figura L.
• Mantenga un ángulo
de corte de 5° a 10°
como se muestra en
la figura M. No supere
los 10°. Corte la punta
de la cuerda. Para
mantener la distancia
de las superficies
duras utilice la guía
de borde (10). Tire de
la guía hacia afuera
hasta que encaje bien
en su sitio.
I
MODO DE BORDEADO (FIGURA J)
ADVERTENCIA: Cuando se usa
como bordeadora, la cuerda puede
despedir piedras, trozos de metal u otros
objetos a gran velocidad. La podadora y el
protector están diseñados para reducir el
peligro. Sin embargo, ASEGÚRESE de
que otras personas y las mascotas estén
como mínimo a 30 metros (100 pies) de
distancia.
Para bordear, el cabezal de la podadora
debe estar en la posición que se muestra
en la figura J. Si no es así:
• Saque la batería de la podadora.
• Afloje el collar (8) como se muestra en la
figura H.
• Sujete el eje metálico y gire la cubierta
inferior 180° hasta que la podadora esté
en la posición que se muestra en la
figura J.
• Ajuste el collar (8) hasta que esté
apretado.
• Baje la guía de borde (10) a la posición
abierta. Compruebe que la guía de
borde esté completamente abajo (se
oirá un clic).
NOTA: El cabezal girará solamente en una
dirección.
NOTA: Es posible que el sistema
de avance automático no funcione
correctamente si no se utiliza la guía de
borde.
Page 43

43
N
CAMBIO DEL CARRETE
(FIGURAS O, P, Q)
ADVERTENCIA:
Retire la batería
de la podadora antes de ensamblar,
realizar ajustes o cambiar accesorios.
Dichas medidas de seguridad preventivas
reducen el riesgo de poner en marcha el
aparato accidentalmente.
ATENCIÓN: Para evitar daños, si la
cuerda de corte sobresale de la hoja de
corte, córtela para que llegue justo a la
hoja.
• Saque la batería de la podadora.
• Presione las lengüetas (14) y retire la
tapa del carrete (13) de la cubierta
del carrete (12) en el cabezal de la
podadora (9) (figura O).
• Para obtener los mejores resultados,
cambie el carrete por el modelo
BLACK+DECKER n.º AF-100.
• Agarre el carrete vacío con una mano y
la cubierta del carrete con la otra mano y
tire del carrete para sacarlo.
• Si la palanca (15) en la base de la
cubierta se desplaza, póngala en la
posición correcta como se muestra en
la figura P antes de insertar el nuevo
carrete en la cubierta.
• Retire la suciedad y el césped del
carrete y la cubierta.
• Afloje el extremo de la cuerda de corte
e introduzca la cuerda en el orificio (18)
figura Q.
• Tome el nuevo carrete y empújelo en
la protuberancia (16) (figura P) de la
cubierta. Gire el carrete ligeramente
hasta que esté asentado. La cuerda
debería sobresalir aproximadamente 136
mm (5-3/8 pulg.) de la cubierta.
• Alinee las lengüetas (14) de la tapa
del carrete con las ranuras (17) de la
cubierta (figura Q).
• Empuje la tapa en la cubierta hasta que
encaje firmemente en su sitio.
NOTA: La cuerda debería sobresalir
aproximadamente 122 mm (4-13/16 pulg.)
de la cubierta.
• Mantenga una distancia mínima de
609,6 mm (24 pulgadas) entre el
protector y sus pies, como se muestra
en la figura M. Para lograr esta distancia
ajuste la altura total de la podadora
como se muestra en la figura H.
M
CONVERTIR A MODO DE BORDEADO
ADVERTENCIA:Cuando se usa
como bordeadora, la cuerda puede
despedir piedras, trozos de metal u otros
objetos a gran velocidad. La podadora y el
protector están diseñados para reducir el
peligro. Sin embargo, ASEGÚRESE de que
otras personas y las mascotas estén como
mínimo a 30 metros (100 pies) de distancia.
• Para operar como bordeadora de
mantenimiento, gire el collar (8) como se
muestra en la figura H.
• Sujete el eje metálico y gire la cubierta
inferior 180° hasta que la podadora esté
en la posición mostrada en la figura J.
• Gire el collar hacia atrás hasta que esté
ajustado.
• Coloque la podadora con la guía de
borde (10) a lo largo de la superficie,
como se muestra en la figura N.
• Vuelva a ponerla en la posición de poda
aflojando el collar y girando la cubierta
inferior hacia atrás 180°.
• Gire el collar hasta que esté ajustado.
Al usar la podadora, retraiga la guía
de borde de alambre hasta la posición
original, apartada.
Page 44

44
• Saque la batería de la podadora.
• Retire el carrete vacío de la
podadora según se describe en
“CAMBIO DEL CARRETE”.
• Quite la cuerda de corte que quede en
el carrete.
• Haga un doblez en el extremo de la
cuerda de corte aproximadamente en
19 mm (3/4 de pulg.) (19). Inserte la
cuerda de corte en una de las ranuras
de retención de la cuerda (20) como se
muestra en la figura R.
• Inserte el extremo de 19 mm (3/4 de
pulgada) de la cuerda a granel en
el orificio (21) del carrete junto a la
ranura, como se muestra en la figura
R. Asegúrese de que la cuerda esté
bien estirada contra el carrete como se
muestra en la figura S.
• Enrolle la cuerda de corte en el carrete
en la dirección de la flecha que se
encuentra en el mismo. Asegúrese de
enrollar la cuerda con cuidado y en
capas. No la entrecruce (figure T).
• Cuando la cuerda de corte enrollada
llegue a las cavidades (22), córtela.
(figura R).
• Inserte el carrete en la
podadora como se describe en
“CAMBIO DEL CARRETE”.
”.
14
13
9
O
14
13
18
17
Q
P
15
16
REBOBINAR EL CARRETE DE
LA CUERDA A GRANEL (USAR
SOLAMENTE CUERDA REDONDA DE
0,065 PULG. DE DIÁMETRO) (FIGURAS
R, S, T)
ADVERTENCIA: Retire la batería
de la podadora antes de ensamblar,
realizar ajustes o cambiar accesorios.
Dichas medidas de seguridad preventivas
reducen el riesgo de poner en marcha el
aparato accidentalmente.
La cuerda a granel también puede
comprarse en su minorista local.
NOTA: No utilice una cuerda cuadrada,
en forma de estrella o de otra forma, ni de
un diámetro mayor. Esto puede ocasionar
problemas de alimentación o sobrecargar
el motor.
NOTA: Es más probable que los carretes
enrollados a mano con cuerda a granel
se enreden con más frecuencia que los
carretes BLACK+DECKER enrollados
en fábrica. Para obtener los mejores
resultados, cambie el carrete por el modelo
BLACK+DECKER n.º AF-100.
Para instalar la cuerda a granel, siga los
pasos que se indican a continuación.
Page 45

45
• Mantenga la podadora inclinada hacia el
área que se corta; ésta es la mejor área
de corte.
• La podadora corta al mover la unidad
de derecha a izquierda. Esto evitará que
se arrojen restos al usuario.
• Evite árboles y arbustos. La cuerda
puede dañar fácilmente la corteza de
árboles, las molduras de madera, los
revestimientos exteriores y los pilares de
cercos.
CUERDA DE CORTE / ALIMENTACIÓN
DE LA CUERDA
Su podadora utiliza una cuerda de nylon
REDONDA de 1,65 mm (0,065 pulgadas)
de diámetro. Durante el uso, las puntas
de las cuerdas de nylon se deshilacharán
y desgastarán, y el carrete especial de
autoalimentación alimentará y recortará
automáticamente un nuevo trozo de
cuerda. No golpee la unidad contra el
suelo para intentar alimentar la cuerda ni
por algún otro motivo.
La cuerda de corte se desgastará más
rápido y necesitará más alimentación si el
corte o el bordeado se realizan a lo largo
de aceras u otras superficies abrasivas, o
si se cortan malezas más espesas.
ELIMINACIÓN DE ATASCOS Y CUERDAS
ENREDADAS (FIGURAS O, P, R)
ADVERTENCIA: Retire la batería
de la podadora antes de ensamblar,
realizar ajustes o cambiar accesorios.
Dichas medidas de seguridad preventivas
reducen el riesgo de poner en marcha el
aparato accidentalmente. Cada cierto
tiempo, especialmente al cortar malezas
frondosas o con mucho tallo, la cubierta
del carrete de la cuerda puede obstruirse
con savia u otro material y como resultado
la cuerda se atascará. Para eliminar el
atasco, siga los pasos indicados a
continuación.
• Presione las lengüetas (14) y retire la
tapa del carrete (13) de la cubierta del
carrete (12) en el cabezal de la podadora
(9) (figura O).
• Agarre el carrete con una mano y la
cubierta del carrete con la otra mano y
tire del carrete hacia afuera y elimine
toda cuerda rota o residuos de corte,
suciedad y césped del área del carrete.
• Si la palanca (15) en la base de la
cubierta se desplaza, póngala en la
posición correcta como se muestra en la
figura P antes de insertar el carrete en la
cubierta.
S
19
20
21
R
23
T
CONSEJOS ÚTILES PARA CORTAR
• Utilice la punta de la cuerda para
realizar el corte; no empuje el cabezal
de la cuerda contra el césped sin cortar.
Para lograr trabajos de calidad, utilice la
guía de borde a lo largo de elementos
como cercos, casas y macizos de flores.
• Los cercos de alambre y de estacas
provocan un mayor desgaste de la
cuerda e incluso su rotura. Los muros
de piedra y ladrillo, los bordillos de
aceras y la madera pueden desgastar la
cuerda rápidamente.
• No permita que la tapa del carrete
se arrastre sobre el suelo u otras
superficies.
• En crecimientos largos, corte desde
arriba hacia abajo y no exceda una
altura de 304,8 mm (12 pulgadas).
Page 46

46
• Ponga el carrete y la cuerda en la
cubierta del carrete con la cuerda
“estacionada” en la ranura de
retención (20) como se muestra en la
figura R.
• Inserte el carrete en la
podadora como se describe en
“CAMBIO DEL CARRETE”
NOTA: Asegúrese de que la cubierta
esté totalmente posicionada, al oír dos
clics comprobará que ambas lengüetas
están ubicadas correctamente. Encienda
el aparato. En unos segundos o menos
oirá que la cuerda de nylon se corta
automáticamente a la longitud adecuada.
ATENCIÓN: Para evitar daños, si la
cuerda de corte sobresale de la hoja de
corte, córtela para que llegue justo a la
hoja.
NOTA: Otras piezas de repuesto
(protectores, tapas de carrete, etc.)
pueden obtenerse a través de los
centros de servicio Black+Decker. Para
encontrar la ubicación de su servicio local
llame al: 1-800-544-6986 o visite www.
blackanddecker.com.
MANTENIMIENTO
ADVERTENCIA: Para evitar
lesiones graves, apague y desenchufe la
herramienta antes de realizar cualquier
tipo de mantenimiento.
1. Mantenga limpias las ranuras de
admisión de aire para evitar el
sobrecalentamiento.
2. La cuerda de la podadora puede
secarse con el tiempo. Para conservar
la cuerda en óptimas condiciones,
guarde los carretes pre-enrollados de
repuesto o la cuerda en paquete en
una bolsa sellada de plástico con una
cucharada de agua.
3. Las piezas de plástico pueden
limpiarse utilizando jabón suave y un
paño húmedo.
4. La cortadora de cuerda en el extremo
del protector puede perder filo con
el tiempo. Se recomienda mantener
periódicamente el filo de la hoja con
una lima.
EL SELLO RBRC™
El sello RBRC™ (Corporación
de reciclado de baterías
recargables) que se encuentra
en la batería de iones de litio
(o paquete de baterías) indica que los
costos de reciclar la batería (o el paquete
de baterías) al final de su vida útil ya
fueron pagados por BLACK+DECKER .
RBRC™ en cooperación con
BLACK+DECKER y otros usuarios de
baterías, ha establecido programas
en los Estados Unidos para facilitar
la recolección de baterías de iones
de litio agotadas. Ayude a proteger
nuestro medio ambiente y a conservar
los recursos naturales: devuelva las
baterías de iones de litio agotadas a un
centro de mantenimiento autorizado de
BLACK+DECKER o a un comerciante
minorista local para que se reciclen.
También puede comunicarse con el
centro local de reciclado para obtener
información sobre dónde dejar las
baterías agotadas. RBRC™ es una marca
comercial registrada de la Corporación
de reciclado de baterías recargables.
Este aparato digital Clase B cumple con
la norma canadiense ICES-003.
Este mecanismo cumple con la parte 15
de las normas de la Comisión Federal
de Comunicaciones de Estados Unidos
(FCC). La operación está sujeta a las
dos condiciones siguientes: (1) Este
mecanismo posiblemente no cause
interferencia perjudicial; y (2) este
mecanismo puede aceptar cualquier
interferencia recibida, incluso interferencia
que podría provocar una operación no
deseada.
NOTA: Este equipo ha sido probado y se
encontró que cumple con los límites para
dispositivo digital Clase B, según la parte
15 de las normas de la FCC. Estos límites
están diseñados para brindar protección
razonable contra interferencia perjudicial
en una instalación residencial. Este equipo
genera, usa y puede irradiar energía en
frecuencia de radio y, si no se instala y
se usa de acuerdo con las instrucciones,
puede provocar interferencia perjudicial en
las comunicaciones de radio. Sin embargo,
no hay garantía de que la interferencia no
ocurra en una instalación en particular.
Si este equipo provoca interferencia
perjudicial en la recepción de radio o
televisión, lo que se puede determinar al
apagar y encender el equipo, el usuario
debe tratar de corregir la interferencia
mediante una o más de las siguientes
medidas:
• Cambiar la orientación o la
ubicación de la antena de
recepción.
• Aumentar la separación entre el
equipo y el receptor.
• Conectar el equipo a un
tomacorriente sobre un circuito
diferente de aquel al que está
conectado el receptor.
• Consultar al vendedor o pedir la
Page 47

47
PROBLEMA
La herramienta
funciona lentamente.
La alimentación automática de cuerda no
alimenta más cuerda.
Sobrealimentación
La cuerda se desenrolla al quitar la tapa
o el carrete
SOLUCIÓN
• Appuyer à fond sur la détente à vitesse variable. Le
niveau de pression sur la détente influence la vitesse.
• Retirer la pile de l’outil. Vérifier que le boîtier de
la bobine peut tourner librement. Le nettoyer avec
précaution si nécessaire.
• S’assurer que le fil de coupe sort d’au plus 122
mm ( 4-13/16 po) de la bobine. Le cas échéant, le
couper afin que sa longueur atteigne juste la lame de
coupe pour le fil.
• Línea más se alimenta cuando la línea se acorta
a aproximadamente 3 pulgadas (76,2 mm). Para
determinar si la línea no está alimentando, que línea
de llevar más allá de este punto.
• Mantenga las lengüetas deprimidas y retire el carrete
de la carcasa de la bobina en el cabezal.
• Asegúrese de que la línea no está surcada en
el carrete como se indica en la figura T. Si es,
desconectar la línea de corte y enrollarla en el carrete
cuidadosamente para que no se cruzan las líneas.
• Inspeccione las pistas en la parte inferior del carrete
por daños. Si está dañado, cambie bobina.
• Tire de la línea de corte hasta que sobresalga
aproximadamente 4 13/16 pulgadas (122mm) de la
bobina. Si la línea de corte insuficiente queda en el
carrete, instale una nueva bobina de hilo de corte.
• Alinee las lengüetas de la tapa del carrete con la
cut outs en la vivienda.
•
Empuje la tapa del carrete sobre la carcasa hasta que
encaje firmemente en su lugar.
• Si la línea de corte sobresale más allá de la
cuchilla, cortarlo para que solo alcanza la hoja. Si la
alimentación automática de línea todavía no funciona
o el carrete está atascado, pruebe las
La cuerda se desenrolla al quitar la tapa o el carrete
de cuerda (tamaños menores y mayores de cuerda
afectarán la funcionalidad del sistema de alimentación
automática).
• Retire el carrete y comprobar si la palanca en la
carcasa de la bobina se puede mover libremente.
• Retire el carrete y desconectar la línea de corte
y enróllelo en perfectamente otra vez. Vuelva a
colocar el carrete en la vivienda.
• Asegúrese de estar cortando con la punta de la
cuerda [177,8 mm (7 pulgadas) desde el carrete]. Si
es necesario, utilice la guía de borde para mantener
la distancia correcta.
• Asegúrese de no exceder un ángulo de 10 grados
como se muestra en la Figura M.
• Antes de quitar la cuerda, asegúrese de sujetarla en las
ranuras de retención (Figura R).
DEPANNAGE
Solamente para Propósitos de México
Para conocer la ubicación del centro de servicio más cercano a fin de recibir ayuda
con su producto, visite nuestro sitio Web www.blackanddecker.com.mx o llame a la
línea de ayuda BLACK+DECKER al 01 800 847 2309/01 800 847 2312.
Page 48

48
ayuda de un técnico en radio y
televisión con experiencia.
Los cambios o las modificaciones que se
le realicen a esta unidad sin aprobación
expresa del tercero responsable
del cumplimiento pueden anular la
autorización del usuario para operar el
equipo. Este aparato digital de la clase B
se conforma con ICES-003 canadiense.
INFORMACIÓN DE
MANTENIMIENTO
Todos los Centros de mantenimiento de
BLACK+DECKER cuentan con personal
altamente capacitado dispuesto a
brindar a todos los clientes un servicio
eficiente y confiable en la reparación
de herramientas eléctricas. Si necesita
consejo técnico, reparaciones o piezas
de repuesto originales de fábrica,
póngase en contacto con el centro de
mantenimiento de BLACK+DECKER
más cercano a su domicilio. Para ubicar
su centro de servicio local, llame al
(55)5326-7100 o visite nuestro sitio
www.blackanddecker.com.
GARANTÍA LIMITADA DE
TRES AÑOS
Black & Decker (U.S.) Inc. garantiza que
este producto está libre de defectos
de material o mano de obra durante un
período de tres (3) años desde la fecha
de compra, siempre y cuando el producto
se utilice en un entorno doméstico. Esta
garantía limitada no cubre contra fallas
debidas a mal uso, daño accidental o
cuando se han realizado o intentado
reparaciones por parte de cualquier otra
persona ajena a Black+Decker y sus
centros de mantenimiento autorizados.
Un producto defectuoso que cumple
con las condiciones de la garantía
establecidas en el presente documento
será remplazado o reparado sin costo de
una dos maneras:
La primera, que únicamente dará lugar
a intercambios, consiste en devolver
el producto al comerciante minorista
donde fue comprado (siempre y cuando
la tienda sea un comerciante minorista
participante). Las devoluciones deben
realizarse dentro del período establecido
en la política para intercambios del
comerciante minorista. Es posible que
se requiera el comprobante de compra.
Consulte al comerciante minorista sobre
su política específica de devoluciones
con respecto a los límites de tiempo para
devoluciones o intercambios.
La segunda opción es llevar o enviar
(pagado por adelantado) el producto a un
centro de mantenimiento de propiedad o
con autorización de Black+Decker para
su reparación o remplazo a discreción
de Black+Decker. Es posible que se
requiera un comprobante de compra. Los
centros de mantenimiento de propiedad
o con autorización de Black+Decker en
línea en www.blackanddecker.com.
Esta garantía no se aplica a los
accesorios. Esta garantía le otorga
derechos legales específicos y es posible
que tenga otros derechos que varían de
un estado a otro. En caso de que tenga
alguna pregunta, comuníquese con el
gerente del centro de mantenimiento
de Black+Decker más cercano a usted.
Este producto no está diseñado para
uso comercial y, en consecuencia, dicho
uso comercial de este producto anulará
la garantía. Por medio del presente
documento, se declina la responsabilidad
de todas las demás garantías, explícitas
o implícitas.
AMÉRICA LATINA: Esta garantía no se
aplica a productos vendidos en América
Latina. Para los productos que se
venden en América Latina, consulte la
información de garantía específica del
país contenida en el empaque, llame a la
compañía local o visite el sitio web para
obtener dicha información.
Page 49

49
· GARANTÍA BLACK+DECKER · BLACK+DECKER WARRANTY
. SOLAMENTE PARA PROPOSITOS DE MEXICO
Distributor Name · Sello firma del distribuidor
Date of purchase · Fecha de compra Invoice No. · No. de factura
PRODUCT INFOMATION · IDENTIFICACIÓN DEL PRODUCTO
Cat. No. · Catalogo ó Modelo Serial Number · No. de serie
Name · Nombre Last Name · Apellido
Address · Dirección
City · Ciudad State · Estado
Postal Code · Código Postal Country · País
Telephone · No. Teléfono
3 AÑOS DE GARANTIA
Este producto cuenta con tres años de garantía a partir de la fecha de compra contra
cualquier defecto de su funcionamiento, así como cualquier falla debido a materiales
empleados para su fabricación ó mano de obra defectuosa.
Nuestra garantía incluye la reparación o reposición del producto y/o componentes sin
cargo alguno para el cliente incluyendo la mano de obra, esta incluye los gastos de
trasportación erogados para lograr cumplimiento de esta garantía en los domicilios
diversos señalados.
Para hacer efectiva esta garantía deberá presentar su herramienta y esta póliza sellada
por el establecimiento comercial donde se adquirió el producto.
Nos comprometemos a entregar el producto en un lapso no mayor a 30 días hábiles
contados a partir de la fecha de recepción del mismo en nuestros talleres de servicio
autorizados.
ESTA GARANTIA NO APLICA CUANDO:
El producto se hubiese utilizado en condiciones distintas a las normales.
El producto no hubiese sido operado de acuerdo con el instructivo de uso que se
acompaña.
El producto hubiese sido alterado o reparado por personas no autorizadas por
nosotros.
Importador: Black & Decker S.A. de .C.V
Bosque de Cidros Acceso Radiatas No.42
3ra.Seccion de Bosques de las lomas
C.P.05120, Mexico, D.F. Tel: (01 55) 5326 7100
Page 50

50
Page 51

51
Page 52

52
Cat.No. LST140 Form No. 90638750 September 2016
Copyright
©
2016 BLACK+DECKER Printed in China
Grupo Realsa en herramientas,
S.A. de C.V.
Súper Manzana 69 MZ.01 Lote 30
(Av. Torcasita)
Col. Puerto Juárez
Cancún, Quintana Roo
Tel. 01 998 884 72 27
Ferre Pat de Puebla, S.A. de C.V.
16 de Septiembre No. 6149
Col. El Cerrito
Puebla, Puebla
Tel. 01 222 264 12 12
Ferre Pat de Puebla, S.A. de C.V.
Ejército Mexicano No. 15
Col. Ejido 1ro. de Mayo
Boca del Rio, Veracruz
Tel. 01 229 167 89 89
Servicio de Fabrica BLACK+DECKER,
S.A. de C.V.
Lázaro Cardenas No. 18
Col. Obrera
Distrito Federal
Tel. 55 88 95 02
Representaciones Industriales Robles,
S.A. de C.V.
Tezozomoc No. 89
Col. La Preciosa
Distrito Federal
Tel. 55 61 86 82
Gpo. Comercial de Htas. y Refacciones
de Occidente, S.A. de C.V.
Av. La Paz No. 1779
Col. Americana, S. Juaréz
Guadalajara, Jalisco
Tel. 01 33 38 25 69 78
Herramientas y Equipos Profesionales
Av. Colón 2915 Ote.
Col. Francisco I. Madero
Monterrey, Nvo. León
Tel. 01 81 83 54 60 06
Htas. Portátiles de Chihuahua,
S.A. de C.V.
Av. Universidad No. 2903
Col. Fracc. Universidad
Chihuahua, Chihuahua
Tel. 01 614 413 64 04
Fernando González Armenta
Bolivia No. 605
Col. Felipe Carrillo Puerto
Cd. Madero, Tamaulipas
Tel. 01 833 221 34 50
Perfiles y Herramientas de Morelia
Gertrudis Bocanegra No. 898
Col. Ventura Puente
Morelia, Michoacán
Tel. 01 443 313 85 50
Enrique Robles
Av. de la Solidaridad No. 12713
Col. La Pradera
Irapuato, Guanajuato
Tel. 01 462 626 67 39
Hernández Martinez Jeanette
Prolongación Corregidora Nte. No. 1104
Col. Arboledas
Queretaro, Qro.
Tel. 01 442 245 25 80
SOLAMENTE PARA PROPOSITOS DE MEXICO
PARA OTRAS LOCALIDADES LLAME AL 01 800 847 2309 o 01 800 847 2312.
BLACK & DECKER S.A. DE C.V.
BOSQUES DE CIDROS ACCESO RADIATAS NO. 42
COL. BOSQUES DE LAS LOMAS.
05120 MÉXICO, D.F
TEL. (01 55) 5326 7100
01 800 847 2309/01 800 847 2312
 Loading...