

Page 1

36V LITHIUMTRIMMER / EDGER
INSTRUCTION MANUAL
Model Number LST136
PLEASE READ BEFORE RETURNING
THIS PRODUCT FOR ANY REASON:
Ifyou have a question or experience a problem with your
Black & Decker purchase, go to
WWW.BLACKAN DDECKER.COM/INSTANTANSWERS
for instant answers 24 hours a day.
Ifyou can't find the answer or do not have access to the internet,
call 1-800-544-6986 from 8 a.m. to 5 p.m. EST Mon. - Fri
to speak with an agent.
Please have the catalog number available when you call.
SAVETHIS MANUAL FOR FUTURE REFERENCE.
VEA EL ESPANOL EN LA CONTRAPORTADA.
POUR LE FRAN_AIS, VOIR LA COUVERTURE ARRI#RE.
IN.STRUCTIVO DE O.PERACION, CENTROS DE SERVICIO Y
POLIZA DE GARANTIA. ADVERTENClA: LI_ASE ESTE
INSTRUCTIVO ANTES DE USAR EL PRODUCTO.
Model # LST136
KEY INFORMATION YOU SHOULD KNOW:
The guard must be installed before trimming or edging - if
not, the motor will overheat (page 8).
When replacing the line, use only .065 inch diameter
ROUND line (B&D Model #AF-100 is recommended) -
otherwise the tool will not function properly (page 11).
Do not bump the feed head against the ground - it will
disrupt the feed mechanism.
1
Page 2

SafetyGuidelines-Definitions.................................................2
ImportantSafetyWarningsandInstructions............................2
Components.............................................................................4
ImportantSafetyInstructionsforBatteryChargers..................4
ImportantSafetyInstructionsforBatteryPacks.......................5
Assembly/ Adjustment ............................................................. 8
Operating Instructions .............................................................. 9
Replacement Accessories ........................................................ 10
Maintenance ............................................................................ 12
Troubleshooting ....................................................................... 12
Service Information .................................................................. 13
Full Three-Year Home Use Warranty ....................................... 15
SAFETY GUIDELINES - DEFINITIONS
It is important for you to read and understand this manual. The
information it contains relates to protecting YOUR SAFETY and
PREVENTING PROBLEMS. The symbols below are used to help
you recognize this information.
_DANGER: Indicates an imminently hazardous situation which,
not avoided, will result in death or serious injury.
_WARNING: Indicates a potentially hazardous situation which, i
not avoided, could result in death or serious injury.
z_CAUTION: Indicates a potentially hazardous situation which, if
not avoided, may result in minor or moderate injury.
NOTICE: Used without the safety alert symbol indicates a
potentially hazardous situation which, if not avoided, may result in
property damage.
z_WARNING: When using electric gardening appliances, basic
safety precautions should always be followed to reduce risk of fire,
electric shock, and personal injury, including the following.
Read All Instructions
• ALWAYS WEAR EYE PROTECTION - Wear safety spectacles
or goggles at all times when this toot is plugged in.
• GUARD - Do not use this tool without guard attached.
• DRESS PROPERLY - Do not wear loose clothing or jewelry.
They can be caught in moving parts. Rubber gloves and
substantial rubber soled footwear are recommended when
working outdoors. Don't operate the toot when barefoot or
wearing open sandals. Wear heavy long pants to protect your
legs. Wear protective hair covering to contain tong hair.
• NYLON LINE - Keep face, hands and feet clear of rotating nylon
line at all times.
• THE ROTATING LINE PERFORMS A CUTTING FUNCTION -
Use care when trimming around screens and desirable plantings.
• KEEP ALL BYSTANDERS AWAY - at a safe distance from
work area, especiatlychitdren.
• IMPORTANTWARNING - When being used as an Edger,
stones, pieces of metal and other objects can be thrown out at
high speed by the line. The toot and guard are designed to
reduce the danger. However, the following special precautions
should be taken:
•MAKESURE thatotherpersonsandpetsare atleast100feet (30m)away.
• TO REDUCE THE RISK of rebound (ricochet) injury, work going
away from any nearby solid object such as watt, steps, large
stone, tree, etc. Use great care when working close to solid
objects and where necessary, do edging or trimming by hand.
• AVOID ACCIDENTALLY STARTING - Don t carry plugged-in
tool with finger on trigger.
• DO NOT FORCE THETOOL - at a rate faster than the rate at
Page 3

whichitisabletocuteffectively.
•USETHERIGHTTOOL- Donotusethistootforanyjobexcept
thatforwhichitisintended.
•DON'TOVERREACH- Keepproperfootingandbalanceatalltimes.
DAMAGETOUNIT- Ifyoustrikeorbecomeentangledwitha
foreignobject,stoptoolimmediately,unplug,checkfordamage
andhaveanydamagerepairedbeforefurtheroperationis
attempted.Donotoperatewithabrokenhuborspool.
•DISCONNECTTOOL-whennotinuse,whenreplacingline,or
priortocleaning.
•AVOIDDANGEROUSENVIRONMENTALCONDITIONS- Do
notuseelectrictoolsindamporwetlocations.Followall
instructionsinthisInstructionManualforproperoperationofyour
tool.Don'tusethetootintherain.
•DONOTOPERATEportableelectrictoolsingaseousor
explosiveatmospheres.Motorsinthesetoolsnormallyspark,and
thesparksmightignitefumes.
•STOREIDLETOOLSINDOORS-Whennotinuse,toolsshouldbe
storedindoorsinadry,locked-upplaceoutofreachofchildren.
•STAYALERT- Donotoperatethisunitwhenyouaretired,ill,
orundertheinfluenceofalcohol,drugs,ormedication.
•MAINTAINAPPLIANCESWITHCARE- Followinstructionsin
maintenancesection.Keephandlesdry,cleanandfreefromoil
andgrease.
•CHECKDAMAGEDPARTS- Beforefurtheruseofthe
appliance,aguardorotherpartthatisdamagedshouldbe
carefullycheckedtodeterminethatitwiltoperateproperlyand
performitsintendedfunction.Checkforalignmentofmoving
parts,bindingofmovingparts,breakageofparts,mounting,and
anyotherconditionthatmayaffectitsoperation.Aguardorother
partthatisdamagedshouldbeproperlyrepairedorreplacedby
anauthorizedservicecenterunlessotherwiseindicated
elsewhereinthismanual.
•DONOTimmersetoolinwaterorsquirtitwithahose.DONOT
allowanyliquidtogetinsideit.
•DONOTstorethetootonoradjacenttofertilizersorchemicals.
•DONOTcleanwithapressurewasher.
Keepguardsinplaceandinworkingorder.
•Keephandsandfeetawayfromcuttingarea.
Z_WARNING: Do not use toot if the switch trigger does not turn
the toot on or off. Any toot that can not be controlled with the switch
trigger is dangerous and must be repaired.
SAVE THESE INSTRUCTIONS
The label on your toot may include the following symbols. The
symbols and their definitions are as follows:
V .............. volts A ................ amperes
Hz ............ hertz W................ watts
min ............ minutes ,x, .............. alternating current
- - -. ......... direct current no .............. no load speed
[] .............. Class II Construction @ ............ earthing terminal
Z_ ............safety alert symbol
_WARNING: Some dust created by this product contains
chemicals known to the State of California to cause cancer,
birth defects or other reproductive harm. Some examples of
these chemicals are:
• compounds in fertilizers
• compounds in insecticides, herbicides and pesticides
To reduce your exposure to these chemicals, wear approved safety
equipment such as dust masks that are specially designed to filter out
microscopic particles.
• arsenic and chromium from chemically treated lumber
.../min ...... revolutions or
reciprocations per minute
Page 4

1. On/Off Switch
2. Handle
3. Lock Off Button
4. Battery
5. Charge Indicator
6. Power Command
7. Auxiliary Handle
8. Height Adjust
Locking Clamp
9.Trimmer Head
10. Edge Guide
11. Guard
12. Spool Housing
SAVE THESE INSTRUCTIONS: This manual contains important
safety instructionsfor battery chargers.
• Before using charger, read all instructions and cautionary markings
on charger, battery pack, and product using battery pack.
z_WARNING: Shock hazard. Do not allow any liquid to get
inside charger.
Z_CAUTION: Burn hazard. To reduce the risk of injury, charge
only designated Black & Decker batteries. Other types of batteries
may burst causing personal injury and damage.
z_CAUTION: Under certain conditions, with the charger plugged
in to the power supply, the charger can be shorted by foreign
material. Foreign materials of a conductive nature such as, but not
limited to, steelwoot, aluminum foil, or any buildup of metallic
particles should be kept away from charger cavities. Always unplug
the charger from the power supply when there is no battery pack in
the cavity. Unplug charger before attempting to clean.
_WARNING:
• DO NOT attempt to charge the battery pack with any chargers
other than the ones in this manual. The charger and battery
pack are specifically designed to work together.
• These chargers are not intended for any uses other than
charging designated Black & Decker rechargeable batteries.
Any other uses may result in risk of fire, electric shock or
electrocution.
Do not expose charger to rain or snow.
Pull by plug rather than cord when disconnecting charger.
This will reduce risk of damage to electric plug and cord.
Make sure that cord is located so that it will not be stepped
on, tripped over, or otherwise subjected to damage or stress.
Do not use an extension cord unless it is absolutely
4
Page 5

necessary. Use of improper extension cord could result in risk of
fire, electric shock, or electrocution.
• An extension cord must have adequate wire size (AWG or
American Wire Gauge) for safety. The smaller the gauge number
of the wire, the greater the capacity of the cable, that is 16 gauge
has more capacity than 18 gauge. When using more than one
extension to make up the total length, be sure each individual
extension contains at least the minimum wire size.
Recommended Minimum Wire Size for Extension Cords
Minimum Gauge for Cord Sets
Volts Total Length of Cord in Feet
120V 0-25 26-50 51-100 101-150
240V 0-50 51-100 101-200 201-300
Ampere Rating
More Not more American Wire Gauge
Than Than
0 6 18 16 16 14
6 10 18 16 14 12
10 - 12 16 16 14 12
12 - 16 14 12 Not Recommended
• Do not place any object on top of charger or place the charger
on a soft surface that might block the ventilation slots and
result in excessive internal heat. Place the charger in a
position away from any heat source. The charger is ventilated
through slots in the top and the bottom of the housing.
• Do not mount charger on wall or permanently affix charger to
any surface. The charger is intended to use on a flat, stable
surface (i.e., table top, bench top).
• Do not operate charger with damaged cord or plug -- have
them replaced immediately.
• Do not operate charger if it has received a sharp blow, been
dropped, or otherwise damaged in any way. Take it to an
authorized service center.
• Do not disassemble charger; take it to an authorized service
center when service or repair is required. Incorrect reassembly
may result in a risk of electric shock, electrocution or fire.
• Disconnect the charger from the outlet before attempting any
cleaning. This will reduce the risk of electric shock. Removing the
battery pack will not reduce this risk.
• NEVER attempt to connect 2 chargers together.
• The charger is designed to operate on standard household
electrical power (120 Volts). Do not attempt to use it on any
other voltage.
SAVE THESE INSTRUCTIONS
z_WARNING: For safe operation, read this manual and manuals
originally supplied with tool before using the charger.
The battery pack is not fully charged out of the carton. Before using
the battery pack and charger, read the safety instructions below.
Then follow charging procedures outlined.
READ ALL INSTRUCTIONS
• Do not incinerate the battery pack even if it is severely
damaged or is completely worn out. The battery pack can
explode in a fire. Toxic fumes and materials are created when
battery packs are burned.
• Do not charge or use battery in explosive atmospheres, such
as in the presence of flammable liquids, gases or dust.
Inserting or removing the battery from the charger may ignite the dust
or fumes.
• If battery contents come into contact with the skin, immediately
wash area with mild soap and water, ffbattery liquid gets into the
eye, rinse water over the open eye for 15 minutes or until irritation
ceases. If medical attention is needed, the battery electrolyte for Li-
ion batteries is composed of a mixture of liquid organic carbonates
and lithium salts.
Page 6

• Contentsof opened batterycells maycause respiratory irritation.
Provide freshair.Ifsymptomspersist, seekmedical attention.
ZLWARNING: Burn hazard. Battery liquid may be flammable if
exposed tospark or flame.
• Charge the batterypacks onlyin Black & Decker chargers.
• DO NOT splash or immerse in water or other liquids. This may
cause premature cell failure.
• Do not store or use the tool and battery pack in locations where
the temperature may reach or exceed 105°F (40°0) (such as
outside sheds or metal buildings in summer).
ZLWARNING: Never attempt to open the battery pack for any
reason. If battery pack case is cracked or damaged, do not insert into
charger. Do not crush, drop or damage battery pack. Do not use a
battery pack or charger that has received a sharp blow, been
dropped, run over or damaged in any way (i.e., pierced with a nail,
hit with a hammer, stepped on). Damaged battery packs should be
returned to service center for recycling.
zLWAR N IN G: Fire hazard. Do not storeor carry batteryso that
metal objects can contact exposed batteryterminals. For example, do
not place battery in aprons, pockets, toolboxes,product kitboxes, drawers,
etc., with loose nails,screws, keys, etc.Transporting batteries can possibly
cause fires if the battery terminals inadvertently come in contact with
conductive materials such as keys, coins, hand tools and the like. The
US Department of TransportationHazardous Material Regulations (HMR)
actuallyprohibit transportingbatteries incommerce or on airplanes (i.e.,
packed in suitcasesand carry-on luggage) UNLESS they areproperly
protectedfrom short circuits.So when transporting individualbatteries, make
sure thatthe battery terminals are protected and wellinsulatedfrom materials
thatcould contact them and causea short circuit.NOTE: Batteries should
not beput in checked baggage.
STORAGE RECOMMENDATIONS
1. The best storage place is one that is coot and dry away from
direct sunlight and excess heat or cold.
2. Long storage will not harm the battery pack or charger.
CHARGING PROCEDURE
The standard charger provided will charge a fully depleted battery in
about 2 hours.
1. Plug the charger into an appropriate outlet before inserting the
battery pack.
2. Insert the battery pack into the charger _1
as shown in figure A.
3. The green LED will flash
indicating that the battery is being
charged.
_4. The completion of charge is
indicated by the green LED
remaining on continuously. The pack
isfully charged and may be used at
this time or left on the charger.
Recharge discharged batteries as soon
as possible after use or battery life may be greatly diminished.
CHARGER DIAGNOSTICS
This charger is designed to detect certain problems that can arise
with the battery packs or the power source. Problems are indicated
by one LED flashing in different patterns.
BAD BATTERY
_The charger can detect a weak or damaged battery. The red
LED flashes in the pattern indicated on the label. If you see
this bad battery blink pattern, do not continue to charge the
battery. Return it to a service center or a collection site for
recycling.
HOT/COLD PACK DELAY
_When the charger detects a battery that is excessively hot or
excessively cold, it automatically starts a Hot/Cold Pack
Delay, suspending charging until the battery has normalized.
After this happens, the charger automatically switches to the
Pack Charging mode. This feature ensures maximum battery
life. The red LED flashes in the pattern indicated on the label
when the hot / cold pack delay is detected.
Page 7

LEAVINGTHEBATTERYINTHECHARGER
Thechargerandbatterypackcanbeleftconnectedwiththegreen
LEDglowingindefinitely.Thechargerwiltkeepthebatterypack
freshandfullycharged.
IMPORTANTCHARGINGNOTES
1.Longestlifeandbestperformancecanbeobtainedifthebattery
packischargedwhentheairtemperatureisbetween60°Fand
80°F(16°-27°C).DONOTchargethebatterypackinanair
temperaturebelow+40°F(+4.5°C),orabove+105°F(+40.5°C).
Thisisimportantandwillpreventseriousdamagetothebattery
pack.
2.Thechargerandbatterypackmaybecomewarmtotouchwhile
charging.Thisisanormalcondition,anddoesnotindicatea
problem.Tofacilitatethecoolingofthebatterypackafteruse,avoid
placingthechargerorbatterypackinawarmenvironmentsuchas
inametalshed,oranuninsulatedtrailer.
3.Ifthebatterypackdoesnotchargeproperly:
a.Checkcurrentatreceptaclebyplugginginalamporother
appliance
b.Checktoseeifreceptacleisconnectedtoalightswitch
whichturnspoweroffwhenyouturnoutthelights.
c.Movechargerandbatterypacktoalocationwherethe
surroundingairtemperatureisapproximately60°F-80°F
(16°-27°C).
d.Ifchargingproblemspersist,takethetoot,batterypackand
chargertoyourlocalservicecenter.
4.Thebatterypackshouldberechargedwhenitfailstoproduce
sufficientpoweronjobswhichwereeasilydonepreviously.DONOT
CONTINUEtouseundertheseconditions.Followthecharging
procedure.Youmayalsochargeapartiallyusedpackwhenever
youdesirewithnoadverseaffectonthebatterypack.
5.Foreignmaterialsofaconductivenaturesuchas,butnotlimited
to,steelwool,aluminumfoil,oranybuildupofmetallicparticles
shouldbekeptawayfromchargercavities.Alwaysunplugthe
chargerfromthepowersupplywhenthereisnobatterypackinthe
cavity.Unplugchargerbeforeattemptingtoclean.
6.Donotfreezeorimmersechargerinwateroranyotherliquid.
zLWARNING: Shock hazard. Do not allow any liquid to get
inside charger. Never attempt to open the battery pack for any
reason. If the plastic housing of the battery pack breaks or cracks,
return to a service center for recycling.
STATE OF CHARGE INDICATOR (FIGURE B)
The battery is equipped with a state of charge indicator. This can be
used to display the current level of charge in the battery during use
and during charging. It does not
indicate toot functionality and is subject
to variation based on product
components, temperature and end-
user application.
Checking state of charge during use:
• Press the state of charge indicator
button (B1).
• The four LED's (B2) wilt illuminate
indicating the percent of charge in
the battery. See chart in figure B.
• If LED light does not
illuminate,charge battery.
INSTALLING AND REMOVING THE BATTERY PACK
ZLWARNING: Make certain the Iock-off button b engaged to
prevent switch actuation before removing or installing battery.
TO INSTALL BATTERY PACK:
Insert battery pack into toot until
fully seated and an audible click is
heard (figure C). Make sure
battery pack is fully seated and
fully latched into position.
TO REMOVE BATTERY PACK:
Depress the battery release button
in the back of the battery pack and
pull battery pack out of toot.
Page 8

Z_WARNING: Before assembly, make sure that the toot is
switched off and the battery has been removed.
ASSEMBLYTOOLS REQUIRED (NOT SUPPLIED):
- Phillips Screwdriver
z_WARNING: Remove the
battery before attempting to
attach any of the following
components.
ATTACHING THE GUARD
(FIGURES D AND E)
Z_WARNING: NEVER
OPERATE TOOL
WITHOUT GUARD FIRMLY
IN PLACE. The guard must
always be properly attached
on the toot to protect theuser.
• Remove the screw from
the guard.
• Keeping the guard square
to the trimmer head slide it
into place until the retaining
tab clicks into place (Ensure
that the guide rails (D1) on
the guard (D2) are correctly
aligned with the guide rails
(D3) on the trimmer head
(D4) (figure D).
• Secure the guard with the
screw (El) (figure E).
ATTACHING THE AUXILIARY HANDLE (FIGURES F AND G)
• Push the auxiliary handle
(F1) onto the tube (F2).
• Slide the bolt (G1) through
the holes in the auxiliary
handle.
• Tighten the knob (G2) onto
the bolt by turning it
clockwise.
\\\
ADJUSTINGTHEPOSITIONOFTHEAUXILIARYHANDLE
(FIG.G)
The auxiliary handle can be
adjusted to provide optimum
balance and comfort.
• Loosen the knob on the
bolt by turning it counter
clockwise.
• Gently slide the auxiliary
handle up or down the tube
to the desired height.
• Tighten the knob onto the
bolt by turning it clockwise.
Page 9

ADJUSTINGTHEHEIGHTOFTHETOOL(FIGUREH)
• This toot has a telescopic
mechanism, allowing you to
set it to a comfortable
height.
To adjust the height setting:
• Release the height adjust /
locking clamp (H1).
• Gently putt the tube (H2)
up or down to the desired
height.
• Close the height adjust
locking clamp (H1).
RELEASING THE CUTTING LINE
In transit, the cutting line is taped to the spool housing.
• Remove the tape holding the cutting line to the spool housing.
Z_WARNING: Always use proper eye protection that conforms
to ANSI Z87.1 (CAN/CSA Z94.3) while operating this power toot.
Z_CAUTION: Inspect area to be trimmed and remove any wire,
cord, or string-like objects which could become entangled in the
rotating line or spool. Be particularly careful to avoid any wire which
might be bent outwardly into the path of the toot, such as barbs at the
base of a chain link fence.
SETTING THE TOOL TO TRIMMING OR EDGING MODE
(FIGURE I, J AND K)
• The toot can be used in trimming mode as shown in figure I or in
edging mode to trim overhanging grass along lawn edges and flower
beds as shown in figure K.
TRIMMING MODE
For trimming,the trimmer head
should be inthe position shown in
figure I. If itis not:
• Remove the battery from thetoot.
• Press and holdthe head release
button (11).
•While holding the auxiliary handle,
rotatethe head clockwise.
• Release thehead release button.
• Liftthe edge guide(J1) intothe
closed position.
Note: The head willonly rotatein one
direction.
z_CAUTION: Wireedgeguide
shouldonly be usedwhen in the
edging mode. Keep wire edge guide
in the retracted position when inthe
trimming mode.
EDGING MODE (FIGURE K)
For edging, the trimmerhead should
be in theposition shown infigure K.
Ifitis not:
• Remove the battery from thetoot.
• Press and holdthe head release
button (K1).
• While holding the auxiliary
handle, rotate the head
counterclockwise.
• Release the head release button.
• Drop the edge guide (K2) in to
Page 10

theopenposition.Ensurethattheedgingguideisallthewaydown,
anaudibleclickwiltbeheard.
Note:Theheadwillonlyrotateinonedirection.
Note:TheAutoFeedSystemmaynotoperatecorrectlyifedgeguide
isnotused.
SWITCHINGONAND OFF
•To switch the toot on, press
in and hold the lock off button
(L1) then squeeze the trigger
lever (L2). Once the tool is
running you may release the
lock off button (L1).
•To switch the toot off, release
the trigger lever.
z_WARNING: Never
attempt to lock the trigger
lever in the on position.
POWER COMMAND-
MAX POWER / MAX RUNTIME
The max power / max runtime
feature (M1)is located on the
tool handle. It allows you to
optimize the tools
performance and boost the
power as needed.
•To choose max power to
tackle thick weeds, rotate dial
to setting 6.
•To choose max runtime to
increase battery life rotate dial
to setting 1.
• For acombination of both,
rotate dialto setting from2 to 5.
OPERATING THE TRIMMER
• With the unit on, angle unit and slowly swing the
trimmer side to side as shown in figure N.
• Maintain a cutting angle of 5° to 10° as shown
in figure N1. Do not exceed 10°(figure N2). Cut
with the tip of the line. To keep distance from hard
surfaces use edge guide (10). Pull the guide out
until it snaps securely into place
• Maintain a minimum distance of 24 inches
(609.6 ram) between the guard and your feet as
shown in figure N3. To acheive this distance
adjust the overall height of the trimmer as shown
in figure H.
(609.6 mm)
EDGING
Optimum cuttingresultsare achievedon
edges deeper than 2inches (50mm).
• Do not use the toot to create edges
or trenches.
• Guide thetool asshown infigure O.
• To make a closer cut, slightly tilt
the toot.
lO
Page 11

HELPFUL CUTTING TIPS
• Use the tip of the string to do the cutting; do not force string
head into uncut grass. Use edge guide along such things as
fences, houses and flower beds for best practices.
• Wire and picket fences cause extra string wear, even breakage.
Stone and brick walls, curbs, and wood may wear string rapidly.
• Do not allow spool cap to drag on ground or other surfaces.
• In tong growth cut from the top down and do not exceed 12
inches (304.8 mm) high.
• Keep trimmer tilted toward the area being cut; this is the best
cutting area.
•The trimmer cuts when passing the unit from the right to left.
This wilt avoid throwing debris at the operator.
•Avoid trees and shrubs. Tree bark, wood moldings, siding, and
fence posts can easily be damaged by the string.
CUTTING LINE / LINE FEEDING
Your trimmer uses .065 inch (1.65 ram) diameter, ROUND
nylon line. During use, the tips of the nylon lines wilt become
frayed and worn and the special self feeding spool wilt
automatically feed and trim a fresh length of line. DO NOT BUMP
unit on ground in attempt to feed line or for any other purposes.
Cutting line will wear faster and require more feeding if the
cutting or edging is done along sidewalks or other abrasive
surfaces or heavier weeds are being cut.
ZLCAUTION: Before you begin trimming, only use the
appropriate type of cutting line.
Use Black & Decker replacement spool Model No. AF-100.
• USE ONLY .065 inch (1.65 mm) DIAMETER ROUND NYLON
MONOFILAMENT LINE. Do not use serrated or heavier gauge
line, as they will overload the motor and cause overheating.
• Other replacement parts (guards, spool caps, etc.) are available
through Black & Decker service centers. To find your local service
location call: 1-800-544-6986
or visit
www.blackanddecker.com. _
_WARNING: The use of
any accessory not Replacement
recommended by Black & spool
Decker for use with this toot
could be hazardous.
REPLACING THE SPOOL
(FIGURES P, Q AND R)
• Remove battery from toot.
• Depress the tabs (P1) and
remove the spool cap (P2)
from the spool housing (P3)
in the trimmer head (figure P).
• Replace spool with Black & Decker model # AF-100.
• Grasp empty spool with one hand and spool housing with other
hand and pull spool out.
• If lever (Q1) in base of
housing becomes dislodged,
replace in correct position
before inserting new spool
into housing.
• Remove any dirt and grass
from the spool and housing.
• Unfasten the end of the
cutting line and guide the line
into the eyelet (R2) figure R.
• Take the new spool and
push it onto the boss (Q2) in
the housing. Rotate the spool
slightly until it is seated.
The line should protrude
approximately 4-13/16 inches
(122mm) from the housing.
11
O
Ii
Page 12
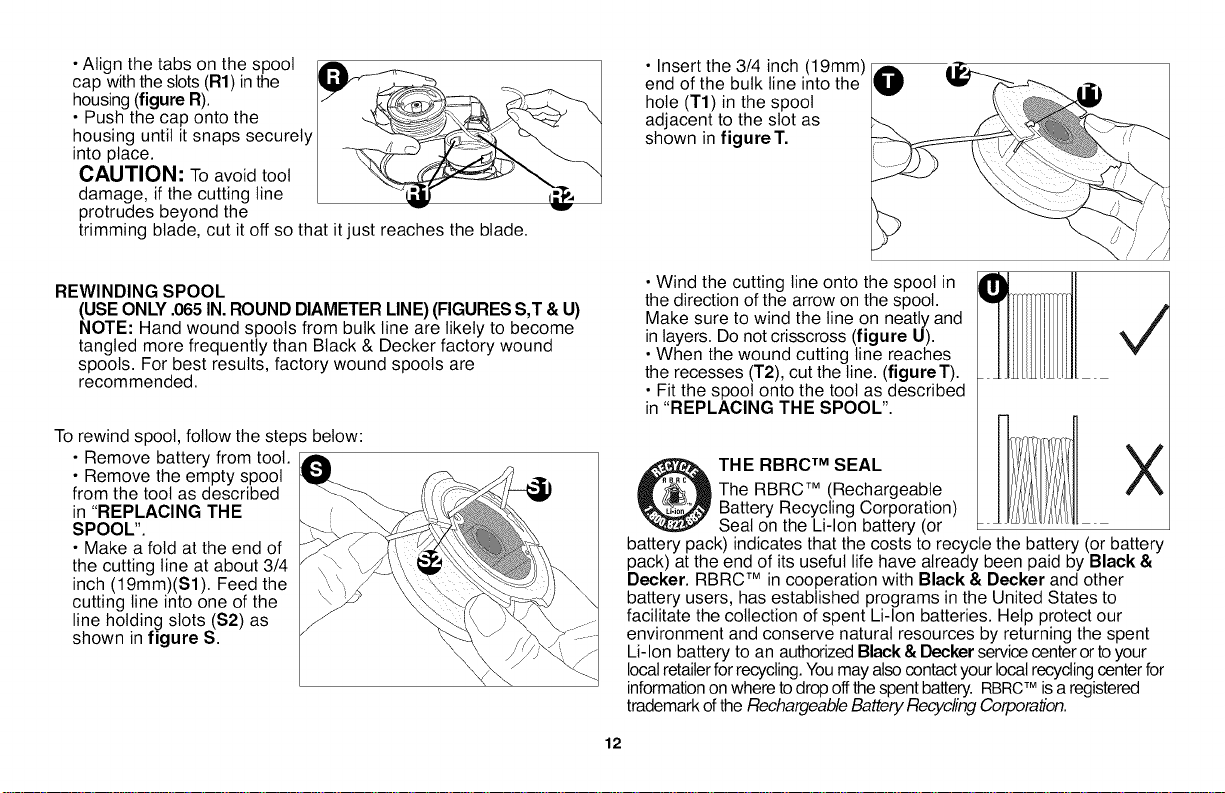
• Align the tabs on the spool JAil, _ - Insert the 3/4 inch (19mm)
cap with the slots (R1) inthe _,_ _ _ / end of the bulk line into the
housing (figure R). / [_'L'/_=:_ __._._ hole (T1) in the spool
• Push the cap onto the ___/_. _<:_' ",J adjacent to the slot as
housing until it snaps securely shown in figure T.
into place. _ _ ._d_,
CAUTION: To avoid tool _._ _ "_
damage, if the cutting line _1_[
_WARNING: To avoid serious injury, remove the battery from
the tool before performing any maintenance.
1. Keep the air intake slots clean to avoid overheating.
2. Your trimmer line can dry out over time. To keep your line in top
condition, store spare pre-wound spools or bulk line in a plastic,
sealable bag with a tablespoon of water.
3. Plastic parts may be cleaned by using a mild soap and a damp rag.
4. The line cutter on the edge of the guard can dull over time. It is
recommended you periodically touch-up the sharpness of the
blade with a file.
PROBLEM
Toot runs slowly.
Automatic line feed does not
feed more line.
SOLUTION
• Remove battery from toot.
• Check that the spool housing
can rotate freely. Carefully clean
it if necessary.
• Check that the cutting line
does not protrude more than
approximately 4-13/16 inches
(122mm) from the spool.
If it does, cut it off so that it just
reaches the line trimmingblade.
• More line is fed when the line
shortens to approximately 3
inches (76.2mm). To determine if
the line is not feeding, let line
wear past this point.
PROBLEM
Automatic line feed does not
feed more line.
SOLUTION
• Keep the tabsdepressed and
remove thespool fromthe spool
housing inthe trimmer head.
• Ensure thatthe line is not
crisscrossedonthe spool as
detailedin figure U. Ifit is,
unwindthe cutting line,then
windit back onthe spool neatly
sothatthe lines do notcross.
• Inspecttracks atthe bottom of
spool fordamage. Ifdamaged,
replace spool.
•Read the codeon theback of
spool.Ifitreads "PA66"call
customer servicefor a replacement.
Ifitreads "ABS" this isnot theissue.
• Pullthe cuttingline untilitprotrudes
approximately4-13/16 inches
(122mm) from thespool. If
insufficientcuttinglineis leftonthe
spool,installa new spoolofcutlng line.
•Alignthe tabs onthe spool cap
with the cutouts in the housing.
• Pushthespoolcapontothe housing
untilitsnaps securelyinto place.
• Ifthe cutting lineprotrudes
beyond the trimming blade,cut
itoffso that itjust reaches the blade.
Ifthe automatic line feed stilldoes
notwork or the spool isjammed, try
the followingsuggestions:
•Carefully clean the spooland
housing.
• Remove the spool andcheck ifthe
leverinthe spool housing can
move freely.
13
Page 14

PROBLEM SOLUTION
• Remove the spool and unwind
the cutting line, then wind it on
neatly again. Replace the spool
into the housing.
Overfeeding
Line unravels when cap or spool
is removed.
• Ensure you are cutting with
the tip of the line (7 inches
(177.8mm) from the spool).
Use the edge guide if needed to
ensure proper space is
maintained.
• Ensure you are not
exceeding a 10 ° angle as
shown infigure N1.
• Make sure to park the lines in
holding slots (S2) figure S
before removing.
IMPORTANT: To assure product SAFETY and RELIABILITY,
repairs, maintenance and adjustment should be performed by
authorized service centers or other qualified service organizations,
always using identical replacement parts.
This device complies with part 15 of the FCC rules. Operation is
subject to the following two conditions: (1) This device may not
cause harmful interference, and (2) this device must accept any
interference received, including interference that may cause
undesired operation.
NOTE: This equipment has been tested and found to comply with
the limits for a Class B digital device, pursuant to Part 15 of the
FCC Rules. These limits are designed to provide reasonable
protection against harmful interference in a residential installation.
This equipment generates, uses and can radiate radio frequency
energy and, if not installed and used in accordance with the
instructions, may cause harmful interference to radio
communications. However, there is no guarantee that interference
will not occur in a particular installation.
If this equipment does cause harmful interference to radio or
television reception, which can be determined by turning the
equipment off and on, the user is encouraged to try to correct the
interference by one or more of the following measures:
Reorient or relocate the receiving antenna.
Increase the separation between the equipment and receiver.
Connect the equipment into an outlet on a circuit different from that
to which the recewer is connected.
Consult the dealer or an experienced radio/TV technician for help.
Changes or modifications to this unit not expressly approved by the
party responsible for compliance could void the user's authority to
operate the equipment. This Class B digital apparatus complies
with Canadian ICES-003.
All Black & Decker Service Centers are staffed with trained
personnel to provide customers with efficient and reliable power toot
service. Whether you need technical advice, repair, or genuine
14
Page 15

factoryreplacementparts,contacttheBlack&Deckerlocation
nearestyou.Tofindyourlocalservicelocation,refertotheyellow
pagedirectoryunder"Tools--Electric"orcall:1-800-544-6986or
visitwww.blackanddecker.com
Black&Decker(U.S.)Inc.warrantsthisproductforthreeyears
againstanydefectsinmaterialorworkmanship.Thedefective
productwiltbereplacedorrepairedatnochargeineitheroftwo
ways:
Thefirst,whichwiltresultinexchangesonly,istoreturntheproduct
totheretailerfromwhomitwaspurchased(providedthatthestoreis
aparticipatingretailer).Returnsshouldbemadewithinthetime
periodoftheretailer'spolicyforexchanges(usually30to90days
afterthesale).Proofofpurchasemayberequired.Pleasecheck
withtheretailerfortheirspecificreturnpolicyregardingreturnsthat
arebeyondthetimesetforexchanges.
Thesecondoptionistotakeorsendtheproduct(prepaid)toaBlack
&DeckerownedorauthorizedServiceCenterforrepairor
replacementatouroption.Proofofpurchasemayberequired.Black
&Deckerownedandauthorizedservicecentersarelistedunder
"Tools-Electric"intheyellowpagesofthephonedirectory.
Thiswarrantydoesnotapplytoaccessories.Thiswarrantygivesyou
specificlegalrightsandyoumayhaveotherrightswhichvaryfrom
statetostate.Shouldyouhaveanyquestions,contactthemanager
ofyournearestBlack&DeckerServiceCenter.Thisproductisnot
intendedforcommercialuse.
LATINAMERICA:Thiswarrantydoesnotapplytoproductssoldin
LatinAmerica.ForproductssoldinLatinAmerica,checkcountry
specificwarrantyinformationcontainedinthepackaging,callthe
localcompanyorseethewebsiteforwarrantyinformation.
FREEWARNINGLABELREPLACEMENT:Ifyourwarninglabels
becomeillegibleoraremissing,call1-800-544-6986forafree
replacement.
Imported by
Black & Decker (U.S.) Inc.,
701 E. Joppa Rd.
Towson, MD 21286 U.S.A.
15
See 'Tools-Electric'
-Yellow Pages -
for Service & Sales
Page 16

TAILLE-BORDURE / COUPE-BORDURE
AVEC PILE AU LITHIUM DE 36 V
MODE D'EMPLOI
A LIRE AVANT DE RETOURNER CE PRODUIT
POUR QUELQUE RAISON QUE CE SOIT •
SidesquestionsoudesproblemessurgissentapresI'achatd'unproduit
Black&Decker,consulterlesiteWeb
HTTP',//WWW.BLACKANDDECKER.COIVl/INSTANTANSWERS
pourobtenirdesreponsesinstantanement24heuresparjour.
SilareponseestintrouvableouenI'absenced'acces.'aFlnternet,.
composerle1-800-544-6986de8h&17h HNE,duluneiauvenereei,
pourparleravecunagent.
Priered'avoirlenumerodecataloguesouslamainlotsdeI'appel.
16
Numero de modele LST136
VOICI DES RENSEIGNEMENTS IMPORTANTS
QU'IL VOUS FAUT CONNAITRE :
• Le pare-main dolt 6tre installe avant de debuter le taillage
ou la coupe sinon le moteur surchauffera.
• Utiliser seulement un fil ROND de 1,7 mm (0,065 po) de
diametre Iors du remplacement (modele AF-1OO de B&D
recommande), sinon I'appareil ne fonctionnera pas
correctement.
• €:viter de frapper la t6te d'alimentation contre le sol. En
effet, cela endommagera le mecanisme d'alimentation.
Page 17

LIGNES DIRECTRICES EN MATIERE DE
SECURITE - DEFINITIONS
I1est important que vous lisiez et compreniez ce mode d'emptoi.
Les informations qu'it contient concernent VOTRE SECURITE et
visent 9.PVlTER TOUT PROBLPME. Les symbotes ci-dessous
s/_vent a vous aider a reconnaTtre cette information.
DANGER : Indiq_ue une situation dangereuse imminente
qui, si elle n'est pas 6vitGe, causera la morl ou des graves
b[essures.
.vZAAVERTISSEMENT : Indique une situation potentiellement
dangereuse qui, si elle n'est pas 6vitee, pourrait causer la mort
oJ) de graves blessures.
/!\ MISE EN GARDE : Indique une situation potentiellement
dangereuse qui, si elle n'estpas 6vitee, pourrait causer des
blessures mineures ou modGrees.
AVIS : Utilise sans le symbole d'alerte a la sGcurite, indique une
situation potentiellement dangereuse qui, si elle n'est pas
evitGe, peut resulter en des d-ommages a la propriGte.
z_AVERTISSEMENT : Lorsque des outils de jardinage
electriques sont utilises, des precautions de base en matiere de
securit6 doivent toujours 6tre suivies afin de reduire te risque
d'incendie, de choc electrique et de blessure corporelte,
notamment les suivantes.
Lire toutes les directives
• TOUJOURS PORTER UNE PROTECTION OCULAIRE - Porter
des tunettes ou des lunettes protectrices en tout temps torsque
cet outil est branche.
• DISPOSlTIF DE PROTECTION - Ne pas utitiser cet outit sans
les dispositifs de protection en place.
• S'HABILLER DE MANII_RE APPROPRII_E - Ne pas porter de
v6tements amples ni de bijoux. Its peuvent s'enchev6trer darts les
pieces mobiles. Des gants en caoutchouc et des chaussures
adequates a semetles en caoutchouc sont recommandes lors de
travaux a I'exterieur. Ne pas utiliser l'outil avec les pieds nus ou
des sandates ouvertes. Porter des pantalons longs pour proteger
vos jambes. Se couvrir les cheveux s'its sont longs.
• FIL EN NYLON - Tenir le visage, lesmains et pieds loin du fil de
nylon rotatif en tout temps.
• LE FIL EN ROTATION EXI_CUTE UNE COUPE - Ptre attentif
Iors de ta[llage autour de gritlages et de plates-ban.des.
• TENIR ELOIGNE TOUSLES SPECTATEURS - A une distance
securitaire de l'aire de travail, particutierement les enfants.
• AVERTISSEMENT IMPORTANT : lorsque l'outil est utilise
comme coupe bordure, des pierres, morceaux de metal et autres
objets peuvent 6tre projetes a haute vitesse par te ill. L'outil et le
dispositif de protection sont congus pour reduire le risque.
Toutefois, les precautions speciales suivantes doivent 6tre prises
• S'ASSURER que toute personne et animaux sont eloign6s d'au
moins 30 m (100 pi).
POUR REDUlRE LE RISQUE de blessures par ricochet, travaitlez
en vous eloignant de tout objet solide tel un mur, des marches, de
grosses pierres, d'arbres, etc. Soyez tres prudent lors de travaux
p@sd'objets solides et, lecas echGant,taillez ou coupez manuellement.
• EVlTER LES DEMARRAGES ACClDENTELS - Ne pas
transporter d'outil branche avec le doigt sur la detente.
• NE PAS FORCER L'OUTIL - a tourner a une vitesse plus rapide
que celle pour laquetle it est capable de couper efficacement.
• UTILISER LE BON OUTIL - Ne pas utiliser cet outil pour tout
autre type de travail sauf pour celui pour lequet it est prevu.
• NE PAS TROP TENDRE LES BRAS - Conserver son equilibre
en tout temps.
• OUTIL ENDOMMAGI_ - Si vous frappez ou devenez
enchev6trer darts un objet, arr6tez immediatement l'outit,
debranchez-te puis inspectez pour toute trace de dommages qui
devront 6tre repar6s avant une autre utilisation. Ne pas utiliser
avec un moyeu ou une bobine brises.
17
Page 18

•DI_BRANCHERL'OUTIL- Lorsqueinactif,Iorsde
remptacementdefilouavantunnettoyage.
•EVlTERLESCONDITIONSENVlRONNEMENTALES
DANGEREUSES-Nepasutitiserd'outilselectriquesdartsdes
lieuxhumidesoumouilles.Suivretouteslesdirectivesdece
moded'emploipouruneutitisationadequatedevotreoutil.Ne
pasutilisert'outitsouslapluie.
•NEPASUTILISERd'outitsetectriquesportatifsdansunmilieu
gazeuxoudeftagrant.Lesmoteursdecesoutitsproduisent
normatementdesetincellesquipourraien,tenflammerdesvapeurs.
•RANGERLESOUTILSINUTILISESA L'INTERIEUR-
Lorsqu'ilsnesontpasutilises,lesoutilsdoivent6trerang&s&I'interieur,
dansunendroitsecetverrouille,horsdeporteedesenfants.
•ETREVIGILANT-Nepasutiliserl'appareitencasdefatigue
oudemaladieousousI'influenced'atcoot,dedroguesoude
medicaments.
•PRENDRESOINDESOUTILSI_LECTRIQUES- Suivreles
directivesfigurantb.la section Entretien. Maintenir les poignees
secbes, propres et exemptes d'huite et de graisse.
• VERIFIER LES PIECES ENDOMMAGEES - Avant toute
utilisation ulterieure de t'appareit electrique, un dispositif de
protection endommage, ou route autre piece endommagee, doit
6tre examine soigneusement afin d'assurer un fonctionnement
adequat selon sa fonction prevue. Verifier I'alignement des pieces
mobiles, la presence de grippage des pieces mobiles, de rupture
• NE PAS immerger t'outil darts l'eau ou I'arroser au boyau.
t_VITER ta pen6tration de tout tiquide dans l'outil.
• NE PAS ranger l'outil sur des engrais ou des produits chimiques
ou pros de ceux-ci.
• NE PAS nettoyer avec un nettoyeur b.pression.
• Maintenir les pare-mains en place et en etat de fonctionnement.
Tenir les mains et les pieds eloign6s de la zone de coupe.
ZLAVERTISSEMENT : Ne pas utiliser l'outil si ta detente ne
fonctionne pas. Tout outil qui ne peut 6tre regl6 par la detente est
dangereux et doit 6tre repar6.
CONSERVER CES MESURES.
L'etiquette apposee sur votre outil pourrait comprendre les symbotes
suivants. Les symbotes et leurs definitions sont indiques ci-apres :
V .............. volts
Hz ............ hertz
min ............ minutes
courant continue
[] .............. Construction ctasse II
zL ............symbole d'alerte a la
securit6
_AVERTISSEMENT : Certaines poussi_res produites par cet
util contiennent des produits chimiques reconnus par I'Etat de
la Californie comme pouvant causer le cancer, les anomalies
cong_nitales et d'autres dangers pour la reproduction. Voici
quelques exemples de ces produits chimiques :
• composes presents dans les engrais
• composes presents dans les insecticides, herbicides et pesticides
• arsenic et chrome provenant de bois traite chimiquement
Pour reduire votre exposition a.ces produits chimiques, porter un
equipement de securit6 approuve comme un masque anti-
poussieres con(_uspeciatement pour fittrer lesparticules
microscopiques.CONSERVER CES DIRECTIVES : ce mode
d'emptoi comprend d'importantes directives de securit6 pour les
chargeurs de piles.
• Avant d'utitiser te chargeur, tire routes tes directives et tous les
avertissements figurant sur le chargeur, le bloc-piles et te produit
z_utilis6 avec le bloc-piles.
A ................ amperes
W................ watts
.............. courant atternatif
non ............ regime &vide
@ ............ borne de terre
.../min ........ revolutions ou
alternance par minute
AVERTISSEMENT : risque de choc _lectrique. Eviter la
.v_6n6tration de tout liquide dans techargeur.
MISE EN GARDE : risque de brl31ure. Pour reduire le risque
de btessures, charger uniquement des piles Black & Decker
conseiltees. D'autres types de piles peuvent exptoser et provoquer
des btessures corporelles et des dommages.
18
Page 19

1. Interrupteur
marche/arr_t
2. Poign_e
3. Bouton de
verrouillage
4. Bloc-piles
5. Indicateur de charge
6. ContrSle de
puissance
7. Poign_e auxiliaire
8. Tendeur pour r_gler
la hauteur
9. T_te de coupe
10. Guide de coupe
11. Pare-main
12. Bo_tier de la bobine
z_MISE EN GARDE : dans certaines circonstances, Iorsque le
chargeur est branche au bloc d'atimentation, te chargeur peut 6tre
court-circuite par des corps etrangers conducteurs tels que, mais
sans s'y timiter, ta taine d'acier, te papier d'atuminium ou route
accumulation de particules metatliques. IIs doivent 6tre maintenus &
distance des ouvertures du chargeur. Debrancher systematiquement
cetui-ci si aucun bloc-piles n'y est inser6. Debrancher le chargeur
avant tout nettoyage.
• NE PAS tenter de charger le bloc-piles avec autre chose qu'un
chargeur de marque. Les chargeurs et blocs-piles sont congus
specialement pour fonctionner ensemble.
• Ces chargeurs ne sont pas destines & 6tre utilis_s _ d'autres
fins que celles de charger les piles rechargeables conseill_es
Black & Decker. Toute autre utilisation risque de provoquer un
incendie, un choc electrique ou une electrocution.
• Prot_ger le chargeur de la pluie et de la neige.
• Tirer la fiche plutSt que le cordon pour d_brancher le chargeur
ou pour d_brancher les cordons a I'aide de la fonction de
guirlande. Cela permet de reduire le risque d'endommager la fiche
ou le cordon d'alimentation.
• S'assurer que le cordon est situ_ en lieu s_3rde mani_re ace
que personne ne marche nine tr_buche dessus ou a ce qu'il ne
soit pas endommag_ ni soumis a une tension.
• Ne pas utiliser de rallonge a moins que cela ne soit absolument
n_cessaire. L'utilisation d'une rallonge inadequate risque
d'entrafner un incendie, un choc electrique ou une electrocution.
• Pour la s_curit_ de I'utilisateur, utiliser une rallonge de calibre
ad_quat (AWG, American Wire Gauge [calibrage am_ricain
normalis_ des fils]). Plus le numero de calibre de fil est petit et plus
sa capacite est grande, par exemple un calibre 16 aplus de
capacite qu'un calibre 18.Si plus d'une rallonge est utilisee pour
obtenir la Iongueur totale, s'assurer que chaque rallonge presente
au moins le calibre de fil minimum.
19
Page 20

Calibre de fil minimum recommand_ pour les rallonges
Tension
120V
240V
Intensit_ (A)
Au Au
moins plus
0 6
6 10
10 12
12 16
Calibre minimal des cordons de rallonge
Longueur totale du cordon en pieds
0-25 26-50 51-100 101-150
(0-7,6m) (7,6-15,2m) (15,2-30,4m) (30,4-45,7m)
0-50 51-100 101-200 201-300
(0-15,2m) (15,2-30,4m)(30,4-60,gm)(60,9-91,4m)
Calibre moyen des ills (AWG)
18 16 16 14
18 16 14 12
16 16 14 12
14 12 Nonrecommande
• Ne pas installer le chargeur sur un tour ni le fixer de mani_re
permanente sur toute surface. Le chargeur est destine a une
utilisation sur une surface plane et stable (c.-a-d. un dessus de
table ou d'etabli).
• Ne pas faire fonctionner le chargeur si la fiche ou le cordon est
endommag_; les remplacer immediatement.
• Ne jamais se servir d'un chargeur qui a subi un choc violent,
qui est tomb_ par terre ou qui est endommag_ de quelque
mani_re que ce soit. Le faire verifier dans un centre de reparation
autoris&
• Ne pas d_monter le chargeur; confierl'entretien ou la reparation
de I'appareil a un centre de reparation autoris& Le remontage non
conforme du chargeur comporte des risques de choc electrique,
d'electrocution ou d'incendie.
• D_brancher le chargeur avant de le nettoyer. Cela reduira le
risque de choc electrique. Le risque ne sera pas elimine en enlevant
simplement le bloc-piles.
• NE JAMAIS relier deux chargeurs ensemble.
• Le chargeur est con(2u pour 6tre aliment_ en courant
domestique standard
(120 V). Ne pas utiliser une tension sup_rieure pour le chargeur.
CONSERVER CES DIRECTIVES
AVERTISSEMENT : Pour un fonctionnement s#r, lire le
present manuel et les manuels fournis avec Ibutil avant d'utiliser le
chargeur.
Le bloc-piles n'est pas completement charge & la sortie de
I'embaltage. Avant d'utiliser le bloc-piles et le chargeur, lire les
directives de securit6 ci-apres. Respecter ensuite les consignes de
chargement decrites.
flammes. Des vapeurs et des matieres toxiques sont degagees
Iorsque les blocs-piles sont incineres.
• Ne pas charger ou utiliser de pile dans un milieu deflagrant, en
presence de liquides, de gaz ou de poussi_re inflammables.
Inserer ou retirer la pile du chargeur peut enflammer de la poussiere
ou des emanations.
• Si le contenu de la pile entre en contact avec la peau, laver
immq_diatement la zone touch_e au savon doux et & I'eau. Si le
liquide de la pile entre en contact avec les yeux, rincer I'ceil ouvert
I'eau pendant 15 minutes ou jusqu'a ce que I'irritation cesse. Si des
soins medicaux sont necessaires, I'electrolyte des piles au fithium-
ion est compose d'un melange de carbonates organiques liquides
et de sels de fithium.
• Le contenu des _l_ments de pile ouverts peut provoquer une
irritation respiratoire. Exposer la personne a de I'air frais. Si les
2O
Page 21

sympt6mespersistent,obtenirdessoinsmedicaux.
z_AVERTISSEMENT : Risque de br_lure. Le Iiquide de la pile
peut s'enflammer s'il est expose a des etincelles ou a une flamme.
• Charger uniquement les blocs-piles au moyen de chargeurs Black
& Decker.
• NE PAS _clabousser le bloc-piles ni I'immerger clans I'eau ou
clans tout autre liquide. Cela peut entrafner une defaillance
prematuree de I'element.
• Ne pas ranger ni utiliser I'outil et le bloc-piles dans un endroit
ou la temperature peut atteindre ou ddpasser les 40 °C (105 °F}
(comme dans les remises ext_rieures ou les b_timents
m_talliques en _t_).
Z_AVERTISSEMENT : Ne jamais tenter d'ouvrir le bloc-piles
pour quelque raison que ce soit. Si le boftier du bloc-piles est fissure
ou endommage, ne pas I'inserer dans un chargeur. Ne pas ecraser,
laisser tomber ou endommager le bloc-piles. Ne pas utiliser un bloc-
piles ou un chargeur qui a regu un choc violent, qui est tombe, a ete
ecrase ou est endommage de quelque maniere que ce soit (p. ex.
perce par un clou, frappe d'un coup de marteau, pietine). Les blocs-
piles endommages doivent _tre envoyes au centre de reparation
pour _tre recycles.
z_AVERTISSEMENT : Risque d'incendie. Ne pas ranger ou
transporter les piles de mani_re h ce que des objets m_talliques
puissent entrer en contact avec les bornes expos_es des piles.
Par exemple, ne pas mettre de pile dans un tablier, une poche, une
bofte a outils, un boftier de rangement, un tiroir, etc. contenant des
objets tels que des clous, des vis ou des dos, Le transport des piles
peut causer un incendie si les bornes des piles entrent en
contact involontairement avec des mati_res conductrices
comme des cl_s, de la monnaie, des outils manuels et d'autres
_l_ments semblables. Selon le reglement HMR du DOT (US
Department of Transportation Hazardous Material Regulations), il est
effectivement interdit de transporter des piles pour le commerce et
dans les avions (c.-a-d. dans les valises et les bagages a main) ,4
MOINS qu'elles ne soient bien protegees contre les courts-circuits.
Pour le transport de piles individuelles, on doit donc s'assurer que les
bomes sont protegees et bien isolees contre toute matiere pouvant
entrer en contact avec elles et provoquer un court-circuit.
REMARQUE :II ne faut pas laisser de piles au LI-ION dans les
bagages enregistr_s.
RECOMMANDATIONS EN MATIERE DE RANGEMENT
1. Le meitleur endroit de rangement est celui qui est frais et sec,
loin de toute tumiere directe et protege d'une temperature extr6me
(chaleur ou froid).
2. Un entreposage protonge ne nuira pas au bloc-piles ou au
chargeur.
PROCEDURE DE CHARGE
Le chargeur standard fourni chargera une
pile completement epuisee en 8 heures
environ.
1. Brancher le chargeur dans une prise
appropriee avant d'inserer le bloc-piles.
2. Inserer le bloc-piles dans le chargeur
comme le montre la figure 1.
_3. Le voyant DEL vert clignotera
indiquant ainsi que la pile est en
cours de charge.
_4. La fin de la charge est indiquee par le voyant DEL vert qui
demeure allume.
Le bloc-piles est charge a plein et peut 6tre utilise ou laisse
sur te chargeur.
Recharger lespiles dpuisdesaussitSt que possible apr_s leur
utilisation pour prolonger leur durde de vie.
FONCTIONS DE DIAGNOSTIC DU CHARGEUR
Ce chargeur est congu pour detecter certains problemes pouvant
_tre associes au bloc-piles ou a la source d'atimentation. Le type de
clignotement de la DEL indique les probtemes.
21
J
Page 22

PILE EN MAUVAIS ETAT
4Bl"_ Le chargeur est en mesure de detecter une pile faibte ou
_J
endommagee. Le voyant DEL rouge ctignoteselon lasequence
indiqueesur t'etiquette.Sila sequence code correspondant a une pile
en mauvaisetatest enclignotement,cesserde recharger tapile.
Retoumer tapileaun centre de reparationou a unsite de cueillette
pour lerecyclage.
FONCTION DE SUSPENSION DU BLOC-PILES CHAUD/FROID
_Lorsque te chargeur detecte qu'une pile est excessivement
chaude ou froide, it commence automatiquement ta
suspension du bloc-piles chaud/froid, la charge est ainsi
interrompue jusqu'a, ce que t'etat de la pile redevienne normal.
Une fois ta temperature revenue 9. la normate, te chargeur
passe automatiquement au mode de recharge du bloc-piles.
Cette fonction assure une duree de vie maximate des piles.
La DEL rouge ctignote de ta maniere indiquee sur t'etiquette
Iorsque la suspension du bloc-piles chaud/froid est detect6e.
PILE LAISSEE DANS LE CHARGEUR
Le chargeur et le bloc-piles peuvent 6tre laisses branches, le voyant
DEL vert demeurant allume. Le chargeur maintiendra le bloc-piles
en bon etat et completement charge.
REMARQUES IMPORTANTES SUR LE CHARGEMENT
1. Pour augmenter la duree de vie du bloc-piles et optimiser son
rendement, le charger b.une temperature situee entre 16 et 27 °C
60 et 80 °F). NE PAS charger le bloc-piles a.des temperatures
nferieures a.4,5 °C (40 °F) ou superieures b.40,5 °C (105 °F). Ces
consignes sont importantes et permettent d'eviter d'endommager
gravement le bloc-piles.
2. Le chargeur et le bloc-piles peuvent devenir chauds au toucher
pendant la recharge. It s'agit d'un etat normal et cela n'indique pas
un probleme. Pour faciliter le refroidissement du bloc-piles apres
son utilisation, eviter de mettre le chargeur ou le bloc-piles dans un
endroit chaud comme dans une remise metallique ou une remorque
non isolee.
3. Si le bloc-piles ne se charge pas adequatement, on dolt :
a. Verifier le courant b. la prise en branchant une lampe ou un autre
appareil etectrique.
b. Verifier si ta prise est reliee a.un interrupteur d'ectairage qui
coupe te courant au moment d'eteindre ta tumiere.
c. Deptacer te chargeur et te bloc-piles a.un endroit oQ la
temperature ambiante est entre 16 °C et 27 °C (60 °F et 80 °F).
d. Si le probteme persiste, apporter ou envoyer l'outit, te bloc-piles
et le chargeur au centre de reparation de votre region.
4. Le bloc-piles dolt 6tre recharge Iorsqu'it n'arrive pas b.produire
suffisamment de puissance pour des travaux qui etaient facilement
realis6s auparavant. NE PAS CONTINUER a.utiliser te bloc-piles
dans ces conditions. Suivre tes procedures de charge. On peut
egatement recharger a. tout moment un bloc-piles partiellement
decharg6 sans affecter sa tongevit6.
5. Tout corps etranger conducteur, tel que notamment la taine
d'acier, le papier d'atuminium ou toute accumulation de particutes
metattiques, dolt 6tre maintenu b.distance des ouvertures du
chargeur. Debrancher systematiquement celui-ci si aucun bloc-piles
n'y est inser6. Debrancher le chargeur avant tout nettoyage.
6. Ne pas congeler le chargeur, I'immerger dans I'eau ou dans tout
autre liquide.
Z_AVERTISSEMENT : Risque de choc _lectrique. E-viter la
Plenetration de tout liquide dans le chargeur. Ne jamais tenter d'ouvrir
e bloc-piles pour quelque raison que ce soil Si le boftier en plastique
du bloc-piles est brise ou fissure, le retoumer 4 un centre de reparation
pour qu'il soit recycle.return to a service center for recycling.
22
Page 23

INDICATEUR DE L'ETAT DE CHARGE (FIGURE B)
Le bloc-piles est pourvu d'un indicateur d'etat de charge. Cet
indicateur peut servir a afficher le niveau actuet de charge d'un bloc-
piles durant t'utitisation et durant ta charge. It ne donne aucune
indication quant au fonctionnement de l'outil. Son propre
fonctionnement pourra aussi varier en fonction des composants
produit, de la temperature et de t'application d'utilisation.
Verification de I'etat de
charge durant rutilisation :
• Enfoncer te bouton de I'indicateur
d'etat de charge (B1).
• Les quatre voyants DEL (B2)
s'allumeront pour indiquer le
pourcentage de charge du bloc-piles.
Consulter le tableau & la figure B.
• Si le voyant & DEL ne s'altume pas,
charger le bloc-piles.
Insertion et retrait du bloc-piles
z_AVERTISSEMENT : S'assurer que te bouton de verrouillage
est bien engage pour emp6cher I'utilisation de la detente avant la
pose ou le retrait de la pile.
INSTALLATION DU BLOC-PILES :
Inserer te bloc-piles darts t'outit de
maniere a bien t'enfoncer et
entendre un dectic (figure C).
S'assurer que te bloc-piles est bien
log0 et enclenche.
RETRAIT DU BLOC-PILES :
Enfoncer le bouton de degagement
du bloc-piles situe au dos du bloc-
piles, puis retirer le bloc-piles de
I'outil.
z_AVE RTI SS EM ENT : Avantlemontage,s'assurerque t'outilest
eteintet que tebloc-pilesa et6 retir&
OL,qqLSREQUISPOUR
UASSEMBLAGE(NONFOURNIS):
- Tournevis cruciforme
_AVERTISSEMENT :
Retirer le bloc-piles avant
d'essayer de fixer I'un des
composants suivants.
FIXATION DU PARE-MAIN
(FIGURES D ET E)
_AVERTISSEMENT :
NE JAMAIS UTILISER
L'OUTIL SANS LE PARE-MAIN
SOLIDEMENT FIXE. Le pare-
main dolt toujours 6tre attache
correctement & I'outil pour
protegert'utilisateur.
• Retirerla visdu pare-main.
•Touten maintenantle pare-
main b.t'equerrede lat6te de
coupe, le gtisseren placede
maniere &entendre le d_lic de
la tanguettede retenue
(s'assurerque les guides (D1)
du pare-main (D2)sont bien
aiignessur ceux (D3)de lat6te
de coupe (D4) (figureD).
• Bienfixer le pare-main au
moyen de tavis (El) (figureE).
23
Page 24

FIXATION DE LA POIGNEE AUXILIAIRE (FIGURES F ET G)
• Pousser ia poignee auxitiaire (F1) sur ie tube (F2).
• Inserer le boulon (G1)dans les orifices pratiquesdans la poignee auxiliaire.
•Serrer le bouton (G2)sur le boulonen letournantdarts lesens horaire.
@
RC:GLER LA POSITION DE
LA POIGNC:E AUXILIAIRE
(FIG. G)
La poignee auxitiaire peut 6tre
regl6e pour assurer un
equilibre et un confort
optimaux.
• Desserrer le bouton du
bouion en le tournant dans le
sens antihoraire.
• Monter ou descendre
doucement la poignee
auxiliaire le long du tube,
jusqu'a, la hauteur souhaitee.
• Serrer le bouton sur le
bouion en te tournant dans le
sens horaire.
REGLAGE DE LA HAUTEUR DE L'OUTIL (FIGURE H)
• Cet outit dispose d'un
mecanisme telescopique O
permettant de le regter
une hauteur confortabte.
Pour regler la hauteur :
• Rel&cher le tendeur pour
regler la hauteur (H1).
• Monter ou descendre
doucement le tube (H2) b.la
hauteur souhaitee.
• Fermer le tendeur pour
regler la hauteur (H1).
LIBERATION DU FIL DE COUPE
Durant le transport, le fil de coupe est cotle au bo'ffier de la bobine.
• Retirer le ruban adhesif retenant le fil de coupe au bo'ffier de la
bobine.
z_AVERTISSEMENT: Toujours utiliser uneprotection ocutaire
appropriee conforme a la norme ANSI Z87.1 (CAN/CSA Z94.3) Iors
de l'utitisation de cet outil electrique.
z_MISE EN GARDE : Inspecter la zone qui sera taitlee et
retirer tout morceau de fil metaltique, de corde ou d'objets simitaires
qui pourraient s'enchev6trer dans te fit rotatif ou avec la bobine.
Etre specialement attentif et eviter, sur le parcours de t'outil, tout fil
metattique courbe vers l'exterieur comme les ills au pied d'une
cl6ture a maitles Iosangees.
24
Page 25

REGLAGE DE L'OUTIL POUR LA TAILLE OU LA COUPE EN
BORDURE
(FIGURE I,J ET K)
• L'outil peut 6tre utilise pour
la tailte comme le montre ta
figure I ou pour la coupe en
bordure pour couper l'herbe
haute sur les bords du
parterre et le long des
massifs de fleurs comme le
montre la figure K.
MODE DE TAILLAGE
Pour ta taitte, lat6te de coupe
doit 6tre dans la position '%-
indiquee a la figure I. Si ce ',,,',
n'est pas le cas :
• Retirer le bloc-piles de t'outil.
• Enfoncer le bouton de
degagement de la t6te (11)et
le maintenir dans cette
position.
• Tout en tenant la poignee
auxitiaire, tourner ta t6te dans te sens horaire.
• Relb.cher le bouton de degagement de la t6te.
• Soutever teguide de coupe (J1) et le mettre en position fermee.
Remarque : Lat6te ne pivote que dans un seul sens.
ZLCAUTION: Wire edge guide should only be used when in the
edging mode. Keep wire edge guide in the retracted position when in
the trimming mode.
MODE DE COUPE-BORDURES (FIGURE K)
Pour la coupe en bordure, la t6te de coupe doit se trouver dans la
position indiquee par la figure K. Si ce n'est paste cas :
• Retirer le bloc-piles de t'outit.
• Enfoncer te bouton de degagement de la t6te (K1) et le maintenir
dans cette position.
• Tout en tenant la poignee auxiliaire, tourner la t6te dans le sens
antihoraire.
• Rel&cher le bouton de
degagement de tat6te.
• Deptacer le guide de coupe
(K2) b.ta position ouverte.
S'assurer que le guide de
coupe est bien descendu; un
dectic se fera entendre.
Remarque : Lat6te ne pivote
que dans un seul sens.
Remarque : Lesysteme
d'atimentation automatique
risque de mal fonctionner si le guide de coupe n'est pas utilise.
MISE EN MARCHE ET ARRET
• Pour allumer I'outil, enfoncer
le bouton de verrouiltage (L1)
et le maintenir dans cette
position, puis serrer le tevier
de dectenchement (L2). Une
fois l'outil en marche, te
bouton de verrouillage peut
6tre relb.che (L1).
• Pour eteindre t'outil, rel&cher
le levier de declenchement.
z_AVERTISSEMENT:
Ne jamais tenter de verrouiller le levier de declenchement en position
de marche.
PUISSANCE MAX./DUREE D'EXECUTION MAX.
La fonction de puissance max./duree d'execution max. (M1) se trouve
sur la poignee de t'outil. Cette fonction permet d'optimiser le
rendement de I'outit et d'augmenter sa puissance au besoin.
• Regler le cadran a la position 6 pour choisir ta puissance max. et
ainsi s'attaquer aux mauvaises herbes denses.
25
Page 26

•Reglerlecadrana.la position
1pour choisir la duree
d'execution max. et ainsi
augmenter la duree de vie du
bloc-piles.
• Regler le cadran de la
position 2 b.5 pour obtenir une
combinaison des deux
fonctions.
FONCTIONNEMENT DU
TAILLE-BORDURES
•TenirI'outilcomme ilestindique &la figureN.
•Maintenirun anglede coupe entre 5°et 10°comme
lemontre la figureN. Ne pas exc_er 10° (figureN1).
Couper avec le boutdu fil.Pour se tenir &distancedes
surfaces dures, utiliserle guide de coupe (7).Sortir le
guidede maniere &bien l'enclencher en place.
•Maintenirune distance minimalede 609,6 mm (24
po) entrete dispositifde protectionet vos pieds,
comme temontre lafigure N3. Pourobtenir cette
distance, r_ter lahauteur globaledu taille-bordures
comme temontre tafigure G.
,/
I:LJ
COUPE EN BORDURE
Les meitleurs resultats de
coupe sont obtenus sur des
bords de plus de 50 mm (2
PO)de profondeur.
• Ne pas utiliser l'outil pour
creer des bordures.
• Guider I'outil comme il est
indique & la figure O.
• Pour couper de plus pros,
incliner legerement I'outil.
CONSEJOS UTILES PARA
CORTAR
• Utilicelapuntadela cuerdapara
realizarelcorte;no empujeel
cabezalde lacuerda contrael
cespedsincortar.Paratogrartrabajosdecatidad,utJlicelaguia de bordea Io
largode elementoscomo cercos,casas ycanteros.
• Loscercosde alambrey de estacasprovocanun mayordesgastede lacuerda
einclusosurotura.Losmuros depiedray tadrillo,lascunetasy lamadera
puedendesgastarlacuerda rb.pidamente.
• Nopermitaque latapadel carretese arrastresobreetsuelo uotrassuperficies.
• En crecimientoslargos,cortedesdearribahaciaabajo y no excedauna altura
de304,8 mm(12 purgadas).
• Mantengatapodadorainclinadahaciael b.reaque se corta;&staes lamejor
b.reade corte.
• La podadoracortaal moverla unidaddederecha aizquierda.Estoevitarb,que
searrojenrestosaJusuario.
• Eviteb.rbotesyarbustos.La cuerda f&cilmentepuede dafiar lacorteza de
b.rboles, tas motduras de madera, los revestimientos exteriores y los
pilares de cercos.
(609.6 ram)
Fil de coupe/AVANCE DU FIL
Votre taitle-bordures utilise un fil de nylon ROND de 1,65 mm
(0,065 po) de diametre. En cours d'utilisation, tes extremit6s des
ills de nylon s'effilocheront et s'useront. La bobine speciale &
26
Page 27

avance automafique de fil fournira et coupera automatiquement
une nouvetle Iongueur de ill. Ne pas flapper t'appareil sur le sot
pour atimenter l'appareil ou pour toute autre raison.
Le fil tranchant s'usera et sera avance plus rapidement si ta
coupe ou te taillage s'effectue le long de trottoirs ou d'autres
surfaces abrasives ou si des mauvaises herbes touffues sont
coupees.
ZLMISE EN GARDE : Avant de proc_der autaillage, s'assurer
d'utiliseruniquement tetype de filde coupe adequat.Utiliserla bobinede
rechange modeleAF-100 de Black & Decker.Rechargerle filde nylon (en
vrac ou pr6enroutesur la bobinede rechange) selon les directivesde ce
mode d'emptoi.
• UTILISER UNIQUEMENT UN FILDE NYLON ROND
(MONOFILAMENT) DE 1,65mm (0,065 po) DE DIAM#TRE. Ne pas utiliser
de fil dentele ou de plusgros calibre,car ces ills surchargeront le moteuret
provoqueront une surchauffe. Ce filest disponibte aupres du detaltlantlocal
ou du centrede reparation agr6&
• D'autres pieces de rechange (pare-mains,couvercles de bobine,etc.)
sont offertesaux centres de reparationBlack & Decker.Pourtrouver le
centre de reparationlocal, composer le : 1800 544-6986 ouconsulter
z_www,blackanddecker.com.
AVERTISSEMENT:
L'utilisation de tout accessoire
non recommande par Black &
Decker, avec cet outil,
pourrait s'averer dangereuse.
REMPLACEMENT DE LA
BOBINE (FIGURES P, Q ET
R)
• Retirer le bloc-piles de
I'outil.
• Enfoncer les languettes (P1)
et retirer le couvercte de ta
bobine (P2) du boftier de la
bobine (P3) log0 dans la t6te
du taitle-bordures (figure P).
• Pour obtenir des resuttats
optimaux, remptacer la
bobine par une bobine de
modele AF-100 de Black &
Decker.
• Tenir ta bobine vide d'une
main et le boftier de bobine
de l'autre, puis sortir la
bobine en tirant dessus.
• Si le levier (Q1), situe b. la
base du boftier, se detache,
le remettre & la bonne
position avant d'inserer la
bobine neuve dans le boftier.
• Retirer l'herbe et les satetes
presentes dans la bobine et
le boftier.
• Detacher I'extremit6 du fil
de coupe et te faire passer
dans I'ceillet (R2), figure R.
• Prendre ta bobine neuve et
I'enfoncer sur la sailtie (Q2)
du boftier. Faire pivoter
leg6rement la bobine jusqu'& ce qu'etle soit bien installee.
Le fit doit sortir d'environ 122 mm (4 13/16 po) du boftier.
• Aligner les languettes du couvercte de la bobine sur les
encoches (R1) du boftier (figure R).
• Enfoncer le couvercte sur le boftier de maniere ace qu'il
s'enclenche bien en place.
O
MISE EN GARDE : Pour eviter d'endommager I'outil, si le fit
depasse la tame de coupe, le couper de fagon & ce qu'il atteigne
seutement la lame.
27
Page 28

REMBOBINER LA BOBINE (UTILISER UNIQUEMENT UN FIL ROND
DE 1,65 MM (0,065 PO) DE DIAMETRE) (FIGURES S, T ET U)
REMARQUE : Le fit en vrac des bob_nes enroulees b.ta main est
susceptible de s'enchev6trer plus souvent que le fit des bobines
enroulees dans une usine Black & Decker.Pour obtenir des
resultats optimaux, il est recommande d'utiliser des bobines
embobinees a I'usine.
Suivre tes etapes ci-dessous pour installer du ill:
•Retirer lebloc-piles de l'outil.
• Retirer ta bobine vide de
I'outil comme le decrit la
section ,, REMPLACEMENT
DE LA BOBINE _,.
• Retirer tout te reste de fil de
coupe de la bobine.
• Replier I'extremit6 du fit de
coupe d'environ 19 mm (3/4
po) (Sl). Inserer le fil de
coupe darts I'une de ses en
coches d'ancrage (S2)
comme le montre la figure S.
• Inserer I'extremit6 de 19mm
(3/4 po) du fit en vrac darts
I'orifice (T1) de la bobine,
juste b.c6te de t'encoche,
comme le montre la figure T.
• Enrouler le fit de coupe sur la bobine dans
le sens indique par la fteche inscrite sur la
bobine. Prendre soin d'enrouter te fit de
fa(_onnette et ordonnee par couches
successives. Ne pas croiser le fit (figure U).
• Couper le fil de coupe enroute Iorsqu'il
atteint tes encoches (T2). (Figure T.)
• Ajuster la bobine sur I'outil comme le
decrit la section - REMPLACEMENT DE
LA BOBINE ,,.
LE SCEAU SRPRC Mc
Le sceau SRPRC Mc(Societ6
de recyctage des piles
rechargeabtes) sur la pile au
lithium-ion (ou sur le bloc-
piles) indique que son coot de
recyclage (ou celui du bloc-piles) b.la fin de sa vie utile est dejb. paye
par
Black & Decker.
La SRPRC Mc,en collaboration avec Black & Decker et d'autres
utilisateurs de piles, a etabli aux €:tats-Unis des programmes facititant
le ramassage des piles au LI-ION epuis6es. Aidez-nous a proteger
I'environnement eta. conserver nos ressources natureltes en
retournant tes piles LI-ION epuis6es a un centre de reparation
Black & Decker ou au detaillant de votre region pour qu'elles soient
recyctees. Vous pouvez aussi communiquer avec le centre de
recyctage de votre region pour obtenir des informations sur l'endroit
oQeliminer vos piles epuis6es. SRPRC Mcest une marque de
commerce depos6e de la Societ6 de recyclage des piles rechargeabtes.
Z_AVERTISSEMENT : Pour eviter des blessures graves,
eteindre et debrancher I'outit avant d'effectuer toute operation
d'entretien.
28
Page 29

1.Maintenirlesorificesdeventilationdegag6spoureviterlasurchauffe.
2.Votrefitrotatifpeutsecheravecletemps.Pourtenirvotrefiten
excetlentecondition,entreposerlesbobinesderechangedefil
pre-enroul6outefilenvracdansunsacenptastiquescelle
contenantl'equivalentd'unecuittereed'eau.
3.Lespiecesenptastiquesenettoientavecunsavondouxetun
chiffonhumide.
4.Lecoupe-illsurleborddudispositifdeprotectionpeuts'emousser
avecletemps.IIestrecommandedes'assurerregutierement
quelalameestbientranchanteenutilisantunelime.
IMPORTANT:PourgarantirlaSECURITEettaFIABILIT¢:du
produit,lesreparations,I'entretienetlereglagedoivent6trereatis6s
paruncentredereparationautoriseoutoutautrecentrede
reparationprofessionnel,etdespiecesderechangeidentiques
doivent6treutitisees.
PROBLI_ME SOLUTION
L'outil fonctionne lentement.
Laalimentaci6n autom&tica de cuerda
no alimenta m&s cuerda.
• Retirer la pile de I'outil.
Verifier que le boftier de la bobine
peut tourner librement. Le nettoyer
avec precaution si necessaire.
• S'assurer que le fil de coupe
sort d'au plus 136 mm (5 3/8
po) de la bobine. Le cas
ech6ant, le couper afin que sa
Iongueur atteigne juste la lame
de coupe pour le ill.
• Retirer la pile de I'outil.
• Enlever le capuchon de la bobine.
• Tirer sur le fil de coupe de
maniere ace qu'il sorte d'environ
136 mm (5 3/8 po) de la bobine. Si
la Iongueur de fil restant sur la
bobine est insuffisante, installer une
nouvelle bobine de ill.
29
PROBLI_ME
Laalimentaci6n autom&ticade cuerda no
alimenta m&scuerda.
SOLUTION
• S'assurer quele fll n'estpas entrecroise
sur labobine comme I'illustre la figure
U. Si c'est le cas, derouler le fil de
coupe, puis I'enrouler de nouveau
sur labobine de fagon ordonnee,de
maniere a ne pas entrecroiser les ills.
• Aligner les languettes, Iogees sur
le couvercle de la bobine, sur les
fentes pratiquees dans le boftier.
• Enfoncerlabobinesurlebofiierdemanbre&
cequ'elles'enclenchebienenpace.
•Inspecterlesrainurespratiqueessousla
bobine&larecherchededommages.Encas
dedommages,remFlacerlabobine.
• Urelecodeinscrit& I'endosde labobine.Sile
codeest_,PA66,,,appebrleservice&la
dbnteb pourfaireremplacerlabobine.
Sib codeindiqubest,,ABS,,,cen'estpasle
probbme.
• Si le filde coupe depasse la lame
de coupe, lecouper de fagon ace
qu'il atteigneseulement la lame. Si
I'alimentationautomatique de filne
fonctionne toujours pasou si la
bobine se bloque,proceder comme suit :
• Nettoyer avec precaution la bobine
et son boftier.
• Retirer la bobine, puis verifier si le
levier, situe dans le boitier de la
bobine, peut se deplacer librement.
• Retirer la bobine et derouler le fil
decoupe, puis I'enrouler a nouveau
de fagon ordonnee. Remettre la
bobine dans le boftier.
Page 30

PROBLI_ME
Alimentation excedentaire
Le fil se deroule Iorsque la bobine ou
le capuchon est enleve.
SOLUTION
• S'assurer de couperavec le boutdu fll
(177,8mm [7po] de la bobine).
Utilisele guide de coupe si necessaire
pour maintenir la bonnedistance.
• S'assurer de ne pas exceder un angle
de 10°comme le montre la figure N1.
• S'assurer de fixerles ills dans les
encoches de retenue (T2) (figureT) avant
le retrait.
Tousles centres de reparation Black & Decker sont dotes de
personnel qualifie en matiere d'outillage electrique; its sont donc en
mesure d'offrir a teur clientele un service efficace et fiable. Que ce
soit pour un avis technique, une reparation ou des pieces de
rechange authentiques instattees en usine, communiquer avec
I'etablissement Black & Decker le plus pros de chez vous. Pour
trouver I'etabtissement de reparation de votre region, consulter le
repertoire des Pages jaunes & la rubrique ,, Outils etectriques ,_ou
composer le numero suivant : 1-800-544-6986 ou consulter le site
www.blackanddecker.com
Black& Decker (€:.-U.)Inc.garantitce produit pourune duree detrois ans
contre toutdefaut de materiauou de fabrication.Le produitdefectueuxsera
remplaceou repar6sans fraisde I'unedes deux fagonssuivantes :
La premiere fagonconsiste enunsimple echange chez tedetaillantqui t'a
vendu (pourvuqu'ils'agisse d'un detaillantparticipant).Toutretourdoitse
fairedurant la periodecorrespondant a la politiqued'_hange du detaillant
(habitueltement,de 30 a90 joursapres l'achat).Unepreuve d'achat peut
6trerequise. Verifieraupres du detaillantpour connaftresa potitique
concernantles retourshorsde laperiodedefinie pour lesechanges.
Ladeuxieme option est d'apporterou d'envoyerle produit (transportpaye
d'avance)a uncentre de reparationautorise ou auncentre de reparationde
Black& Decker pourfairereparerou echanger teproduit,a notre discretion.
Une preuved'achat peut6tre requise.Lescentres Black& Deckeretles
centresde service autorises sont repertori6sdans les pagesjaunes, sous la
rubrique, Outils electriques,_.Cettegarantie ne s'apptiquepas aux
accessoires.Cettegarantie vous accorde des droitslegauxspecifiques et
vous pourriezavoird'autres droitsquivarient d'un Etatou d'une province
I'autre.Pourtoutequestion,communiquer avec tedirecteurdu centre de
reparationBlack &Decker leplus pres de chezvous. Ce produit n'est pas
destineb.un usage commercial.
REMPLACEMENT GRATUIT DES ETIQUETTES
D'AVERTISSEMENT :si les etiquettes d'avertissement deviennent
illisibtes ou sont manquantes, composer le 1 800 544-6986 pour en
obtenir le remptacement gratuit.
Imported by
Black & Decker (U.S.) Inc.,
701 E. Joppa Rd.
Towson, MD 21286 U.S.A.
3O
See 'Tools-Electric'
- Yellow Pages -
for Service & Sales
Page 31

DE PODADORA/BORDEADORA
DE LITIO DE 36 V
MANUAL DE INSTRUCCIONES
LEA EL MANUAL ANTES DE DEVOLVER
ESTE PRODUCTO POR CUALQUIER MOTIVO:
Sitieneunaconsultao algQninconvenienteconsuproducto
Black&Decker,visite
HTTP://WWW.BLACKANDDECKER.COM/INSTANTANSWERS
paraobtenerrespuestasinstant&neaslas24horasdeldia.
SinoencuentralarespuestaonotieneaccesoaInternet,Ilameal
1-800-544-6986dehnesaviernesde8a.m.a5p.m.horadelEstepara
hablarconunagente.
CuandoIlame,tengaamanoelnemerodecat&logo.
31
Model # LST136
INFORMACION CLAVE QUE DEBE SABER:
• El protector debe instalarse antes de podar o bordear. De
Io contrario, el motor se sobrecalentar&.
• AI reemplazar la cuerda, utilice s61ouna cuerda REDONDA
de 1,7 mm (0,065 pulgada) de di_tmetro (Se recomienda el
modelo N° AF-IO0 de B&D). De Io contrario, la unidad no
funcionar& correctamente.
• No golpee el cabezal de alimentaci6n contra el piso. Esto
interrumpir& el mecanismo de alimentaci6n.
Page 32

PAUTAS DE SEGURIDAD/DEFINICIONES
Es importante que lea y comprenda este manual. La informacion
que contiene s.e relaciona con ta proteccion de SU SEGURIDAD y
la PREVENClON DE PROBLEMAS. Los simbotos que siguen se
utitizan para ayudarlo a reconocer esta informacion.
,/_ PELIGRO: indica una situacion de peligro inminente que, si no se
evita, provocara la muerte o lesiones graves.
/_ ADVERTENCIA: indica una situacion de peligro potencial que, si
no se evita, provocara la muerte o tesiones graves.
,/_ PRECAUCl0N: indica una situacion de peligro potencial que, si no
se evita, provocara tesiones teves o moderadas.
AVISO: utitizado sin el simboto de alerta de seguridad indica una
situacion de peligro potencial que, si no se evita, puede provocar dados
en la propiedad.
ZLADVERTENCIA: At utitizar herramientas etectricas para et
jardin, siempre se deben tomar ciertas precauciones b&sicas de
seguridad para minimizar et riesgo de incendio, descarga electrica y
lesiones personates, entre elias:
Lea todas las instrucciones
• SIEMPRE UTILICE PROTECCION PARA LOS OJOS: utilice
_afas o anteojos de seguridad en todo momento que esta
erramienta este enchufada.
• PROTECTOR: nunca utilice esta herramienta sin el protector.
• UTILICE LA VESTIMENTA ADECUADA: no utilice ropa holgada
ni joyas. Pueden atascarse en tas piezas moviles. Se recomienda
utilizar guantes de goma y catzado con una suela de goma
considerable at trabajar al aire tibre. No opere ta herramienta
descalzo ni con sandalias abiertas. Utitice pantalones largos para
protegerse las piernas. Recojase y cubra el cabello largo.
• CUERDA DE NYLON: mantenga la cara, las manos y los pies
lejos de la cuerda de nylon giratoria en todo mome.nto.
• LA CUERDA GIRATORIA REALIZA UNA FUNClON DE CORTE:
tenga precaucion alpodar atrededorde pantatlasy ptantasque desea.
• MANTENGA ALEJADOS A TODOS LOS ESPECTADORES: a
una distancia segura, especialmente a los nirios.
• ADVERTENClA IMPORTANTE: al utilizar ta herramienta como
Bordeadora, las piedras, las piezas de metal y otros objetos
pueden ser arrojados a atta velocidad por la accion de la cuerda.
La herramienta y el protector est&n diseriados para reducir el
peligro. No obstante, se deben tener en cuenta las siguientes
precauciones especiates:
• ASEGURESE de que las demb.s personas y mascotas esten a no
menos de 30 m (100 pies) de distancia.
• PARA REDUClR EL RIESGO de lesiones por repercusion
(rebote), trabaje tejos de cualquier objeto sotido cercano, como
pared, escalones, piedras grandes, b.rbotes, etc. Tenga suma
precaucion al trabajar cerca de objetos sotidos y, cuando sea
necesario, pode o recorte los bordes en forma manual.
• EVlTE EL ARRANQUE ACCIDENTAL: nunca transporte la
herramienta enchufada con el dedo en et interruptor.
• NO FUERCE LA HERRAMIENTA: a una velocidad m&s r&pida
de ta velocidadpara laque fue diseriada para cortaren forma eficaz.
• UTILICE LA HERRAMIENTA ADECUADA: no utilice esta
herramientapara untrabajodiferentea aquellosparalos que fue diseriada.
• NO SE ESTIRE: conserve et equilibrio adecuado y mantengase
parado correctamente en todo momento.
• DANO A LA UNIDAD: si golpea la herramienta o esta se atasca
con un objeto extrario, detengala de inmediato, desenchOfela,
verifique que no se haya dariado y repare cualquier dario antes
de seguir utilizb.ndota. No opere la herramienta si la bobina o el
carrete est&n dariados.
DESCONECTE LA HERRAMIENTA: cuando no la utilice, al
reemplazar la cuerda o antes de limpiarta.
EVlTE LAS CONDIClONES AMBIENTALES PELIGROSAS: no
utitice herramientas electricas en lugares hOmedos o mojados.
32
Page 33

SigatodaslasinstruccionesinctuidasenesteManualde
instruccionesparaunaoperacionadecuadadelaherramienta.
Noutilicelaherramientabajolalluvia.
NOOPEREherramientasetectricasport&tilesenatmosferas
gaseosasoexptosivas.Losmotoresdeestasherramientas
normalmentechispean,ylaschispaspuedenencenderlosvapores.
GUARDE LAS HERRAMIENTAS QUE NO SE UTILICEN EN EL
INTERIOR: cuando no las utilice, las herramientas deben
guardarse en un lugar seco, alto o bajo ltave, fuera del alcance de
los nidos.
• MANTENGASE ALERTA: No haga funcionaresta unidad siest&
cansado, enfermoo bajo la influenciadel alcohol,drogas o medicamentos.
CONSERVE LAS HERRAMIENTAS ADECUADAMENTE: siga
las instrucciones en la seccion de mantenimiento. Mantenga los
mangos secos, limpios y libres de aceite y grasas.
VERIFIQUE LAS PIEZAS AVERIADAS: antes de votver a utitizar
la herramienta, se debe controtar cualquier proteccion u otra
pieza que este averiada para determinar si funcionar&
correctamente y realizar& la funcion para la que fue diseriada.
Verifique la alineacion y la sujecion de tas piezas moviles, ta
rotura de piezas, el montaje y cualquier otra condicion que pueda
afectar el funcionamiento. Cualquier proteccion u otra pieza que
este dariada debe ser reparada correctamente o reemptazada por
un centro de mantenimiento autorizado, a menos que este
manual indique otra cosa.
• NO sumerja la herramienta en agua ni la satpique con una
manguera. NO permita que ningQn tiquido entre en ella.
• NO guarde ta herramienta sobre o cerca de fertilizantes o
productos quimicos.
• NO limpie con una tavadora a presion.
• Mantenga los protectores instalados adecuadamente y en
funcionamiento.
• Mantenga las manos y los pies atejados del &rea de corte.
1. Interruptor de
encendido/apagado
2. Mango
3. Boton de bloqueo
4. Bateria
5. Indicador de carga
6. Control de potencia
7. Mango auxiliar
8. Abrazadera de
bloqueo para ajuste de
altura
9. Cabezal de la
podadora
10. Guia de borde
ZhADVERTENCIA: No utilice la herramienta si et gatitlo interruptor
no enciende o apaga la herramienta. Toda herramienta que no
pueda controtarse mediante el gatillo interruptor es peligrosa y debe
repararse.
11. Protector
12. Cubierta del carrete
33
Page 34

CONSERVE ESTAS INSTRUCCIONES
La etiqueta de su herramienta puede incluir los siguientes simbotos.
Los simbotos y sus definiciones son los siguientes:
V .............. vottios
Hz ............ hertz
min ............ minutos
- - -. ......... corriente continua
[] .............. Construccion de ctase II
z_ ............simboto de alerta de
seguridad
Z_ADVERTENCIA: Parte del polvo generado por este producto
contiene sustancias quimicas reconocidas por el Estado de
California como causantes de c_ncer, defectos congenitos u
otros problemas reproductivos. Algunos ejemplos de estas
sustancias quimicas:
• compuestos en los fertilizantes
• compuestos en los insecticidas, herbicidas y pesticidas
• arsenico y cromo de ta madera con tratamiento quimico
Para reducir su exposicion a estas sustancias quimicas, utilice el
equipo de seguridad aprobado, como mascaras para potvo
especialmente disedadas para filtrar particutas microsc6picas.
CONSERVE ESTAS INSTRUCCIONES: Este manual contiene
instrucciones de seguridad importantes para los cargadores de
baterias.
• Antes de utilizar el cargador, lea todas las instrucciones y las
A ............ amperios
W ............ vatios
"_ .......... corriente atterna
no ............ no vetocidad sin
carga
........terminal atierra
.../min ......revotuciones o
reciprocidad por minuto
seguridad
prevenciones en el cargador, en el paquete de baterias y en el
producto que utiliza el paquete de baterias.
Z_ADVERTENCIA: Riesgo de descarga el_ctrica. No permita que
ningQn tiquido entre en el cargador.
Z_PRECAUCl6N: Riesgo de quemaduras. Para reducir el riesgo
de tesiones, cargue sotamente baterias Black & Decker. Otros tipos
de baterias pueden estallar y provocar dados personates y materiates.
z_PRECAUCl6N: En determinadas circunstancias, con el cargador
enchufado en et tomacorriente, algunos materiates extrados pueden
_arOVocarun cortocircuito en et cargador. Se deben mantener lejos de
s cavidades del cargador los materiates extrados de naturateza
conductora, entre los que se inctuyen la lana de acero, el papel de
aluminio o cualquier acumulacion de particutas met&ticas. Estos son
solo algunos ejemplos y no constituyen una lista taxativa. Siempre
desenchufe el cargador del tomacorriente cuando no haya un
paquete de baterias en la cavidad. Desenchufe el cargador antes de
intentar limpiarto.
• NO intente cargar el paquete de baterias con otros cargadores
que no sean de la marca. Los cargadores y los paquetes de
baterias estan disefiados especificamente para trabajar juntos.
• Estos cargadores estan disehados para utilizarse
exclusivamente con las baterias recargables Black & Decker
designadas. Otros usos pueden provocar riesgo de incendio,
descarga electrica o electrocucion.
• No exponga el cargador a la Iluvia ni a la nieve.
• Para desconectar el cargador o los cables para cadena de
margarita, tire del enchufe en lugar del cable. Esto reducira el
riesgo de dafiar el enchufe o el cable.
• Asegt_rese de que el cable est_ ubicado de modo que no Io pise
o se tropiece con _1y que no est_ sujeto a dahos o tensiones de
alguna otra forma.
• No utilice un cable prolongador a menos que sea
absolutamente necesario. El uso de un cable prolongador
incorrecto puede provocar riesgo de incendio, descarga electrica o
electrocucion.
34
Page 35

• Para garantizar la seguridad, un cable prolongador debe tener
un tamaho de cable adecuado (AWG o Calibre de conductor de
Estados Unidos). Cuanto mas pequefio sea el numero de calibre
del conductor, mayor sera la capacidad del cable; es decir, un
calibre 16 tiene mas capacidad que un calibre 18. Cuando se utiliza
mas de una prolongacion para Iograr la Iongitud total asegurese de
que cada prolongacion tenga la medida minima del conductor.
Tamaho minimo recomendado del conductor
para los cables de extensibn
Volts
120V
240V
Amperaje
0 6 18
6 10 18
10 12 16
12 16 14
Calibre minimo para cables de extensibn
Longitud total del cable en pies
0-25 26-50 51-100 101-150
(0-7,6m) (7,6-15,2m) (15,2-30,4m) (30,4-45,7m)
0-50 51-100 101-200 201-300
(0-15,2m) (15,2-30,4m)(30,4-60,9m)(60,9-91,4m)
M&sde No masde
16 16 14
16 14 12
16 14 12
12 No serecomienda
American Wire Gage
• No coloque objetos en la parte superior del cargador ni
coloque el cargador en una superficie blanda que pueda
bloquear las ranuras de ventilacibn y provocar un calor
interno excesivo. Coloque el cargador en una posicibn
alejada de cualquier fuente de calor. El cargador se ventita a
traves de ranuras en la parte superior e inferior de la cubierta.
• No monte el cargador en la pared ni Io instale en forma
permanente sobre ninguna superficie. El cargador est&
disedado para ser utilizado sobre una superficie plana y estable
(p. ej., un banco o una mesa).
• No opere el cargador con cables o enchufes dahados:
reemplacelos de inmediato.
• No opere el cargador si _ste ha recibido un golpe fuerte, se
ha caido, o se ha dahado de cualquier otra manera. L/eve/o a un
centro de mantenimiento autorizado.
• No desarme el cargador; 116veloa un centro de mantenimiento
autorizado cuando se requiera mantenimiento o una
reparacibn. El armado incorrecto puede impficar un riesgo de
descarga electrica, electrocucion o incendio.
• Antes de limpiarlo, desconecte el cargador del tomacorriente.
Esto reducira el riesgo de descarga electrica. Quitar el paquete de
baterias no reducira este riesgo.
• NUNCA intente conectar 2 cargadores juntos.
• El cargador esta disehado para operar con corriente el_ctrica
dom_stica estandar (120 voltios). No intente utilizarlo con otro
voltaje.
ZLADVERTENCIA: Para un funcionamiento seguro, lea #ste y
todos los manuales de instrucciones incluidos con la herramienta
antes de usar el cargador.
Et paquete de baterias inctuido en ta caja no est& comptetamente
cargado. Antes de utilizar el paquete de baterias y et cargador, lea
las instrucciones de seguridad a continuacion. Luego, siga los
procedimientos de carga descritos.
LEA TODAS LAS INSTRUCCIONES
• No incinere el paquete de baterias, aun si tiene dahos
importantes o est& completamente desgastado. Elpaquete de
baterias puede explotar en el fuego. Cuando se queman los
paquetes de baterias, se generan vapores y materiales toxicos.
• No cargue ni use la bateria en atmosferas explosivas, como
ambientes en los que hay liquidos, gases 0 polvo inflamables.
Insertar 0 retirar la bateria del cargador puede encender el polvo 0
los vapores.
• Si el contenido de las baterias entra en contacto con la piel,
35
Page 36

lave el _rea de inmediato con agua y jabon suave. Si el liquido
de la bateria entra en contacto con los ojos, enjuague con agua
manteniendo los ojos abiertos durante 15 minutos o hasta que la
irritacion cese. Si se necesita atencion medica, el electrofito de las
baterias de iones de fitio contiene una mezcla de carbonatos
organicos liquidos y sales de fitio.
• El contenido de las c_lulas de la bateria abierta puede causar
irritacion respiratoria. Respire aire fresco. Si los sintomas
persisten, busque atencion medica.
%ADVERTENClA: Riesgo de quemaduras. El liquido de labateria
puede encenderse si se expone a chispas o llamas.
• Cargue los paquetes de batedas sotamente en cargadores
Black & Decker.
• NO salpique ni sumerja en agua u otros liquidos. Estopuede
causar una falla prematura de las celulas.
• No almacene ni utilice la herramienta y el paquete de baterias
en lugares en los que la temperatura pueda alcanzar o superar
los 40 °C (105 °F) (como en toldos at aire libre o construcciones de
metal en verano).
_ADVERTENCIA: Nunca intente abrir el paquete de baterias
por ningun motivo. Si la caja del paquete de baterias esta agrietada
o dadada, no la introduzca en el cargador. No comprima, deje caer
ni dade el paquete de baterias. No utilice un paquete de baterias o
un cargador que haya recibido un golpe fuerte, se haya caido, este
agotado o dadado de alguna forma (por ejemplo, perforado con un
clavo, golpeado con un martillo, pisado). Los paquetes de baterias
dadados deben devolverse al centro de mantenimiento para su reciclado.
_ADVERTENClA: Riesgo de incendio. No guarde o
transporte la bateria de ninguna manera que permita que los
terminales expuestos de la bateria entren en contacto con
objetos met_licos. Por ejemplo, no cotoque ta bateria en delantales,
botsiltos, cajas de herramientas, cajas de juegos de productos,
cajones, con clavos, tornittos, Ilaves sueltos, etc. Transportar
baterias puede provocar incendios si los terminales de la bateria
entran en contacto accidentalmente con materiales conductores
como Ilaves, monedas, herramientas manuales y similares. Las
Normas para Materiales Peligrosos del Departamento de
Transporte de los EE.UU. (HMR) concretamente prohiben
transportar baterias comercialmente o en aviones (es decir,
empacadas en maletas y equipaje de mano) A MENOS que esten
debidamente protegidas de cortocircuitos. Por Io tanto, cuando
transporte batedas individuates, asegQrese de que los terminates de
la bateda esten protegidos y bien aislados de materiates que puedan
hacer contacto y causar un cortocircuito. NOTA: Las baterias de
IONES DE LITIO no deben guardarse en el equipaje que se
despacha.
RECOMENDAClONES CON RESPECTO AL ALMACENAMIENTO
1. El mejor lugar de atmacenamiento es uno que sea fresco y seco
fuera de la luz solar directa y de un exceso de calor o frio.
2. El almacenamiento protongado no dadarb, el paquete de baterias
o el cargador.
PROCEDIMIENTO DE CARGA
El cargador est&ndar suministrado carga una bateria totalmente
descargada en 8 horas.
1. Enchufe el cargador en un tomacorriente adecuado antes de
insertar et paquete de baterias.
2. Introduzca el paquete de baterias en el cargador como se
muestra en la figura A.
t_3. Et indicador LED verde desteltara
indicando que la bateria se esta.
cargando.
_4. La bateria esta. completamente
cargada cuando et indicador LED
verde permanece encendido
continuamente. Et paquete esta.
completamente cargado y puede
utilizarse en este momento o
dejarse en el cargador.
Despu_s del uso, recargue las baterias
descargadas a la brevedad posible o de
Io contrario la vida _til de las baterias podria acortarse en gran
medida.
36
Page 37

DIAGNOSTICO DEL CARGADOR
Este cargador esta. dise_ado para detectar ciertos problemas que
pueden surgir con los paquetes de baterias o el cargador. Los
problemas se indican mediante el indicador LED b.mbar, que
destella en diferentes patrones.
BATERIA DANADA
_Et cargador puede detectar una bateria debit o da_ada. Et
indicador LED destetlara, en et patron indicado en la etiqueta.
Si observa este patron de destello de bateria dadada, no
contint_e cargando la bateria. Devuelvala a un centro de
mantenimiento o a un lugar de recoteccion para reciclado.
RETRASO POR PAQUETE CALIENTE/FRIO
_Cuando el cargador detecta que la bateria esta.
excesivamente caliente o fria, comienza un Retraso por
paquete caliente/frio, y suspende la carga hasta que la
bateria se haya normatizado. Despues que ocurra esto, el
cargador cambia automb.ticamente al modo de Paquete
cargando. Esta funcion garantiza ta duracion ma.xima de la
bateria. Et indicador LED rojo desteltar& en un patron
indicado en la etiqueta cuando detecte el retraso por paquete
caliente / frio.
DEJAR EL PAQUETE DE BATERIAS EN EL CARGADOR
Et cargador y el paquete de baterias se pueden dejar conectados
con la luz verde encendida indefinidamente. El cargador mantendra
el paquete de baterias como nuevo y completamente cargado.
NOTAS IMPORTANTES SOBRE LA CARGA
1. Se puede obtener una mayor duracion y optimo rendimiento si se
carga el paquete de baterias cuando la temperatura del aire esta.
entre los 16°C y los 27°C (60°F y 80°F). NO cargue el paquete de
bateria con una temperatura ambiental por debajo de +4,5 °C
(+40 °F) o por encima de +40,5 °C (+105 °F). Esto es importante y
evitarb, dados graves en et paquete de baterias.
2. El cargador y el paquete de baterias pueden estar calientes al
tacto durante ta carga. Esto es una condicion normal y no indica un
problema. Para facilitar el enfriado det paquete de baterias despues
de su uso, evite cotocar et cargador o el paquete de baterias en un
ambiente cb.lido, como debajo de un totdo de metal o en un
remotque sin aistamiento.
3. Si et paquete de baterias no se carga adecuadamente:
a. Revise et tomacorriente enchufando una tb.mpara u otro aparato
b. Verifique si el tomacorriente esta. conectado a un interruptor que
corta ta energia cuando usted apaga ta tuz.
c. Mueva el cargador y et paquete de baterias a un lugar donde la
temperatura ambiental sea alrededor de 16 °C a 27 °C
(60 °F a 80 °F).
d. Si los probtemas de carga persisten, tleve ta herramienta, et
paquete de baterias y et cargador at centro de mantenimiento local.
4. Se debe recargar el paquete de baterias cuando no produce
energia suficiente para.tareas que previamente realizaba con
facilidad. NO CONTINUE utilizando la herramienta en estas
condiciones. Siga el procedimiento de carga. Tambien se puede
cargar un paquete de baterias parcialmente agotado cuando se
desee, sin ningQn efecto negativo sobre estas.
5. Se deben mantener tejos de las cavidades del cargador los
materiates extrados de naturaleza conductora, entre los que se
incluyen la lana de acero, et papel de aluminio o cualquier
acumulacion de particulas met&ticas. Siempre desenchufe el
cargador del tomacorriente cuando no haya un paquete de baterias
en la cavidad. Desenchufe el cargador antes de intentar limpiarto.
6. No congele ni sumerja el cargador en agua ni en ningQn otro
liquido.
Z_ADVERTENCIA: Riesgo de descarga el_ctrica. No permita
que ningt_n liquido entre en el cargador. Nunca intente abrir el
paquete de baterias por ningun motivo. Si la cubierta protectora de
plastico del paquete de baterias se rompe o agrieta, devuelvala a un
centro de mantenimiento para su reciclado.
37
Page 38

INDICADOR DEL ESTADO DE LA CARGA (FIGURA B)
La bateria esta. equipada con un indicador de estado de la carga.
Esto se puede utitizar para visualizar el nivel actual de carga de la
bateria durante el uso y durante la carga. No indica el nivel de
funcionatidad de la herramienta.y
puede variar de acuerdo alas plezas
del producto, tatemperatura y ta
aplicaci6n que el usuario le d6.
Verificacion del estado de carga
durante el uso:
• Oprima el boton del indicador de
estado de tacarga (B1).
• Los cuatro LED (B2) se encenderb.n
_aaraindicar el porcentaje de carga de
bateria. Consulte el recuadro en la
Figura B.
• Si la luz LED no enciende, cargue la bateria.
INSTALACION Y EXTRACCION DEL PAQUETE DE BATERiAS
Z_ADVERTENClA: Aseg0rese de que el boton de bloqueo este
accionado para evitar el acc]onamiento del interruptor antes de quitar
o instatar la bateria.
PARA INSTALAR EL PAQUETE DE BATERiAS:
Inserte el paquete de baterias en la
herramienta hasta que este
completamente asentado y se oiga
un ctic (Figura C). Aseg0rese de que
el paquete de baterias este bien
cotocado y completamente
asegurado en su lugar.
PARA QUlTAR EL PAQUETE DE
BATERIAS: Oprima el boton de
liberacion de la bateria en la parte
posterior det paquete de baterias y
extraiga el paquete de baterias de la
Z_ADVERTENCIA: Antes del ensambtaje, asegOrese de que la
herramienta este apagada y se haya quitado la bateria.
HERRAMIENTAS NECESARIAS PARA EL ENSAMBLAJE (NO
SUMINISTRADAS):
- Destornillador Phillips
z_ADVERTENCIA: Quite ta bateria antes de intentar la
instalacion de cualquiera de los siguientes componentes.
INSTALACI(_N DEL PROTECTOR (FIGURAS D Y E)
z_ADVERTENCIA: NUNCA OPERE LA HERRAMIENTA SIN EL
PROTECTOR ADECUADAMENTE INSTALADO. El protector
siempre debe estar correctamente instalado en ta herramienta para
proteger al usuario.
• Quite el tomillo del protector.
• Mientras mantiene el
protector atineado con el
cabezal de la podadora,
deslicelo a su posicion
hasta que la teng0eta de
retencion encaje y haga ctic
en su lugar (asegOrese de
que los rieles guia (D1) del
protector (D2) esten
correctamente atineados
con los rieles guia (D3) del
cabezat de la podadora
(D4) (Figura D).
38
Page 39

•Fijeelprotectorconeltornillo
(El)(FiguraE).
INSTALACI()N DEL MANGO AUXILIAR (FIGURAS F Y G)
• Empuje et mango auxiliar (F1) sobre el tubo (F2).
• Inserte el perno (G1) por los orificios del mango auxiliar.
• Ajuste la perilla (G2) en el
perno girandoto en el sentido
de las agujas del reloj.
AJUSTE DE LA POSICION
DEL MANGO AUXILIAR
(FIG. G)
Et mango auxiliar se puede
ajustar para proporcionar
optimo equilibrio y comodidad.
• Afloje ta peritta del perno
girb.ndota en sentido contrario
alas agujas del reloj.
• Destice suavemente et
mango auxitiar hacia arriba o
hacia abajo por el tubo hasta
la altura deseada.
• Ajuste la peritla en el perno
girb.ndota en el sentido de las
agujas del reloj.
AJUSTE DE LA ALTURA DE
LA HERRAMIENTA (FIGURA H)
• Esta herramienta posee un
mecanismo telescopico,
que le permite ajustarta a
una attura comoda.
Para ajustar la configuracion
de attura:
• Suelte la abrazadera de
btoqueo de ajuste de altura
(H1).
• Mueva suavemente del tubo
(H2) hacia arriba o hacia
abajo hasta alcanzar la
altura deseada.
• Cierre la abrazadera de btoqueo de ajuste de altura (H1).
O
39
Page 40

LIBERACI(DN DE LA CUERDA DE CORTE
AI despacharse de la f&brica, la cuerda de corte esta sujeta con cinta
a ta cubierta del carrete.
• Quite ta cinta que sujeta la cuerda de corte a la cubierta del
carrete.
Z_ADVERTENCIA: Siempre utilice proteccion adecuada para los
ojos que cumple con ta norma ANSI Z87.1 (CAN/CSA Z94.3)
mientras opera esta herramienta electrica.
z_ATENClON: Inspeccione el area que va a podar y saque los
alambres, cables u objetos similares a un cordel, que podrian
enredarse en la cuerda giratoria o el carrete. Tenga especial
precaucion a fin de evitar cables que esten doblados hacia afuera
en el trayecto de la herramienta, como las pt_as en la base de una
vatla de tela met&tica.
AJUSTE DE LA HERRAMIENTA EN MODO DE PODA O
BORDEADO (FIGURAS I, J Y K)
• La herramienta se puede utitizar en modo de poda como se
muestra en ta Figura I o en modo de bordeado para cortar
cesped que sobresate a lo largo de los bordes del prado y de
macizos de fiores como se muestra en la Figura K.
MODO DE PODA
Para podar, et cabezal de la podadora debe estar en la posicion
que se muestra en la Figura
I. Si no es asi:
• Quite la bateria de la
herramienta.
• Mantenga oprimido el boton
de liberacion del cabezat
(11).
• Mientras sostiene el mango
auxiliar, gire et cabezat en
et sentido de las agujas del
reloj.
• Suette el boton de liberacion del cabezal.
• Levante la guia de borde
(J1) a la posicion cerrada.
Nota: Et cabezal girar&
0nicamente en una
direccion.
z_ATENCION: La guia de
atambre para bordes debe
utitizarse Onicamente cuando
est& en modo de bordeado.
Mantenga ta guia de borde de
alambre en la posicion retraida.
MODO DE BORDEADO
(FIGURA K) O
Para bordear, el cabezat de ta
podadora debe estar en la
posicion que se muestra en la
Figura K. Si no es asi:
• Quite la bateria de la
herramienta.
• Mantenga oprimido el boton de
liberacion del cabezal (K1).
• Mientras sostiene el mango auxiliar, gire el cabezal en sentido
contrario alas agujas del reloj.
• Suelte el boton de tiberacion del cabezat.
• Baje ta guia de borde (K2) a la posicion abierta. AsegQrese de que la
guia de borde este completamente abajo (se oira un clic).
Nota: Etcabezat girar& Qnicamente en una direccion.
Nota: Es posibte que el sistema de avance autom&tico no funcione
correctamente si no se utiliza la guia de borde.
4O
Page 41

ENCENDIDOYAPAGADO
•Paraencenderla
herramienta,mantenga
oprimidoelbotondebtoqueo
enapagado(L1)ytuego
oprimaetgatilto(L2).Una
vezquetaherramientaeste
funcionandopuedesottarel
botondebtoqueoen
apagado(L1).
•Paraapagarlaherramienta,
suelteelgatillo.
Z_ADVERTENClA: Nunca
intente btoquear el gatilto en la
posicion de encendido.
MAXIMA POTENCINMAXIMO TIEMPO DE FUNCIONAMIENTO
La caracteristica de mb.xima
potencia/mb.ximo tiempo de
funcionamiento (M1) se
encuentra en el mango de la
herramienta. €:stale permite
optimizar el rendimiento de
las herramientas y aumentar
la potencia seg5n sea
necesario.
• Para elegir mb.xima potencia a
fin de encargarse de malezas
gruesas, gire el dial a la
posicion 6.
• Para elegir mb.ximo tiempo de funcionamiento afin de aumentar la
vida Otilde la bateria, gire el dial a la posicion 1.
• Para una combinacion de ambas opciones, gire el dial alas
posiciones de 2 a 5.
FUNClONAMIENTO DE LA PODADORA
• Sostengalaherramientacomose muestraen laFiguraN.
•Mantengaun _gulo de cortede5 a 10gradoscomose
muestraen ta FiguraN1.No excedalos10 grados(Figura
N2).Corteconla puntadelacuerda.Paramantenerdecca
distanciadetassuperficiesduras,ulJlicetaguia deborde
(7).Ha!etaguia haciaafuerahastaque encaje
firmementeensu lugarproduciendounchasquido.
•Mantengaunadistanciaminimade 609,6mm (24
putgadas)entreetprotectorysus piescomose muestra
entaFiguraXX.Paratograrestadistancia,ajustelaaltura
generaldela podadoracomose muestraen laFiguraG.
BORDEADO
Los resultadosoptimos de corte se obtienen
en bordes de mb.sde 50 mm (2pulgadas)
de profundidad.
• No utilicela herramienta para crearbordes.
• Guie taherramienta como se muestraen la
Figura O.
• Para hacer uncorte mb.sa ras, incline
levemente la herramienta.
41
(609.6 mm)
Page 42

CONSEJOSUTILESPARA CORTAR
•Utilicelapuntadetacuerdapararealizareloorte;noempujeelcabezalde la
cuerdaoonlraetc&spedsincortar.ParatograrIrabajosde calidad,utilicetaguia
debordeab largodeelementoscomo cercos,casasycanteros.
•Loscercosdealambreyde estacasprovocanunmayordesgastede lacuerdae
indusosu rotura.Losmurosde piedrayladrilb,lascunetasy lamaderapueden
desgastarlacuerdarApidamente.
•No permitaquelatapadel carretesean'aslresobreetsueb uolrassuperficies.
•Encrecimientoslargos,cortedesdearribahaciaabajoy noexcedauna alturade
304,8mm (12putgadas).
•Marfergatapodadora_ hadaetbreacpesee3Ca;eslaeslamejor&'eadecorte.
•Lapodadoraoortaalmoverlaunidaddederechaa izquierda.Estoevitarb,quese
arrojenrestosalusuarb.
•EviteArbolesyarbustos.Lacuerdaf&cilmentepuededadarlacortezadea.rboles,
lasmotdurasde madera,losrevestimientosexterbresy lospilaresdecercos.
CUERDA DECORTF..JAUMENTACI(SNDE LA CUERDA
Supodadorautilizaunacuerdade nallonREDONDAde 1,7mm (0,065
pulgada)de di_ne_o. Duranteeluso, laspuntasde lascuerdasde nalbnse
deshilachar&ny desgastar&n,yel carreteespecialde autoalimentad0n
alimentar&y recortar&autom&lJcamenteunnuevo Irozode cuerda.No gotpeela
unidadcontraelsueb para intentaralimentarlacuerdani poralgQnotromotivo.
Lacuerda decorte se desgastarb,mb.srApidoy necesitarb,mb.satimentacionsi
elcorteo et bordeadose realizanab largode acerasu olrassuperficies
abrasives,osisecortanmalezasmb.sespesas.
z_ATENCl0N: Antes decomenzara podar,asegQresede utJlizar
enicamenteettipoapropiadodecuerda decorte.
Utiliceet carretede repuestode Black& Decker modeb N.° AF-100.
Recarguelacuerdade nallon(agranelo encarretede repuestopre-enrotlado
comose.muestraeneste manual.
•UTILICE UNICAMENTE CUERDADE MONOFILAMENTO REDONDO DE
NAILON DE 1,7mm (0,065putgada)DE DIAMETRO.Noutilicecuerdas
dentadaso demayor calibreyaque sobrecargarb.nel motory provocarb.n
sobrecalentamiento. Puede conseguiresta cuerda atraves desu
distribuidorlocalocentro de mantenimiento autorizado.
•Olraspiezasderepuesto(protectores,tapasdecarrete,etc.)est,Cndisponibles
en los centrosde mantenimientode Black& Decker.Paraencontrarsu
centro de mantenimientolocalIlameal: 1-800-544-6986o visite
www.btackanddecker.com.
ZLABVERTENClA: Et uso de accesorios no recomendados
por Black & Decker para esta herramienta puede ser peligroso.
REEMPLAZO DEL CARRETE
(FIGURAS P, Q Y R)
• Quite la bateda de ta
herramienta.
• Opdma las lengQetas (P1) y
quite la tapa del carrete (P2)
de la cubierta del carrete
(P3) en el cabezal de la
podadora (Figura P).
• Para obtener 0ptimos
resuttados, reemptace el
carrete con el modeto N.° AF-
100 de Black & Decker.
• Sujete el carrete vacio con
una mano y la cubierta del
carrete con la otra y tire de
este para quitarlo.
• Si ta palanca (Q1) de la base
de la cubierta se desprende,
vuelva a ponerla en ta
posicion correcta antes de
insertar et nuevo carrete en
la cubierta.
• Etimine toda la tierra,
suciedad o cesped del
carrete y la cubierta.
42
Replacement
spool
Model #
AF-100
@
Page 43

• Aftoje et extremo de ta cuerda
de corte e introduzca la
cuerda en el orificio (R2)
Figura R.
• Tome el carrete nuevo y
empQjelo sobre et soporte
(Q2) en la cubierta. Gire el
carrete tigeramente hasta
que este bien cotocado.
La cuerda debe sobresalir aproximadamente 122 mm (4-13/16
putgadas) desde ta cubierta.
• Alinee tas lengQetas de la tapa del carrete con las ranuras (R1) en
la cubierta (Figura R).
• Empuje la tapa dentro de la
cubierta hasta que encaje
firmemente en su lugar
produciendo un chasquido.
Z_ATENCION: Para evitar que se dade la herramienta, si la
cuerda de corte sobresate m&s all& de la hoja de corte, recortela de
manera que Itegue solo hasta la hoja.
REBOBINADO DEL CARRETE
(UTILICE 0NICAMENTE
CUERDA REDONDA DE 1,7
MM [0,0065 PULGADA] DE
DIAMETRO) (FIGURAS S, T
Y U)
NOTA: Es mb.s probable que
los carretes enrollados a
mano con una cuerda a
granet se enreden con mayor
frecuencia que los carretes
de Black & Decker
enrotlados de f&brica. Para
obtener mejores resultados, se recomiendan los carretes enrotlados
de fabrica.
Para rebobinar la cuerda,
siga los pasos a continuacion:
• Quite la bateria de la
herramienta.
• Quite et carrete vacio de la
herramienta como se
describe en "REEMPLAZO
DEL CARRETE".
• Elimine cualquier resto de
cuerda de corte del carrete.
• Pliegue el extremo de ta
cuerda de corte unos 19 mm
(3/4 putgada) (S1).
Introduzca la cuerda de
corte dentro de una de las ranuras de
anctaje para la cuerda (S2) como se
muestra en ta Figura S.
• Inserte et extremo de 19 mm (3/4
pulgada) de la cuerda a granet en el
orificio (T1) del carrete adyacente a ta
ranura como se muestra en ta Figura T.
Enrotte ta cuerda de corte en el carrete en
la direccion de la fiecha det carrete.
AsegQrese de enrotlar la cuerda con
nitidez yen capas. No la entrecruce
(Figura U).
• Cuando ta cuerda de corte enrollada
Ilegue a los huecos (T2), corte la cuerda (Figura T).
• Cotoque el carrete en ta herramienta como se describe en
"REEMPLAZO DEL CARRETE".
43
X
Page 44

EL SELLO RBRC TM
El sello RBRC TM (Corporacion de reciclado de baterias
recargabtes) que se encuentra en ta bateria de iones de
litio (o paquete de baterias) indica que los costos de
recictar la bateria (oel paquete de baterias) al final de su
vida Qtilya fueron pagados por Black & Decker.
RBRC TM en cooperacion con Black & Decker y otros usuarios de
baterias, ha estabtecido programas en los Estados Unidos para
facilitar la recoleccion de baterias de iones de litio agotadas. Ayude a
proteger nuestro medio ambiente y a conservar los recursos
naturales: devuelva las baterias de iones de litio agotadas a un
centro de mantenimiento autorizado de Black & Decker o a un
comerciante minorista local para que se recicten. Tambien puede
comunicarse con el centro local de recictado para obtener
informacion sobre d6nde dejar tas baterias agotadas. RBRC TM es
una marca comercial registrada de la Corporacion de reciclado de
baterias recargables.
Z_ADVERTENCIA: Para evitar lesiones graves, apague y
desenchufetaherramienta antesde realizar cualquiertipode
mantenimiento.
1. Mantenga timpias las ranuras de admision de aire para evitar el
sobrecalentamiento.
2. La cuerda de la podadora puede secarse con et tiempo. Para
conservar la cuerda en optimas condiciones, guarde los carretes
pre-enrottados de repuesto o la cuerda en paquete en una botsa
seltada de ptb.stico con una cucharada de agua.
3. Las piezas de ptb.stico pueden timpiarse utilizando jabon suave
y un patio hQmedo.
4. La cortadora de cuerda en el extremo del protector puede
perder filo con et tiempo. Se recomienda mantener
periodicamente el filo de ta hoja con una lima.
IMPORTANTE: Para garantizar la SEGURIDAD y la
CONFIABILIDAD del producto, las reparaciones, el mantenimiento
y et ajuste deben reatizarse en los centros de mantenimiento
autorizados o en otras organizaciones de mantenimiento
calificadas, utilizando siempre piezas de repuesto identicas.
PROBLEMA SOLUCI()N
La herramienta
funciona lentamente.
La alimentacion autom&tica de
cuerda no alimenta m&s cuerda.
44
• Extraiga la bateria de la
herramienta.
• Verifique que la cubierta del carrete
pueda girar libremente. Si es
necesario, limpiela cuidadosamente.
• Verifique que la cuerda de corte no
sobresalga m&s de 122 mm (4-
13/16 pulgadas) del carrete
aproximadamente. Si sobresale
m&s, corte el excedente de manera
que este a la altura de la cuerda de
la hoja de corte.
• Se alimenta m&s cuerda cuando
esta se acorta a aproximadamente
76,2 mm (3 pulgadas). Para
determinar si la cuerda no se est&
alimentando, permita que la misma
se desgaste m&s all& de este punto.
• Extraiga la bateria de la
herramienta.
• Retire la tapa del carrete.
• Tire de la cuerda de corte hasta
que. sobresalga 122 mm (4-13/16
pulgadas) del carrete. Si la cuerda
de corte que queda en el carrete es
insuficiente, instaleunnuevo carretede
cuerda de corte.
• Asegerese de que la cuerda no se
haya entrecruzado con el carrete
como se detalla en la figura 18. Si
se ha entrecruzado, desenrolle la
cuerda de corte y nuevamente
Page 45

PROBLEMA
La alimentacion autom&tica de
cuerda no alimenta m&s cuerda.
Sobrealimentaci6n
SOLUCI()N
enrolle la cuerda prolijamente en el
carrete de manera que las cuerdas
no se entrecrucen.
• Alinee las lengQetasen la tapadel
carrete con las muescas de lacubierta.
• Empuje el carrete dentro de la
cubierta hasta que encaje
firmemente en su lugar.
• Inspeccione si los surcos en la base del
carrete presentan daSos. Siest&n
daSados, reemplace el carrete.
• Leael codigo que seencuentra en la
parteposterior del carrete. Siaparece
"PA66", Ilamea atencional diente para
obtener un repuesto.
Siaparece "ABS", este no es el problem&
• Si la cuerda de corte sobresale m&s
all& de la hoja de corte, corte el
excedente de manera que este a la
altura de la hoja. Si la alimentaci6n
autom&tica de la cuerda aQn no
funciona o el carrete est& atascado,
haga Io siguiente:
•Umpb_e elcarretey lacul:ie_
• Retire el carrete y verifique si la
3alanca en la cubierta se puede
mover libremente.
•Retireel carretey desenrolle la cuerda de
corte, para luego volver a enrollarla
prolijamente. Reemplace el carretede la
cubierta.
•AsegOresedeestarcortandocon lapunta
de lacuerda[177,8mm(7 pulgadas)desde
etcarrete].
Sies necesario,utilicelaguiade bordepara
mantenerladistanciacorrecta.
•AsegQresedenoexcederun_gulo de 10
gradoscomo semuestraen laRgura Nt.
PROBLEMA
La cuerda se desenrolla al
quitar la tapa o el carrete
SOLUCI()N
• Antes de quitar la cuerda,
asegQrese de sujetarla en las
ranuras de retencion (S2) (Figura S).
Todos los Centros de servicio de Black & Decker cuentan con
personal altamente capacitado dispuesto a brindar a todos los
clientes un servicio eficiente y confiabte en ta reparacion de
herramientas electricas. Si necesita consejo tecnico, reparaciones
o piezas de repuesto originales de f&brica, pongase en contacto
con el centro de servicio de Black & Decker mas cercano a su
domicitio. Para ubicar su centro de servicio local, consutte la
seccion "Herramientas etectricas" (Tools-Electric) de las paginas
amarittas, Ilame al 1-800-544-6986 o visite nuestro sitio
www.blackanddecker.com.
Black & Decker (Estados Unidos) Inc. ofrece una garantia de tres
ados por cuatquier defecto del material o de fabricacion de este
producto. El producto defectuoso se reparara o reemplazara sin
costo atguno de dos maneras.
La primera opcion, el reemplazo, es devotver el producto al
comercio donde se 1oadquirio (siempre y cuando se trate de un
comercio participante). Las devoluciones deben realizarse
conforme a la potitica de devolucion del comercio (generatmente,
entre 30 y 90 dias posteriores a ta venta). Le pueden soticitar
comprobante de compra. Consutte en et comercio acerca de la
politica especial sobre devotuciones una vez excedido el plazo
establecido.
45
Page 46

LasegundaopcionesItevaroenviarelproducto(confletepago)a
unCentrodemantenimientopropiooautorizadodeBlack&Decker
parasureparacionoreemptazosegQnnuestrocriterio.Lepueden
solicitarelcomprobantedecompra.LosCentrosdemantenimiento
autorizadosydepropiedaddeBlack&Deckersedetatlanenta
seccion"Herramientasetectricas"(Toots-Electric)delasp&ginas
amarillasdelaguiatelefonica.
Estagarantianoseextiendealosaccesorios.Estagarantiate
concedederechoslegalesespecificos;ustedpuedetenerotros
derechosquepuedenvariarsegQnelestadoolaprovincia.Sitiene
atgunapregunta,comuniqueseconelgerentedetCentrode
mantenimientodeBlack&Deckerdesuzona.Esteproductono
est&disefiadoparausocomercial.
REEMPLAZO GRATUITO DE LAS ETIQUETAS DE
ADVERTENCIAS: si sus etiquetas de advertencia se tornan ilegibtes
o faltan, ltame al (55)5326-7100 para que se le reemptacen
gratuitamente.
• GARANTiA BLACK & DECKER •
• SOLAMENTE PARA PROPOSITOS DE MEXICO
Sello firma del distribuidor
Fecha de compra Invoice No. •No. de factura
IDENTIFICACION DEL PRODUCTO
Catalogo 6 Modelo Serial Number. No. de serie
AMI_RICA LATINA: esta garantia no se aplica a los productos que se
venden en America Latina. Para los productos que se venden en
America Latina, debe consultar ta informacion de la garantia
especifica det pals que viene en el empaque, Ilamar a la compafiia
local o visitar el sitio Web a fin de obtener esa informacion.
ESTA GARANTIA NO APLICA CUANDO:
El producto se hubiese utilizado en condiciones distintas a las
normates.
El producto no hubiese sido operado de acuerdo con el instructivo de
uso que se acompafia.
Et producto hubiese sido atterado o reparado por personas no
autorizadas por nosotros.
Importador: Black & Decker S.A. de .C.V
Bosque de Cidros Acceso Radiatas No.42
3ra.Seccion de Bosques de las tomas
C.P.05120, Mexico, D.R Tel: (01 55) 5326 7100
Nombre Last Name •Apellido
Direccion
Ciudad State • Estado
Codigo Postal Country. Pais
No. Tel_fono
46
Page 47

Grupo Realsa en herramientas,
S.A. de C.V.
Seper Manzana 69 MZ.01 Lote 30
(Av. Torcasita)
Cot. Puerto Ju&rez
Cancen, Quintana Roo
Tel. 01 998 884 72 27
Ferre Pat de Puebla, S.A. de C.V.
16 de Septiembre No. 6149
Cot. El Cerrito
Puebla, Puebta
Tel. 01 222 264 12 12
Ferre Pat de Puebla, S.A. de C.V.
Ejercito Mexicano No. 15
Cot. Ejido lro. de Mayo
Boca det Rio, Veracruz
Tel. 01 229 167 89 89
Servicio de Fabrica Black & Decker,
S.A. de C.V.
L&zaro Cardenas No. 18
Cot. Obrera
Distrito Federal
Tel. 55 88 95 02
SOLAMENTE PARA PROPOSITOS DE MEXICO
Representaciones Industriales Robles,
S.A. de C.V.
Tezozomoc No. 89
Cot. La Preciosa
Distrito Federal
Tel. 55 61 86 82
Gpo. Comercial de Htas. y Refacciones
de Occidente, S.A. de C.V.
Av. La Paz No. 1779
Col. Americana, S. Juarez
Guadalajara, Jalisco
Tel. 01 33 38 25 69 78
Herramientas y Equipos Profesionales
Av. Col6n 2915 Ote.
Col. Francisco I. Madero
Monterrey, Nvo. Leon
Tel. 01 81 83 54 60 06
Htas. Port&tiles de Chihuahua,
S.A. de C.V.
Av. Universidad No. 2903
Fernando Gonz_lez Armenta
Bolivia No. 605
Cot. Fetipe Carritlo Puerto
Cd. Madero, Tampico
Tel. 01 833 221 34 50
Perfiles y Herramientas de Morelia
Gertrudis Bocanegra No. 898
Cot. Ventura Puente
Morelia, Michoac&n
Tel. 01 443 313 85 50
Enrique Robles
Av. de ta Sotidaridad No. 12713
Cot. La Pradera
Tel. 01 462 626 67 39
Hernbndez Martinez Jeanette
Protongacion Corregidora Nte. No. 1104
Col. Arbotedas
Queretaro, Qro.
Tel. 01 442 245 25 80
Cot. Fracc. Universidad
Chihuahua, Chihuahua
Tel. 01 614 413 64 04
Irapuato, Guanajuato
47
Page 48

PARA OTRAS LOCALIDADES LLAME AL 01 800 847 2309 o 01 800 847 2312.
BLACK & DECKER S.A. DE C.V.
BOSQUES DE CIDROS ACCESO RADIATAS NO. 42
COL. BOSQUES DE LAS LOMAS.
05120 MEXICO, D.F
TEL. (01 55) 5326 7100
01 800 847 2309/01 800 847 2312
Vea "Herramientas
el_ctricas (Tools-Electric)" SE_¢N
AMARIL_
- P_ginas amarillas .... _,_'_,o
para Servicio y ventas
Cat. No. LST136
Copyright @2012 Black & Decker
Form No. 90578591 rev02
48
March 2012
Printed in China
 Loading...