

Black & Decker LP1000-A TYPE 1 Owner’s Manual

KEY INFORMATION YOU SHOULD KNOW:
®
• DO NOT OVER-TENSION CHAIN. Refer to "CHAIN
TENSION ADJUSTMENT" for proper method of
tensioning chain.
IHSTRUCTIOHMAHUAL
IF YOU SHOULD HAVE A QUESTION OR
EXPERIENCE A PROBLEM WITH YOUR
BLACK & DECKER PRODUCT,
CALL 1-800-544-6986
BEFORE YOU CALL, HAVE THE FOLLOWING INFORMATION
AVAILABLE,CATALOG No., TYPE No.,ANDDATECODE (e.g.0130M). IN
MOST CASES,A BLACK & DECKER REPRESENTATIVECAN
RESOLVEYOUR PROBLEM OVER THE PHONE. IF YOU HAVE A
SUGGESTION ORCOMMENT, GIVEUSA CALL. YOUR FEEDBACK IS
VITALTO BLACK& DECKER.
SAVETHIS MAHUAL FORFUTUREREFEREHCE.
VEAELESPAHOLEH LACOHTRAPORTADA.
POUR LEFRAHCAIS,VOIR LA €OUVERTUREARRli:RE.
INSTRUCTIVO DE O.PERACION, CENTRO$ DE SERVlCIO Y
POLIZA DE GARANTIA. ADVERTENCIA: LEASE ESTE
INSTRUCTIVO ANTES DE USAR EL PRODUCTO.
•Retighten chain frequently during first two hours of use as
chain breaks in.

Intended use
Your Black & Decker Alligator Lopper TM has been designed for
pruning trees and cutting small logs up to 4 inches (100mm) in
diameter. This tool is intended for consumer use only.
General Safety Rules
_WARNING: Read all instructions. Failure to follow all instructions
listed below may result in electric shock, fire and/or serious injury.
_WARNING: To reduce the risk of injury, user must read
instruction manual.
SAVE THESE INSTRUCTIONS.
1. Work area
a. Keep work area clean and well lit. Cluttered and dark areas
invite accidents.
b. Do not operate power tools in explosive atmospheres, such
as in the presence of flammable liquids, gases or dust. Power
tools create sparks which may ignite the dust or fumes.
c. Keep children and bystanders away while operating a power
tool. Distractions can cause you to lose control.
2. Electrical safety
a. Power tool plugs must match the outlet. Never modify the
plug in any way. Do not use any adapter plugs with earthed
(grounded) power tools. Unmodified plugs and matching outlets
will reduce risk of electric shock.
b. Avoid body contact with earthed or grounded surfaces such
as pipes, radiators, ranges, refrigerators and wire fences. There
is an increased risk of electric shock if your body is earthed or
grounded.
c. Do not expose power tools to rain, damp or wet conditions.
Water entering a power tool will increase the risk of electric shock.
Don't use in rain.
d. Do not abuse the cord. Never use the cord for carrying,
pulling or unplugging the power tool. Keep cord away from
heat, oil, sharp edges or moving parts. Damaged or entangled
cords increase the risk of electric shock.
e. When operating a power tool outdoors, use an extension
cord suitable for outdoor use. Use of a cord suitable for outdoor
use reduces the risk of electric shock.
f. Ground Fault Circuit Interrupter (GFCl) protection should be
provided on the circuit(s) or outlet(s) to be used for the
gardening appliance. Receptacles are available having built-in
GFCI protection and may be used for this measure of safety.
3. Personal safety
a. Before you start the saw, make sure the saw chain is not
contacting anything. Stay alert, watch what you are doing and
use common sense when operating a power tool. Do not use a
power tool while you are tired or under the influence of drugs,
alcohol or medication. A moment of inattention while operating
power tools may result in serious personal injury.
b. Use safety equipment. Always wear eye protection. Safety
equipment such as dust mask, non-skid safety shoes, hard hat,
rubber gloves, snug-fitting clothing or hearing protection used for
appropriate conditions will reduce personal injuries.
c. Avoid accidental starting. Ensure the switch is in the off
position before plugging in. Carrying power tools with your finger
on the switch or plugging in power tools that have the switch on
invites accidents.
d. Remove any adjusting key or wrench before turning the
power tool on. A wrench or a key left attached to a rotating part of
the power tool may result in personal injury.
e. Do not overreach. Keep proper footing and balance at all
times. This enables better control of the power tool in unexpected
situations.
f. Dress properly. Do not wear loose clothing or jewellery. Keep

your hair, clothing and gloves away from moving parts. Loose
clothes, jewellery or long hair can be caught in moving parts.
g. If devices are provided for the connection of dust extraction
and collection facilities, ensure these are connected and
properly used. Use of these devices can reduce dust related
hazards.
h. Maintain Appliance With Care - Keep cutting edge sharp and
clean for best performance and to reduce the risk of injury.
Follow instructions for lubricating and changing accessories. Inspect
appliance cord periodically, and if damaged, have it repaired by an
authorized service facility. Inspect extension cords periodically and
replace if damaged. Keep handles dry, clean, and free from oil and
grease.
i. Grip Saw Firmly - Hold the chain saw firmly with both hands
when the motor is running. Use a firm grip with thumbs and
fingers encircling the chain saw handles.
j. Power Supply - Connect chain saw to correct voltage, that is,
be sure that the voltage supplied is the same as that specified
on the nameplate of the tool.
4. Power tool use and care
a. Do not force the power tool. Use the correct power tool for
your application. The correct power tool will do the job better and
safer at the rate for which it was designed.
b. Do not use the power tool if the switch does not turn it on
and off. Any power tool that cannot be controlled with the switch is
dangerous and must be repaired.
c. Disconnect the plug from the power source when not in use,
before servicing, before making any adjustments, changing
accessories and attachments such as saw chain and guard or
storing power tools. Such preventive safety measures reduce the
risk of starting the power tool accidentally.
d. When not in use, appliances should be stored indoors in a
dry, and high or locked-up place, out of the reach of children
and do not allow persons unfamiliar with the power tool or
these instructions to operate the power tool. Power tools are
dangerous in the hands of untrained users.
e, Check Damaged Parts - Before further use of the appliance, a
guard or other part that is damaged should be carefully
checked to determine that it will operate properly and perform
its intended function. Check for alignment of moving parts, binding
of moving parts, breakage of parts, mounting, and any other
condition that may affect its operation. A guard or other part that is
damaged should be properly repaired or replaced by an authorized
service center unless indicated elsewhere in this manual.
f. Keep cutting tools sharp and clean. Properly maintained cutting
tools with sharp cutting edges are less likely to bind and are easier
to control.
g. Use the power tool, accessories and tool bits etc,, in
accordance with these instructions and in the manner intended
for the particular type of power tool, taking into account the
working conditions and the work to be performed. Use of the
power tool for operations different from those intended could result
in a hazardous situation.
h. Do not operate a chain saw that is damaged, improperly
adjusted, or is not completely and securely assembled. Be sure that
the saw chain stops moving when the trigger is released.
i. Use extreme caution when cutting small size brush and
saplings because the slender material may catch the saw chain
and be whipped toward you or pull you off balance.
j. Carry the chain saw by the front handle with the saw stopped,
finger off the switch, the guide bar and saw chain to the rear.
k. Maintain Chain Saw With Care - Inspect chain saw cords
periodically and if damaged, have repaired by authorized
service facility. Keep cord clear of the chain and operator at all
times.Nevercarrysawbythecordorpullittodisconnectfrom
receptacle.Keepcordfromoilandsharpedges.Inspectextension
cordsperiodicallyandreplaceifdamaged.Keeptoolssharpand
cleanforbetterandsaferperformance.Followinstructionsfor
lubricatingandchangingaccessories.Keephandlesdry,clean,and
freefromoilandgrease.
5.Service
a.Haveyourpowertoolservicedbyaqualifiedrepairperson
usingonlyidenticalreplacementparts.Thiswillensurethatthe
safetyofthepowertoolismaintained.
b. Ifthereplacementofthesupplycordisnecessary,thishasto
bedonebythemanufacturerorhisagentinordertoavoidasafety
hazard.
Additional safety instructions for the
Alligator TM Lopper
Z_WARNING: Never use the tool above shoulder height. Always
position yourself out of the path of falling branches and debris.
Z_WARNING: Do not use this tool to fell trees.
- Pre-plan a safe exit from falling branches and debris. Ensure the
exit route is clear of obstacles that would prevent or hinder
movement. Remember wet grass and freshly cut bark is slippery.
- Be aware of the direction that a branch may fall Consider all
conditions that may affect the direction of fall, including:
The intended direction of fall.
The natural lean of the branch.
Any unusual heavy limb structure or decay.
Surrounding trees and obstacles including overhead lines.
The wind speed and direction.
The safe distance between a branch and debris to be felled and
bystanders, buildings and other objects is at least 2 1/2 times the
length of the branch. Any bystander, building or object within this
distance is at risk from being struck by the falling branch.
- When cutting a limb that is under tension be aware of spring back.
When the tension in the wood fibres are released the spring loaded
limb may strike the operator and/or throw the tool out of control.
- Always wear suitable safety equipment such as non-skid
heavy-duty shoes, goggles, ear protection and gloves when
operating the tool.
- Ensure someone is nearby (at a safe distance) in case of an
accident.
- Do not attempt to operate the tool when in a tree, on a ladder or
standing on any other unstable support.
- Keep proper footing and balance at all times.
- Hold the tool firmly with both hands when the motor is running.
- Keep handles dry, clean and free from oil and grease. Greasy oily
handles are slippery causing loss of control.
- Do not let the moving chain contact any object at the tip of the
guide bar.
- Keep your saw chain properly tensioned. Check tension at regular
intervals with the motor stopped and cord disconnected.
- Begin and continue cutting only with the chain moving at full
speed.
- Watch for shifting branches or other forces that could close a cut
and pinch or fall into the chain.
- Use extreme caution when re-entering a previous cut. Engage
spikes on lower jaw into wood and allow the chain to reach full
speed before proceeding with cut.
- Use of this tool for operation different to those intended could
result in hazardous situations. Cut wood only. Don't use this tool for
purposes not intended - for example - Don_ use tool for cutting
plastic, masonry or non-wood building materials.
- If any debris gets caught with the guard or tool discontinue use,
disconnect power cord and clear debris.

-Wornchainsandchainguidebarsshouldbereplaced.
-Onlyusereplacementbarsandchainsspecifiedbythe
manufacturer.
-ThiselectricallypoweredsawisclassifiedbyCSAasaClass2C
saw.Itisintendedforinfrequentusebyhomeowners,cottagers,
andcampers,andforsuchgeneralapplicationsasclearing,
pruning,cuttingfirewood,etc.Itisnotintendedforprolongeduse.
Prolongedperiodsofoperationcancausecirculatoryproblemsin
theuser'shandsduetovibration.Forsuchuse,itmaybe
appropriatetouseasawhavingananti-vibrationfeature.
Kickback Safety Features
Guard against kickback. Kickback is the upward motion of the guide
bar that occurs when the saw chain, at the nose of the guide bar,
contacts an object. Kickback can lead to dangerous loss of control of
the chain saw.
Z_WARNING: The following features are included on your Alligator
Lopper TM to help reduce the hazard of kickback; however such
features will not totally eliminate this dangerous reaction. As a chain
saw user do not rely only on safety devices. You must follow all
safety precautions, instructions, and maintenance in this manual to
help avoid kickback and other forces which can result in serious
injury.
Top Jaw - This has been designed specifically to cover the tip of the
chain bar where the danger zone for kickback occurs. In the event
of any kickback the guard also helps prevent the chain coming into
contact with the operator.
Reduced Kickback Guide Bar - This has been designed with a
small radius tip which reduces the size of the kickback zone on the
bar tip.
Reduced Kickback Chain - Designed with a contoured depth gauge
and guard link which deflect kickback force and allows wood to
gradually ride into the cutter.
Electrical safety
This tool is double insulated; therefore no grounding wire is
required. Always check that the power supply corresponds to the
voltage on the rating plate.
Z_WARNING: Some dust created by power sanding, sawing,
grinding, drilling, and other construction activities contains
chemicals known to cause cancer, birth defects or other
reproductive harm. Some examples of these chemicals are:
lead from lead-based paints,
crystalline silica from bricks and cement and other masonry
products, and
arsenic and chromium from chemically-treated lumber. (CCA)
Your risk from these exposures varies, depending on how often you
do this type of work. To reduce your exposure to these chemicals:
work in a well ventilated area, and work with approved safety
equipment, such as those dust masks that are specially designed to
filter out microscopic particles.
• Avoid prolonged contact with dust from power sanding,
sawing, grinding, drilling, and other construction activities.
Wear protective clothing and wash exposed areas with soap
and water. Allowing dust to get into your mouth, eyes, or lay on the
skin may promote absorption of harmful chemicals.
Z_WARNING: Use of this tool can generate and/or disburse
dust, which may cause serious and permanent respiratory or
other injury. Always use NIOSH/OSHA approved respiratory
protection appropriate for the dust exposure. Direct particles away
from face and body.
CAUTION: Wear appropriate personal hearing protection during use.

Undersomeconditionsanddurationofuse,noisefromthisproduct
maycontributetohearingloss.
Extension Cord
Make sure your extension cord is in good condition. When using an
extension cord be sure it is heavy enough to carry the current your
product will draw. An undersized extension cord will cause a drop in
line voltage resulting in loss of power and overheating. The following
table shows the correct size to use depending on cord length and
nameplate ampere rating. If in doubt, use the next heavier gage. The
smaller the gage number, the heavier the cord.
Minimum Gage for Cord Sets
Volts Total Length of Cord in Feet
120V 0-25 26-50 51-100 101-150
240V 0-50 51-100 101-200 201-300
Ampere Rating
More Not more American Wire Gage
Than Than
0 - 6 18 16 16 14
6 10 18 16 14 12
10 12 16 16 14 12
12 - 16 14 12 Not Recommended
Double Insulation
Double insulated tools are constructed throughout with two
separate layers of electrical insulation 9 r one double thickness
of insulation between you and the toolAfs electrical system.
Tools built with this insulation system are not intended to be
grounded. As a result, your tool is equipped with a two prong
plug which permits you to use extension cords without concern
for maintaining a ground connection. NOTE: Double insulation does
not take the place of normal safety precautions when operating this
tool. The insulation system is for added protection against injury
resulting from a possible electrical insulation failure within the tool.
REPLACEMENT PARTS: When servicing all tools, USE IDENTICAL
REPLACEMENT PARTS. Repair or replace damaged cords.
Polarized Plugs
To reduce the risk of electric shock, this equipment has a polarized
plug (one blade is wider than the other). This equipment must be
used with a suitable polarized 2 wire or 3 wire extension cord.
Polarized connections will fit together only one way. Make sure that
the receptacle end of the extension cord has large and small blade
slot widths. If the plug does not fit fully into the extension cord,
reverse the plug. Ifit still does not fit, obtain a suitable extension cord.
Ifthe extension cord does not fit fully into the outlet, contact a
qualified electrician to install the proper outlet. Do not change the tool
plug or extension cord in any way.
The label on your tool may include the following symbols.
V................ volts
Hz.............. hertz
rain ............ minutes
.... .......... direct current
[] .............. Class II Construction
............ safety alert symbol
SAVE THESE INSTRUCTIONS
A .................... amperes
W .................. watts
.................. alternating current
no .................. no load speed
_ .................... earthing terminal
.../min ............ revolutions
per minute

CHAIN SAW NAMES AND TERMS
• Bucking - The process of cross cutting a felled tree or log into
lengths.
• Chain Brake - A device used to stop the chain saw.
•Chain Saw Powerhead - A chain saw without the saw chain and
guide bar.
• Clutch - A mechanism for connecting and disconnecting a driven
member to and from a rotating source of power.
• Drive Sprocket or Sprocket - The toothed part that drives the
saw chain.
• Felling - The process of cutting down a tree.
• Felling Back Cut - The final cut in a tree felling operation made
on the opposite side of the tree from the notching cut.
•Guide Bar - A solid railed structure that supports and guides the
saw chain.
• Kickback - The backward or upward motion, or both of the guide
bar occurring when the saw chain near the nose of the top area of
the guide bar contacts any object such as a log or branch, or when
the wood closes in and pinches the saw chain in the cut.
• Kickback, Pinch - The rapid pushback of the saw which can
occur when the wood closes in and pinches the moving saw chain
in the cut along the top of the guide bar.
• Kickback, Rotational - The rapid upward and backward motion
of the saw which can occur when the moving saw chain near the
upper portion of the tip of the guide bar contacts an object, such as
a log or branch.
• Low-Kickback Chain - A chain that complies with the kickback
performance requirements of ANSI B175.1-1991 (when tested ona
representative sample of chain saws.)
• Normal Cutting Position - Those positions assumed in
performing the bucking and felling cuts.
• Reduced Kickback Guide Bar - A guide bar which has been
demonstrated to reduce kickback significantly.
• Replacement Saw Chain - A chain that complies with kickback
performance requirements of ANSI B175.1-1991 when tested
with specific chain saws. It may not meet the ANSI performance
requirements when used with other saws.
• Saw Chain - A loop of chain having cutting teeth, that cut the
wood and that is driven by the motor and is supported by the guide
bar.
• Switch - A device that when operated will complete or interrupt an
electrical power circuit to the motor of the chain saw.
• Switch Linkage - The mechanism that transmits motion from a
trigger to the switch.
O
12 11
\
\
\
\
0
0
0
0

O
Contents
1. Oil Bottle
2. Wrench
3. Instruction Manual
4. Alligator Lopper TM
Overview
5. On/off switch actuators
6. Top jaw
7. Lower jaw
8. Chain guide bar
9. Chipping ejection point
10. Oiling cover

Preparing Your Alligator Lopper TM For Use
z_WARNING: Read and understand all instructions. Failure to
follow all instructions listed below may result inelectric shock, fire
and/or serious personal injury
A\ WARNING: Sharp moving blade. To prevent accidental
operation, ensure that the tool is disconnected from the power
source before performing the following operations. Failure to do
this could result in serious personal injury.
z_CAUTION: Sharp moving blade. Always wear protective
gloves when installing or removing the chain. The chain is sharp
and can cut you when it is not running.
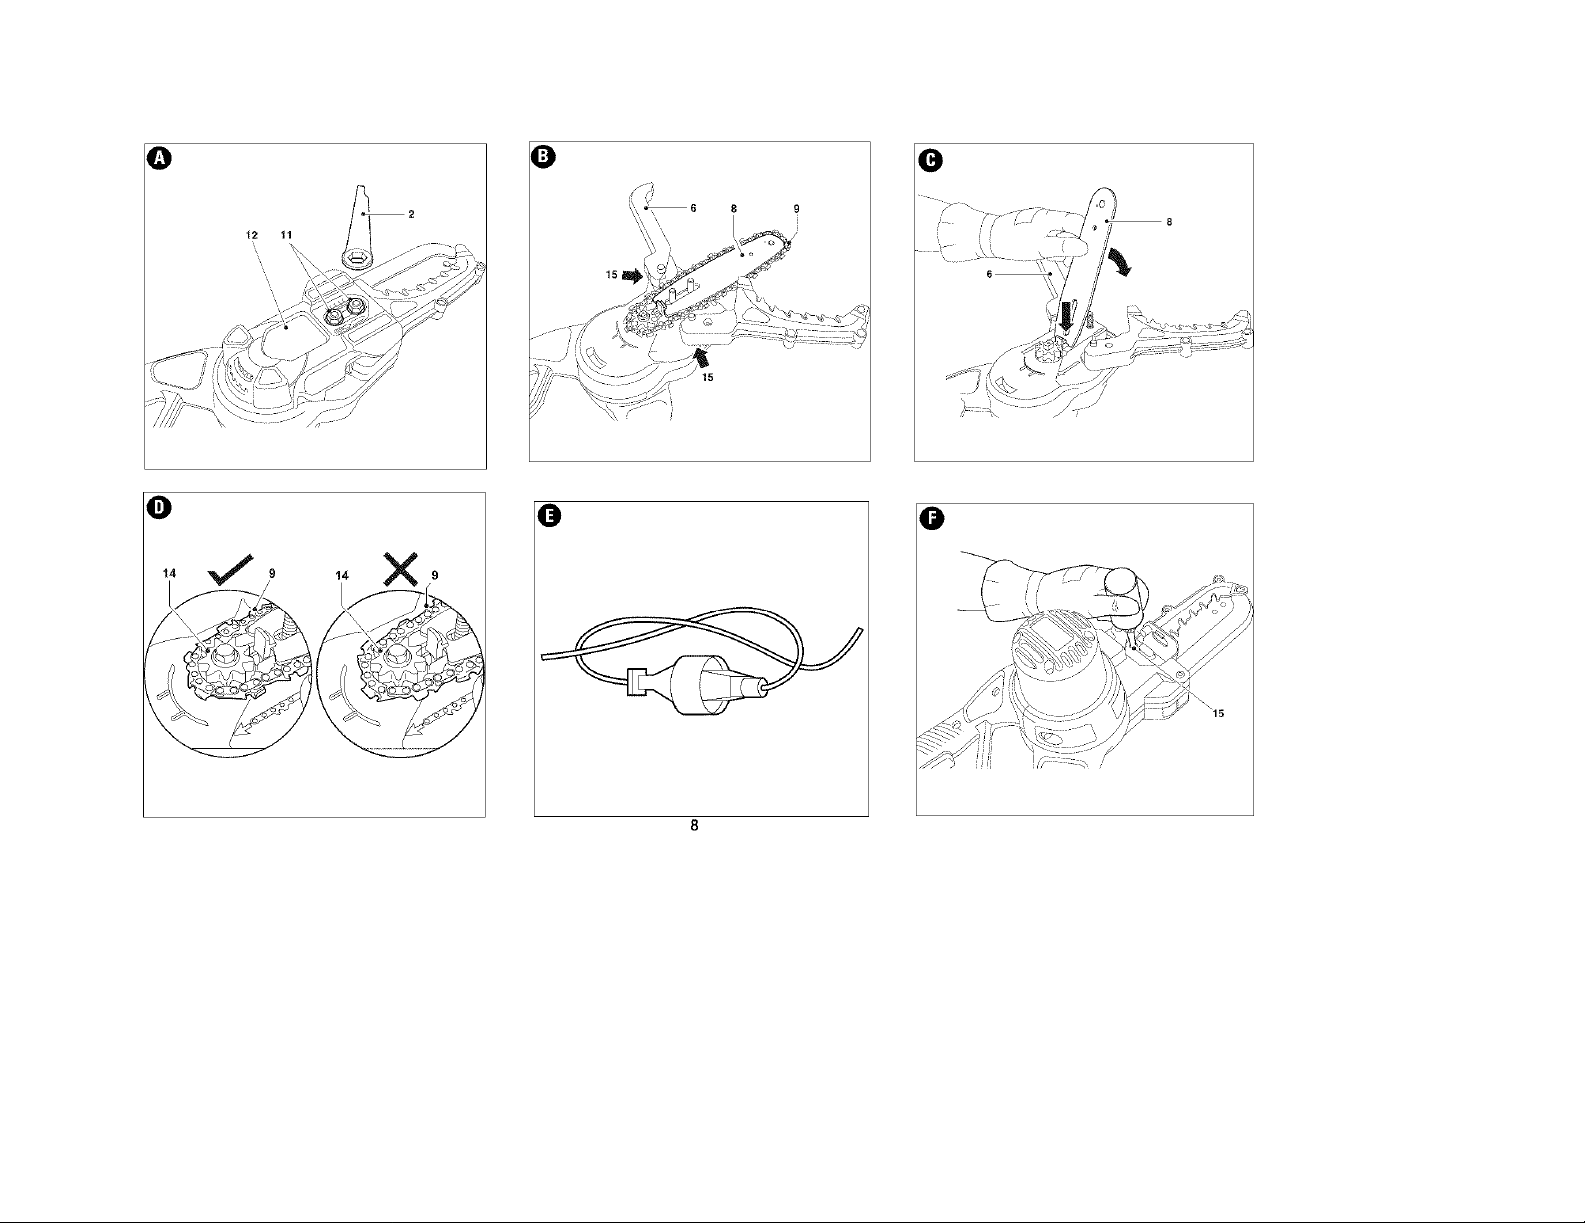
Chain tension adjustment (fig. A)
Z_WARNING: Before chain or other adjustments, make sure
that the tool is switched off and unplugged.
If the chain can not be correctly tensioned, it may need to be
replaced. Contact your nearest service center.
The product comes ready assembled. However we recommend that
you check the tension of the chain, and chain retention nuts before
use and if required adjust.
Checking and adjusting the chain tension (fig. A)
Totension the chain slacken the two chain cover retention nuts (11)
with the wrench (2) and the chain tensioning device will push the
chain bar out, setting the correct tension. Retighten the two
retention nuts (11) securely.
Check that the correct tension has been set by lightly pulling on the
chain. The tension is correct when the chain snaps back after being
pulled 1/8" inch (3 mm) away from the guide bar. There should be
no "sag" between the guide bar and chain on the underside.
Note: Do not over tension the chain as this will lead to excessive
wear and reduce the life of the bar and chain. It will also lead to
reduced product performance.
Note: With first use and when the chain is new, check tension
frequently as a new chain stretches slightly.
Replacing the chain and chain bar
After prolonged use the chain and / or chain bar may need
replacing. Use Black & Decker replacement chain RC600 only.
Low-Kickback saw chain is a chain which has met the kickback
performance requirements of ANSI B175.1 when tested on the
representative sample of chain saws.
Removina the saw chain & chain bar (figs. A & B)
Z_WARNIN_I: Before chain or other adjustments, make sure
that the tool is switched off and unplugged.
Z_WARNING: Laceration hazard. Always wear protective gloves
when installing or removing the saw chain. The saw chain is sharp
and can cut you when it is not running.
z_WABNING: Burn hazard. The chain guide bar and chain may
become hot during use. Allow to cool before adjustment or removal.
- Place the tool on a firm surface.
- Rotate the two retention nuts (11) counter clockwise with wrench
(2) provided and remove completely.
- Remove the chain access cover (12).
- Open the handles and pull back the top chain cover (6).
- Pull back chain bar (8) and then lift the saw chain (9) out of the
groove in the guide bar. The chain can then be removed from the
unit.
- The chain bar can then be angled up and over the bolts.
Assembling the chain bar and chain (figs. C&D)
Z_WARNING: Before chain or other adjustments, make sure
that the tool is switched off and unplugged.
Z_WARNING: Always wear protective gloves when installing or
removing the saw chain. The saw chain is sharp and can cut you
when it is not running.
- Ensure the operation is carried out on a firm surface.
- Open the handles and pull back the top jaw (6).
- Insert the chain bar (8) into the space between the chain
tensioner and the first bolt, angle the chain bar down over the bolts.
- Place the chain (9) around the front of the chain bar and engage
in the nose sprocket of the chain bar. Make sure chain is installed
properly, with the cutting teeth facing forward as shown here.
10

Pullthechainbarandchainback,engagingitinthegrooveinthe
chainbarandthenoverthesprocket(14)positioningteethinthe
correctpositiononthesprocket.
- Replacethechainaccesscover(12)andretentionnuts(11)
tighteningsecurely.
Operation
Never operate a chain saw that is damaged or improperly adjusted or
that is not completely and securely assembled. Be sure that the saw
chain stops moving when the power control system triggers are
released. Never adjust the guide bar or saw chain when the engine is
operating.
/.'\WARNING: Let the tool work at its own pace. Do not overload.
- Carry out regular cleaning of the unit as described in the
maintenance section and in particular cleaning inside the chain
access cover.
- The lower guard (7) and top jaw (6) are designed to close when
one of the handles is released or when the piece of branch being
cut has been cut. If this does not occur, discontinue use of the tool
and remove the power cord. Check if any debris is blocking
movement. To help in this process it may be necessary to remove
chain access cover(12). If on assembly the problem is still present
take the unit to a service center.
Extension Cord (fig. E)
To reduce the risk of disconnection of appliance cord from the
extension cord during operation make a knot as shown in Figure E on
page 8.
NOTE" Always keep the cord away from the cutting area and position
the cord so that it will not be caught on branches, and other material,
during cutting.
Oiling (fig. F)
A high quality bar and chain oil or SAE30 weight motor oil should be
used for chain and bar lubrication. The use of a vegetable based bar
and chain oil is recommended when pruning trees. Never use waste
oil or very thick oil. These may damage your chain saw.
- Before first use and every ten minutes of use you must oil the
product with the recommended chain oil. Open the oiling cover (10)
and insert the bottle into the oil filling hole (15) apply pressure to the
bottle once to dispense oil.
- This should be adequate for about 10 minutes of cutting
depending upon cutting speed and type of wood.
- The hole feeds the oil through to the chain onto the chain bar and
an excessive amount of oil applied to the unit could mean the oil
drips from the unit around the jaw area. This is normal and is
nothing to be concerned about.
Switching on and off (fig. G)
For your safety, this tool is equipped with a double switching
system. This system prevents starting the tool inadvertently.
A chain saw is intended for two-handed use. Serious injury to the
operator, helpers, and/or bystanders can result from one-handed
operation.
Switching on
Ensure a firm grip on the handles and then squeeze both switch
actuators to switch the unit on.
Note: Both switches must be activated for the product to be used.
Do not force the tool - allow it to do the work. It will do a better and
safer job at the speed for which it is designed. Excessive force will
stretch the chain.
Ifthe saw chain or bar becomes jammed:
- Switch the tool off.
- Disconnect the tool from the power supply.
- Open the cut with wedges to relieve the strain on the guide bar.
Do not try to wrench the saw free. Start a fresh cut.
Trimming branches
- Make sure the tool is running at full speed before making a cut.
- Hold the tool firmly in place to avoid possible bouncing or
sideways movement of the tool.
- Guide the tool using light pressure.
- Always cut down from the top. This way you will avoid pinching
the saw chain.
11

- Remove branches as shown in Fig H. Starting from branch tip
reduce the branch in logical steps cutting off small sections. "When
cutting a limb that is under tension be aware of spring back.
- When the tension in the wood fibres are released the spring
loaded limb may strike the operator and/or throw the tool out of
control"
- Remove the tool from the cut while it is running at full speed.
Maintenance
Your Black & Decker tool has been designed to operate over a long
period of time with a minimum of maintenance. Continuous
satisfactory operation depends upon proper tool care and regular
cleaning.
Ifthe replacement of the supply cord is necessary, this has to be
done by the manufacturer or his agent in order to avoid a safety
hazard.
Z_WARNING: Before performing any maintenance or cleaning of
the tool, unplug the unit from the power supply.
Cleaning
- Regularly remove the chain access cover and remove any debris
that has become trapped.
- Regularly clean the ventilation slots with a clean, dry paint brush.
- To clean the tool, use only mild soap and a damp cloth. Never let
any liquid get inside the tool and never immerse any part of the tool
into liquid.
Oiling
- Regularly oil the oiling points (15) as indicated in figure F.
Transporting
- Always transport the tool with the jaws closed.
Storage
- When the tool will not be used for several months, wipe any metal
components with oil.
- Store the tool in a secure and dry location. The storage
temperature must always remain inthe range of 41 °F (+5 °C) to
104°F (+40 °C). Place the product on a level safe location.
IMPORTANT: To assure product SAFETY and RELIABILITY, repairs,
maintenance and adjustment should be performed by authorized
service centers or other qualified service organizations, always using
identical replacement parts.
Accessories
Replacement chain and bar are available from your nearest Black &
Decker service center.
Replacement chain catalog number RC600
The use of accessories not recommended in this manual may be
hazardous.
Service Information
Whether you need technical advice, repair, or genuine factory
replacement parts, contact the Black & Decker location nearest you.
To findyour local serv,ice location, refer to the yellow page directory
under Tools-Electric or call: 1-800-54-HOW TO (544-6986).
Full Two-Year Home Use Warranty
Black & Decker (U.S.) Inc. warrants this product for two years against
any defects in material or workmanship. The defective product will be
replaced or repaired at no charge in either of two ways:
The first, which will result in exchanges only, is to return the product
to the retailer from whom it was purchased (provided that the store is
a participating retailer). Returns should be made within the time
period of the retailer's policy for exchanges (usually 30 to 90 days
after the sale). Proof of purchase may be required. Please check
with the retailer tor their specific return policy regarding returns that
are beyond the time set for exchanges.
The second option is to take or send the product (prepaid) to a Black
& Decker owned or authorized Service Center for repair or
replacement at our option. Proof of purchase may be required. Black
& Decker owned and authorized service centers are listed under
"Tools-Electric" in the yellow pages of the phone directory.
This warranty does not apply to accessories. This warranty gives you
specific lega/rights and you may have other rights which vary from
state to state. Should you have any questions, contact the manager
of your nearest Black & Decker Service Center. This product is not
intended for commercial use.
12
 Loading...