

Page 1
www.blackanddecker.ae
KG2300
Page 2
ENGLISH
4
1
2
3
5
2
Page 3
ENGLISH
5
8
14
A
10
6
9
7
9
12
13
11
6
B
14
12
11
6
14
15 14 12
C
12
11
6
4
D
3
Page 4
ENGLISH
Intended use
Your Black & Decker angle grinder has been
designed for grinding and cutting metal and
masonry using the appropriate type of cutting or
grinding disc. When fitted with the appropriate
guard, this tool is intended for consumer use
only.
Safety instructions
General power tool safety warnings
Warning! Read all safety warnings and
all instructions. Failure to follow the
warnings and instructions listed below may
result in electric shock, fire and/or serious injury.
Save all warnings and instructions for future
reference.
The term "power tool" in all of the warnings
listed below refers to your mains operated
(corded) power tool or battery operated
(cordless) power tool.
1. Work area safety
a. Keep work area clean and well lit. Cluttered
or dark areas invite accidents.
b. Do not operate power tools in explosive
atmospheres, such as in the presence of
flammable liquids, gases or dust. Power
tools create sparks which may ignite the dust
or fumes.
c. Keep children and bystanders away while
operating a power tool. Distractions can
cause you to lose control.
2. Electrical safety
a. Power tool plugs must match the outlet.
Never modify the plug in any way. Do not use
any adapter plugs with earthed (grounded)
power tools. Unmodified plugs and matching
outlets will reduce risk of electric shock.
4
b. Avoid body contact with earthed or grounded
surfaces such as pipes, radiators, ranges and
refrigerators. There is an increased risk of
electric shock if your body is earthed or
grounded.
c. Do not expose power tools to rain or wet
conditions. Water entering a power tool will
increase the risk of electric shock.
d. Do not abuse the cord. Never use the cord for
carrying, pulling or unplugging the power tool.
Keep cord away from heat, oil, sharp edges
or moving parts. Damaged or entangled cords
increase the risk of electric shock.
e. When operating a power tool outdoors, use
an extension cord suitable for outdoor use.
Use of a cord suitable for outdoor use
reduces the risk of electric shock.
f. If operating a power tool in a damp location is
unavoidable, use a residual current device
(RCD) protected supply. Use of an RCD
reduces the risk of electric shock.
3. Personal safety
a. Stay alert, watch what you are doing and use
common sense when operating a power tool.
Do not use a power tool while you are tired or
under the influence of drugs, alcohol or
medication. A moment of inattention while
operating power tools may result in serious
personal injury.
b. Use personal protective equipment. Always
wear eye protection. Protective equipment
such as dust mask, non-skid safety shoes,
hard hat, or hearing protection used for
appropriate conditions will reduce personal
injuries.
c. Prevent unintentional starting. Ensure the
switch is in the off-position before connecting
to power source and/or battery pack, picking
up or carrying the tool. Carrying power tools
with your finger on the switch or energising
power tools that have the switch on invites
accidents.
Page 5
ENGLISH
d. Remove any adjusting key or wrench before
turning the power tool on. A wrench or a key
left attached to a rotating part of the power
tool may result in personal injury.
e. Do not overreach. Keep proper footing and
balance at all times. This enables better
control of the power tool in unexpected
situations.
f. Dress properly. Do not wear loose clothing or
jewellery. Keep your hair, clothing and gloves
away from moving parts. Loose clothes,
jewellery or long hair can be caught in
moving parts.
g. If devices are provided for the connection of
dust extraction and collection facilities,
ensure these are connected and properly
used. Use of dust collection can reduce
dust-related hazards.
4. Power tool use and care
a. Do not force the power tool. Use the correct
power tool for your application. The correct
power tool will do the job better and safer at
the rate for which it was designed.
b. Do not use the power tool if the switch does
not turn it on and off. Any power tool that
cannot be controlled with the switch is
dangerous and must be repaired.
c. Disconnect the plug from the power source
and/or the battery pack from the power tool
before making any adjustments, changing
accessories, or storing power tools. Such
preventive safety measures reduce the risk
of starting the power tool accidentally.
d. Store idle power tools out of the reach of
children and do not allow persons unfamiliar
with the power tool or these instructions to
operate the power tool. Power tools are
dangerous in the hands of untrained users.
e. Maintain power tools. Check for misalignment
or binding of moving parts, breakage of parts
and any other condition that may affect the
power tools operation. If damaged, have the
power tool repaired before use. Many
accidents are caused by poorly maintained
power tools.
f. Keep cutting tools sharp and clean. Properly
maintained cutting tools with sharp cutting
edges are less likely to bind and are easier to
control.
g. Use the power tool, accessories and tool bits
etc. in accordance with these instructions,
taking into account the working conditions
and the work to be performed. Use of the
power tool for operations different from those
intended could result in a hazardous situation.
5. Service
a. Have your power tool serviced by a qualified
repair person using only identical
replacement parts. This will ensure that the
safety of the power tool is maintained.
Additional power tool safety
warnings
Warning! Additional safety warnings for
grinding, sanding, wire brushing,
polishing or abrasive cutting-off operations
• This power tool is intended to function as a
grinder, sander, wire brush, polisher or cut-off
tool. Read all safety warnings, instructions,
illustrations and specifications provided with
this power tool. Failure to follow all
instructions listed below may result in electric
shock, fire and/or serious injury.
• Operations for which the power tool was not
designed may create a hazard and cause
personal injury.
5
Page 6

ENGLISH
• Do not use accessories which are not
specifically designed and recommended by
the tool manufacturer. Just because the
accessory can be attached to your power
tool, it does not assure safe operation.
• The rated speed of the accessory must be at
least equal to the maximum speed marked
on the power tool. Accessories running faster
than their rated speed can break and fly
apart.
• The outside diameter and the thickness of
your accessory must be within the capacity
rating of your power tool. Incorrectly sized
accessories cannot be adequately guarded
or controlled.
• The arbour size of wheels, flanges, backing
pads or any other accessory must properly fit
the spindle of the power tool. Accessories
with arbour holes that do not match the
mounting hardware of the power tool will run
out of balance, vibrate excessively and may
cause loss of control.
• Do not use a damaged accessory. Before
each use inspect the accessory such as
abrasive wheels for chips and cracks,
backing pad for cracks, tear or excess wear,
wire brush for loose or cracked wires. If
power tool or accessory is dropped, inspect
for damage or install an undamaged
accessory. After inspecting and installing an
accessory and run the power tool at
maximum no-load speed for one minute.
Damaged accessories will normally break
apart during this test time.
• Wear personal protective equipment.
Depending on application, use face shield,
safety goggles or safety glasses. As
appropriate, wear dust mask, hearing
protectors, gloves and workshop apron
capable of stopping small abrasive or
workpiece fragments. The eye protection
must be capable of stopping flying debris
6
generated by various operations. The dust
mask or respirator must be capable of filtering
particles generated by your operation.
Prolonged exposure to high intensity noise
may cause hearing loss.
• Keep bystanders a safe distance away from
work area. Anyone entering the work area
must wear personal protective equipment.
Fragments of workpiece or of a broken
accessory may fly away and cause injury
beyond immediate area of operation.
• Hold power tool by insulated gripping
surfaces only, when performing an operation
where the cutting accessory may contact
hidden wiring or its own cord. Cutting
accessory contacting a "live" wire may make
exposed metal parts of the power tool "live"
and shock the operator.
• Position the cord clear of the spinning
accessory. If you lose control, the cord may
be cut or snagged and your hand or arm may
be pulled into the spinning accessory.
• Never lay the power tool down until the
accessory has come to a complete stop. The
spinning accessory may grab the surface and
pull the power tool out of your control.
• Do not run the power tool while carrying it at
your side. Accidental contact with the
spinning accessory could snag your clothing,
pulling the accessory into your body.
• Regularly clean the power tool's air vents.
The motor's fan will draw the dust inside the
housing and excessive accumulation of
powdered metal may cause electrical
hazards.
• Do not operate the power tool near flammable
materials. Sparks could ignite these
materials.
• Do not use accessories that require liquid
coolants. Using water or other liquid coolants
may result in electrocution or shock.
Page 7

ENGLISH
Note: The above warning does not apply for
power tools specifically designed for use with a
liquid system.
Kickback and related warnings
Kickback is a sudden reaction to a pinched or
snagged rotating wheel, backing pad, brush or
any other accessory. Pinching or snagging
causes rapid stalling of the rotating accessory
which in turn causes the uncontrolled power tool
to be forced in the direction opposite of the
accessory's rotation at the point of the binding.
For example, if an abrasive wheel is snagged or
pinched by the workpiece, the edge of the wheel
that is entering into the pinch point can dig into
the surface of the material causing the wheel to
climb out or kick out. The wheel may either jump
toward or away from the operator, depending on
direction of the wheel's movement at the point of
pinching. Abrasive wheels may also break under
these conditions.
Kickback is the result of power tool misuse
and/or incorrect operating procedures or
conditions and can be avoided by taking proper
precautions as given below.
• Maintain a firm grip on the power tool and
position your body and arm to allow you to
resist kickback forces. Always use auxiliary
handle, if provided, for maximum control over
kickback or torque reaction during start-up.
The operator can control torque reactions or
kickback forces, if proper precautions are
taken.
• Never place your hand near the rotating
accessory. Accessory may kickback over
your hand.
• Do not position your body in the area where
power tool will move if kickback occurs.
Kickback will propel the tool in direction
opposite to the wheel's movement at the
point of snagging.
• Use special care when working corners,
sharp edges etc. Avoid bouncing and
snagging the accessory. Corners, sharp
edges or bouncing have a tendency to snag
the rotating accessory and cause loss of
control or kickback.
• Do not attach a saw chain woodcarving blade
or toothed saw blade. Such blades create
frequent kickback and loss of control.
Additional safety warnings
specific for abrasive cutting-off
operations
• Do not "jam" the cut-off wheel or apply
excessive pressure. Do not attempt to make
an excessive depth of cut. Over stressing the
wheel increases the loading and susceptibility
to twisting or binding of the wheel in the cut
and the possibility of kickback or wheel
breakage.
• Do not position your body in line with and
behind the rotating wheel. When the wheel, at
the point of operation, is moving away from
your body, the possible kickback may propel
the spinning wheel and the power tool directly
at you.
• When wheel is binding or when interrupting a
cut for any reason, switch off the power tool
and hold the power tool motionless until the
wheel comes to a complete stop. Never
attempt to remove the cut-off wheel from the
cut while the wheel is in motion otherwise
kickback may occur. Investigate and take
corrective action to eliminate the cause of
wheel binding.
• Do not restart the cutting operation in the
workpiece. Let the wheel reach full speed and
carefully re-enter the cut. The wheel may
bind, walk up or kickback if the power tool is
restarted in the workpiece.
7
Page 8

ENGLISH
• Support panels or any oversized workpiece
to minimize the risk of wheel pinching and
kickback. Large workpieces tend to sag
under their own weight. Supports must be
placed under the workpiece near the line of
cut and near the edge of the workpiece on
both sides of the wheel.
• Use extra caution when making a "pocket
cut" into existing walls or other blind areas.
The protruding wheel may cut gas or water
pipes, electrical wiring or objects that can
cause kickback.
Safety warnings specific for sanding
operations
• Do not use excessively oversized sanding
disc paper. Follow manufacturers
recommendations, when selecting sanding
paper. Larger sanding paper extending
beyond the sanding pad presents a
laceration hazard and may cause snagging,
tearing of the disc or kickback.
Safety warnings specific for polishing
operations
• Do not allow any loose portion of the
polishing bonnet or its attachment strings to
spin freely. Tuck away or trim any loose
attachment strings. Loose and spinning
attachment strings can entangle your fingers
or snag on the workpiece.
Safety warnings specific for wire brushing
operations
• Be aware that wire bristles are thrown by the
brush even during ordinary operation. Do not
overstress the wires by applying excessive
load to the brush. The wire bristles can easily
penetrate light clothing and/or skin.
• If the use of a guard is recommended for wire
brushing, do not allow any interference of the
wire wheel or brush with the guard. Wire
wheel or brush may expand in diameter due
to work load and centrifugal forces.
Safety of others
• This appliance is not intended for use by
persons (including children) with reduced
physical, sensory or mental capabilities, or
lack of experience and knowledge, unless
they have been given supervision or
instruction concerning use of the appliance by
a person responsible for their safety.
• Children should be supervised to ensure that
they do not play with the appliance.
Vibration
The declared vibration emission values stated in
the technical data and the declaration of
conformity have been measured in accordance
with a standard test method provided by EN
60745 and may be used for comparing one tool
with another. The declared vibration emission
value may also be used in a preliminary
assessment of exposure.
Warning! The vibration emission value during
actual use of the power tool can differ from the
declared value depending on the ways in which
the tool is used. The vibration level may increase
above the level stated.
When assessing vibration exposure to determine
safety measures required by 2002/44/EC to
protect persons regularly using power tools in
employment, an estimation of vibration exposure
should consider, the actual conditions of use and
the way the tool is used, including taking account
of all parts of the operating cycle such as the
times when the tool is switched off and when it is
running idle in addition to the trigger time.
8
Page 9
ENGLISH
Labels on tool
The following pictograms are shown on the tool:
Warning! To reduce the risk of injury,
the user must read the instruction
manual.
Wear safety glasses or goggles when
operating this tool.
Wear ear protection when operating
this tool.
Electrical safety
This tool is double insulated; therefore
no earth wire is required. Always check
that the power supply corresponds to
the voltage on the rating plate.
• If the supply cord is damaged, it must be
replaced by the manufacturer or an
authorised Black & Decker Service Centre in
order to avoid a hazard.
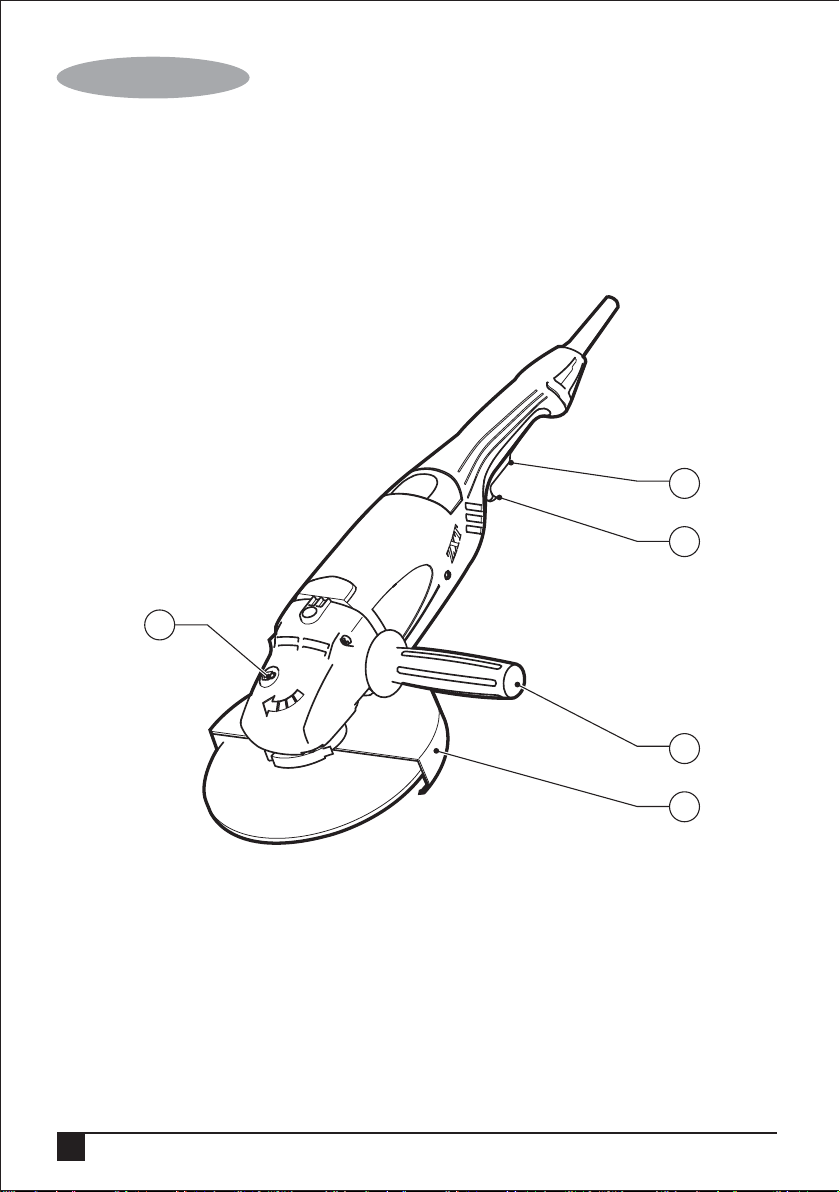
Features
This tool includes some or all of the following
features.
1. On/off switch
2. Lock-off button
3. Side handle
4. Spindle lock
5. Guard
Assembly
Warning! Before assembly, make sure that the
tool is switched off and unplugged.
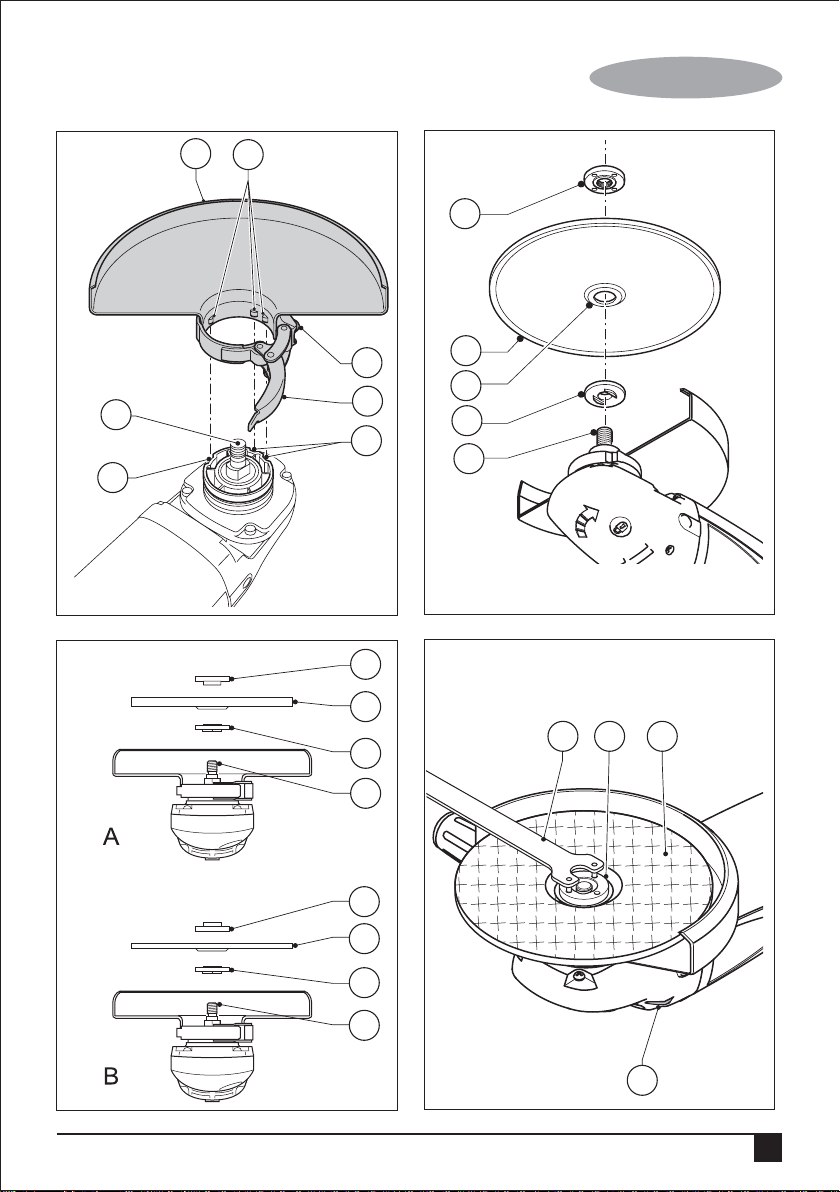
Fitting and removing the guard
(fig. A)
The tool is supplied with a guard intended for
grinding purposes only. If the unit is intended to
perform cutting off operations, a guard specific
for this operation must be fitted. A suitable guard
for cutting off operations part number
1004484-02 is available and can be obtained
from Black & Decker service centres.
Fitting
• Place the tool on a table, with the spindle (6)
facing up.
• Release the clamping lock (7) and hold the
guard (5) over the tool as shown.
• Align the lugs (8) with the notches (9).
• Press the guard down and rotate it
counterclockwise to the required position.
• Fasten the clamping lock to secure the guard
to the tool.
• If required, tighten the screw (10) to increase
the clamping force.
Removing
• Release the clamping lock (7).
• Rotate the guard clockwise to align the lugs
(8) with the notches (9).
• Remove the guard from the tool.
Adjusting the guard (fig. A)
The guard can be rotated 90°.
• Rotate the guard as required.
Fitting the side handle (fig. B)
• Screw the side handle (3) into one of the
mounting holes in the tool.
Warning! Always use the side handle.
Fitting and removing grinding or
cutting discs (fig. B - D)
Always use the correct type of disc for your
application. Always use discs with the correct
diameter and bore size (see technical data).
9
Page 10

ENGLISH
Fitting
•
Fit the guard as described above.
• Place the inner flange (11) onto the spindle
(6) as shown (fig. B). Make sure that the
flange is correctly located on the flat sides of
the spindle.
• Place the disc (12) onto the spindle (6) as
shown (fig. B). If the disc has a raised centre
(13), make sure that the raised centre faces
the inner flange.
• Make sure that the disc locates correctly on
the inner flange.
• Place the outer flange (14) onto the spindle.
When fitting a grinding disc, the raised centre
on the outer flange must face towards the
disc (A in fig. C). When fitting a cutting disc,
the raised centre on the outer flange must
face away from the disc (B in fig. C).
• Keep the spindle lock (4) depressed and
tighten the outer flange using the two-pin
spanner (15) (fig. D).
Removing
•
Keep the spindle lock (4) depressed and
loosen the outer flange (14) using the
two-pin spanner (15) (fig. D).
• Remove the outer flange (14) and the disc
(12).
Use
• Warning! Let the tool work at its own pace.
Do not overload.
• Carefully guide the cable in order to avoid
accidentally cutting it.
• Be prepared for a stream of sparks when the
grinding or cutting disc touches the
workpiece.
• Always position the tool in such a way that
the guard provides optimum protection from
the grinding or cutting disc.
Switching on and off
• To switch the tool on, move the lock-off button
(2) into the unlock position and squeeze the
on/off switch (1).
• To switch the tool off, release the on/off
switch.
Warning! Do not switch the tool off while under
load.
Hints for optimum use
• Firmly hold the tool with one hand around the
side handle and the other hand around the
main handle.
• When grinding, always maintain an angle of
approx. 15° between the disc and the
workpiece surface.
Maintenance
Your Black & Decker corded/cordless
appliance/tool has been designed to operate
over a long period of time with a minimum of
maintenance. Continuous satisfactory operation
depends upon proper tool care and regular
cleaning.
Warning! Before performing any maintenance
on corded/cordless power tools:
• Switch off and unplug the appliance/tool.
• Or switch off and remove the battery from the
appliance/tool if the appliance/tool has a
separate battery pack.
• Or run the battery down completely if it is
integral and then switch off.
10
Page 11
ENGLISH
• Unplug the charger before cleaning it. Your
charger does not require any maintenance
apart from regular cleaning.
• Regularly clean the ventilation slots in your
appliance/tool/charger using a soft brush or
dry cloth.
• Regularly clean the motor housing using a
damp cloth. Do not use any abrasive or
solvent-based cleaner.
• Regularly open the chuck and tap it to
remove any dust from the interior (when
fitted).
Mains Plug Replacement
If a new mains plug needs to be fitted:
• Safely dispose of the old plug.
• Connect the brown lead to the live terminal of
the new plug.
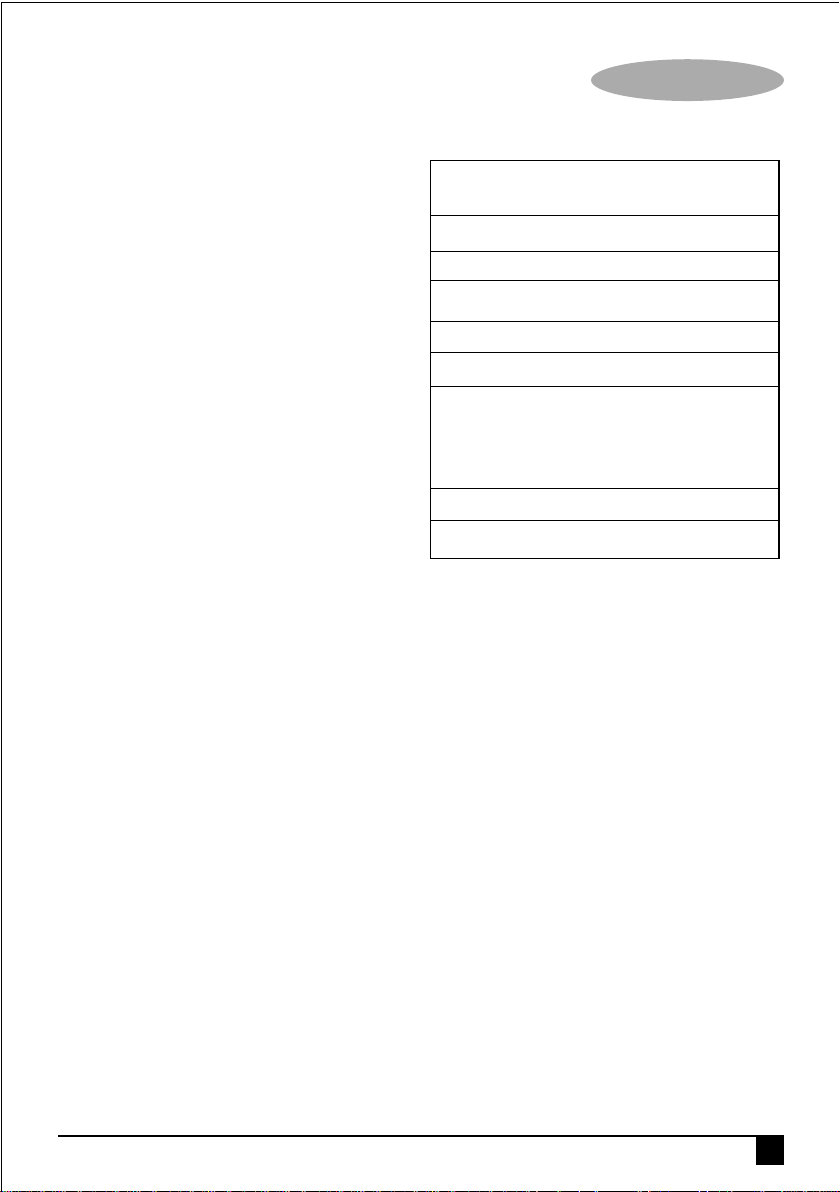
Technical Data
KG2300
Type 2
Input voltage Vac 220-240
Power input W 2,300
No-load speed min
Disc diameter mm 230
Disc bore mm 22
Max. disc thickness
Grinding discs mm 6
Cutting discs mm 3
Spindle size M14
Weight kg 6.4
-1
6,000
• Connect the blue lead to the neutral terminal.
• If the product is class l (earthed), connect the
green / yellow lead to the earth terminal.
Warning! If your product is class ll double
insulated (only 2 wires in the cord set), no
connection is to be made to the earth terminal.
Follow the fitting instructions supplied with good
quality plugs.
Any replacement fuse must be of the same
rating as the original fuse supplied with the
product.
11
Page 12

ENGLISH
Protecting the environment
Separate collection. This product must not
be disposed of with normal household
waste.
Should you find one day that your Black &
Decker product needs replacement, or if it is of
no further use to you, do not dispose of it with
other household waste. Make this product
available for separate collection.
• Black & Decker provides a facility for
recycling Black & Decker products once they
have reached the end of their working life.
This service is provided free of charge. To
take advantage of this service please return
your product to any authorised repair agent
who will collect them on our behalf.
• You can check the location of your nearest
authorised repair agent by contacting your
local Black & Decker office at the address
indicated in this manual. Alternatively, a list of
authorized Black & Decker repair agents and
full details of our after-sales service and
contact are available on the Internet at:
www.2helpU.com.
Warranty
If a Black & Decker product becomes defective
due to a material or manufacturing defect , within
12 months from the date of purchase, Black &
Decker guarantees to replace defective parts or
replace such products to ensure minimum
inconvenience to the customer unless:
• The product has been subjected to misuse or
neglect.
• The product has sustained damage through
foreign objects, substances or accidents.
• Repairs have been attempted by persons
other than authorised repair agents or Black
& Decker service staff.
To claim on the warranty, you will need to submit
proof of purchase to the seller or an authorised
repair agent. You can check the location of your
nearest authorised repair agent by contacting
your local Black & Decker office at the address
indicated in this manual. Alternatively, a list of
authorised Black & Decker repair agents and full
details of our after-sales service and contacts are
available on the Internet at: www.2helpU.com.
Please visit our website www.blackanddecker.ae
to register your new Black & Decker product and
to be kept up to date on new products and
special offers. Further information on the Black &
Decker brand and our range of products is
available at www.blackanddecker.ae.
12
Page 13

ARABIC
1
2
4
3
5
13
Page 14

ARABIC
5
8
14
A
10
6
9
7
9
12
13
11
6
B
14
12
11
6
14
15 14 12
C
14
12
11
6
4
D
Page 15

ARABIC
Ö«HÉfC’G πãe á°VQDƒŸG í£°SCÓd ∂ª°ùL á°ùeÓe ÖæŒ .Ü
ôWÉfl OGOõJ å«M ,äÉLÓãdGh óbGƒŸGh áÄaóàdG Iõ¡LC
.Ék°VQDƒe ∂ª°ùL ¿Éc GPEG á«FÉHô¡c áeó°üH ∂àHÉ°UEG
,áÑWôdG AGƒLC’G hCG ô£ª∏d á«FÉHô¡μdG Iõ¡LC’G ¢Vô©J ’ .ê
¤EG »FÉHô¡μdG RÉ¡÷G πNGO AÉŸG ∫ƒNO …ODƒj ±ƒ°ùa
.á«FÉHô¡c áeó°üH áHÉ°UE’G ôWÉfl IOÉjR
.ÅWÉN πμ°ûH »FÉHô¡μdG QÉ«àdG ∂∏°S ΩGóîà°SG ΩóY Öéj .O
RÉ¡÷G πª◊ »FÉHô¡μdG QÉ«àdG ∂∏°S Ék≤∏£e Ωóîà°ùJ ’
ɪc .»FÉHô¡μdG QÉ«àdG øY ¬∏°üa hCG ¬Ñë°S hCG »FÉHô¡μdG
IQGô◊G øY Gkó«©H »FÉHô¡μdG QÉ«àdG ∂∏°ùH ®ÉØàM’G Öéj
kɪ∏Y .ácôëàŸG AGõLC’G hCG IOÉ◊G ±Gƒ◊G hCG âjõdG hCG
ôWÉfl øe ójõJ áμHÉ°ûàŸG hCG áØdÉàdG ∑Ó°SC’G ¿CÉH
.á«FÉHô¡c áeó°üH áHÉ°UE’G
Öéj ,êQÉÿG ‘ »FÉHô¡μdG RÉ¡÷G 𫨰ûJ óæY .`g
,»LQÉÿG ΩGóîà°SÓd Ö°SÉæŸG π«°UƒàdG ∂∏°S ΩGóîà°SG
Ö°SÉæŸG »FÉHô¡μdG QÉ«àdG ∂∏°S ΩGóîà°SG ¿C’ kGô¶f
áeó°üd ¢Vô©àdG ôWÉfl øe π∏≤j »LQÉÿG ΩGóîà°SÓd
Öéj ,ÖWQ ¿Éμe ‘ »FÉHô¡μdG RÉ¡÷G 𫨰ûJ ºà– GPEG .h
¿C’ kGô¶f ,»≤ÑàŸG QÉ«àdG øe ájÉbh RÉ¡L ΩGóîà°SG
øe π∏≤j »≤ÑàŸG QÉ«àdG øe ájÉbh RÉ¡L ΩGóîà°SG
.á«FÉHô¡c áeó°üH áHÉ°UE’G ôWÉfl
á«°üî°ûdG áeÓ°ùdG .3
óæY º«∏°ùdG ¢ù◊G Ωóîà°SGh ¬∏©ØJ ÉŸ ¬ÑàfGh kGQòM øc .CG
»FÉHô¡μdG RÉ¡÷G Ωóîà°ùJ ’ .»FÉHô¡μdG RÉ¡÷G 𫨰ûJ
äÉHhöûŸG hCG ÒbÉ≤©dG ÒKCÉJ â– hCG É
AÉæKCG á∏بdG øe á¶◊ ÖÑ°ùàJ ó≤a ,ájhOC’G hCG á«dƒëμdG
á«°üî°T áHÉ°UEG çhóM ‘ á«FÉHô¡μdG Iõ¡LC’G 𫨰ûJ
m¥Gh ÉkehO …óJQG .á«°üî°ûdG ájÉbƒdG äGó©e Ωóîà°SG .Ü
äÉeɪc πãe ,ájÉbƒdG äGó©e ΩGóîà°SG ¿C’ ,Úæ«©∏d
áÑ∏°üdG äGPƒÿGh ¥’õfÓd á©fÉŸG ájòMC’Gh áHôJC’G
äÉHÉ°UEG çhóM ôWÉfl øe π∏≤j ,™ª°ùdG ájÉbh äGhOCGh
¿hO ∫ƒë∏d áeRÓdG äÉWÉ«àM’G áaÉc PÉîJG Öéj .ê
óY ™°Vh ‘ ìÉàØŸG ¿CG ócCÉJ .ó°üb ¿hO RÉ¡÷G 𫨰ûJ
hCG/h »FÉHô¡μdG QÉ«àdG Qó°üà π«°UƒàdG πÑb 𫨰ûàdG
πªM ¿CG PE
™°Vh ‘ ìÉàØŸGh ábÉ£dÉH á«FÉHô¡μdG Iõ¡LC’G ójhõJ
G .¬∏ªM hCG RÉ¡÷G ™aQ hCG ,äÉjQÉ£ÑdG Ö«côJ
hCG ìÉàت∏d á°ùeÓe ™HÉ°UC’Gh á«FÉHô¡μdG Iõ¡LC’G
.çOGƒM ´ƒbh ¤EG …ODƒj 𫨰ûàdG
μ¡æe âæc GPEG
k
Gh
.á«FÉHô¡c
.á¨dÉH
.á«°üî°T
ΩGóîà°S’G ¢VôZ
ï∏÷ ôμjO ófBG ∑ÓH á«fGƒ£°S’G ï∏÷G áæ«cÉe º«ª°üJ ”
Ö°SÉæŸG ´ƒædG ΩGóîà°SÉH AÉæÑdG OGƒeh ¿OÉ©ŸG ™«£≤Jh
ºª°üe RÉ¡÷G Gòg ¿CÉH kɪ∏Y ,™«£≤àdG hCG ï∏÷G ¢UGôbCG øe
äGhOCÉH √ójhõJ á£jöT ;§≤a ∂∏¡à°ùŸG ᣰSGƒH ¬eGóîà°S’
.áeRÓdG ájÉbƒdG
áeÓ°ùdG äGOÉ°TQEG
á«FÉHô¡μdG Iõ¡LC’G ¢Uƒ°üîH áeÉ©dG áeÓ°ùdG äGôjò–
äGOÉ°TQEGh äGôjò– áaÉc IAGôb »¨Ñæj !ôjò–
äGôjòëàdG áaÉc ´ÉÑJEG ΩóY ÖÑ°ùàj ó≤a .áeÓ°ùdG
hCG á«FÉHô¡c áeó°U çhóM ‘ √ÉfOCG IQƒcòŸG äGOÉ°TQE’Gh
.kÉ©e AÉ«°TC’G √òg ™«ªL hCG IÒ£N áHÉ°UEG hCG ≥jôM
´ƒLô∏d äGOÉ°TQE’Gh äGôjòëàdG áaÉμH ®ÉØàM’G ≈Lôj
.kÓÑ≤à°ùe É¡«dEG
áaÉc ‘ OQGƒdG "»FÉHô¡c RÉ¡L" í∏£°üŸG Ò°ûj
…òdG »FÉHô¡μdG RÉ¡÷G ¤EG √ÉfOCG IQƒcòŸG äGôjòëàdG
»FÉHô¡μdG RÉ¡÷G hCG (É
É¡JAÉ°VEGh πª©dG á≤£æe áaɶf ≈∏Y ®ÉØ◊G »¨Ñæj .CG
ΩÉcôdÉH á¶àμŸG hCG áª∏¶ŸG ≥WÉæŸG ÖÑ°ùàJ PEG ,Gkó«L
á∏HÉb AGƒLCG ‘ á«FÉHô¡μdG Iõ¡LC’G 𫨰ûàH º≤J ’ .Ü
hCG äGRÉZ hCG πFGƒ°S OƒLh ‘ É¡∏«¨°ûJ πãe ;QÉéØfÓd
á«FÉHô¡μdG Iõ¡LC’G ¿C’ kGô¶f ,∫É©à°TÓd πHÉb QÉÑZ
hCG QÉѨdG ∫É©à°TG ¤EG …ODƒJ ób äGQGöT É¡æY èàæj
RÉ¡÷G 𫨰ûJ AÉæKCG IQÉŸGh ∫ÉØWC’G OÉ©HEG »¨Ñæj .ê
Iô£«°ù∏d ∂fGó≤a ‘ AÉ¡dE’G ÖÑ°ùàj ó≤a ,»FÉHô¡μdG
™e á≤aGƒàe »FÉHô¡μdG RÉ¡÷G ¢ùHGƒb ¿ƒμJ ¿CG Öéj .CG
¢ùHÉ≤dG πjó©J Ék≤∏£e ÖæŒ .»FÉHô¡μdG QÉ«àdG òNCÉe
™e ä’ƒfi ¢ùHGƒb ájCG Ωóîà°ùJ ’h ,á≤jôW ájCÉH
ádó©ŸG ÒZ ¢ùHGƒ≤dG ΩGóîà°SG ¿C’ ,á°VQDƒŸG Iõ¡LC’G
π«∏≤J ¤EG …ODƒj á≤aGƒàŸG »FÉHô¡μdG QÉ«àdG òNBÉeh
«μ∏°S) »FÉHô¡μdG QÉ«àdÉH πª©j
k
.(Ék«μ∏°S’) ájQÉ£ÑdÉH πª©j …òdG
πª©dG á≤£æe áeÓ°S .1
.çOGƒ◊G ´ƒbh ‘
.áæNOC’G
.RÉ¡÷G ≈∏Y
á«FÉHô¡μdG áeÓ°ùdG .2
.á«FÉHô¡c áeó°üd ¢Vô©àdG ôWÉfl
15
Page 16

ARABIC
¢üëaG .á«FÉHô¡µdG Iõ¡LCÓd ájQhO áfÉ«°U AGôLEG Öéj .`g
¥ƒ©J »àdG hCG ¬«a áÑ«©ŸG AGõLC’G ≈∏Y ±ô©à∏d RÉ¡÷G
AGõLC’G øe √ƒ∏N øe ócCÉàdGh ácôëàŸG AGõLC’G ácôM
IAÉØc ≈∏Y ôKDƒj ób ôNBG A»°T …CG øeh IQƒ°ùµŸG
RÉ¡÷G ìÓ°UEG Öéj ,∞∏J …CG ±É°ûàcG ” GPEGh .¬∏«¨°ûJ
øe ójó©dG ¿CÉH kɪ∏Y ,¬eGóîà°SG πÑb »FÉHô¡µdG
.á«FÉHô¡µdG Iõ¡LC’G áfÉ«°U Aƒ°S ÖÑ°ùH ™≤J çOGƒ◊G
¿C’ ,áØ«¶fh
Ö°SÉæŸG πµ°ûdÉH É¡«∏Y ®ÉØ◊G ºàj »àdG ™£≤dG äGhOCG
∫É£YCÓd á°VôY πbCG IOÉM á©WÉb äGôØ°ûH IOhõŸGh
¬FGõLCGh ¬JÉ≤ë∏eh »FÉHô¡µdG RÉ¡÷G ΩGóîà°SG Öéj .R
±hôX òNCG ™e ,äGOÉ°TQE’G √ò¡d Ék≤ah ∂dP ¤EG Éeh
ó≤a ,QÉÑàY’G ‘ √ò«ØæJ OGôŸG πª©dGh ᣫëŸG πª©dG
äÉ«∏ªY πLCG øe »FÉHô¡µdG RÉ¡÷G ΩGóîà°SG ÖÑ°ùàj
çhóM ‘ É¡∏LCG øe ºª°üŸG ¢VGôZC’G iƒ°S 𫨰ûJ
ᣰSGƒH »FÉHô¡µdG RÉ¡÷G ìÓ°UEGh áfÉ«°U Öéj .CG
∂dP ¿C’ ,á≤HÉ£e QÉ«Z ™£b ΩGóîà°SÉH πgDƒe ¢üî°T
IOÉM ™£≤dG äGhOCG ≈∏Y ®ÉØ◊G »¨Ñæj .h
k
.ºµëàdG ‘ π¡°SCGh
.ôWÉfl
áfÉ«°üdG .5
.»FÉHô¡µdG RÉ¡÷G áeÓ°S øª°†j
RÉ¡÷G ¢Uƒ°üîH á«aÉ°VEG áeÓ°S äGôjò–
»FÉHô¡µdG
¢Uƒ°üîH á«aÉ°VEG áeÓ°S äGôjò– !ôjò–
¢TôØdÉH ∞«¶æàdG hCG IôØæ°üdG hCG ï∏÷G äÉ«∏ªY
.»î«∏éàdG ™«£≤àdG hCG ™«ª∏àdG hCG ᫵∏°ùdG
ï∏L áæ«cɪc ¬eGóîà°S’ »FÉHô¡µdG RÉ¡÷G Gòg ºª°U
Öéj .᫵∏°S IÉ°TôØc hCG ™«£≤J hCG ™«ª∏J hCG IôØæ°U hCG
Ωƒ°SôdGh äGOÉ°TQE’Gh ¿ÉeC’G äGôjò– áaÉc IAGôb
RÉ¡÷G Gòg ™e IOhõŸG äÉØ°UGƒŸGh á«ë«°VƒàdG
äGOÉ°TQE’G ™«ªL ´ÉÑJG ΩóY ¿CÉH kɪ∏Y ,»FÉHô¡µdG
hCG á«FÉHô¡c áeó°U çhóM ¤EG …ODƒj ób √ÉfOCG IOQGƒdG
.kÉ©e AÉ«°TC’G √òg ™«ªL hCG IÒ£N äÉHÉ°UEG hCG ≥FGôM
ºàj ⁄ ¢VGôZCG ‘ »FÉHô¡µdG RÉ¡÷G Gòg ΩGóîà°SG
ÖÑ°ùàjh ôWÉîŸG øe ójó©dG ódƒj ób É¡∏LCG øe ¬ª«ª°üJ
.á«°üî°T äÉHÉ°UEG çhóM ‘
16
𫨰ûJ πÑb §HQ ìÉàØe hCG πjó©J ìÉàØe …CG ádGREÉH ºb .O
kÉ`≤∏©e ìÉàØŸG ∑ôJ ÖÑ°ùàj ó≤a ,»FÉHô¡µdG RÉ¡÷G
áHÉ°UEG çhóM ‘ »FÉHô¡µdG RÉ¡÷G øe QGhódG Aõ÷ÉH
Öéj ɪc ,•ôØe πµ°ûH RÉ¡÷G øe ÜGÎb’G ΩóY Öéj .`g
¿C’ ,πª©dG AÉæKCG ¿RGƒàdGh Úeó≤dG äÉÑK ≈∏Y ®ÉØ◊G
RÉ¡÷G ≈∏Y ó«L πµ°ûH Iô£«°ùdG ∂d í«àj ∂dP
.á©bƒàŸG ÒZ ∞bGƒŸG ‘ »FÉHô¡µdG
¢ùHÓŸG AGóJQG ΩóYh ,áÑ°SÉæŸG ¢ùHÓŸG AGóJQG Öéj .h
∂°ùHÓeh ∑ô©°T AÉ≤HEG Öéj ɪc ,»∏◊G hCG á°VÉØ°†ØdG
¢ùHÓŸG ¿C’ ,ácôëàŸG AGõLC’G øY Gkó«©H ∂jRÉØbh
™e ∂HÉ°ûàj ób ‹óàŸG ô©°ûdG hCG »∏◊G hCG á°VÉØ°†ØdG
.ácôëàŸG AGõLC’G
hCG QÉѨdG êGôîà°S’ äGhOCÉH
É¡eGóîà°SGh äGhOC’G ∂∏J π«°UƒJ øe ócCÉJ ,¬©«ªŒ
øe π∏≤j äGhOC’G √òg ΩGóîà°SG ¿C’ ,Ö°SÉæe πµ°ûH
¬H ájÉæ©dGh »FÉHô¡µdG RÉ¡÷G ΩGóîà°SG .4
ÒZ ¢VôZ ‘ »FÉHô¡µdG RÉ¡÷G ΩGóîà°SG ΩóY Öéj .CG
»FÉHô¡µdG RÉ¡÷G Ωóîà°SG Öéj πH ,¬d ¢ü°üfl
»FÉHô¡µdG RÉ¡÷G ¿C’ ,√ójôJ …òdG ¢Vô¨dÉH ¢UÉÿG
ÉkfÉeCG ÌcCGh π°†aCG πµ°ûH πª©dG …ODƒj ±ƒ°S Ö°SÉæŸG
.¬∏LCG øe ¬ª«ª°üJ ” …òdG ∫ó©ŸÉHh
‘ ºµëàdG ™£à°ùJ ⁄
…CG ¿C’ ,ìÉàØŸG ᣰSGƒH ¬∏«¨°ûJ ±É≤jEGh ¬∏«¨°ûJ
ìÉàØŸG ΩGóîà°SÉH ¬«a ºµëàdG øµÁ ’ »FÉHô¡c RÉ¡L
QÉ«àdG Qó°üe øY »FÉHô¡µdG RÉ¡÷G ¢ùHÉb π°üa Öéj .ê
•
hCG äÓjó©J ájCG AGôLEG πÑb äÉjQÉ£ÑdG hCG/h »FÉHô¡µdG
Iõ¡LC’G ‘ äÉ≤ë∏e ájCG Ö«côJ hCG äGÒ«¨J
á«FÉbƒdG áeÓ°ùdG äGAGôLEG ¿C’ ,É¡æjõîJ hCG á«FÉHô¡µdG
»FÉHô¡µdG RÉ¡÷G 𫨰ûJ AóH ôWÉfl øe π∏≤J √òg
áeóîà°ùŸG ÒZ á«FÉHô¡µdG Iõ¡LC’G øjõîJ Öéj .O
ÒZ ¢UÉî°TCÓd íª°ùJ ’h ∫ÉØWC’G ∫hÉæàe øY Gkó«©H
•
ÒZ hCG »FÉHô¡µdG RÉ¡÷G ΩGóîà°SG ≈∏Y øjOÉà©ŸG
RÉ¡÷G 𫨰ûàH äGOÉ°TQE’G √òg ≈∏Y Ú©∏£ŸG
Gô£N πµ°ûJ á«FÉHô¡µdG Iõ¡LC’Éa ,»FÉHô¡µdG
ÉeóæY
k
GPEG »FÉHô¡µdG RÉ¡÷G Ωóîà°ùJ ’ .Ü
k
.¬MÓ°UEG Öéjh ôWÉîŸÉH kÉaƒØfi ¿ƒµj
.ÚHQóe ÒZ ¢UÉî°TCG É¡eóîà°ùj
GOhõe RÉ¡÷G ¿Éc GPEG .R
k
.QÉѨdÉH á£ÑJôŸG ôWÉîŸG
.ó°üb ¿hO ICÉéa
.á«°üî°T
Page 17

ARABIC
¿ƒμJ ¿CG Öéj ,∂dP ¤EG áaÉ°VEG .áØ∏àîŸG äÉ«∏ª©dG
í«°TôJ ≈∏Y IQOÉb ¢ùØæàdG áeɪc hCG áHôJC’G áeɪc
¢Vô©àdG …ODƒj óbh .πª©dG AÉæKCG áŒÉædG äÉÄjõ÷G
.™ª°ùdG ¿Gó≤a ¤EG á∏jƒW IóŸ Ió°ûdG á«dÉY AÉ°Vƒ°†d
ɪc ,πª©dG á≤£æe øe kGóL ÜGÎb’ÉH IQɪ∏d íª°ùJ ’
πª©dG á≤£æe ¤EG ΩOÉb ¢üî°T …CG …óJôj ¿CG Öéj
á©£b Éjɶ°T ôjÉ£àJ ó≤a ,á«°üî°ûdG ájÉbƒdG äGó©e
áHÉ°UEG çhóM ‘ ÖÑ°ùàJh IQƒ°ùμŸG äÉ≤ë∏ŸG hCG πª©dG
.πª©dG á≤£æà kIöTÉÑe ᣫëŸG á≤£æŸG ‘
äGP ∑É°ùeEG äGhOCG ᣰSGƒH »FÉHô¡μdG RÉ¡÷G ∂°ùeG
ób ™«£≤àdG ≥ë∏e ¿C’ ,Ée á«∏ªY AGOCG óæY ádhõ©e í£°SCG
,É¡H ¢UÉÿG ∂∏°ùdG hCG »Øfl »FÉHô¡c QÉ«J ∂∏°S ¢ùeÓj
¬«a …öùj ∂∏°ùd ™«£≤àdG ≥ë∏e á°ùeÓe …ODƒJ óbh
RÉ¡÷G ‘ á«fó©ŸG AGõLC’G ájô©J ¤EG "»FÉHô¡c QÉ«J"
¢Vô©Jh ¬«a »Hô¡μdG QÉ«àdG ¿ÉjöSh »FÉHô¡μdG
.á«FÉHô¡c áeó°üd Ωóîà°ùŸG
≥ë∏ŸG øY kÉeÉ“ »FÉHô¡μdG QÉ«àdG ∂∏°S OÉ©HEG Öéj
ób ,RÉ¡÷G ≈∏Y Iô£«°ùdG ¿Gó≤a ádÉM ‘ ¬fC’ ,QGhódG
∂YGQP hCG ∑ój ¬©e Öë°ùjh ≥∏©j hCG ∂∏°ùdG ™£≤æj
.QGhódG ≥∏ëŸG √ÉŒÉH
∞bƒàj ⁄ Ée í£°S …CG ≈∏Y »FÉHô¡μdG RÉ¡÷G ∑ÎJ ’
QGhódG ≥ë∏ŸG Ωƒ≤j ó≤a ,kÉeÉ“ ¿GQhódG øY ¬≤ë∏e
.»FÉHô¡μdG RÉ¡÷G ≈∏Y Iô£«°ù∏d ∑OÉ≤aEGh í£°ùdG ÜòéH
QGƒéH ¬∏ªM óæY »FÉHô¡μdG RÉ¡÷G 𫨰ûàH º≤J ’
∂°ùHÓà káaó°U ¢ùeÓàj ób QGhódG ≥ë∏ŸG ¿C’ ,∂ÑfÉL
.∂ª°ùL √ÉŒ ≥ë∏ŸG ÜòéH Ωƒ≤jh É¡H ≥∏©jh
»FÉHô¡μdG RÉ¡÷G ‘ ájƒ¡àdG äÉëàa ∞«¶æJ Öéj
πNGO QÉѨdG Öë°ùJ ∑ôëŸG áMhôe ¿C’ ,ΩɶàfÉH
QÉѨd •ôØŸG ºcGÎdG …ODƒj óbh ∑ôëŸG ¥hóæ°U
.á«FÉHô¡c ôWÉfl çhóM ¤EG ¿OÉ©ŸG
á∏HÉ≤dG OGƒŸG øe Üô≤dÉH »FÉHô¡μdG RÉ¡÷G Ωóîà°ùJ ’
‘ ÖÑ°ùàJ ¿CG øμÁ áŒÉædG IQGöûdG ¿C’ ,∫É©à°TÓd
.OGƒŸG √òg ∫É©à°TG
,á∏FÉ°S äGOÈe ¤EG êÉà– »àdG äÉ≤ë∏ŸG Ωóîà°ùJ ’
¤EG iôNC’G ójÈàdG πFGƒ°S hCG √É«ŸG ΩGóîà°SG …ODƒj ó≤a
.á«FÉHô¡μdG äÉeó°üdG hCG AÉHô¡μdÉH ≥©°üdG
á©æ°üŸG ácöûdG É¡ªª°üJ ⁄ äÉ≤ë∏e Ωóîà°ùJ ’ •
»æ©j ’h .É¡eGóîà°SÉH â°UhCGh RÉ¡÷G Gò¡d kÉ°ü«°üN
¿CG ,»FÉHô¡μdG RÉ¡÷ÉH ≥ë∏e …CG Ö«côJ øμÁ ¬fCG
.¿ÉeCÉH 𪩫°S RÉ¡÷G
•
≈∏Y ájhÉ°ùe ≥ë∏ª∏d áØæ°üŸG áYöùdG ¿ƒμJ ¿CG Öéj
RÉ¡÷G ≈∏Y IOóëŸG iƒ°ü≤dG áYöù∏d πbC’G
áYöùH É¡∏«¨°ûJ ºàj »àdG äÉ≤ë∏ŸG ¿C’ ,»FÉHô¡μdG
.kGó«©H ôjÉ£àJh öùμæJ ób áØæ°üŸG É¡àYöS RhÉéàJ
¬μª°Sh ≥ë∏ª∏d »LQÉÿG ô£≤dG ¿ƒμj ¿CG Öéj
•
¿C’ ,»FÉHô¡μdG RÉ¡é∏d IQó≤dG ∞«æ°üJ ™e Ú≤aGƒàe
hCG É¡àjÉbh øμÁ ’ áÑ°SÉæŸG ÒZ äÉ≤ë∏ŸG ΩÉéMCG
.É¡«∏Y Iô£«°ùdG
hCG äÉéæ∏ØdG hCG äÓé©dG ´òL ºéM ¿ƒμj ¿CG Öéj
Oƒª©d kÉeÉ“ kÉÑ°SÉæe ôNBG ≥ë∏e …CG hCG ºYódG íFÉØ°U
»àdG äÉ≤ë∏ŸG ¿C’ ,»FÉHô¡μdG RÉ¡÷G ‘ ¿GQhódG
äGó©e ™e á≤HÉ£àe ÒZ ´hòL äÉëàa ≈∏Y …ƒà–
•
ÒZ IQƒ°üH πª©J ób »FÉHô¡μdG RÉ¡÷G ‘ Ö«cÎdG
¿Gó≤a ‘ ÖÑ°ùàj ób Ée ,•ôØe πμ°ûH õà¡Jh áfRGƒàe
.RÉ¡÷G ≈∏Y Iô£«°ùdG
πc πÑb Öéjh .kÉ≤∏£e kÉHƒ£©e kÉ≤ë∏e Ωóîà°ùJ ’
•
kÉãëH ï∏÷G äÓéY πãe äÉ≤ë∏ŸG ¢üëa ΩGóîà°SG
øY kÉãëH ºYódG íFÉØ°Uh ,¥ƒ≤°ûdGh Éjɶ°ûdG øY
IÉ°TôØdGh ,ó◊G øY óFGõdG πcBÉàdG hCG ≥≤°ûàdGh ,¥ƒ≤°ûdG
GPEGh .á≤≤°ûàŸG hCG áÑFÉ°ùdG ∑Ó°SC’G øY kÉãëH á«μ∏°ùdG
•
¬°üëa Öéj ,¬JÉ≤ë∏e hCG »FÉHô¡μdG RÉ¡÷G §≤°S
äÉ≤ë∏e Ö«côJ hCG QöV …CÉH ¬àHÉ°UEG ΩóY øe ócCÉà∏d
Öéj ,äÉ≤ë∏e …CG Ö«côJh ¢üëa ó©Hh .᪫∏°S iôNCG
•
™°Vh ‘ áYöS ≈°übCÉH »FÉHô¡μdG RÉ¡÷G 𫨰ûJ
öùμæJ Ée kIOÉ©a ,á∏eÉc á≤«bO IóŸ π«ªëàdG ΩóY
.√òg QÉÑàN’G Ióe ∫ÓN áØdÉàdG äÉ≤ë∏ŸG
≈∏Y kGOɪàYGh .á«°üî°ûdG ájÉbƒdG äGó©e AGóJQG Öéj
•
¬Lƒ∏d ájɪM IGOCG Ωóîà°SG ,¬H Ωƒ≤J …òdG πª©dG ´ƒf
áHôJCG áeɪc …óJQG ,IQhö†dG óæYh .á«bGh äGQɶfh
≈∏Y QOÉb πªY á°TQh AGOQh äGRÉØbh ™ª°ù∏d äÉ«bGhh
ï∏÷G AÉæKCG ôjÉ£àJ »àdG IÒ¨°üdG Éjɶ°ûdG øe ∂àjɪM
•
äGQɶædG ¿ƒμJ ¿CG Öéj ɪc ,πª©dG á©£b øe hCG
øY Å°TÉædG ôjÉ£àŸG ΩÉcôdG ó°U ≈∏Y IQOÉb á«bGƒdG
•
•
•
•
•
17
Page 18

ARABIC
RÉ¡÷G ¬«a ∑ôëà«°S …òdG õ«◊G øY kGó«©H ∂ª°ùL ≥HG
±ƒ°ùa ,áØ«æY äGOGóJQG çhóM ádÉM ‘ »FÉHô¡μdG
√ÉŒ’G ‘ RÉ¡÷G ™aO ¤EG áØ«æ©dG äGOGóJQ’G …ODƒJ
.QÉ°ûëf’G á£≤f óæY äÓé©dG ácô◊ ¢ùcÉ©ŸG
IOÉ◊G ±Gƒ◊Gh ÉjGhõdG ™e πª©dG óæY kÉeÉ“ ¢SÎMG
hCG ÉjGhõdÉa ,≥ë∏ŸG QÉ°ûëfGh OGóJQG ÖæŒ .ÉgÒZh
QÉ°ûëfG ‘ ÖÑ°ùàJ ób OGóJQ’G hCG IOÉ◊G ±Gƒ◊G
äGOGóJQG çhóM hCG Iô£«°ùdG ¿Gó≤ah QGhódG ≥ë∏ŸG
.áØ«æY
hCG Ö°ûÿG âëæd QÉ°ûæe ôjõæL IôØ°T Ö«cÎH º≤J ’
çhóM ¤EG …ODƒJ äGôØ°ûdG √ò¡a ,áææ°ùe QÉ°ûæe IôØ°T
.Qôμàe πμ°ûH Iô£«°ùdG ¿Gó≤ah áØ«æY äGOGóJQG
™«£≤àdG äÉ«∏ª©H á°UÉÿG áeÓ°ùdG äGôjò–
»î«∏éàdG
§¨°†d É¡°†jô©J hCG ™«£≤àdG á∏éY "á∏bôY" ΩóY Öéj •
øY IóFGR ¥ƒ≤°T AGôLEG ádhÉfi ΩóY Öéj ɪc ,•ôØe
ójõj á∏é©dG ≈∏Y •ôØŸG §¨°†dG ¿C’ ,샪°ùŸG ó◊G
AÉæKCG AÉæãf’Gh AGƒàdÓd É¡°Vô©jh É¡«∏Y AÖ©dG
hCG áØ«æY äGOGóJQG çhóM á«dɪàMG ∂dòch ,™«£≤àdG
.á∏é©dG º£–
ÉeóæY ¬fC’ ,É¡Ø∏N hCG IQGhódG á∏é©dG IGPÉëà ∞≤J ’
ób ,™«£≤àdG á£≤f ‘ ,∑ó°ùL øY kGó«©H á∏é©dG ∑ôëàJ
IQGhódG á∏é©dG ´ÉaófG ¤EG …ODƒJ áØ«æY äGOGóJQG çó–
.∂gÉŒÉH »FÉHô¡μdG RÉ¡÷Gh
ÖÑ°S …C’ ™«£≤àdG á«∏ªY á©WÉ≤e hCG á∏é©dG ∞bƒJ óæY
¬à«ÑãJh »FÉHô¡μdG RÉ¡÷G ±É≤jEG Öéj ,ÜÉÑ°SC’G øe
¿GQhódG øY á∏é©dG ∞bƒàJ ≈àM kÉ≤∏£e ¬μjô– ¿hO
≥°ûdG øe ™«£≤àdG á∏éY ádGREG kÉ≤∏£e ∫hÉ– ’h .kÉeÉ“
.∞«æY OGóJQG çóëj ób ’EGh ,á∏é©dG ¿GQhO AÉæKCG
áÑ°SÉæŸG á«ë«ë°üàdG äGAGôLE’G òîJGh á∏é©dG ¢üëaG
.á∏é©dG á∏bôY ÖÑ°S øe ¢ü∏îà∏d
∑ôJG πH ,πª©dG á©£b ™«£≤J ‘ iôNCG Iôe CGóÑJ ’
‘ É¡∏NOCG ºK É¡àYöS πeÉc ¤EG π°üJ ≈àM á∏é©dG
∞æ©H óJôJ hCG õØ≤J hCG á∏é©dG ∞bƒàJ ó≤a ,QòëH ≥°ûdG
á©£b πNGO »FÉHô¡μdG RÉ¡÷G 𫨰ûJ IOÉYEG ádÉM ‘
.πª©dG
•
Iõ¡LC’G ≈∏Y √ÓYCG OQGƒdG ôjòëàdG ≥Ñ£æj ’ :á¶MÓe
º¶ædG ™e ΩGóîà°SÓd kÉ°ü«°üN ᪪°üŸG á«FÉHô¡μdG
á∏°üdG äGP äGôjòëàdGh áØ«æ©dG äGOGóJQ’G
•
çó– áÄLÉØe áØ«æY π©a OhOQ »g áØ«æ©dG äGOGóJQ’G
,ºYódG áë«Ø°U hCG ,IQGhódG á∏é©dG QÉ°ûëfG hCG πbô©J áé«àf
ÖÑ°ùàJ å«M ,iôNC’G äÉ≤ë∏ŸG øe …CG hCG IÉ°TôØdG hCG
ƒgh ;ICÉéa QGhódG ≥ë∏ŸG ∞bƒJ ‘ QÉ°ûëf’G hCG á∏bô©dG
•
•
•
•
RÉ¡÷G ≈∏Y Iô£«°ùdG ¿Gó≤a ¿CG ¤EG √QhóH …ODƒj Ée
≥ë∏ŸG ¿GQhód ¢ùcÉ©ŸG √ÉŒ’G ¤EG ¬YÉaófGh »FÉHô¡μdG
.πbô©àdG á£≤f óæY
ï∏÷G á∏éY πbô©J hCG QÉ°ûëfG ádÉM ‘ ,∫ÉãŸG π«Ñ°S ≈∏Y
á°ùeÓŸG á∏é©dG áaÉM …ODƒJ ób ,πª©dG á©£b ᣰSGƒH
‘ ÖÑ°ùàj ɇ IOÉŸG í£°S ‘ ôØ◊G ¤EG QÉ°ûëf’G á£≤æd
√ÉŒÉH ÉeEG á∏é©dG õØ≤J óbh .êQÉÿG ¤EG á∏é©dG ´ÉaófG
‘ á∏é©dG ácôM √ÉŒ’ kÉ©ÑJ ,¬æY kGó«©H hCG Ωóîà°ùŸG
√òg πX ‘ kÉ°†jCG ï∏÷G äÓéY öùμæJ óbh .πbô©àdG á£≤f
RÉ¡÷G ΩGóîà°SG Aƒ°ùd káé«àf áØ«æ©dG äGOGóJQ’G çó–
,𫨰ûàdG äGOÉ°TQEG hCG äɪ«∏©J ´ÉÑJG ΩóY hCG/h »FÉHô¡μdG
≈∏Y áÑ°SÉæŸG äÉWÉ«àM’G PÉîJG ∫ÓN øe É¡ÑæŒ øμÁh
.√ÉfOCG ÚÑŸG ƒëædG
º°ù÷G AÉ≤HEGh ΩÉμMEÉH »FÉHô¡μdG RÉ¡÷G ∑É°ùeEG Öéj
äGOGóJQ’G áehÉ≤Ã íª°ùJ á«©°Vh ‘ ÚYGQòdGh
GPEG ,‘É°VE’G ¢†Ñ≤ŸG ΩGóîà°SG kÉehO Öéjh .áØ«æ©dG
≈°übCÉH ≈∏Y Iô£«°ùdG πLCG øe ,RÉ¡÷G ™e kGôaƒàe ¿Éc
hCG ¿GQhódG Ωõ©d IOÉ°†ŸG π©ØdG OhOQ ≈∏Y øμ‡ Qób
™«£à°ùjh .RÉ¡÷G 𫨰ûJ AóH óæY áØ«æ©dG äGOGóJQ’G
Ωõ©d IOÉ°†ŸG π©ØdG OhOQ ≈∏Y Iô£«°ùdG Ωóîà°ùŸG
äòîJG Ée GPEG áØ«æ©dG äGOGóJQ’G hCG ¿GQhódG
.áÑ°SÉæŸG äÉWÉ«àM’G
óJôJ ó≤a ,IQGhódG äÉ≤∏ëŸG øe Üô≤dÉH ∑ój ™°†J ’
.∑ój √ÉŒÉH áÄLÉØe IQƒ°üH äÉ≤ë∏ŸG
.á∏FÉ°ùdG
.±hô¶dG
•
•
18
Page 19

ARABIC
™e ájÉbh IGOCG ΩGóîà°SÉH äÉ«°UƒJ ∑Éæg âfÉc GPEG
IÉ°Tôa hCG á∏éY ∂HÉ°ûàH íª°ùJ Óa ,á«μ∏°ùdG IÉ°TôØdG
IÉ°Tôa hCG á∏éY ô£b ™°ùàj ó≤a ,ájÉbƒdG IGOCG ™e ∑Ó°SC’G
.…õcôŸG Oô£dG iƒbh πª©dG πªM ÖÑ°ùH ∑Ó°SC’G
øjôNB’G áeÓ°S
ᣰSGƒH ¬eGóîà°S’ ¢ü°üfl ÒZ RÉ¡÷G Gòg •
ájó°ù÷G äGQó≤dG …hP (∫ÉØWC’G ∂dP ‘ ÉÃ) ¢UÉî°TC’G
º¡jód øjòdG hCG ,á«fóàŸG á«∏≤©dGh á«°ù◊Gh á«ægòdGh
πX ‘ ’EG ,ΩGóîà°S’G »MGƒæH á∏«∏b áaô©e hCG IÈN
á≤∏©àŸG äɪ«∏©àdG º¡FÉ£YEG hCG º¡«∏Y ±GöTE’G
øY ∫hDƒ°ùŸG ¢üî°ûdG πÑpb øe RÉ¡÷G ΩGóîà°SÉH
.º¡àeÓ°S
º¡ãÑY ΩóY ¿Éª°†d ∫ÉØWC’G ≈∏Y ±GöTE’G Öéj
.RÉ¡÷ÉH
RGõàg’G
‘ IQƒcòŸG áæ∏©ŸG äGRGõàg’G çÉ©ÑfG º«b ¢SÉ«b ”
QÉÑàNG á≤jô£d Ék≤ah á≤HÉ£ŸG ¿ÓYEGh á«æØdG äÉfÉ«ÑdG
EN 60745 QÉ«©ŸG ÖLƒÃ É¡«∏Y ¢Uƒ°üæe á«°SÉ«b
øμÁh .ôNBG ™e Ée RÉ¡L áfQÉ≤Ÿ É¡eGóîà°SG øμÁh
‹hCG º««≤J AGôLE’ áæ∏©ŸG äGRGõàg’G çÉ©ÑfG ᪫b ΩGóîà°SG
.äGRGõàgÓd ¢Vô©àdG áÑ°ùæd
ºé◊G IÒÑc πªY á©£b …CG hCG ìGƒdC’G º«YóàH ºb •
•
äGOGóJQG çhóMh äÓé©dG QÉ°ûëfG ôWÉfl π«∏≤àd
πØ°SC’ ¤óàJ ºé◊G IÒÑc πª©dG ™£b ¿C’ ,áØ«æY
â– äÉeÉYO ™°Vh Öéj Gòd ,óFGõdG É¡fRh áé«àf
áaÉM øe Üô≤dÉHh ≥°ûdG §N øe Üô≤dÉH πª©dG á©£b
.á∏é©dG »ÑfÉL Óc ≈∏Y πª©dG á©£b
≥°T" AGôLEG óæY á≤FÉØdG äÉWÉ«àM’G PÉîJG Öéj
,iôNCG AÉ«ªY ≥WÉæe …CG hCG á«æÑe §FGƒM ‘ "»Ñ«L
hCG √É«ŸG hCG RɨdG Ö«HÉfCG ™£≤J ób IQGhódG á∏é©dG ¿C’
‘ ÖÑ°ùàJ ób »àdG ΩÉ°ùLC’G hCG á«Hô¡μdG ∑Ó°SC’G
.áØ«æY äGOGóJQG çhóM
•
.¥QƒdG QÉ«àNG óæY á©æ°üŸG äÉcöûdG äÉ«°UƒJ ™ÑJG
¬ªéM RhÉéàj …òdG ÒÑμdG IôØæ°üdG ¥Qh ¿CÉH kɪ∏Y
çhóM hCG ,¢Uô≤dG ¥õ“ hCG QÉ°ûëfG çhóM ‘ ÖÑ°ùàj
IôØæ°üdG äÉ«∏ª©H á°UÉÿG áeÓ°ùdG äGôjò–
.•ôØe πμ°ûH ºé◊G ÒÑc IôØæ°U ábQh Ωóîà°ùJ ’
óbh ¥õªàdG ôWÉfl øe ójõj IôØæ°üdG IóYÉb ºéM
.áØ«æY äGOGóJQG
™«ª∏àdG äÉ«∏ª©H á°UÉÿG áeÓ°ùdG äGôjò–
•
•
AÉæKCG äGRGõàg’G çÉ©ÑfG ᪫b ∞∏àîJ ¿CG øμÁ !ôjò–
áæ∏©ŸG ᪫≤dG øY »FÉHô¡μdG RÉ¡é∏d »∏©ØdG ΩGóîà°S’G
OGOõj óbh ,RÉ¡÷G ΩGóîà°SG ¥ôW ≈∏Y ∂dP ∞bƒàj å«M
.QƒcòŸG iƒà°ùŸG øY RGõàg’G iƒà°ùe
áeÓ°ùdG äGAGôLEG ójóëàd RGõàgÓd ¢Vô©àdG º««≤J óæY
ájɪ◊ EC/2002/44 QÉ«©ŸG ÖLƒÃ áHƒ∏£ŸG
πμ°ûH á«FÉHô¡μdG Iõ¡LC’G ¿ƒeóîà°ùj øjòdG ¢UÉî°TC’G
º««≤J á«∏ªY ‘ »∏j Ée IÉYGôe Ωõ∏j ,º¡∏ªY ‘ º¶àæe
á≤jô£dGh ΩGóîà°SÓd á«∏©ØdG ±hô¶dG :RGõàgÓd ¢Vô©àdG
AGõLCG áaÉc òNCG ∂dP ‘ Éà ,É¡H RÉ¡÷G ΩGóîà°SG ºàj »àdG
É¡«a ºàj »àdG äÉbhC’G πãe ;QÉÑàY’G ‘ 𫨰ûàdG IQhO
™°Vh ‘ RÉ¡÷G ¿ƒμj ÉeóæY hCG RÉ¡÷G 𫨰ûJ ±É≤jEG
.𫨰ûàdG äÉbhCG ¤EG áaÉ°VE’ÉH ,¿ƒμ°ùdG
AÉ£Z ‘ ÖFÉ°S AõL …CG ¿GQhóH ìɪ°ùdG ΩóY Öéj
¢üb hCG §HQ Öéj Gòd ,ájôëH §HôdG ∫ÉÑM hCG ™«ª∏àdG
hCG áÑFÉ°ùdG §HôdG ∫ÉÑM ¿C’ kGô¶f ,áÑFÉ°S §HQ ∫ÉÑM …CG
.πª©dG á©£≤H ≥∏©J hCG ∂©HÉ°UCG ∫ƒM ∞à∏J ób IQGhódG
¢TôØdÉH ∞«¶æàdG äÉ«∏ª©H á°UÉÿG áeÓ°ùdG äGôjò–
á«μ∏°ùdG
≈àM IÉ°TôØdG øe IôjÉ£àŸG ∑Ó°SC’G äGÒ©°T øe QòMG
≈∏Y §¨°†dG ‘ •ôØJ ’ .…OÉ©dG 𫨰ûàdG AÉæKCG
,IÉ°TôØdG ≈∏Y •GôaEÉH π«ªëàdG ≥jôW øY ∑Ó°SC’G
áØ«ØÿG ¢ùHÓŸG ¥ÎîJ ¿CG øμÁ ∑Ó°SC’G äGÒ©°ûa
.ádƒ¡°ùH ó∏÷G hCG/h
•
•
19
Page 20

ARABIC
Ö«cÎdG
OƒªY ¬Lh ¿ƒμj å«ëH ,ádhÉW ≈∏Y RÉ¡÷G ™°V •
.≈∏YC’ (6) ¿GQhódG
¥ƒa (5) ájÉbƒdG IGOCG âÑKh (7) â«ÑãàdG πØb ∂ØH ºb
.πμ°ûdÉH ÚÑe ƒg ɪc RÉ¡÷G
.(9) ¿Éæ°SC’G ™e (8) äGhô©dG IGPÉëà ºb
¢ùμY ÉgôjhóàH ºb ºK πØ°SC’ ájÉbƒdG IGOCG ≈∏Y §¨°VG •
.܃∏£ŸG ¿ÉμŸG ¤EG π°üJ ≈àM áYÉ°ùdG ÜQÉ≤Y
‘ ájÉbƒdG IGOCG â«Ñãàd (7) â«ÑãàdG πØb §HQ óYCG
.RÉ¡÷G
IOÉjõd ΩÉμMEÉH (10) »ZÈdG §HQG ,ôeC’G ≈°†àbG GPEG
.â«ÑãàdG Iƒb
ádGRE’G
.(7) â«ÑãàdG πØb ∂ØH ºb •
áYÉ°ùdG ÜQÉ≤Y √ÉŒG ‘ ájÉbƒdG IGOCG ôjhóàH ºb •
.(9) ¿Éæ°SC’G ™e (8) äGhô©dG IGPÉëŸ
.RÉ¡÷G øe ájÉbƒdG IGOCG ádGREÉH ºb
Iõ¡LC’G ≈∏Y äÉ≤°ü∏ŸG
:RÉ¡÷G ≈∏Y á«dÉàdG á«ë«°VƒàdG Qƒ°üdG ô¡¶J
≈∏Y Öéj ,áHÉ°UE’G ôWÉfl π«∏≤àd !ôjò–
•
•
.äGOÉ°TQE’G π«dO IAGôb Ωóîà°ùŸG
Gòg 𫨰ûJ óæY á«bGh äGQɶf AGóJQG Öéj
.RÉ¡÷G
Gòg 𫨰ûJ óæY ÚfPCÓd m¥Gh AGóJQG Öéj
.RÉ¡÷G
á«FÉHô¡μdG áeÓ°ùdG
•
’ ,∂dòdh ;ÉkLhOõe k’õY ∫hõ©e RÉ¡÷G Gòg
ÉkªFGO ócCÉàdG »¨Ñæjh .»°VQCG ∂∏°S ¤EG áLÉM
ó¡÷G ™e »FÉHô¡μdG QÉ«àdG Qó°üe ≥aGƒJ øe
•
¬dGóÑà°SG Öéj ,»FÉHô¡μdG QÉ«àdG ∂∏°S ∞∏J ádÉM ‘
iód óªà©e áfÉ«°U õcôe hCG á©æ°üŸG ácöûdG πÑpb øe
.É¡©«ªL hCG á«dÉàdG ÉjGõŸG ¢†©H ≈∏Y RÉ¡÷G Gòg πªà°ûj
•
.∞«æ°üàdG áMƒd ≈∏Y í°VƒŸG
.ôWÉîŸG Öæéàd ôμjO ófBG ∑ÓH
±É≤jEG / 𫨰ûJ ìÉàØe .1
•
ÉjGõŸG
(CG πμ°ûdG) ájɪ◊G IGOCG πjó©J
.áLQO 90 ájhGõH ájÉbƒdG IGOCG ôjhóJ øμÁ
.܃∏£ŸG ™°VƒdG ¤EG ájÉbƒdG IGOCG ôjhóàH ºb
(Ü πμ°ûdG) »ÑfÉ÷G ¢†Ñ≤ŸG Ö«côJ
Ö«cÎdG äÉëàa ióMEG ‘ (3) »ÑfÉ÷G ¢†Ñ≤ŸG §HQG •
.RÉ¡÷G ‘ IOƒLƒŸG
.kÉehO »ÑfÉ÷G ¢†Ñ≤ŸG Ωóîà°SG !ôjò–
É¡àdGREGh ™«£≤àdG hCG ï∏÷G ¢UGôbCG Ö«côJ
(O - Ü πμ°ûdG)
,¬H Ωƒ≤J …òdG πª©∏d Ö°SÉæŸG ¢Uô≤dG ´ƒf kÉehO Ωóîà°SG
á«∏NGódG QÉ£bC’Gh äÉ£«ëŸG äGP ¢UGôbC’G kÉehO Ωóîà°SGh
.(á«æØdG äÉfÉ«ÑdG ™LGQ) áÑ°SÉæŸG
20
»ÑfÉL ¢†Ñ≤e .3
•
ó«b ¢ù«d RÉ¡÷G ¿CG ócCÉJ ,äÉ≤ë∏e …CG Ö«côJ πÑb !ôjò–
.»Hô¡μdG QÉ«àdG Qó°üà π°Uƒe ÒZh 𫨰ûàdG
¿GQhódG OƒªY πØb ìÉàØe .4
ájÉbh IGOCG .5
(CG πμ°ûdG) É¡àdGREGh ájÉbƒdG IGOCG Ö«côJ
ï∏÷G ¢VGôZC’ á°ü°üfl ájÉbh IGOCG RÉ¡÷G Gòg ™e »JCÉj
,™«£≤àdG äÉ«∏ªY AGôLE’ IóMƒdG ΩGóîà°SG ádÉM ‘h .§≤a
IGOCG AõL ºbQ ¿CÉH kɪ∏Y .áÑ°SÉæŸG ájÉbƒdG IGOCG Ö«côJ Öéj
1004484-02 ƒg ™«£≤àdG äÉ«∏ª©d Ö°SÉæŸG ájÉbƒdG
ófBG ∑ÓÑd á©HÉàdG áfÉ«°üdG õcGôe øe ¬«∏Y ∫ƒ°ü◊G øμÁh
πØb QR .2
Ö«cÎdG
.ôμjO
Page 21

ARABIC
¢ùeÓj ÉeóæY IQGöûdG øe QÉ«J Qhó°üd kGó©à°ùe øc •
.πª©dG á©£b ™«£≤àdG hCG ï∏÷G ¢Uôb
ájɪM ≈°übCG ∂d ôaƒJ á«©°Vh ‘ kÉehO RÉ¡÷G âÑK
.™«£≤àdG hCG ï∏÷G ¢Uôb ó°V
±É≤jE’Gh 𫨰ûàdG
AɨdEG ™°Vh ¤EG (2) πØ≤dG QR ∑ôM ,RÉ¡÷G 𫨰ûàd •
.±É≤jE’G/𫨰ûàdG ìÉàØe ≈∏Y §¨°VG ºK ,πØ≤dG
.±É≤jE’G/𫨰ûàdG ìÉàØe ≈∏Y §¨°VG ,RÉ¡÷G ±É≤jE’
.¬eGóîà°SG AÉæKCG RÉ¡÷G ±É≤jEÉH º≤J ’ !ôjò–
πãeC’G ΩGóîà°SÓd íFÉ°üf
∑É°ùeE’ øjó«dG ióMEG kÉeóîà°ùe ΩÉμMEÉH RÉ¡÷G ∂°ùeG •
.»°SÉ°SC’G ¢†Ñ≤ª∏d iôNC’Gh »ÑfÉ÷G ¢†Ñ≤ŸG
á©£b í£°Sh ¢Uô≤dG ÚH áaÉ°ùe ∑ôJ Öéj ,ï∏÷G óæY
.áLQO 15 ÉgQób ájhGõH πª©dG
áfÉ«°üdG
𪩫d »μ∏°SÓdG hCG »μ∏°ùdG ôμjO ófBG ∑ÓH RÉ¡L ºª°U
∫ƒ°ü◊G óªà©jh .áfÉ«°üdG øe øμ‡ óM πbCÉH á∏jƒW äGÎØd
RÉ¡÷ÉH áÑ°SÉæŸG ájÉæ©dG ≈∏Y ôªà°ùeh
:á«μ∏°SÓdG hCG á«μ∏°ùdG Iõ¡LCÓd áfÉ«°U …CG AGôLEG πÑb !ôjò–
.»FÉHô¡μdG QÉ«àdG øY ¬∏°üah RÉ¡÷G ±É≤jEÉH ºb
¢Vôe AGOCG ≈∏Y
m
.ΩɶàfÉH ¬Ø«¶æJh
.√ÓYCG í°Vƒe ƒg ɪc ájÉbƒdG IGOCG Ö«cÎH ºb •
•
ɪc (6) ¿GQhódG OƒªY ‘ (11) á«∏NGódG áéæ∏ØdG ™°V •
πμ°ûH áàÑãe áéæ∏ØdG ¿CG ócCÉJ .(Ü πμ°ûdG) ÚÑe ƒg
.¿GQhódG Oƒª©d á룰ùŸG ÖfGƒ÷G ≈∏Y í«ë°U
ƒg ɪc (6) ¿GQhódG OƒªY ≈∏Y (12) ¢Uô≤dG ™°V
õcôe ≈∏Y …ƒàëj ¢Uô≤dG ¿Éc GPEG .(Ü πμ°ûdG) ÚÑe
áéæ∏Ø∏d kÉ¡LGƒe ÅJÉædG õcôŸG ¿CG ócCÉJ ,(13) ÅJÉf
•
áéæ∏ØdG ≈∏Y í«ë°U πμ°ûH ´ƒ°Vƒe ¢Uô≤dG ¿CG ócCÉJ
óæY .¿GQhódG Qƒfi ≈∏Y (14) á«LQÉÿG áéæ∏ØdG ™°V •
ÅJÉædG õcôŸG ¿ƒμj ¿CG Öéj ,ï∏L ¢Uôb Ö«côJ
.(ê πμ°ûdG ‘ CG) ¢Uô≤∏d kÉ¡LGƒe á«LQÉÿG áéæ∏Ø∏d
õcôŸG ¿ƒμj ¿CG Öéj ,™«£≤J ¢Uôb Ö«côJ óæYh
•
‘ Ü) ¢Uô≤∏d ¬LGƒe ÒZ á«LQÉÿG áéæ∏Ø∏d ÅJÉædG
á«LQÉÿG áéæ∏ØdG §HQGh (4) ¿GQhódG OƒªY πØb âÑK
πμ°ûdG) (15) ¿Éæ°SC’G »FÉæK §HôdG ìÉàØe ΩGóîà°SÉH
áéæ∏ØdG ∂ØH ºbh (4) ¿GQhódG OƒªY πØb âÑK •
»FÉæK §HôdG ìÉàØe ΩGóîà°SÉH (14) á«LQÉÿG
.(O πμ°ûdG) (15) ¿Éæ°SC’G
•
.(12) ¢Uô≤dGh (14) á«LQÉÿG áéæ∏ØdG ádGREÉH ºb
.á«∏NGódG
.á«∏NGódG
.(ê πμ°ûdG
Ö«cÎdG
•
•
•
.(O
ádGRE’G
•
¿Éc PEG RÉ¡÷G øe ájQÉ£ÑdG ádGREGh RÉ¡÷G ±É≤jEÉH ºb hCG •
.á∏°üØæe äÉjQÉ£H IóMh ≈∏Y πªà°ûj RÉ¡÷G
GPEG kÉeÉ“ ájQÉ£ÑdG ÆôØJ ¿CG ¤EG RÉ¡÷G 𫨰ûàH ºb hCG
.¬aÉ≤jEÉH ºb ºK RÉ¡÷ÉH á›óe ájQÉ£ÑdG âfÉc
ΩGóîà°S’G
¬∏ª– ’h ,ájOÉ©dG ¬àYöùH πª©j RÉ¡÷G ∑ôJG !ôjò– •
•
.¬©£b Öæéàd ¢UôëH »FÉHô¡μdG QÉ«àdG ∂∏°S ÖbGQ •
.¬àbÉW ¥ƒa
21
Page 22

ARABIC
á«æØdG äÉfÉ«ÑdG
KG2300
Type 2
220-240 OOΟG QÉ«àdG Ió°T »Hô¡µdG ó¡÷G
2300 äGh πNGódG »Hô¡µdG QÉ«àdG
6000
230 º∏e ¢Uô≤dG §«fi
22 º∏e ¢Uô≤∏d »∏NGódG ô£≤dG
6 º∏e ï∏÷G ¢UGôbCG
3 º∏e ™«£≤àdG ¢UGôbCG
M14 ¿GQhódG OƒªY ºéM
6.4 ºéc ¿RƒdG
-1
á≤«bO πªM ¿hóH áYöùdG
¢Uô≤∏d ∂ª°S ≈°übCG
’ øMÉ°ûdG ¿CÉH kɪ∏Y ,¬Ø«¶æJ πÑb øMÉ°ûdG π°üØH ºb •
.ΩɶàfÉH ¬Ø«¶æJ iƒ°S áfÉ«°U …CG ¤EG êÉàëj
ΩɶàfÉH RÉ¡÷G øMÉ°T ‘ ájƒ¡àdG äÉëàa ∞¶f
.áaÉL ¢Tɪb á©£b hCG áªYÉf IÉ°Tôa kÉeóîà°ùe
á©£b ΩGóîà°SÉH ΩɶàfÉH ∑ôëŸG ¥hóæ°U ∞¶f
hCG ᣰTÉc ∞«¶æJ IOÉe …CG Ωóîà°ùJ ’ .áÑWQ ¢Tɪb
QÉÑZ …CG ádGRE’ ≥aôH ¬°†ØfGh º≤∏dG ¢†HÉb íàaG
,»°ù«FôdG òNCɪ∏d ójóL ¢ùHÉb Ö«cÎd áLÉ◊G ádÉM ‘
.øeBG πµ°ûH Ëó≤dG ¢ùHÉ≤dG øe ¢ü∏îJ
π°UƒŸG ±ô£dÉH ¿ƒ∏dG »æÑdG π«°UƒàdG ∂∏°S π°U •
•
•
.áÑjòe
•
.(¬Ñ«côJ ” GPEG) ¬∏NGóH
»°ù«FôdG òNCÉŸG ¢ùHÉb ∫GóÑà°SG
:»∏j Ée ™ÑJG
•
.ójó÷G ¢ùHÉ≤dG øe QÉ«àdÉH
22
.ójÉëŸG ±ô£dÉH ¿ƒ∏dG ¥QRC’G π«°UƒàdG ∂∏°S π°U
∂∏°ùdG π°U ,(¢VQDƒe) 1 áÄØdG øe èàæŸG ¿Éc GPEG •
.»°VQC’G ±ô£dÉH ¿ƒ∏dG ôØ°UC’G/ö†NC’G
ÉkLhOõe k’õY ádhõ©ŸG 2 áÄØdG øe èàæŸG ¿Éc GPEG !ôjò–
π«°UƒJ …C’
òFóæY áLÉM Óa (πѵdG ‘ §≤a ¿Éµ∏°S)
m
.»°VQC’G ±ô£dÉH
.IOƒ÷G á«dÉY ¢ùHGƒ≤dG ™e á≤aôŸG Ö«cÎdG äɪ«∏©J ™ÑJG
ô¡°üŸG ≤e ¢ùØf ∫óÑà°ùe ô¡°üe …C’ ¿ƒµj ¿CG »¨Ñæj
.èàæŸG ™e ≥aôŸG »∏°UC’G
•
Page 23

ARABIC
¿Éª°†dG
OGƒŸG ‘ Ö«Y ÖÑ°ùH ôμjO ófBG ∑ÓH èàæe ‘ π∏N ô¡X GPEG
¿EÉa ,AGöûdG ïjQÉJ øe
∫GóÑà°SG hCG áÑ«©ŸG AGõLC’G ∫GóÑà°SG øª°†J ôμjO ófBG ∑ÓH
:GPEG ’EG ,𫪩∏d бMGфdG шe Qуb ≈°ьbCG Тaƒаd дЙйажŸG √тg
.∫ɪgE’G hCG ΩGóîà°S’G IAÉ°SE’ èàæŸG ¢Vô©J
OGƒe hCG ΩÉ°ùLCG ÖÑ°ùH èàæŸÉH ᪫°ùL QGöVCG â≤◊ •
hCG øjóªà©ŸG áfÉ«°üdG AÓch iƒ°S ôNBG ¢üî°T ∫hÉM
ìÓ°UEG ôμjO ófBG ∑ÓÑd Ú©HÉàdG áfÉ«°üdG »∏eÉY
AGöûdG IQƒJÉa Ëó≤J Öéj ,¿Éª°†dG äÉeóN ≈∏Y ∫ƒ°üë∏d
ÜôbCG ™bƒe áaô©e ∂æμÁ .óªà©ŸG áfÉ«°üdG π«ch hCG ™FÉÑ∏d
ófBG ∑ÓH Öàμà ∫É°üJ’G ≥jôW øY óªà©e áfÉ«°U π«ch
øe k’óHh .π«dódG Gòg ‘ ÚÑŸG ¿Gƒæ©dG ‘ »∏ëŸG ôμjO
ófBG ∑ÓH iód øjóªà©ŸG áfÉ«°üdG AÓcƒH áªFÉb ôaƒàJ ,∂dP
äÉ¡Lh ™«ÑdG ó©H Ée áeóÿ á∏eÉμdG π«°UÉØàdGh ôμjO
Gô¡°T 12 ¿ƒ°†Z ‘ ,™«æ°üàdG hCG
k
.çOGƒM hCG áÑjôZ
.èàæŸG
:âfÎfE’G ≈∏Y Éæ©bƒe ≈∏Y ∫É°üJ’G
.www.2helpU.com
áÄ«ÑdG ájɪM
Gòg øe ¢ü∏îàdG ΩóY Ωõ∏j .π°üØæŸG ™ª÷G
.ájOÉ©dG á«dõæŸG áeɪ≤dG ™e èàæŸG
ôμjO ófBG ∑ÓH èàæe ∫GóÑà°SG ΩÉjC’G øe Ωƒj ‘ Ωõd GPEG
™e ¬æe ¢ü∏îàJ Óa ,¬eóîà°ùJ ó©J ⁄ GPEG hCG ,∂H ¢UÉÿG
•
èàæŸG Gòg áMÉJEG øe ócCÉJ πH ,iôNC’G á«dõæŸG áeɪ≤dG
.π°üØæŸG ™ªé∏d
ôjhóJ IOÉYE’ ≥aôe ôμjO ófBG ∑ÓH ácöT ôaƒJ
бjЙ¡f ¤EG Й¡dƒ°Uh OфйГ фμjO уfBG ∑УH дЙйажe
•
√òg Ëó≤J ºàjh .πª©∏d É¡à«MÓ°U ΩóYh ÉgôªY
≈Lôj ,áeóÿG √òg øe IOÉØà°SÓd .É
±ƒ°S …òdGh óªà©e áfÉ«°U π«ch …CG ¤EG èàæŸG IOÉYEG
.ЙжY бHЙ«f дЙйажŸG ™ªL √QhуH ¤ƒаj
óªà©e áfÉ«°U π«ch ÜôbCG ™bƒe ≈∏Y ±ô©àdG ∂æμÁ
»∏ëŸG ôμjO ófBG ∑ÓH Öàμe ≈∏Y ∫É°üJ’G ∫ÓN øe
,∂dP øe k’óHh .π«dódG Gòg ‘ í°VƒŸG ¿Gƒæ©dG ‘
Ú©HÉàdG øjóªà©ŸG áfÉ«°üdG AÓcƒH áªFÉb óLƒJ
Ée äÉeóÿ á∏eÉμdG π«°UÉØàdGh ôμjO ófBG ∑ÓH ácöûd
âfÎfE’G ≈∏Y ÉæH á°UÉÿG ∫É°üJ’G πFÉ°Shh ™«ÑdG ó©H
.www.2helpU.com :ÊhÎμdE’G ™bƒŸG ≈∏Y
fÉ› áeóÿG
k
•
•
π«é°ùàd www.blackanddecker.ae IQÉjõH π°†ØJ
дЙйажŸG ≈∏Y ´УW’Gh фμjO уfBG ∑УH шe уjучG ∂йажe
äÉeƒ∏©ŸG øe ójõŸG ôaƒàJ .á°UÉÿG ¢Vhô©dGh Iójó÷G
≈∏Y ÉæJÉéàæe áYƒª›h ôμjO ófBG ∑ÓH ácöT ∫ƒM
.www.blackanddecker.ae
23
Page 24

FRENCH
4
1
2
24
3
5
Page 25

FRENCH
5
8
14
A
10
6
9
7
9
12
13
11
6
B
14
12
11
6
14
15 14 12
C
12
11
6
4
D
25
Page 26

FRENCH
Utilisation prévue
Votre meuleuse d'angle Black & Decker a été
conçue pour meuler et découper le métal et le
béton avec des disques de tronçonnage ou de
meulage spécifiques. Équipé du carter de
protection approprié, cet outil est réservé à un
usage domestique.
Instructions de sécurité
Consignes de sécurité générales pour les outils
électriques
Attention ! Prenez connaissance de
tous les avertissements de sécurité et
de toutes les instructions. Le non-respect des
avertissements et des instructions indiqués
ci-dessous peut entraîner une électrocution, un
incendie ou de graves blessures.
Conservez tous les avertissements et
instructions pour référence future.
La notion d'« outil électroportatif » mentionnée par
la suite se rapporte à des outils électriques
raccordés au secteur (avec câble de
raccordement) ou fonctionnant sur piles (sans fil).
1. Sécurité de la zone de travail
a. Maintenez la zone de travail propre et bien
éclairée. Un lieu de travail en désordre ou mal
éclairé augmente le risque d'accidents.
b. N'utilisez pas les outils électroportatifs dans un
environnement présentant des risques
d'explosion ni en présence de liquides, gaz ou
poussières inflammables. Les outils
électroportatifs génèrent des étincelles risquant
d'enflammer les poussières ou les vapeurs.
c. Tenez les enfants et autres personnes éloignés
durant l'utilisation de l'outil électroportatif. En
cas d'inattention, vous risquez de perdre le
contrôle sur l'outil.
2. Sécurité électrique
a. La fiche de secteur de l'outil électroportatif doit
convenir à la prise de courant. Ne modifiez en
aucun cas la fiche. N'utilisez pas de fiches
d'adaptateur avec des outils ayant une prise de
terre. Les fiches non modifiées et les prises de
courant appropriées réduisent le risque
d'électrocution.
b. Évitez le contact physique avec des surfaces
mises à la terre telles que tuyaux, radiateurs,
fours et réfrigérateurs. Il y a un risque élevé
d'électrocution si votre corps est relié à la terre.
26
c. N'exp
d. Préservez le câble d'alimentation. N'utilisez
e. Si vous utilisez l'outil électroportatif à
f. Si l'usage d'un outil dans un emplacement
3. Sécurité personnelle
a. Restez vigilant, surveillez ce que vous faites.
b. Utilisez un équipement de protection
c. Évitez toute mise en marche involontaire.
osez pas l'outil électroportatif à la pluie
ni à l'humidité. La pénétration d'eau dans un
outil électroportatif augmente le risque
d'électrocution.
pas le câble à d'autres fins que celles
prévues, notamment pour porter l'outil,
l'accrocher voire le débrancher de la prise de
courant. Maintenez le câble éloigné des
sources de chaleur, des parties grasses, des
bords tranchants ou des parties de l'outil en
rotation. Un câble endommagé ou enchevêtré
augmente le risque d'électrocution.
l'extérieur, utilisez une rallonge homologuée
pour utilisation à l'air libre. L'utilisation d'une
rallonge électrique homologuée pour les
applications extérieures réduit le risque
d'électrocution.
humide est inévitable, utilisez une
alimentation protégée par un dispositif à
courant différentiel résiduel (RCD). L'usage
d'un RCD réduit le risque de choc électrique.
Faites preuve de bon sens quand vous
utilisez l'outil électroportatif. N'utilisez pas
l'outil lorsque vous êtes fatigué ou après avoir
consommé de l'alcool, des drogues voire des
médicaments. Un moment d'inattention lors
de l'utilisation de l'outil peut entraîner de
graves blessures.
personnelle. Portez toujours une protection
pour les yeux. Les équipements de protection
personnelle tels que les masques
anti-poussières, chaussures de sécurité
antidérapantes, casques ou protections
acoustiques utilisés dans des conditions
appropriées réduisent les blessures.
Vérifiez que l'interrupteur est en position arrêt
avant de brancher l'outil au secteur ou au
bloc de batteries, de le prendre ou de le
porter. Transporter les outils en avec le doigt
sur l'interrupteur ou les brancher avec
l'interrupteur en position de marche est une
source d'accidents.
Page 27

FRENCH
d. Enlevez tout outil ou clé de réglage avant de
mettre l'outil en marche. Une clé ou un outil
se trouvant sur une partie en rotation peut
causer des blessures.
e. Adoptez une position confortable. Adoptez
une position stable et gardez votre équilibre
à tout moment. Vous contrôlerez mieux l'outil
dans des situations inattendues.
f. Portez des vêtements appropriés. Ne portez
pas de vêtements flottants ou de bijoux.
N'approchez pas les cheveux, vêtements ou
gants des parties des pièces mobiles. Les
vêtements amples, les bijoux ou les cheveux
longs peuvent être attrapés dans les pièces
en mouvement.
g. Si des dispositifs servant à aspirer ou à
recueillir les poussières doivent être utilisés,
vérifiez qu'ils sont correctement raccordés et
utilisés. Le fait d'aspirer la poussière permet
de réduire les risques inhérents à la
poussière.
4. Utilisation des outils électroportatifs et
précautions
a. Ne surchargez pas l'outil. Utilisez l'outil
électroportatif approprié pour le travail à
effectuer. Avec l'outil électroportatif
approprié, vous travaillerez mieux et avec
plus de sécurité à la vitesse pour laquelle il a
été conçu.
b. N'utilisez pas un outil électroportatif dont
l'interrupteur est défectueux. Un outil
électroportatif qui ne peut plus être mis en ou
hors fonctionnement est dangereux et doit
être réparé.
c. Déconnectez la prise de la source
d'alimentation ou le pack-batterie de l'outil
électrique avant tout réglage, changement
d'accessoire voire rangement des outils
électriques. Cette mesure de précaution
empêche une mise en marche par mégarde.
d. Rangez les outils électroportatifs hors de
portée des enfants. Ne laissez pas les
personnes n'étant pas familiarisées avec
l'outil ou n'ayant pas lu ces instructions
l'utiliser. Les outils électroportatifs sont
dangereux lorsqu'ils sont utilisés par des
personnes non initiées.
e. Prenez soin des outils électroportatifs.
Vérifiez que les parties en mouvement
fonctionnent correctement et qu'elles ne sont
pas coincées ; vérifiez qu'il n'y a pas de
pièces cassées ou endommagées
susceptibles de nuire au bon fonctionnement
de l'outil. S'il est endommagé, faites réparer
l'outil avant de l'utiliser. De nombreux
accidents sont dus à des outils
électroportatifs mal entretenus.
f. Maintenez les outils de coupe aiguisés et
propres. Des outils soigneusement
entretenus avec des bords tranchants bien
aiguisés se coincent moins souvent et
peuvent être guidés plus facilement.
g. Utilisez l'outil électrique, les accessoires et
forets, etc. conformément à ces instructions,
en tenant compte des conditions de travail et
des tâches à effectuer. L'utilisation des outils
électroportatifs à d'autres fins que celles
prévues peut entraîner des situations
dangereuses.
5. Réparations
a. Faites réparer votre outil électroportatif
uniquement par du personnel qualifié et
seulement avec des pièces de rechange
d'origine. Cela garantira le maintien de la
sécurité de votre outil.
Avertissements de sécurité
additionnels pour les outils
électriques
Attention ! Avertissements de sécurité
additionnels pour les opérations de
meulage, de ponçage, de brossage, de
polissage ou de tronçonnage par abrasion.
• Cet outil électrique est conçu pour être utilisé
comme une meuleuse, une ponceuse, une
brosse métallique, une polisseuse et une
tronçonneuse. Lisez tous les avertissements
de sécurité, instructions, illustrations et
spécifications fournis avec cet outil électrique.
Le non-respect des instructions indiquées
ci-dessous peut entraîner une électrocution,
un incendie ou de graves blessures.
• Les opérations pour lesquelles cet outil
électrique n'a pas été conçu sont des sources
de dangers et de blessures.
27
Page 28

FRENCH
• Utilisez uniquement les accessoires
spécifiquement conçus et recommandés par
le fabricant de l'outil. Il ne suffit pas qu'un
accessoire soit adaptable sur votre outil
électrique pour assurer son utilisation en
toute sécurité.
• La vitesse nominale de l'accessoire doit être
au moins égale à la vitesse maximum
mentionnée sur l'outil électrique. Les
accessoires dépassant leur vitesse nominale
peuvent se rompre et être projetés.
• Le diamètre extérieur et l'épaisseur de votre
accessoire doivent respecter la capacité
nominale de votre outil électrique. Des
accessoires d'une taille incorrecte ne
peuvent bénéficier d'une protection et d'un
contrôle adéquats.
• L'alésage des roues, brides, tampons de
support ou autres accessoires doit s'adapter
correctement à l'axe de l'outil électrique. Les
accessoires dont l'alésage ne correspond
pas au système de fixation de l'outil
électrique sont déséquilibrés, vibrent
excessivement et peuvent causer une perte
de contrôle.
• N’utilisez pas un accessoire endommagé.
Avant chaque utilisation, vérifiez l'état de
l'accessoire : disque abrasif ébréché ou
fissuré, tampon de support fissuré, usure ou
dégâts excessifs, brosse métallique aux fils
libres ou cassés. Si l'outil électrique ou
l'accessoire tombe, vérifiez son état ou
installez un accessoire en parfait état. Après
l'inspection et l'installation d'un accessoire,
faites marcher l'outil électrique à la vitesse
maximum à vide pendant une minute. Un
accessoire endommagé casse normalement
après ce délai de test.
• Portez un équipement de protection
personnelle. Selon l'application, utilisez un
écran facial, un masque de sécurité ou des
lunettes de sécurité. Selon les besoins,
portez un masque anti-poussière, une
protection auditive, des gants et un tablier
d'atelier capable de stopper de petits
fragments générés par l'abrasion ou de la
pièce à ouvrer. La protection oculaire doit
pouvoir arrêter les débris projetés par les
diverses opérations. Le masque
anti-poussière ou le respirateur doit pouvoir
28
filtrer les particules générées par l'opération.
Une exposition prolongée à des bruits d'une
intensité élevée peut engendrer une perte de
l'audition.
• Maintenez les passants à distance de
sécurité de la zone de travail. Quiconque
pénétrant dans la zone de travail doit porter
un équipement de protection personnelle.
Des fragments de pièce à ouvrer ou un
accessoire cassé peuvent être projetés et
blesser au-delà de la zone de travail
immédiate.
• Tenez l’outil électrique uniquement par les
surfaces isolées des poignées si l’opération
effectuée peut mettre la lame en contact avec
des câbles électriques cachés ou son propre
cordon électrique. Le contact de l’accessoire
de coupe avec un câble sous tension met les
parties métalliques de l’outil électrique sous
tension et peut provoquer une électrocution
de l’utilisateur.
• Positionnez le cordon à l'écart de l'accessoire
en rotation. Si vous perdez le contrôle, le
cordon peut être coupé ou attrapé et votre
main ou votre bras être attiré dans
l'accessoire en rotation.
• Ne posez jamais l'outil électrique tant que
l'accessoire ne s'est pas arrêté
complètement. L'accessoire en rotation peut
toucher la surface et faire échapper l'outil
électrique à votre contrôle.
• N'utilisez pas l'outil électrique en le tenant à
vos côtés. Un contact accidentel avec
l'accessoire en rotation pourrait attraper vos
vêtements et attirer l'accessoire vers votre
corps.
• Nettoyez régulièrement les fentes de
ventilation de l'outil électrique. Le ventilateur
du moteur attire la poussière à l'intérieur du
carter et une accumulation excessive de
poudre métallique est une source de dangers
électriques.
• N'utilisez pas l'outil électrique près de
matériaux inflammables. Des étincelles
pourraient enflammer ces matériaux.
• N'utilisez aucun accessoire nécessitant un
liquide de refroidissement. L'emploi d'eau ou
d'autres liquides de refroidissement peut
occasionner une électrocution ou un choc.
Page 29

FRENCH
Remarque : l'avertissement précédent ne
concerne pas les outils électriques spécialement
conçus pour être utilisés avec un système
liquide.
Contrecoup et avertissements
associés
Le contrecoup est une réaction soudaine d'un
disque, d'un tampon de support, d'une brosse
ou de tout autre accessoire en rotation pincé ou
attrapé. Le pincement ou le blocage entraîne un
calage rapide de l'accessoire en rotation ce qui
provoque une perte de contrôle de l'outil
électrique qui est forcé dans le sens opposé à la
rotation de l'accessoire à l'endroit du blocage.
Par exemple, si un disque abrasif est attrapé ou
pincé par la pièce à ouvrer, le bord du disque
inséré dans le point de pincement peut
s'enfoncer dans la surface du matériau, faisant
sauter ou remonter le disque. Le disque peut
être soit projeté en avant, soit s'éloigner de
l'opérateur, selon le sens de rotation du disque à
l'endroit du pincement. Dans ces conditions, un
disque abrasif peut même se casser.
Le contrecoup est le résultat d'une utilisation
inappropriée de l'outil électrique voire de
procédures ou de conditions d’utilisation
incorrectes. Il peut être évité en appliquant les
précautions adéquates, décrites ci-dessous:
• Maintenez une prise ferme sur l'outil
électrique et positionnez votre corps et votre
bras afin de disposer d'une force suffisante
pour résister aux contrecoups. Utilisez
toujours la poignée auxiliaire, le cas échéant,
pour disposer d'un contrôle maximum sur le
contrecoup ou sur la réaction du couple au
démarrage. L'opérateur peut contrôler les
réactions du couple et les forces de
contrecoup si les précautions adaptées sont
respectées.
• Ne placez jamais votre main à proximité de
l'accessoire rotation. Le contrecoup de
l'accessoire peut toucher votre main.
• Ne positionnez jamais votre corps dans la
zone où l'outil électrique peut se déplacer en
cas de contrecoup. Le contrecoup propulse
l'outil dans le sens opposé à la rotation du
disque au point de blocage.
• Faites spécialement attention en travaillant
dans les angles, les arêtes, etc. Évitez toute
secousse et tout blocage de l'accessoire. Les
angles, les arêtes et les secousses ont
tendance à bloquer l'accessoire en rotation et
peuvent vous faire perdre le contrôle ou
générer un contrecoup.
• Ne montez pas une chaîne de coupe, une
lame à sculpter le bois ou une lame de scie
dentée. Ce type de lames génère
fréquemment des contrecoups et des pertes
de contrôle.
Avertissements de sécurité
additionnels spécifiques aux
opérations de tronçonnage par
abrasion
• Ne bloquez pas le disque de tronçonnage et
n'appliquez pas de pression excessive.
N'essayez pas d'effectuer une coupe d'une
profondeur excessive. Une pression
excessive sur le disque augmente la charge,
donc le risque de torsion ou de blocage du
disque dans la coupe et, par conséquent, la
possibilité de contrecoup ou de rupture du
disque.
• Ne positionnez pas votre corps aligné ou
derrière le disque en rotation. Lorsque le
disque, au point d'opération, s'écarte de votre
corps, le contrecoup potentiel peut propulser
le disque en rotation avec l'outil électrique
directement vers vous.
• Lorsque le disque bloqué ou en cas
d'interruption d'une coupe pour une raison
quelconque, arrêtez l'outil électrique et
maintenez-le immobile jusqu'à l'arrêt complet
du disque. N'essayez jamais de retirer un
disque tronçonnage de la coupe alors qu'il est
encore en rotation sinon un contrecoup est
possible. Déterminez pourquoi le disque s’est
coincé et corrigez le problème.
• Ne recommencez pas à l'opération de coupe
dans la pièce à ouvrer. Laissez le disque
atteindre sa vitesse maximum puis entrez à
nouveau dans la coupe avec précaution. Le
disque peut se pincer, remonter ou générer
un contrecoup si l'outil électrique est
redémarré dans la pièce à ouvrer.
29
Page 30

FRENCH
• Soutenez les panneaux ou les pièces à
ouvrer de grande taille afin de minimiser le
risque de pincement et de contrecoup du
disque. Les grandes pièces à ouvrer ont
tendance à s’arquer sous leur propre poids.
La pièce à ouvrer doit être soutenue des
deux côtés par des supports près de la fente
de scie ainsi qu'aux bords, de chaque côté
du disque.
• Faites preuve d’une prudence particulière
pour effectuer une « découpe en poche »
dans les murs préexistants ou autres parties
non apparentes. Le disque saillant peut
couper les conduites de gaz ou d'eau, le
câblage électrique ou d'autres objets
susceptibles de générer un contrecoup.
Avertissements de sécurité spécifiques aux
opérations de ponçage
• N'utilisez pas un papier de ponçage
surdimensionné. Suivez les
recommandations du fabricant pour le choix
du papier de ponçage. Un papier de
ponçage plus grand, dépassant du patin de
ponçage, présente un risque de lacération et
peut attraper ou casser le disque voire
engendrer un contrecoup.
Avertissements de sécurité spécifiques aux
opérations de polissage
• Ne laissez aucune partie libre du chapeau de
polissage ou ses cordons de fixation tourner
librement. Écartez ou coupez tout cordon de
fixation libre. Un cordon de fixation libre en
rotation peut s'enchevêtrer avec vos doigts
ou attraper la pièce à ouvrer.
Avertissements de sécurité spécifiques aux
opérations de brossage
• Notez que des brins métalliques sont
projetés par la brosse même pendant le
fonctionnement normal. Ne forcez pas les fils
en appliquant une pression excessive sur la
brosse. Les brins métalliques peuvent
facilement pénétrer sous les vêtements ou la
peau.
• Si l'emploi d'une protection est recommandé
avec la brosse métallique, aucun élément du
disque ou de la brosse ne doit interférer avec
la protection. Le disque ou la brosse
métallique peut voir son diamètre s'agrandir
en raison de la charge de travail et des forces
centrifuges.
Sécurité des tiers
• Cet appareil n'est pas destiné à être utilisé
par des personnes (notamment des enfants)
présentant des capacités physiques,
sensorielles ou mentales limitées voire
dépourvues de connaissance et d'expérience,
sauf si elles sont supervisées ou ont reçu des
instructions pour l'usage de l'appareil par une
personne responsable de leur sécurité.
• Les enfants ne doivent pas jouer avec
l’appareil.
Vibration
Les valeurs des émissions de vibrations
mentionnées dans les données techniques et la
déclaration de conformité ont été mesurées
conformément à la méthode de test normalisée
indiquée par EN 60745 et permettent les
comparaisons entre outils. Les valeurs des
émissions de vibrations peuvent également
servir à une évaluation préliminaire de
l'exposition.
Attention ! Les valeurs des émissions de
vibrations en utilisant réellement l'outil peuvent
différer des valeurs déclarées en fonction du
mode d'usage de l'outil. Le niveau de vibration
peut dépasser le niveau indiqué.
Pour évaluer l'exposition aux vibrations afin de
déterminer les mesures de sécurité imposées
par 2002/44/CE pour protéger les personnes
utilisant régulièrement des outils électriques, une
estimation de l'exposition aux vibrations devrait
prendre en compte les conditions réelles et le
mode d'utilisation de l'outil, notamment
l'ensemble du cycle de fonctionnement ainsi
l'arrêt de l'outil et son fonctionnement au ralenti,
outre le démarrage.
30
Page 31

FRENCH
Étiquettes apposées sur l'outil
Les pictogrammes suivants sont présents sur
l'outil :
Attention ! Afin de réduire les risques
de blessures, l'utilisateur doit lire le
manuel d'instructions.
Portez des lunettes de sécurité lorsque
vous utilisez cet outil.
Portez des protections auditives
lorsque vous utilisez cet outil.
Sécurité électrique
L'outil est doublement isolé ; par
conséquent, aucun câble de masse
n'est nécessaire. Vérifiez si le voltage
mentionné sur la plaque signalétique de la
machine correspond bien à la tension de
secteur présente sur lieu.
• Si le câble d'alimentation est endommagé, il
doit être remplacé par le fabricant ou par un
centre de réparation agréé Black & Decker
afin d'éviter tout accident.
Caractéristiques
Cet outil comprend toutes ou certaines des
caractéristiques suivantes.
1. Interrupteur marche/arrêt
2. Bouton de blocage
3. Poignée latérale
4. Verrouillage de l’arbre
5. Carter de protection
Assemblage
Attention ! Avant l'assemblage, assurez-vous
que l'outil est éteint et débranché.
Installation et retrait du carter
de protection (fig. A)
L'outil est fourni avec un carter de protection
réservé à des fins de meulage. Si l'unité doit
être employée pour des opérations de découpe,
un carter de protection spécifique doit être
installé. Un carter de protection pour les
opérations de découpe référence 1004484-02
est disponible et peut être obtenu auprès des
centres d'entretien Black & Decker.
Installation
• Placez l'outil sur une table, arbre (6) tourné
vers le haut.
• Dévissez le système de blocage (7) et placez
le carter de protection (5) sur l'outil selon le
schéma.
• Alignez les œillets (8) avec les encoches (9).
• Enfoncez le carter de protection et faites-le
tourner dans le sens inverse des aiguilles
d'une montre jusqu'à la position souhaitée.
• Serrez le système de blocage pour bloquer le
carter de protection sur l'outil.
• Si nécessaire, serrez la vis (10) pour
augmenter la force de serrage.
Retrait
• Relâchez le système de blocage (7).
• Faites tourner le carter de protection dans le
sens horaire pour aligner les œillets (8) avec
les encoches (9).
• Déposez le carter de protection.
Réglage du carter de protection
(fig. A)
Il est possible de faire pivoter le carter de
protection sur 90°.
• Faites pivoter le carter de protection à votre
convenance.
Montage de la poignée latérale
(fig. B)
• Vissez la poignée latérale (3) dans l'un des
orifices de montage de l'outil.
Attention ! Utilisez toujours la poignée latérale.
Montage et démontage des
disques de meulage ou de
tronçonnage (fig. B - D)
Utilisez toujours le type de disque adapté à votre
application. Utilisez toujours des disques
présentant un diamètre et un alésage de
dimension correcte (voir caractéristiques
techniques).
31
Page 32

FRENCH
Installation
• Installez le carter de protection comme
indiqué ci-dessus.
• Placez la bride intérieure (11) sur l'arbre (6)
comme indiqué (fig. B). Assurez-vous que la
bride est bien en place sur les côtés plats de
l'arbre.
• Placez le disque (12) sur l'arbre (6) comme
indiqué (fig. B). Si le disque comporte un
centre surélevé (13), assurez-vous qu'il est
bien en face de la bride intérieure.
• Assurez-vous que le disque est bien en
place sur la bride intérieure.
• Placez la bride extérieure (14) sur l'arbre.
Lors du montage du disque de meulage, le
centre surélevé sur la bride extérieure doit
faire face au disque (A dans fig. C). Lors du
montage du disque de tronçonnage, le
centre surélevé sur la bride extérieure doit
être opposé au disque (B dans fig. C).
• Appuyez sur le bouton de verrouillage de
l'arbre (4) et serrez la bride extérieure à
l'aide de la clé à deux griffes (15) (fig. D).
Retrait
• Appuyez sur le bouton de verrouillage de
l'arbre (4) et desserrez la bride extérieure
(14) à l'aide de la clé à deux griffes (15) (fig.
D).
• Enlevez la bride extérieure (14) et le disque
(12).
Utilisation
• Attention ! Laissez l'outil fonctionner à sa
propre vitesse. Ne le surchargez pas.
• Guidez le câble avec soin pour ne pas le
couper par mégarde.
• Attendez-vous à un jet d'étincelles lorsque le
disque de meulage ou de tronçonnage
touche la pièce à travailler.
• Placez toujours l'outil de telle sorte que le
carter de protection puisse vous protéger au
maximum du disque de meulage ou de
tronçonnage.
Démarrage et arrêt
• Pour allumer l'outil, placez le bouton de
verrouillage (2) sur la position déverrouillée et
appuyez sur l'interrupteur de marche/arrêt
(1).
• Pour éteindre l’outil, relâchez le bouton
marche/arrêt.
Attention ! N’éteignez pas l’outil lorsqu’il est
encore en charge.
Conseils pour une utilisation
optimale
• Tenez l'outil fermement avec une main sur la
poignée latérale et l'autre autour de la
poignée principale.
• Lors du meulage, conservez toujours un
angle d'environ 15º entre le disque et la
surface de la pièce à ouvrer.
Entretien
Votre appareil/outil Black & Decker avec/sans fil
a été conçu pour fonctionner pendant longtemps
avec un minimum d'entretien. Un
fonctionnement continu satisfaisant dépend d'un
nettoyage régulier et d'un entretien approprié de
l'outil.
Attention ! Avant toute activité d'entretien sur les
outils électriques avec/sans fil :
• Eteignez et débranchez l’appareil/l'outil.
• Ou coupez et retirez la batterie de
l'appareil/outil s'il comporte un pack-batterie
séparé.
• Voire épuisez complètement la batterie si elle
est intégrée puis mettez hors tension.
32
Page 33

FRENCH
• Débranchez le chargeur avant de le nettoyer.
Votre chargeur ne nécessite aucun autre
entretien qu'un nettoyage régulier.
• Nettoyez régulièrement les fentes de
ventilation de votre outil/appareil/chargeur à
l'aide d'une brosse douce ou d'un chiffon
sec.
• Nettoyez régulièrement le carter moteur à
l'aide d'un chiffon humide. N'utilisez pas de
produit abrasif ou à base de solvant.
• Ouvrez régulièrement le mandrin (le cas
échéant) et tapotez dessus pour retirer toute
poussière à l'intérieur.
Remplacement d’une prise
électrique
En cas d’installation d’une nouvelle prise:
• Jetez l’ancienne prise.
• Connectez le fil marron sur la borne sous
tension de la nouvelle prise.
Caractéristiques techniques
KG 2300
TYPE 2
Tension V
Puissance absorbée W 2.300
Vitesse à vide min-1 6.000
Diamètre du disque mm 230
Alésage du disque mm 22
Épaisseur max. du disque
disques de meulage mm 6
disques de tronçonnage mm 3
Taille de l'arbre M14
Poids kg 6,4
AC 220-240
• Connectez le fil bleu sur la borne neutre.
• Si le produit est de classe I (terre), connecter
le fil vert / jaune sur la borne terre.
Attention! Si votre produit est de classe II avec
double isolation (seulement 2 fils dans le cordon
électrique), il n’y a aucune connexion à faire sur
la borne terre.
Suivez les instructions de montage fournies
avec les prises de bonne qualité
Tout fusible de rechange doit être du même
calibre que le fusible d'origine fourni avec le
produit.
33
Page 34

FRENCH
Protection de l'environnement
Collecte séparée. Ce produit ne doit
pas être jeté avec les déchets
domestiques normaux.
Si vous décidez de remplacer ce produit Black
& Decker, ou si vous n'en avez plus l'utilité, ne
le jetez pas avec vos déchets domestiques
Rendez-le disponible pour une collecte séparée.
• Black & Decker fournit un dispositif
permettant de collecter et de recycler les
produits Black & Decker lorsqu'ils ont atteint
la fin de leur cycle de vie. Pour pouvoir
profiter de ce service, veuillez retourner votre
produit à un réparateur agréé qui se
chargera de le collecter pour nous.
• Pour connaître l'adresse du réparateur agréé
le plus proche de chez vous, contactez le
bureau Black & Decker à l'adresse indiquée
dans ce manuel. Vous pourrez aussi trouvez
un liste des réparateurs agréés de Black &
Decker et de plus amples détails sur notre
service après-vente sur le site Internet à
l'adresse suivante : www.2helpU.com
34
Page 35

Garantie
Lorsqu’un appareil Black & Decker s’avère
defectueux en raison d’un défaut matériel ou de
fabrication dans les 12 mois à compter de la
date d’achat, Black & Decker garantit le
remplacement des pièces défectueuses ou de
l’appareil afin de minimiser les désagréments
causés au client, à l’exclusion des cas suivants:
• Utilisation abusive de l’appareil ou appareil
endommagé à cause de négligence.
• Appareil endommagé par d’autres appareils,
des substances ou par accident.
• Réparations effectuées par des personnes
autres qu’un réparateur agréé ou le service
technique de Black & Decker.
Pour avoir recours à la garantie, il est
nécessaire de fournir une preuve d’achat à
votre revendeur ou à un réparateur agréé. Pour
connaitre l’adresse du réparateur agréé le plus
proche, contactez le bureau Black & Decker à
l’adresse indiquée dans ce manuel. Vous
pouvez aussi trouver une liste des réparateurs
agréés Black & Decker et de plus amples
détails sur notre service après-vente en visitant
notre site: www.2helpU.com.
FRENCH
Visitez notre site Web www.blackanddecker.ae
pour enregistrer votre nouveau produit Black &
Decker et être informé des nouveaux produits et
des offres spéciales. Pour plus d'informations
concernant la marque Black & Decker et notre
gamme de produits, consultez notre site
www.blackanddecker.ae
35
Page 36

Names & Addresses for Black & Decker Service Concessionaries
ALGERIA: Sarl Outillage Corporation, 08 Rue Med Boudiaf - Cheraga - Algiers, Algeria. Tel: (213-21) 375130, Fax: (213-21) 369667. AZERBAIJAN:
Royalton Holdings Ltd. 41 Khagani St. Apt. 47 AZ 1001, Baku. Tel: (994-12) 4935544, Fax: (994-12) 5980378. BAHRAIN: Alfouz Services Co. WLL.,
P.O. Box 26562, Tubli, Manama. Tel: (973) 17783562, Fax: (973) 17783479. EGYPT: El-Farab S.A.E 15 - Nabil El Wakkad Street, Dokki, Giza. Tel:
(202) 37603946, Fax: 33352796. ETHIOPIA: Seif Tewfik Sherif, Arada Sub-City, Kebele 01/02, Global Insurance Building, 2nd Floor, Room 43,
P.O. Box 2525, Addis Ababa, Ethiopia. Tel: (251-11) 1563968/ 1563969, Fax: (251-11) 1558009. IRAQ: Al Sard Co. for General Trading Ltd.
Jbara Bldg. 3Flr, Al Rasheed St. Bagdad. Tel: (964) 18184102. Sakhar Group, Arrassat al-hindya Al Masbah, Bagdad. (964) 7400144446. JORDAN:
Palestine Bldg. Matl. (Bashiti Hardware), 93 King Abdullah 2nd Street, Opp. ELBA House, P.O. Box 3005, Amman 11953, Tel: (962-6) 5349098, Fax:
(962-6) 5330731. KENYA: Dextron Tools Ltd., P.O. Box 20121-00200, Shariff House, Kimathi Street, Nairobi. Tel: (254-20) 6905000/ 2358021, Fax:
(254-20) 6905111/ 6905112. KUWAIT: Al Omar Technical Co., P .O. Box 4062, 13041 Safat, Kuwait. Tel: (965) 24848595/ 24840039, Fax:
(965) 24845652. Fawaz Al Zayani Establishment, P.O. Box 42426, Shop No. 18, Al Humaizi Commercial Complex, Khalifa Al Jassim, Shuwaikh, Kuwait.
Tel: (965) 24828710, Fax: (965) 24828716. LEBANON: Est. Shaya & Azar S.A.R.L., Boulvard, Jdeideh, Mar Takla-Bouchrieh, P.O. Box 90545,
Jdeideh, Beirut. Tel: (961-1) 872305/ 872306, Fax: (961-1) 872303. LIBYA: (Benghazi) Sniydel st., Amr Ibn EL-Aas Rd. Tel: (+218) 92 5771120.
(Tripoli) Al Barniq Service Center, Mokhazin elsukar st., ElFallah. Tel: (+218) 21 4808019. (Misrata) Al Hilal Service Center, Tawergha st. T el:
(+218) 51 2626743. MAURITIUS: Robert le Marie Limited, Old Moka Road, Bell Village, P.O. Box 161, Port Louis. Tel: (230) 2121865/ 2122847, Fax:
(230) 2080843. MOROCCO: Ets. Louis Guillaud & Cie, 31, Rue Pierre Parent, Casablanca-21000. Tel: (+212) 522 305971, Fax: (+212) 522 444518.
NIGERIA: Meridian Power Tools Ltd., Gr. Floor, #1 Alhaji Masha Road, Next to Teslim Balogun Stadium, Near National Stadium, Surulere, Lagos. Tel:
(234-1) 7740431/ 7740410, Fax: (234-1) 7913798. OMAN: Al Jizzi Company LLC, P.O. Box 1704, P.C. 112 Ruwi, Oman. Tel: (968) 24832618/
24835153, Fax: (968) 24831334. Al Hassan Technical & Construction Supplies Co. LLC., P.O. Box 1948, P.C. 112, Ruwi, Oman. Tel: (968) 24810575/
24837054, Fax: (968) 24810287/ 248333080. Khimji Ramdas, P.O. Box 19, Post Code 100, Ghala, Muscat, Oman. Tel: (968) 24595906/ 907, Fax:
(968) 24852752. Oman Hardware Co. LLC., P.O. Box 635, Ruwi-112. Tel: (968) 24815131, Fax: (968) 24816491. Oman Marketing & Service Co.
(Omasco), P.O. Box 2734, Behind Honda Showroom, Wattayah, Oman. Tel: (968) 24560232/ 24560255, Fax: (968) 24560993. Oman Market ing &
Service Co. (Omasco), Al Ohi, Sohar, Oman. Tel: (968) 26846379, Fax: (968) 26846379. Oman Marketing & Service Co. (Omasco), Sanaya, Salalah,
Oman. Tel: (968) 23212290, Fax: (968) 23210936. PAKISTAN: Ammar Service & Spares, 60-Bank Arcade, Serai Road, Karachi, Pakistan. Tel:
(92-21) 32426905, Fax: (92-21) 32427214. ZIT Co., Nasir & Bros., 2nd Floor, Qadri Center, Chowk Dalgran, Railway Road, Lahore. Tel :
(92-42) 37670839, Fax: (92-42) 37652989. QATAR: Al Muftah Service Centre, Al Wakrah Road, P.O. Box 875, Doha, Qatar. Tel: (974) 4650880/
4650110/ 4446868, Fax: (974) 4441415/ 4662599. Shaheen Electrical Works & Trading Co. WLL., Gate 34, St.44 Industriala Area, P.O. Box 9756,
Doha. Tel: (974) 4600230/ 4600525, Fax: (974) 4601338. Teyseer Industrial Supplies & Services Co. WLL., 55, Al Wakalat St. (Between St. 18 & 19)
Salwa Industrial Area, P.O. Box 40523, Doha, Qatar. Tel: (974) 4581536, Fax: (974) 4682024. SAUDI ARABIA: (Al Bahr) Mohamed Ahmed Bin Afif
Est., P.O. Box 530, Yanbu, Al Bahr. Tel: (966-4) 3222626/ 3228867, Fax: (966-4) 3222210. (Al Khobar) Fawaz Ebrahim Al Zayani Trading Est.,
P.O. Box 76026, Al Khobar # 31952, Tel: (966-3) 8140914, Fax: (966-3) 8140824. MSS (Al-Mojil Supply & Services) P.O. Box 450, Jubail 31951,
Opp. Gulf Bridge Library & Riyadh House. Tel: (966-3) 3612850/ 3624487/ 3621729, Fax: (966-3) 3623589/ 3620783. (Dammam) Al Bawardi Tools &
Hardware, P.O. Box 112, Dammam 31411. Tel: (966-3) 8330780/ 8348585 ext. 24, Fax: (966-3) 8336303. (Jeddah) Al Bawardi Tools & Hardware,
P.O. Box 16905, Jeddah-21474. Tel: (966-2) 6444547, Fax: (966-2) 6439024. EAC (Al Yousef Contg. & Trdg. Est.), P.O. Box 30377, Jeddah -21477, Tel:
(966-2) 6519912, Fax: (966-2) 6511153. (Madina) Garziz Trading for Bldg Mat & Decoration, P.O. Box 3364, Madina. Tel: (966-4) 8261490/ 8227636,
Fax: (966-4) 8265741. (Riyadh)
Industrial Material Organization (IMO), P.O. Box 623, Rail Street, Riyadh. Tel: (966-1) 4028010, Fax: (966-1) 4037970. Sulatn Garment factory (RSC),
P.O. Box 29912, Riyadh 11467. Tel: (966-1) 4055148/ 4042889, Fax: (966) 4055148. SOUTH AFRICA: Trevco Power Tool Service 14 Steenbok Street,
Koedoespoort, 0186, Pretoria, South Africa. Tel: (27-86) 1873826, Fax: (27-86) 5001771. TANZANIA: General Motors investment Ltd., P.O. Box 16541,
14 Nyerere Road, Vingunguti, Dar-es-Salaam. Tel: (255 22) 2862661/ 2865022, Fax: (255 22) 2862667. TUNISIA: Societe Tunisienne De Maintenance
(STM), Rue de la Physique. Nouvelle Zone Industrielle Ben Arous., 2013 Ben Arous, Tunisia. Tel: (+216) 71 389687, Fax: (+216) 7 1 385154. UAE:
(Abu Dhabi) Light House Electrical, P.O. Box 120, Abu Dhabi, Tel: (971-2) 6726131, Fax: (971-2) 6720667. (Ajman) Al Sukoon Gen. Trdg. Co. LLC,
P.O. Box 2975, Ajman. Tel: (971-6) 7435725/ 7438317, Fax: (971-6) 7437350. (Al Ain) Zillion Equipment and Spare Parts Trading LLC, P.O. Box 19740,
Opp. Bin Sadal/ Trimix Redymix Sanaiya, Al Ain. Tel: (971-3) 7216690, Fax: (971-3) 7216103. (Dubai) Alebrah Engineering Service, P.O. Box 78954,
Al Qusais, Dubai. Tel: (971-4) 2850044, Fax: (971-4) 2844802. Black & Decker (Overseas) GmbH, P.O. Box 5420, Dubai, Tel: (971-4) 8127400/
8127406, Fax: (971-4)2822765. Ideal Star Workshop Eqpt. trading LLC, P.O. Box 37110, Al Quoz, Dubai. Tel: (971-4) 3474160, Fax: (971-4) 3474157.
(Musaffah) Light House Electrical, P.O. Box 120, Abu Dhabi, Tel: (971-2) 5548315, Fax: (971-2) 5540461. (Sharjah) Mc Coy Middle East LLC,
P.O. Box 25793, Sharjah, Tel: (971-6) 5395931, Fax: (971-6) 5395932. Burj Al Madeena, Industrial Area No.1, Opp. Pakistani Masjid, P.O. Box 37635,
Sharjah. Tel: (971-6) 5337747, Fax: (971-6) 5337719. (Ras Al Khaimah) Mc Coy Middle East LLC, P.O. Box 10584, Ras Al Khaimah, T el:
(971-7) 2277095, Fax: (971-7) 2277096. UGANDA: The Building Center (U) Ltd., 52 Station Road, Kitgum House, P.O. Box 7436, Kampala, Uganda.
Tel: (256-41) 4234567/ 4259754, Fax: (256-41) 4236413. YEMEN: (Aden) Middle East Trad. Co. Ltd. (METCO), Mualla Dakka, Aden, Yemen. Tel:
(967-2) 222670, Fax: (967-2) 222670. (Sana'a) Middle East Trad. Co. Ltd. (METCO), Hayel St., Sana'a, Yemen. Tel: (967-1) 204201, Fax:
(967-1) 204204. (Taiz) Middle East Trading Co. (METCO), P.O. Box 12363, 5th Flr, Hayel Saeed Anam Bldg, Al-Mugamma St. Taiz, Yemen. Tel:
(967-4) 213455, Fax: (967-4) 219869.
Al Bawardi Tools & Hardware, P.O. Box 68, Riyadh 11411. Tel: (966-1) 4484999, Fax: (966-1) 4487877.
Page 37

WARRANTY REGISTRATION CARD
YOUR NAME/
YOUR ADDRESS
POSTCODE
DATE OF PURCHASE
DEALER'S NAME & ADDRESS/
«ùßr
«∞FMu«Ê
«∞d±e «∞∂d¥bÍ
¢U¸¥a «∞Ad«¡
≈ßr Ë ´Mu«Ê «∞∂Uzl
PRODUCT MODEL NO.
KG2300
 Loading...