

Page 1
W ARNING: IMPOR TANT SAFETY W ARNINGS AND INSTRUCTIONS
O REDUCE RISK OF INJURY:
Before any use, be sure everyone using this garden appliance reads and understands all safety instructions
and other information contained in this manual.
Save these instructions and review frequently prior to use and in instructing others.
WARNING: When using electric hedge trimmers, basic safety precautions should always be
followed to reduce risk of fire, electric shock, and personal injury, including the
following:
READ ALL INSTRUCTIONS
GENERAL SAFETY WARNINGS AND INSTRUCTIONS
• Replacement Parts
When servicing use only identical replacement parts.
• Polarized Appliance Connections
To reduce the risk of electric shock, this appliance has a polarized plug (one blade is wider than
the other) and will require the use of a polarized extension cord. The appliance plug will fit into a
11.Don't Abuse Cord - Never carry hedge trimmer b
receptacle. Keep cord from heat, oil and sharp edge
DANGER: Risk of Cut – Keep hands away from bl
power is on.
Do not attempt to remove cut material nor hold ma
Make sure trimmer switch is off when clearing jamm
exposed cutting blades or cutting edges when picking
DANGER: BLADES COAST AFTER TURN OFF.
12. Don’t Force Hedge Trimmer – It will do the job
injury at the rate for which it was designed.
13. Don’t Overreach – Keep proper footing and bala
14. Stay Alert - Watch what you are doing. Use com
when you are tired.
15. Disconnect Hedge T rimmer– Disconnect the hed
in use, before servicing and when changing accesso
16. Store Idle Hedge Trimmer Indoors – When no
indoors in dry and high or locked-up place – out of r
17. Maintain Hedge Trimmer with Care – Keep
performance and to reduce the risk of injury. Follow
accessories. Inspect extension cord periodically, a
clean and free from oil and grease.
18. Check Damaged Parts – Before further use of th
is damaged should be carefully checked to determine
intended function. Check for alignment of moving p
parts. mounting, and any other condition that may
that is damaged should be properly repaired by an
indicated elsewhere in this manual.
19. Hold appliance by handles provided and avoid
cord. Contact with a "live" wire will make exposed m
operator.
20. KEEP HANDS AW AY from cutting area. Never re
trimmed for any reason. Hold the appliance by grasp
hands into the vicinity of the reciprocating blade. Do
anywhere other than the handles provided.
21. Do not use appliance if switch does not turn it o
controlled with the switch is dangerous and must be
WARNING: DO NOT USE WITHOUT HANDLE AN
• See figure 13 of this manual for a drawing of typical
• The trimmer shall not be used to cut stems greater tha
• When operating the trimmer, keep extension cord
hedge being trimmed.
SAVE THESE INST
CAT. NO. HTD22SW FORM NO 389877 PRINTED IN U.S.A. (MAR98 CD-1)
KEY INFORMA TION YOU SHOULD KNOW:
•Always unplug trimmer before exchanging blades.
•Keep trimmer drive pin (Fig. 7) clean and oiled. Clean debris away from metal surface
of blade cassette and drive spud (Fig. 7).
•The saw accessory is intended for pruning trees and shrubs and should not be used for
any other purpose.
VEA EL ESPAÑOL EN LA CONTRAPORTADA.
SAVE THIS MANUAL FOR FUTURE REFERERENCE.
INSTRUCTIVO DE OPERACIÓN, CENTROS DE SERVICIO YPÓLIZA
DE GARANTÍA. ADVERTENCIA: LÉASE ESTE INSTRUCTIVO ANTES
DE USAR ELPRODUCTO.
R
INSTRUCTION MANUAL
Catalog Nos. HTD22SW
HHHHeeeeddddggggeeee HHHHoooogg
gg
®®®®
XXXXBB
BB
HHHHeeeeddddggggeeee TTTTrrrriiiimmmmmmmmeeeerr
rr
1
2
5
6
BEFORE RETURNING THIS PRODUCT
FOR ANY REASON PLEASE CALL
1-800-54-HOW-TO
IF YOU SHOULD EXPERIENCE A PROBLEM
WITH YOUR BLACK & DECKER PURCHASE,
CALL 1-800-54-HOW-TO (1-800-544-6986).
IN MOST CASES, A BLACK & DECKER REPRESENTATIVE
CAN RESOLVE YOUR PROBLEM OVER THE PHONE.
IF YOU HAVE A SUGGESTION OR COMMENT,
GIVE US A CALL. YOUR FEEDBACK IS VITAL
TO THE SUCCESS OF BLACK & DECKER'S QUALITY
IMPROVEMENT PROGRAM.
(544-6986)
Page 2

ASSEMBL Y/ADJUSTMENT SET-UP
READ IMPORTANT SAFETYWARNINGS & INSTRUCTIONS BEFORE ASSEMBLY”
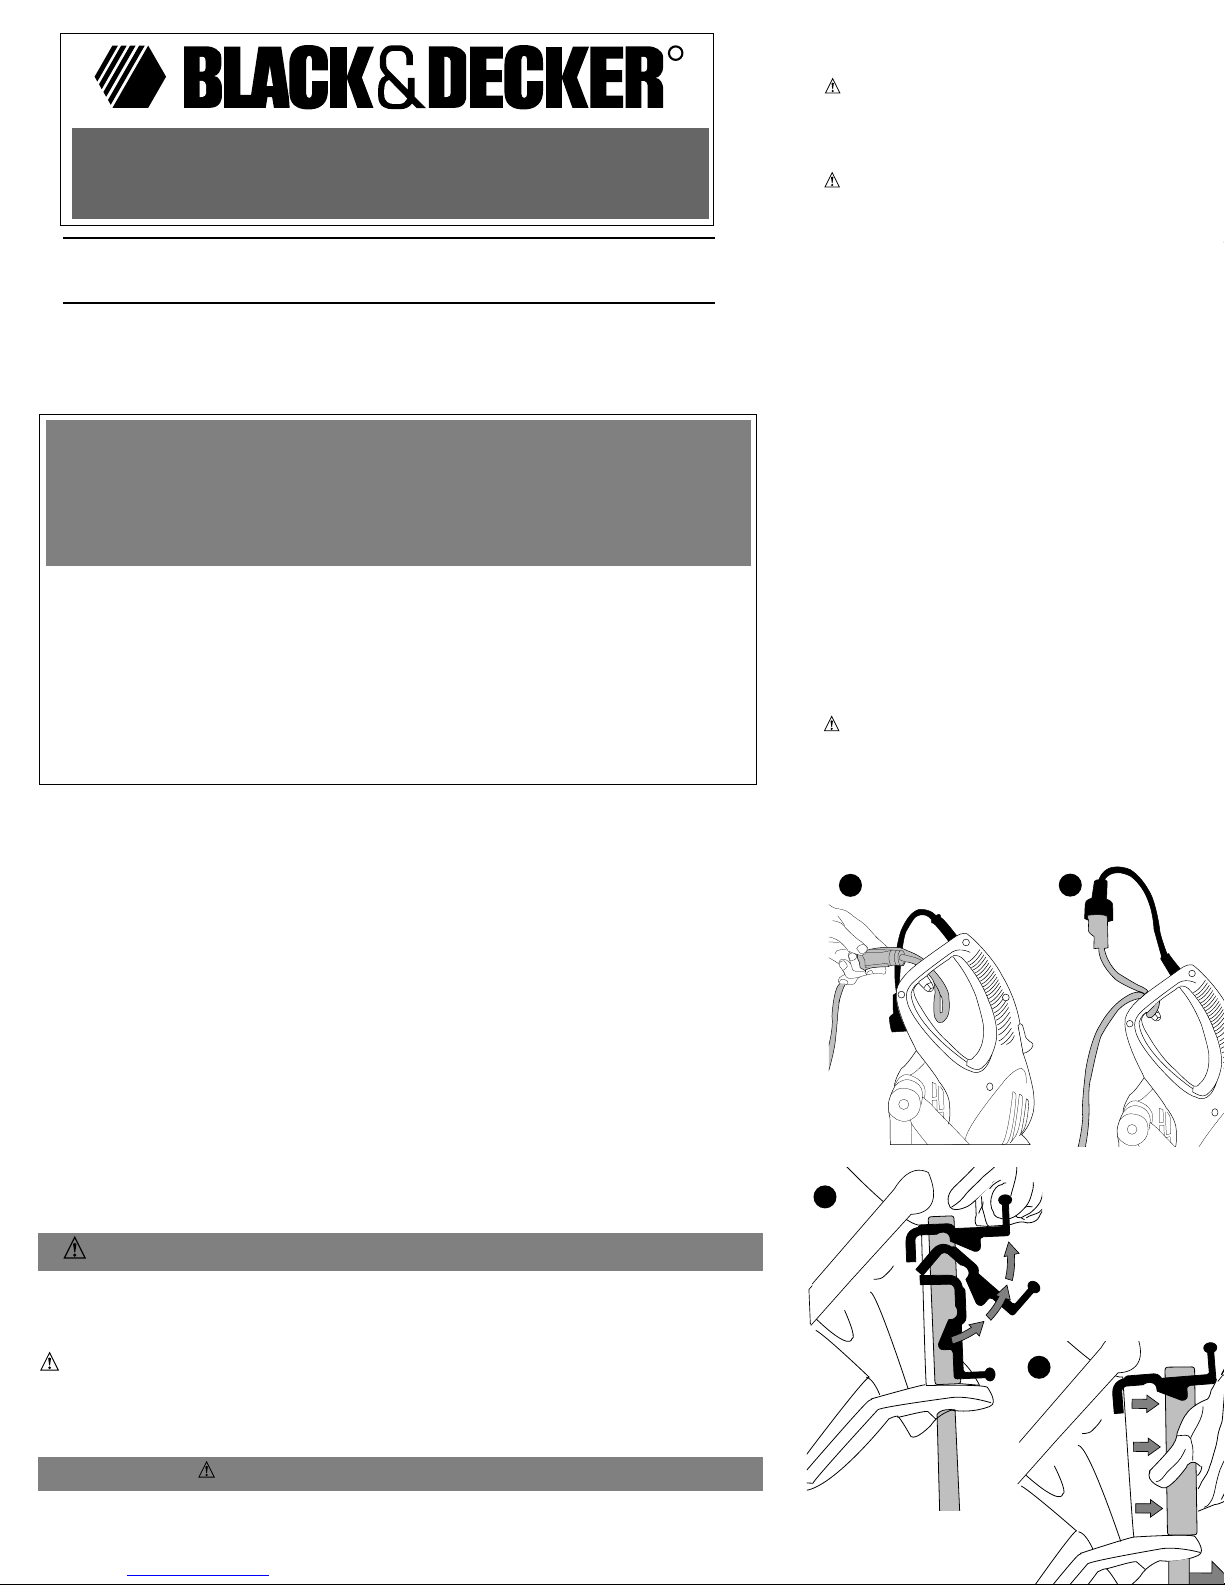
AT TACHING EXTENSION CORD TO TRIMMER
An extension cord retainer is built into the switch handle that prevents the extension cord
from pulling out of the handle. To use this feature, simply double the extension cord as
shown in Figure 1, about a foot from the end and insert it into the end of the handle. Hook the
loop formed by doubling the cord over the tab, as shown in Figure 2. Gently tug on the cord
to ensure that it is firmly retained in the trimmer’s handle. Plug the receptacle end of the
extension cord into the tool's power supply cord. Figure 3 illustrates an alternate method for
securing the extension cord to the trimmer power supply cord.
EXCHANGING BLADES
TURN OFF POWER AND UNPLUG TRIMMER.
WARNING: The metal portions of the unit and blade can become hot after heavy use.
Allow to cool before touching. The use of work gloves is recommended when handling
the blade.
Grasp the blade latch grip (Fig. 4) and rotate toward the back of the unit until the latch detent
reaches the fully open position as shown in Fig. 5. With the handle fully open, pull straight
out on the black plastic cassette portion of the exchangeable blade as shown in Fig. 6.
Important - When replacing the blade, make sure that the long drive pin and the mating
surface of the blade cassette are clean and apply a few drops of light oil to the side of the pin.
Next align the pin with the center hole in the drive spud as shown in Fig. 7. Guide the drive
spud onto the pin until the cassette is fully seated against the trimmer. It may be necessary to
rotate the cassette about the pin until the two alignment pins fit into the metal cover plate on
the cassette (Fig. 7). Use the heel of your hand to rotate the blade latch grip handle toward
the front of the unit until it "snaps" fully closed as shown in Fig. 8.
BAIL HANDLE
WARNING:Do not use hedge trimmer without bail handle.
The bail handle can be locked in four different positions. To change the position of the handle
GENERAL PRUNING INSTRUCTIONS
• When sawing, do not attempt to cut branches in
This could cause damage to the motor and transm
• With the saw running, place the arm of the bl
(number 1 in Fig. 15) and bring the saw teeth gr
hold the arm against the branch (number 2 in Fig
do not force the saw through the cut.
• Exposed cuts should be left unsealed open to the
• Plan your cutting to avoid pinching the blade
underside of the branch to sever the bark and av
so that the weight of the branch tends to widen
pinched the trimmer will begin to vibrate and wil
trimmer and disconnect the plug then re-position
OPTIONAL BLADES AVAILABLE
XB10: Detail trimmer - Light weight and short
greater accuracy and control for smaller hedge
Replace worn blades with:
XB22: 22" Replacement blade
XB18: 18" Replacement blade
WARNING:TO GUARD AGAINSTINJURY, O
• READ INSTRUCTION MANUAL BEFORE USING.
•SAVE INSTRUCTION MANUAL.
• KEEP HANDS A WAY FROM BLADES.
• KEEP HANDS ON HANDLES. DON’T OVERREAC
• CAUTION – BLADE COASTS AFTER TURN OFF.
• DO NOT USE UNDER WET CONDITIONS.
• DO NOT USE WITH DAMAGED EXTENSION COR
• DO NOT UNPLUG OR STORE WITH SWITCH LOC
MAINTENANCE
The hedge trimming blades are made from high
accidentally hit a wire fence, stones, glass or oth
blade. There is no need to remove this nick a
movement of the blade. If it does interfere, un
sharpening stone to remove the nick.
If you drop the trimmer, carefully inspect it for dam
or handles broken or if you see any other conditio
contact your local Black & Decker Service Center
Fertilizers and other garden chemicals conta
corrosion of metals. Do not store the tool on or ad
With the unit unplugged, use only mild soap and
any liquid get inside the tool; never immerse any p
IMPORTANT: To assure product SAFETY and
adjustment should be performed by authorized
organizations, always using identical replacemen
Service Information
Black & Decker offers a full network of company
throughout North America. All Black & Decker
personnel to provide customers with efficient and
Whether you need technical advice, repair, or ge
the Black & Decker location nearest you.
To find your local service location, refer to the ye
or call: 1-800-54-HOW TO.
Full Two-Year Home Use Warranty
Black & Decker (U.S.) Inc. warrants this produ
material or workmanship. The defective product w
either of two ways: The first, which will result in e
the retailer from whom it was purchased (provide
Returns should be made within the time period of
30 to 90 days after the sale). Proof of purchase
retailer for their specific return policy regarding
exchanges.
The second option is to take or send the produc
authorized Service Center for repair or replaceme
required. Black & Decker owned and author
"Tools–Electric" in the yellow pages of the phone
accessories. This warranty gives you specific le
which vary from state to state. Should you have a
nearest Black & Decker Service Center.This prod
14
13
Lock Off/Lock On Button
VERROUILLÉ «MARCHE»VERROUILLÉ «ARRÊT»
Botón de seguro de Apagado/Encendido
Black & Decker (U.S.) Inc.,
701 E. Joppa Rd.
Towson, MD 21286 U.S.A.
YOU'VE GOT
NOW GET THE
http://www.black
(3) TO LOCK ON-VERROUILLÉ ARRÊT
SEGURO DE ENCENDIDO
(2) TO START-ARRÊT ENCENDIDO
(1) OFF-MARCHE-SEGURO DE APAGADO
12
15
16
3
2
1
2
2
1
1
Page 3

euvent rester coincés dans les pièces mobiles. On recommande le port de gants de caoutchouc et
e chaussures de sécurité pour les travaux extérieurs. Couvrir les cheveux longs.
. Porter des lunettes de sécurité; toujours porter un masque lorsqu’on soulève de la poussière.
. On recommande que le circuit (ou la prise) utilisé soit doté d’un disjoncteur détecteur de fuites à la
erre (DDFT); certaines prises sont vendues avec un DDFT intégré.
. Utiliser l’outil approprié; n’utiliser le taille-haie que pour les travaux indiqués.
. AVERTISSEMENT :afin de réduire les risques de choc électrique, n’utiliser que des rallonges
onçues pour l’extérieur, comme celles de type SW-A, SOW -A, SOW, STW-A, STW, STOW -A, STOW,
SJW-A, SJOW-A, SJOW , SJTW-A, SJTW, SJTOW-Aou SJTOW.
. Rallonge. S’assurer que la rallonge électrique soit en bon état et qu’elle soit en mesure de porter le
ourant nécessaire à l’outil. Une rallonge de calibre inférieur entraînera une chute de tension se
raduisant par une perte de puissance et une surchauffe. Le tableau ci-dessous illustre les calibres que
on doit utiliser selon la longueur de la rallonge et l’intensité nominale indiquée sur la plaque
ignalétique. En cas de doute, utiliser le calibre suivant celui qui est indiqué sur le tableau. Plus le
alibre est petit, plus la rallonge peut porter de courant. Utiliser le dispositif de retenue décrit dans le
résent manuel pour empêcher la rallonge de se débrancher du taille-haie. Black & Decker offre des
allonges polarisées homologuées UL pour l’extérieur; celles-ci sont vendues séparément chez les
épositaires locaux ou les centres de service autorisés de Black & Decker.
0. Éviter les démarrages accidentels : quand le taille-haie est enfiché, on ne doit jamais le
ransporter en laissant le doigt sur la gâchette. S’assurer que l’interrupteur soit en position d’arrêt au
moment de brancher l’outil.
1.Ne jamais utiliser la rallonge de manière abusive : on ne doit pas transporter le taille-haie en le
enant par la rallonge, ni tirer sur cette dernière pour débrancher l’outil; celui-ci doit être tenu à l’écart de
a chaleur, de l’huile et de bords tranchants.
DANGER. Risques de coupure : garder les mains loin des lames et sur les poignées de l’outil
orsque celui-ci est en marche.
Ne pas tenter de retirer le feuillage coupé ou de tenir celui qu’on s’apprête à tailler lorsque les lames
ont en mouvement. On doit s’assurer d’avoir bien fermer l’interrupteur avant de dégager toute matière
oincée dans les lames. Ne pas saisir ni soulever l’outil au moyen des lames ou des bords tranchants.
DANGER : les lames ne s’arrêtent pas immédiatement lorsque l’interrupteur est mis en
position d’arrêt.
2. Ne pas forcer le taille-haie : pour obtenir de meilleurs résultats et réduire les risques de blessure,
aisser l’outil couper à la vitesse pour laquelle il a été conçu.
3. Ne pas trop étendre les bras : les pieds doivent rester ancrés fermement sur le sol afin de
maintenir son équilibre en tout temps.
4. Rester vigilant : on doit demeurer attentif et faire preuve de jugement lorsqu’on utilise le taille-haie;
e pas s’en servir lorsqu’on est fatigué.
5. Débrancher le taille-haie : on doit débrancher le taille-haie après chaque usage, avant d’en
ffectuer l’entretien ou lorsqu’on remplace des accessoires comme les lames.
6. Ranger l’outil à l’intérieur : lorsqu’on ne l’utilise pas, on doit ranger le taille-haie à l’intérieur, à un
ndroit sec, élevé et verrouillé, hors de portée des enfants.
7. Bien entretenir l’outil : afin d’obtenir de meilleurs résultats et de réduire les risques de blessure,
arder les bords tranchants propres et bien aiguisés. Suivre les consignes lorsqu’on lubrifie ou on
emplace les accessoires. Vérifier la rallonge périodiquement et la remplacer en cas de dommage.
Maintenir les poignées sèches, propres et exemptes d’huile et de graisse.
8. Vérifier les pièces endommagées : avant de réutiliser le taille-haie, inspecter le dispositif de
rotection ou toute autre pièce ayant été endommagée afin de s’assurer que tous fonctionnent
déquatement et soient toujours propres à l’usage qu’on leur réserve. S’assurer que les pièces mobiles
oient bien alignées et qu’elles ne soient ni bloquées, ni brisées, ni mal assemblées; vérifier qu’il
’existe aucune autre condition susceptible de nuire au fonctionnement de l’outil. À moins d’indication
ontraire dans le présent manuel, le dispositif de protection, de même que les autres pièces
ndommagées, doivent, le cas échéant, être confiés à un centre de service autorisé.
19. Ne pas utiliser l'outil si l'interrupteur ne fonctionne pas. Tout outil qu'on ne peut maîtriser au
moyen de l'interrupteur est dangereux et doit être réparé.
20. T enir le taille-haie par les poignées et éviter tout contact avec la rallonge ou les fils cachés;
'opérateur pourrait subir un choc électrique si un fil sous tension entre en contact avec les pièces
métalliques de l'outil.
21. GARDER LES MAINS LOIN de la zone de coupe : ne jamais passer la main sous le feuillage à
couper. Tenir l'outil par les poignées. Ne pas mettre les mains à proximité des lames à va-et-vient. Ne
pas stabiliser le taille-haie autrement que par les poignées.
AVERTISSEMENT : NE PAS UTILISER L’OUTILSANS SES POIGNÉES ET SON DISPOSITIF DE
PROTECTION.
La figure 13 illustre le mode d’emploi le plus courant de ce taille-haie.
On ne doit jamais tailler des tiges d’un diamètre supérieur à celui précisé dans le présent manuel.
T oujours placer la rallonge derrière soi en évitant de la déposer sur la haie qu’on taille.
CONSERVER CES DIRECTIVES
ASSEMBLAGE / RÉGLAGE
dessus. Quand l’outil est en marche, on doit cependant c
pousser le bouton vers l’avant jusqu’à ce qu’il atteigne la
position «MARCHE». Pour maintenir l’outil en marche, re
Pour arrêter l’outil, appuyer sur la gâchette et la relâcher.
position «ARRÊT».
DISPOSITIF DE PROTECTION
Le dispositif de protection est translucide afin de permett
l’outil.
MÉTHODE DE COUPE
1. RALLONGE (figure 13). Toujours placer la rallonge de
Ne jamais la déposer sur la haie à tailler. Si on coupe ou
l’outil et le débrancher immédiatement de la prise murale
réparations requises.
2. POSITION DE TRA VAIL. S’assurer que les pieds soie
maintenir son équilibre en tout temps. Ne pas trop étendr
chaussures antidérapantes et des gants de caoutchouc.
avant de le mettre en marche. Toujours tailler en gardant
sur celle de manoeuvre, tel qu’illustré dans le présent ma
de protection.
3. T AILLE DE JEUNES POUSSES.La méthode la plus e
vers le bas, de les faire passer directement sur les tiges e
mouvements de balayage.
4. T AILLE DE VIEILLES POUSSES.Tailler lentement sa
coupe de branches d’un diamètre supérieur à _ po (19 m
vendue séparément.
MISE EN GARDE : ne pas couper de tiges d’un diam
exclusivement conçu pour les petit arbustes décoratifs.
5. NIVELAGE DES HAIES (figure 14). Pour bien niveler
leur longueur afin de guider la coupe.
UTILISATION DES LAMES DE SCIE
REMARQUE : cette scie sert à élaguer les arbres et les a
les travaux indiqués.
Cet outil est particulièrement utile pour la taille de haies e
grosses pour les lames de taille-haie.
MÉTHODE D'ÉLAGAGE
• Afin d'éviter d'endommager le moteur et la transmission, n
est supérieur à 3 po (75 mm).
• Une fois la scie en marche, placer le bras de poussée des
y enfonçant graduellement les dents de la scie (figure 15
laquelle il a été conçu, sans le forcer.
• On doit laisser les sections de coupe exposées à l'air pou
• Planifier la coupe de sorte que les lames ne restent pas c
incision sur la partie inférieure de la branche pour coupe
haut, puisque le poids des branches tend à élargir la sec
coincent, le taille-haie se met à vibrer et s'arrête; dans de
d'arrêt, débrancher l'outil, le rebrancher puis le redémarr
coincer les lames.
LAMES VENDUES SÉPARÉMENT.
LAMES DE PRÉCISION XB10 : lames courtes et légère
coupe précise et bien maîtrisée de petites haies.
REMPLACEMENT DE LAMES USÉES :
Lames XB22 : lames de rechange de 22 po (56 cm)
Lames XB18 : lames de rechange de 18 po (46 cm)
AVERTISSEMENT : AFIN DE PRÉVENIR LES BLES
CI-DESSOUS :
•LIRE LE MANUELD’UTILISATION A V ANTDE PROCÉD
•CONSERVER LE MANUELD’UTILISATION.
•GARDER LES MAINS LOIN DES LAMES.
•GARDER LES MAINS SUR LES POIGNÉES; NE P AS T
• MISE EN GARDE : LES LAMES NE S’ARRÊTENT P
L’INTERRUPTEUR ESTMIS EN POSITION D’ARRÊT.
•NE PAS UTILISER DANS DES ENDROITS MOUILLÉS
•NE PAS UTILISER AVEC UNE RALLONGE ENDOMMA
•NE PAS DÉBRANCHER NI RANGER LORSQUE L’INT
«MARCHE».
ENTRETIEN
Bien que les lames soient fabriquées en acier trempé de
les heurtant contre une clôture en fil métallique, des pierr
doit réparer les dommages que s’ils nuisent au mouveme
débrancher l’outil et poncer la section endommagée au m
pierre à aiguiser .
Si on échappe le taille-haie, on doit l’inspecter afin de s’a
échéant, en présence notamment de déformation des lam
poignées ou de toute autre condition susceptible de gêne
communiquer avec le centre de service autorisé de Black
avant de s’en servir à nouveau.
Les engrais ou autres produits de fertilisation contiennen
corrosion des métaux. On doit donc éviter de ranger l’out
l’outil avant de le nettoyer avec un savon doux et un linge
à l’intérieur de l’outil ni le plonger dans un liquide quelcon
Calibre minimal des cordons de rallonge
Tension Longueur totale du cordon en pieds
120 V De 0 à 25 De 26 à 50 De 51 à 100 De 101 à 150
240 V De 0 à 50 De 51à 100 De 101 à 200 De 201 à 300
Intensité (A)
Au Au Calibre moyen de fil
moins plus
0-6 18 16 16 14
6 - 10 18 16 14 12
10 - 12 16 16 14 12
12 - 16 14 12 Non recommandé
Page 4

INFORMACION CLAVE QUE DEBE SABER:
•Desconecte siempre la podadora antes de cambiar de cuchillas.
•Conserve el perno de mando de la podadora (Fig. 7) limpio y aceitado. Limpie de
desechos la superficie metálica del cartucho de cuchillas y la escarda (Fig. 7) .
•El accesorio de sierra está diseñado para recortar árboles y arbustos y no debe
utilizarse para otro propósito.
ADVERTENCIA:ADVERTENCIAS E INSTRUCCIONES IMPORTANTES DE
SEGURIDAD
Antes de cualquier uso, asegúrese que cualquier persona que utilice esta herramienta de
ardinería lea y comprenda todas las instrucciones de seguridad y otra información
contenida en este manual.
Conserve estas instrucciones y repáselas con frecuencia antes de utilizar la herramienta o
de instruir a terceras personas.
ADVERTENCIA: Cuando use podadoras de setos eléctricas, debe seguir ciertas
precauciones básicas de seguridad a fin de reducir los riesgos de incendio, choque eléctrico
y lesiones personales, entre las que se encuentran las siguientes:
LEA TODAS LAS INSTRUCCIONES
ADVERTENCIAS E INSTRUCCIONES GENERALES DE SEGURIDAD
Partes de repuesto
Cuando efectúe servicio utilice únicamente refacciones idénticas.
Conexiones polarizadas del aparato
Se emplean clavijas polarizadas (con una pata más ancha que la otra) en los equipos para
educir los riesgos de choque eléctrico. Este equipo debe usarse con una cable de
extensión adecuado de 2 o 3 hilos. Las conexiones polarizadas ajustan de una sola
manera. Asegúrese que el extremo del contacto tenga una ranura pequeña y una grande. Si
a clavija no se ajusta perfectamente a la extensión, inviértala. Si aún así no se ajusta,
busque una extensión adecuada. Si la extensión no entra perfectamente en la toma de
corriente, haga que un electricista calificado le instale un contacto apropiado. No haga
modificaciones a la clavija de la herramienta ni a la extensión por ningún motivo.
1. Evite ambientes peligrosos- No utilice podadoras de setos en lugares mojados o
nundados
2. No se emplee bajo la lluvia.
3. Conserve apartados a los niños- Todos los visitantes deben permanecer a distancia
segura del área de trabajo.
4. Vístase de manera apropiada- No vista ropas flojas ni artículos de joyería, pueden
quedar atrapados en las piezas móviles. Se recomienda el uso de guantes de goma y
calzado resistente cuando trabaje a la intemperie. Cúbrase el cabello si lo tiene largo.
5. Utilice anteojos de seguridad- También utilice una mascarilla contra polvo si la
operación que va a efectuar lo produce.
6. Circuito de Falla de Tierra (ICFT) Deben protegerse las tomas de corriente que vayan a
utilizarse con la podadora con un Interruptor de Circuito de Falla de Tierra (ICFT). Existen
omas de corriente que cuentan con este dispositivo interconstruido, y pueden ser
empleadas para esta medida de seguridad.
7. Utilice el aparato correcto- No utilice el aparato para un trabajo diferente para el que no
se diseñó.
8. ADVERTENCIA: Para reducir el riesgo de choque eléctrico utilice únicamente una
extensión para uso a la intemperie, como los siguientes tipos: SW-A, S0W-A, STW-A,
STOW-A, SJW-A, SJOW-A, SJTW -Ao SJTOW-A, o SJTOW.
9. Cable de extensión - Asegúrese que su extensión esté en buenas condiciones. Cuando
utilice una extensión, asegúrese que tenga el calibre suficiente para conducir la corriente
que su herramienta necesita. Una extensión con calibre menor al necesario causará una
caída en el voltaje de la línea, resultando en pérdida de potencia y sobrecalentamiento. La
abla siguiente muestra el calibre correcto para usarse, de acuerdo con la longitud de la
extensión y el amperaje en la placa de identificación. Si tiene dudas, utilice el calibre
siguiente. Mientras menor sea el número del calibre, mayor será la capacidad del cable.
10. Evite el encendido accidental- No acarree la podadora de setos con el dedo en el
nterruptor. Asegúrese que el interruptor esté en posición de apagado antes de conectar la
podadora.
• Cuando opere la podadora, conserve el cable de
encima del seto con el que esté trabajando.
CONSERVE ESTAS IN
ENSAMBLAJE / AJUST
COLOCACION DE LA EXTENSION EN LA PODAD
La empuñadura cuenta con un retén para el cable
posición. Para usar este retén, simplemente doble
una distancia aproximada de 30 cm del extremo de
doblar el cable en la lengüeta, como se muestra en
para asegurarse que esté retenido con firmeza en
terminal hembra del cable de extensión a la clavija
del interruptor. La Figura 3 ilustra un método altern
al cable de alimentación de la podadora.
CAMBIO DE CUCHILLAS
APAGUE LAPODADORA Y DESCONECTELA D
ADVERTENCIA: Las porciones metálicas de la
con el uso. Permita que se enfríen antes de tocarla
manejar la cuchilla. Tome el seguro de la empuñad
parte posterior de la unidad hasta que el retén del
abierta,ˆ como se observa en la figura 5. Con el ma
fuera en línea recta la porción del cartucho de plás
como se observa en la Figura 6.Importante - Cuan
perno de mando grande y la contraparte del cartuc
unas gotas de aceite ligero al lado del perno. Acon
orificio central de la escarda, como se observa en
hasta que el cartucho haya asentado perfectamen
necesario girar el cartucho sobre el perno hasta qu
acoplen a la placa metálica del cartucho (Fig. 7). U
del seguro de la cuchilla hacia el frente de la unida
se observa en la Figura 8
MANGO EN ARCO
ADVERTENCIA: No use la podadora de setos s
El mango en arco puede asegurarse en cuatro dife
posición del mango gire la perilla que se muestra e
manecillas del reloj hasta que el mango gire librem
que desee. Apriete la perilla con firmeza girándola
Para tener el grado óptimo de balance y maniobra
en arco en la posición delantera (Figs. 13, 14). Par
mango en arco puede moverse hacia atrás (Figura
unidad se aumenta en aproximadamente 25 cm (1
ADVERTENCIA: SUJETE SIEMPRE EL MANG
MANGO DEL INTERRUPTOR CON LA OTRA CU
INSTRUCCIONES DE O
INTERRUPTOR
Seguro de apagado - Para “ENCENDER” la herra
se muestra en la Fig. 11 hacia adelante y oprima e
apagado alcance la posición 2, ilustrado en la figur
la herramienta arrancará. En este momento puede
la herramienta continúe en funcionamiento, deberá
“AP AGAR” la herramienta, sencillamente suelte el
asegurará la herramienta en posición de “APAGAD
Seguro de encendido - La herramienta puede as
deslizando el botón del seguro de apagado y oprim
anteriormente, pero, al encender la unidad, continú
botón del seguro hasta alcanzar la posición 3, ilust
herramienta estará en posición de encendido perm
continuación el botón del seguro y la herramienta c
apagar la herramienta desde la posición de encen
gatillo. El seguro de apagado asegurará automátic
apagado.
GUARDA
La guarda es translúcida para mejorar la visibilidad
junto al frente de la unidad.
INSTRUCCIONES DE PODADO
1. EXTENSION (Fig. 13) Conserve siempre el cord
podadora y alejado de la zona de corte. Nunca lo p
podando. Si corta o daña el cable, desconéctelo in
repararlo.
2. POSICION DE TRABAJO Conserve los pies ap
perder el equilibrio. Utilice anteojos de seguridad, c
que pode. Sostenga la herramienta firmemente co
siempre la unidad como se muestra en las ilustrac
del interruptor y la otra en el asa. Nunca sostenga
3. PODADO DE PLANT AS JOVENES.Un movim
alimentando la hoja a través de las ramas es la ma
ligeramente en la misma dirección en que hace los
suficiente normalmente para cortar todas las rama
si no es así, con la segunda pasada deberá elimin
CCalibre mínimo para cordones de extensión
Volts Longitud total del cordón en metros
120V 0-7,6 7,6-15,2 15,2-30,4 30,4-45,7
240V 0-15,2 15,2-30,4 30,4-60,9 60,9-91,4
Amperje
Más No más Calibre del cordón AWG
de de
0-6 18 16 16 14
6 -10 18 16 14 12
10 -12 16 16 14 12
12 -16- 14 12 No recomendado
MANUAL DE INSTRUCCIONES
Page 5

• CONSERVE LAS MANOS ALEJADAS DE LAS CUCHILLAS.
• CONSERVE LAS MANOS EN LOS MANGOS. NO SE EXTIENDAEXCESIVAMENTE.
PRECAUCION – LACUCHILLASIGUE EN MOVIMIENTO DESPUES DE AP AGAR LA
UNIDAD.
• NO SE USE BAJO LALLUVIA NI EN LUGARES MOJADOS.
• NO SE USE CON UNAEXTENSION DAÑADA.
• NO SE DESCONECTE NI SE GUARDE CON ELINTERRUPTOR EN POSICION DE
ENCENDIDO.
ANTENIMIENTO
Las hojas de corte están hechas de acero templado de gran calidad y no requieren ser
afiladas si se les da un empleo normal. Sin embargo, si golpea accidentalmente una cerca
de alambre, piedras, vidrios u otros objetos de dureza similar, la hojas pueden resultar con
mellas. No hay necesidad de eliminar las melladuras mientras no interfieran con el
movimiento de las hojas; si lo hacen, desconecte la unidad y utilice una lima o una piedra
de afilar para eliminar la o las melladuras.
Si accidentalmente suelta la podadora, revísela con cuidado en busca de daños. Si la hoja
se dobla, se cuartea la cubierta o se rompen el asa o la empuñadura, o si encuentra alguna
otra condición que afecte la operación de la podadora, lleve la unidad a su Centro de
Servicio Black & Decker para que la reparen antes de volverla a utilizar.
Los fertilizantes y otros productos químicos para jardinería contienen agentes que aceleran
a corrosión en los metales. No guarde la herramienta en lugares adyacentes a fertilizantes
u otros productos químicos.
Con la unidad desconectada, utilice únicamente jabón suave y un trapo húmedo para
impiar la herramienta. Nunca deje que se metan líquidos al interior de la unidad ni sumerja
ninguna parte de la herramienta en estos.
MPORTANTE:Para garantizar la SEGURIDAD y la CONFIABILIDAD del producto, las
reparaciones, el mantenimiento y los ajustes deberán ser efectuados en centros de servicio
autorizados u otras organizaciones de servicio calificado que utilicen siempre refacciones
dénticas.
NFORMACIÓN DE SERVICIO
Black & Decker ofrece una red completa de centros de servicio propiedad de la compañía y
ranquiciados a través de toda Norteamérica. Todos los centros de servicio Black & Decker
cuentan con personal capacitado para proporcionar el servicio a herramientas más eficiente
y confiable.
Siempre que necesite consejo técnico, reparaciones o partes de repuesto genuinas,
comuníquese con el centro Black & Decker más cercano a usted.
Para encontrar su centro de servicio local, consulte la sección amarilla bajo "Herramientas
eléctricas", o llame al: 326-7100
ARANTÍA COMPLETAPOR DOS AÑOS P ARAUSO DOMÉSTICO
Black & Decker (U.S.) garantiza este producto por dos años completos contra cualquier falla originada
por materiales o mano de obra defectuosos. El producto defectuoso será reemplazado o reparado sin
cargo alguno en cualquiera de las siguientes dos maneras:
La primera, que resulta únicamente en cambios, es regresar el producto al vendedor al que se compró
en la suposición que es un distribuidor participante). Las devoluciones deberán hacerse dentro del
iempo estipulado por la política de cambios del distribuidor (usualmente de 30 a 90 días después de la
venta). Se puede requerir prueba de compra. Por favor verifique con el vendedor las políticas
específicas de devolución relacionadas a las devoluciones en tiempo posterior al estipulado para
cambios.
La segunda opción es llevar o enviar el producto (con porte pagado) a los centros de servicio Black &
Decker propios o autorizados, para que la reparemos o reemplacemos a nuestra opción. Se puede
equerir prueba de compra. Los centros de servicio Black & Decker propios y autorizados están
enlistados bajo “Herramientas eléctricas” en la sección amarilla del directorio telefónico.
Esta garantía no se aplica a los accesorios. Esta garantía le otorga derechos legales específicos, y
usted puede tener otros que varíen de estado a estado. Si tiene usted cualquier pregunta,
comuníquese con el gerente del centro de servicio Black & Decker más cercano.
Este producto no está destinado a uso comercial.
ARA REPARACION YSERVICIO DE SUS HERRAMIENTAS ELECTRICAS FAVOR DE DIRIGIRSE
AL CENTRO DE SERVICIO MAS CERCANO
ULIACAN
. Nicolas Bravo #1063 Sur (91 671) 242 10
AUDALAJARA
. La Paz #1779 (91 3) 826 69 78.
EXICO
e Lázaro Cárdenas No. 18 Local D, Col. Obrera 588-9377
ERIDA
alle 63 #459-A (91 99) 23 54 90
ONTERREY
. Francisco I. Madero Pte. 1820-A (91 83) 72 11 25
UEBLA
Norte #205 (91 22) 46 37 14
UERETARO
. Madero 139 Pte. (91 42) 14 16 60
AN LOUIS POTOSI
edro Moreno #100 Centro (91 48) 14 25 67
ORREON
vd. Independencia, 96 pte. (91 17) 16 52 65
ERACRUZ
olongación Diaz Miron #4280 (91 29) 21 70 16
 Loading...