

Page 1
SAVE THIS USE AND CARE BOOK
Handy Steamer Plus
™
Food Steamer/Rice Cooker
?
800-231-9786
QUESTIONS? Please call us TOLL FREE
Monday - Friday 8:15 a.m. - 5:00 p.m. Eastern Time.
MODEL HS90
Page 2

2
When using electrical appliances, basic safety precautions should
always be followed, including the following:
■ Read all instructions.
■ Do not touch hot surfaces. Use potholders when removing cover
or handling hot containers.
■ To protect against electrical shock, do not immerse cord, plug or
base unit in water or other liquid.
■ Close supervision is necessary when any appliance is used by or
near children.
■ Unplug from outlet when not in use. Unplug before putting on or
taking off parts, and allow to cool before cleaning.
■ Do not operate any appliance with a damaged cord or plug, or
after the appliance malfunctions or has been damaged in any
manner. Return appliance to an authorized service facility for
examination, repair or adjustment.
■ The use of accessory attachments not recommended by this
appliance manufacturer may cause hazards.
■ Do not use outdoors.
■ Do not let cord hang over edge of table or counter, or touch
hot surfaces.
■ Do not place on or near a hot gas or electric burner, or in a
heated oven.
■ Extreme caution must be used when moving an appliance
containing hot food, water, or other hot liquids.
■ Do not use appliance for other than intended use.
■ Lift and open cover carefully to avoid scalding, and allow water to
drip into steamer.
IMPORTANT SAFEGUARDS
SAVE THESE INSTRUCTIONS
Page 3
3
Do not place the unit directly under cabinets when operating
as this product produces large amounts of steam. Avoid
reaching over the Steamer when operating.
Always use hot pads during steaming to remove the Cover or
any part of the unit to avoid steam burns.
Steaming times will vary depending on desired doneness and
food quantity, size and arrangement. The cooking times in the
Steaming Guide are suggested times. You may want to
lengthen/shorten cooking times to suit your taste.
NOTE: If the desired cooking time is less than 15 minutes,
first turn the Timer past 15 minutes and then turn to desired
cooking time
Altitude affects the temperature at which water boils. Thus in
higher altitudes longer cooking times may become necessary.
1. Cover with tabs
2. Rice Bowl
3. Steaming Bowl
with handle openings
4. Drip Tray
5. Base
6. Cooking Light
7. Timer
8. Steaming Guide (on back of unit)
9. Bowl Divider
10. Heater Element
11. Water Reservoir in Base with Lo,
Med and Hi Fill Marks
2
8
4
3
6
7
5
1
10
11
POINTS TO
REMEMBER
9
Page 4
4
Some water will remain in the Water Reservoir after the
Steamer has turned off; this is normal.
Do not use any Steamer parts in microwave or on any
cooking/heated surface.
How To Use
COOKING IN THE
STEAMING BOWL
(See Steaming Guide for suggested
cooking times, techniques and water
fill levels.)
CAUTION: To avoid steam burns and
when checking foods while cooking,
use long handled utensils/tongs.
Always use potholders to remove
Cover. When removing the Cover, be
careful to lift Cover slowly.
Fill Water Reservoir with cold tap water
to appropriate fill line. For added flavor,
you may add lemon juice, chicken
broth, white wine and herbs/spices to
the water in the Reservoir. Do NOT use
beer, red wine, oil, spice extracts (i.e.,
vanilla) or fruit juices in the Reservoir.
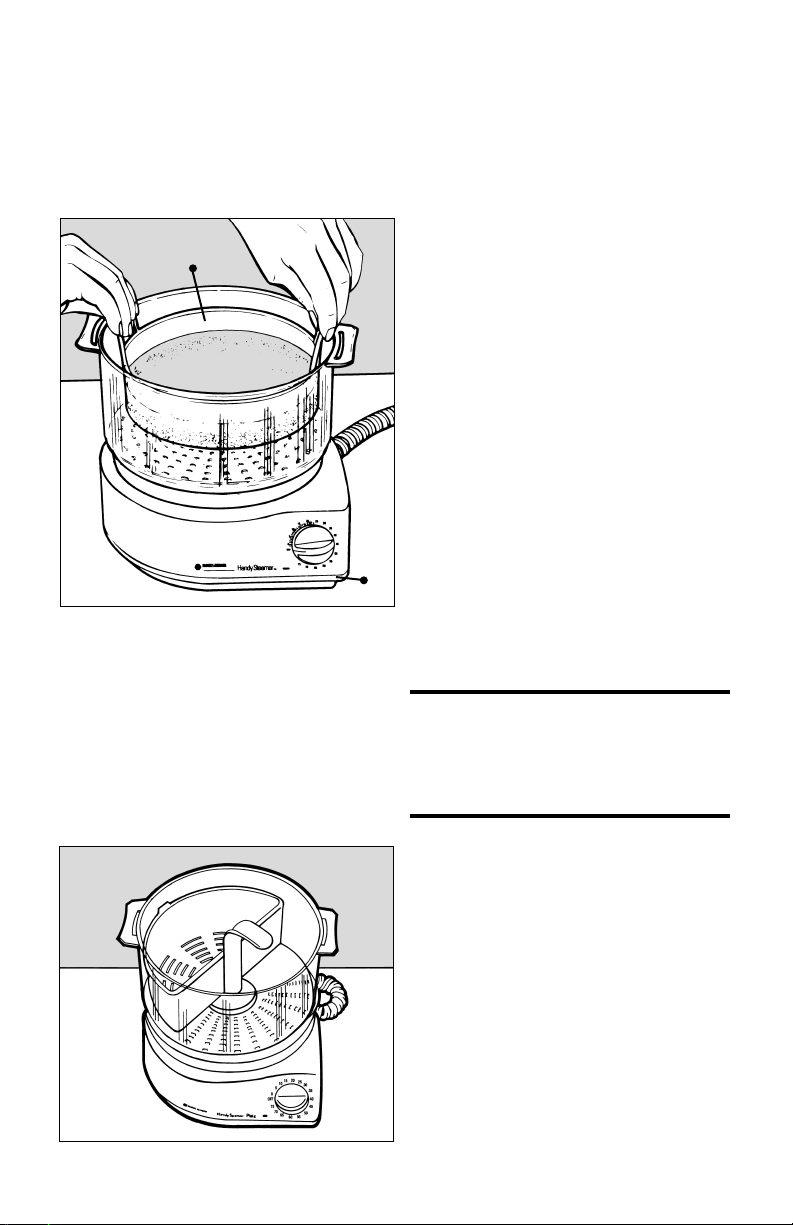
Hold the Drip Tray by the handle and
place it into the Base. (Figure A )
NOTE: The Drip Tray is always used
whenever the Rice Bowl is not used. It
prevents fats/juices of some foods
from dripping into the water and
bubbling up into the Steaming Bowl. If
you choose, save these juices for
gravies, sauces, soup stock, etc.
Figure A
Page 5
Place the foods to be steamed into
the Steaming Bowl. You may add
seasonings, such as lemon slices, fresh
dry herbs, seafood seasoning mix, etc.
to the food.
Place the Cover on the Steaming Bowl.
Make sure the handles line up over
each other and the tabs fit properly into
the openings.
Put the Steaming Bowl onto the Base.
Plug the cord into an electrical outlet.
Set the Timer for the desired cooking
time. When the time is up, a bell will
ring, the Cooking Light will stop glowing
and the unit will automatically shut off.
NOTE: If the desired cooking time is
less than 15 minutes, first turn the
Timer past 15 minutes and then turn to
desired cooking time.
The Cover can be turned over with the
top facing downward and used as a
trivet/base for resting the Steaming
Bowl. (Figure B) When cooking has
been completed, unplug cord.
Promptly remove Steaming Bowl from
Base and place on inverted Cover.
Carefully remove the Drip Tray by the
handles. Contents will be hot.
COOKING RICE
(See Steaming Guide for suggested
cooking times, techniques and water
fill levels.)
NOTE: Drip Tray is not used with Rice
Bowl.
5
Figure B
Steaming Bowl
Cover
Page 6
6
Fill Water Reservoir with cold tap water
to appropriate fill line. Do not use wine,
broth or other liquids.
Put Steaming Bowl onto the Base.
Add rice and water to Rice Bowl.
Place Rice Bowl with rice and water
into the Steaming Bowl. (Figure C)
Place the Cover on the Steaming Bowl.
Make sure the handles line up over
each other and the tabs fit properly into
the openings. Plug the unit into a
standard electrical outlet.
Set the Timer for the desired cooking
time. When the time is up, a bell will
ring, the Cooking Light will stop glowing
and the unit will automatically shut off.
When cooking has been completed,
carefully remove Steaming Bowl from
Base. Unplug cord. Remove the Cover
carefully to prevent water on it from
dripping into the rice.
Using potholders, carefully lift the Rice
Bowl by its handles.
NOTE: The Rice Bowl can also be used
for cooking vegetables with sauces,
poaching chicken or fish in liquids,
reheating foods like casseroles or
foods with sauces.
BOWL DIVIDER FEATURE
The Bowl Divider allows you the option
of steaming 2 foods at once and
keeping them totally separate. The
Bowl Divider can be opened to cover
half the Steaming Bowl (for cooking 2 to
3 servings) (Figure D) or reduced to
cover only a fourth of the Bowl (for 1 or
2 servings).
Figure C
Figure D
Rice
Base
Page 7

7
Always place the Bowl Divider in the Steaming Bowl prior
to the start of steaming (even if empty and food is to be
added later.)
If steaming foods with different water levels, always use the
higher water level of the 2 foods. Refer to Steaming Guide for
water levels to use for each food.
Prepare foods as recommended in the Steaming Guide, but
generally quantities should be reduced to:
3 cups or less in Steaming Bowl
2 cups or less in Bowl Divider - largest position
1 1/4 cups or less in Bowl Divider - smallest position
Position larger amount of food in the Steaming Bowl. Reserve
smaller food amount for Bowl Divider.
Foods can be started at the same time, or 1 food started in the
Steaming Bowl, or Bowl Divider, and the second one added 5
or 10 minutes later.
Stir vegetables every 10-15 minutes; after 7-8 minutes for
vegetables that cook in 15 minutes or less. This promotes
more even cooking.
Check doneness of vegetables often. Generally they will take
a little longer than when the Bowl Divider is not used, but
not always. Time will depend upon the amount and size of the
food pieces.
GUIDELINES:
Few foods steam in the same amount of
time so it will be necessary to plan the
steaming time for each food. You can
add a second food after the first one
has steamed for a while; you can also
remove the Bowl Divider before food in
the Steaming Bowl is done. Here are
some basic guidelines for using the
Bowl Divider feature.
Page 8

8
If food in the Bowl Divider is done first, remove Bowl Divider using potholder to grip hot handle - and continue cooking
other food.
SUGGESTED FOOD COMBINATIONS
Carrots and Red Potatoes
Medium water level
1 1/2 cups carrots (1/8” thick slices)
4 potatoes, quartered
Place carrots in Bowl Divider, fully opened. Potatoes in Bowl.
Start together. Set Timer for 30 minutes. Stir both after 15
minutes. Check doneness at 25 minutes.
Yield: 2-3 servings of both in 28-31 minutes.
Snow Peas and Yellow Squash
Low water level
1/4 lb. snow peas (about 1 1/4 cups)
2 cups squash (1/4” thick slices)
Place snow peas in Bowl Divider, fully opened. Squash in
Bowl. Start together. Set Timer for 19 minutes. Stir after 7
minutes. Check snow peas after 14 minutes; remove Divider
when done. Cook squash until crisp and tender.
Yield: 2-3 servings of both in 14-19 minutes.
Cauliflower and Zucchini
Medium water level
1 1/4 cups cauliflowerets
3 cups zucchini (1/4” slices)
Reduce Bowl Divider to one-fourth size and set Timer for 20
minutes. Add cauliflowerets and steam 10 minutes. Add
zucchini; stir after 5 minutes; cook 3 minutes more. Check
doneness of both after 18 minutes.
Yield: 2-3 servings of both in 18-20 minutes.
Page 9

9
Boneless Chicken Fillets and Cut Green Beans
Medium water level
1/2 lb. cut green beans (1 1/2 cups)
2 chicken fillets (each 1/4 lb., 3/4” thick)
Open Bowl Divider fully and fill with green beans. Place
chicken fillets in Bowl. Start together. Set Timer for 30
minutes. Stir beans after 15 minutes. Check doneness at
27 minutes.
Yield: 2 servings of both in 27-30 minutes
CAUTION: Allow steamer to cool before washing. Turn timer
to off. Unplug cord from outlet.
Bowls, Cover and Drip Tray: Immerse in HOT, SUDSY WATER.
Rinse thoroughly. Dry all parts.
May be washed in a dishwasher.
Water Reservoir: (Interior of Base) Pour HOT, SUDSY WATER
into Water Reservoir. Use a non-abrasive plastic brush or
mesh scouring pad to clean the interior. Do not use abrasive
scouring pads or abrasive cleaners to clean any part of the
Steamer.
Thoroughly rinse with clean, hot water to remove all traces of
detergent.
Special Care For Heater Element: After a period of use, the
Heater surface may become coated from mineral deposits left
by water. Severe build-up should be treated by heating
vinegar in the Water Reservoir. Do not use household bleach.
When cleaning, follow this procedure:
Do not cover Base with any Steamer parts while cleaning.
Pour vinegar (1 quart) into the Base to the “Hi” fill line.
Plug unit into electrical outlet and turn Timer ON for
approximately 20 minutes.
Do not allow solution to boil over or spill onto exterior
surfaces.
Care Guide
CLEANING
Page 10

When bell sounds and Cooking Light stops glowing, unplug
cord from outlet. Pour out vinegar solution and using a nonabrasive plastic brush, scrub the Heater Element.
Rinse only interior surfaces with fresh water.
Exterior of Base: Wipe Base and cord with a damp cloth,
then dry thoroughly. Never immerse Base in liquid or place
in dishwasher.
To maintain appearance of the exterior, avoid the use of
abrasive pads, brushes or cleansers.
NOTE: Steaming times will vary depending on desired
doneness and quantity used. The cooking times in the
Steaming Guide are suggested times. You may want to
lengthen/shorten cooking times to suit your taste. The times
suggested in the Steaming Guide are total cooking times,
starting when the Timer is turned ON.
While the majority of foods cook in much less than 75 minutes,
longer cooking times may require adding additional water to
the Water Reservoir. Remember to reset the Timer. Also, when
using the ”Lo” fill line and if the unit shuts off just short of your
desired doneness, just add 1/2 cup water and reset the Timer.
Watch food to avoid overcooking.
CAUTION: To avoid steam burns and when checking foods
while cooking, use long handled utensils/tongs. Always use
potholders to remove Cover. When removing the Cover, be
careful to lift Cover slowly.
10
When a Foil Cover is Used Over
the Rice Bowl
Some foods that are steamed in the
Rice Bowl need an aluminum foil cover
to prevent excess moisture from getting
into the food.
Foods that need a foil cover are
specified in the Steaming Guide.
STEAMING
GUIDE
Page 11

11
To cover Rice Bowl, use about a 7”
width of foil. Place the length over
Bowl and across the handles; press
length down and against outside of
handles. Extend width of foil just
beyond opposite sides of Bowl; leave
a little space between foil and edge of
Bowl. (Figure E)
To move Bowl, grip top of foil-covered
handles and carefully lift Rice Bowl.
Figure E
NOTE: The water levels in the Base of the Steamer are as follows:
Lo level = 1 1/2 cups or 12 ounces
Medium level = 2 1/2 cups or 20 ounces
High level = 4 cups or 32 ounces
FRESH VEGETABLES
Weight, as specified for some vegetables in the Guide, is the purchased weight of
the food before it is trimmed, peeled, or cleaned.
Freshness, size/uniformity, and quantity will affect steaming time and quality of results.
Use crisp, firm vegetables.
Select uniform foods or cut pieces as evenly as possible.
Use amounts as recommended in the Steaming Guide.
Stirring is recommended when steaming some foods. Use a long handled spoon to stir.
Steam foods until just crisp, tender for best flavor and food value.
Season vegetables after steaming.
Weight/Or Use Use Water Approx.
Fresh Number Rice Drip Fill Line Time
Vegetables Pieces Bowl Tray In Base (Minutes) Tips
Artichokes, 5-6 medium No Yes Hi 38-40
whole
■ Trim top, tips and bottom
so each sits flat.
■ Pull open slightly and soak
in water (10 mins.) to clean.
■ Use tongs to remove from
Steaming Bowl.
Page 12

12
Weight/Or Use Use Water Approx.
Fresh Number Rice Drip Fill Line Time
Vegetables Pieces Bowl Tray In Base (Minutes) Tips
Asparagus, 1 lb. No Yes Lo 13-15
Spears (about
3/8” - 1/2”
in diameter)
1 1/2 lbs.
(3/8” - 1/2”
in diameter) No Yes Lo 16-18
Beans, 1 lb. No Yes Med 24-28
Green/Wax
Cut or Whole 1 1/2lbs. No Yes Med 29-32
Broccoli, 1 lb. No Yes Lo 16-18
Spears
1 1/2 lbs. No Yes Med 19-21
Brussels 1 lb. No Yes Med 24-26
Sprouts
1 1/2 lbs. No Yes Med 26-29
Cabbage 3/4 -1 lb. No Yes Med 20-23
(about 1/2
small head)
Carrots 1 lb. No Yes Lo 16-18
2 lbs. No Yes Med 21-23
■ Cut off and discard tough
portion of spears.
■ Up to 8” lengths will fit in
center of Steaming Bowl.
■ Trim to 8” lengths.
■ For over 1/2 pound, place
half of spears in single layer;
crisscross remaining in
second layer.
■ Use tongs to remove from
Steaming Bowl.
■ For thinner spears, reduce
cooking time.
■ Stir after 15 mins.
■ Yield 4 cups.
■ Stir after 15 and 25 mins.
■ Yield about 5-1/2 cups.
■ Trim to 4" lengths from top of
head to stem. Stems should
be about 1/4" - 3/8"
in diameter.
■ Arrange over Steaming Bowl
surface.
■ Yield about 4 1/2 cups.
■ Trim to 4” lengths from top
of head.
■ Stems should be 1/4” - 3/8”
in diameter.
■ Layer loosely.
■ Yield about 6 cups.
■ Trim leaves/stem, as
necessary.
■ Cut a 1/4” deep cross into
stem end; wash; drain.
■ Place smallest sprouts in
second layer.
■ Stir after about 15 mins.
■ Yield about 3 cups.
■ Yield about 4 1/2 cups.
■ Trim outer leaves/base.
■ Cut into 4 equal wedges,
maintaining a section of core
with each wedge.
■ Place wedges on side and
over steam holes around
Bowl.
■ Remove with tongs.
■ Peel; slice thinly
(about 1/8” thick).
■ Spread over Steaming Bowl
surface.
■ Stir after 10 mins.
■ Yield about 2 2/3 cups.
■ Stir after 13 and 18 mins.
■ Yield about 5 cups.
Page 13

13
Weight/Or Use Use Water Approx.
Fresh Number Rice Drip Fill Line Time
Vegetables Pieces Bowl Tray In Base (Minutes) Tips
Cauliflower Medium size No Yes Med 26-29
Whole Head (about
2 1/2 lbs.
untrimmed)
Flowerets 1 head No Yes Med 23-25
(1 1/4 1 1/2 lbs.
untrimmed med.)
Corn on Cob Up to No Yes Med 29-33
8 pieces
(2 3/4”- 3 1/2”
in length)
Snow/Chinese Pods 1/2 lbs. No Yes Lo 10-11
Peppers, Whole 4 - 5 medium No Yes Lo 10-12
Sweet Green or Red
(to partially cook,
then stuff)
Potatoes, Whole 1 lb.- No Yes Med 35-39
Red 4-6 small
(2” - 2 1/2”
in width)
2 lbs.- No Yes Hi 41-45
7-9 small
(2” - 2 1/2”
in width)
■ Trim; remove core.
■ Center in Steaming Bowl.
■ Insert 2 forks to lift from
Steaming Bowl after
steaming.
■ Cut flowerets to about 2”
diameter.
■ Layer loosely.
■ Stir after 15 mins.
■ Yield about 4 1/2 cups.
■ Cut or break whole ears
into pieces.
■ Arrange vertically (stand on
end) around sides of
Steaming Bowl.
■ Remove with tongs.
■ Break off ends; remove
strings and wash.
■ Spread over Steaming Bowl
surface.
■ Stir after 7 mins.
■ Yield about 2 cups.
■ Cut across width of pepper
at stem end; carefully
remove seeds and
membranes. Wash.
■ Arrange in Steaming Bowl
with open side down.
■ After steaming, peppers can
be cooled quickly using cold
water; carry Steaming Bowl
with peppers to sink and run
cold water over them.
■ Fill peppers with a
precooked filling and bake in
oven as recipe directs.
■ Scrub/wash potatoes; do not
peel or cut.
■ Arrange along sides of
Steaming Bowl.
■ Remove with tongs.
■ Prepare as previously
described.
■ Place potato halves in
second layer above steam
holes in Bowl.
■ Stir after 20 mins.
■ Remove with tongs.
Page 14

14
Weight/Or Use Use Water Approx.
Fresh Number Rice Drip Fill Line Time
Vegetables Pieces Bowl Tray In Base (Minutes) Tips
Spinach 1 lb. No Yes Lo 13-15
Squash 1 lb. No Yes Lo 14-16
Summer (Yellow) medium
and Zucchini size
■ Remove stems; wash, then
drain leaves for 1-2 mins.
■ Pack into Steaming Bowl,
Bowl will be heaping full.
■ Stir after 7 and 10 mins; use
a long-handled fork to bring
wilted leaves from bottom
of Bowl.
■ Yield about 2 cups.
■ Trim; wash.
■ Cut into 1/4” slices.
■ Stir after 9 mins.
■ Yield about 3 cups.
FROZEN VEGETABLES
Times given are for the contents of one or two boxes or bag of the size specified for
the frozen vegetable. Foods listed are not packaged in butter or a sauce; most are
placed directly into the Steaming Bowl. Do not thaw before steaming.
Frozen vegetables may be very icy; some are a solid block when removed from the
package. When possible, break-up/separate frozen pieces before adding them to
Steaming Bowl. These foods should be separated/stirred after 10 - 12 mins., or at
the time suggested in the Steaming Guide.
Use a long handled fork or spoon to separate or stir foods.
Mashed, frozen vegetables, like winter squash, are placed in the Rice Bowl, then
the Steaming Bowl and should be covered with a piece of aluminum foil during
steaming. See instructions for using a foil cover.
Season vegetables after steaming.
Pkg. Weight/ Use Use Water Approx.
Frozen Or Number Rice Drip Fill Line Time
Vegetables Pieces Bowl Tray In Base (Minutes) Tips
Asparagus 2 pkgs. No Yes Med 21-23
Cut 9-10 ounces
Spears 2 pkgs. No Yes Med 18-20
9-10 ounces
Beans 2 pkgs. No Yes Med 22-25
Green/Wax, 8-9 ounces
cut or whole
Lima, Baby 2 pkgs. No Yes Med 22-25
9-10 ounces
■ Separate/stir after 15 mins.
■ Separate/rotate after 12 and
17 minutes.
■ Stir after 15 and 20 mins.
■ Stir after 15 and 20 mins.
Page 15

15
Pkg. Weight/ Use Use Water Approx.
Frozen Or Number Rice Drip Fill Line Time
Vegetables Pieces Bowl Tray In Base (Minutes) Tips
Broccoli 2 pkgs. No Yes Med 29-31
Chopped (9-10 ounces)
Spears 1 pkg. No Yes Med 22-25
(16 ounces)
Brussels Sprouts 2 pkgs. No Yes Med 26-28
(9-10 ounces)
Carrots 2 pkgs. No Yes Med 26-28
Baby, Whole (9-10 ounces)
Cauliflower 2 pkgs. No Yes Med 26-29
(9-10 ounces)
Corn 2 pkgs. No Yes Med 22-25
Cut (9-10 ounces)
On Cob Up to No Yes Med 36-38
9 half ears
(about 2 3/4”
in length)
Mixed Vegetables 1 pkg. No Yes Med 21-23
(16 ounces)
Peas 1 pkg. No Yes Lo 15-17
Green (9-10 ounces)
Snow/Chinese 1 pkg. No Yes Lo 12-13
Pea Pods (6 ounces)
Sugar Snap 1 pkg. No Yes Med 18-20
(8-9 ounces)
Spinach 1 pkg. No Yes Med 25-27
Cut Leaf (16 ounces)
Squash 2 pkgs. Yes No Hi 47-52
Winter, Mashed (12 ounces)
■ Separate with long-handled
fork after 15 mins; stir after
15 and 20 mins.
■ Separate pieces as
possible; layer loosely.
■ Separate pieces as possible.
■ Stir gently after 15, 20 and
24 mins.
■ Stir gently after 15 and
20 mins.
■ Stir after 15 and 20 mins.
■ When serving, sprinkle with
ginger or dry mustard,
if desired.
■ Stir after 15 and 20 mins.
■ Flavor with butter or
margarine, if desired.
■ Arrange vertically (standing
on end) with one ear in
center of Steaming Bowl.
■ Remove with tongs.
■ Stir after 15 and 20 mins.
■ Stir after 10 mins.
■ Separate after 8 mins; stir
after 10 mins.
■ Stir after 10-15 mins.
■ Separate/stir after
15-20 mins.
■ Place frozen block in Rice
Bowl; it will not lay flat.
Cover Rice Bowl with foil.
■ After 30 mins., remove
Steaming Bowl from Base.
Lift foil from Rice Bowl; be
careful of steam.
■ Separate/stir mixture.
Replace foil; replace
Steaming Bowl on Base to
continue steaming.
Page 16

16
SEAFOOD AND FISH
Steaming times provided are for fresh, or frozen and thawed, seafood and fish.
Clean and prepare fresh seafood and fish, as appropriate, before steaming.
Most seafood and fish cook quickly. Steam in small quantities, or in amounts as
specified.
Clams tend to open at different times during steaming. To avoid overcooking, watch
the shells. Tap the exterior of Cover to improve visibility as steam forms on inside of
Steaming Bowl. Use tongs to remove shells when opened; be careful as the steam
is hot. Replace Cover after opened shells are removed.
Serve steamed seafood or fish with plain or seasoned butter or margarine, fresh
lemon, and/or favorite sauces.
Fish fillets may be steamed in the Rice Bowl. See the procedure provided for
poached fillets. Experiment with your favorite fish fillets and/or seasonings by
following the proportions and procedures given in the recipe. Adjust steaming
times, as necessary.
Use Use Water Approx.
Type Of Rice Drip Fill Line Time
Seafood/Fish Amount Bowl Tray In Base (Minutes) Tips
Clams 1 dozen No Yes Lo 11-16
Littlenecks/Cherrystones in shell
(fresh) (up to 2”
across)
Steamers/Longnecks 1 dozen No Yes Lo 9-16
(fresh) in shell
(up to 2 3/4”
across)
2 dozen No Yes Lo 9-18
in shell
(up to 2 3/4”
across)
Scallops (fresh) 1 lb., No Yes Lo 12-14
Bay shucked
Sea 1 lb., No Yes Lo 12-15
shucked
(up to
3/4” thick)
Shrimp Large No Yes Lo 13-15
(Fresh, or frozen 1 lb. in shell
and thawed)
1 1/2 lbs. No Yes Med 18-20
in shell
■ Clean, soak shells.
■ Stagger shells that
are layered.
■ Cook until shells are
well opened.
■ Larger clams need
maximum time.
■ Use tongs to remove.
■ To steam larger Littlenecks
or Cherrystones (up to 2 3/4”
across), use “Med” water
level; steam 1 dozen at a
time; stir after 15 mins.
■ Steam until shells
are opened.
■ Arrange in single
layer; larger quantity must
be layered.
■ Larger scallops and/or
larger amount may take
maximum time.
■ Stir at 7 minutes; again at 10
minutes if not done. Use a
long handled spoon.
■ Steam until opaque.
■ Stagger shrimp that
are layered.
■ Stir with long handled spoon
after 8 minutes and
11 minutes.
■ Steam until shells are
reddish and flesh is opaque.
■ Stir after 12 and 16 minutes.
Page 17

17
Use Use Water Approx.
Type Of Rice Drip Fill Line Time
Seafood/Fish Amount Bowl Tray In Base (Minutes) Tips
Fish Fillets 1/2 lb. No Yes Lo 10-14
(Fresh, or frozen (1/4” - 1/2”
and thawed) thick)
Sole
Flounder
Other favorite fillets
Poached Sole Dijon* 1 - 1 1/4 lbs. Yes No Med 23-38
fillets
*Your favorite (4-6 fillets of
fish fillets can similar size
be substituted each about
for sole. 9” L: x
2 1/2” W)
Steaks 1-1 1/2 lbs.
(Fresh, or frozen
and thawed)
Halibut 1-2 steaks No Yes Med 23-25
(3/4” - 1”
thick)
Salmon 3-4 steaks No Yes Med 24-30
(3/4” - 1”
thick)
Swordfish 1-2 steaks No Yes Med 22-29
(3/4” - 1”
thick)
Tuna 1-2 steaks No Yes Med 22-26
(3/4” - 1”
thick)
■ Spray bottom of Steaming
Bowl with non-stick cooking
spray before adding fillets
for easier removal of fish
and for easier cleaning.
■ Place largest pieces in
single layer; stagger any
smaller pieces on top.
■ Steam until opaque and flesh
flakes easily.
■ Gently remove with spatula.
■ Combine 3 tbs.. lemon
juice, 2 tbs.. melted butter
or margarine, 1 small
chopped onion, 4 sprigs
chopped parsley, 1 chopped
clove garlic and 1 teaspoon
Dijon mustard. Wash and dry
fillets. Spread onion mixture
evenly down meaty side of
fillets. Roll up and position in
Rice Bowl in single layer
with end side down. Cover
Bowl with foil. Serve with
rice, spooning seasoned fish
juices over rice. Steam until
opaque and flesh
flakes easily.
■ Makes 2-4 servings.
For all fish steaks —
■ Spray bottom of Steaming
Bowl with non-stick cooking
spray before adding steaks
for easier removal of fish/for
easier cleaning.
■ Arrange in single layer in
Steaming Bowl.
■ Steam until opaque and flesh
flakes easily; check next to
any bone for doneness, or in
thickest area.
■ If steam stops before Timer
rings, add 1/2 cup water to
Base and watch closely to
avoid overcooking.
■ Carefully remove from
Steaming Bowl using
a spatula.
■ Experiment with others, or
your favorite. Follow basic
procedure for fish steaks.
■ Watch to prevent
overcooking.
Page 18

18
CHICKEN, FRANKFURTERS
To steam chicken pieces:
Select pieces of similar size and weight for even cooking.
Trim off fat; removal of skin is recommended.
Arrange in single layer; see Tips in Steaming Guide.
Steam until well done - when juices run clear. Check for doneness next to any bone
and in thickest area.
To steam frankfurters:
Pierce whole franks with a fork (several times along the length) to reduce splitting
while steaming.
Weight/Or Use Use Water Approx.
Chicken, Number Rice Drip Fill Line Time
Frankfurters Pieces Bowl Tray In Base (Minutes) Tips
Chicken 1 lb. No Yes Med 22-25
Breast, boneless fillets (4 pieces;
3/4” - 1” at
thickest part)
1 1/4 - 1/2 lbs. No Yes Med. 25-28
(4 large
pieces)
Breast, split with bone 1 - 1 1/4 lbs. No Yes Hi 30-34
(2 pieces)
1 3/4 - 2 lbs. No Yes Hi 37-41
(4 pieces)
Poached Chicken 1 - 1 1/4 lbs. Yes No Med 32-35
Breast - boneless, (4 pieces;
skinless fillets 3/4” - 1” at
thickest part)
Poaching Liquid for Chicken
1 cup water
1 1/2 teaspoon instant chicken flavored bouillon granules
1/2 teaspoon dried minced onion
1/2 teaspoon dried basil, savory, marjoram or thyme
1/8 teaspoon black pepper
Salt to taste
Combine ingredients in Rice Bowl.
■ Place in single layer; stagger
smallest piece on top,
if necessary.
■ Great for chicken salad
or soup.
■ Position as previous. Place
any small pieces,as may be
cut from larger pieces, in
center of Bowl.
■ Place flesh side down with
thickest part toward sides of
Steaming Bowl.
■ Combine ingredients for
Poaching Liquid (see below )
in Rice Bowl.
■ Place chicken pieces in
liquid with thickest part
toward sides of Rice Bowl;
bone side up for pieces
with bone.
■ Serve poaching liquid with
cooked chicken, or
refrigerate for soup stock,
gravy or sauces.
Page 19

19
Weight/Or Use Use Water Approx.
Chicken, Number Rice Drip Fill Line Time
Frankfurters Pieces Bowl Tray In Base (Minutes) Tips
Frankfurters About 7/8” No Yes Lo 15-17
Up to 7” long in diameter,
uncooked
2 lbs. No Yes Lo 17-19
(16-20)
■ Crisscross and stagger
franks in layers. For 2 lbs.,
make 3 layers.
■ For 1 lb. franks, rolls can be
heated toward the end of the
steaming period. Using
tongs, place up to 4 rolls at a
time on top of franks for 3045 secs. Shake water from
Cover before replacing
over rolls.
■ For 2 lbs. franks, heat
rolls by another method,
such as in the oven.
■ To steam larger diameter
franks, use a”Lo” water
level, steam 1 lb. at a time for
17-19 mins.
RICE
There are many different kinds of rice. The more common ones, listed in the
Steaming Guide, vary in the amount of water that is combined with rice in the Rice
Bowl, and in the cooking time. Follow amounts of water and rice in Steaming Guide
(not on the package) for each kind of rice. Wild rice, other than in a package mix
with whole rice, does not cook effectively using steam.
Accurately measure the rice and water that are combined in the Rice Bowl.
Measure water using a liquid measuring cup. Level rice in a dry measuring cup.
(Fig. F) Stir rice and water. Place Rice Bowl into Steaming Bowl for steaming.
Consistency of rice can be varied, if desired.
For drier/firmer rice, decrease specified
amount of water that is combined with the
rice by 1 - 2 tablespoons. For softer rice,
increase water mixed with rice by the same
amount.
Check doneness and consistency of rice at
minimum time specified for each type; stir rice at this time.
After checking/stirring rice, shake Cover before replacing it on Steaming Bowl. This
will prevent water in Cover from dripping into Rice Bowl which would reduce the
quality and flavor of the steamed rice.
Season rice after
steaming. Add salt, pepper, butter or margarine. Toss with
sauteed chopped onions or mushrooms; with toasted nuts or chopped parsley.
Figure F
Liquid
Dry
Page 20

20
For flavored rice, substitute the specified amount of water that is combined with
rice in the Rice Bowl with beef or chicken broth, consomme or bouillon.
For a tasty change from plain rice, refer to recipe for Parmesan Rice with Spinach.
At completion of steaming, carefully remove Rice Bowl from Steaming Bowl;
handles will be hot and wet. If transferring rice to another serving bowl,
wipe moisture from outside of Rice Bowl to prevent water from dripping into
serving bowl.
Combine in Rice Bowl
Use Water Fill Approx.
Amount Amount Drip Line Time
Type of Rice Rice Cold Water Tray In Base (Minutes) Tips
Brown 1 cup 1 1/4 cups No Hi 50-52
Regular,
Long or 1 1/2 cups 2 cups No Hi 54-56
Short Grain
2 1/2 cups 3 cups No Hi 60-62
White 1 cup 1 1/2 cups No Med 35-36
Regular,
Extra Long, 1 1/2 cups 2 cups No Hi 38-39
Long and
Medium Grain 2 1/2 cups 3 cups No Hi 48-50
Regular, 1 cup 1 2/3 cups No Hi 50-52
Parboiled,
Long Grain 1 1/2 cups 2 cups No Hi 53-55
2 1/2 cups 3 cups No Hi 61-63
Long Grain and Mix 1 2/3 cups No Hi 57-59
Wild Rice Mix
Regular
(6 oz. pkg.)
(Two 6 oz. pkgs.) Mix 3 cups No Hi 67-68
Fast cooking Mix 1 1/2 cups No Lo 22-24
(6 1/4 oz. pkg.)
(Two 5.2 oz. or Mix 3 1/3 cups No Med 36-38
6.25 oz. pkgs.)
Brown Rice
UNCLE BEN’S
®
2 cups 2 cups No Lo 24-25
Brand*
MINUTE
®
2 cups 1 2/3 cups No Lo 22-24
Brand **
White Rice
UNCLE BEN’S
®
2 cups 1 3/4 cups No Lo 20-21
Converted Brand*
■ Makes about 3 1/2 cups.
■ Makes about 4 1/2 cups.
■ Makes about 7 1/2 cups.
■ Makes about 3 1/2 cups.
■ Makes about 4 1/2 cups.
■ Makes about 8 - 8 1/2 cups.
■ Makes about 3 1/2 cups.
■ Makes about 5 cups.
■ Makes about 8 cups.
■ Add 1 tablespoon butter or
margarine to mix and water
in Rice Bowl
before steaming.
■ After steaming, stir and let
stand 3-5 minutes.
■ Makes about 3 1/2 cups.
■ Makes about 6 1/2 cups.
■ Makes about 3 cups.
■ Makes about 6 cups.
■ Makes about 4 1/2 cups.
■ Makes about 3 1/2 cups.
■ Makes about 4 cups.
Fast Cooking Rice After steaming, add any seasoning, if desired; stir, cover and let stand 3-5 minutes.
*Registered trademark of Uncle Ben’s Inc.
** Registered trademark of Kraft General Foods Inc.
Page 21

21
Combine in Rice Bowl
Use Water Fill Approx.
Amount Amount Drip Line Time
Type of Rice Rice Cold Water Tray In Base (Minutes) Tips
White (cont.)
MINUTE
®
2 cups 1 2/3 cups No Lo 18-29
Brand Original
MINUTE
®
2 cups 1 2/3 cups No Lo 19-21
Brand Premium
Long Grain
■ Makes about 4 cups
■ Makes about 3 1/2 cups
*Registered trademark of Uncle Ben’s Inc.
REHEATING
When reheating breads, a foil cover is not needed.
For leftovers, reheating times are based on foods at refrigerator temperatures.
When reheating leftovers in the Rice Bowl, always arrange/spread leftovers evenly
in Rice Bowl and be sure to use a foil cover. See instructions for using a foil cover.
(Figure E, page 11)
Foods Weight/Or Use Use Water Approx.
To Be Number Rice Drip Fill Line Time
Reheated Pieces Bowl Tray In Base (Minutes) Tips
Breads
Brown and Serve 8-10 No Yes Lo 10 mins.
Type Rolls (divided)
Sour Dough Rolls, 6-8 rolls No Yes Lo 12 mins.
(divided)
For all breads -
■ Heat water in Base for 7
minutes with empty
Steaming Bowl and Cover
in place.
■ Remove Steaming Bowl
Place breads around Bowl,
leaving a little space along
sides; stagger second layer.
■ Shake moisture from Cover
before replacing it.
■ Steam bread for time
recommended. Blot any
excess moisture using paper
towel after steaming.
■ Heat water in Base for 7
mins. Remove Steaming
Bowl/Cover.
■ Place rolls in Steaming
Bowl, staggering rolls in
second layer.
■ Heat 3 mins.
■ Heat water in Base for 5
mins. Remove Steaming
Bowl/Cover.
■ Heat 5 mins.
Page 22

22
Foods Weight/Or Use Use Water Approx.
To Be Number Rice Drip Fill Line Time
Reheated Pieces Bowl Tray In Base (Minutes) Tips
Muffins Up to 6 No Yes Lo 17 mins.
(At refrigerator (Medium size; (Divided)
temperature) in paper
baking cups)
■ Place muffins in single
layer only.
■ Steam for 10 mins.
■ For room temperature
muffins, or without paper
baking cups, steam for
5-7 mins.
LEFTOVERS (REFRIGERATED)
Leftovers are easily reheated in the Steamer. The following are some examples.
Experiment with your own leftovers.
Leftovers Weight/Or Use Use Water Approx.
To Be Number Rice Drip Fill Line Time
Reheated Pieces Bowl Tray In Base (Minutes) Tips
Beef Stew, Chili 2 cups Yes No Med 23-26
Macaroni and Cheese, 2 cups Yes No Med 27-31
Pasta with Sauce
Mashed Potatoes, 2 cups Yes No Lo 20-22
Rice (white)
Vegetables 2 cups Yes No Lo 19-21
Green beans,
carrots, green peas
■ Remember to always cover
Rice Bowl with foil when
reheating leftovers. See
instructions for using a foil
cover, page 10-11).
■ Spread leftovers evenly in
Rice Bowl.
■ If food is not quite hot
enough when unit shuts off,
reset time for 3-5 mins. and
continue steaming. To
continue steaming when
using Lo water level, remove
Steaming Bowl and add 3/4
cup tap water to Water
Reservoir. Replace Steaming
Bowl/Cover and reset Timer
for 3-5 mins. Continue
steaming and check after
2-4 additional minutes.
Weight/Or Use Use Water Approx.
Number Rice Drip Fill Line Time
Other Foods Pieces Bowl Tray In Base (Minutes) Tips
Eggs, Large size Up to 12 No Yes Med 30
Hard Cooked
■ Use eggs at room
temperature to prevent
cracking during steaming.
■ Place eggs over, or close to,
steam holes.
■ If eggs are cold, increase
steaming time by 5 mins.
Page 23

23
Weight/Or Use Use Water Approx.
Number Rice Drip Fill Line Time
Other Foods Pieces Bowl Tray In Base (Minutes) Tips
Oatmeal 2/3 cups oats Yes No Lo 10 mins.
Regular, 1 cup hot (divided)
Old Fashioned tap water
Oatmeal 1 1/3 cups Yes No Lo 13 mins.
Regular, oats; 2 cups (divided)
Old Fashioned hot tap water
■ Heat water (to Lo fill line) in
Base with Steaming Bowl
and Cover in place for
5 mins.
■ Stir oats and hot water
together in Rice Bowl; place
Rice Bowl in Steaming Bowl.
■ Shake moisture from Cover
before replacing.
■ Reset Timer for 5 mins.
■ For 2/3 cups oats, reset
Timer to steam 5 mins.; For
1 1/3 cups oats, reset
timer to steam 8 mins.
■ Remove Steaming Bowl, stir
oatmeal and let stand
covered for one minute.
■ Remove Rice Bowl.
■ Stir mixture; serve.
■ Makes 2 (1/2 cup) servings
using 2/3 cups oats; 4 (1/2
cup) servings using 1 1/3
cups oats.
Page 24

24
POACHED CHICKEN BREASTS
WITH FRESH SALSA
Change rice into a colorful and flavorful
side dish by adding spinach and nutmeg.
Using the Handy Steamer Plus ™ to
cook rice prevents the nuisance of a
saucepan boiling over or having to
scrub a pan with scorched, crusty rice.
1 cup regular long or
extra long grain white rice
1/4 teaspoon ground nutmeg
2 cups packed spinach, untrimmed
1 small onion, finely chopped
1 1/2 cups chicken broth
1/4 cup grated Parmesan cheese
(optional)
TO PREPARE:
1. Add rice and nutmeg to Rice Bowl; stir well.
2. Trim and wash spinach; pat dry.
3. Finely chop spinach; add spinach, onion and chicken broth to Rice Bowl. Stir to blend.
4. Fill Steamer Base with water to “Hi” fill line. Position Steaming Bowl, Rice Bowl and
Cover. Steam for 45-47 minutes or until rice is tender. Remove Cover after 25 minutes
and stir mixture with a long handled spoon. Shake water off inside of Cover before
replacing it on Steaming Bowl.
5. Gently stir Parmesan cheese into rice just before serving, if desired.
MAKES 6 (1/2 CUP) SERVINGS
PARMESAN RICE
WITH SPINACH
This Fresh Salsa is a pleasant surprise
and very different from the more
common variety of red salsas. It’s a
perfect complement to the plump juicy
chicken breasts.
FOR POACHED CHICKEN:
1 cup dry white wine or chicken broth
1/2 teaspoon thyme
1/4 teaspoon salt
1/8 teaspoon black pepper
4 boneless, skinless chicken breast
cutlets, about 1 lb.
FOR FRESH SALSA:
1 medium tomato, chopped
1 small avocado, chopped
1/2 cup fresh cilantro (leaves only),
finely chopped
1/4 cup finely chopped walnuts
1-2 jalapeño peppers, seeded and minced
1 small onion, minced
2 tablespoons lemon juice
1/4 teaspoon salt
1/4 cup poaching liquid from Rice Bowl after
cooking chicken (or 2 tablespoons each of
poaching liquid and olive oil)
TO PREPARE:
1. Fill Steamer Base with water to “Hi” fill line. Position Steaming Bowl.
2. Combine wine or chicken broth, thyme, salt, and black pepper in Rice Bowl. Stir to
blend seasonings. Add chicken breast cutlets, with thickest pieces toward sides of
Rice Bowl. Position Cover and steam for 34-37 minutes, or until done.
3. While chicken is cooking, combine tomato, avocado, cilantro, walnuts, jalapeño
peppers, onion, lemon juice and salt; mix well.
4. Transfer chicken cutlets to a bed of rice, if desired. Stir 1/4 cup poaching liquid from
Rice Bowl (or poaching liquid and olive oil) into salsa. Top cutlets with fresh Salsa and
serve immediately. Pass remaining poaching liquid, if desired.
MAKES 4 SERVINGS (1 cutlet, about 1/2 cup salsa each)
Page 25

25
A tangy, flavorful taste is
created as blue cheese
melts on hot broccoli and
the two are tossed
together with the
vinaigrette sauce.
1 lb. broccoli spears
2 tablespoons olive or vegetable oil
1 tablespoon red wine vinegar
1 large clove garlic, peeled and minced
1 teaspoon Worcestershire sauce
1/4 cup crumbled blue cheese
Salt and pepper
1/4 - 1/2 cup seasoned croutons (optional)
TO PREPARE:
1. Fill Steamer Base with water to “Lo” fill line. Position Drip Tray.
2. Trim broccoli to 4” lengths from top of head to steam. Stems should be no larger than
1/4” - 3/8” in diameter. Layer loosely in Steaming Bowl.
3. Position Cover and steam for 16-19 minutes or to desired tenderness.
4. While broccoli is steaming, prepare vinaigrette sauce combining oil, vinegar, garlic
and Worcestershire sauce; whisk together to blend ingredients.
5. Transfer steamed broccoli to salad bowl; pour sauce over top. Add blue cheese, then
salt and pepper to taste; toss. Sprinkle with croutons just before serving.
MAKES 5 (3/4 CUP) SERVINGS
CAESAR BROCCOLI
Peel ‘n eat shrimp may be somewhat
messy, but they’re an irresistible treat.
Using the Handy Steamer Plus™ lets
the steam cook the shrimp while adding
flavor from the spicy seasoning, lemon
and vegetables. Serve with a favorite
sauce and plenty of napkins.
1 lb. fresh large shrimp
(30-35 per lb.), in shell
1-2 tablespoons seafood seasoning mix
1 lemon, cut into 6 slices
1 medium onion, cut into 6 pieces
1 medium carrot, cut into 6 pieces
1 medium stalk celery, cut into 6 pieces
TO PREPARE:
1. Fill Steamer Base with water to “Lo” fill line. Position Drip Tray, then Steaming Bowl.
2. Rinse shrimp; add to Steaming Bowl. Sprinkle seafood seasoning mix over shrimp and
stir to coat. Spread shrimp evenly in Bowl.
3. Place lemon slices and vegetable pieces on top of shrimp.
4. Position Cover. Steam until shells are reddish and flesh is opaque, from 14 to 17
minutes. After 8 minutes, stir mixture with a long-handled spoon; stir 1 or 2 more times
to ensure even steaming.
5. Serve with a favorite cocktail sauce, or a mixture of lemon juice and melted butter or
margarine, with a dash of hot sauce.
MAKES 4 SERVINGS (ABOUT 8 SHRIMP EACH)
SPICY STEAMED SHRIMP
Page 26

26
APPLE BREAD PUDDING
Bread puddings are quintessential, old-fashioned
comfort food. This one is made extra tasty by the
addition of sliced apple, raisins and walnuts.
2 red cooking apples
2 tablespoons softened butter or margarine
6 slices day-old bread (sandwich slice size; firm or
soft type)
2-3 tablespoons raisins
1/4 cup chopped walnuts
3 eggs
2/3 cup sugar
1 1/2 cups light cream
1 cup sweet apple cider
1 1/2 teaspoons ground cinnamon
1/2 teaspoon ground nutmeg
TO PREPARE:
Wash and core apples; peel if desired. Slice apples crosswise into 1/4” rounds; cut each
round in half.
Spread butter or margarine evenly over one side of each bread slice. Cut each slice
diagonally into 4 pieces. Position 8 bread quarters in bottom of Rice Bowl. Arrange onethird of the apple pieces on bread. Repeat with two more layers. Prior to final apple
layer, sprinkle raisins and walnuts over surface. Then arrange remaining apple pieces
(7-8) in a decorative pinwheel pattern. Place any remaining apple pieces along the sides
of Rice Bowl.
In a small bowl, beat together eggs and sugar. Add cream and apple cider; whisk to
blend. Stir in cinnamon and nutmeg. Immediately pour over top of bread mixture. Cover
Rice Bowl with an 8 1/2” width of aluminum foil.*
Fill Steamer Base with water to “Hi” fill line. Position Steaming Bowl, Rice Bowl with
foil, and Cover. Steam the pudding for 73 minutes, or until a knife inserted into center
comes out clean. Allow to stand for 5-10 minutes before serving. Serve warm or at room
temperature. Garnish with vanilla ice cream or a whipped topping, if desired.
MAKES 8 (3/4 CUP) SERVINGS
*
Foil is necessary to prevent water condensation from dripping into pudding.
(See instructions for using a foil cover, Pages 10-11).
Page 27

27
The cord length of this appliance was selected to
reduce safety hazards that may occur with a longer
cord. If more cord length is needed, an extension cord
may be used. It should be rated not less than 10
amperes, 120 volts, and should have Underwriters
Laboratories listing. A properly rated extension cord
may be purchased from a Black & Decker (U.S.) Inc.,
Household Appliance Company-Owned or Authorized
Service Center. When using a longer cord, be sure that it
does not drape over a working area or dangle where it
could be pulled on or tripped over.
This appliance has a polarized plug (one blade is wider
than the other). As a safety feature, this plug will fit into
a polarized outlet only one way. If the plug does not fit
fully in the outlet, reverse the plug. If it still does not fit,
contact a qualified electrician. Do not attempt to defeat
this safety feature.
ELECTRICAL CORD
AND PLUG
POLARIZED PLUG
Page 28

28
Need Help?
SERVICE
OR REPAIR
Service, if necessary, must be performed by a Black &
Decker (U.S.) Inc., Household Appliance CompanyOwned or Authorized Service Center. The Service
Center nearest you can be found in the yellow pages
of your phone book under “Electric Appliances Small - Repairing.”
If mailing or shipping your Handy Steamer Plus™Food
Steamer/Rice Cooker, pack it carefully in a sturdy carton
with enough material to prevent damage. The original
carton is not suitable for mailing. Include a note
describing the problem to our Service Center and be
sure to give your return address. We also suggest that
you insure the package for your protection.
Consumer-replaceable parts and accessories are
also available at Black & Decker (U.S.) Inc.,
Household Appliance Company-Owned or Authorized
Service Centers.
Page 29

29
TWO-YEAR
WARRANTY
Black & Decker (U.S.) Inc. warrants this product against
any defects that are due to faulty material or
workmanship for a two-year period after the original
date of consumer purchase or receipt as a gift. This
warranty does not include damage to the product
resulting from accident or misuse.
If the product should become defective within the
warranty period, we will repair it or elect to replace it
free of charge. We will return your product,
transportation charges prepaid, provided it is delivered
prepaid to any Black & Decker (U.S.) Inc.,
Household Appliance Company-Owned or Authorized
Service Center.
This warranty gives you specific legal rights and
you may also have other rights which vary from state
to state.
Answers to any questions regarding warranty
service/locations may be obtained by writing:
Consumer Assistance and Information
Black & Decker (U.S.) Inc.
6 Armstrong Road
Shelton, CT 06484-4797
Page 30

Listed by Underwriters Laboratories Inc.
Copyright © 1991, 1993 Black & Decker
Pub. No. 168633-16-RV00
Printed in China
 Loading...