

Page 1

Please read before returning this product for any reason.
Àlire avant de retourner ce produit pour quelque raison que
ce soit.
Lea el manual antes de devolver este producto por cualquier
motivo.
INSTRUCTION MANUAL
MODE D’EMPLOI
MANUAL DE INSTRUCCIONES
3 IN 1 CORDLESS VACUUM
ASPIRATEUR-BALAI 3 EN 1 SANS FIL
ASPIRADORA SIN CABLE 3 EN 1
HFEK520J
HFEK620J
Page 2

ENGLISH
English (original instructions) 1
Français (traduction de la notice d’instructions originale) 9
Español (traducido de las instrucciones originales) 18
To register your new product, visit
www.BlackandDecker.com/NewOwner
Consulter le site Web www.BlackandDecker.com/NewOwner
pour enregistrer votre nouveau produit.
Visite www.BlackandDecker.com/NewOwner para registrar su
nuevo producto.
Thank you for choosing BLACK+DECKER!
If you have a question or experience a problem with your BLACK+DECKER
purchase, go to: http://www.blackanddecker.com/instantanswers
If you can’t find the answer or do not have access to the Internet,
call 1-800-544-6986 from 8 a.m. to 5 p.m. EST Mon. – Fri. to speak
with an agent. Please have the CATALOG NUMBER available when you call.
Page 3
ENGLISH
1
DEFINITIONS: SAFETY ALERT SYMBOLS AND WORDS
This instruction manual uses the following safety alert symbols and words to alert you to hazardous situations and your risk
of personal injury or propertydamage.
DANGER: Indicates an imminently hazardous situation which, if not avoided, will result in death
or seriousinjury.
WARNING: Indicates a potentially hazardous situation which, if not avoided, could result in
death or seriousinjury.
CAUTION: Indicates a potentially hazardous situation which, if not avoided, may result in minor
or moderateinjury.
(Used without word) Indicates a safety relatedmessage.
NOTICE: Indicates a practice not related to personal injury which, if not avoided, may result in
propertydamage.
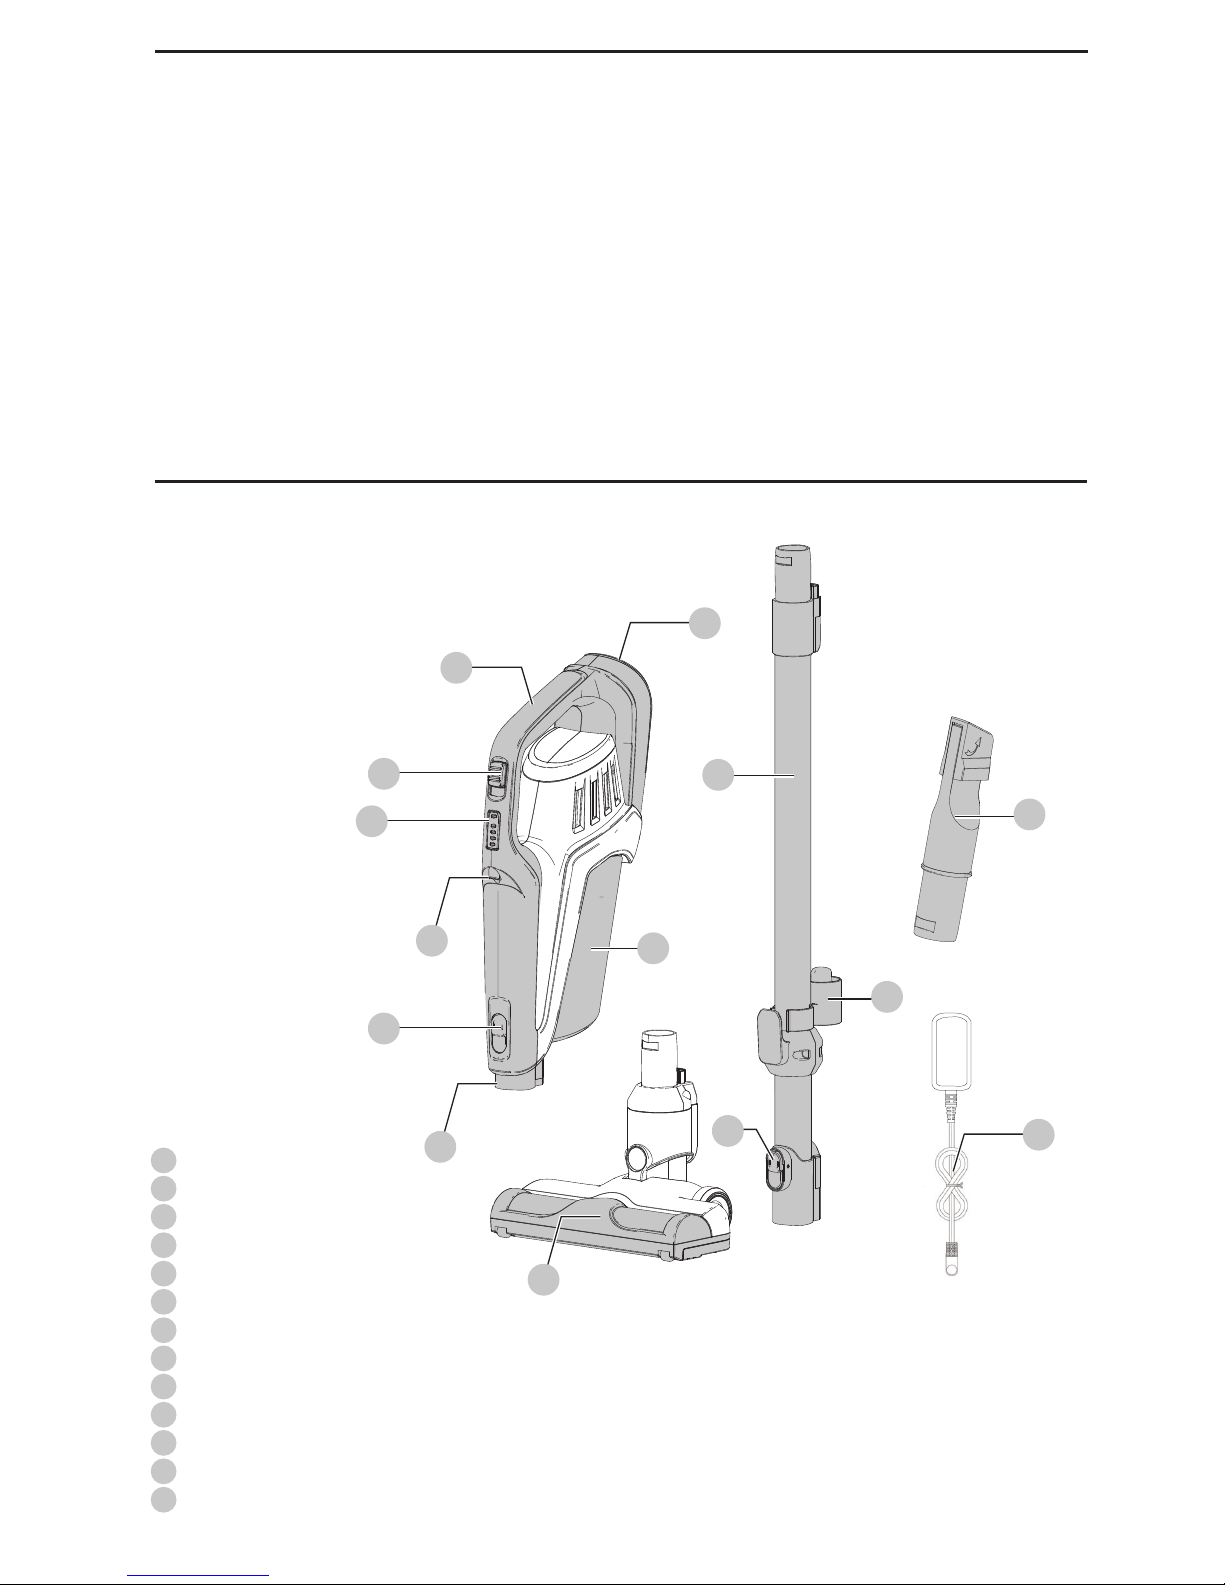
Fig. A
1
On/Off switch
2
Main handle
3
State of charge indicator
4
Charging port
5
Vacuum inlet
6
Extension tube
7
Accessory release latch
8
Dust canister
9
Floor brush
10
3 in 1 Accesssory tool
11
Jack plug charger
12
LED worklight
13
Accessory clip
1
6
8
10
9
12
5
7
2
7
11
4
3
13
Page 4

ENGLISH
2
IMPORTANT SAFETY
INSTRUCTIONS
When using an electrical appliances, basic precautions should
always be followed, including the following:
READ ALL
INSTRUCTIONS BEFORE
USING THIS APPLIANCE.
WARNING: Read all safety warnings
and all instructions. Failure to follow the warnings
and instructions listed below may result in electric
shock, fire and/or seriousinjury.
WARNING: Some household dust
contains chemicals known to the State of California to
cause cancer, birth defects or other reproductive harm
such as asbestos and lead in lead basedpaint.
WARNING: Do not attempt to modify or
repair theappliance.
WARNING: Do not charge the battery
at ambient temperatures below 39°F (4°C) or above
104°F (40°C). Follow all charging instructions and do
not charge the appliance outside of the temperature
range specified in the instructions. Charging
improperly or at temperatures outside of the specified
range may damage the battery and increase risk
offire.
WARNING: To reduce the risk of fire,
electrical shock or injury:
• Shock Hazard. To protect against risk of electrical shock,
do not put charging base in water or otherliquid.
• Do not allow to be used as a toy. Close attention is
necessary when used by or nearchildren.
• Use only as described in this manual. Use only
manufacturer’s recommendedattachments.
• Do not use with damaged cord or plug. If appliance is
not working as it should, has been dropped, damaged,
left outdoors, or dropped into water, return it to a
servicecenter.
• Do not pull or carry by cord, use cord as a handle, close a
door on cord, or pull cord around sharp edges or corners.
Do not run appliance over cord. Keep cord away from
heatedsurfaces.
• Do not unplug by pulling on cord. To unplug, grasp the
plug, not thecord.
• Do not handle charger, including charger plug, and
charger terminals with wethands.
• Do not put any object into openings. Do not use with any
opening blocked; keep free of dust, lint, hair, and anything
that may reduce airflow.
• Keep hair, loose clothing, fingers, and all parts of body
away from openings and movingparts.
• Use extra care when cleaning onstairs.
• Do not use to pick up flammable or combustible liquids,
such as gasoline, or use in areas where they may
bepresent.
• Do not pick up anything that is burning or smoking, such
as cigarettes, matches, or hotashes.
• Do not use without dust bag and/or filters inplace.
• Do not charge the unitoutdoors.
• Use only the charger supplied by the manufacturer
torecharge.
• Do not incinerate the appliance even if it is severely
damaged. The batteries can explode in afire.
• This appliance is intended for household use only and not
for commercial or industrialuse.
• Do not allow the cord to hang over the edge of a table or
counter or touch hot surfaces. The unit should be placed
or mounted away from sinks and hotsurfaces.
• Plug the charger directly into an electricaloutlet.
• Use the charger only in a standard electrical outlet
(120V/60Hz).
• Unplug the charger from outlet before any routine
cleaning ormaintenance.
• Do not look into the air vents when the unit is switched
on, as sometimes there is a possibility of small debris being
discharged from the air vents, especially after cleaning
/ replacement of the filters as debris inside the unit can
bedisturbed.
• Leaks from battery cells can occur under extreme
conditions. If the liquid, which is a 20-35% solution of
potassium hydroxide, gets on the skin (1) wash quickly
with soap and water or (2) neutralize with a mild acid
such as lemon juice or vinegar. If the liquid gets into
the eyes, flush them immediately with clean water for a
minimum of 10 minutes. Seek medicalattention.
ADDITIONAL SAFETY WARNINGS
a ) Prevent unintentional starting. Ensure the
switch is in the off-position before picking up or
carrying the appliance. Carrying the appliance with
your finger on the switch or energizing appliance that
have the switch on invitesaccidents.
b ) Recharge only with the charger specified by the
manufacturer. A charger that is suitable for one type
of battery pack may create a risk of fire when used
with another batterypack.
c ) Do not use a battery pack or appliance that
is damaged or modified. Damaged or modified
WARNING! Read all safety warnings
and all instructions. Failure to follow the warnings
and instructions may result in electric shock, fire and/
or seriousinjury.
WARNING: To reduce the risk of injury,
read the instructionmanual.
Page 5
ENGLISH
3
batteries may exhibit unpredictable behavior resulting
in fire, explosion or risk ofinjury.
d ) Do not expose a battery pack or appliance
to fire or excessive temperature. Exposure to
fire or temperature above 266°F (130°C) may
causeexplosion.
e ) Have servicing performed by a qualified repair
person using only identical replacement parts.
This will ensure that the safety of the product
ismaintained.
f ) Only for use with S010QU2300040 and
S014CU2720050chargers.
SAVE THESE
INSTRUCTIONS
SYMBOLS
The label on your tool may include the following symbols. The
symbols and their definitions are as follows:
V .............................. volts
A .................................. amperes
Hz ................................hertz
W .................................watts
min .............................minutes
or AC ................ alternating current
or DC .......... direct current
n
o ............................... no load speed
.............................. Class I Construction
(grounded)
...............................earthing terminal
.............................safety alert symbol
.............................. Class II Construction
(double insulated)
.../min or rpm. revolutions or reciprocation
per minute
Wh ..............................Watt Hours
ASSEMBLY
WARNING: Do not attempt to modify or
repair theappliance.
Intended use
Your BLACK+DECKER lithium ion cordless 3 in 1 stick
vacuum cleaner has been designed for light, dry vacuum
cleaning purposes. This appliance is intended for household
useonly.
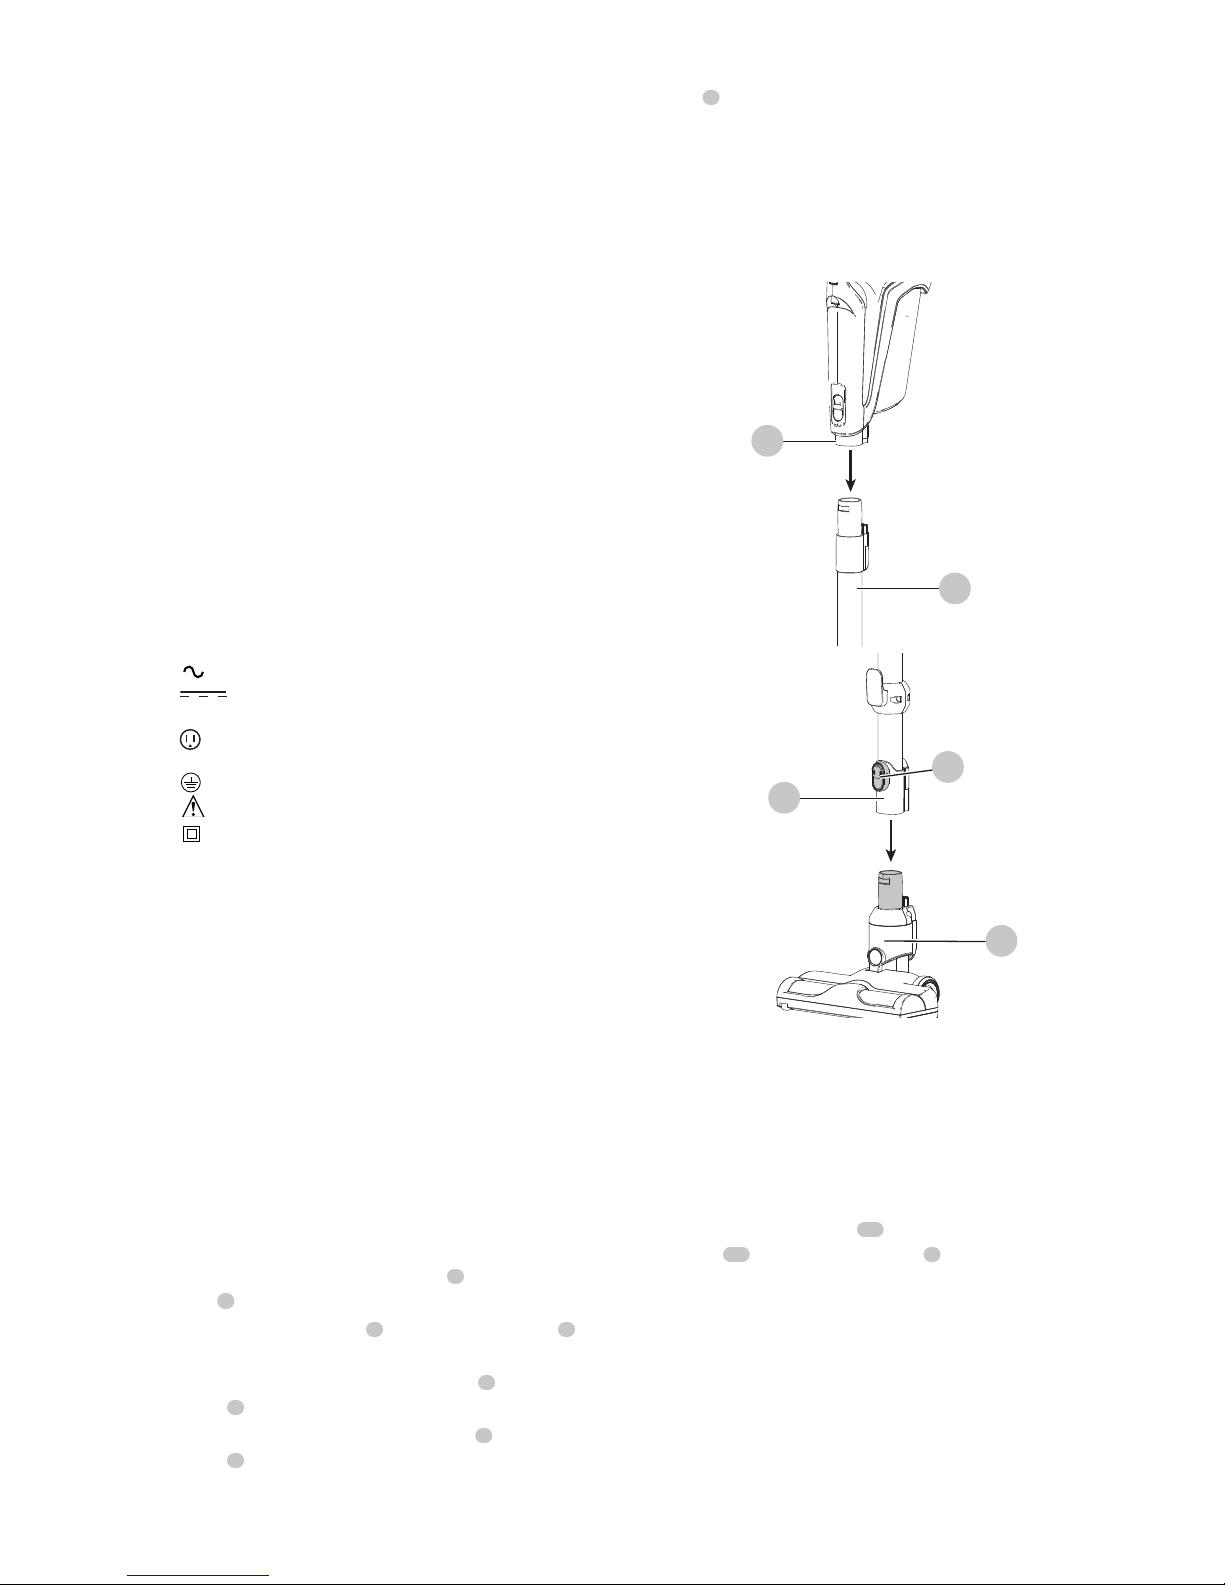
Assembly (Fig. B, C)
1. Align the top of the extension tube
6
with the vacuum
inlet
5
as shown in Fig.B.
2. Push the extension tube
6
onto the vacuum inlet
5
so
it locks into position.
3. Align the bottom of the extension tube
6
with the floor
brush
9
as shown in Fig.C.
4. Push the bottom of the extension tube
6
onto the floor
brush
9
so it locks into position.
5. To remove an accessory, press the accessory release
latch
7
located on the vacuum or extension tube and
gently pull the connected accessory off.
WARNING: When not in use position the
unit with the rear of the vacuum facing a wall so that
any inadvertent fall of the unit would contact a wall
and not people orpets.
Fig. B
5
6
Fig. C
6
9
7
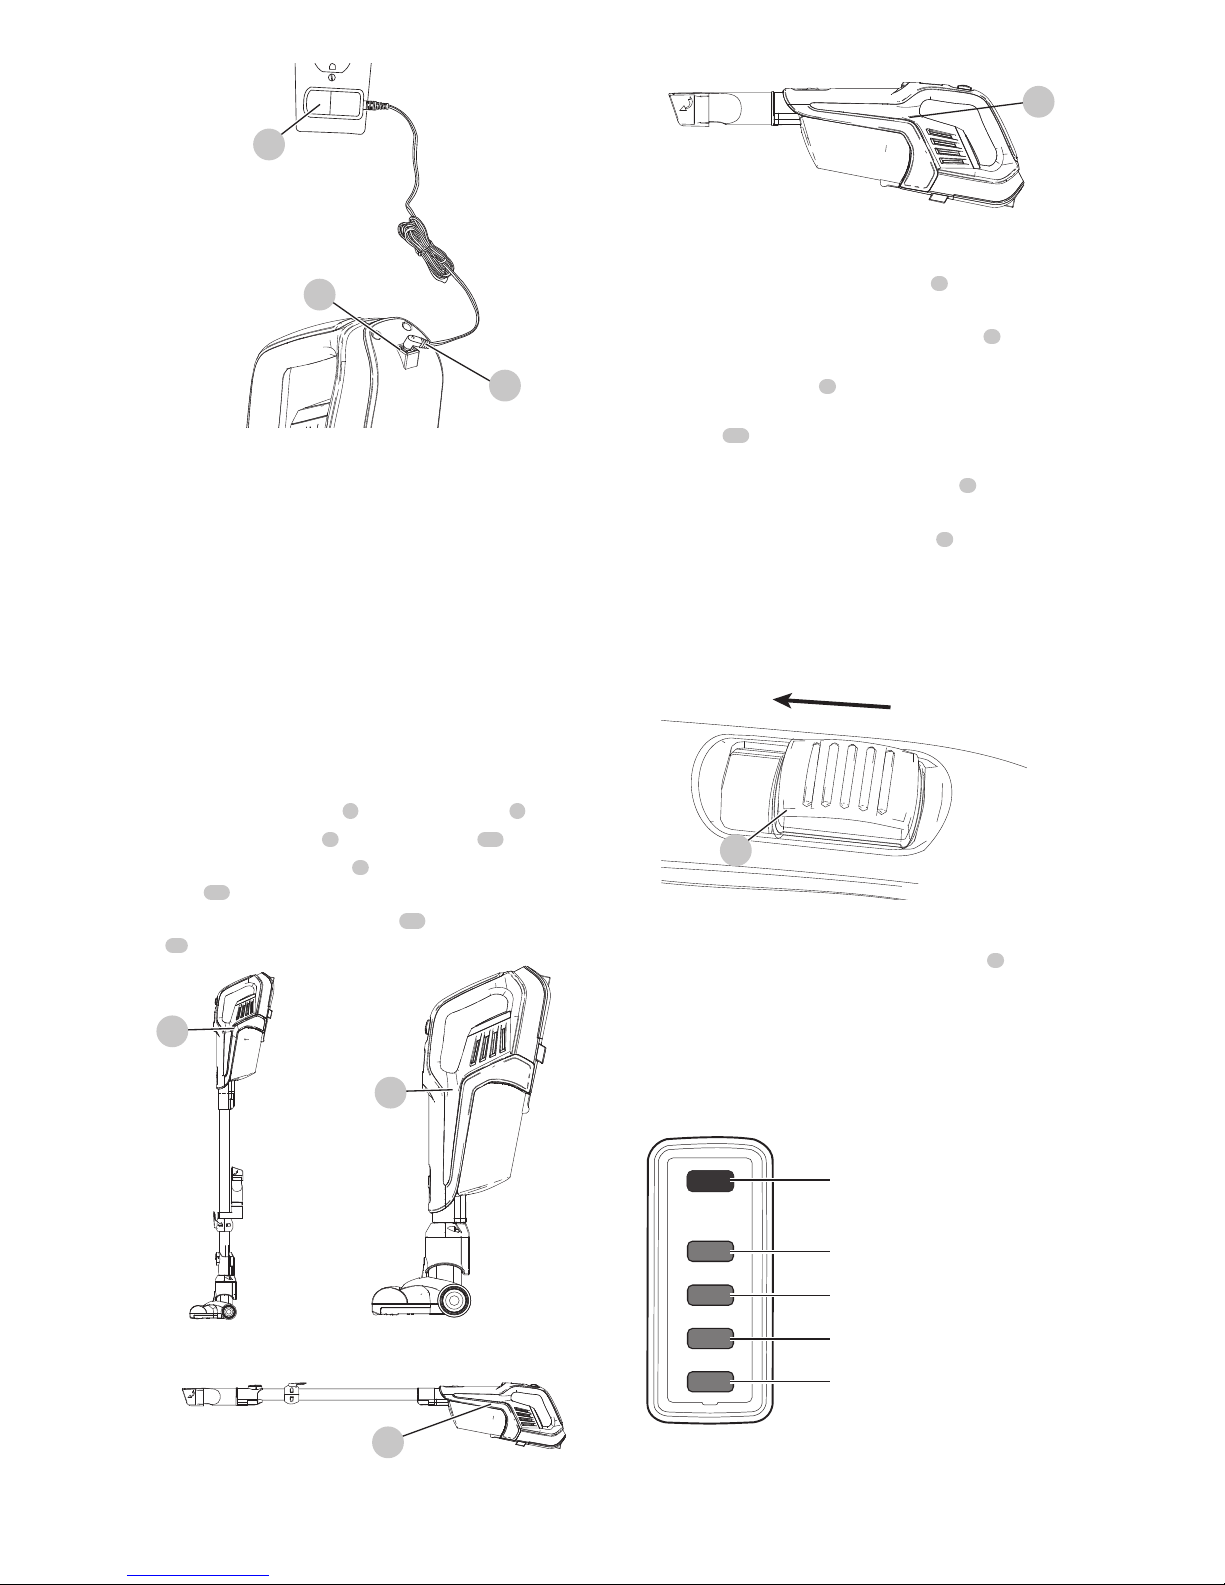
Charging the battery (Fig. D)
WARNING: For use only with the
suppliedcharger.
From new, the rechargeable cells of the product need a
minimum charge time of 5 hours to ensure fullpower.
• Fig. D - Plug the jack plug
14
of the jack plug
charger
11
into the charging port
4
of the vacuum.
Plug the charger into any standard 120 Volt 60 Hz
electricaloutlet.
Page 6
ENGLISH
4
Fig. D
14
11
4
• While charging, the charger may get warm, this
is perfectly normal and safe. It is safe to leave the
appliance connected to the charger indefinitely. The
charger automatically reduces power consumption
when charging iscomplete.
WARNING:
Do not charge the battery
at ambient temperatures below 39°F (4°C) or above
104°F (40°C). Follow all charging instructions and do
not charge the appliance outside of the temperature
range specified in the instructions.
USE
This vacuum cleaner can be used in one of four ways.
• With the extension tube 6 and the floor brush 9 . (Fig. E)
• With the floor brush 9 and the vacuum 15 . (Fig. F)
• With the extension tube 6 and the 2 in 1 Accesssory
tool 10 . (Fig. G)
• With the 2 in 1 Accesssory tool 10 and the vacuum
14 . (Fig. H)
Fig. E Fig. F
15
15
15
Fig. G
15
Fig. H
Switching ON and OFF (Fig. I)
• To switch ON, slide the On/Off switch
1
forward to the
" I " position.
• For increased power, slide the On/Off switch
1
forward
to the " II " position.
NOTE: The floor brush
9
will power on when it is
attached to the vacuum or extension tube. The LED
worklight
12
will illuminate whenever the unit is
switched ON.
NOTE: The state of charge indicator LEDs
3
will
illuminate while the vacuum is ON.
• To switch OFF, slide the On/Off switch 1 to the " O "
position.
• Return the product to the charger immediately after use
so that it will be ready and fully charged for the next
use. Ensure that the product is fully engaged with the
chargerplug.
Fig. I
1
State of charge indicator
This appliance include a state of charge indicator
3
which
consists of four green and one red LED lights that indicate
the level of charge remaining in the battery. This feature is
only activated when the vacuum is poweredon.
The state of charge indicator is an indication of approximate
levels of charge remaining in the battery pack according to
the followingindicators:
< 10% charged
11–29% charged
30–49% charged
50–74% charged
75–100% charged
The LED battery indicator displays the remaining charge and
warns you when the battery is low. The red LED will flash
continuously when the unit is nearly out of charge. If the red
LED flashes continuously when the switch is turned to the
Page 7
ENGLISH
5
ON position, plug the jack plug
14
of the jack plug charger
11
into the charging port
4
of the vacuum. Plug the
charger into any standard 120 Volt 60 Hz electricaloutlet.
NOTE: The state of charge indicator is only an indication
of the charge left on the battery. It does not indicate tool
functionality and is subject to variation based on product
components, temperature and end-userapplication.
Using the 3 in 1 Accessory tool (Fig. J)
• The 3-in-1 accessory tool
10
has twoconfigurations.
- Brushmode.
- Small crevicemode.
• The 3-in-1 accessory tool
10
can be fitted either directly
to the extension tube
6
or to the vacuum inlet
5
as
shown in Fig. J.
• Align the top of the 3-in-1 accessory tool
10
with the
vacuum inlet
5
or extension tube
6
and push into
place so it locks into position as shown in Fig.J.
• The flat nozzle can be used to clean the wall corner,
stairs, furniture crevices, and household appliance
cooling fins.
• The combination of a flat nozzle with a brush can be
used to clean the furniture, curtains, lamps and lanterns.
Fig. J
6
10
5
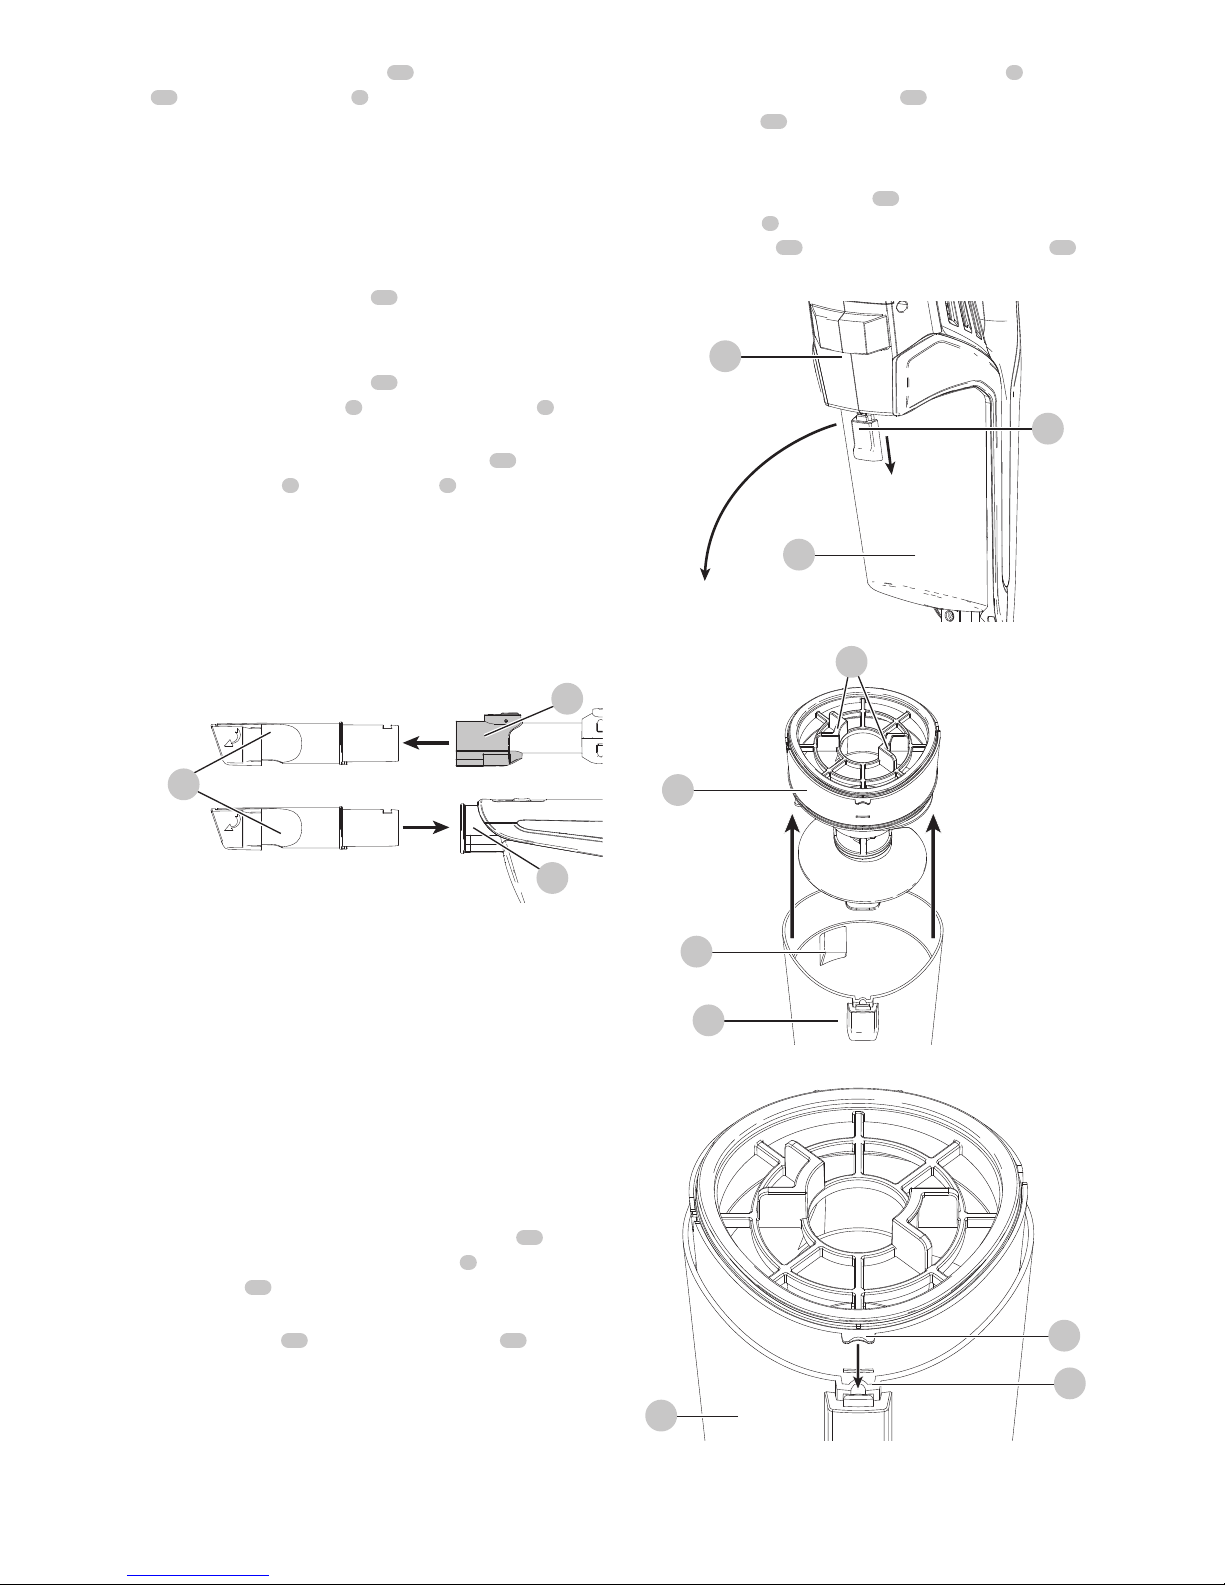
Cleaning and emptying the vacuum
WARNING: Projectile/Respiratory Hazard:
Never use the vac without itsfilter.
NOTE: The filter is re-usable, do not confuse it with a
disposable dust bag, and do not throw it away when the
product is emptied. We recommend that you replace the
filter every 6–9 months depending on frequency ofuse.
There are two methods of cleaning the canister, a quick
empty method and a thorough clean method.
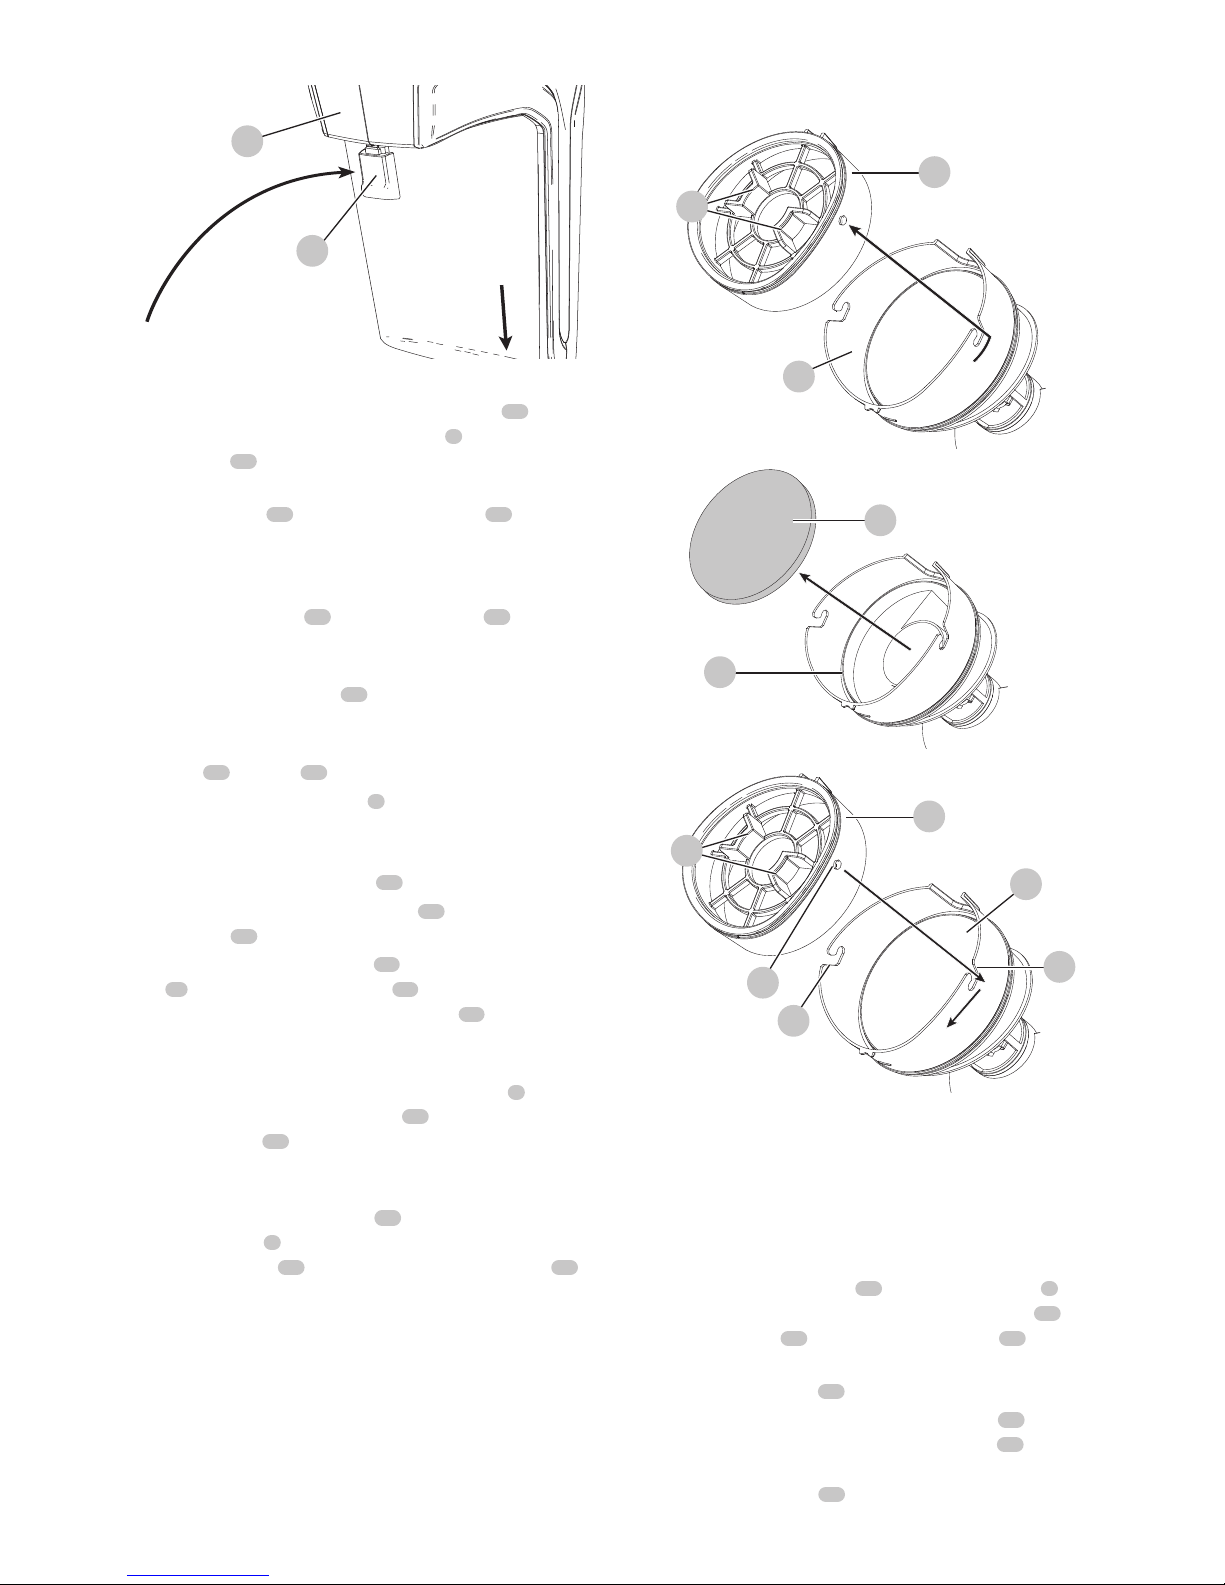
To empty the dust canister (Fig. K, L, M, O)
• Pull back on the dust canister release button
16
to
release and remove the dust canister
8
from the
vacuum
15
as shown in Fig.K.
• Use your index finger and thumb to pinch the filter
housing tabs
17
and lift the filter housing
18
from the
dust canister as shown in Fig. L.
NOTE: The filter housing fits snuggly in the dust canister
and may be difficult to remove at first.
• Place the dust canister over a trash can and empty the
dust canister.
• Install the filter housing into the dust canister
8
ensuring the dust canister slots
19
align with the filter
housing tabs
20
as shown in Fig.M.
• Install the dust canister onto the vacuum, until it
“clicks”
firmly intoposition.
NOTE:
Ensure the dust port
21
is placed towards the
main handle
2
of the vacuum and the dust canister
release button
16
is facing away from the vacuum
15
as shown in Fig O.
Fig. K
16
8
15
Fig. L
17
8
18
21
Fig. M
20
8
19
Page 8
ENGLISH
6
Fig. O
15
16
Cleaning the filters (Fig. K, L, O, P - R)
• Pull back on the dust canister release button
16
to
release and remove the dust canister
8
from the
vacuum
15
as shown in Fig.K.
• Use your index finger and thumb to pinch the filter
housing tabs
17
and lift the filter housing
18
from the
dust canister as shown in Fig. L.
• Once the filter housing is removed from the dust
canister, use your index finger and thumb to pinch the
filter housing tabs
17
and rotate the filter
22
counterclockwise and remove it from filter housing as shown
in Fig. P.
• Remove the foam filter
23
from the filter housing as
shown in Fig. Q.
• Shake or lightly brush any loose dust off of the foam
filter
23
and filter
22
.
• Rinse out the dust canister
8
with warm soapywater.
• Wash the filters with warm soapy water.
• Ensure the filters are completely dry before refitting the
filters into thefilter housing
18
.
• Refit the clean and dry foam filter
23
into the filter
housing
18
.
• Refit the clean and dry filter
22
into the filter housing
18
by aligning the filter locks
24
, located on the sides
of the filter, with the filter housing slots
25
, located on
the sides of the filter housing, and turn the filter clockwise
until it locks firmly intoposition as shown in Fig. R.
• Install the filter housing into the dust canister
8
ensuring the dust canister slots
19
align with the filter
housing tabs
20
as shown in Fig.M.
• Install the dust canister onto the vacuum, until it
“clicks”
firmly intoposition.
NOTE:
Ensure the dust port
21
is placed towards the
main handle
2
of the vacuum and the dust canister
release button
15
is facing away from the vacuum
16
as shown in Fig O.
IMPORTANT: Maximum dust collection will only be
obtained with clean filters and an empty dust canister.
If dust begins to fall back out of the product after it is
switched off, this indicates that the dust canister is full and
requiresemptying.
• Wash the filters regularly using warm, soapy water and
ensure that it is completely dry before using again. The
cleaner the filter is, the better the product will perform.
• It is very important that the filters are completely dry
and correctly in position beforeuse.
Fig. P
17
22
18
Fig. Q
18
23
Fig. R
24
17
25
22
25
18
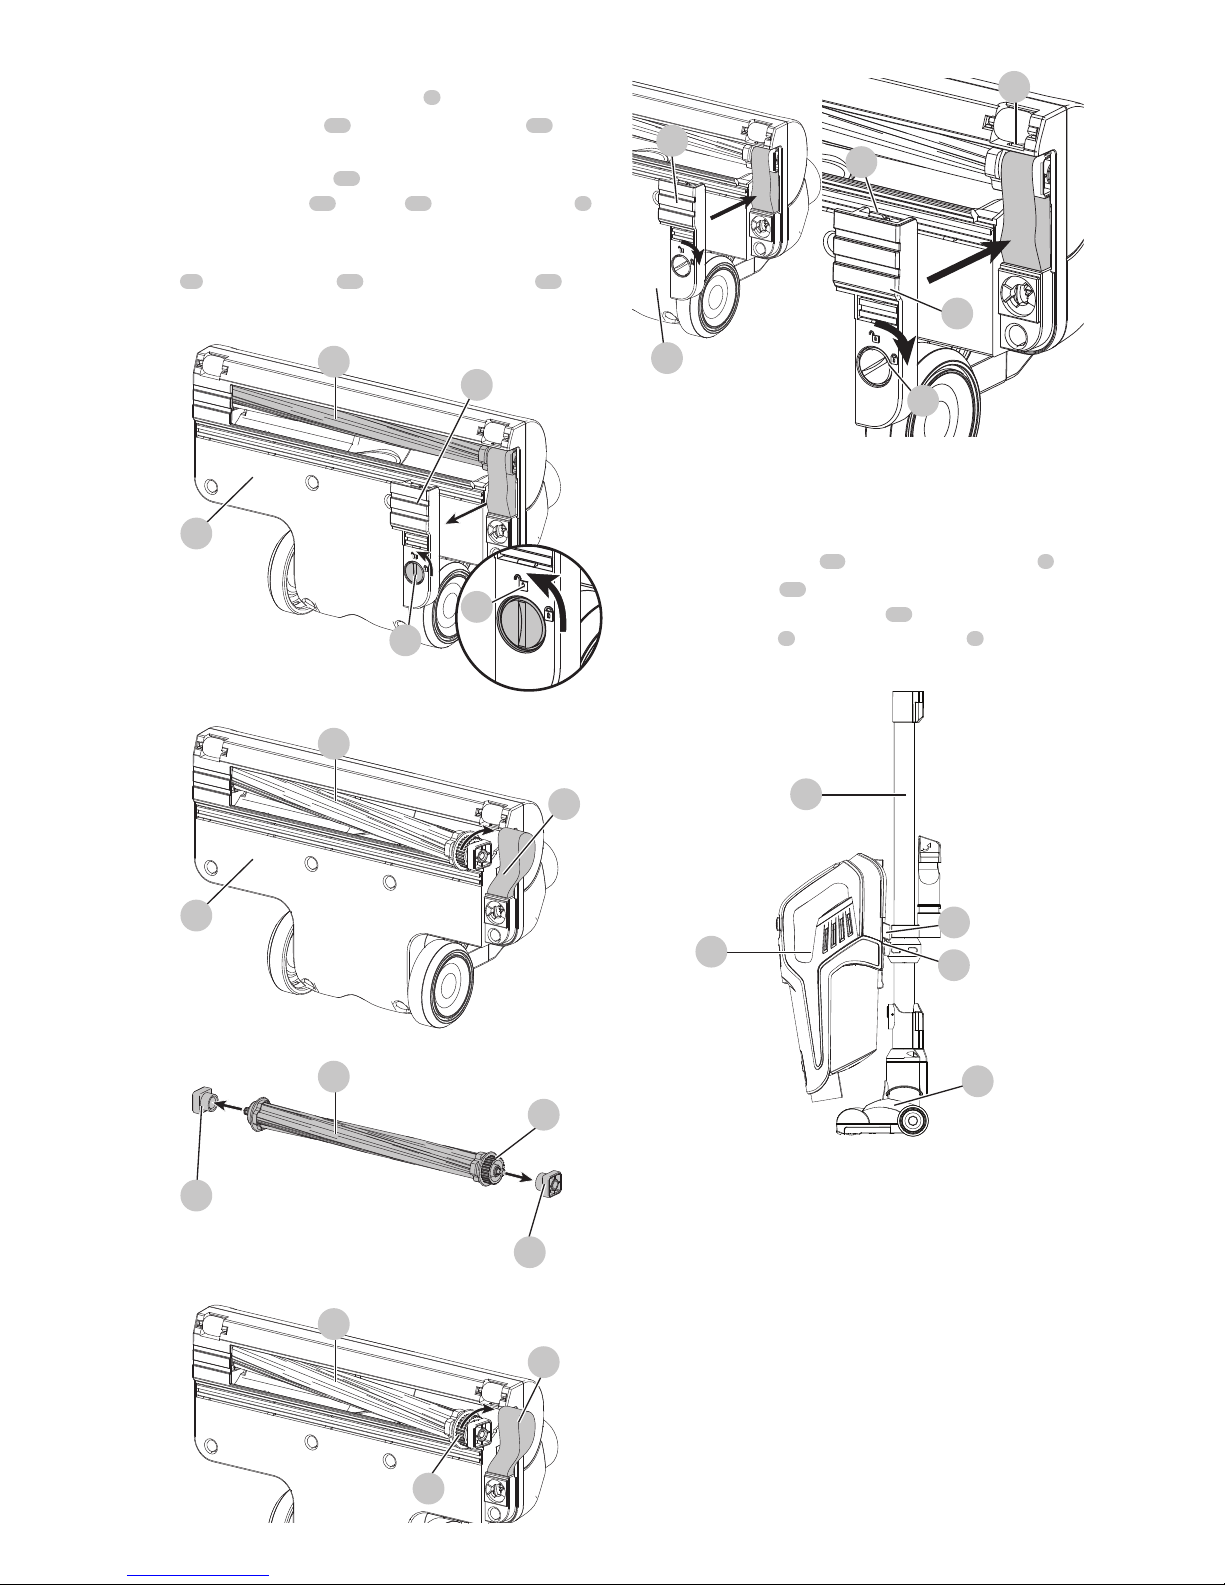
Removing and cleaning the rotary brushes
(Fig. S, T, U, V, W)
CAUTION: To reduce the risk of injury from
moving parts, disconnect the floor brush from the
vacuum before cleaning orservicing.
• To remove the rotary brush
26
from the floor brush
9
use a coin or straight screwdriver to rotate the lock
27
on the lock plate
28
to the unlocked position
29
as
shown in Fig. S.
• Remove the lock plate
28
.
• Lift the rotary brush up and slide the drive belt
31
off
to the side as shown in Fig. T. The rotary brush
26
can
now be removed.
NOTE: The end pieces
32
are also removable allowing
you to clear the brushes of any hair or other debris that
may have accumulated as shown in Fig.U.
Page 9
ENGLISH
7
• Once the rotary brush has been cleaned, reinstall the
rotary brush into the floor brush
9
.
• Slide the drive belt
31
onto the toothed gear
33
on
the rotary brush as shown in Fig. V.
• Install the lock plate
28
onto the floor brush. Insert
the retaining bar
34
into slot
35
on the floor brush
9
shown in Fig. W.
• Use a coin or straight screwdriver to rotate the lock
27
on the lock plate
28
to the locked position
36
as
shown in Fig. W.
Fig. S
28
9
27
26
29
Fig. T
31
9
26
Fig. U
32
32
26
33
Fig. V
33
26
31
Fig. W
34
28
36
35
28
9
Storing the vacuum
This vacuum cleaner can be stored compactly and stand on
it's own.
• Remove the vacuum 15 from the extension tube 6 .
• Place the catch
37
located on the back of vacuum
cleaner into the storage hook
38
,located on the
extension tube
6
, while the floor brush
9
is in the
locked position as shown in Fig. X.
Fig. X
6
38
37
9
15
Replacing the filters
The filters should be replaced every 6 to 9 months and
whenever worn or damaged. Replacement filters are
available from your BLACK+DECKERdealer.
Visit www.blackanddecker.com to locatedealers.
• Remove the old filters as describedin Cleaning
theFilters.
• Fit the new filters as describedin Cleaning the Filters.
(cat. no: SVFK10)
MAINTENANCE
Use only mild soap and damp cloth to clean the vac. Never
let any liquid get inside the vac; never immerse any part of
the vac into aliquid.
Page 10

ENGLISH
8
WARNING: Make sure the vacuum is
completely dry before usingit.
IMPORTANT: To assure product SAFETY and RELIABILITY,
repairs, maintenance and adjustment (other than those
listed in this manual) should be performed by authorized
service centers or other qualified service organizations,
always using identical replacementparts.
TROUBLESHOOTING
If the product does not work, check the following:
• The charger was correctly plugged in for recharge. (It
feels slightly warm to the touch.)
• The charger cord is not damaged and is correctly attached.
• The charger is plugged into a working electricaloutlet.
• The switch is in the “OFF” position whencharging.
If vacuum performance is poor, check the following:
• Clean the filters. (See "Cleaning and emptying the
vacuum" section.)
• Empty the dust canister. (See "Cleaning and emptying
the vacuum" section.)
• Clean the rotary brushes. (See "Removing and cleaning
the rotary brushes" section.)
• The red LED flashes continuously, plug in the charger
and perform a recharge cycle
For assistance with your product, visit our website
www.blackanddecker.com for the location of the service
center nearest you or call the BLACK+DECKER help line at
1–800–544–6986.
ACCESSORIES
Recommended accessories for use with your appliance are
available from your local dealer or authorized service center.
If you need assistance regarding accessories, please call:
1-800-544-6986.
WARNING: The use of any accessory
not recommended for use with this appliance could
behazardous.
The RBRC® Seal
The RBRC® (Rechargeable Battery
Recycling Corporation) Seal on the nickel
cadmium, nickel metal hydride or lithiumion batteries (or battery packs) indicates
that the costs to recycle these batteries
(or battery packs) at the end of their useful life have already
been paid by BLACK+DECKER. In some areas, it is illegal
to place spent nickel cadmium, nickel metal hydride or
lithium-ion batteries in the trash or municipal solid waste
stream and the Call2Recycle® program provides an
environmentally consciousalternative.
Call 2 Recycle, Inc., in cooperation with BLACK+DECKER
and other battery users, has established the program in
the United States and Canada to facilitate the collection
of spent nickel cadmium, nickel metal hydride or
lithium-ion batteries. Help protect our environment and
conserve natural resources by returning the spent nickel
cadmium, nickel metal hydride or lithium-ion batteries to
an authorized BLACK+DECKER service center or to your
local retailer for recycling. You may also contact your local
recycling center for information on where to drop off the
spent battery. RBRC® is a registered trademark of Call 2
Recycle,Inc.
SERVICE INFORMATION
All
BLACK+DECKER
Service Centers are staffed with trained
personnel to provide customers with efficient and reliable
power tool service. Whether you need technical advice,
repair, or genuine factory replacement parts, contact the
BLACK+DECKER
location nearest you. To find your local
service location, call: 1-800-544-6986 or visit
www.blackanddecker.com
TWO-YEAR LIMITED WARRANTY
Black & Decker (U.S.) Inc. warranties this product to be free from
defects in material or workmanship for a period of two (2) years
following the date of purchase, provided that the product is used
in a home environment. This limited warranty does not cover
failures due to abuse, accidental damage or when repairs have
been made or attempted by anyone other than BLACK+DECKER
and its Authorized Service Centers. A defective product meeting
the warranty conditions set forth herein will be replaced or
repaired at no charge in either of two ways: The first, which
will result in exchanges only, is to return the product to the
retailer from whom it was purchased (provided that the store is
a participating retailer).Returns should be made within the time
period of the retailer’s policy for exchanges. Proof of purchase
may be required. Please check with the retailer for its specific
return policy regarding time limits for returns or exchanges.
The second option is to take or send the product (prepaid) to a
BLACK+DECKER owned or authorized Service Center for repair
or replacement at BLACK+DECKER’s option. Proof of purchase
may be required. BLACK+DECKER owned and authorized service
centers are listed online at www.blackanddecker.com. This
warranty does not apply to accessories. This warranty gives you
specific legal rights and you may have other rights which vary
from state to state. Should you have any questions, contact the
manager of your nearest BLACK+DECKER Service Center. This
product is not intended for commercial use, and accordingly,
such commercial use of this product will void this warranty. All
other guarantees, express or implied, are herebydisclaimed.
LATIN AMERICA:
This warranty does not apply to products
sold in Latin America. For products sold in Latin America,
check country specific warranty information contained in
the packaging, call the local company or see the website for
suchinformation.
Imported by Black & Decker (U.S.) Inc.,
701 E. Joppa Rd.
Towson, MD 21286
BlackandDecker.com
1-800-544-6986
Page 11

FRANÇAIS
9
Définitions: symboles et termes d'alarmes sécurité
Ces guides d'utilisation utilisent les symboles et termes d'alarmes sécurité suivants pour vous prévenir de situations
dangereuses et de risques de dommages corporels oumatériels.
DANGER : indique une situation dangereuse imminente qui, si elle n’est pas évitée, entraînera la mort ou
des blessuresgraves.
AVERTISSEMENT : indique une situation potentiellement dangereuse qui, si elle n’est pas évitée,
pourrait entraîner la mort ou des blessuresgraves.
ATTENTION : indique une situation potentiellement dangereuse qui, si elle n’est pas évitée, pourrait
entraîner des blessures légères oumodérées.
(Si utilisé sans aucun terme) Indique un message propre à lasécurité.
AVIS : indique une pratique ne posant aucun risque de dommages corporels mais qui par contre, si rien n’est
fait pour l’éviter, pourrait poser des risques de dommages matériels.
Fig. A
1
Bouton Marche/Arrêt
2
Poignée principale
3
Voyants DEL de l’état de charge
4
Port de chargement
5
L’entrée de l’aspirateur
6
Tube d’extension
7
Verrou de déblocage
8
Bac à poussière
9
Brosse pour plancher
10
L’outil accessoire 3 en 1
11
Connecteur mâle
12
Lampe de travail DEL
13
Accessory crochet
1
6
8
10
9
12
5
7
2
7
11
4
3
13
Page 12

FRANÇAIS
10
AVERTISSEMENT! lire tous
les avertissements de sécurité et toutes les
directives. Le non-respect des avertissements et des
directives pourrait se solder par un choc électrique, un
incendie et/ou une blessuregrave.
AVERTISSEMENT : afin de réduire le risque de
blessures, lire le mode d’emploi del’outil.
CONSIGNES
IMPORTANTES DE
SÉCURITÉ
Lorsque vous utilisez un appareil électrique, des précautions
élémentaires devraient toujours être prises, incluant les suivantes:
LISEZ TOUTES LES
INSTRUCTIONS AVANT
D’UTILISER CET
APPAREIL.
AVERTISSEMENT : Lisez tous
les avertissements de sécurité et toutes les
instructions. Ne pas suivre les avertissements et
les instructions ci-dessous peut entraîner un choc
électrique, un incendie et/ou des blessures graves.
AVERTISSEMENT : Certaines
poussières domestiques comme l’amiante ou le
plomb dans la peinture à base de plomb contiennent
des produits chimiques reconnus dans l’État de la
Californie pour causer le cancer et des anomalies
congénitales ou autres effets nuisibles sur la
reproduction.
AVERTISSEMENT : Ne pas tenter
de modifier ou de réparer l’appareil.
AVERTISSEMENT : Ne pas
recharger le bloc-piles à des températures sous 4°C
(39 °F) ou au-dessus de 40°C (104°F). Suivez les
instructions de recharge et ne pas recharger l’appareil
hors de la plage de températures indiquée dans
les instructions. Recharger de façon inappropriée
ou hors de la plage de températures indiquée peut
endommager le bloc-piles et augmenter le risque
d’incendie.
AVERTISSEMENT : Afin de
réduire le risque d’incendie, de choc électrique ou de
blessure:
• Danger de choc électrique. Afin de vous protéger contre
le risque de choc électrique, ne pas mettre le poste de
recharge dans l’eau ou autre liquide.
• Ne pas le laisser être utilisé comme jouet. Une attention
particulière est nécessaire lorsque l’appareil est utilisé par
des enfants ou près des enfants.
• Utilisez seulement comme décrit dans le présent manuel.
Utiliser seulement les accessoires recommandés du
fabricant.
• Ne pas utiliser avec un cordon ou une fiche endommagée.
Si l’outil ne fonctionne pas comme il le devrait, a été
échappé, endommagé, laissé à l’extérieur ou échappé
dans l’eau, retournez-le dans un centre de services.
• Ne pas tirer ou transporter par le cordon, utiliser celui-ci
comme une poignée, le passer sous une porte ou autour
d’arêtes ou coins acérés. Ne pas passer la machine sur
le cordon. Gardez le cordon hors de portée de surfaces
chaudes.
• Ne pas débrancher en tirant sur le cordon. Pour
débrancher, saisissez la fiche, pas le cordon.
• Ne pas toucher au chargeur ou sa fiche et ses contacts si
vos mains sont mouillées.
• Ne pas mettre tout objet dans les ouvertures. Ne pas
utiliser si une ouverture est bloquée; tenez à l’écart de la
poussière, de la charpie ainsi que des cheveux et de tout ce
qui peut réduire la circulation de l’air.
• Gardez vos cheveux, vêtements amples, doigts et toutes les
parties de votre corps loin des ouvertures et des pièces en
mouvement de l’outil.
• Redoublez de prudence durant le nettoyage d’escaliers.
• Ne pas utiliser pour ramasser des liquides combustibles
ou inflammables, comme l’essence ou utiliser dans des
endroits où ils sont présents.
• Ne pas ramasser tout ce qui brûle ou fume comme des
cigarettes, des allumettes ou des cendres chaudes.
• Ne pas utiliser sans le sac à poussière et/ou les filtres en
place.
• Ne pas charger l’appareil à l’extérieur.
• Utilisez seulement le chargeur fourni par le fabricant pour
recharger.
• Ne pas incinérer l’appareil même s’il est sévèrement
endommagé. Les piles peuvent exploser et causer un
incendie.
• Cet appareil n’est prévu que pour usage domestique et non
pour utilisation commerciale ou industrielle.
• Ne pas laisser le cordon pendre du bord d’une table ou
comptoir ou entrer en contact avec une surface chaude.
L’appareil ne devrait pas être placé ou monté près d’un
évier ou d’une source de chaleur.
• Branchez le chargeur directement dans une prise de
courant.
• Branchez le chargeur seulement dans une prise de courant
domestique standard (120V - 60Hz).
• Débranchez le chargeur de sa prise avant tout entretien ou
nettoyage de routine.
• Ne pas regarder dans les évents lorsque l’appareil est
en marche parce qu’il arrive parfois que de petits débris
puissent être éjectés des évents, particulièrement après le
nettoyage/remplacement des filtres puisque les débris à
l’intérieur de l’appareil peuvent être dérangés.
• Sous conditions extrêmes, une fuite des cellules du blocpiles peut se produire. Si le liquide (qui est une solution
de 20 à 35% d’hydroxyde de potassium) se retrouve sur
Page 13

FRANÇAIS
11
l’épiderme, (1) lavez rapidement à l’eau et au savon et (2)
neutralisez avec un produit légèrement acide comme du
jus de citron ou du vinaigre. Si du liquide entre dans les
yeux, rincez immédiatement avec de l’eau propre pour une
durée minimum de 10minutes. Consultez un médecin.
AVERTISSEMENTS DE SÉCURITÉ
SUPPLÉMENTAIRES
a ) Prévention le démarrage intempestif. S'assurer
que le commutateur est en position Arrêt avant
de manipuler l'appareil. Transporter l’appareil avec
votre doigt sur l’interrupteur ou mettre sous tension
un appareil dont le commutateur de marche est fermé
favorise les accidents.
b ) Rechargez seulement avec le chargeur indiqué
par le fabricant. Un chargeur est approprié pour un
type de bloc-piles et peut créer un risque d’incendie s’il
est utilisé avec un bloc-piles d’un autre type.
c ) Ne pas utiliser un bloc-piles ou un appareil
qui est endommagé ou qui a été modifié. Les
piles endommagées ou modifiées peuvent avoir un
comportement imprévisible entraînant un incendie,
une explosion ou un risque de blessure.
d ) Ne pas exposer le bloc-piles ou l’appareil au feu
ou à une température excessive. L’exposition au feu
ou à une température au-dessus de 130°C (266°F)
pourrait entraîner une explosion.
e ) Pour les réparations, se référer à une personne
qualifiée utilisant uniquement des pièces de
rechange d’origine identiques. Ceci assurera le
maintien de la sécurité du produit.
f ) Utilisez seulement avec des chargeurs
S010QU2300040 et S014CU2720050.
CONSERVEZ CES
INSTRUCTIONS
SYMBOLES
L’étiquette apposée sur votre outil pourrait comprendre les
symboles suivants. Les symboles et leurs définitions sont
indiqués ci-après :
V..................................volts
A .................................ampères
Hz ...............................hertz
W ................................watts
min ............................minutes
ou AC ...............courant alternatif
ou DC ..........courant continu
n
o ...............................sous vide
.............................Construction de classe I
............................... borne de mise à la minute
(mis à la terre)
............................
Construction de classe II
...........................symbole d´avertissement
.../min .......................tours à la minute
Wh .................................Watt Heures
ASSEMBLAGE
AVERTISSEMENT : Ne pas tenter
de modifier ou de réparer l’appareil.
Utilisation prévue
Votre aspirateur vertical sans fil au lithium-ion 3 dans 1
grande capacité BLACK + DECKER a été conçu pour le
nettoyage à sec. Cet appareil est conçu pour un usage
domestique seulement.
Assemblage (Fig. B, C)
1. Alignez le haut du tube d’extension
6
avec l’entrée de
l’aspirateur
5
comme illustré dans la Fig.B.
2. Poussez le tube d’extension
6
dans l’entrée de
l’aspirateur
5
pour qu’il se verrouille en place.
3. Alignez le bas du tube d’extension
6
avec la brosse
pour plancher
9
comme illustré dans la Fig.C.
4. Poussez le bas du tube d’extension
6
dans la brosse
pour planchers
9
pour qu’il se verrouille en place.
5. Pour retirer un accessoire, appuyez sur le verrou de
déblocage
7
de l’accessoire sur l’aspirateur ou le tube
d’extension et retirez doucement l’accessoire connecté.
AVERTISSEMENT : Lorsqu’elle
n’est pas utilisée, placez l’unité avec l’arrière de
l’aspirateur face à un mur de sorte qu’elle ne tombe
pas sur un enfant ou un animal domestique.
Fig. B
5
6
Fig. C
6
9
7
Page 14

FRANÇAIS
12
Fig. E Fig. F
15
15
15
Fig. G
15
Fig. H
Mettre en marche et éteindre (Fig. I)
• Pour mettre en marche, glissez le bouton Marche/Arrêt
1
vers l’avant à la position «I».
• Pour augmenter la puissance, glissez le bouton Marche/
Arrêt
1
vers l’avant à la position «II».
• REMARQUE : La brosse pour planchers
9
se mettra
en marche lorsqu’elle fixée à l’aspirateur ou au tube
d’extension. Lampe de travail DEL
12
s’allumera chaque
fois que l’unité est en marche.
• REMARQUE : Les voyants DEL de l’état de charge
3
s’allumeront pendant que l’aspirateur est en marche.
• Pour éteindre, glissez le bouton Marche/Arrêt
1
à la
position «O».
• Replacez l’aspirateur dans son chargeur immédiatement
après le travail pour qu’il soit prêt pour la prochaine
utilisation. Assurez-vous que le produit est bien branché
avec la fiche du chargeur.
Fig. I
1
Indicateur de l’état de charge
Cet appareil comprend un indicateur de l’état de charge
3
comprenant quatre voyants DEL verts et un rouge indiquant
le niveau de charge restant dans la pile. Cette fonction
s’active seulement lorsque l’aspirateur est en marche.
Chargement de la pile (Fig. D)
AVERTISSEMENT : Pour
utilisation avec le chargeur fourni seulement.
Lorsqu’elles sont neuves, les piles rechargeables du produit
ont besoin d’un temps de charge minimum de 5heures
pour assurer une pleine puissance.
• Fig. D - Connectez le connecteur mâle
14
du chargeur
à connecteur mâle
11
dans le port de chargement
4
de l’aspirateur. Branchez le chargeur dans une prise
électrique 120 volts 60 Hz standard.
Fig. D
14
11
4
• Pendant la recharge, le chargeur peut devenir chaud. Ceci
parfaitement normal et sécuritaire. L’appareil peut demeurer
connecté sur le chargeur indéfiniment sans aucun problème.
Le chargeur réduit automatiquement sa consommation
électrique lorsque le chargement est terminé.
AVERTISSEMENT : Ne pas
recharger le bloc-piles à des températures sous 4°C
(39 °F) ou au-dessus de 40°C (104°F). Suivez les
instructions de recharge et ne pas recharger l’appareil
hors de la plage de températures indiquée dans les
instructions.
UTILISATION
L’aspirateur peut être utilisé de quatre façons.
• Avec le tube d’extension
6
et la brosse pour planchers
9
. (Fig. E)
• Avec le tube d’extension
9
et l’aspirateur
15
. (Fig. F)
• Avec le tube d’extension
6
et l’outil accessoire
2 en 1
10
. (Fig. G)
• Avec l’outil accessoire 2 en 1
10
et l’aspirateur
14
. (Fig. H)
Page 15

FRANÇAIS
13
L’indicateur d’état de charge est une indication du niveau
approximatif de charge restant dans le bloc-piles selon les
indicateurs suivants:
< 10% chargé
11 à 29 % chargé
30 à 74 % chargé
50 à 74 % chargé
75 à 100% chargé
Les DEL de l’indicateur d’état de charge du bloc-piles
affichent la charge résiduelle et vous avertissent d’un faible
niveau de charge. Le voyant DEL rouge clignote de façon
continue lorsque l’unité est presque déchargée. SI le voyant
DEL rouge clignote de façon continue lorsque le bouton
est en position Marche, connectez le connecteur mâle
14
du chargeur à connecteur mâle
11
dans le port de
chargement
4
de l’aspirateur. Branchez le chargeur dans
une prise électrique 120 volts 60 Hz standard.
REMARQUE : L’indicateur d’état de charge est seulement
une indication du niveau de charge restant dans le blocpiles. Il n’indique pas la fonctionnalité de l’appareil et
peut varier selon les accessoires utilisés, la température et
l’utilisation faite de l’appareil.
Utilisation de l’outil accessoire 3 en 1 (Fig. J)
• L’outil accessoire 3 en 1
10
a deux configurations.
- Mode Brosse.
- Mode Petit suceur.
• L’outil accessoire 3 en 1
10
peut être fixé directement
sur le tube d’extension
6
ou sur l’entrée de
l’aspirateur
5
comme illustré dans la Fig. J.
• Alignez le haut de l’outil accessoire 3 en 1
10
avec
l’entrée de l’aspirateur
5
ou le tube d’extension
6
et
poussez en place afin qu’il se verrouille comme illustré
dans la Fig. J.
• Le suceur plat peut être utilisé pour nettoyer les coins
de murs, les escaliers, les interstices des meubles et les
ailettes de refroidissement des appareils domestiques.
• La combinaison d’un suceur plat avec une brosse peut
être utilisée pour nettoyer les meubles, les rideaux, les
lampes et les lanternes.
Fig. J
6
10
5
Nettoyer et vider l’aspirateur
AVERTISSEMENT : Risque
de projectiles/respiratoires: Ne jamais utiliser cet
aspirateur sans son filtre.
REMARQUE : Le filtre est réutilisable, ne pas le confondre
avec le sac à poussière jetable et ne pas le jeter lorsque vous
videz le produit. Nous vous recommandons de remplacer le
filtre tous les 6 à 9 mois selon la fréquence d’utilisation.
Il y a deux méthodes de nettoyage du bac, une méthode
pour vider rapidement et une méthode de nettoyage en
profondeur.
Pour vider le bac à poussière
(Fig. K, L, M, O)
• Reculez le bouton de libération(16 du bac à
poussièreet retirez le bac à poussière
8
de l’aspirateur
15
comme illustré dans la Fig.K.
• Utilisez votre index et votre pouce pour pincer les
languettes
17
du boîtier des filtres et levez le boîtier
des filtres
18
du bac à poussière comme illustré dans
la Fig.L.
• REMARQUE : Le boîtier des filtres s’ajuste de façon
serrée dans le bac à poussière et peut être difficile à
retirer au début.
• Placez le bac à poussière au-dessus de la poubelle et
videz-le.
• Installez le boîtier des filtres dans le bac à poussière
8
en vous assurant que les fentes du bac à poussière
19
s’alignent avec les languettes du boîtier des filtres
20
comme illustré dans la Fig.M.
• Installez le bac à poussière sur l’aspirateur jusqu’à ce qu’il
«clique» solidement en place.
• REMARQUE : Assurez-vous que le capteur de poussière
21
est placé vers la poignée principale
2
de l’aspirateur
et que le bouton de libération du bac à poussière
16
est à l’opposé de l’aspirateur
15
comme illustré dans
la Fig.O.
Fig. K
16
8
15
Page 16

FRANÇAIS
14
Fig. L
17
8
18
21
Fig. M
20
8
19
Fig. O
15
16
Nettoyage des filtres (Fig. K, L, O, P - R)
• Reculez le bouton de libération(16 du bac à
poussièreet retirez le bac à poussière
8
de l’aspirateur
15
comme illustré dans la Fig.K.
• Utilisez votre index et votre pouce pour pincer les
languettes
17
du boîtier des filtres et levez le boîtier des
filtres
18
du bac à poussière comme illustré dans la Fig.L.
• Une fois que vous avez retiré le boîtier des filtres du bac
à poussière, utilisez votre index et votre pouce pour
pincer les languettes du boîtier des filtres
17
, tournez
le filtre
22
dans le sens contraire des aiguilles d’une
montre et retirez-le du boîtier des filtres comme illustré
dans la Fig.P.
• Retirez le filtre en mousse
23
du boîtier des filtres
comme illustré dans la Fig.Q.
• Secouez ou brossez légèrement la poussière du filtre en
mousse
23
et du filtre
22
.
• Lavez le bac à poussière
8
dans une eau tiède
savonneuse.
• Lavez les filtres dans une eau tiède savonneuse.
• Assurez-vous que les filtres sont complètement secs
avant de les remettre dans le boîtier des filtres
18
.
• Remettez le filtre en mousse
23
propre et sec dans le
boîtier des filtres
18
.
• Remettez le filtre
22
propre et sec ans le boîtier des
filtres
18
en alignant les verrous du filtre
24
, situé sur
le filtre, avec les fentes du boîtier des filtres
25
, situées
sur les côtés du boîtier des filtres et tournez le filtre
dans le sens des aiguilles d’une montre jusqu’à ce qu’il
se verrouille solidement en place comme illustré dans
la Fig.R.
• Installez le boîtier des filtres dans le bac à poussière
8
en vous assurant que les fentes du bac à poussière
19
s’alignent avec les languettes du boîtier des filtres
20
comme illustré dans la Fig.M.
• Installez le bac à poussière sur l’aspirateur jusqu’à ce qu’il
«clique» solidement en place.
• REMARQUE : Assurez-vous que le capteur de poussière
21
est placé vers la poignée principale
2
de l’aspirateur
et que le bouton de libération du bac à poussière
15
est à l’opposé de l’aspirateur
16
comme illustré dans
la Fig.O.
IMPORTANT: La succion maximale ne sera obtenue
qu’avec des filtres propres et un bac à poussière vide. Si la
poussière commence à s’échapper de l’unité après qu’elle
est arrêtée, ceci indique que le bac à poussière est plein et
qu’il doit être vidé.
• Lavez les filtres régulièrement à l’eau tiède savonneuse
et assurez-vous qu’ils sont complètement secs avant de
les utiliser à nouveau. Plus le filtre sera propre, meilleure
sera la performance de l’aspirateur.
• Il est très important que les filtres soient complètement
secs et installés correctement avant d’utiliser l’appareil.
Fig. P
17
22
18
Page 17

FRANÇAIS
15
Fig. Q
18
23
Fig. R
24
17
25
22
25
18
Retirer et nettoyer les brosses rotatives
(Fig. S, T, U, V, W)
ATTENTION : Pour réduire le risque
de blessures causées par les pièces en mouvement,
déconnectez la brosse pour planchers de l’aspirateur
avant de nettoyer ou de réparer.
• Pour retirer la brosse rotative
26
de la brosse pour
planchers
9
, utilisez une pièce de monnaie ou un
tournevis plat pour tourner le verrou
27
sur la plaque
de verrouillage
28
à la position déverrouillée
29
comme illustré dans la Fig. S.
• Retirez la plaque de verrouillage
28
.
• Levez la brosse rotative et glissez la courroie d’entraînement
31
vers le côté comme illustré dans la Fig. T. La brosse
rotative
26
peut maintenant être retirée.
• REMARQUE : Les pièces des extrémités
32
sont
également amovibles, vous permettant de retirer les
cheveux ou d’autres débris pouvant être accumulés des
brosses comme illustré dans la Fig.U.
• Une fois que la brosse rotative a été nettoyée, réinstallez
la brosse rotative dans la brosse pour planchers
9
.
• Glissez la courroie d’entraînement
31
sur la roue dentée
33
sur la brosse rotative comme illustré dans la Fig.V.
• Installez la plaque de verrouillage
28
sur la brosse pour
planchers. Insérez la barre de retenue
34
dans la fente
35
sur la brosse pour planchers
9
illustrée dans la Fig.W.
• Utilisez une pièce de monnaie ou un tournevis plat pour
tourner le verrou
27
sur la plaque de verrouillage
28
à la position déverrouillée
36
comme illustré dans la
Fig. W.
Fig. S
28
9
27
26
29
Fig. T
31
9
26
Fig. U
32
32
26
33
Fig. V
33
26
31
Page 18

FRANÇAIS
16
Fig. W
34
28
36
35
28
9
Ranger l’aspirateur
Cet aspirateur peut être rangé de façon compacte et se tenir
de lui-même.
• Retirez l’aspirateur
15
du tube d’extension
6
.
• Placez le cran
37
situé à l’arrière de l’aspirateur dans le
crochet de rangement
38
, situé sur le tube d’extension
6
, pendant que la brosse pour planchers
9
est en
position verrouillée comme illustré dans la Fig. X.
Fig. X
6
38
37
9
15
Remplacer les filtres
Les filtres doivent être remplacés tous les 6 à 9 mois
et lorsqu’ils sont usés ou endommagés. Les filtres de
remplacement sont disponibles chez votre détaillant
BLACK+DECKER.
Visitez www.blackanddecker.com pour trouves les
détaillants.
• Retirez les anciens filtres comme décrit dans Nettoyage
des filtres.
• Mettez les nouveaux filtres comme décrit dans
Nettoyage des filtres.
(Nº de cat.: SVFK10)
ENTRETIEN
Utilisez seulement un savon doux et un linge humide pour
nettoyer l’aspirateur. Ne jamais laisser de liquide entrer à
l’intérieur de l’aspirateur; ne jamais immerger toute partie de
l’aspirateur dans un liquide.
AVERTISSEMENT : Assurez-vous
que l’aspirateur est complètement sec avant de
l’utiliser.
IMPORTANT: Afin d’assurer votre SÉCURITÉ et la FIABILITÉ
du produit, les réparations, l’entretien et les ajustements
(autres que ceux énumérés dans le présent manuel) doivent
être effectués dans un centre de service BLACK+DECKER ou
une entreprise de service autorisée, toujours en utilisant des
pièces de remplacement identiques.
DÉPANNAGE
L’appareil ne fonctionne pas. Contrôler ce qui suit:
• Le chargeur avait été branché pour la recharge (Il sera
légèrement chaud au toucher.)
• Le cordon du chargeur est bien fixé et non endommagé.
• Le chargeur est branché dans une prise de courant.
• Le bouton est en position «Arrêt» lors du chargement.
Si la performance de l’aspirateur est faible, vérifiez ce
qui suit:
• Nettoyez les filtres. (Consultez la section «Nettoyer et
vider l’aspirateur».)
• Videz la bac à poussière. (Consultez la section «Nettoyer
et vider l’aspirateur».)
• Nettoyez les brosses rotatives. (Consultez la section
«Retirer et nettoyer les brosses rotatives».)
Le voyant DEL rouge clignote de façon continue, branchez
le chargeur et effectuez un cycle de rechargePour de l’aide
avec l’outil, consulter notre site Web
www.blackanddecker.com pour l’emplacement du centre
de réparation le plus près ou communiquer avec l’assistance
BLACK+DECKER au 1–800–544–6986.
ACCESSOIRES
Les accessoires recommandés pouvant être utilisés avec
l’appareil sont disponibles auprès du détaillant local ou
du centre de réparation autorisé. Pour obtenir de l’aide
concernant les accessoires, composer le : 1 800 544-6986.
AVERTISSEMENT : l’utilisation
de tout accessoire non recommandé avec cet appareil
pourrait s’avérerdangereuse.
Page 19

FRANÇAIS
17
INFORMATION SUR LES RÉPARATIONS
Tous les centres de réparation BLACK+DECKER sont dotés
de personnel qualifié en matière d’outillage électrique;
ils sont donc en mesure d’offrir à leur clientèle un service
efficace et fiable. Que ce soit pour un avis technique,
une réparation ou des pièces de rechange authentiques
installées en usine, communiquer avec l’établissement
BLACK+DECKER le plus près de chez vous. Pour trouver
l’établissement de réparation de votre région, composer le
numéro suivant : 1 800 544-6986 ou consulter le site
www.blackanddecker.com
GARANTIE LIMITÉE DE DEUX ANS
Black & Decker (É.-U.) Inc. garantit que le produit est exempt
de défauts de matériau et de fabrication pendant deux(2)
ans à partir de la date d’achat, à condition que le produit soit
utilisé en milieu domestique. La présente garantie limitée
ne couvre pas les défaillances provoquées par un abus,
un dommage accidentel ou des réparations ou tentatives
de réparations effectuées par toute autre personne que
le personnel de BLACK+DECKER et de ses centres de
réparation agréés. Un produit défectueux qui remplit les
conditions stipulées par la présente garantie sera remplacé
ou réparé sans frais d’une des deux façons suivantes :
La première façon consiste en un échange chez le détaillant
où le produit a été acheté (à la condition que le magasin
soit un détaillant participant).Tout retour doit se faire durant
la période correspondant à la politique d’échange du
détaillant. Une preuve d’achat peut être requise. Prière de
vérifier la politique de retour du détaillant au sujet des délais
impartis pour les retours ou leséchanges.
La deuxième option est d’apporter ou d’envoyer le produit
(en port payé) à un centre de réparation agréé ou à un
centre de réparation BLACK+DECKER pour faire réparer ou
échanger le produit, à la discrétion de BLACK+DECKER. Une
preuve d’achat peut être requise. Les centres de réparation
de BLACK+DECKER et les centres de réparation ou en ligne
sur www.blackanddecker.com.
Cette garantie ne s’applique pas aux accessoires. Cette
garantie accorde des droits légaux propres au propriétaire
de l’outil. Ce dernier pourrait avoir d’autres droits selon
l’État ou la province qu’il habite. Pour toute question,
communiquer avec le directeur du centre de réparation
BLACK+DECKER le plus près. Ce produit n’est pas destiné
à un usage commercial. L’usage commercial de ce produit
annule par conséquent cette garantie. Toutes autres
garanties, expresses ou implicites, sont déclinées par
laprésente.
Importé par Black & Decker (U.S.) Inc.,
701 E. Joppa Rd.
Towson, MD 21286
BlackandDecker.com
1-800-544-6986
Page 20

ESPAÑOL
18
Definiciones: Símbolos y palabras de alerta de seguridad
Este manual de instrucciones utiliza los siguientes símbolos y palabras de alerta de seguridad para alertarle de situaciones
peligrosas y del riesgo de lesiones corporales o dañosmateriales.
PELIGRO: Indica una situación de peligro inminente que, si no se evita, provocará la muerte o
lesionesgraves.
ADVERTENCIA: Indica una situación de peligro potencial que, si no se evita, podría provocar la
muerte o lesionesgraves.
ATENCIÓN: Indica una situación de peligro potencial que, si no se evita, posiblemente provocaría lesiones
leves omoderadas.
(Utilizado sin palabras) indica un mensaje de seguridadrelacionado.
AVISO: Se refiere a una práctica no relacionada a lesiones corporales que de no evitarse puede resultar en
daños a la propiedad.
Fig. A
1
Interruptor On/Off
2
Manija principal
3
LED indicadores de estado de carga
4
Puerto de carga
5
La entrada de aspirado
6
Tubo de extensión
7
Seguro de liberación de accesorios
8
Depósito de polvo
9
Cepillo de piso
10
Herramienta de accesorio 3 en 1
11
Cargador de enchufe
12
Luz de trabajo LED
13
Accesorio gancho
1
6
8
10
9
12
5
7
2
7
11
4
3
13
Page 21

ESPAÑOL
19
¡ADVERTENCIA! Lea todas las
advertencias de seguridad e instrucciones. El
incumplimiento de las advertencias e instrucciones
puede provocar descargas eléctricas, incendios o
lesionesgraves.
ADVERTENCIA: Para reducir el riesgo de lesiones, lea
el manual deinstrucciones.
INSTRUCCIONES
DE SEGURIDAD
IMPORTANTES
Cuando use aparatos eléctricos, siempre se deben seguir las
precauciones básicas, incluyendo las siguientes:
LEA TODAS LAS
INSTRUCCIONES ANTES
DE USAR ESTE APARATO.
ADVERTENCIA: Lea todas
las advertencias de seguridad y todas las
instrucciones. La falla en seguir las advertencias e
instrucciones indicadas a continuación puede resultar
en descarga eléctrica, incendio y/o lesiones serias.
ADVERTENCIA: Algunos polvos
domésticos contienen químicos conocidos por el
Estado de California que causan cáncer, y defectos de
nacimiento u otros daños reproductivos tales como
asbesto y plomo en pintura a base de plomo.
ADVERTENCIA: No intente modificar
o reparar el aparato.
ADVERTENCIA: No cargue la batería
en temperaturas ambiente menores a 39°F (4°C) o
mayores a 104°F (40°C). Siga todas las instrucciones
de carga y no cargue el aparato fuera del rango
de temperatura especificado en las instrucciones.
Cargar inadecuadamente o en una temperatura
fuera del rango especificado puede dañar la batería e
incrementar el riesgo de incendio.
ADVERTENCIA: Para reducir el riesgo
de incendios, descarga eléctrica, o lesiones:
• Riesgo de descarga eléctrica. Para protegerse contra riesgo
de descarga eléctrica, no coloque la base de carga en
agua u otro líquido.
• No permita que se use como un juguete. Se necesita poner
atención cuando sea usado por o cerca de niños.
• Sólo use como se describe en este manual. Sólo use
conexiones recomendadas por el fabricante.
• No use con el cable o enchufe dañado. Si el aparato no
funciona como debería, se ha dejado caer, se dañó, se
dejó en exteriores, o se dejó caer en agua, regréselo a un
centro de servicio.
• No jale o transporte por el cable, no use el cable como
manija, cierre una puerta sobre el cable, o jale el cable
alrededor de bordes o esquinas filosas. No opere el
aparato sobre el cable. Mantenga el cable lejos de
superficies calientes.
• No desconecte jalando del cable. Para desconectar, sujete
el enchufe, no el cable.
• No maneje el cargador, incluyendo el enchufe del
cargador, y las terminales del cargador con las manos
húmedas.
• No coloque ningún objeto en las aberturas. No lo use con
ninguna abertura bloqueada; manténgalo libre de polvo,
pelusa, cabello y cualquier cosa que pueda reducir el flujo
de aire.
• Mantenga el cabello, ropa suelta, y todas las partes del
cuerpo alejados de las aberturas y partes móviles.
• Tenga cuidado adicional cuando limpie en escaleras.
• No lo use para recoger líquidos inflamables o
combustibles, tales como gasolina, o en áreas donde
puedan estar presentes.
• No recoja nada que esté encendido o humeando, tal
como cigarrillos, cerillos, o cenizas calientes.
• No lo use sin bolsa para polvo y/o filtros en su lugar.
• No cargue la unidad en exteriores.
• Sólo use el cargador suministrado por el fabricante para
recargar.
• No incinere el aparato incluso si está dañado
severamente. Las baterías pueden explotar en el fuego.
• Este aparato está diseñado para uso doméstico
únicamente y no para uso comercial o industrial.
• No permita que el cable cuelgue sobre el borde de una
mesa o mostrador o toque superficies calientes. La unidad
se debe colocar o montar lejos de tarjas y superficies
calientes.
• Conecte el cargador directamente en un tomacorriente
eléctrico.
• Use el cargador únicamente en un tomacorriente eléctrico
estándar (120V/60Hz).
• Desconecte el cargador del tomacorriente antes de
cualquier limpieza o mantenimiento de rutina.
• No vea dentro de las ventilas de aire cuando la unidad
esté encendida, ya que existe una posibilidad de que se
descarguen desechos pequeños de las ventilas de aire, en
especial después de la limpieza / reemplazo del filtro ya
que el desecho dentro de la unidad se puede mover.
Pueden ocurrir fugas de las celdas de la batería bajo
condiciones extremas. Si el líquido, que es una solución de
20-35% de hidróxido de potasio, tiene contacto con la piel (1)
lave rápidamente con agua y jabón o (2) neutralice con un
ácido suave tal como jugo de limón o vinagre. Si el líquido
Page 22

ESPAÑOL
20
entra en los ojos, lávelos de inmediato con agua limpia por un
mínimo de 10 minutos. Busque atención médica.
ADVERTENCIAS DE SEGURIDAD
ADICIONALES
a ) Evite el arranque no intencional. Asegure que el
interruptor esté en la posición apagada antes
de recoger o transportar el aparato. Transportar
el aparato con su dedo en el interruptor o energizar
el aparato que tenga el interruptor encendido puede
provocar accidentes.
b ) Sólo recargue con el cargador especificado por
el fabricante. Un cargador que es adecuado para un
tipo de paquete de batería puede crear un riesgo de
incendio cuando se use con otro tipo de batería.
c ) No use un paquete de batería que esté dañado
o modificado. Las baterías dañadas o modificadas
pueden presentar comportamiento imprevisto que
resulte en incendio, explosión o riesgo de lesiones.
d ) No exponga un paquete de batería o aparato
a fuego o temperatura excesiva. La exposición a
fuego o temperatura mayor a 266°F (130°C) puede
causar una explosión.
e ) Pida que el servicio sea realizado por una
persona de reparación calificada usando
únicamente partes de reemplazo idénticas.
Esto garantizará que se mantenga la seguridad del
producto.
f ) Sólo use con cargadores S010QU2300040 y
S014CU2720050.
CONSERVE ESTAS
INSTRUCCIONES
SÍMBOLOS
La etiqueta de su herramienta puede incluir los siguientes
símbolos. Los símbolos y sus definiciones son los siguientes:
V..................................voltios
A .................................amperios
Hz ...............................hertz
W ................................vatios
min ............................minutos
o AC ..................corriente alterna
o DC ............corriente directa
n
o ...............................no velocidad sin carga
.............................Construcción Clase I
...............................
terminal a tierra
(mis à la terre)
............................
Construcción de clase II
...........................simbolo de alerta
.../min .......................revoluciones o minuto seguridad
Wh ................................Watt Horas
ASSEMBLY
WARNING: Do not attempt to modify or
repair theappliance.
ENSAMBLE
ADVERTENCIA: No intente modificar
o reparar el aparato.
Uso pretendido
Su aspiradora de bastón 3 en 1 inalámbrica de ion de litio
BLACK+DECKER se diseñó para propósitos de aspirado en
seco ligero. Este aparato está diseñado para uso doméstico
únicamente.
Ensamble (Fig. B, C)
1. Alinee la parte superior del tubo de extensión
6
con la
entrada de aspirado
5
como se muestra en la Fig. B.
2. Empuje el tubo de extensión
6
en la entrada de
aspirado
5
para que se asegure en su posición.
3. Alinee la parte inferior del tubo de extensión
6
con el
cepillo de piso
9
como se muestra en la Fig. C.
4. Presione la parte inferior del tubo de extensión
6
sobre
el cepillo del piso
9
para que se asegure en su posición.
5. Para quitar un accesorio, presione el seguro de liberación
de accesorios
7
ubicado en la aspiradora o el tubo de
extensión y jale suavemente el accesorio conectado.
ADVERTENCIA: Cuando no esté
en uso, coloque la unidad con la parte trasera de
aspirado viendo a una pared de forma que cualquier
caída inadvertida de la unidad haga contacto con la
pared y no con personas o mascotas.
Fig. B
5
6
Fig. C
6
9
7
Page 23

ESPAÑOL
21
Carga de la batería (Fig. D)
ADVERTENCIA: Sólo para uso con el
cargador incluido.
Cuando es nuevo, las celdas recargables del producto
necesitan un tiempo de carga mínima de 5 horas para
asegurar la energía completa.
• Fig. D - Conecte el enchufe
14
del cargador de enchufe
11
en el puerto de carga
4
de la aspiradora. Conecte
el cargador en cualquier tomacorriente de 120 Volts 60
Hz estándar.
Fig. D
14
11
4
• Mientras carga, el cargador se puede calentar, esto
es perfectamente normal y seguro. Es seguro dejar el
aparato conectado al cargador de forma indefinida.
El cargador reduce automáticamente el consumo de
energía cuando la carga está completa.
ADVERTENCIA: No cargue la batería
en temperaturas ambiente menores a 39°F (4°C) o
mayores a 104°F (40°C). Siga todas las instrucciones
de carga y no cargue el aparato fuera del rango de
temperatura especificado en las instrucciones.
USO
Esta aspiradora se puede usar en una de cuatro maneras.
• Con el tubo de extensión
6
y el cepillo de piso
9
. (Fig.
E)
• Con el cepillo de piso
9
y la aspiradora
15
. (Fig. F)
• Con el tubo de extensión
6
y la herramienta de
accesorios 2 en 1
10
. (Fig. G)
• Con la herramienta de Accesorio 2 en 1
10
y la
aspiradora
14
. (Fig. H)
Fig. E Fig. F
15
15
15
Fig. G
15
Fig. H
Encendido y apagado (Fig. I)
• Para encender, deslice el interruptor On/Off
1
hacia el
frente a la posición " I ".
• Para incrementar la potencia, deslice el interruptor On/
Off
1
hacia el frente a la posición " II ".
• NOTA: El cepillo de piso
9
se encenderá cuando esté
conectado a la aspiradora o tubo de extensión. La luz de
trabajo LED
12
se iluminará cada vez que se encienda
la unidad.
• NOTA: Los LED indicadores de estado de carga
3
se
iluminarán mientras la aspiradora esté ENCENDIDA.
• Para apagar, deslice el interruptor on/off
1
en la
posición “ O ”.
• Regrese el producto al cargador de inmediato después
de cada uso de forma que esté listo y completamente
cargado para el siguiente uso. Asegúrese que el
producto esté completamente conectado con el
enchufe del cargador.
Fig. I
1
Page 24

ESPAÑOL
22
Indicador de estado de carga
Este aparato incluye un indicador de estado de carga
3
que
consiste en cuatro luces LED verdes y una roja que indican
el nivel de carga restante en la batería. Esta función sólo está
activa cuando la aspiradora está encendida.
El indicador de estado de carga es una indicación de los
niveles aproximados de carga restantes en el paquete de
batería de acuerdo con los siguientes indicadores:
< 10% cargado
11-29% cargado
30-49% cargado
50-74% cargado
75–100% cargado
El indicador de batería LED muestra la carga restante y le
advierte cuando la batería es baja. El LED rojo parpadeará
continuamente cuando la unidad esté casi descargada. Si
el LED rojo parpadea continuamente cuando el interruptor
se coloca en la posición de ENCENDIDO, conecte el enchufe
14
del cargador de enchufe
11
en el puerto de carga
4
de la aspiradora. Conecte el cargador en cualquier
tomacorriente de 120 Volts 60 Hz estándar.
NOTA: El indicador de estado de carga sólo es una
indicación de la carga que queda en la batería. No indica la
funcionalidad de la herramienta y está sujeto a variación en
base a los componentes del producto, la temperatura y la
aplicación del usuario final.
Uso de herramienta de accesorio 3 en 1
(Fig. J)
• La herramienta de accesorio 3 en 1
10
tiene dos
configuraciones.
- Modo de cepillo.
- Modo de fisura pequeña.
• La herramienta de accesorio 3 en 1
10
se puede colocar
directamente al tubo de extensión
6
o a la entrada de
la aspiradora
5
como se muestra en la Figura J.
• Alinee la parte superior de la herramienta de accesorio
3 en 1
10
con la entrada de aspirado
5
o el tubo de
extensión
6
y empújela para que se asegure en su
posición como se muestra en la Fig. J.
• La boquilla plana se puede usar para limpiar la esquina
de la pared, las escaleras, las grietas de los muebles y las
aletas de enfriamiento de electrodomésticos.
• La combinación de una boquilla plana con un cepillo
se puede utilizar para limpiar los muebles, cortinas,
lámparas y linternas.
Fig. J
6
10
5
Limpieza y vaciado de aspiradora
ADVERTENCIA: Peligro de Proyectil/
Respiratorio: Nunca use la aspiradora sin su filtro.
NOTA: El filtro es reutilizable, no lo confunda con una
bolsa de polvo desechable, y no lo tire cuando se vacíe el
producto. Le recomendamos que reemplace el filtro cada
6-9 meses según la frecuencia de uso.
Hay dos métodos para limpiar el depósito, un método de
vaciado rápido y un método de limpieza exhaustivo.
Para vaciar el recipiente de polvo (Fig.
K, L, M, O)
• Jale hacia atrás el botón de liberación del depósito de
polvo
16
para liberar y retirar el depósito de polvo
8
de la aspiradora
15
como se muestra en la Figura K.
• Use sus dedos índice y pulgar para pellizcar las
lengüetas del alojamiento del filtro
17
y levante el
alojamiento del filtro
18
del depósito de polvo como se
muestra en la Fig. L.
• NOTA: El alojamiento del filtro se ajusta cómodamente
en el recipiente de polvo y puede ser difícil de quitar al
principio.
• Coloque el recipiente de polvo sobre un bote de basura
y vacíe el recipiente de polvo.
• Instale el alojamiento del filtro en el depósito de polvo
8
asegurándose que las ranuras del depósito de polvo
19
estén alineadas con las lengüetas del alojamiento
del filtro
20
como se muestra en la Fig. M.
• Instale el depósito de polvo en la aspiradora, hasta que
“haga clic” firmemente en posición.
• NOTA: Asegúrese que el orificio para el polvo
21
esté
ubicado hacia la manija principal
2
de la aspiradora y
que el botón de liberación del receptáculo de polvo
16
quede alejado de la aspiradora
15
como se muestra
en la Fig. O.
Page 25

ESPAÑOL
23
Fig. K
16
8
15
Fig. L
17
8
18
21
Fig. M
20
8
19
Fig. O
15
16
Limpieza de filtros (Fig. K, L, O, P - R)
• Jale hacia atrás el botón de liberación del depósito de
polvo
16
para liberar y retirar el depósito de polvo
8
de la aspiradora
15
como se muestra en la Figura K.
• Use sus dedos índice y pulgar para pellizcar las
lengüetas del alojamiento del filtro
17
y levante el
alojamiento del filtro
18
del depósito de polvo como se
muestra en la Fig. L.
• Una vez que se retira el alojamiento del filtro, utilice
los dedos índice y pulgar para apretar las pestañas
del alojamiento del filtro
17
y gire el filtro
22
en
sentido contrario a las manecillas del reloj y retírelo del
alojamiento del filtro como se muestra en la Fig. P.
• Retire el filtro de espuma
23
del alojamiento del filtro
como se muestra en la Fig. Q.
• Agite o cepille ligeramente el polvo suelto del filtro de
espuma
23
y el filtro
22
.
• Enjuague el depósito de polvo
8
con agua jabonosa
tibia.
• Lave los filtros con agua jabonosa tibia.
• Asegúrese que los filtros estén completamente secos
antes de volver a colocar los filtros en el alojamiento del
filtro
18
.
• Vuelva a colocar el filtro de espuma limpio y seco
23
en
el alojamiento del filtro
18
.
• Vuelva a colocar el filtro limpio y seco
22
en el
alojamiento del filtro
18
alineando los bloqueos del
filtro
24
, ubicados a los lados del filtro, con las ranuras
del alojamiento del filtro
25
, ubicadas a los lados del
alojamiento del filtro y gire el filtro en el sentido de las
manecillas del reloj hasta que se asegure firmemente en
su posición como se muestra en la Fig. R.
• Instale el alojamiento del filtro en el depósito de polvo
8
asegurándose que las ranuras del depósito de polvo
19
estén alineadas con las lengüetas del alojamiento
del filtro
20
como se muestra en la Fig. M.
• Instale el depósito de polvo en la aspiradora, hasta que
“haga clic” firmemente en posición.
• NOTA: Asegúrese que el orificio para el polvo
21
esté
ubicado hacia la manija principal
2
de la aspiradora y
que el botón de liberación del receptáculo de polvo
15
quede alejado de la aspiradora
16
como se muestra
en la Fig. O.
IMPORTANTE: La recolección máxima de polvo sólo se
obtendrá con filtros limpios y un depósito para polvo vacío.
Si el polvo comienza a caer del producto después que se
apaga, esto indica que el depósito de polvo está lleno y
requiere que se vacíe.
• Lave los filtros regularmente utilizando agua jabonosa
tibia y asegúrese que estén completamente secos antes
de usarlos de nuevo. Mientras más limpio esté el filtro,
mejor se desempeñará el producto.
• Es muy importante que los filtros estén completamente
secos y correctamente en posición antes del uso.
Page 26

ESPAÑOL
24
Fig. P
17
22
18
Fig. Q
18
23
Fig. R
24
17
25
22
25
18
Extracción y limpieza de los cepillos giratorios
(Fig. S, T, U, V, W)
ATENCIÓN: Para reducir el riesgo de
lesiones a partir de partes móviles, desconecte el
cepillo de piso de la aspiradora antes limpiar o dar
servicio.
• Para retirar el cepillo giratorio
26
del cepillo de piso
9
, use una moneda o un destornillador recto para girar
el seguro
27
en la placa de bloqueo
28
a la posición
desbloqueada
29
como se muestra en la Fig. S.
• Retire la placa de bloqueo
28
.
• Levante el cepillo giratorio y deslice la correa de
transmisión
31
hacia un lado como se muestra en la
Fig. T. Ahora se puede quitar el cepillo giratorio
26
.
• NOTA: Las piezas de extremo
32
también son
removibles para permitirle limpiar los cepillos de
cualquier cabello u otros desechos que se puedan haber
acumulador como se muestra en la Fig. U.
• Una vez que se haya limpiado el cepillo giratorio, vuelva
a instalar el cepillo giratorio en el cepillo para piso
9
.
• Deslice la correa de transmisión
31
sobre el engrane
dentado
33
en el cepillo giratorio como se muestra en
la Fig. V.
• Instale la placa de bloqueo
28
en el cepillo de piso.
Inserte la barra de retención
34
en la ranura
35
en el
cepillo de piso
9
que se muestra en la Fig. W.
• Use una moneda o un destornillador recto para girar el
bloqueo
27
en la placa de bloqueo
28
a la posición de
bloqueo
36
como se muestra en la Fig. W.
Fig. S
28
9
27
26
29
Fig. T
31
9
26
Fig. U
32
32
26
33
Page 27

ESPAÑOL
25
Fig. V
33
26
31
Fig. W
34
28
36
35
28
9
Almacenamiento de aspiradora
Esta aspiradora puede almacenarse de forma compacta y
sostenerse por sí misma.
• Retire la aspiradora
15
del tubo de extensión
6
.
• Coloque el seguro
37
ubicado en la parte posterior
de la aspiradora en el gancho de almacenamiento
38
, ubicado en el tubo de extensión
6
, mientras que el
cepillo de piso
9
se encuentra en la posición bloqueada
como se muestra en la Fig. X.
Fig. X
6
38
37
9
15
Reemplazo de filtros
Los filtros deben reemplazarse cada 6 a 9 meses y siempre
que estén desgastados o dañados. Los filtros de repuesto
están disponibles en su distribuidor BLACK+DECKER.
Visite www.blackanddecker.com para localizar
distribuidores.
• Retire los filtros viejos como se describe en Limpieza de
los filtros.
• Ajuste los nuevos filtros como se describe en Limpieza
de los filtros.
(cat. no: SVFK10)
MANTENIMIENTO
Use sólo jabón suave y una tela húmeda para limpiar la
aspiradora. Nunca permita que entre líquido a la aspiradora;
nunca sumerja ninguna parte de la aspiradora en líquido.
ADVERTENCIA: Asegúrese que la
aspiradora esté completamente seca antes de usarla.
IMPORTANTE: Para garantizar la SEGURIDAD y
CONFIABILIDAD del producto, las reparaciones,
mantenimiento y ajuste (diferentes a las indicadas en
este manual) sólo deben realizar por centros de servicio
autorizados u otras organizaciones de servicio calificado,
utilizando siempre partes de reemplazo idénticas.
SOLUCIÓN DE PROBLEMAS
Si el producto no funciona, revise lo siguiente:
• El cargador se conectó correctamente para recarga. (Se
siente ligeramente caliente al tacto.)
• El cable del cargador no está dañado y está conectado
correctamente.
• El cargador está conectado en un tomacorriente
eléctrico que funciona.
• El interruptor está en la posición “OFF” (apagado)
cuando carga.
Si el rendimiento de la aspiradora es deficiente,
verifique lo siguiente:
• Limpie los filtros. (Consulte la sección "Limpieza y
vaciado de la aspiradora").
• Vacíe el depósito de polvo. (Consulte la sección
"Limpieza y vaciado de la aspiradora").
• Limpie los cepillos giratorios. (Consulte la sección
"Extracción y limpieza de cepillos giratorios").
El LED rojo parpadea continuamente, conecte el cargador
y realice un ciclo de recargaSolamente para Propósitos de
México
Para conocer la ubicación del centro de servicio más
cercano a fin de recibir ayuda con su producto, visite
nuestro sitio Web www.blackanddecker.com.mx o llame
a la línea de ayuda BLACK+DECKER al
01 800 847 2309/01 800 8472312.
ACCESORIOS
Los accesorios recomendados para uso con el artefacto están
disponibles en su distribuidor o centro de mantenimiento
Page 28

ESPAÑOL
26
autorizado local. Si necesita ayuda con respecto a los accesorios,
llame al:
1-800-544-6986.
ADVERTENCIA: El empleo de cualquier accesorio
no recomendado para uso con este artefacto puede
serpeligroso.
INFORMACIÓN DE MANTENIMIENTO
Todos los Centros de servicio de BLACK+DECKER cuentan con
personal altamente capacitado dispuesto a brindar a todos los
clientes un servicio eficiente y confiable en la reparación de
herramientas eléctricas. Si necesita consejo técnico, reparaciones
o piezas de repuesto originales de fábrica, póngase en contacto
con el centro de servicio de BLACK+DECKER más cercano a su
domicilio. Para ubicar su centro de servicio local, llame al 1-800544-6986 o visite nuestro sitio www.blackanddecker.com.
GARANTÍA LIMITADA DE DOS AÑOS
Black & Decker (U.S.) Inc. garantiza que este producto está
libre de defectos de material o mano de obra durante un
período de dos (2) años desde la fecha de compra, siempre
y cuando el producto se utilice en un entorno doméstico.
Esta garantía limitada no cubre contra fallas debidas a
mal uso, daño accidental o cuando se han realizado o
intentado reparaciones por parte de cualquier otra persona
ajena a BLACK+DECKER y sus centros de mantenimiento
autorizados. Un producto defectuoso que cumple con
las condiciones de la garantía establecidas en el presente
documento será remplazado o reparado sin costo de una
dos maneras:
La primera, que únicamente dará lugar a intercambios,
consiste en devolver el producto al comerciante minorista
donde fue comprado (siempre y cuando la tienda sea un
comerciante minorista participante). Las devoluciones
deben realizarse dentro del período establecido en la
política para intercambios del comerciante minorista.
Es posible que se requiera el comprobante de compra.
Consulte al comerciante minorista sobre su política
específica de devoluciones con respecto a los límites de
tiempo para devoluciones ointercambios.
La segunda opción es llevar o enviar (pagado por
adelantado) el producto a un centro de mantenimiento de
propiedad o con autorización de BLACK+DECKER para su
reparación o remplazo a discreción de BLACK+DECKER. Es
posible que se requiera un comprobante de compra. Los
centros de mantenimiento de propiedad o con autorización
de BLACK+DECKER en línea en www.blackanddecker.com.
Esta garantía no se aplica a los accesorios. Esta garantía
le otorga derechos legales específicos y es posible que
tenga otros derechos que varían de un estado a otro. En
caso de que tenga alguna pregunta, comuníquese con el
gerente del centro de mantenimiento de BLACK+DECKER
más cercano a usted. Este producto no está diseñado para
uso comercial y, en consecuencia, dicho uso comercial de
este producto anulará la garantía. Por medio del presente
documento, se declina la responsabilidad de todas las
demás garantías, explícitas oimplícitas.
AMÉRICA LATINA: Esta garantía no se aplica a productos
vendidos en América Latina. Para los productos que se
venden en América Latina, consulte la información de
garantía específica del país contenida en el empaque,
llame a la compañía local o visite el sitio web para obtener
dichainformación.
Importado por Black & Decker (U.S.) Inc.,
701 E. Joppa Rd.
Towson, MD 21286
BlackandDecker.com
1-800-544-6986
Page 29

Page 30

Page 31

Page 32

Grupo Realsa en herramientas,
S.A. de C.V.
Súper Manzana 69 MZ.01 Lote 30
(Av. Torcasita)
Col. Puerto Juárez
Cancún, Quintana Roo
Tel. 01 998 884 72 27
Ferre Pat de Puebla, S.A. de C.V.
16 de Septiembre No. 6149
Col. El Cerrito
Puebla, Puebla
Tel. 01 222 264 12 12
Ferre Pat de Puebla, S.A. de C.V.
Ejército Mexicano No. 15
Col. Ejido 1ro. de Mayo
Boca del Rio, Veracruz
Tel. 01 229 167 89 89
Servicio de Fabrica BLACK+DECKER,
S.A. de C.V.
Lázaro Cardenas No. 18
Col. Obrera
Distrito Federal
Tel. 55 88 95 02
Representaciones Industriales Robles,
S.A. de C.V.
Tezozomoc No. 89
Col. La Preciosa
Distrito Federal
Tel. 55 61 86 82
Gpo. Comercial de Htas. y Refacciones
de Occidente, S.A. de C.V.
Av. La Paz No. 1779
Col. Americana, S. Juaréz
Guadalajara, Jalisco
Tel. 01 33 38 25 69 78
Herramientas y Equipos Profesionales
Av. Colón 2915Ote.
Col. Francisco I. Madero
Monterrey, Nvo. León
Tel. 01 81 83 54 60 06
Htas. Portátiles de Chihuahua,
S.A. de C.V.
Av. Universidad No. 2903
Col. Fracc. Universidad
Chihuahua, Chihuahua
Tel. 01 614 413 64 04
Fernando González Armenta
Bolivia No. 605
Col. Felipe Carrillo Puerto
Cd. Madero, Tamaulipas
Tel. 01 833 221 34 50
Perfiles y Herramientas de Morelia
Gertrudis Bocanegra No. 898
Col. Ventura Puente
Morelia, Michoacán
Tel. 01 443 313 85 50
Enrique Robles
Av. de la Solidaridad No. 12713
Col. La Pradera
Irapuato, Guanajuato
Tel. 01 462 626 67 39
Hernández Martinez Jeanette
Prolongación Corregidora Nte. No. 1104
Col. Arboledas
Queretaro,Qro.
Tel. 01 442 245 25 80
SOLAMENTE PARA PROPOSITOS DE MEXICO
PARA OTRAS LOCALIDADES LLAME AL 01 800 847 2309 o 01 800 847 2312.
BLACK & DECKER S.A. DE C.V.
BOSQUES DE CIDROS ACCESO RADIATAS NO. 42
COL. BOSQUES DE LASLOMAS.
05120 MÉXICO, D.F
TEL. 01 55 5326 7100
01 800 847 2309/01 800 847 2312
Black & Decker (U.S.)Inc.
701 East Joppa Road, Towson, MD 21286
Part No. N604793
HFEK520J, HFEK620J
JULY 2018
Copyright © 2018 BLACK+DECKER
 Loading...