

Page 1
www.blackanddecker.com
HD18F2M
1
Page 2
8
10 9
4
3 2 1
11
12
5
4
4
5
A
C
B
7
4
1
6
D
2
E
F
Page 3
14
3 2
G
I
13 14
H
13
K
3
J
3
Page 4
L M
1516
4
Page 5

Intended use
Your Black & Decker hand held vacuum
cleaner has been designed for light dry
vacuum cleaning purposes.This product is
intended for household use only.
The appliance is not supplied with its
own battery and charger. Please use the
equipment supplied with a Black & Decker
power tool that uses the type of battery
and charger suitable for this appliance.
For the correct type of battery and
charger, refer to the technical data.
Safety instructions
◆ Warning! When using battery-
powered appliances, basic safety
precautions, including the following,
should always be followed to reduce
the risk of fire, leaking batteries,
personal injury and material damage.
◆ Read this manual carefully before
using the appliance.
◆ The intended use is described in this
manual. The use of any accessory or
attachment or the performance of
any operation with this appliance
other than those recommended in
this instruction manual may present
a risk of personal injury.
◆ Retain this manual for future
reference.
Using your appliance
◆ Do not use the appliance to pick up
liquids or any materials that could
catch fire.
◆ Do not use the appliance near water.
Do not immerse the appliance in
water.
◆ Never pull the charger lead to
disconnect the charger from the
socket. Keep the charger lead away
from heat, oil and sharp edges.
After use
◆ Unplug the charger before cleaning
the charger.
◆ When not in use, the appliance
should be stored in a dry place.
Children should not have access to
stored appliances.
Inspection and repairs
◆ Before use, check the appliance for
damaged or defective parts. Check
for breakage of parts, damage to
switches and any other conditions
that may affect its operation.
◆ Do not use the appliance if any part
is damaged or defective.
◆ Have any damaged or defective parts
repaired or replaced by an
authorised repair agent.
◆ Regularly check the charger lead for
damage. Replace the charger if the
lead is damaged or defective.
◆ Never attempt to remove or replace
any parts other than those specified
in this manual.
Additional safety instructions for
batteries and chargers
Batteries
◆ Never attempt to open for any reason.
◆ Do not expose to water.
◆ Do not store in locations where the
temperature may exceed 40 °C.
◆ Charge only at ambient temperatures
between 4 °C and 40 °C.
◆ Charge only using the charger provided
with the tool (see technical data).
◆ Before charging, make sure that the
battery is dry and clean.
◆ Use only the correct type of battery
for the tool (see technical data).
◆ When disposing of batteries, follow
the instructions given in the section
“Protecting the environment”.
◆ Under extreme conditions, battery
leakage may occur. When you notice
liquid on the battery, proceed as
follows:
- Carefully wipe the liquid off using
a cloth. Avoid skin contact.
- In case of skin or eye contact,
follow the instructions below.
Warning! The battery fluid, a 25-30%
solution of potassium hydroxide, can be
harmful. In case of skin contact,
immediately rinse with water. Neutralize
with a mild acid such as lemon juice or
vinegar.
5
Page 6

In case of eye contact, rinse copiously
with clean water for at least 10 minutes.
Seek medical attention.
Fire hazard! Avoid shortcircuiting the contacts of a
detached battery (e.g. keys
carried in the same pocket as a
battery).
Do not incinerate the battery.
Do not attempt to charge
damaged batteries.
Chargers
◆ Use your Black & Decker charger
only to charge batteries of the type
supplied with your tool.
Other batteries could burst, causing
personal injury and damage.
◆ Never attempt to charge non-
rechargeable batteries.
◆ Have defective cords replaced
immediately.
◆ Do not expose to water.
◆ Do not open the charger.
◆ Do not probe the charger.
The charger is intended for
indoor use only.
Electrical safety
Your charger has been designed for a
specific mains voltage. Always check
that the mains voltage corresponds to the
voltage on the rating plate.
Your charger is double
insulated in accordance with
EN 60335; therefore no earth
wire is required.
Never attempt to replace the
charger unit with a regular
mains plug.
Mains plug replacement
(U.K. & Ireland only)
◆ Should your mains plug need
replacing and you are competent to
do this, proceed as instructed below.
If you are in doubt, contact an
authorised repair agent or a qualified
electrician.
◆ Disconnect the plug from the supply
and remove the fuse from the plug.
◆ Cut off the plug and dispose of it
safely; a plug with bared copper
conductors is dangerous if engaged
in a live socket outlet.
◆ Only fit 13 Amperes BS1363A
approved plugs fitted with a 5 A fuse
(1).
◆ The cable wire colours, or a letter,
will be marked at the connection
points of most good quality plugs.
Attach the wires to their respective
points in the plug (see above).
Brown is for Live (L) (2), blue is for
Neutral (N) (4).
◆ Before replacing the top cover of the
mains plug ensure that the cable
restraint (3) is holding the outer
sheath of the cable firmly and that
the leads are correctly fixed at the
terminal screws.
◆ If the plug has a fuse cover, make
sure that the fuse cover is fitted.
Do not use the plug if the fuse cover
is missing or damaged.
Never use a light socket.
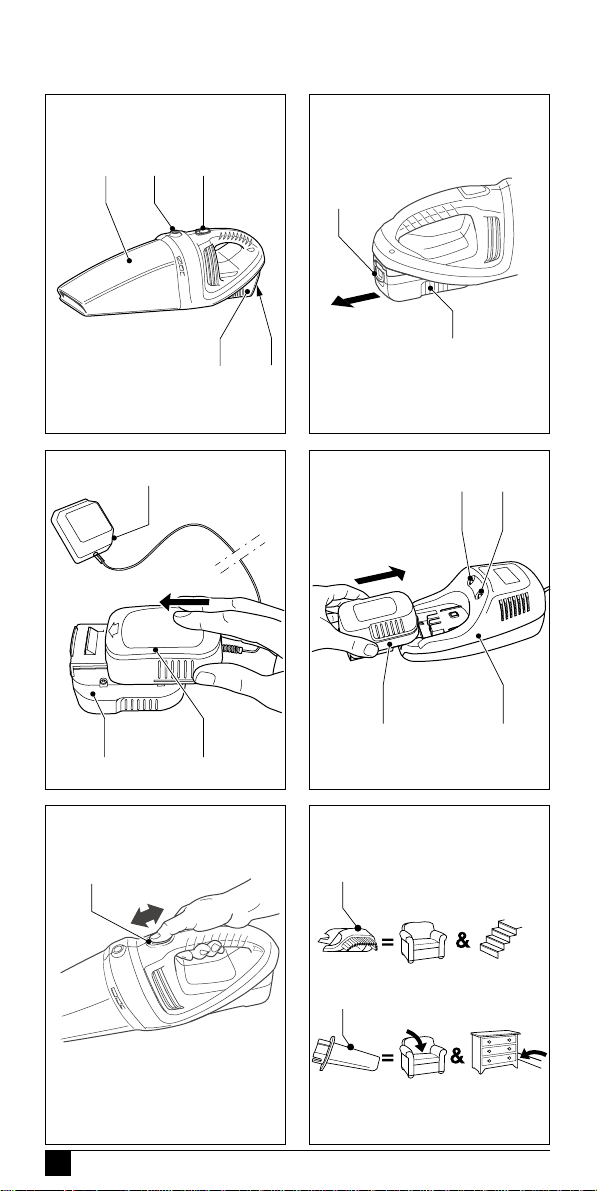
Features (fig. A)
1. On/off switch
2. Release button for dust bowl
3. Dust bowl
6
Page 7

4. Battery
5. Battery release button
Assembly
Fitting and removing the battery (fig. B)
◆ To fit the battery (4), line it up with
the receptacle on the tool. Slide the
battery into the receptacle and push
until the battery snaps into place.
◆ To remove the battery, push the
release button (5) while at the same
time pulling the battery out of the
receptacle
Use
Charging the battery
The battery needs to be charged before
first use and whenever it fails to produce
sufficient power on jobs that were easily
done before. When charging the battery
for the first time, or after prolonged
storage, it will only accept an 80%
charge. After several charge and
discharge cycles, the battery will attain
full capacity. The battery may become
warm while charging; this is normal and
does not indicate a problem.
1 hr charger (fig. D)
◆ To charge the battery (4), remove it
from the tool and insert it into the
charger (8). The battery will only fit
into the charger in one way. Do not
force. Be sure that the battery is fully
seated in the charger.
◆ Plug in the charger.
Switch on at the mains.
◆ Check if the red charging indicator
(9) lights up. If the green end of
charge indicator (10) lights up now
instead, the battery is too hot and
cannot be charged. If this happens,
remove the battery from the charger,
let the battery cool down for approx.
1 hour and re-insert it.
After approx. 1 hour of charging, the red
charging indicator (9) will stop lighting
and the green end of charge indicator
(10) will light up. The battery is now fully
charged.
◆ Remove the battery from the charger.
Operating the appliance (fig. E)
◆ To switch on, slide the on/off switch
(1) forward.
◆ To switch off, slide the on/off switch
back.
Do not charge the battery at
ambient temperatures below
4 °C or above 40 °C.
Recommended charging
temperature: approx. 24 °C.
3 hr charger (fig. C)
◆ To charge the battery (4), remove it
from the tool.
◆ Slide the charger receptacle (6) onto
the battery as shown.
◆ Plug in the charger (7). Switch on at
the mains.
The battery will become warm while
charging. After approx. 3 hours of
charging, the battery will be fully charged.
◆ Remove the charger receptacle from
the battery.
Accessories
These models are supplied with the
following accessories (fig. F):
- a hard brush (11) for furniture and
stairs
- a crevice tool (12) for confined spaces
To fit an accessory, proceed as follows
(fig. G):
◆ Take the accessories from the
appliance.
◆ Insert the appropriate accessory into
the front of the appliance.
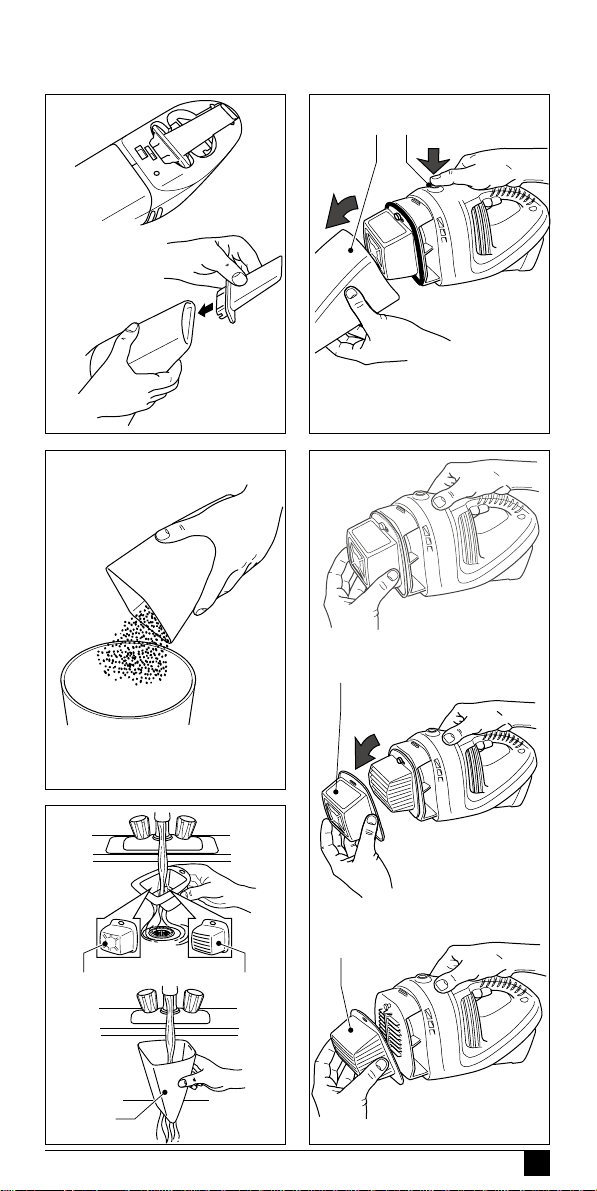
Cleaning and maintenance
Warning! Regularly clean the filters.
Cleaning the dust bowl and filters
(fig. H - L)
The filters are re-usable and should be
cleaned regularly.
7
Page 8

◆ Press the release button (2) and
remove the dust bowl (3) (fig. H).
◆ Remove any dust from the dust bowl
(fig. I).
◆ Remove the filters (13 & 14) by
twisting them clockwise (fig. J).
◆ Brush any loose dust off the filters.
◆ Wash the filters in warm, soapy
water (fig. K). The bowl can also be
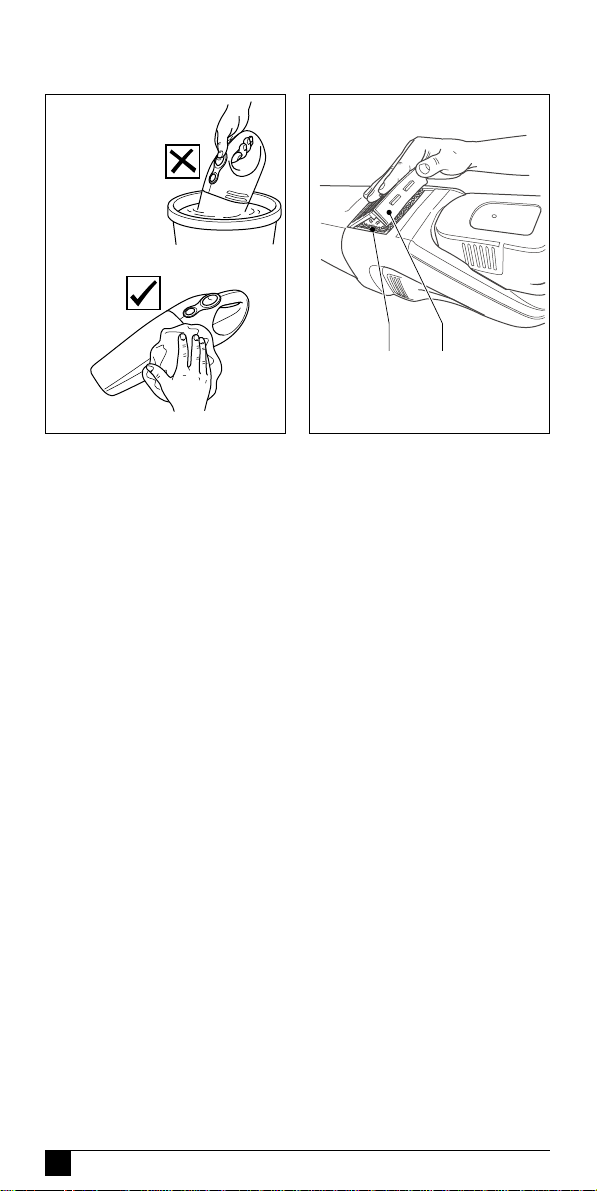
washed if necessary. Do not immerse
the appliance in water (fig. L).
◆ Make sure the dust bowl and filters
are dry.
◆ Refit the filters (13 & 14) onto the
appliance, twisting them
counterclockwise until they lock into
place.
◆ Refit the dust bowl onto the
appliance. Make sure the dust bowl
clicks into place.
Cleaning the exhaust filter (fig. M)
◆ Open the lid (15).
◆ Remove the filter (16) from the recess.
◆ Wash the filter in warm, soapy water.
The filter may discolour slightly.
◆ Make sure the filter is dry.
◆ Refit the filter (16), making sure the
black side faces out.
◆ Close the lid.
Warning! Never use the appliance
without the filters. Optimum dust
collection will only be achieved with
clean filters and an empty dust bowl.
Replacing the filters
The filters should be replaced every 6 to
9 months and whenever worn or damaged.
Replacement filters are available from
your Black & Decker dealer.
Protecting the environment
Should you find one day that
your Black & Decker product
needs replacement, or if it is of
no further use to you, think of
the protection of the
environment.
Black & Decker repair agents
will accept old Black & Decker
products and ensure that they
are disposed of in an
environmentally safe way.
Batteries
Black & Decker batteries can
be recharged many times.
At the end of their useful life,
discard batteries with due care
for our environment:
◆ Run the battery down completely,
then remove it from the tool.
◆ NiCd and NiMH batteries are
recyclable. Take them to any
authorised repair agent or a local
recycling station.
You can check the location of your
nearest authorised repair agent by
contacting your local Black & Decker
office at the address indicated in this
manual. Alternatively, a list of authorised
Black & Decker repair agents and full
details of our after-sales service and
contacts are available on the Internet at:
www.2helpU.com.
Technical data
HD18F2M
Voltage VDC18
Weight (without battery) kg 0.92
Battery
Cat. no A18
Voltage VDC18
Capacity Ah 1.5
Weight kg 0.9
Charger
Cat. no. 5100235-03
Input voltage VAC230
Approx. charging time h 1
8
Page 9

EC declaration of conformity
Black & Decker declares that these
products conform to:
98/37/EC, 89/336/EEC, 73/23/EEC,
EN 55014, EN 60335, EN 61000
L
(sound pressure): < 85 dB(A), hand/
pA
arm weighted vibration < 2.5 m/s
2
Colin Wills, Director of Engineering
BDCI, 4/F, 2 Dai Wang Street, Tai Po
Industrial Estate, Tai Po NT, Hong Kong
Guarantee
Black & Decker is confident of the
quality of its products and offers an
outstanding guarantee. This guarantee
statement is in addition to and in no
way prejudices your statutory rights.
The guarantee is valid within the
territories of the Member States of the
European Union and the European Free
Trade Area.
If a Black & Decker product becomes
defective due to faulty materials,
workmanship or lack of conformity,
within 24 months from the date of
purchase, Black & Decker guarantees to
replace defective parts, repair products
subjected to fair wear and tear or
replace such products to ensure
minimum inconvenience to the customer
unless:
◆ The product has been used for
trade, professional or hire purposes;
◆ The product has been subjected to
misuse or neglect;
◆ The product has sustained damage
through foreign objects, substances
or accidents;
◆ Repairs have been attempted by
persons other than authorised
repair agents or Black & Decker
service staff.
To claim on the guarantee, you will
need to submit proof of purchase to the
seller or an authorised repair agent.
You can check the location of your
nearest authorised repair agent by
contacting your local Black & Decker
office at the address indicated in this
manual. Alternatively, a list of
authorised Black & Decker repair
agents and full details of our after-sales
service and contacts are available on
the Internet at: www.2helpU.com.
Please register at our website
www.blackanddecker.com to be
kept up to date on new products and
special offers. Further information on
the Black & Decker brand and our range
of products is available at
www.blackanddecker.com.
9
Page 10

101112
Page 11

Page 12

Australia
DEWALT Industrial Power Tool Company
7 Clarice Road Tel. 03 9895 9200
Box Hill, Victoria 3128 Fax 03 9899 7465
New Zealand
Black & Decker Tel. 09 579 7600
81 Hugo Johnston Drive Fax 09 579 8200
Penrose, Auckland, New Zealand
United Kingdom
Black & Decker Tel. 01753 511234
210 Bath Road Fax 01753 551155
Slough, Berkshire SL1 3YD Helpline 01753 574277
5103788-01
06/03
 Loading...