

Page 1

www.blackanddecker.com
FSM1625
11
10
12
8
9
English 4
10
Page 2
2
B
A
D
C
F
E
13
14
13
13
12
Page 3
3
HG
J
21
22
I
10
9
20
Page 4

4
ENGLISH
(Original instructions)
Intended use
Your Black & Decker steam mop has been designed for
sanitising and cleaning sealed hardwood, sealed laminate,
linoleum, vinyl, ceramic tile, stone and marble oors and for
refreshing carpets. This appliance is intended for indoor
household use only.
Safety instructions
@
Warning! Read all safety warnings and all
instructions. Failure to follow the warnings and
instructions listed below may result in electric
shock, re and/or serious injury.
@
Warning! When using mains-powered appliances, basic safety precautions, including the
following, should always be followed to reduce
the risk of re, electric shock, personal injury and
material damage.
u Read all of this manual carefully before using the appli-
ance.
u The intended use is described in this manual. The use of
any accessory or attachment or the performance of any
operation with this appliance other than those recommended in this instruction manual may present a risk of
personal injury.
u Retain this manual for future reference.
Using your appliance
u Do not direct steam at people, animals, electrical appli-
ances or electrical outlets.
u Do not expose to rain.
u Do not immerse the appliance in water.
u Do not leave the appliance unattended.
u Do not leave the appliance connected to an electrical
outlet when not in use.
u Never pull the power lead to disconnect the appliance
from the socket. Keep the appliance lead away from heat,
oil and sharp edges.
u Do not handle steam cleaner with wet hands.
u Do not pull or carry by cord, use cord as a handle, close
door on cord, pull cord around sharp corners or expose
cord to heated surfaces.
u Do not use appliance in an enclosed space lled with
vapour given off by oil-base paint thinner, some moth-
proong substances, ammable dust, or other explosive or
toxic vapours.
u Check the type of oor with the manufacturer.
u Do not use on leather, wax polished furniture or oors,
synthetic fabrics, velvet or other delicate, steam-sensitive
materials.
@
Warning! Do not use on unsealed wood or
unsealed laminate oors. On surfaces that have
been treated with wax or some no wax oors, the
sheen may be removed by the heat and steam
action. It is always recommended to test an
isolated area of the surface to be cleaned before
proceeding. We also recommend that you check
the use and care instructions from the oor
manufacturer.
u Never put descaling, aromatic, alcoholic or detergent
products into the steam cleaner, as this may damage it or
make it unsafe for use.
u If the home circuit breaker activates while using the steam
function, discontinue product use immediately and contact
the customer support centre. (Beware of the risk of electrical shock.)
u The appliance emits very hot steam to sanitize the area of
use. This means that the steam head, cleaning pads and
carpet attachment get very hot during use.
u Caution! Always wear suitable shoes when using your
steam mop and when changing the accessories on your
steam mop. Do not wear slippers or open toed footwear.
u The lid may become hot during use.
u Steam may escape from the appliance during use.
u Care should be taken when using this appliance. DO NOT
touch any parts which may become hot during use.
u Switch the appliance off and return the handle to the
upright position before removing the water tank.
u For oor use only; do not use the unit upside down. This
appliance is intended for indoor household use only.
After use
u Unplug the appliance and allow to cool before cleaning.
u When not in use, the appliance should be stored in a dry
place.
u Children should not have access to stored appliances.
Steam Mop with Deluxe Head FSM1625
Voltage
V
ac
220-240
Power W 1600
Tank capacity ml 460
Weight kg 2.7
FSM1625
STEAM MOP WITH DELUXE HEAD
Technical data
Page 5
5
ENGLISH
(Original instructions)
Inspection and repairs
u Unplug the appliance and allow to cool before performing
any maintenance or repairs.
u Before use, check the appliance for damaged or defective
parts. Check for breakage of parts, damage to switches
and any other conditions that may affect its operation.
u Regularly check the power lead for damage.
u Do not use the appliance if any part is damaged or defec-
tive.
u Have any damaged or defective parts repaired or replaced
by an authorized repair agent.
u Never attempt to remove or replace any parts other than
those specied in this manual.
Safety of others
u This appliance is not intended for use by persons (includ-
ing children) with reduced physical, sensory or mental
capabilities, or lack of experience and knowledge, unless
they have been given supervision or instruction concerning the use of the appliance by a person responsible for
their safety.
u Children should be supervised to ensure that they do not
play with the appliance.
Residual risks.
Additional residual risks may arise when using the tool which
may not be included in the enclosed safety warnings. These
risks can arise from misuse, prolonged use etc.
Even with the application of the relevant safety regulations
and the implementation of safety devices, certain residual
risks can not be avoided. These include:
u Injuries caused by touching any moving parts.
u Injuries caused by touching any hot parts.
u Injuries caused when changing any parts or accessories.
u Injuries caused by prolonged use of the appliance. When
using any appliance for prolonged periods ensure you
take regular breaks.
Electrical safety
@
Warning! This product must be earthed.
Always check that the power supply corresponds to the voltage on the rating plate.
Power plugs must match the outlet. Never modify the plug in
any way. Unmodied plugs and matching outlets will reduce
risk of electric shock.
u If the supply cord is damaged, it must be replaced by
the manufacturer or an authorised Black & Decker
Service Centre in order to avoid a hazard.
Extension cables & Class 1 product
u A 3-core cable must be used as your appliance is
earthed and of Class 1 construction.
u Up to 30m (100 ft) can be used without loss of power.
Labels on the appliance
The following pictograms are shown on the tool:
Warning! To reduce the risk of injury, the user
must read the instruction manual.
Warning! Danger of scalding.
Features
This appliance includes some or all of the following features.
1. ON/Off switch
2. AutoselectTM dial
3. Removable water tank
4. Handle
5. Steam head
6. Steam head cleaning pad
7. Delta head cleaning pad
8. Resting mat
9. Bottom cable tidy hook
10. Top cable tidy hook
11. Cable management clip
12. Carpet Glider
Assembly
Warning! Before attempting any of the following operations,
make sure that the appliance is switched off and unplugged
and that the appliance is cold and does not contain any water.
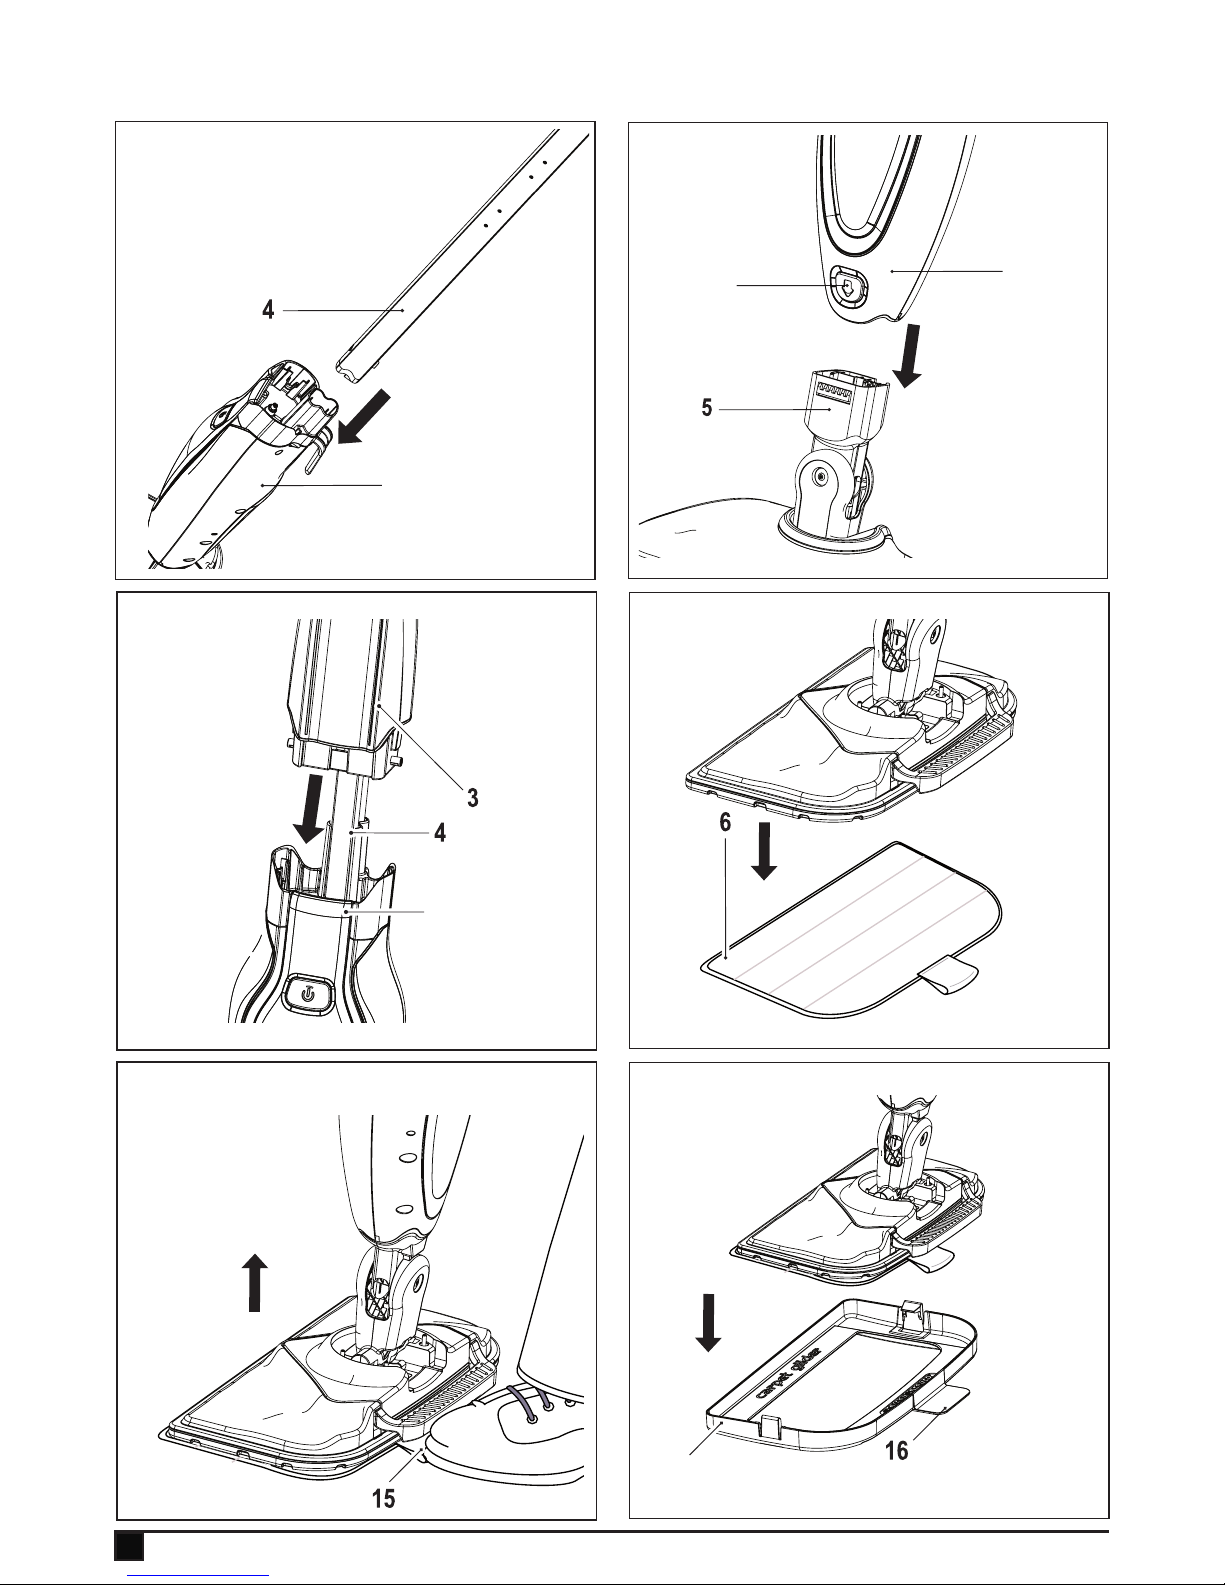
Attaching the handle (Fig. A)
u Slide the bottom end of the handle (4) into the top end of
the steam mop body (13) until it clicks into place.
Attaching the steam head (Fig. B)
u Slide the bottom end of the steam mop body (13) onto the
steam head (5) until it clicks into place.
u The steam head can be removed from the Steam mop
body by pressing the steam head release button (14) and
pulling the steam mop body (13) off the steam head (5).
Attaching the water jug (Fig. C)
u Clip the water jug (3) onto the handle (4).
u Slide the water jug (3) down into the Steam mop body
Page 6

6
ENGLISH
(Original instructions)
(13), ensure that the water jug is rmly seated.
Attaching a cleaning pad (Fig. D)
Replacement cleaning pads are available from your Black &
Decker dealer:- (cat. no. FSMP20-XJ).
Steam head cleaning pad - cat. no. FSMP20-XJ).
Delta head cleaning pad - cat. no. FSMP30-XJ.
u Place a cleaning pad (6 or 7) on the oor with the‘hook &
loop’ side facing up.
u Lightly press the steam mop down onto the cleaning pad
(6 or 7).
Caution! Always place your steam mop on the resting mat (8)
with the handle (4) in the upright position when stationary and
make sure the steam mop is turned off when not in use.
Removing a cleaning pad (Fig. E)
Caution! Always wear suitable shoes when changing the
cleaning pad on your steam mop. Do not wear slippers or
open toed footwear.
u Return the handle (4) to the upright position and turn the
steam mop ‘OFF’.
u Place the steam mop on the resting mat and wait until it
cools down. (approximately ve minutes)
u Place the front of your shoe onto the cleaning pad removal
tab (15) and press down rmly.
u Lift the steam mop up off the cleaning pad.
Caution! Always place the steam mop on the resting mat (8)
with the handle (4) in the upright position when stationary and
make sure the steam mop is turned off when not in use.
Attaching the carpet glider (Fig. F)
u Place carpet glider on the oor.
u Lightly press the steam mop down onto the carpet glider
(12) until it clicks into place.
Caution! Always place the steam mop on the resting mat (8)
with the handle (4) in the upright position when stationary and
make sure the steam mop is turned off when not in use.
Removing the carpet glider (Fig. F)
Caution! Always wear suitable shoes when changing the
carpet glider on your steam mop. Do not wear slippers or
open toed footwear.
u Return the handle (4) to the upright position and turn the
steam mop ‘OFF’.
u Place the steam mop on the resting mat and wait until it
cools down. (approximately ve minutes)
u Place the front of your shoe onto the carpet glider removal
tab (16) and press down rmly.
u Lift the steam mop up off the carpet glider (12).
Caution! Always place the steam mop on the resting mat (8)
with the handle (4) in the upright position when stationary and
make sure the steam mop is turned off when not in use.
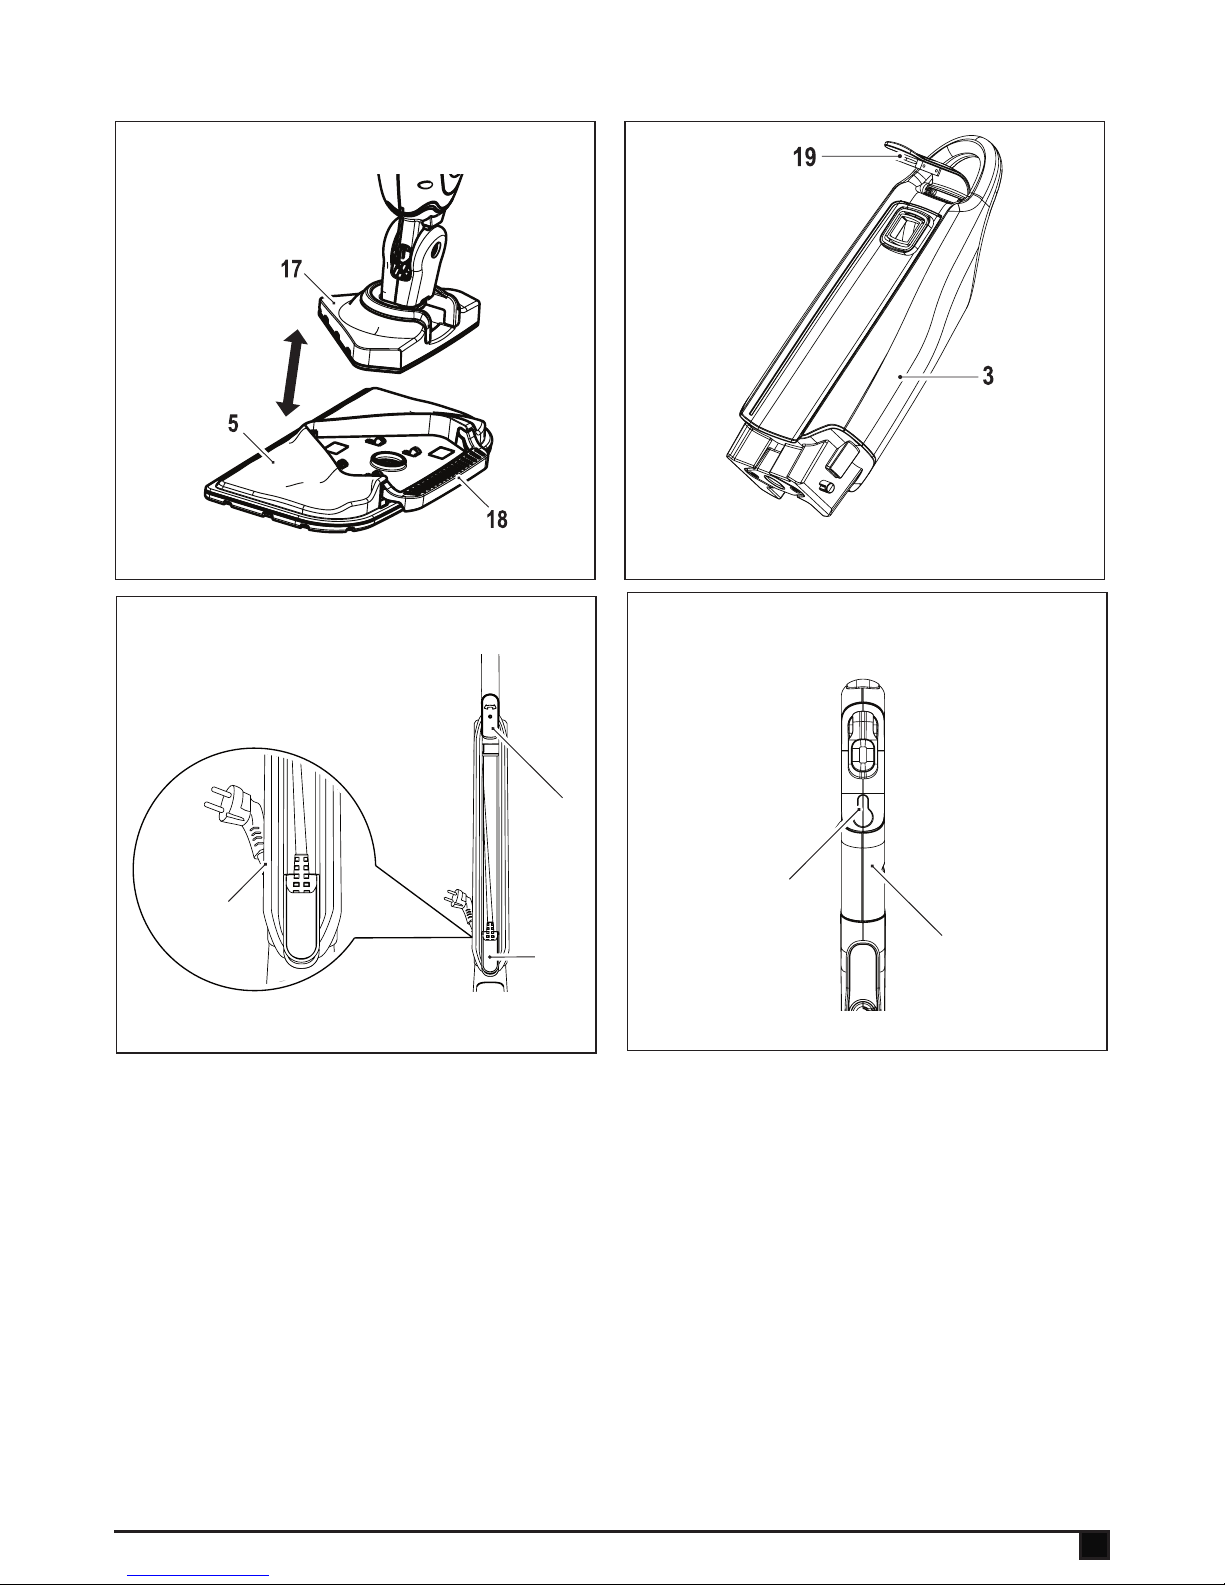
The Delta Head (Fig. G)
This Steam Mop incorporates a built in delta head which
enables you to access into tight corners and narrow gaps.
Caution! Always wear suitable shoes when accessing the
delta head on your steam mop. Do not wear slippers or open
toed footwear.
u Return the handle (4) to the upright position and turn the
steam mop ‘OFF’.
u Place the steam mop on the resting mat and wait until it
cools down. (approximately ve minutes)
u Place the front of your shoe onto the steam head removal
tab (18) and press down gently.
u Lift the delta head (17) up off the steam head (5).
u Fit the delta head cleaning pad to the bottom of the delta
head.
Note: Remove the cleaning pad before re-tting the delta
head to the steam head.
u To ret the delta head, place the tip of the delta head into
the steam head then press down rmly ensuring that the
delta head clicks into place.
Caution! Always place the steam mop on the resting mat (8)
with the handle (4) in the upright position when stationary and
make sure the steam mop is turned off when not in use.
Filling the water tank (Fig. H)
The watertank on your steam mop is removable for convi-
enient and easy lling.
This Steam Mop incorporates an anti-calc system to help
prolong the life of the system.
Note: Fill the water tank with clean tap water.
Note: In areas of very hard water, the use of de-ionised water
is recommended.
u Remove the water tank (3).
u Open the ller cap (19) by lifting it up.
u Fill the water tank (3) with water.
Warning! Your water tank has a 0.46 litre capacity. Do not
over ll the tank.
u Re-t the ller cap (19).
u Re-t the water tank (3).
Note: Ensure the ller cap is rmly secured.
Use
Important! This unit will kill 99.9% of bacteria & germs when
used in accordance with this manual and with the micro bre
pad tted and a continuous run time of 90 seconds.
Switching on and off
u To switch the appliance on, press the ON/OFF button (1).
It takes approximately 15 seconds for the steam mop to
heat up.
Note: When the steam mop is rst turned on the water reservoir will glow red. Once the steam mop is ready to use the
Page 7

7
ENGLISH
(Original instructions)
water reservoir will glow blue.
u To switch the appliance off, press the ON/OFF button (1).
Caution! Never leave the steam mop in one spot on any
surface for any period of time. Always place the steam mop on
the resting mat (8) with the handle (4) in the upright position
when stationary and make sure the steam mop is turned off
when not in use.
Caution! Always empty the steam mop after use.
AutoselectTM Technology
This steam mop is tted with an AutoselectTM dial (2) which
shows various cleaning applications. They are used to select
the correct operating mode for your particular cleaning operation.
Using the AutoselectTM dial (2), choose from one of the following applications:
Wood/Laminate
Stone/Marble
Tiles/Vinyl
The steam mop will select the correct volume of steam
required for your particular cleaning operation.
Note: Always check you are using the correct setting before
using your steam mop.
Hints for optimum use
General
Caution! Never use the steam mop without rst attaching a
cleaning pad.
u During use you can use the cable mamagement clip (11)
to keep your cable out of the way of the work area..
u Always vacuum or sweep the oor before using the steam
mop.
u The easiest way to use the machine is to tilt the handle to
a 45˚ angle and clean slowly, covering a small area at a
time.
u Do not use chemical cleaners with your steam mop. To
remove stubborn stains from vinyl or linoleum oors, you
can pre-treat with a mild detergent and some water before
using the steam mop.
Steam cleaning
u Place a cleaning pad (6 or 7) on the oor with the ‘hook &
loop’ side facing up.
u Raise the steam mop off the resting mat (8) and lightly
press it down onto the cleaning pad (6 or 7).
u Place the steam mop on the resting mat.
u Connect the steam mop to the mains.
u Turn the Autoselect
TM
dial (2) to the required setting.
u Press the ON/OFF button (1). It takes approximately 15
seconds for the steam mop to heat up.
u Pulling the handle (4) back will activate the steam pump.
After a few seconds steam will start to come out of the
steam head.
u It takes a few seconds for steam to enter the cleaning pad.
The steam mop will now glide easily over the surface to be
sanitised/cleaned.
u Push and pull the steam mop slowly across the oor to
thoroughly steam clean each section.
Note: During use you may turn off the steam pump by returning the handle to the upright position, this convenient feature
will allow you to place the steam mop on the resting mat for
a short time so that you may move items of furniture, then
continue cleaning without the need to switch the appliance off.
u When you have nished using the steam mop, return the
handle (4) to the upright position and turn it ‘OFF’, place it
on the resting mat (8) and wait until the steam mop cools
down. (approximately ve minutes)
Caution! It is important to monitor the water level in the water
tank. To rell the water tank and continue to sanitise/clean,
return the handle (4) to the upright position and turn the steam
mop ‘OFF’. Unplug the unit from the electrical wall outlet,
remove and rell the water tank (3).
Caution! Never leave the steam mop in one spot on any
surface for any period of time. Always place the steam mop on
the resting mat (8) with the handle (4) in the upright position
when stationary and make sure the steam mop is turned off
when not in use.
Carpet refreshing
u Place a cleaning pad (6 or 7) on the oor with the ‘hook &
loop’ side facing up.
u Raise the steam mop off the resting mat (8) and lightly
press it down onto the cleaning pad (6 or 7).
u Place the carpet glider (12) on the oor.
u Lightly press the steam mop down onto the carpet glider
(12) until it clicks into place.
u Place the steam mop on the resting mat. (8)
u Connect the steam mop to the mains.
u Press the ON/OFF button (1). It takes approximately 15
seconds for the steam mop to heat up.
u Turn the Autoselect
TM
dial (2) to the Wood/Laminate set-
ting.
u Pulling the handle (4) back will activate the steam pump.
After a few seconds steam will start to come out of the
Page 8

8
ENGLISH
(Original instructions)
steam head.
u Push and pull the steam mop slowly across the carpet to
thoroughly refresh each section.
Note: During use you may turn off the steam pump by returning the handle (4) to the upright position, this convenient
feature will allow you to place the steam mop on the resting
mat (8) so that you may move items of furniture with out the
need to switch the appliance off.
u When you have nished using the steam mop, return the
handle (4) to the upright position and turn it ‘OFF’, place it
on the resting mat (8) and wait until the steam mop cools
down. (approximately ve minutes)
Caution! It is important to monitor the water level in the water
tank. To rell the water tank and continue to sanitise/clean,
return the handle (4) to the upright position and turn the steam
mop ‘OFF’. Unplug the unit from the electrical wall outlet,
remove and rell the water tank (3).
Caution! Never leave the steam mop in one spot on any
surface for any period of time. Always place the steam mop on
the resting mat (8) with the handle (4) in the upright position
when stationary and make sure the steam mop is turned off
when not in use.
After use (Fig. H & I)
u Return the handle (4) to the upright position and turn the
steam mop ‘OFF’,
u Place the steam mop on the resting mat (8) and wait until
the steam mop cools down. (approximately ve minutes)
u Unplug the steam mop from the electrical wall outlet.
u Empty the water tank (3).
u Remove the cleaning pad (6 or 7) and wash it ready for
next use. (Take care to follow the wash care instructions
printed on the cleaning pad).
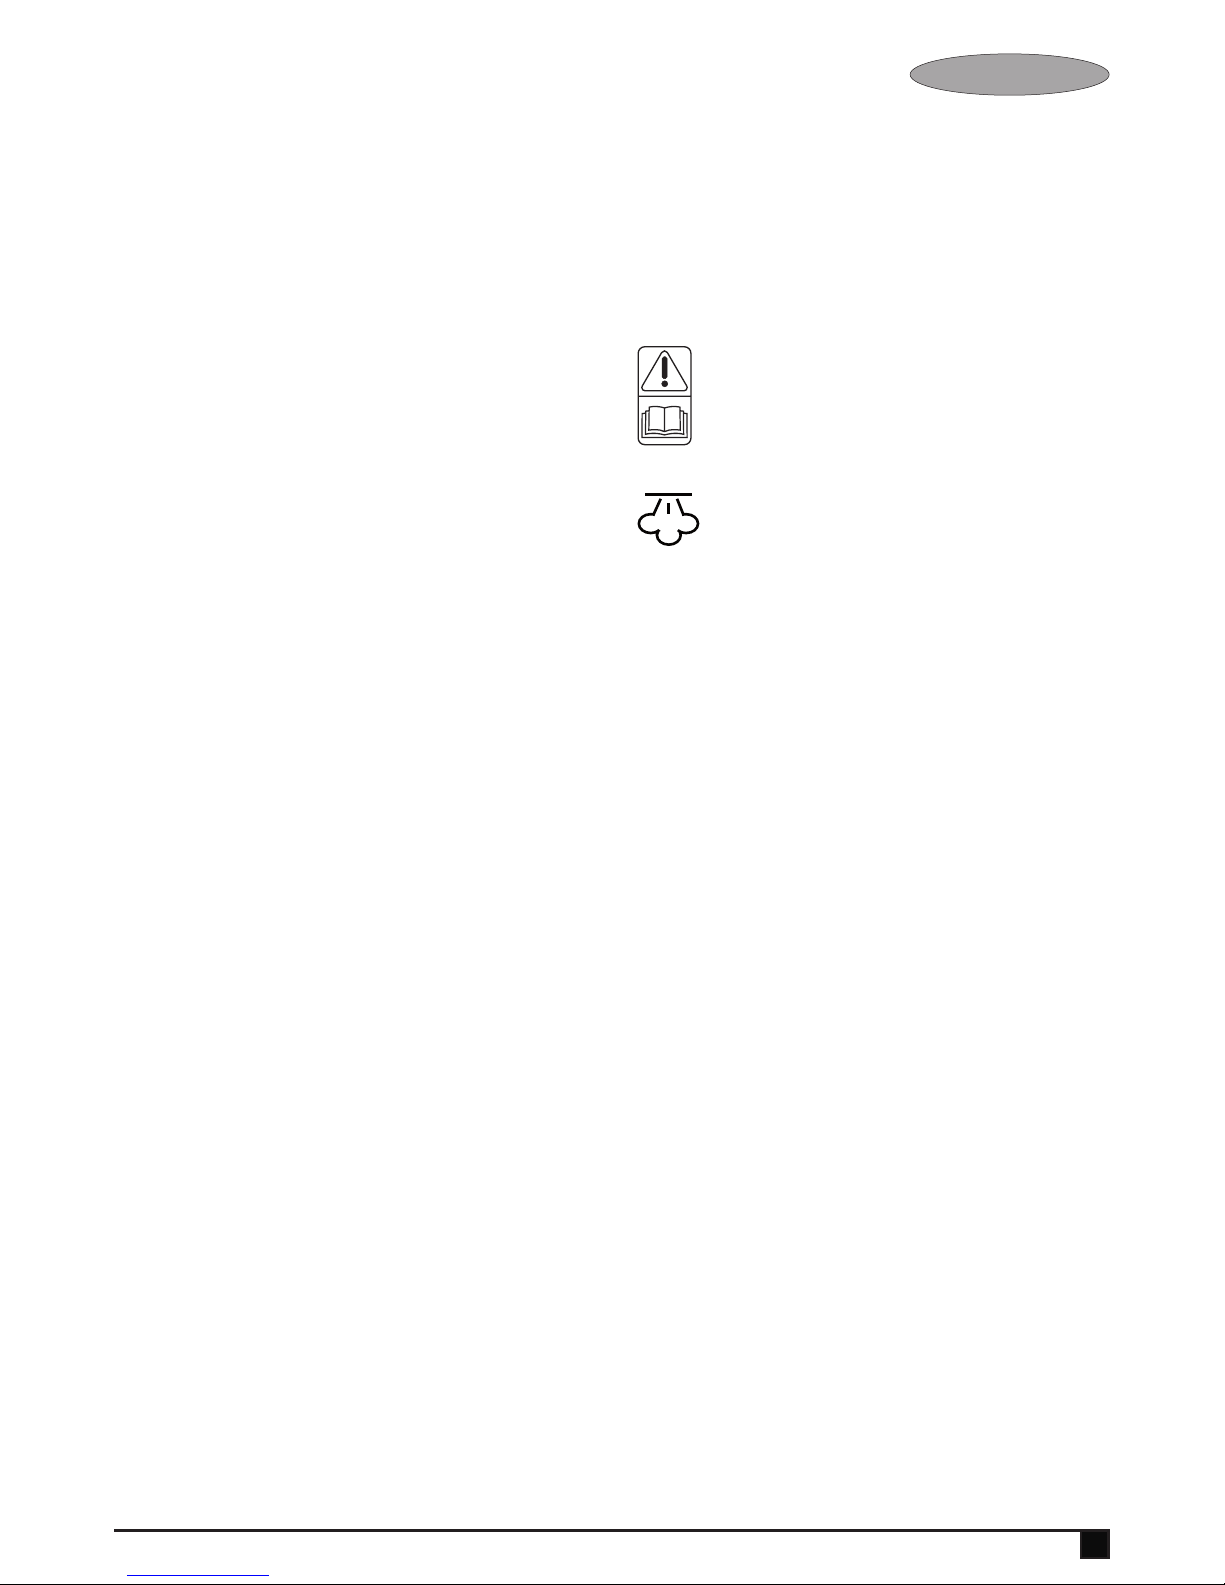
u Wrap the supply cable around the cable tidy hooks (9 &
10).
Note: The top cable tidy hook (10) rotates to easily release
the cable ready for next use.
u Clip the supply cable onto itself using the cable tidy clip
(20) close to the plug.
u Place steam mop on the resting mat (8) for storage.
Note: With the handle (4) in the upright position, the cable
neatly wrapped around the cable tidy hooks (9 & 10) and
secured with the cable tidy clip (20) your steam mop will stand
on its own for storage. Alternatively there is a hanging bracket
(21) built into the hand grip (22) which will allow your steam
mop to be hung from a suitable hook on the wall. Always
ensure that your wall hook is capable of supporting the weight
of the steam mop safely.
Maintenance and cleaning
Your Black & Decker corded appliance has been designed to
operate over a long period of time with a minimum of maintenance. Continuous satisfactory operation depends upon
proper appliance care and regular cleaning.
Warning! Before performing any maintenance or cleaning on
corded appliances switch off and unplug the appliance.
u Wipe your appliance over using a soft damp cloth.
u For stubborn marks you can use a mild solution of soap
and water to dampen your cloth.
Care of the cleaning pads
Wash care instructions - No fabric conditioner - Allow to dry
fully before re-use.
Caution! Follow the cleaning instructions printed on the label
of the cleaning pad.
Protecting the environment
Z
Separate collection. This product must not be
disposed of with normal household waste.
Should you nd one day that your Black & Decker product
needs replacement, or if it is of no further use to you, do not
dispose of it with household waste. Make this product available for separate collection.
z
Separate collection of used products and packaging
allows materials to be recycled and used again.
Re-use of recycled materials helps prevent environmental pollution and reduces the demand for raw
materials.
Local regulations may provide for separate collection of electrical products from the household, at municipal waste sites or
by the retailer when you purchase a new product.
Service Information
Black & Decker offers a full network of company-owned and
authorized service locations throughout Asia. All Black &
Decker Service Centers are staffed with trained personnel
to provide customers with efcient and reliable power tool
service.Whether you need technical advice, repair, or genuine
factory replacement parts, contact the Black & Decker location
nearest to you.
Notes
u Black & Decker's policy is one of continuous improvement
to our products and, as such, we reserve the right to
change product specications without prior notice.
u Standard equipment and accessories may vary by
country.
u Product specications may differ by country.
Page 9

9
ENGLISH
(Original instructions)
u Complete product range may not be available in all
countries.
u Contact your local Black & Decker dealers for range
availability.
Page 10

10
(사용 지침 원본)
한국어
용도
Black & Decker 스팀맙은 포장 견목, 포장 합판,
리놀륨, 비닐, 세라믹 타일, 석재 및 대리석 바닥의
오염 물질을 제거하고 청소할 수 있도록
제작되었습니다. 본 제품은 실내 가정용입니다.
안전 지침
@
경고! 모든 안전 경고와 모든 지시사항을
읽으십시오. 아래 나열된 경고와 지시 사항
을 준수하지 않으면 감전, 화재 및/또는 심
각한 부상을 초래할 수 있습니다.
@
경고! 주 전원 공급으로 구동되는 제품을
사용할 때는 화재, 감전, 신체 부상 및 중대
한 손상의 위험을 줄이기 위해 항상 다음과
같은 기본적 안전 주의 사항에 따라 사용해
야 합니다.
u 제품을 사용하기 전에 본 사용 설명서 전체 내용
을 잘 읽고 숙지해주십시오.
u 본 설명서에 제품의 용도가 설명되어 있습니다.
본 사용 설명서에서 권장하는 방식 이외의 다른
방식으로 본 제품을 조작하거나 액세서리 또는
부착물을 사용하는 경우 신체 부상의 위험이 있
을 수 있습니다.
u 향후 참고할 수 있도록 본 사용 설명서를 잘 보관
해두십시오.
제품 사용
u 사람, 동물, 가전 제품 또는 전기 콘센트 쪽으로
스팀이 향하지 않도록 하십시오.
u 비에 노출되지 않도록 하십시오.
u 본 제품을 물에 담그지 마십시오.
u 본 제품의 곁을 비우지 마십시오.
u 사용하지 않을 때는 제품을 전기 콘센트에 연결
한 상태로 두지 마십시오.
u 제품을 소켓에서 분리할 때 절대로 충전기 리드
선을 잡아당기지 마십시오. 제품이 열, 오일 및 날
카로운 가장자리에 닿지 않도록 하십시오.
u 스팀 클리너를 손으로 다루지 마십시오.
u 코드로 잡아 당기거나 들고 다니거나, 코드를 손
잡이로 사용하거나 날카로운 모서리 주변으로 코
드를 잡아당기거나 코드를 가열된 표면에 노출시
키지 마십시오.
u 유성 도료 희석제에서 분비되는 증기, 일부 방충
가공, 가연성 분진 또는 기타 폭발성 또는 독성 증
기가 가득한 밀폐된 공간에서 제품을 사용하지
마십시오.
u 바닥 유형은 제조업체에 문의하여 확인하십시오.
u 가죽, 왁스 광택제 가구 또는 바닥, 합성 섬유, 벨
벳 또는 기타 약하고 증기에 민감한 재질에서 사
용하지 마십시오.
@
경고! 비처리 목재 또는 비처리 합판 바닥
에서 사용하지 마십시오. 왁스로 처리된 표
면 또는 일부 왁스가 처리되지 않은 바닥은
열과 증기 작용으로 인해 광택이 벗겨질 수
있습니다. 항상 진행하기 전에 청소할 표면
의 고립된 영역을 테스트해 보는 것이 좋습
니다. 또한 마루 제조업체의 사용 및 주의
지시 사항을 확인하는 것이 좋습니다.
u 제석, 방향성, 알코올 또는 세제 제품을 스팀 클리
너에 넣지 마십시오. 이로 인해 제품이 손상되거
나 사용 시 안전하지 않을 수 있습니다.
u 스팀 기능을 사용하는 동안 가정의 회로 차단기
가 작동하는 경우, 즉시 제품 사용을 중단하고 고
객 지원 센터에 문의하십시오. (감전 위험에 대해
주의하십시오.)
u 본 제품은 매우 뜨거운 증기를 내뿜어서 사용 영
역을 살균합니다. 이는 스팀 헤드, 클리닝 패드 및
카펫 부착물이 사용 중에 매우 뜨거워진다는 의
미입니다.
u 주의! 스팀맙을 사용하고 스팀맙의 액세서리를
바꿀 때는 적합한 신발을 신고 하십시오. 슬리퍼
또는 발가락 부분이 트인 신발을 신지 마십시오.
u 뚜껑은 사용 중에 뜨거워질 수 있습니다.
u 사용 중에 제품에서 증기가 새어 나갈 수 있습니다.
u 이 제품을 사용할 때는 각별히 주의해야 합니다.
사용 중에 뜨거워질 수 있는 부품을 만지지 마십
시오.
u 물 탱크를 제거하기 전에 제품 스위치를 끄고 핸
들을 똑바로 세워 두십시오.
u 바닥 전용인 경우, 장치를 거꾸로 사용하지 마십
시오. 본 제품은 실내 가정용입니다.
사용 후
u 청소하기 전에 제품의 플러그를 뽑아서 열을 식
히십시오.
u 사용하지 않을 때에는 본 제품을 습기가 없는 건
조한 장소에 보관해야 합니다.
델타 헤드가 부착된 스팀맙 FSM1625
전압 Vac 220-240
전력 W 1600
탱크 용량 ml 460
무게 kg 2.7
FSM1625
델타 헤드가 부착된 스팀맙
기술 데이터
Page 11

11
(사용 지침 원본)
한국어
u 어린이가 보관된 제품을 만지지 못하도록 해야
합니다.
검사 및 수리
u 유지 보수하거나 수리하기 전에 제품의 플러그를
뽑아서 열을 식히십시오.
u 사용 전, 제품에 손상되거나 결함 있는 부품이 있
는지 점검하십시오. 부품 파손, 스위치 손상 등 정
상적 사용에 영향을 미칠 수 있는 제품 이상이 있
는지 점검하십시오.
u 전원 리드 선의 손상 여부를 주기적으로 점검하
십시오.
u 손상되거나 결함 있는 부품이 있는 경우에는 제
품을 사용하지 마십시오.
u 손상되거나 결함 있는 부품은 공인 수리 대리점
에 의뢰하여 교체 또는 수리하십시오.
u 본 사용 설명서에 명시된 내용 이외에는 어떤 부
품도 제거하거나 교체하지 마십시오.
다른 사람들의 안전
u 이 스팀청소기는 신체, 지각 또는 정신 능력이 낮
거나 경험 및 지식이 부족한 사람(어린이 포함)이
사용하도록 설계되지 않았습니다. 이러한 사람이
사용할 때는 안전 책임자의 감독 또는 제품 사용
과 관련된 지시 사항이 필요합니다.
u 어린이가 본 제품을 가지고 놀지 못하도록 항상
주시해야 합니다.
기타 발생 가능한 위험.
공구를 사용할 때 동봉된 안전 경고에 포함되어 있지
않은 위험이 발생할 수 있습니다. 이러한 위험은 오
용, 장시간 사용 등으로 인해 발생할 수 있습니다.
관련된 안전 규정을 준수하고 안전 장치를 사용한다
고 해도 어떤 위험들은 피하지 못할 수도 있습니다.
이러한 위험으로는 다음과 같은 것들이 있습니다.
u 작동 부품을 만져 발생하는 부상.
u 뜨거운 부품을 만져 발생하는 부상.
u 부품 또는 액세서리 변경으로 인한 부상.
u 장시간에 걸친 제품 사용으로 인한 부상.어떤 제
품이든 장시간에 걸쳐 사용할 때는 반드시 정기
적인 휴식을 취하십시오.
전기안전
@
경고! 본 제품은 접지해야 합니다. 전원이
전동기 네임 플레이트에 기재된 전압과 일
치하는지 항상 확인하십시오.
전원 플러그는 콘센트와 형식이 일치해야 합니다. 플
러그를어떤방식으로든절대개조하지마십시오. 개조
되지 않은 플러그 및 형식이 일치하는 콘센트를 사용
하면 감전 위험이 줄어듭니다.
u 전원 코드가 손상된 경우 사고가 발생하지 않도
록 제조업체 또는 공인 Black & Decker 서비스
센터에서 교체해야 합니다.
연장 케이블 및 Class 1 제품
u 제품이 접지되어 있고 Class 1 구조이므로 3심
케이블을 사용해야 합니다.
u 최대 30m까지 동력이 약해지지 않고 사용할 수
있습니다.
제품에 부착된 레이블
공구에는 다음과 같은 그림이 있습니다.
경고! 부상 위험을 줄이려면 사용자는 사용
설명서를 주의 깊게 읽어야 합니다.
경고! 뜨거운 물에 인한 화상 위험.
기능
본 제품에는 다음 기능들 중 일부 또는 모두가 포함
되어 있습니다.
1. 온/오프 스위치
2. 자동선택TM다이얼
3. 착탈식 물 탱크
4. 핸들
5. 스팀 헤드
6. 스팀 헤드 클리닝 패드
7. 델타 헤드 클리닝 패드
8. 받침 매트
9. 하단 케이블 정돈 걸이
10. 상단 케이블 정돈 걸이
11. 케이블 관리 클립
12. 카펫 글라이더
조립
경고! 다음 조작 중 하나를 시도하기 전에, 제품 전원
이 꺼졌고 플러그를 뽑았는지, 그리고 제품의 열이
식었으며 물이 들어 있지 않은지 확인하십시오.
핸들 장착(그림 A)
u 제 자리에서 소리가 날 때까지 핸들(4)의 하단 끝
쪽을 스팀맙 본체(13)의 상단 끝 쪽으로 밉니다.
스팀 헤드 장착(그림 B)
u 제 자리에 딸깍 소리가 날 때까지 스팀맙 본체(13)
의 하단 끝 쪽을 스팀 헤드(5)로 밉니다.
u 스팀 헤드는 스팀 헤드 해제 버튼(14)을 누르고 스
팀맙 본체(13)를 스팀 헤드(5)에서 당겨 빼내서 스
팀맙 본체에서 분리할 수 있습니다.
Page 12

12
(사용 지침 원본)
한국어
워터 저그 장착(그림 C)
u 핸들(4)에 워터 저그(3)를 핀으로 고정하십시오.
u 워터 저그(3)를 스팀맙 본체(13)로 밀어 넣어 워터
저그가 단단히 안착되도록 하십시오.
클리닝 패드 부착(그림 D)
교체 클리닝 패드는 Black & Decker 판매점에서 구입
할 수 있습니다(카탈로그 번호 FSMP20-XJ).
스팀 헤드 클리닝 패드 - 카탈로그 번호 FSMP20-XJ.
델타 헤드 클리닝 패드 - 카탈로그 번호 FSMP30-XJ.
u ‘고리’쪽이 위를 향하도록 한 상태에서 클리닝
패드(6 또는 7) 를 바닥에 놓으십시오.
u 스팀맙을 클리닝 패드(12)에 놓고 살짝 아래로 누
릅니다 (6 또는 7).
주의! 항상 고정 시에는 핸들(4)을 수직 위치로 한 상
태에서 스팀맙을 받침 매트(8)에 놓고 사용하지 않을
때는 스팀맙이 꺼졌는지 확인하십시오.
클리닝 패드 제거(그림 E)
주의! 스팀맙의 클리닝 패드를 교체할 때는 항상 적
합한 신발을 신으십시오. 슬리퍼 또는 발가락 부분이
트인 신발을 신지 마십시오.
u 핸들(4)을 똑바로 세우고 스팀맙을 끕니다.
u 스팀맙을 받침 매트에 놓고 식을 때까지 기다립
니다. (약 5분)
u 클리닝 패드 제거 탭(15)에 신발 앞쪽을 놓고 단단
히 아래로 누릅니다.
u 스팀맙을 위로 올려 클리닝 패드를 제거합니다.
주의! 항상 고정 시에는 핸들(4)을 수직 위치로 한 상
태에서 스팀맙을 받침 매트(8)에 놓고 사용하지 않을
때는 스팀맙이 꺼졌는지 확인하십시오.
카펫 글라이더 장착(그림 F)
u 카펫 글라이더를 바닥에 놓습니다.
u 제 자리에 딸깍하고 소리가 날 때까지 스팀맙을
카펫 글라이더(12)에 놓고 살짝 누릅니다.
주의! 항상 고정 시에는 핸들(4)을 수직 위치로 한 상
태에서 스팀맙을 받침 매트(8)에 놓고 사용하지 않을
때는 스팀맙이 꺼졌는지 확인하십시오.
카펫 글라이더 제거(그림 F)
주의! 스팀맙의 카펫 글라이더를 교체할 때는 항상
적합한 신발을 신으십시오. 슬리퍼 또는 발가락 부분
이 트인 신발을 신지 마십시오.
u 핸들(4)을 똑바로 세우고 스팀맙을 끕니다.
u 스팀맙을 받침 매트에 놓고 식을 때까지 기다립
니다. (약 5분)
u 카펫 글라이더 제거 탭(16)에 신발 앞쪽을 놓고 단
단히 아래로 누릅니다.
u 스팀맙을 위로 올려 카펫 글라이더(12)를 제거합
니다.
주의! 항상 고정 시에는 핸들(4)을 수직 위치로 한 상
태에서 스팀맙을 받침 매트(8)에 놓고 사용하지 않을
때는 스팀맙이 꺼졌는지 확인하십시오.
델타 헤드(그림 G)
이 스팀맙에는 내장된 델타 헤드가 포함되어 있어 좁
은 구석과 좁은 틈에 접근할 수 있습니다.
주의! 스팀맙의 델타 헤드에 접근할 때는 항상 적합
한 신발을 신으십시오. 슬리퍼 또는 발가락 부분이
트인 신발을 신지 마십시오.
u 핸들(4)을 똑바로 세우고 스팀맙을 끕니다.
u 스팀맙을 받침 매트에 놓고 식을 때까지 기다립
니다. (약 5분)
u 카펫 글라이더 제거 탭(18)에 신발 앞쪽을 놓고 부
드럽게 아래로 누릅니다.
u 델타 헤드를 위로 올려 스팀 헤드(5)를 제거합니다.
u 델타 헤드 클리닝 패드를 델타 헤드의 아래쪽에
장착합니다.
참고: 델타 헤드를 스팀 헤드에 다시 장착하기 전에
클리닝 패드를 분리하십시오.
u 델타 헤드를 다시 장착하려면, 델타 헤드의 끝을
스팀 헤드에 놓은 다음 델타 헤드가 제 자리에 딸
깍 소리가 나는지 확인하면서 단단히 아래로 누
릅니다.
주의! 항상 고정 시에는 핸들(4)을 수직 위치로 한 상
태에서 스팀맙을 받침 매트(8)에 놓고 사용하지 않을
때는 스팀맙이 꺼졌는지 확인하십시오.
물 탱크 보충(그림 H)
스팀맙의 물탱크는 편리하고 간편한 보충을 위해 분
리할 수 있습니다.
이 스팀맙에는 반 석회 시스템이 포함되어 있어 시스
템 수명을 연장시킬 수 있습니다.
참고: 물 탱크는 깨끗한 수돗물로 채우십시오.
참고: 강한 경수 지역의 경우, 비이온화 물을 사용하
는 것이 좋습니다.
u 물 탱크(3)를 제거하십시오.
u 주입구 뚜껑(19)을 위로 올려서 엽니다.
u 물 탱크(3)를 물로 채우십시오.
경고! 물 탱크의 용량은 0.46리터입니다. 탱크에 너무
많이 넣지 마십시오.
u 주입구 뚜껑(19)을 다시 끼우십시오.
u 물 탱크(3)를 다시 끼웁니다.
참고: 주입구 뚜껑이 확실히 잠겼는지 확인하십시오.
사용 방법
중요! 이 기기는 본 설명서에 따라 사용하고 초극세
사 패드를 부착하며 90초 동안 연속 작동했을 때 세
균과 미생물을 99.9% 살균할 것입니다.
전원 켜기/끄기
u 제품 스위치를 켜려면, ON/OFF 버튼(1)을 누릅니
다. 스팀맙을 예열하려면 약 15초가 걸립니다.
Page 13

13
(사용 지침 원본)
한국어
참고: 스팀맙을 처음 켜면, 정수지가 빨간색으로 켜
집니다. 스팀맙을 사용할 준비가 되면, 정수지가 파
란색으로 켜집니다.
u 제품 스위치를 끄려면, ON/OFF 버튼(1)을 누릅니다.
주의! 일정 기간 동안 스팀맙의 모든 표면에 얼룩이
남아 있도록 두지 마십시오. 항상 고정 시에는 핸들
(4)을 수직 위치로 한 상태에서 스팀맙을 받침 매트
(8)에 놓고 사용하지 않을 때는 스팀맙이 꺼졌는지 확
인하십시오.
주의! 항상 사용후에는 물통을 비워주세요.
자동선택TM 기술
이 스팀맙에는 다양한 청소 용도를 보여주는 자동선
택TM 다이얼(2)이 장착되어 있습니다. 이를 사용해서
특정 청소를 위한 정확한 작동 모드를 선택합니다.
자동선택TM다이얼(2)을 사용하여, 다음 중 하나에서
선택하십시오.
목재/합판
석재/대리석
타일/비닐
스팀맙이 특정 청소를 위해 필요한 정확한 스팀 양
을 선택합니다.
참고: 스팀맙을 사용하기 전에 정확한 설정으로 사
용하고 있는지 확인하십시오.
최적의 사용법
일반 주의 사항
주의! 스팀맙 패드를 장착하지 않은채 제품을 사용
하지 마세요.
u 사용하는 동안, 케이블 관리 클립(11)을 사용하여
케이블이 청소를 방해하지 않는 범위에 두십시오.
u 스팀맙을 사용하기 전에 항상 바닥을 진공 청소
하거나 빗자루로 청소하십시오.
u 장치를 사용하는 가장 쉬운 방법은 핸들을 45도
로 기울여서 한 번에 적은 영역을 천천히 청소하
는 것입니다.
u 스팀맙에 화학제품 클리너를 사용하지 마십시
오.비닐 또는 리놀륨 바닥에서 없애기 힘든 오염
을 제거하려면, 스팀맙을 사용하기 전에 중성 세
제와 약간의 물로 사전 처리할 수 있습니다.
스팀 청소
u ‘고리’쪽이 위를 향하도록 한 상태에서 클리닝
패드(6 또는 7)를 바닥에 놓으십시오.
u 스팀맙을 올려 받침 매트(8)에서 분리하고 클리닝
패드(6 또는 7)에 놓고 아래로 누릅니다.
u 스팀맙을 받침 매트에 놓습니다.
u 스팀맙을 메인 콘센트에 연결합니다.
u 자동선택
TM
다이얼(2)을 필요한 설정으로 돌립니다.
u ON/OFF 버튼(1)을 누릅니다. 스팀맙을 예열하려면
약 15초가 걸립니다.
u 핸들(4)을 뒤로 당기면 스팀 펌프가 작동됩니다.
몇 초 후에 스팀 헤드에서 증기가 나오기 시작합
니다.
u 스팀이 클리닝 패드에 들어가려면 몇 초가 걸립
니다. 스팀맙은 살균/청소할 표면 위로 쉽게 미끄
러집니다.
u 바닥에서 천천히 스팀맙을 끌어 당겨 모든 부분
을 철저히 스팀 청소합니다.
참고: 사용하는 동안에는 핸들을 수직 위치로 복귀
하여 스팀 펌프를 끌 수 있는데, 이러한 편리한 기능
을 통해 스팀맙을 받침 매트에 놓을 수 있어 제품을
끌 필요 없이 가구를 이동한 다음 청소를 계속할 수
있습니다.
u 스팀맙을 다 사용했으면, 핸들(4)을 수직 위치로
돌려 놓고 ‘OFF’로 바꾸고, 받침 매트(8)에 놓은
다음 스팀맙이 식을 때까지 기다립니다. (약 5분)
주의! 물 탱크를 보충하고 살균/청소를 계속하려면,
핸들(4)을 수직 위치로 돌려 놓고 스팀맙을 ‘OFF’로
바꿉니다. 전기 벽 콘센트에서 장치의 플러그를 뽑
고, 물 탱크(3)를 보충합니다.
주의! 일정 기간 동안 스팀맙의 모든 표면에 얼룩이
남아 있도록 두지 마십시오. 항상 고정 시에는 핸들
(4)을 수직 위치로 한 상태에서 스팀맙을 받침 매트
(8)에 놓고 사용하지 않을 때는 스팀맙이 꺼졌는지 확
인하십시오.
카펫 청소하기
u ‘고리’ 쪽이 위를 향하도록 한 상태에서 클리닝
패드(6 또는 7)를 바닥에 놓으십시오.
u 스팀맙을 올려 받침 매트(8)에서 분리하고 클리닝
패드(6 또는 7)에 놓고 아래로 누릅니다.
u 카펫 글라이더(12)를 바닥에 놓습니다.
u 제 자리에 딸깍하고 소리가 날 때까지 스팀맙을
카펫 글라이더(12)에 놓고 살짝 누릅니다.
u 스팀맙을 받침 매트(8)에 놓습니다.
u 스팀맙을 메인 콘센트에 연결합니다.
u ON/OFF 버튼(1)을 누릅니다. 스팀맙을 예열하려면
약 15초가 걸립니다.
u 자동선택
TM
다이얼(2)을 목재/합판 설정으로 돌립
니다.
u 핸들(4)을 뒤로 당기면 스팀 펌프가 작동됩니다.
몇 초 후에 스팀 헤드에서 증기가 나오기 시작합
니다.
u 카펫에서 천천히 스팀맙을 끌어 당겨 모든 부분
을 철저히 리프레시합니다.
Page 14

14
(사용 지침 원본)
한국어
참고: 사용하는 동안에는 핸들(4)을 수직 위치로 복귀
하여 스팀 펌프를 끌 수 있는데, 이러한 편리한 기능
을 통해 스팀맙을 받침 매트(8)에 놓을 수 있어 제품
스위치를 끌 필요 없이 가구를 이동할 수 있습니다.
u 스팀맙을 다 사용했으면, 핸들(4)을 수직 위치로
돌려 놓고 ‘OFF’로 바꾸고, 받침 매트(8)에 놓은
다음 스팀맙이 식을 때까지 기다립니다. (약 5분)
주의! 물 탱크의 물 레벨을 모니터링하는 것이 중요
합니다. 물 탱크를 보충하고 살균/청소를 계속하려
면, 핸들(4)을 수직 위치로 돌려 놓고 스팀맙을
‘OFF’로 바꿉니다. 전기 벽 콘센트에서 장치의 플러
그를 뽑고, 물 탱크(3)를 보충합니다.
주의! 일정 기간 동안 스팀맙의 모든 표면에 얼룩이
남아 있도록 두지 마십시오. 항상 고정 시에는 핸들
(4)을 수직 위치로 한 상태에서 스팀맙을 받침 매트
(8)에 놓고 사용하지 않을 때는 스팀맙이 꺼졌는지 확
인하십시오.
사용 후(그림 H 및 I)
u 핸들(4)을 똑바로 세우고 스팀맙을 ‘OFF’로 바
꿉니다.
u 스팀맙을 받침 매트(8)에 놓고 스팀맙이 식을 때
까지 기다립니다. (약 5분)
u 전기 벽 콘센트에서 스팀맙의 플러그를 뽑으십시오.
u 물 탱크(3)를 제거하십시오.
u 클리닝 패드(6 또는 7)를 분리하여 다음 사용을 위
해 닦아 놓으십시오. (클리닝 패드에 인쇄되어 있
는 세척 관리 지침 사항을 준수하십시오).
u 케이블 정돈 걸이(9 및 10)에 공급 케이블을 정리
합니다.
참고: 상단 케이블 정돈 걸이(10)가 회전하여 다음에
케이블을 사용할 때 쉽게 준비할 수 있습니다.
u 플러그 가까이에 있는 케이블 정돈 클립(20)을 사
용하여 공급 케이블을 클립으로 고정합니다.
u 보관 시에는 스팀맙을 받침 매트(8)에 놓습니다.
참고: 핸들(4)을 수직 위치로 하고, 케이블 정돈 걸이
(9 및 10) 주변으로 말끔하게 포장하고 케이블 정돈
클립(20)으로 고정하면 스팀맙이 보관 시 제힘으로
서 있게 됩니다. 그 대신에 핸드 그립(22)에 장착되어
있는 벽걸이 브래킷(21)이 있어 스팀맙을 해당하는
벽 고리에 걸 수 있습니다. 항상 벽 걸이가 스팀맙의
무게를 안전하게 지탱할 수 있는지 확인하십시오.
유지 보수 및 청소
Black & Decker 유선 제품은 최소한의 유지 보수로 장
기간에 걸쳐 작업이 가능하도록 설계되어 있습니다.
만족스러운 동작을 계속 유지하려면 적절한 제품 관
리와 정기적인 청소가 필요합니다.
경고! 유선 제품의 유지 보수 또는 청소를 수행하기
전에 전원을 끄고 제품의 플러그를 뽑으십시오.
u 부드러운 젖은 헝겊으로 제품을 닦으십시오.
u 없애기 힘든 자국이 있는 경우, 따뜻한 비누와 물
을 사용하여 헝겊을 축일 수 있습니다.
클리닝 패드 관리
세척 관리 지침 - 섬유 유연제 없이 사용 - 다시 사용
하기 전에 충분히 말리십시오.
주의! 클리닝 패드 라벨에 인쇄되어 있는 클리닝 지
침 사항을 따르십시오.
환경 보호
Z
분리 수거하십시오. 본 제품을 일반 가정용
쓰레기로 처리하면 안됩니다.
Black & Decker 제품을 교체해야 하거나 더 이상 쓸모
가 없어졌다고 판단되면 본 제품을 가정용 쓰레기로
처리하지 마십시오. 이 제품은 분리 수거하십시오.
z
사용하던 제품과 포장을 분리 수거하면 자원
을 재활용 및 재사용할 수 있습니다. 재활용
자원을 이용하면 환경 오염이 방지되고 고철
자원에 대한 수요를 줄일 수 있습니다.
지역에 따라 가정용 가전제품을 분리 수거하는 규정
이 마련되어 있거나 새로운 제품을 구입할 때 판매점
에서 폐기 방법을 알려줄 수 있습니다.
서비스 정보
블랙앤드데커 청소기는 가까운 동부 일렉 서비스센
터(구 대우일렉서비스센터)에서 받으실 수 있습니
다.동부 일렉 서비스센터의 모든 직원들은 블랙앤드
데커본사로부터 서비스 교육을 이수한 전문 직원들
로써친절하고 편리한 제품 서비스를 제공할 것입니
다.1588-1888 대표 전화에 전화하시어 가까운 동부 일
렉서비스센터의 위치를 안내 받으실 수 있습니다.
참고사항
u Black & Decker 의 정책은 제품을 지속적으로 개선
시키기 때문에 사전 통지 없이 제품 사양이 변경
될 수 있습니다.
u 표준 장비 및 액세서리는 국가에 따라 다를 수 있
습니다.
u 제품 사양은 나라에 따라 다를 수 있습니다.
u 나라에 따라 판매하지 않는 제품도 있을 수있습
니다.
u 제품 판매 여부는 해당 지역에 있는 Black & Decker
판매점으로 문의하십시오.
Page 15

Page 16

90599453 06/2013
 Loading...