

Page 1
EASY ASSEMBLY
8-CUP FOOD PROCESSOR
(1.9 LITERS)
ENSAMBLAJE FÁCIL
DEL PROCESADOR
DE 8 TAZAS (1,9 LITROS)
ROBOT CULINAIRE
DE 8 TASSES (1,9 LITRE)
FACILE À ASSEMBLER
FP4100
FP4200
Page 2

PLEASE READ AND SAVE THIS USE AND CARE BOOK.
IMPORTANT SAFEGUARDS.
When using electrical appliances, always follow basic safety precautions to reduce the risk of fire, electric
shock, and/or injury, including the following:
• Read all instructions.
• To protect against risk of electrical shock, do not
put food processor base, cord or plug in water or other liquid.
• Close supervision is necessary when any appliance is used by or
near children.
• Unplug from outlet when not in use, before putting on or
taking off parts, and before cleaning.
• Avoid contacting blades and moving parts.
• Do not operate any appliance with a damaged cord or plug,
or after the appliance malfunctions, or has been dropped or
damaged in any manner. Contact the consumer service number
listed in this manual. This appliance has important markings
on the plug blade. The attachment plug or entire cordset is not
suitable for replacement. If damaged, the appliance must be
replaced.
• The use of attachments not recommended by the appliance
manufacturer may cause fire, electric shock or injury.
• Do not use outdoors.
• Do not let cord hang over the edge of table or counter, or touch
hot surfaces.
• Keep hands and utensils out of container while processing to
reduce the risk of severe injury to persons or damage to the
food processor. A scraper may be used but must be used only
when the processor is not running.
• Never feed food by hand. Always use food pusher.
• Blades are sharp. Handle carefully.
• To reduce the risk of injury, never place blades or discs on base
without first putting workbowl properly in place.
• Be certain the lid is securely locked in place before operating
appliance.
• This appliance has a protection system. The unit will not
operate unless the workbowl is on the base and the lid is
securely locked onto workbowl.
• Do not place on or near a hot gas or electric burner or in a
heated oven.
• Do not attempt to defeat the lid interlock mechanism.
• Do not use appliance for other than intended use.
• This product is designed for household use only.
• Do not open lid until blade or disc stops completely.
• The maximum rated wattage for this product was obtained
with the chopping blade.
• This appliance is not intended for use by persons (including
children) with reduced physical, sensory or mental capabilities,
or lack of experience and knowledge, unless they have
been given supervision or instruction concerning use of the
appliance by a person responsible for their safety.
• Children should be supervised to ensure that they do not play
with the appliance.
Note: Processing items with low moisture content may dull the
finish of the bowl.
SAVE THESE INSTRUCTIONS.
This product is for household use only.
POLARIZED PLUG (120V models only)
This appliance has a polarized plug (one blade is
wider than the other). To reduce the risk of electric
shock, this plug is intended to t into a polarized
outlet only one way. If the plug does not t fully
into the outlet, reverse the plug. If it still does not
t, contact a qualied electrician. Do not attempt to
modify the plug in any way.
TAMPER-RESISTANT SCREW
Warning: This appliance is equipped with a
tamper-resistant screw to prevent removal of the
outer cover. To reduce the risk of re or electric
shock, do not attempt to remove the outer
cover. There are no user-serviceable parts inside.
Repair should be done only by authorized service
personnel.
ELECTRICAL CORD
a) A short power-supply cord is provided to reduce
the risks resulting from becoming entangled in or
tripping over a longer cord.
b) Extension cords are available and may be used if
care is exercised in their use.
c) If an extension cord is used:
1) The marked electrical rating of the extension
cord should be at least as great as the electrical
rating of the appliance;
2) If the appliance is of the grounded type, the
extension cord should be a grounding-type
3-wire cord; and
3) The cord should be arranged so that it will not
drape over the counter top or tabletop where it
can be pulled on by children or tripped over.
Note: If the power cord is damaged, please
contact the warranty department listed in these
instructions.
2
Page 3
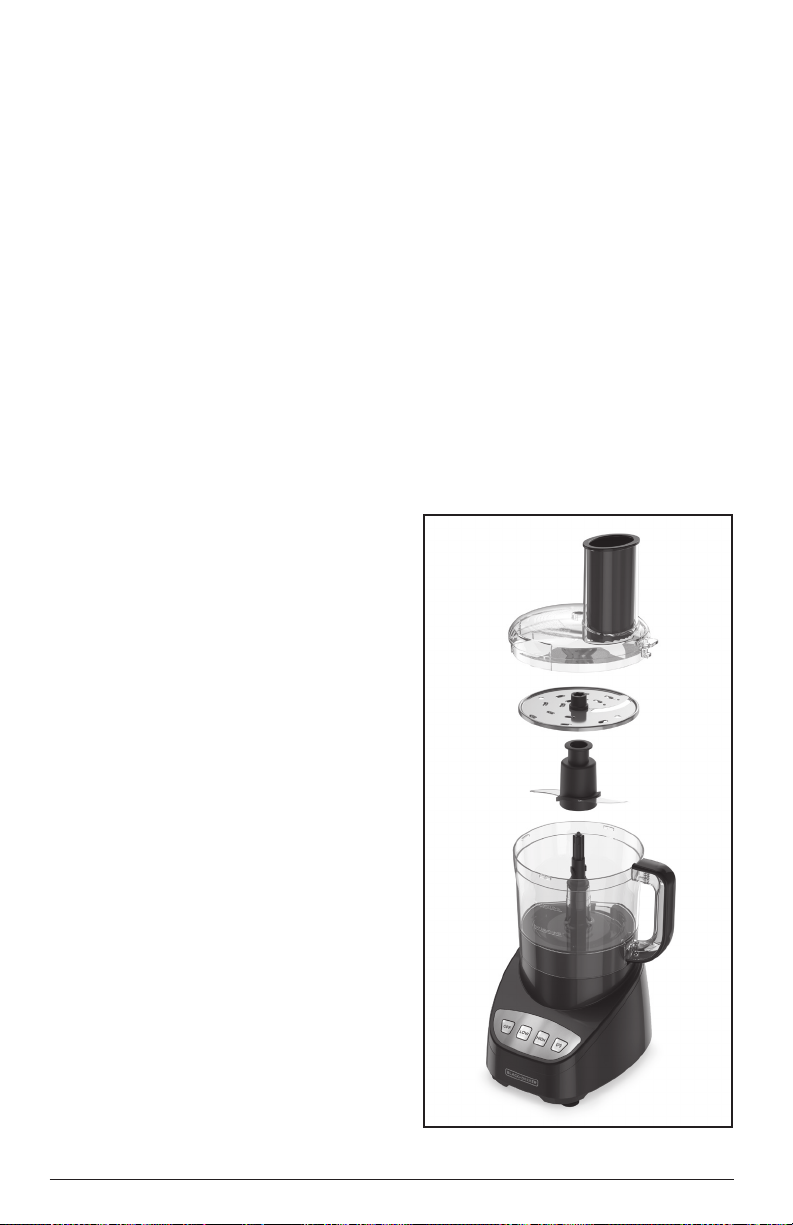
GETTING TO KNOW YOUR
FOOD PROCESSOR
1
2
3
4
5
7
8
9
6
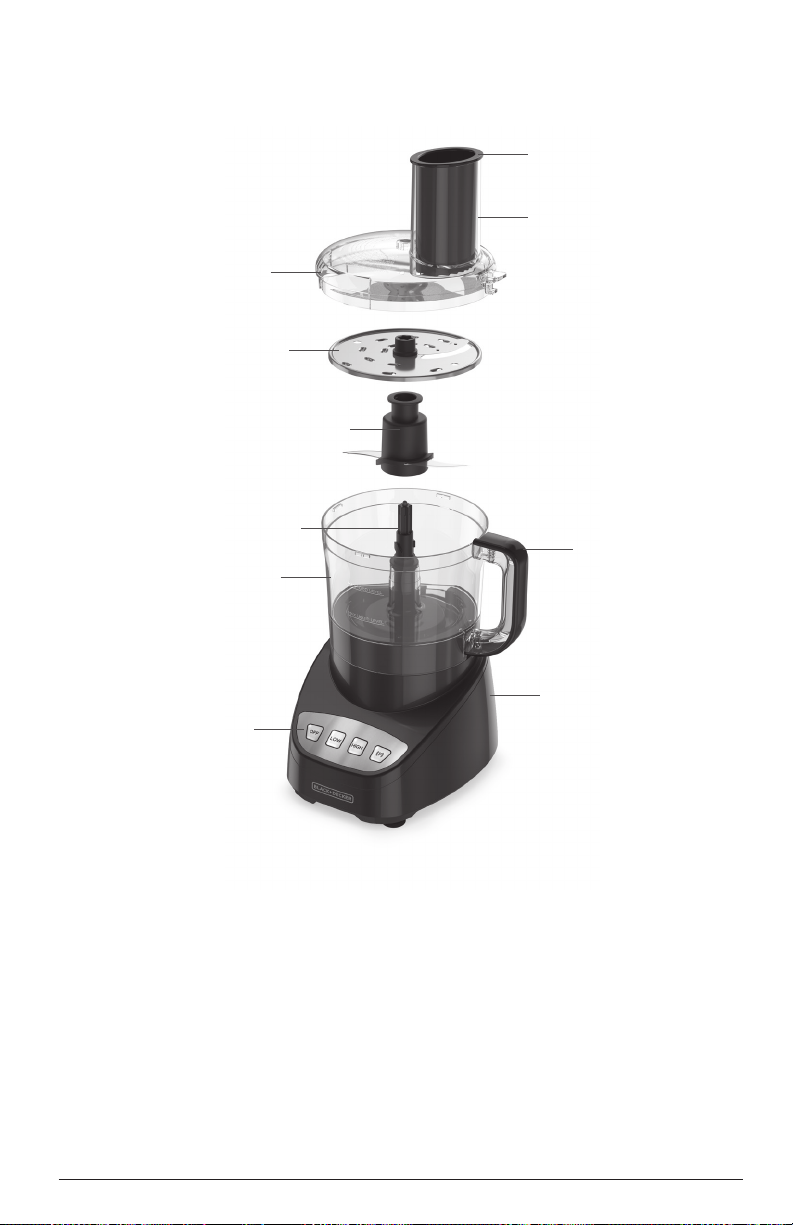
1. Workbowl cover (Part # 2050201951)
2. Slicing/shredding disc
(Part # 2050201481)
3. Chopping blade (Part # 2050201301)
4. Center shaft (Part # 2050201311)
5. Workbowl (Part # 2050201491)
6. Control panel
Product may vary slightly from what is illustrated.
7. Food pusher
(Part # 20102000003802)
8. Feed chute
9. Handle
10. Base
3
10
Page 4
HOW TO USE
This product is for household
use only.
GETTING STARTED
• Remove all packing material, any stickers,
and the plastic band around the power plug.
• Remove and save literature.
• Please visit
www.prodprotect.com/applica
to register your warranty.
• Wash all removable parts as instructed
in CARE AND CLEANING section of this
manual.
CAUTION: Handle blade and disc carefully.
They are very sharp.
• Select a level dry countertop where the
appliance is to be used allowing air space
on all sides to provide proper ventilation
for the motor.
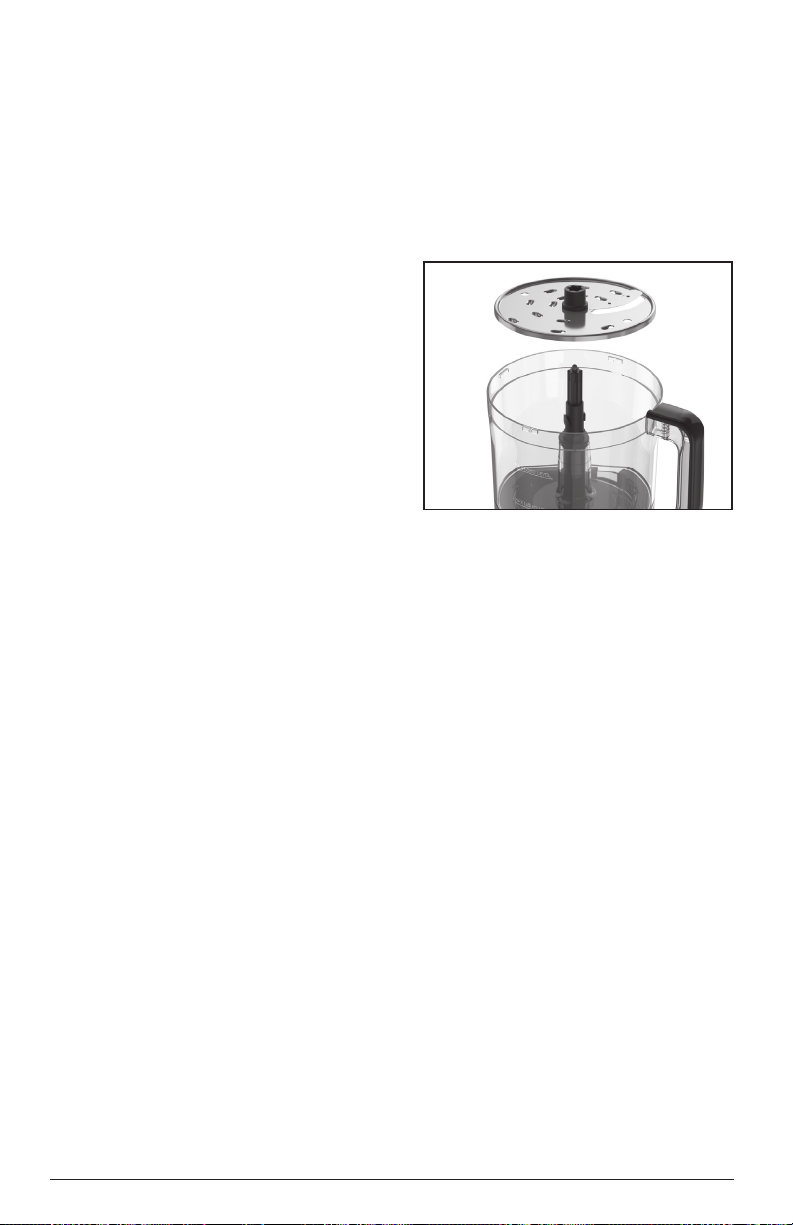
ASSEMBLING THE
FOOD PROCESSOR
Important: Always make sure your food
processor is unplugged and placed on a at,
level surface before starting to assemble.
Important: For your protection this
appliance has an interlock system. The
processor will not operate unless the cover
is properly locked in place.
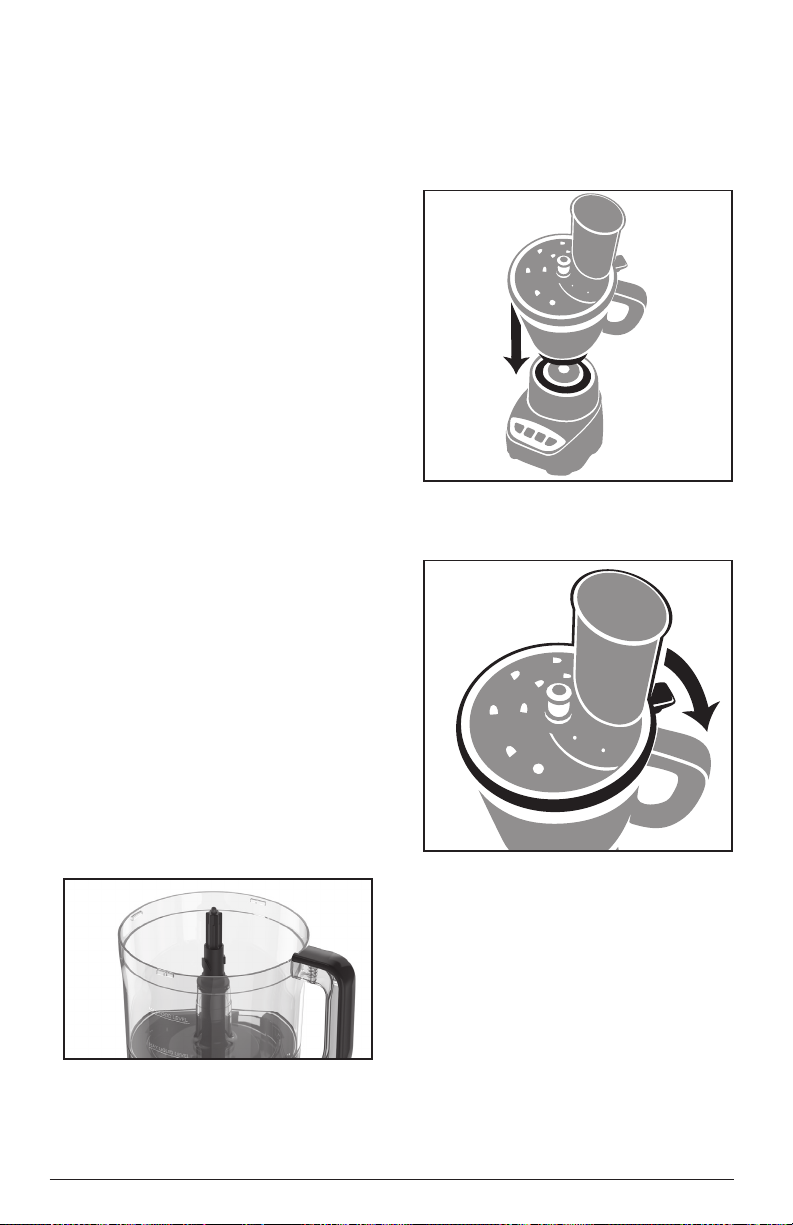
1. Place center shaft in workbowl.
2. Place either the chopping blade or the
slicing/shredding disc onto center shaft.
3. Place cover on work bowl with the small
latch to the right of the workbowl’s handle.
4. Place workbowl onto base
5. Rotate cover clockwise until cover locks
into place.
6. Insert the food pusher into the feed
chute.
7. Make sure OFF button is pressed. Plug in
the appliance to turn it on. It is now ready
to use.
4
Page 5
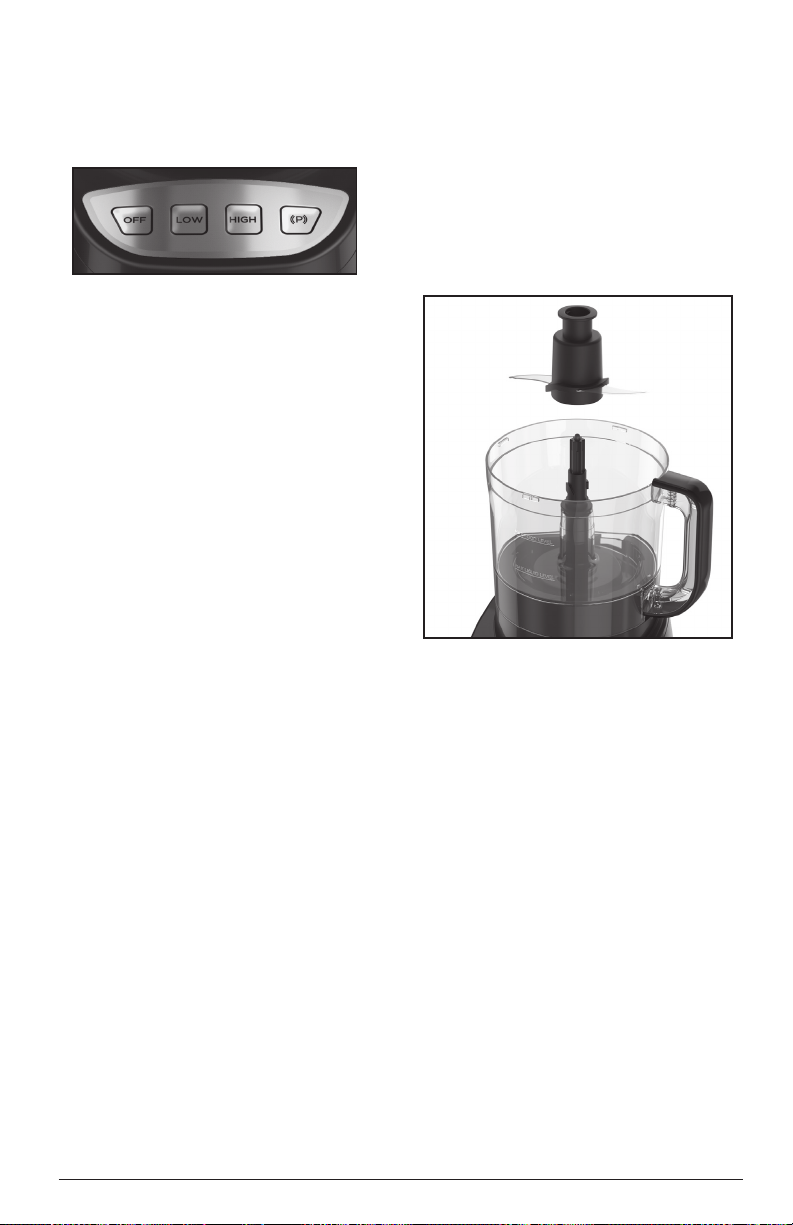
CONTROL PANEL
Note: If the food processor does not
run, make sure the workbowl and lid are
properly locked and on the base.
OFF
Press OFF to stop the food processor when
it is running on LOW or HIGH.
LOW
When LOW is selected, the processor will
run at a low speed until OFF is pressed.
HIGH
When HIGH is selected, the processor will
run at a high speed until OFF is pressed.
PULSE
Use PULSE for short processing tasks using
the chopping blade. This lets you control
the size and uniformity of foods being
chopped.
• The PULSE button must be pressed and
held for the appliance to operate in PULSE
mode. When released, the appliance will
stop.
• Press the button and then release to allow
the blade to stop running and the food to
fall to the bottom of the workbowl.
o
USING THE CHOPPING
BLADE
The chopping blade is used to coarsely or
nely chop, mince, mix, and puree.
Caution: The chopping blade is very sharp.
Use caution when handling and storing.
1. Assemble the food processor with the
center shaft and chopping blade in the
workbowl.
2. Place food in workbowl.
3. Place cover on workbowl and lock into
place by rotating clockwise.
4. Put the food pusher in place.
Important: Never use your ngers to direct
food through the feed chute.
5. Select your desired speed (LOW, HIGH, or
PULSE).
Note: Process foods for no more than a
few seconds at a time. Pulsing produces
excellent results and oers greater control.
6. When nished, press OFF.
Important: Make sure the chopping blade
has completely stopped before removing
the cover or workbowl from the processor.
7. Twist cover counterclockwise to remove.
8. Lift workbowl o base.
5
Page 6
Note: Remove workbowl from appliance
before removing the chopping blade to
prevent food from leaking through the
center opening of the workbowl.
9. Remove center shaft.
10. Unplug appliance when not in use.
HELPFUL TIPS FOR
USING THE CHOPPING
BLADE
• The processor works very quickly. Watch
carefully to avoid over-processing foods.
• For best results, process foods that are
about the same size.
• The processor will be more ecient if
lled no more than 1/2 to 2/3 full.
• Do not ll the workbowl, past the “Max
Food Level” mark.
• When chopping cooked or raw meat, the
food should be very cold. Use no more
than 2 cups of 3/4 inch cubes. Process
using PULSE in 5 second intervals.
• Processing nuts or other hard foods may
scratch the surface nish on the inside of
the bowl.
• Never walk away from the processor while
it is on.
• You may use hot, but never boiling liquids.
• The PULSE button oers the best control.
• Insert a funnel into the feed chute when
adding ingredients such as, oil, our and sugar.
USING THE SLICING/
SHREDDING DISC
1. Set workbowl onto base.
2. Place center shaft in workbowl.
3. Carefully place slicing and shredding disc
on top of center shaft with appropriate side
up (depending on work to be done).
4. Place cover on workbowl and lock into
place by rotating clockwise.
5. Place food in feed chute.
6. Press LOW speed button; press lightly
but rmly on food pusher to guide food
through processor.
Note: Heavy pressure on the pusher does
not speed the work; use the pusher only as
a guide. Let the processor do the work.
7. When nished, press OFF.
Important: Make sure the slicing/shredding
disc has completely stopped before
removing the cover or workbowl from the
processor.
8. Twist cover counterclockwise to remove.
9. Carefully remove the slicing/shredding
disc. Lift the workbowl o the base.
10. Unplug appliance when not in use.
6
Page 7

HELPFUL TIPS FOR
SLICING OR SHREDDING
• Before slicing round fruits and vegetables
through the processor cut a thin slice from
the bottom so food will be more stable.
Place food cut side down in the feed chute.
• Always remove seeds, core and pits
before processing
• Select foods that are rm and not over
ripe.
• Remove the core from hard vegetables,
such as cabbage.
• To prevent slender foods, such as carrots
or celery, from falling over in the feed
chute, cut food into several pieces and
pack the feed chute with the food.
• When slicing thinner vegetables cut them
just short of the length of the feed chute;
stand them vertically in the feed chute so
they are solidly packed and cannot turn or
tilt.
• Soft and semi hard cheeses should
be well chilled before shredding. For
best results with soft cheeses such as
mozzarella, freeze 15-20 minutes before
processing. Cut to t feed tube and process
using even pressure.
• To slice cooked meat, including salami
and pepperoni, food should be very cold.
Cut in pieces to t feed tube and process
food using rm, even pressure.
• Do not let the food accumulate too
high (over 2/3 full); stop and empty the
workbowl.
• Remove the slicing/shredding disc
before removing the workbowl from the
processor.
GENERAL TIPS FOR
USING THE PROCESSOR
• Organize processing tasks to avoid
multiple cleanups of the bowl; process dry
before wet.
• Do not process foods that are so frozen
or hard that the tip of a knife cannot be
inserted into the food.
• If a piece of hard food, such as a carrot,
becomes wedged or stuck on the blade,
stop the processor and unplug, then
remove the blade. Gently remove food
from the blade.
• Do not use the processor to:
- Grind coee beans, bones, grains or
hard spices
- Slice or chop warm meat
7
Page 8
CARE AND CLEANING
This product contains no user serviceable
parts. Refer service to qualied service
professional.
Important: Always unplug your processor
from the outlet before cleaning.
CLEANING
Important: Blades and discs are sharp.
Handle carefully.
• Completely disassemble processor parts
before washing.
• Rinse parts immediately after processing
for easier cleaning.
• Wipe base and feet with a damp cloth
and dry thoroughly. Stubborn spots can
be removed by rubbing with a damp cloth
and a mild, nonabrasive cleaner. Do not
immerse base in liquid.
• All removable parts can be washed by
hand in hot water with dish soap or in the
dishwasher, top rack only. Hand-washing of
plastic parts will help to maintain the food
processor’s appearance.
• Do not use rough scouring pads or
cleansers on any plastic or metal parts to
clean.
• Do not allow blade or disc to soak in
water for long periods of time.
• Remember to clean the internal shaft of
the chopping blade. Use a brush to remove
any residual food particles.
CLEANING TIPS
• For quick clean up, combine 1 cup warm
water and a drop of liquid dish soap in the
food processor workbowl.
• Cover and process on LOW for about 30
seconds.
• Discard liquid and rinse thoroughly.
Important: Do not place the processor
parts in boiling liquids.
STORAGE
Caution: Blades and discs are sharp. Handle
carefully.
1. Wrap cord under base.
2. Assemble the parts onto the base in this
order: workbowl, center shaft, chopping
blade, slicing/shredding disc, workbowl
cover, food pusher.
8
Page 9

TROUBLESHOOTING:
PROBLEM SOLUTION
Food Processor
doesn’t run
Food processor not
shredding or slicing
properly
• Make sure the bowl and lid are properly aligned and in place.
• Check to make sure the food processor is plugged in.
• If you have a circuit breaker box, be sure the circuit is closed.
• Unplug the food processor, and then plug it back into the
outlet.
• Make sure the disc or blade is installed properly.
• Make sure ingredients are suitable for slicing or shredding.
If workbowl cover
won’t close
If the problem is not due to one of the above items, see the “Warranty and Service” section of
this Use and Care Manual. Do not return the Food processor to the retailer. Retailers no not
provide service.
• Make sure the disc or blade is installed correctly.
9
Page 10

RECIPES
Simple Salsa
Total Time: 5 minutes
Servings: makes 2 cups
Ingredients
2 medium fresh tomatoes, quartered
1/3 cup loosely packed cilantro
1/ 3 cup diced tomatoes and green
chilies*
1/4 small yellow onion
1 tsp. minced garlic
Directions
1. Place the tomatoes into the food processor bowl and pulse 4 to 5 times
to chop.
2. Add the remaining ingredients into the bowl with the chopped tomatoes and process on
Low for about 30 seconds, or until desired consistency
is reached.
3. Serve with tortilla chips.
*Look for cans of diced tomatoes with green chilies in the Mexican or International section of
the grocery store.
2 Tbsp. fresh lime juice
1/2 tsp. salt
1/2 tsp. sugar
1/ 2 jalapeño, stem and seeds removed
(optional)
Black Bean Hummus
Total Time: 5 minutes
Servings: 7
Serving Size: 1/4 cup
Ingredients
1 (15 oz) can black beans, drained and
rinsed
2 Tbsp. fresh lime juice
1/4 cup tahini
1/4 cup olive oil
1 Tbsp. minced garlic
Directions
1. Add all ingredients into the food processor bowl. Process on High for about 1 minute until
the hummus is a smooth consistency.
2. Serve with your favorite chips or crackers.
10
2 tsp. cumin
1/2 tsp. chili powder
2 Tbsp. cilantro
1/2 tsp. salt
1/8 tsp. pepper
1/2 small yellow onion
Page 11

Jalapeño Pepper Dip
Prep Time: 5 minutes
Total Time: 20–25 minutes
Servings: makes 3 1/2 cups
Ingredients
2 jalapeño peppers, stems and seeds
removed
16 oz. cream cheese, softened
1/2 cup sour cream
1 Tbsp. minced garlic
Directions
1. Preheat oven or toaster oven to 350°F.
2. In the food processor bowl, place the seeded jalapeño in and pulse
3 to 4 times to dice.
3. Put the remaining ingredients, and 1 3/4 cup of the shredded cheese into the bowl with
the diced jalapeño. Process on High for about 30 seconds to reach a smooth consistency.
4. Pour the mixture into an oven safe dish and smooth out. Top with the remaining 1/2 cup
shredded cheese.
5. Bake for 15–20 minutes until the cheese is bubbly.
6. Serve with tortilla chips or crackers.
1/2 tsp. salt
8 slices cooked bacon, chopped
2 1/4 cups shredded pepper jack
cheese, divided
11
Page 12

WARRANTY AND CUSTOMER
SERVICE INFORMATION
For support or any questions regarding your appliance, call the appropriate 800 number
listed within this section. Please DO NOT return the product to the place of purchase. Also,
please DO NOT mail product back to manufacturer, nor bring it to a service center. You may
also want to consult our Product Protection Center at www.prodprotect.com/applica.
Two-Year Limited Warranty
(Applies only in the United States and Canada)
What does my warranty cover?
• Your warranty covers any defect in material or workmanship provided; however, the liability of
Spectrum Brands Inc. will not exceed the purchase price of product.
How long is the warranty period?
• Your warranty extends two years from the date of original purchase with proof of purchase.
What support does my warranty provide?
• Your warranty provides you with a reasonably similar replacement product that is either new or
factory refurbished.
How do you get support?
• Save your receipt as proof of date of sale.
• Visit the online service website at www.prodprotect.com/applica, or call toll-free
1-800-231-9786, for general warranty service.
• If you need parts or accessories, please call 1-800-738-0245.
What does my warranty not cover?
• Damage from commercial use
• Damage from misuse, abuse or neglect
• Products that have been modied in any way
• Products used or serviced outside the country of purchase
• Glass parts and other accessory items that are packed with the unit
• Shipping and handling costs associated with the replacement of the unit
• Consequential or incidental damages (Please note, however, that some states do not allow the
exclusion or limitation of consequential or incidental damages, so this limitation may not apply to you.)
How does state law aect my warranty?
• This warranty gives you specic legal rights. You may also have other rights that vary from state to
state or province to province.
12
Page 13

POR FAVOR LEA ESTE INSTRUCTIVO ANTES DE USAR EL PRODUCTO.
INSTRUCCIONES
IMPORTANTES DE SEGURIDAD
Cuando se utilizan aparatos eléctricos, siempre se debe respetar ciertas medidas de seguridad, incluyendo las siguientes:
• Lea todas las instrucciones.
• La unidad cuenta con un sistema de
protección para el motor. Si el empujador de
alimentos más grande dentro del tubo de
alimentación se sale de la tapa del procesador
de alimentos, el aparato se apagará.
• Para protegerse contra el riesgo de
descargas eléctricas, no coloque el
procesador de alimentos en agua ni en
otro líquido.
• Se requiere la supervisión de un adulto
cuando algún electrodoméstico está siendo
utilizado cerca de los
• Desenchufe el tomacorriente cuando no
esté en uso, antes de instalar o retirar piezas
y antes de limpiar.
• Evite el contacto con las cuchillas y las
piezas móviles.
• No opere el aparato con un cable o
enchufe dañado, o después de presentar
problemas de funcionamiento o si
se ha dejado caer o se ha dañado de
manera alguna. Comuníquese con el
departamento de Servicio al Cliente, al
número gratis que aparece en la sección
de garantía. Este aparato contiene marcas
importantes en el contacto del enchufe.
Ni el enchufe de accesorio ni el enchufe
conector es apto para ser reemplazado. Si
se daña, el aparato debe ser reemplazado.
• El uso de accesorios no recomendados por
el fabricante puede provocar incendios,
descargas eléctricas o lesiones.
• No utilice el aparato a la intemperie.
• No deje que el cable cuelgue del borde
de la mesa o mostrador ni que toque
superficies calientes.
• Para reducir los riesgos de lesiones graves
a personas o de daños al procesador de
alimentos, mantenga las manos y los
utensilios lejos del recipiente mientras
procese alimentos. Puede utilizar una espátula
raspadora pero sólo cuando el procesador
de alimentos no esté funcionando.
• Nunca introduzca los alimentos con la mano.
Siempre utilice el empujador de alimentos.
• Las cuchillas están afiladas. Manéjelas
con cuidado.
• Para reducir el riesgo de lesiones, nunca
cloque la cuchilla ni los discos sobre la base
sin antes colocar el recipiente correctamente
en su lugar.
• Asegúrese de que la tapa esté bien
asegurada en su lugar antes de hacer
funcionar el electrodoméstico.
• Este aparato cuenta con un sistema de
seguridad. La unidad no funcionará hasta que
el recipiente de preparación no esté colocado
en la base y la tapa esté cerrada de forma
segura sobre el recipiente de preparación.
• No coloque el electrodoméstico sobre o cerca
de una hornilla de gas o eléc trica ni adentro de
un horno caliente.
• No intente anular el mecanismo de entrecierre
de la tapa.
• No utilice el electrodoméstico para otro fin
que no sea para el que fué diseñado.
• Este producto está diseñado para ser
utilizado sólo para uso doméstico.
• No abra la tapa hasta que la cuchilla o el
disco haya parado completamente.
• La potencia eléctrica máxima para este
producto fue obtenida con la cuchilla
para picar.
• Este aparato no está diseñado para ser
usado por personas (incluído niños)
con capacidad limitada física, mental
o sensoriales disminuidas y falta de
experiencia o conocimiento que les
impida utilizar el aparato con toda
seguridad sin supervisión o instrucción.
• Los ninos deben ser supervisados para asegurar
que no jueguen con el aparato.
Nota: El procesamiento de alimentos bajos
en contenido líquido puede opacar el
acabado del recipiente.
13
Page 14

CONSERVE ESTAS INSTRUCCIONES
Este aparato eléctrico es para uso doméstico únicamente.
CARACTERÍSTICAS DE SEGURIDAD
ENCHUFE POLARIZADO (Solamente
para los modelos de 120V)
Este aparato cuenta con un enchufe polarizado
(un contacto es más ancho que el otro). A n de
reducir el riesgo de un choque eléctrico, este
enchufe encaja en un tomacorriente polarizada
en un solo sentido. Si el enchufe no entra en
el tomacorriente, inviértalo y si aun así no encaja,
consulte con un electricista. Por favor no trate de alterar
esta medida de seguridad.
TORNILLO DE SEGURIDAD
Advertencia: Este aparato cuenta con un tornillo de
seguridad para
evitar la remoción de la cubierta exterior del mismo.
A n de reducir el riesgo de incendio o de choque
eléctrico, por favor no trate de remover la cubierta
exterior. Este producto no contiene piezas reparables
por el consumidor. Toda reparación se debe llevar a
cabo únicamente por personal de servicio autorizado.
CABLE ÉLECTRICO
a) Un cable de alimentación corto es provisto para
reducir los riesgos de enredarse o tropezar con un
cable más largo.
b) Existen cables de extensión disponibles y estos
pueden ser utilizados si se toma el cuidado
debido en su uso.
c) Si se utiliza un cable de extensión:
1) La clasicación eléctrica marcada del cable de
extensión debe ser, como mínimo, igual a la
clasicación eléctrica del aparato;
2) Si el aparato es del tipo de conexión a tierra,
el cable de extensión debe ser un cable de tres
alambres de conexión a tierra; y
3) El cable debe ser acomodado de manera que no
cuelgue del mostrador o de la mesa para evitar
que un niño tire del mismo o que alguien se
tropiece sin darse cuenta.
Nota: Si el cable de alimentación está dañado, por
favor llame al número del departamento de garantía
que aparece en estar instrucciones.
14
Page 15

CONOZCA SU
PROCESADOR
DE ALIMENTOS
7
8
1
2
3
4
9
5
6
1. Tapa del recipiente de preparación
(pieza no. 2050201951)
2. Disco para rebanar/rallar
(pieza no. 2050201481)
3. Cuchilla para picar (pieza no. 2050201301)
4. Vástago central (pieza no. 2050201311)
5. Recipiente de preparación
El producto puede variar ligeramente del que aparece ilustrado.
(pieza no. 2050201491)
6. Panel de control
7. Empujador de alimentos
8. Tubo de alimentación
9. Asa
10. Base
15
10
(pieza no. 20102000003802)
Page 16

CÓMO USAR
Este producto es para uso doméstico
solamente.
PREPARACIÓN PARA
UTILIZAR SU PROCESADOR
DE ALIMENTOS
• Retire todo material de empaque,
cualquier etiqueta y la tira plástica
alrededor del enchufe.
• Retire y conserve la literatura.
• Por favor, visite www.prodprotect.
com/applica para registrar su garantía.
• Lave todas las piezas removibles
según se indica en la sección de
Cuidado y limpieza de este manual.
PRECAUCIÓN: Maneje cuidadosamente la
cuchilla y el disco. Ambos tienen mucho lo.
• Seleccione un área del mostrador que
esté seca y nivelada donde colocar
el electrodoméstico para su uso, que
permita la circulación de aire a su
alrededor para facilitar la ventilación
adecuada del motor.
ENSAMBLAJE
DEL PROCESADOR
DE ALIMENTOS
Importante: Siempre asegúrese de que su
procesador de alimentos esté desenchufado y colocado sobre una supercie plana,
nivelada antes de ensamblarlo
Importante: Para su protección, este
aparato está equipado con un sistema de
entrecierre. El procesador de alimentos
no funcionará hasta que la tapa del
recipiente de preparación esté asegurada
debidamente en su lugar.
1. Coloque el vástago central en el
recipiente de preparación.
2. Coloque la cuchilla para picar o el disco
para rebanar/rallar sobre el vástago central.
3. Coloque la tapa sobre el recipiente de
preparación con el cierre de traba pequeño
hacia la derecha del asa del recipiente.
4. Coloque el recipiente de preparación
sobre la base.
5. Gire la tapa hacia la derecha hasta que se
asegure en su lugar.
6. Inserte el empujador de alimentos dentro
del tubo de alimentación.
7. Asegúrese de que el botón de de la
función de apagado (OFF) esté presionado.
Enchufe el aparato para activarlo. Ahora ya
está listo para usar
16
Page 17

PANEL DE CONTROL
Nota: Si el procesador de alimentos no
funciona, asegúrese de que el recipiente
de preparación y la tapa estén asegurados
correctamente y que estén colocados en
la base.
Botón de apagado (OFF)
Presione el botón OFF para detener el
procesador de alimentos cuando esté funcionando a velocidad baja (LOW) o alta (HIGH).
Botón de velocidad baja (LOW)
Cuando se presiona este botón, el
procesador de alimentos funcionará a
velocidad baja hasta que se presiona el
botón de apagado (OFF).
Botón de velocidad alta (HIGH)
Cuando se presiona este botón, el
procesador de alimentos funcionará a
velocidad alta hasta que se presiona el
botón de apagado (OFF).
Botón de pulso (PULSE)
Utilice el botón de pulso para tareas de
procesamiento cortas utilizando la cuchilla
para picar. Esto le permite controlar el
tamaño y uniformidad de los alimentos
mientras se pican.
• El botón de pulso (PULSE) debe
presionarse y sostenerse para que
el aparato funcione en el modo de
pulso. Cuando se suelta, el aparato se
detendrá.
• Presione el botón y luego suéltelo para
permitir que la cuchilla se detenga y el
alimento caiga al fondo del recipiente
de preparación.
o
USO DE LA CUCHILLA
PARA PICAR
La cuchilla para picar se utiliza para picar
texturas gruesas a nas, para cortar en
pedazos bien nos, para mezclar y hacer puré.
Precaución: La cuchilla para picar tiene
mucho lo. Proceda con cuidado al
manejarla y almacenarla.
1. Ensamble el procesador de alimentos con
el vástago central y la cuchilla para picar
colocados en el recipiente de preparación.
2. Coloque los alimentos en el recipiente de
preparación.
3. Coloque la tapa sobre el recipiente de
preparación y asegure en su lugar, girándola
hacia la derecha.
4. Coloque el empujador de alimentos en
su lugar.
Importante: Nunca use sus dedos para
guiar los alimentos a través del tubo de
alimentación.
5. Seleccione la velocidad deseada (baja,
alta o pulso) (LOW, HIGH or PULSE).
Nota: Procese los alimentos por pocos
segundos a la vez. La función de pulso produce
resultados excelentes y ofrece más control.
6. Cuando haya terminado, presione el
botón de apagado (OFF).
17
Page 18

Importante: Asegúrese de que la cuchilla
se haya detenido completamente antes de
retirar la tapa o el recipiente del procesador.
7. Gire la tapa hacia la izquierda para retirarla.
8. Alce el recipiente de preparación fuera de
la base.
Nota: Retire el recipiente de preparación
del aparato antes de retirar la cuchilla para
evitar que los alimentos goteen a través de
la apertura en el centro del recipiente.
9. Retire el vástago central.
10. Desenchufe el aparato cuando no esté
en uso.
CONSEJOS PRÁCTICOS
PARA USAR LA CUCHILLA
PARA PICAR
• El procesador trabaja muy rápido.
Supervise cuidadosamente el proceso
para evitar que los alimentos se procesen
demasiado.
• Para mejores resultados, se recomienda
procesar alimentos similares en tamaño.
• El procesador funcionará con más
eciencia si no se llena más de 1/2 a 1/3 de
su capacidad.
• No llene el recipiente pasado de la marca
que indica "nivel máximo de alimentos"
(Max Food Level").
• Para picar carne cocinada o cruda, el
alimento debe estar bien frío. No utilice
más de 2 tazas de cubos de 3/4 de
pulgada. Procese utilizando la función de
pulso en intervalos de 5 segundos.
• Procesar nueces u otros alimentos de
textura dura podría rayar el acabado de la
supercie en el interior del recipiente de
preparación.
• Nunca desatienda el procesador mientras
está en funcionamiento.
• Puede utilizar líquidos calientes, pero que
no estén hirviendo.
• El botón de pulso ofrece el mejor control.
• Inserte un embudo dentro del tubo de
alimentación al añadir ingredientes tales
como aceite, harina y azúcar.
USO DEL DISCO PARA
REBANAR/RALLAR
1. Asegure el recipiente de procesamiento
sobre la base.
2. Coloque el vátago central en el
recipiente.
3. Coloque cuidadosamente el disco para
rebanar/rallar encima del vástago central
con el lado adecuado mirando hacia arriba
(dependiendo en el tipo de procesamiento
a realizar).
4. Coloque la tapa sobre el recipiente y
asegure en su lugar, girándola hacia la
derecha.
5. Coloque los alimentos en el tubo de
alimentación.
6. Presione el botón de velocidad baja
(LOW); presione el empujador de alimentos
ligeramente, pero con rmeza, para guiar
los alimentos a través del procesador.
Nota: Ejercer presión fuerte sobre el
empujador de alimentos no hace el proceso
más rápido; use el empujador solamente
como una guía. Deje que el procesador
haga el trabajo.
7. Cuando haya terminado, presione el
botón de apagado (OFF).
18
Page 19

Importante: Asegúrese de que el disco
para rebanar/rallar se haya detenido
completamente antes de retirar la tapa del
recipiente del procesador.
8. Gire la tapa hacia la izquierda para retirarla.
9. Retire cuidadosamente el disco para
rebanar/rallar. Alce el recipiente de
preparación fuera de la base.
10. Desenchufe el aparato cuando no esté
en uso.
CONSEJOS PRÁCTICOS
PARA REBANAR/RALLAR
• Antes de rebanar frutas y vegetales en el
procesador, corte una rebanada na de la
parte inferior para que los alimentos estén
más estables. Coloque los alimentos con
la parte cortada hacia abajo en el tubo de
alimentación.
• Siempre extraiga las semillas, el centro y
las semillas grandes antes de procesar.
• Escoja alimentos que sean rmes y no
demasiado maduros.
• Extraiga el centro de las verduras duras,
como la col.
• Para evitar que alimentos nos, como las
zanahorias y el apio, caigan en el tubo de
alimentación, corte los alimentos en varios
pedazos y llene el tubo de alimentación con
los alimentos formando un grupo sólido.
• Cuando rebane vegetales más nos,
córtelos un poco más cortos de la medida
del largo del tubo de alimentación,
colóquelos en posición vertical en el tubo
de alimentación de modo que formen un
grupo sólido y no puedan girar o inclinarse.
• Los quesos blandos o semiduros deben
estar bien fríos antes de rallarse. Para
obtener mejores resultados con los quesos
blandos, como mozzarella, congélelo 15
a 20 minutos antes de procesar. Córtelo
de modo que se acomode en el tubo de
alimentación y procese utilizando una
presión uniforme.
• Para rebanar carnes cocinadas,
incluyendo salami y pepperoni, éstas
deben estar bien frías. Corte en pedazos
que se acomoden en el tubo de
alimentación y procese los alimentos
utilizando una presión rme y uniforme.
• No deje que los alimentos se amontonen
demasiado alto en el recipiente (más de
2/3 de su capacidad); detenga el proceso y
vacíe el recipiente de preparación.
• Retire el disco para rebanar/rallar antes de
retirar el recipiente del procesador.
CONSEJOS GENERALES
PARA UTILIZAR EL
PROCESADOR
• Organice las tareas de procesamiento para
evitar que el recipiente de procesamiento
se limpie varias veces; procese los alimentos
secos antes que los húmedos.
• No procese alimentos que estén tan
congelados o duros que no se pueda
introducir la punta de un cuchillo.
• Si un pedazo de un alimento duro, tal
como la zanahoria, se traba en la cuchilla,
detenga el procesador y desenchúfelo,
luego retire la cuchilla. Retire con suavidad
el alimento de la cuchilla.
• No utilice el procesador para:
- Moler granos de café, huesos, granos
o especias duras
- Rebanar o picar carne caliente
19
Page 20

CUIDADO Y LIMPIEZA
Este producto no contiene piezas que
deban ser reparadas por el usuario. En caso
de requerir servicio, consulte al personal de
servicio calicado.
Importante: Siempre desenchufe su
procesador del tomacorriente antes de
limpiarlo.
LIMPIEZA
Importante: La cuchilla y el disco tienen
lo. Maneje con cuidado.
• Desensamble totalmente las piezas del
procesador antes de lavarlas.
• Enjuague las piezas de inmediato después
del procesado para facilitar la limpieza.
• Limpie la base y los pies con un paño
húmedo y séquelos por completo. Las
manchas resistentes pueden eliminarse
frotándolas con un paño húmedo y un
limpiador suave que no sea abrasivo. No
sumerja la base en líquido.
• Todas las piezas extraíbles pueden lavarse
a mano en agua caliente con líquido de fregar o
en la máquina lavadora de platos. Lavar a mano
las piezas de plástico ayudará a mantener
el aspecto del procesador de alimentos.
• No use productos de limpieza ni
estropajos ásperos en ninguna pieza de
plástico o metal que se deba limpiar.
• No deje que la cuchilla ni el disco
permanezcan remojados durante períodos
prolongados.
• Recuerde limpiar el eje interno de la
cuchilla para picar; use un cepillo para
biberón para quitar cualquier partícula de
alimentos que haya quedado atrapada.
CONSEJOS PARA
LA LIMPIEZA
• Para una limpieza rápida, combine 1 taza de
agua caliente y una gota de líquido de fregar
en el recipiente del procesador de alimentos.
• Tape y procese a velocidad baja por
aproximadamente 30 segundos.
• Deseche el líquido y enjuague por completo.
Importante: No coloque las piezas del
procesador en líquidos que estén hirviendo.
ALMACENAMIENTO
Precaución: La cuchilla y el disco tienen lo.
Maneje con cuidado.
1. Enrolle el cable debajo de la base.
2. Ensamble las piezas sobre la base en
este orden: recipiente de preparación,
vástago central, cuchilla para picar, disco
para rebanar/rallar, tapa del recipiente de
procesamiento, empujador de alimentos.
20
Page 21

RESOLUCIÓN DE PROBLEMAS
PROBLEMA SOLUTIÓN
El procesador
de alimentos no
funciona
El procesador de
alimentos no desmenuza o rebana
adecuadamente
Si la tapa del recipiente no se cierra
Si el problema no se debe a uno de los mencionados anteriormente, consulte la sección
Garantía y Servicio de este manual de Uso y cuidado. No devuelva el procesador de alimentos
al minorista. Los minoristas no proveen servicio.
• Asegúrese de que el recipiente y la tapa estén alineados
correctamente y asegurados en su lugar y que el empujador de
alimentos grande esté insertado en el tubo de alimentación.
• Verique que el procesador de alimentos esté enchufado.
• Si usted tiene una caja de cortacircuitos, asegúrese de que el
circuito esté cerrado.
• Desenchufe el procesador de alimentos y luego enchúfelo de
nuevo al tomacorriente.
• Asegúrese de que el disco o la cuchilla esté instalado
adecuadamente.
• Asegúrese de los ingredientes sean apropiados para rebanar o
desmenuzar.
• Asegúrese de que el disco o la cuchilla esté instalado
adecuadamente.
21
Page 22

RECETAS
Salsa Sencilla
Tiempo total: 5 minutos
Porciones: prepara 2 tazas
Ingredientes
2 tomates medianos frescos, cortados
en cuartos
1/3 taza de cilantro, empacado suelto
1 /3 taza de tomates cortados en cubos y
chiles verdes*
1/4 cebolla amarilla, pequeña
1 cucharadita de ajo picado
Preparación
1. En el recipiente de preparación, coloque los tomates y utilice la función de pulso 4 a 5
veces para picarlos.
2. Añada el resto de los ingredientes en el recipiente con los tomates picados y procese a
velocidad baja por aproximadamente 30 segundos o hasta que alcance la consistencia
deseada.
3. Sirva con nachos.
*Busque latas de tomates cortados en cubos con chiles verdes en la sección mejicana o
internacional del supermercado.
2 cucharadas de jugo de lima fresco
1/2 cucharadita de sal
1/2 cucharadita de azúcar
1 /2 ají jalapeño, sin tallos ni semillas
(opcional)
Hummus de Frijoles Negros
Tiempo total: 5 minutos
Porciones: 7
Tamaño de la porción: 1/4 taza
Ingredientes
1 lata de frijoles negros (15 onzas),
escurridos y lavados
2 cucharadas de jugo de limón fresco
1/4 taza de tahini
1/4 taza de aceite de oliva
1 cucharada de ajo picado
Preparación
1. Añada todos los ingredientes en el recipiente de preparación. Procese a velocidad alta por
1 minuto hasta que el hummus tenga una consistencia suave.
2. Sirva con sus papitas o galletas favoritas.
22
2 cucharaditas de comino
1/2 cucharadita de chili en polvo
2 cucharadas de cilantro
1/2 cucharadita de sal
1/8 cucharadita de pimienta
1/2 cebolla amarilla, pequeña
Page 23

Dip de Ají Jalapeño Relleno
Tiempo de preparación: 5 minutos
Tiempo total: 5 minutos
Porciones: prepara 3 1/2 tazas
Ingredientes
2 ajíes jalapeños, sin tallos ni semillas
16 onzas de queso crema, suavizado
1/2 taza de crema agria
1 cucharada de ajo picado
Preparación
1. Precaliente el horno u horno tostador a 350°F.
2. En el recipiente de preparación del procesador de alimentos, coloque el ají jalapeño y
utilice la función de pulso 3 a 4 veces para cortarlo en cubos.
3. Coloque el resto de los ingredientes y 1 ¾ tazas de queso rallado en el recipiente con el ají
jalapeño cortado en cubos. Procese en la velocidad alta por aproximadamente 30 segundos
para alcanzar una consistencia suave.
4. Vierta la mezcla en una bandeja apta para el horno y expárzala. Cubra con la ½ taza
restante de queso rallado.
5. Hornee por 15 a 20 minutos hasta que el queso esté burbujeando.
1/2 cucharadita de sal
8 tiras de tocino cocinado, picado
2 1/4 tazas de queso pepper jack,
dividido
6. Sirva con nachos o galletas.
23
Page 24

INFORMACIÓN DE GARANTÍA Y
SERVICIO AL CLIENTE
Para servicio, reparaciones o preguntas relacionadas al producto, por favor llame al
número del centro de servicio que se indica para el país donde usted compró su producto.
NO devuélva el producto al fabricante. Llame o lleve el producto a un centro de servicio
autorizado. Usted también puede consultar a nuestro Centro de Protección del Producto en
www.prodprotect.com/applica.
Garantía limitada de dos años
(Solamente aplica en los Estados Unidos y el Canadá).
¿Qué cubre mi garantía?
• Su garantía cubre cualquier defecto de material o de mano de obra, siempre y cuando la
responsabilidad de Spectrum Brands, Inc. no exceda el precio de compra del producto.
¿Por cuánto tiempo es valida la garantía?
• Su garantía se extiende por dos años a partir de la fecha original de compra mientras que tenga una
prueba de la compra.
¿Qué tipo de asistencia provee mi garantía?
• Su garantía le brinda un producto de reemplazo similar que sea nuevo o que ha sido restaurado de
fábrica.
¿Cómo se puede obtener asistencia?
• Conserve el recibo original de compra.
• Para servicio al cliente y para registrar su garantía, visite www.prodprotect.com/applica, o llame al
número 1-800-231-9786, para servicio al cliente
• Por favor llame al número del centro de servicio autorizado. 1-800-738-0245.
¿Qué no cubre mi garantía?
• Los productos que han sido utilizados en condiciones distintas a las normales.
• Los daños ocasionados por el mal uso, el abuso o negligencia.
• Los productos que han sido alterados de alguna manera.
• Los daños ocasionados por el uso comercial del producto.
• Los productos utilizados o reparados fuera del país original de compra.
• Las piezas de vidrio y demás accesorios empacados con el aparato.
• Los gastos de tramitación y embarque asociados al reemplazo del producto.
• Los daños y perjuicios indirectos o incidentales.
¿Cómo afecta a mi garantía la ley estatal?
• Esta garantía le otorga derechos legales especícos y el consumidor podría tener otros
derechos que varían de una región a otra.
24
Page 25

PÓLIZA DE GARANTÍA
(Válida sólo para México)
DURACIÓN
Spectrum Brands de México, SA de CV garantiza este producto por 2 años a partir de la
fecha original de compra.
¿Qué cubre esta garantía?
• Esta Garantía cubre cualquier defecto que presenten las piezas, componentes y la mano de
obra contenidas en este producto.
• Requisitos para hacer válida la garantía
• Para reclamar su Garantía deberá presentar al Centro de Servicio Autorizado la póliza
sellada por el establecimiento en donde adquirió el producto. Si no la tiene, podrá presentar
el comprobante de compra original.
¿Donde hago válida la garantía?
• Llame sin costo al teléfono 01 800 714 2503, para ubicar el Centro de Servicio Autorizado
más cercano a su domicilio en donde usted podrá encontrar partes, componentes,
consumibles y accesorios.
Procedimiento para hacer válida la garantía
Acuda al Centro de Servicio Autorizado con el producto con la póliza de Garantía sellada
o el comprobante de compra original, ahí se reemplazará cualquier pieza o componente
defectuoso sin cargo alguno para el usuario nal. Esta Garantía incluye los gastos de
transportación que se deriven de su cumplimiento.
Excepciones
Esta Garantía no será válida cuando el producto:
A) Se hubiese utilizado en condiciones distintas a las normales.
B) No hubiese sido operado de acuerdo con el instructivo de uso
que le acompaña.
C) Cuando el producto hubiese sido alterado o reparado por personas
no autorizadas por Spectrum Brands de México, SA de CV.
Nota: Usted podra encontrar partes, componentes, consumibles y accesorios en los centros
de servicios autorizados. Esta garantía incluyen los gastos de transportación que se deriven
de sus cumplimiento dentro de sus red de servicio.
25
Page 26

¿NECESITA AYUDA?
Para servicio, reparaciones o preguntas relacionadas al producto, por favor llame al
número del centro de servicio que se indica para el país donde usted compró su producto.
NO devuélva el producto al fabricante. Llame o lleve el producto a un centro de servicio
autorizado.
DOS AÑOS DE GARANTÍA LIMITADA
(No aplica en México, Estados Unidos y Canada)
¿Qué cubre la garantía?
• La garantía cubre cualquier defecto de materiales o de mano de obra que no haya sido generado por
el uso incorrecto del producto.
¿Por cuánto tiempo es válida la garantía?
• Por dos años a partir de la fecha original de compra mientras que tenga una prueba de la compra.
¿Cómo se obtiene el servicio necesario?
• Conserve el recibo original como comprobante de la fecha de compra, comuníquese con el
centro de servicio de su país y haga efectiva su garantía si cumple lo indicado en el manual de
instrucciones.
¿Cómo se puede obtener servicio?
• Conserve el recibo original de compra.
• Por favor llame al número del centro de servicio autorizado.
¿Qué aspectos no cubre esta garantía?
• Los productos que han sido utilizados en condiciones distintas a las normales.
• Los daños ocasionados por el mal uso, el abuso o negligencia.
• Los productos que han sido alterados de alguna manera.
• Los daños ocasionados por el uso comercial del producto.
• Los productos utilizados o reparados fuera del país original de compra.
• Las piezas de vidrio y demás accesorios empacados con el aparato.
• Los gastos de tramitación y embarque asociados al reemplazo del producto.
• Los daños y perjuicios indirectos o incidentales.
¿Qué relación tiene la ley estatal con esta garantía?
• Esta garantía le otorga derechos legales especícos y el consumidor podría tener otros
derechos que varían de una región a otra.
26
Page 27

Por favor llame al número correspondiente que aparece en la lista a continuación para solicitar que
se haga efectiva la garantía y donde Ud. puede solicitar servicio, reparaciones o partes en el país
donde el producto fué comprado.
Argentina
Atención al consumidor
0800 444 7296
Horario de atención:
Lunes a viernes de 9 a 13 hs
y de 14.30 a 17 hs.
email: servicios@spectrumbrands.com
Humboldt 2495 piso 3
C.A.B.A. – Argentina
Chile
SERVICIO DE MAQUINAS Y HERRAMIENTAS LTDA.
Portugal Nº 644
Santiago – Chile
Fonos: 02-6355208 / 02- 6341169
Email: servicio@spectrumbrands.cl
Call center: 800-171-051
Colombia
Rayovac Varta S.A
Carrera 17 Número 89-40
Línea gratuita nacional
018000510012
Costa Rica
Aplicaciones Electromecanicas
Calle 22 y 24 en Avenida 3 BLV de la torre Mercedes
Benz
200 mts norte y 50 mts este
San José, Costa Rica
Tel. (506) 2257-5716
Ecuador
Servicio Master
Dirección: Capitán Rafael
Ramos OE 1-85 y Galo plaza lasso.
Tel (593) 2281-3882 / 2240-9870
El Salvador
Sedeblack
Calle San Antonio Abad, Colonia Lisboa
No 2936
San Salvador, Depto. de San Salvador
Tel. (503) 2284-8374
Guatemala
Kinal
17 avenida 26-75, zona 11 Centro
comercial Novicentro,
Local 37 - Ciudad
Guatemala
Tel. (502)-2476-7367
Honduras
Serviteca
San Pedro Sula, B Los Andes, 2 calle-entre 11-12
Avenida
Honduras
Tel. (504) 2550-1074
México
Articulo 123 # 95 Local 109 y 112
Col. Centro, Cuauhtemoc,
México, D.F.
Tel. 01 800 714 2503
Nicaragua
LRM ELECTRONICA
Managua - Sinsa Altamira 1.5
kilómetros al norte
Nicaragua
Tel. (505) 2270-2684
Panamá
Supermarcas
Centro comercial El dorado, Plaza
Dorado, Local 2.
Panama
Tel. (507) 392-6231
Perú
Servicio Central Fast Service
Av. Angamos Este 2431
San Borja, Lima Perú
Tel. (511) 2251 388
Puerto Rico
Buckeye Service
Jesús P. Piñero #1013
Puerto Nuevo, SJ PR 00920
Tel.: (787) 782-6175
Republica Dominicana
Prolongación Av. Rómulo
Betancourt
Zona Industrial de Herrera
Santo Domingo, República
Dominicana
Tel.: (809) 530-5409
Venezuela
Inversiones BDR CA
Av. Casanova C.C.
City Market Nivel Plaza Local 153
Diagonal Hotel Melia,
Caracas.
Tel. (582) 324-0969
27
Page 28

Veuillez lire et conserver ce guide d’entretien et d’utilisation.
MISES EN GARDE IMPORTANTES.
Lorsqu’on utilise des appareils électriques, il faut toujours respecter certaines
règles de sécurité fondamentales, notamment les suivantes :
• Lire toutes les instructions.
• L’appareil est équipé d’un dispositif de
protection du moteur. Si le plus grand des
poussoirs d’aliments pour la trémie ressort
du couvercle, le robot culinaire s’arrêtera.
• Afin d’éviter les risques de choc
électrique, ne pas immerger la base, le
cordon ou la fiche du robot culinaire dans
l’eau ou dans d’autres liquides.
• Exercer une étroite surveillance lorsque
l’appareil est utilisé à proximité d’un
enfant ou lorsqu’un enfant s’en sert.
• Débrancher l'appareil de la prise de
courant lorsqu'il n'est pas utilisé, avant
d'installer ou de retirer des pièces et avant
de le nettoyer.
• Éviter tout contact avec les lames et les
pièces mobiles.
• Ne pas utiliser un appareil dont la fiche
ou le cordon est abîmé, qui présente un
problème de fonctionnement, qui est
tombé par terre ou qui est endommagé
de quelque façon que ce soit.
Communiquer avec le Service de soutien
à la clientèle au numéro sans frais indiqué
à la section « Garantie ». D’importantes
indications sont inscrites sur la lame
de la fiche de cet appareil. La fiche de
branchement ou l’ensemble du cordon
ne peuvent pas être remplacés. S’il est
endommagé, l’appareil doit être remplacé
• L’utilisation d’accessoires non
recommandés par le fabricant présente
des risques d’incendie, de choc électrique
ou de blessures.
• Ne pas utiliser l’appareil à l’extérieur.
• Ne pas laisser le cordon pendre du rebord
d’une table ou d’un comptoir, ou toucher les
surfaces chaudes.
• Garder les mains et les ustensiles hors
du contenant pendant l’utilisation pour
réduire les risques de blessures graves
ou de dommages au robot culinaire. Une
spatule peut être utilisée, mais seulement
lorsque l’appareil est arrêté.
• Ne jamais insérer les aliments avec
les mains. Toujours utiliser le poussoir
d’aliments.
• Les lames sont tranchantes. Les manipuler
avec soin.
• Pour réduire les risques de blessures, ne
jamais installer les lames ou les disques
sur la base avant d’avoir bien fixé le bol en
place.
• S’assurer que le couvercle est bien
verrouillé avant d’utiliser l’appareil.
• Cet appareil est équipé d'un dispositif de
protection. L'appareil ne fonctionnera pas
si le bol ne repose pas sur la base et si le
couvercle n'est pas bien fixé sur le bol.
• Ne pas placer l’appareil sur un brûleur
au gaz ou électrique ou près d’un tel
appareil, ni dans un four chaud.
• Ne pas tenter de contourner le dispositif
de verrouillage du couvercle.
• N’utiliser cet appareil que pour les
fonctions auxquelles il est destiné.
• Cet appareil est conçu pour un usage
domestique seulement.
• Ne pas ouvrir le couvercle avant que
la lame ou le disque ne se soit pas
immobilisé complètement.
• La puissance nominale maximale de
ce produit a été atteinte avec la lame à
hacher.
• Cet appareil n’est pas conçu pour être
utilisé par des personnes (notamment
des enfants) dont les capacités physiques,
sensorielles ou mentales sont réduites
ou qui manquent d’expérience ou de
connaissances, à moins qu’elles ne soient
supervisées ou dirigées par une personne
responsable de leur sécurité pendant
l’utilisation.
• Exercer une étroite surveillance lorsque
l’appareil est utilisé par un enfant ou près
d’un enfant.
REMARQUE : Le traitement d'aliments à
basse teneur en humidité peut ternir le
fini du bol.
28
Page 29

CONSERVER CES MESURES
Cet appareil est conçu pour un usage domestique seulement.
CARACTÉRISTIQUES DE SÉCURITÉ
FICHE MISE À LA TERRE (Modèles de
120 V seulement)
Par mesure de sécurité, le produit comporte une
che mise à la terre qui n’entre que dans une prise à
trois trous. Il ne faut pas neutraliser ce dispositif de
sécurité. La mauvaise connexion du conducteur de
terre présente des risques de secousses électriques.
Communiquer avec un électricien certié lorsqu’on se
demande si la prise est bien mise à la terre.
VIS INDESSERRABLE
AVERTISSEMENT : L’appareil est doté d’une vis
indesserrable empêchant l’enlèvement du couvercle
extérieur. Pour réduire les risques d’incendie ou
de secousses électriques, ne pas tenter de retirer
le couvercle extérieur. L’utilisateur ne peut pas
remplacer les pièces de l’appareil. En coner la
réparation seulement au personnel des centres de
service autorisés.
CORDON D’ALIMENTATION
a) Un cordon d’alimentation court est fourni pour
éviter qu’un cordon long s’emmêle ou fasse
trébucher.
b) Des rallonges électriques sont disponibles et
peuvent être utilisées avec prudence.
c) En cas d’utilisation d’une rallonge :
1) Le calibre indiqué de la rallonge doit être au
moins aussi élevé que celui de l’appareil,
2) si l’appareil est mis à la terre, la rallonge doit être
de type mise à la terre avec 3 broches; et
3) le cordon électrique doit être disposé de façon à
ce qu’il ne pende pas du comptoir ou de la table,
qu’il ne soit pas à la portée des enfants et qu’il ne
fasse pas trébucher.
Remarque : Si le cordon d’alimentation est
endommagé, veuillez communiquer avec le
Service de la garantie dont les coordonnées
gurent dans les présentes instructions.
29
Page 30

FAMILIARISATION
AVEC VOTRE
ROBOT CULINAIRE
1
2
4
5
7
8
3
9
6
1. Couvercle du bol
(no de pièce 2050201951)
2. Disque éminceur/déchiqueteur
(no de pièce 2050201481)
3. Lame à hacher
(no de pièce 2050201301)
4. Tige centrale
(no de pièce 2050201311)
Le produit peut diérer légèrement de celui qui est illustré.
30
10
5. Bol (no de pièce 2050201491)
6. Panneau de commande
7. Poussoir d'aliments
(no de pièce 20102000003802)
8. Trémie
9. Poignée
10. Base
Page 31

UTILISATION
Cet appareil est conçu pour un usage
domestique seulement.
POUR COMMENCER
• Retirer tout matériau d’emballage,
toute étiquette et la bande de
plastique entourant la che.
• Retirer et conserver la documentation.
• Visiter le www.prodprotect.com/
applica pour enregistrer la garantie.
• Laver toutes les pièces amovibles en
suivant les directives de la section
ENTRETIEN ET NETTOYAGE du
présent guide.
• MISE EN GARDE : Manipuler la lame
et le disque avec précaution. Ils sont
extrêmement tranchants.
• Choisir un comptoir sec et de niveau
où utiliser l’appareil; laisser assez
d’espace sur tous les côtés pour assurer
la ventilation adéquate du moteur.
ASSEMBLAGE DU
ROBOT CULINAIRE
Important : Toujours s'assurer que le robot
culinaire est débranché et déposé sur une
surface plane et de niveau avant de commencer l'assemblage.
Important : Pour votre protection,
cet appareil est dotwé d'un dispositif
de verrouillage. Le robot culinaire ne
fonctionnera pas si le couvercle n'est pas
correctement verrouillé en place.
1. Placer la tige centrale dans le bol.
2. Placer la lame à hacher ou le disque
éminceur/déchiqueteur sur la tige centrale.
3. Placer le couvercle sur le bol, le petit
loquet placé à droite de la poignée du bol.
4. Fixer le bol à la base.
5. Tourner le couvercle dans le sens horaire
jusqu'à ce qu'il se verrouille en place.
6. Insérer le poussoir d'aliments dans la trémie.
7. S'assurer que le bouton OFF est pressé.
Brancher l'appareil pour le mettre en
marche. Il est prêt à être utilisé.
31
Page 32

PANNEAU DE
COMMANDE
Remarque : Si le robot culinaire ne
fonctionne pas, s'assurer que le bol est
bien xé à la base et que le couvercle est
en place.
OFF (arrêt)
Appuyer sur le bouton OFF pour arrêter le
robot culinaire lorsqu'il fonctionne à basse
vitesse (LOW) ou à vitesse élevée (HIGH).
LOW (basse vitesse)
Lorsque l'option LOW est sélectionnée, le
robot culinaire fonctionne à basse vitesse
jusqu'à ce que le bouton OFF soit pressé.
HIGH (vitesse élevée)
Lorsque l'option HIGH est sélectionnée, le
robot culinaire fonctionne à vitesse élevée
jusqu'à ce que le bouton OFF soit pressé.
UTILISATION DE LA
LAME À HACHER
La lame à hacher sert à hacher
grossièrement ou nement, à émincer, à
mélanger et à réduire en purée.
Mise en garde : La lame à hacher est
extrêmement tranchante. La manipuler et la
ranger avec prudence.
1. Assembler le robot culinaire en insérant la
tige centrale et la lame à hacher dans le bol.
PULSE (impulsion)
Utiliser l'option PULSE pour de brèves
tâches exécutées avec la lame à hacher.
Cette option vous permet de contrôler la
taille et l'uniformité des aliments hachés.
• Le bouton PULSE doit être maintenu
enfoncé pour que l'appareil fonctionne
en mode d'impulsion. L'appareil s'arrête
lorsque le bouton est relâché.
• Appuyer sur le bouton et le relâcher pour
permettre à la lame de s'immobiliser et aux
aliments de retomber dans le fond du bol.
o
2. Placer les aliments dans le bol.
3. Placer le couvercle sur le bol et le
verrouiller en place en le tournant dans le
sens horaire.
4. Mettre le poussoir d'aliments en place.
Important : Ne jamais utiliser ses doigts
pour pousser les aliments dans la trémie.
5. Sélectionner la vitesse désirée (BASSE,
ÉLEVÉE ou IMPULSION).
Remarque : Hacher les aliments pas plus
de quelques secondes à la fois. La fonction
d'impulsion donne d'excellents résultats et
ore une plus grande maîtrise.
7. Lorsque la tâche est terminée, appuyer
sur le bouton OFF.
Important : S'assurer que la lame à hacher
s'est immobilisée complètement avant de
retirer le couvercle ou le bol du robot culinaire.
32
Page 33

8. Tourner le couvercle dans le sens
antihoraire pour le retirer.
9. Retirer le bol de la base.
Remarque : Retirer le bol de l'appareil avant
de retirer la lame à hacher, an d'éviter
que des aliments tombent par l'ouverture
centrale du bol.
10. Retirer la tige centrale.
11. Débrancher l'appareil quand il ne sert pas.
CONSEILS PRATIQUES
POUR L'UTILISATION DE
LA LAME À HACHER
• Le robot culinaire fonctionne très
rapidement. Faire attention de ne pas trop
traiter les aliments.
• Pour obtenir des résultats optimaux, traiter
des morceaux d'aliments sensiblement de
la même grosseur.
• Le robot culinaire sera plus ecace s'il est
rempli au plus à moitié ou aux 2 tiers.
• Lors du remplissage du bol, ne pas
dépasser la marque « Max Food Level »
(niveau maximal d’aliments).
• Pour hacher de la viande cuite ou crue,
elle doit être très froide. Ne pas utiliser
plus de 500 ml (2 tasses) de cubes de 2 cm
(3/4 po). Utiliser le mode d'impulsion par
intervalles de 5 secondes.
• Le hachage de noix ou autres aliments
durs peut rayer la surface de nition à
l'intérieur du bol.
• Ne jamais laisser le robot culinaire
fonctionner sans surveillance.
• Il est possible de passer des liquides chauds
au robot, mais jamais des liquides brûlants.
• Le mode d'impulsion ore la plus grande
maîtrise.
• Insérer un entonnoir dans la trémie pour
ajouter des ingrédients comme de l'huile, de
la farine et du sucre.
UTILISATION DU
DISQUE ÉMINCEUR/
DÉCHIQUETEUR
1. Fixer le bol à la base.
2. Placer la tige centrale dans le bol.
3. Placer soigneusement le disque
éminceur/déchiqueteur sur la tige centrale,
en mettant vers le haut le côté approprié ( selon
la tâche à accomplir).
4. Placer le couvercle sur le bol et le
verrouiller en place en le tournant dans le
sens horaire.
5. Placer les aliments dans la trémie.
6. Appuyer sur le bouton LOW; appuyer
légèrement, mais fermement, sur le
poussoir d'aliments an de guider les
aliments dans le robot culinaire.
Remarque : Exercer une forte pression
sur le poussoir d'aliments n'accélère pas le
travail; utiliser le poussoir d'aliments comme
guide uniquement. Laisser le robot culinaire
faire le travail.
7. Lorsque la tâche est terminée, appuyer
sur le bouton OFF.
Important : S'assurer que le disque
éminceur/déchiqueteur s'est immobilisé
complètement avant de retirer le couvercle
ou le bol du robot culinaire.
8. Tourner le couvercle dans le sens
antihoraire pour le retirer.
9. Retirer délicatement le disque éminceur/
déchiqueteur. Retirer le bol de la base.
10. Débrancher l'appareil quand il ne sert pas.
33
Page 34

CONSEILS PRATIQUES
POUR ÉMINCER OU
DÉCHIQUETER
• Avant de trancher des fruits et des
légumes ronds avec le robot culinaire,
enlever une tranche mince au bas de
l'aliment an de le rendre plus stable.
Placer les aliments dans la trémie, côté
coupé vers le bas.
• Avant de traiter les aliments, toujours en
retirer les graines, le noyau et les pépins.
• Sélectionner des fruits et légumes fermes
et pas trop mûrs.
• Retirer le cœur des légumes durs tels que
le chou.
• Pour éviter que les longs aliments, tels
que les carottes ou le céleri, sortent de
l’orice d’alimentation, les couper en
plusieurs morceaux et bien remplir l’orice
d’alimentation.
• Pour trancher des légumes minces,
les couper à une dimension tout juste
inférieure à celle de la trémie; les placer à la
verticale dans la trémie de sorte qu'ils soient
bien serrés pour ne pas tourner ou s'incliner.
• Les fromages à pâte molle ou semiferme doivent être refroidis avant d'être
déchiquetés. Pour obtenir les meilleurs
résultats avec du fromage à pâte molle
comme du mozzarella, le congeler de 15 à
20 minutes avant de le traiter. Le découper
en fonction de l'ouverture de la trémie, et
l'insérer en exerçant une pression uniforme.
• Pour trancher de la viande cuite, y
compris du salami et du pepperoni, elle
doit être très froide. La découper en
fonction de l'ouverture de la trémie, et
l'insérer en exerçant une pression ferme et
uniforme.
• Ne pas laisser les aliments s'accumuler
exagérément (plus des 2/3 du bol);
interrompre la tâche et vider le bol.
• Retirer le disque éminceur/déchiqueteur
avant de retirer le bol du robot culinaire.
CONSEILS GÉNÉRAUX
POUR L'UTILISATION
DU ROBOT CULINAIRE
• Organiser les tâches an d'éviter le
nettoyage répété du bol; traiter les
aliments secs avant les liquides.
• Ne pas traiter des aliments à ce point
congelés ou durs que la pointe d'un
couteau ne puisse les pénétrer.
• Si un morceau d'aliment dur, comme une
carotte, reste coincé ou bloqué sur la lame,
arrêter le robot culinaire, le débrancher
et retirer la lame. Retirer délicatement les
aliments de la lame.
• Ne pas utiliser le robot culinaire pour :
- moudre des grains de café, des os,
des graines ou des épices dures
- découper ou hacher des viandes
chaudes
34
Page 35

ENTRETIEN ET
NETTOYAGE
Cet appareil ne contient aucune pièce
réparable par l’utilisateur. En coner la
réparation à un professionnel qualié.
Important : Toujours débrancher le robot
culinaire avant de le nettoyer.
NETTOYAGE
Important : Les lames et les disques sont
tranchants. Les manipuler avec soin.
• Désassembler complètement les pièces
du robot culinaire avant de les laver.
• Pour faciliter le nettoyage, rincer les pièces
immédiatement après les avoir utilisées.
• Essuyer la base et les pieds avec un
chion humide et bien les assécher.
Enlever les taches tenaces en frottant à
l’aide d’un chion humide et d’un produit
nettoyant doux et non abrasif. Ne pas
plonger la base dans un liquide.
• Toutes les pièces amovibles peuvent
être lavées à la main avec de l'eau chaude
et du savon à vaisselle, ou dans le lavevaisselle, panier supérieur seulement. Laver
les pièces de plastique à la main aidera à
conserver l'apparence du robot culinaire.
• Ne pas utiliser de tampons à récurer ni de
produits nettoyants abrasifs pour nettoyer les
pièces de plastique ou de métal de l'appareil.
• Ne pas laisser la lame ou le disque
tremper longtemps dans l'eau.
• Ne pas oublier de nettoyer la tige interne
de la lame à hacher. Utiliser une brosse pour
déloger les particules d'aliments collées.
CONSEILS POUR LE
NETTOYAGE
• Pour un nettoyage rapide, verser 250 ml (1
tasse) d’eau chaude et une goutte de détergent
à vaisselle dans le bol du robot culinaire.
• Mettre le couvercle et faire fonctionner
l'appareil à basse vitesse pendant environ
30 secondes.
• Jeter le liquide et rincer le récipient à fond.
Important : Ne pas mettre les pièces du
robot culinaire dans des liquides bouillants.
RANGEMENT
Mise en garde : Les lames et les disques
sont tranchants. Les manipuler avec soin.
1. Enrouler le cordon sous la base.
2. Assembler les pièces sur la base dans
l'ordre suivant : bol, tige centrale, lame à
hacher, disque éminceur/déchiqueteur,
couvercle du bol, poussoir d'aliments.
35
Page 36

DÉPANNAGE
PROBLÈME SOLUTION
Le robot culinaire
ne fonctionne pas
Le déchiquetage
ou l’éminçage est
incorrect
• S’assurer que le bol et le couvercle sont correctement alignés
et xés en place, et que le grand poussoir d’aliments est inséré
dans la trémie.
• S’assurer que le robot culinaire est branché.
• Si vous utilisez une boîte à disjoncteurs, s’assurer que le circuit
est fermé.
• Débrancher le robot culinaire, puis le rebrancher.
• Assurez-vous que le disque ou la lame sont installés
correctement.
• S’assurer que les ingrédients conviennent à l’éminçage ou au
déchiquetage.
Le couvercle du bol
ne ferme pas
Si le problème n’est pas causé par les éléments ci-dessus, consulter la section « Information
sur la garantie et le service à la clientèle » du présent guide d’utilisation et d’entretien. Ne pas
retourner l’appareil au détaillant. Les détaillants ne fournissent pas de services de réparation.
• Assurez-vous que le disque ou la lame sont installés
correctement.
36
Page 37

RECETTES
Salsa facile
Temps total : 5 minutes
Portions : 500 ml (2 tasses)
Ingrédients
2 tomates fraîches moyennes, en
quartiers
125 ml (1/3 tasse) de coriandre un peu
compactée
125 ml (1/3 tasse) de tomates et de
piments verts* en dés
Directives
1. Dans le bol du mélangeur, déposer les tomates et mélanger par impulsion 4 ou 5 fois
pour hacher.
2. Ajouter les autres ingrédients aux tomates hachées dans le bol et mélanger à basse
vitesse pendant environ 30 secondes, ou jusqu'à consistance désirée.
3. Servir avec des croustilles au maïs.
* Vous trouverez des boîtes de tomates en dés avec piments verts dans le rayon des produits
mexicains ou internationaux de l'épicerie.
1/4 petit oignon jaune
5 ml (1 c. à thé) d'ail émincé
30 ml (2 c. à table) de jus de lime frais
2,5 ml (1/2 c. à thé) de sel
2,5 ml (1/2 c. à thé) de sucre
1/2 jalapeno, tige et pépins enlevés
Hummus aux haricots noirs
Temps total : 5 minutes
Portions : 7
Quantité d'une portion : 60 ml (1/4 tasse)
Ingrédients
1 boîte (425 ml/15 oz) de pois noirs,
égouttés et rincés
30 ml (2 c. à table) de jus de lime frais
60 ml (1/4 tasse) de tahini
60 ml (1/4 tasse) d'huile d'olive
15 ml (1 c. à table) d'ail émincé
Directives
1. Placer tous les ingrédients dans le bol du mélangeur. Mélanger à vitesse élevée pendant
environ 1 minute jusqu'à ce que le hummus ait une consistance lisse.
2. Servir avec vos croustilles ou biscottes préférées.
10 ml (2 c. à thé) de cumin
2,5 ml (1/2 c. à thé) de poudre de chili
30 ml (2 c. à table) de coriandre
2,5 ml (1/2 c. à thé) de sel
1,2 ml (1/8 c. à thé) de poivre
1/2 petit oignon jaune
37
Page 38

Trempette aux piments jalapeno
Temps de préparation : 5 minutes
Temps total : 20 à 25 minutes
Portions : 375 ml (3 1/2 tasses)
Ingrédients
2 piments jalapeno, tige et pépins
enlevés
455 g (16 oz) de fromage à la crème,
ramolli
125 ml (1/2 tasse) de crème sure
Directives
1. Préchauer le four ou le grille-pain four à 180 °C (350 °F).
2. Dans le bol du mélangeur, déposer les jalapenos épépinés et mélanger par impulsion 3 ou
4 fois pour découper en dés.
3. Ajouter les autres ingrédients et 415 ml (1 3/4 tasse) du fromage râpé aux jalapenos en
dés dans le bol. Mélanger à vitesse élevée pendant environ 30 secondes pour obtenir une
consistance lisse.
4. Verser le mélange dans un plat allant au four et lisser. Garnir avec les 125 ml (1/2 tasse) de
fromage râpé restant.
5. Faire cuire de 15 à 20 minutes jusqu'à ce que le fromage forme des bulles.
15 ml (1 c. à table) d'ail émincé
2,5 ml (1/2 c. à thé) de sel
8 tranches de bacon cuit, haché
625 ml (2 1/4 tasses) de fromage pepper
jack râpé, divisé
6. Servir avec des croustilles au maïs ou des biscottes.
38
Page 39

RENSEIGNEMENTS DE GARANTIE ET
SERVICE À LA CLIENTÈLE
Pour communiquer avec les services d’entretien ou de réparation, ou pour adresser toute
question relative au produit, composer le numéro sans frais approprié indiqué sur la page
couverture. Ne pas retourner le produit où il a été acheté. Ne pas poster le produit au
fabricant ni le porter dans un centre de service. On peut également consulter le site web
indiqué sur la page couverture.
Garantie Limitée De Deux Ans
(Valable seulement aux États-Unis et au Canada)
Quelle est la couverture?
• Tout défaut de main-d’oeuvre ou de matériau; toutefois, la responsabilité de la société. Spectrum
Brands, Inc. se limite au prix d’achat du produit.
Quelle est la durée?
• Deux années à compter de la date d’achat initiale, avec une preuve d’achat.
Quelle aide orons nous?
• Remplacement par un produit raisonnablement semblable nouveau ou réusiné.
Comment se prévaut-on du service?
• Conserver son reçu de caisse comme preuve de la date d’achat.
• Visiter notre site web au www.prodprotect.com/applica, ou composer sans frais le
1-800 231-9786, pour obtenir des renseignements généraux relatifs à la garantie.
• On peut également communiquer avec le service des pièces et des accessoires au
1-800 738-0245.
Qu’est-ce que la garantie ne couvre pas?
• Des dommages dus à une utilisation commerciale.
• Des dommages causés par une mauvaise utilisation ou de la négligence.
• Des produits qui ont été modiés.
• Des produits utilisés ou entretenus hors du pays où ils ont été achetés.
• Des pièces en verre et tout autre accessoire emballés avec le produit.
• Les frais de transport et de manutention reliés au remplacement du produit.
• Des dommages indirects (il faut toutefois prendre note que certains états ne permettent pas
l’exclusion ni la limitation des dommages indirects).
Quelles lois régissent la garantie?
• Les modalités de la présente garantie donnent des droits légaux spéciques. L’utilisateur peut
également se prévaloir d’autres droits selon l’état ou la province qu’il habite.
39
Page 40

www.BlackAndDeckerAppliances.com
Sello del Distribuidor:
Fecha de compra:
Modelo:
450W 120V 60Hz
Comercializado por:
SPECTRUM BRANDS DE MÉXICO,
SA de C.V Autopista México Querétaro
No 3069-C Oficina 004
Colonia San Andrés
Atenco, Tlalnepantla
Estado de México,
C.P. 54040 Mexico.
Teléfono: (55) 5831-7070
Servicio y Reparación
Art. 123 No. 95
Col. Centro, C.P. 06050
Deleg. Cuauhtemoc
Servicio al Consumidor,
Venta de Refacciones
y Accesorios
01 800 714 2503
Importado y Distribuido por:
Rayovac Argentina S.R.L.
Humboldt 2495 Piso# 3
C1425FUG) C.A.B.A. Argentina
C.U.I.T No. 30-70706168-1
Código de fecha / Date Code / Le code de date:
Importado por / Imported by:
SPECTRUM BRANDS DE MÉXICO,
SA de C.V
Autopista México Querétaro No 3069-C Oficina
004
Colonia San Andrés Atenco, Tlalnepantla
Estado de México, C.P. 54040
Mexico.
Telefono: (55) 5831 – 7070
Para atención de garantía marque:
01 (800) 714 2503
Importado por / Imported by:
Spectrum Brands En Chile,
Household Products Chile Ltda
Av. Del Valle 570, Ofic. 704
Ciudad Empresarial, Huechuraba
Santiago - Chile
Fono: (562) 2571 3700
Importado por / Imported by:
Spectrum Brands Colombia S.A.
Carrera 17 No.89-40
Bogotá, Colombia
Línea de atención al cliente: 018000510012
BLACK & DECKER, BLACK+DECKER, the BLACK & DECKER and BLACK+DECKER logos and product names are
trademarks of The Black & Decker Corporation, used under license. All rights reserved.
BLACK & DECKER, BLACK+DECKER, the BLACK & DECKER y los logos y nombres de productos de BLACK+DECKER
son marcas registradas de The Black & Decker Corporation, usados bajo licencia. Todos los derechos reservados.
BLACK & DECKER, BLACK+DECKER, les logos et noms de produits BLACK & DECKER et BLACK+DECKER sont des
marques de commerce de The Black & Decker Corporation, utilisées sous licence. Tous droits réservés.
Made in China.
Fabricado en China.
Fabriqué en Chine.
© 2017 The Black & Decker Corporation and Spectrum Brands, Inc., Middleton, WI 53562
40
T22-5003907
1823 9-0 0 E/S/F
 Loading...