

Page 1
alimentos (G) .
5. Gire el dial a PULSE, 1 o po sición 2; presione firmemente empujador para
guiar los alimentos a través de rampa de alimentación, per o no lo fuerce.
Nota: fuerte pr esión sobre el empujador no acelera el trabajo, utilice el
empujador solamente como una guía. Deje que el procesado r haga el trabajo.
6. Cuando haya terminado, vuelva a marcar OFF ( 0) y espere para el disco
deje de girar antes de retirar la cubiert a. Gire la tapa hacia la izquierda
para quitarlo.
IMPORTANTE: Asegúrese de que el disco de corte y tritur ación haya detenido
por completo antes de retirar la tap a del tazón de procesamiento.
Importante: Abra la tapa an tes de retirar el recipiente.
7. Retire con cuidado el disco de rebanar y triturar. Desbloquear recipiente
girándolo hacia la izquierda y levantándola de la base.
8. Desconecte el aparato cuand o no está en uso.
CONSEJOS ÚTIL ES DURANTE EL CORTE Y TR ITURACIÓN
• A ntes de cortar frutas y verduras en el pr ocesador, cortar una rebanada
delgada de la parte inferior de la comida para hacerla plana.
• C oloque el lado cortado hacia abajo alimentos en el conducto de
alimentación.
• Re tire las semillas y los hoyos antes del procesamiento.
• S eleccione alimentos que sean firmes y maduras no.
• Qui te el centro de vegetales duros como el repollo.
• Dur ante el corte más delgadas verduras, se cort an justo antes de la
longitud de la tolva de alimentación y de pie vertic almente en el conducto
de alimentación de manera que están sólidamen te embalados y no puede
girar o inclinar.
• Triture los que sos duros a temperatura ambiente.
• En fríe los quesos blandos y semiduros antes de la trituració n.
• De spués de la comida se ha procesado, retire la tapa e invierta en la
encimera. Retire el disco cort ado y triturado antes de retirar el recipiente
del procesador. Colocar el disco en la par te superior de la tapa del
recipiente invertido.
COMO BLOQUEAR LA CUBIERTA
1. Coloque la tapa sobre el recipiente con el pequeño pes tillo a la izquierda del
asa del recipiente (H ).
2. Mantenga alimentar tolva de la cubiert a tazón y gire hacia la izquierda
hasta cubrir tapa quede en su lugar.
Importante: Pa ra su protección, este aparato cuenta con un sistema de
bloqueo. El procesador no funcionará a men os que el recipiente de
procesamiento y la cubierta es tán bien bloqueado en su lugar.
3. Inserte el empujador de alimentos en el conduc to de alimentación.
Nota: El empujador de alimentos se u tiliza para guiar los alimentos a través
de la tolva de alimentación y se puede quitar cuando la adició n de alimentos
líquidos o adicional mientras que el procesador es tá funcionando.
CUIDADO Y LIMPIEZ A
Nota: No trate de afilar los b ordes cortantes de la cuchilla o disco de corta r
cortar y triturar. Ellos vienen afi lados de fábrica y se arruinará si afilada.
LIMPIEZA
Nota: Antes de limpiar, asegúrese de que la unidad e stá apagada y el cable
desenchufado.
• C ompletamente desmontar las piezas del procesador an tes de lavar.
• Enjuague l as piezas inmediatamente después de procesar para una fácil
limpieza.
Precaución: El corte y el disco de tr ituración es muy fuerte. Tenga cuidado al
manejar y almacenar.
• L impie la base y los pies con un paño húmedo y séquela bien. Las manchas
persistentes pueden eliminarse frot ando con un paño húmedo y un
detergente suave, no abrasivo. No sumerja la base en líquido.
• Todas las piezas de smontables se pueden lavar a mano o en el lavavajillas.
El lavado de manos de las piezas de plástico le ayuda rá a mantener su
apariencia en el procesador de alimentos.
• Si e s necesario lavar a mano, llene el recipiente con agua jabonosa caliente
y rápidamente subir y bajar el disco de cort ar la hoja o corte y trituración de
arriba y abajo en el eje central.
Precaución: El corte y el disco de tr ituración es muy fuerte. Tenga cuidado al
manejar y almacenar.
• Si us a la máquina lavaplatos, coloque las piezas removibles en la bandeja
superior solamente - no en o cerca de canas ta utensilio.
• A lgunas manchas de partes puede ocurrir. Si es así, haga una pasta
compuesta de 2 cucharadas de bicarb onato de sodio y 1 cucharada de
agua. Aplicar a las manchas y dejar repos ar durante la noche. Enjuague y
seque.
• N o use almohadillas ni limpiadores abrasivos en ninguna parte de plástico
o de metal para limpiar.
• N o permita que la cuchilla de cortar o rebanar y triturar disc o en remojo en
agua durante largos períodos de tiempo.
• Re cuerde limpiar el eje interno de la cuchilla de picar, el uso de un cepillo
de botella de bebé para eliminar las partículas de a limentos tapados.
• Si us ted está teniendo problemas para cerrar la tapa so bre el recipiente,
aplique una pequeña cantidad de aceite vegetal en el bor de de la tapa y
el recipiente. Esto debería hacer que las piezas de t rabajo más suave al
colocar la tapa al recipiente.
¿NECESITA AYUDA?
Para servicio, repar aciones o preguntas relacionadas al product o, por favor
llame al número del centro de servi cio que se indica para el país donde usted
compró su producto. NO devuélva e l producto al fabricante. Llame o lleve el
producto a un centro de ser vicio autorizado.
DOS AÑOS DE GAR ANTÍA LIMITADA
(No aplica en México, E stados Unidos y Canada)
¿Qué cubre la garant ía?
• La garantía cubre cualquier defecto de materiales o de mano de obr a que no
haya sido generado por el uso incorr ecto del producto.
¿Por cuánto tiemp o es válida la garantía?
• Por dos años a partir de la fecha original de compra mientras qu e tenga una
prueba de la compra.
¿Cómo se obtiene el servicio necesario?
• Conserve el recibo original como comprobante de la fecha de compr a,
comuníquese con el centro de ser vicio de su país y haga efectiva su garantía
si cumple lo indicado en el manual de instrucc iones.
¿Cómo se puede obtener servicio?
• Conserve el recibo original de compra.
• Por favor llame al número del centro de servicio autorizado.
¿Qué aspectos no c ubre esta garantía?
• Los productos que han sido utilizados en condiciones distint as a las normales.
• Los daños ocasionados por el mal uso, el abuso o negligencia.
• Los productos que han sido alterados de alguna manera.
• Los daños ocasionados por el uso comercial del product o.
• Los productos utilizados o reparados fuera del país or iginal de compra.
• Las piezas de vidrio y demás accesorios empacados con el apa rato.
• Los gastos de tramitación y embarque asociados al re emplazo del producto.
• Los daños y perjuicios indirectos o incidentales.
¿Qué relación tie ne la ley estatal con esta g arantía?
• Esta garantía le otorga derechos legales específ icos y el consumidor podría
tener otros derechos que varía n de una región a otra.
Póliza de Garantía
(Válida sólo para Méxic o)
Duración
Rayovac de México SA de CV garant iza este producto por
2 años a partir de la fecha original de compra .
¿Qué cubre esta gar antía?
Esta Garantía cubre cualquier de fecto que presenten las piezas, componentes
Please Read and Save this Use and C are Book.
IMPORTANT SAFEGUARDS.
When using electrical appliances, basic safety precautions
should always be followed, including the following:
• Read all instructions.
• To protect against risk of electrical shock do not immerse cord,
plugs or appliance in water or other liquid.
• Close supervision is necessary when any appliance is used by
or near children.
• Unplug from outlet when not in use, before putting on or taking
off parts and before cleaning.
• Avoid contacting moving parts.
• Do not operate any appliance with a damaged cord or plug
or after the appliance malfunctions, or is dropped damaged
in any manner. Return appliance to the nearest authorized
service facility for examination, repair or electrical or
mechanical adjustment. Or, call the appropriate toll-free
number listed on this sheet.
• The use of attachments, including canning jars, not
recommended by the manufacturer may cause fire, electric
shock or injury.
• Do not use outdoors.
• Do not let cord hang over edge of table or counter.
• Keep hands and utensils away from moving blades or discs
while processing food to reduce the risk of severe injury to
persons or damage to the food processor. A scraper may be
used, but must be used only when the food processor is not
running.
• Blade is sharp. Handle carefully.
• To reduce the risk of injury, never place cutting blade or discs
on base without first putting bowl properly in place.
• Be certain cover is securely locked in place before operating
appliance.
• Never feed food by hand. Always use food pusher.
• Do not attempt to defeat the cover interlock mechanism.
SAVE THESE INSTRUCTIONS.
This product is for household use only.
POLARIZED PL UG (120V MODELS ONLY)
This appliance has a polarized plug (one blade is wider
than the other). To reduce the risk of electric shock, this
plug is intended to fit into a polarized outlet only one way.
If the plug does not fit fully into the outlet, reverse the plug.
If it still does not fit, contact a qualified electrician. Do not
attempt to modify the plug in any way.
TAMPER-RESISTANT SCREW
Warning: This appliance is equipped with a tamper-resistant screw
to prevent removal of t he outer cover. To reduce the risk of fire or
electric shock, d o not attempt to remove the ou ter cover. There are no
user-serviceab le parts inside. Repair should be d one only by authorized
service personnel.
ELECTRICAL CORD
The cord of this appliance was selected t o reduce the possibility of tangling
in or tripping over a longer cord. If more length is neede d, use an extension
cord rated no less than 15 amperes. ( For 220-volt rated products, use an
extension cord rated no less tha n 6 amperes.) When using an extension cord,
do not let it drape over the working area or da ngle where someone could
accidentally trip over it. Handle cord ca refully for longer life; avoid jerking or
straining it at outlet and appliance conne ctions.
Note: If the power cor d is damaged, it should be replaced by qualified personnel; in Latin America, by a n authorized service center.
CONTROL PANEL
The controls are located on t he front of the base (A). Turn dial to P, 1 or 2 in
order to select a function (s ee directions below).
OFF CONTROL
Processor should be stored in O FF position (0) and unplugged
when not in use.
PULSE CONTROL
Use PULSE ( P) for short processing tasks. This lets you con trol
the size and uniformity of foods being chopp ed.
• T he dial must be turned to the P position and held for the appliance to
operate in PULSE mo de. When released, the dial will return to the 0 position
and the function will end.
• T he motor of the processor will run as long as the PU LSE position is held.
Hold the dial in the PULS E position and then release to allow the blade to
stop running and the food to fall to the bo ttom of the workbowl.
• Puls ing gives better control when chopping, mincing, mixing and blending
foods. You can control the size of the food s, from coarse to fine.
SPEED 1 and 2 CONTROL
This food processor has t wo speeds. Turn the dial to the appropriate speed
when the food is ready to be process ed. When turned to one of these speeds,
the processor will continue to run unt il the dial is returned to the OFF (0 )
position.
HOW TO USE
This product is for household use only.
• Remove all pack ing material and any stickers from the
product.
• Ple ase go to www.prodprotect.com/ applica to register your
warranty.
Important: Handle chopping blade and slicing and
shredding disc carefully. They are very sharp.
• Was h all removable parts as instructed in CA RE AND CLEAN ING section of
this manual.
• S elect a level, dry countertop where the appliance is to be used, a llowing
air space on all sides to provide proper ventilation fo r the motor.
ASSEMBLING THE PROCESSOR
HOW TO INSERT AND REMO VE THE CENTER POST
The center post is removable. When you are r eady to use the food processor,
place the center post into the smaller opening in the ba se (B).
HOW TO LOCK THE PROCESSING WORKBOWL IN POSITION
1. Attach center post to workbowl. Place t he workbowl on the base with
handle turned to the right of the locking mecha nism (C) over the unlock
symbol
2. Hold handle and rotate workbo wl clockwise toward the until it clicks
firmly into place (D).
Note: Be sure to lock the wo rkbowl in place before attaching the chopping
blade or the slicing and shredding disc and the cover.
HOW TO CHOP IN THE PROCESSING WORKBOWL
The chopping blade is used to coarsely or finel y chop, mince,
mix, and puree foods to a smooth consis tency.
1. Lock workbowl into position (s ee Illustrations C and D).
2. Hold chopping blade by center shaft and inser t onto center
post (E).
Caution: The chopping blade is very sharp. Use caution when
handling and storing.
3. Place food in workbowl.
4. Place cover on workbowl and lock into place by ro tating
counterclockwise (H).
5. Place the food pusher in place.
Important: Never use your fingers to direc t food through the
feed chute.
6. Select your desired speed ( PULSE, 1 or 2).
Note: Process f oods for no more than a few seconds at a
time. Pulsing produces excellent results and of fers
greater control.
Important: Make sure the chopping blade ha s completely
stopped spinning before removing cover from
processing bowl.
7. Return the dial to the OFF (0) p osition and allow the
chopping blade to stop revolving before removing cover.
Twist cover toward (clockwise ) to remove.
Important: Unlock lid first be fore removing workbowl.
8. Unlock workbowl by turning it count erclockwise and lift off
base.
Note: Remove workbowl f rom appliance before removing
the chopping blade to prevent food from leaking t hrough the
center opening of the workbowl.
9. Carefully remove the chopping blade.
10. Unplug appliance when not in use.
HELPFUL TIPS FOR CHOPPING
• Watc h carefully to avoid over-processing foods.
• T he PULSE position offers t he best control.
• F or best results, process foods that are abo ut the same
size.
• Do n ot overload the workbowl.
• Never wa lk away from the processor while it is on.
• You may use hot but n ot boiling liquids.
• Do n ot process more 3 cups of liquid in the workbowl at any given time.
• To process mea t, use no more than 2 cups of ¾-inch cubes. Process using
PULSE in 5-sec ond intervals.
• In sert a funnel into the feed chute when adding ingredients such as oil,
flour and sugar.
HOW TO SLICE OR SHRED IN TH E WORKBOWL
1. Lock workbowl into position (s ee Illustrations C and D).
2. Carefully place slicing and shredding disc on top of cen ter post with
appropriate side up (depending on work to b e done) (F).
CAUTION: The slicing and shredding disc is very s harp. Use caution when
handling and storing.
3. Place cover on workbowl and lock into plac e by rotating cover
counterclockwise (see Illustration H).
4. Fill feed chute with food. Position f ood pusher over food (G).
5. Turn dial to PULSE, 1 or 2 position ; press firmly on food pusher to guide
food through feed chute, but do not force i t.
Note: Heavy pressur e on the pusher does not speed the work; use the pusher
only as a guide. Let the processor do the w ork.
6. When finished, return dial to OFF ( 0) position and wait for disc to s top
rotating before removing cover. Twist cover toward clockwise t o remove.
IMPO RTANT: Make sure the slicing and shredding disc has completely
stopped spinning before removing cover from proc essing bowl.
Important: Unlock lid first befo re removing workbowl.
7. Carefully remove the slicing and shredding disc. Unlock workbowl by
turning it clockwise and lift ing it off the base.
8. Unplug appliance when not in use.
HELPFUL TIPS WH EN SLICING AND SHREDDING
• B efore slicing fruits and vegetables in the processor, cut a thin slice from
the bottom of the food to make i t flat.
• Pla ce the food cut side down in feed chute.
• Remove se eds and pits before processing.
• S elect foods that are firm and not overripe.
• Remove t he core from hard vegetables such as cabbage.
• W hen slicing thinner vegetables, cut them just short of the length o f the
feed chute and stand them vertic ally in feed chute so they are solidly
packed and cannot turn or tilt.
• Shr ed hard cheeses at room temperature.
• Chill so ft and semi-hard cheeses before shredding.
• A fter food has been processed, remove the cover and invert o n countertop.
Remove the slicing and shredding disc before removing the work bowl from
the processor. Place the disc on top of the inver ted workbowl cover.
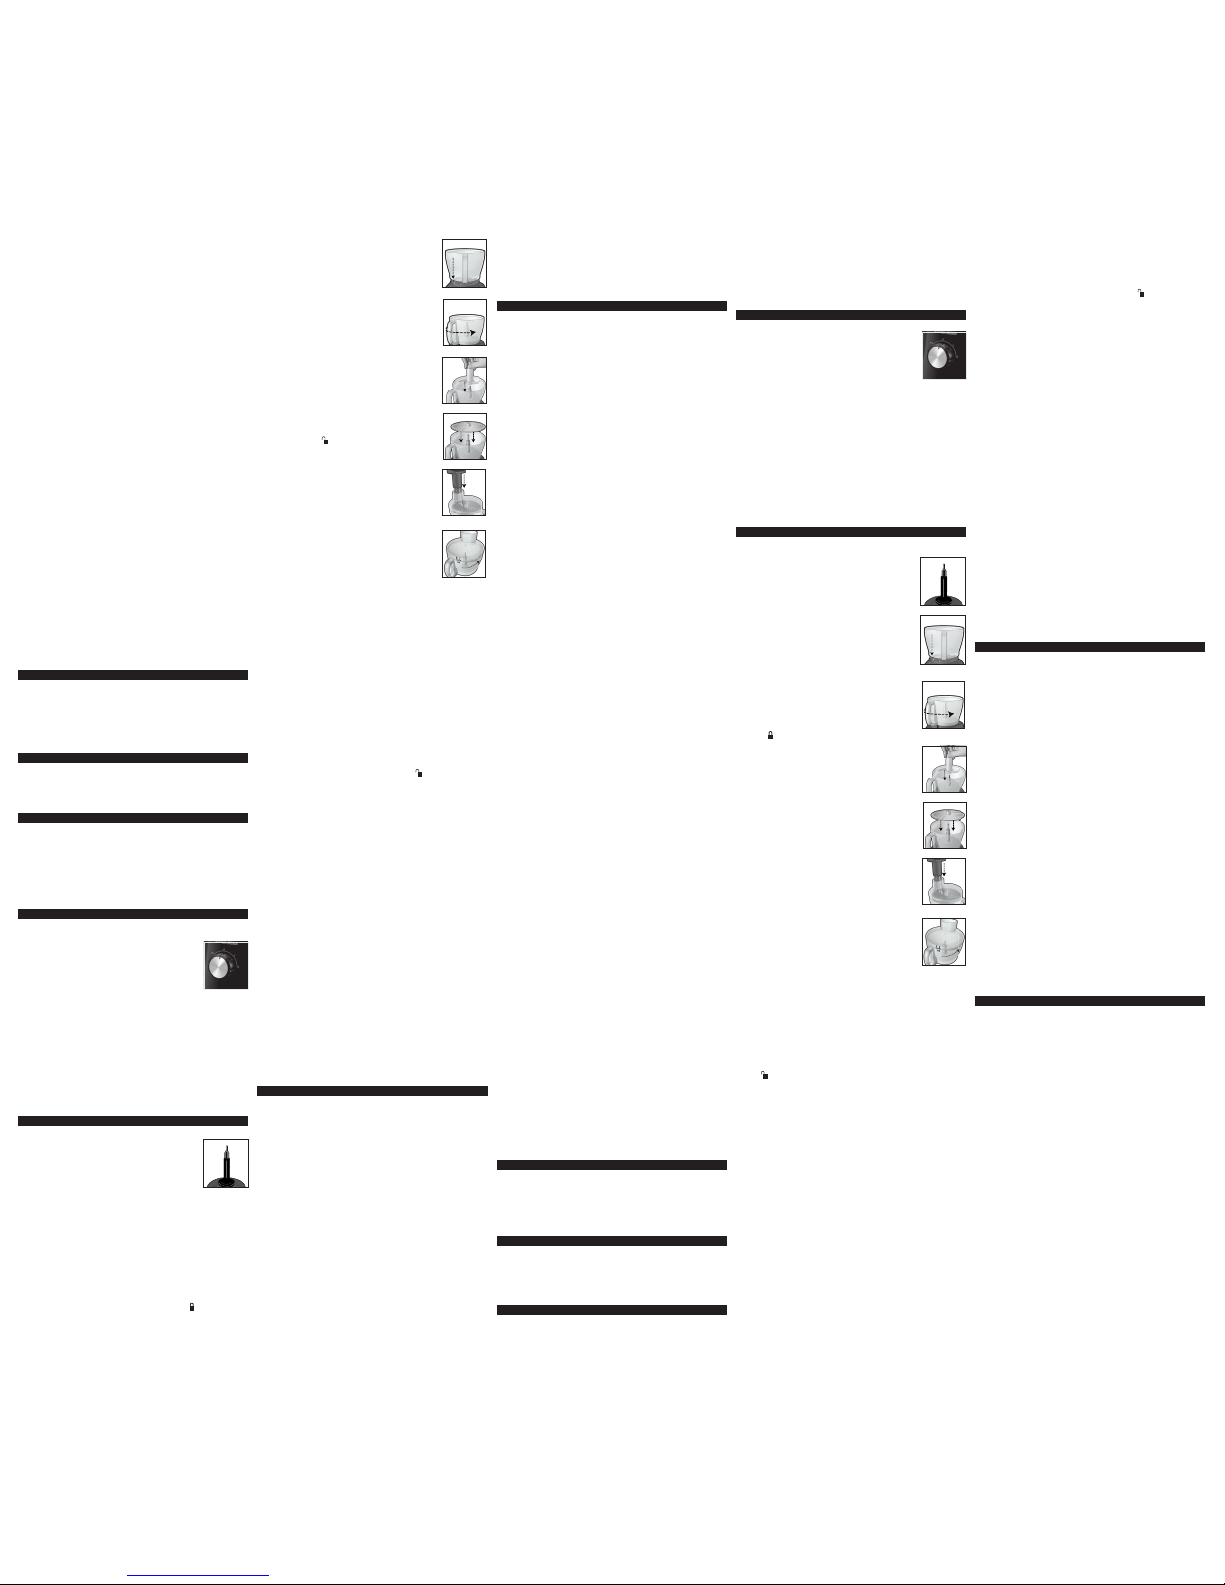
HOW TO LOCK THE COVER
1. Place cover over workbowl with the small latch to the lef t of the workbowl’s
handle (H) .
2. Hold feed chute of workbowl cover and r otate cover counterclockwise until
cover locks into place.
Important: Fo r your protection this appliance has an interlock system. The
processor will not operate unless t he processing workbowl and cover are
properly locked in place.
3. Insert the food pusher into t he feed chute.
Note: The food pushe r is used to guide foods through the feed chute and
can be removed when adding liquid or additional foods while the pro cessor is
running.
CARE AND CLEANING
Note: Do not at tempt to sharpen the cutting edges of the chopping blade or
slicing and shredding disc. They are permanently shar pened at the factory
and will be ruined if sharpened.
CLEANING
Note: Before cleaning, be sure unit is t urned off and cord is unplugged.
• C ompletely disassemble processor parts be fore washing.
• R inse parts immediately after processing for eas y cleanup.
Caution: The slicing and shredding disc is very shar p. Use caution when
handling and storing.
• W ipe base and feet with a damp cloth and dry thoroughly. Stubbor n spots
can be removed by rubbing with a damp cloth and a mild, nonabra sive
cleaner. Do not immerse base in liquid.
• A ll removable parts can be washed by hand or in a dishwasher. Hand
washing of plastic parts will help to ma intain the food processor’s
appearance.
• I f washing by hand, fill workbowl with hot soapy water and rapidly r aise
and lower the chopping blade or slicing and shredding disc up and down on
the center shaft.
Caution: The slicing and shredding disc is very shar p. Use caution when
handling and storing.
• I f washing in a dishwasher, place removable parts on top rack only – not in
or near utensil basket.
• S ome staining of parts may occur. If so, make a paste of 2 tablespoo ns
of baking soda and 1 tablespoon o f water. Apply to stains and let stand
overnight. Rinse and dry.
• Do n ot use rough scouring pads or cleansers on any plastic or met al parts
to clean.
• Do n ot allow chopping blade or slicing and shredding disc to soak in water
for long periods of time.
• Remember t o clean the internal shaft of the chopping blade; use a baby
bottle brush to remove any clogged foo d particles.
• I f you are having trouble closing the cover over the workbowl, apply a small
amount of vegetable oil to the rim of the cover and wor kbowl. This should
make the pieces work smoother when attaching the cover to the workb owl.
NEED HELP?
For service, repair or any que stions regarding your appliance, call the appropr iate
800 number on the front of t his sheet. Please DO NOT return the pr oduct to the
place of purchase. Also, pleas e DO NOT mail product back to manufacturer, nor
bring it to a service center. You may also want to co nsult the website listed on this
sheet.
TWO-YEAR LIMITED WARRANTY
(Applies only in the Unit ed States and Canada)
What does it cover?
• A ny defect in material or workmanship provided; however, Applica’s liability
will not exceed the purchase price of product.
For how long?
• Two years from t he date of original purchase with proof of such purchase.
What will we do to help you ?
• Pr ovide you with a reasonably similar replacement product that is either
new or factory refurbished.
How do you get servi ce?
• S ave your receipt as proof of date of sale.
• V isit our website at www.prodprotect.com /applica, or call toll-free 1-800231-9786, for general warranty service.
• I f you need parts or accessories, please call 1-80 0-738-0245.
What does your warra nty not cover?
• Damage from commercial use
• Damage from misuse, abuse or neglect
• Products that have been modified in any w ay
• Products used or service d outside the country of purchase
• Glass parts and other acc essory items that are packed with th e unit
• Shipping and handling costs associa ted with the replacement of the unit
• Consequential or incidental damage s (Please note, however, that some states
do not allow the exclusion or limitation of c onsequential or incidental damages,
so this limitation may not apply to you. )
How does state law r elate to this warranty ?
• This warranty gives you specif ic legal rights. You may also have other rights
that vary from stat e to state or province to province.
Por favor lea este inst ructivo antes de usar el producto
INSTRUCCIONES
IMPORTANTES
DE SEGURIDAD.
Cuando se usan aparatos electricos, siempre se deben respetar
las siguientes medidas basicas de segurida.
• Por favor lea todas las instrucciones.
• A fin de protegerse contra el riesgo de un choque eléctrico,
no sumerja el cable, los enchufes ni el aparato en agua ni en
ningún otro líquido.
• Todo aparato eléctrico usado en la presencia de los niños o
por ellos mismos requiere la supervisión de un adulto.
• Desconecte el aparato del tomacorriente cuando no esté en
uso, antes de instalarle o retirarle piezas y antes de limpiarlo.
• Evite el contacto con las piezas móviles.
• No use ningún aparato eléctrico que tenga el cable
o el enchufe averiado, que presente un problema de
funcionamiento o que esté dañado. Acuda a un centro de
servicio autorizado para que lo examinen, reparen o ajusten o
llame gratis al número correspondiente en la cubierta de este
manual.
• El uso de accesorios, incluyendo los tarros de envasar, no
recomendados por el fabricante pueden o casionar incendio,
choque eléctrico o lesiones.
• No use este aparato a la intemperie.
• No permita que el cable cuelgue del borde de la mesa o del
mostrador.
• Para reducir el riesgo de lesiones severas a las personas
o daño al procesador de alimentos, mantenga las manos
y utensilios alejados de las cuchillas o discos mientras el
aparato está en uso. Se puede usar un raspador siempre y
cuando el procesador no esté en funcionamiento.
• Las cuchillas tienen filo. Manéjelas con cuidado.
• Para reducir el riesgo de lesiones, nunca instale la cuchilla de
cortar ni los discos en la base sin antes colocar el recipiente
debidamente en su lugar.
• Verifique que la tapa esté bien asegurada antes de operar el
aparato.
• Nunca empuje los alimentos con la mano. Siempre use el
empujador de alimentos.
• No trate de anular el mecanismo de enclavamiento de la tapa.
CONSERVE ESTAS
INSTRUCCIONES.
Este aparato electrico es para uso domestico
unicamente.
ENCHUFE POL ARIZADO (SOLAMENTE PA RA LOS MODELOS DE 120V)
Este aparato cuenta co n un enchufe polarizado (un contacto es
más ancho que el otro) . A fin de reducir el riesgo de un choque
eléctrico, este enchufe encaja en un tomacorriente polarizada
en un solo sentido. Si el enchuf e no entra en el tomacorriente,
inviértalo y si aun así no encaja, c onsulte con un electricista. Por
favor no trate de alterar est a medida de seguridad.
TORNILLO DE SEGURIDAD
Advertencia : Este aparato cuenta con u n tornillo de seguridad para
evitar la remoción d e la cubierta exterior del mi smo. A fin de reducir el
riesgo de incendio o de c hoque eléctrico, por favor no tr ate de remover
la cubierta exterior. Este producto no contiene piezas reparables por
el consumidor. Toda reparación se de be llevar a cabo únicamente por
personal de servicio autorizado.
CABLE ELÉCTRICO
El cable de este aparato fue selecci onado para reducir el riesgo de enredarse
o de tropezar con un cable largo. Si se necesi ta más longitud, use un cable
de extensión no inferior a 15 amperios. (P ara 220-voltios de productos
valorados, use un cordón de extensi ón no menor de 6 amperios.) Si se utiliza
un cable de extensión, no permita que cuelgue sobr e el área de trabajo ni que
cuelgue que alguien se pueda tropezar con él. Manipule el cable con cuid ado
para una vida más larga, evitar sacudid as o el esfuerzo que en la salida y las
conexiones de electrodoméstico s.
Nota: Si el cable de alimentació n está dañado, debe ser sustituido por
personal cualificado y en Améric a Latina, por un centro de servicio
autorizado.
PANEL DE CONTROL
Los controles están si tuados en la parte frontal de la base (A ). Gire el dial a P,
1 o 2 para seleccionar una función (ver direccio nes abajo).
APAGADO DE CONTROL
• Pr ocesador deben ser almacenados en posición de apagado
(0) y desenchuf ado cuando no está en uso.
CONTROL DE PULSO
• U tilice PULSE (P) para la s funciones cortas. Esto le permite
controlar el tamaño y la uniformidad de los a limentos ser picado.
• El dial d ebe girarse a la posición P y sostuvo que el aparato funcion e
en modo PULSE. Cua ndo se suelta el mando volverá a la posición 0 y la
función terminará.
• El mo tor del procesador se ejecutará siempre que la posición PU LSE se
lleva a cabo. Mantenga el selector en la posición P ULSE y luego suelta para
permitir que la cuchilla para detener la ejecución y la comida caiga al fon do
del recipiente.
• Puls ante permite un mejor control al cortar, picar alimentos, mezcla y
mezcla. Se puede controlar el tamaño de lo s alimentos, de grueso a fino.
VELOCIDAD 1 Y CONTRO L 2
Este procesador de alimentos tiene d os velocidades. Girar el selector a
la velocidad adecuada cuando la comida está lista p ara ser procesada.
Cuando se volvió hacia uno de estas velocidade s, el procesador continuará
funcionando hasta que el disco se devuelve a la p osición de apagado (0).
COMO USAR
EEste producto es para u so doméstico solamente.
• Re tire todo el material de empaque y calcomanía adherida al producto.
• Po r favor, vaya a www.prodprotect.com / applica para
registrar su garantía.
Importante :. Manija cortar la hoj a y corte y trituración de
disco cuidadosamente Ellos están muy afiladas.
• L ave todas las piezas removibles según las instrucciones
de CUIDADO Y LI MPIEZA de este manual.
• S eleccionar un nivel, encimera seco donde el aparato se va
a utilizar, permitiendo que el espacio de aire por todos los
lados para una ventilación adecuada para el motor.
ENSAMBLAJE DEL PROCESADOR DE ALIMENTOS
CÓMO COLOCAR Y RE TIRAR EL POSTE CENTR AL
El poste central es removible. Cuando e sté listo para usar su
procesadora de alimentos, coloque el p oste central dentro de la apertura más
pequeña en la base (B ).
CÓMO CERRAR EL RECIPIENTE EN POSICIÓN
1. Inserte el poste central en la base. Col oque el recipiente
en la base con el asa orientada hacia la izquierda del
mecanismo de cierre (C ) sobre el símbolo de abrir.
2. Sujete el asa y gire el recipiente hacia la dirección del
símbolo hasta que encaje firmemente en su lugar (D ).
Nota: Asegúrese de cerrar el r ecipiente en su lugar antes de
insertar las cuchillas de picar o el disco r ebanador/rallador y
la tapa.
COMO BLOQUEAR EL PROCESAMIENTO EN POSICIÓN
RECIPIENTE
1. Fije el poste central para recipiente. Coloqu e el recipiente
en la base con el asa hacia la derecha del mecanismo de
bloqueo (C) sobr e el símbolo de desbloqueo
2. Sostenga el asa y gire el recipiente hacia la derech a hacia el
símbolo de bloqueo hasta que encaje en su lugar ( D).
Nota: Asegúrese de cerrar el r ecipiente en su lugar antes de
colocar la cuchilla de picar o el disco de corte y t rituración y
la tapa.
CÓMO CORTAR EN EL RECIPIENTE PROCESAMIENTO
La cuchilla de cortar se usa par a picar texturas gruesas o
finas, picar, mezclar, y los alimentos puré hasta lograr una
consistencia suave.
1. Lock recipiente en su posición (vea las ilustracion es C y D).
2. Sostenga la cuchilla de cortar el vá stago y deslícela sobre la guía central
(E).
Precaución: La cuchilla para picar es muy fuer te. Tenga
cuidado al manejar y almacenar.
3. Coloque los alimentos en el recipiente.
4. Coloque la tapa sobre el recipiente y bloqu eo en su lugar
girando en sentido horario (ver la ilus tración H).
5. Coloque el empujador de alimentos en el lugar.
Importante: Nunca use los dedo s a la alimentación directa a través del
conducto de alimentación.
6. Seleccione la velocidad deseada ( PULSE, 1 o 2).
Nota: Procese los alimentos por n o más de unos pocos segundos a la vez.
Pulsante produce resultados excelent es y ofertas
un mayor control.
Importante: Asegúrese de que la cuchilla de pic ar se ha detenido por
completo antes de retirar la cubiert a de procesamiento tazón.
7. Gire el selector a la posición de apagado (0 ) posición y permitir que la
cuchilla de picar dejen de girar antes de retirar la cubier ta. Gire la tapa
hacia (hacia la izquierda) para eliminar.
Importante: Abra la tapa a ntes de retirar el recipiente.
8. Desbloquear recipiente girándolo hacia la izquierda y levan te la base.
Nota: Retire el recipiente d el aparato antes de retirar la cuchilla de picar para
evitar que los alimentos se filtre a tr avés de la abertura central del recipiente.
9. Retire con cuidado la cuchilla de picar.
10. Desconecte el aparato cuando no est á en uso.
CONSEJOS ÚTILES PARA PICAR
• Pr este atención para evitar el exceso de procesamiento de alimento s.
• L a posición PULSE ofrece el mejor cont rol.
• P ara mejores resultados, se recomienda procesar alimento s
aproximadamente el mismo tamaño.
• N o sobrecargue el recipiente.
• Nun ca desatienda el procesador mientras está encen dido.
• Us ted puede utilizar líquidos calientes pero no hirviendo.
• N o procese más tazas 3 de líquido en el recipiente en cualquier momento
dado.
• P ara procesar la carne, no use más de 2 tazas de cubos de ¾ d e pulgada.
Proceso mediante PUL SE en intervalos de 5 segundos.
• In sertar un embudo en el conducto de alimentación para agregar
ingredientes como el aceite, la harina y el azúcar.
CÓMO CORTAR NI DESTRU YA EN EL RECIPIENTE
1. Lock recipiente en su posición (vea las ilustracion es C y D).
2. CColoque cuidadosamente cor tado y el disco para rallar encima del poste
central con hasta latera l correspondiente (según el trabajo por hacer) ( F).
PRECAUCIÓN: El disco de corte y t rituración es muy fuerte. Tenga cuidado al
manejar y almacenar.
3. Coloque la tapa y el tazón de bloqu eo en su lugar girando la cubierta hacia
la izquierda (ver ilustración H) .
4. Rellene alimentar tolva con la comida. Coloque el empujad or sobre los
D
E
F
G
C
A
H
D
E
F
G
B
C
A
H
B
Page 2
2013-6-12-70 E/S/F
© 2013 Applica Consumer Products, Inc.
† 1. Food pusher small
(Part # FP 1140-01)
† 2. Food pusher large
(Part # FP 1140-02)
† 3. Processing workbowl cover
(Part # FP 1140-03)
† 4. Stainless steel slicing and
shredding disc
(Part # FP 1140-04)
† 5. Center post (Part # F P1140-05)
† 6. Stainless steel chopping blade
(Part # FP 1140-06)
† 7. 8-cup processing workbowl
(Part # FP 1140-07)
8. Base
† 9. Non-skid suction feet
(Part # FP 1140-08)
10. Control knob
11. Feed chute
Note: † indicates cons umer
replaceable/removable parts
Product may vary slig htly from what is illustrated.
8 CUP FOOD PROCESSOR
y la mano de obra contenidas en este produc to.
Requisitos para hacer válida la garantía
Para reclamar su Garantía deber á presentar al Centro de Servicio Aut orizado
la póliza sellada por el establecimiento en donde adquirió el pr oducto. Si no la
tiene, podrá presentar el comproban te de compra original.
¿Donde hago válida la garantía?
Llame sin costo al teléfono 01 80 0 714 2503, para ubicar el Centro de Servicio Autorizado más cercano a su domicilio en don de usted podrá encontrar
partes, componentes, consumibles y accesorios.
Procedimiento para hacer válida la garantía
Acuda al Centro de Servici o Autorizado con el producto con la póliza de
Garantía sellada o el comprobante de compr a original, ahí se reemplazará
cualquier pieza o componente defectuoso sin c argo alguno para el usuario
final. Esta Garantía incluye lo s gastos de transportación que se deriven de su
cumplimiento.
Excepciones
Esta Garantía no ser á válida cuando el producto:
A) Se hubiese utilizado en condiciones distin tas a las normales.
B) No hubiese sido operado de acuerdo con el instr uctivo de uso que le acompaña.
C) Cuando el producto hubiese sido alterad o o reparado por personas no autorizadas
por Rayovac de México SA de CV.
Nota: Usted podr a encontrar partes, componentes, consumibles y ac cesorios
en los centros de servicios au torizados. Esta garantía incluyen los gasto s
de transportación que se der iven de sus cumplimiento dentro de sus red de
servicio.
Veuillez lire et conser ver ce guide d’entretien et d’utilisa tion.
IMPORTANTES CONSIGNES
DE SÉCURITÉ.
Lorsqu’on utilise des appareils électriques, il faut toujours respecter certaines règles de sécurité fondamentales, notamment
les suivantes
• Lisez toutes les instructions.
• Pour éviter tout risque de choc électrique, ne pas immerger le
cordon, les fiches ou l’appareil dans l’eau ou tout autre liquide.
• Une surveillance étroite est nécessaire lorsque l’appareil est
utilisé par ou près des enfants.
• Débranchez l’appareil lorsqu’il n’est pas utilisé, avant de
mettre ou d’enlever des pièces et avant de le nettoyer.
• Évitez tout contact avec les pièces mobiles.
• Ne pas utiliser un appareil dont le cordon ou la fiche est
endommagé ou après un dysfonctionnement de l’appareil,
s’il est tombé endommagé en aucune manière. Renvoyer
l’appareil au centre de service agréé le plus proche pour le
réglage examen, réparation ou électrique ou mécanique. Ou
composer le numéro sans frais approprié indiqué sur cette
fiche.
• L’utilisation d’accessoires, y compris les bocaux de conserve,
non recommandée par le fabricant peut pr ovoquer un
incendie, de choc électrique ou de blessure.
• Ne pas utiliser à l’extérieur.
• Ne pas laisser le cordon pendre de la table ou du comptoir.
• Garder les mains et les ustensiles loin des lames ou des
disques en mouvement tandis que la transformation des
aliments afin de réduire le risque de blessures graves ou
de dommages au robot culinaire. Un grattoir peut être
utilisé, mais doit être utilisé uniquement lorsque le robot ne
fonctionne pas.
• La lame est tranchante. Manipuler avec précaution.
• Pour réduire le risque de blessure, ne placez jamais la lame ou
des disques de coupe sur la base sans d’abord mettre un bol
bien en place.
• S’assurer que le couvercle est bien verrouillé en place avant
de faire fonctionner l’appareil.
• Ne nourrissez jamais les aliments à la main. Toujours utiliser
le p ouss oir.
• Ne pas tenter de contourner le mécanisme de verrouillage du
couvercle.
CONSERVER CES MESURES
.
Cet appareil est conçu pour un usage
domestique seulement.
FICHE POLARI SÉE (MODÈLES DE 120 V SEULEMENT )
L’appareil est muni d’une fiche polarisée (une lame
plus large que l’autre). Afin de minimiser les risques de
secousses électriques, ce genre de fiche n’entre que d’une
façon dans une prise polarisée. Lorsqu’on ne peut insérer
la fiche à fond dans la prise, il faut tenter de le faire après
avoir inversé les lames de côté. Si la fiche n’entre toujours
pas dans la prise, il faut communiquer avec un électricien
certifié. Il ne faut pas tenter de modifier la fiche.
VIS INDESSERRABLE
Avertissement : L’appareil est doté d’une vis indesserrable empêchant
l’enlèvement du couvercle extérieur. Pour réduire les risques d’incendie
ou de secousses éle ctriques, ne pas tenter de re tirer le couvercle
extérieur. L’utilisateur ne peut pas remplacer les pièces de l’appareil.
En confier la réparation seulement au personnel des centres de service
autorisés.
CORDON ÉLECTRIQUE
Le cordon de cet appareil a été choisie afin de ré duire la possibilité
d’enchevêtrement et de trébuchement sur un cordon plus long. Si plus long
est nécessaire, utiliser une rallonge élec trique nominale d’au moins 15
ampères. (Pour 220 vol ts notés produits, utilisez une rallonge puissance
nominale d’au moins de 6 ampères.) Lorsque vous utilisez une r allonge,
ne le laissez pas pendre du plan de travail ni qu’il pend quelqu’un pourrait
accidentellement trébucher. Manipuler le cordon avec soin pour en prolonger
la durée éviter de tirer dessus ou de forcer elle à la sor tie et les connexions
de l’appareil.
Remarque: Si le cordo n d’alimentation est endommagé, il doit être remplacé
par du personnel qualifié, en Amérique latine, par un ce ntre de service agréé.
PANNEAU DE COMMANDE
Les commandes se trouvent à l’avant de la base ( A). Tourner
le cadran à la position P, 1 ou 2 pour sélectionner une fonction
(voir les instructions ci-de ssous).
ARRÊT
Lorsque le robot culinaire est rangé, il doi t être en position
PROCESADOR DE AL IMENTOS DE 8 TAZAS
†1. Empujador de alimentos a
pequeña (Pieza no. FP1140-01)
† 2. Empujador de alimentos a gran
(Pieza no. FP1140-02 )
†3. Tapa del recipiente para
procesar alimentos
(Pieza no. FP1140-03 )
†4. Disco de acero inoxidable para
rebanar y rallar
(Pieza no. FP1140-04 )
†5. Poste central
(Pieza no. FP1140-05 )
†6. Cuchilla para picar de acero
inoxidable
(Pieza no. FP1140-06 )
† 7. 8 tazas de procesamiento t azón
(Pieza no. FP1140-07)
8. Base
†9. Patas de succión antide slizantes
(debajo de la base)
(Pieza no. FP1140-08 )
10. Mando de control
11. Conducto de alimentos
Nota: † Indica piezas re emplazables
/ removibles por el consumidor
Este producto pue de variar ligeramente del que aparece il ustrado.
c
d
f
j
k
g
is a registered trademark of The Black & De cker Corporation,
Towson, Maryland, USA
es una marca registrada de The Black & Decker C orporation,
Towson, Maryland, E.U.
Marque de commerce déposée de la société T he Black &
Decker Corporation, Towson, Maryland, É.-U.
Made and Printed in People’s Republic of China
Fabricado e Impreso en la República Popular de C hina
Fabriqué et Imprimé en République populaire de Chine.
Sello del Distribuidor:
Fecha de compra:
Modelo:
Código de fecha / Date Code / Le code de date
Argentina
Servicio Técnico
Monroe 3351
CABA Argentina
Tel: 0800 – 444 - 72 96
servicios@ rayovac.com.ar
Chile
SERVICI O DE MAQUINA S Y
HERRAMIENTAS LTDA.
Portugal Nº 6 44
Santiago – Chile
Fonos: 02-6 355208 / 02-63 41169
Email: servicio@spectrumbrands.cl
Call center: 800 -171-051
Colombia
Rayovac Varta S. A
Carrera 17 Número 89- 40
Línea gratuita nacional
018000510012
Costa Rica
Aplicaciones Electromecanicas,
S.A.
Calle 26 Bis y Ave. 3
San Jose, Cost a Rica
Tel.: (506) 2 57-5716 / 223-0136
Ecuador
Servicio Master
Dirección: Capitán Rafael
Ramos OE 1-85 y Galo plaz a lasso.
Tel (593) 2281-38 82 / 2240-9870
El Salvador
Calle San Antonio A bad 2936
San Salvador, El Salvador
Tel. (503) 2284-8374
Guatemala
MacPartes SA
3ª Calle 414 Zona 9
Frente a Tecun
Tel. (502) 2331-50 20 / 2332-2101
Honduras
Ser viTot al
Contigua a Telecentro
Tegucigalpa, Honduras,
Tel. (504) 235-6271
México
Articulo 123 # 95 Loca l 109 y 112
Col. Centro, Cuauht emoc,
México, D.F.
Tel. 01 800 714 2503
Nicaragua
Ser viTot al
De semáforo de portezu elo
500 metros al sur.
Managua, Nicaragua,
Tel. (505) 248-7001
Panamá
Servicios Técnicos CAPRI
Tumbamuerto Boulevard
El Dorado Panamá
500 metros al sur.
Tel. 3020-480 -800 sin costo
(507) 23 60-236 / 159
Perú
Servicio Central Fast Service
Av. Angamos Este 2431
San Borja, Lima Perú
Tel. (511) 2251-388
Puerto Rico
Buckeye Service
Jesús P. Piñero #1013
Puerto Nuevo, SJ P R 00920
Tel.: (787) 782-6 175
Republica Dominicana
Prolongación Av. Rómulo
Betancourt
Zona Industrial de Herrera
Santo Domingo, República
Dominicana
Tel.: (809) 5 30-5409
Venezuela
Inversiones BDR CA
Av. Casanova C.C.
City Market Nivel Pl aza Local 153
Diagonal Hotel Melia, C aracas.
Tel. (582) 324-0 969
www.applicaservice.com
servicio@applicamail.com
Comercializado por:
Rayovac de México SA de C.V
KM. 14.5 Carretera P uente de Vigas.
Col. Lechería, Tultitlán.
Estado de México. C.P. 5494 0
México
Tel: (55) 58 31-7070
Servicio y Reparación
Art. 123 No. 95
Col. Centro, C.P. 06050
Deleg. Cuauhtemoc
Servicio al Consumidor,
Venta de Refacciones y A ccesorios
01 800 714 2503
Importado por / Imported by:
RAYOVAC Argentin a s.r.l. Humboldt 2495
Piso# 3
(C1425FUG) C.A.B.A . Argentina. C.U.I.T
No. 3070706168-1
Importado por / Imported by:
Rayovac de México SA de C.V
KM. 14.5 Carretera
Puente de Vigas. Col. L echería, Tultitlán.
Estado de México. C.P. 5494 0
México Tel: (55) 5 831-7070 Del interior
marque sin costo 01 ( 800) 714 2503
Por favor llame al número correspondiente que apa rece en la lista a continuación
para solicitar que se haga efectiva la g arantía y donde Ud. puede solicitar
servicio, reparaciones o par tes en el país donde el producto fué comprado.
Comercializado por:
Rayovac de México SA de C.V
KM. 14.5 Carretera Puente de Vigas.
Col. Lechería, Tultitlán.
Estado de México.
C.P. 54940
México
Tel: (55) 5831-7070
Servicio y Reparación
Art. 123 No. 95
Col. Centro, C.P. 06050
Deleg. Cuauhtemoc
Servicio al Consumidor,
Venta de Refacciones y Accesorios
01 800 714 2503
500 W 120 V~ 60 Hz
OFF (0) e t débranché lorsqu’il n’est pas utilisé.
IMPULSION
Utiliser la fonction PUL SE (IMPULS ION) (P) pour les tâch es brèves. Cette
fonction vous permet de contrôler la t aille et l’uniformité des aliments hachés.
• Il f aut maintenir le cadran enfoncé à la position P pour que l’appareil
fonctionne en mode PUL SE (IMPULSI ON). Lorsqu’on le relâche, le cadran
retourne à la position 0, et la fonct ion est désactivée.
• L e moteur du robot culinaire fonctionnera tant et aussi longt emps que la
position PULS E (IMPULSIO N) sera maintenue. Maintenir le cadran à la
position PULS E (IMPULSIO N) et le relâcher pour permettre à la lame de
s’immobiliser et aux aliments de retomber dans le fond du bol.
• L a fonction d’impulsion donne plus de maîtrise pour hacher, émincer et
mélanger les aliments. Il est possible de choisir la t aille des morceaux
d’aliments, de grossiers à fins.
RÉGLAGE DES VIT ESSES 1 ET 2
Le robot culinaire offre deux vit esses. Tourner le cadran à la vitesse
appropriée lorsque les aliments sont pr êts à être traités. Lorsqu’il est réglé à
une de ces vitesses, le robot culinaire fonc tionne continuellement jusqu’à ce
que le cadran soit remis à la position d’arrêt ( 0).
UTILISATION
Cet appareil est conçu pour un usage dome stique seulement.
• Re tirer tous les matériaux d’emballage et les autocollants
sur le produit.
• V isiter le www.prodprotect.com/a pplica pour enregistrer la
garantie.
Important : Manip uler avec soin la lame à hacher
ainsi que le disque éminceur/déchiqueteur. Ils sont
extrêmement tranchants.
• L aver toutes les pièces amovibles en suivant les directives
de la section ENTR ETIEN ET NET TOYAGE du présent guide.
• Ch oisir un comptoir sec et de niveau où utiliser l’appareil;
laisser assez d’espace sur tous les côtés pour as surer la
ventilation adéquate du moteur.
ASSEMBLAGE DU ROBOT CULINAIRE
COMMENT INSÉRER ET RETIRER L’AXE D’ENTRAÎNEMENT
L’axe d’entraînement est amovible. Lorsque vou s êtes prêt à
utiliser le robot culinaire, placer l’axe d’entraînement dans le
petit orifice pratiqué dans la ba se.
COMMENT VERROUILLER LE BOL EN PLACE
1. Fixer l’axe d’entraînement au bol. Placer le bol sur le socle,
la poignée tournée à la droite du mécanisme de verrouillage
(C) au-dessus du symbole de déverrouillage.
2. En tenant la poignée, tourner le bol vers la droit e jusqu’à ce
qu’il s’enclenche (D).
Remarque : S’assurer de verrouiller le bol en place avant de
poser la lame à hacher ou le disque éminceur/déchiqueteur et
de mettre le couvercle.
COMMENT HACHER À L’AIDE DU BOL
La lame à hacher sert à hacher ou à émincer gross ièrement
ou finement des aliments, à les mélanger ou à les réduire en
purée homogène.
1. Verrouiller le bol en place (voir les illustrat ions C et D).
2. Tenir la lame à hacher par la tige centrale et l’insérer sur
l’axe d’entraînement (E).
Mise en garde: L a lame à hacher est extrêmement
tranchante. Faire preuve de prudence penda nt sa manipulation
et son rangement.
3. Placer les aliments dans le bol.
4. Placer le couvercle sur le bol et le verrouiller en place en le
tournant vers la gauche (H).
5. Mettre le poussoir d’aliments en place.
Important : Ne jamais utiliser ses doigts pour pou sser les
aliments dans la trémie.
6. Sélectionner la vitesse désirée ( PULSE, 1 ou 2) .
Remarque : Hacher les aliments pas plus de que lques
secondes à la fois. La fonction d’impulsion do nne d’excellents
résultats et offre une plu s grande maîtrise.
Important : Avant d’enlever le couvercle du bol, at tendre que la lame à
hacher se soit complètement immobilisée.
7. Remettre le cadran à la position OFF ( 0) et permettre à la lame à hacher
de s’immobiliser avant d’enlever le couvercle. Tourner le couvercle vers (la
droite) pour l’enlever.
Important : Déverrouiller le co uvercle avant de retirer le bol.
8. Déverrouiller le bol en le tournant vers la gauche et l’enlever du socle.
Remarque : Retirer le bol de l’appareil avant de ret irer la lame à hacher, afin
d’éviter que des aliments tombent par l’ouverture centrale du bo l.
9. Retirer délicatement la lame à hacher.
10. Débrancher l’appareil quand il ne sert pas.
TRUCS UTILES P OUR HACHER LES ALIMENTS
• Fa ire attention de ne pas trop traiter les aliments.
• L a position PULSE (I MPULSION) o ffre la meilleure maîtrise.
• Po ur obtenir des résultats optimaux, traiter des morcea ux d’aliments
sensiblement de la même taille.
• Ne p as trop remplir le bol.
• Ne ja mais laisser le robot culinaire fonctionner sans surveillance.
• Il e st possible de traiter des liquides chauds, mais pas brûlants.
• Ne p as traiter à la fois plus de 0,75 litre (3 tasses ) de liquide dans le bol.
• Po ur traiter de la viande, ne pas utiliser plus de 500 ml (2 ta sses) de cubes
de 2 cm (3/4 po) U tiliser la fonction PULSE ( IMPULSION ) par intervalles de
5 secondes.
• In sérer un entonnoir inséré dans la trémie pour ajouter des ingrédients tels
que de l’huile, de la farine et du sucre.
COMMENT ÉMINCER OU H ACHER DANS LE BOL
1. Verrouiller le bol en place (voir les illustrat ions C et D).
2. Placer soigneusement le disque éminceur/déchiqueteur s ur l’axe
d’entraînement, en mettant vers le haut le c ôté approprié (convenant à la
tâche à accomplir) (F).
MISE EN GARDE : Le disque éminceur/ déchiqueteur est extrêmement
tranchant. Faire preuve de prudence p endant leur manipulation et leur
rangement.
3. Placer le couvercle sur le bol et le verrouiller en place en le tourna nt vers la
gauche (H).
4. Remplir la trémie d’aliments. Placer le poussoir sur les aliments (G).
5. Tourner le cadran à la position PULS E (IMPULSIO N), 1 ou 2; appuyer
fermement sur le poussoir pour guider les aliments dans la t rémie, mais
sans forcer.
Remarque : Exercer une press ion élevée sur le poussoir d’aliments n’accélère
pas le travail; n’utiliser le poussoir d’aliments que comme guide. L aisser le
robot culinaire faire le travail.
6. Lorsque le traitement est ter miné, remettre le cadran à la position OFF ( 0)
et attendre que le disque s’immobilise avant de retirer le couvercle. Tourner
le couvercle vers (la droite) p our l’enlever.
IMPO RTANT : Avant d’enlever le couvercle du bol, attendre que le disque
éminceur/déchiqueteur se soit complètement immobilisé.
Important : Déverrouiller le couvercle ava nt de retirer le bol.
7. Retirer délicatement le disque éminceur/déchiqueteur. Déverrouiller le bol
en le tournant vers la droite et en l’enlevant du socle.
8. Débrancher l’appareil quand il ne sert pas.
TRUCS UTILES POUR LE TRANCHAGE ET LE DÉCHIQUETAGE
• Avan t de trancher des fruits et des légumes avec le robot culinaire, enlever
b
h
une tranche mince au bas de l’aliment afin de le rendre plus plat.
• Pla cer les aliments dans la trémie, côté coupé vers le bas.
• Avan t de traiter les aliments, en retirer les graines et les pépins.
• S électionner des fruits et légumes fermes et pas trop mûrs.
• Re tirer le cœur des légumes durs tels que le chou.
• Po ur trancher des légumes minces, les couper à une dimension tout juste
inférieure à celle de la trémie et les placer à la verticale da ns la trémie de
sorte qu’ils soient bien serrés pour ne pas to urner ou s’incliner.
• Dé chiqueter les fromages durs à la température ambiante.
• Ré frigérer les fromages à pâte molle ou semi-ferme avant le râpage.
• Un e fois les aliments traités, enlever le couvercle et le déposer à l’envers
sur le comptoir. Retirer le disque éminceur/déchiqueteur avant de retirer le
bol du robot culinaire. Placer le disque par-dessus le couvercle à l’envers
du bol.
COMMENT VERROUILLER LE COUVERCLE
1. Placer le couvercle sur le bol, la petite languette placée à gau che de la
poignée du bol (H).
2. Tenir la trémie d’aliments du couvercle et tourner le couvercle vers la
gauche jusqu’à ce qu’il se verrouille en place.
Important: Pour votre protec tion, cet appareil est doté d’un système de
verrouillage. Le robot culinaire ne fonctionnera pa s si le bol et le couvercle ne
sont pas correctement verrouillés en plac e.
3. Insérer le poussoir d’aliments dans la trémie.
Remarque : Le poussoir ser t à guider les aliments dans la trémie et peut
être enlevé pour l’ajout de liquides ou d’autres aliments pendant que le robot
culinaire fonctionne.
ENTRETIEN ET NETTOYAGE
Remarque : Ne pas tenter d’aff ûter la lame à hacher ni le disque éminceur et
déchiqueteur. Ceux-ci ont été affûtés en permanen ce à l’usine et tout autre
affûtage les endommagera.
NET TOYAG E
Remarque : Avant de laver l’appareil, s’assurer qu’il est hors tension et
débranché.
• Dé sassembler complètement les pièces amovibles du robot culinaire avant
de les laver.
• Po ur un nettoyage aisé, rincer les pièces immédiatement après les avoir
utilisées.
Mise en garde : Le disque éminceur/d échiqueteur est extrêmement
tranchant. Faire preuve de prudence p endant sa manipulation et son
rangement.
• E ssuyer le socle et les pieds de l’appareil avec un chiffon humide et bien
les assécher. Enlever les taches tenaces en frot tant à l’aide d’un chiffon
humide et d’un produit nettoyant doux et non abr asif. Ne pas plonger le
socle de l’appareil dans un liquide.
• Toutes les pièces am ovibles peuvent être lavées à la main ou dans le
lave-vaisselle. Laver les pièces de plastique à la main aider a à conserver
l’apparence du robot culinaire.
• Po ur les laver à la main, remplir le bol d’eau chaude savonneuse, puis
abaisser et relever rapidement la lame à hacher et le disque éminceur/
déchiqueteur sur la tige centrale.
Mise en garde : Le disque éminceur/d échiqueteur est extrêmement
tranchant. Faire preuve de prudence p endant sa manipulation et son
rangement.
• Po ur laver les pièces amovibles au lave-vaisselle, les placer dans le panier
supérieur seulement, et non dans le panier à ustensiles ni prè s de celui-ci.
• De s taches peuvent se former sur les pièces de l’appareil. Le cas échéant,
faire une pâte composée de 30 ml (2 c. à t able) de bicarbonate de sodium
et de 15 ml (1 c. à table) d’eau. Appliquer sur les taches et laisser repo ser
toute la nuit. Rincer et assécher.
• Ne p as utiliser de tampons à récurer ni de produits nettoyant s abrasifs pour
nettoyer les pièces de plastique ou de mét al de l’appareil.
• Ne p as laisser la lame à hacher ou le disque éminceur/déchiqueteur
tremper longtemps dans l’eau.
• Ne pa s oublier de nettoyer la tige interne de la lame à hacher; utiliser une
brosse à biberon pour déloger les par ticules d’aliments collées.
• Si vou s éprouvez des difficultés à fermer le couvercle sur le bol, appliquer
une petite quantité d’huile végétale sur le pour tour du couvercle et du bol. Il
devrait ainsi être plus facile de mettr e le couvercle sur le bol.
BESOIN D’AIDE?
Pour communiquer avec les services d’entretien ou de répar ation, ou pour
adresser toute question relative au p roduit, composer le numéro sans frais
approprié indiqué sur la page couverture. Ne pa s retourner le produit où il a
été acheté. Ne pas poster le produit au f abricant ni le porter dans un centre
de service. On peut également consulter le s ite web indiqué sur la page
couverture.
Garantie limitée de d eux ans
(Valable seulemen t aux États-Unis et au Canada )
Quelle est la couver ture?
• Tout défaut de main-d’oeuvre ou de matériau; toutefois, la responsabilité de l a
société Applica se limite au prix d’achat du produit.
Quelle est la durée ?
• Deux année(s) à compter de la date d’achat initiale, avec une preuve d’achat.
Quelle aide offrons nous?
• Remplacement par un produit raisonnablement semblable nouveau ou réusiné.
Comment se prévaut-on du service?
• Conserver son reçu de caisse comme preuve de la date d’achat.
• Visiter notre site web au www.prodprotect.com /applica, ou composer sans
frais le 1 800 231-9786, pour obtenir de s renseignements généraux relatifs à
la garantie.
• On peut également communiquer avec le service des pièces et des
accessoires au 1 800 73 8-0245.
Qu’est-ce que la garantie n e couvre pas?
• Des dommages dus à une utilisation commerciale.
• Des dommages causés par une mauvaise utilisation ou de la négligence.
• Des produits qui ont été modifiés.
• Des produits utilisés ou entretenus hors du pays où ils ont été achet és.
• Des pièces en verre et tout autre accessoire emballés avec le produit.
• Les frais de transport et de manutention reliés au r emplacement du produit.
• Des dommages indirects (il faut toutefois prendre note que cer tains états ne
permettent pas l’exclusion ni la limitation des dommages indirect s).
Quelles lois régiss ent la garantie?
• Les modalités de la présente garantie donnent des droits lé gaux spécifiques.
L’utilisateur peut également se prévaloir d’autres droits selon l’état ou la
province qu’il habite.
Model/Mod elo/ Modèle: FP1140BD
Customer Care Lin e: 1-800 -231-9 786
For online customer service: w ww.prodprotect.com/applica
Línea de Atención del Cliente: 1-800 -231-9 786
Para servicio al cliente en línea : www.prodprotect.com/applica
Ligne Service à la Clientèle: 1-80 0-23 1-9786
Pour le service à la clientèle en ligne: w ww.prodprotect.com/applica
ROBOT CULINAIRE DE 8 TAS SES
†1. Petit poussoir d’aliments (no de
pièce FP1140-01)
†2. Grand poussoir d’aliments ( no
de pièce FP1140-02)
†3. Couvercle du bol (no de pièce
FP114 0- 03)
†4. Disque éminceur/déchiqueteur
en acier inoxydable (no de
pièce FP1140-04)
†5. Axe d’entraînement (no de
pièce FP1140-05)
†6. Lame à hacher en acier
inoxydable (no de pièce
FP1140-06)
†7. Bol de 1,89 litre (8 ta sses)
(no de pièce FP1140-07)
8. Base
†9. Pieds-ventouses
antidérapants (no de pièc e
FP114 0- 08)
10. Bouton de commande
11. Trémie
Nota: Le symbole † indique une
pièce amovible/remplaçable par
l’utilisateur
Le produit peut dif férer légèrement de celui qui est illust ré.
B
A
D
E
F
G
C
H
e
 Loading...