

Page 1
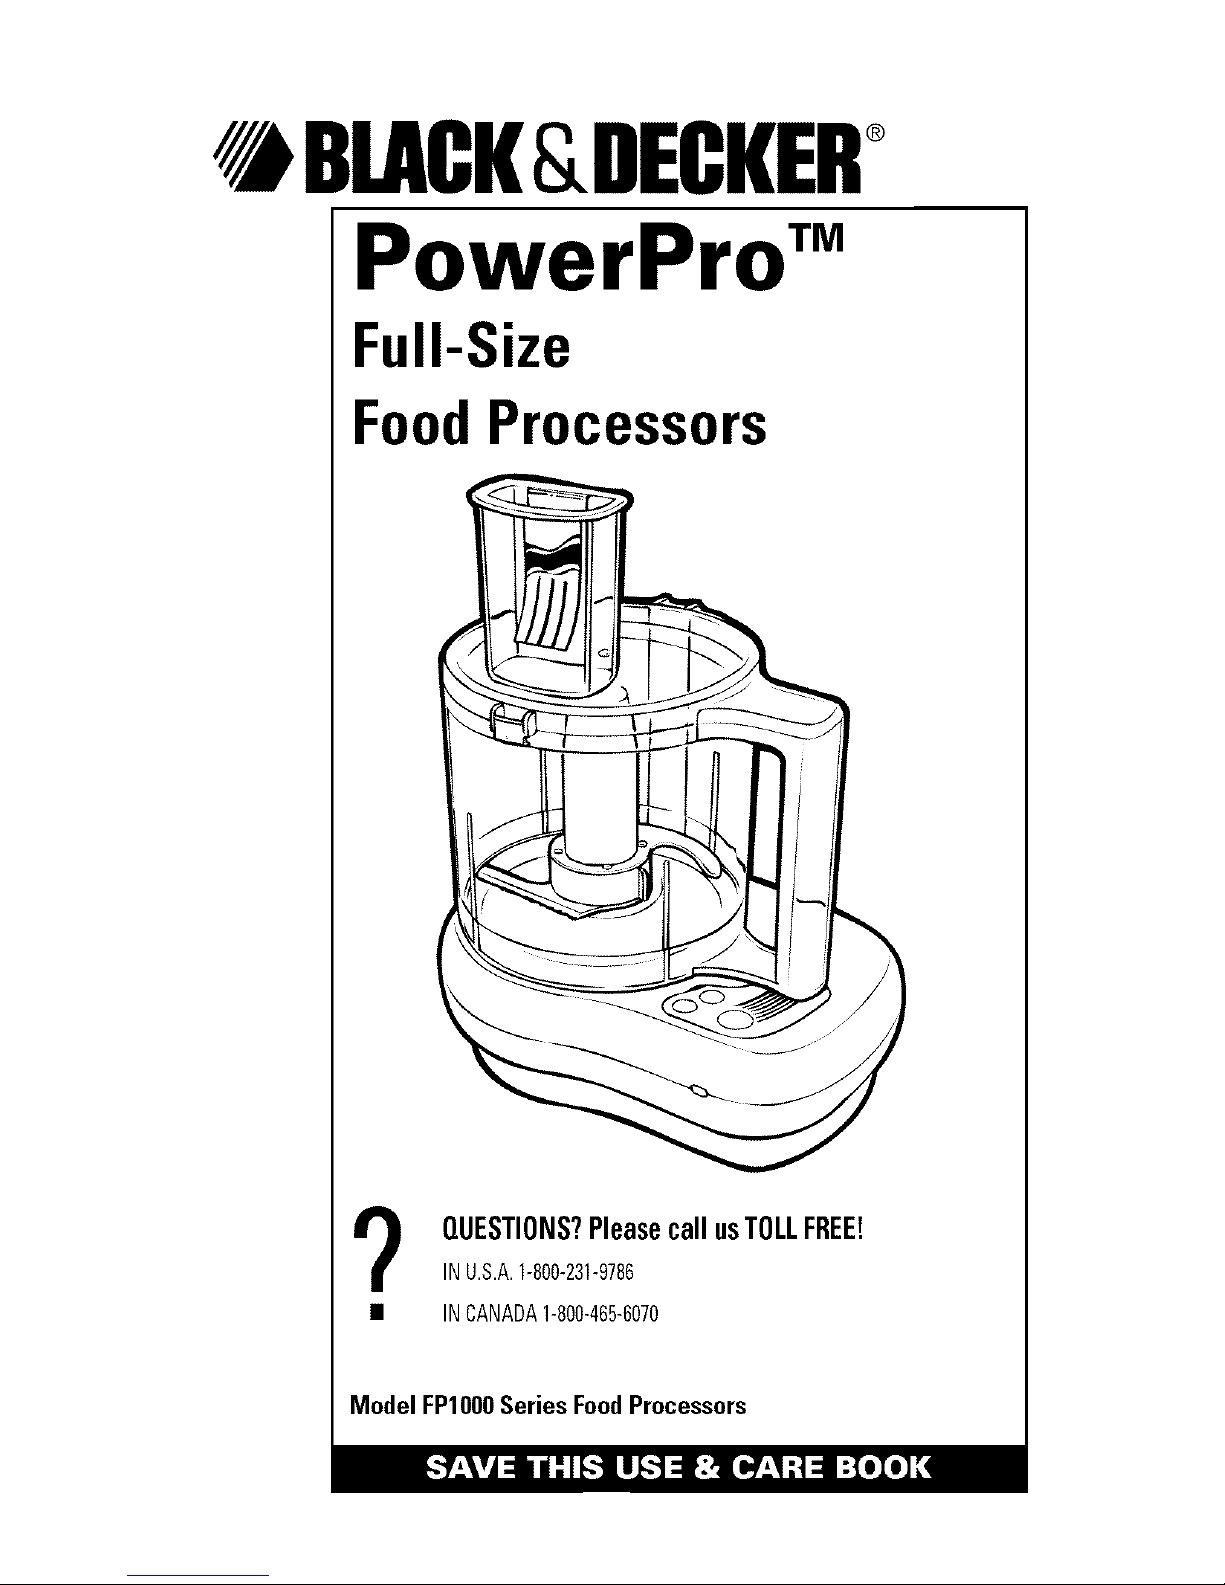
_BLACK&DECKER_
PowerPro'"
Full-Size
FoodProcessors
QUESTIONS?Pleasecall usTOLLFREE!
INU.S.A.1-800-231-9786
• INCANADA1-800-465-6070
Model FPIO00Series FoodProcessors
Page 2
l IMPORTANTSAFEGUARDS
When using electrical appliances, basic safety precautions should always be
followed, including the following:
1
Pleaseread all instructions.
To protect against riskof electrical shock, donot put base, cord,or plug in water or
other liquid.
• Closesupervisionis necessarywhen anyappliance is used byornear children.
• Turn unit off and unplugfrom outlet when not in use, before putting on ortaking off
parts,and before cleaning. Todisconnect, turn unit off, grasp plug,and pull from
wall outlet. Never yankon cord.
• Avoid contacting moving parts.Keep fingers out offood chute.
• Donot operate any appliance with a damaged cord or plug orafter the appliance
malfunctions or isdropped or damagedin anymanner.Return the appliance to an
authorized service facility for examination, repair, or adjustment.
• The useof attachments not recommendedor sold bythe appliance manufacturer
may causefire, electric shock, or injury.
• Donot useoutdoors.
• Donot let cord hang overedge oftable or counter.
• Donot let cord contact hot surface, including the stove.
• Keephands and utensils away from moving blades or discs while processing food
to prevent the possibility of severe personal injury or damageto the food processor.
A spatulamay be used,but it mustbe usedonly when the food processor is not
running.
• Bladesare sharp.Handle carefully.
• Toavoid injury, never place knife blade or disc on basewithout first putting bowl
properly in place. Make sure motor, disc, and/or knife blade have stopped com-
pletely before removing cover.
• Be certain cover is securely locked in place before operating appliance.
• Neverfeed food byhand. Always usefood pusher.
• Donot attempt to defeat the cover interlock mechanism.
• Donot operatethis appliance in the presence of explosiveand/or flammable fumes.
• his applianceis intendedfor householduseonlyand notfor commercial or industrial
use.
SAVETHESEINSTRUCTIONS J
POLARIZEDPLUG
This appliance hasa polarized plug--one blade is wider thanthe other. To reduce the
risk of electric shock, this plug will fit into a polarizedoutlet only one way. If the plug
does notfit fully into the outlet, reverse it. If it still does not fit, contact a qualified elec-
trician. Donot attempt to defeatthis safety feature bymodifying the plug in anyway.
AVOIDPREPARINGSOMEFOODS
The FoodProcessor may not beat egg whites to a desirable volume. It maynot satis-
factorily slice solidly frozen meat;slice or shred hard-cooked eggs,marshmallows, or
very soft cheeses; or processfoods which are sohard that the tip of a knife cannot
Page 3
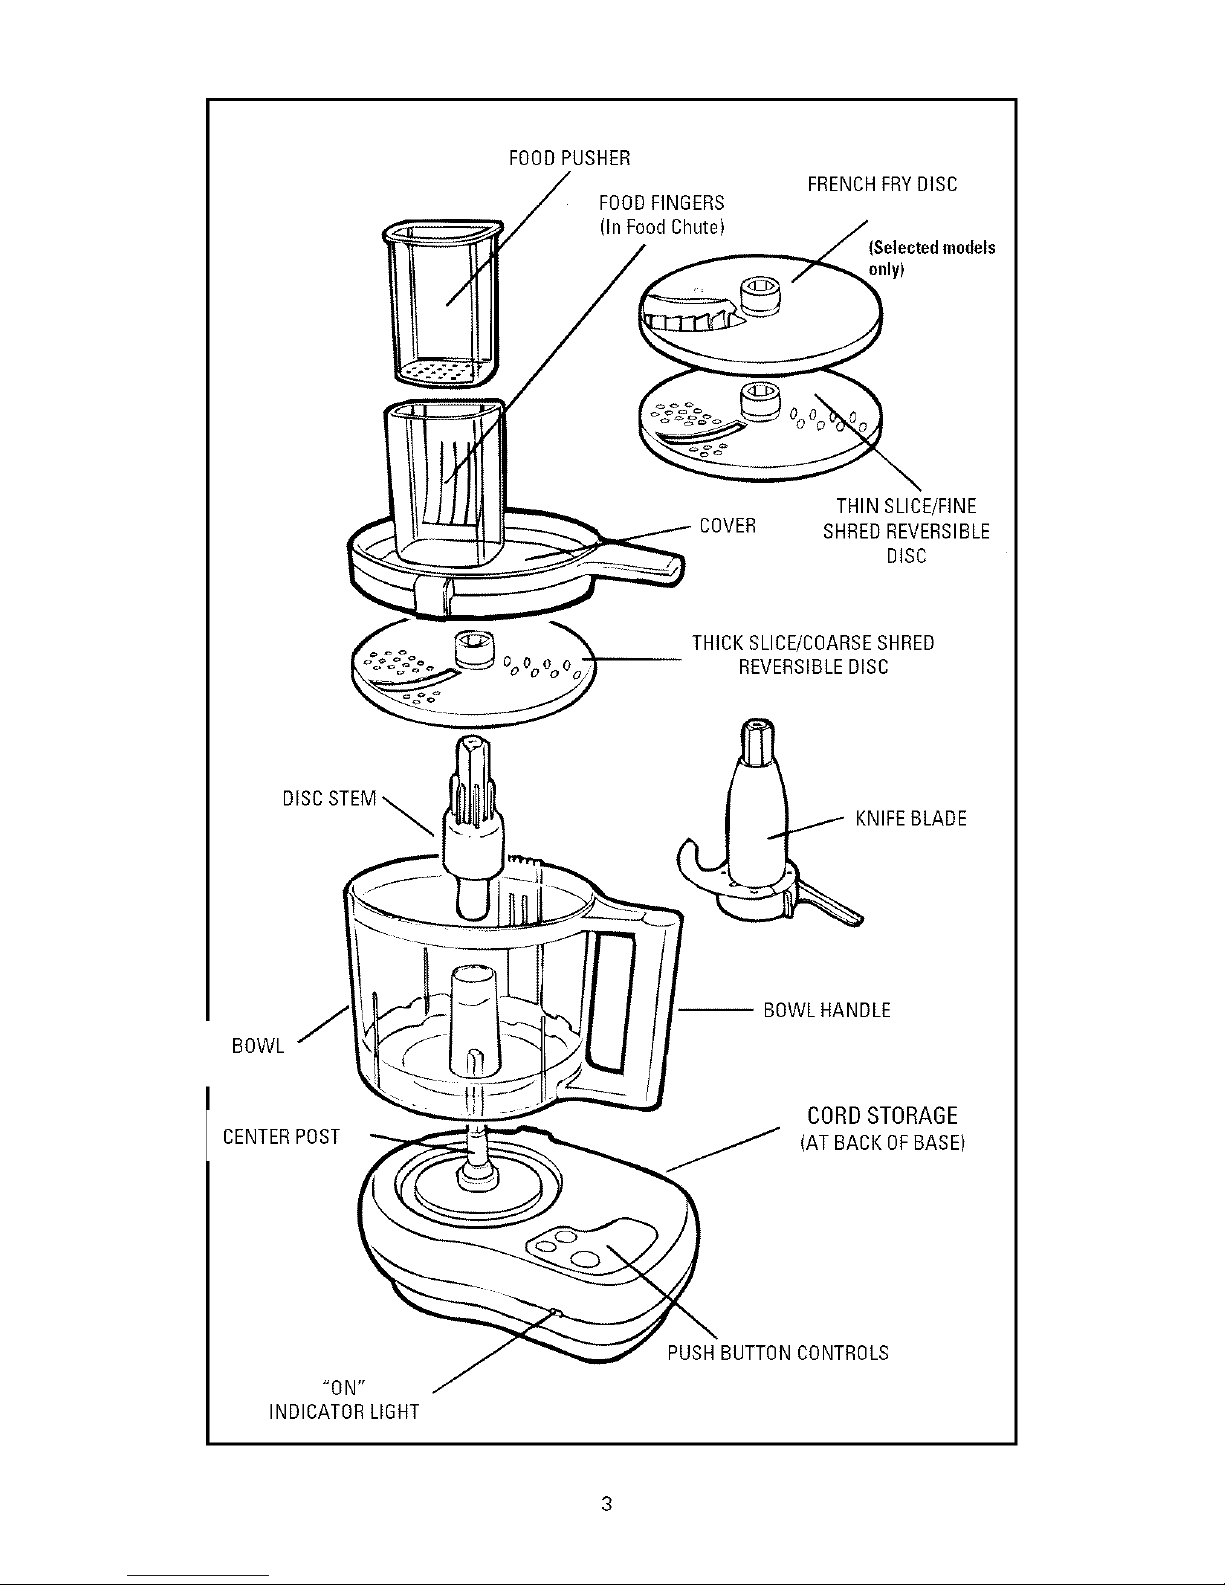
FOODPUSHER
FOODFINGERS
(In Food Chute)
FRENCHFRYDISC
only)
THIN SLICE/FINE
COVER SHREDREVERSIBLE
DISC
THICK SLICE/COARSESHRED
REVERSIBLEDISC
DISCSTEM_.._W-__ _ _NIFE BLADE
BOWL J_ _--- BOWLHANDLE
" ' -- CORD STORAGE
CENTERPOST __ (AT BACKOF BASE)
J "_" PUSH BUTTONCONTROLS
"ON" J
INDICATORLIGHT
Page 4
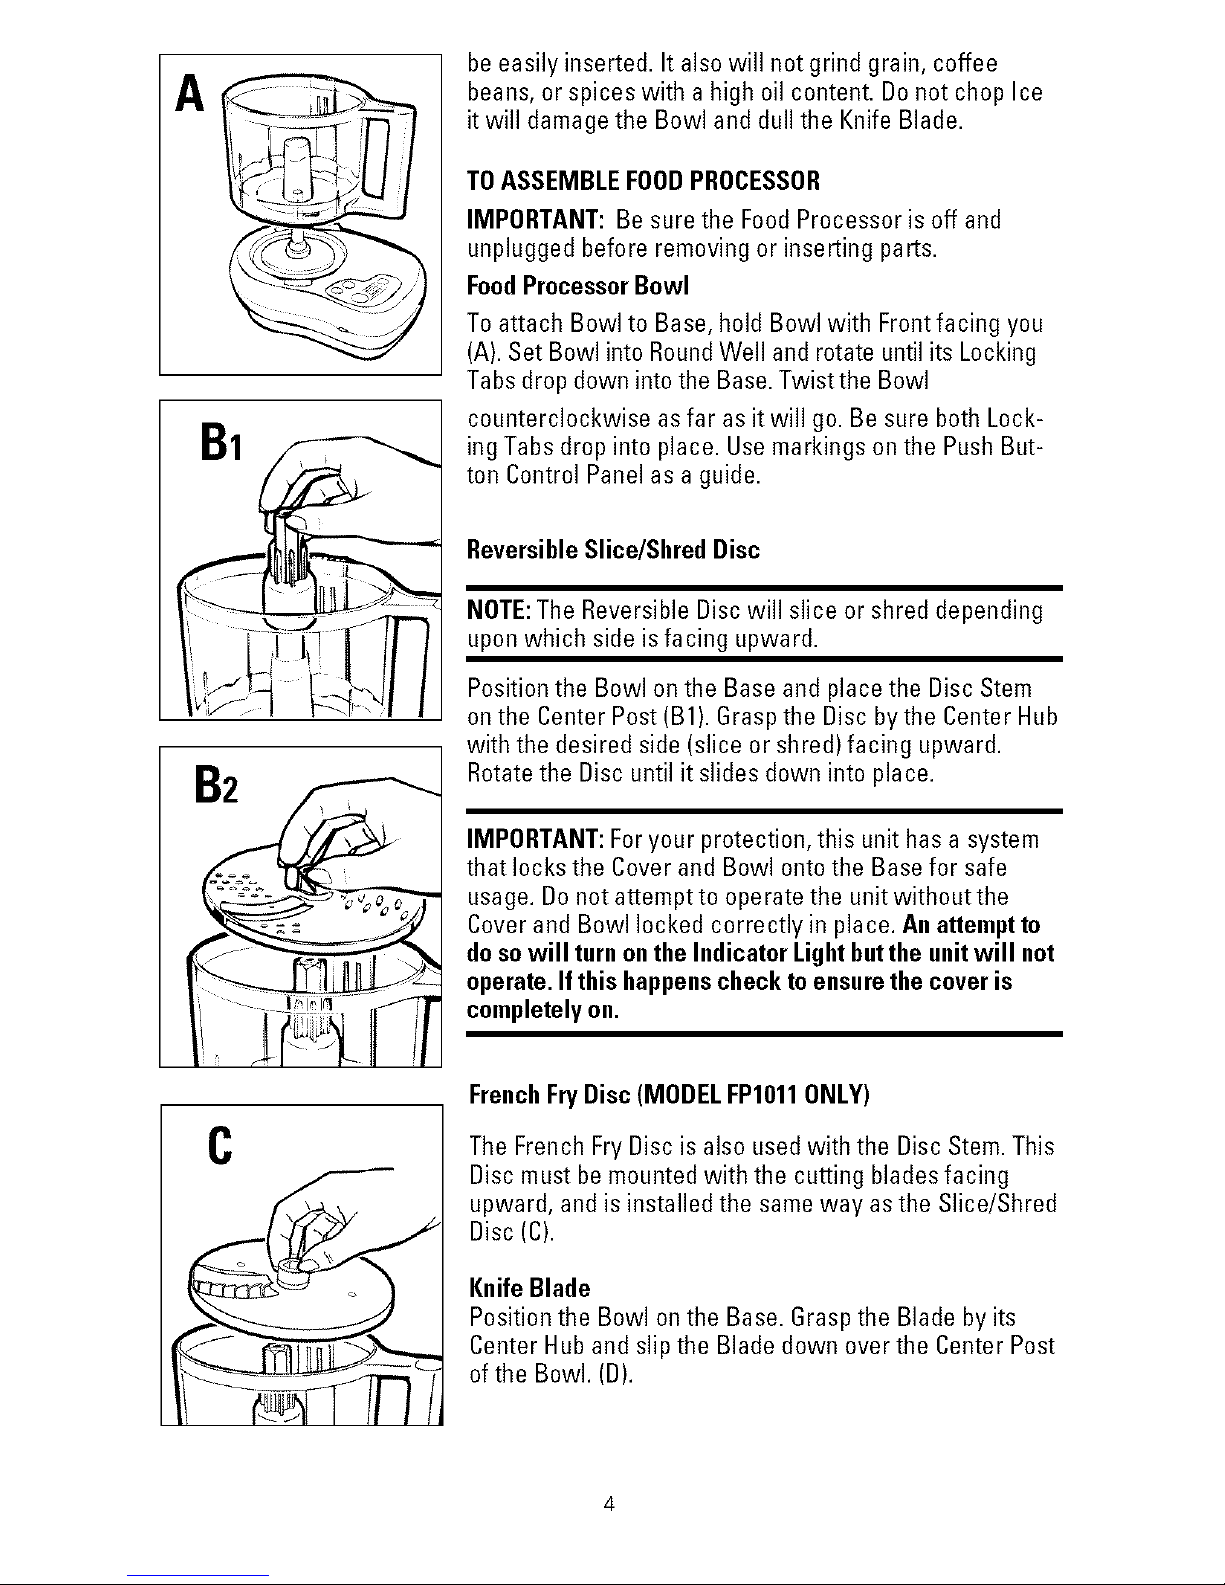
A
91
92
be easily inserted. It also will not grind grain, coffee
beans, or spices with a highoil content. Donot chop Ice
it will damagethe Bowl anddull the Knife Blade.
TOASSEMBLEFOODPROCESSOR
IMPORTANT:Be surethe FoodProcessor isoff and
unplugged before removing or inserting parts.
FoodProcessorBowl
To attach Bowl to Base,hold Bowl with Frontfacing you
(A).SetBowl into RoundWell and rotate until its Locking
Tabs drop down intothe Base.Twist the Bowl
counterclockwise asfar asit will go. Be sure both Lock-
ing Tabs drop into place. Usemarkings on the Push But-
ton Control Panel asa guide.
ReversibleSlice/ShredDisc
NOTE:TheReversible Discwill slice or shred depending
upon which side is facing upward.
Positionthe Bowl on the Base and place the Disc Stem
onthe Center Post (B1).Graspthe Disc bythe Center Hub
with the desired side (slice or shred)facing upward.
Rotatethe Disc until it slides down into place.
IMPORTANT:Foryour protection, this unit hasa system
that locks the Coverand Bowl onto the Basefor safe
usage. Do not attemptto operatethe unit withoutthe
Coverand Bowl locked correctly in place. Anattempt to
do sowill turnontheIndicatorLightbut the unitwill not
operate.Ifthis happenscheckto ensurethe coveris
completelyon.
C
FrenchFryDisc (MODELFP1011ONLY)
The French FryDiscis also usedwith the Disc Stem.This
Discmust bemounted with the cutting bladesfacing
upward, andis installedthe sameway asthe Slice/Shred
Disc(C).
KnifeBlade
Position the Bowl onthe Base. Graspthe Blade by its
Center Hub andslip the Blade down over the Center Post
ofthe Bowl. (D).
Page 5
F
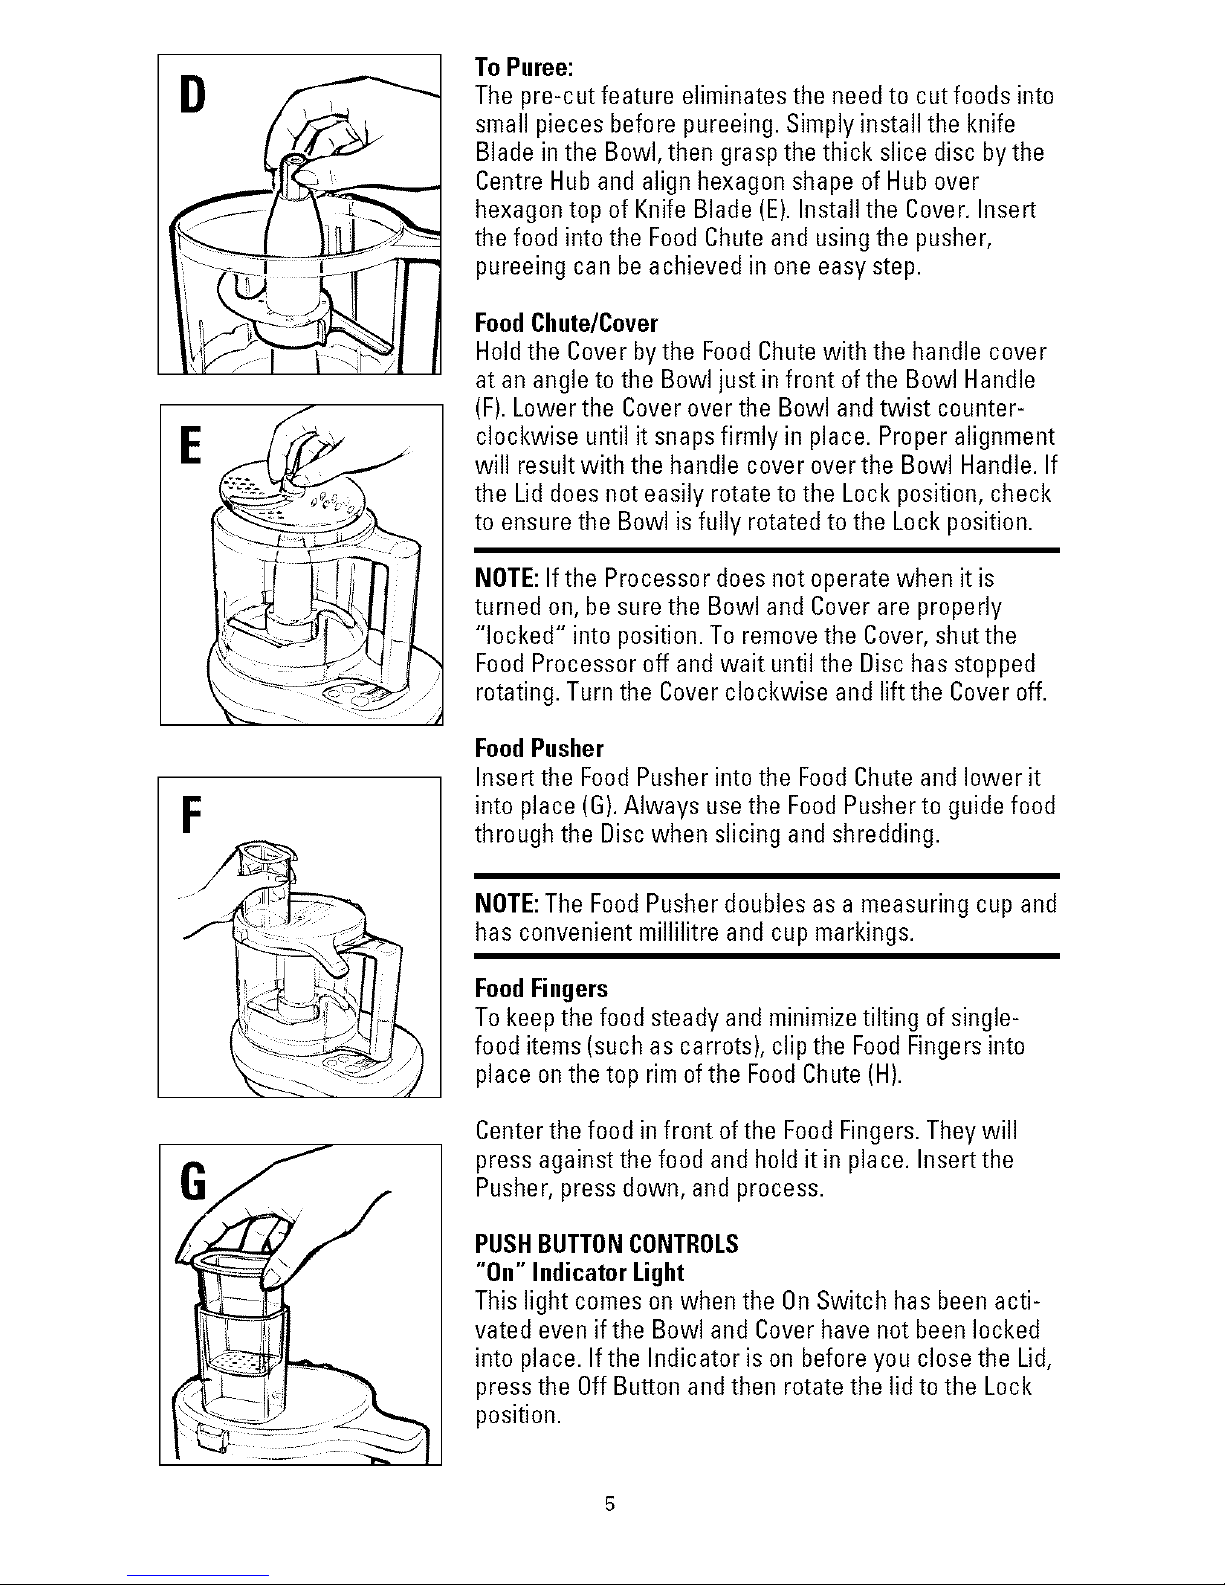
To Puree:
Thepre-cut feature eliminates the needto cut foods into
small piecesbefore pureeing.Simply install the knife
Blade inthe Bowl, then graspthe thick slice disc bythe
Centre Hub andalign hexagon shapeof Hub over
hexagontop of Knife Blade (E).Install the Cover.Insert
the food intothe FoodChuteand usingthe pusher,
pureeing can be achieved in one easystep.
FoodChute/Cover
Holdthe Coverbythe FoodChutewith the handle cover
at an angleto the Bowl just in front ofthe Bowl Handle
(F).Lowerthe Coverover the Bowl andtwist counter-
clockwise until it snapsfirmly in place. Properalignment
will result with the handle cover overthe Bowl Handle. If
the Lid doesnot easily rotate tothe Lock position, check
to ensurethe Bowl isfully rotated to the Lock position.
NOTE:Ifthe Processor does not operate when it is
turned on, besurethe Bowl and Coverare properly
"locked" into position. To remove the Cover,shut the
FoodProcessor off and wait untilthe Disc hasstopped
rotating. Turnthe Cover clockwise and lift the Coveroff.
FoodPusher
Insert the FoodPusher intothe FoodChuteand lower it
into place (G).Always usethe FoodPusherto guide food
through the Discwhen slicing andshredding.
NOTE:The FoodPusherdoubles as a measuring cup and
has convenient millilitre and cup markings.
FoodFingers
Tokeepthe food steady andminimizetilting of single-
food items(such as carrots), clipthe Food Fingersinto
place on thetop rim of the FoodChute(H).
Centerthe food infront of the FoodFingers.They will
press against the food and holdit in place. Insert the
Pusher, press down, and process.
PUSHBUTTONCONTROLS
"0." IndicatorLight
This light comeson when the OnSwitch has been acti-
vated even if the Bowl and Coverhavenot been locked
into place. If the Indicator is onbefore you closethe Lid,
press the OffButton and then rotate the lid tothe Lock
position.
Page 6

H
Pulse On
Light Off
J High Low
Speed Speed
\
Pulse
PulseButton
• Press andholdthe Pulse Button must be pressed and
held in placefor the unitto operate. When you
release it, the unit will stop. (I)
• Usethe Pulse Button for short processing tasks,
such as chopping raw beef cubes orvegetables. This
allows youto control processing time aswell as
results.
OnButton(Models FPIO00and FPIO00-04)
• Whenthe Onbutton is pressed,the unitwill run until
the Off Button is pressed.
• Usethe Onposition for longer processing tasks, such
as making peanut butter, smoothspreads, dips,etc.
2-SpeedButtons(Model FP1011)
Insteadof an ONButton, Model FP1011hastwo (2)
SpeedControl Buttons.(J)
• When the "11"button is pressed,the unit will run at
HighSpeeduntil the OFFor "1" button is pressed.
• When the "T" button ispressed,the unit will run at
LOWSPEEDuntil the OFFor "11"button is pressed.
• Formost applications requiring longer processing,
use HIGHSPEED(ll).Use LOWSPEED(I)for higher
volumes of liquid (3to 4 cups/750to 1000ml).
Otherthanthe cleaning mentionedinthis manual,no other
servicingor maintenanceofthis applianceis required.
Repairs,if necessary,mustbe performedbyaBlack &
DeckerAuthorizedService Center.
GeneralCare
• Donot attemptto sharpenthe cutting edgesofthe
KnifeBlade orthe ReversibleDisc. They are perma-
nently sharpened atthe factory and will be ruined by
attempted sharpening.
• Tostore the unit, pushthe cord intothe storage compartment atthe back ofthe unit.
Cleaning
• Before cleaning, be surethe unitis off and unplugged,from outlet.
• Whenever possible,rinse partsimmediately after processing to make cleanup easier.
• Wipe the basewith a dampcloth and drythoroughly. Stubborn spots can be
removed byrubbing with a damp cloth and amild, non-abrasive cleaner. Donot
immersethe Basein liquid.
• All removableparts can bewashed by hand or in adishwasher.
Page 7

Page 8

Page 9

L
M
-If washing byhand, use in hot, sudsywater, rinse,
and drythoroughly. If necessary, usea nylon bristle
brushto thoroughly clean the Bowl and Food
Chute/Cover;this typeof brushwill also help to pre-
vent cutting yourself on the Knife Bladeand
ReversibleDiscs.
-If washing in a dishwasher, the Knife Blade and
Discs should beplaced onthe upper rack- not in or
near the utensil basket where your hand could be
cut when removing utensils.
Donot use rough scouring padsor abrasive
cleansers.
Donotfill the Bowl with boiling water. Donot place
anyof the parts in boiling water.
Donot let the Knife Blade orDiscs soak in water for
anylength of time.
FOODPROCESSINGTECHNIQUES
Emptythe bowl when food reaches the lower rimof the
Cover.Removethe Disc or Blade before removingfood
from the bowl.
FoodSize
• When chopping, quarterfoods or cutthem into 1" (25
ram)pieces. Largepieces chop unevenly,with some
particles coarse and others overprocessed. When
slicing orshredding foods which are too large for the
FoodChute, decrease the size by first pre-cutting
them by handto fit (K).
• When slicing and shredding, cut long foods to fit the
FoodChute [approximately
3 1/2" (90mm)]for best results.
• When processing long, narrowfoods, packthe Food
Chutesofood will stand upright. Slices will then be
round and even (L).
• Forlong shreds or slices, arrange 21/2" (65ram)food pieces horizontally inthe Food
Chute.These are attractive in salads, Orientaldishes, and vegetable dips (M).
FoodQuantity
• Medium-sized loads chop more evenlythan large ones. If your recipe calls for 4
medium onions,for instance, chopthem 2at a time; sothey will beevenly chopped
without being over-processed.
FoodTemperature
• Fruits,vegetables, and medium-hard cheeses should beprocessed at refrigerator
temperature.
• Parmesan and Romanocheese should be processed at roomtemperature. See
"Processing Cheese"for techniques.
Page 10

• Whenslicingrawmeat,itshouldbepartiallyfrozen(firm,butnotsolid).
FoodQuality
• Fresh,crisp, and firmfruits and vegetables process best.This does not meanyou
cannot use up anold carrot or alimp piece of celery, but you should not expect the
same results you would get with fresh produce.
• Foruniform texture, usea spatula to scrape down the sides ofthe Bowl when nec-
essary.
Liquids
• Hot liquids (not boiling) andhotfoods can beprocessed inthe Bowl.
Model FPIO00,FPIO00-04
• Forbest results process less than 3 cups (800ml) of liquids at a time. Larger
amounts mayleak between the Coverand the Bowl.
Model FP1011
• Forbest results you can process upto 4 cups (1000ml)of liquids at atime on low
speed; less than 3 cups (800ml)of liquids at atime on high speed.Larger amounts
may leak betweenthe Cover andthe Bowl.
OtherTechniques
• Process dry ingredients first and moist ingredients later when making several differ-
ent recipes or using several different foods in a recipe. This reduces the number of
times the Bowl must bewashed and dried.
• Wash andremove inedible parts offood before processing.
• Chopraw meatwith the Knife Bladeonly.Chopamaximumof 1Cup(240ml)at a time.
ProcessingCheese
Many kindsof cheese can be processed in this Food Processor. However, some pre-
cautions must beobserved for good results and to avoid damagingyour machine.
When usingthe Slice/Shred Disc to process cheese,always use light pressure onthe
FoodPusher. Lightpressure meansjust enough force to keepthe FoodPusher in con-
tact with the cheese.
Followthese guidelines for best results when processing cheese.
Soft Cheeses- Cottage,Cream,Ricotta, Brie, Camembert,Liederkranz, Mozzarella.
These cheeses maybe processed with the Knife Blade.Temperature is not critical.
Cream cheesewill process more easily at room temperature. Ofthis group, only
mozzarellacheese maybe processed with the shredding side ofthe Disc, but it must
be well chilled. Putit in the freezer 20minutes before shredding. Soft cheeses can-
not be sliced or shredded.
Semi-Soft Cheeses- Blue, BelPaese, Meunster, Fontina,Monterey Jack. These
cheeses may be processed with the Knife Blade.Temperature is not critical. How-
ever, if usingthe shredding side of the Disc,these cheeses must be chilled. These
cheeses cannot be sliced.
10
Page 11

Semi-Hard Cheeses- Cheddar, Colby,Longhorn,American, Swiss, Gruyere,
Emmenthaler,Jarlsberg, Edam,Gouda, Provolone.Temperature is not critical if
usingthe Knife Blade.These cheeses may beshredded or sliced, but they must be
well chilled. Use only light pressure on the Pusher.
Hard Cheeses- Parmesan,Romano,Pecarino,Sapsage. Thesecheeseshave a
lower moisture content. Ifthese cheeses are so hard as notto be ableto pierce
easily with a thin knife, do not attempt to process in FoodProcessor. Hardcheeses
may beprocessed as soon as purchased andthen stored infreezer until needed.
These cheeses should be processed with the Knife Blade only, as results are better
chopped than shredded.
• ToChopor GrateCheeseto anytexture from coarseto fine, first cut into 1" (25ram)
cubes. Place in Bowl and pulseor process continuously until desired texture is
reached. Process upto 2 cups (480ml)of cheese cubesat a time.
Maki.g Baby Food
The FoodProcessor makes preparing food for a baby an easytask. The babymay eat
what the rest ofthe family is eating ratherthan preparing a different meal.
With the FoodProcessor,it is possibleto puree raw and cooked foodswith a bit of
sauce orjuice to enhance flavour and aid processing. Freshfruits and cooked meats
can be pureed;vegetables can bestewed briefly and pureed. The texture of the food
can be controlled bypulsing more or less to suit the needs and age of the child. Fresh
babyfood can beavailable for even/feeding with a minimumof preservatives and
additives.
Page 12

12
Page 13

DALLYUSECHART
Food/Result Attachmeet Special Iostructioes
Apples, Chopped Knife Blade Peel(if desired), quarter andcore. Cuteach
1/4inhalf crosswise. Addup to 1 cup
(240ml) ata time.
Apples,Sliced Disc,Slicing Side Stack quarters horizontally.Usefirm
pressure.
Avocado,Sliced Disc, Slicing Side Pit,quarter, and core. Arrange quarters
(back to back) in Chute, alternating thick
andthin ends. Usefirm pressure.
Baby Food Knife Blade See "Making BabyFood" (pg. 12)for
techniques.
Bananas, Mashed Knife Blade Useripefruit.Peelandcutinto1"(25ram)pieces.
Process up to 3 bananasata time.
Bananas,Sliced Disc, Slicing Side Peeland cut in half. Place cutside against
Disc. Uselight pressure.
Bread (Dry) Knife Blade Break breadinto pieces. Process until
FinelyCrumbed crumbed to desiredfineness.
Bread (Fresh) Knife Blade Use up to 4 slices in quarters. Process
Coarsely Crumbed until crumbedto desired fineness.
Cabbage,Chopped Knife Blade Coreand cutinto 1" (25 ram)pieces.Add up
to 2cups(480ml)at atime. Pulseto
desired fineness.
Cabbage,CoarselyShredded Disc,SlicingSide Cutinto pieces tofit Chute.Use light
pressure.EmptyBowl as cabbage reaches
lower rimof Bowl Cover.
Cabbage,FinelyShredded Disc, ShreddingSide Cutinto pieces tofit Chute.Use light
pressure.EmptyBowl as cabbage reaches
lower rimof Bowl Cover.
Carrots, Chopped Knife Blade Peeland cut into 1" (25ram)lengths. Add up
to 2cups(480ml)at atime. Pulseto
desired fineness.
Carrots,Shredded Disc, ShreddingSide Position in Chuteand shred.
Carrots,Sliced Disc, Slicing Side Cutto fit Chute- 3 1/2"(90ram).Pack
Chute,alternating thick and thin ends.
CelerySliced Disc,SlicingSide Removestringsand cut each stalk
crosswise inthirds. Place upright in
Chute.For best results, slice more than
1stalk at atime. Use firm pressure.
Cheese Knife Blade or Disc See "Processing Cheese" (pg. 12)for
techniques.
Chocolate, Grated Knife Blade Useroom-temperature chocolate. Cut
squares into quarters. Add up to 2
quartered squares or upto 1cup (240ml)
chipsto Bowl. Process 15to 30 seconds.
Coconut )Fresh),Grated Knife Blade Removebrown husk and cut coconut meat
into 1" (25 ram)pieces.Add up to a cup
(240ml).Process to desired fineness.
Coconut )Fresh),Shredded Disc, ShreddingSide Removebrown husk and cut coconut meat
to fit Chute.Pack Chute.Usefirm pressure.
Cookies,Crackers,Crumbed Knife Blade Break up into bowl. Processuntil crumbed
to desiredfineness.
Cranberries, Chopped Knife Blade Add up to 2cups (480ml)and pulseto
desired fineness.
Cream)Whippingor Heavy), KnifeBlade Add2 cups (480ml)to Bowl andprocess
Thickened untilthickened )check after 20seconds).
If desired, sweeten with 2to 3tablespoons
(30to 45 ml) confectioners sugar.
13
Page 14

DALLYUSECHART
Food/Result Attachmeet
Cucumbers,Chopped Knife Blade
Cucumbers,Shredded Disc,ShreddingSide
Cucumbers,Sliced Disc, Slicing Side
Eggplant,Sliced Disc, Slicing Side
Eggs(Hard Cooked),Chopped Knife Blade
Fish)Boned, Raw),Chopped KnifeBlade
Fruit)Candied,Dried),Chopped Knife Blade
Garlic, Minced Knife Blade
Horseradish,Grated Knife Blade
Lemons,Sliced Disc, Slicing Side
Lettuce, Sliced (into Strips) Disc, Slicing Side
Limes,Sliced Disc,Slicing Side
Meat(Boneless, Uncooked DiscSlicing Side
Chicken,Pork,Beef) Sliced
Meat (Boneless, Uncooked KnifeBlade
Chicken,Pork,Beef)
Chopped
Meat (Boneless, CookedHam, Knife Blade
Pork,Lamb,Veal, Beef)
Melon, Sliced Disc, Slicing Side
Mushrooms, Chopped Knife Blade
Mushrooms, Sliced Disc, SlicingSide
Special lestroctioos
Peel(if desired), halve lengthwise, and
scoop outseeds (iftough). Cutinto
1" (25mm) pieces. Add up to 2 cups
(480ml) ata time. Pulseto desiredfineness.
Cutto fit Chute(if necessary).
Cutto fit Chute(if necessary). Uselight
pressure.
Peel(if desired)and quarteredor cutto
fit Chute.Usefirm pressure.
Forfrying afterslicing, salt andlot stand
in colander to drain off excess moisture.
Peel, dry andhalve.Add upto 6 eggsat
atime. Chopto desiredfineness.
Cutinto cubes.Add up to 1cup (240ml)at
atime. Pulseto desired fineness.
Pitand addupto 1 cup (240ml) ata time.
Add 1/2-cup (120 ml)flour percup offruit.
(Subtract this flour from amount called for in
recipe).
With Processor running, drop clove down
Chute.Quickly cover Chuteand process
3to 5seconds. (Usethis methodto mince
other small items,such as gingerroot.)
Peel; cut into 1" (25ram)cubes.Add up to
1cup (240ml).Processto desiredfineness.
Chooselemons to fit Chute(if possible).
Cutoff oneend and place lemon in Chute
with cut endon Disc.Usefirm pressure.
Cutwedgesto fit Chute.(Never tryto
shred lettuce; it istoo soft and delicate.)
Chooselimes tofit Chute(if possible).Cut
off one endand place lime inChutewith cut
endon Disc.Usefirm pressure.
Position meat on cookie sheet andfreeze
until partiallyfrozen, (firm, but notsolid).
Cutmeat to fit Chute.(if meat istoo
solid,it can damageProcessor.) Usefirm
pressure.
Cutinto 1" (25ram)cubes. Add upto 1cup
(240ml) ata time.
Cutinto 1" (25ram)cubes. Add upto 1cup
(240ml) ata time. Chop coarsely for salads,
finely Choppedfor spreads.
Halve,removeseeds, cutto fit Chute,and
removerind. Use moderatepressure.
Wash (keepstemson). Add5 or6
mushroomsat atime and pulse to desired
texture.
Cuta thin slice off 1side of 2mushrooms.
Place cut sides directly on Disc in area
beneath Chute. PlaceCover on Bowl and
stack remaining mushroomssideways in
Chute,alternating stemsandcaps. Use
firm pressure.
14
Page 15

DALLYUSECHART
Food/Result Attachmoet Special Iostructioes
Nuts (Hard,Almonds, Knife Blade Add up to 1cup (240ml)at atime to dry
Peanuts),Ground Bowl and pulseto desired fineness.
(Forbest results, process frozen).
Nuts (Hard,Almonds Knife Blade Add 1/4-cup (60 ml)flour for 1cup (240ml)
Peanuts),Very Finely Ground nuts.(Subtract this flour from amount
called for in recipe.)
Nuts (Soft,Walnuts, Pecans, Disc, Slicing Side FillChute with nuts. Use moderate pros-
Brazil), Coarsely Chopped sure.
Nuts (Soft,Walnuts, Pecans, Knife Blade Add up to 1cup (240ml)at atime. Pulse
Brazil), Finely Chopped to desiredfineness.
Olives,Chopped Knife Blade Add up to 1cup (240ml) pitted or
stuffed olives andpulse to desiredfineness.
Olives,Sliced Disc, Slicing Side Arrange pitted or stuffed olives (openend
down) on Disc in area beneath Chute.
Place Cover on Bowl andslice using
moderate pressure.
Onions,Green (Scallions), Knife Blade Removeroots,trim tops, andcut into
Chopped 1" (25 mm) pieces.Add up to 2cups
(480ml) ata time and pulseto desired
fineness. (Choppedpieces maybe
slightly longer than hand-chopped results.)
Onions,Green (Scallions), Disc, Slicing Side Removeroots and soft parts oftops. Cut
Sliced onionsinto 3" (75ram)equal parts.
Place upright inChuteand packtightly.
Onions,White, Chopped Knife Blade Peeland quarter.(Cut large onionsinto
eighths).Add upto 4 mediumonions at
atime andpulse to desired fineness.
Onions,White, Sliced Disc, Slicing Side Peelandslice offends. (Use whole, small
onions for rings.) Position onDisc (For
large onions, cut in half from root to stem
andwedge upright in Chute.)Usefirm
pressure.
Oranges,Sliced Disc, Slicing Side Cuta slice off one end of orange. (If orange
istoo largeto fit Chute, halve lengthwise
cutting straight down through stem.) In-
sert orangethrough bottom of Chutewith
sliced end down. Usefirm pressure.
Parsley, Chopped Knife Blade Wash and drythoroughly. Chopto desired
fineness.
Parsnips,Shredded Disc, ShreddingSide Position in Chuteand shred.
Parsnips,Sliced Disc, Slicing Side Halve crosswise and place upright in
Chutewith cut sideon Disc.
Peaches, Sliced Disc, Slicing Disc Peel,halve, and pit firm, ripe peaches,
Position 2 halves in Chute and slice us-
ing firm pressure (Sprinkle with lemon
juice to prevent browning.)
Pears, Sliced Disc, Sliding Side Quarter and core firm, ripe pears.Arrange
quarters in Chute (back to back), alter-
nating thick and thin ends. (Sprinkle with
lemon juice to prevent browning.)
Pepperoni,Sliced Disc,Slicing Side Cutinto 3"(75ram)lengths. Remove
inedible casing. Slice 1piece ata time
usingfirm pressure.
Peppers (Sweet,Red,Green), Knife Blade Quarter andremovetops, seeds, and
Chopped pith. Cutquarters crosswise in thirds.
Add up to 1pepperat a time andpulse
to desiredfineness.(Do not over-process).
15
Page 16

DALLYUSECHART
Food/Result Attachmoet Special Iostructioes
Peppers (Sweet,Rod,Green), Disc, Slicing Side Removetopfrom pepper.(Ifpepper is
Sliced smallenough tofit Chute, removeseeds
andpith from top and leave pepper
whole.) Halve larger peppersand remove
insides. Fit pepper into bottom of Chute
by gentlysqueezing pepper bythe sides.
Slice using moderate pressure.
Pickles, Chopped KnifeBlade Peel(if desired),halve lengthwise, andscoop
out seeds(iftough). Cutinto 1" (25ram)
pieces.Add up to 2 cups (480ml)
at atime. Pulseto desiredfineness.
Pickles, Sliced Disc, Slicing Side Cutends from pickles andplace pickles
upright in Chute.Slice using moderate
pressure.
Pineapple (Fresh),Sliced Disc, Slicing Side Removetop andcut into wedges to fit
Chute.Trim off rind, eyes,and core.
Stand wedges upright inChute. Usefirm
pressure.
Potatoes, Chopped Knife Blade Peel(if desired), quarter andcut each
quarter in half crosswise. (If very large,
cut quarters into thirds.) Add up to 1 cup
(240ml) pieces to Bowl. Pulse to desired
fineness.
Potatoes,Shredded Disc, ShreddingSide Cuttofit Chute.After processing, place
shreds in cold water to prevent darken-
ing. Drain before cooking. Drywoll for
frying.
Potatoes,Sliced Disc, Slicing Side Peel(if desired). Usesmall potatoesfor
whole slicesor cut larger potatoes to fit
Chute.
Pumpkin,Mashed Knife Blade Peel, cut into 1" (25 ram)pieces,and simmer
in salted water until tender.Brain well. Pro-
cess up to3 cups (720ml)at atime.
Radishes,Sliced Disc, Slicing Side Removeroots andtops. Use moderate
pressure.
Rhubarb,Sliced Disc, Slicing Side Cuteach stalk crosswise inthirds. Place
upright in Chute.For best results, slice
more than 1 stalk at atime. Usefirm
pressure.
Rutabagas,Sliced Disc, Slicing Side Peel(if desired). Usesmall rutabagas for
whole slicesor cut larger rutabagas to fit
Chute.
Salami (HardSausage),Sliced Disc, Slicing Side Cutinto 3" (75mm)lengths. Cutlarger
Salamito fit chute; smaller onesfit whole.
Removeinediblecasing. Slice 1piece at a
time usingfirm pressure.
Squash(Butternut),Mashed Knife Blade Peel, cut into 1" (25ram)pieces,and simmer
in salted water until tender.Brain well. Pro-
cess up to3 cups (720ml)at atime.
Squash,(Summer,Zucchini) Disc, ShreddingSide Slice offends. Cutto fit horizontally in
Shredded Chute.Salt shreds, toss, and drain at
least 10minutes in colander. Squeezeout
excess moisture. (Shreddedsquash
cooks quickly in butter or oil.)
Squash(Summer,Zucchini), Disc, SlicingSide Peel(if desired). Usesmall squashfor
Sliced whole slices or cut larger squashto fit
Chute.
Strawberries, Chopped Knife Blade Hull andhalve, iflarge. Addup to 2cups
(480ml) ata time to Bowl. Pulseto desired
fineness.
16
Page 17

DALLYUSECHART
Food/Result Attachmoet Special Iostructioes
Strawberries, Pureed Knife Blade Hull andhalve, iflarge. Addup to
2cups (480ml) at atime to Bowl. Process
10seconds.(Use in fruit topping er
gelatin desserts.)
Strawberries, Sliced Disc, Slicing Side Hull.Arrange berries ontheir sidesin
Chutefor lengthwise slices. Usevery light
pressure.
Sweet Potatoes (Yams), Knife Blade Peel, cut into 1" (25ram)pieces,and simmer
Mashed in salted water until tender.Brain well. Pro-
cess up to3 cups (720ml)at atime.
Tomatoes,Chopped Knife Blade Quarter andremove peeland seeds(if
desired).Add upto2 mediumtomatoes
at atime.
Pulseto desiredfineness.
Tomatoes,Sliced Disc, Slicing Side Select tomatoes small enoughto fit Chute
or halve,if necessary. Peel (if desired)
andremove stemend.Insert tomato
through bottom of Chute.For meatier
slices, turn tomato on its side. Use
medium pressure.
Turnips, Sliced Disc, Slicing Slide Peel(if desired). Usesmall turnips for
whole slicesor cut largerturnips to fit
Chute.
Water ChestnutsSliced Disc, Slicing Side FillChute.Usemoderate pressure.
Vegetables)Various),Julionno Disc, SlicingSide Slicevegetables (such aspotato, cu-
or Matchstick Cut cumber, or zucchini). Hold Cover
sideways with Pusherinserted part way
to form a cup atthe bottom ofthe Chute.
Pack slicestightly in Chutewith cut edges
at rightangles to Cover.Slice again.
17
Page 18

RECIPES
OnionSoupau Gratin
5 medium onions 3 cups (720 ml) water
2 tablespoons (3O ml) butter or margarine 4 oz. (114 gms) Swiss or Gruyere cheese
1 teaspoon (5 ml) sugar cut to fit Chute
1 tablespoon (15 ml) all-purpose flour 4 slices French bread - 1inch thick
(25 mm) toasted
2 cans (10 1/2 oz. / 300 gms each) condensed beef broth
Position Disc in Bowl, slicing side up. Cutonions to fit FoodChute and slice. In 4 quart saucepan
(4 L),melt butter or margarine. Add onions, sprinkle with sugar. Saut6, covered, over low heat 15
minutes, stirring occasionally. (Onions should not brown).
Stir in flour. Then add beef broth and water, stirring constantly, until mixture starts to boil. (Adjust
heat as necessary) Simmer, uncovered for 20minutes.
Position Disc in Bowl, shredding side up. Shred cheese. Divide soup into4oven-proofbowls.
Top each with a slice of bread and shredded cheese.
Bake in 400°F(200°0)preheated oven or heat in microwave oven until cheese melts and soup is
hot.
MAKES: 4 (1-1/2 cups/360 ml) servings
FreshMushroomSoup
2 tablespoons (30 mi) butter or margarine
1 medium onion, quartered
1/2 tablespoon (226 gms) mushrooms
2 tablespoons (30 ml) all-purpose flour
2 cups (480 ml) chicken broth
2 cups (480 ml) milk
In 4 quart (4 L)saucepan, melt butter or margarine. Position Knife Blade in Bowl; add onion, pro-
cess to finely chop. Saut6 insaucepan.
Position Disc in Bowl, slicing side up. Slice mushrooms. Add to skillet and saut6 until soft. Stir in
flour. Then add broth, stirring constantly, until mixture thickens.
Add milk, heat gently until soup is hot(but not boiling). Seasonwith salt and pepper, if desired.
Makes: 6 (3/4 cup/180 ml) servings
ChunkyTomatoSalsa
1/4 cup (60 ml) parsley
1 clove garlic, peeled
1green pepper, cut into 1" (25 mm) pieces
1 red pepper, cut into 1" (25 mm) pieces
1 medium onion, quartered
8 medium tomatoes, peeled and quartered
1 can (6 oz/170 gms) tomato paste
1/4 cup (60 ml) red vinegar
1 -2 teaspoons (5 - 10 ml) cumin
Position Knife Blade in Bowl. Add parsley. With processor running, drop garlic through Food
Chute. Process to finely chop. Transfer to 4 quart (4 L)saucepan.
Reposition Knife Blade; add onion. Process to coarsely chop. Transfer to saucepan. Repeat with
peppers and tomatoes, chopping peppers, one at a time, and tomatoes, 2 at a time. Add remain-
ing ingredients - stir to mix. Bring to a boil. Simmer, uncovered, for about 2 hours, or until thick.
Store in refrigerator for 2weeks or freeze.
Makes: About 5 cups (I.2 L)
OvernightCabbageSlaw
Page 19

1/2 medium cabbage, cut in wedges
1 small sweet or red onion, halved
1/2 medium green pepper
2 carrots, peeled
2/8 cup (160 ml) vinegar
1/3 cup (80 ml) vegetable oil
1/4 cup (60 ml) sugar
1 teaspoon (5 ml) salt
1/4 teaspoon (1 ml) pepper
Position Disc in Bowl, slicing side up. Slice cabbage, onion and pepper. When vegetables reach
top of bowl, transfer to extra-large bowl and slice remaining quantity.
Position Disc in Bowl, shredding side up. Shred carrots. Add to cabbage mixture. Position Knife
Blade in Bowl. Add vinegar, oil, sugar, salt and pepper. Process until well mixed, about 10sec-
onds. Pour over vegetables; stir to combine, cover; refrigerate at least 8hours before serving. At
serving time, stir thoroughly, then drain.
Makes: 6 - 1 cup (240 ml) servings Note: Maybe made a day or two
in advance.
Quick CheesePizza
Crust:
2 packages (1/4 oz./7gms each)
active dry yeast
2 teaspoons (10 ml) sugar
1 cup (240 ml) lukewarm water
(110-115°F/44-46°C)
3 cups (720 ml) all-purpose flour
1 teaspoon (5 ml) salt
2 tablespoons (30 ml) vegetable oil
Topping:
1jar (14 oz./400 gms) pizza sauce
1package (16 0z./454 gms)
mozzarella cheese
(chilled in freezer 20 minutes
before using), cut to fit Chute
Stir yeast and sugar into water and let stand 5 minutes. Position Knife Blade in Bowl. Add flour
and salt. Turn processor on and pour yeast mixture through Food Chute. Add oil and process
until dough forms a ball. If dough sticks to side of bowl, add more flour, 1 tablespoon (15 ml) at a
time. Process about 60 seconds. Let dough rest 10 minutes. Divide dough evenly into 2 balls.
Stretch or roll each ball to fit a lightly oiled 14" (36cm) pizza pan. Top with pizza sauce.
Position Disc in Bowl, shredding side up. Shred cheese using light pressure on Food Pusher.
Spread cheese evenly over pizza sauce and add other toppings if desired. Bake in pre-heated
400°F(205%) oven for 20 to 25minutes.
Makes: 2 - 14 inch (36 cm) pizzas
WholeWheat Bread
2 cups (480 ml) all-purpose flour 1package (1/4 oz./7 gms) active dry yeast
Page 20

1cup(240ml)wholewheatflour
2tablespoons(30ml)brownsugar
2tablespoons(30ml)softbutter
ormargarine
1-1/2teaspoon(7ml)salt
1/4cup(60ml)lukewarmwater
(110-115°F/44-46°C)
2/3to1cup(160-240ml)lukewarmwater
(110-115°F/44-46°C)
Position Knife Blade in Bowl. Add flour, sugar, butter or margarine and salt. Process until blend-
ed, about 5 seconds. In a small bowl, add yeast to 1/4 cup (60 ml) water. Stir and allow to dis-
solve, about 10minutes. With processor running, add yeast mixture through Food Chute,then add
only enough water, in a slow stream, to make dough form a ball.
Stop processor (add only enough water to form a soft dough). Turn dough out and with floured
hands, toss or fold dough over 9- 10 times. Shape into a ball. Place dough in greased bowl and
rotate to grease surface. Cover and let rise in warm place until dough doubles in size, about 1-1/2
hours. With floured hands, punch down and toss until no longer sticky. Form into smooth ball.
Coverwith bowl and let rest 15minutes. Shape into loaf. Place inwell greased 9x 5 inch (23x13
cm) pan. Cover and let rise until dough doubles in size, about 1 hour. Bake in preheated
375°F(190°C)oven for 35-40minutes. Removefrom panimmediately, cool before slicing.
Makes 1-9"x5" (23x13 cm) loaf
Pasta BonanzaToss
3 medium carrots, peeled
1 medium onion, quartered
4 oz. (114 gms) broccoli, cut in 2"
(50 mm) pieces
1 medium zucchini
6 medium mushrooms
8 oz. (226 gms) favorite pasta
4 oz. (114 gms) sliced dell ham
1/4 cup (60 ml) milk
3 tablespoons (45 ml) Parmesan cheese
Position disc in Bowl, slicing side up. Slice carrots and onion. In 4 quart saucepan (4 L),steam
carrots until just done (about 7minutes). Add broccoli to carrots after 3 minutes.
Repositiondisc, slicing side up. Slice zucchini and mushrooms. Add to carrot mixture for last2
minutes of steaming.
Transfer steamed vegetables to large mixing bowl (reserve water in saucepan). In same
saucepan, add additional water and cook pasta as directed on package. Reposition Disc in Bowl,
slicing side up. roll up ham slices and slice for a coarse, chopped result. Add to steamed vegeta-
bles along with remaining ingredients; stir to blend.
When pasta isjust done, drain and return to pot. Add vegetable mixture. Over low heat, toss veg-
etables with pasta until well mixed and thoroughly heated. Seasonto taste.
Makes: 4 (2 cups/480 ml) servings.
PeanutButterChip Cookies
1 cup (240 m0 roasted salted peanuts
1 cup (240 ml) packed brown sugar
1/3 cup (80 m0 butter or margarine,
softened, cut into 6 pieces
1 cup (240 ml) all-purpose flour
1/2 cup (120 ml) semi-sweet
chocolate morsels
1/2 teaspoon (2 ml) baking soda
20
Page 21

1 egg 1 teaspoon (5 ml) vanilla
Position Knife Blade in Bowl. Process peanuts until a butter forms (about 2 minutes). Add sugar
and butter, process until smooth (15 seconds). Scrape down bowl as necessary. Add egg and
vanilla, process 5seconds.
Add flour, chocolate morsels and baking soda. Pulse just until flour is blended into mixture (about
5times).
Shape dough into balls using 1tablespoon(15 ml) doughfor each. Place on ungreased cookie
sheets, about 2" (50 mm) apart. Flatten each cookie with fork in a crisscross pattern to 1/4" (6
mm) thick. Bake in preheated350°F(175°C) ovenfor 12 minutes, or until cookies are firm to the
touch. Cool on wire racks.
Makes: about 2-1/2 dozen cookies.
Note: Cookie doughmay bestored in refrigerator 1week or in freezer up to 6 months.
Aloha Carrot Cake
3 medium carrots, peeled
1 cup (240 ml) sugar
1/2 cup (120 ml) vegetable oil
2 eggs
1 teaspoon (5 ml) baking powder
1 teaspoon (5 ml) baking soda
1 teaspoon (5 ml) cinnamon
1 teaspoon (5 ml) salt
1/4 teaspoon (1 ml) mace
1-1/2 cups (360 ml) aft-purpose flour
1 can (8 oz./227 gms) crushed pineapple,
undrained
Preheat oven to 375°F(190°C). Position Knife Blade in Bowl with disc above it, shredding side up.
Shred carrots. Add sugar, oil, eggs, baking powder, soda, cinnamon, salt and mace. Process to
mix, 30 seconds. Add flour. Process to combine 15seconds. Add pineapple. Pulse until just
mixed, about 2to 3 seconds. Turn into a greased andfloured 9"(23 cm) square baking pan. Bake
until cake springs back when lightly touched in center, 30 to 35 minutes. Cooland remove from
pan. Frostwith CreamCheese frosting (see below). Refrigerate any unused portion.
Makes: 1 (9"/23 cm sq.) cake
CreamCheeseFrosting
1package (3 oz./85 gms) cream cheese,
chilled, cut in 4 pieces
2 tablespoons (30 ml) soft butter
or margarine
2-3 teaspoons (10-15 ml) lemon juice
1-1/2 cups (360 ml) confectioners sugar
1/4 teaspoon (1 ml) mace
Position Knife Blade in Bowl. Drop cream cheese through food chute, one piece atatime, with
processor running. Turn off. Add butter and lemon juice. Process to mix ingredients, 3to 4 sec-
onds. Add sugar and mace and process until smooth, 15to 20seconds.
Makes: 1 cup (240 ml)
Apple Crisp
6 medium cooking apples, peeled,
cored, quartered
2 tablespoons (30 ml) lemon juice
1 cup (240 ml) quick oats, uncooked
1 teaspoon (5 ml) cinnamon
1/2 cup (120 ml) aft-purpose flour
1/2 cup (120 ml) butter or
margarine, chilled, cut in 6 pieces
3/4 cup (180 ml) packed brown sugar
21
Page 22

Preheatovento375°F(190°C).PositionDiscinbowlwithslicingsideupandsliceapples.As
slicesreachtopofbowl,emptyintoungreased9"(23cm)squarebakingpan.Sprinklelemon
juiceoverapples.PositionKnifeBladeinBowl;addremainingingredients.Processuntil
crumbly,about10seconds.Crumbleevenlyoverapples.Bakeuntilapplesaretender,40to45
minutes.Servewarmorcold,plain,orwithicecream,orsweetenedwhippedcream.
Makes: 6 (3/4 cup/180 ml) servings
Note: Substitute S to 6 cups (1.2 to 1.4 L) fruitsin season such as peaches or rhubarb. With
rhubarb, add 1/2cup (120ml) sugarto fruit.
PecanCrescents
3/4 cup (180 ml) pecans
1-1/2 cups (360 ml) all-purpose flour
3/4 cup (180 ml) butter or margarine,
softened, cut into 10 pieces
1/3 cup confectioners sugar
1/2 teaspoon vanilla
Position Knife Blade in Bowl. Add pecans; pulse until coarsely chopped. Add butter, flour, con-
fectioners sugar and vanilla; pulse just until flour is blended into mixture (about 8 pulses).
Roll 1tablespoon (15 ml) at atime with palms of hands, into a 3" (75 mm) long roll. Place 1" (25
mm) apart on ungreased cookie sheet and curve into a crescent. Bake in preheated 375°F(190°C)
oven for 12 minutes or until set, but not browned. Dust lightly with confectioners sugar before
serving.
Makes: 2-1/2 dozen cookies
OneCrustStandardPie Crust
1 cup (240 ml) all-purpose flour 1 tablespoon (15 ml) butter or margarine, frozen
1/2 teaspoon (2 ml) salt 3 tablespoons (45 ml) cold water
1/4 cup (60 ml) vegetable shortening,
room temperature, divided in 3 pieces.
Position Knife Blade in Bowl. Add flour, salt, vegetable shortening and butter or margarine. Pro-
cess until particles resemble coarse crumbs, about 15 seconds. Add water all at once through
Food Chutewith processor running. Process until dough forms a ball, or no more than 15-20sec-
onds. Stop processor; remove Knife Blade. Shape into ball with hands, if necessary. Roll out for
pie, or as directed in recipe. If crust is to be baked before filling, prick generously with fork.
Bake in preheated 450°F(230°C)oven for 9-12 minutes.
Makes: 1 (9"/23 cm) pie crust
Two CrustStandardPie Crust
2 cup (480 ml) all-purpose flour 1 tablespoon (15 ml) butter or margarine, frozen
1 teaspoon (5 ml) salt 1/3 tablespoons (80 ml) cold water
1/2 cup (120 ml) vegetable shortening,
room temperature, divided in 6 pieces.
Follow the directions for the One Crust Standard Pie Crust (above), but divide dough in half and
shape into 2 balls.
Makes: 2 (9"/23 cm) pie crusts or 1 double crust pie.
22
Page 23

NOTES
23
Page 24

Service if necessary, must be performed by a Black & Decker Inc., Household Appliance
Company-Owned or Authorized Service Center.
The Service Center nearest you can be found in the yellow pages of your phone book under
"Electric Appliances - Small - Repairing", or call the tool-free number on the cover of this
book for the location of the Service Center nearest you.
If mailing or shipping your Food Processor, pack it carefully in a sturdy carton with enough
packing material to prevent damage. Include a note describing the problem to our Service
Center and be sure to give your return address. We also suggest that you insure the pack-
age for your protection.
Consumer replaceable parts and accessories are available at Black & Decker Inc., House-
hold Appliance Company-Owned or Authorized Service Centers.
Black & Decker Inc. warrants this product against any defects that are due to faulty materi-
al or workmanship for a two year period after the original date of consumer purchase or
receipt as a gift. This warranty does not include damage to the product resulting from acci-
dent or misuse.
If the product should become defective within the warranty period, we will repair it or elect
to replace it free of charge. We will return your product, transportation charges prepaid,
provided it is delivered prepaid to any Black & Decker Inc., Household Appliance Company-
Owned or Authorized Service Center.
This warranty gives you specific legal rights, and you may also have other rights which vary
from state to state or province.
The provisions of this warranty are in addition to and not a modification of or subtraction
from the statutory warranties and other rights and remedies contained in any applicable
legislation and to the extent that any such provisions purport to disclaim, exclude or limit
any such statutory warranties or other rights or remedies, such provisions shall be deemed
to be amended to the extent necessary to comply herewith.
Answers to any questions regarding warranty, repair, or service locations may be obtained
by writing or by phoning:
In the U.$.A,
Consumer Assistance & Information
Black& Decker (U.S.)Inc.
626Hanover Pike
Hamstead, MD.
21074-0618
In Canada
Consumer Assistance & Information
Black & Decker Canada Inc.
100Central Avenue
Brockville, Ontario
K6V 5W6
Tell Free Phone Number
1-800-231-9786
Monday- Friday
8:15a.m. to 5:00 p.m.
Eastern Time
Toll Free Phone Number
1-800-465-6070
Monday- Friday
8:00a.m. to 4:30 p.m.
Eastern Time
Form No. 263902-01
Publication No. 168633-24-RV02 Printed in People's Republic of China
Copyright@ Black & Decker Inc. 1993- 1995
Page 25

POUSSOIR
GUIDESPOURLESALIMENTS
COUVERCLE-ENTONNOIR
DISQUESREVERSIBLES
COUTEAU
POIGNEEDU BOL
ESPACEDE RANGEMENT DUCORDON
SOCLE
COMMANDE,_
BOUTON-POUSSOIR
MARCHE/ARRET/MARCHE
INTERMITTENTE
TEMOIN DEFONCTIONNEMENT
AXED'ENTRAiNEMENT
BOL
TIGEDESOUTIEN
DESDISQUES
GRIFFES
MARCHE
INTERMITTENTE
DISQUE{_MINCEUR
DISQUE
Dt_CHIQUETEUR
COUTEAU
DEVANT
DU BOL
CREUXROND
ERGOTS
POSITION DE
VERROUILLAGE
ENTONNOIR
BOL
COUVERCLE
POIGNt_EDU
COUVERCLE
COLONNE DE
LA COMMANDE
MOYEU
DISQUEREVERSIBLE
BOL
POUSSOIR
ENTONNOIR
GUIDESPOUR
LESALIMENTS
ENTONNOIR
INTERMITTENT
MARCHE
ARRET
FROMAGE
ENTDNNDIR
ENTDNNDIR
LEGUMES
LEGUMES
ENTONNOIR
A
B
C
D
E
F
G
H
I
J
K
L
M
N
0
P
Q
R
S
T
U
V
 Loading...