

Black+Decker FD1620, FW1620, FS1620, FS1620R Original Instructions Manual
AR PT FR EN
www.blackanddecker.ae
FD1620
FW1620
FS1620
FS1620R
ENGLISH
FD1620
Desk Fan
FW1620
Wall Fan
(Original instructions)
7 6 5 4 3 2 1
8
9
10
11
6 5 4 3 2 1
1112
10
8
9
2
7
(Original instructions)
ENGLISH
FS1620
Pedestal fan
7 6
10
54321
9
11
FS1620R
Pedestal fan
54321
& Remote
6
8
8
9
7
16
10
12
14
15
13
16
11
13
14
12
15
3

ENGLISH
(Original instructions)
Intended use
Your BLACK+DECKER FD1620 desk fan, FW1620 wall fan,
FS1620 Pedestal fan and FS1620R Pedestal fan with
remote control have been designed to create a flow of air.
This appliance is intended for indoor household use only.
This appliance is not intended to be used in:
• Staff kitchen areas in shops, offices and other working
environments;
• Farm houses;
• By clients in hotels, motels and other residential type
environments;
• Bed and breakfast type environments;
Thank you for choosing BLACK+DECKER. We hope that
you will enjoy using this product for many years.
Safety instructions
Warning! When using mains- powered appliances, basic
safety precautions, including the following, should always be
followed to reduce the risk of fire, electric shock and
personal injury.
• Read all of this manual carefully before using the
appliance.
• In order to avoid a hazard due to inadvertent resetting of
the thermal cut-out, this appliance must not be supplied
through an external switching device, such as a timer, or
connected to a circuit that is regularly switched on and
off by the utility.
• The intended use is described in this manual. The use of
any accessory or attachment or the performance of any
operation with this appliance other than those
recommended in this instruction manual may present a
risk of personal injury.
• Retain this manual for future reference.
Using your appliance
• Always take care when using the appliance.
• Do not use outdoors.
• Do not operate the appliance if your hands are wet. Do
not operate the appliance if you are barefoot.
• Guide the power supply cord neatly so it does not hang
over the edge of a worktop and cannot be caught
accidentally or tripped over.
• Never pull the power supply cord to disconnect the plug
from the socket. Keep the power supply cord away from
heat, oil and sharp edges.
• If the supply cord is damaged, it must be replaced by the
manufacturer, its service agent or similarly qualified
persons in order to avoid a hazard.
• Disconnect the appliance from the power supply when
not in use and before cleaning.
Warning! Long hair and loose clothing can be sucked into
the back of the fan.
Warning! Never allow the back of the fan to be covered with
curtains or other obstructions.
Safety of others
• This appliance is not intended for use by persons
(including children) with reduced physical, sensory or
mental capabilities, or lack of experience and knowledge,
unless they have been given supervision or instruction
concerning use of the appliance by a person responsible
for their safety.
• Children should be supervised to ensure that they do not
play with the appliance.
After use
• Switch off, remove the plug from the socket and let the
appliance cool down before leaving it unattended and
before changing, cleaning or inspecting any parts of the
appliance.
• When not in use, the appliance should be stored in a dry
place. Children should not have access to stored
appliances.
Inspection and repairs
• Switch off the appliance before cleaning, changing
accessories or approaching parts which move in use.
• Always allow the motor to stop turning before removing
any cover or accessory.
• Before use, check the appliance for damaged or
defective parts. Check for breakage of parts, damage to
switches and any other conditions that may affect its
operation.
• Do not use the appliance if any part is damaged or
defective.
• Have any damaged or defective parts repaired or
replaced by an authorised repair agent.
• Before use, check the power supply cord for signs of
damage, ageing and wear.
• Do not use the appliance if the power supply cord or
mains plug is damaged or defective.
• If the power supply cord or mains plug is damaged or
defective it must be repaired by an authorised repair
agent in order to avoid a hazard. Do not cut the power
supply cord and do not attempt to repair it yourself.
• Never attempt to remove or replace any parts other than
those specified in this manual.
• Do not attempt to repair the appliance. Take it to your
nearest BLACK+DECKER-owned or authorised Service
Centre for repair.
• Ensure that the fan is switched off and disconnected from
the mains supply before removing the guard.
4

(Original instructions)
ENGLISH
Electrical safety
Before use, check that the mains voltage corresponds to the
voltage on the rating plate.
This appliance is double insulated in accordance
with EN 60335; therefore no earth wire is required.
• Appliance plugs must match the outlet. Never modify the
plug in any way.
• Do not use any adapter plugs with earthed (Class 1)
appliances. Unmodified plugs and matching outlets will
reduce the risk of electric shock.
• To avoid the risk of electric shock, do not immerse the
cord, plug or appliance in water or other liquid.
Mains plug replacement
If a new mains plug needs to be fitted:
• Safely dispose of the old plug.
• Connect the brown lead to the live terminal in the new
plug.
• Connect the blue lead to the neutral terminal.
• If the product is class I (earthed), connect the
green/yellow lead to the earth terminal
Note! If your product is class II double insulated (only 2
wires in the cord set), no connection is to be made to the
earth terminal. Follow the fitting instructions supplied with
good quality plugs.
Any replacement fuse must be of the same rating as the
original fuse supplied with the product.
Warning! The above section on mains plug replacement is
for authorized service centre persons.
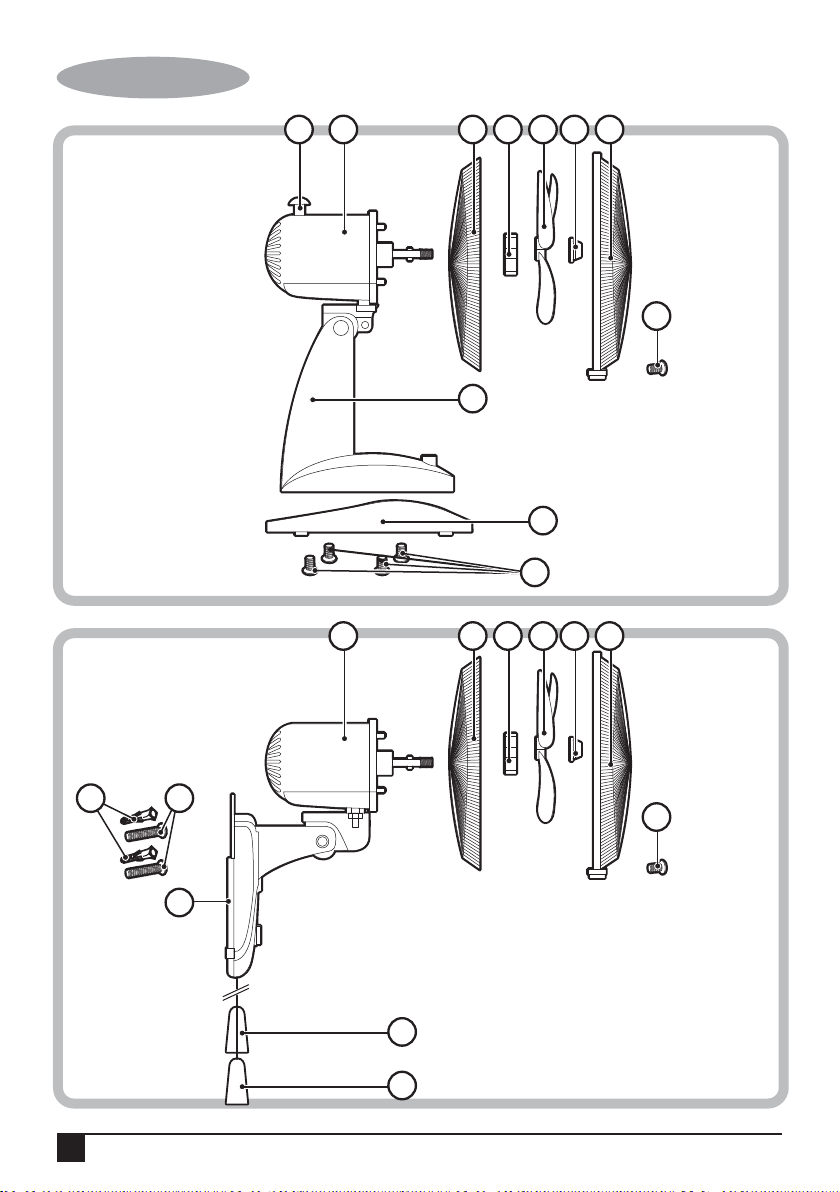
FD1620 Desk Fan
Features
1. Front guard
2. Blade cap
3. Fan blade
4. Guard nut
5. Rear guard
6. Fan head
7. Oscillating knob
8. Guard screw
9. Fan unit
10. Base
11. Screw
Assembly
Note: Make sure your fan is switched off before connecting
to or disconnecting frompower supply.
Warning! Never use the fan without the guard in place or if
the guard is damaged.
Fitting the fan to the base
• Remove four screws(10) from the fan unit.
• Insert the fan unit into the base, re-fit the four screw into
the fan unit.
Fitting the fan blade and guard
• Remove the guard nut from the motor shaft by turning it
anti-clockwise.
• Place the rear guard by positioning it on the location pins
on the fan unit. Ensure that the rear guard is in the
correct orientation.
• Secure the guard on to the fan unit by re-fitting the guard
nut. Tighten the guard nut by turning it clockwise.
• Secure the fan blade on the motor shaft by fitting the
blade cap. Tighten the blade cap by turning it
anti-clockwise.
• Place the front guard onto the rear guard by positioning
the top clip on the uppermost part of the rear guard. Push
the top clip down and press the rim of the front guard
onto the rear guard ensuring a tight fit all the way round.
• Close the bottom clip. Tighten the bottom clip screw by
turning it clockwise.
Use
Warning! Never use the fan without the guard in place or if
the guard is damaged.
Switching on and off
• Your fan has three speed control to keep the desired air
flow through your room.
• 0 - Off
• 1 - Low
• 2 - Medium
• 3 - High
• To switch on, press the button to set the desired speed.
The fan will start.
• To switch off, press the “ 0 “ button.
Oscillation
• The fan can be set to oscillate by pushing Oscillating
Knob downwards.To stop the oscillating feature, pull up
the Oscillation Knob.
Adjusting the angle of the fan
The angle of the fan can be adjusted up and down.
• Tilt the head of the fan to the desired angle.
5

ENGLISH
(Original instructions)
FW1620 Wall Fan
Features
1. Front guard
2. Blade cap
3. Fan blade
4. Guard nut
5. Rear Guard
6. Fan Unit
7. Guard Screw
8. Speed Pull Cord
9. Oscillation Pull Cord
10. Wall mount bracket
11. Wall screw
12. Wall plugs
Assembly
Note: Make sure your fan is switched off before connecting
to or disconnecting from power supply.
Warning! Never use the fan without the guard in place or if
the guard is damaged.
Wall mounting
When fixing to a wall,make sure that the fixing method is
suitable for the wall type and is appropriate to the weight of
the fan.
Warning! Before drilling into walls, check for the location of
wiring and pipes.
• Mark the location of the screw holes(within reach of an
electrical outlet).
• Secure the wall mount bracket using screws and wall
plugs.
• Hang the fan on the wall by placing the wall mount
bracket into the screw.
• The fan should installed so that the blades are more
than 2.3m above the floor.
Fitting the fan blade and guard
• Remove the guard nut from the motor shaft by turning it
anti-clockwise.
• Place the rear guard by positioning it on the location
pins on the fan unit. Ensure that the rear guard is in the
correct orientation.
• Secure the guard on to the fan unit by re-fitting the
guard nut. Tighten the guard nut by turning it clockwise.
• Secure the fan blade on the motor shaft by fitting the
blade cap. Tighten the blade cap by turning it
anti-clockwise.
• Place the front guard onto the rear guard by positioning
the top clip on the uppermost part of the rear guard.
Push the top clip down and press the rim of the front
guard onto the rear guard ensuring a tight fit all the way
round.
• Close the bottom clip. Tighten the bottom clip screw by
turning it clockwise.
Use
Warning! Never use the fan without the guard in place or if
the guard is damaged.
Switching on and off
• Your fan has three speed control to keep the desired air
flow through your room.
• 0 - Off
• 1 - Low
• 2 - Medium
• 3 - High
• To switch on, turn the knob to the desired speed. The fan
will start.
• To switch off, turn the knob to the “ 0 “ button.
• The speed can also be adjusted by pulling the right hand
cord. Each pull of the cord will advance the speed by one
setting until the fan returns to the off position.
Oscillation
The fan can oscillate when in use to circulate air around a
greater area.
• Pull the left hand cord to start oscillation.
• Pull the left hand cord again to stop oscillation.
Adjusting the angle of the fan
• The angle of the fan can be adjusted up and down.
• Hold the fan unit and tilt the head of the fan to the desired
angle.
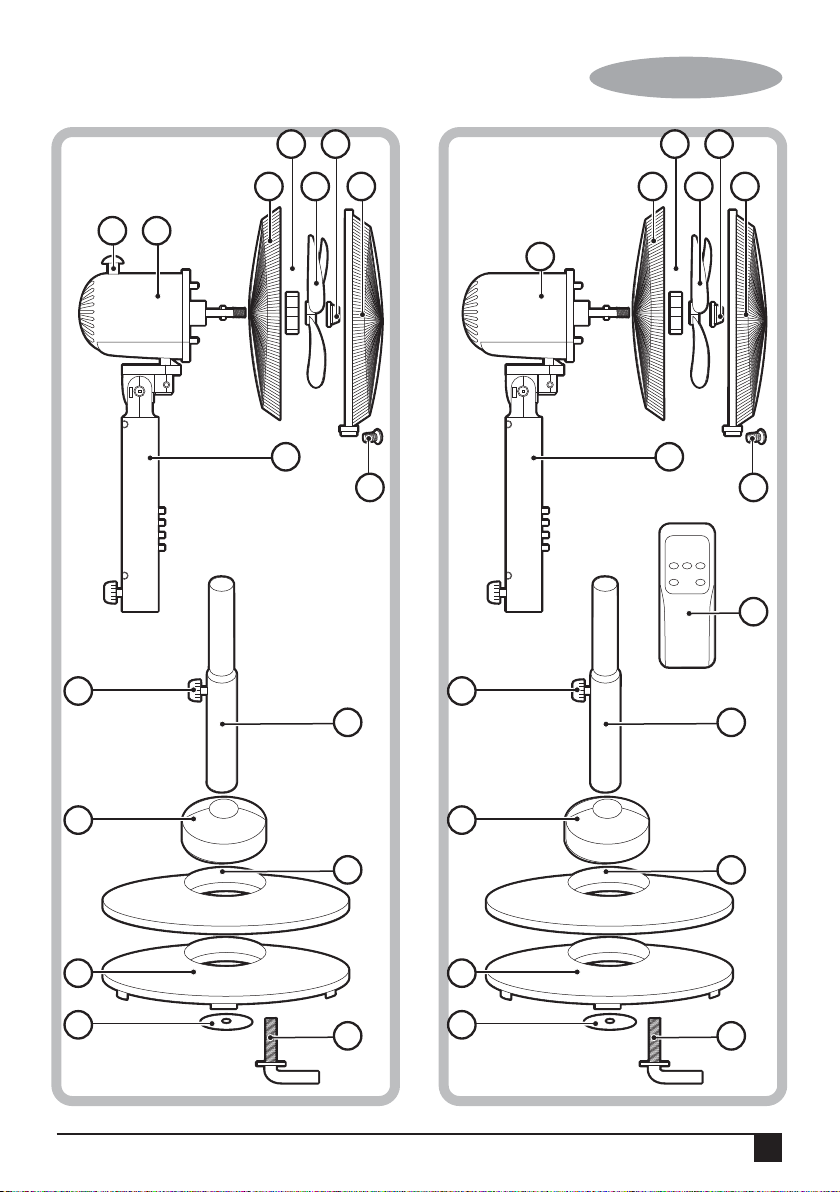
FS1620 Pedestal Fan
Features
1. Front Guard
2. Blade Cap
3. Fan Blade
4. Guard Nut
5. Rear Guard
6. Fan Head
7. Oscillating Knob
8. Guard Screw
9. Fan unit
10. Set Screw
11. Support Tube
12. Base Cover
13. Round Base
14. Base
15. Washer
16. Screw
6

(Original instructions)
ENGLISH
Assembly
Note: Make sure your fan is switched off before connecting
to or disconnecting frompower supply.
Warning! Never use the fan without the guard in place or if
the guard is damaged.
Assembling the base and stand
• Remove the washer (15) and screw (16) from the
support tube by turning it anti-clockwise.
• Place the support tube into the base. Re-insert the
screw into the support tube from underneath. Tighten
the screw by turning it clockwise.
Fitting the fan to the stand
• Remove the screw from the bottom of the fan unit by
turning it anti-clockwise.
• Place the fan unit onto the top of the support tube.
Re-insert the screw into the fan unit. Tighten the screw
by turning it clockwise.
Fitting the fan blade and guard
• Remove the guard nut from the motor shaft by turning it
anti-clockwise.
• Place the rear guard by positioning it on the location
pins on the fan unit. Ensure that the rear guard is in the
correct orientation.
• Secure the guard on to the fan unit by re-fitting the
guard nut. Tighten the guard nut by turning it clockwise.
• Secure the fan blade on the motor shaft by fitting the
blade cap. Tighten the blade cap by turning it
anti-clockwise.
• Place the front guard onto the rear guard by positioning
the top clip on the uppermost part of the rear guard.
Push the top clip down and press the rim of the front
guard onto the rear guard ensuring a tight fit all the way
round.
• Close the bottom clip. Tighten the bottom clip screw by
turning it clockwise.
Oscillation
• The fan can be set to oscillate by pushing Oscillating
Knob downwards.To stop the oscillating feature, pull up
the Oscillation Knob.
Adjusting the angle of the fan
The angle of the fan can be adjusted up and down.
• Tilt the head of the fan to the desired angle.
Adjusting the height of the fan
• Loosen the screw at the top of the support tube by
turning it anti-clockwise.
• Lift the fan to the desired height.
• Tighten the screw at the top of the support tube by
turning it clockwise.
FS1620R Pedestal Fan with remote Control
Features
1. Front Guard
2. Blade Cap
3. Fan Blade
4. Guard Nut
5. Rear Guard
6. Fan Head
7. Guard Screw
8. Fan unit
9. Set Screw
10. Support Tube
11. Base Cover
12. Round Base
13. Base
14. Washer
15. Screw
16. Remote Control
Use
Warning! Never use the fan without the guard in place or if
the guard is damaged.
Switching on and off
• Your fan has three speed control to keep the desired air
flow through your room.
• 0 - Off
• 1 - Low
• 2 - Medium
• 3 - High
• To switch on, press the button to set the desired speed.
The fan will start.
• To switch off, press the “ 0 “ button.
Assembly
Note: Make sure your fan is switched off before connecting to
or disconnecting frompower supply.
Warning! Never use the fan without the guard in place or if
the guard is damaged.
Assembling the base and stand
• Remove the flat washer (14) and screw (15) from the
support tube by turning it anti-clockwise.
• Place the support tube into the base. Re-insert the screw
into the support tube from underneath. Tighten the screw
by turning it clockwise.
Fitting the fan to the stand
• Remove the screw from the bottom of the fan unit by
turning it anti-clockwise.
7
ENGLISH
(Original instructions)
• Place the fan unit onto the top of the support tube.
Re-insert the screw into the fan unit. Tighten the screw
by turning it clockwise.
Fitting the fan blade and guard
• Remove the guard nut from the motor shaft by turning it
anti-clockwise.
• Place the rear guard by positioning it on the location
pins on the fan unit. Ensure that the rear guard is in the
correct orientation.
• Secure the guard on to the fan unit by fitting the guard
nut. Tighten the guard nut by turning it clockwise.
• Secure the fan blade on the motor shaft by fitting the
blade cap. Tighten the blade cap by turning it
anti-clockwise.
• Place the front guard onto the rear guard by positioning
the top clip on the uppermost part of the rear guard.
Push the top clip down and press the rim of the front
guard onto the rear guard ensuring a tight fit all the way
round.
• Close the bottom clip. Tighten the bottom clip screw by
turning it clockwise.
Use
Warning! Never use the fan without the guard in place or if
the guard is damaged.
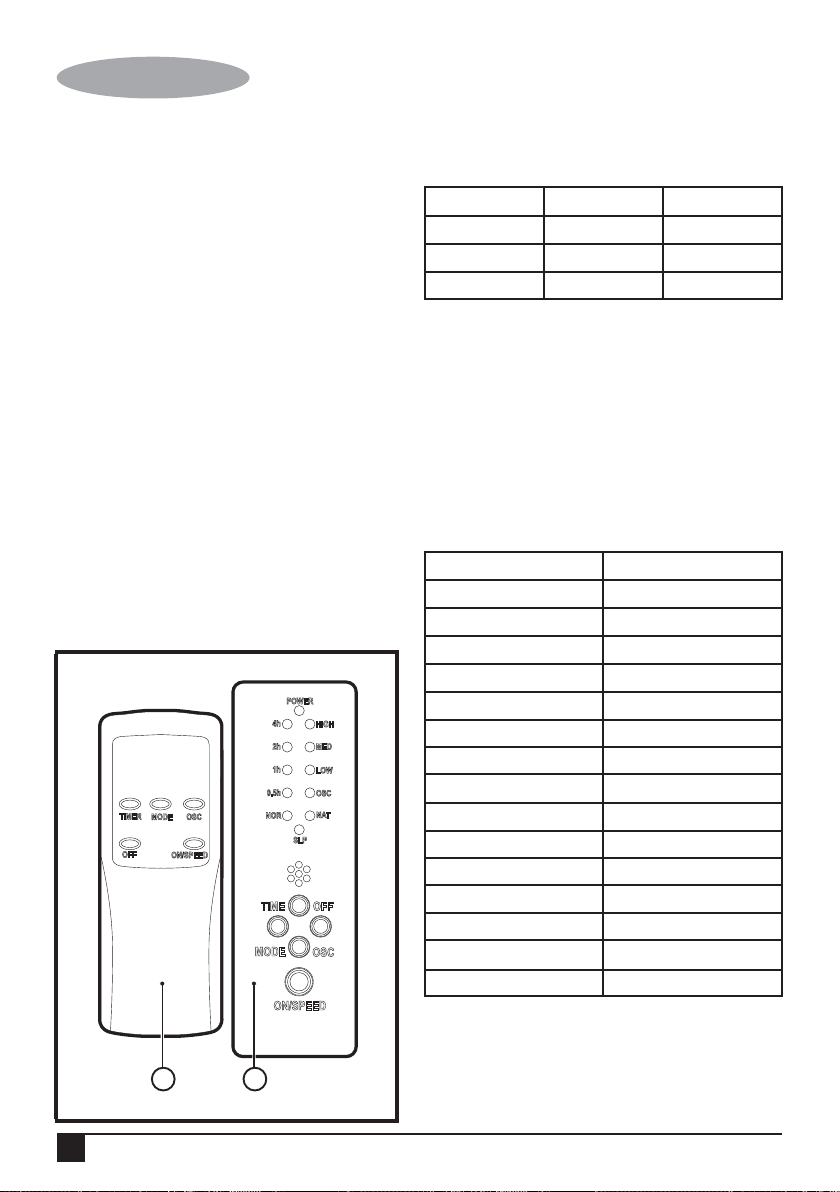
Note: All controls can be operated from the fan unit or from
the remote control.
POWER
4h
HIGH
2h
MED
1h
LOW
0.5h
OSC
NAT
TIMER
MODE OSC
OFF
ON/SPEED
16 8
NOR
MODE
SLP
OFFTIME
OSC
ON/SPEED
Switching on and off
Your fan has three speed control to keep the desired air flow
through your room.
Symbol Speed Press Button
LOW Low 1 Time
MED Medium 2 Times
HIGH High 3 Times
• To switch on, press the “ON/SPEED” button the required
number of times to set the desired speed. The fan will
start.
• To switch off, press the “OFF” button.
Oscillation
The fan can oscillate when in use to circulate air around a
greater area.
• Press the “OSC” button to start oscillation.
Timer
The timer can be used to set the running time of the fan.
Symbol Press Button
0.5 Hour 1 Time
1 Hour 2 Times
1.5 Hours 3 Times
2 Hours 4 Times
2.5 Hours 5 Times
3 Hours 6 Times
3.5 Hours 7 Times
4 Hours 8 Times
4.5 Hours 9 Times
5 Hours 10 Times
5.5 Hours 11 Times
6 Hours 12 Times
6.5 Hours 13 Times
7 Hours 14 Times
7.5 Hours 15 Times
Press the TIME button the required number of times to set
the run time. The fan will automatically stop when the run
time is reached.
8
(Original instructions)
ENGLISH
Mode
Mode Press Button
NOR = Normal Press ON/SPEED button 1 time
NAT = Natural Press MODE button 1 time
SLP = Sleep Press MODE button 2 times
NOR = Normal Press MODE button 3 times
• When the the ON/SPEED button is pressed, the NOR
mode indicator lights up red.
• Press the MODE button the required number of times to
set the MODE.
• NOR Mode (the NOR mode indicator lights up red.):You
can adjust the speed settings yourself at any time.
• NAT Mode (the NAT mode indicator lights up red.)
• If the HIGH speed is selected, the speed switches
between high-medium-slow-off.
• If you have selected MED speed, the speed switches
between medium-slow-off.
• In the LOW mode the speed switches between slow-off.
• SLP Mode( the SLP mode indicator lights up red.)
• If the HIGH speed is selected: the fan operates as in
“NAT mode” for first 30 minutes on the HIGH speed
setting. It then opreates for 30 minutes as in “NAT mode”
on the MED speed setting. For the remaining time, the
fan works as in “NAT mode” on the LOW speed setting.
• On the MED speed setting:the fan works as in “NAT
mode” for the first 30 minutes on the MED speed setting.
For the remaining time, the fan works as in “NAT mode”
on the LOW speed setting.
• If the LOW speed setting is selected: Switch between
slow speed and shutdown of the fan as in “NAT mode”.
Adjusting the angle of the fan
The angle of the fan can be adjusted up and down.
• Tilt the head of the fan to the desired angle.
Adjusting the height of the fan
• Loosen the screw at the top of the support tube by
turning it anti-clockwise.
• Lift the fan to the desired height.
• Tighten the screw at the top of the support tube by
turning it clockwise.
Cleaning and maintenance
Warning! Before cleaning and maintenance, switch the
appliance off and remove the plug from the socket.
Warning! Allow the unit to thoroughly cool down before
attempting to clean it.
• Do not immerse the appliance into liquid.
• Never use dilutent or benzene, chemical wiping cloths,
plastic brush or metal brush.
• The basketand pan can be washed in hot soapy water.
Rinse & dry thoroughly after cleaning.
• Use a damp cloth to wipe the outside of the body (1) and
the internal cavity.
• Keep the power cord, control panel clean and dry,
otherwise it may cause problems.
Caution: NEVER immerse the appliance in water or any
liquids. Make sure the appliance is thoroughly dried before
use.
Protecting the environment
Separate collection. This product must not be
disposed of with normal household waste.
Should you find one day that your Black+Decker product
needs replacement, or if it is of no further use to you, do not
dispose of it with other household waste. Make this product
available for separate collection.
• Black+Decker provides a facility for recycling
Black+Decker products once they have reached the end
of their working life. This service is provided free of
charge. To take advantage of this service please return
your product to any authorised repair agent who will
collect them on our behalf.
• You can check the location of your nearest authorised
repair agent by contacting your local Black+Decker
office at the address indicated in this manual.
Alternatively, a list of authorized Black+Decker repair
agents and full details of our after-sales service and
contact are available on the Internet at:
www.2helpU.com.
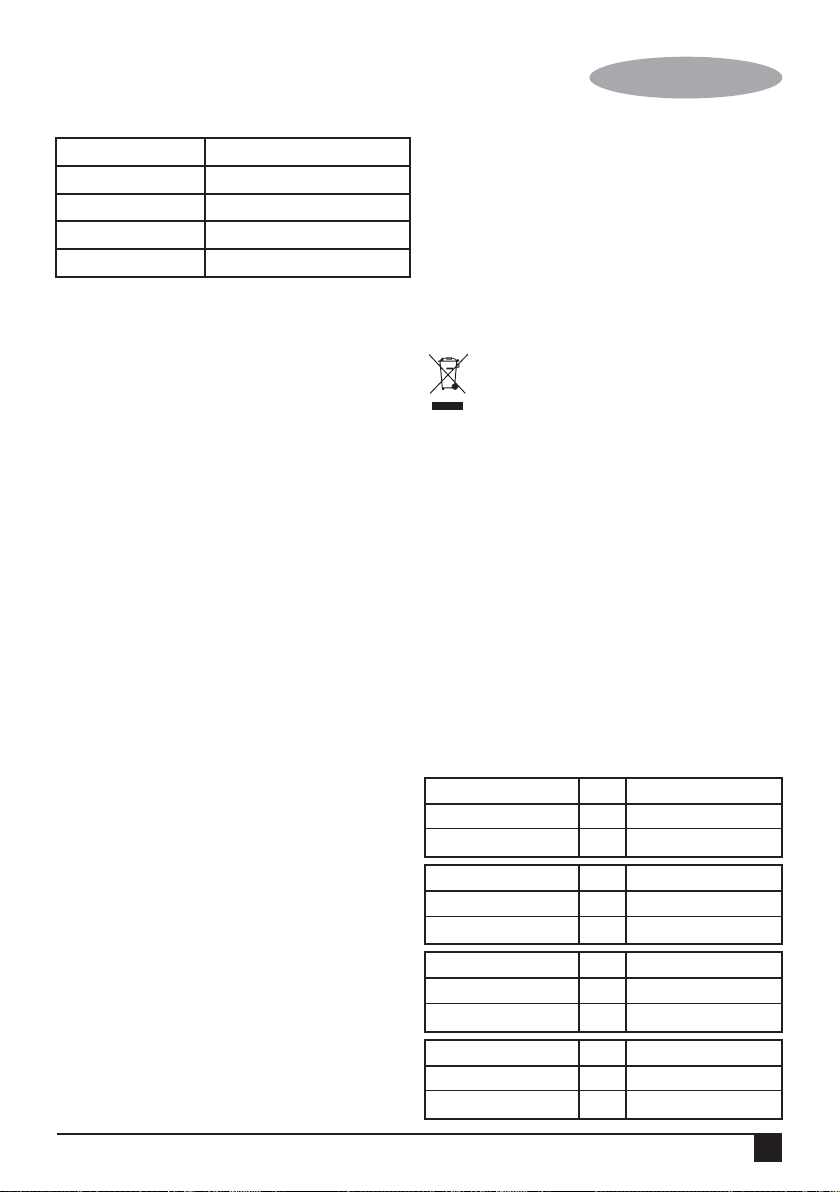
Technical data
FD1620
Input voltage VAC 220 - 240
Power input W 60
FW1620
Input voltage VAC 220 - 240
Power input W 55
FS1620
Input voltage VAC 220 - 240
Power input W 60
FS1620R
Input voltage VAC 220 - 240
Power input W 60
9

ENGLISH
(Original instructions)
Warranty
Black+Decker is confident of the quality of its products and
offers an outstanding warranty.
This warranty statement is in addition to and in no way
prejudices your statutory rights.
If a Black+Decker product becomes defective due to faulty
materials, workmanship or lack of conformity, within 24
months from the date of purchase, Black+Decker warranty
to replace defective parts, repair products subjected to fair
wear and tear or replace such products to ensure minimum
inconvenience to the customer unless:
The product has been used for trade, professional or
hire purposes;
The product has been subjected to misuse or neglect;
The product has sustained damage through foreign
objects, substances or accidents;
Repairs have been attempted by persons other than
authorised repair agents or Black+Decker service staff.
To claim on the warranty, you will need to submit proof of
purchase to the seller or an authorised repair agent. You can
check the location of your nearest authorised repair agent by
contacting your local Black+Decker office at the address
indicated in this manual.
Alternatively, a list of authorised Black+Decker repair
agents and full details of our after-sales service and contacts
are available on the Internet at: www.2helpU.com.
10

(Traduction des instructions d'origine)
FRANÇAIS
Usage prévu
Vos ventilateur de bureau BLACK+DECKER FD1620,
ventilateur mural FW1620, ventilateur sur pied FS1620 et
ventilateur sur pied télécommandé FS1620R ont été conçus
pour générer une ventilation.
Cet appareil est destiné à une utilisation domestique interne
uniquement.
Cet appareil n'est pas destiné à une utilisation :
• dans les cuisines pour les employés de boutiques, de
bureaux et d’autres environnements profesionnels ;
• dans les fermes ;
• par les clients d’hôtels, de motels et autres
environnements de type résidentiels ;
• dans les environnements de type maison d’hôte.
Merci d’avoir choisi BLACK+DECKER. Nous espérons que
vous profiterez de ce produit pendant de nombreuses
années.
Consignes de sécurité
Avertissement ! L’utilisation d’appareils électriques requiert
le respect de consignes de sécurité de base, notamment
celles indiquées ci-après, afin de réduire les risques
d’incendie, d’électrocution et de blessure.
• Lisez attentivement ce manuel dans son intégralité
avant d’utiliser l’appareil.
• Pour éviter tout danger résultant de la réinitialisation par
inadvertance du coupe-circuit thermique, évitez
d’alimenter cet appareil au moyen d’un dispositif de
commutation externe tel qu’une minuterie, ou de le
connecter à un circuit régulièrement mis sous/hors
tension par le réseau public.
• L’usage prévu est décrit dans le présent manuel.
L’utilisation d’un accessoire ou d'une pièce jointe ou
l’exécution de toute opération avec cet appareil autre
que ceux qui sont recommandés dans ce mode d’emploi
peut présenter un risque de blessure.
• Conservez ce manuel à titre de référence.
Utilisation de l’appareil
• Utilisez toujours l’appareil avec précaution.
• Ne l’utilisez pas à l’extérieur.
• N’utilisez pas l’appareil avec les mains mouillées.
N’utilisez pas l’appareil pieds nus.
• Positionnez correctement le cordon d’alimentation de
sorte qu’il ne pende pas du bord d’un plan de travail et
d’éviter tout accrochage et trébuchement accidentels.
• Ne tirez jamais sur le cordon d’alimentation pour
débrancher la fiche du secteur. Maintenez le cordon
d’alimentation à l’écart des sources de chaleur, de l’huile
et des bords tranchants.
• Si le cordon d’alimentation est abîmé, il doit être
remplacé par le fabricant, un agent de service agréé ou
d’autres personnes tout autant qualifiées afin d’éviter
tout danger.
• Débranchez l’appareil de l’alimentation électrique en cas
de non-utilisation et avant de le nettoyer.
Avertissement ! Les cheveux longs et les vêtements amples
peuvent être aspirés à l'arrière du ventilateur.
Avertissement ! Évitez toujours que l'arrière du ventilateur
soit recouvert par des rideaux ou d'autres objets.
Sécurité d’autrui
• Cet appareil n’est pas prévu pour être utilisé par des
personnes (y compris les enfants) présentant des
capacités physiques, sensorielles ou mentales réduites,
ou manquant d’expérience et de connaissances, sans
surveillance ou sans avoir reçu d’instructions concernant
l’utilisation de l’appareil de la part d’une personne
responsable de leur sécurité.
• Les enfants doivent être surveillés pour s’assurer qu’ils
ne jouent pas avec l’appareil.
Après utilisation
• Éteignez et débranchez la fiche du secteur et laissez
l’appareil refroidir avant de le laisser sans surveillance et
avant d’en remplacer, nettoyer ou inspecter les pièces.
• Lorsqu’il n’est pas utilisé, l’appareil doit être rangé à un
endroit sec. L’appareil doit être rangé hors de portée des
enfants.
Inspection et réparations
• Mettez l’appareil hors tension avant de le nettoyer, de
remplacer des accessoires ou d’approcher des pièces
mobiles en cours d’utilisation.
• Veillez toujours à attendre l’arrêt total du moteur avant de
retirer un accessoire ou un couvercle.
• Avant d’utiliser l’appareil, vérifiez qu’aucune pièce n’est
endommagée ou défectueuse. Vérifiez si des pièces ne
sont pas cassées, si les interrupteurs ne sont pas
endommagés, et toutes les autres conditions qui peuvent
affecter son fonctionnement.
• N’utilisez pas l’appareil si une pièce est endommagée ou
défectueuse.
• Faites réparer ou remplacer les pièces endommagées ou
défectueuses par un agent de service agréé.
• Avant l'utilisation, vérifiez que le cordon d'alimentation ne
présente pas de signes de dommages, de vieillissement
et d'usure.
• N’utilisez pas l’appareil si la fiche ou le cordon
d’alimentation est endommagé ou défectueux.
• Si la fiche ou le cordon d’alimentation est endommagé ou
défectueux, sa réparation doit être effectuée par un agent
de réparation agréé afin d’éviter tout danger. Ne coupez
pas le cordon d’alimentation et n’essayez pas de le
réparer par vos propres moyens.
• N’essayez jamais de retirer ou de remplacer des pièces
différentes de celles qui sont indiquées dans le présent
manuel.
11
 Loading...