

Page 1
www.blackanddecker.ae
EF2750
Page 2
ENGLISH
10
8
7
9
11
12
1
2
3
4
5
6
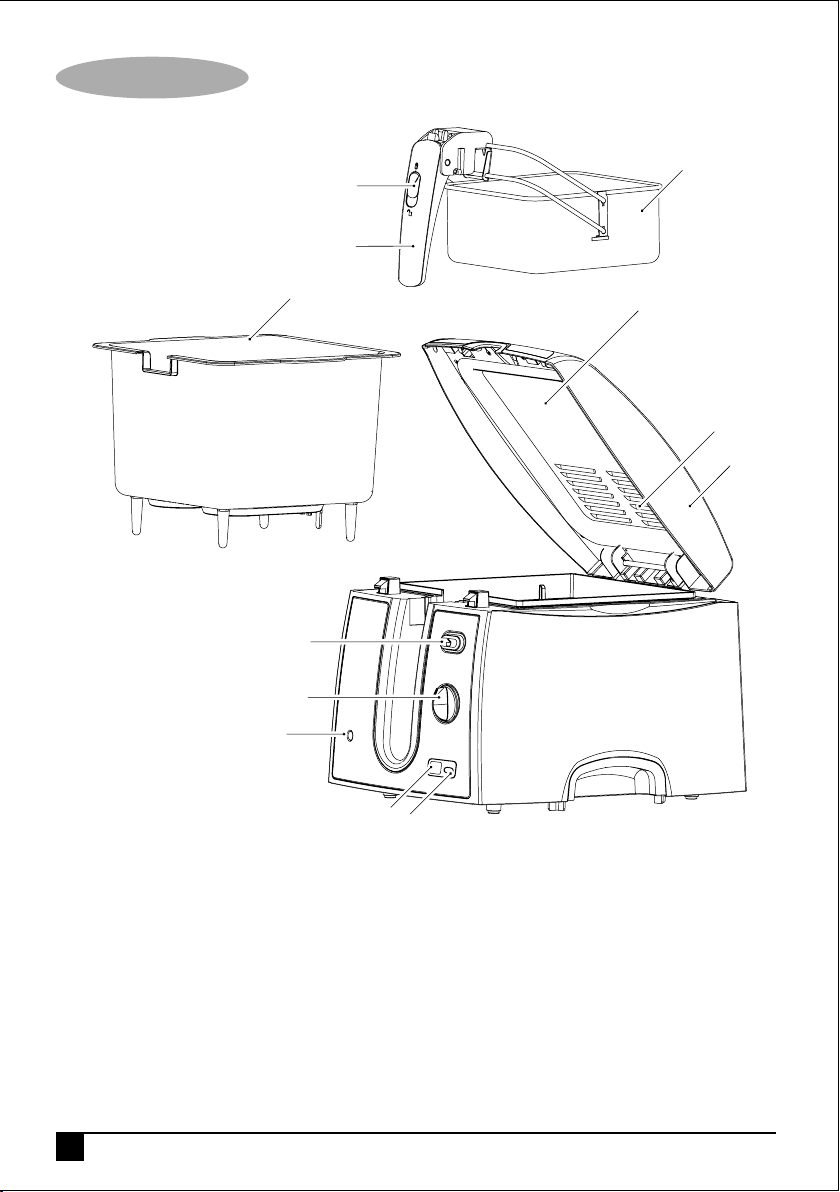
Parts Identification
1. Lid
2. Lid release button
3. On/Off - Temperature dial
4. Temperature indicator
5. Timer
6. Timer set button
2
7. Basket handle
8. Handle release button
9. Cooking bowl
10. Basket
11. Viewing window
12. Filter cover
Page 3

ENGLISH
Intended use
Your Black & Decker Deep Fryer has been
designed for cooking ingredients as listed in the
Frying Guide in this manual. This product is
intended for household use only.
Read this entire manual carefully
before using the appliance.
Safety instructions
Warning! When using mains-powered
appliances, basic safety precautions, including
the following, should always be followed to
reduce the risk of fire, electric shock, personal
injury and material damage.
• The intended use is described in this manual.
The use of any accessory or attachment or
the performance of any operation with this
appliance other than those recommended in
this instruction manual may present a risk of
personal injury.
• Retain this manual for future reference.
• Always route the cord carefully to avoid a
tripping hazard.
• Never operate an appliance directly below
the socket-outlet it is connected to.
Using your appliance
• Make sure that the appliance is switched off
before connecting to or disconnecting from
the power supply.
• Always take care when using the appliance.
• Never pull the power supply cord to
disconnect the plug from the socket.
• Keep the power supply cord away from heat,
oil and sharp edges.
• Surfaces may be hot during use and during
the cool down period.
• Do not operate or place any part of this
appliance on or near any hot surface, such as
gas or electric burner or in a heated oven.
• When using an extension cord with your
appliance, make sure the extension cord is
correctly wire & rated for its use.
Safety of others
• Do not allow the cord set to hang over bench
tops.
• This appliance is not intended for use by
persons (including children) with reduced
physical, sensory or mental capabilities, or
lack of experience and knowledge, unless
they have been given supervision or
instruction concerning use of the appliance by
a person responsible for their safety.
• Do not allow children or any person unfamiliar
with these instructions to use the appliance.
• Do not allow children or animals to come near
the work area or to touch the appliance or
power supply cord. Close supervision is
necessary when the appliance is used near
children.
• Never leave the appliance unattended when
in use.
After use
• Switch off and remove the plug from the
socket before leaving the appliance
unattended and before changing, cleaning or
inspecting any parts of the appliance.
3
Page 4

ENGLISH
• When not in use, the appliance should be
stored in a dry place. Children should not
have access to stored appliances.
Inspection and repairs
• Before use, check the appliance for
damaged or defective parts. Check for
breakage of parts, damage to switches and
any other conditions that may affect its
operation.
• Do not use the appliance if any part is
damaged or defective.
• Have any damaged or defective parts
repaired or replaced by an authorised repair
agent.
• Before use, check the power supply cord for
signs of damage, ageing and wear.
• Do not use the appliance if the power supply
cord or mains plug is damaged or defective.
• If the power supply cord or mains plug is
damaged or defective it must be repaired by
an authorised repair agent in order to avoid a
hazard. Do not cut the power supply cord
and do not attempt to repair it yourself.
• Never attempt to remove or replace any
parts other than those specified in this
manual.
• Do not attempt to repair the appliance. Take
it to your nearest Black & Decker-owned or
authorised Service Centre for repair.
adapter plugs with earthed (Class 1)
appliances. Unmodified plugs and matching
outlets will reduce the risk of electric shock.
Extension cables & Class 1
product
• A 3-core cable must be used as your
appliance is earthed and of Class 1
construction.
• Up to 30m (100ft) can be used without loss of
power.
• If the supply cord is damaged, it must be
replaced by the manufacturer or an
authorized Black & Decker Service Center in
order to avoid a hazard.
Mains plug replacement
If a new mains plug needs to be fitted:
• Safely dispose of the old plug
• Connect the brown lead to the live terminal of
the new plug
• Connect the blue lead to the neutral terminal
• If the product is class I (earthed), connect the
green/yellow lead to the earth terminal.
Note: If your product is class II double insulated
(only 2 wires in the cord set), no connection is to
be made to the earth terminal.
Follow the fitting instructions supplied with good
quality plugs
Electrical safety
• This product must be earthed. Always check
that the power supply corresponds to the
voltage on the rating plate.
• Power plugs must match the outlet. Never
modify the plug in any way. Do not use any
4
Any replacement fuse must be of the same
rating as the original fuse supplied with the
product.
Warning! The above section on mains plug
replacement is for authorized service centre
personals.
Page 5

ENGLISH
Additional safety instructions
for deep fryers
• Do not immerse the appliance, cord set or
plug in liquids
• Never add water or ice to oil
• Do not use solid fats
• Extra care is required when cooking frozen
food
• Only use good quality cooking oil in this fryer
• Always close the lid before lowering the
basket into the hot oil
• Care should be taken when opening the fryer
as hot steam may escape on opening.
• Hot steam may escape from the filter cover
vents during use
• Take care when opening the Fryer lid as hot
steam may escape
• Do not touch hot surfaces such as the bowl,
lid and main body during use or the
cool-down period. Always use the handles or
knobs provided.
• Allow Fryer & oil to cool before carrying or
emptying.
• Surfaces may be hot during use and during
the cool down period.
• Always leave sufficient space around the
fryer for ventilation.
Assembly
This appliance is supplied fully assembled &
only requires parts to be cleaned & oil adding to
the cooking bowl before use.
Lid
• To open the lid (1), press the lid release
button (2).
• Once open, the lid can be removed by
releasing the clips and then lifting it vertically
from the appliance.
• To re-fit the lid, insert the 2 posts into the slot
in the appliance. Close the lid, ensuring it
locks in place.
Basket
• Raise the basket handle (7) until it locks in
the horizontal position.
• Press the lid release button (2) & allow the
lid (1) to open.
• Lift the basket (10) from the Fryer.
• To re-fit the basket, insert the rib on the
basket into the slot in the appliance and
lower into position.
• Close the lid, & press the handle release
button (8). Slowly lower the handle to the
vertical position.
Cooking bowl
• Press the lid release button (2) & allow the
lid (1) to open.
• Lift the basket (10) from the Fryer.
• Grip the bowl (9) at either side & lift it from
the cavity.
• To re-fit, place it back in the cavity, ensuring
the mark on the bowl is matching with mark
on the unit and it is correctly seated. Re-fit
the basket, lower it & close the lid.
5
Page 6

ENGLISH
Use
Adding oil
• Raise the basket handle (7) until it locks in
the horizontal position.
• Press the lid release button (2) & allow the
lid to open.
• Lift the basket (10) from the Fryer.
• Remove the cooking bowl (9).
• Check the element for signs of damage or
debris to prolong the life of the appliance &
improve efficiency.
Note: The bowl should only be removed while
the product is cool.
• Place the cooking bowl back in the appliance
making sure it is seated correctly.
Note: If the cooking bowl is not seated correctly
the fryer will not function.
• Pour good quality cooking oil into the
cooking bowl. Always make sure the oil level
is between the maximum & minimum marks
on the cooking bowl. (Approx 1.65 liters)
Note: Cook only in the bowl supplied.
• Fit the basket into the appliance. Close the
lid & press handle release button to lower
the handle to the vertical position.
Cooking
• Connect the appliance to a suitable electrical
supply.
• Rotate the temperature control (3) to the
required setting, the temperature indicator
lamp (4) will light up to indicate the appliance
is on and the oil is being heated.
• The temperature indicator lamp (4) will go out
the oil is at the selected temperature.
• Preheating the empty basket in this way will
help prevent food sticking to it.
• Raise the handle (7) to the carrying position.
• Press the lid release button (2) & allow the lid
to open.
• Remove the basket & close the lid. Place the
basket on a worktop, using clean cloth or
paper towels to prevent marking the work
surface.
• Place the prepared ingredients in the basket
(10), then open the Fryer lid & fit the basket
to the appliance, slowly lowering into the oil.
Note: Excess moisture should be removed from
ingredients with a clean cloth or paper towels
before frying.
Note: Do not over fill the basket.
• Carefully close the lid, making sure it latches
in position.
• While holding the handle, press the handle
button (8). Slowly lower the handle to the
vertical position.
Note: The temperature indicator lamp (4) will
cycle on and off during cooking. Keep lid (1)
closed during cooking.
• Set the timer by pressing the timer set button
(6) until the required number of minutes is
reached. (The timer increases in increments
of 1 minute up to a maximum of 30 minutes)
When the timer has finished a series of
beeps will be heard, The beeping will be
repeated after 1 minute and can be cancelled
by pressing the timer set button (6).
6
Page 7
ENGLISH
• Use the Frying Guide as a guide to
determine food quantities, temperature
settings and cooking times.
• The cooking progress can be checked by
looking through the viewing window (11).
Note: Hot steam may escape from the filter
vents and lid during cooking.
• When cooking is completed, rotate the
temperature dial (3) to the off position, the
on/off indicator lamp (4) will go out.
Disconnect the appliance from the electrical
supply.
• Raise the basket handle (10) until it locks in
the horizontal position. Press the lid release
button (2) to open the Fryer & remove the
basket, shaking it so any excess oil falls back
into the cooking bowl.
Note: The basket can be positioned onto the
side of the cooking bowl to drain excess oil from
the food.
Frying guide
This frying time given in this chart is only a guide
and should be adjusted according to the quantity
fried.
Food Oil Temp Max. Weight Approx.
(ºC) (Grams) Frying Time
(Minutes)
Shrimp 130 250 3 – 5
Onion Rings 140 150 3 – 4
Mushrooms 140 300 6 – 8
Fish Fillet 150 250 5 – 6
Fish Fillet in Batter 150 400 6 – 8
Fish Cakes or Balls 150 400 7 – 10
Sliced Meat 170 400 7 – 10
Steak 170 400 7 – 10
Chicken Strips 180 400 6 – 10
French Fries 190 500 9 – 12
Practical advice
Oils and fats
• Always use oil that can withstand high
temperature.
• Do not mix different types of oil or fat.
• Change the oil or fat when it becomes brown
after cooking.
Preparing the food
• Whatever the recipe used, the food must be
perfectly dry: this will avoid overflowing and
make the oil or fat last longer.
• When preparing potato-based food (chips,
crisps, etc.), cut them up and then wash them
in cold water to remove the starch. Dry them
carefully. This will stop them sticking
together.
Cooking
• Do not overfill the basket. This will cause the
oil temperature dropping and make the food
greasy.
• Do not keep the oil at high temperature for
long periods. This will deteriorate the oil.
• Set the temperature controller to the lowest
temperature while waiting between two
batches.
• Do not leave the cooked food in the basket in
the draining position too long. The vapors
could cause the food to lose its crispness and
go soft.
• Frozen food can be cooked in the basket
without being defrosted.
After cooking
• Change the fat or oil regularly, after
approximately 10 batches.
7
Page 8

ENGLISH
Maintenance
Your Black & Decker tool has been designed to
operate over a long period of time with a
minimum of maintenance. Continuous
satisfactory operation depends upon proper
care and regular cleaning.
Warning! Before performing any maintenance
or cleaning of the Fryer, disconnect the
appliance from the power supply.
Emptying the Fryer
When the Fryer is cool, pour the old oil from the
coking bowl (9) into a suitable container. Always
follow local regulations concerning the disposal
of used cooking oil.
Replacing the Filter
The filter is fitted to reduce frying odours and
should always be in place when using the Fryer.
Over time, the filters will become less effective
& will need to be replaced.
To replace the filters, remove the filter cover
(12) from the lid. The filter material can now be
removed. Fit the new filter material, making sure
the white filter is down, and the wire mesh is on
top.
B&D recommend replacing the filter after every
50 - 60 uses.
Cleaning
The main housing should be cleaned with a
clean damp cloth only.
Lid & Basket:
basket in warm soapy water. Rinse with clean
water and dry thoroughly with a dry soft cloth.
Cleaning the bowl
Unplug the Fryer & allow the oil to cool to room
temperature. Remove the lid (1), basket (10)
and the cooking bowl (9) from the unit. Pour out
the cool oil and filter it in to a suitable container
using a sieve to filter out food particles from the
oil.
Wipe the oil off with an absorbing paper. Wash
the lid & basket in warm soapy water. Rinse with
clean water and dry thoroughly with a dry soft
cloth.
Note: Do not use abrasives or chemical
cleaners on any part of this appliance.
Do not allow the filters to get wet.
Do not wash any part of this appliance in a
dishwasher.
Always follow local regulations concerning the
disposal of used cooking oil. Ventilation slot
should be cleaned occasionally with a clean, dry
paint brush.
Technical data
EF2750
Voltage 220 – 240 Volts
Supply 50/60 Hz
Power input 1800 W
Cable length 0.77 m
Container size 2.5 litre
Weight 2.8 kg
Remove the lid & basket from the appliance.
Remove the filter from the lid. Wash the lid &
8
Page 9

ENGLISH
Protecting the environment
Separate collection. This product must not
be disposed of with normal household
waste.
Should you find one day that your Black &
Decker product needs replacement, or if it is of
no further use to you, do not dispose of it with
other household waste. Make this product
available for separate collection.
• Black & Decker provides a facility for
recycling Black & Decker products once they
have reached the end of their working life.
This service is provided free of charge. To
take advantage of this service please return
your product to any authorised repair agent
who will collect them on our behalf.
• You can check the location of your nearest
authorised repair agent by contacting your
local Black & Decker office at the address
indicated in this manual. Alternatively, a list of
authorized Black & Decker repair agents and
full details of our after-sales service and
contact are available on the Internet at:
www.2helpU.com.
Warranty
Black & Decker is confident of the quality of its
products and offers an outstanding warranty.
This warranty statement is in addition to and in
no way prejudices your statutory rights.
The warranty is valid within the territories of the
Member States of the European Union and the
European Free Trade Area.
If a Black & Decker product becomes defective
due to faulty materials, workmanship or lack of
conformity, within 24 months from the date of
purchase, Black & Decker warranty to replace
defective parts, repair products subjected to fair
wear and tear or replace such products to ensure
minimum inconvenience to the customer unless:
The product has been used for trade,
professional or hire purposes;
The product has been subjected to misuse
or neglect;
The product has sustained damage
through foreign objects, substances or
accidents;
Repairs have been attempted by persons
other than authorised repair agents or
Black & Decker service staff.
To claim on the warranty, you will need to submit
proof of purchase to the seller or an authorised
repair agent. You can check the location of your
nearest authorised repair agent by contacting
your local Black & Decker office at the address
indicated in this manual.
Alternatively, a list of authorised Black & Decker
repair agents and full details of our after-sales
service and contacts are available on the Internet
at: www.2helpU.com.
9
Page 10

FRANÇAIS
10
8
7
9
11
12
1
2
3
4
5
6
Identification des pièces
1. Couvercle
2. Bouton de déverrouillage du couvercle
3. Marche/Arrêt – Cadran du thermostat
4. Témoin lumineux de température
5. Minuteur
6. Bouton de réglage de la minuterie
10
7. Poignée du panier
8. Bouton de déverrouillage de la poignée
9. Cuve de cuisson
10. Panier
11. Hublot de contrôle
12. Couvercle du filtre
Page 11

FRANÇAIS
Utilisation prévue
Votre friteuse Black & Decker a été conçue pour
cuire des aliments dont la liste figure sur le
Guide de cuisson dans ce manuel. Cet appareil
est uniquement destiné à un usage domestique
à l’intérieur.
Lisez ce manuel attentivement avant
d’utiliser l’appareil.
Consignes de sécurité
Avertissement! Lorsqu’on utilise un appareil
électrique, il faut toujours respecter certaines
règles de sécurité fondamentales, notamment
les suivantes, afin de prévenir les risques
d’incendie, de décharges électriques, de
blessures corporelles et de dommages
matériels.
• Ce manuel décrit la manière d’utiliser cet
appareil. L’utilisation d’un accessoire ou
d’une fixation, ou l’utilisation de cet appareil
à d’autres fins que celles recommandées
dans ce manuel d’instruction peut présenter
un risque de blessures corporelles.
• Conservez ce manuel pour un usage
ultérieur.
• Toujours positionner le cordon d’alimentation
avec soin afin d’éviter les risques de chute.
• Ne jamais faire fonctionner un appareil
directement en-dessous de la prise sur
laquelle il est branché.
Utilisation de votre appareil
• S’assurer que l’appareil est éteint avant de le
brancher ou de le débrancher de
l’alimentation secteur.
• Prendre toutes les précautions nécessaires
pendant l’utilisation de l’appareil.
• Ne jamais tirer sur le cordon d’alimentation
pour débrancher la fiche de la prise.
• Garder le cordon d’alimentation éloigné de
toute source de chaleur, de zones
graisseuses ou de bords tranchants.
• Les surfaces de l’appareil peuvent être
brûlantes pendant le fonctionnement et
pendant le temps de refroidissement.
• Ne pas faire fonctionner l’appareil et ne pas le
placer sur ou à proximité de surfaces
chaudes, tel un brûleur à gaz ou électrique,
ou un four chauffant.
• Lorsque vous utilisez une rallonge avec votre
appareil, assurez-vous que la rallonge soit
bien branchée et adaptée à cet usage.
Sécurité d’autrui
• Ne pas laisser pendre le cordon
d’alimentation sur le rebord d’un plan de
travail.
• Cet appareil ne doit pas être utilisé par des
personnes (y compris les enfants) ayant des
déficiences physiques, sensorielles ou
mentales. Cette consigne s’applique aussi
aux personnes manquant d’expérience ou de
connaissances du matériel, à moins que
celles-ci n’aient reçu les instructions
appropriées ou ne soient encadrées par une
personne responsable de leur sécurité pour
utiliser l’appareil.
• Ne jamais laisser les enfants ni les personnes
non familiarisées avec ces instructions utiliser
l’appareil.
• Ne pas laisser les enfants ni les animaux
s’approcher de la zone de travail, ni toucher
l’appareil ou le cordon d’alimentation. Rester
vigilant lorsque l’appareil fonctionne à
proximité d’enfants.
• Ne jamais laisser l’appareil sans surveillance
pendant son fonctionnement.
Après utilisation
• Eteindre et retirer la fiche de la prise avant de
laisser l’appareil sans surveillance et avant de
changer, nettoyer ou inspecter les éléments
de l’appareil.
11
Page 12

FRANÇAIS
• Lorsque l’appareil n’est pas utilisé, rangez-le
dans un endroit sec. Les enfants ne doivent
pas avoir accès aux appareils rangés.
Inspection et réparations
• Avant l’utilisation, vérifier l’état de l’appareil
et des pièces. Vérifier la présence de pièces
cassées, interrupteurs endommagés ou
toute autre anomalie susceptibles de nuire
au bon fonctionnement de l’appareil.
• Ne pas utiliser l’appareil si un élément est
endommagé ou défectueux.
• Faire réparer ou remplacer toute pièce
endommagée ou défectueuse par un
réparateur agréé.
• Avant l’utilisation, vérifier l’état du cordon
d’alimentation pour des signes de
dommages, de vieillissement ou d’usure.
• Ne pas utiliser l’appareil si le cordon
d’alimentation ou la fiche secteur sont
endommagés ou défectueux.
• Si le cordon d’alimentation ou la fiche
secteur sont endommagés ou défectueux, ils
doivent être réparés par un réparateur agréé
pour éviter les risques d’accident. Ne pas
couper le cordon d’alimentation et ne pas
essayez de le réparer soi-même.
• Ne jamais tenter d’enlever ou de remplacer
des pièces autres que celles citées dans ce
manuel.
• Ne pas tenter de réparer l’appareil. Porter
l’appareil en réparation au Service
après-vente Black & Decker le plus proche
ou un réparateur agréé.
Sécurité électrique
• Cet appareil doit être mis à la terre. Toujours
vérifier que la tension électrique correspond
à celle indiquée sur la plaque signalétique.
• Les fiches électriques doivent correspondre
aux prises de courant. Ne jamais modifier la
fiche en aucune façon. Ne pas utiliser
d’adaptateur avec des appareils mis à la
terre (Classe 1). L’utilisation de fiches
inchangées avec des prises correspondantes
réduit le risque de chocs électriques.
Rallonges et appareils de
classe 1
• Utiliser un cordon à 3 fils car votre appareil
est mis à la terre et de fabrication classe 1.
• Une longueur allant jusqu’à 30m (100pieds)
peut être utilisée sans perte de puissance.
• Si le cordon d’alimentation est endommagé,
il doit être remplacé par le fabricant ou un
Centre de Service agréé Black & Decker afin
d’éviter tout danger.
Remplacement de la fiche
électrique
En cas d’installation d’une nouvelle fiche:
• Jetez l’ancienne fiche avec prudence
• Connectez le fil marron sur la borne sous
tension de la nouvelle fiche
• Connectez le fil bleu sur la borne neutre
• Si l’appareil est de classe I (mis à la terre),
connectez le fil vert/jaune sur la borne terre.
Remarque: Si votre appareil est de classe II
double isolation (seulement 2 fils dans le
cordon), aucune connexion n’est à faire sur la
borne terre. Suivez les instructions de montage
fournies avec les fiches de bonne qualité. Tout
fusible remplacé doit être du même calibre que
le fusible d’origine fourni avec l’appareil.
Avertissement! La section ci-dessus sur le
remplacement de la fiche concerne le personnel
des centres de service agréés.
12
Page 13

FRANÇAIS
Instructions de sécurité
supplémentaires pour les
friteuses
• Ne pas plonger l’appareil, le cordon ou la
prise dans un liquide
• Ne jamais ajouter de l’eau ou de la glace
dans l’huile
• Ne pas utiliser de matières grasses solides
• Faire très attention lors de la cuisson
d’aliments surgelés
• Utiliser uniquement une huile de bonne
qualité dans cette friteuse
• Toujours fermer le couvercle avant
d’abaisser le panier dans l’huile chaude
• Faire attention lors de l’ouverture de la
friteuse car de la vapeur brûlante peut sortir.
• De la vapeur brûlante peut sortir par les
orifices du couvercle du filtre pendant le
fonctionnement de la friteuse.
• Faire attention lors de l’ouverture du
couvercle de la friteuse, de la vapeur
brûlante peut sortir.
• Ne pas toucher les surfaces chaudes,
comme la cuve, le couvercle et le corps
principal de la friteuse pendant le
fonctionnement ou la période de
refroidissement. Toujours utiliser les
poignées ou les boutons prévus à cet effet.
• Laisser refroidir la friteuse et l’huile avant de
la transporter ou de la vider.
• Les surfaces peuvent être brûlantes pendant
le fonctionnement et pendant la période de
refroidissement de la friteuse.
• Toujours laisser un espace suffisant autour
de la friteuse pour la ventilation.
Assemblage
Cet appareil est livré entièrement monté et il est
seulement nécessaire de nettoyer les éléments
et d’ajouter de l’huile dans la cuve avant son
utilisation.
Couvercle
• Pour ouvrir le couvercle (1), appuyez sur le
bouton de déverrouillage du couvercle (2).
• Une fois ouvert, le couvercle peut être retiré
en débloquant les pinces puis tiré vers le
haut
• Pour remettre le couvercle, insérer les 2
pattes dans la fente de l’appareil. Fermer le
couvercle et s’assurer qu’il se verrouille en
place.
Panier
• Relever la poignée du panier (7) jusqu’à ce
qu’elle se verrouille en position horizontale.
• Appuyer sur le bouton de déverrouillage du
couvercle (2) et laisser le couvercle (1)
s’ouvrir.
• Soulever le panier (10) hors de la friteuse.
• Pour remettre le panier, insérer la nervure du
panier dans la fente de l’appareil et
l’abaisser pour le mettre en place.
• Fermer le couvercle et appuyer sur le bouton
de déverrouillage de la poignée (8). Abaisser
lentement la poignée en position verticale.
Cuve de cuisson
• Appuyer sur le bouton de déverrouillage du
couvercle (2) et laisser le couvercle (1)
s’ouvrir.
• Soulever le panier (10) hors de la friteuse.
• Tenir la cuve (9) de chaque côté et la
soulever hors de la cavité.
• Pour la réinstaller, l’insérer dans la cavité, en
veillant à ce que le repère sur la cuve
coïncide avec le repère sur l’appareil et
qu’elle soit correctement positionnée.
Remettre le panier, l’abaisser et fermer le
couvercle.
13
Page 14

FRANÇAIS
Utilisation
Ajouter de l’huile
• Relever la poignée du panier (7) jusqu’à ce
qu’elle se verrouille en position horizontale.
• Appuyer sur le bouton de déverrouillage du
couvercle (2) et laisser le couvercle (1)
s’ouvrir.
• Soulever le panier (10) hors de la friteuse.
• Retirer la cuve de cuisson (9).
• Vérifier l’élément pour des signes de
dommage ou de casse afin de prolonger le
temps de vie de l’appareil et améliorer son
efficacité.
Remarque: La cuve ne doit être retirée que
lorsque l’appareil est froid.
• Replacer la cuve de cuisson dans l’appareil
en s’assurant qu’elle est correctement
positionnée.
Remarque: Si la cuve de cuisson n’est pas
correctement placée, la friteuse ne fonctionnera
pas.
• Verser une huile de bonne qualité dans la
cuve de cuisson. S’assurer que le niveau
d’huile se situe entre les repères maximum
et minimum de la cuve de cuisson. (Environ
1,65 litre)
Remarque: Frire uniquement dans la cuve
fournie.
• Mettre le panier dans l’appareil. Fermer le
couvercle et appuyer sur le bouton de
déverrouillage de la poignée en positon
verticale.
Cuisson
• Brancher l’appareil à une prise électrique
adaptée.
• Tourner le cadran du thermostat (3) sur la
température souhaitée, le témoin lumineux
de température (4) s’allume pour indiquer
que l’appareil est en fonctionnement et que
l’huile est en phase de chauffage.
14
• Le témoin lumineux de température (4)
s’éteint lorsque l’huile a atteint la température
souhaitée.
• Le fait de préchauffer ainsi le panier vide
permet d’éviter aux aliments de coller au
panier.
• Soulever la poignée (7) en position de
transport.
• Appuyer sur le bouton de déverrouillage du
couvercle (2) et le laisser s’ouvrir.
• Retirer le panier et fermer le couvercle.
Poser le panier sur le plan de travail, utiliser
un torchon propre ou du papier absorbant
pour éviter de faire des marques sur le plan
de travail.
• Placer les aliments préparés dans le panier
(10), puis ouvrir le couvercle de la friteuse et
insérer le panier dans l’appareil en
l’abaissant lentement dans l’huile.
Remarque: Essuyer les aliments avec un
torchon propre ou du papier absorbant pour
enlever l’excès d’humidité avant de les frire.
Remarque: Ne pas surcharger le panier.
• Fermer soigneusement le couvercle, en
veillant à le verrouiller en place.
• Tout en maintenant la poignée, appuyer sur
le bouton de déverrouillage de la poignée (8).
Abaisser lentement la poignée en position
verticale.
Remarque: Le témoin lumineux de température
(4) s’allumera et s’éteindra pendant la cuisson.
Garder le couvercle (1) fermé pendant la
cuisson.
• Régler la minuterie en appuyant sur le
bouton de réglage de la minuterie (6) jusqu’à
atteindre le nombre de minutes souhaité (la
minuterie augmente le temps par intervalles
de 1 minute jusqu’à 30 minutes). Lorsque le
temps est écoulé la minuterie émettra une
série de bips, Le bip se répète après 1
minute et peut être annulé en appuyant sur le
bouton de réglage de la minuterie (6).
Page 15

FRANÇAIS
• Utiliser le Guide de cuisson à titre
d’indication pour déterminer la quantité des
aliments, les températures et les temps de
cuisson.
• La progression de la cuisson peut être suivie
en regardant par le hublot de contrôle (11).
Remarque: De la vapeur brûlante peut
s’échapper par les orifices du filtre et du
couvercle pendant la cuisson.
• Lorsque la cuisson est terminée, tourner le
cadran du thermostat (3) sur la position arrêt,
le témoin lumineux de température (4)
s’éteindra. Débrancher l’appareil de
l’alimentation secteur.
• Soulever la poignée du panier (10) jusqu’à
son verrouillage en position horizontale.
Appuyer sur le bouton de déverrouillage du
couvercle (2) pour ouvrir la friteuse et
enlever le panier en le secouant pour faire
tomber l’excès d’huile dans la cuve de
cuisson.
Remarque: Le panier peut être accroché sur le
côté de la cuve de cuisson pour laisser l’excès
d’huile s’égoutter des aliments.
Guide de cuisson
Les temps de cuisson donnés dans ce tableau
sont approximatifs et doivent être adaptés en
fonction de la quantité des aliments à frire.
Aliment Température Poids Temps de
de l’huile maximum cuisson moyen
(ºC) (grammes) (Minutes)
Crevettes 130 250 3 – 5
Rondelles d’oignon 140 150 3 – 4
Champignons 140 300 6 – 8
Filets de poisson 150 250 5 – 6
Filets de poisson panés 150 400 6 – 8
Beignets ou boulettes
de poisson 150 400 7 – 10
Viande en tranches 170 400 7 – 10
Steak 170 400 7 – 10
Lanières de poulet 180 400 6 – 10
Frites 190 500 9 – 12
Conseils pratiques
Huiles et graisses
• Toujours utiliser une huile pouvant résister à
des températures élevées.
• Ne pas mélanger différents types d’huile ou
de graisse.
• Changer l’huile ou la graisse lorsqu’elle
devient brune après la cuisson.
Préparation des aliments
• Quelle que soit la recette utilisée, les aliments
doivent être parfaitement séchés: cela évite
les projections d’huile et permet à l’huile ou à
la graisse de durer plus longtemps.
• Pour les préparations à base de pomme de
terre (frites, chips, etc.), laver les pommes de
terre à l’eau froide après les avoir coupées
pour éliminer l’amidon. Séchez-les
soigneusement. Cela permet d’empêcher
qu’elles collent entre elles.
Cuisson
• Ne pas surcharger le panier. Cela entrainerait
une baisse soudaine de la température de
l’huile et donc une friture top grasse.
• Ne pas garder l’huile à haute température
pendant de longues périodes. Cela
détériorerait l’huile.
• Régler le thermostat sur la plus basse
température entre deux cuissons.
• Ne pas laisser égoutter les aliments cuits trop
longtemps dans le panier. Les aliments
perdraient leur croustillant et se ramolliraient
à cause des vapeurs.
• Les aliments surgelés peuvent être cuits dans
le panier sans décongélation préalable.
Après la cuisson
• Changer la graisse ou l’huile régulièrement,
après 10 utilisations environ.
15
Page 16

FRANÇAIS
Entretien
Votre appareil Black & Decker a été conçu pour
fonctionner pendant longtemps avec un
minimum d’entretien. Un fonctionnement
satisfaisant dans la durée dépend du soin
apporté et d’un nettoyage régulier.
Avertissement! Avant d’effectuer toute
opération d’entretien ou de nettoyage,
débrancher la friteuse de l’alimentation secteur.
Vider la friteuse
Lorsque la friteuse est froide, vider l’huile
usagée de la cuve de cuisson (9) dans un
récipient adapté. Toujours suivre la
réglementation locale en matière d’élimination
des huiles de cuisson usagées.
Remplacer le filtre
Le filtre est conçu pour réduire les odeurs de
friture et doit toujours être installé dans la
friteuse avant toute utilisation.
Avec le temps, les filtres perdent de leur
efficacité et doivent être remplacés.
Pour remplacer les filtres, retirer le couvercle du
filtre (12) du couvercle. Le filtre peut alors être
enlevé. Mettre un nouveau filtre, en veillant à
placer le côté blanc du filtre en dessous et le
treillis métallique dessus. B&D recommande de
remplacer le filtre après 50 à 60 utilisations.
Nettoyage
Nettoyer le corps principal de l’appareil
uniquement avec un chiffon humide.
Couvercle et panier:
Enlever le couvercle et le panier de l’appareil.
Enlever le filtre du couvercle. Laver le couvercle
et le panier à l’eau chaude savonneuse. Rincer
à l’eau claire et sécher soigneusement avec un
chiffon doux.
Nettoyage de la cuve
Débrancher la friteuse et laisser l’huile refroidir à
température ambiante. Enlever le couvercle (1),
le panier (10) et la cuve de cuisson (9) de
l’appareil. Vider l’huile froide et la filtrer dans un
récipient approprié en utilisant un tamis pour
filtrer les particules alimentaires présentes dans
l’huile.
Essuyer les dépôts huileux avec du papier
absorbant. Laver le couvercle dans de l’eau
chaude savonneuse. Rincer à l’eau claire et
sécher soigneusement avec un chiffon doux.
Remarque: Ne pas utiliser de produits abrasifs
ou de nettoyants chimiques sur aucune partie de
l’appareil.
Ne pas laisser les filtres se mouiller.
Ne laver aucune partie de l’appareil dans un
lave-vaisselle.
Toujours suivre la réglementation locale
concernant l’élimination d’huiles de cuisson
usagées. Les orifices de ventilation doivent être
nettoyés de temps en temps avec un pinceau
propre et sec.
Données techniques
EF2750
Tension 220 – 240 Volts
Courant d’alimentation 50/60 Hz
Puissance nominale 1800 W
Longueur du cordon 0,77 m
Capacité de la cuve 2,5 litres
Poids 2,8 kg
16
Page 17

FRANÇAIS
Protection de l'environnement
Collecte séparée. Ce produit ne doit
pas être jeté avec les déchets
domestiques normaux.
Si vous décidez de remplacer ce produit Black &
Decker, ou si vous n'en avez plus l'utilité, ne le
jetez pas avec vos déchets domestiques
Rendez-le disponible pour une collecte séparée.
• Black & Decker fournit un dispositif
permettant de collecter et de recycler les
produits Black & Decker lorsqu'ils ont atteint
la fin de leur cycle de vie. Pour pouvoir
profiter de ce service, veuillez retourner votre
produit à un réparateur agréé qui se chargera
de le collecter pour nous.
• Pour connaître l'adresse du réparateur agréé
le plus proche de chez vous, contactez le
bureau Black & Decker à l'adresse indiquée
dans ce manuel. Vous pourrez aussi trouvez
un liste des réparateurs agréés de Black &
Decker et de plus amples détails sur notre
service après-vente sur le site Internet à
l'adresse suivante : www.2helpU.com
Garantie
Black & Decker est confiant dans la qualité de
ses produits et vous offre une garantie très
étendue.
Ce certificat de garantie est un document
supplémentaire et ne peut en aucun cas se
substituer à vos droits légaux.
La garantie est valable sur tout le territoire des
Etats Membres de l'Union Européenne et de la
Zone de Libre Echange Européenne.
Si un produit Black & Decker s'avère défectueux
en raison de matériaux en mauvaises conditions,
d'une erreur humaine, ou d'un manque de
conformité dans les 24 mois suivant la date
d'achat, Black & Decker garantit le remplacement
des pièces défectueuses, la réparation des
produits usés ou cassés ou remplace ces
produits à la convenance du client, sauf dans les
circonstances suivantes :
Le produit a été utilisé dans un but
commercial, professionnel, ou a été loué.
Le produit a été mal utilisé ou avec
négligence.
Le produit a subi des dommages à cause
d'objets étrangers, de substances ou à
cause d'accidents.
Des réparations ont été tentées par des
techniciens ne faisant pas partie du
service technique de Black & Decker.
Pour avoir recours à la garantie, il est nécessaire
de fournir une preuve d'achat au vendeur ou à un
réparateur agréé. Pour connaître l'adresse du
réparateur agréé le plus proche de chez vous,
contactez le bureau Black & Decker à l'adresse
indiquée dans ce manuel.
Vous pourrez aussi trouver une liste des
réparateurs agréés de Black & Decker et de plus
amples détails sur notre service après-vente sur
le site Internet à l'adresse suivante :
www.2helpU.com
17
Page 18

ARABIC
¿Éª°†dG
Ékfɪ°V ¢Vô©Jh É¡JÉéàæe IOƒL ‘ ôµjO ófBG ∑ÓH ≥ãJ
.πLC’G πjƒW
»àdG ∂bƒ≤M ¤EG áaÉ°VE’ÉH ¿ƒµj Gòg ¿Éª°†dG ¿É«H
.∫GƒMC’G øe ∫ÉM …CÉH É¡H πîj ’h ¿ƒfÉ≤dG É¡ëæÁ
OÉ–’G ‘ AÉ°†YC’G ∫hódG º«dÉbCG ‘ ¿Éª°†dG …öùj
.á«HhQhC’G Iô◊G IQÉéàdG á≤£æeh »HhQhC’G
‘ Ö«Y ÖÑ°ùH ôµjO ófBG ∑ÓH èàæe ‘ π∏N OƒLh ádÉM ‘
24 ∫ÓN ,ÒjÉ©ŸG ™e ≥aGƒàdG ΩóY hCG áYÉæ°üdG hCG OGƒŸG
∫GóÑà°SG ôµjO ófBG ∑ÓH øª°†J ,AGöûdG ïjQÉJ øe Gkô¡°T
πcBЙаdG IЙYGфe ™e дЙйажŸG мУ°UEGh бС«©ŸG AGхLC’G
πbCG ¿Йª°†d дЙйажŸG √тg ∫GуСа°SG hCG »©«С£dG ≈∏СdGh
:⁄ Ée 𫪩∏d êÉYREG
;ÒLCÉJ ¢VGôZCG
;çOGƒM hCG
™HÉàdG áfÉ«°üdG ≥jôa hCG øjóªà©ŸG áfÉ«°üdG AÓch
.ôµjO ófBG ∑ÓH ácöûd
Ëó≤J ¤EG êÉà– ±ƒ°S ,¿Éª°†dG ÖLƒÃ áÑdÉ£e Ëó≤àd
∂æµÁh .óªà©ŸG áfÉ«°üdG π«ch hCG ™FÉÑ∏d AGöûdG π«dO
∫ÓN øe óªà©e áfÉ«°U π«ch ÜôbCG ™bƒe ≈∏Y ±ô©àdG
¿Gƒæ©dG ‘ »∏ëŸG ôµjO ófBG ∑ÓH Öàµe ≈∏Y ∫É°üJ’G
.π«dódG Gòg ‘ í°VƒŸG
áÄ«ÑdG ájɪM
Gòg øe ¢ü∏îàdG ΩóY Ωõ∏j .π°üØæŸG ™ª÷G
.ájOÉ©dG á«dõæŸG áeɪ≤dG ™e èàæŸG
ôµjO ófBG ∑ÓH èàæe ∫GóÑà°SG ΩÉjC’G øe Ωƒj ‘ Ωõd GPEG
™e ¬æe ¢ü∏îàJ Óa ,¬eóîà°ùJ ó©J ⁄ GPEG hCG ,∂H ¢UÉÿG
èàæŸG Gòg áMÉJEG øe ócCÉJ πH ,iôNC’G á«dõæŸG áeɪ≤dG
.π°üØæŸG ™ªé∏d
ôjhóJ IOÉYE’ ≥aôe ôµjO ófBG ∑ÓH ácöT ôaƒJ
бjЙ¡f ¤EG Й¡dƒ°Uh OфйГ фµjO уfBG ∑УH дЙйажe
√òg Ëó≤J ºàjh .πª©∏d É¡à«MÓ°U ΩóYh ÉgôªY
hCG á«æ¡e hCG ájQÉŒ ¢VGôZCG ‘ èàæŸG ΩGóîà°SG ºàj
≈Lôj ,áeóÿG √òg øe IOÉØà°SÓd .ÉkfÉ› áeóÿG
±ƒ°S …òdGh óªà©e áfÉ«°U π«ch …CG ¤EG èàæŸG IOÉYEG
;∫ɪgE’G hCG ΩGóîà°S’G Aƒ°ùd èàæŸG ¢Vô©àj
áÑjôZ OGƒe hCG AÉ«°TCG áé«àf ∞∏à∏d èàæŸG ¢Vô©àj
óªà©e áfÉ«°U π«ch ÜôbCG ™bƒe ≈∏Y ±ô©àdG ∂æµÁ
ÒZ ¢UÉî°TCG ᣰSGƒH èàæŸG ìÓ°UEG ádhÉfi ºàj
»∏ëŸG ôµjO ófBG ∑ÓH Öàµe ≈∏Y ∫É°üJ’G ∫ÓN øe
,∂dP øe k’óHh .π«dódG Gòg ‘ í°VƒŸG ¿Gƒæ©dG ‘
Ú©HÉàdG øjóªà©ŸG áfÉ«°üdG AÓcƒH áªFÉb óLƒJ
Ée äÉeóÿ á∏eɵdG π«°UÉØàdGh ôµjO ófBG ∑ÓH ácöûd
âfÎfE’G ≈∏Y ÉæH á°UÉÿG ∫É°üJ’G πFÉ°Shh ™«ÑdG ó©H
.www.2helpU.com :ÊhεdE’G ™bƒŸG ≈∏Y
.ЙжY бHЙ«f дЙйажŸG ™ªL √QhуH ¤ƒаj
•
•
øjóªà©ŸG áfÉ«°üdG AÓcƒH áªFÉb óLƒJ ,∂dP øe k’óHh
äÉeóÿ á∏eɵdG π«°UÉØàdGh ôµjO ófBG ∑ÓH ácöûd Ú©HÉàdG
âfÎfE’G ≈∏Y ÉæH á°UÉÿG ∫É°üJ’G πFÉ°Shh ™«ÑdG ó©H Ée
.www.2helpU.com :ÊhεdE’G ™bƒŸG ≈∏Y
18
Page 19

ARABIC
.áaÉL áªYÉf ¢Tɪb á©£b
»¡£dG AÉYh ∞«¶æJ
OÈj ≈àM âjõdG ∑ôJGh AÉHô¡µdG Qó°üe øY IÓ≤ŸG π°üaG
(10) á∏°ùdGh (1) AÉ£¨dG ∫RCG .áaô¨dG IQGôM áLQO iƒà°ùŸ
‘ OQÉÑdG âjõdG Ö°üH ºb .IóMƒdG øe (9) »¡£dG AÉYhh
ΩÉ©£dG ÉjÉ≤H øe ¢ü∏îà∏d IÉØ°üe ∫ÓN Ö°SÉæe AÉYh
.¬H IOƒLƒŸG
AÉ£¨dG π°ùZG .∞«°ûæJ ¥Qh ΩGóîà°SÉH âjõdG ôKCG í°ùeG
∂dP ó©H ɪ¡Ø£°ûH ºb ºK ,IƒZôdG Òãc ÅaGO AÉe ‘ á∏°ùdGh
áªYÉf ¢Tɪb á©£b ΩGóîà°SÉH kGó«L ɪ¡Ø«ØŒh ∞«¶f AÉÃ
.áaÉL
ájhɪ«µdG äÉضæŸG hCG ᣰTɵdG OGƒŸG Ωóîà°ùJ ’ :á¶MÓe
.RÉ¡÷G Gòg ‘ AõL …CG ™e
.Î∏ØdG ¤EG AÉŸG ∫ƒ°UƒH íª°ùJ ’
.¥ÉÑWC’G ádÉ°ùZ ‘ RÉ¡÷G Gòg øe AõL …CG π°ù¨J ’
âjR øe ¢ü∏îàdÉH á°UÉÿG á«∏ëŸG íFGƒ∏dG ÉkªFGO ™ÑJG
ΩɶàfÉH ájƒ¡àdG äÉëàa ∞«¶æJ »¨Ñæj .Ωóîà°ùŸG »¡£dG
.áØ«¶f áaÉL IÉ°Tôa ΩGóîà°SÉH
áfÉ«°üdG
øe á∏jƒW IÎØd 𫨰ûà∏d ôµjO ófBG ∑ÓH IGOCG º«ª°üJ ”
πµ°ûH RÉ¡÷G πªY ∞bƒàj .áfÉ«°üdG øe Qób πbCÉHh âbƒdG
∞«¶æàdGh ºFÓŸG ΩGóîà°S’G ≈∏Y QGôªà°SÉH »°Vôe
.…QhódG
hCG ¬Ø«¶æJ πÑb AÉHô¡µdG Qó°üe øY RÉ¡÷G π°üaG !ôjò–
.¬d áfÉ«°U ájCG AGôLEG
IÓ≤ŸG ≠jôØJ
(9) »¡£dG AÉYh øe âjõdG Öµ°ùH ºb ,IÓ≤ŸG OÈJ ÉeóæY
á°UÉÿG á«∏ëŸG íFGƒ∏dG ÉkªFGO ™ÑJG .ºFÓe AÉYh ‘
.Ωóîà°ùŸG »¡£dG âjR øe ¢ü∏îàdÉH
Î∏ØdG ∫GóÑà°SG
»∏≤dG øe áã©ÑæŸG íFGhôdG π«∏≤àd Î∏ØdG Gòg Ö«côJ ºàj
.IÓ≤ŸG ΩGóîà°SG óæY ¬fɵe ‘ ¿ƒµj ¿CG Öéjh
.¬dGóÑà°SG òÄæ«M Ú©àjh Î∏ØdG á«dÉ©a π≤J ,âbƒdG QhôÃh
,AÉ£¨dG øe (12) Î∏ØdG AÉ£Z ádGREÉH ºb ,Î∏ØdG ∫GóÑà°S’h
™e ójó÷G Î∏ØdG Ö«cÎH ºb .Î∏ØdG ádGREG ∂æµÁ òÄæ«Mh
áµÑ°ûdGh πØ°SC’G á«MÉf ¢†«HC’G Î∏ØdG ¿CG øe ócCÉàdG
.≈∏YC’G á«MÉf ᫵∏°ùdG
á«æØdG äÉfÉ«ÑdG
EF2750
âdƒa 240-220 ó¡÷G
õJôg 60/50 OOÎdG
äGh 1800 ábÉ£dG
Ω 0^77 ∂∏°ùdG ∫ƒW
Îd 2^5 AÉYƒdG ºéM
ºéc 2^8 ¿RƒdG
60 ¤EG 50 øe ó©H Î∏ØdG Ò«¨àH ôµjO ófBG ∑ÓH »°UƒJ
.ΩGóîà°SG
∞«¶æàdG
á©£b ΩGóîà°SÉH »°ù«FôdG …hÉ◊G AÉYƒdG ∞«¶æJ »¨Ñæj
.áØ«¶f á∏∏Ñe ¢Tɪb
á∏°ùdGh AÉ£¨dG
.AÉ£¨dG øe Î∏ØdG ∫RCG .IóMƒdG øe á∏°ùdGh AÉ£¨dG ádGREÉH ºb
ºb ºK ,IƒZôdG Òãc ÅaGO AÉe ‘ á∏°ùdGh AÉ£¨dG π°ùZG
ΩGóîà°SÉH kGó«L ɪ¡Ø«ØŒh ∞«¶f AÉà ∂dP ó©H ɪ¡Ø£°ûH
19
Page 20

ARABIC
á«∏ªY íFÉ°üf
øª°ùdGh âjõdG
äÉLQO πª– É¡æµÁ »àdG äƒjõdG k ɪFGO Ωóîà°SG •
.á«dÉ©dG IQGô◊G
.øª°ùdG hCG âjõdG øe áØ∏àfl kÉYGƒfCG êõ“ ’ •
»æÑdG ¿ƒ∏dG ¤EG ¬dƒ– óæY øª°ùdG hCG âjõdG Ò«¨àH ºb •
.»¡£dG ó©H
ΩÉ©£dG OGóYEG
ΩÉ©£dG áØ°Uh âfÉc ɪ¡e kÉaÉL ΩÉ©£dG ¿ƒµj ¿CG Öéj •
Ióe ádÉWEGh óFGõdG ≥aóàdG Öæéàd ∂dPh ,É¡eóîà°ùJ »àdG
.øª°ùdG hCG âjõdG ΩGóîà°SG
≈∏Y »°SÉ°SCG πµ°ûH …ƒàëj …òdG ΩÉ©£dG OGóYEG óæY •
™«£≤àH ºb ,(ïdG...ÉWÉ£ÑdG ™HÉ°UCG hCG íFGöT) ÉWÉ£ÑdG
ºb .É¡æe É°ûædG ádGRE’ OQÉH AÉà k’hCG É¡∏°ùZh ÉWÉ£ÑdG
É¡bÉ°üàdG ΩóY øª°†J ∂dòHh .¢UôëH É¡Ø«ØéàH
.»¡£dG óæY É¡°†©ÑH
»¡£dG
‘ ∂dP ÖÑ°ùàj å«M ∫ƒ≤©ŸG ó◊G ¥ƒa á∏°ùdG CÓ“ ’ •
.âjõdÉH ΩÉ©£dG ™Ñ°ûJh âjõdG IQGôM áLQO •ƒÑg
å«M á∏jƒW IóŸ á©ØJôe âjõdG IQGôM áLQO ∑ÎJ ’ •
.âjõdG IOƒL ¢†ØN ¤EG ∂dP …ODƒj
áLQO πbCG ≈∏Y IQGô◊G áLQO ‘ ºµëàdG ¢Uôb §Ñ°VG •
äÉfƒµe áYƒª› πc ÚH Qɶàf’G IÎa AÉæKCG IQGôM
.É¡àaÉ°VEG ºàj
IóŸ á«Ø°üàdG ™°VƒH á∏°ùdG ‘ ó©ŸG ΩÉ©£dG ∑ÎJ ’ •
¬à°TÉ°ûg ΩÉ©£dG ó≤Øj ¿CG ¤EG QÉîÑdG …ODƒj ób .á∏jƒW
.kÉjôW íÑ°üjh
¿hO á∏°ùdG ‘ IöTÉÑe óªéŸG ΩÉ©£dG »¡W øµÁ •
.¬Ñjhòàd áLÉ◊G
»¡£dG ó©H
Ée ó©H ᪶àæe IQƒ°üH øª°ùdG hCG âjõdG Ò«¨àH ºb •
.ΩÉ©£dG øe äÉ©aO öûY øe Üô≤j
äÉfƒµŸG ᫪c áaô©Ÿ ∂d ó°Tôªc »∏≤dG π«dO Ωóîà°SG •
.»∏≤dG Ióe ójó–h áÑ°SÉæŸG IQGô◊G áLQO §Ñ°Vh
IòaÉf ÈY ô¶ædG ≥jôW øY »¡£dG Ò°S á©HÉàe ∂æµÁ •
.(11) IógÉ°ûŸG
äÉëàa øe »¡£dG AÉæKCG øNÉ°S QÉîH Üöùàj ób :á¶MÓe
.AÉ£¨dG hCG Î∏ØdG
áLQO ‘ ºµëàdG ¢Uôb QOG ,»¡£dG øe AÉ¡àf’G óæY •
,(OFF) 𫨰ûàdG ±É≤jEG ™°Vh ¤EG (3) IQGô◊G
.(4) ±É≤jE’G/𫨰ûàdG öTDƒe ìÉÑ°üe ÅØ£æj ±ƒ°Sh
.AÉHô¡µdG Qó°üe øY RÉ¡÷G π°üaG
.»≤aCG ™°Vh ‘ É¡∏Øb ºàj ≈àM (10) á∏°ùdG ój ™aQG •
êôNCG .IÓ≤ŸG íàa ºà«d (2) AÉ£¨dG ôjô– QR §¨°VG
âjõdG É¡æe §bÉ°ùà«d Égõ¡H ºbh IÓ≤ŸG øe á∏°ùdG
.iôNCG Iôe »¡£dG AÉYh ¤EG óFGõdG
»¡£dG AÉYh ÖfÉL ≈∏Y á∏°ùdG ™°Vh øµÁ :á¶MÓe
.óFGõdG âjõdG øe ΩÉ©£dG á«Ø°üàd
»∏≤dG π«dO
¤EG §≤a ±ó¡J ∫hó÷G Gòg ‘ IQƒcòŸG »¡£dG äÉbhCG
.É¡«∏b ܃∏£ŸG ᪩WC’G ᫪c ≥ah É¡£Ñ°V Ωõ∏jh OÉ°TQE’G
»∏≤dG âbh ¿Rh ≈°übCG IQGôM áLQO ΩÉ©£dG
(≥FÉbO) »Ñjô≤àdG (ΩGôL) (rΩ) âjõdG
5 ¤EG 3 250 130 ¿É«HhQ
4 ¤EG 3 150 140 π°üH äÉ≤∏M
8 ¤EG 6 300 140 ô£a
6 ¤EG 5 250 150 ∂ª°S íFGöT
á£∏N ™e ∂ª°S íFGöT
8 ¤EG 6 400 150 äÉ«∏≤ŸG á∏«ÑàJ
10 ¤EG 7 400 150 ∂ª°ùdG äGôc hCG ™£b
10 ¤EG 7 400 170 º◊ íFGöT
10 ¤EG 7 400 170 ∂«à°S
10 ¤EG 6 400 180 êÉLO ™£b
12 ¤EG 9 500 190 á«∏≤e ÉWÉ£H
20
Page 21

ARABIC
.áHƒ∏£ŸG IQGô◊G áLQO
πÑb á«Ø«µdG √ò¡H âjõ∏d ≥Ñ°ùŸG Úî°ùàdG á«∏ªY øª°†J
.á∏°ùdÉH ᪩WC’G ¥É°üàdG ΩóY ᪩WC’G áaÉ°VEG
.πª◊G ™°Vh ¤EG (7) ó«dG ™aQG •
.íàØæ«d AÉ£¨dG ∑ôJGh (2) AÉ£¨dG ôjô– QR ≈∏Y §¨°VG •
ádhÉW ¥ƒa á∏°ùdG ™°V .AÉ£¨dG ≥∏ZCGh á∏°ùdG êôNCG •
•ƒa hCG áØ«¶f á°ûªbCG ΩGóîà°SG IÉYGôe ™e ïÑ£ŸG
.ádhÉ£dG í£°S ¥ƒa äÉeÓY …CG ∑ôJ Ωó©d á«bQh
íàaG ºK ,(10) á∏°ùdG πNGO IõgÉ÷G äÉfƒµŸG ™°V •
‘ A§ÑH É¡©°VƒH ºbh á∏°ùdG Ö«cÎH ºbh IÓ≤ŸG AÉ£Z
.âjõdG
á°ûªbCG ᪩WC’G øe IóFGõdG áHƒWôdG ádGREÉH ºb :á¶MÓe
.øNÉ°ùdG âjõdG ¤EG É¡àaÉ°VEG πÑb á«bQh •ƒa hCG áØ«¶f
.É¡d Ö°SÉæŸG ó◊G RhÉéàj Éà á∏°ùdG áÄÑ©àH º≤J ’ :á¶MÓe
.¬©bƒe ‘ ¬à«ÑãJ øe ócCÉàdG ™e ¢UôëH AÉ£¨dG ≥∏ZCG •
¢†ØîH ºb .(8) ó«dG QR §¨°VG ,ó«dÉH ∑É°ùeE’G AÉæKCG •
.»°SCGôdG ™°VƒdG ¤EG A§ÑH ó«dG
öTDƒe ìÉÑ°üe A»°†j ±ƒ°S ,»¡£dG Ióe AÉæKCG :á¶MÓe
¥ÓZEG øe ócCÉJ .ôNB’ ÚM øe ÅØ£æjh IQGô◊G áLQO
.»¡£dG AÉæKCG kGó«L AÉ£¨dG
âbDƒŸG §Ñ°V QR ≈∏Y §¨°†dG ≥jôW øY âbDƒŸG §Ñ°VG •
IOÉjR øµÁ) .áHƒ∏£ŸG ≥FÉbódG OóY ¤EG k’ƒ°Uh (6)
á≤«bO ÚKÓK ≈àMh IóMGh á≤«bO øe ≥FÉbódG OóY
™ª°ùà°S ,OóëŸG â«bƒàdG AÉ¡àfG óæYh (≈°übCG óëc
Gòg Qôµàj ±ƒ°Sh ,á«dÉààŸG äGQÉØ°üdG øe áYƒª›
≈∏Y §¨°†dÉH √DhɨdEG øµÁh IóMGh á≤«bO ó©H 䃰üdG
.(6) âbDƒŸG §Ñ°V QR
ΩGóîà°S’G
.»≤aCG ™°Vh ‘ É¡∏Øb ºàj ≈àM (7) á∏°ùdG ój ™aQG •
.íàØ«d (1) AÉ£¨dG ∑ôJGh (2) AÉ£¨dG ôjô– QR §¨°VG •
.IÓ≤ŸG øe (10) á∏°ùdG êôNCG •
.(9) »¡£dG AÉYh êôNCG •
ádÉWE’ öùc hCG ∞∏J äÉeÓY …CG OƒLh ΩóY øe ≥≤– •
.¬JAÉØc õjõ©Jh RÉ¡÷G ôªY
.kGOQÉH èàæŸG ¿Éc GPEG ’EG AÉYƒdG ádGREÉH º≤J ’ :á¶MÓe
ócCÉàdG ™e RÉ¡÷G πNGO iôNCG Iôe »¡£dG AÉYh óYCG •
.º«∏°S πµ°ûH ¬©°Vh øe
Ωƒ≤J ød º«∏°ùdG ¬©°Vh »¡£dG AÉYh òîàj ⁄ GPEG :á¶MÓe
.É¡àØ«XƒH IÓ≤ŸG
.»¡£dG AÉYh πNGO IOƒ÷G ‹ÉY »¡W âjR Ö°üH ºb •
ó◊G »àeÓY ÚH âjõdG iƒà°ùe ¿CG øe kɪFGO ócCÉJh
kÉÑjô≤J) .AÉYƒdÉH ÚJOƒLƒŸG ≈fOC’G ó◊Gh ≈∏YC’G
(Îd 1^65
.RÉ¡÷ÉH ≥aôŸG »¡£dG AÉYh ’EG Ωóîà°ùJ ’ :á¶MÓe
§¨°VGh AÉ£¨dG ≥∏ZCG .RÉ¡÷G πNGO AÉYƒdG Ö«cÎH ºb •
.»°SCGôdG iƒà°ùŸG ¤EG ó«dG ¢†Øÿ ó«dG ôjô– QR ≈∏Y
»¡£dG
.Ö°SÉæe AÉHô¡c Qó°üà RÉ¡÷G π«°UƒàH ºb •
¤EG (3) IQGô◊G áLQO ‘ ºµëàdG ¢Uôb IQGOEÉH ºb •
öTDƒe ìÉÑ°üe A»°†j ±ƒ°S .áHƒ∏£ŸG IQGô◊G áLQO
¿CGh RÉ¡÷G 𫨰ûJ AóH ¤EG IQÉ°TEÓd (4) IQGô◊G áLQO
.¬æ«î°ùJ …ôéj âjõdG
¤EG âjõdG ∫ƒ°Uh Oôéà ìÉÑ°üŸG ÅØ£æj ±ƒ°S •
21
Page 22

ARABIC
πÑb »¡£dG AÉYƒd âjõdG áaÉ°VEGh AGõL’G ¢†©H ∞«¶æJ
.ΩGóîà°S’G
AÉ£¨dG
.(2) AÉ£¨dG ôjô– QR §¨°VG ,(1) AÉ£¨dG íàØd •
∂HÉ°ûŸG ∂a ≥jôW øY ¬àdGREG øµÁ AÉ£¨dG íàa ó©Hh •
.RÉ¡÷G êQÉN kÉ«°SCGQ ¬∏ªM ºK øeh
iôéŸG ‘ ÚàeÉYódG πNOCG ,AÉ£¨dG Ö«côJ IOÉYE’h •
.RÉ¡÷ÉH IOƒLƒŸG
á∏°ùdG
.»≤aCG ™°Vh ‘ É¡∏Øb ºàj ≈àM (7) á∏°ùdG ój ™aQG •
.íàØæ«d (1) AÉ£¨dG ∑ôJGh (2) AÉ£¨dG ôjô– QR §¨°VG •
.IÓ≤ŸG øe (10) á∏°ùdG êôNCG •
‘ á∏°ùdÉH OƒLƒŸG ™∏°†dG πNOCG ,á∏°ùdG Ö«côJ IOÉYE’ •
¬©°Vh ¤EG k’ƒ°Uh ¬°†ØNGh RÉ¡÷ÉH OƒLƒŸG iôéŸG
.Ö°SÉæŸG
¢†ØîH ºbh ,(8) ó«dG Qô– QR §¨°VGh AÉ£¨dG ≥∏ZCG •
.»°SCGôdG ™°VƒdG ¤EG k’ƒ°Uh A§ÑH ó«dG
»¡£dG AÉYh
.íàØæ«d (1) AÉ£¨dG ∑ôJGh (2) AÉ£¨dG ôjô– QR §¨°VG •
.IÓ≤ŸG øe (10) á∏°ùdG êôNCG •
IÓ≤ª∏d á«aÉ°VE’G áeÓ°ùdG äɪ«∏©J
.πFGƒ°ùdG ‘ ¢ùHÉ≤dG hCG ∂∏°ùdG hCG RÉ¡÷G ôª¨J ’ •
.âjõdG ≈∏Y è∏ãdG hCG AÉŸG áaÉ°VEG øe QòMG •
.Ö∏°üdG øª°ùdG Ωóîà°ùJ ’ •
᪩WC’G »¡W óæY Qò◊G øe ójõŸG »NƒJ »¨Ñæj •
.IóªéŸG
ΩGóîà°SG ≈∏Y §≤a QÉ°üàb’G IÓ≤ŸG √òg ™e »¨Ñæj •
.IOƒ÷G ‹ÉY »¡W âjR
âjõdG ‘ á∏°ùdG ¢†ØN πÑb kGó«L AÉ£¨dG ≥∏Z Öéj •
.øNÉ°ùdG
Üöùàj ób å«M ;IÓ≤ŸG íàa óæY Qò◊G »NƒJ »¨Ñæj •
.íàØdG óæY øNÉ°S QÉîH É¡æe
IÉØ°üŸG AÉ£Z äÉëàa øe øNÉ°ùdG QÉîÑdG Üöùàj ób •
.ΩGóîà°S’G AÉæKCG
Üöùàj ób å«M IÓ≤ŸG AÉ£Z íàa óæY kÉ°üjôM øc •
.øNÉ°S QÉîH É¡æe
AÉ£¨dGh AÉYƒdG πãe ,áæNÉ°ùdG í£°SC’G ¢ùª∏J ’ •
.ójÈàdG IÎa hCG ΩGóîà°S’G AÉæKCG »°ù«FôdG πµ«¡dGh
.¢†HÉ≤ŸG ΩGóîà°SG ≈∏Y ÉkªFGO ¢UôMG
hCG πª◊G πÑb ¿GOÈj ≈àM âjõdGh IÓ≤ŸG ∑ôJG •
.≠jôØàdG
øe ¬LôNCGh ¬«ÑfÉL øe ÖfÉL …CG øe AÉYƒdG ∂°ùeG •
.RÉ¡÷G
™e RÉ¡÷G ¤EG iôNCG Iôe √óYCG ,AÉYƒdG Ö«côJ IOÉYE’h •
™e AÉYƒdG ≈∏Y IOƒLƒŸG áeÓ©dG ≥aGƒJ øe ócCÉàdG
™°Vh øe ócCÉàdGh IóMƒdG ≈∏Y IOƒLƒŸG áeÓ©dG
ºK É¡°†ØNGh á∏°ùdG Ö«côJ óYCG .í«ë°U πµ°ûH AÉYƒdG
.AÉ£¨dG ≥∏ZCG
22
ΩGóîà°S’G AÉæKCG áæNÉ°S í£°SC’G ¿ƒµJ ¿CG øµÁ •
.ójÈàdG IÎa AÉæKCGh
.ájƒ¡à∏d IÓ≤ŸG ∫ƒM Ék«aÉc ÉkZGôa ÉkªFGO ∑ôJG •
™«ªéàdG
ƒg ∂«∏Y Ée πc ,πeɵdÉH kÉ©ª› RÉ¡÷G Gòg ∂∏°üj
Page 23

ARABIC
Iõ¡LC’G ¢ùHGƒb ™e ÅjÉ¡e …CG ΩGóîà°SG ∂dòc ô¶ëj
.(¤hC’G áLQódG øe) á°VQDƒŸG á«FÉHô¡µdG IôFGódG äGP
É¡àÑ°SÉæeh ádó©ŸG ÒZ á«∏°UC’G ¢ùHGƒ≤dG ΩGóîà°SG
áeó°üd ¢Vô©àdG ôWÉfl øe π∏≤j AÉHô¡µdG òØæŸ
.á«FÉHô¡c
¤hC’G áLQódG èàæeh ójóªàdG äÓHÉc
øeh ¢VQDƒe RÉ¡÷G ¿C’ A3 Ö∏≤H πHÉc ΩGóîà°SG Öéj •
.¤hC’G áLQódG
(Ωób 100) Îe 30 ¤EG πHɵdG ∫ƒW π°üj ¿CG øµÁ •
.ábÉ£∏d ó≤a ¿hO
¬dGóÑà°SG Öéj ,AÉHô¡µdG π«°UƒJ ∂∏°S ∞∏J ádÉM ‘ •
øe óªà©e áeóN õcôe …CG hCG ™«æ°üàdG á¡L πÑb øe
.ôWÉîŸG Öæéàd ôµjO ófBG ∑ÓH
¢ù«FôdG QÉ«àdG ¢ùHÉb ∫GóÑà°SG
:ójóL ¢ùHÉb Ö«côJ ¤EG áLÉ◊G ádÉM ‘
.Ëó≤dG ¢ùHÉ≤dG øe øeBG πµ°ûH ¢üq∏îJ •
¢ùHÉ≤dG ‘ π°UƒŸG §ÿG ¤EG »æÑdG ∂∏°ùdG π«°UƒàH ºb •
.ójó÷G
.ójÉëŸG »FÉHô¡µdG §ÿG ¤EG ¥QRC’G ∂∏°ùdG π«°UƒàH ºb •
øY kGó«©H ±ÉL ¿Éµe ‘ RÉ¡÷ÉH ®ÉØàM’G »¨Ñæj •
.ΩGóîà°S’G ΩóY óæY ∫ÉØWC’G ∫hÉæàe
í«∏°üàdGh áæjÉ©ŸG
Ö«Y hCG ∞∏J …CG OƒLh ΩóY øe ΩGóîà°S’G πÑb ócCÉJ •
…CÉH öùc OƒLh ΩóY øe ∂dòc ≥≤– .RÉ¡÷G AGõLCÉH
Éeh 𫨰ûàdG í«JÉØà ∞∏J hCG RÉ¡÷G AGõLCG øe AõL
πªY ≈∏Y ôKDƒJ ¿CG É¡fCÉ°T øe »àdG QƒeC’G øe ∂dP ¤EG
.RÉ¡÷G
∞∏J hCG Ö«Y …CG OƒLh ∫ÉM ‘ RÉ¡÷G ΩGóîà°SG ô¶ëj •
.¬FGõLCG øe AõL …CÉH
hCG áÑ«©ŸG AGõLC’G ∫GóÑà°SG hCG í«∏°üàH íª°ùJ ’ •
.óªà©e í«∏°üJ π«ch πÑb øe ’EG áØdÉàdG
πcBÉJ hCG ∞∏J …CG OƒLh ΩóY øe ΩGóîà°S’G πÑb ócCÉJ •
.AÉHô¡µdG π«°UƒJ ∂∏°ùH
Ö«Y hCG ∞∏J OƒLh ∫ÉM ‘ RÉ¡÷G ΩGóîà°SG ô¶ëj •
.»°ù«FôdG ¢ùHÉ≤dÉH hCG AÉHô¡µdG π«°UƒJ ∂∏°ùH
¢ùHÉ≤dG hCG AÉHô¡µdG π«°UƒJ ∂∏°S ∫GóÑà°SG Öéj •
í«∏°üJ π«ch ∫ÓN øe Ö«©ŸG hCG ∞dÉàdG »°ù«FôdG
π«°UƒJ ∂∏°S ™£b ÖæŒ .ôWÉîŸG Öæéàd óªà©e
.∂°ùØæH ¬ë«∏°üJ ádhÉfi hCG AÉHô¡µdG
ôØ°UC’G/ö†NC’G §ÿG π«°UƒàH ºb I ∞æ°üdG ádÉM ‘ •
.»°VQC’G §ÿG ¤EG
∞YÉ°†e ∫õ©H II ∞ж°ьdG шe дЙйажŸG бdЙM ‘ :á¶MÓe
AGôLE’ »YGO ’ ,(§jöûdG ‘ §≤a ¿É«FÉHô¡c ¿Éµ∏°S)
.»°VQC’G §ÿG ¤EG π«°UƒJ
.IOƒ÷G äGP ¢ùHÉ≤ŸG ™e á≤aôŸG Ö«cÎdG äGOÉ°TQEG ™ÑqJG
¢ùHÉ≤dG ‘ É¡eGóîà°SG ºàj á∏jóH ᪰UÉa ájCG ¿ƒµJ ¿CG Öéj
.èàæª∏d á«∏°UC’G ᪰UÉØdG ∞æ°U ¢ùØf øe
á«FÉHô¡µdG ájò¨àdG ¢ùHÉb ∫GóÑà°SÉH ≥∏©àŸG Aõ÷G !ôjò–
.óªà©ŸG äÉeóÿG õcôe »ØXƒŸ ¬Lƒe
RÉ¡÷G AGõLCG øe …CG ∫GóÑà°SG hCG ádGREG ∫hÉ– ’ •
.π«dódG Gòg ‘ IOóëŸG AGõLC’G ∂∏J ±ÓîH
ÜôbCG ¤EG RÉ¡÷ÉH ¬LƒJ .RÉ¡÷G í«∏°üJ ∫hÉ– ’ •
.ôµjO ófBG ∑ÓH πÑb øe óªà©e hCG ∑ƒ∏‡ áeóN õcôe
á«FÉHô¡µdG áeÓ°ùdG
∂∏°S ≥aGƒJ øe kɪFGO ócCÉJ .èàæŸG Gòg ¢†jQCÉJ Öéj •
áMƒ∏H ÚÑŸG »FÉHô¡µdG ó¡÷G ™e π«°UƒàdG
.∞«æ°üàdG
òØæŸ áÑ°SÉæe »FÉHô¡µdG ∂∏°ùdG ¢ùHÉb ¿ƒµj ¿CG Öéj •
ɪc .¿Éc πµ°T …CÉH ¢ùHÉ≤dG πjó©J ô¶ëj .AÉHô¡µdG
23
Page 24

ARABIC
âjõdG hCG IQGô◊G øY π«°UƒàdG ∂∏°S OÉ©HEG ≈∏Y ¢UôMG •
.IOÉ◊G ±GôWC’G hCG
RÉ¡é∏d á«LQÉÿG í£°SC’G IQGôM áLQO ¿ƒµJ ób •
.√ójÈJ IÎa AÉæKCGh ΩGóîà°S’G AÉæKCG á©ØJôe
¥ƒa ¬FGõLCG øe AõL …CG ™°Vh hCG RÉ¡÷G 𫨰ûJ ô¶ëj •
πª©j …òdG óbƒŸG πãe øNÉ°S í£°S …CG øe Üô≤dÉH hCG
.IQGô◊G ™ØJôe ¿ôa πNGO hCG AÉHô¡µdG hCG RɨdG ᣰSGƒH
∂∏J ≥aGƒJ øe ócCÉJ ,á«FÉHô¡c á∏°Uh ΩGóîà°SG óæY •
.RÉ¡÷G ™e á∏°UƒdG
øjôNB’G áeÓ°S
.ä’hÉ£dG ¢ShDhôH ∂∏°ùdG ≥∏©J ΩóY ≈∏Y ¢UôMG •
¢UÉî°TC’G ᣰSGƒH ΩGóîà°SÓd IGOC’G √òg ºª°üoJ ⁄ •
äGQó≤dG ¢ü≤f øe ¿ƒfÉ©j øjòdG (∫ÉØWC’G ∂dP ‘ ÉÃ)
IÈÿG ¢ü≤f hCG ájQƒ©°ûdG hCG á«fóÑdG hCG á«∏≤©dG
∂dP øµj ⁄ Ée ,RÉ¡÷G Gòg 𫨰ûàd áeRÓdG áaô©ŸGh
.º¡àeÓ°S øY ∫hDƒ°ùŸG ¢üî°ûdG ±GöTEG â–
√ò¡H ájGQO ÒZ ≈∏Y ¢üî°T …CG hCG ∫ÉØWCÓd íª°ùJ ’ •
.RÉ¡÷G ΩGóîà°SÉH äɪ«∏©àdG
á≤£æe øe ÜGÎb’ÉH äÉfGƒ«◊G hCG ∫ÉØWCÓd íª°ùJ ’ •
AÉæKCG AÉHô¡µdG π«°UƒJ ∂∏°S hCG RÉ¡÷G ¢ùŸ hCG πª©dG
ΩGóîà°SG óæY ¢Uô◊G øe ójõŸG AGóHEG Öéj .𫨰ûàdG
.∫ÉØWC’G øe Üô≤dÉH RÉ¡÷G
.𫨰ûàdG AÉæKCG áHÉbQ ¿hO kGóHCG RÉ¡÷G ∑ÎJ ’ •
ΩGóîà°S’G ó©H
Oƒ°ü≤ŸG ΩGóîà°S’G
ôµjO ófBG ∑ÓH øe á≤«ª©dG IÓ≤ŸG √òg º«ª°üJ ”
‘ OQGƒdG »∏≤dG π«dO ‘ áæ«ÑŸG ᪩WC’G »¡£d kÉ°ü«°üN
.§≤a ‹õæŸG ΩGóîà°SÓd ¢ü°üfl èàæŸG Gòg .π«dódG Gòg
πÑb ≠dÉH ¢UôëH kÓeÉc π«dódG Gòg CGôbG
.RÉ¡÷G ΩGóîà°SG
áeÓ°ùdG äɪ«∏©J
π«°UƒJ ∑Ó°SCÉH IOhõŸG Iõ¡LC’G ΩGóîà°SG óæY !ôjò–
‘ ÉÃ á«°SÉ°SC’G áeÓ°ùdG ÒHGóJ ´ÉÑJG Öéj ,á«FÉHô¡c
≥jô◊G ôWÉîŸ ¢Vô©àdG øe óë∏d á«dÉàdG äɪ«∏©àdG ∂dP
hCG á«°üî°ûdG äÉHÉ°UE’G hCG á«FÉHô¡µdG äÉeó°üdG hCG
.ájôgƒ÷G QGöVC’G
Gòg øe Oƒ°ü≤ŸG ΩGóîà°S’G ≈∏Y π«dódG Gòg …ƒàëj •
hCG äÉ≤aôe hCG äÉ≤ë∏e …CG ΩGóîà°SG …ODƒj óbh .RÉ¡÷G
Gòg ‘ IOóëŸG ∂∏J ±ÓîH iôNCG äÉ«∏ªY …CG AGOCG
.á«°üî°ûdG äÉHÉ°UEÓd ¢Vô©àdG ôWÉfl ¤EG π«dódG
.kÓÑ≤à°ùe ¬«dEG ´ƒLô∏d π«dódG Gò¡H ßØàMG •
ôWÉîŸ kÉjOÉØJ ¢UôëH AÉHô¡µdG π«°UƒJ ∂∏°S Qôe •
.ôNBG ¢VôZ …CÉH ≥∏©àdG
¬H π°UƒŸG AÉHô¡µdG òØæe πØ°SCG RÉ¡÷G 𫨰ûJ ÖæŒ •
.IöTÉÑe
RÉ¡÷G ΩGóîà°SG
òØæà ¬∏«°UƒJ πÑb RÉ¡÷G 𫨰ûJ ±É≤jEG øe ócCÉJ •
.¬æY ¬∏°üa hCG AÉHô¡µdG
AÉHô¡µdG òØæe øe ¢ùHÉ≤dG π°üaGh RÉ¡÷G 𫨰ûJ ∞bhCG •
hCG Ò«¨J hCG ∞«¶æJ πÑbh RÉ¡÷G ΩGóîà°SG ΩóY óæY
.¬FGõLCG øe AõL …CG ¢üëa
24
.RÉ¡÷G ΩGóîà°SG óæY kGQòM øc •
¢ùHÉ≤dG π°üa ±ó¡H π«°UƒàdG ∂∏°S ó°T ÖæŒ •
.AÉHô¡µdG òØæe øe »FÉHô¡µdG
Page 25

ARABIC
١٠
٨
٧
٩
١١
١٢
١
٢
٣
٤
٥
٦
á∏°ùdG ¢†Ñ≤e 7
¢†Ñ≤ŸG ôjô– QR 8
»¡£dG AÉYh 9
á∏°ùdG 10
IógÉ°ûª∏d IòaÉf 11
Î∏ØdG AÉ£Z 12
RÉ¡÷G AGõLCG
AÉ£¨dG 1
AÉ£¨dG ôjô– QR 2
IQGô◊G §Ñ°V ¢Uôb – 𫨰ûàdG/±É≤jE’G ìÉàØe 3
IQGô◊G öTDƒe 4
âbDƒe 5
âbDƒŸG §Ñ°V QR 6
25
Page 26

N a m e s & A dd re ss e s f o r B l a c k & De c k e r Se r v i c e C o n c e s s i o n a r i e s
ALGERIA: SARL Outillage Corporation, After Sale Service Center-08, Rue Mohamed Boudiaf - Cheraga, Algiers, Algeria, Tel:
+213 21 375131, Fax: +213-0-369667. AZERBAIJAN: Kontakt - NN LLC, M.Qashqay 43, Baku, Azerbaijan Az1000. Tel:
+994 12 4082050, Fax: +994 12 4117090. BAHRAIN: Alfouz Services Co. WLL., P.O. Box 26562, Tubli, Manama, Tel: +973-17783562/
17879987, Fax: +973-17783479. Kewalram & Sons Co. WLL P.O. Box 84, Manama, Kingdom of Bahrain, Tel: +973-17213110/ 17210617/
17210619, Fax: +973-17213211/ 17210627. BANGLADESH: Ultra Corporation, 8, Kushol Centre, Uttara, Dhaka 1230. Tel:
+880-2-8922144, Fax: +880-2-8951339. EGYPT: Anasia Egypt for Trading S.A.E, P.O. Box 2443, 9, Mostafa Refaat Street,
Sheraton Heliopolis 11361, Cairo, Tel: +202-22684159, Fax: +202-22684169. ETHIOPIA: Seif Sherif Trade PLC -Arada Sub City,
Kebele 01-02, Global Insurance Bldg., 2nd Flr. Room 43, P.O.Box 2525, Addis Ababa, Ethiopia, Tel: 00-251-11-1563968/ 1563969, Fax:
00-251-11-1558009. INDIA: Gryphon Appliances Ltd., D-6/4, Okhla Industrial Area, Phase-I, New Delhi-110020, Tel: +91-11-46731111,
Fax: +91-11-46731111. JORDAN: Bashiti Hardware, 93 King Abdullah 2nd St., Opp ELBA House, P.O. Box 3005, Tel: +962-6-5349098
ext.11, Fax: +962-6-5330731. KENYA: Leading Concepts, P.O. Box: 40877-00100, Nairobi, Kenya. Tel: +254 20 690 5000, Fax:
+254 20 690 5111. KUWAIT: Al Omar Technical Co., P.O. Box 4062, Safat 13041, Kuwait, Tel: 00965-24848595/ 24840039, Fax:
00965-24845652. The Sultan Centre, P.O. Box 26567-13126 Safat, Kuwait, Tel: 00965-24343155 Etn. 432, Fax: 00965-24319071.
LEBANON: Aces Service Centre, P.O. Box 90-102, Nahr El Mot, Seaside Highway, Pharaon Building, Beirut. Tel: 00961-1-898989, Fax:
00961-1-245880. LIBYA: Homeworld Co., Building No.5, Senidal St., Amr Ibn Elaas Road, Benghazi, Libya. Tel: 00218-61-9094183.
Service Center1 - Benghazi: Tel: +218-061-3383994, Fax: +218-092-7640688, Service Center2 - Tripoli: Tel: +218-021-3606430, Fax:
+218-092-6514813. MALTA: John G Cassar Ltd. 36-Victory Street, Qormi QRM 06, Malta. Tel: +356-21493251, Fax: +356-21483231.
MAURITIUS: J.M. Goupille & Co. Ltd., Rogers Industrial Park 1, Riche Terre, Mauritius, Tel: +230 206 9450/ +230 207 1700, Fax:
+230 206 9474/ +230 248 3188. MOROCCO: UATS 26 Rue Ennarjisse, Hay Erraihan, Beausejour - Hay Hassani-Casablanca, Morocco.
Tel: +212 522945114, Fax: +212 522942442. NEPAL: Universal Electrocom, Tripureshwor, Kathmandu, Nepal. Tel:+977-1-4265191.
NIGERIA: Dana Electronics Ltd. (Lagos) 116/ 120, Apapa Oshodi Express Way, Isolo, Lagos, Nigeria. Tel: +234-17431818/
+234-8037767774/ +234-8057445477. (Abuja) 18, A.E. Ekukinam Street, Off Obsfemi Awolowo Road, Utako, Abuja, Nigeria. Tel:
+234-8032276101/ +234-8037767774. (Kano) 9A - Mai Malari Road, Bompai, Kano, Nigeria. Tel: +234-8053294947/ +234-8037767774.
OMAN: Oman Marketing & Service Co. (Omasco), P.O. Box 2734, Behind Honda Showroom, Wattayah, Oman, Tel: +968-24560232/
24560255, Fax: +968-24560993. Oman Marketing & Service Co. (Omasco), Al Ohi, Sohar, Oman, Tel: +968-26846379, Fax:
+968-26846379. Oman Marketing & Service Co. (Omasco) - Sanaya, Salalah, Oman, Tel: 00968-23212290, Fax: +968-23210936.
PAKISTAN: Ammar Service & Spares - 60-Bank Arcade, Serai Road, Karachi, Pakistan, Tel: 0092-21-32426905, Fax: 0092-21-32427214.
PHILIPPINES: 476 J. P. Rizal St., cor Kakarong St. Brgy Olympia, Makati City, Tel: +632 403-5698. QATAR: Al Muftah Service Centre -
Al Wakrah Road, P.O. Box 875, Doha, Qatar. Tel: 00974-4650880/ 4650110/ 4446868, Fax: 00974-4441415/ 4662599. SAUDI ARABIA:
(Al Khobar) Al-Suwaiket Catering & Trading Co., P.O.Box 4228, King A.Aziz Street, Al Khobar, Tel: +966-3-8591088, Fax:
+966-3-8595648. Fawaz Ebrahim Al Zayani Trading Est. P.O. Box 76026, Al Khobar #31952, Tel: +966-3-8140914, Fax: +966-3-8140824.
(Jeddah) Banaja Trading Co. Ltd, P.O. Box 366, Jeddah-21411, Tel: +966-2-6511111, Fax: +966-2-6503668. (Riyadh) Banaja Trading Co.
Ltd, P.O. Box 566, Riyadh-11421, Tel: 00966-1-4124444, Fax: +966-1-4033378. SOUTH AFRICA: Trevco Power Tool Service 14
Steenbok Street, Koedoespoort, 0186, Pretoria, South Africa, Tel: +27-86-1873826, Fax: +27-86-5001771. SRI LANKA: Delmege
Construction Products (Pvt) Ltd., No 101 Vinayalankara Mawatha, Colombo-10, Sri Lanka, Tel: +94-11-2693361-7, Service hotline:
+94-77-2211111. TUNISIA: Société Tunisienne De Manutention - Rue de la Physique, Nouvelle Zone Industrielle de Ben Arous-2013
Tunisie, Tel: +216-71-386102/ 380620, Fax: +216-71380412 ext 216. UGANDA: Anisuma Investment and Services Ltd., J R complex,
Ware House No.5, Plot No 101, 3rd Street Industrial Area, Jinja Road, Kampala, Tel: +256-414237106. UAE: (Abu Dhabi)
Light House Electrical, P.O. Box 120, Abu Dhabi, Tel: +971-2-6726131, Fax: +971-2-6720667. (Al Ain) Zillion Equipment and Spare Parts
Trading LLC, P.O. Box 19740, Opp. Bin Sadal/Trimix Redymix Sanaiya, Al Ain. Tel: +971-3-7216690, Fax:+971-3-7216103 (Dubai)
Black & Decker (Overseas) GmbH, P.O. Box 5420, Dubai, Tel: +971-4-8127400/ 8127406, Fax: +971-4-2822765. (Musaffah) Light House
Electrical, P.O. Box 120, Abu Dhabi, Tel: +971-2-5548315, Fax: +971-2-5540461. (Sharjah) Mc Coy Middle East LLC, P.O. Box 25793,
Sharjah, Tel: +971-6-5395931, Fax: +971-6-5395932. (Ras Al Khaimah) Mc Coy Middle East LLC, P.O.Box 10584, Ras Al Khaimah, Tel:
+971-7-2277095, Fax: +971-7-2277096. YEMEN: (Aden) Muala St., Tel: +967 2 222670, Fax: +967 2 222670. (Sana'a) Middle East Trad.
Co. Ltd., P.O. Box 12363, Hayel Street, Sana'a. Tel: +967-1-204201, Fax: +967-1-204204. (Taiz) Middle East Trading Co. (METCO),
5th Flr.Hayel Saeed Anam Bldg, Al-Mugamma St. Taiz, Yemen, Tel: +967-4-213455, Fax: +967-4-219869.
Page 27

Page 28

WARRANTY REGISTRATION CARD
YOUR NAME/
YOUR ADDRESS
POSTCODE
DATE OF PURCHASE
DEALER'S NAME & ADDRESS/
«ùßr
«∞FMu«Ê
«∞d±e «∞∂d¥bÍ
¢U¸¥a «∞Ad«¡
≈ßr Ë ´Mu«Ê «∞∂Uzl
PRODUCT MODEL NO.
EF2750
 Loading...