

Page 1
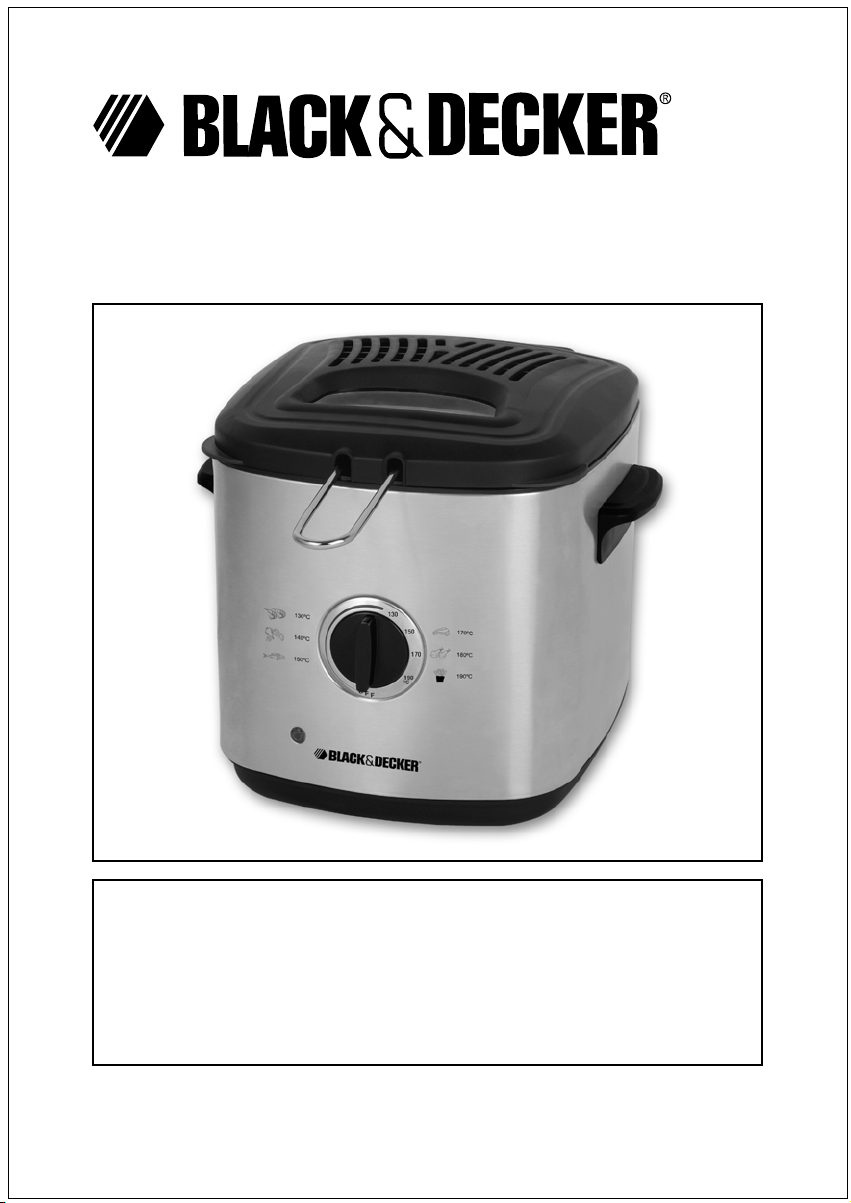
Deep Fryer
First Use Safety Recommendation
Please read through this booklet for safe and efficient use of the appliance.
We urge you to read the "Hint's" section and also follow all detailed
instructions even if you are familiar with using this appliance.
Keep this guide handy for future reference.
English Page 02
Arabic Page 15
EF1220
Page 2
English
Parts Identification
1 Fryer body
2 Temperature control dial
4
3 Thermostat lamp
4 Removable lid
5 Removable frying basket
6 Removable basket handle
7 Removable cooking pot
8 Max and Min indication lines
130
150
170
190
ºC
O
F
F
8
7
1
3
2
4
4
7
2
6
6
5
5
5
-2-
Page 3

English
Intended use
Your Black & Decker Deep Fryer has been
designed for cooking ingredients as listed
in the Frying Guide in this manual.
This appliance is intended for indoor
consumer use only.
Safety Instructions
Read all of this manual carefully
before using the appliance.
Warning! When using mains-powered
appliances, basic safety precautions,
including the following, should always be
followed to reduce the risk of fire, electric
shock, personal injury and material
damage.
• The intended use is described in this
manual. The use of any accessory or
attachment or the performance of any
operation with this appliance other than
those recommended in this instruction
manual may present a risk of personal
injury.
• Retain this manual for future reference.
• Always route the cord carefully to avoid
a tripping hazard.
• Never pull the power supply cord to
disconnect the plug from the socket.
• Keep the power supply cord away from
heat, oil and sharp edges.
• Disconnect the appliance from the power
supply when not in use, before fitting or
removing parts, maintenance and before
cleaning.
• Surfaces may be hot during use and
during the cool down period.
• Do not operate or place any part of this
appliance on or near any hot surface,
such as gas or electric burner or in a
heated oven.
• When using an extension cord with your
appliance, make sure the extension cord
is correctly wired & rated for its use.
Safety of others
• This appliance is not intended for use by
persons (including children) with reduced
physical, sensory or mental capabilities,
or lack of experience and knowledge,
unless they have been given supervision
or instruction concerning use of the
appliance by a person responsible for
their safety.
• Never operate an appliance directly
below the socket-outlet it is connected
to.
Using your appliance
• Make sure that the appliance is
switched off before connecting to or
disconnecting from the power supply.
• Do not allow the cord set to hang over
bench tops.
• Always take care when using the
appliance.
• Children should be supervised to ensure
that they do not play with the appliance.
• Do not allow children or any person
unfamiliar with these instructions to use
the appliance.
• Do not allow children or animals to come
near the work area or to touch the
appliance or power supply cord.
• Close supervision is necessary when the
appliance is used near children.
• Never leave the appliance unattended
when in use.
-3-
Page 4

English
After use
• Switch off and remove the plug from the
socket before leaving the appliance
unattended and before changing,
cleaning or inspecting any parts of the
appliance.
• When not in use, the appliance should
be stored in a dry place. Children should
not have access to stored appliances.
Inspection and repairs
• Before use, check the appliance for
damaged or defective parts. Check for
breakage of parts, damage to switches
and any other conditions that may affect
its operation.
• Do not use the appliance if any part is
damaged or defective.
• Have any damaged or defective parts
repaired or replaced by an authorised
repair agent.
• Before use, check the power supply
cord for signs of damage, ageing and
wear.
• Do not use the appliance if the power
supply cord or mains plug is damaged
or defective.
• If the power supply cord or mains plug
is damaged or defective it must be
repaired by an authorised repair agent in
order to avoid a hazard. Do not cut the
power supply cord and do not attempt
to repair it yourself.
• Never attempt to remove or replace any
parts other than those specified in this
manual.
• Do not attempt to repair the appliance.
Take it to your nearest Black &
Decker-owned or authorised Service
Centre for repair.
Electrical Safety
This product must be earthed.
Always check that the power
supply corresponds to the voltage on the
rating plate.
Power plugs must match the outlet. Never
modify the plug in any way. Do not use any
adapter plugs with earthed (Class 1)
appliances. Unmodified plugs and matching
outlets will reduce the risk of electric shock.
Extension cables & Class 1 product
• A 3-core cable must be used as your
appliance is earthed and of Class 1
construction.
• Up to 30m (100ft) can be used without
loss of power.
• This appliance is not intended for use by
young or infirm persons without
supervision. Children must be supervised
to ensure they do not play with the
appliance.
• If the supply cord is damaged, it must be
replaced by the manufacturer or an
authorised Black & Decker Service
Center in order to avoid a hazard.
Additional safety instructions for Deep
Fryers
• Do not immerse the appliance, cord set
or plug in liquids
• Never add water or ice to oil
• Extra care is required when cooking
frozen food
• Only use good quality cooking oil in this
fryer
• Care should be taken when opening the
fryer as hot steam may escape on
opening.
• Hot steam may escape from the filter
cover vents during use
-4-
Page 5

English
• Do not touch hot surfaces such as the
bowl, lid and main body during use or
the cool-down period. Always use the
handles or knobs provided.
• Allow Fryer & oil to cool before carrying
or emptying.
• Surfaces may be hot during use and
during the cool down period.
• Cook only in the bowl supplied.
• Close the lid whilst cooking.
• Never mix different types of oil and
never add fresh oil to used oil.
• Do not melt solidified fat in an empty
fryer.
• Always leave sufficient space around the
fryer for ventilation.
Warning!
Caution: Hot surface
Hot surface or emissions
Features
1 Fryer body
2 Temperature control dial
3 Thermostat lamp
4 Removable lid
5 Removable frying basket
6 Removable basket handle
7 Removable cooking pot
8 Max and Min indication lines
Preparing for use
• The assembly of the removable basket
handle (6) onto the removable cooking
basket (5) is required. No other user
assembly is required.
• Before use remove all packaging –
plastic bags and cardboard and clean
the frying basket and the cooking pot (7)
in warm sudsy water.
• Always keep the heating element and the
outside surface of the cooking pot (7)
clean and free of any foreign substances.
• Dry the unit thoroughly before use.
• Do not switch the unit on before you
have filled it will oil as this will damage
the unit.
Use
• Make sure the fryer is filled with oil to a
level between the min and max indication
lines (8) on the inside face of the cooking
pots.
• Ensure the unit is placed on a flat surface
with the basket in the lowered position in
the cooking pot and the lid (4) is closed.
• Connect the appliance to a suitable
electrical supply.
• Rotate the temperature control dial (2) to
the required temperature. The thermostat
lamp (3) will light up to indicate the oil is
heating up.
Note: There are several recommended
temperature settings indicated on the unit
and in this user manual. These are a guide
only.
• The lamp will go out once the oil has
reached the required temperature.
Preheating the oil in this way before
adding food will ensure food does not
stick to the basket and will also ensure
the food does not absorb oil.
• The hot lid can be safely opened using
the handles on the front of the lid.
• Lift the basket out of the oil and position
it onto the side of the cooking pot.
• Add the food to the basket.
-5-
Page 6

English
Note: Remove excess moisture from the
food before adding it to the hot oil.
• Do not overfill the basket. All of the food
being fried must be under the oil level.
• Carefully lower the basket into the oil.
• Close the lid.
Note: During the cooking duration the
temperature lamp will come on and off from
time to time. This shows the thermostat
switching on and off to maintain the correct
Once the food is cooked, turn the
temperature dial to the OFF position and
open the lid.
Carefully remove the basket from the oil.
The basket can be positioned on the side of
the cook pot to drain the oil from the food.
To remove excess oil the food can be
placed into a bowl or container lined with
grease absorbing paper or kitchen paper
towels.
cooking temperature.
Note: Hot steam may escape from the filter
vents during use.
Unplug the appliance after use and allow to
it cool.
Frying Guide
This frying time given in this chart is only a guide and should be adjusted according to the
quantity fried.
Food Oil Temp (ºC) Max. Weight (Grams) Approx. Frying Time (Minutes)
Shrimp 130 25 3 to 5
Onion rings 140 150 3 to 4
Mushroom 140 300 6 to 8
Fish filet 150 250 5 to 6
Fish filet in batter 150 300 6 to 8
Fish cakes or balls 150 300 7 to 10
Sliced meat 170 300 7 to 10
Steak 170 300 7 to 10
Chicken strips 180 300 6 to 10
French fries 190 300 7 to 10
Maintenance
Your Black and Decker tool has been
designed to operate over a long period of
time with minimum maintenance.
Continuous satisfactory operation depends
upon proper use and regular cleaning.
Emptying the fryer
When the fryer is cool, pour the oil from the
cooking bowl into a suitable container.
Always follow local regulations concerning
the disposal of used cooking oil.
Note: If you do not use the fryer regularly, we
advise you to remove the oil from the unit
whilst storing it. Store the oil in a sealed
container, preferably in the refrigerator or in a
cool place.
Cleaning
• Disconnect the product from the electrical
supply before cleaning or carrying out any
maintenance.
• The main housing should be cleaned with
a clean damp cloth only.
-6-
Page 7

English
Lid and Basket
• Remove the lid and basket from the unit.
The lid can be removed from the unit by
lifting it vertically. Wash in warm sudsy
water. Rinse with clean water and dry
thoroughly with a dry soft cloth.
• Ventilation slots in the lid can be cleaned
using a clean, dry paint brush.
Cooking Pot
• Open the lid and remove the frying
basket (5).
• Remove the cooking pot from the unit
by grasping the bowl at either end and
lifting vertically.
• Wash in warm sudsy water. Rinse with
clean water and dry thoroughly with a
dry soft cloth.
• To re-fit, place it back into the cavity
ensuring it is seated correctly.
• Do not wash any part of this appliance in
a dishwasher.
• Always follow local regulations
concerning the disposal of used cooking
oil. Ventilation slots should be cleaned
occasionally with a clean, dry paint
brush.
Technical Data
EF1220
Voltage V 220-240
Power W 1000
Weight Kg 2
Note: Do not use abrasives or chemical
cleaners on any part of this appliance.
Cleaning the bowl
• Unplug the Fryer and allow the oil to
cool to room temperature. Remove
cooking bowl (7) from the unit. Pour out
the cool oil and filter it into a suitable
container using a sieve to filter out food
particles from the oil.
• Wipe the oil off with an absorbing paper.
Wash the lid & basket in warm soapy
water. Rinse with clean water and dry
thoroughly with a dry soft cloth.
Note: Do not use abrasives or chemical
cleaners on any part of this appliance.
-7-
Page 8

English
Protecting the environment
Separate collection. This product must not be disposed of with normal household waste.
Should you find one day that your Black & Decker product needs replacement, or if it is of no
further use to you, do not dispose it off with other household waste. Make this product available
for separate collection.
Separate collection of used products and packaging allows materials to be recycled and
used again. Use of recycled materials helps prevent environmental pollution and reduces
the demand for raw materials.
Local regulations may provide for separate collection of electrical products from the household,
at municipal waste sites or by the retailer when you purchase a new product.
Black & Decker provides a facility for the collection and recycling of Black & Decker products
once they have reached the end of their working life. To take advantage of this service please
return your product to any authorised repair agent who will collect them on our behalf. You can
check the location of your nearest authorised repair agent by contacting your local Black &
Decker office at the address indicated in this manual. A list of authorised Black & Decker repair
agents and full details of our after-sales service and contact are available on the Internet at:
www.2helpU.com
BLACK & DECKER HOME APPLIANCE 2 YEAR WARRANTY
Black & Decker provides a 2 Year Warranty for this product from the date of purchase against
defects due to defective materials or workmanship. Motor/element burn-outs due to voltage
fluctuations are not covered under warranty. If the product should become defective within the
warranty period, Black & Decker will repair or (at Black & Decker's discretion) replace it free of
charge.
The warranty provisions do not cover failure due to accident, misuse, abuse, negligence or non
observation of local regulations on the part of the user. Equally, the warranty provisions do not
apply where the appliance has been serviced by a person not authorized by Black & Decker or
serviced with non-approved parts and this has contributed to the fault of the product.
Superseded models without a replacement equivalent will either be repaired or (at Black &
Decker's discretion) replaced with another product of similar retail value.
UPON PURCHASE
Fill in the Warranty Registration Card with the original Authorized Dealer's stamp (indicating date
of purchase) and attach your purchase receipt to it. Retain in case of claims in the future.
MAKING A CLAIM
Take your defective product together with the Warranty Registration Card & purchase receipt to
your local service Centre. You can either do this in person or send it freight prepaid. If mailing or
shipping your appliance, ensure that it is packed carefully in a sturdy carton with enough
packing material to prevent damage. Include a note describing the problem to the service
Centre and be sure to give your return address.
DESIGNED FOR DOMESTIC PURPOSES ONLY.
-8-
Page 9

Arabic
¥πV ´b «∞∑ªKh ±s ≥c« «∞LM∑Z ±l °IOW «∞MHU¥U‹ «∞LMe∞OW.
«ùß∑ö «∞LMHBq ∞KLM∑πU‹ «∞Lº∑FLKW ˱u«œ «∞∑GKOn ¥ºL` °S´Uœ… ¢BMOl «∞Lu«œ Ë«ß∑FLU∞NU ±s §b¥b. ≈ß∑FLU‰ «∞
Lu«œ «∞LFUœ ¢BMOFNU ¥ºU´b ´Kv ±Ml «∞∑KuÀ «∞∂Oµw Ë¥IKq «∞DKV ´Kv «∞Lu«œ «_Ë∞OW.
•LU¥W «∞∂OµW
≈–« ˧b‹ ≠w ¥u ±s «_¥U √≤p °∫U§W ∞Ad«¡ §NU“ °ö„ √≤b œ¥Jd §b¥b, √Ë ∞r ¢Fb °∫U§W ∞KπNU“ «∞Ib¥r, ô ¢∑ªKh ±Mt ±l «∞
MHU¥U‹ «∞LMe∞OW «_îdÈ. §Ne ≥c« «∞LM∑Z ∞ûß∑öÂ «∞LMHBq.
«_≤ELW «∞L∫KOW Æb ¢Mh ´Kv {d˸… «ùß∑ö «∞LMHBq ∞KLM∑πU‹ «∞JNd°UzOW ±s «∞LMU“‰, ≠w ±u«Æl «∞∂Kb¥W ∞KMHU¥U‹ √Ë °u«ßDW
°Uzl «∞∑πezW ´Mb±U ¢A∑dÍ ±M∑πUÎ §b¥b«Î.
¢u≠d °ö„ √≤b œ¥Jd «∞∑ºNOö‹ ôß∑ö Ë≈´Uœ… ¢BMOl ±M∑πU‹ °ö„ √≤b œ¥Jd ´Mb±U ¢Bq ≈∞v ≤NU¥W •OU¢NU «∞FLKOW. ∞ûß∑HUœ…
±s ≥cÁ «∞ªb±W, ¥d§v ≈´Uœ… §NU“„ ≈∞v √Í ËØOq ¢BKO` ±F∑Lb Ë«∞cÍ ßOIu °Uß∑ö±t °U∞MOU°W ´MU. ¥LJMp ±Fd≠W ±uÆl √Æd»
ËØOq ¢BKO` ±F∑Lb °U∞Mº∂W ∞p °Ld«§FW ±J∑V °ö„ √≤b œ¥Jd «∞L∫Kw ´Kv «∞FMu«Ê «∞L∂Os ≠w ≥c« «∞J∑OV. ¢∑u≠d ÆUzLW °QßLU¡
ËØö¡ «∞∑BKO` «∞LF∑Lb¥s ±s °ö„ Ë œ¥Jd, ØLU ¢∑u≠d ¢HUÅOq ØU±KW ´s îb±U‹ ±U °Fb «∞∂Ol Ë´MUË¥s «ô¢BU‰ ´Kv ®∂JW «ù≤∑d
≤X : moc.Upleh2.www
BLACK & DECKER
Black & Decker
{LUÊ ®U±q ∞Lb… ßM∑Os _§Ne… «∞LMe∞OW
Black & Decker
Black & Decker
◊ «∞CLUÊ ≈–« ¢LX ÅOU≤W √Ë ¢BKO` «∞LM∑Z ∞bÈ ©d· ¨Od ±F∑Lb ±s Æ∂q ®dØW , √ Ë ≠w •U∞W «ß
Black & Decker
∑U§d «∞LF∑Lb (Ë¢u{O` ¢U¸¥a «∞Ad«¡) £r «¸≠o ≈¥BU‰ «∞Ad«¡ °U∞∂DUÆW.
∞LU¡ ØKOUÎ ËÆr °∑GKOHt §Ob«Î ≠w ÅMbË‚ Ød¢uÊ ±IuÈ ±l ≈{U≠W
¢LM` {LU≤UÎ ®U±öÎ ±b¢t ßM∑Os ∞Nc« «∞LM∑Z «´∑∂U¸«Î ±s ¢U¸¥a «∞Ad«¡.
¥GDw «∞CLUÊ ´Ou» «∞∑BMOl √Ë «∞Lu«œ «∞b«îKW ≠w «∞∑BMOl. Ë≠w •U∞W ≈ÅU°W «∞LM∑Z °QÍ ´Dq √£MU¡ ≠∑d… «∞CLUÊ, ß∑Iu ®dØW
°SÅö•t √Ë (Ë≠IUÎ ∞∑Ib¥d ) «ß∑∂b«∞t ±πU≤UÎ.
ô ¥GDw «∞CLUÊ «_´DU‰ «∞MU¢πW ´s «∞∫u«œÀ, ßu¡ «ôß∑FLU‰, «ù≥LU‰, «ôß∑FLU‰ «∞ªU©T, √Ë ´b «¢∂UŸ «∞MEr «∞LFLu‰ °NU ±∫KOUÎ.
Øc∞p, ô ¢MD∂o ®dË
∑ªb«Â ÆDl ¨OU¸ °bËÊ «∞d§uŸ ≈∞v «∞AdØW √Ë «∞∫Bu‰ ´Kv ±u«≠I∑NU, Ë¢º∂∂X ≥cÁ «∞IDl ≠w «∞FDq. Ë≈–« ¢uÆn ≈≤∑Uà √Í ©d«“ ±l ´bÂ
˧uœ «∞∂b¥q «∞LMUßV, ≠SÊ ∞AdØW •o «î∑OU¸ ≈ÅöÕ «∞LM∑Z √Ë «ß∑∂b«∞t °Dd«“ ¬îd °MHf «∞IOLW «∞Ad«zOW.
´Mb «∞Ad«¡
«±ú °DUÆW ¢ºπOq «∞CLUÊ ±l «∞∑QØb ±s ˧uœ «∞ª∑r «_ÅKw ∞K
«∞d§U¡ «ô•∑HUÿ °NLU ù°d«“≥LU ≠w •U∞W ˧uœ ±DU∞∂U‹ ≠w «∞Lº∑I∂q.
´LKOW «∞LDU∞∂W
îc «∞LM∑Z «∞LFDq ±l °DUÆW «∞CLUÊ Ë≈¥BU‰ «∞Ad«¡ °MHºp ≈∞v ±dØe «∞BOU≤W «∞L∫Kw √Ë ¥LJMp ≈¸ßU∞t °U∞∂d¥b «∞Lb≠u´W √§d¢t ßKHUÎ.
Ë≠w •U∞W ≈¸ßU‰ «∞πNU“ °U∞∂d¥b √Ë «∞A∫s, ¢QØb ±s ¢Hd¥m «∞LM∑Z ±s «
±u«œ ¢GKOn ∞LKv¡ «∞Hd«¨U‹ ∞∑HUœÍ ≈ÅU°∑t °QÍ {d¸. «¸≠o ±ö•EW ¢Bn ≠ONU «∞LAJKW ∞LdØe «∞BOU≤W Ë¢QØb ±s Ø∑U°W ´Mu«≤p.
ÅÔLr ∞öß∑FLUô‹ «∞LMe∞OW ≠Ij.
-9-
Page 10

Arabic
.¥ÉÑWC’G ádÉ°ùZ ‘ RÉ¡÷G Gòg øe AõL …CG π°ù¨J ’ •
»¡£dG âjR øe ¢ü∏îàdÉH á°UÉÿG á«∏ëŸG íFGƒ∏dG ÉkªFGO ™ÑJG •
ΩGóîà°SÉH ΩɶàfÉH ájƒ¡àdG äÉëàa ∞«¶æJ »¨Ñæj .Ωóîà°ùŸG
.áØ«¶f áaÉL IÉ°Tôa
á«æØdG äÉfÉ«ÑdG
EF1220
240-220 âdƒa ó¡édG
1000 äGh ábÉ£dG
2 ºéc ¿RƒdG
AÉ£¨dG ádGREG øµÁ .IóMƒdG øe á∏°ùdGh AÉ£¨dG ádGREÉH ºb •
‘ á∏°ùdGh AÉ£¨dG π°ùZG .Ék«°SCGQ ¬©aQ ∫ÓN øe IóMƒdG øe
∞«¶f AÉà ∞£°ûdÉH ºb ºK ,IƒZôdG Òãc ÅaGO AÉe
.áaÉL áªYÉf ¢Tɪb á©£b ΩGóîà°SÉH ó«÷G ∞«ØéàdGh
ΩGóîà°SÉH AÉ£¨dG ‘ IOƒLƒŸG ájƒ¡àdG äÉëàa ∞«¶æJ øµÁ •
∂°ùe ∫ÓN øe IóMƒdG øe »¡£dG AÉYh ádGREÉH ºb •
ºb ºK ,IƒZôdG Òãc ÅaGO AÉe ‘ »¡£dG AÉYh π°ù¨H ºb •
á©£b ΩGóîà°SÉH ó«÷G ∞«ØéàdGh ∞«¶f AÉà ∞£°ûdÉH
∞jƒéàdG ‘ iôNCG Iôe »¡£dG AÉYh ™°V ,Ö«cÎdG IOÉYE’ •
á∏°ùdGh AÉ£¨dG
.áØ«¶f áaÉL IÉ°Tôa
»¡£dG AÉYh
.(5) »∏≤dG á∏°S ádGREÉH ºbh AÉ£¨dG íàaG •
.Ék«°SCGQ É¡©aQh ÚÑfÉ÷G øe á«fÉ£∏°ùdG
.áaÉL áªYÉf ¢Tɪb
.í«ë°üdG ¬©°Vƒe ‘ √QGô≤à°SG øe ócCÉJh
…CG ™e ájhɪ«µdG äÉضæŸG hCG ᣰTɵdG OGƒŸG Ωóîà°ùJ ’ :á¶MÓe
.RÉ¡÷G Gòg ‘ AõL
á«fÉ£∏°ùdG ∞«¶æJ
OÈj ≈àM âjõdG ∑ôJGh AÉHô¡µdG Qó°üe øY IÓ≤ŸG π°üaG •
(7) »¡£dG á«fÉ£∏
AÉYh ‘ ¬à«Ø°üJh OQÉÑdG âjõdG ≠jôØàH ºb .IóMƒdG øe
.âjõdG øe ᪩WC’G ÉjÉ≤H á«Ø°üàd πîæe ΩGóîà°SÉH Ö°SÉæe
‘ á∏°ùdGh AÉ£¨dG π°ùZG .¢UÉe ¥Qh ΩGóîà°SÉH âjõdG í°ùeG •
AÉà ∞£°ûdÉH ºb ºK ,¿ƒHÉ°üdG ≈∏Y …ƒàfi ÅaGO AÉe
áªYÉf ¢Tɪb á©£b ΩGóîà°SÉH ó«÷G ∞«ØéàdGh ∞«¶f
…CG ™e ájhɪ«µdG äÉضæŸG hCG ᣰTɵdG OGƒŸG Ωóîà°ùJ ’ :á¶MÓe
-01-
°S ádGREÉH ºb .áaô¨dG IQGôM áLQO iƒà°ùŸ
.áaÉL
.RÉ¡÷G Gòg ‘ AõL
Page 11

Arabic
AÉæKCG IÉØ°üŸG äÉëàa øe øNÉ°S QÉîH Üô°ùàj ¿CG Rƒéj :á¶MÓe
.ΩGóîà°S’G
IQGô◊G áLQO ‘ ºµëàdG ¢Uôb IQGOEÉH ºb ,᪩WC’G »¡W OôéÃ
.AÉ£¨dG íàaGh (OFF) 𫨰ûàdG ±É≤jEG ™°Vh ¤EG
óMCG ≈∏Y á∏°ùdG ™°Vh øµÁ .âjõdG øe ¢UôëH á∏°ùdG ádGREÉH ºb
É¡àaÉ°VEG πÑb ᪩WC’G øe IóFGõdG áHƒWôdG ádGREÉH ºb :á¶MÓe
.øNÉ°ùdG âjõdG ¤EG
É¡«∏b ܃∏£ŸG ᪩WC’G áaÉc .á∏°ùdG áÄÑ©J ‘ •GôaE’G ÖæŒ •
.âjõdG iƒà°ùe πØ°SCG ¿ƒµJ ¿CG Ωõ∏j
.âjõdG πNGO ¤EG ¢UôëH á∏°ùdG ¢†ØîH ºb •
.᪩WC’G øe âjõdG á«Ø°üàd »¡£dG AÉYh ÖfGƒL
AÉYh hCG á«fÉ£∏°S ‘ ᪩WC’G ™°Vh øµÁ ,óFGõdG âjõdG øe ¢ü∏îà
.á«bQƒdG ïÑ£ŸG ∞°TÉæe hCG ¿ƒgó∏d ¢UÉe ¥QƒH ø£Ñe/áæ£Ñe
≈àM ¬côJGh ΩGóîà°S’G ó©H AÉHô¡µdG Qó°üe øY RÉ¡÷G π°üaG
∏d
IQGô◊G áLQO ìÉÑ°üe A»°†j ±ƒ°S ,»¡£dG IÎa AÉæKCG :á¶MÓe
𫨰ûJ ±É≤jEGh 𫨰ûJ ¿CG ∂dP ô¡¶j .ôNB’ ÚM øe ÅØ£æjh
.áªFÓŸG »¡£dG IQGôM áLQO ≈∏Y ®ÉØë∏d äÉà°SƒeÌdG
.OÈj
.É¡«∏b ܃∏£ŸG ᪩WC’G ᫪c ≥ah É¡£Ñ°V Ωõ∏jh OÉ°TQE’G ¤EG §≤a ±ó¡J ∫hó÷G Gòg ‘ IQƒcòŸG »¡£dG äÉbhCG
(≥FÉbO) »Ñjô≤àdG »∏≤dG âbh (ΩGôL) ¿Rh ≈°übCG (ájƒÄe áLQO) âjõdG IQGôM áLQO ΩÉ©£dG
5 ¤EG 3 25 130 ¿É«HhQ
4 ¤EG 3 150 140 π°üH äÉ≤∏M
8 ¤EG 6 300 140 ô£a
6 ¤EG 5 250 150 ∂ª°S íFGô°T
8 ¤EG 6 300 150 äÉ«∏≤ŸG á∏«ÑàJ á£∏N ™e ∂ª°S íFGô°T
10 ¤EG 7 300 150 ∂ª°ùdG äGôc hCG ™£b
10 ¤EG 7 300 170 º◊ íFGô°T
10 ¤EG 7 300 170 º◊
10 ¤EG 6 300 180 êÉLO ™£b
10 ¤EG 7 300 190 á«∏≤e ÉWÉ£H
.AÉ£¨dG ≥∏ZCG •
»∏≤dG π«dO
ádGREÉH í°üæf ,ΩɶàfÉH IÓ≤ŸG ΩGóîà°SG ΩóY ádÉM ‘ :á¶MÓe
,≥∏¨e AÉYh ‘ âjõdG øjõîàH ºb .É¡æjõîJ AÉæKCG IóMƒdG øe âjõdG
.OQÉH ¿Éµe ‘ hCG áLÓãdG ‘ ¬H ®ÉØàM’G π°†Øjh
∞«¶æàdG
AGôLEG hCG ∞«¶æàdG πÑb AÉHô¡µdG Qó°üe øY RÉ¡÷G π°üaG •
.áfÉ«°U ájCG
¢Tɪb á©£b ΩGóîà°SÉH »°ù«FôdG …hÉ◊G AÉYƒdG ∞
«¶æJ Ωõ∏j •
.áØ«¶f á∏∏Ñe
áfÉ«°üdG
âbƒdG øe á∏jƒW IÎØd 𫨰ûà∏d ôµjO ófBG ∑ÓH IGOCG º«ª°üJ ”
ΩGóîà°S’G ≈∏Y ôªà°ùŸG »°VôŸG 𫨰ûàdG ∞bƒàj .áfÉ«°U πbCÉHh
.…QhódG ∞«¶æàdGh ºFÓŸG
IÓ≤ŸG ≠jôØJ
AÉYh ‘ »∏≤dG á«fÉ£∏°S øe âjõdG Öµ°ùH ºb ,IÓ≤ŸG OÈJ ÉeóæY
âjR øe ¢ü∏îàdÉH á°UÉÿG á«∏ëŸG íFGƒ∏dG ÉkªFGO ™ÑJG .ºFÓe
.Ωóîà°ùŸG »¡£dG
-11-
Page 12

Arabic
ÖFÉ≤ëdGh ∞«∏¨àdG OGƒe áaÉc ádGREÉH ºb ,ΩGóîà°SÉdG πÑb
»¡£dG AÉYhh »∏≤dG á∏°S ∞«¶æàH ºbh ¿ƒJôµdGh ᫵«à°SÉ∏ÑdG
.IƒZôdG ô«ãc ÅaGO AɪH (7)
»LQÉîdG í£°ùdGh ø«î°ùàdG ô°üæY áaɶf ≈∏Y ÉkªFGO ¢UôMG •
.áÑjôZ OGƒe ájCG øe √ƒ∏Nh (7) »¡£dG AÉYƒd
.ΩGóîà°SÉdG πÑb Gkó«L IóMƒdG ∞ØL •
…ODƒj å«M ;âjõdÉH Gkó«L É¡àÄÑ©J πÑb IóMƒdG 𫨰ûJ ÖæéJ •
.IóMƒdG ∞∏J ≈dEG ∂dP
ΩGóîà°SÉdG
»£N ø«H ™≤j iƒà°ùe ≈àM âjõdÉH IÉ∏≤ªdG áÄÑ©J øe ócCÉJ •
»∏NGódG ÖfÉédG »a (8) ≈fOCÉdG óëdGh ≈°übCÉdG óëdG QÉ¡XEG
.»¡£dG á«YhCG øe
»a á∏°ùdG OƒLh ™e ƒà°ùe í£°S ¥ƒa IóMƒdG ™°Vh øe ócCÉJ •
.(4) AÉ£¨dG ¥É∏ZEGh »¡£dG AÉYh »a »∏Ø°ùdG ™°VƒdG
.Ö°SÉæe AÉHô¡c Qó°üªH RÉ¡édG π«°UƒàH ºb •
áLQO ≈dEG (2) IQGôëdG áLQO »a ºµëàdG ¢Uôb IQGOEÉH ºb •
(3) äÉà°SƒeôãdG ìÉÑ°üe A»°†j ±ƒ°S .áHƒ∏£ªdG IQGôëdG
.¬æ«î°ùJ …ôéj âjõdG ¿CG QÉ¡XEÉd
•
πµ«¡dGh AÉ£¨dGh á«fÉ£∏°ùdG πãe ,áæNÉ°ùdG í£°SCÉdG ¢ùª∏J Éd •
ÉkªFGO ¢UôMG .ójôÑàdG Iôàa hCG ΩGóîà°SÉdG AÉæKCG ,»°ù«FôdG
.¢†HÉ≤ªdG ΩGóîà°SG ≈∏Y
.≠jôØàdG hCG πªëdG πÑb ¿GOôÑj ≈àM âjõdGh IÉ∏≤ªdG ∑ôJG •
Iôàa AÉæKCGh ΩGóîà°SÉdG AÉæKCG áæNÉ°S í£°SCÉdG ¿ƒµJ ¿CG øµªj •
.á≤aôªdG á«fÉ£∏°ùdG »a §≤a »¡£dG »¨Ñæj •
.»¡£dG AÉæKCG AÉ£¨dG ≥∏ZCG •
áaÉ°VEG ÖæéJh áØ∏àîªdG âjõdG ´GƒfCG §∏N ÉkeɪJ ÖæéJ •
.Ωóîà°ùªdG âjõdG ≈∏Y ójóédG âjõdG
.áZQÉa IÉ∏≤e »a IóªéªdG ¿ƒgódG ÜòJ Éd •
.ájƒ¡à∏d IÉ∏≤ªdG ∫ƒM Ék«aÉc ÉkZGôa ÉkªFGO ∑ôJG •
äÉKÉ©ÑfG hC
G øNÉ°S í£°S
IÉ∏≤ªdG πµ«g 1
.ójôÑàdG
!ôjòëJ
Caution: Hot surface
AGõLCÉdG
É¡H ≈
°UƒªdG IQGôëdG áLQO äGOGóYEG øe ójó©dG ∑Éæg :á¶MÉ∏e
√òg øe ¢Vô¨dG ,Ωóîà°ùªdG π«dO »ah IóMƒdG ≈∏Y IQƒcòe
.§≤a OÉ°TQEÉdG ƒg äGOGóYEÉdG
áLQO ≈dEG âjõdG ∫ƒ°Uh OôéªH ìÉÑ°üªdG ÅØ£æj ±ƒ°S •
âjõ∏d ≥Ñ°ùªdG ø«î°ùàdG á«∏ªY øª°†J .áHƒ∏£ªdG IQGôëdG
᪩WCÉdG ¥É°üàdG ΩóY ᪩WCÉdG áaÉ°VEG πÑb á«Ø«µdG √ò¡H
.âjõ∏d ᪩WCÉdG ¢UÉ°üàeG ΩóY Ék°†jCG øª°†Jh á∏°ùdÉH
¢†HÉ≤ªdG ΩGóîà°SÉH ¿ÉeCÉH øNÉ°ùdG AÉ£¨dG íàa øµªj •
.AÉ£¨dG øe »eÉeCÉdG AõédG »a IOƒLƒªdG
.»¡£dG AÉYh ÖfÉL ¥ƒa É¡©°Vh âjõdG êQÉN á∏°ùdG ™aQG •
.á∏°ùdG »a ᪩WCÉdG áaÉ°VEÉH ºb •
IQGôëdG áLQO »a ºµëàdG ¢Uôb 2
äÉà°SƒeôãdG ìÉÑ°üe 3
ádGREÉ∏d πHÉb AÉ£Z 4
ádGREÉ∏d á∏HÉb »∏b á∏°S 5
ádGREÉ∏d á∏HÉ≤dG á∏°ùdG ¢†Ñ≤e 6
ádGREÉ∏d πHÉb »¡W AÉYh 7
≈fOCÉdG óëdGh ≈°übCÉdG óëdG QÉ¡XEG »£N 8
ΩGóîà°SÉ∏d OGóYEÉdG
á∏°S »a (6) ádGREÉ∏d á∏HÉ≤dG á∏°ùdG ¢†Ñ≤e Ö«côJ Ωõ∏j •
ᩪée ájCG Ωóîà°SG Ωõ∏j Éd .(5) ádGREÉ∏d á∏HÉ≤dG »¡£dG
.iôNCG
-21-
Page 13

«∞ºö±W «∞JNd°UzOW
Arabic
¥πV ¢uÅOq ≥c« «∞LM∑Z °ºKp √¸{w. ¢QØb œ«zLU
√Ê ±Bb¸ «∞∑OU¸ ±∑u«≠o ±l «∞Hu∞DOW «∞L∂OMW ´Kv ∞
IÉ∏≤ª∏d á«aÉ°VEÉdG áeÉ∏°ùdG äɪ«∏©J
.πFGƒ°ùdG »a ¢ùHÉ≤dG hCG ∂∏°ùdG hCG RÉ¡édG ¢ùª¨J Éd •
°Fb «ôß∑ªb«Â
u•W «∞LFU¥d….
¥πV √Ê ¢∑u«≠o ±IU°f «∞∑OU¸ ±l «∞LQîc. ô ¢Fb‰
«∞IU°f √°b« °QÍ •U‰. ô ¢º∑ªb ±IU°f ±NU¥T ±l «_§Ne…
«∞LuÅKW °ºKp √¸{w («∞HµW 1). «∞Iu«°f ¨Od «∞LFb∞W Ë«∞
LPîc «∞Lu«≠IW ∞NU ß∑IKq ±s îDd «∞Bb±W «∞JNd°OW.
Ø∂ö‹ «∞∑uÅOq ˱M∑πU‹ «∞HµW 1
• ¥πV «ß∑ªb«Â Ø∂q £ö£w «∞IKV ±l ¢uÅOq √£MU¡ ¢uÅOq
§NU“„ °ºKp √¸{w Ë¢dØO∂W ±s «∞HµW 1.
• ¥LJs «ß∑ªb«Â 03  (001 ÆbÂ) °bËÊ ≈ßd«· ≠w
«∞∑OU¸ «∞JNd°w.
• ≥c« «∞LM∑Z ¨Od ±Fb ∞öß∑ªb«Â ±s Æ∂q «∞BGd √Ë
«∞Fπe… ±U ∞r ¥Js ≥MU„ ±s ¥d«Æ∂Nr. ¥πV ±d«Æ∂W
«_©HU‰ ∞K∑QØb ±s ´b ∞F∂Nr ≠w «∞πNU“.
• ≈–« ¢Fd÷ Ø∂q «∞∑OU¸ ∞K∑Kn ≠OπV «ß∑∂b«∞t ∞bÈ
«∞LBMl √Ë ±dØe «∞ªb±W «∞LF∑Lb ∞AdØW °ö„ ¬≤b œ¥Jd
∞∑πMV «∞LªU©d.
AGOq
• «•d’ ´Kv ≠Bq «∞πNU“ Ë≤eŸ «∞IU°f ±s ±Qîc
«∞∑OU¸ Æ∂q ¢d„ «∞πNU“ œËÊ ±d«Æ∂W √Ë Æ∂q ¢GOOd √Ë
¢MEOn √Ë ≠∫h √Í ±s √§e«¡ «∞πNU“
• ´Mb ´b «ôß∑ªb«Â, ¥πV ¢ªe¥s «∞πNU“ ≠w ±JUÊ
§U· °FOb«Î ´s «_©HU‰
´LKOW «∞H∫h Ë«ùÅöÕ
• Æ∂q ´LKOW «∞∑AGOq, «•d’ ´Kv ≠∫h
«∞πNU“ ôØ∑AU· «_§e«¡ «∞LFO∂W √Ë «∞∑U∞HW √Ë
«∞LJºu¸… √Ë √Í ¢Kn ≠w «∞LHU¢O` √Ë √Í •U∞W
√îdÈ Æb ¢R£d ´Kv ´LKOW «∞∑
• ¥πV «ôß∑FU≤W °U∞LM∑Z √Ë ËØOq îb±U¢t √Ë √Í ≠Mw ´Kv
≤Hf œ¸§W «∞∑Q≥Oq ôß∑∂b«‰ «_ßö„ «∞∑U∞HW ±s √§q
∞∑HUœÍ √Í √îDU¸ ±LJMW.
• ô ¢∫Uˉ «ß∑ªb«Â «∞πNU“ ´Mb ¢Kn √Ë ´DV √Í §e¡
≠Ot
• ¥πV «ôß∑FU≤W °uØOq «∞BOU≤W «∞LF∑Lb ùÅöÕ «_§e«¡
«∞∑U∞HW Ë«∞LFO∂W ≠w «∞πNU“
• Æ∂q «ôß∑ªb«Â, «•d’ ´Kv ≠∫h ßKp «∞DUÆW
ô Ø∑AU· ˧uœ √Í ´ö±U‹ «∞∑Kn ≠Ot
.âjõdG ≈∏Y è∏ãdG hCG AɪdG áaÉ°VEG ÉkeɪJ QòMG •
᪩WCÉdG »¡W óæY QòëdG øe ójõe »NƒJ »¨Ñæj •
.IóªéªdG
ΩGóîà°SG ≈∏Y §≤a QÉ°üàbÉdG IÉ∏≤ªdG √òg ™e »¨Ñæj •
.IOƒédG »dÉY »¡W âjR
Üô°ùàj ób å«M ;IÉ∏≤ªdG íàa óæY QòëdG »NƒJ »¨Ñæj •
.íàØdG óæY øNÉ°S QÉîH É¡æe
IÉØ°üªdG AÉ£Z äÉëàa øe øNÉ°ùdG QÉîÑdG Üô°ùàj ób •
.ΩGóîà°SÉdG AÉæKCG
• ô ¢∫Uˉ «ß∑ªb«Â «∞πNU“ ´Mb ˧uœ ¢Kn √Ë ´OV
≠w ßKp «∞DUÆW √Ë ±Qîc «∞∑OU¸
• ¥πV «ôß∑FU≤W °uØOq «∞BOU≤W «∞LF∑Lb ôß∑∂b«‰
«_ßö„ √Ë ±Qîc «∞∑OU¸ «∞∑U∞n √Ë «∞LFOV •∑v ¥∑r
¢HUœÍ √Í √îDU¸ ±LJMW.
• ô ¢∫Uˉ ≠p √Ë «ß∑∂b«‰ √Í §e¡ ¨Od «_§e«¡
«∞LcØu¸… ≠w «∞b∞Oq
• ô ¢∫Uˉ ≈ÅöÕ ≥cÁ «∞πNU“ ±DKIUÎ. ¥d§v
«ôß∑FU≤W °QÆd» ±dØe ±s ±d«Øe °ö„ √≤b œ¥Jd √Ë √
Æd» ±dØe îb±W ±F∑Lb ùÅöÕ ≥c« «∞πNU“.
-31-
Page 14

Arabic
øjôNBÉdG áeÉ∏°S
.¬eGóîà°SG AÉæKCG á©HÉàe ¿hO RÉ¡édG ∑ôJ ΩóY Ωõ∏j •
√òg ≈∏Y ™∏£e ô«Z ¢üî°T …CG hCG ,∫ÉØWCÉ∏d íª°ùJ Éd •
.RÉ¡édG Gòg ΩGóîà°SÉH ,äGOÉ°TQEÉdG
°IU¡ ßKp «∞DUÆW °FOb«Î ´s «∞∫d«¸… Ë«∞e¥X Ë«∞∫u«·
«∞∫Uœ….
Æ∂q ¢dØOV √Ë ≠p «_§e«¡ √Ë ´Mb ≈§d«¡ «∞BOU≤W √Ë Æ∂q
«∞∑MEOn
°Fb ≈©HUzt ±∂U®d…
≠w ≠dÊ ¢r ≈•LUƒÁ √Ë °U∞Id» ±MNr.
°AJq §Ob ˱ö¡±∑t ∞öß∑ªb«Â ±l ≥c« «∞πNU“.
• ô ¢Ab «∞ºKp ∞MeŸ «∞IU°f ±s ±Qîc «∞∑OU¸. «•d’ ´Kv
• «≤eŸ «∞IU°f ±s ±Qîc «∞∑OU¸ √£MU¡ ´b «ôß∑ªb«Â √Ë
• ¥LJs √Ê ¢JuÊ «_ßD` ßUîMW √£MU¡ «ß∑ªb«Â «∞πNU“ √Ë
¥d§v Æd«¡… ≥c« «∞b∞Oq °FMU¥W Ø∂Od… Æ∂q
«ß∑ªb«Â «∞πNU“.
• ô ¢Cl «∞πNU“ ´Kv ≠dÊ ¨U“ √Ë ≠dÊ ØNd°Uzw ßUîs √Ë
• ´Mb «ß∑ªb«Â ßKp ¢Lb¥b, ¥d§v «∞∑QØb ±s ¢uÅOKt
Lu«œ:
√¨d«÷ «ôß∑ªb«Â
¢r ¢BLOr ±Iö… °ö„ √≤b œ¥Jd «∞FLOIW ∞DNw «∞L∫∑u¥U‹
«∞LcØu¸… ≠w œ∞Oq «∞IKw
≥c« «∞πNU“ ±Fb ∞öß∑ªb«Â «∞LMe∞w ≠Ij
¢FKOLU‹ «∞ºö±W
¢∫c¥d! ´Mb «ß∑ªb«Â «_§Ne… «∞JNd°UzOW «∞LuÅKW
°ªDu◊ «∞DUÆW «∞dzOºOW, ¥d§v «¢∂UŸ ¢FKOLU‹ «∞ºö±W
«∞∑U∞OW ∞K∫b ±s ≠d’ ËÆuŸ «∞∫d«zo Ë«ùÅU°W °U∞Bb±U‹
«∞JNd°UzOW Ë/√Ë ≈ÅU°W «_®ªU’ Ë¢Kn «∞
• ¥∫∑uÍ ≥c« «∞J∑OV ´Kv «∞Gd÷ ±s «ß∑ªb«Â ≥c«
«∞πNU“. ¥LJs √Ê ¢M∑Z ≈ÅU°U‹ «_®ªU’ §d«¡
«ß∑ªb«Â ±K∫IU‹ £U≤u¥W ∞r ¥uÅv °NU ±M∑Z «∞πNU“ √Ë
«ß∑ªb«Â «∞πNU“ ≠w ¨Od «∞Gd÷ «∞LFb ∞t
πª©dG á≤£æe øe ÜGôàbÉdÉH äÉfGƒ«ëdG hCG ∫ÉØWCÉ∏d íª°ùJ Éd •
.»FÉHô¡µdG QÉ«àdG ∂∏°S hCG RÉ¡édG ¢ùªd hCG
RÉ¡édG ΩGóîà°SG óæY á≤«bódG á©HÉàªdGh QòëdG »NƒJ Ωõ∏j •
.∫ÉØWCÉdG øe Üô≤dÉH
äGQó≤dG hhP ¢UÉî°TCÉdG ¬eóîà°ù«d ºª°üe ô«Z RÉ¡édG Gòg •
IôÑîdGh áæjóàªdG á«∏≤©dGh á«°ùëdGh á«ægòdGh ájó°ùédG
πX »a ÉdEG (∫ÉØWCÉdG ∂dP »a ɪH) ø«à∏«∏≤dG áaô©ªdGh
ΩGóîà°SÉH á≤∏©àªdG äɪ«∏©àdG º¡FÉ£YEG hCG º¡«∏Y ±Gô°TEÉdG
.º¡àeÉ∏°S øY
∫hDƒ°ùªdG ¢üî°ûdG πÑb øe RÉ¡édG
.RÉ¡édÉH º¡ãÑY ΩóY ¿Éª°†d ∫ÉØWCÉdG ≈∏Y ±Gô°TEÉdG Ωõ∏j •
• ¥d§v «ô•∑HUÿ °Nc« «∞b∞Oq ∞Kd§uŸ ≈∞Ot ≠w «∞Lº∑I∂q
• «•d’ ´Kv √Ê ¥JuÊ ±ºU¸ «∞ºKp ¬±MU •∑v ô ¢∑F∏d ≠Ot
• ô ¢Cl ≥c« «∞πNU“ ¢∫X ±Qîc «∞IU°f ±∂U®d…
√£MU¡ «ôß∑ªb«Â
• ¢QØb ±s ≈¨ö‚ «∞πNU“ Æ∂q ¢uÅOKt √Ë ≠BKt ±s ±Qîc
«∞∑OU¸
• ô ¢bŸ «∞ºKp ¥∑b∞v ≠u‚ •U≠W «∞LMCb…
• ¥πV ¢uîw «∞∫c¸ œ«zLUÎ ´Mb «ß∑ªb«Â «∞πNU“
-41-
Page 15

Arabic
4
AGõLCÉdG ∞jô©J
IÉ∏≤ªdG πµ«g 1
IQGôëdG áLQO »a ºµëàdG ¢Uôb 2
äÉà°SƒeôãdG ìÉÑ°üe 3
1
3
ádGREÉ∏d πHÉb AÉ£Z 4
ádGREÉ∏d á∏HÉb »∏b á∏°S 5
ádGREÉ∏d á∏HÉ≤dG á∏°ùdG ¢†Ñ≤e 6
ádGREÉ∏d πHÉb »¡W AÉYh 7
2
130
150
170
190
ºC
O
F
F
4
≈fOCÉdG óëdGh ≈°übCÉdG óëdG QÉ¡XEG »£N 8
4
7
8
2
7
6
6
5
5
5
-51-
Page 16

WARRANTY REGISTRATION CARD
YOUR NAME/
YOUR ADDRESS
POSTCODE
DATE OF PURCHASE
DEALER'S NAME & ADDRESS/
«ùßr
«∞FMu«Ê
«∞d±e «∞∂d¥bÍ
¢U¸¥a «∞Ad«¡
≈ßr Ë ´Mu«Ê «∞∂Uzl
PRODUCT MODEL NO. EF1220
Page 17

Names & Addresses for Black & Decker Service Concessionaries
Afghanistan: Ishan National Co., Opp. Ministry of Justice, Kabul. Tel.: +93-2-2101727. Algeria: SARL Outillage Corporation, 04
Route De Dely Brahim Cheraga, Alger. Tel.: +213-21-364363/508, Fax: +213-21-369667. Bahrain: Fawaz Al Zayani, P.O.Box
26563, Adliya, Manama. Tel.: +973-17-715252/712756, Fax: +973-17-713789. Bangladesh: Ultra Corporation, 8, Kushol
Centre, Uttara, Dhaka 1230. Tel.: +880-2-8919272/9756 Ext.28, Fax: +880-2-9887167. Egypt: Anasia Egypt for Trading S. A.
E., P.O.Box 2443, 110 Mostafa Refaat Street, Sheraton Heliopolis 11361, Cairo. Tel.: +20-2-2684159, Fax: +20-2-2684169.
Ethiopia: Tewfik Sherif & Co. Ltd., P.O.Box 5583, Debre Zeit Road, Addis Ababa. Tel.: +251-1-651700/601, Fax:
+251-1-650570. India: Gryphon Impex Pvt. Ltd., D-6/4, Okhla Industrial Area, Phase-I, New Delhi-110020. Tel.:
+91-11-26372602-4, Fax: +91-11-26372601. Iran: Tehran - Service Centre of Iran, No 510, South Karger Ave, Below Pasteur
Sq. Tehran. Tel.: +98-21-6490608/0656/6407672. Kish Island: Cayhan Electric Co., No. 69, Paradise Shopping Centre, Kish
Island. Tel.: +98-76444-22894. Jordan: Bashiti Hardware, P.O.Box 1564, TLA Ali, Amman. Tel.: +962-6-5350009/4770741,
Fax: +962-6-5350012/4789783. Kenya: Zylog Enterprises, IPS Building, Kuanda Street, P.O.Box 40877, Nairobi. Tel.:
+254-2-338188/199, Fax: +254-2-330642. Kuwait: Al Omar Technical Co., P.O.Box 4062, 13041 Safat, Kuwait. Tel.:
+965-4848595/0039, Fax: +965-4845652. Lebanon: Est. F.A. Kettaneh SA, P.O.Box 110242, Dora Highway, Kettaneh
Building, Beirut. Tel.: +961-1-255860/6, Fax: +961-1-255891. Libya: El Ghoul Brothers, P.O.Box 348, Islamic Call Bldg., Office
201-202, Benghazi. Tel.: +218-61-9097681/4183, Fax: +218-61-9094123. Madagascar: Group Tana Confort S. A. R. L., B. P.
1770, Antananarivo. Tel.: +261-20-2264505, Fax: +261-20-2264244. Malta: John G. Cassar Ltd., 36 Victory Str, Qormi QRM
06, Malta. Tel.: +356-21-493251, Fax: +356-21-483231. Mauritius: Happy World Marketing Ltd., Block 2, Industrial Estate,
Coromandel, P.O.Box 429, Port Louis. Tel.: +230-2076700, Fax: +230-2337330/7400. Nepal: Universal Trading Centre,
P.O.Box 1947, Tripureswor, Kathmandu. Tel.: +977-1-262192/260587/785, Fax: 261154. Nigeria: Amin Bros. Eng. Co. Ltd.,
30A (Plot 1291), Akin Adesola Street, Victoria Island, Lagos. Tel.: +234-1-3201778, Fax: +234-1-2613667. Oman: Oman Mktg.
& Service Co., P.O.Box 2734, Ruwi, Muscat. Tel.: +968-560232, Fax: +968-560255. Pakistan: Karachi - Ammar Service &
Spares, 60, Bank Arcade, Serai Road, Karachi. Tel.: +92-21-2426905, Fax: 2427214/5243. Pakistan: Lahore - Electronics Inn,
212-G Raja Centre, Main Market, Gulberg, Lahore. Tel.: +92-42-5756750. Philippines: Modern House International Enterprises,
213 Rizal Ave. Extension, between 2nd and 3rd Ave. Kalookan City. Tel.: +632 366-4487, Fax: +632 366-4489. Qatar: Al
Muftah Trading & Cont., P.O.Box 875, Doha. Tel.: +974-4650880/4446868, Fax: +974-4441415. Saudi Arabia: Dammam -
Ebrahim Fawaz Al Zayani, P.O.Box 76026, Al Raka, Dammam. Tel.: +966-3-8140914, Fax: +966-3-8140824. Jeddah: Anasia
Trading Co. Ltd. Caravan Shopping Centre, Hail Street. P. O. Box 50959, Jeddah-21477, Tel. 02 650 0948/02 636 3825, Fax 02
638 0720. Madina: Garziz Trdg. for Bldg. Mat.&Decor., P.O.Box 3364, Madina. Tel.: +966-4-8261490/8227636, Fax:
+966-4-8265741. Riyadh: Anasia Trading Co Ltd. New Akaria Building, 60th St., 3rd Floor, Building # 4, Office # 3402, Malaz. P.
O. Box. 18689, Riyadh-11425, Tel.: 01 478 2549, Fax: 01 478 2761. Yanbu: Bin Afif, P.O.Box 530 Yanbu, Al Bahr. Tel.:
+966-4-3222626/8867, Fax: +966-4-3222210. Sri Lanka: Delmege Gen. Equip. Pvt. Ltd., No. 428/1AT. B., Jaya Mawatha
(Darley Road), Colombo-10. Tel.: +94-11-2665914, Fax: +94-11-2665915. Sudan: United Distribution Company, P.O.Box 325,
Sayed Abdul Rehman Street, Khartoum. Tel.: +249-11-772612/777296, Fax: +249-11-770919. Tanzania: General Motors
Investment, P. O Box 16541, 14 Vingunguti Nyerere Road, Dar Es Salaam. Tel.: +255-22-2862661/5022, Fax:
+255-22-2862667/5412/3. Tunisia: STE Tunisienne De Quincaillerie Stq., Nvelle Z.I 2013, Ben Arous, Tunis, Tunisia, Tel: +216
71386102, Fax: +216 71380412. UAE: Abu Dhabi - Light House Electric., P.O.Box 120, Abu Dhabi. Tel.: +971-2-6726131, Fax:
+971-2-6720667. Dubai - Black & Decker (O) A.G., P.O.Box 5420, Dubai. Tel.: +971-4-7028234/233, Fax: +971-4-2822765.
Ideal Mach. & Equipt. R. W/shop P.O.Box 37116, Al Quoz, Dubai. Tel.: +971-4-3474160, Fax: +971-4-3474157. Sharjah -
McCoy Middle East LLC, P.O.Box 20228, Sharjah. Tel.: +971-6-5336321, Fax: +971-6-5336320. Uganda:
Kitgum House, 52 Station Road, P.O.Box 7436, Kampala. Tel.: +256-41-234567, Fax: +256-41-236413. Yemen: Aden - Middle
East Trad. Co. Ltd., Mulla Dakka, Aden. Tel.: +967-2-240950, Fax: +967-2-240952. Sana'a: Middle East Trad. Co. Ltd.,
P.O.Box 12363, Hayel Street, Sana'a. Tel.: +967-1-204201, Fax: +967-1-204204. Taiz: Middle East Trad. Co. Ltd., Campa area
near Al-Kair mosque, Taiz. Tel.: +967-4-231610/232033, Fax: +967-4-219869. Zimbabwe: J.D.Distributors, P.O.Box 226, 17
Bessemer Road, Graniteside, Harare. Tel.: +263-4-753913-7, Fax: 753918. Cyprus: G. Kyprianou Trading Co Ltd., 51
Prodromou AVE. Strovolos, 1681, P.O. Box 23318 Nicosia Cyprus. Tel.: 00357 22 468170/1, Fax: 00357 22 468186, Email
gktltd@spidernet.com.cy
The Building Centre,
 Loading...