

Page 1

Série, Serie CTO100 Series
USA/Canada 1-800-231-9786
Mexico 01-800-714-2503
www.blackanddecker.com
Accessories/Parts (USA/Canada) 1-800-738-0245
Accesorios/Partes
(EE.UU/Canadá)
Accessoires/Pièces (É.-U./Canada)
PLEASE READ AND SAVE THIS USE AND CARE BOOK.
POR FAVOR LEA ESTE INSTRUCTIVO ANTES DE USAR EL PRODUCTO.
VEUILLEZ LIRE ET CONSERVER CE GUIDE D’ENTRETIEN ET D’UTILISATION.
Countertop Convection Oven
Horno de convección para el mostrador
Four à convection
CTO100Pub10000011881 5/6/05 12:08 PM Page 1
Page 2

2
1
When using electrical appliances, basic safety precautions should always be
followed, including the following:
❑ Read all instructions.
❑ Do not touch hot surfaces. Use handles or knobs.
❑ To protect against risk of electrical shock, do not immerse cord, plug, or any
non-removable parts of this oven in water or other liquid.
❑ Close supervision is necessary when any appliance is used by or near
children.
❑ Unplug from outlet when not in use and before cleaning. Allow to cool
before putting on or taking off parts.
❑ Do not operate any appliance with a damaged cord or plug or after the
appliance malfunctions or is dropped or damaged in any manner. Return
the appliance to the nearest authorized service facility for examination,
repair, or electrical or mechanical adjustment. Or, call the appropriate tollfree number listed on the cover of this manual.
❑ The use of accessory attachments not recommended by the appliance
manufacturer may cause injuries.
❑ Do not use outdoors.
❑ Do not let cord hang over edge of table or counter, or touch hot surfaces.
❑ Do not place on or near a hot gas or electrical burner, or in a heated oven.
❑ Extreme caution must be used when moving an appliance containing hot
oil or other hot liquid.
❑ Turn all controls to OFF before inserting or removing plug from wall outlet.
❑ Do not use appliance for other than intended use.
❑ Oversize foods or metal utensils must not be inserted in this appliance, as
they may create a fire or risk of electric shock.
❑ A fire may occur if the toaster oven is covered or touching flammable
material including curtains, draperies, walls and the like, when in
operation. Do not store any item on top of unit when in operation.
❑ Do not clean with metal scouring pads. Pieces can break off the pad and
touch electrical parts resulting in a risk of electric shock.
❑ Extreme caution should be used when using containers constructed of other
than metal or glass.
❑ Do not store any material, other than manufacturer's recommended
accessories, in this oven when not in use.
❑ Do not place any of the following materials in the oven: paper, cardboard,
plastic wrap, and the like.
IMPORTANT SAFEGUARDS
SAVE THESE INSTRUCTIONS.
GROUNDED PLUG
As a safety feature, this product is equipped with a grounded plug, which will only fit
into a three-prong outlet. Do not attempt to defeat this safety feature. Improper
connection of the grounding conductor may result in the risk of electric shock.
Consult a qualified electrician if you are in doubt as to whether the outlet is properly
grounded.
ELECTRICAL CORD
a) A short power-supply cord (or detachable power-supply cord) is to be
provided to reduce the risk resulting from becoming entangled in or tripping
over a longer cord.
b) Longer detachable power-supply cords or extension cords are available and
may be used if care is exercised in their use.
c) If a long detachable power-supply cord or extension cord is used,
1) The marked electrical rating of the detachable power-supply cord or extension
cord should be at least as great as the electrical rating of the appliance,
2) If the appliance is of the grounded type, the extension cord should be a
grounding-type 3-wire cord, and
3) The longer cord should be arranged so that it will not drape over the
countertop or tabletop where it can be pulled on by children or tripped over.
NOTE: If the power supply cord is damaged, it must be replaced by the
manufacturer or its service agent or a similarly qualified person in order
to avoid a hazard.
❑ Do not cover crumb tray or any parts of the oven with metal foil. This will
cause overheating of the oven.
❑ To stop toasting, turn toast shade selector to TOAST OFF. To stop baking
or broiling, turn temperature control BAKE OFF and Timer to OFF.
CTO100Pub10000011881 5/6/05 12:08 PM Page 2
Page 3
4
3
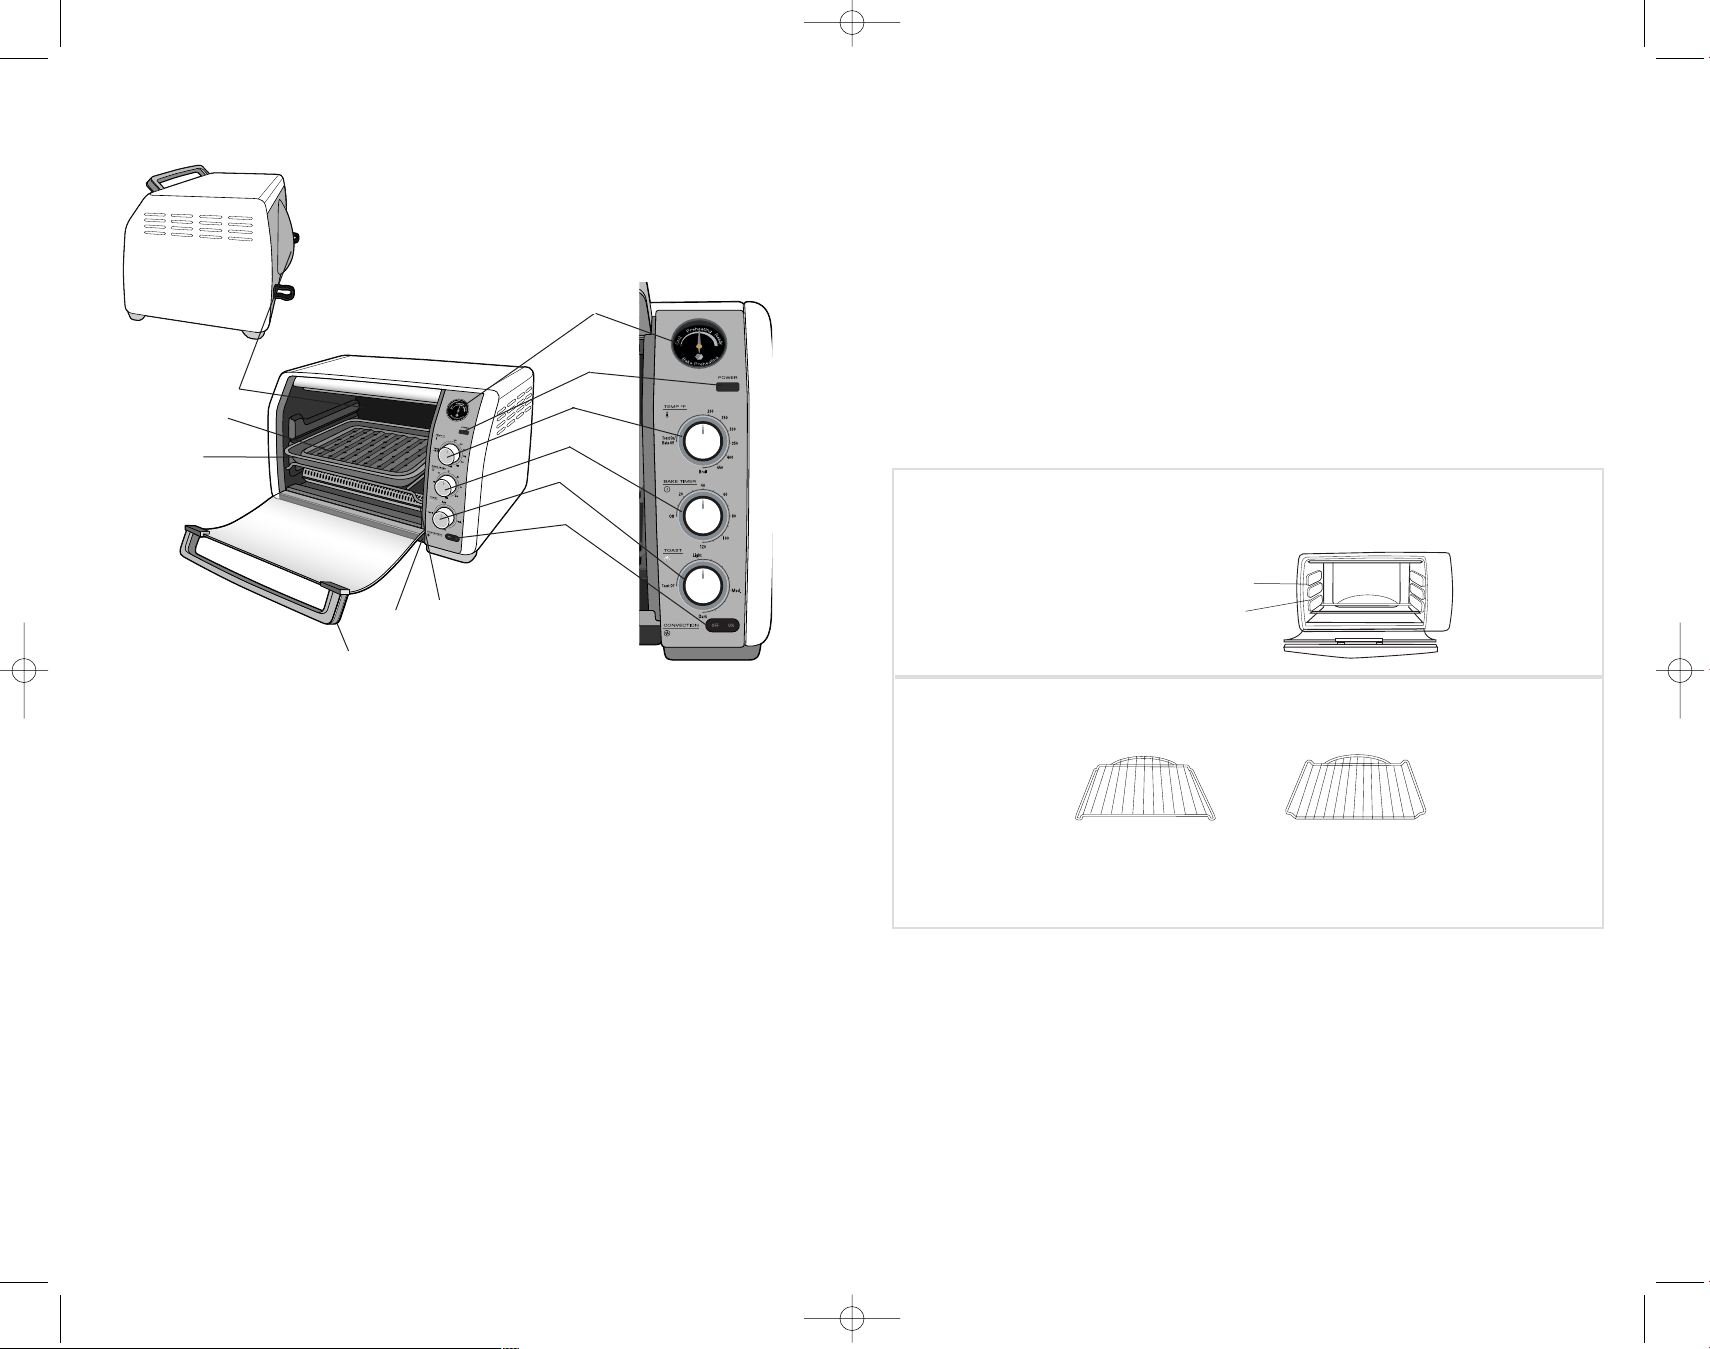
1. Bake preheating gauge
2. Power indicator light
3. Toast and Bake/Broil temperature control
4. 120-minute bake timer
5. Toast shade selector
6. Convection switch
†7.Slide rack (Part # 14582101)
†8.Slide-out crumb tray
(Part # 1471110213710303 (W)) (Part # 1471110213710304 (B))
9. Ergonomic door handle
†10. Bake pan (Part # 14581201)
†11. Broil rack (Part # 14581301 )
12. Extra-deep curved interior
†Consumer replaceable
Product may vary slightly from what is illustrated.
How to Use
This product is for household use only.
Getting Started
• Remove packing materials and any stickers.
Important: For warranty verification, please do not remove line cord sticker.
•Wash all parts as instructed in the Care and Cleaning section.
• Select a location for the unit. Leave some space between the back and top of the unit and your
cabinet and walls to allow heat to flow without damaging counter space.
• Insert the crumb tray underneath the bottom heating elements.
• Plug the unit into a standard outlet.
Using Slide Rack
The slide rack must be used for all cooking functions. It may be inserted into either the upper or
lower rack slot. It can also be inverted for two additional positions.
1 - top up 2 - top down
3 - bottom up 4 - bottom down
Slide Rack Positions
Convection oven has 2 slots with 4 rack positions
Upper slot (use rack positions 1 and 2)
Lower slot (use rack positions 3 and 4)
Toasting
1. Insert the slide rack in the lower slot (rack position (3)). It is not necessary to preheat the oven
for toasting.
2. Set the toast shade selector as desired. For best results, select the medium setting for your first
cycle, then adjust lighter or darker to suit your taste.
3. Be sure to turn temperature control to TOAST ON. The POWER indicator light comes on and
stays on during the toasting cycle. When toasting is done, the signal bell sounds. The oven
automatically shuts off and the POWER indicator light goes out.
4. To momentarily stop toasting at any time, open the oven door. The heating elements and the
POWER indicator light go out. Close the door to resume toasting. The heating elements and the
POWER indicator light turn back on.
CTO100Pub10000011881 5/6/05 12:08 PM Page 4
Page 4

5. If you want to stop the toasting before the timing cycle is complete, turn the toast shade
selector to TOAST OFF.
6. Using an oven mitt or pot holder, open the door and slide out the slide rack to remove food.
Caution: The oven is hot. Do not let your skin touch any surface.
Preheating
Note: For best baking results, always preheat the oven for 5 minutes.
Use the preheating gauge as a visual reference. Needle on gauge points to Ready when the set
oven temperature is reached. The letter "R" in the gauge marking "Ready" represents approximately
300°F (150°C).
Baking
1. Turn the temperature control to the desired temperature setting. Turn the timer to the desired
number of minutes, include preheating in timing.
2. Once oven is heated to desired temperature place the bake pan
containing food to be cooked on the slide rack and insert into oven (A).
3. The heating elements will cycle on and off to maintain the temperature.
To momentarily stop cooking, open the oven door; the heating elements
and the POWER indicator light go out. The timer continues to
countdown. To continue cooking, close the door. The heating elements
and the POWER indicator light turn back on. Check food for doneness at
minimum time.
4. Using the 120-minute bake timer, you will hear a bell sound once it reaches the set time. The
POWER indicator light goes out and the oven automatically shuts off. When finished cooking,
turn the temperature control to OFF. If cooking is done before the bell sounds, turn the timer to
(OFF). The POWER indicator goes out. Turn the temperature control to OFF.
5. Using an oven mitt or pot holder, open the door and slide out the slide rack to remove the bake
pan.
Caution: The oven is hot. Do not let your skin touch any surface.
Convection Cooking
To use for convection cooking press the convection switch to the ON position. Watch time
carefully as many foods will bake in less time in this mode. Turn switch to OFF after use.
Broiling
1. Insert the broil rack in the bake pan and place both on the slide rack (B).
2. Insert the slide rack in the top rack slot.
Note: The oven does not need to be preheated for broiling.
3. Turn the temperature control to BROIL. Closely monitor the food.
a. Using the 120-minute bake timer, turn the timer to the desired number
of minutes. You will hear a bell sound once it reaches the set time.
The POWER indicator light goes out and the oven automatically shuts
off. When finished broiling, turn the temperature control to BAKE OFF.
b. If broiling is done before the bell sounds, turn the timer to (OFF). The POWER indicator
goes out. Turn the temperature control to BAKE OFF.
4. To momentarily stop broiling, open the oven door, the heating elements and the POWER
indicator light go out. Close the door to resume broiling. The heating elements and the POWER
indicator turn back on. Check food for doneness at minimum cooking time.
5. When finished broiling, using an oven mitt or pot holder, slide out slide rack to remove
bake pan.
Caution: The oven is hot. Do not let your skin touch any surface.
6. Be sure when broiling is finished to turn the temperature control to BAKE OFF and 120-minute
bake timer to (OFF).
Care and Cleaning
This product contains no user serviceable parts. Refer service to qualified service personnel.
1. Turn off unit, unplug from wall outlet and let it cool before cleaning.
2. Clean the glass door with a nylon pad and sudsy water. Do not use a spray glass cleaner.
3. To remove slide rack, open the door, pull the rack forward and out. Wash in warm, sudsy water
or in a dishwasher.
To remove stubborn spots, use a polyester or nylon pad.
To replace the slide rack, open the door completely, slide into the rail and close the door.
4. Wash the bake pan and broil rack in warm, sudsy water or in the dishwasher. To minimize
scratching, use a polyester or nylon pad.
Note: Bake pan is not nonstick.
5. To remove the crumb tray, grasp the handle at the front of the oven and
pull it out (C). Dispose of crumbs and wash the tray in warm, sudsy water.
Remove stubborn spots with a nylon mesh pad. Be sure to dry thoroughly
before inserting the tray back into the oven.
Interior
1. Unplug the oven and let it cool, then wipe with a soapy sponge or nylon
pad after each use.
2. Do not use a chemical oven cleaner. Do not use any abrasive cleansers or scouring pads. Dry
with paper towel or soft cloth.
Exterior
Let the oven cool completely before cleaning any outer surface. Wipe with a damp cloth or sponge
and dry with paper towel or soft cloth.
Cooking Containers
Metal or ceramic bakeware without glass lids can be used in your oven.
Follow manufacturer’s instructions. Be sure the top edge of the container is at least 1" (2.54 cm)
away from the upper heating elements.
6
5
A
B
C
CTO100Pub10000011881 5/6/05 12:08 PM Page 6
Page 5

8
7
Cuando se utilizan aparatos eléctricos, se debe respetar ciertas medidas de
seguridad, incluyendo las siguientes:
❑
Por favor lea todas las instrucciones.
❑
No toque las superficies calientes. Utilice las asas o las perillas.
❑
A fin de protegerse contra un choque eléctrico, no sumerja el cable, el
enchufe ni ninguna pieza no removible del aparato.
❑
Se debe tomar mucha precaución cuando el producto se utilice por o en la
presencia de menores de edad.
❑
Desconecte el aparato de la toma de corriente cuando no esté en uso y antes
de limpiarlo. Espere que el aparato se enfríe antes de instalar o retirar los
accesorios.
❑
No se debe utilizar ningún aparato eléctrico que tenga el cable o el
enchufe averiado, que presente un problema de funcionamiento o que
esté dañado. Devuelva el aparato al centro de servicio autorizado más
cercano para que lo examinen, reparen o ajusten. También puede
llamar gratis al número apropiado que aparece en la cubierta de este
manual.
❑
El uso de accesorios no recomendados por el fabricante del producto
presenta el riesgo de lesiones personales.
❑
No utilice el aparato a la intemperie.
❑
No permita que el cable cuelgue del borde de la mesa o del mostrador ni
que entre en contacto con superficies calientes.
❑
No coloque este aparato sobre ni cerca de una hornilla de gas o eléctrica, ni
cerca de un horno caliente.
❑
Se debe tener extremada precaución cuando se mueve un aparato que
contiene aceite caliente o cualquier otro líquido caliente.
❑ Antes de enchufar o desconectar el aparato, todos los controles deben estar
en la posición de apagado (OFF).
❑
Utilice el aparato solamente con el fin previsto.
❑
A fin de evitar el riesgo de incendio o choque eléctrico, nunca introduzca
alimentos demasiado grandes ni utensilios de metal en el aparato.
❑
Existe el riesgo de incendio si el aparato permanece cubierto mientras está en
funcionamiento o si entra en contacto con cualquier material inflamable
incluyendo las cortinas y las paredes. Asegúrese de no colocar nada sobre el
aparato mientras está en uso.
❑
No utilice almohadillas de fibras metálicas para limpiar el aparato. Las fibras
metálicas podrían entrar en contacto con los componentes eléctricos del
aparato produciendo el riesgo de un choque eléctrico.
INSTRUCCIONES IMPORTANTES
DE SEGURIDAD
CONSERVE ESTAS
INSTRUCCIONES.
ENCHUFE DE TIERRA:
Como medida de seguridad, este producto cuenta con un enchufe de tierra que tiene
tres contactos. No trate de alterar esta medida de seguridad. La conexión inapropiada
del conductor de tierra puede resultar en un riesgo de choque eléctrico. Si tiene
alguna duda, consulte con un eléctricista calificado para asegurarse de que la toma
de corriente sea una de tierra.
CABLE ELÉCTRICO
a) El producto debe proporcionarse con un cable corto (o uno desmontable) para
reducir el riesgo de enredarse o de tropezar con un cable largo.
b) Se encuentran disponibles cables desmontables o de extensión más largos,
que es posible utilizar si se emplea el cuidado debido.
c) Si se utiliza un cable desmontable o de extensión,
1) El voltaje eléctrico del cable desmontable o del cable de extensión debe ser,
como mínimo, igual al del voltaje del aparato,
2) Si el aparato es del tipo que va connectado a tierra, el cable de extensión
deberá ser un cable de tres alambres connnectado a tierra.
3) El cable más largo debe acomodarse de modo que no cuelgue del mostrador
o de la mesa, para evitar que un niño tire del mismo o que alguien se
tropiece.
NOTA: Si el cordón de alimentación es dañado, éste debe ser reemplazado por
el fabricante, o su agente de servicio o por personal calificado para evitar
cualquier riesgo.
❑
Se debe tener mucho cuidado cuando se utilicen recipientes que no sean
de metal ni de vidrio.
❑
Cuando el aparato no esté en funcionamiento, asegúrese de no almacenar
nada más que los accesorios recomendados.
❑
No introduzca los siguientes materiales en el aparato: papel, cartón,
envolturas plásticas ni materiales semejantes.
❑
A fin de evitar que el aparato se sobrecaliente, no se debe cubrir la bandeja
de residuos ni ninguna otra superficie con papel metálico.
❑
Para interrumpir el ciclo de tostado, gire el selector del grado de tostado a la
posición (TOAST OFF). Para interrumpir el ciclo de cocción, gire el control
de temperatura a la posición (BAKE OFF) y ajuste el minutero a la posición
(OFF).
CTO100Pub10000011881 5/6/05 12:08 PM Page 8
Page 6

10
9
Este producto puede variar ligeramente del que aparece ilustrado.
1. Calibrador de precalentamiento del horno
2. Luz indicadora de funcionamiento
3. Control de temperatura para hornear/asar y tostar
4. Cronómetro de 120 minutos
5. Selector del grado de tostado
6. Interruptor de cocción por convección
†7.Parrilla corrediza (Pieza Nº 14582101)
†8.Bandeja de residuos removible
(Pieza Nº 1471110213710303 (W)) (Pieza Nº 1471110213710304 (B))
9. Asa ergonómica de la puerta
†10. Bandeja de hornear (Pieza Nº 14581201)
†11. Parrilla de asar (Pieza Nº 14581301)
12. Interior curvo extra profundo
† Reemplazable por el consumidor
Como usar
Este producto es para uso doméstico solamente.
Pasos preliminares
• Retire el material de empaque y toda calcomanía.
Importante: Para verificación de la garantía, por favor no retire la etiqueta del cable eléctrico.
• Lave todas las piezas según las instrucciones en la sección de cuidado y limpieza de este
manual.
• Determine adonde desea colocar el aparato. Asegúrese de que haya cierto espacio entre la
parte superior y trasera del aparato y los gabinetes y las paredes, de manera que el flujo de
calor no perjudique la superficie del mostrador.
• Instale la bandeja de residuos debajo de los elementos calefactores inferiores.
• Enchufe el aparato a una toma de corriente estándar.
Uso de la parrilla corrediza
La parrilla corrediza se debe de emplear con todas las funciones de cocción y puede ser
introducida en la ranura superior o inferior del aparato. Igualmente, uno la puede invertir
porque ésta ofrece dos posiciones adicionales.
1 - Parte superior hacia arriba 2 - Parte superior hacia abajo
3 - Parte inferior hacia arriba 4 - Parte inferior hacia abajo
Posiciones de la parrilla corrediza
El horno de convection tiene 2 ranuras y 4 posiciones para la parrilla
Ranura superior
(utilizar las posiciones 1 y 2)
Ranura inferior
(utilizar las posiciones 3 y 4)
Para tostar
1. Instale la parrilla corrediza en la ranura inferior (parrilla en la posición 3). No es necesario
precalentar el horno para tostar.
2. Ajuste el grado de tostado al nivel deseado. Para el primer ciclo de tostado, se recomienda el
nivel medio, luego ajuste entre claro y oscuro al gusto.
3. Asegúrese de girar el control de temperatura a la posición de tostar (TOAST ON). La luz
indicadora de funcionamiento (POWER) se enciende y permanece así durante el ciclo de
tostado. Al finalizar el ciclo de tostado, se escucha una señal audible. La luz indicadora de
funcionamiento (POWER) desaparece y el aparato se apaga automáticamente.
CTO100Pub10000011881 5/6/05 12:08 PM Page 10
Page 7

12
11
b. Si los alimentos están listos antes de sonar la campana de aviso, gire el cronómetro a la
posición de apagado (OFF). La luz indicadora se apaga. Gire el control de temperatura
a la posición de apagado (BAKE OFF).
4. Para interrumpir momentáneamente el ciclo de cocción, abra la puerta del aparato. Los
elementos calefactores y la luz indicadora de funcionamiento (POWER) se apagan. Para
continuar con el proceso de cocción, cierre nuevamente la puerta del aparato. La luz
indicadora de funcionamiento (POWER) y los elementos calefactores se encienden
nuevamente. Supervise los alimentos al cumplirse el tiempo mínimo de cocción.
5. Cuando termine de cocinar, utilice un protector o un guante de cocina para abrir la puerta del
aparato y deslizar la parrilla hacia afuera a fin de retirar la bandeja de hornear.
Advertencia: El horno se calienta. Evite el contacto de la piel con las superficies del aparato.
6. Una vez finalizado el ciclo de cocción, asegúrese de ajustar la temperatura a la posición de
apagado (BAKE OFF) y de girar el cronómetro de 120 min. a la posición de apagado.
Cuidado y limpieza
Este producto no contiene piezas reparables por el consumidor. Para servicio, acuda a personal
calificado.
1. Apague el aparato, desconecte de la toma de corriente y permita que se enfríe antes de
limpiarlo.
2. Limpie la puerta de vidrio con una almohadilla de nailon y agua jabonada. No utilice
rociadores de limpiar vidrios.
3. Para retirar la parrilla corrediza, abra la puerta del aparato y tire de la parrilla hacia enfrente.
Lave la parrilla corrediza con agua caliente jabonada o en la máquina lavaplatos. Para remover
las manchas persistentes, utilice una almohadilla de poliéster o de nailon. Para instalar esta
parrilla nuevamente, abra bien la puerta, deslice la parrilla en el carril del aparato y cierre
la puerta.
4. Lave la bandeja de hornear y la parrilla de asar, en agua jabonada o en la máquina lavaplatos.
Utilice una almohadilla de poliéster o de nailon a fin de evitar los rayones.
Nota: La bandeja de hornear no es de recubrimiento antiadherente.
5. Para retirar la bandeja de los residuos, sujete el asa en la parte delantera
del aparato y tire para afuera (C). Deseche las migajas y lave la bandeja
en agua tibia, jabonada. Elimine las manchas persistentes con una
almohadilla de nailon. Asegúrese de secar bien la bandeja antes de
instalarla nuevamente en el horno.
Interior
1. Desconecte el horno y permita que se enfríe. Limpie con una esponja jabonada o con una
almohadilla de nailon después de cada uso.
2. No utilice limpiadores químicos para hornos. No utilice limpiadores abrasivos ni almohadillas
de fregar. Seque bien con un paño suave o con papel de toalla.
Exterior
Permita que el horno se enfríe bien antes de limpiar cualquier superficie exterior. Limpie las
superficies exteriores con un paño o con una esponja humedecida. Seque bien con un paño suave
o con papel de toalla.
Recipientes de cocinar
Este aparato le permite utilizar recipientes de metal o de cerámica sin tapas de vidrio. Siga las
indicaciones del fabricante.
Asegúrese de que haya un espacio mínimo de 2,54 cm (1 pulg) entre el borde superior del
recipiente y los elementos calefactores.
4. Para interrumpir el ciclo de tostado, simplemente abra la puerta del horno. Se apagan los
elementos calefactores y la luz indicadora de funcionamiento (POWER). Cierre la puerta del
aparato para reiniciar el ciclo de tostado. Los elementos calefactores y la luz indicadora de
funcionamiento (POWER) se encienden nuevamente.
5. Si desea interrumpir el ciclo de tostado, gire el selector del grado de tostado a la posición de
apagado (TOAST OFF).
6. Utilice un protector o un guante de cocina para abrir la puerta del aparato y deslizar la parrilla
hacia afuera a fin de retirar los alimentos.
Precalentamiento
Nota: A fin de optimizar los resultados de cocción, siempre precaliente el horno durante
5 minutos. Utilice el calibrador de precalentamiento como referencia visual. La aguja del
calibrador indica cuando el horno alcanza la temperatura programada. La letra “R” que indica
“listo” en el calibrador, representa aproximadamente 150 °C (300 °F).
Advertencia: El horno se calienta. Evite el contacto de la piel con las superficies del aparato.
Para hornear:
1. Ajuste el control de temperatura al nivel deseado. Ajuste el cronómetro al tiempo de cocción
deseado, incluyendo el período de precalentamiento.
2. Una vez que el horno alcance la temperatura programada, coloque la
bandeja de hornear que contiene los alimentos a cocinar, sobre la parrilla
corrediza e introdúzcala en el horno (A).
3. Los elementos calefactores funcionan de manera intermitente a fin de
mantener la temperatura. Para interrumpir momentáneamente el ciclo de
cocción, abra la puerta del aparato. La luz indicadora de funcionamiento
(POWER) se apaga. No se interrumpe la cuenta regresiva del minutero.
La luz indicadora de funcionamiento (POWER) y los elementos
calefactores se encienden nuevamente. Supervise los alimentos al cumplirse el tiempo mínimo
de cocción.
4. Si utiliza el cronómetro de 120 min. del horno,, la señal audible suena al finalizar el tiempo
que uno ha programado, la luz indicadora de funcionamiento (POWER) desaparece y el
aparato se apaga automáticamente. Cuando termine de cocinar, gire el control de temperatura
a la posición de apagado (OFF). Si los alimentos están listos antes de sonar la campana de
aviso, gire el cronómetro a la posición de apagado (OFF). La luz indicadora de funcionamiento
(POWER) se apaga. Gire el control de temperatura a la posición de apagado (OFF).
5. Utilice un protector o un guante de cocina para abrir la puerta del aparato y deslizar la parrilla
hacia afuera a fin de retirar la bandeja de hornear.
Advertencia: El horno se calienta. Evite el contacto de la piel con las superficies del aparato.
Cocción por convección
Para cocinar los alimentos por convección, presione el interruptor de convección a la posición de
encendido (ON). Supervise el tiempo cuidadosamente ya que ciertos alimentos se cocinan más
rápido por este medio. Ajuste el interruptor a la posición de apagado (OFF) después de usar.
Para asar:
1. Coloque la parrilla de asar encima de la bandeja de hornear y luego,
coloque la bandeja sobre la parrilla corrediza del aparato (B).
2. Instale la parrilla corrediza en la ranura superior del aparato.
Nota: No se requiere precalentar el horno antes de asar.
3. Ajuste el control de temperatura a la posición de asar (BROIL). Supervise
de cerca los alimentos.
a. Si utiliza el cronómetro del horno, ajuste el control al tiempo de cocción deseado.
Una señal audible suena al finalizar el tiempo que uno ha programado, la luz indicadora
defuncionamiento (POWER) desaparece y el horno se apaga automáticamente. Cuando
termine de asar, ajuste el control de temperatura a la posición de apagado (BAKE OFF).
A
B
C
CTO100Pub10000011881 5/6/05 12:08 PM Page 12
Page 8

14
13
IMPORTANTES MISES EN GARDE
Lorsqu’on utilise un appareil électrique, il faut toujours respecter certaines
règles de sécurité fondamentales, notamment les suivantes.
❑
Lire toutes les directives.
❑
Ne pas toucher aux surfaces chaudes. Utiliser les poignées et les
boutons.
❑
Afin d’éviter les risques de secousses électriques, ne pas immerger le
cordon, la fiche ni toute autre pièce non amovible de l’appareil.
❑
Exercer une étroite surveillance lorsqu’on utilise l’appareil près d’un
enfant ou lorsque ce dernier s’en sert.
❑
Débrancher l’appareil lorsqu’on ne s’en sert pas et avant de le nettoyer.
Le laisser refroidir avant d’y ajouter ou d’en retirer un accessoire.
❑
Ne pas utiliser un appareil dont la fiche ou le cordon est abîmé, qui
présente un problème de fonctionnement, qui est tombé par terre ou qui
est endommagé. Retourner le produit au centre de service de la région
pour qu'il y soit examiné, réparé ou réglé électriquement ou
mécaniquement. Ou composer le numéro sans frais approprié indiqué
sur la page couverture du présent guide.
❑
L’utilisation d’accessoires non recommandés par fabricant présente des
risques de blessures.
❑
Ne pas utiliser l’appareil à l’extérieur.
❑
Ne pas laisser pendre le cordon d’une table ou d’un comptoir, ni le
laisser entrer en contact avec une surface chaude.
❑
Ne pas placer près ou sur une cuisinière au gaz ou à l’électricité
chaude, ni dans un four réchauffé.
❑
Déplacer avec une extrême prudence un appareil renfermant de l'huile
chaude ou tout autre liquide chaud.
❑
Mettre toutes les commandes à la position (OFF) avant de brancher ou
de débrancher l’appareil.
❑
Utiliser l'appareil seulement aux fins qu'il est prévu.
❑
Ne pas introduire dans l'appareil des aliments grandes dimensions ni
des ustensiles en métal qui pourraient provoquer des risques d'incendies
ou de secousses électriques.
❑
Il y a risque d'incendie lorsque le grille-pain est recouvert de matériaux
inflammables comme des rideaux, des draperies ou des revêtements
muraux, ou lorsqu'il entre en contact avec ceux-ci alors qu'il
fonctionne. Ne rien ranger sur l’appareil en service.
❑
Ne pas nettoyer l'appareil avec des tampons métalliques abrasifs.
Ces derniers peuvent s'effriter et entrer en contact avec les composants
électriques de l'appareil, ce qui présente un risque de secousses
électriques.
FICHE MISE À LA TERRE
Par mesure de sécurité, le produit comporte une fiche mise à la terre qui n’entre que
dans une prise à trois trous. Il ne faut pas neutraliser ce dispositif de sécurité. La
mauvaise connexion du conducteur de terre présente des risques de secousses
électriques. Communiquer avec un électricien certifié lorsqu’on se demande si la
prise est bien mise à la terre.
CORDON ÉLECTRIQUE
a) Le cordon d’alimentation de l’appareil est court (ou amovible) afin de
minimiser les risques d’enchevêtrement ou de trébuchement.
b) Il existe des cordons d’alimentation amovible ou de rallonge plus longs
et il faut s’en servir avec prudence.
c) Lorsqu’on utilise un cordon d’alimentation amovible de rallonge plus long,
il faut s’assurer que :
1) la tension nominale du cordon d’alimentation amovible ou de rallonge soit
au moins égale à celle de l’appareil, et que;
2) lorsque l’appareil est de type mis à la terre, il faut utiliser un cordon de
rallonge mis à la terre à trois broche; and
3) le cordon plus long soit placé de sorte qu’il ne soit pas étalé sur le comptoir
ou la table d’où des enfants pourraient le tirer, ni placé de manière à
provoquer un trébuchement.
NOTE : Lorsque le cordon d'alimentation est endommagé, il faut en confier la
réparation au fabricant, à son agent de service autorisé ou une personne
qualifiée afin d'éviter tout risque.
❑
Bien surveiller lorsqu'on utilise des plats qui ne sont pas en métal ni en
verre.
❑
Ne rien ranger d'autre que les accessoires recommandés par le fabricant
dans ce dernier lorsqu'il ne sert pas.
❑
Ne pas placer l’un des matériaux suivants dans le four : du papier, du
carton, de la pellicule plastique et d’autres matériaux du genre.
❑
Éviter de recouvrir le plateau à miettes ou toute autre pièce de
l'appareil de papier métallique car cela présente des risques de
surchauffe.
❑
Pour arrêter le cycle de grillage, placer le sélecteur du degré de grillage
à la position d'arrêt (TOAST OFF). Pour arrêter la cuisson ou le
rôtissage, régler le sélecteur de température à la position d'arrêt (BAKE
OFF) et la minuterie à la position d'arrêt (OFF).
CONSERVER CES INSTRUCTIONS.
CTO100Pub10000011881 5/6/05 12:08 PM Page 14
Page 9

16
15
1. Indicateur de réchauffement pour la cuisson
2. Témoin de fonctionnement
3. Commande de grillage et sélecteur de température ou de rôtissage
4. Minuterie de cuisson de 120 minutes
5. Sélecteur du degré de grillage
6. Interrupteur pour la convection
†7.Grille coulissante (pièce n° 14582101)
†8.Plateau à miettes coulissant
(pièce n° 1471110213710303 (W)) (pièce n° 1471110213710304 (B))
9. Poignée de porte
†10. Plat de cuisson (pièce n° 14581201)
†11. Lèchefrite (pièce n° 14581301)
12. Intérieur très profond et courbé
†Remplaçable par le consommateur
Le produit peut différer légèrement de celui illustré.
Utilisation
L'appareil est conçu pour une utilisation domestique seulement.
Démarrage
• Retirer tous les matériaux d'emballage et les autocollants.
Important : Afin de pouvoir en vérifier la garantie, ne pas retirer l’étiquette du cordon
d’alimentation.
• Laver toutes les pièces selon les directives de la rubrique relative à l'entretien et au nettoyage.
• Choisir un emplacement pour l'appareil. Il faut laisser de l'espace entre l'arrière de l'appareil
et le mur, ainsi qu'entre le dessus de l'appareil et le dessous des armoires afin de permettre
la circulation d'air et éviter d'endommager le comptoir.
• Insérer le plateau à miettes sous les éléments inférieurs.
• Brancher l'appareil dans une prise standard.
Utilisation de la grille coulissante
Il faut toutjours utiliser la grille coulissante. On peut l'insérer dans l'une des deux fentes prévues
à cet effet. On peut également l'inverser pour obtenir deux autres positions.
1 - Haut vers le haut 2 - Haut vers le bas
3 - Bas vers le haut 4 - Bas vers le bas
Positions de la grille coulissante
Le grille-pain a 2 fentes avec 4 positions de grille.
Fente supérieure
(pour les positions 1 et 2)
Fente inférieure
(pour les positions 3 et 4)
Grillage
1. Placer la grille coulissante dans la fente inférieure (la grille se trouve dans la position (3)).
Il n’est pas nécessaire de préchauffer le four pour le grillage.
2. Régler le sélecteur du degré de grillage au goût. Afin d'optimiser les résultats, choisir le réglage
moyen pour le premier cycle puis régler plus foncé ou plus pâle, au goût.
3. S'assurer de régler le sélecteur de température à la position de grillage (TOAST ON). Le témoin
de fonctionnement s’allume et demeure allumé pendant le grillage. Un timbre sonore se fait
entendre à la fin du cycle de grillage. Le four s'arrête automatiquement et le témoin de
fonctionnement s’éteint.
4. Ouvrir la porte pour interrompre arrêter le grillage en tout temps. Les éléments chauffants et le
témoin de fonctionnement s’éteignent. Refermer la porte pour reprendre le cycle de grillage.
Les éléments chauffants et le témoin se rallument.
CTO100Pub10000011881 5/6/05 12:08 PM Page 16
Page 10

18
17
5. Pour arrêter le cycle de grillage avant la fin, remettre le sélecteur du degré de grillage à la
position d'arrêt (TOAST OFF).
6. À l'aide d'une mitaine ou d'une poignée isolante, ouvrir la porte et faire glisser la grille
coulissante pour enlever les aliments.
Réchauffage
Note : Afin d'optimiser les résultats, toujours réchauffer le four pendant 5 minutes. L'indicateur de
réchauffement sert de référence. L'aiguille de l'indicateur pointe vers la mention Ready lorsque la
température voulue est atteinte. La lettre « R » de l'indicateur représente environ 150 °C (300 °F).
Mise en garde : Le four est brûlant. La peau ne doit pas y toucher.
Cuisson
1. Régler le sélecteur à la température voulue. Régler la minuterie au nombre de minutes voulu, y
compris le temps de réchauffage.
2. Lorsque le four atteint la température voulue, déposer le plat de cuisson
contenant l'aliment à cuire sur la grille coulissante et l'insérer dans le four
(A).
3. Les éléments de chauffage s’allument et s’éteignent pour maintenir la
température. Ouvrir la porte du four pour interrompre la cuisson, les
éléments et le témoin s'éteignent. La minuterie poursuit le compte à
rebours. Les éléments et le témoin se rallument alors. Vérifier la cuisson
des aliments au bout de la durée minimale de cuisson.
4. Lorsqu'on utilise la minuterie, un timbre sonore se fait entendre à la fin de la durée déterminée.
Le témoin de fonctionnement s'éteint et le four s'arrête automatiquement. À la fin de la cuisson,
régler le sélecteur de température à la position d'arrêt (OFF). Lorsque la cuisson est terminée
avant la fin de la durée déterminée, régler la minuterie à 0 (arrêt). Le témoin s'éteint. Régler le
sélecteur de température à la position d'arrêt (OFF).
5. À l'aide d'une mitaine ou d'une poignée isolante, ouvrir la porte et faire glisser la grille
coulissante pour retirer le plat de cuisson.
Mise en garde : Le four est brûlant. La peau ne doit pas y toucher.
Rôtissage
1. Placer la lèchefrite dans le plat de cuisson et les mettre tous les deux sur
la grille coulissante (B).
2. Insérer la grille coulissante dans le fente supérieure.
Note : Il n'est pas nécessaire de réchauffer le four avant le rôtissage
3. Régler le sélecteur à la position de rôtissage (BROIL). Surveiller de près la
cuisson.
a. Lorsqu'on utilise la minuterie, la régler au nombre de minutes voulu.
Un timbre sonore se fait entendre à la fin de la durée déterminée. Le témoin de fonctionnement
s'éteint et le four s'arrête automatiquement. À la fin du rôtissage, régler le sélecteur de température
à la position d'arrêt (BAKE OFF).
b. Lorsque le rôtissage est terminé avant la fin de la durée déterminée, régler la minuterie à
la position d'arrêt (OFF). Le témoin s'éteint. Régler le sélecteur de température à la position
d'arrêt (BAKE OFF).
4. Pour interrompre le cycle de rôtissage, ouvrir la porte du four, les éléments et le témoin
s'éteignent. Refermer la porte pour reprendre le rôtissage. Les éléments et le témoin se
rallument. Vérifier la cuisson des aliments au bout de la durée minimale de cuisson.
5. À la fin du cycle de rôtissage, utiliser une mitaine ou une poignée isolante pour faire glisser la
grille coulissante et retirer le plat de cuisson.
Mise en garde : Le four est brûlant. La peau ne doit pas y toucher.
6. À la fin du rôtissage, s'assurer de remettre le sélecteur de température à la position d'arrêt
(BAKE OFF) et la minuterie à la position d'arrêt (OFF).
Entretien et nettoyage
L’utilisateur ne peut entretenir aucune composante du produit. En confier l’entretien à du
personnel qualifié.
1. Éteindre l’appareil, le débrancher de la prise et le laisser refroidir avant de le nettoyer.
2. Nettoyer la porte en verre avec un tampon en nylon et de l’eau savonneuse. Ne pas utiliser
de nettoyant à vitres en vaporisateur.
3. Pour enlever la grille coulissante, ouvrir la porte puis tirer la grille et la sortir. La laver dans
de l’eau chaude savonneuse ou au lave-vaisselle. Pour enlever les taches tenaces, utiliser un
tampon en nylon ou en polyester. Pour remettre la grille en place, ouvrir complètement la
porte, la faire glisser dans la fente, puis fermer la porte.
4. Laver le plat de cuisson et la lèchefrite dans de l’eau chaude savonneuse ou au lave-vaisselle.
Utiliser un tampon en nylon ou en polyester pour minimiser les égratignures.
Note : Le plat de cuisson n'a pas de revêtement antiadhésif.
5. Pour enlever le plateau à miettes, saisir la poignée à l'avant du four et
sortir le plateau à miettes (C). Jeter les miettes et laver le plateau dans de
l’eau chaude savonneuse. Enlever les taches tenaces à l'aide d'un tampon
en nylon. Bien assécher le plateau avant de le remettre dans le four.
Intérieur
1. Débrancher l’appareil et le laisser refroidir, puis l'essuyer après chaque
utilisation avec une éponge ou un tampon en nylon et de l'eau
savonneuse.
2. Ne pas utiliser un produit nettoyant à four chimique, des produits nettoyants ni des tampons à
récurer abrasifs, car ceux-ci peuvent endommager le revêtement. Assécher avec un essuie-tout
ou un chiffon doux.
Extérieur
S'assurer que l'appareil est complètement refroidi avant de le nettoyer. Essuyer la paroi extérieure
à l'aide d'un chiffon ou d'une éponge humide, puis assécher à l'aide d'un essuie-tout ou d’un
chiffon doux.
Plats de cuisson
On peut utiliser des récipients en métal ou en céramique sans couvercle en verre dans le four.
Respecter les consignes du fabricant. Il doit y avoir un espace minimal de 2,54 cm (1 po) entre
le haut du plat et les éléments du dessus.
A
B
C
CTO100Pub10000011881 5/6/05 12:08 PM Page 18
Page 11

20
19
NEED HELP?
For service, repair or any questions regarding your appliance, call the appropriate "800"
number on the cover of this book. Do not return the product to the place of purchase. Do
not mail the product back to the manufacturer nor bring it to a service center. You may
also want to consult the website listed on the cover of this manual.
One-Year Limited Warranty
(Applies only in the United States and Canada)
What does it cover?
• Any defect in material or workmanship; provided; however, Applica’s liability will not
exceed the purchase price of the product.
For how long?
• One year after the date of original purchase.
What will we do to help you?
• Provide you with a reasonably similar replacement product that is either new or factory
refurbished.
How do you get service?
• Save your receipt as proof of the date of sale.
• Check our on-line service site at www.prodprotect.com/applica, or call our toll-free
number, 1-800-231-9786, for general warranty service.
• If you need parts or accessories, please call 1-800-738-0245.
What does your warranty not cover?
• Damage from commercial use
• Damage from misuse, abuse or neglect
• Products that have been modified in any way
• Products used or serviced outside the country of purchase
• Glass parts and other accessory items that are packed with the unit
• Shipping and handling costs associated with the replacement of the unit
• Consequential or incidental damages (Please note, however, that some states do not
allow the exclusion or limitation of consequential or incidental damages, so this
limitation may not apply to you.)
How does state law relate to this warranty?
• This warranty gives you specific legal rights, and you may also have other rights that
vary from state to state or province to province.
¿NECESITA AYUDA?
Para servicio, reparaciones o preguntas relacionadas al producto, por favor llame al
número del centro de servicio en el país donde usted compró su producto. NO devuelva
el producto al fabricante. Llame o lleve el producto a un centro de servicio autorizado.
DOS AÑOS DE GARANTÍA LIMITADA
(No aplica en México, Estados Unidos o Canadá)
¿Qué cubre la garantía?
• La garantía cubre cualquier defecto de materiales o de mano de obra. Applica no se
responsabiliza por ningún costo que exceda el valor de compra del producto.
¿Por cuánto tiempo es válida la garantía?
• Por dos años a partir de la fecha original de compra.
¿Cómo se puede obtener servicio?
• Conserve el recibo original de compra.
• Por favor llame al número del centro de servicio autorizado.
Esta garantía no
cubre:
• Los productos que han sido utilizados en condiciones distintas a las normales
• Los daños ocasionados por el mal uso, el abuso o negligencia.
• Los productos que han sido alterados de alguna manera
• Los daños ocasionados por el uso comercial del producto
• Los productos utilizados o reparados fuera del país original de compra
• Las piezas de vidrio y demás accesorios empacados con el aparato
• Los gastos de tramitación y embarque asociados al reemplazo del producto
• Los daños y perjuicios indirectos o incidentales.
BESOIN D’AIDE?
Pour communiquer avec les services d’entretien ou de réparation, ou pour adresser toute
question relative au produit, composer le numéro sans frais approprié indiqué sur la page
couverture. Ne pas retourner le produit où il a été acheté. Ne pas poster le produit au
fabricant ni le porter dans un centre de service. On peut également consulter le site web
indiqué sur la page couverture.
Garantie limitée de un an
(Valable seulement aux États-Unis et au Canada)
Quelle est la couverture?
•Tout défaut de main-d’oeuvre ou de matériau; toutefois, la responsabilité de la société
Applica se limite au prix d’achat du produit.
Quelle est la durée?
• Un an après l’achat original.
Quelle aide offrons nous?
• Remplacement par un produit raisonnablement semblable nouveau ou réusiné.
Comment se prévaut-on du service?
• Conserver son reçu de caisse comme preuve de la date d’achat.
•Visiter notre site web au www.prodprotect.com/applica, ou composer sans frais
le 1 800 231-9786, pour obtenir des renseignements généraux relatifs à la garantie.
• On peut également communiquer avec le service des pièces et des accessoires
au 1 800 738-0245.
Qu’est-ce que la garantie ne couvre pas?
• Des dommages dus à une utilisation commerciale.
• Des dommages causés par une mauvaise utilisation ou de la négligence.
• Des produits qui ont été modifiés.
• Des produits utilisés ou entretenus hors du pays où ils ont été achetés.
• Des pièces en verre et tout autre accessoire emballés avec le produit.
• Les frais de transport et de manutention reliés au remplacement
du produit.
• Des dommages indirects (il faut toutefois prendre note que certains états ne permettent
pas l’exclusion ni la limitation des dommages indirects).
Quelles lois régissent la garantie?
• Les modalités de la présente garantie donnent des droits légaux spécifiques. L’utilisateur
peut également se prévaloir d’autres droits selon l’état ou la province qu’il habite.
CTO100Pub10000011881 5/6/05 12:08 PM Page 20
Page 12

22
21
Póliza de Garantía
(Válida sólo para México)
Duración
Applica de México, S. de R. L. de C.V. garantiza este producto por 2 años a partir de la
fecha original de compra.
¿Qué cubre esta garantía?
Esta Garantía cubre cualquier defecto que presenten las piezas, componentes y la mano de
obra contenidas en este producto.
Requisitos para hacer válida la garantía
Para reclamar su Garantía deberá presentar al Centro de Servicio Autorizado la póliza
sellada por el establecimiento en donde adquirió el producto. Si no la tiene, podrá
presentar el comprobante de compra original.
¿Donde hago válida la garantía?
Llame sin costo al teléfono 01 800 714 2503, para ubicar el Centro de Servicio Autorizado
más cercano a su domicilio en donde usted podrá encontrar partes, componentes,
consumibles y accesorios.
Procedimiento para hacer válida la garantía
Acuda al Centro de Servicio Autorizado con el producto con la póliza de Garantía sellada
o el comprobante de compra original, ahí se reemplazará cualquier pieza o componente
defectuoso sin cargo alguno para el usuario final. Esta Garantía incluye los gastos de
transportación que se deriven de su cumplimiento.
Excepciones
Esta Garantía no será válida cuando el producto:
A) Se hubiese utilizado en condiciones distintas a las normales.
B) No hubiese sido operado de acuerdo con el instructivo de uso que le acompaña.
C) Cuando el producto hubiese sido alterado o reparado por personas no autorizadas por
Applica de México, S. de R. L. de C.V.
Nota:
Si el cordón de alimentación es dañado, este debe ser remplazado por el fabricante
o por un Centro de Servicio Autorizado para evitar el riesgo.
Argentina
Servicio Técnico Central
Service New S.R.L.
Atención al Cliente
Ruiz Huidobro 3860
Buenos Aires, Argentina
Tel.: (54-11) 4546-1212
Chile
Servicio Máquinas y
Herramientas Ltda.
Av. Apoquindo No. 4867 - Las
Condes
Santiago, Chile
Tel.: (562) 263-2490
Colombia
PLINARES
Avenida Ciudad de Quito #8809
Bogotá, Colombia
Tel.: (57-1) 610-1604/533-4680
Costa Rica
Aplicaciones Electromecanicas,
S.A.
Calle 26 Bis y Ave. 3
San Jose, Costa Rica
Tel.: (506) 257-5716/223-0136
Ecuador
Castelcorp
Km 2-1/2 Avenida Juan T.
Marengo junto Dicentro
Guayaquil, Ecuador
Tel.: (5934) 224-7878/224-1767
El Salvador
Sedeblack Calle A San Antonio
Abad
y Av. Lisboa, Edif. Lisboa Local
#21
San Salvador, El Salvador
Tel.: (503) 274-1179/274-0279
Guatemala
MacPartes, S.A.
34 Calle 4-14 Zona 9
Frente a Tecun
Guatemala City, Guatemala
Tel.: (502) 331-5020 / 3600521
Honduras
Lady Lee
Centro Comercial Mega Plaza
Carretera a la Lima
San Pedro Sula, Honduras
Tel.: (504) 553-1612
México
Art. 123 y José Ma. Marroquí
#28-D
Centro.
Mexico D.F.
Tel.: (55) 5512-7112/(55)
5512-3164
Nicaragua
H & L Electronic
Zumen 3, C. Arriba y 15 Varas
al Sur
Managua, Nicaragua
Tel.: (505) 260-3262
Panamá
Authorized Service Center
Electrodomésticos, S.A.
Boulevard El Dorado, al lado
del Parque de las Mercedes
Panamá, Panamá
Tel.: (507) 236-5404
Perú
AV. REPUBLICA DE PANAMA
3535
Ofic 1303
San Isidro
Lima, Peru
Tel.: 2 22 44 14
Fax: 2 22 44 04
Puerto Rico
Buckeye Service
Jesús P. Piñero #1013
Puerto Nuevo, SJ PR 00920
Tel.: (787) 782-6175
Republica Dominicana
Plaza Lama, S.A.
Av, Duarte #94
Santo Domingo, República
Dominica
Tel.: (809) 687-9171
Trinidad and Tobago
A.S. Bryden & Sons (Trinidad)
Limited
33 Independence Square,
Port of Spain
Trinidad, W.I.
Tel.: (868) 623-4696
Venezuela
Tecno Servicio TS2002
Av. Casanova
Centro Comercial del Este Local
27
Caracas, Venezuela
Tel.: (58-212) 324-0969
Por favor llame al número correspondiente que aparece en la lista a continuación para
solicitar que se haga efectiva la garantía y donde Ud. puede solicitar servicio, reparaciones
o partes en el país donde el producto fué comprado.
Comercializado por:
Applica de México, S. de R. L. de C.V.
Manuel Avila Camacho No. 2900-902,
Torre el Dorado, Fracc. Los Pirules,
Tlalnepantla, Edo. de México, CP 54040.
R. F. C. AME-001026- PE3.
Servicio y Reparacione
Art. 123 y José Ma. Marroquí # 28 D
Col. Centro, Mexico D. F., CP 06050
Servicio al Consumidor,
Venta de Refacciones y Accesorios
01 800 714 2503
Sello del Distribuidor:
Fecha de compra:
Modelo:
CTO100Pub10000011881 5/6/05 12:08 PM Page 22
Page 13

is a trademark of The Black & Decker Corporation,
Towson, Maryland, USA
Marca registrada de The Black & Decker Corporation,
Towson, Maryland, E.U.
Marque de commerce déposée de la société The Black & Decker Corporation,
Towson, Maryland, É.-U.
2005/1-5-30E/S/F
1440 W 120 V 60 Hz
Copyright © 2005 Applica Consumer Products, Inc.
Pub. No. 1000001181-00-RV00
Made in People’s Republic of China
Printed in People’s Republic of China
Importado por:
Applica de México S. de R.L. de C.V.
Blvd. Manuel Avila Camacho 2900 Int. 902
Los Pirules, Tlalnepantla,
Edo. Mex.
C.P. 54040
México
Teléfono: (55) 1106-1400
Del interior marque sin costo
01 (800) 714-2499
Fabricado en la República Popular de China
Impreso en la República Popular de China
Fabriqué en République populaire de Chine
Imprimé en République populaire de Chine
CTO100Pub10000011881 5/6/05 12:08 PM Page 24
 Loading...