

Black & Decker CO100B, CO100W Use & Care Manual

TM
UNDER THE CABINET CAN OPENER
ABRELATAS PARA INSTALAR DEBAJO DEL GABINETE
OUVRE-BOÎTE ACCROCHABLE
Use & Care Manual
Manual de uso y cuidado
Guide d’utilisation et d ’entretien
CO100B CO100W
SPACEMAKER

2
Should you have any questions or concerns with your new product,
please call our Customer Service Line at 1-800-231-9786 (US and
Canada). Please do not return to the store.
Si usted tiene alguna inquietud o pregunta con su producto, por
favor llame a nuestra línea de servicio al cliente una atención
inmediata 1-800-231-9786 (EE.UU/Canadá) 01-800-714-2503
(México). No devuela a la tienda.
Si vous avez des questions ou des préoccupations à propos de
votre nouveau produit, veuillez communiquer avec notre Service à
la clientèle au 1 800 231-9786 (États-Unis et Canada). Veuillez ne
pas rapporter le produit au magasin.
Thank you for your purchase!
Gracias por su compra!
Merci de votre achat!

3
POLARIZED PLUG (120V models only)
This appliance has a polarized plug (one
blade is wider than the other). To reduce
the risk of electric shock, this plug is
intended to fit into a polarized outlet only
one way. If the plug does not fit fully into
the outlet, reverse the plug. If it still does
not fit, contact a qualified electrician. Do
not attempt to modify the plug in any way.
TAMPER-RESISTANT SCREW
Warning: This appliance is equipped
with a tamper-resistant screw to prevent
removal of the outer cover. To reduce
the risk of fire or electric shock, do not
attempt to remove the outer cover. There
are no user-serviceable parts inside.
Repair should be done only by authorized
service personnel.
ELECTRICAL CORD
1. A short power-supply cord is provided
to reduce the risk resulting from becoming
entangled in or tripping over a longer cord.
2. Extension cords may be used if care is
exercised in their use.
3. If a long detachable extension cord is used:
a) The marked electrical rating of the
power cord or extension cord should
be at least as great as the electrical
rating of the appliance.
b) If the appliance is of the grounded
type, the extension cord should be a
grounding-type 3-wire cord.
c) The cord should be arranged so that
it will not drape over the countertop
or tabletop where it can be pulled on
by children or tripped over.
Note: If the power cord is damaged,
please contact the warranty department
listed in these instructions.
• Read all instructions.
• To protect against risk of electrical shock do not
immerse cord, plugs or appliance in water or
other liquid.
• Close supervision is necessary when any
appliance is used by or near children.
• Unplug from outlet when not in use, before
disassembly, and before cleaning.
• Avoid contacting moving parts.
• Do not operate any appliance with a damaged
cord or plug or after the appliance malfunctions,
or has been damaged in any manner. Contact
the consumer service number listed in this
manual.
• The use of attachments not recommended or
sold by the manufacturer may cause fire, electric
shock or injury.
• Do not use outdoors.
• Do not attempt to open pressurized
(aerosol-type) cans.
• Do not open cans of flammable liquids such as
lighter fluids.
• To reduce the risk of fire or electric shock, do
not operate any heating appliance beneath the
mounted unit.
• Do not mount the storage bracket/unit over
or near any portion of a heating or cooking
appliance, or a sink or basin.
• Handle can opener carefully; cutting blades
are sharp.
• This appliance is not intended for use by
persons (including children) with reduced
physical, sensory or mental capabilities, or lack
of experience and knowledge, unless they have
been given supervision or instruction concerning
use of the appliance by a person responsible for
their safety.
• Children should be supervised to ensure that
they do not play with the appliance.
Please Read and Save this Use and Care Book.
IMPORTANT SAFEGUARDS.
When using electrical appliances, basic safety precautions should always be followed to
reduce the risk of fire, electric shock, and/or injury, including the following:
SAVE THESE INSTRUCTIONS.
This product is for household use only.
4
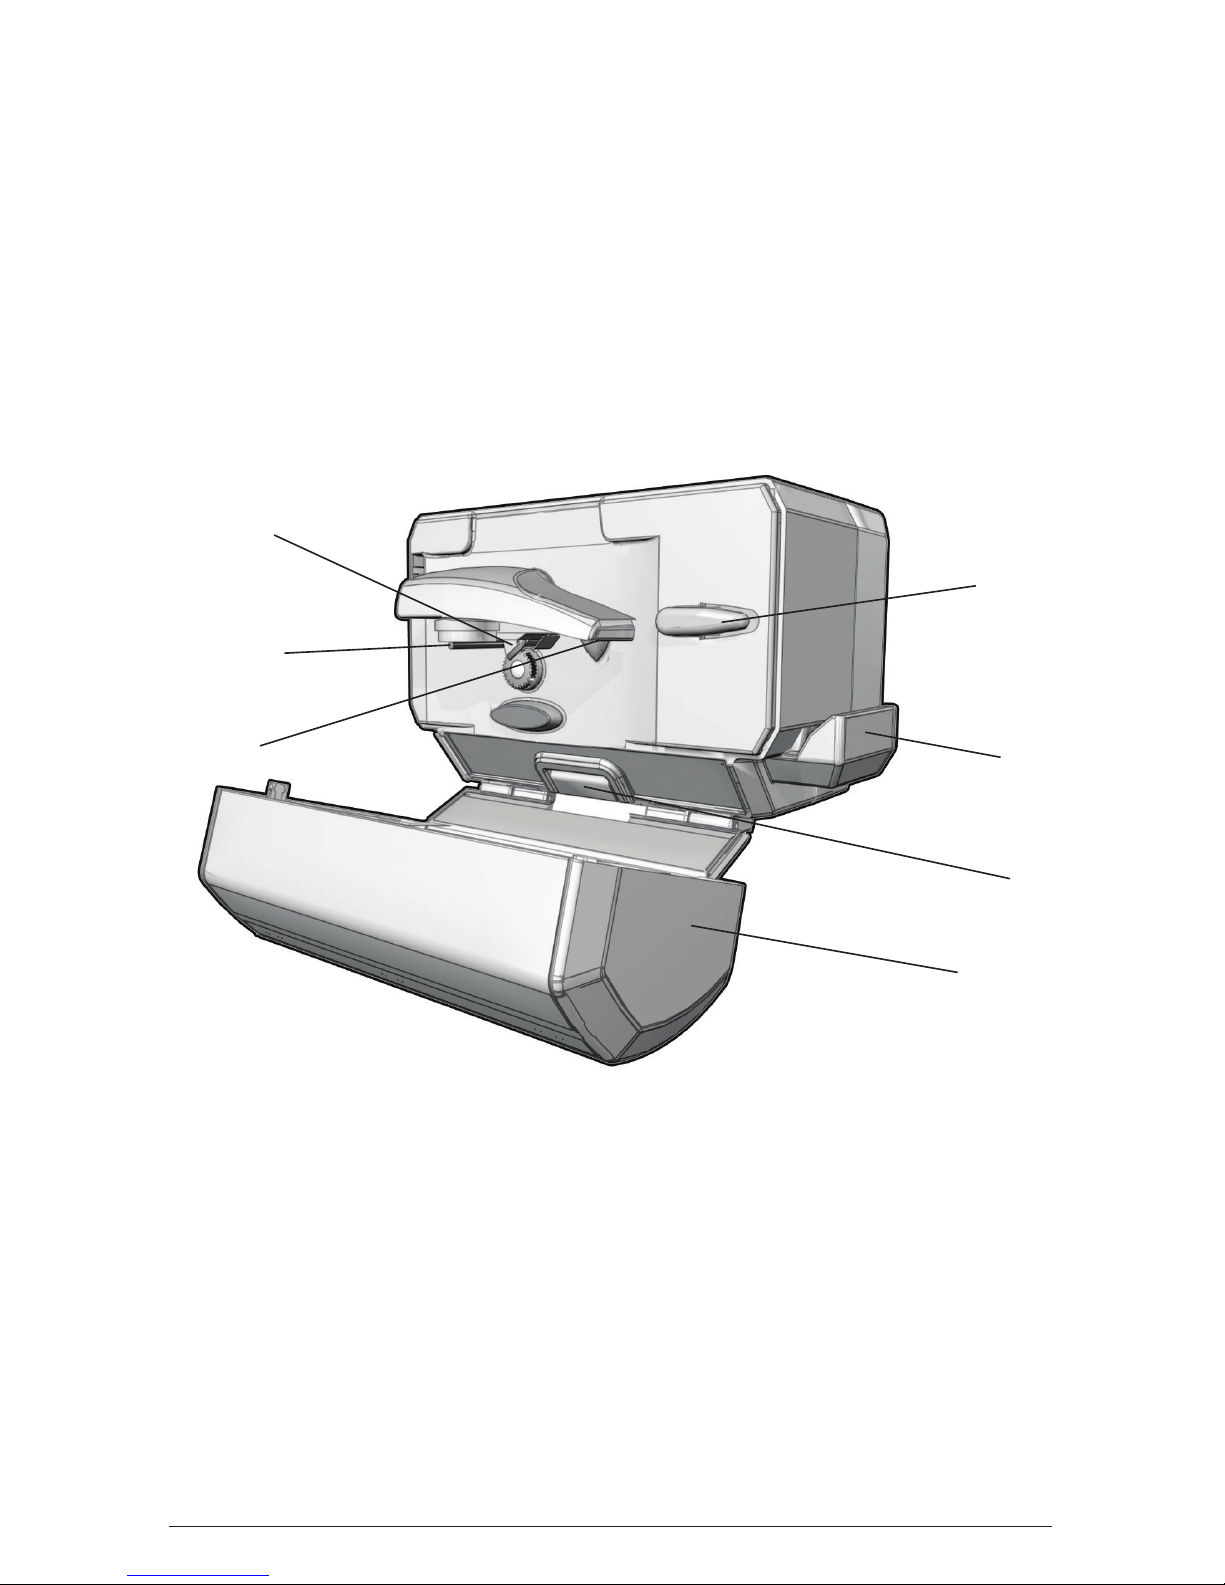
GETTING TO KNOW YOUR
SPACEMAKER™ CAN OPENER
1. Bag cutter
2. Knife sharpener
3. Bottle Opener
4. Cover
5. † Blade assembly with magnet
(Part # CO100-01) ±
6. Key post
7. Piercing lever
8. Cord storage (not included in all
models/not shown)
9. Cord management hook
(not shown)
Note: † indicates consumer
replaceable/removable parts
WELCOME!
Congratulations on your purchase of the Spacemaker™ Can Opener. We have
developed this guide to ensure optimal product performance and your complete
satisfaction. Save this use and care manual and be sure to register your
appliance online at www.prodprotect.com/applica.
5
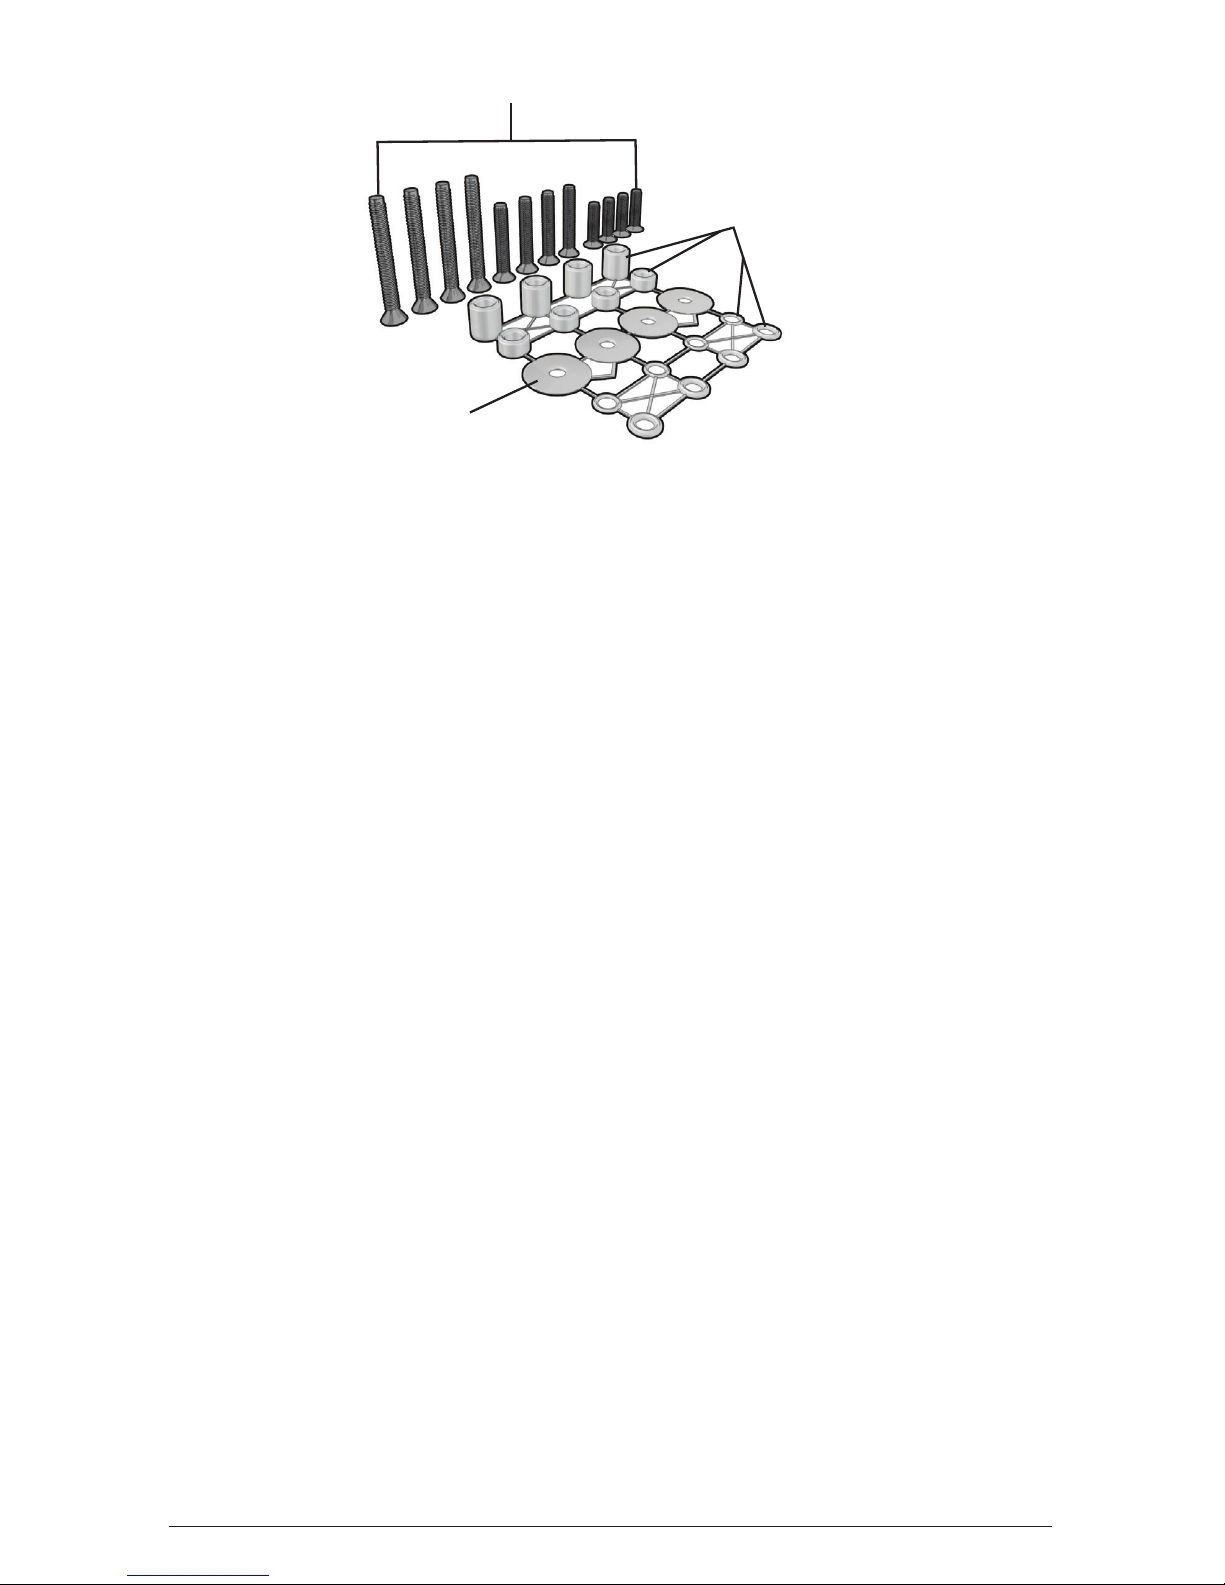
SPACERS
SCREWS
WASHERS
MOUNTING
• Mounting Parts
(Part # SDC-MOUNTING KIT)
16 Spacers
4:
1
⁄2"
4:
1
⁄4"
4:
3
⁄16"
4:
1
⁄16"
12 Screws
4: 1"
4: 1
1
⁄2"
4: 2
1
⁄4"
4 Washers
• Mounting Template (in box)
You will also need:
• Tape
• Ruler
• Electric drill with a
1
⁄4” drill bit
and a
1
⁄32” drill bit
• Screwdriver
• Protective glasses
• A second person
Note: The use of all provided mounting hardware may not be necessary in the
installation of all Spacemaker™ products.
Product may vary slightly from what is illustrated.
6
GETTING STARTED
• Remove all packing material, any stickers, and the plastic band around the
power plug.
• Register your product at www.prodprotect.com/applica
• Remove and save literature.
• Remove mounting hardware and template. Set them safely aside.
• For warranty verifi cation, do not remove cord tag.
Do not attempt to operate appliance until properly installed.
INSTALLING YOUR SPACEMAKER™
This unit is for household use only. Only recommended for installation on
fl at bottom cabinets.
CHOOSE A LOCATION
When choosing your location, consider the following:
• DO make sure to mount within reach of an electrical outlet.
• DO consider your normal work patterns in the kitchen when choosing location.
• DO NOT mount over any heating or cooking appliance such as your range or
oven.
• DO NOT mount over or near a sink.
• DO NOT mount under, in front of or behind any under-cabinet light
fi xtures.
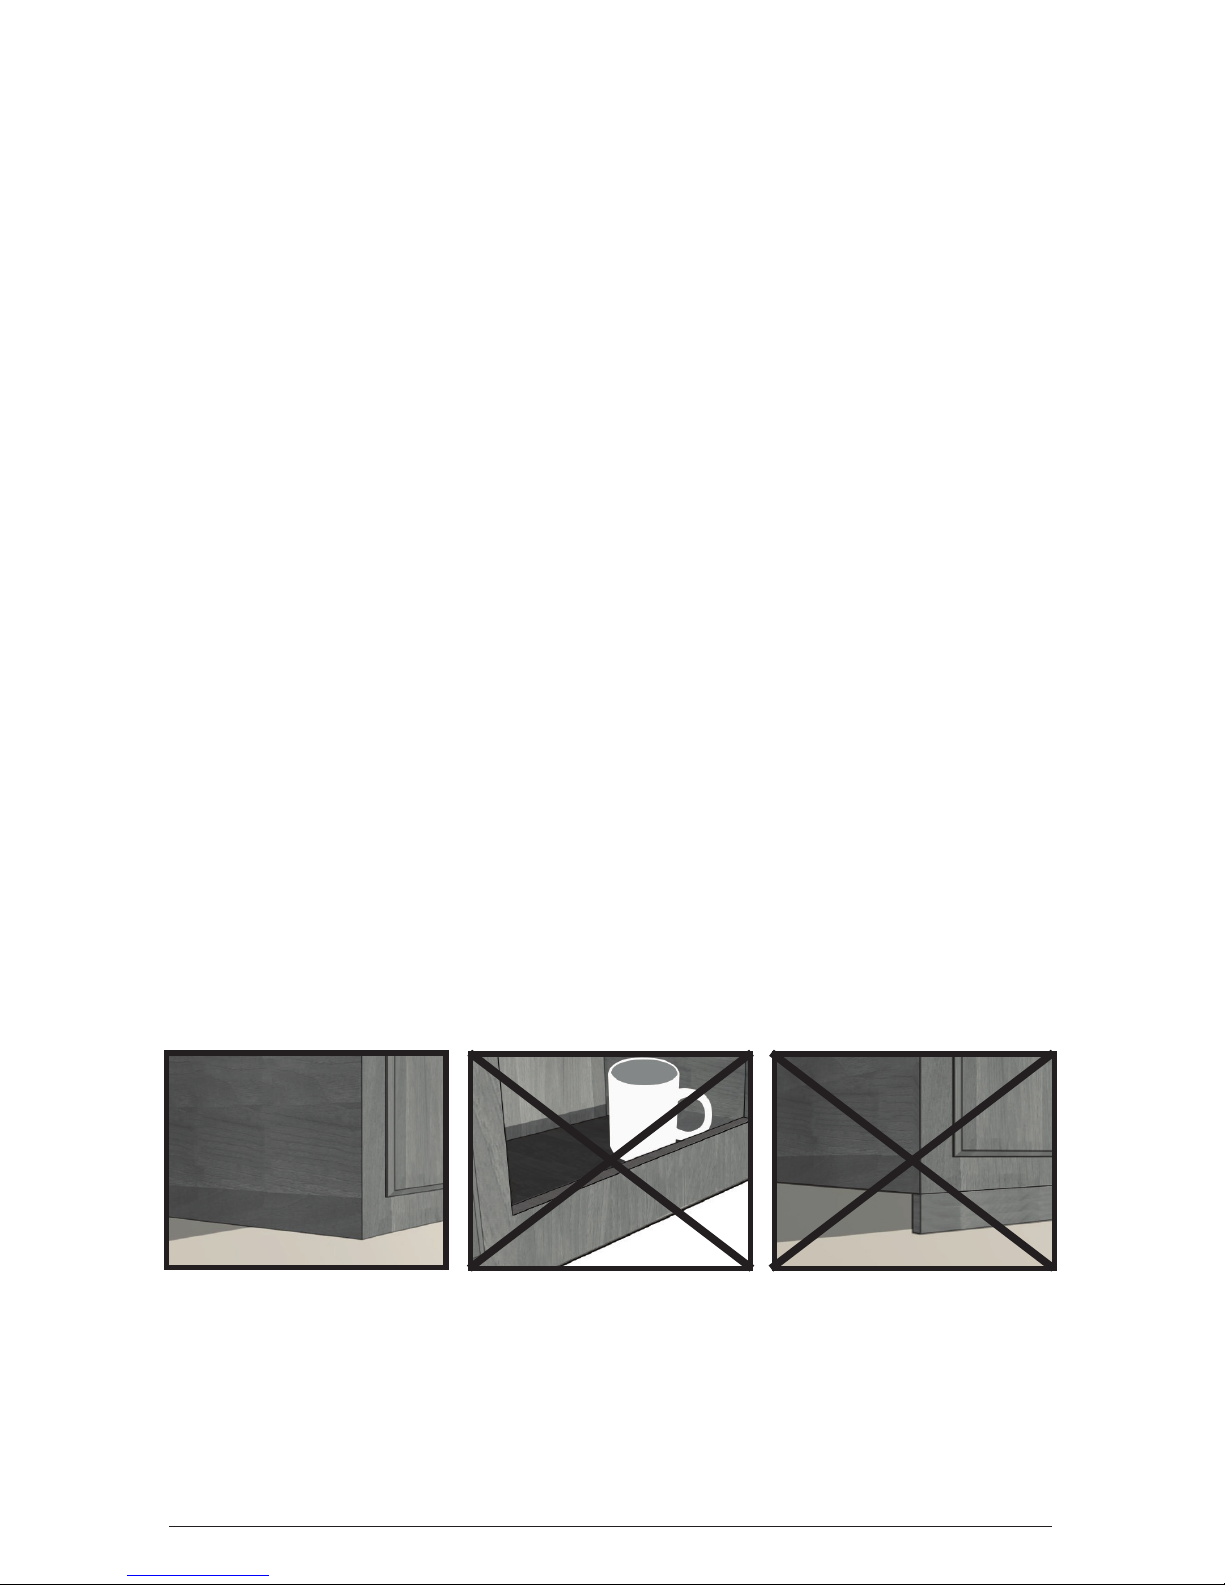
DETERMINE CABINET TYPE
Important: Spacemaker™ appliances are only recommended to be installed
on cabinets without a top lip and with a fl at bottom. It is not recommended
to install Spacemaker appliances on cabinets with an overhang. See image
below for recommended cabinet types.
FLAT BOTTOM
TOP LIP OVERHANG
7
STANDARD INSTALLATION (FLAT CABINET)
Important: Always wear protective glasses or goggles to prevent injury
when drilling.
Important: Do not align screw holes on the template directly under the
partition between cabinets, as this will prevent you from installing the
appliance properly. Pay close attention to where drill holes will be set so as
not to damage your cabinets during mounting. Drilling through your cabinet’s
partition may cause damage to cabinets and prevent proper installation.
1. Clear countertop under installation area to avoid getting dust or
debris on other appliances or items. Open cabinets and remove
contents to make mounting easier.
2. Clean both the underside and topside of
the bottom panel of the cabinet.
3. Decide whether you will be drilling from
the top down or from the bottom up.
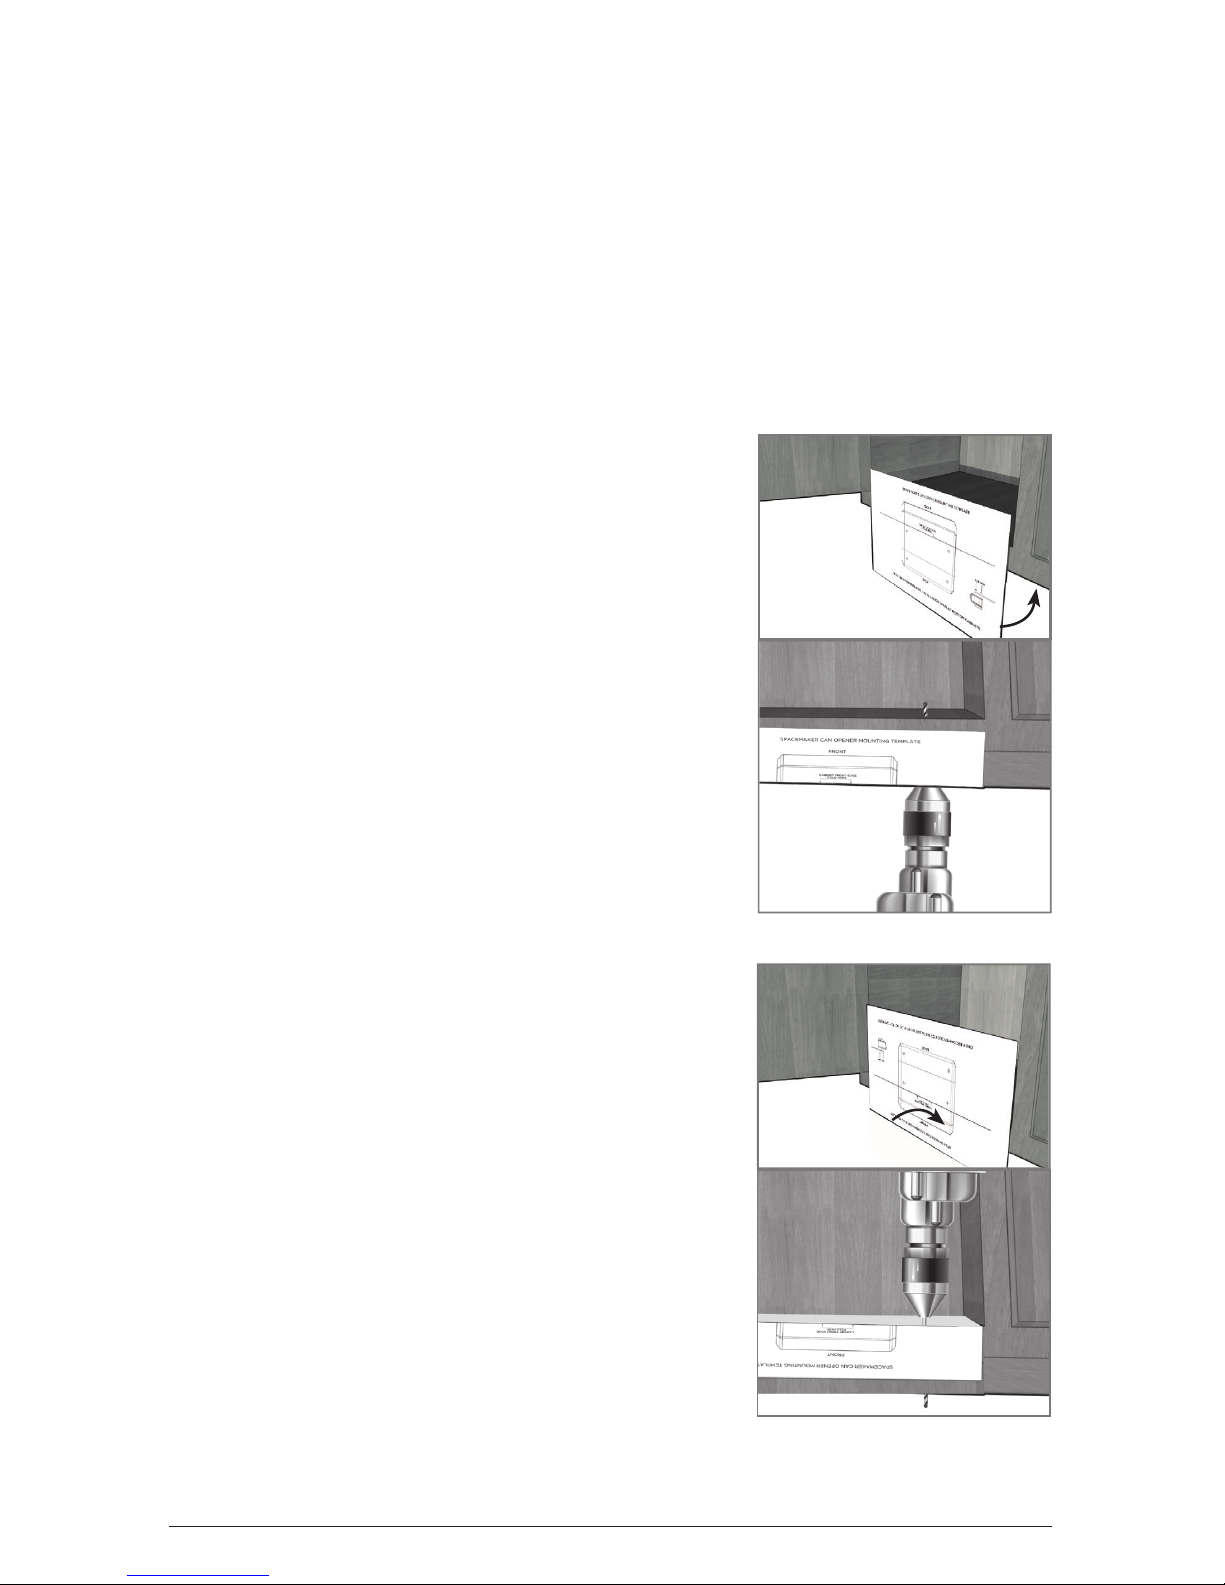
IF DRILLING FROM THE BOTTOM UP:
a. With cabinet doors open, place mounting
template against the surface of the front
edge of your cabinet. Align the thick line
on the template (labeled “cabinet front
edge”) with the lower front edge of your
cabinet (D).
b. Fold the balance of the template up along
the underside of your cabinet, ensuring the
“cabinet front edge” line remains aligned
with the bottom front cabinet edge.
c. Make sure the template is smooth and
fl ush against the cabinet’s underside. Pull
template tight and tape down to hold in
place.
IF DRILLING FROM THE TOP DOWN:
a. With cabinet doors open, place mounting
template against the surface of the front
edge of your cabinet. Align the thick line
on the template (labeled “cabinet front
edge”) with the upper front edge of your
cabinet (E).
b. Fold the balance of the template over into
the inside of your cabinet, ensuring the
“cabinet front edge” line remains aligned
with the upper front cabinet edge.
c. Make sure the template is smooth and fl ush
against the cabinet’s inside. Pull template
tight and tape down to hold in place.
D
E

8
Important: Always ensure you are drilling straight
up or straight down through the marked mounting
holes on the template. Drilling at an angle may
prevent proper installation and may damage
cabinets if the drill bit pierces the partition.
4. Using a 1/32” drill bit, drill from the underside
of the cabinet up or the top down, creating
pilot holes through the 4 holes marked on
the template. This will help guide the ¼” drill
bit in the next step. (F)
5. Switch to a ¼” drill bit and drill straight up
or straight down through the holes that
have just been created. (G)
6. Once holes are drilled, remove tape and
mounting template.
7. Wipe dust and debris off the top side and
the underside of the cabinet surface.
8. Place a washer inside the cabinet over each
of the 4 holes you drilled. (H)
9. Determine what size screws to use by
placing a screw through the hole in the
cabinet without the appliance in place. The
screw should be ½” exposed underneath
the cabinet to ensure the appliance is
properly attached to the cabinet. (I)
Note: Several standard screw lengths are provided
but may not fi t all cabinet sizes.
10. Place one of the screws through each
of the washers covering the holes in the
cabinet, from the inside of the cabinet
down.
11. Hold appliance up to the screws, aligning
the front of the appliance with the front
edge of the cabinet base. The front of the
can opener DOES NOT include the cover,
as indicated on the mounting template.
Make sure there will be enough room to
lift the can opener lever when the cover is
open. Screws in the cabinet should align
with the mounting holes in the appliance.
(J)
Note: It may require two people to ensure the
appliance is held in place while drilling.
J
F
G
H
I
9
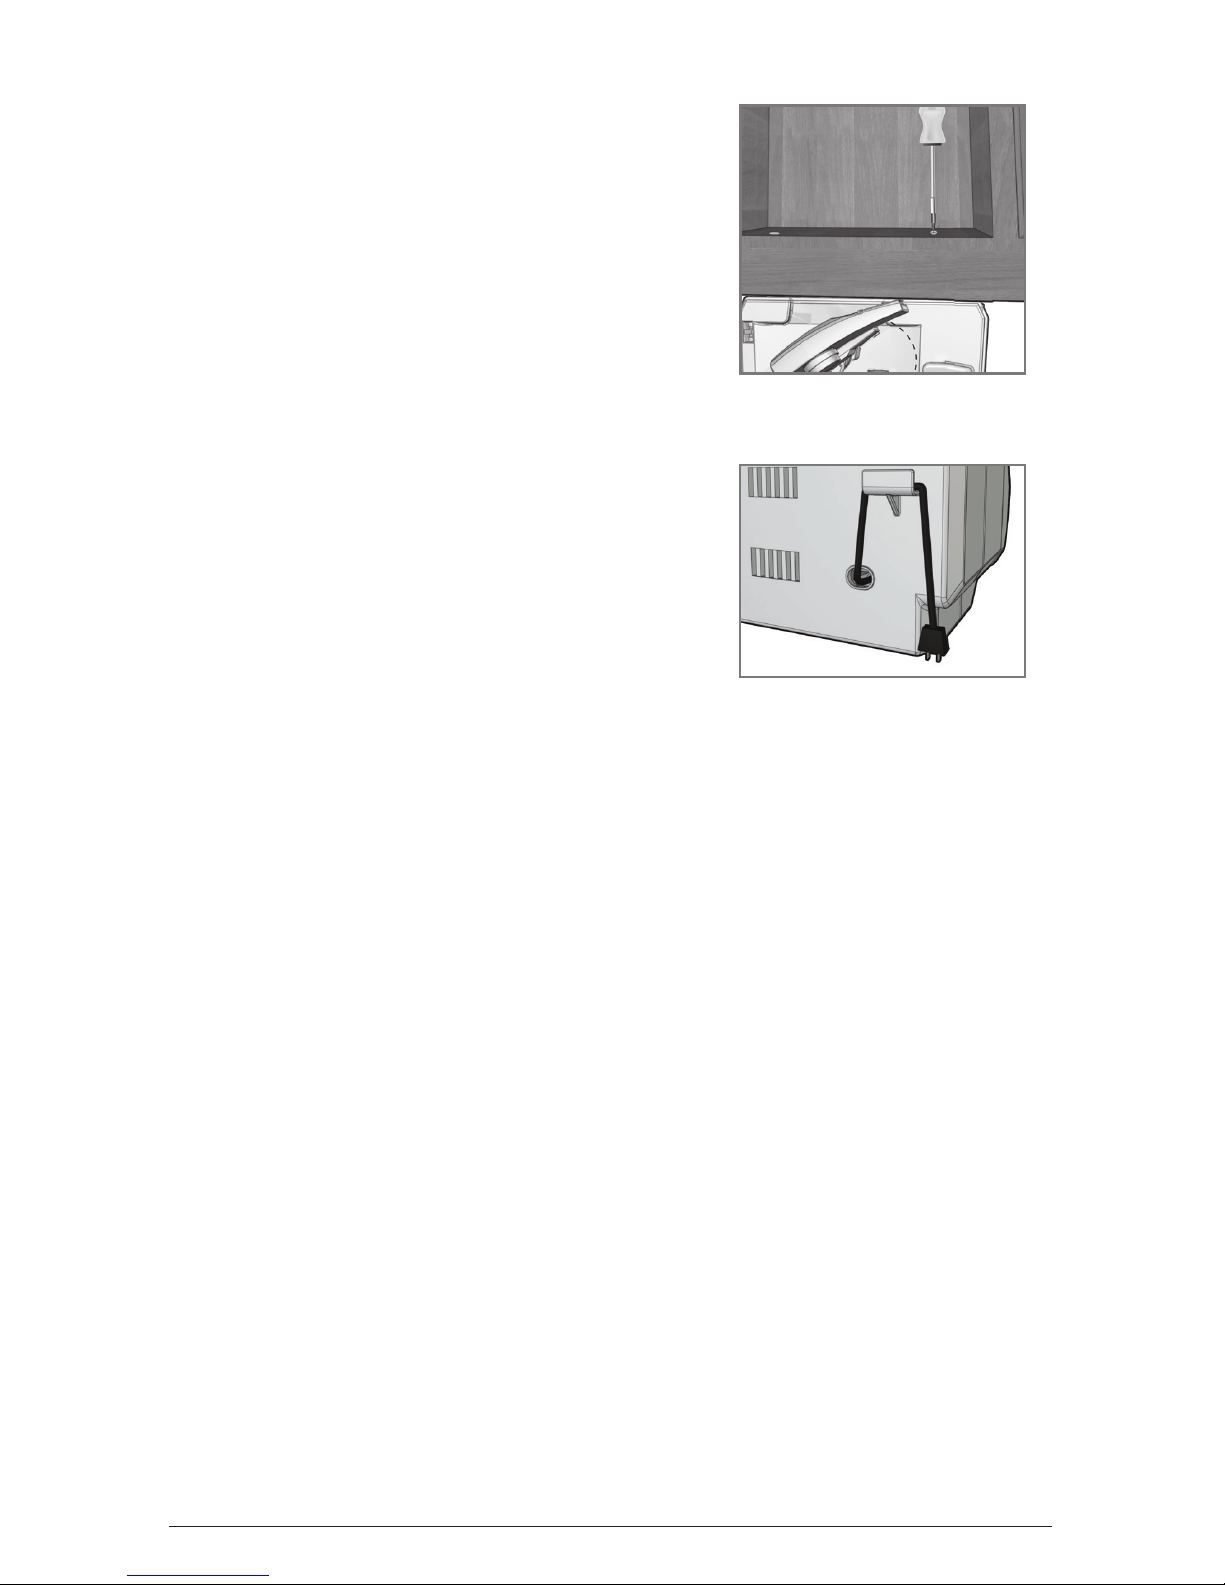
12. Screwing from inside the cabinet down
into the appliance holes, use your
drill or screwdriver to tighten the four
screws in place. (K)
Note: Always tighten screws to properly secure
the appliance to the cabinet and to ensure
the appliance does not move or shake during
operation.
13. Pull out cord from cord storage behind
the appliance and plug into a standard
electrical outlet. Extra cord can be
fed back into storage or hung over
cord management hook behind the
appliance. (L)
Note: If you are connecting this appliance to the
receptacle of another Spacemaker
™
appliance
such as the toaster oven or coffeemaker, make
sure you can easily unplug the appliance
following use.
14. Your Spacemaker
™
appliance is now
ready for use!
K
L
10
HOW TO USE
This product is for household use only.
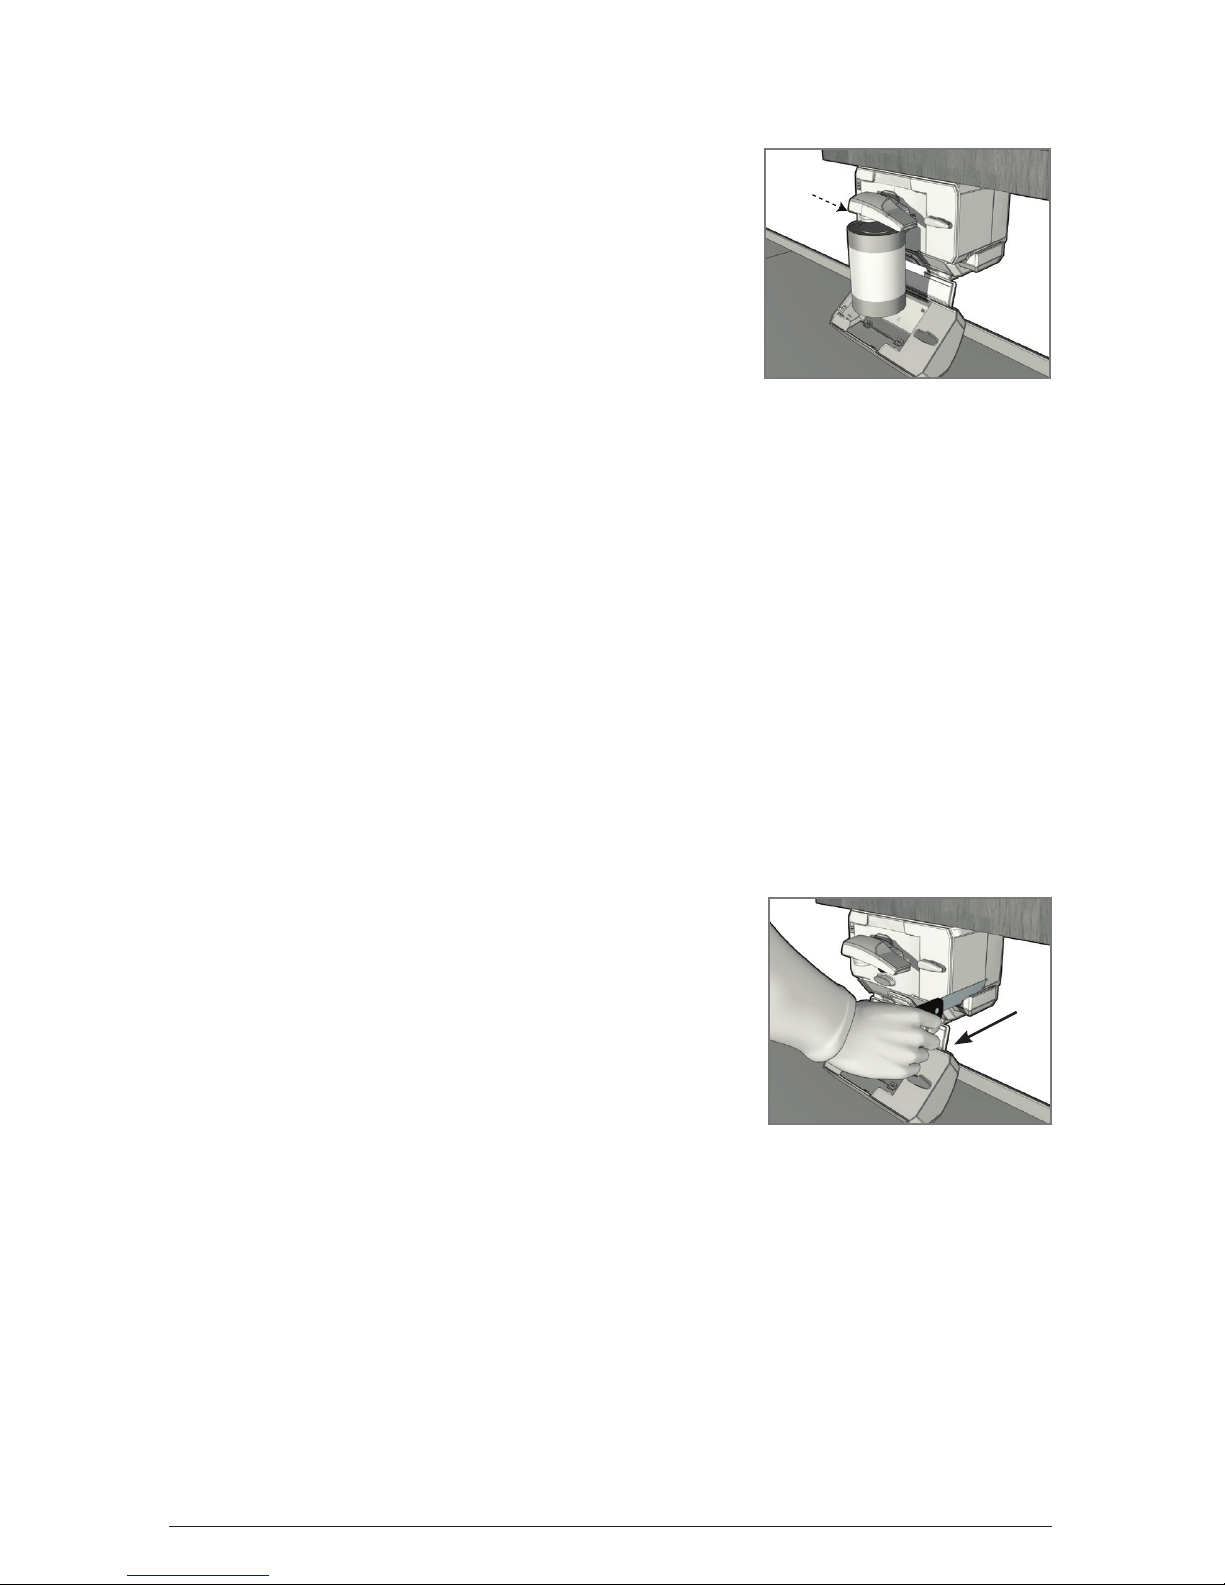
OPENING A CAN
1. Lift piercing lever.
2. Tip the can so that the rim is under the
locating post, then push down on the
piercing lever, making sure the cutter blade
is inside the rim of the can (M)
Note: Because of the hands-free feature, it is not necessary to hold the lever
down or hold the can during cutting. However, you may have to support very
tall or heavy cans.
Tip: When the can is opened, the can opener will stop automatically.
3. To remove the can, hold it with one hand and raise the lever with the other.
Caution: Avoid contact with the cut edges of the can or lid; they are sharp.
During opening process, the design of your can opener will roll the rim of the can
to prevent sharp edges; however, handle open can and cut lid with caution.
4. Carefully discard the lid from the magnet.
HELPFUL TIPS AND TRICKS:
• Do not use this can opener to open cans with a pull tab, peel-off foil
seal, rolling key or rimless cans.
• Open frozen juices or foods in cardboard cans right from the freezer,
while they are frozen.
• Aluminum lids will not stick to the magnet.
USING THE KNIFE SHARPENER
1. Insert blade to be sharpened with the end of
the blade closest to the knife handle into the
sharpening slot.
2. Carefully press down on the blade and pull it
toward you through the slot in one continuous
stroke. (N)
Important: Do not saw knife back and forth to sharpen. Pull through the
sharpener in one direction with a continuous, slow and even motion. Failure to do
so may dull or damage your blade.
3. Repeat until desired sharpness is achieved.
4. Wash and dry knife before using again.
HELPFUL TIPS AND TRICKS:
• Use caution when washing and drying knives after sharpening.
• Do not sharpen serrated blades, as this will smooth their edges.
• Do not sharpen scissors.
M
N
11
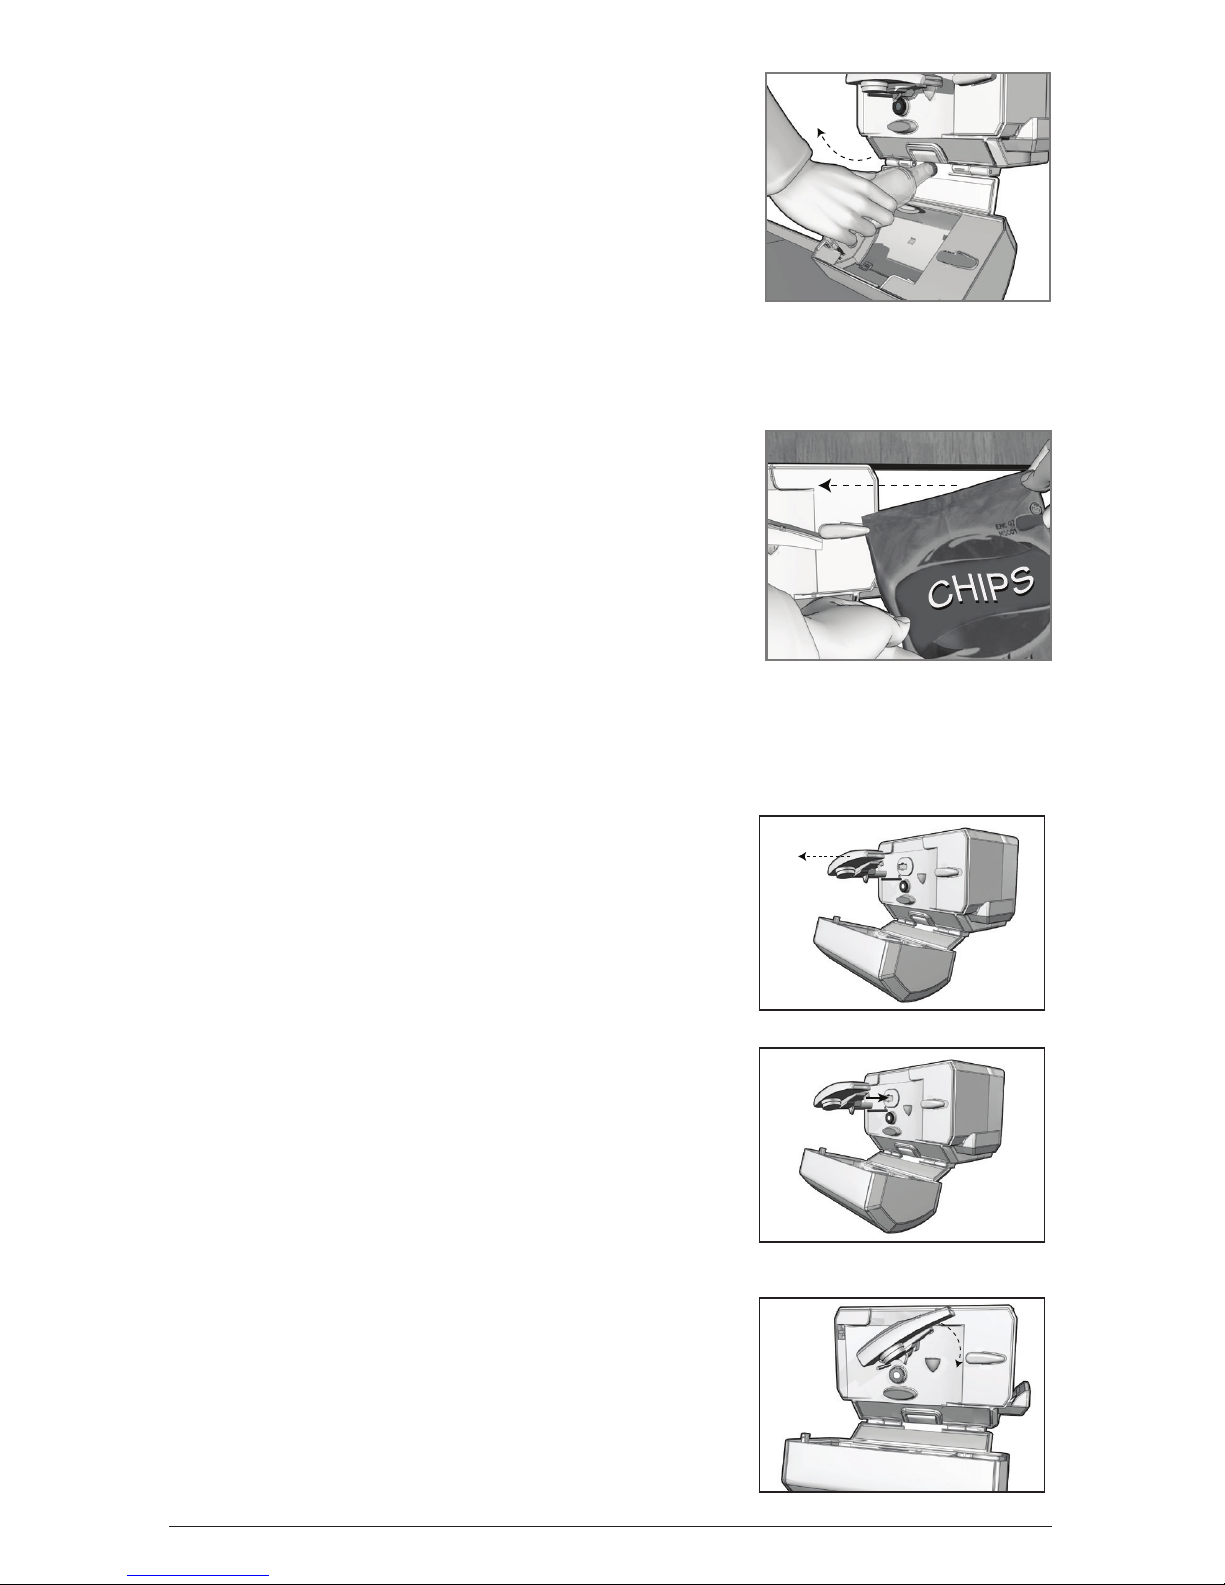
USING THE BOTTLE OPENER
1. Grab the bottle to be opened and position the
cap above the lip on the back side of the bottle
opener.
2. Tilt bottom of the bottle away from you to catch
the cap on the lip and open the bottle. (O)
USING THE BAG CUTTER
1. Grasp the plastic or metal foil bag to be opened by one corner, with one
hand holding the top edge and the other hand holding the side or bottom,
depending on the size of the bag.
2. Position tightly pulled corner of bag against the
cutter and pull firmly to the left to open the bag.
Note: Pulling a bag straight against the cutter will cut
a line along the top of the bag; pulling at an angle will
simply remove the corner. (P)
CARE AND CLEANING
This product contains no user serviceable parts. Refer service to qualified service
personnel.
Important: Unplug the cord before cleaning the unit.
REMOVING BLADE ASSEMBLY
1. Lift the piercing lever up as far as it will go
(roughly 90 degrees)
2. Carefully grip the blade assembly and pull it away
from the can opener. (Q)
3. Wash with water and dish soap and dry
thoroughly. Do not put the blade assembly
in the dishwasher.
4. Before replacing the blade assembly, wipe the can
opener body, knife sharpener and area around the
geared wheel with a slightly damp cloth or sponge.
REPLACING BLADE ASSEMBLY
1. Align key post on the blade assembly with key
slot on the unit. (R)
2. Push in blade assembly and turn clockwise until it
locks into position. (S)
O
P
Q
R
S
 Loading...