

Page 1

TM
DUAL BREW
CARAFE | K-CUP®
COFFEEMAKER
DOBLE COLADO
JARRA | K-CUP®
CAFETERA
CM6000B
CM6000BD
CM6000BDM
CAFÉ SELECT™
Page 2

2
Should you have any questions or concerns with your new product,
please call our Customer Service Line at 1-800-231-9786 (US and
Canada). Please do not return to the store.
Si usted tiene alguna inquietud o pregunta con su producto, por
favor llame a nuestra línea de servicio al cliente una atención
inmediata 1-800-231-9786 (EE.UU/Canadá) 01-800-714-2503
(México). No devuela a la tienda.
Si vous avez des questions ou des préoccupations à propos de
votre nouveau produit, veuillez communiquer avec notre Service à
la clientèle au 1 800 231-9786 (États-Unis et Canada). Veuillez ne
pas rapporter le produit au magasin.
Thank you for your purchase!
Gracias por su compra!
Merci de votre achat!
Page 3

3
• Read all instructions prior to use.
• Do not touch hot surfaces. Use handles or knobs.
• To protect against fire, electrical shock and
injury to persons, do not immerse cord, plugs or
appliance in any liquids.
• Close supervision is necessary when any appliance
is used by or near children.
• Turn off and unplug appliance from outlet when
not in use and before cleaning.
• Allow appliance to cool before cleaning and adding
or removing parts.
• Do not operate any appliance with a damaged cord
or plug, or after the appliance malfunctions or has
been damaged in any manner. Contact consumer
support at the number listed in this manual.
• The use of accessory attachments that have
not been recommended by the appliance
manufacturer may result in fire, electric shock or
injury to persons.
• Do not use outdoors.
• Do not let cord hang over edge of table or counter,
or touch hot surfaces.
• Do not place appliance on or near a hot gas or
electric burner, or in a heated oven.
• To disconnect, turn the unit OFF, then remove plug
from wall outlet.
• Do not use this appliance for anything other than
its intended use.
• Keep lid on the carafe when in use.
• Scalding and/or burns may occur if either the
carafe or single-serve filter basket lid is removed
or unit cover is opened during the brewing cycle.
• The unit’s carafe is designed for use only with this
appliance. It must never be used on a range top.
• Do not set a hot carafe on a wet or cold surface.
• Do not use a cracked carafe or a carafe having a
loose or weakened handle.
• Do not clean carafe with harsh cleansers, steel
wool or other abrasive material.
• This appliance is not intended for use by persons
(including children) with reduced physical, sensory
or mental capabilities, or lack of experience
and knowledge, unless they have been given
supervision or instruction concerning use of the
appliance by a person responsible for their safety.
• Children should be supervised to ensure that they
do not play with the appliance.
CAUTION: Four piercing nozzles puncture the POD,
three in the housing lid and the other in the base of
the POD Adapter. To avoid risk of injury, do not place
your fingers in the single serve housing.
CAUTION: There is extremely hot water in the single
serve POD adapter during brew process. To avoid
risk of injury, do not lift the single serve lid during the
brewing process.
CAUTION: Please always keep the brewer in its
upright position to avoid potential injury and/or
damage to your brewer.
Please Read and Save this Use and Care Book.
IMPORTANT SAFEGUARDS.
When using electrical appliances, basic safety precautions should always be followed to
reduce the risk of fire, electric shock, and/or injury, including the following:
Page 4

4
POLARIZED PLUG (120V models only)
This appliance has a polarized plug (one
blade is wider than the other). To reduce
the risk of electric shock, this plug is
intended to fit into a polarized outlet only
one way. If the plug does not fit fully into
the outlet, reverse the plug. If it still does
not fit, contact a qualified electrician. Do
not attempt to modify the plug in any way.
TAMPER-RESISTANT SCREW
Warning: This appliance is equipped
with a tamper-resistant screw to prevent
removal of the outer cover. To reduce
the risk of fire or electric shock, do not
attempt to remove the outer cover. There
are no user-serviceable parts inside.
Repair should be done only by authorized
service personnel.
ELECTRICAL CORD
1. A short power-supply cord is provided
to reduce the risk resulting from becoming
entangled in or tripping over a longer cord.
2. Extension cords may be used if care is
exercised in their use.
3. If a long detachable extension cord is used:
a) The marked electrical rating of the
power cord or extension cord should
be at least as great as the electrical
rating of the appliance.
b) If the appliance is of the grounded
type, the extension cord should be a
grounding-type 3-wire cord.
c) The cord should be arranged so that
it will not drape over the countertop
or tabletop where it can be pulled on
by children or tripped over.
Note: If the power cord is damaged,
please contact the warranty department
listed in these instructions.
SAVE THESE INSTRUCTIONS.
This product is for household use only.
Page 5
5
CONTENTS
Important Safeguards ............................................... 3
Table of Contents .................................................. 5
Getting to know your Café Select™ .................................... 6
Features and Benefits ............................................... 7
Café Select™ - Quick Tips ............................................ 8
Before Brewing .................................................... 8
Brewing a Carafe ................................................... 9
Brewing Single Serve – PODS.........................................10
Brewing Single Serve – Ground Coffee .................................11
Care and Cleaning ..................................................12
Troubleshooting....................................................14
Warranty and Customer Service Information ............................17
WELCOME!
Congratulations on your purchase of the Black + Decker Café Select™! We have
developed this guide to ensure optimal product performance for your complete
satisfaction. Save this use and care manual and be sure to register your
appliance online at www.prodprotect.com/applica.
SAVE THESE INSTRUCTIONS.
This product is for household use only.
WARNING
RISK OF FIRE OR ELECTRIC SHOCK. DO NOT OPEN.
The lightning symbol refers to “dangerous voltage”; the exclamation symbol refers
to maintenance instructions. See below.
Warning: To reduce the risk of fire or electric shock, do not remove the cover of the
coffeemaker. There are no user-serviceable parts inside. Repair should be done by
authorized service personnel only.
Page 6
6
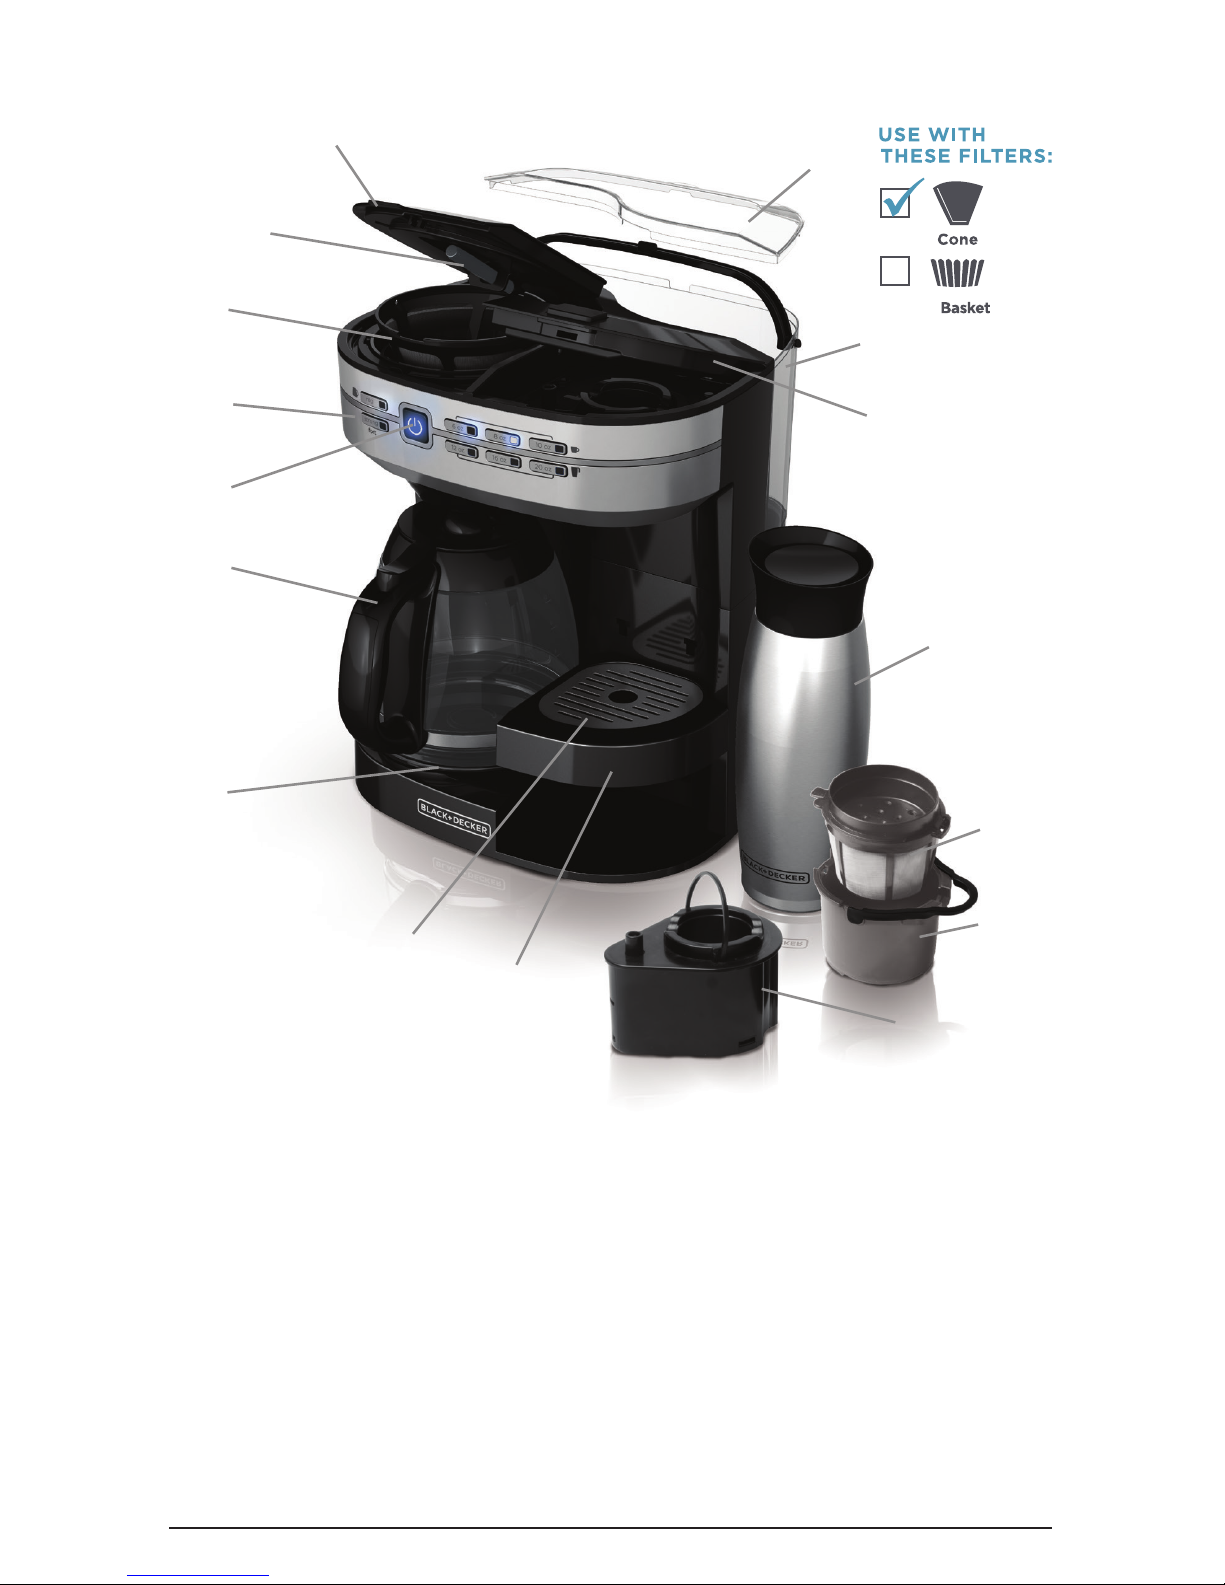
GETTING TO KNOW YOUR Café Select™*
1. Carafe filter basket lid
2. Evenstream™ showerhead
3. Washable brew basket
(Part #CM6000-01)
4. LED lit control panel
5. Power button
6. Perfect Pour™ 12-cup glass carafe
(Part #CM6000-02)
7. Nonstick keep hot carafe plate
8. Removable stainless steel drip tray
cover (Part #CM6000-03)
9. Adjustable drip tray
(Part #CM6000-04)
10. Water reservoir lid
(Part #CM6000-05)
11. 60 oz. Removable water reservoir
(Part #CM6000-06)
12. Single serve filter basket lid
13. Travel mug (select models)
(Part #CM6000-07)
14. Reusable single serve ground
coffee filter (Part #CM6000-08)
15. Single serve ground coffee adapter
(Part #CM6000-09)
16. Single serve POD adapter
(Part #CM6000-10)
1
10
2
3
12
16
11
13
9
8
4
5
6
7
14
15
*Product image may vary slightly
from actual product appearance.
Page 7

7
FEATURES AND BENEFITS
Always On Ready Mode
To ensure a quick cup, press the
power button
once and your
Café Select™ will remain in ready
mode, waiting for you to brew.
60 oz. Removable Water Reservoir
It’s easy fill and easy clean. The
removable reservoir holds 60 oz.
of water and is used to brew from
both sides of the Café Select™.
Auto Clean™ System
To ensure a quality brew and long
lifespan of your Café Select™, the
Auto Clean™ system will alert you
when it’s time to descale. Follow
a few simple steps (see Care and
Cleaning section), and your Café
Select™ will take care of the rest.
Simple 1-Touch Operation
From ready mode, press the button
that corresponds to your favorite
brew size. ENJOY!
FULL CARAFE
Evenstream™ Showerhead
This custom engineered technology
provides even saturation across
all coffee grounds for an optimally
flavored cup.
Perfect Pour™ Spout
Specially designed to eliminate
dripping, the Perfect Pour™ spout
keeps your counters clean.
Cone Style Filter Basket
This filter’s funnel shape ensures
all coffee grounds are evenly
saturated, leaving you one step
closer to the perfect cup.
Brew Strength Selector
Customize your carafe’s brew strength
by choosing Regular or Robusto.
Sneak-A-Cup™ Feature
Stop the flow of coffee into your
carafe for a no-mess fill-up at any time.
Replace the carafe within 20 seconds
to prevent brew basket overflow.
Auto-Shutoff
For your peace of mind, the
full carafe keep hot plate will
automatically shut off 2 hours after
the brew cycle is complete.
SINGLE SERVE
Customize Your Size
Choose your favorite brew size: 6, 8,
10, 12, 16 or 20 ounces.
Adjustable Drip Tray
Select from three tray heights
or simply remove the drip tray
altogether for an impressive 9 ½
inch clearance, perfect for large
capacity travel mugs.
Single Serve POD Adapter
Insert this K-Cup® compatible
adapter to brew your favorite POD
coffee with ease.
Single Serve Ground Coffee
Adapter
Use this adapter to brew up to
20 ounces of your favorite
ground coffee.
Reusable Single Serve
Ground Coffee Filter
To brew your favorite ground
coffee, scoop coffee grounds
directly into this washable filter,
no paper filter needed.
Page 8

8
1. Press the power button at any time to turn the unit on or off.
2. A self-check will run each time the unit is restarted from off mode. During this
self-check the power button will blink. After the self-check is complete, the
power button will remain lit and the Café Select™ will remain in ready mode
unless it is manually turned off or unplugged.
3. The Café Select™ will only brew from either the full carafe or single serve side at
any given time.
4. To brew extra tall mugs, remove the adjustable height drip tray altogether.
5. When brewing single serve, ensure that the water reservoir is filled with a
minimum of 20 ounces of water. If you attempt to brew a single serve selection
with less than 20 ounces of water in the reservoir, the six single serve selection
buttons will flash to alert you to add more water. The unit will not allow you to
brew a single serve selection with less than 20 ounces of water in the reservoir.
6. Because a great deal of pressure is required for pressurized POD brewing, the
amount of force needed to close the filter basket lid with a POD enclosed will be
greater than that of the other brewing options. This is for your safety.
7. If the robusto and 20oz. selection buttons flash several times before each brew,
it’s time to Auto Clean™ your brewer. This critical step is needed to maintain
both the quality of your coffee and lifespan of your Café Select™ (see De-scaling
With Auto Clean™ section for details). After you run the Auto Clean™ system, the
blinking will stop, until it is time to clean the unit again.
Café Select™—QUICK TIPS
BEFORE BREWING
1. Register your product at www.prodprotect.com/applica.
2. Carefully unpack your coffeemaker, removing all packaging materials, labels,
stickers and the plastic band around the power plug.
3. Thoroughly clean your coffeemaker according to the basic cleaning instructions
found in the Care and Cleaning section of this manual.
4. Plug in your Café Select™ and press the power button. A self-check will run each
time the unit is restarted from off mode. During this self-check the power button will
blink. After the self-check is complete, the power button will remain lit and the Café
Select™ will remain in ready mode unless it is manually turned off or unplugged.
TWO WAYS TO BREW
CARAFE
Brew up to 12 Cups
Cone filter
+
Select strength:
reg (regular) or robusto
SINGLE SERVE
Brew Directly Into Mug
OR
+
Select mug size
6 8 10 12 16 20oz.
Page 9
9
BREWING A CARAFE
1. Make sure your Café Select™ is in ready mode and the
power button LED
is lit. (See the Before Brewing
section for assistance.)
2. Fill water reservoir with desired amount of water. The
MAX line represents a full carafe of coffee. Do not fill
reservoir past this MAX line.
3. Place a #4 paper cone filter into the brew basket
above the full carafe.
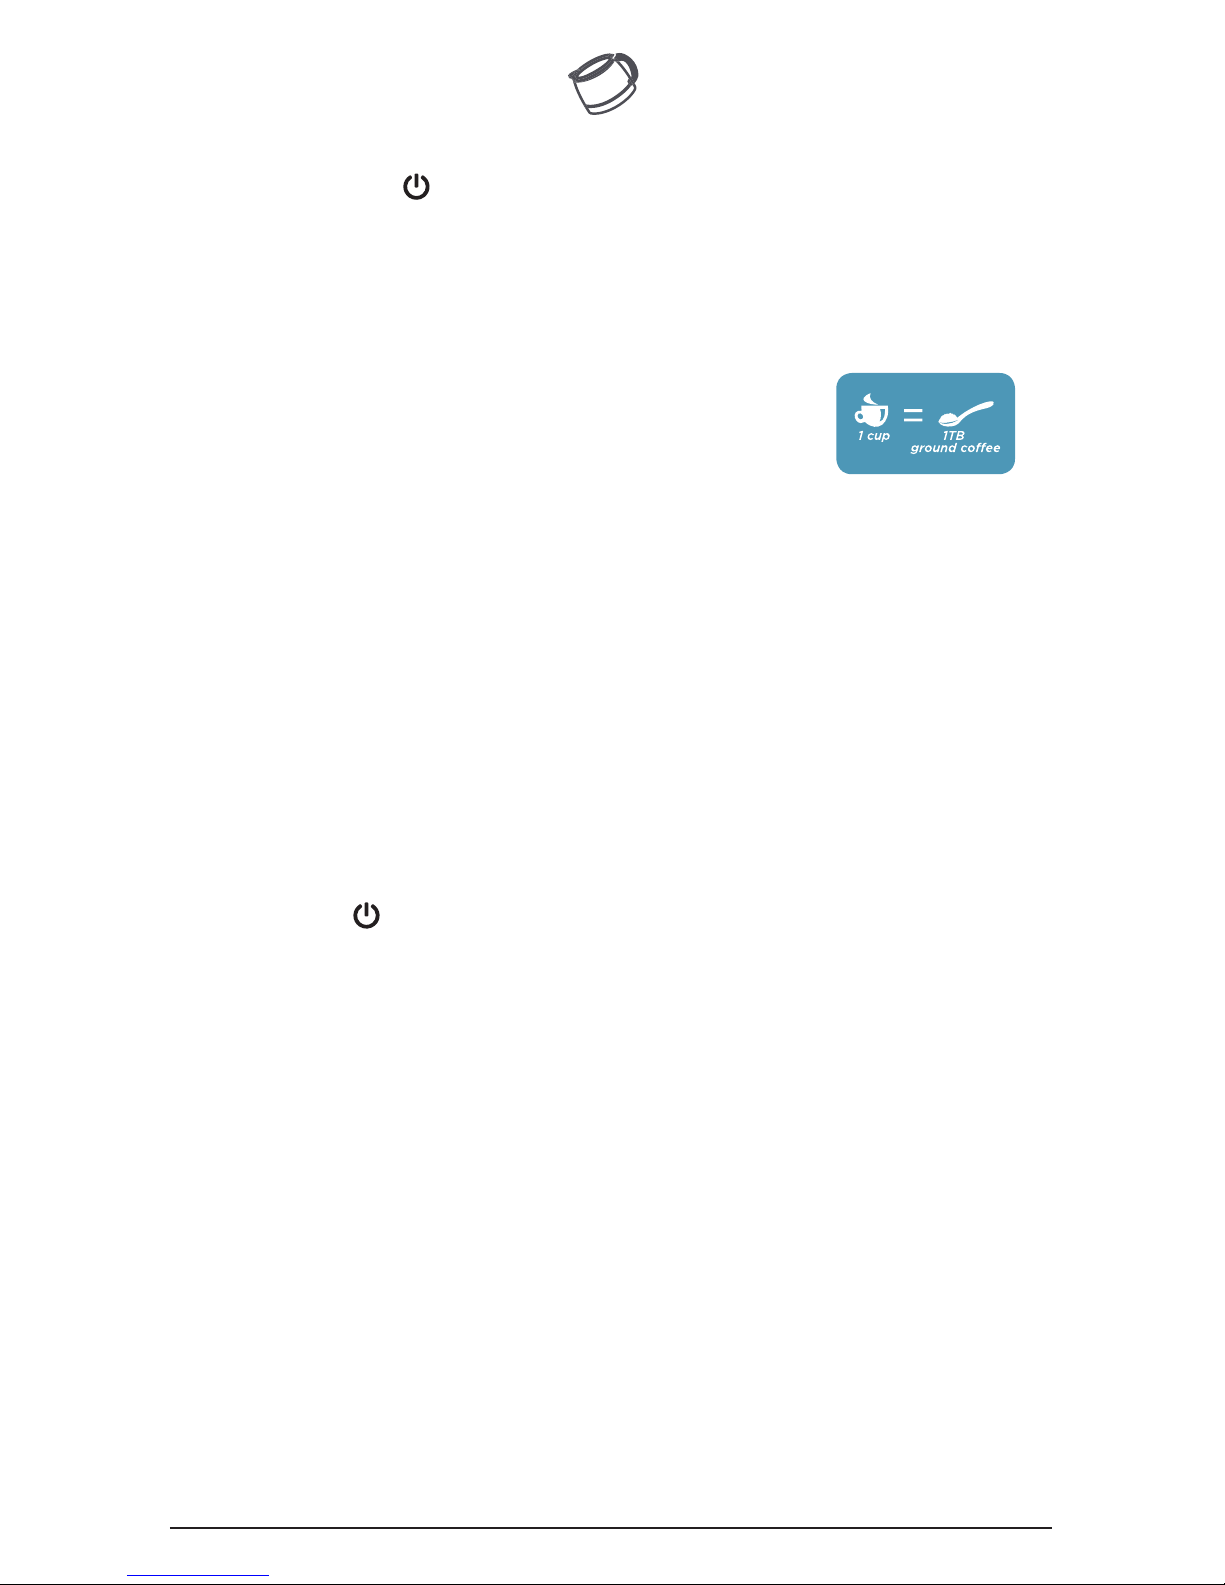
4. Add one tablespoon of ground coffee per cup, or to
taste.
5. Ensure brew basket is secured in place and close filter
basket lid.
6. Place carafe on carafe plate with lid closed. Coffee
may run over if carafe lid is not correctly in place.
7. Press your brew strength preference, Reg or Robusto,
to start the brew cycle.
8. While brewing, the Sneak-A-Cup™ feature stops coffee flow
out of the unit, allowing you to pour a cup of coffee before
the brew cycle finishes. Always return the carafe on to the
carafe plate within 20 seconds to prevent coffee overflow.
9. The keep hot carafe plate will remain on for two hours
before automatically shutting off.
10. To turn off the coffeemaker at any time, press the
power button
.
11. When coffee grounds are cool, carefully remove and
dispose of the used grounds and paper filter.
Page 10
10
BREWING SINGLE SERVE—PODS
1. One coffee POD generally brews 6 to 12 ounces. For
stronger coffee or when filling higher capacity mugs,
select the 6, 8, or 10 ounce setting and brew twice
using two separate PODs.
To customize strength, see Brewing Single Serve–
Ground Coffee.
2. Make sure your Café Select™ is in ready mode and the
power button LED
is lit. (See Before Brewing.)
3. Ensure the water reservoir is filled with a minimum
of 20 ounces of water. Do not fill reservoir past the
MAX fill line.
IMPORTANT: If you attempt to brew any single serve
selection with less than 20 ounces of water in the
reservoir, the six brew selection buttons will flash
several times to alert you to add more water.
4. To open, press the button on the filter basket lid above
the single serve spout.
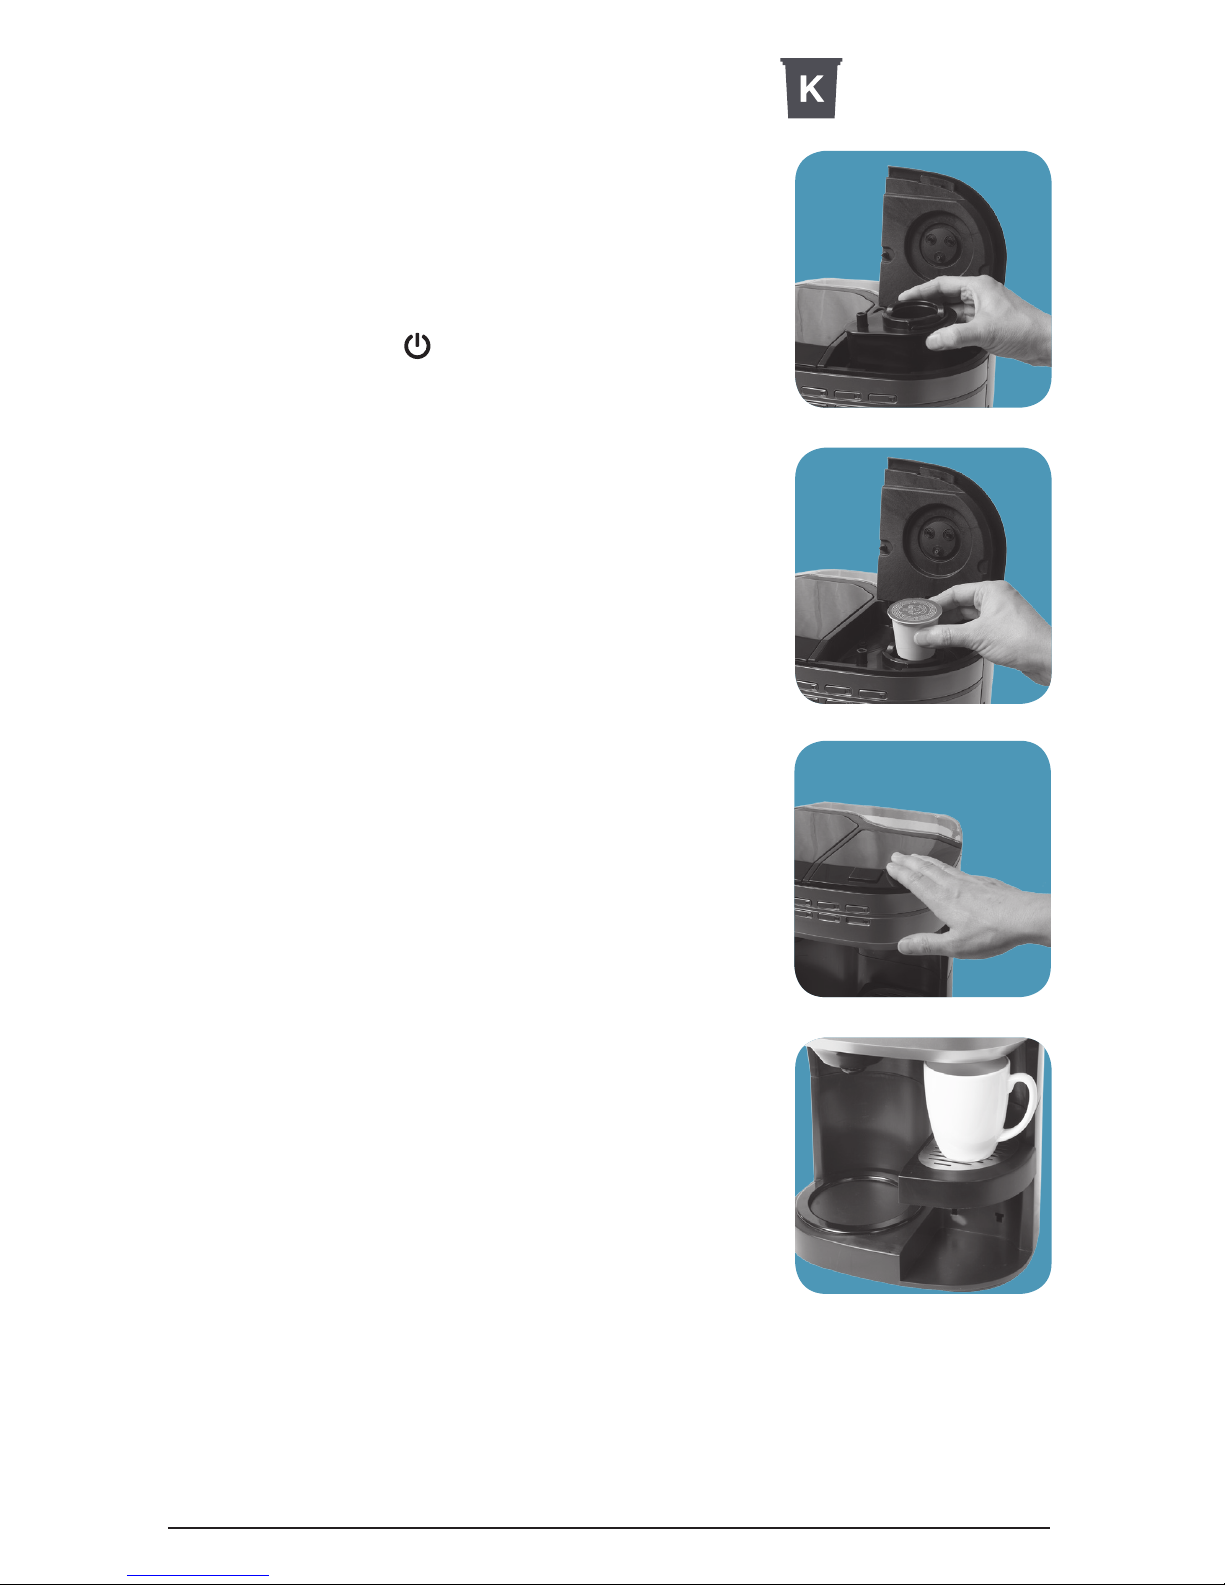
5. Place the POD adapter into the cavity inside the unit. (A)
6. Insert a coffee POD of your choice into the
POD adapter. (B)
NOTE: Do not remove the foil lid or puncture the
coffee POD before inserting.
CAUTION: There are four sharp needles that
puncture the coffee POD, three above the POD
adapter on the filter basket lid and one in the bottom
of the POD adapter. To avoid risk of injury, do not put
your fingers in the POD adapter.
7. Push the single serve filter basket lid down firmly until
it locks into place. (C) This will puncture the coffee
POD and keep the filter basket lid from opening
during brewing.
NOTE: A great deal of pressure is required for
pressurized POD brewing. For your safety, the
amount of force needed to close the filter basket lid
with a POD in place is greater than that of the other
brewing options.
8. Adjust the drip tray so that it holds your coffee or
travel mug close to the single serve spout. Place your
mug on the drip tray. (D)
9. To start the brew cycle, press your choice of brew size.
Place POD adapter.
A
Insert POD.
B
Adjust drip tray to mug.
D
Press lid firmly.
C
NOTE: The brew cycle for 12, 16, or 20 ounces pauses mid-cycle and restarts. The
brew selection light turns off when brewing is complete.
CAUTION: There is extremely hot water in the coffee POD during the brew process.
To avoid risk of injury do not open the filter basket lid during brewing process.
Page 11
11
10. To turn off the coffeemaker at any time, press the power button .
CAUTION: The coffee POD will be hot.
11. When cooled, carefully remove and dispose of the used POD.
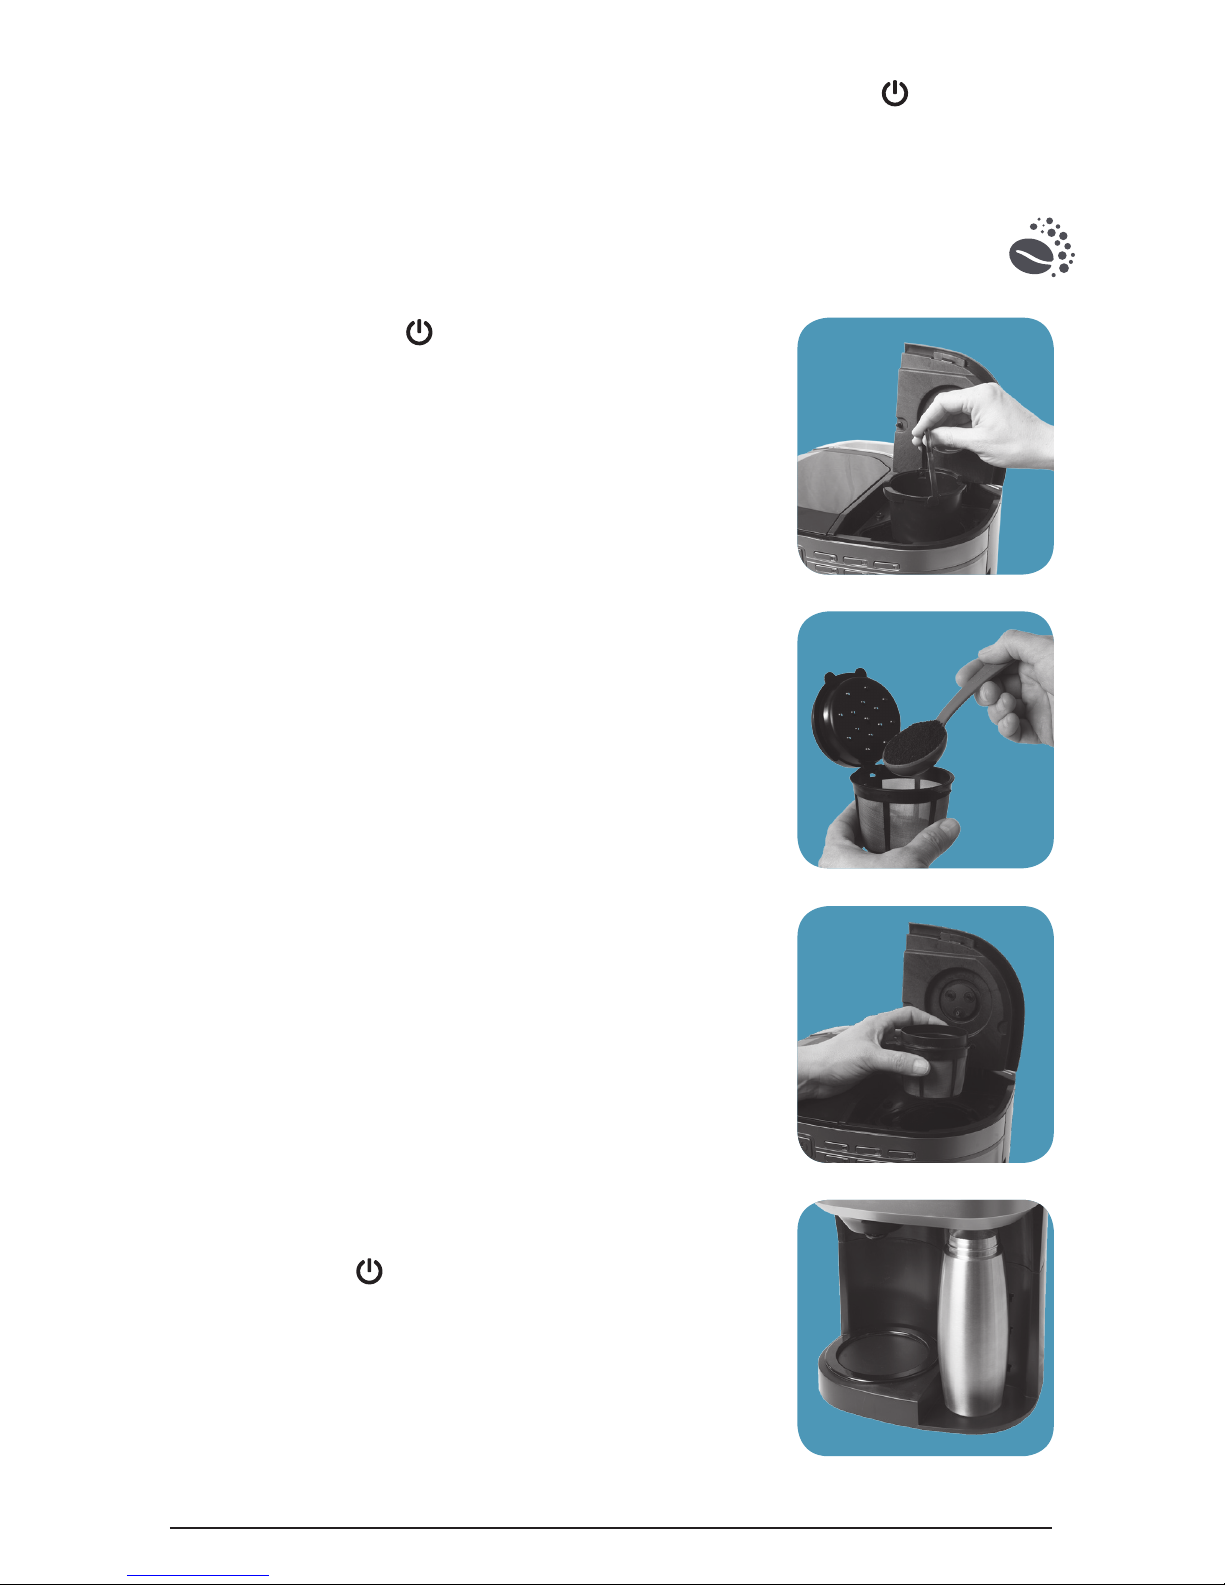
BREWING SINGLE SERVE—GROUND COFFEE
1. Make sure your Café Select™ is in ready mode and the
power button LED
is lit. (See Before Brewing.)
2. Ensure the water reservoir is filled with a minimum
of 20 ounces of water. Do not fill reservoir past the
MAX fill line.
IMPORTANT: If you attempt to brew a single serve
selection with less than 20 ounces of water in the
reservoir, the six brew selection buttons will flash
several times to alert you to add more water.
3. Open the filter basket lid above the single serve spout.
4. Place the grey ground coffee adapter into the cavity
inside the unit. (E)
5. Fill the reusable grey single serve filter with your
desired amount of coffee grounds, one tablespoon
per brewed cup or to taste. (F)
6. Close reusable filter lid and place it into the ground
coffee adapter. (G)
7. Push the single serve filter basket lid down until it
locks in place. (C) This will ensure the filter basket lid
does not lift open during brewing.
8. Adjust the drip tray so that it holds your coffee mug close to
the single serve spout. Place your mug on the drip tray. (D)
9. If your coffee mug is too tall to fit on the drip tray, remove
the drip tray and place your mug on the unit’s base. (H)
10. To start the brew cycle, press your choice of brew
size: 6, 8, 10, 12, 16, or 20 ounces.
NOTE: The brew cycle for 12, 16, or 20 ounces pauses
mid-cycle and restarts. The brew selection light turns off
when brewing is complete.
11. To turn off the coffeemaker at any time, press the
power button
.
12. When cooled, carefully dispose of the used grounds
and wash the reusable filter for future use.
Place ground coffee adapter.
E
Add grounds to filter.
F
Place filter into adapter.
G
Place tall mug without tray.
H
Page 12

12
CARE AND CLEANING
COFFEEMAKER PART CLEANING INSTRUCTIONS
Housing
Carafe Plate
Power Cord
POD coffee adapter
Stainless steel drip tray insert
Wipe with a soft, damp cloth.
Brew Basket
Glass Carafe Lid
Glass Carafe
Reusable single serve filter
Single serve ground coffee adapter
Plastic adjustable drip tray base
Thermal Travel Mug*
Thermal Travel Mug Lid*
Wash by hand in warm soapy water,
or in the dishwasher (top rack only).
Basic Cleaning
Follow the directions below to clean your Café Select™ after each use.
1. Ensure your coffeemaker is unplugged and cool.
2. Open carafe filter basket lid. If remaining, throw away the used paper filter and
coffee grounds. Remove the cone shaped carafe brew basket.
3. Open single serve filter basket lid. If remaining, discard used POD or coffee
grounds. Remove any adapters from inside the filter basket.
4. Wipe the outside of the coffeemaker, power cord, carafe plate and inside of the
filter basket lid with a soft, damp cloth.
5. Wash each removable piece of your Café Select™ according to the chart below.
Rinse and dry all removable components before replacing into the unit.
Note: Do not use abrasive cleansers or scouring pads on this product.
Never immerse the coffeemaker in water.
*Select models
Page 13

13
De-scaling With Auto Clean™
Over time, calcium deposits or “scale” may build up in your brewer. Scale is nontoxic but if left unattended can hinder brewer performance. Regularly de-scaling
your brewer helps to maintain quality coffee as well as the lifespan of the heating
element, and other internal parts that come in contact with water throughout the
brew process.
To make the de-scaling process as effortless as possible, an Auto Clean™ system
has been programmed into your Café Select™.
When is it time to Auto Clean™?
After every 120 brews, full carafe and single serve combined, the Robusto and 20
oz. brew selection buttons will begin to flash prior to brewing your coffee selection.
When this happens, it is time to de-scale your Café Select™.
After you run the Auto
Clean™ system, the blinking will stop, until it is time to clean the unit again.
How do I use Auto Clean™?
Follow the simple steps below. Your Café Select™ will take care of the rest.
1. Fill the water reservoir approximately half-way with white vinegar.
2. Fill the remaining half of the water reservoir with cool water.
3. Place a #4 paper cone filter into the carafe side brew basket, close the lid and
place the empty carafe onto the carafe plate.
4. Place the POD adapter into the single serve brew basket cavity and lock the
lid closed.
5. Place a mug or other receptacle that holds a minimum of 20 ounces of liquid
onto the single serve mug base.
6. Press and hold both the robusto and 20 oz. buttons together for five seconds to
start the Auto Clean™ system.
Note: The LED lights for
strong and 20 oz. w
ill remain lit to indicate that the
Auto Clean™ system is activated.
7. Leave unit to Auto Clean™ for approximately 80 minutes.
8. When Auto Clean™ has finished, the LED lights for strong and 20 oz. will turn off.
9. Discard the liquid in both the carafe and single serve mug or receptacle.
10. Using water only, run a minimum of two full brew cycles through the full carafe.
11. Using water only, run a minimum of two 20 ounce brews through the single serve unit.
12. Wash, rinse and dry each removable piece of your Café Select™ (see the Basic Cleaning
section of this guide for specific instructions).
Page 14

14
TROUBLESHOOTING—GENERAL
PROBLEM POSSIBLE CAUSE SOLUTION
Coffeemaker will
not turn on.
Unit is unplugged Make sure appliance is
plugged into a working
outlet.
Unit is plugged in but
not turned on.
Press the power button
to turn the unit on.
All eight selection
lights are blinking and
unit will not brew.
Water reservoir may
not be securely placed
onto unit.
Remove and securely
replace the water
reservoir.
Robusto and 20oz.
selection lights blink
before starting to brew.
It is time to
Auto Clean™
your Café Select™.
Follow the instructions
in the De-scaling
with the Auto Clean™
System section.
Coffeemaker is leaking.
Water reservoir may be
overfilled.
Ensure water reservoir
is not filled beyond the
MAX line.
Coffeemaker brews
more slowly than usual.
The coffeemaker needs
cleaning.
Follow the instructions
in the De-scaling With
Auto Clean™ section.
The brew basket
overflows.
Excessive amount of
ground coffee used.
Reduce the amount
of coffee used to
eliminate brew basket
overflows.
Coffeemaker needs
cleaning.
Follow the instructions
in the De-scaling With
Auto Clean™ section.
Page 15

15
TROUBLESHOOTING—CARAFE
PROBLEM POSSIBLE CAUSE SOLUTION
Coffeemaker
is leaking.
Carafe lid may not be
correctly placed on
carafe.
Make sure carafe lid is
placed straight onto
the carafe.
Carafe may not be
correctly placed on the
carafe plate
Place carafe securely and
squarely onto the carafe
plate.
Coffee sediment in
brewed cup of coffee.
Paper filter not opened
or properly placed in
brew basket.
Rinse brew basket and
re-insert paper filter
into brew basket so
edges remain pressed
against the sides of the
basket.
Coffee leaks onto base.
The carafe has been
removed for longer
than 20 seconds during
a brew cycle.
Make sure to replace
the carafe within 20
seconds during the
brewing cycle.
A partial carafe of
coffee brews.
Water reservoir was not
filled to the MAX line
when the brew cycle
started.
Ensure the water
reservoir is filled to
the MAX line prior to
brewing a full carafe.
The six single-serve
selection lights blink
before brewing begins.
There is less than
20 oz. of water in the
water reservoir.
Add additional water, or
ensure that the volume
of ground coffee has
been adjusted.
Page 16

16
TROUBLESHOOTING—SINGLE SERVE
PROBLEM POSSIBLE CAUSE SOLUTION
Coffeemaker is leaking.
Travel mug lid may still
be on travel mug.
Ensure lid is removed
from travel mug before
brewing.
The six single serve
selection lights are
blinking and unit will
not brew.
Less than 20 oz. of
water in reservoir.
Check water levels.
Add additional water to
reservoir if needed.
Brew basket lid may
not be latched properly.
Reopen brew basket lid
and push to close unit
lid clicks into place.
Coffee tastes weaker
than preferred.
Too much water used
for a single POD coffee
brew.
Brew 2 coffee PODs
into your mug. Choose
a small brew volume.
Not enough ground
coffee used.
Increase the volume
of coffee grounds in
permanent filter.
Coffee leaks onto base.
The coffee cup or mug
was removed before
brewing was complete.
Wait until brew is
complete and dripping
stops before removing
your mug.
The 6 oz. and 12 oz.
selection lights are
blinking.
The single serve filter
basket lid is not tightly
closed.
Open and securely
reclose the single serve
filter basket lid.
If additional assistance is needed,
please contact our consumer service team at
1-800-231-9786.
Page 17

17
WARRANTY AND CUSTOMER
SERVICE INFORMATION
For service, repair or any questions regarding your appliance, call the
appropriate 800 number listed within this section. Please DO NOT return the
product to the place of purchase. Also, please DO NOT mail product back to
manufacturer, nor bring it to a service center. You may also want to consult
the website listed on the cover of this manual.
Two-Year Limited Warranty
(Applies only in the United States and Canada)
What does it cover?
• Any defect in material or workmanship provided; however, Spectrum Brands,
Inc.’s liability will not exceed the purchase price of product.
For how long?
• Two years from the date of original purchase with proof of purchase.
What will we do to help you?
• Provide you with a reasonably similar replacement product that is either new or
factory refurbished.
How do you get service?
• Save your receipt as proof of date of sale.
• Visit the online service website at www.prodprotect.com/applica, or call toll-free
1-800-231-9786, for general warranty service.
• If you need parts or accessories, please call 1-800-738-0245.
What does your warranty not cover?
• Damage from commercial use
• Damage from misuse, abuse or neglect
• Products that have been modified in any way
• Products used or serviced outside the country of purchase
• Glass parts and other accessory items that are packed with the unit
• Shipping and handling costs associated with the replacement of the unit
• Consequential or incidental damages (Please note, however, that some states do
not allow the exclusion or limitation of consequential or incidental damages, so
this limitation may not apply to you.)
How does state law relate to this warranty?
• This warranty gives you specific legal rights. You may also have other rights that
vary from state to state or province to province.
Page 18

18
• Lea todas las instrucciones antes de utilizar.
• No toque las superficies calientes.Use las asas o las perillas.
• A fin de protegerse contra un incendio, descarga
eléctrica y lesiones a las personas, no sumerja el
cable, los enchufes ni el aparato en agua ni en ningún
otro líquido.
• Todo aparato eléctrico utilizado cerca de la
presencia de los niños o por ellos mismos, requiere la
supervisión de un adulto.
• Apague y desenchufe el aparato del tomacorriente
cuando no esté en uso y antes de limpiar.
• Espere a que el aparato se enfríe antes de instalarle o
retirarle piezas y antes de limpiarlo.
• No opere ningún aparato eléctrico que tenga el cable
o el enchufe averiado, que presente un problema
de funcionamiento o que esté dañado. Devuelva el
aparato al centro de servicio autorizado más cercano
para que lo examinen, reparen o le hagan los ajustes
necesarios.
• El uso de accesorios no recomendados por el
fabricante para ser utilizados con este aparato puede
ocasionar incendio, descarga eléctrica o lesiones a
las personas.
• No utilice este aparato a la intemperie.
• No permita que el cable cuelgue del borde de la
mesa o del mostrador ni que entre en contacto con
las superficies calientes.
• No coloque el aparato sobre ni cerca de una hornilla
de gas o eléctrica ni adentro de un horno caliente.
• Para desenchufar, ajuste todo control a la posición
de apagado (OFF) y después retire el enchufe del
tomacorriente.
• Este aparato se debe usar únicamente con el fin
previsto.
• La tapa debe mantenerse sobre la jarra cuando el
aparato está en uso.
• El retirar la tapa de la jarra o abrir la tapa de la
unidad durante el ciclo de colado puede ocasionar
quemaduras.
• La jarra está diseñada para ser utilizada con este
aparato. Jamás se deberá utilizar sobre una estufa.
• Nunca coloque una jarra caliente sobre una superficie
fría ni mojada.
• No utilice la jarra si el vidrio se ha rajado o si el asa
está floja o débil.
• No limpie la jarra con limpiadores abrasivos, con
almohadillas de fibra de metal ni demás limpiadores
abrasivos.
• Este aparato no está diseñado para ser usado por
personas (incluyendo los niños) con su capacidad física,
psíquica o sensorial reducida, o con falta de experiencia
o sabiduria, a menos que sean supervisadas o instruidas
acerca del uso del aparato por una persona responsable
de su seguridad.
• Los niños deben ser supervisados para asegurar que no
jueguen con el aparato.
PRECAUCIÓN: Cuatro pinchos perforan la bolsita, tres
en la tapa y la otra en la base del adaptador de la bolsita.
Para eliminar el riesgo de daño, no coloque sus dedos en
la caja de la bolsita para una sola taza.
PRECAUCIÓN: El agua es extremadamente caliente en
el adaptador de bolsitas para una sola taza durante el
proceso de colado. Para evitar el riesgo de una lesión, no
levante la tapa para una sola taza durante el proceso de
colado.
PRECAUCIÓN: Siempre mantenga la cafetera en posición
vertical para evitar la posibilidad de una lesion y/o daño
a su cafetera.
Por favor lea este instructivo antes de usar el producto.
INSTRUCCIONES IMPORTANTES
DE SEGURIDAD
Al utilizar cualquier aparato eléctrico siempre deben tomarse precauciones básicas de
seguridad, incluyendo las siguientes:
PRECAUCIÓN
RIESGO DE INCENDIO O DE CHOQUE ELÉCTRICO. NO ABRA.
El símbolo de un rayo indica voltaje peligroso. El signo de exclamación
indica importantes instrucciones de mantenimiento. Consulte a
continuación:
Precaución: Para reducir el riesgo de incendio o de choque eléctrico,
no retire la cubierta de la cafetera. No contiene por dentro partes
reparables por el consumidor. Cualquier reparación deberá ser
efectuada únicamente por personal autorizado.
Page 19

19
ENCHUFE POLARIZADO (Solamente
para los modelos de 120V)
Este aparato cuenta con un enchufe polarizado (un
contacto es más ancho que el otro). A fin de reducir
el riesgo de un choque eléctrico, este enchufe
encaja en un tomacorriente polarizada en un solo
sentido. Si el enchufe no entra en el tomacorriente,
inviértalo y si aun así no encaja, consulte con
un electricista. Por favor no trate de alterar esta
medida de seguridad.
TORNILLO DE SEGURIDAD
Advertencia: Este aparato cuenta con un tornillo
de seguridad para evitar la remoción de la cubierta
exterior del mismo. A fin de reducir el riesgo de
incendio o de choque eléctrico, por favor no trate
de remover la cubierta exterior. Este producto no
contiene piezas reparables por el consumidor. Toda
reparación se debe llevar a cabo únicamente por
personal de servicio autorizado.
CABLE ÉLECTRICO
1. El producto se debe de proporcionar con un
cable eléctrico corto, a fin de reducir el riesgo de
tropezar o de enredarse en un cable más largo.
2. Cables de extensión pueden ser utilizados si se
tiene el cuidado debido.
3. Si se utiliza un cable separable o de extensión,
a) El régimen nominal del cable separable o del
cable de extensión debe ser, como mínimo, igual
al del régimen nominal del aparato.
b) Si el aparato es de conexión a tierra, el cable de
extensión debe ser un cable de tres alambres de
conexión a tierra.
c) Uno debe de acomodar el cable más largo de
manera que no cuelgue del mostrador o de la
mesa, para evitar que un niño tire del mismo o
que alguien se tropiece.
Nota: Si el cordón de alimentación es dañado,
en América Latina debe sustituirse por personal
calificado o por el centro de servicio autorizado.
CONSERVE ESTAS INSTRUCCIONES.
Este aparato eléctrico es para uso doméstico solamente.
Page 20

20
INFORMACIÓN CONTENIDA
Instrucciones Importantes de Seguridad ............................... 18
Índice ...........................................................20
Conozca su Cafetera Café Select™ .....................................21
Características y Beneficios ......................................... 22
Café Select™ – Consejos Rápidos .................................... 23
Antes de Colar .................................................... 24
Preparación de Café para Una Jarra .................................. 24
Preparación de Café para Una Sola Taza - BOLSITAS INDIVIDUALES ........ 2 5
Preparación de Café para Una Sola Taza – Café Molido ................... 26
Cuidado y Limpieza ................................................ 27
Resolución de Problemas ........................................... 29
Información de Garantía y Servicio al Cliente ........................... 32
¡BIENVENIDO!
¡Felicitaciones por su compra de la cafetera Café Select™ de Black & Decker!
Hemos desarrollado este manual para asegurar rendimiento óptimo y su
satisfacción total. Conserve este manual de uso y cuidado y asegúrese de
registrar su producto en línea visitando www.prodprotect.com/applica.
CONSERVE ESTAS INSTRUCCIONES.
Este producto es para uso doméstico solamente.
Page 21

21
CONOZCA SU CAFETERA Café Select™*
1
10
2
3
12
16
11
13
9
8
4
5
6
7
14
15
*La ilustración del producto puede
variar ligeramente de la apariencia
del producto original.
1. Tapa del cesto del filtro de la jarra
2. Distribuidor de agua Evenstream™
3. Cesto de colar lavable (pieza no.
CM6000-01)
4. Panel de control iluminado LED
5. Botón de funcionamiento
6. Jarra de vidrio de 12 tazas Perfect Pour™
(pieza no. CM6000-02)
7. Placa de calentamiento para la jarra,
antiadherente
8. Cubierta de la bandeja de goteo de
acero inoxidable, removible (pieza no.
CM6000-03)
9. Bandeja de goteo ajustable
(pieza no. CM6000-04)
10. Tapa del tanque de agua
(pieza no. CM6000-05)
11. Tanque de agua removible de 60 onzas
(pieza no. CM6000-06)
12. Tapa del cesto del filtro para una sola taza
13. Taza portátil (modelos selectos)
(pieza no. CM6000-07)
14. Filtro reusable para café molido para
una sola taza (pieza no. CM6000-08)
15. Adaptador para café molido para una
sola taza (pieza no. CM6000-09)
16. Adaptador para bolsitas para una sola
taza (pieza no. CM6000-10)
Page 22

22
CARACTERÍSTICAS Y BENEFICIOS
Siempre en modo de listo
Para asegurar una taza rápida,
presione el botón de funcionamiento
una vez y su cafetera Café Select™
se mantendrá en el modo de listo,
esperando a que usted decida colar
.
Tanque de agua removible
de 60 onzas
Es fácil de llenar y fácil de limpiar.
El tanque removible acomoda 60
onzas de agua y es utilizado para
colar desde ambos lados de la
cafetera Café Select™.
Sistema de limpieza automática
Para asegurar un colado de calidad
y una vida larga de su cafetera Café
Select™, el sistema de limpieza
automática le avisará cuando es
tiempo de descalcificar su cafetera.
Sólo requiere seguir unos pasos
sencillos (ver la sección de Cuidado
y Limpieza) y su cafetera Café
Select™ se encargará del resto.
Operación simple de un toque
Desde el modo de listo, presione el
botón que corresponda a su tamaño
favorito de colado. ¡DISFRUTE!
JARRA COMPLETA
Distribuidor de agua Evenstream™
Este diseño de tecnología exclusiva
provee una saturación uniforme
sobre todos los granos de café
molido produciendo una taza de
café con máximo sabor.
Boquilla Perfect Pour™
Especialmente diseñada para eliminar
goteos, la boquilla Perfect Pour™
mantiene sus mostradores limpios.
Filtro cónico para el cesto
La forma de embudo del filtro
asegura que todo el café molido
esté saturado de manera uniforme,
permitiendole dar un paso más
cercano para obtener la taza de
café perfecta.
Selector de intensidad del café
Personalice la intensidad del colado
de su jarra, seleccionando Regular o
Robusto.
Dispositivo de interrupción del
colado Sneak-A-Cup™
Detenga el flujo de café que cae
en su jarra para llenar su taza en
cualquier momento sin ensuciar.
Coloque la jarra de nuevo en su
lugar en 20 segundos para prevenir
que el cesto de colar se desborde.
Sistema de apagado automático
Para mayor tranquilidad, la placa
de calentamiento se apagará
automáticamente 2 horas después
que el ciclo de colado haya terminado.
UNA SOLA TAZA
Personalice el tamaño
Seleccione su tamaño favorito de
colado: 6, 8, 10, 12, 16 ó 20 onzas.
Bandeja de goteo ajustable
Seleccione entre tres niveles de
altura o simplemente retire la
bandeja de goteo para obtener
un espacio impresionante de
9 ½ pulgadas, perfecto para tazas
portátiles de capacidad grande.
Adaptador para bolsitas para una
sola taza
Inserte un adaptador compatible
con una cápsula K-Cup® para colar
su bolsita de café favorito con
facilidad.
Adaptador para café molido para
una sola taza
Utilice este adaptador para colar hasta
20 onzas de su café molido favorito.
Filtro reusable para café molido
para una sola taza
Para colar su café molido favorito,
échelo directamente dentro del
filtro lavable, sin necesidad de
utilizar un filtro de papel.
Page 23

23
1. Presione el botón de funcionamiento en cualquier momento para encender
o apagar la unidad.
2. La unidad realiza un proceso de auto verificación cada vez que es reactivada
desde el modo de apagado. Durante esta auto verificación, el botón de
funcionamiento parpadeará. Después de que el proceso de auto verificación
haya terminado, el botón de funcionamiento se mantendrá iluminado y la
cafetera Café Select™ se mantendrá en el modo de listo, a no ser que sea
apagada manualmente o desenchufada.
3. La cafetera Café Select™ solo colará una vez, desde el lado para colar una jarra
completa o desde el lado para colar una sola taza.
4. Para colar utilizando tazas muy altas, retire la bandeja de goteo ajustable.
5. Cuando vaya a colar una sola taza, asegúrese de que el tanque de agua esté
lleno con un mínimo de 20 onzas de agua. Si usted trata de colar una selección
para una sola taza con menos de 20 onzas de agua en el tanque, los seis
botones selectores parpadearán varias veces para avisarle que necesita agregar
más cantidad de agua. La unidad no le permitirá colar una sola taza con menos
de 20 onzas de agua en el tanque.
6. Debido al alto grado de presión requerida para el colado con bolsitas
individuales presurizadas, la cantidad de fuerza necesaria para cerrar la tapa
del cesto del filtro que contenga una bolsita, será más grande que para las otras
opciones de colado. Esto es reiterado para su seguridad.
7. Si los botones selectores de intensidad robusto y de 20 onzas parpadean varias
veces antes de cada ciclo de colado, es tiempo de activar el sistema de limpieza
automática. Este paso crítico es necesario para mantener la calidad de su café y
la vida útil de su cafetera Café Select™ (consulte la sección de Descalcificación
con el Sistema de Limpieza Automática para más detalles). Después de haber
utilizado el sistema de limpieza automática, el parpadeo se detendrá, hasta que
sea tiempo de limpiar la unidad otra vez.
CAFETERA Café Select™ -- CONSEJOS RÁPIDOS
DOS MANERAS DE COLAR
JARRA
Cuele hasta 12 tazas
Filtro cónico
+
Seleccione la intensidad:
regular o robusto
UNA SOLA TAZA
Cuele directamente dentro de
una taza
o
+
Seleccione el tamaño de taza
6 8 10 12 16 20o
nzas
Page 24

24
ANTES DE COLAR
1. Para registrar su producto, visite www.prodprotect.com/applica.
2. Desempaque su cafetera cuidadosamente, retirando todo material de empaque,
etiquetas adheridas a su cafetera y la tira plástica alrededor del enchufe.
3. Limpie bien su cafetera según las instrucciones de limpieza básica, descritas en
la sección de Cuidado y Limpieza de este manual.
4. Enchufe su cafetera Café Select™ y presione el botón de funcionamiento. La
unidad realiza un proceso de auto verificación cada vez que es reactivada
desde el modo de apagado. Durante esta auto verificación, el botón de
funcionamiento parpadeará. Después de que el proceso de auto verificación
haya terminado, el botón de funcionamiento se mantendrá iluminado y la
cafetera Café Select™ se mantendrá en el modo de listo, a no ser que sea
apagada manualmente o desenchufada.
PREPARACIÓN DE CAFÉ PARA UNA JARRA
1. Asegúrese de que su cafetera Café Select™ esté en el modo de
listo y de que el botón de funcionamiento LED
esté iluminado.
(Consulte la sección de Antes de Colar para asistencia).
2. Llene el tanque de agua con la cantidad de agua deseada. La línea
MAX representa una jarra completa de café. No llene el tanque
pasado de la línea MAX.
3. Coloque un filtro cónico de papel #4 dentro del cesto de
colar, arriba de la jarra.
4. Añada una cucharada de café molido por cada taza o según
su gusto.
5. Asegúrese de que el cesto de colar esté seguro en su lugar
y cierre la tapa del cesto del filtro.
6. Coloque la jarra sobre la placa de calentamiento con la tapa
cerrada. El café se puede desbordar si la tapa no está colocada
correctamente en su lugar.
7. Presione el botón selector de la intensidad de colado preferida,
regular o robusto.
8. Mientras la cafetera cuela, el dispositivo de interrupción de colado
Sneak-A-Cup™ le permite servir una taza antes de que termine el
ciclo de colado. Para evitar un derrame, siempre coloque la jarra de
nuevo sobre la placa de calentamiento en 20 segundos.
9. La placa de calentamiento se mantendrá encendida por dos horas
antes de apagarse automáticamente.
10. Para apagar la cafetera en cualquier momento, presione el botón de
funcionamiento
.
11. Cuando el café molido se haya enfriado, retírelo cuidadosamente y
deseche el café usado y el filtro de papel.
1 taza 1 cucharada de
café molido
Page 25

25
1. Una bolsita de café cuela generalmente 6 a 12 onzas.
Para café más fuerte o cuando se llene tazas de mas
capacida, seleccione el ajuste de 6, 8 ó 10 onzas y
cuele dos veces utilizando dos bolsitas separadas.
Para personalizar la intensidad del café, ver la sección
Preparación de Café para Una Sola Taza – Café Molido.
2. Asegúrese de que su cafetera Café Select™ esté en el
modo de listo y de que el botón de funcionamiento
LED
esté iluminado. (Ver Antes de Colar.)
3. Verifique que el tanque de agua esté lleno con un
mínimo de 20 onzas de agua. No llene el tanque
pasado de la línea MAX.
IMPORTANTE: Si usted trata de colar cualquier
selección para una sola taza con menos de 20 onzas
de agua en el tanque, los seis botones selectores
parpadearán varias veces para avisarle que necesita
agregar más cantidad de agua.
4. Para abrir, presione el botón situado en la tapa del
cesto del filtro arriba de la boquilla para una sola taza.
5. Coloque el adaptador para bolsitas dentro de la
cavidad interior de la unidad. (A)
6. Inserte una bolsita de café de su preferencia dentro
del adaptador para bolsitas. (B)
NOTA: No retire la tapa de papel de aluminio ni perfore
la bolsita de café antes de insertarla.
Precaución: Cuatro agujas afiladas perforan la bolsita de
café, tres arriba del adaptador de bolsitas en la tapa del
cesto del filtro durante el proceso de colado.
7. Empuje la tapa del cesto del filtro para una sola taza
hacia abajo firmemente hasta que se cierre en su lugar.
(C) Esto perforará la bolsita de café y evitará que la tapa
del cesto del filtro se abra durante el ciclo de colado.
NOTA: Un alto grado de presión es requerida para colar
con bolsitas de café presurizadas. Para su seguridad,
la cantidad de fuerza necesaria para cerrar la tapa del
filtro del cesto que contiene una bolsita es mayor que la
requerida con las otras opciones de colado.
8. Ajuste la bandeja de goteo de manera que sostenga
su taza de café regular o portátil cerca de la boquilla
para una sola taza. Cologue su taza sobre la bandeja
de goteo. (D)
9. Para comenzar el ciclo de colado, presione el botón
selector del tamaño de colado preferido.
NOTA: El ciclo de colado para 12, 16 ó 20 onzas pausa
a mitad del ciclo y vuelve a comenzar. La luz de la
selección de colado se apaga cuando el ciclo de colado
ha terminado.
Precaución: La bolsita de café contiene agua
extremedamente caliente. Para evitar un riesgo de
lesión, no abra la tapa del cesto del filtro durante el
proceso de colado.
Coloque el adaptador para
bolsitas de café.
A
Inserte bolsita de café.
B
Ajuste la bandeja de goteo
a la taza.
D
Presione la tapa firmemente.
C
PREPARACIÓN DE CAFÉ PARA UNA SOLA TAZA
BOLSITAS INDIVIDUALES
Page 26

26
10. Para apagar su cafetera en cualquier momento, presione el botón de funcionamiento .
Precaución: La bolsita de café estará caliente.
11. Cuando su cafetera se haya enfriado, retire cuidadosamente la bolsita de café
usada y deséchela.
PREPARACIÓN DE CAFÉ PARA UNA SOLA TAZA
CAFÉ MOLIDO
1. Asegúrese de que su cafetera Café Select™ esté en el
modo de listo y de que el botón de funcionamiento
LED
esté iluminado. (Ver Antes de Colar.)
2. Verifique que el tanque de agua esté lleno con un
mínimo de 20 onzas de agua. No llene el tanque
pasado de la línea MAX.
IMPORTANTE: Si usted trata de colar cualquier
selección para una sola taza con menos de 20 onzas
de agua en el tanque, los seis botones selectores
parpadearán varias veces para avisarle que necesita
agregar más cantidad de agua. La unidad no le
permitirá colar una sola taza con menos de 20 onzas
de agua en el tanque.
3. Abra la tapa del cesto del filtro situado arriba de la
boquilla para una sola taza.
4. Coloque el adaptador para café molido dentro de la
cavidad interior de la unidad. (E)
5. Llene el filtro reusable para una sola taza con la
cantidad de café molido deseada, una cucharada por
cada taza o según su gusto. (F)
6. Cierre la tapa del filtro reusable y colóquelo dentro del
adaptador para café molido. (G)
7. Empuje la tapa del cesto del filtro para una taza hacia
abajo hasta que se cierre en su lugar. (C) Esto asegurará
que la tapa del filtro no se abra durante el ciclo de colado.
8. Ajuste la bandeja de goteo de manera que sostenga
su taza de café cerca de la boquilla para una sola taza.
Coloque su taza sobre la bandeja de goteo. (D)
9. Si su taza es demasiado alta para acomodarse en la
bandeja, retire la bandeja de goteo y coloque su taza
en la base de la unidad. (H)
10. Para comenzar el ciclo de colado, presione su tamaño
de colado preferido: 6, 8, 10, 12, 16 ó 20 onzas.
NOTA: El ciclo de colado para 12, 16 ó 20 onzas pausa a
mitad del ciclo y vuelve a comenzar. La luz de la selección
de colado se apaga cuando el ciclo de colado ha terminado.
11. El ciclo de colado para 12, 16 ó 20 onzas hace una
pausa a mitad del ciclo y luego comienza otra vez. La
luz de selección de colado se apagará para indicar que
el ciclo de colado ha terminado.
12. Para apagar la cafetera en cualquier momento,
presione el botón de funcionamiento
.
Coloque el adaptador para
café molido.
E
Añada café molido en el filtro.
F
Coloque el filtro dentro
del adaptador.
G
Coloque taza alta sin la
bandeja de goteo.
H
Page 27

27
CUIDADO Y LIMPIEZA
PIEZA DE LA CAFETERA INSTRUCCIONES
DE LIMPIEZA
Caja
Placa de calentamiento
Cable de alimentación
Adaptador para bolsitas de café
Cubierta de acero inoxidable de la bandeja de goteo
Limpie con un paño
suave, humedecido.
Cesto de colar
Tapa de la jarra de vidrio
Jarra de vidrio
Filtro reusable para una sola taza
Adaptador para café molido para una sola taza
Base plástica ajustable de la bandeja de goteo
Taza portátil térmica*
Tapa de la taza portátil térmica*
Lave a mano con agua
caliente jabonosa o en
la máquina lavaplatos
(en la rejilla superior
solamente).
Limpieza básica
Siga las instrucciones a continuación para limpiar su cafetera Café Select™
después de cada uso.
1. Asegúrese de que la cafetera esté desenchufada y fría.
2. Abra la tapa del cesto del filtro de la jarra. Si aún queda café molido, deseche el
filtro de papel usado y el café molido. Retire el cesto en forma de cono de la jarra.
3. Abra la tapa del cesto del filtro para una sola taza. Deseche cualquier bolsita
o café molido usado después de colar. Retire los adaptadores de adentro del
cestro del filtro.
4. Limpie la superficie exterior de la cafetera, el cable de alimentación, la placa
de calentamiento y el interior de la tapa del cesto del filtro con un paño
suave, humedecido.
5. Lave cada pieza removible de su cafetera Café Select™ según indica la tabla
de abajo. Enjuague y seque todas las piezas removibles antes de colocarlas de
nuevo en la unidad.
Nota: No use limpiadores abrasivos ni almohadillas de fibras de metal. Nunca
sumerja la cafetera en agua.
*Modelos selectos
Page 28

28
Descalcificación con el sistema de limpieza automática.
Con el tiempo, depósitos de calcio o sarro pueden acumularse en su cafetera.
El sarro no es tóxico, pero si se descuida puede entorpecer el desempeño de la
cafetera. La descalcificación regular de su cafetera ayuda a mantener la calidad del
café así como la vida útil del elementro de calor y otras piezas internas que entran
en contacto con el agua a través del proceso de colado.
Para hacer el proceso de descalcificación lo más simple posible, un sistema de
limpieza automática ha sido programado en su cafetera Café Select™.
¿Cuándo es tiempo de una limpieza automática?
1. Después de cada 120 coladas, jarra completa y solo una taza combinadas, los
botones selectores de intensidad robusto y de 20 onzas comenzarán a parpadear
antes colar su selección de café. Cuando esto sucede, es tiempo de descalcificar
su cafetera Café Select™. Después de activar el sistema de limpieza automática, el
parpadeo se detendrá hasta que sea tiempo de limpiar la unidad otra vez.
¿Como utilizo el sistema de limpieza automática?
Siga los paso simples a continuación. Su cafetera Café Select™ se encargará
del resto.
2. Llene aproximadamente la mitad del tanque de agua con vinagre blanco.
3. Llene la mitad restante del tanque con agua fresca.
4. Coloque un filtro cónico de papel #4 dentro del cesto de colar en el lado de la
jarra, cierre la tapa y coloque la jarra vacía sobre la placa de calentamiento.
5. Coloque el adaptador para bolsitas de café dentro de la cavidad del cesto de
colar para una sola taza y cierre la tapa asegurada en su lugar.
6. Coloque una taza u otro recipiente que acomode un mínimo de 20 onzas de
líquido sobre la base de la taza para la selección de una sola taza.
7. Presione y sostenga ambos, los botones de intensidad robusto y de 20 onzas,
manteniéndolos juntos por 5 segundos para activar el sistema de limpieza
automática.
Nota: Las luces LED de los botones selectores de intensidad robusto y de
20 onzas se mantendrán iluminadas para indicar que el sistema de limpieza
automática está activado.
8. Deje funcionar el sistema de limpieza automática por aproximadamente 80 minutos.
9. Cuando el ciclo de limpieza automática haya terminado, las luces LED de los
botones selectores de intensidad robusto y de 20 onzas se apagarán.
10. Deseche el líquido de la jarra y de la taza o recipiente en el lado de una sola taza.
11. Utilizando solo agua, cuele un mínimo de dos ciclos completos a través de la
selección de jarra completa.
12. Utilizando solo agua, cuele un mínimo de dos ciclos de 20 onzas a través de la
unidad en el lado de selección de una sola taza.
13. Lave, enjuague y seque cada pieza removible de su cafetera Café Select™ (consulte
la sección de Limpieza Básica de este manual para instrucciones específicas).
Page 29

29
RESOLUCIÓN DE PROBLEMAS—GENERAL
PROBLEMA CAUSA POSIBLE SOLUCIÓN
La cafetera no se
enciende.
La unidad está
desenchufada.
Asegúrese de que el
aparato esté enchufado
a un tomacorriente que
funcione.
La unidad está
enchufada pero no
encendida.
Presione el botón de
funcionamiento para
encender la unidad.
Las ocho luces de
selección están parpadeando y la unidad
no cuela.
El tanque de agua
puede no estar
colocado de forma
segura en la unidad.
Retire y vuelva a colocar
de forma segura el
tanque de agua.
Las luces de intensidad robusto y de
20 onzas parpadean
antes de colar.
Es tiempo de activar
el sistema de limpieza
automática en su
cafetera Café Select™.
Siga las instrucciones
en la sección de
Descalcificación con el
Sistema de Limpieza
Automática.
La cafetera está goteando.
El tanque de agua
puede estar demasiado
lleno.
Asegúrese de que el
tanque de agua no
esté lleno pasado de la
línea MAX.
La cafetera cuela más
lento de lo normal.
La cafetera necesita
limpieza.
Siga las instrucciones
en la sección de
Descalcificación con el
Sistema de Limpieza
Automática.
El cesto de colar se
desborda.
Se ha utilizado una
cantidad excesiva de
café molido.
Reduzca la cantidad
de café utilizada
para eliminar
debordamientos en el
cesto de colar.
La cafetera necesita
limpieza.
Siga las instrucciones
en la sección de
Descalcificación con el
Sistema de Limpieza
Automática.
Page 30

30
RESOLUCIÓN DE PROBLEMAS—JARRA
PROBLEMA CAUSA POSIBLE SOLUCIÓN
La cafetera gotea.
La tapa de la jarra
puede no estar
colocada correctamente
en la jarra.
Asegúrese de la
tapa de la jarra esté
colocada derecha
sobre la jarra.
La jarra puede no
estar colocada
correctamente sobre la
placa de calentamiento.
Coloque la jarra de forma
segura sobre la placa de
calentamiento.
Sedimentos de café
alojados en la taza
de café.
El filtro de papel no se
ha abierto o colocado
apropiadamente en el
cesto de colar.
Enjuague el cesto de
colar y reinserte el
filtro de papel dentro
del cesto de colar
de manera que los
bordes se mantengan
presionados contra los
lados del cesto.
La cafetera gotea
sobre la base.
La jarra ha sido
removida por más de
20 segundos durante el
ciclo de colado.
Asegúrese de volver a
colocar la jarra en 20
segundos durante el
ciclo de colado.
La cafetera cuela una
jarra parcial de café.
Al comenzar el ciclo de
colado, el tanque de
agua no se habia llenado
hasta la línea MAX.
Asegúrese de que el
tanque de agua esté
llenado hasta la línea
MAX antes de colar una
jarra completa.
Las seis luces de selección para una sola
taza parpadean antes
de comenzar el ciclo
de colado.
El tanque de agua
contiene menos de 20
onzas de agua.
Añada agua adicional
o asegúrese de que la
cantidad de café molido
ha sido ajustada.
Page 31

31
RESOLUCIÓN DE PROBLEMAS—PARA SOLO UNA TAZA
PROBLEMA CAUSA POSIBLE SOLUCIÓN
La cafetera está
goteando.
La tapa de la taza
portátil puede estar
todavía colocada sobre
la taza.
Asegúrese de que la
tapa esté removida de
la taza portátil antes de
comenzar a colar.
Las seis luces de
selección están
parpadeando y la
unidad no cuela.
El tanque de agua
contiene menos de 20
onzas de agua.
Verifique los niveles de
agua. Agregue agua
adicional en el tanque,
si es necesario.
La tapa del cesto
de colar puede no
estar enganchada
correctamente.
Vuelva a abrir la tapa del
cesto de colar y empuje
hasta que la tapa de la
unidad encaje cerrada
en su lugar.
El café sabe menos
fuerte de lo preferido.
Se ha utilizado
demasiada cantidad
de agua para colar una
bolsita de café.
Cuele dos bolsitas
de café en su taza.
Seleccione una cantidad
pequeña de colado.
No se utilizó suficiente
cantidad de café molido.
Aumente la cantidad
de café molido en el
filtro permanente.
La cafetera gotea
sobre la base.
La taza de café regular
o portátil fue removida
antes de terminar el
ciclo de colado.
Espere hasta que el
ciclo de colado termine
y el goteo pare antes
de retirar su taza.
Las luces de selección
de 6 onzas y 12 onzas
están parpadeando.
La tapa del cesto del
filtro para una sola
taza no está cerrada
ajustadamente.
Abra y vuelva a cerra
de forma segura la tapa
del cesto del filtro para
una sola taza.
Si necesita ayuda adicional, por favor comuníquese con nuestro equipo de
servicio para el consumidor, llamando al número
1-800-231-9786.
Page 32

32
INFORMACIÓN DE GARANTÍA Y
SERVICIO AL CLIENTE
Para servicio, reparaciones o preguntas relacionadas al producto, por favor
llame al número del centro de servicio que se indica para el país donde
usted compró su producto. NO devuélva el producto al fabricante. Llame o
lleve el producto a un centro de servicio autorizado.
Dos Años de Garantía Limitada
(Solamente aplica en los Estados Unidos y el Canadá)
¿Qué cubre la garantía?
• La garantía cubre cualquier defecto de materiales o de mano de obra que no haya
sido generado por el uso incorrecto del producto.
¿Por cuánto tiempo es válida la garantía?
• Por dos años a partir de la fecha original de compra mientras que tenga una
prueba de la compra.
¿Cómo se obtiene el servicio necesario?
• Conserve el recibo original como comprobante de la fecha de compra,
comuníquese con el centro de servicio de su país y haga efectiva su garantía si
cumple lo indicado en el manual de instrucciones.
¿Cómo se puede obtener servicio?
• Conserve el recibo original de compra.
• Para servicio al cliente y para registrar su garantía, visite www.prodprotect.com/
applica, o llame al número 1-800-231-9786, para servicio al cliente
• Por favor llame al número del centro de servicio autorizado. 1-800-738-0245.
¿Qué aspectos no cubre esta garantía?
• Los productos que han sido utilizados en condiciones distintas a las normales.
• Los daños ocasionados por el mal uso, el abuso o negligencia.
• Los productos que han sido alterados de alguna manera.
• Los daños ocasionados por el uso comercial del producto.
• Los productos utilizados o reparados fuera del país original de compra.
• Las piezas de vidrio y demás accesorios empacados con el aparato.
• Los gastos de tramitación y embarque asociados al reemplazo del producto.
• Los daños y perjuicios indirectos o incidentales.
¿Qué relación tiene la ley estatal con esta garantía?
• Esta garantía le otorga derechos legales específicos y el consumidor PODría
tener otros derechos que varían de una región a otra.
Page 33

33
PÓLIZA DE GARANTÍA
(Válida sólo para México)
DURACIÓN
Rayovac de México SA de CV garantiza este producto por 2 años a partir de
la fecha original de compra.
¿Qué cubre esta garantía?
• Esta Garantía cubre cualquier defecto que presenten las piezas,
componentes y la mano de obra contenidas en este producto.
• Requisitos para hacer válida la garantía
• Para reclamar su Garantía deberá presentar al Centro de Servicio Autorizado
la póliza sellada por el establecimiento en donde adquirió el producto. Si no
la tiene, PODrá presentar el comprobante de compra original.
¿Donde hago válida la garantía?
• Llame sin costo al teléfono 01 800 714 2503, para ubicar el Centro de
Servicio Autorizado más cercano a su domicilio en donde usted PODrá
encontrar partes, componentes, consumibles y accesorios.
Procedimiento para hacer válida la garantía
Acuda al Centro de Servicio Autorizado con el producto con la póliza de
Garantía sellada o el comprobante de compra original, ahí se reemplazará
cualquier pieza o componente defectuoso sin cargo alguno para el usuario
final. Esta Garantía incluye los gastos de transportación que se deriven de su
cumplimiento.
Excepciones
Esta Garantía no será válida cuando el producto:
A) Se hubiese utilizado en condiciones distintas a las normales.
B) No hubiese sido operado de acuerdo con el instructivo de uso
que le acompaña.
C) Cuando el producto hubiese sido alterado o reparado por personas
no autorizadas por Rayovac de México SA de CV.
Nota: Usted PODra encontrar partes, componentes, consumibles y
accesorios en los centros de servicios autorizados. Esta garantía incluyen los
gastos de transportación que se deriven de sus cumplimiento dentro de sus
red de servicio.
Page 34

34
Por favor llame al número correspondiente que aparece en la lista a continuación para solicitar
que se haga efectiva la garantía y donde Ud. puede solicitar servicio, reparaciones o partes en
el país donde el producto fué comprado.
Argentina
Servicio Técnico
Monroe 3351
CABA Argentina
Tel: 0800 – 444 - 7296
servicios@rayovac.com.ar
Chile
SERVICIO DE MAQUINAS Y HERRAMIENTAS
LTDA .
Portugal Nº 644
Santiago – Chile
Fonos: 02-6355208 / 02-6341169
Email: servicio@spectrumbrands.cl
Call center: 800-171-051
Colombia
Rayovac Varta S.A
Carrera 17 Número 89-40
Línea gratuita nacional
Tel. 018000510012
Costa Rica
Aplicaciones Electromecanicas, S.A.
Calle 26 Bis y Ave. 3
San Jose, Costa Rica
Tel. (506) 257-5716 / 223-0136
administracion@masterecuador.com
Ecuador
SERVICIO MASTER ECUADOR
ALMERIA N50-71 Y DE LOS ALAMOS
Tel. (593) 2281-3882 / 2240-9870
El Salvador
Calle San Antonio Abad 2936
San Salvador, El Salvador
Tel. (503) 2284-8374
Guatemala
MacPartes SA
3ª Calle 414 Zona 9
Frente a Tecun
Tel. (502) 2331-5020 / 2332-2101
Honduras
ServiTotal
Contigua a Telecentro
Tegucigalpa, Honduras,
Tel. (504) 235-6271
México
Articulo 123 # 95 Local 109 y 112
Col. Centro, Cuauhtemoc,
México, D.F.
Tel. 01 800 714 2503
Nicaragua
ServiTotal
De semáforo de portezuelo
500 metros al sur.
Managua, Nicaragua,
Tel. (505) 248-7001
Panamá
Servicios Técnicos CAPRI
Tumbamuerto Boulevard
El Dorado Panamá
500 metros al sur.
Tel. 3020-480-800 sin costo
(507) 2360-236 / 159
Perú
Servicio Central Fast Service
Av. Angamos Este 2431
San Borja, Lima Perú
Tel. (511) 2251 388
Puerto Rico
Buckeye Service
Jesús P. Piñero #1013
Puerto Nuevo, SJ PR 00920
Tel.: (787) 782-6175
Republica Dominicana
Prolongación Av. Rómulo Betancourt
Zona Industrial de Herrera
Santo Domingo, República Dominicana
Tel.: (809) 530-5409
Venezuela
Inversiones BDR CA
Av. Casanova C.C.
City Market Nivel Plaza Local 153
Diagonal Hotel Melia,
Caracas.
Tel. (582) 324-0969
www.applicaservice.com
servicio@applicamail.com
Page 35

35
Comercializado por:
Rayovac de México S.A de C.V
Autopista México Querétaro
No 3069-C Oficina 004
Colonia San Andrés Atenco, Tlalnepantla
Estado de México, C.P. 54040
Mexico.
Tel: (55) 5831 – 7070
Servicio y Reparación
Art. 123 No. 95
Col. Centro, C.P. 06050
Deleg. Cuauhtemoc
Servicio al Consumidor,
Venta de Refacciones y Accesorios
01 800 714 2503
Importado por / Imported by:
RAYOVAC ARGENTINA S.R.L.
Humboldt 2495 Piso# 3
(C1425FUG) C.A.B.A. Argentina.
C.U.I.T No. 30-70706168-1
Importado por / Imported by:
Rayovac de México S.A de C.V
Autopista México Querétaro
No 3069-C Oficina 004
Colonia San Andrés Atenco, Tlalnepantla
Estado de México, C.P. 54040
Mexico.
Tel: (55) 5831-7070
Para atención de garantía marque:
01 (800) 714 2503
CM6000–950W 120 V ~ 60 Hz
Sello del Distribuidor:
Fecha de compra:
Modelo:
Código de fecha / Date Code / Le code de date:
Page 36

11193-00
T22-5001545
© 2015 The Black + Decker Corporation
and Spectrum Brands, Inc.,
Middleton, WI 53562
Made in People’s Republic of China
Fabricado en la República Popular de China
Fabriqué en République populaire de Chine
K-Cup® pack is a registered trademark of Keurig Green Mountain, Inc.
K-Cup® es una marca registrada de Keurig Green Mountain, Inc.
BLACK+DECKER and the BLACK+DECKER logo are trademarks of The Black + Decker
Corporation and are used under license. All rights reserved.
BLACK+DECKER y el logo tipo BLACK+DECKER son marcas registradas de The Black +
Decker Corporation y son utilizados bajo licencia. Todos los derechos reservados.
BLACK + DECKER et le logo BLACK &+DECKER sont des marques de commerce de The
Black + Decker Corporation, et sont utilisés sous licence. Tous droits réservés.
www.BlackAndDeckerAppliances.com
 Loading...